Showing 2068 items matching "bendigo show"
-
 Ballarat Tramway Museum
Poster, Transport Regulation Board, Ballarat Bus Services", Aug. 1971
Yields information about the closure of the Ballarat Tramway system and the bus replacements made by the Transport Regulation Board, can be compared to that for Bendigo and Geelong.Poster, titled "Ballarat Bus Services" printed on off white gloss paper. Produced shortly before the closure of the State Electricity Commission of Victoria operated Ballarat Tramway system. Gives details of the replacement bus services as well as the existing bus services and other changes planned. Provides notes on the operator, timetables, fares, route numbers and dates when the services would be changed. Map shows the bus routes, route numbers, section points and City stands and stops. Authorised by the Secretary of the Transport Regulation Board B. P. Kay. pdf file has to be opened outside dbTextWorks.trams, tramways, ballarat, map, closure, buses -
 Ballarat Tramway Museum
Poster, Transport Regulation Board, Bendigo Bus Services", Feb. 1972
Yields information about the closure of the Bendigo Tramway system and the bus replacements made by the Transport Regulation Board, can be compared to that for BallaratDigital print of a scanned Poster, titled "Bendigo Bus Services" printed on white paper. Produced shortly before the closure of the State Electricity Commission of Victoria operated Bendigo Tramway system. Gives details of the replacement bus services as well as the existing bus services and other changes planned. Provides notes on the operator, timetables, fares, route numbers and dates when the services would be changed. Map shows the bus routes, route numbers, section points and City stands and stops. Authorised by the Transport Regulation Board. trams, tramways, bendigo, map, closure, buses -
 Ballarat Tramway Museum
Ephemera - Ticket/s, State Electricity Commission of Victoria (SECV), $2.10 - Scholar's Monthly Ticket, c1966
Yields information and demonstrates the tickets used to for Scholar's or students to travel on the trams in Ballarat during the mid 1960's.Set of 6 Yellow cloth backed paper tickets with white front, printed in black ink with fare value of $2.10. Blank or Unused Scholar's monthly ticket for use by under 15 years students. Has form number "TYE 3-570" in top left hand corner. Space for an expiry date to be stamped on the ticket and name, address and school of the student. The 1966 Schedule of Fares and Charges shows these tickets. See Reg Item 8455 for samples of issued tickets. Ticket Nos. A008695, 96, 97, 98, 99, A008700trams, tramways, secv, bendigo, schools tickets -
 Ballarat Tramway Museum
Slide - 35mm slide/s - set of 17, Noel Simons, 20/11/1962 12:00:00 AM
Set of 17 transparencies taken on 20/11/1962 on Kodak mounts. 1187.1 - Bendigo No. 2 at the Quarry Hill terminus, showing destination of Quarry Hill. Has Cohns Drinks and Streets Ice Cream ads on dash panel, a SEC 'electric cooking' roof ad and another roof ad. Shows the Y terminus at this location, but tram standing just before it. Overhead in position. 1187.2 - as above, but closer up. 1187.3 - as above, but from the north side, showing cemetery in the background. 1187.4 - Bendigo No.3 at Eaglehawk terminus. Tram showing destination of Quarry Hill. Has the various buildings at Eaglehawk in the background including the Foodland store. Has Streets Ice cream and White Horse Whiskey ads on the dash panel. 1187.5 - Bendigo No. 18 at Garden Gully crossing loop, in bound, with destination of Eaglehawk. Passengers waiting for an Eaglehawk tram at the stop. Has a white horse whiskey ad on dash panel and SEC roof ads. Conductor standing in doorway looking out. 1187.6 - Bendigo No. 7 inbound in Nolan St. at cnr of McCrae St. showing destination of Golden Square. Has Streets Ice cream ad on dash panel and a Castrol Roof ad. 1187.7 - Bendigo No. 19 at the North Bendigo terminus with railway level crossing in background. Tram has a Cohns Drinks ad and an SEC 'Electric Cooking' roof ad. 1187.8 - Bendigo No. 2 at the Quarry Hill terminus, looking back into Bendigo, showing destination of Eaglehawk. 1187.9 - Bendigo No. 21 in McCrae St, near Nolan St outbound for North Bendigo. Photo taken after tram has passed photographer. 1187.10 - Bendigo Nos. 4 and 26 at Charing Cross in View St. with fountain alongside and the Beehive, Ezywalkin Buildings in the background. No. 26 has a Sandhurst Milk and SEC 'Electric Cooking' roof ad. 1187.11 - close up of 22E maximum traction truck and folded footstep. 1187.12 - Bendigo No. 19 at Charing Cross terminus, after tram has passed photographer, showing destination of North Bendigo, with the Beehive building in the background and passengers boarding tram. 1187.13 - Bendigo No. 11, turning from View St. into Pall Mall, showing Special with the conductor holding point bar. Has the Beehive and Ezywalkin Buildings in the background. 1187.14 - No. 7 at Charing Cross terminus, in Pall Mall, bound for Golden Square. Has the Beehive and Ezywalkin buildings in the background and passengers waiting at the tram stop. 1187.15 - No. 18 at the Charing Cross terminus, bound for Eaglehawk. Has the Beehive and Ezywalkin buildings in the background and passengers waiting at the tram stop. Also has the 'Safety Zone' sign in the photograph. 1187.16 - No. 2 at Quarry Hill terminus, night or dusk photo. Tram showing destination of Depot. 1187.17 - No. 26 at Charing Cross, night photo. Tram has destination of Quarry Hill, but is on the line for Eaglehawk. Photo looks along Mitchell St. Also shows Safety Zone sign. Information written on in black ink and date stamped on purple ink. 1187.1 - "No. 2 at Quarry Hill terminus Bendigo" 1187.2 - "No. 2 at Quarry Hill terminus Bendigo" 1187.3 - "No. 2 at Quarry Hill terminus Bendigo" 1187.4 - "No. 3 at Eaglehawk terminus" 1187.5 - "No. 18 in Mt Korong Road, Long Gully at cnr of Havilah Road (Eaglehawk Route)" 1187.6 - "No. 7 in Nolan St. Bendigo, at Cnr of McCrae St., near lake Weeroona, (North Bendigo Route)' 1187.7 - "No. 19 at North Bendigo terminus" 1187.8 - "No. 2 at Quarry Hill terminus" 1187.9 - "No. 21 in McCrae St. Bendigo, near Nolan St. (North Bendigo Route) 1187.10 - "4 and 26 at Alexandra Fountain, Charing Cross Bendigo" 1187.11 - "Truck of Bogie Car, Bendigo Tramways" 1187.12 - "No. 19 in Pall Mall at Charing Cross, Bendigo" 1187.13 - "Birney car No. 11 entering Pall Mall from View St. at Charing Cross Bendigo" 1187.14 - "No. 7 in Pall Mall at Charing Cross, Bendigo" 1187.15 - "No. 18 at Alexandra Fountain, Charing Cross, Bendigo" 1187.16 - "No. 2 at Quarry Hill terminus, Bendigo" 1187.17 - "No. 26 at Alexandra Fountain, Charing Cross, Bendigo" tramways, trams, bendigo, quarry hill, eaglehawk, north bendigo, maximum traction, night photo, tram 2, tram 3, tram 4, tram 7, tram 11, tram 18, tram 19, tram 21, tram 26 -
 Ballarat Tramway Museum
Slide - 35mm slide/s - set of 20, Noel Simons, 21/05/1971 12:00:00 AM
Set of 20 transparencies taken on 21/5/1971 on Kodak mounts. 1197.1 - Bendigo No. 5 en route to Eaglehawk at Creeth St Long Gully. Tram has a SEC roof ad and Cinzano roof ad. 1197.2 - No 5 approaching Needle Loop between Long Gully and California Gully. On left hand side is the City of Bendigo sign, indicating city boundary. 1197.3 - As for 1197.2 but actually entering loop. Photo taken after tram has passed photographer. 1197.4 - No. 26 bound for Eaglehawk descending the railway bridge near Eaglehawk, at Jobs Gully. 1197.5 - as for 1197.4, but after crossing bridge, now ascending a hill. Photo taken after tram has passed photographer. 1197.6 - No. 26 climbing High St. hill Eaglehawk, nearing end of Double track, bound for Quarry Hill. Shows centre of the road poles. 1197.7 - As for 1197.6, with tram entering single track section. Photo taken after tram has passed photographer. Has a BP service station in the background. 1197.8 - No. 26 (bound for Quarry Hill) crossing No. 17 (Eaglehawk) at Job's Gully Loop. 1197.9 - No. 17 climbing railway bridge at Job's Gully, en route to Eaglehawk. Photo taken after tram has passed photographer. 1197.10 - No.26 bound for Quarry Hill, leaving Long Gully Loop? Has the Creeth St. church in l197.l in the far background. Photo taken after tram has passed photographer. 1197.11 - Tramway Point work at the northern end of Long Gully Loop. 1197.12 - No. 17 en route for Quarry Hill turning into View St. from Bamard St. Tram has SEC roof ads "Everything fine in my all electric Kitchen' and 'Electric Cooking is Matchless'. 1197.13 - as for 1197.12, but tram has turned into View St and about to enter the double line track. Photo taken after tram has passed photographer. 1197.14 - No. 21 enters Nolan St after turning from MacRae St. en route to Bendigo. Note sign on its own post noting tram turns "Beware Tram Turns" and stop sign on adjacent pole "Trams stop on Request". No. 21 has two SEC roof ads. 1197.15 - No. 21 in Nolan St. after turning from Bridge St. (White Hills Road). Note signal light for Bridge St. loop on pole corner of street. Photo taken after tram has passed photographer. 1197.16 - No. 2 bound for Eaglehawk at unknown location. 1197.17 - Tram stop sign on a pole "CARS STOP BY REQUEST" 1197.18 - No. 5 in Carpenter St.? en route to Quarry Hill. 1197.19 - No. 28 has just arrive at Golden Square terminus, passengers are disembarking and the trolley pole is being turned. Golden Square Hotel in the background. 1197.20 - No. 28 at Golden Square terminus. Has a "Nothing beats Briquettes for hear roof ad. Information written on in black ink and date stamped on purple ink. 1197.1 - "No. 5 at Creeth St. Long Gully" 1197.2 - "No. 5 approaching Needle Loop between Long Gully and California Gully" 1197.3 - "No. 5 at Needle Loop between Long Gully and California Gully" 1197.4 - "No. 26 crossing railway bridge at Job's Gully near Eaglehawk" 1197.5 - "No. 26 just after crossing railway bridge at Job's Gully near Eaglehawk/ 1197.6 - "No. 26 in High St. Eaglehawk" 1197.7 - "No. 26 at end of double track in High St. Eaglehawk" 1197.8 - "Nos. 26 and 17 crossing at Job's Gully Loop" 1197.9 - "No. 17 crossing railway bridge at Job's Gully near Eaglehawk". 1197.10 - "No. 26 at Long Gully" 1197.11 - 'Northern end of points at Long Gully Loop". 1197.12 - "No. 17 turning into View St. from Bamard St. Bendigo". 1197.13 -'No. 17 at beginning of double track in View St. after leaving Bamard St. Bendigo. 1197.14 - "No. 21 enters Nolan St. from MacRae St. Bendigo." 1197.15 - "No. 21 in Nolan St. Bendigo just after leaving White Hills Road." 1197.16 - "No. 2" 1197.18 - "No. 5" 1197.19 - "Birney car No. 28 at Golden Square Terminus" 1197.20 "Birney car No. 28 at Golden Square Terminus" tramways, trams, bendigo, long gully, railway bridge, jobs gully, trackwork, nolan st, quarry hill, tram stops, golden square, tram 2, tram 5, tram 17, tram 21, tram 26, tram 28 -
 Ballarat Tramway Museum
Slide - 35mm slide/s - set of 32, Noel Simons, 25/02/1971 12:00:00 AM
Set of 31 transparencies taken on 25/2/1972 on Kodak mounts. 1201.1 - Bendigo No. 26 in Bond St. just after leaving Long Gully en route for Quarry Hill. Has Norris Supermarket in background. Has two SEC roof ads. 1201.2 - No. 26 climbing View St. from Charing Cross en route to Eaglehawk. Has ANZ bank and AMOCO service station in background. 1201.3 - as for 1201.3, but after tram has passed photographer. Has buildings west of Mackenzie St. in photograph. 1201.4 - Tram stop and centre of the road pole with two "CARS STOP BY REQUEST" signs mounted on pole at the corner of Mackenzie St. 1201.5 - same position as for 1201.3, but with No. 5 descending the street. 1201.6 - same position as for 1201.2, but with No. 5 descending the street. Photo taken after tram has passed photographer. 1201.7 - No. 7 in Nolan St. from across the park at Lake Weeroona. 1201.8 - No. 7 entering McCrae St from Nolan St. - distant view. Note "TRAM "sign on left hand side under tree and overhead in McCrae St. from former track that once was in this street. 1201.9 - No. 7 in High St. with Cathedral in background. Tram en route to North Bendigo. Note scaffolding around Cathedral main spire area. 1201.10 - No. 7 crossing Bendigo Creek bridge in High St. near Golden Square. Has a Caltex Service station in the background. 1201.11 - No. 7 at Golden Square terminus with Sunburst Fruit Juices and a Peters Ice cream delivery vans alongside. 1201.12 - as for 1201.11 but photo taken from behind tram, with the end of the rails in the photograph. 1201.13 - No. 7 and 21 in Pall Mall at Charing Cross with No. 5 in the background. Taken some distance away from the location. 1201.14 - No. 7 at Golden Square terminus, taken a short distance from the tram terminus. Shows Milk Bar on right hand side and the hotel on the left hand side. Taken from the south side of the roadway. 1201.15 - as from 1201.14 but taken from the north side of the roadway. 1201.16 - No 5 waiting at California Gully loop. Distant photo showing surrounds 1201.17 - No. 5 en route for Quarry Hill crossing No. 26 at California Gully. 1201.18 - No. 26 at Eaglehawk terminus with Eaglehawk Town Hall and Post Office in background. 1201.19 - No. 21 arriving at Charing Cross en route to North Bendigo. Has Alexandra Fountain in the background, ANZ bank RACV building, and other buildings on the north side of Pall Mall or Nolan St. 1201.20 - No. 26 en route for Quarry Hill at Charing Cross, with crew standing by front door. Has Colonial Mutual life building, Armstrong Tyre Service (Firestone) and a sign for Cohns Drinks in the background. 1201.21 - as for 1201.20 but with No. 5 en route to Eaglehawk now in photograph. 1201.22 - No. 26 at Quarry Hill terminus. 1201.23 - No. 26 at Quarry Hill terminus, view of front portion of tram only from a gate at the Bendigo cemetery. 1201.24 - Track at the end of the Quarry Hill line showing the point blades of the former "Y" terminus and the overhead for this. 1201.25 - No. 2 at the Quarry Hill terminus, looking along the former Trackwork. 1201.26 - as for 1201.25 1201.27 - number not used. 1201.28 - Golden Square terminus from some distance from the actual terminus, showing the Warning sign "TRAM" for motorists from the south. No. 7 at the terminus. 1201.29 - No. 7 passing through the Golden Square shopping centre. Numerous cars and pedestrians. Tram en route for North Bendigo. 1201.30 - No. 7 in High St. Golden Square, en route for North Bendigo. Photo taken after tram has passed photographer. 1201.31 - No. 7 in High St. just past Wattle St. with the Cathedral in the background. Tram has two SEC roof ads good side on photo, 'Everything's fine in my all electric kitchen' and 'Electrical cooking - clean, quick, economical'. 1201.32 - No. 7 in High St. nearing Wattle St. Has Cathedral in the background. Photo taken after tram has passed photographer.Information written on in black ink and date stamped on purple ink. 1201.1 - "No. 26 in Bond St just after leaving Long Gully" 1201.2 - "No. 26 climbing View St. from Charing Cross" 1201.3 - "No. 26 ascending View St. from Charing Cross (At Mackenzie St.)" 1201.4 - "View St. & Mackenzie St." 1201.5 - "No. 5 in View St. near Mackenzie St." 1201.6 - "No. 5 in View St. nearing Charing Cross." 1201.7 - "No. 7 in Nolan St. seen from Lake Weeroona Park." 1201.8 - "No. 7 entering McRae St. from Nolan St. Note "TRAM" warning sign on left. 1201.9 - "No. 7 in High St. passing Short St." 1201.10 - "No. 7 crossing Bendigo Creek bridge in High St. near Golden Square." 1201.11 - "No. 7 at Golden Square terminus" 1201.12 - "No. 7 at Golden Square terminus" 1201.13 - "No 7, 21 and 5 at Charing Cross" 1201.14 - "No. 7 at Golden Square terminus" 1201.15 - "No. 7 at Golden Square terminus" 1201.16 - "No 5 waiting at California Gully loop." 1201.17 - "Nos. 5 and 26 crossing at California Gully loop" 1201.18 - "No. 26 at Eaglehawk terminus" 1201.19 - "No. 21 arriving at Charing Cross from Golden Square" 1201.20 - "No. 26 at Charing Cross" 1201.21 - "Nos. 5 and 26 at Charing Cross." 1201.22 - "No. 26 at Quarry Hill terminus" 1201.23 - "No. 26 at Quarry Hill terminus seen through the gates of the Bendigo Cemetery." 1201.24 - "Quarry Hill terminus showing remains for former double track layout abandoned before 1964." 1201.25 - "No. 2 at Quarry Hill terminus" 1201.26 - "No. 2 at Quarry Hill terminus" 1201.28 - "The Southern approach to Golden Square with No. 7 standing at the terminus, "TRAM" warning sign on the left. 1201.29 - "No. 7 passing through Golden Square Shopping Centre" 1201.30 - "No. 7 in High St. Golden Square" 1201.31 - "No. 7 in High St. passing Wattle St." 1201.32 - "No. 7 in High St. nearing Wattle St."tramways, trams, bendigo, bond st., view st., nolan st., high st., eaglehawk, california gully, charing cross, quarry hill, trackwork, tram 2, tram 5, tram 7, tram 21, tram 26 -
 Ballarat Tramway Museum
Film - Video cassette tape and box, John Phillips and Warren Doubleday and Bruce McLean and Richard Gilbert, "Ballarat Trammies at War", 1995
Demonstrates aspects of the SEC governance system in issuing By-laws for the travelling public, as part of their Act. Yields information about fares charged for tram services in Ballarat, Bendigo and Geelong. Issued to crews.Video Tape titled "Ballarat's Trammies and War" in white cardboard slip box. Features the 1930's rehabilitation of the system, the huge patronage increase due to WW2, conductresses, Most Popular Conductress competition, Brownout conditions and modifications made to the trams, interviews with Jean Maxwell and Norm Lorensini. Made from parts of the Ballarat Tramways tape. Gives credits, shows the "Australia Remembers" logo. Approx 4 mins running time - 6 copies on the 25 min. tape.video tape, world war ii, conductresses, australia remembers` -
 Ballarat Tramway Museum
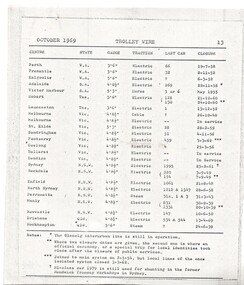
Document - Photocopy, Closure Dates of Australian Tramway Systems, c1970
... , the gauge and the form of traction power. List 24 systems, shows..., shows Melbourne, Ballarat and Bendigo as still being in service ...Photocopy of part of page 13 of 'Trolley Wire', October 1969 listing the closure dates of the various Australian tramway systems and if known, the 'last tramcar' to operate, the gauge and the form of traction power. List 24 systems, shows Melbourne, Ballarat and Bendigo as still being in service and the Glenelg interurban as well. Has been photocopied and then trimmed with a ruler. Three copies held.trams, tramways, tramways, closure, australian tramways, gauge -
 Ballarat Tramway Museum
Photograph - Black & White Photograph/s, Tramway Museum Society of Victoria (TMSV), 1967?
Black and white interior photograph of SEC Birney No. 28, Bendigo, decorated as a Santa Special. Year not given. Possibly the same year as Ballarat No. 32, as the same handwriting on the back of the photograph - see Reg. Item 1876, which was taken in 1967. Shows simple decoration down the centre of the tram. Photographed in the depot - has other trams in the background. Has interior roof advertisements for Wales Savings Bank, fight cancer and "Straight 8" stockings. On Agfa paper.On rear in red brown ink, "Interior View of Birney No. 28, the "Santa Special", Bendigo tramways, Wednesday, December T.M.S.V. archives".trams, tramways, decorated trams, christmas trams, interiors, bendigo, santa tram, tram 28 -
 Ballarat Tramway Museum
Photograph - Colour Photograph/s, B. Groves?, 7/12/1962 12:00:00 AM
Colour print of five SECV Bendigo trams at the North Bendigo tram terminus during a 1962 tour. Tram 28 (Birney), another Birney and then three single truckers at the terminus. All have their poles turned to return to the City. Photo shows the nature of the location of the terminus; open paddocks. All trams have been fitted with dash canopy lights. Taken on AGFA paper. On rear is a stamped date "- 7.12.62", looks like a machine imprint.On rear "Tram Tour Bendigo / Mr. B. Groves / 333 Pascoe Vale Road / Essendon W5 / Vict." In top right hand corner is the number "1175" In the stamp appears " 110B / Photo / The? / -7.12.62"birney, bendigo, north bendigo, tram 28 -
 Ballarat Tramway Museum
Photograph - Colour Photograph/s, 21/11/1962 12:00:00 AM
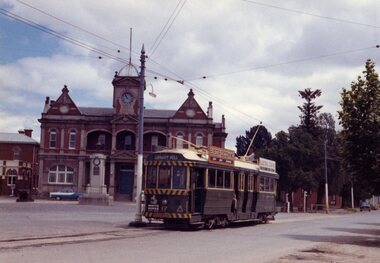
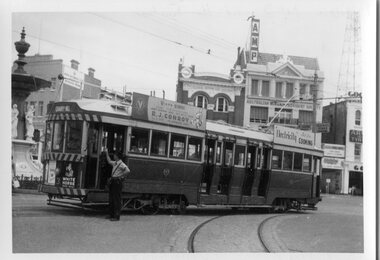
Colour print of Bendigo SECV Bendigo trams 2 and 4 at Charing Cross. On Kodacolor paper with a Kodak red ink stamp on rear. Trams have dash canopy lights, but no large white strip under the drivers windows. Photo dated 21.11.1962. Buildings on corner of Pall Mall and Mitchell St in background. Both trams fitted with roof ads and dash canopy ads - White Horse Whiskey. Shows "safety zone" arrangements. No. 2 has destination of "Quarry Hill" while 4 has destination of "Eaglehawk". Has a number of passengers boarding trams. Note "PYE" name on radio tower mast.On rear top left hand corner "2 and 4 / 21.11.62" in very wavy handwriting, typical of an aged person.charing cross, bendigo, mitchell st., safety zone, tram 2, tram 4 -
 Ballarat Tramway Museum
Photograph - Colour Photograph/s, 21/11/1962 12:00:00 AM
Colour print of Bendigo SECV Bendigo tram 17 at Eaglehawk Terminus. On Kodacolor paper with a Kodak red ink stamp on rear. Tram has dash canopy lights, but no large white strip under the drivers windows. Photo not dated but appears to be at about the same time as 977, 21.11.1962. Has Eaglehawk Town Hall and Post office in background and war memorial. Tram showing destination of "Quarry Hill". Photo shows how tram line extended past the town hall with the white posts visible. Tram has White Horse Whiskey ad on front dash panel and two SEC "Electric Cooking" ads.On rear top left hand corner "17".eaglehawk, bendigo, town hall, post office, tram 17 -
 Ballarat Tramway Museum
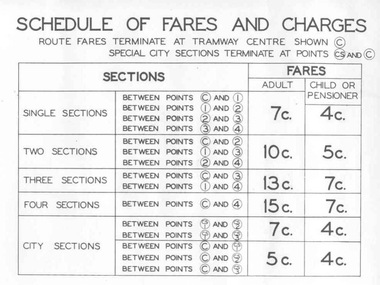
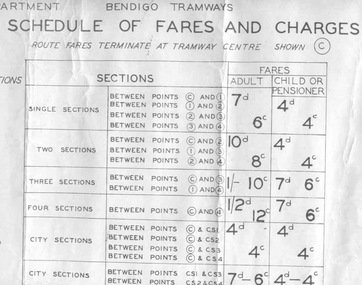
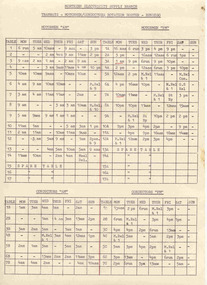
Poster, State Electricity Commission of Victoria (SECV), "Schedule of Fares and Charges - August 1966", Aug. 1966
Demonstrates an aspect of the SEC method of advising fares and sections to the travelling public. Also gave a small map that would have been useful to crews to explain to visitors where things were. Used in tramcars when trimmed. This poster made for the 1966 or second last fare increase. A similar arrangement used on Bendigo tramcars.Dyeline print of a drawing showing Ballarat Tramway (SEC) Fares, Charges, and Section Map. Also gives charges for Scholar's Monthly tickets, Luggage, Parcels, Newspapers and Chartered trams. Originally dated August 1965, amended August 1966. Note only shows decimal currency. Fares were applicable from 1/9/1966. Titled - "Schedule of Fares and Charges - August 1966" 2nd copy added 1/5/2001 - In good condition and images added as well. 3rd copy added 3-8-2006 - BTPS Cat. No. 608 - folded into four. For map - see blrtfcmap.jpg and for actual fare tables, btm705i1.jpg, btm705i2.jpg"BTPS 608" on outside of folded sheet in black ink and "Ballarat Tramway Preservation Society Catalogue No. 608" on top right hand corner of sheet.trams, tramways, ballarat, fares, sections, map -
 Ballarat Tramway Museum
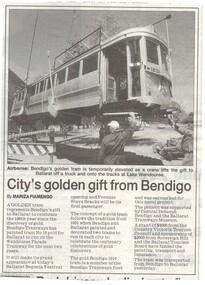
Newspaper, The Courier Ballarat, "City's golden gift from Bendigo", 2/03/2001 12:00:00 AM
Newspaper Clipping from The Courier, Ballarat 2/3/2001, titled "City's golden gift from Bendigo", page 5. Item written by Mariza Fiamengo about the delivery of the Gold Tram (Ballarat 45) from Bendigo, the previous day. Mentions the 1951 painting of trams to celebrate the 100th anniversary, sponsorship from the Country Victoria Tourism Council, Sovereign Hill and the Ballarat Tourism Board. Photo shows the tram about to be positioned on its trucks.gold tram, bendigo, btm, gold -
 Ballarat Tramway Museum
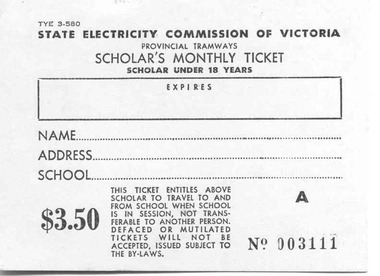
Ephemera - Ticket/s, State Electricity Commission of Victoria (SECV), $2.50 - Scholar's Monthly Ticket, 1969
Yields information about the style and printing of tickets used in Ballarat and Bendigo tramways and how they were presented.Yellow cloth backed paper ticket with white front, printed in black ink with fare value of $3.50. Blank or Unused Scholar's monthly ticket for use by under 18 years students, number No. 003111. Has form number "TYE 3-580" in top left hand corner. Space for an expiry date to be stamped on the ticket and name, address and school of the student. The 1969 Schedule of Fares and Charges shows these tickets. 1969 Schedule of Fares and Charges for the Ballarat Tramways - Reg. Item No. 704.trams, tramways, secv, ballarat, schools tickets -
 Ballarat Tramway Museum
Poster, State Electricity Commission of Victoria (SECV), "Schedule of Fares and Charges - 11 August 1965", Aug. 1966
Dye line print of a drawing showing Bendigo Tramways (SEC) Fares, Charges, and Section Map. Also gives charges for Scholar's Monthly tickets, Luggage, Parcels, Newspapers and Chartered trams. Dated 11 August 1965. Fares in shillings and pence and decimal currency. Titled - "Schedule of Fares and Charges - 11August 1965". Shows offices as Hargreaves St. For map - see bgofsmap.jpg and for actual fare tables, btm1732i1.jpg and btm1732i2.jpg. .1 - Second copy from Ron Fluck, added 26/9/2008. Note: 1732 - first copy stored rolled, 1732 - 2nd copy stored flat in box at bottom of rolls. .2 - as above but mounted onto a heavy card sheet with wear marks along the bottom edge - see image i3. Stored as for the 2nd copy. Note: 1732 - first copy stored rolled, 1732 - 2nd copy stored flat in box at bottom of rolls, .3 dittotrams, tramways, bendigo, fares, sections, map -
 Ballarat Tramway Museum
Slide - 35mm slide/s - set of 5, Peter Moses, Jan. 1969
Set of five colour slides taken the SEC Bendigo depot, Jan. 1969. .1 - inside depot, show two bogies and one Birney on one road and the pit arrangements. .2 - ditto, slightly different exposure .3 - trams 21, 24 and 5 at the front of the depot .4 - Scrubber tram by the depot extension. .5 - Looking across the depot yard with the scrubber in the foreground and depot in the background. Kodak cardboard mount slide, taken by Peter Moses, Jan. 1969. On the rear of all the slides "P. Moses" in black ink .1 - "Jan 1969 Bendigo / Depot" in blue ink and on the opposite side of the slide in red ink “28” .2 - "Jan 1969 Bendigo / Depot" in blue ink and on the opposite side of the slide in red ink “27” .3 - "Jan 1969 Bendigo / Tram Depot" in blue ink and on the opposite side of the slide in red ink “29” .4 - In red ink "31" .5 - "Jan 1969 Bendigo / Depot" in blue ink and on the opposite side of the slide in red ink “30”. tramways, trams, bendigo, depot, scrubber tram, tram 21, tram 24, tram 5 -
 Ballarat Tramway Museum
Slide - 35mm slide/s, Peter Moses, Jan. 1969
Photo of SEC Ballarat No.41 passing through the railway gates at Ballarat Railway Station, Lydiard St. North, with the destination of "Lydiard St Nth". Tram has a SEC "Everything's under control in my all-electric kitchen". Reid's Coffee Palace is in the background. Photo shows the Ballarat Railway Station clock tower, part of the train shed and the signals on the station side of the gates. A "B" class locomotive on a passenger train is standing in platform 1 of the station. Kodak cardboard mount slide, taken by Peter Moses assumed Jan. 1969, dated only "Jan", but date lines up with Bendigo slides and type of numbering. Could be 1970.On the rear of the slides in black ink "P. Moses" along bottom left hand corner in black ink.tramways, trams, railway crossing, lydiard st, railway station, reid's coffee palace, tram 41 -
 Ballarat Tramway Museum
Slide - 35mm slide/s - set of 2, Peter Moses, Jan. 1969
2059.1 - Photo of SEC Ballarat No.41 passing through the railway gates at Ballarat Railway Station, Lydiard St. North, with the destination of "Sebastopol". Tram has a SEC "Everything's under control in my all electric kitchen". Reid's Coffee Palace is the background. Photo shows the Ballarat Railway station clock tower, part of the train shed and the signals on the station side of the gates and another bogie tram waiting at the end of the double track in Lydiard St. for No. 41 to pass. 2059.2 - ditto, but with the two trams passing each other. The Provincial Hotel is also in the photograph. Kodak cardboard mount slide, taken by Peter Moses assumed Jan. 1969, dated only "Jan", but date lines up with Bendigo slides and type of numbering. Could be 1970.On the rear of the slides in black ink "P. Moses" along bottom left hand corner in black ink.tramways, trams, railway crossing, lydiard st, railway station, reid's coffee palace, provincial hotel, tram 41 -
 Ballarat Tramway Museum
Photograph - Colour Photograph/s, Warren Doubleday, 2/03/2001 12:00:00 AM
Colour print of Ballarat Gold Tram, No. 14, Bendigo 18, in Wendouree Parade on 2/3/2001. Tram destination showing Special. On Kodak paper. Same photograph used on the front cover of March 2001Fares Please! and in the Topmill 2002 calendar. Begonia festival and APEX Art show signs in the background at the Ferry stop. In worksheet folder is letter from Topmill and cover page of Fares Please!On rear in blue ink "AVG" and arrow, showing printing marks.gold tram, fares please!, wendouree parade, topmill, tram 45 -
 Ballarat Tramway Museum
Photograph - Black & White Photograph/s, Ian Barkla, c1960
Black and white photograph of Bendigo 3 at Charing Cross, with the Fountain in left hand edge of photograph. Photo shows the curve from View St. into Pall Mall. Tram has "White Horse" whiskey ad and another ad on the drivers dash panel, an SEC roof ad on the rear of the tram and R.J.Conroy's Victa Mowers roof ad on the front of the tram. Conductor in a short sleeved shirt, is standing at front of tram talking to the driver. AMP and CML buildings in background. Tram has been fitted with dash canopy lighting, but not the enlarged white strip. Not dated.On rear in black biro "Bendigo No. 3 at the Fountain ' Ex Geelong 32, Ex 122 MMTB".trams, tramways, bendigo, charing cross , tram 3 -
 Ballarat Tramway Museum
Poster, State Electricity Commission of Victoria (SECV), "Schedule of Fares and Charges - July 1951", Jul.1951
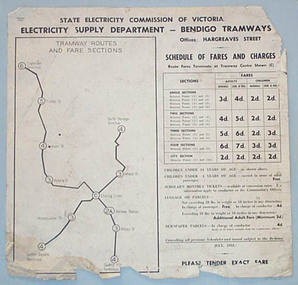
Demonstrates the way the SEC advised passengers in Ballarat and Bendigo how the fare and charges systems worked and yielded information about the fare charges in force at the time. A copy was provided in each tram behind framed glass.Printed sheet and mounted onto at least two other sheets of heavy blank paper to form a poster of a drawing showing Bendigo Tramways (SEC) Fares, Charges, and Section Map. Also gives charges for Scholar's Monthly tickets, Luggage, Parcels, Newspapers and Chartered trams. Fares in shillings and pence and decimal currency. Titled - "Schedule of Fares and Charges - July 1951". Shows offices as Hargreaves St. Has details of designer/draftsman and date "AVM/MM / 14/5/51" in top left hand corner. See images for digital photographs of the poster. Stored within a purpose made folder. In very poor order.trams, tramways, bendigo, fares, sections, map -
 Ballarat Tramway Museum
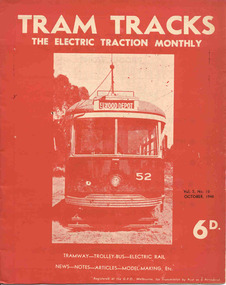
Magazine, Jack Richardson, "Tram Tracks - The Electric Traction Monthly", July to Dec 1948
Three issues of "Tram Tracks - The Electric Traction Monthly" of the Australian Electric Traction Association. Each issue has a standard cover, of the magazine name etc, and featuring a front end photo of Victorian Railways tram No. 52 with the destination of Elwood but are in different colours, all have been saddled stapled with a single staple. The Volume and date details have been over printed. Back covers inside covers have the same advertisements. The three issues contain advertisements for the Wee Folks productions, Wattle Park, G&R model railway parts, Richard Noble model electric motors, Hobbyco, Fleet scale model railway equipment, Masseys Sports, Lloyd's Hobbycraft, John Martin Ltd, Johnson's Variety Store, the ARLHS, Barnes Tennis Centre, The Model Dockyard, the American Subscription Agency, Robilt Models, Meadmore Model Engineering and Austral Bronze Pty Ltd, Hearns Hobbies, Christie Scale Model Railway Products and Traction Publications. 2466.1 - Vol. 3 No. 10 - 20 pages, Oct. 1948, with cover printed in red ink. Has articles on anti-tram propaganda, Alphington - Heidelberg duplication and Sydney's early electric trams - C and D class. Also has news items on Brisbane, Newcastle, Sydney, Melbourne, Sandringham - Black Rock, Hobart, Launceston, Perth, Sydney and Melbourne electric trains, Launceston Trolley Buses, AETA notes, and a caricature of the Editor, Jack Richardson. 2466.2 - Vol. 3 No. 11 - 24 pages, Nov. 1948, with cover printed in blue ink. Has articles on construction of tram track in Melbourne (Victoria Parade), Bourke St., tram-bus controversy, (Reg Ansett, Noel Gipps and USNR Commander Quinby), Sydney's early electric trams - C and D class continued. Also news items on Last tram to Mayfield, Sydney, Latrobe St. Melbourne, Adelaide, opening to Alamein, Melbourne show traffic, VR Trams and AETA notes. 2466.3 - Vol. 3 No. 12 - 16 pages, Dec. 1948, with cover printed in green ink. Has articles on Sydney's electric railways, Brisbane Tramways and an AETA Melbourne tour. News items cover Sydney, Newcastle, Melbourne, Geelong, Bendigo, Kalgoorlie, Melbourne and Sydney trains and AETA news. 2466.4 - Vol 3 - No. 7 - 20 pages - July 1948 with cover printed in red ink. Has articles on cost of building trams for Brisbane, Sydney and Melbourne, abandonment of VR trams, Newcastle, Sydney, centre page photo of Y1 611, Sydney Electric train system including map and AETA news. 2466.5 - Vol 3 - No. 9 - 20 pages - Sep 1948 with cover printed in blue ink. Has articles on Mr. T. G. Patterson, Acting Director of Commonwealth Road Transport and Chairman of Federal Road Safety Council (very anti tram), news from Brisbane, Launceston, Sydney, Newcastle, Burwood, cost of trams, impressions of transport in Europe and North America, Melbourne and Sydney electric trains, tramways of Newcastle and model notes and AETA news. 2466.6 - Vol. 3, No. 1 - Jan 1948 - 16 pages with photo of Brisbane 407, political news, direct Melbourne to Footscray line proposal, new trams, bogie trams in Ballarat, article on Melbourne cable trams, electric trains, AETA outing in Melbourne and various adverts for model railways. 2466.7 - Vol 3 No. 2 - Feb. 1948 - 16 pages - political news, Ballarat news, traffic in Sturt St and new bogie cars, Christchurch closure, cartoon by Mercier on Sydney Honesty box, Brisbane suburban electrification, general tramway and electric railway news and various adverts for model railways. 2466.8 - Vol. 3 No. 3 - March 1948, with photo of VR 52 on front cover, 16 pages, political news, closures, Reg Ansett offer to buy the Melbourne bus system, Newcastle News, SEC Transfer of cars between the three systems, tramways in the Maribyrnong area, map of Melbourne trams, cartoon by Mercier, Brisbane train electrification and general news. 2466.9 - Vol. 3 No. 6 - June 1948 - 12 pages - MMTB political news, new trams for Sydney, tramways of Newcastle, Invercargill, Sydney Suburban trains, and AETA General news. .6 to .9 added 24-3-18 - from consolidation of Melbourne Tram Museum and BTM collections - ex AETA. trams, tramways, electric traction, aeta, models, australian tramways, melbourne, sydney, brisbane, newcastle, costs, ballarat, footscray -
 Ballarat Tramway Museum
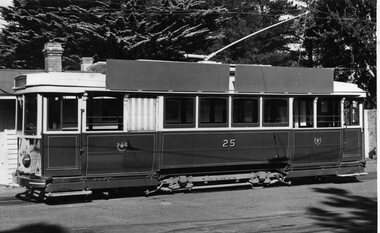
Photograph - Black & White Photograph/s, State Electricity Commission of Victoria (SECV), late 1950's?
Yields information about No. 25 (one of the best side on photographs of this tram) and the fitting or trial of roof advertisements that was a prominent feature of SEC trams from the late 1950's onwards. Noted in an actual photograph, only one roof advertisement fitted.Black and white print of a photograph of No. 25 in the SEC Ballarat depot yard fitted with two blank advertising boards on the roof. Understood prepared to give details to prospective advertisers or to show management how arrangements could be made. Advised by Ron Scholten on 2/12/2013, that "Alan Davis (Vic) Advertising" was the SEC's advertising agent and it has long been defunct. Photo taken late 1950's. One of a few good photographs of No. 25 prior to going to Bendigo in October 1960. See Reg Item 2312 for a photograph of this tram with one roof advertisement c1960. Second copy added 30/11/2013 - high res scan added. See Reg Item 6408 for a 1959 memo regarding the fitting of roof advertising signs.tramways, trams, depot, roof ads, advertisements, tram 25 -
 Ballarat Tramway Museum
Photograph - Colour Photocopy/photocopies, 2004
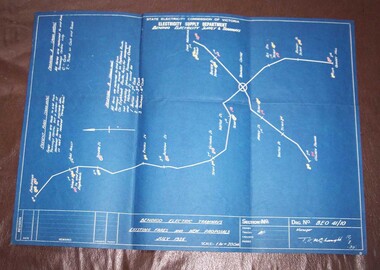
Colour print from a scanned image of a blueprint drawing, BEO 41/10 titled "Bendigo Electric Tramways / Existing Fares and New Proposals / July 1935". Has date of 18/7/1935, shows a map of the Bendigo system, with current fares to various points, and two proposal A - shown in yellow (cash and ticket) and B shown in red. Gives various locations on the tramways. Scanned image prepared by joining six portions into one using photoshop by W. Doubleday. Image made 9/3/2005. Image 1 is of the blue print itself - forwarded to Bendigo Tramway Image 2 is a jpg of colour scanned image. high density image on the special image files directory.bendigo, fares, tickets -
 Ballarat Tramway Museum
Document - Roster, State Electricity Commission of Victoria (SECV), "Tramways - Motormen/Conductors Rotation Roster - Bendigo", 1970
Significant in being a roster rotation sheet for Bendigo that used a different method of advising crews of the system of tables and weeks. Shows how the system was used. Given date, may have been the last one issued.Printed form titled "Tramways - Motormen/Conductors Rotation Roster - Bendigo" for Bendigo Tramways. Duplicated foolscap size paper, giving roster for motormen and conductors AM and PM rosters. Duplicated form in black ink with a red line drawing to split the AM and PM rosters and two tables on Monday underline. Gives details of the run, tables for each day of the week and shows Spare Tables. Headed "Northern Electricity Supply Branch" Five copies held. Copy 1 has pencil date "29 June 1970" in top right hand corner. trams, tramways, tram crews, shifts, rosters -
 Ballarat Tramway Museum
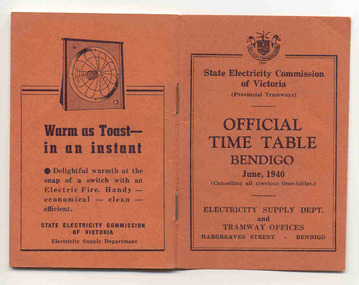
Ephemera - Timetable/s, State Electricity Commission of Victoria (SECV), "Official Time Table Bendigo June 1940", Jun. 1940
Centre pages show a map of the system and the sections. The extension to North Bendigo is yet to be constructed. Gives times for trams leaving the city or the terminals for the routes and for the Eaglehawk route, leaving Long Gully Bridge. Has four SECV Advertisements within the book for hot water, ovens - cookers, toasters and electric fan heaters. Three copies held. See item 5356 for a digital image of the same document with a photograph of Len Smith of Geelong loading a pram into a Birney tram.Provides details of 1940 tram services in Bendigo.Forty-page booklet, with orange lightweight covers, saddle-stapled, SECV Provincial Tramways with the title "Official Time Table Bendigo June 1940". Has address if Hargreaves St Bendigo on bottom of the cover. Two copies held.bendigo, timetables, secv -
 Ballarat Tramway Museum
Document - Manuscript, State Electricity Commission of Victoria (SECV), "Geelong Tramways Early History", 1960s
Consists of formation history, track and route dates, operator, SEC takeover and route lengths. Three pages of statistics - Income, Expenditure and loss 1935 to 1936, - includes car miles., operational statistics, expenditure breakdown of the SEC era. The last three years of operational statistics have been filled in by hand. Probably prepared late 1960's by Les Denmead (assumption here - See Reg item 3289 and 3483 for Bendigo version)Yields historical notes and statistics on the Geelong Tramway system - the statistical information being the most important. Shows the financial situation of the Geelong system was never satisfactory.Four sets - original and three copies - foolscap typed documents, five pages each, titled "Geelong Tramways Early History". 'BTPS 402" in top right hand corner.trams, tramways, geelong, sec, mesco, history, statistics -
 Ballarat Tramway Museum
Photograph - Black & White Photograph/s, Ron Hann, Jan. 1963
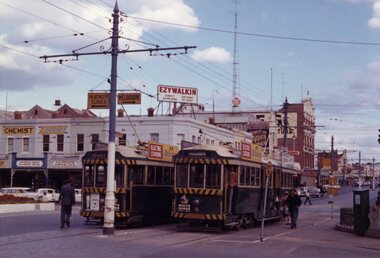
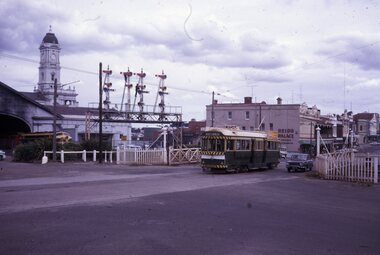
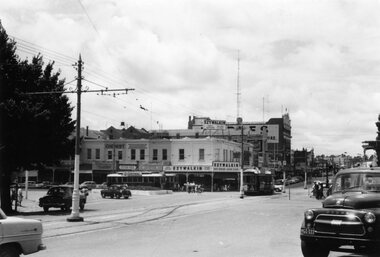
Yields information about the Charing Cross Bendigo tram terminal, and nature of the traffic arrangements.Black and white print on heavy matt photographic paper of a view of Bendigo Charing Cross tram terminal area from western side. Has two single truckers in Pall Mall and a bogie tram. Shows the tram crossover in High St and a number of motor vehicles. Has the Ezywalkin building on the north east corner. 2nd copy - laser print - with date etc on rear - added 22/2/2010, copy from Ron Hann. Printed on Fujifilm, Fujicolour Crystal Archive for Frontier"On rear in pencil "Charing Cross 1963" 2nd copy has label "Reference 6/214/25" Photo by Ron Hann" and another label "Charing Cross Bendigo 01.63"tramways, trams, bendigo, charing cross -
 Ballarat Tramway Museum
Photograph - Black & White Photograph/s, Ron Hann, Jan. 1963
Yields information about the interior arrangement of the Bendigo tram depot and the tramcars.Black and white print on heavy matt photographic paper of the interior of the northern section of the Bendigo tram depot with No. 17 on the northern most track. Shows the pit arrangements and cross planks. 2nd copy - laser print - with date etc on rear - added 22/2/2010, copy from Ron Hann. Printed on Fujifilm, Fujicolour Crystal Archive for Frontier"On rear in pencil "Bendigo 1963" 2nd copy has label "Reference 6/212/31" Photo by Ron Hann" and another label "Bendigo Depot 01.63"tramways, trams, bendigo, depot, tram 17