Showing 2385 items
matching golden bendigo
-
 Ballarat Tramway Museum
Photograph - Black & White Photograph/s, Ian Barkla, 30/08/1969 12:00:00 AM
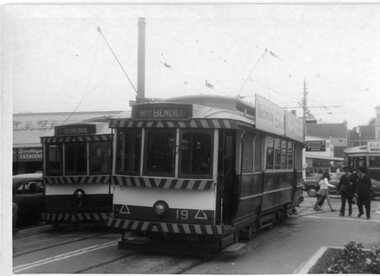
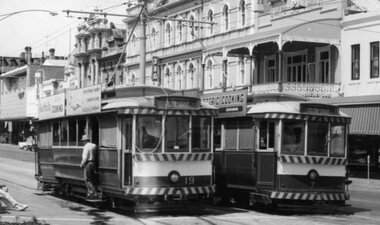
... 19 has destination of "Nth Bendigo", 7 of "Golden Square... in the background. Bendigo 19 has destination of "Nth Bendigo", 7 of "Golden ...Black and white photograph of Bendigo 7 and 19 at Charing Cross, with the end of a Bogie tram in the background. Bendigo 19 has destination of "Nth Bendigo", 7 of "Golden Square". Both trams have the large white strip under the dash canopy lighting. In background is a driver and conductor walking towards 19. Tram 19 has two large SEC roof ads. Taken 30-8-1969. On Kodak paper.On rear in black biro "Bendigo 19 at the Fountain, 30-8-69 / Ex 185 MMTB"trams, tramways, bendigo, pall mall, charing cross , tram 19, 7 -
 Ballarat Tramway Museum
Photograph - Black & White Photograph/s, Des Jowett, 1950
... On rear in blue biro "Bendigo 1959 / Golden Square / line... photograph of Bendigo scrubber car on the Golden Square line. Taken ...Black and white photograph of Bendigo scrubber car on the Golden Square line. Taken 1959. On Ilford paper.On rear in blue biro "Bendigo 1959 / Golden Square / line Work Car" and in bottom left hand corner, in purples stamped ink, "D.F.Jowett, 192a Booran Rd., Carnegie, SE9, Victoria" with two address lines crossed out.trams, tramways, bendigo, scrubber tram , tram scrubber -
 Ballarat Tramway Museum
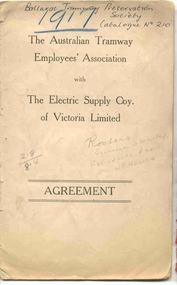
Book, Electric Supply Co. of Vic (ESCo), "The Australian Tramway Employees' Association with the Electric Supply Coy. of Victoria Limited / Agreement", 1917
Sixteen page booklet, off white paper, saddle stapled, titled "The Australian Tramway Employees' Association with the Electric Supply Coy. of Victoria Limited / Agreement". Has 1917 in indelible pencil on top of cover, with numerous red and pencil notes inside on the various clauses of the agreement. Date of Agreement from 1/1/1917 to continue to the 31/12/1918. Applies to both Ballarat and Bendigo. Details hours of work, rates, Sunday runs, casual rates, holidays, free passes, uniforms, window shields (windscreens) on Bendigo trams, eyesight tests, dismissals, meals, Board of Reference. First schedule gives rates of pays for all types of tramway workers and Rosters for Bendigo Eaglehawk and Cemetery line, Golden Square and Lake Weeroona line and Ballarat Rosters for Summer and winter - gives Run Nos. Signed by William Home for P. J. Pringle for ESCo and Lionel Hill, President and T. Jewell General Secretary for the Union."Ballarat Tramway Preservation Society Catalogue No. 210" in ink on top of outside cover. Numerous notes in red ink or pencil against the various rules. trams, tramways, bendigo, ballarat, atea, unions, agreements, esco -
 Ballarat Tramway Museum
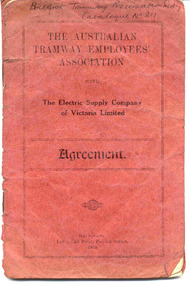
Book, Electric Supply Co. of Vic (ESCo), "The Australian Tramway Employees' Association with the Electric Supply Coy. of Victoria Limited / Agreement", 1919
Twenty page booklet, off white paper, saddle stapled, with additional red paper cover titled "The Australian Tramway Employees' Association with the Electric Supply Coy. of Victoria Limited / Agreement". Dated on cover 1919. Agreement dated 4/9/1919 Applies to both Ballarat and Bendigo. Details hours of work, rates, Sunday runs, casual rates, holidays, free passes, uniforms, window shields (windscreens) on Bendigo trams, eyesight tests, dismissals, meals, Board of Reference. First schedule gives rates of pays for all types of tramway workers and Rosters for Bendigo Eaglehawk and Cemetery line, Golden Square and Lake Weeroona line and Ballarat Rosters for Summer and winter - gives Run Nos. Signed by P. J. Pringle for ESCo and John L Abfalter Vice President and T. Jewell General Secretary for the Union. Two copies held. On Copy two "1919" written in indelible ink on front cover."Ballarat Tramway Preservation Society Catalogue No. 211" in ink on top of outside cover. Numerous notes in red ink or pencil against the various rules. "1919" on copy two. copy 2 - has schedules varied 1/2/20 and revised amounts. trams, tramways, bendigo, ballarat, atea, unions, agreements, esco -
 Ballarat Tramway Museum
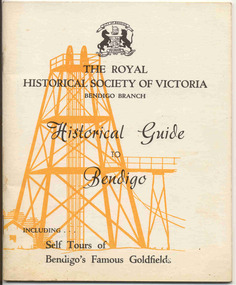
Book, Royal Historical Society of Vic - Bendigo Branch, "Historical Guide to Bendigo", 1968
Yields information about the appearance of SEC single truck trams during 1938. Has a strong association with Wal Jack.Book - 200gsm card cover - two colours, 36 pages off white paper printed with text and 8 pages of black and white photos printed onto gloss paper, centre stapled titled "Historical Guide to Bendigo". Published by the Royal Historical Society of Victoria Bendigo Branch, 1968. Contents: Derivation of the name of Bendigo, historical facts. mining guide, post offices, early Bendigo Hotels, Bendigo Tramways, Eaglehawk, the Lonely Grave. Has photos on the Battery Tram, Steam Tram and ESCo No. 2, Pall Mall, various mines, Golden Square and the Lonely Grave. Bendigo Tram item written by H. Biggs.On page 3 in black ink "Ballarat Tramway Preservation Society, Catalogue No. 119"trams, tramways, bendigo, eaglehawk, mining, post office -
 Ballarat Tramway Museum
Slide - 35mm slide/s - set of 13, Carolyn Dean, 24/09/1970 12:00:00 AM
Set of photographs of operations, including special tram, track work by SEC prior to the Bendigo system closing closing.Set of 13 Agfa slides, blue and white plastic base of Bendigo trams. Taken 24.9.1970 by Carolyn Dean. .1 - "5" - No. 7 at Golden Square terminus, with Golden Square Hotel in background. .2 - "6" - No. 7 passing SEC workmen replacing a broken joint, in McCrae St. Piece of rail alongside tram. .3 - "7" - No. 7 crossing No. 29 at start of double track with Hotel in background .4 - "8" - No. 29 running special at depot junction. .5 - "9" - No. 29 turning from Nolan into Bridge St. .6 - "10" - ditto, passing old loop .7 - "12" - ditto, turning from Caledonia into Thunder St .8 - "13" - ditto, southbound in Pall Mall near Bull St. .9 - "16" - ditto, crossing bridge into tram depot, with tram depot in background. .10 - "17" - ditto, entering depot. .11 - "18" - No. 26 entering the Eaglehawk terminus, High St. with Leo A Hughes photographer shop in background. .12 - "19" - No. 26 at terminus, showing "Quarry Hill", with High St in the background. .13 - "21" - No. 26 after leaving terminus, travelling in High St with shops n the background.Each slide has in corner a number in pencil and the first one the date of "24-9-70".tramways, trams, bendigo, tram 7, tram 29, tram 26 -
 Ballarat Tramway Museum
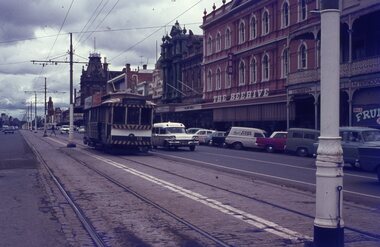
Photograph - Black & White Photograph/s - set of 2, George Bishop, Dec. 1971
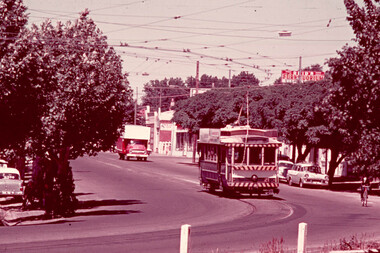
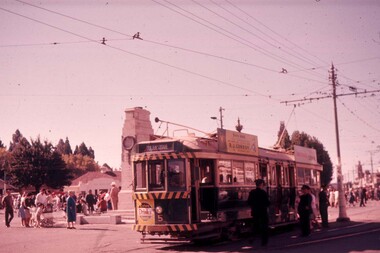
Black and white photographs of Bendigo No. 7 and 19 at Charing Cross 12/1971. Photos by George Bishop. .1 - 19 and 7 at the Charing Cross stop, with a man getting off the tram. Has a over exposure line across part of No. 19. 3BO sign on the Beehive buildings in the background. .2 - Close up of the ends of the both trams - note both have destinations of "Golden Square". Both trams have two SEC roof advertisements for electric cooking.On the back of two of the photos in ink No. 7 and 19, at Charing Cross Bendigo Dec. 1971 / G. Bishop photo"tramways, trams, bendigo, charing cross, pall mall, tram 7, tram 19 -
 Ballarat Tramway Museum
Slide - 35mm slide/s - set of 2, Theo Dunstan, May. 1973
Set of two 35mm slides, square format mounted in a "Kodak " cardboard slide mount with Kodak logos and printing of No. Bendigo No. 25 at the Central Deborah terminus with buildings in background and North Bendigo terminus with the driver standing alongside the front of the tram. No. 25 painted in the Bendigo Trust / ESCo livery. Tram has the destination of Golden Square. Taken May 1973 or earlier.Has date of "May 73" and "18" "19" stamped onto the slide. 3245.1 - "Tourist tram at Deborah Mine Bendigo" in blue ink. 3245.2 - Tourist tram at Joss House, Bendigo".tramways, trams, bendigo, tram 25 -
 Ballarat Tramway Museum
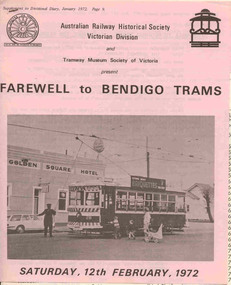
Ephemera - Tour Notes, Victorian Railways et al, "Farewell to Bendigo Trams", Jan. 1972
Set of 5 documents for the "Farewell to Bendigo Trams" tour conducted by the ARHS Vic Div and the TMSV, first scheduled for Sat. 12/2/1972, but delayed to Sat. 4/3/1972 due to SECV Power restrictions on the day. 3277.1 - documents 1 to 3 stapled in top left hand corner. 1. Tour circular, printed on pink paper with a photo of No. 28 at Golden Square terminus. Has logos of ARHS Vic Div and TMSV, part missing - used for booking. Gives details of the purpose of the tour, approx. times, refreshments, a booklet and fares. Organiser Victor Isaacs and Neil Morrow Booking Officer. Printed on foolscap paper in landscape format 2. Victorian Railways S Circular, or special train notice, S.224/72, single page giving train schedules, loads, motive power, carriage numbers and tickets. Signed by J.C. Crute as Chief Traffic Manager. Dated 19/1/1972. Printed on foolscap paper. 3. Ticket circular printed on quarto paper giving times of departure and arrival back, noting its express run to Melbourne. 3277.2 - documents 4 to 5, stapled in top left hand corner. 4. Set of two sheets, one printed on foolscap card paper, the other on foolscap paper, giving a graph of the tram workings, showing the special trams (tours A and B) overlain with the Saturday timetable. Dated 4/3/1972. 5. Victorian Railways S Circular, or special train notice, S.435/72, single page giving train schedules, loads, motive power, carriage numbers and tickets. Signed by J.C. Crute as Chief Traffic Manager. Dated 11/2/1972. Printed on foolscap paper. Noted that the special train of 12/2/1972 is cancelled "Due to SECV Restrictions". Has return train timetabled for 2 hours and five minutes. (Additional copies of item 4 - graph on one sheet only and item 5 - added 3/10/2007 - ex Graeme Breydon materials) 3277.3 - Welcome Aboard Circular - red foolscap paper, giving train time summary, photostops, arrangements in Bendigo, Bendigo line history and tram tours. Images of document added 27-08-12.arhs, special trains, bendigo, tmsv, timetables -
 Ballarat Tramway Museum
Slide - 35mm slide/s, Dave Macartney, Dec. 1968
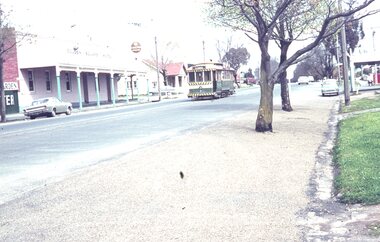
White cardboard mount, 35mm slide, from the Association of Railway Enthusiast's film strip titled "Provincial Tramway Film Strip" of Bendigo No. 21 in High St (Calder Highway), near Short St, outbound to Golden Square. Photo taken after the tram has passed the photographer. Has Reid's Furntuorium sign in the background. The film strip notes (Reg. Item 2560), provided the following caption details: "The "GOLDEN SQUARE" line followed the Calder Highway toward Melbourne for a couple of miles. Here, 21 is outbound not far from Charing Cross - Dec '68 (Dave Macartney)" See image btm2583p.tif for high level scan of image. Stamped on base of slide "11792" and written in ink on top edge "21 on Golden Square"tramways, trams, are, film strip, high st, golden square, tram 21 -
 Ballarat Tramway Museum
Slide - 35mm slide/s, Bob Wilson, Dec. 1972
White cardboard mount, 35mm slide, from the Association of Railway Enthusiast's film strip titled "Provincial Tramway Film Strip" of a Bendigo Trust Birney tram, December 1972 at Charing Cross, outbound to the mine. Tram painted in the Bendigo Trust colour scheme and is fitted with a Bendigo Television BCV roof advertisement. "For Television BCV Channel 8 & 11" and underneath the roof advertisement a route sign "Gold Mine - Joss House". Photo has the Ezywalkin store in the background, Fountain Plaza in the foreground. The film strip notes (Reg. Item 2560), provided the following caption details: "The Bendigo Trust operates a tourist service over the former "NORTH BENDIGO" and part of the "GOLDEN SQUARE" lines using severally visually restored cars, such as Birney No. 30 at Charing Cross - Dec ' 72 (Bob Wilson) See image btm2598p.tif for high level scan of image. Stamped on base of slide "11808" and written in ink on top edge "No. 30 Charing Cross"tramways, trams, are, film strip, charing cross, bendigo trust, tram 30 -
 Ballarat Tramway Museum
Slide - 35mm slide/s - set of 5, 1970's
Series of five 35mm slides in a yellow colour "Peter Fox Collins St. Melbourne" cardboard mounts, of view of Bendigo trams. Each slide along the top edge has the details while the bottom edge, has a number in the details area. 2599.1 - No. 9420, No. 24 at Quarry Hill - photo at dusk, poor quality, has surface damage all over slide. 2599.2 - No. 9421, ditto 2599.3 - No. 10132, No. 19 in Bendigo Trust operation colours at intersection of McCrae St & Nolan St, some surface damage around the top and bottom edges. Has Gillies Pies roof advertisement. Tram has destination of North Bendigo. 2599.4 - No. 10133, No. 25, High St, south of Charing Cross - some surface damage around the top and bottom edges. Tram has roof advertisements for "Gas" and "Myers". Has destination of Joss House 2599.5 - No. 10134, No. 19, Pall Mall, some slight surface damage. Tram has destination of Golden Square and has a roof advertisement for Sandhurst Milk and one other company. In blue ink on each slide; number as above in bottom edge. 2599.1 and .2 - "No. 24 Quarry Hill" 2599.3 & .5 - "No. 19 Nth Bendigo" 2599.4 - "No. 25 Nth Bendigo"tramways, trams, bendigo, pall mall, bendigo trust, nolan st, tram 24, tram 19, tram 25 -
 Ballarat Tramway Museum
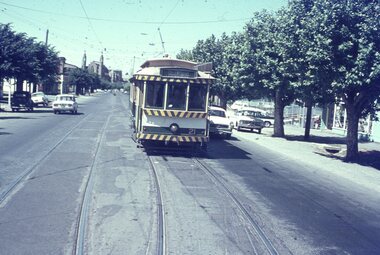
Slide - 35mm slide/s, Travis Jeffrey, c1962
Agfa plastic mount (blue base, white cover) with a photo of Bendigo 7, crossing the bridge outside the Bendigo Tram Depot. Possibly taken on the same day as Reg. item 2611 to 2615. Tram has the destination of Golden Square. Photo taken c1962."BES 6" in penciltramways, trams, bendigo, depot, tram 7 -
 Ballarat Tramway Museum
Slide - 35mm slide/s, Travis Jeffrey, c1962
Agfa plastic mount (blue base, white cover) with a photo of Bendigo 29 at the North Bendigo terminus. Photo taken from the level crossing, looking across to the new housing estate, then under construction. Tram has the destination of Golden Square and has a SEC Briquettes roof advertisement."BES 14" in penciltramways, trams, bendigo, north bendigo, tram 29 -
 Ballarat Tramway Museum
Slide - 35mm slide/s, Travis Jeffrey, c1962
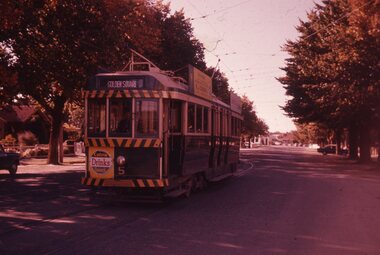
Agfa plastic mount (blue base, white cover) with a photo of Bendigo No. 5 at Charing Cross near the end of the double line with the Cenotaph in the background. Tram has the destination of Golden Square, a Cohns Drinks advertisement on the front panel and a R.J. Conroy roof advertisement. Three SEC Tramway personnel standing by the side of the tram. Many people standing in the background - Easter Fair or similar event. Photo taken c1962."BES 26" in penciltramways, trams, bendigo, charing cross, celebrations, tram 5 -
 Ballarat Tramway Museum
Slide - 35mm slide/s, Travis Jeffrey, c1962
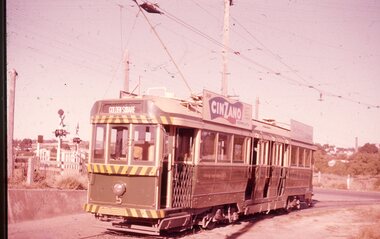
Agfa plastic mount (blue base, white cover) with a photo of Bendigo 5 at North Bendigo terminus. Tram has the destination of Golden Square. Photo has the level crossing in the background. Tram has a "Cinzano" and another roof advertisement. Photo taken c1962."BES 30" in penciltramways, trams, bendigo, north bendigo, tram 5 -
 Ballarat Tramway Museum
Slide - 35mm slide/s, Travis Jeffrey, c1962
Agfa plastic mount (blue base, white cover) with a photo of Bendigo 5 passing through the Bridge St Loop. Tram has the destination of Golden Square, a Cohns Soft drink ad on the dash panel and a "R.J. Conroy" roof advertisement. Photo taken c1962."BES 31" in penciltramways, trams, bendigo, north bendigo, bridge st, tram 5 -
 Ballarat Tramway Museum
Slide - 35mm slide/s, Travis Jeffrey, late 1960's or early 1970's
Agfa plastic mount (blue base, white cover) with a photo of Bendigo scrubber tram at the end of the double track in High St., heading out for Golden Square Photo taken late 1960's early 1970's. Photo has the City Family Hotel in the background."BES 34" in penciltramways, trams, bendigo, high st, scrubber tram, scrubber -
 Ballarat Tramway Museum
Slide - 35mm slide/s, Travis Jeffrey, late 1960's or early 1970's
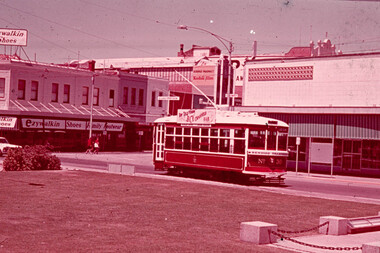
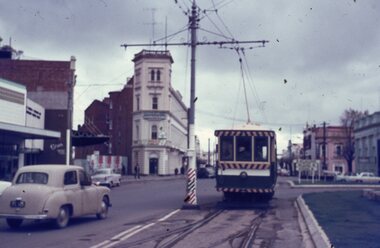
Agfa plastic mount (blue base, white cover) with a photo of Bendigo No. 19 in Pall Mall, nearing Charing Cross. Tram has the destination of Golden Square Photo taken late 1960's early 1970's. Photo has the Beehive, the Shamrock Hotel in the background. Radio station 3BO can be seen on the Beehive building. No. 19 has two SEC roof advertisements. Note the point bar on the pole on the right hand side of the photograph."BES 35" in penciltramways, trams, bendigo, pall mall, beehive building, tram 19 -
 Ballarat Tramway Museum
Slide - 35mm slide/s, Travis Jeffrey, late 1960's or early 1970's
Agfa plastic mount (blue base, white cover) with a photo of Bendigo No. 21 in the loop at Myrtle St, High St, bound for Golden Square. Photo taken late 1960's early 1970's from the window of another tram, either inbound or outbound, at the southern end of the loop. In the background is the Sacred Heart Cathedral ."BES 41" in penciltramways, trams, bendigo, quarry hill, tram 21 -
 Ballarat Tramway Museum
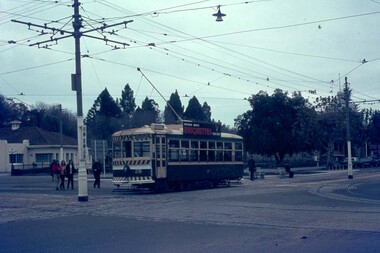
Slide - 35mm slide/s, Travis Jeffrey, late 1960's or early 1970's
Agfa plastic mount (blue base, white cover) with a photo of Bendigo No 28 arriving at the Charing Cross stop, from Golden Square. Two SEC crewmen waiting at stop. Tram has a SEC Briquettes roof advertisement on the side of the tram. Photo taken late 1960's early 1970's from the window of another tram."BES 47" in pencil.tramways, trams, bendigo, charing cross, tram 28 -
 Ballarat Tramway Museum
Negative, Travis Jeffrey, 17/06/1962 12:00:00 AM
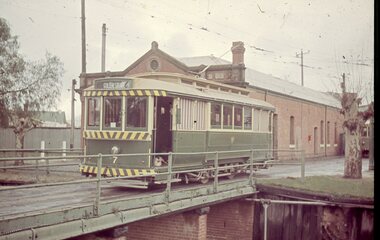
Colour Negative No. N396, of Bendigo Birney No. 30 on the North Bendigo line at the Bridge St. loop. Tram has the destination of Golden Square. Photo possibly 17/6/1962. Colour laser printed copy of image stored in box 73. Image scanned at hi res 27/5/2020 and image updated.In red pen on folder that contained negative, "NR69B" and "17 Jun 62". trams, tramways, bendigo, bridge st, north bendigo, tram 30 -
 Ballarat Tramway Museum
Negative, Travis Jeffrey, 5/08/1962 12:00:00 AM
Colour Negative No. N402, of the interior of Birney tram with two crew members, driver and conductor sitting at one end of the tramcar. Probably No. 11 - see Reg. Item 2753 for the same Conductor, probably at Golden Square terminus. Photo possibly 17/6/1962. Colour laser printed copy of image stored in box 73. Image scanned at hi res 27/5/2020 and image updated.In red pen on folder that contained negative, "NR92B" and "5 Aug 62". trams, tramways, bendigo, crews, birney -
 Ballarat Tramway Museum
Negative, Travis Jeffrey, 5/08/1962 12:00:00 AM
Colour Negative No. N407, of the Bendigo No 11 on the North Bendigo line at the Bridge St. loop. Tram has the destination of Golden Square. Photo taken possibly on 5/8/1962. Colour laser printed copy of image stored in box 73. Original negative hires scan and image updated 28/5/2020.In red pen on folder that contained negative, "NR95B" and "5 Aug 62". trams, tramways, bendigo, north bendigo, bridge st, tram 11 -
 Ballarat Tramway Museum
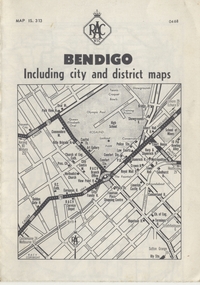
Map, Royal Automobile Club of Victoria, "Bendigo District Map - RACV", c1971
Printed street map titled "Bendigo District Map", published by the RACV, showing the central part of Bendigo, Bendigo Outlets, streets, principal attractions, Bendigo and district maps and information, and a list of sporting and entertainment facilities. Has the tram lines shown dotted, only shows the full extent of the Golden Square line. The main map has the number "0171" in the bottom left hand corner, indicating the publication date.in ink on the Bendigo Outlet map, "3/4" along bottom edge.trams, tramways, map, bendigo, racv, railways -
 Ballarat Tramway Museum
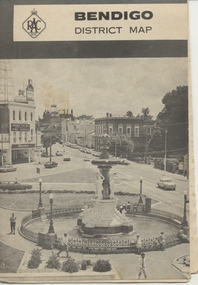
Map, Royal Automobile Club of Victoria, "Bendigo Including city and district maps - RACV", c1968
Printed street map titled "Bendigo Including city and district maps", published by the RACV, showing the central part of Bendigo on the front cover, Bendigo Outlets and notes on the city itself. Has the tram lines shown dotted, only shows the full extent of the Golden Square line. Inside has a district road map. The front cover has the number "0468" in the bottom left hand corner, indicating the publication date.in ink on the Bendigo Outlet map, has various notes showing the location of crossing loops on and off the map and the location of the tram depot itself.trams, tramways, map, bendigo, racv, railways -
 Ballarat Tramway Museum
Photograph - Digital image Set of 20, Dec. 1970
... Parade Ballarat Ballarat goldfields Trams tramways Bendigo ...Set of 20 digital images of Bendigo Tramways December 1970 by Stuart Lodington. .1 - Bendigo track gang renewing a joint, McCrae St, with welding truck alongside and Birney No. 29. .2 - No. 5 at Quarry Hill terminus? .3 - No. 24 at the depot .4 - No. 2 on the Quarry Hill line .5 - No. 5 approaching the Eaglehawk terminus .6 - No. 29? at the Golden Square Terminus with Bill Rodda's Golden Square hotel in the background. .7 - No. 3 inbound on the Quarry Hill line. .8 - trams crossing on the Eaglehawk line, through the window of one tram. .9 - side on view of a B23D controller in a bogie tram .10 - No. 5 at the Eaglehawk terminus .11 - No. 21 at No. 21 crossing on the Golden Square line. No. 29 showing special, No.21 - North Bendigo, Fire Station Loop? .12 - No. 29 and another tram - near work site? .13 - interior view from Birney looking at the front of another tram parked behind. .14 - No. 29, No. 6 crossing at .15 - No. 6, showing special at Charing Cross. .16 - No. 5 and another tram at North Bendigo on a Special .17 - No. 28 at Charing Cross .18 - No. 5 on Special at a Loop on the Eaglehawk line .19 - No. 28, and two other trams at the Myrtle St Loop .20 - No. 18 showing Quarry Hill and two other trams on View St.trams, tramways, bendigo, trackwork, mccrae st, depot, quarry hill, eaglehawk, golden square, controllers, north bendigo, view st, tram 29, tram 5, tram 24, tram 2, tram 3, tram 6, tram 28, tram 18 -
 Ballarat Tramway Museum
Photograph - Digital image Set of 20
... Parade Ballarat Ballarat goldfields Trams tramways Bendigo ...Set of 20 digital images of Bendigo Tramways, 1972 at or before closure while on a tram tour by Stuart Lodington. .1 - No. 28 and 5 at Eaglehawk terminus .2 - No. 28 leaving Charing Cross and travelling into View St with Armstrong Type Service building in background and Firestone Advertisements. .3 - No. 29 with Eaglehawk Town Hall and Post Office in background. .4 - No. 26 and 29 at start of double track, High St Eaglehawk .5 - No. 29 leaving Eaglehawk with shops in the background, Foodland, J. Bests .6 - No. 29 and 23 crossing Manchester Loop with Manchester Arms Hotel in the background and an old poppet head. .7 - No. 29 at ditto with poppet head in the background. .8 - No. 28 and two other trams at the Quarry Hill terminus. .9 - No. 29 in High St Bendigo with the Cathedral and Golden Gate Hotel in the background. .10 - No. 3 with destination Eaglehawk, in bound Carpenter St? .11 - No. 29 following a single trucker through a loop or the end of the double track near the depot. .12 - No. 23?, at Eaglehawk terminus, with Eaglehawk Town Hall in the background. .13 - Birney tram crossing the bridge at the Depot entrance - No. 29 .14 - No. 29 on the Eaglehawk line? .15 - as for .13 .16 - No. 29 entering the depot. .17 - No. 23, inbound from Eaglehawk, at Jobs Gully Loop with the railway overbridge in the background. .18 - No. 28 and two other trams (see also Reg Item 4982) for the same tram tour at Myrtle St. Loop. .19 - No. 21 with North Bendigo on the destination approaching the Golden Square terminus. .20 - No. 7 at Golden Square terminustrams, tramways, bendigo, eaglehawk, quarry hill, golden square, depot, tram 5, tram 29, tram 28, tram 26, tram 23, tram 7, tram 21 -
 Ballarat Tramway Museum
Photograph - Digital image Set of 20, 1971-72
... Parade Ballarat Ballarat goldfields Trams tramways Bendigo ...Set of 20 digital images of Bendigo Tramways, 1972 at or before closure while on a tram tour by Stuart Lodington. .1 - No. 7 at Golden Square terminus .2 - ditto .3 - No. 26 in bound on the Eaglehawk line with a crossing loop behind. .4 - Birney crossing the bridge by the tram depot. .5 - No. 29 running a special on the Eaglehawk line with a HBA billboard in the background. .6 - No. 29 with a driver walking in front of the tram at the above location. .7 - No. 29 on the Eaglehawk line .8 - ditto waiting for a tram at Manchester Loop with poppet head in the background. .9 - No. 29 on the Eaglehawk line .10 - Eaglehawk Town Hall at night. .11 - No. 7 at the depot junction in McCrae St, with Golden Square destination. .12 - No. 29 with the Camp Hotel Eaglehawk in the background. Also a Newsagent with The Sun, The Bendigo Advertiser and The Age signs on the building, High St .13 - No. 29 Mt Korong Rd, with the railway overbridge in the background. .14 - interior photo of Birney tram roof .15 - interior view of controls of Birney at Eaglehawk .16 - No. 29 outbound at the Depot Junction McCrae St. .17 - No. 18 at the Eaglehawk terminus .18 - close up view of No. 29 front. .19 - No. 29 in Nolan St, crossing the bridge, outbound. .20 - No. 18 at the Eaglehawk terminus with the Eaglehawk Town Hall, Post Office in the background. Has a circus banner on the side.trams, tramways, bendigo, eaglehawk, quarry hill, golden square, depot, mccrae st, nolan st, tram 7, tram 26, tram 29, tram 18 -
 Ballarat Tramway Museum
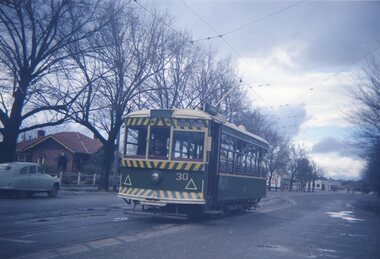
Photograph - Black & White Photograph/s, Chris Wurr, early 1970's
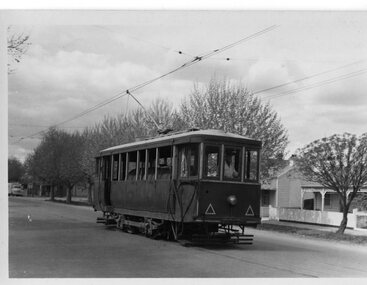
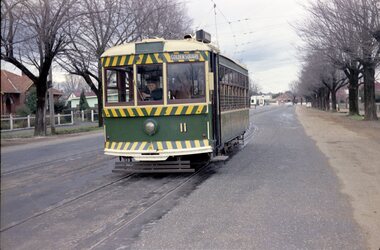
Yields information about the appearance of Bendigo Birney trams early 1970's en route to North Bendigo and its tree lined streets.Black and White Photograph of SEC Bendigo 30, Birney at North Bendigo terminus with the driver turning the trolley pole. Tram has the destination of Golden Square. Photo shows the fitting in the overhead to help locate the trolley pole on the inbound wire. Photo Chris Wurr, early 1970's. "Photo by Chris Wurr" stamped on the rear.trams, tramways, bendigo, north bendigo, overhead, birney, tram 30