Showing 232 items
matching railway terminus
-
 Ballarat Tramway Museum
Slide - 35mm slide/s, Wal Jack, 26/06/1962 12:00:00 AM
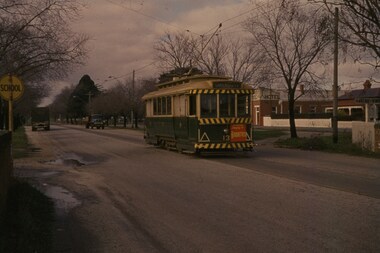
... Tram 13 approaching Victoria St. terminus, taken from.... tram 13 'SEC Ballarat, No. 13, Victoria St, near terminus ...Tram 13 approaching Victoria St. terminus, taken from Buninyong railway overbridge, with 13 travelling away from photographer. Two trucks in background. Tram has been fitted with lights, but not the larger white strip. Taken on 26.6.62. With Meagher's Hotel in background.'SEC Ballarat, No. 13, Victoria St, near terminus, Ballarat East, 26-6-62' in blue ink, and on reverse side, 'W.Jack photo' in blue ink.tramways, trams, victoria st., tram 13 -
 Kew Historical Society Inc
Photograph - Harp of Erin Tram Terminus, c.1916
An electrified tram route from Melbourne along High Street replaced an original Horse Tram that terminated at the Kew Cemetery. This new tram only reached the bridge over the Outer Circle railway at the Harp Junction. The line was later extended to North Balwyn.Black and white print positive of the Tram Terminus in High Street, Kew at the Harp of Erin hotel. "Harp of Erin Tram Terminus about 1916. House on left still standing behind delicatessen [in 1978]. / Courtesy Mrs E Bennett, Kew East / Property of Miss Foley."tramways, mmtb, tram terminus, no 48 tram route, harp of erin hotel, trams - kew, trams - kew east -
 Kew Historical Society Inc
Photograph - Harp of Erin Tram Terminus, 1977
An electrified tram route from Melbourne along High Street replaced an original Horse Tram that terminated at the Kew Cemetery. This new tram only reached the bridge over the Outer Circle railway at the Harp Junction. The line was later extended to North Balwyn.Black and white print enlargement of the Tram Terminus in High Street, Kew at the Harp of Erin hotel. The rear of the photograph identifies it as an enlargement donated by Stewart West from an original owned by Miss Foley.tramways, mmtb, tram terminus, no 48 tram route, harp of erin hotel, trams - kew, trams - kew east -
 Kew Historical Society Inc
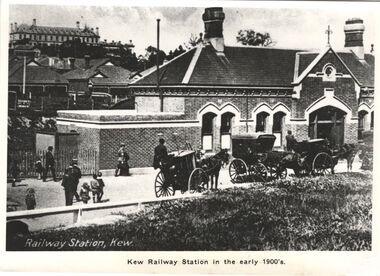
Print, Kew Railway Station in the early 1900s
Kew Railway Station (1887-1959). ‘Kew Railway Station’ in Denmark Street was the terminus of the Kew Line, which extended from Hawthorn Station to just south of Wellington Street. The Station opened on 19 December 1887 after a prolonged campaign for a railway by the people of Kew. Due to a decline in patronage, the passenger service ceased operations in August 1952. While a freight service continued for another five years, the line and station were officially closed on 13 May 1957. Subsequently demolished in 1959, the headquarters of VicRoads (formerly Country Roads Board) now stands on the former Station site.This work forms part of the collection assembled by the historian Dorothy Rogers, that was donated to the Kew Historical Society by her son John Rogers in 2015. The manuscripts, photographs, maps, and documents were sourced by her from both family and local collections or produced as references for her print publications. Many were directly used by Rogers in writing ‘Lovely Old Homes of Kew’ (1961) and 'A History of Kew' (1973), or the numerous articles on local history that she produced for suburban newspapers. Most of the photographs in the collection include detailed annotations in her hand. The Rogers Collection provides a comprehensive insight into the working habits of a historian in the 1960s and 1970s. Together it forms the largest privately-donated collection within the archives of the Kew Historical Society.A photographic copy of a book plate from 'Kew's Civic Century' (1960) by W.D. Vaughan. The book plate was itself a copy of an early 20th century postcard depicting the Kew Railway Station."Railway opened 1887 - Then as photo states"kew railway station, dorothy rogers, country roads board, vicroads -
 Kew Historical Society Inc
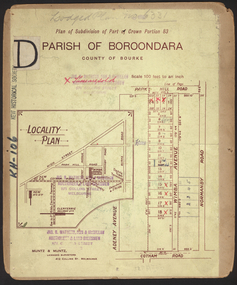
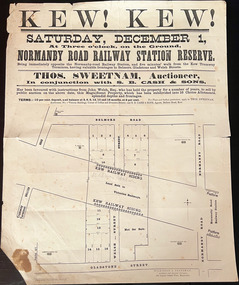
Plan - Subdivision Plan, Wimba Estate, Kew, c.1925-c.1929, ca. 1925-ca. 1929
Pru Sanderson, in her groundbreaking ‘City of Kew Urban Conservation Study : Volume 2 - Development History’ (1988), summarised the periods of urban development and subdivisions of land in Kew. The periods that she identified included 1845-1880, 1880-1893, 1893-1921, 1921-1933, 1933-1943, and Post-War Development. These periods were selected as they represented periods of rapid growth or decline in urban development. An obvious starting point for Sanderson’s groupings involved population growth and the associated economic cycles. These cycles also highlighted urban expansion onto land that was predominantly rural, although in other cases it represented the decline and breakup of large estates. A number of the plans in the Kew Historical Society’s collection can also be found in other collections, such as those of the State Library of Victoria and the Boroondara Library Service. A number are however unique to the collection.Subdivision plans are historically important documents used as evidence of the growth of suburbs in Australia. They frequently provide information about when the land was sold on which a built structure was subsequently constructed as well as evidence relating to surveyors and real estate and financial agents. The numerous subdivision plans in the Kew Historical Society's collection represent working documents, ranging from the initial sketches made in planning a subdivision to printed plans on which auctioneers or agents listed the prices for which individual lots were sold. In a number of cases, the reverse of a subdivision plan in the collection includes a photograph of a house that was also for sale by the agent. These photographs provide significant heritage information relating house design and decoration, fencing and household gardens.In 1925, the City of Kew called for tenders for the construction of Wimba Avenue, Cadow Street and Lalla Street. Subsequent advertisements for the sale of land in Wimba Avenue continued from 1926 to 1929. The 18 lots (and a further five allotments on the eastern side of the street) offered for sale were unofficially described in the subdivision plan as the ‘Wimba Estate’. These lots began in Park Hill Road and extended almost to Cotham Road. The subdivision took its name from the house ‘Wimba’ in Cotham Road, which may have formed the southern boundary of the subdivision. (Wimba, at 235 Cotham Road was constructed between 1862-70). The Plan highlights the proximity and advantage of ‘electric’ trams in Cotham and Glenferrie Roads, and the Kew and Glenferrie Railway Stations. An oddity in the Plan is the reference to the electric tram terminus at Burke Road, given that the tramline had already been extended to Mont Albert in 1916.wimba estate, subdivision plans - kew, parkhill road – kew (vic.), normanby road – kew (vic.), wimba avenue – kew (vic.) -
 Kew Historical Society Inc
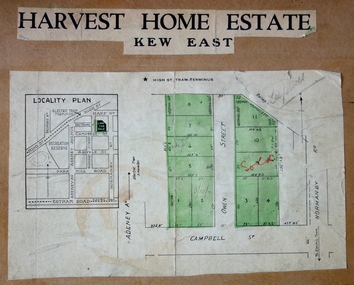
Plan - Subdivision Plan, Harvest Home Estate, 1919
Pru Sanderson, in her groundbreaking ‘City of Kew Urban Conservation Study : Volume 2 - Development History’ (1988), summarised the periods of urban development and subdivisions of land in Kew. The periods that she identified included 1845-1880, 1880-1893, 1893-1921, 1921-1933, 1933-1943, and Post-War Development. These periods were selected as they represented periods of rapid growth or decline in urban development. An obvious starting point for Sanderson’s groupings involved population growth and the associated economic cycles. These cycles also highlighted urban expansion onto land that was predominantly rural, although in other cases it represented the decline and breakup of large estates. A number of the plans in the Kew Historical Society’s collection can also be found in other collections, such as those of the State Library of Victoria and the Boroondara Library Service. A number are however unique to the collection.The Kew Historical Society collection includes almost 100 subdivision plans pertaining to suburbs of the City of Melbourne. Most of these are of Kew, Kew East or Studley Park, although a smaller number are plans of Camberwell, Deepdene, Balwyn and Hawthorn. It is believed that the majority of the plans were gifted to the Society by persons connected with the real estate firm - J. R. Mathers and McMillan, 136 Cotham Road, Kew. The Plans in the collection are rarely in pristine form, being working plans on which the agent would write notes and record lots sold and the prices of these. The subdivision plans are historically significant examples of the growth of urban Melbourne from the beginning of the 20th Century up until the 1980s. A number of the plans are double-sided and often include a photograph on the reverse. A number of the latter are by noted photographers such as J.E. Barnes.The ‘Harvest Home Estate’ was advertised as being a subdivision in East Kew. Now, Campbell and Owen Streets on which the allotments were located are classed as being in Kew. The Estate included 11 residential allotments abutting the Outer Circle Railway line [at the end of Owen Street]. Understandably, the vendors focused on the availability of transport by tram, noting that the Estate was near the High Street tram terminus at the Harp of Erin. A small note on the subdivision advises that the Cotham Road tram was only 3 minutes away. The location – ‘The most elevated position in lovely Kew’ – was also promoted as an advantage.subdivision plans - east kew, harvest home estate -
 Kew Historical Society Inc
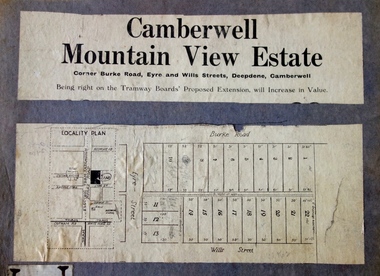
Plan - Subdivision Plan, Camberwell Mountain View Estate, 1923
The Kew Historical Society collection includes almost 100 subdivision plans pertaining to suburbs of the City of Melbourne. Most of these are of Kew, Kew East or Studley Park, although a smaller number are plans of Camberwell, Deepdene, Balwyn and Hawthorn. It is believed that the majority of the plans were gifted to the Society by persons connected with the real estate firm - J. R. Mathers and McMillan, 136 Cotham Road, Kew. The Plans in the collection are rarely in pristine form, being working plans on which the agent would write notes and record lots sold and the prices of these. The subdivision plans are historically significant examples of the growth of urban Melbourne from the beginning of the 20th Century up until the 1980s. A number of the plans are double-sided and often include a photograph on the reverse. A number of the latter are by noted photographers such as J.E. Barnes.The so-called Camberwell Mountain View Estate was a subdivision on ‘the corner [of] Burke Road, Eyre and Wills Streets, Deepdene’. The Estate was not the first attempt to subdivide this land holding. In 1884, 1888 and 1894 the Belmore Park subdivision proposed 18 allotments for this parcel of land. The final stages of the Belmore Park subdivision occurred during the Depression of the 1890s. Apart from perhaps one block facing Burke Road, which is unnumbered in the Mountain View Estate subdivision, the rest must have remained unsold. The later subdivision would redraw the original 18 allotments, creating 22 new lots. In the Locality Plan on the left side of the subdivision plan, Deepdene Station, which formed part of the Outer Circle Railway is represented, as is the location of Deepdene Primary School. A selling point was the proposed extension of the Burke Road tram beyond its terminus at Cotham Road. The extension did not eventuate.subdivision plans - camberwell, mountain view estate -
 Kew Historical Society Inc
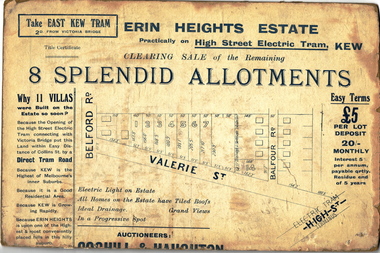
Plan - Subdivision Plan, Erin Heights Estate, East kew, 1917
Pru Sanderson, in her groundbreaking ‘City of Kew Urban Conservation Study : Volume 2 - Development History’ (1988), summarised the periods of urban development and subdivisions of land in Kew. The periods that she identified included 1845-1880, 1880-1893, 1893-1921, 1921-1933, 1933-1943, and Post-War Development. These periods were selected as they represented periods of rapid growth or decline in urban development. An obvious starting point for Sanderson’s groupings involved population growth and the associated economic cycles. These cycles also highlighted urban expansion onto land that was predominantly rural, although in other cases it represented the decline and breakup of large estates. A number of the plans in the Kew Historical Society’s collection can also be found in other collections, such as those of the State Library of Victoria and the Boroondara Library Service. A number are however unique to the collection.The Kew Historical Society collection includes almost 100 subdivision plans pertaining to suburbs of the City of Melbourne. Most of these are of Kew, Kew East or Studley Park, although a smaller number are plans of Camberwell, Deepdene, Balwyn and Hawthorn. It is believed that the majority of the plans were gifted to the Society by persons connected with the real estate firm - J. R. Mathers and McMillan, 136 Cotham Road, Kew. The Plans in the collection are rarely in pristine form, being working plans on which the agent would write notes and record lots sold and the prices of these. The subdivision plans are historically significant examples of the growth of urban Melbourne from the beginning of the 20th Century up until the 1980s. A number of the plans are double-sided and often include a photograph on the reverse. A number of the latter are by noted photographers such as J.E. Barnes.The Erin Heights Estate in Kew included just seven lots in in Valerie Street. These were all that remained of this wartime subdivision, the other 11 allotments on Balfour and Belford Roads having already been sold. Balfour Road was to be only a temporary name as the street is currently called Windella Avenue. Now, the parkland opposite the subdivision is the reserve created from the route of the Outer Circle Railway. This Railway reached Kew East in 1925, but had been planned as far back as 1873. The development focuses on the benefits of living in Kew: being at the highest of Kew’s ‘suburbs’; being a good residential area; its rapid growth; and the proximity of the Kew East tram in High Street. In 1917, the electric tramline only extended to a terminus at the Harp of Erin hotel. The terminus is clearly represented on the plan.subdivision plans - east kew, erin heights estate -
 Tarnagulla History Archive
Letter: Railway League to the Mayor of Maryborough, 24th February 1873
David Gordon Collection. From John Simpson, Secretary of the Sandhurst, Tarnagulla and Dunolly Railway League. Asks for support of a proposed extension of railway line beyond the exisitng terminus at Dunolly so that it would continue on through Tarnagulla, Newbridge and Woodstock and terminating at Sandhurst (Bendigo), with the purpose of completing a line between Ballarat and Sandhurst (Bendigo).railways, transport, trade -
 Wodonga & District Historical Society Inc
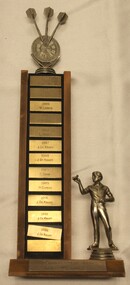
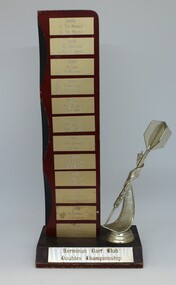
Award - Trophy - Terminus Hotel Wodonga Dart Club, 1985 - 1992
The Terminus Hotel was one of the earliest hotels in Wodonga, with clear links to the establishment of the railway line. It was an important business and meeting place from the original construction in 1873 until 1st June 1998 the Terminus Hotel when it was destroyed by fire. It provided a popular venue for social activities, including competitive darts, both through its own competition and as part of the Albury-Wodonga District Darts Association. The remains of the building were demolished in 1999. This is perpetual trophy for the Terminus Dart club based at the Terminus Hotel in Wodonga. This trophy recognises the winners of the Singles Championship from 1985 to 1992. Engravings on the front of the trophy indicate that the competition was held twice a year for most of the years recorded here.The Terminus Hotel was an important meeting place in Wodonga for more than 100 years. This item is representative of one of the social and sporting activities it provided for members of the local community.A perpetual trophy for the Terminus Dart club based at the Terminus Hotel in Wodonga. This trophy recognises the winners of the Singles Championship from 1985 to 1992. Down the front of the trophy, each name on a separate metal rectangle: 1985: A. Fleming 1985: K.Cook 1986: W. Larsen 1986: J. DeKruif 1987: L. Stokes 1987: J. DeKruiff 1988: J. DeKruiff 1989: C. Shaw 1989: H. Curphy 1991: J. DeKruiff 1992: J. DeKruiff 1992: J. DeKruifterminus hotel wodonga, terminus hotel darts, sport and recreation wodonga, albury-wodonga district darts association -
 Wodonga & District Historical Society Inc
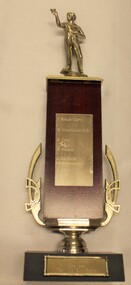
Award - Wodonga Darts Association Premiers 1985
The Terminus Hotel was one of the earliest hotels in Wodonga, with clear links to the establishment of the railway line. It was an important business and meeting place from the original construction in 1873 until 1st June 1998 the Terminus Hotel when it was destroyed by fire. It provided a popular venue for social activities, including competitive darts, both through its own competition and as part of the Albury-Wodonga District Darts Association. The remains of the building were demolished in 1999. This is perpetual trophy for the Terminus Dart club based at the Terminus Hotel in Wodonga. This trophy recognises the winners of the Albury-Wodonga Darts Association Premiers 1985.The Terminus Hotel was an important meeting place in Wodonga for more than 100 years. This item is representative of one of the social and sporting activities it provided for members of the local community.A trophy made from timber and metal with a representation of a darts player on the top.At base: "A.W.D.D.A 1985/ PREMIERS TERMINUS EASY BEATS Listed on front: I. BOSLEY (CAPT.) G. MULHOLLAND (V.C.) K. COOK R. HUDSON J. DE KRUIFF D. ROWE B. SAYERSterminus hotel wodonga, albury-wodonga district darts association, sport and recreation -
 Wodonga & District Historical Society Inc
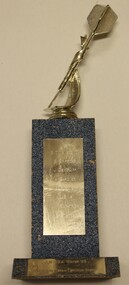
Award - Darts Trophy - A.W.D.D.A Winter '93 - A-Grade
The Terminus Hotel was one of the earliest hotels in Wodonga, with clear links to the establishment of the railway line. It was an important business and meeting place from the original construction in 1873 until 1st June 1998 the Terminus Hotel when it was destroyed by fire. It provided a popular venue for social activities, including competitive darts, both through its own competition and as part of the Albury-Wodonga District Darts Association. The remains of the building were demolished in 1999. This is a trophy for the Albury-Wodonga District Darts Association won by the team "Terminus Goers' in 1993.The Terminus Hotel was an important meeting place in Wodonga for more than 100 years. This item is representative of one of the social and sporting activities it provided for members of the local community.A trophy made from timber and metal with a representation of a dart on the top.On plaque lower front "A.W.D.D.A WINTER '93/A GRADE PREMIERS TERMINUS GOERS" In vertical list "B. TINGWELL (C) S. GRIFFITHS J. DE KRUIFF A. GARDNER R. GARDNER L. SIMS W. KILPATRICK B. SNEDDONterminus hotel, terminus hotel darts, sport and recreation wodonga -
 Wodonga & District Historical Society Inc
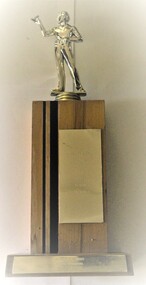
Award - Darts Trophy - A.W.D.D.A 1992 A Grade Premiers
The Terminus Hotel was one of the earliest hotels in Wodonga, with clear links to the establishment of the railway line. It was an important business and meeting place from the original construction in 1873 until 1st June 1998 the Terminus Hotel when it was destroyed by fire. It provided a popular venue for social activities, including competitive darts, both through its own competition and as part of the Albury-Wodonga District Darts Association. The remains of the building were demolished in 1999. The Terminus Hotel was an important meeting place in Wodonga for more than 100 years. This item is representative of one of the social and sporting activities it provided for members of the local community.A wood and metal trophy with a figurine of a darts player mounted on the top and a metal panel engraved with players' names.At base of trophy: "A.W.D.D.A 1992 / A GRADE PREMIERS / TERMINUS ALBURY" On front of trophy, top to bottom " J. DEKRUIFF (C) B. TINGWELL S. HONG L. SIMS S. GRIFFITHS A. GARDNER R. GARDNER'terminus hotel wodonga, terminus hotel darts, sport and recreation wodonga -
 Wodonga & District Historical Society Inc
Award - Darts Trophy - Terminus Dart Club Doubles Championship, 1985
The Terminus Hotel was one of the earliest hotels in Wodonga, with clear links to the establishment of the railway line. It was an important business and meeting place from the original construction in 1873 until 1st June 1998 the Terminus Hotel when it was destroyed by fire. It provided a popular venue for social activities, including competitive darts, both through its own competition and as part of the Albury-Wodonga District Darts Association. The remains of the building were demolished in 1999. This is a perpetual trophy for the Terminus Dart Club Doubles Championship from 1985 to 1992.The Terminus Hotel was an important meeting place in Wodonga for more than 100 years. This item is representative of one of the social and sporting activities it provided for members of the local community.A wood and metal engraved trophy with stylised dart mounted on the side.At base: " TERMINUS DART CLUB/ DOUBLES CHAMPIONSHIP" On vertical list - top to bottom 1985 J. DEKRUIFF/ H. DEKRUIFF 1985 R. HUDSON/ A. FLEMING 1986 K. COOK/ H.M. COOK 1986 TONY LOWE / K.A.COOK 1987 J. DEKRUIFF/ A. FLEMING 1987 L. STOKES / K. MERRILESS 1988 J. DEKRUIFF/ T. LOWE 1989 ROB BENNETT/ B. STEWART 1989 L. BRUCE/B. STEWART 1991 J. DEKRUIFF/ P. HOLLINGSWORTH 1992 B. TINGWELL/ S. GRIFFITHS 1992 B. TINGWELL / C. BLUNDEN terminus hotel darts, terminus hotel wodonga, sport and recreation -
 Wodonga & District Historical Society Inc
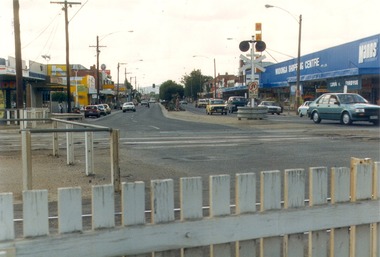
Photograph - Codling Collection 01 - High Street Wodonga looking north from the railway crossing, 1987
Miss Olive Codling was a Foundation Member and a Life Member of the Wodonga Historical Society. Many of her prize-winning photos are held in the Society Collection. She also held a range of roles and committee positions in a wide range of Wodonga community organisations. These included the Horticultural Society, the Wodonga Arts Council, the Wodonga Camera Club and the Wodonga Lapidary Club. This photo collection is significant as it documents how the businesses and buildings in Wodonga have evolved and contributed to community throughout the 20th century.High Street Wodonga looking north from the railway crossing. Railway crossing lights and fence in the foreground. Businesses include Wodonga Shopping Centre Pty Ltd, Lunn & Fordyce and Manns on the right. The Terminus hotel can be seen on the left. This photo was taken for Heritage Week 1987.wodonga businesses, high st wodonga, railway crossing, manns, lunn & fordyce -
 Wodonga & District Historical Society Inc
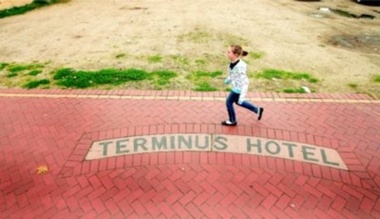
Photograph - Terminus Hotel footpath inlay
During the depression of the early 1930s, men on the dole carried out work for the Wodonga Shire Council. One of the projects during the term of councillor Mick Martin, as shire president, was to seal the footpaths in central Wodonga. Local business people supplied the cement. The police department refused to fund the cement for its section of High Street, north of the railway line, which included the police station and the courthouse. The then licensee of the Terminus Hotel offered to provide the cement for sealing the footpath in front of the police station and courthouse. This offer was made on the condition that tiles bearing the words Terminus Hotel be inserted into the footpath pointing toward the hotel.The police objected but the hotel licensee, Tex Bailey, won the day. As a result, his hotel’s tiled name was inserted into the footpath in front of the police station. Cr Mick Martin’s son, Des, wrote to the council in 1967 asking that the sign be preserved and it was moved to the Terminus Hotel and placed in the footpath there.The Terminus Hotel was one of the earliest hotels in Wodonga with clear links to the establishment of the railway line. It was an important business and meeting place for social gatherings.The name, Terminus Hotel worked into the brickwork of the footpath when they were surfaced by sustenance workers during the 1930s Depression. "TERMINUS HOTEL"hotels wodonga, businesses wodonga, terminus hotel wodonga -
 Wodonga & District Historical Society Inc
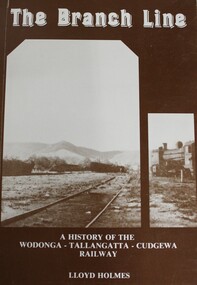
Book - The Branch Line : A history of the Wodonga - Tallangatta - Cudgewa Railway, Lloyd Holmes, 1985
This railway story concerns just one of the many branch lines that snaked across the landscape of Victoria. This book concentrates on the Wodonga - Tallangatta - Cudgewa line, a railway that took 32 years to complete from starting point to eventual terminus. The first section of the Wodonga to Tallangatta line opened in 1889 and was further extended in 1891. It was a vital community link until the passenger service closed in September 1961. The last regular goods train on the line ran on 21st April 1978. The north- east train line to Wodonga remained a significant factor in the development of Wodonga as a rural city in the 20th century.non-fictionThis railway story concerns just one of the many branch lines that snaked across the landscape of Victoria. This book concentrates on the Wodonga - Tallangatta - Cudgewa line, a railway that took 32 years to complete from starting point to eventual terminus. The first section of the Wodonga to Tallangatta line opened in 1889 and was further extended in 1891. It was a vital community link until the passenger service closed in September 1961. The last regular goods train on the line ran on 21st April 1978. The north- east train line to Wodonga remained a significant factor in the development of Wodonga as a rural city in the 20th century.railroads -- victoria, northeastern victoria, tallangatta, wodonga railways, cudgewa railroad -
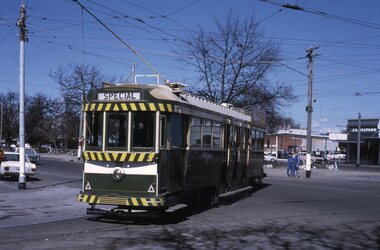 Ballarat Tramway Museum
Slide - Set of 6, Warren Doubleday, Ballarat - last day of the Lydiard St Nth to Sebastopol line, 19/9/1971
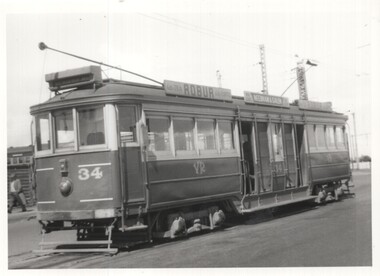
Photos taken on the last day of the SECV operated tram services in Ballarat 19/9/1971 1 - Tram 39 running out as Special at corner of Sturt and Drummond St North. Has the Mobil Service station and J A Malpass shop in the background. 2 - Tram 40 waiting at the railway gates. Has the Kennedy Murray Pty Ltd General Carrier office in the background and the railway goods shed. Photo taken from the signal box. 3 - Tram 42 in Lydiard St North with Reids Coffee Palace and the Provincial Hotel in the background. The street is very quiet. 4 - Tram 39 at the Lydiard St North terminus. 5 - Tram 40 at the Lydiard St North terminus. Note the shelter and the tram stop pole. 6 - Tram 40 using the Dawson St Crossover with St Patricks Cathedral behind.Yields information about the last day of SEC public operations in Ballarat.Set of 6 Kodachrome colour slides - cardboard mounts. Sixth one in a green card mount.Have the photographer's slide numbers written on them.trams, tramways, closure, tram 35, tram 34, tram 42, tram 40, lydiard st north, level crossing, dawson st -
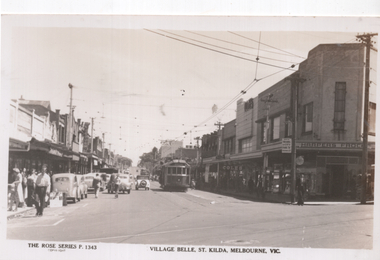 Melbourne Tram Museum
Postcard, Rose Stereograph Co, "Village Belle, St Kilda, Melbourne Vic", early 1950s
Rose Series postcard No. P 1343, titled "Village Belle, St Kilda, Melbourne Vic" showing W2 568 (Moreland Route 15) at the St Kilda Beach terminus in Ackland St. Another W2 is further behind. A uniformed tramway employee is walking across the road, underneath a MMTB sign advising of Trams to the City and a Fare of 5d and child fares of 2d. In the background is the Coles store and Harpers Frocks. In the foreground are tram tracks for the Victorian Railways St. Kilda to Brighton Beach line in Buckly Street.Yields information about Ackland St, St Kilda early 1950s.Postcard - printed real photograph with Rose Stereograph Co. name on the rear.trams, tramways, village belle, ackland st, route 15, st kilda, w2 class, tram 568 -
 Melbourne Tram Museum
Drawing, Melbourne & Metropolitan Tramways Board (MMTB), "Melbourne & Metropolitan Tramways Board Electric Tramway System 1979", 1979
Drawing of the track plan for the Melbourne Tramway System in 1979 over two separate sheets - titled "Melbourne & Metropolitan Tramways Board Electric Tramway System 1979". Shows the route numbers and terminus names, depot locations, rail lines, cross overs and junctions. Has the name J.Chau in bottom left hand corner. Yields information about the the Melbourne tram system in 1979Drawing - print on paper P15060. Two copies held.trams, tramways, map, mmtb, trackwork, depots, route numbers, railways, junction -
 Kew Historical Society Inc
Plan, Kew! Kew!, 1888
The Land Boom of the 1880s accelerated the rate of subdivisions in Kew. This subdivision, 'Kew! Kew!' was also impacted by, or resulted from, the decision by the Victorian Government to construct the Outer Circle railway. Construction of the railway began in 1888 and was completed in 1891. Plan of an 1888 subdivision bounded by Bulleen Road (now High Street), Gladstone Street (now Campbell Street?), Park Street (now Adeney Avenue), and Belmore Road (now Harp Road). The 16 lots in the proposed subdivision are bisected by the route of the Outer Circle railway, and next to the proposed Normanby Station (later renamed East Kew). On the plan, local landmarks such as the tram terminus, the Harp of Erin hotel, and the station are located. The street where the lots are numbered , was called Welsh Street on the plan as this was the name of the vendor. Surrounding land owners are also named: G. Smith Esq, Matthew Maher Esq, and Maurice Neligan Esq.outer circle railway, land subdivisions -
 Melbourne Tram Museum
Drawing, Melbourne & Metropolitan Tramways Board (MMTB), "Melbourne & Metropolitan Tramways Board Electric Tramway System 1979", 1979
Photocopy of the track plan for the Melbourne Tramway System in 1979 over two separate sheets - titled "Melbourne & Metropolitan Tramways original pr Board Electric Tramway System 1979". Shows the route numbers and terminus names, depot locations, rail lines, cross overs and junctions. Has the name J.Chau in bottom left hand corner. See item 7740 for an original print.trams, tramways, melbourne, map, trackwork, depots, route numbers, railways, junction -
 Ballarat Tramway Museum
Album - Postcards & Photographs - Vic Solomons and others - Australian Tramways, Vic Solomons, 2023
Contains 184 images of postcards and photographs collected primarily by Vic Solomons of Sydney, with others from the collection of Wal Jack and Warren Doubleday. Covers almost all of Australia's tramway systems. 1 Post Card Hay St Perth Looking East No 3 Unknown Perth 2 Post Card Cars 30 & 90 both on Route 19 pass in Barrack St looking South Perth WA 1935.02.18 Perth 3 Post Card Hay St Looking East Perth WA Unknown Perth 4 Post Card William St Perth WA Unknown Perth 5 Post Card Perth from Shaftsbury Hotel Unknown Perth 6 Post Card Hay St Perth WA Looking East Unknown Perth 7 Post Card Barrack St Perth Unknown Perth 8 Post Card Murray Views No 3 High St Showing Town Hall Fremantle WA Unknown Fremantle 9 Post Card High St Fremantle WA Unknown Fremantle 10 Post Card View of Bolder City Golden Mile in the Background (Section No 1) 1908.08.20 Kalgoolie 11 Post Card Hannan St Kalgoolie 1900.08.19 Kalgoolie 12 Post Card Hannan St Kalgoolie WA (No 2) Unknown Kalgoolie 13 Post Card Intersection Hannan & Maritana Sts Kalgoolie WA Unknown Kalgoolie 14 Post Card Hannan St Kalgoolie Unknown Kalgoolie 15 Post Card Lane Street Bolder City Unknown Kalgoolie 16 Post Card Hobart Double Deck Tram Unknown Hobart 17 Post Card Macquarie St Hobart Unknown Hobart 18 Photo Liverpool Street Hobart Unknown Hobart 19 Photo Hobart 21 Unknown Hobart 20 Photo Hobart 14 in Elizabeth St Hobart Unknown Hobart 21 Post Card Macquarie St Hobart Unknown Hobart 22 Post Card Macquarie St Hobart Tas Unknown Hobart 23 Photo Double Decker Tram 3 at G.P.O. Hobart Tas No 31 Unknown Hobart 24 Post Card Double Decker Tram 19 Hobart Tas A B Series No 24 Unknown Hobart 25 Photo Hobart Municipal Tramways Tas No 95 Unknown Hobart 26 Post Card Elizabeth St Hobart Unknown Hobart 27 Post Card Elizabeth St Hobart Unknown Hobart 28 Post Card Elizabeth St Hobart Unknown Hobart 29 Post Card Elizabeth St Hobart Tas Unknown Hobart 30 Post Card HMT 21 with crew at Beach Road Terminus Unknown Hobart 31 Post Card HMT 9 & another with crew at Beach Road Terminus. Front cover photo of Destination GPO 1921.01.00 Hobart 32 Post Card Cascade Road and Mount Wellington Hobart Unknown Hobart 33 Post Card Elizabeth St Hobart Unknown Hobart 34 Post Card Elizabeth St Hobart Unknown Hobart 35 Post Card Elizabeth St Hobart 1915.04.07 Hobart 36 Post Card Macquarie St Hobart Tas Unknown Hobart 37 Post Card Macquarie St showing Post Office Hobart 1908.03.12 Hobart 38 Post Card Hobart Municipal Tramways 21 Unknown Hobart 39 Post Card Elizabeth St Hobart Tas Unknown Hobart 40 Post Card Liverpool Street Hobart Unknown Hobart 41 Post Card Electric Tram Launceston Tas 446 W J Little Photo 1919.02.08 Launbceston 42 Post Card Launceston Tram no 3 1911.08.30 Launbceston 43 Post Card Launceston Tram no 3 passes tram No 1 Unknown Launbceston 44 Post Card Tram 6 at Trevallyn a popular suburb Launceston Tasmania Unknown Launbceston 45 Post Card Tram 7 at Trevallyn Road Terminus Launceston Tasmania Unknown Launbceston 46 Post Card Tram 4 in Brisbane St Launceston Unknown Launbceston 47 Post Card Tram 9 in Brisbane St Launceston Tasmania Unknown Launbceston 48 Post Card Camerom Street Launceston Tasmania Unknown Launbceston 49 Post Card Murray Views No 15 Jetty Road Glenelg Terminus 1962-02-08 Adelaide 50 Post Card Bay Tram at Jetty Road Terminus Glenelg SA Unknown Adelaide 51 Post Card Tram 3 in King William Street Adelaide S Aust Unknown Adelaide 52 Post Card Valentine Series No 3065 The Old Horse Tram Victor Harbour Unknown Victor Harbour 53 Post Card Bourke Street Melbourne with Cable Car Looking East 1904.04.25 Melbourne 54 Post Card Opening of New Electric Tramway Elsternwick 1913-11-13 Melbourne 55 Post Card Cable trams in Clarendon St Sth Melb Unknown Melbourne 56 Post Card Pall Mall from Charing Cross Bendigo Unknown Bendigo 57 Post Card Tram 4 & 7 pass at The Fountain and Mitchell Street Bendigo Vic Rose Series P 3198 Unknown Bendigo 58 Post Card M&MTB 133 at Charing Cross bound for Eaglehawk Bendigo Vic Murray Views No 45 Unknown Bendigo 59 Post Card Pall Mall Bendigo Vic Unknown Bendigo 60 Post Card Charing Cross & Mitchell St Bendigo Trams passing 1919.00.00 Bendigo 61 Post Card Pall Mall Looking East Unknown Bendigo 62 Post Card Electric Trams and City Hotel Bendigo Vic Unknown Bendigo 63 Post Card Moorabool Street Geelong V 23 Unknown Geelong 64 Post Card Murray Views No 3 Moorabool Street Geelong Vic Unknown Geelong 65 Post Card The Rose Series P 2487 Ryrie Street Geelong Vic Unknown Geelong 66 Post Card Southern Cross Series 2696 Ryrie Stret Geelong Vic Unknown Geelong 67 Post Card The Rose Series P 1490 Ryrie Street Geelong Vic 1920-03-04 Geelong 68 Post Card Valentine Series No 1568 Lower Sturt Street Ballarat Unknown Ballarat 69 Post Card Rose Series P 1710 Sturt Street Ballarat Victoria Unknown Ballarat 70 Post Card Sturt Street Ballarat Victoria Unknown Ballarat 71 Post Card Horse Tram In Sturt Street Ballarat 1905.11.10 Ballarat 72 Post Card Sturt Street Ballarat Looking North-West Unknown Ballarat 73 Post Card Shoppes Square Sturt Street Ballarat Looking North Unknown Ballarat 74 Post Card Junction Sturt and Lydiard Streets Ballarat 1909-09-01 Ballarat 75 Post Card The Electric Supply Co Souvenir Tram Ticket No 3085of the opening of Electric System August 18 1905 1905.08.18 Ballarat 76 Post Card Sturt Street Ballarat Victoria 1907.11.25 Ballarat 77 Post Card Off to the Gardens Electric Tram Ballarat Unknown Ballarat 78 Post Card Sturt Street Ballarat 1907.04.16 Ballarat 79 Post Card Sturt Street Ballarat Looking East Electric tram with Double Deck Trailer 1911.04.17 Ballarat 80 Post Card Sturt Street Ballarat Looking East Unknown Ballarat 81 Post Card Sturt Street Ballarat Looking West 1911.03.01 Ballarat 82 Post Card Town Hall and Sturt Street Ballarat Unknown Ballarat 83 Post Card Lydiard Street Ballarat 1906.11.23 Ballarat 84 Post Card Looking North along Adelaide Street from George Street Brisbane Sidues Series No 764 Unknown Brisbane 85 Post Card Looking South along Queen Street from the Creek Street Intersection Brisbane Qld Sirues Series No 1379 Unknown Brisbane 86 Post Card George Street from near Supreme Court Brisbane Unknown Brisbane 87 Post Card Queen and Eagle Streets Brisbane 1907.07.04 Brisbane 88 Post Card Queen Street showing His Majesty’s Theatre Brisbane Unknown Brisbane 89 Post Card Queen Street Treasury Building 1908.01.20 Brisbane 90 Post Card G P O and Queen Street Brisbane Unknown Brisbane 91 Post Card Queen Street Brisbane Looking from Wharf Street Unknown Brisbane 92 Post Card Customs House Brisbane 1905.02.16 Brisbane 93 Post Card Queen St Brisbane 1905.09.16 Brisbane 94 Post Card Queen St Brisbane 1907.11.19 Brisbane 95 Post Card Treasury Buildings Brisbane Unknown Brisbane 96 Post Card Queen and Eagle Streets Brisbane Unknown Brisbane 97 Post Card The Valley Corner Brisbane Unknown Brisbane 98 Post Card Brisbane Queen Street opposite General Post Office Unknown Brisbane 99 Post Card North Quay and Milton Beach Brisbane Q Unknown Brisbane 100 Post Card Victoria Bridge Brisbane South Side 1907.08.14 Brisbane 101 Post Card Victoria Bridge Brisbane Unknown Brisbane 102 Post Card Breakfast Creek Bridge Brisbane Q Unknown Brisbane 103 Post Card Melbourne Street Station South Brisbane Queensland Unknown Brisbane 104 Post Card General Post Office Queen Street Brisbane 1955.09.23 Brisbane 105 Post Card Customs House Brisbane 1904.11.04 Brisbane 106 Post Card Queen St Brisbane 1919.11.00 Brisbane 107 Post Card Queen St Brisbane Sidues Series No 627 Unknown Brisbane 108 Post Card Creek Street Brisbane Queensland Unknown Brisbane 109 Post Card Customs House and Garden Reach Brisbane Queensland 1910.00.08 Brisbane 110 Post Card Queen and Creek Streets Brisbane 1909.06.07 Brisbane 111 Post Card Queensland National Bank andd Queen Street Brisbane Queensland Unknown Brisbane 112 Post Card Queen Street and Treasury Buildings Brisbane 0000.09.07 Brisbane 113 Post Card Queen Street showing “Courier” Buildings Brisbane Unknown Brisbane 114 Post Card Intersection George & Roma Streets Brisbane Q 1916.05.11 Brisbane 115 Post Card Adelaide Street Brisbane Q Unknown Brisbane 116 Post Card G P O Queen Street Brisbane Q Unknown Brisbane 117 Post Card Treasury Building Brisbane 1906.03-20 Brisbane 118 Post Card Queen and Eagle Streets Brisbane 1907.02.01 Brisbane 119 Post Card Queen St Brisbane Unknown Brisbane 120 Post Card Queen St Brisbane Q Unknown Brisbane 121 Post Card Victoria Bridge Brisbane 1906.07.30 Brisbane 122 Post Card An Unusual View showing Head of Queen Street Victoria Bridge & South SideSuburbs Brisbane Q Unknown Brisbane 123 Post Card Petries Bight Brisbane Q Unknown Brisbane 124 Post Card South End Victoria Bridge Brisbane Q Unknown Brisbane 125 Post Card Customs House Brisbane Unknown Brisbane 126 Post Card Photo of toastrack car circa 1910 Unknown Brisbane 127 Post Card Treasury Buildings Brisbane Unknown Brisbane 128 Post Card East Street Rockhampton with Steam Tram & trailer Unknown Rockhampton 129 Post Card Post Office Rockhampton with steam tram Unknown Rockhampton 130 Post Card East Street Rockhampton with Steam Trams Rose Series P 7154 Unknown Rockhampton 131 Post Card William Street Rockhampton Rose Series P 7156 Unknown Rockhampton 132 Post Card Central East Street Rockhampton Q with Steam Trams Unknown Rockhampton 133 Photo Sturt St Ballarat Unknown Ballarat 134 Photo Bridge Street Ballarat Unknown Ballarat 135 Post Card George St Sydney Unknown Sydney 136 Post Card Elizabeth St Sydney Unknown Sydney 137 Post Card Railway Square Unknown Sydney 138 Post Card Sydney Harbor Bridge - pending receipt 139 Post Card Kings Cross - Mowbray Series with description on rear from C Roy G Field Unknown Sydney 140 Post Card Kings Cross - Mowbray Series with description on rear from C Roy G Field Unknown Sydney 141 Post Card Central Railway Station Sydney - Rose Series P6033 1954-01-26 Sydney 142 Post card William Street Darlinghurst looking towards City - Rose Series P6602 unknown Sydney 143 Post Card Circular Quay Sydney - Rose Series P6680 Unknown Sydney 144 Post Card View at Manly NSW - Rose Series B1003 Unknown Sydney 145 Post Card Hunter St Newcastle NSW - Rose Series P7843 Unknown Newcastle 146 Post Card Bank Corner Newcastle NSW - Mowbray Series No. 155 Unknown Newcastle 147 Post Card Hunter St Newcastle NSW Unknown Newcastle 148 Post Card Criterion Hotel Hunter St Newcastle NSW Unknown Newcastle 149 Photo Horse tram at Newtown Station 1894 to 1898 - PTC photo c1894 Newtown 150 Photo Steam tram motor No 3 at Railway Square 1879 1879 Sydney 151 Photo Railway steam tram c1900 with a horse drawn double deck bus c1900 Sydney 152 Photo Steam motor 5A and doubled deck bus Unknown Sydney 153 Photo Steam motor 53A with detail notes on rear 1922 Sydney 154 Photo Cable tram set at Milsons Point ferry terminal c1900 Sydney 155 Photo Early Sydney electric car - Ocean St - Rose Bay Unknown Sydney 156 Photo George St looking souoth c1905 c1905 Sydney 157 Photo Tram 165 at Circular Quay Unknown Sydney 158 Photo Tramcar ferry or transporter at The Spit Unknown Sydney 159 Photo tram 882 George St at Marti Place, 1937 1937 Sydney 160 Photo Tram 826 Railway Sq area Unknown Sydney 161 Photo Railway Sq in background, Broadway with double decker bus and toastrack car late 1930s Sydney 162 Photo Coupled St Pitt St? - photo Ben Parle Feb. 1950 Sydney 163 Photo Electric tram No. 2 - North Sydney with side trolley pole running Unknown Sydney 164 Photo George St - Horden's Corner Unknown Sydney 165 Photo George St at Martin Place c1920 Sydney 166 Photo Castlereagh St Sydney c1928 c1928 Sydney 167 Photo Railway Sqare c1920 c1920 Sydney 168 Photo Darling St Countereweight Unknown Sydney 169 Photo Trolley bus depot Unknown Sydney 170 Photo Trolley bus No. 14 Unknown Sydney 171 Photo Newcastle Railway Station with steam tram - Wharf Road?? Unknown Newcastle 172 Photo High St West Maitland - steam tram Unknown Maitland 173 Photo High St West Maitland - steam tram Unknown Maitland 174 Post Card Argent St near tram terminal Broken Hill NSW c1900 Broken Hill 175 postcard Argent St looking south Broken Hill - with Ken Magor's notes on rear Unknown Broken Hill 176 Photo Toronto - steam tram 61A Unknown Toronto 177 Photo 124A trial run 1911? Sutherland - Cronulla line 1911 Sutherland 178 Photo 103A at a tram stop Unknown Sydney 179 Photo Cable tram set at Crows Nest terminus grip car 12, trailer 22 Unknown Sydney 180 Photo Cable tram Queens Square Sydney 1903 Sydney 181 Photo cars 2078 and 2077 Chatswood late 1950s Sydney 182 Photo car 1877 Balmain area late 1950s Sydney 183 Photo Trolley bus - Rockdale destination Late 1950s Sydney 184 Photo Broken Hill steam tram - motor 18A North Tram Unknown Broken Hill 185 Photo Millars Point Sydney NSW - ferry/tram interchange, unknown Sydney All items imaged including the rear or back where there was writing of information. All files stored on the Museum's Photo Collections directory. Demonstrates through the medium of many images, Australian tramway systems and Ballarat's place in them.Album - heavy card covers, plastic lined with postcard or 6x4 photo sleeves.australia, tramways, postcards, photographs, steam trams, horse trams, cable trams, trolley buses -
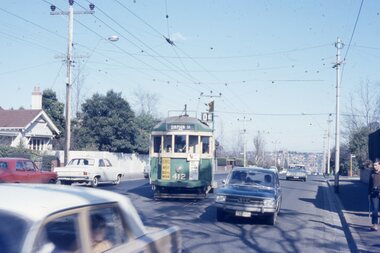 Melbourne Tram Museum
Photograph - Four color slides - tram W2 412 and tour ticket, 9-8-1970
Set of four colour slides taken during the Monash Railway club tour on 9-8-1970 using W2 412. The route number and destinations are for show only. Photography by Warren Doubleday. Ticket - No. 0004, printed on yellow card detailing the event. Date stamped on the rear using and Edmondson ticket dater.Yields information on Monash Railway club tour, the trams used, the ticket and the locations.Set of four Anscochrome colour slides, of Melbourne tram W2 412 on a Monash Railway Club tour - 9-8-1970 .1 - Shuntiing at Leura Grove Crossover in Burke Road .2 - Shunting at the crossover in Riversdale Road, near Glenferrie Road .3 - at the Burwood terminus .4 - Outside 412 Toorak Road. Since changed to 1412 Toorak Road .5 - Edmondson style ticket for the tourHas photographers slide numbers on each slide.monash railway club, w2 class, tram 412, toorak road, burwood, burke road, riversdale road, trams, tramways, tickets, edmondson tickets -
 Melbourne Tram Museum
Photograph - VR Tram 34 at Brighton Beach terminus, Bob Lilburn, 1965 & 1970
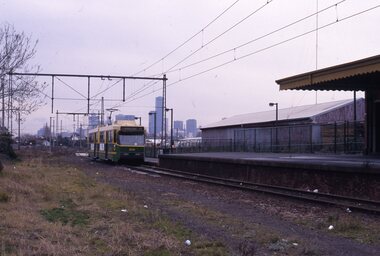
... Photo shows Victorian Railways tram No. 34 at the Brighton Beach ...Photo shows Victorian Railways tram No. 34 at the Brighton Beach terminus, late 1950s. On the left-hand side, a suburban train can be seen at the adjacent Brighton Beach railway station.Yields information about VR tram 34 and the Brighton Beach terminus.Photograph - black and white - VR Tram 34 at Brighton terminusOn rear in ink - '"VR No. 34 at Brighton Beach terminus - late 1950's R. Lilburn Photo"tramways, melbourne, victorian railways, tram 34, brighton beach, vr trams -
 Melbourne Tram Museum
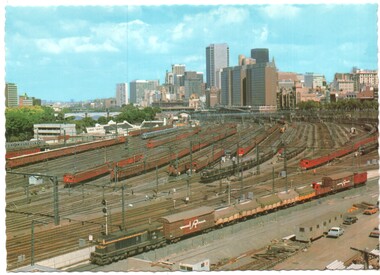
Postcard - Flinders St Rail Yard and city, Biscay Greetings, mid 1970s
Shows an aerial view looking west over the Flinders St railway yards and the city skyline. Photo shows the Swimming centre in Batman Ave, the Victorian Railways Metrol signal control building and the large yard with Tait, Harris and a silver train. On the left is the overhead wiring train A goods train lead by a flat top T class is passing in the lower part of the photo. In the 1980s the yards were redeveloped to provide the Tennis Centre, partly roofed at the western end and a new bridge over the yard at Exhibition St that replaced the tram track in Batman Ave and the Princes Bridge terminus.Yields information about the Flinders Railway Yard prior to redevelopment.Postcard - Flinders St Rail Yard and city - Serrated edges - Divided back BG83railways, victorian railways, railway yard, flinders st, suburban trains, melbourne -
 Melbourne Tram Museum
Photograph - Spencer St Station and W2 536, c1962
Photo shows the new Spencer St station which was completed around 1962 with tram W2 430 (Spencer St, Route 48), fitted with large trolley bridges, northbound to the terminus at Latrobe St. Eight taxis are lined up at the taxi stand, mostly Holdens with at least one Ford.Yields information about the Spencer Station building when new and the taxis serving the station.Colour print - satin finish print - Spencer St Station and W2 536 c1962railways, victorian railways, spencer st, spencer st station, taxis, w2 class, tram 536 -
 Melbourne Tram Museum
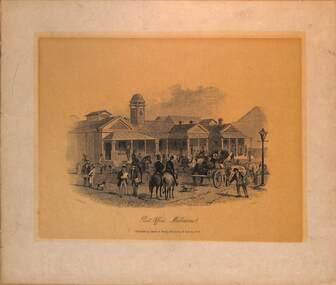
Drawing - early Melbourne CBD scenes, Sands & Kenny Melbourne & Sydney, 1856
... and city terminus of M&HB Railway Melbourne (Melbourne and Hobsons... terminus of M&HB Railway Melbourne (Melbourne and Hobsons Bay ...Set of three prints of Melbourne street scenes published by Sands & Kenny in 1856 1 - Post Office 2 - Princes Bridge and city terminus of M&HB Railway Melbourne (Melbourne and Hobsons Bay Railway) 3 - Collins Street looking east from Wesleyan Chapel Melbourne (near Queens St) Shows typical horse-drawn transport, railway and pedestrians of the era.Yields infomaition about Melbourne in 1856.Set of three prints or lithographs of drawings of early Melbourne scenes on paper.melbourne, horses, horse drawn vehicles, collins st, post office, princes bridge, railways, m&hbr -
 Melbourne Tram Museum
slide - Colour - Melbourne Trams, David Verrier, August 1989
1 - B2 2014 arriving Port Melbourne - showing Exhibition Route 111 - the tram stop is on the north side of the former railway platform at this time. 2- headon photo - shows the undeveloped nature of the background. 3 - W6 996 Spencer St with A2 288 behind - both trams running route 48 - note the Outward Parcels Office building and the VR Head Office. 4 - A2 288 and Z16 - as above 5 - Z16 as above - Route 75, showing East Burwood 6 - Z57 at La Trobe University terminus, route 87 7 - Z3 113 and Z1 9, both running route 86 - Bundoora - in High St 8 - Z3 186 at Bundoora terminus, with many people at the bus stop interchange.Yields information about Melbourne tram operations in Sept 1999Set of eight white / grey plastic slides, marked "CS System" and date stamped 08/89tramways, z3 class, b2 class, port melbourne, route 109, tram 2013, route 111, spencer st, tram 288, tram 996, route 48, w6 class, a2 class, z class, tram 16, route 75, tram 113, tram 9, bundoora, high st, la trobe university, tram 186 -
 Melbourne Tram Museum
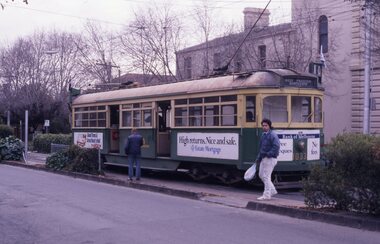
slide - Colour - Melbourne Trams, David Verrier, August 1989
1 - W7 1033, South Melbourne / St Kilda terminus in Park St. showing route 10. Has Bank of Melbourne and Estate Mortgage adverts. 2 - B2 2012 (route 96) , Fitzroy Street, St Kilda 3 - SW6 858 (route 16), Fitzroy St St Kilda. Has Bank of Melbourne adverts. 4 - Elizabeth St terminus from Flinders Lane, looking south. 5 - Z3 156 (route 19), arriving Elizabeth St terminus at Flinders St 6 - Z3 176 crossing Park St, Parkville, West Coburg, route 68. 7 - Z3 217 near zoo, about to pass under the railway over bridge - route 68 8 - Z3 129, ditto inbound. Yields information about Melbourne tram operations in Sept 1999Set of eight white / grey plastic slides, marked "CS System" and date stamped 08/89tramways, z3 class, b2 class, park st, south melbourne beach, route 10, w7 class, tram 1033, tram 2012, fitzroy st, tram 858, route 16, route 96, elizabeth street, flinders st, tram 156, route 19, tram 176, parkville, route 68, tram 217, tram 129