Showing 372 items
matching water glass
-
 Flagstaff Hill Maritime Museum and Village
Domestic object - Plate, Alfred Meakin
The Process of Making Pottery Decorating, Firing, Glazing, Making, Technical There is a rhythm and flow to clay. It can’t be done all at once! Even the making process! It can take weeks to get everything done, especially if you can only work on your pottery once a week! Even though we have three hour classes, it’s often just not enough time! Here is an overview of some of the processes so you have a bit more grasp on some of the technical stuff! Step One – Design There are SO many ideas out there for making stuff in clay! From delicate porcelain jewellery, through to heavy sculptural work and everything in between. Deciding your direction is sometimes not that easy – when you first start, try everything, you will naturally gravitate to the style that you enjoy! The options and variations are endless and can get a wee bit overwhelming too! Check in with me before you start to ensure your ideas will work, what order you might do things, how you could achieve the look you are seeking and any other technical data required! Step Two – Making Clay is thixotropic. This means that as you work with it, the clay first gets sloppier and wetter, before is begins to dry in the atmosphere. For most things, you simply can’t do all parts of the project at once. An example of work order might look like: Get last weeks work out from the shelves Prepare clay for today’s work – roll your clay, prepare balls for throwing, make the first stage of a pinch pot) Clean up last week’s work and put it on the shelf for bisque firing Check that you have any glazing to do – and do enough of it that you will have time to finish your main project Do the next step of your next project – there might be a further step that can’t be complete immediately, in that case, wrap your work well and put onto the shelves. Letting your work rest for a while can really help keep your work clean and professional looking. Many things require bagging under plastic to keep it ready for work the next week – put your name on the outside of the bag so you can find your work easily. We have stickers and markers. Consider how you want to decorate your work – coloured slip can be applied at a fairly wet stage (remembering that it will make your work even wetter!). Trying to apply slip to dry clay won’t work! If you want to do sgraffito – you will need to keep the work leather hard (a state of dryness where you can still work the clay with a little effort and a little water and care). Step Three – Drying Most of the time your work can go into the rack uncovered to let it dry out for the following week. If you want to continue forming or shaping you will need to double bag your work – put your work on a suitable sized bat and put the bat in a bag so the base of the bag is under the bat, then put another bag over the top of the work and tuck the top of the bag under the bat. If you want to trim (or turn) your thrown work the following week, it should also be double bagged. If your work is large, delicate, or of uneven thicknesses, you should lightly cover your work for drying. When considering the drying process, bare in mind the weather, humidity and wind! The hotter and dryer, the faster things dry and work can dry unevenly in the shelves – this can lead to cracking – another time to lightly cover your work for drying. Step Four – Trimming and Cleaning Up Your work is dry! It is called greenware now and it is at it’s most fragile! Handle everything with two hands. I often refer to soft hands – keep everything gentle and with your fingers spread as much as possible. Try to not pick up things like plates too much, and always with both hands! Before your work can be bisque fired it should be “cleaned up”. You work won’t go into the kiln if it has sharp edges – when glazed, sharp edges turn into razor blades! Use a piece of fly wire to rub the work all over – this will scratch a little so be light handed. Use a knife or metal kidney to scrape any areas that require a bit more dynamic treatment than the fly wire offers! Finally, a very light wipe over with a slightly damp sponge can help soften and soothe all of your edges and dags! Trimming thrown work: If you are planning to trim (or turn) your thrown work (and you should be), make sure you bag it well – your work should be leather hard to almost dry for easiest trimming. Use this step to finish the work completely – use a metal kidney to polish the surface, or a slightly damp sponge to give a freshly thrown look. Wipe the sponge around the rim after trimming, and check the inside of the pot for dags! Trimming slip cast work: Usually I will trim the rims of your work on the wheel the following day to make that stage easier, however you will still need to check your work for lumps and bumps. Last but not least – check that your name is still clearly on the bottom of your work. Step Five – Bisque Firing When the work is completely dry it can go into the bisque kiln. The bisque kiln is fired to 1000°C. This process burns off the water in the clay as well as some of the chemically bound water. The structure of the clay is not altered that much at this temperature. Inside the bisque kiln, the work is stacked a little, small bowl inside a larger bowl and onto a heavy plate. Smaller items like decorations or drink coasters might get stacked several high. Consideration is paid to the weight of the stack and shape of the work. A bisque kiln can fire about one and a half times the amount of work that the glaze kiln can fire. The firing takes about 10 hours to complete the cycle and about two days to cool down. Once it has been emptied the work is placed in the glaze room ready for you to decorate! Step Six – Glazing Decorating your work with colour can be a lot of fun – and time consuming! There are three main options for surface treatment at this stage: Oxide Washes Underglazes Glazes Washes and underglazes do not “glaze” the work – It will still need a layer of glaze to fully seal the clay (washes don’t need glaze on surfaces not designed for food or liquid as they can gloss up a little on their own). Underglazes are stable colourants that turn out pretty much how they look in the jar. They can be mixed with each other to form other colours and can be used like water colours to paint onto your work. Mostly they should have a clear glaze on top to seal them. Oxides are a different species – the pink oxide (cobalt) wash turns out bright blue for instance. They don’t always need a glaze on top, and some glazes can change the colour of the wash! The glazes need no other “glaze” on top! Be careful of unknown glaze interactions – you can put any combination of glaze in a bowl or on a plate, but only a single glaze on the outside of any vertical surface! Glazes are a chemical reaction under heat. We don’t know the exact chemicals in the Mayco glazes we use. I can guess by the way they interact with each other, however, on the whole, you need to test every idea you have, and not run the test on a vertical surface! Simply put, glaze is a layer of glass like substance that bonds with the clay underneath. Clay is made of silica, alumina and water. Glaze is made of mostly silica. Silica has a melting point of 1700°C and we fire to 1240°C. The silica requires a “flux” to help it melt at the lower temperature. Fluxes can be all sorts of chemicals – a common one is calcium – calcium has a melting point of 2500°C, however, together they both melt at a much lower temperature! Colourants are metal oxides like cobalt (blue), chrome (green through black), copper (green, blue, even red!), manganese (black, purple and pink) iron (red brown), etc. Different chemicals in the glaze can have dramatic effects. for example, barium carbonate (which we don’t use) turns manganese bright pink! Other elements can turn manganese dioxide brown, blue, purple and reddish brown. Manganese dioxide is a flux in and of itself as well. So, glazes that get their black and purple colours, often interact with other glazes and RUN! Our mirror black is a good example – it mixes really well with many glazes because it fluxes them – causes them to melt faster. It will also bring out many beautiful colours in the glazes because it’s black colouring most definitely comes from manganese dioxide! Glaze chemistry is a whole subject on it’s own! We use commercial Mayco glazes on purpose – for their huge range of colour possibilities, stability, cool interactions, artistic freedom with the ability to easily brush the glazes on and ease of use. We currently have almost 50 glazes on hand! A major project is to test the interactions of all glazes with each other. That is 2,500 test tiles!!!! I’m going to make the wall behind the wheels the feature wall of pretty colours! Step Seven – Glaze (Gloss or sometimes called “Glost”) Firing Most of the time this is the final stage of making your creation (but not always!) The glaze kiln goes to 1240°C. This is called cone 6, or midrange. It is the low end of stoneware temperatures. Stoneware clays and glazes are typically fired at cone 8 – 10, that is 1260 – 1290°C. The energy requirement to go from 1240°C to 1280°C is almost a 30% more! Our clay is formulated to vitrify (mature, turn “glass-like”) at 1240°, as are our glazes. A glaze kiln take around 12 hours to reach temperature and two to three days to cool down. Sometimes a third firing process is required – this is for decoration that is added to work after the glaze firing. For example – adding precious metals and lustres. this firing temperature is usually around 600 – 800°C depending upon the techniques being used. There are many students interested in gold and silver trims – we will be doing this third type of firing soon! After firing your work will be in the student finished work shelves. Remember to pay for it before you head out the door! There is a small extra charge for using porcelain clay (it’s more than twice the price of regular clay), and for any third firing process! Once your work has been fired it can not turn back into clay for millennia – so don’t fire it if you don’t like it! Put it in the bucket for recycling. https://firebirdstudios.com.au/the-process-of-making-pottery/Ceramics have evolved over thousands of years.Earthenware dessert plate, cream colour. Made by Alfred Meakin, England. Backstamped ‘Alfred Meakin England’. flagstaff hill, warrnambool, shipwrecked-coast, flagstaff-hill, flagstaff-hill-maritime-museum, maritime-museum, shipwreck-coast, flagstaff-hill-maritime-village, alfred meakin, ceramics, earthenware, kitchenware -
 Flagstaff Hill Maritime Museum and Village
Domestic object - Jug
The Process of Making Pottery Decorating, Firing, Glazing, Making, Technical There is a rhythm and flow to clay. It can’t be done all at once! Even the making process! It can take weeks to get everything done, especially if you can only work on your pottery once a week! Even though we have three hour classes, it’s often just not enough time! Here is an overview of some of the processes so you have a bit more grasp on some of the technical stuff! Step One – Design There are SO many ideas out there for making stuff in clay! From delicate porcelain jewellery, through to heavy sculptural work and everything in between. Deciding your direction is sometimes not that easy – when you first start, try everything, you will naturally gravitate to the style that you enjoy! The options and variations are endless and can get a wee bit overwhelming too! Check in with me before you start to ensure your ideas will work, what order you might do things, how you could achieve the look you are seeking and any other technical data required! Step Two – Making Clay is thixotropic. This means that as you work with it, the clay first gets sloppier and wetter, before is begins to dry in the atmosphere. For most things, you simply can’t do all parts of the project at once. An example of work order might look like: Get last weeks work out from the shelves Prepare clay for today’s work – roll your clay, prepare balls for throwing, make the first stage of a pinch pot) Clean up last week’s work and put it on the shelf for bisque firing Check that you have any glazing to do – and do enough of it that you will have time to finish your main project Do the next step of your next project – there might be a further step that can’t be complete immediately, in that case, wrap your work well and put onto the shelves. Letting your work rest for a while can really help keep your work clean and professional looking. Many things require bagging under plastic to keep it ready for work the next week – put your name on the outside of the bag so you can find your work easily. We have stickers and markers. Consider how you want to decorate your work – coloured slip can be applied at a fairly wet stage (remembering that it will make your work even wetter!). Trying to apply slip to dry clay won’t work! If you want to do sgraffito – you will need to keep the work leather hard (a state of dryness where you can still work the clay with a little effort and a little water and care). Step Three – Drying Most of the time your work can go into the rack uncovered to let it dry out for the following week. If you want to continue forming or shaping you will need to double bag your work – put your work on a suitable sized bat and put the bat in a bag so the base of the bag is under the bat, then put another bag over the top of the work and tuck the top of the bag under the bat. If you want to trim (or turn) your thrown work the following week, it should also be double bagged. If your work is large, delicate, or of uneven thicknesses, you should lightly cover your work for drying. When considering the drying process, bare in mind the weather, humidity and wind! The hotter and dryer, the faster things dry and work can dry unevenly in the shelves – this can lead to cracking – another time to lightly cover your work for drying. Step Four – Trimming and Cleaning Up Your work is dry! It is called greenware now and it is at it’s most fragile! Handle everything with two hands. I often refer to soft hands – keep everything gentle and with your fingers spread as much as possible. Try to not pick up things like plates too much, and always with both hands! Before your work can be bisque fired it should be “cleaned up”. You work won’t go into the kiln if it has sharp edges – when glazed, sharp edges turn into razor blades! Use a piece of fly wire to rub the work all over – this will scratch a little so be light handed. Use a knife or metal kidney to scrape any areas that require a bit more dynamic treatment than the fly wire offers! Finally, a very light wipe over with a slightly damp sponge can help soften and soothe all of your edges and dags! Trimming thrown work: If you are planning to trim (or turn) your thrown work (and you should be), make sure you bag it well – your work should be leather hard to almost dry for easiest trimming. Use this step to finish the work completely – use a metal kidney to polish the surface, or a slightly damp sponge to give a freshly thrown look. Wipe the sponge around the rim after trimming, and check the inside of the pot for dags! Trimming slip cast work: Usually I will trim the rims of your work on the wheel the following day to make that stage easier, however you will still need to check your work for lumps and bumps. Last but not least – check that your name is still clearly on the bottom of your work. Step Five – Bisque Firing When the work is completely dry it can go into the bisque kiln. The bisque kiln is fired to 1000°C. This process burns off the water in the clay as well as some of the chemically bound water. The structure of the clay is not altered that much at this temperature. Inside the bisque kiln, the work is stacked a little, small bowl inside a larger bowl and onto a heavy plate. Smaller items like decorations or drink coasters might get stacked several high. Consideration is paid to the weight of the stack and shape of the work. A bisque kiln can fire about one and a half times the amount of work that the glaze kiln can fire. The firing takes about 10 hours to complete the cycle and about two days to cool down. Once it has been emptied the work is placed in the glaze room ready for you to decorate! Step Six – Glazing Decorating your work with colour can be a lot of fun – and time consuming! There are three main options for surface treatment at this stage: Oxide Washes Underglazes Glazes Washes and underglazes do not “glaze” the work – It will still need a layer of glaze to fully seal the clay (washes don’t need glaze on surfaces not designed for food or liquid as they can gloss up a little on their own). Underglazes are stable colourants that turn out pretty much how they look in the jar. They can be mixed with each other to form other colours and can be used like water colours to paint onto your work. Mostly they should have a clear glaze on top to seal them. Oxides are a different species – the pink oxide (cobalt) wash turns out bright blue for instance. They don’t always need a glaze on top, and some glazes can change the colour of the wash! The glazes need no other “glaze” on top! Be careful of unknown glaze interactions – you can put any combination of glaze in a bowl or on a plate, but only a single glaze on the outside of any vertical surface! Glazes are a chemical reaction under heat. We don’t know the exact chemicals in the Mayco glazes we use. I can guess by the way they interact with each other, however, on the whole, you need to test every idea you have, and not run the test on a vertical surface! Simply put, glaze is a layer of glass like substance that bonds with the clay underneath. Clay is made of silica, alumina and water. Glaze is made of mostly silica. Silica has a melting point of 1700°C and we fire to 1240°C. The silica requires a “flux” to help it melt at the lower temperature. Fluxes can be all sorts of chemicals – a common one is calcium – calcium has a melting point of 2500°C, however, together they both melt at a much lower temperature! Colourants are metal oxides like cobalt (blue), chrome (green through black), copper (green, blue, even red!), manganese (black, purple and pink) iron (red brown), etc. Different chemicals in the glaze can have dramatic effects. for example, barium carbonate (which we don’t use) turns manganese bright pink! Other elements can turn manganese dioxide brown, blue, purple and reddish brown. Manganese dioxide is a flux in and of itself as well. So, glazes that get their black and purple colours, often interact with other glazes and RUN! Our mirror black is a good example – it mixes really well with many glazes because it fluxes them – causes them to melt faster. It will also bring out many beautiful colours in the glazes because it’s black colouring most definitely comes from manganese dioxide! Glaze chemistry is a whole subject on it’s own! We use commercial Mayco glazes on purpose – for their huge range of colour possibilities, stability, cool interactions, artistic freedom with the ability to easily brush the glazes on and ease of use. We currently have almost 50 glazes on hand! A major project is to test the interactions of all glazes with each other. That is 2,500 test tiles!!!! I’m going to make the wall behind the wheels the feature wall of pretty colours! Step Seven – Glaze (Gloss or sometimes called “Glost”) Firing Most of the time this is the final stage of making your creation (but not always!) The glaze kiln goes to 1240°C. This is called cone 6, or midrange. It is the low end of stoneware temperatures. Stoneware clays and glazes are typically fired at cone 8 – 10, that is 1260 – 1290°C. The energy requirement to go from 1240°C to 1280°C is almost a 30% more! Our clay is formulated to vitrify (mature, turn “glass-like”) at 1240°, as are our glazes. A glaze kiln take around 12 hours to reach temperature and two to three days to cool down. Sometimes a third firing process is required – this is for decoration that is added to work after the glaze firing. For example – adding precious metals and lustres. this firing temperature is usually around 600 – 800°C depending upon the techniques being used. There are many students interested in gold and silver trims – we will be doing this third type of firing soon! After firing your work will be in the student finished work shelves. Remember to pay for it before you head out the door! There is a small extra charge for using porcelain clay (it’s more than twice the price of regular clay), and for any third firing process! Once your work has been fired it can not turn back into clay for millennia – so don’t fire it if you don’t like it! Put it in the bucket for recycling. https://firebirdstudios.com.au/the-process-of-making-pottery/The form of the jug has been in use for many centuries.Stoneware jug. Two tone brown glaze with pierced lip behind spout. Spout chipped.None.flagstaff hill, warrnambool, shipwrecked-coast, flagstaff-hill, flagstaff-hill-maritime-museum, maritime-museum, shipwreck-coast, flagstaff-hill-maritime-village, jug, ceramic jug -
 Federation University Historical Collection
Report, Wendy Jacobs et al, The Pyrenees Shire Avoca Shire Study 1864-1994 Volume 3, 1995, 1995
.1) Copy of Volume 1 of the Avoca Shire Heritage Study which outlines the enviromental history of the shire including gold, water, farming. wine and fruit, towns, road and rail, and extractive industries. .2) Copy of Volume 3 The Avoca Heritage Study which was commissioned by the National Estate Committee. Voume Three contains documentation on individual sites whoch reflect themes outlined in the Environmental History (Volume One). These sites are recommended for protectins under the Local Planning Scheme or the provisions of the Historic Buildings Act. The sites are arranged by geographical location, then, alphabetically by road.wendy jacobs, karen twigg, avoca, bung bung, homebush, crowlands, landsborough, moonambel, natte yallock, navarre, barkly, ]percydale, redbank, mountain creek, nettyalloc, green hills, glendhu, djadja wurrung, djab wurrung, hugh glass, glenmona, charles williamson, woodlands, william degreaves, chinese, mining, ironbark mine, homebush deep lead mine, ampitheatre, dredging, water, mashado's well, ellen allan, hunter's hime, wine, fruit, mackereth's vineyard, orchards, viticulture, edwin mackereth, john costello, w.a. adams, chateau remy, david rodwell, schools, education, churches, road, rail, avoca road districy board, ben nevis, eucalyptus distelleries, jim farnsworth, ned gollop, reg harvey, heritage study -
 Flagstaff Hill Maritime Museum and Village
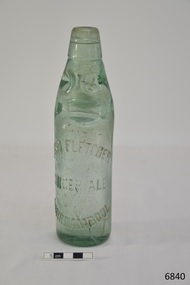
Container - Bottle, c. 1905
This bottle once contained John Fletcher’s ginger cordial. It was found in August 2014 in the sand dunes at Levy's Point, near McKinnon's quarry, Warrnambool. ABOUT JOHN FLETCHER of WARRNAMBOOL John Fletcher Cordial (or Beverage) Co . Warrnambool, supplied cordial and aerated drinks to the Western district of Victoria. John Fletcher was named as a cordial manufacturer in the Warrnambool Standard of June 13th 1895, when he attended a Publican’s Association meeting. Mr John Fletcher, aerated water and cordial manufacturer of Koroit Street Warrnambool, had a summary of his factory printed in a short article in the Advocate, Melbourne, in February 1901. The article said “one of the most complete plants outside the metropolis … spacious … well appointed …old-established business … noted for the excellence of the quality … a trial [of the beverage] is solicited.” John Fletcher and Harold Caffin, trading as J.S. Rowley & co cordial manufacturers in 1903; were prosecuted in September 1903 when the Board of Health found an analysed sample of Raspberry Vinegar to contain coal tar colouring, which could be injurious to health, particularly to the kidneys. The factory was still in operation in December 1924, when sadly, Mr S. Fletcher, who was carrying bottles of aerated water at Mr John Fletcher’s cordial factory, sustained an eye injury when one of the bottles burst. Later the eye had to be removed at the Warrnambool Base Hospital. ABOUT CODD BOTTLES During the mid-to-late 1800s there were many inventions to keep the fizz in carbonated drinks such as ginger ale, soda water and fruit drinks. Hiram Codd, an English engineer invented a successful process that he patented as “Codd’s patented globe stopper bottle” in 1872. The Codd-neck bottle (commonly called Codd or marble bottle) is manufactured in two parts. The body of the bottle is cast in two sections. At the time of joining the sections a glass marble and rubber seal are inserted into the neck section. The lip is then applied to the top of the bottle. The Codd bottle is filled upside down as the pressure of the gas from the carbonated liquid holds the marble up and out of the way. When the bottle stands upright the gas pushes the marble up against the washer, creating a firm seal to keep the fizz inside. The bottle is opened by pushing the marble down firmly to allow some of the gas to escape. The marble drops down and is caught in a depression formed in the neck. When the bottle is tilted to pour or drink the liquid the marble rests in a dimple. Some have said that the bottle as a character, the shape having a face with its mouth keeping the marble out of the drink and eyes that catch the marble so that it doesn’t roll into the mouth of the drinker. The Codd bottle was expensive to produce and children loved to destroy the marbles to play with the marbles inside. Many shops and factories added a deposit to the cost of buying the drink to encourage children to return the bottles rather than break it for the marble. Codd bottles are still being produced in India and Japan for soft drinks. A Codd bottle with the same markings as this one is valued on today’s Australian auction sites from $35 - $75 AUD. Bottle, aqua/green glass, with glass marble inside. John Fletcher's Ginger Ale, Warrnambool. Container is often called a "Codd neck bottle", “marble bottle” or “Codd’s patent bottle”. Bottle made by Dobson. Inscription on bottle and base. c. 1905Marks moulded into glass; "JOHN FLETCHER / GINGER ALE / WARRNAMBOOL" and “DOBSON” and on base “G”. flagstaff hill, warrnambool, shipwrecked coast, flagstaff hill maritime museum, maritime museum, shipwreck coast, flagstaff hill maritime village, great ocean road, codd bottle, codd neck bottle, marble bottle, ginger beer bottle, john fletcher soft drinks, warrnambool soft drinks and cordials, john fletcher cordial (or beverage) co ., codd neck bottle, glass stopper bottle, hiram codd, antique bottle, harold caffin, john fletcher -
![Painting - Artwork - Painting, [Still Life] c 1931 - 1933, 1931-1933](/media/collectors/4f729f6797f83e0308601707/items/5d9428d221ea670878d79223/item-media/5dca306721ea670e48ad96aa/item-fit-380x285.jpg) Federation University Historical Collection
Federation University Historical CollectionPainting - Artwork - Painting, [Still Life] c 1931 - 1933, 1931-1933
The full folio of work undertaken by Alice Watson while a student at the Ballarat Technical Art School is held by Federation University Australia.Double sided. Two water colour paintings undertaken by Edith Alice (Alice) Watson for art course at the Ballarat Technical Art School, a division of the Ballarat School of Mines. One side has a corked bottle,jar with leaves and onions. At the side is a flower and two onions. Verso is a blue vase, metal mug, champagne glass, an onion and two tomatoes. E.A.WATSON verso lrs of paintingballarat technical art school, edith alice watson, ornament, flora, alumni, still life, water colour, onions, alice watson, tomatoes -
Glenelg Shire Council Cultural Collection
Photograph, n.d
... of white stones in a glass tank full of water. There is a scale... full of water. There is a scale marked on the glass. The stones ...Port of Portland Authority Archivesport of portland archives -
 City of Moorabbin Historical Society (Operating the Box Cottage Museum)
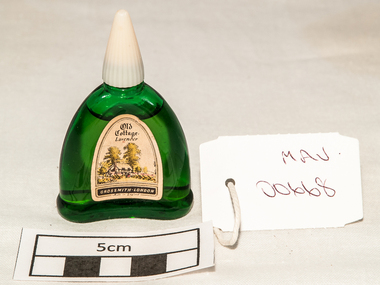
Manufactured Glass, small perfume bottle, 20thC
An accoutrement for a Lady's Evening bag early 20thC A small, green glass perfume bottle with Lavender water. An accoutrement for a Lady's Evening bag.OLD COTTAGE LAVENDER/ GROSSMITH / LONDONperfume, lavender water, fashion, personal effects, moorabbin, bentleigh, cheltenham, early settlers -
 City of Moorabbin Historical Society (Operating the Box Cottage Museum)
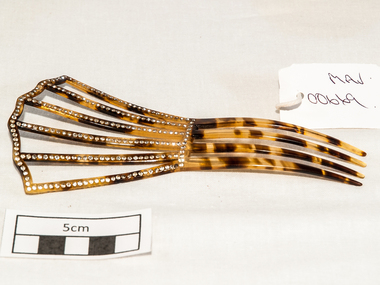
Personal Effects, lady's mantilla style haircomb, 20thC
A hair fashion accessory for 20thCentury ladies. Plastic is a material consisting of any of a wide range of synthetic or semi-synthetic organics that are malleable and can be moulded into solid objects of diverse shapes. Due to their relatively low cost, ease of manufacture, versatility, and imperviousness to water, plastics are used in an enormous and expanding range of products. They displaced many traditional materials, such as wood, stone, horn and bone, leather, paper, metal, glass, and ceramic, in most of their former uses including jewellery. Parkesine is considered the first man-made plastic. The plastic material was patented by Alexander Parkes, In Birmingham, UK in 1856.The world's first fully synthetic plastic was bakelite, invented in New York in 1907 by Leo Baekeland who coined the term 'plastics'. After World War I, improvements in chemical technology led to an explosion in new forms of plastics, with mass production beginning in the 1940s during World War 11 due to shortages of silk and ivory.A plastic, tortoise shell pattern, lady's hair-comb in the mantilla style with diamante decoration.hair fashion, hairdressing, coiffure, plastic, personal effects, jewellery, moorabbin, bentleigh, cheltenham, early settlers, world war 1 1914-1918, world war 11 1939-1945, silk, ivory, bakelite, -
 City of Moorabbin Historical Society (Operating the Box Cottage Museum)
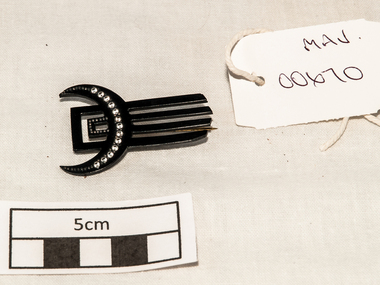
Jewellery, small plastic brooch, 20thC
A plastic, costume jewellery, fashion accessory for early 20th Century ladies Plastic is a material consisting of any of a wide range of synthetic or semi-synthetic organics that are malleable and can be moulded into solid objects of diverse shapes. Due to their relatively low cost, ease of manufacture, versatility, and imperviousness to water, plastics are used in an enormous and expanding range of products. They displaced many traditional materials, such as wood, stone, horn and bone, leather, paper, metal, glass, and ceramic, in most of their former uses including jewellery. Parkesine is considered the first man-made plastic. The plastic material was patented by Alexander Parkes, In Birmingham, UK in 1856.The world's first fully synthetic plastic was bakelite, invented in New York in 1907 by Leo Baekeland who coined the term 'plastics'. After World War I, improvements in chemical technology led to an explosion in new forms of plastics, with mass production beginning in the 1940s during World War 11 due to shortages of silk and ivory. A small, black plastic brooch with a verticle pin at back and diamante decoration .fashion, costume jewellery, personal effects, moorabbin, bentleigh, cheltenham, early settlers, jewellery, plastic -
 City of Moorabbin Historical Society (Operating the Box Cottage Museum)
Certificate - Documents, Funeral James Jones 1940, c1940
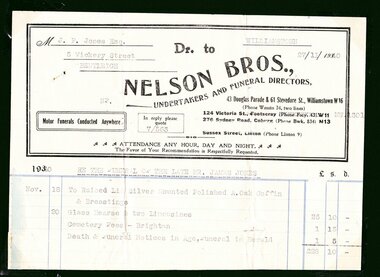
James Jones was the son of Philip Jones, a Chairmaker, and Ann Jones who settled in East Brighton after the sale of land c1852 in the area of the Henry Dendy Special Survey of 1841. Mary Ann Moore was the daughter of Thomas Moore, a Gardener, and Sarah Harris who also settled in Brighton c1852. James and Mary Ann Jones settled and raised their family in East Brighton now Bentleigh. Mr John Herron resided at 4 Vickery St Bentleigh until 1989. Sadly Martha Jones born 1888 died in 1890 and James Jones had to purchase a plot at Brighton General Cemetery for her burial. Baby Ethel May was interred in 1893 and then Mary Ann in 1903 and finally James in 1940. Their stillborn baby was buried in the Wesleyan public grave in 1900James Jones and Mary Ann Moore were born in Brighton c1857 and c 1859 into pioneer market gardener families in the area of the Dendy Special Survey of 1841. They married in 1883 and raised their family in East Brighton, now Bentleigh. Sadly infectious diseases took the lives of many infants throughout the Colony of Victoria due to the poor state of water supply and sewerage disposal and locally the swamps of the Elster Creek were a constant breeding ground. Martha Jones born 1888 died 1890 and was interred in the Brighton General Cemetery in a family plot, in the Wesleyan Section, purchased by her father James Jones. In 1893 another daughter Ethel May died and was buried in the family plot. A stillborn baby was interred in the public grave of Brighton General Cemetery in May1900. Mary Ann Jones died, at age 43years, and was interred in January 1903. Finally in November 1940 Mr James Jones was buried in the family grave. 1 original paper account and 1 paper receipt from Nelson Bros. Funeral Directors re the funeral of James Jones in November 19401) M..J.P Jones Esq./ 5 Vickery Street/ Bentleigh / WILLIAMSTOWN/ 27/11/1940 Dr to / NELSON BROS.,/UNDERTAKERS AND FUNERAL DIRECTORS, / 43 Douglas Parade & 51 Stevedore St., Williamstown W16 / Motor Funerals Conducted Anywhere / In reply please quote 7/563/ Re The Funeral of The Late MR. JAMES JONES/ £28:10:0 -1 Glass Hearse & 2 Limousines, Cemetery Fees and Newspaper notices 2) As above / 27/111940 / A Memo. from NELSON BROS.,/ Dear Sir, /Herewith ...our official receipt... / signed A Nelson / Manager* wesleyan church, brighton general cemetery, vaccination, pioneers, early settlers, typhoid, brighton, moorabbin, bentleigh, market gardeners, jones james, jones mary ann, jones martha, dendy henry, dendys special survey 1841, infectious diseases, water supply, elster creek, melbourne, orford g h, printers, southern cross office, “brighton leader” print, bay street brighton, jones ethel may -
 City of Moorabbin Historical Society (Operating the Box Cottage Museum)
Container - Manufactured glass, Codd bottle, c1888
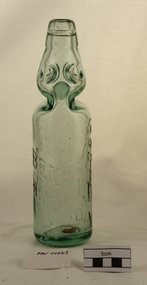
The Codd Bottle was first invented by English manufacturer, Hiram Codd at Barnsley in 1870. The groove inside the top of the bottle held a rubber ring. A small glass balll was held against this ring by the pressure of the 'pop' or 'fizzy' carbonated drink inside the bottle. This style of bottle was widely manufactured and used in the production of mineral waters and lemonade. The glass has a slight green tint, known as aqua glass, and is what the Victorian era produced as 'clear glass'This glass Codd bottle with glass ball and partial rubber ring was probably imported from England by Bennetts Pty. Ltd of Richmond, Victoria for their Lemonade and sold as refreshment to early settlers of Moorabbin Shire c1880A slightly green tinted, glass bottle with a groove inside the top which held a rubber ring, against which, the small glass ball inside the bottle was held by the pressure of the 'fizzy' drink inside.BENNETTS / LEMONADE diagonally across bottlecodd hiram, glass manufacture, glass bottles, moorabbin, brighton, barnsley england, carbonated water, soft drink, mineral water, bennetts lemonade maker, richmond, early settlers, market gardeners, melbourne -
 City of Moorabbin Historical Society (Operating the Box Cottage Museum)
Equipment - Selley's Waterproof Glue, Selley's Chemical Manufacturing Co. Pty Ltd, 20thC
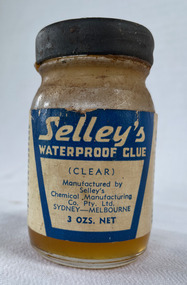
Selley's is an Australian company which produces household 'do it yourself' and cleaning products. Martin Selley, who fled Germany in 1939, prior to the start of WWII, established the Selleys Chemical Company - selling wood putty.Selley's is an Australian company which produces household 'do it yourself' and cleaning products that were used by residents of City of Moorabbin in 20thC3 oz Glass bottle with screw on metal lid, painted blue - with a blue and white labelFRONT: Selley's Waterproof glue - (Clear) Manufactured by Selley's Chemical Manufacturing Co. Pty Ltd - SYDNEY - MELBOURNE 3 ozs. Net. BACK: Instructions for use. Selley's Waterproof Glue is a unique material which can be used for almost any type of joint. When used for wood to wood it gives excellent results, comparing favourably with all other types of wood glues, but in addition has the advantage that it is applied cold, and further, when set, is completely water-proof. It does not require any catalyst or hardening agent to set, but dries by evaporation of the solvent, leaving a tough, hard film. The glue contains thinners. Do not use near a naked flame, but after it has dried it is no more inflammable than dry timber. If glue too stiff, add acetone. glue, selley's, waterproof glue, bottle -
 City of Moorabbin Historical Society (Operating the Box Cottage Museum)
Domestic object - Watkins Polish, J. R. Watkins Co (USA), 20thC
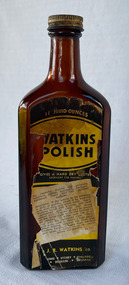
The J. R. Watkins Co. opened its first overseas branch in Australia in 1935. The J. R. Watkins built a large factory at Highett on a six acres on the east side of Nepean Highway (no. 1123) in 1954. The J. R. Watkins company was founded in 1868 in Plainview, Minnesota USA, moving to Winona in 1885, by J. R. Watkins.Example of industry in the City of Moorabbin.Amber glass bottle with a metal screw on lid. A paper label is on the front of the bottle 'Watkins Polish" printed in yellow, black and white.PRINTED ON LABEL: 11 Fluid ounces - WATKINS POLISH - Gives a hard dry lustre excellent for Dusting For cleaning, dusting and polishing furniture, pianos, woodwork, linoleum, hardwood floors and all polished surfaces. Directions: If the article to be polished is dirty or gummy, clean it by washing with mild soap and warm water. Apply Watkins Polish with a damp, soft cloth (Dampened with water and wrung almost dry). The Polish may be poured on the damp cloth or on the surface to be polished. In either case rub it all with a dry cloth to obtain a high polish. When dusting, dampen the cloth with Watkins Polish - it keeps down the dust and gives a lustre which is neither greasy not gummy. The J. R. Watkins Co. Melbourne - Sydney - Adelaide - Kogarah EMBOSED ON BOTTLE: "The J.R.Watkins co. Made in Australia" the j. r. watkins co, highett, polish -
 City of Moorabbin Historical Society (Operating the Box Cottage Museum)
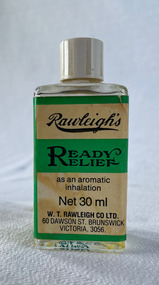
Domestic object - Rawleigh's Ready Relief, as an aromatic inhalation, 1967
Rawleigh's Ready Relief was advertised for checking and relieving head colds and catarrh. W. T. Rawleighs Co Ltd was a Canadian firm who expanded their food manufacturing business to Australia in 1928. In 1934 they purchased land in Dawson Road, Brunswick and built a five storey brick and reinforced factory. The building was still standing in 2022.Clear glass bottle with white plastic screw on lid. Paper wrap around label printed in green, black and pinkFRONT: Rawleigh's Ready Relief as an aromatic inhalation Net 30 ml W. T. Rawleigh Co Ltd. 60 Dawson St. Brunswick Victoria, 3056. LEFT SIDE: Active Constituents % w/w Alcohol 57.571, Camphor Crystals 4.789, Menthol Crystals 10.200, Menthol Liquid 5.100, Oil of Lavender 50% 18.124 Oil of Pinus Pumilous 0.786, Oil of Eucalyptus 0.180, Musc Ambrette Solution 0.20, Dist. Water 3.00. Reg. Vic 18810 E2012 RIGHT SIDE: Directions: Place drop or tow on folded handkerchief. Inhale gently, then gradually deepen inhalation. At night put a few drops at end of pillow. Not recommended for children under three years. Keep tightly closed. Store in cool place.medical, rawleighs co ltd, brunswick -
 City of Moorabbin Historical Society (Operating the Box Cottage Museum)
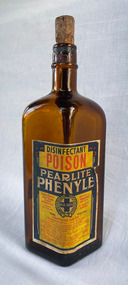
Container - Pearlite Phenyle Bottle
Pearlite Phenyle was manufactured by Renown Pearlite Company Pty Ltd, which was formerly known as Pearlite Manufacturing Company. The factory was in 171-177 Stawell Street, Richmond and they manufactured kitchen products essence, Sunflakes - breakfast cereal.4 sided, diamond-shaped amber glass Phenyle bottle with cork stopper and paper label printed in blue, red, and yellow.Disinfectant – Poison – Pearlite Phenyle Poisonous not to be taken Contents 20 Fluid ozs Renown & Pearlite Pty Ltd DIRECTIONS FOR USE 2 teaspoonfuls to 1 pint of water 1 pint to 6 Gallons of water Does not contain more than 3 per cent or less than 2 pre cent or Carbolic or its homologue. Guaranteed to destroy Typhoid Fever Bacillus, 1 part fluid 30 parts water, in 10 minutes. NOTE – Placing the disinfectant in copper vessels or in contact with Alkaline Substances renders it imperative. ANTIDOTE: Epsom or Glauber salts in water. Lime water and olive oil or castor oil (Perlite for Preference) EMBOSED ON BOTTLE: Phenyle with XX’s – poisonous – this bottle is the property of – 2140 STICKER: Sold by Crofts Stores Pty Ltd Branch Store: Hawthorn Road Caulfield. phenyle, bottle, cleaning, disenfectant -
 Flagstaff Hill Maritime Museum and Village
Photograph - Set of Photographs, John Chance, late 1960s to early 1970s
This set of glossy black and white photographs is a set of images of Glenample Homestead circa late 1960s to early 1970s. They were taken by John Chance and are part of the John Chance Collection. The Colonial Georgian style Glenample Homestead was built from 1866 to 1869 from locally quarried sandstone. In is built on the top of a hill amongst trees. There are paddocks below and around the building. The building is basically a rectangular shape with a recessed room on the right side of the front. The pitched roof is covered in corrugated iron. The veranda, added in 1886, also has a corrugated iron room and is supported by square posts with decorative tops. It shelters three sides of the building. The edge of the veranda is decorated with scalloped shapes along the front and left side of the building. On the right is a brick wall incorporating a chimney. Another chimney on the left is contained within the building. The four-panelled outside doors are visible in some of the photos, as are the 12-paned glass windows, which are framed in contrasting stone. The veranda is trimmed with scalloped metal work on two sides and had some enclosed corners. There appears to be a cubical water tank on the roof line. Out-buildings include a toilet built against the house's brick wall. Another building appears to have two rooms with outside doors, perhaps for workers. There is the remains of a two-wheeled cart under a shelter. GLENAMPLE & the LOCH ARD Glenample Homestead became famous after the disastrous wreck of the sailing ship Loch Ard on June 1, 1878. The owners, Hugh Hamilton Gibson and Peter McArthur, were involved in the rescue and recovery of the only two survivors, as well as overseeing the salvage of items from the shipwreck and the burial of those who lost their lives. Glenample Homestead is on the Great Ocean Road at Princetown. Originally the land was part of Kennan’s Station lease, one of the district’s early settlements, circa 1847. James Murray bought Kerman’s land in 1856-57, combined it with nearby land, and named it Glenample Homestead. The ruins of huts Murray built on the property were still there until recently. Glenample was sold in 1866 to the partnership of Gibson and McArthur, who built a Georgian style house there using local sandstone, completing it by 1869. On 1st June 1878 the Loch Ard was wrecked at what is now called Loch Ard Gorge. Apprentice crewman Tom Pearce and eighteen year old passenger Eva Carmichael were the only survivors. Pearce had brought Eva ashore and sheltered her in a cave, reviving her with whiskey found amongst items washed up from the wreck. He climbed the cliffs and came across two riders from Glenample. No other survivors were found and sadly, Eva’s family members were amongst those who drowned. Hugh and Lavinia Gibson cared for Pearce and Eva at Glenample and extended their hospitality to Eva, who stayed on for about six weeks as she recovered from the ordeal physically and emotionally. Mrs Gibson introduced Eva to Jane Shields and the young ladies became lifelong friends. Years after Eva had returned to England, Jane’s daughter visited her. Eva handed her a blue china tea set to pass onto her mother as a gift. A descendant of Jane’s donated part of the tea set to Flagstaff Hill Maritime Village while another descendant donated her inherited share of the tea set to the Warrnambool and District Historical Society. In 1886 Glenample Homestead was updated to include a veranda on three sides. In 1887 Gibson sold his share to partner Peter McArthur. McArthur’s son Ernest inherited the property in 1897. Ernest established the Glenample Cheese Factory in around 1911. It was closed due to the World War and reopened in 1929 by McArthur’s sons, Robert and Colin, when they took control. In 1945 they sold Glenample and several owners followed but it was left unoccupied and became dilapidated. It was during this time that John Chance visited the property and photographed the buildings. In the 1980s the National Parks Service acquired the Glenample Homestead and began a restoration program. Work began in 1989 by Cathedral Stone, which was established in 1989 by James Charlwood, a specialist stonemason and son of maritime author Don Charlwood. This set of photographs are significant as a record of Glenample Homestead as it was from around the late 1860s to the late 1960s. The photographs are also significant as they were taken by John Chance, a diver from the wreck of the Loch Ard in the 1960s-70s. Items that come from several wrecks along Victoria's coast have since been donated to the Flagstaff Hill Maritime Village’s museum collection by his family, illustrating this item’s level of historical value. The photographs are significant as a link between Glenample, the vessel Loch Ard, and the only survivors of the Loch Ard. Glenample Homestead is of historical, social and architectural significance to the State of Victoria and is listed on the Victorian Heritage Register (VHR H0392). It is a historical example of early settlement and development of a run in the coastal land of South West Victoria, and it is constructed from locally quarried sandstone but doesn’t take away from its Georgian design. Glenample Homestead is of State significance through its unique connection with the wreck of the ship Loch Ard and the connection to its owners, Hugh and Lavinia Gibson and Peter McArthur, played a historically and socially significant role in the rescue and care of the survivors, the salvage of goods and the burial of those who lost their lives. The shipwreck of the Loch Ard itself is of significance for Victoria and is registered on the Victorian Heritage Register (S417). The set of ten rectangular black and white photographs of the Glenample Homestead, taken in the late 1960s or early 1970s, give san overview of the Glenample property. The views include the front, back and one side of the building, three outbuildings, and the situation of the homestead on the property. The details on the photographs show the materials used and the Colonial Georgian style. The photographs are also a record of the deterioration of the property over the years it was unoccupied.flagstaff hill, warrnambool, flagstaff hill maritime museum, maritime museum, shipwreck coast, flagstaff hill maritime village, great ocean road, kennans station, glenample homestead, georgian homestead, loch ard, princetown, victoria, james murray, hugh hamilton gibson, lavinia gibson, jane shields, eva carmichael, tom pearce, blue china tea set, peter mcarthur, ernest mcarthur, robert mcarthur, colin mcarthur, glenample cheese factory, cathedral stone, don charlwood, james charlwood, antique door key, glenample photographs, john chance, victorian heritage database 392 -
 Flagstaff Hill Maritime Museum and Village
Domestic object - Washboard, 1900-1930
A washboard is a tool designed for hand washing clothing that are soaked in hot soapy water in a wash tub or sink, then squeezed and rubbed against the ridged surface of the washboard to force the cleaning fluid through the cloth to carry away dirt. With the invent of mechanized cleaning of clothing becoming more common by with the use of washing machines by the end of the 20th century the washboard was soon discontinued. The traditional washboard is usually constructed with a rectangular wooden frame in which are mounted a series of ridges or corrugations for the clothing to be rubbed upon. For 19th-century washboards, the ridges were often of wood, sometimes glass and by the 20th century, ridges of metal became common The first "fluted" metal washboard was patented in the United States by Stephen Rust in 1833 and Zinc washboards were predominantly manufactured in the United States from the middle of the 19th century. A significant item for cleaning clothes still in use today in many countries giving a snapshot into the domestic life of a housewife into the 20th century.Washboard wooden frame with a ribbed glass sectionMarked "Possum Brand"warrnambool, shipwrecked-coast, flagstaff-hill, flagstaff-hill-maritime-museum, shipwreck-coast, flagstaff-hill-maritime-village, washboard, glass ripples, clothes cleaning, washing, laundry -
 Flagstaff Hill Maritime Museum and Village
Container - Ink Bottle, from mid-19th century to 1902
This ink bottle is ‘boat’ shaped, which was a common design from the mid-1840s. It was crudely made; maybe it was rejected as a practice bottle or perhaps heat or pressure has distorted it. The bottle was recovered from the wreck of the Inverlochy and is part of the John Chance collection. Ink in the 1700s ink could be purchased in powdered or block form from apothecary shops, to be mixed with water as needed. Then in the mid-1800s chemists began selling ink in liquid form, in small, inexpensive and often attractive bottles. The small glass ink bottles were handmade, blown into a cup shaped mould, and sharply broken off from the blow-pipe at the neck, referred to as the English-made ‘burst-off’ finish. The neck was then filed, filled with liquid ink and sealed with a cork or wax. It was a quick, affordable container and made pen and ink writing available to the public. The name ‘penny ink’ bottles was a common title due to their low cost. INVERLOCHY 1895-1902 - The Inverlochy was a steel sailing barque built in Scotland in 1895 for international trade. In 1902 the Inverlochy left Liverpool under the command of Captain E.R. Kendrick. There were 21 officers and crew and the captain’s wife Mrs Kendrick, on board, bound for Australia with cargo that included tools, chemicals, liquor (beer, whisky, stout, rum, and brandy), steel, iron, wire netting, hoop iron, tinplate and pig iron), and steel wire for the Melbourne Tramway Company, tiles, soap, soft goods and earthenware. On December 18 almost at their destination, the Inverlochy ran aground on Ingoldsby Reef at Point Addis, near Anglesea. The crew and passengers left the ship via lifeboat and landed at Thompson’s Creek, then walked about 20 kilometres to Barwon Heads. Salvagers were interested in the 10 miles of cable in the hold. Mrs Kendrick’s ‘high grade’ bicycle was amongst the items salvaged but she lost her jewellery and two pianos. By February 1903 the ship had broken up and objects such as bottles and casks of liquor were washed ashore. Bad weather shook the wreck in June 1903, causing the ship’s spars and figurehead to be washed ashore. This boat shaped handmade ink bottle is historically significant for its association with communications and record keeping in the mid-to-late 19th century. The bottle is socially significant as an example of making a useful product affordable to every day people. This handmade glass ink bottle is significant for its connection with the John Chance Collection, which is historically significant as an example of artefacts from wrecks that had been lost in the coastal waters of Victoria from thirty to over one hundred years before John Chance and others discovered them. These artefacts are a sample of goods carried as cargo or personal possessions, and of ship hardware of that era. The ink bottle is significant through its connection with the barque, Inverlochy, The Inverlochy is significant for its cargo, which is a snapshot of the array of goods imported into Australia at the turn of the 19th century, including cable for the Melbourne Tramway Company. The Inverlochy is historically significant and is registered on the Victorian Heritage Database, VHR S338. The wreck of the Inverlochy is important as an accessible dive site that shows the remains of a large international trading vessel and its contents. It is valuable for an insight into Victorian era of shipping and maritime history.Ink bottle, thick clear glass, rectangular base with small round mouth, long sides have have a U shaped groove along the shoulders (used for resting pen handles). The outside surface has a white clay-type reside over it. Bottle is very bent and distorted. flagstaff hill, warrnambool, flagstaff hill maritime museum, maritime museum, shipwreck coast, flagstaff hill maritime village, great ocean road, john chance, inverlochy, scotland, captain e.r. kendrick, melbourne tramway company, tramway cable, ingoldsby reef, point addis, anglesea, thompson’s creek, barwon heads, boat ink bottle, cottage ink, penny ink, glass ink bottle, pen rest, writing accessory, victorian, antique, ink well, sheer lip, distorted body, handmade, mould blown, statoionery -
 Flagstaff Hill Maritime Museum and Village
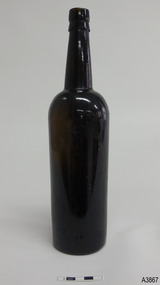
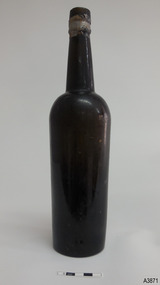
Container - Bottle, 1840s to 1910
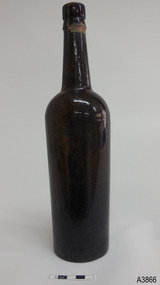
This handmade ‘gallon’ style of bottle was generally used for storing and transporting wine and ale. Many bottles similar to this one have their bases embossed with “6 TO THE GALLON”. It is one of many artefacts recovered from unidentified shipwrecks along Victoria’s coast between the late 1960s and the early 1970s. It is now part of the John Chance Collection. The capacity of this is one-sixth of a gallon (imperial measure), which is equal to 758 ml. (American bottles were often inscribed “5 TO THE GALLON”, which is one-fifth of an American gallon, equal to 757 ml.) Contemporary home brewers can purchase new ‘6 to gallon’ bottles that hold 750 ml. and are sold in cases of 36 bottles, which is equal to 6 gallons of wine. Glass was made thousands of years ago by heating together quartz-sand (Silica), lime and potash. Potash was obtained from burnt wood, but these days potash is mined. The natural sand had imperfections such as different forms of iron, resulting in ‘black’ glass, which was really dark green or dark amber colour. The ‘black’ glass was enhanced by residual carbon in the potash. Black glass is rarely used nowadays but most beer, wine, and liquors are still sold in dark coloured glass. Glass vessels were core-formed from around 1500 BC. An inner core with the vessel’s shape was formed around a rod using a porous material such as clay or dung. Molten glass was then modelled around the core and decorated. When the glass had cooled the vessel was immersed in water and the inner core became liquid and was washed out. Much more recently, bottlers were crafted by a glassblower using molten glass and a blow pipe together with other hand tools. Another method was using simple moulds, called dip moulds, that allowed the glass to be blown into the mould to form the base, then the glassblower would continue blowing free-form to shape the shoulders and neck. The bottle was then finished by applying a lip. These moulded bottles were more uniform in shape compared to the free-form bottles originally produced. English glassblowers in the mid-1800s were making some bottles with 2-piece and 3-piece moulds, some with a push-up style base, sometimes with embossing in the base as well. Improvements allowed the moulds to also have embossed and patterned sides, and straight sided shapes such as hexagons. Bottles made in full moulds usually displayed seam seams or lines. These process took skill and time, making the bottles valuable, so they were often recycled. By the early 20th century bottles were increasingly machine made, which greatly reduced the production time and cost. This bottle is historically significant as an example of a handmade, blown inscribed glass bottle manufactured in the mid-to-late 1800s for specific use as a liquor bottle with a set measurement of one-sixth of gallon. It is also historically significant as an example of liquor bottles imported into Colonial Victoria in the mid-to-late 1800s, giving a snapshot into history and social life that occurred during the early days of Victoria’s development, and the sea trade that visited the ports in those days. The bottle is also significant as one of a group of bottles recovered by John Chance, a diver in Victoria’s coastal waters in the late 1960s to early 1970s. Items that come from several wrecks have since been donated to the Flagstaff Hill Maritime Village’s museum collection of shipwreck artefacts by his family, illustrating this item’s level of historical value. Bottle, brown glass, handmade. Tall slim Gallon style liquor bottle. Applied, double collar lip; square upper with flared lower. Neck has seams and shoulder seam from 3-piece mould. Body with horizontal ripples tapers inwards to base. Push-up base with pontil mark and embossed inscription. Tape over wire around mouth. Cork remnants inside mouth. Embossed on base "6 TO THE GALLON"flagstaff hill, warrnambool, flagstaff hill maritime museum, maritime museum, shipwreck coast, flagstaff hill maritime village, great ocean road, shipwreck artefact, john chance, glass bottle, antique bottle, gallon bottle, 6 to the gallon bottle, handmade, dip mould, mouth blown, pontil mark, blown bottle, liquor bottle, ale bottle, double collar, 19th century bottle, collectable -
 Flagstaff Hill Maritime Museum and Village
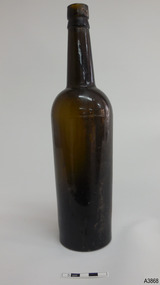
Container - Bottle, 1840s to 1910
This handmade ‘gallon’ style of bottle was generally used for storing and transporting wine and ale. Many bottles similar to this one have their bases embossed with “6 TO THE GALLON”. It is one of many artefacts recovered from unidentified shipwrecks along Victoria’s coast between the late 1960s and the early 1970s. It is now part of the John Chance Collection. The capacity of this is one-sixth of a gallon (imperial measure), which is equal to 758 ml. (American bottles were often inscribed “5 TO THE GALLON”, which is one-fifth of an American gallon, equal to 757 ml.) Contemporary home brewers can purchase new ‘6 to gallon’ bottles that hold 750 ml. and are sold in cases of 36 bottles, which is equal to 6 gallons of wine. Glass was made thousands of years ago by heating together quartz-sand (Silica), lime and potash. Potash was obtained from burnt wood, but these days potash is mined. The natural sand had imperfections such as different forms of iron, resulting in ‘black’ glass, which was really dark green or dark amber colour. The ‘black’ glass was enhanced by residual carbon in the potash. Black glass is rarely used nowadays but most beer, wine, and liquors are still sold in dark coloured glass. Glass vessels were core-formed from around 1500 BC. An inner core with the vessel’s shape was formed around a rod using a porous material such as clay or dung. Molten glass was then modelled around the core and decorated. When the glass had cooled the vessel was immersed in water and the inner core became liquid and was washed out. Much more recently, bottlers were crafted by a glassblower using molten glass and a blow pipe together with other hand tools. Another method was using simple moulds, called dip moulds, that allowed the glass to be blown into the mould to form the base, then the glassblower would continue blowing free-form to shape the shoulders and neck. The bottle was then finished by applying a lip. These moulded bottles were more uniform in shape compared to the free-form bottles originally produced. English glassblowers in the mid-1800s were making some bottles with 2-piece and 3-piece moulds, some with a push-up style base, sometimes with embossing in the base as well. Improvements allowed the moulds to also have embossed and patterned sides, and straight sided shapes such as hexagons. Bottles made in full moulds usually displayed seam seams or lines. These process took skill and time, making the bottles valuable, so they were often recycled. By the early 20th century bottles were increasingly machine made, which greatly reduced the production time and cost. This bottle is historically significant as an example of a handmade, blown inscribed glass bottle manufactured in the mid-to-late 1800s for specific use as a liquor bottle with a set measurement of one-sixth of gallon. It is also historically significant as an example of liquor bottles imported into Colonial Victoria in the mid-to-late 1800s, giving a snapshot into history and social life that occurred during the early days of Victoria’s development, and the sea trade that visited the ports in those days. The bottle is also significant as one of a group of bottles recovered by John Chance, a diver in Victoria’s coastal waters in the late 1960s to early 1970s. Items that come from several wrecks have since been donated to the Flagstaff Hill Maritime Village’s museum collection of shipwreck artefacts by his family, illustrating this item’s level of historical value. Bottle, brown glass, handmade. Tall slim Gallon style liquor bottle. Applied double collar lip; square upper with flared lower. Push-up base with pontil mark and embossed inscription. Base is uneven, glass composition has imperfections.Embossed on base "6 TO THE GALLON"flagstaff hill, warrnambool, flagstaff hill maritime museum, maritime museum, shipwreck coast, flagstaff hill maritime village, great ocean road, shipwreck artefact, john chance, glass bottle, antique bottle, gallon bottle, 6 to the gallon bottle, handmade, dip mould, mouth blown, pontil mark, blown bottle, liquor bottle, ale bottle, double collar, 19th century bottle, collectable -
 Flagstaff Hill Maritime Museum and Village
Container - Bottle, 1840s to 1910
This handmade ‘gallon’ style of bottle was generally used for storing and transporting wine and ale. Many bottles similar to this one have their bases embossed with “6 TO THE GALLON”. It is one of many artefacts recovered from unidentified shipwrecks along Victoria’s coast between the late 1960s and the early 1970s. It is now part of the John Chance Collection. The capacity of this is one-sixth of a gallon (imperial measure), which is equal to 758 ml. (American bottles were often inscribed “5 TO THE GALLON”, which is one-fifth of an American gallon, equal to 757 ml.) Contemporary home brewers can purchase new ‘6 to gallon’ bottles that hold 750 ml. and are sold in cases of 36 bottles, which is equal to 6 gallons of wine. Glass was made thousands of years ago by heating together quartz-sand (Silica), lime and potash. Potash was obtained from burnt wood, but these days potash is mined. The natural sand had imperfections such as different forms of iron, resulting in ‘black’ glass, which was really dark green or dark amber colour. The ‘black’ glass was enhanced by residual carbon in the potash. Black glass is rarely used nowadays but most beer, wine, and liquors are still sold in dark coloured glass. Glass vessels were core-formed from around 1500 BC. An inner core with the vessel’s shape was formed around a rod using a porous material such as clay or dung. Molten glass was then modelled around the core and decorated. When the glass had cooled the vessel was immersed in water and the inner core became liquid and was washed out. Much more recently, bottlers were crafted by a glassblower using molten glass and a blow pipe together with other hand tools. Another method was using simple moulds, called dip moulds, that allowed the glass to be blown into the mould to form the base, then the glassblower would continue blowing free-form to shape the shoulders and neck. The bottle was then finished by applying a lip. These moulded bottles were more uniform in shape compared to the free-form bottles originally produced. English glassblowers in the mid-1800s were making some bottles with 2-piece and 3-piece moulds, some with a push-up style base, sometimes with embossing in the base as well. Improvements allowed the moulds to also have embossed and patterned sides, and straight sided shapes such as hexagons. Bottles made in full moulds usually displayed seam seams or lines. These process took skill and time, making the bottles valuable, so they were often recycled. By the early 20th century bottles were increasingly machine made, which greatly reduced the production time and cost. This bottle is historically significant as an example of a handmade, blown inscribed glass bottle manufactured in the mid-to-late 1800s for specific use as a liquor bottle with a set measurement of one-sixth of gallon. It is also historically significant as an example of liquor bottles imported into Colonial Victoria in the mid-to-late 1800s, giving a snapshot into history and social life that occurred during the early days of Victoria’s development, and the sea trade that visited the ports in those days. The bottle is also significant as one of a group of bottles recovered by John Chance, a diver in Victoria’s coastal waters in the late 1960s to early 1970s. Items that come from several wrecks have since been donated to the Flagstaff Hill Maritime Village’s museum collection of shipwreck artefacts by his family, illustrating this item’s level of historical value. Bottle, brown glass, handmade. Tall slim Gallon style liquor bottle. Applied double collar lip; square upper and flared lower. Neck has seams and shoulder seam from 3-piece mould. Body tapers towards base. Push-up base with pontil mark and embossed inscription. Base is uneven. Mouth has remnants of the seal in it and tape remnants around its outside. Embossed on base "6 TO THE GALLON"flagstaff hill, warrnambool, flagstaff hill maritime museum, maritime museum, shipwreck coast, flagstaff hill maritime village, great ocean road, shipwreck artefact, john chance, glass bottle, antique bottle, gallon bottle, 6 to the gallon bottle, handmade, dip mould, mouth blown, pontil mark, blown bottle, liquor bottle, ale bottle, double collar, 19th century bottle, collectable -
 Flagstaff Hill Maritime Museum and Village
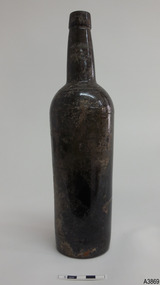
Container - Bottle, 1840s to 1910
This handmade ‘gallon’ style of bottle was generally used for storing and transporting wine and ale. Many bottles similar to this one have their bases embossed with “6 TO THE GALLON”. It is one of many artefacts recovered from unidentified shipwrecks along Victoria’s coast between the late 1960s and the early 1970s. It is now part of the John Chance Collection. The capacity of this is one-sixth of a gallon (imperial measure), which is equal to 758 ml. (American bottles were often inscribed “5 TO THE GALLON”, which is one-fifth of an American gallon, equal to 757 ml.) Contemporary home brewers can purchase new ‘6 to gallon’ bottles that hold 750 ml. and are sold in cases of 36 bottles, which is equal to 6 gallons of wine. Glass was made thousands of years ago by heating together quartz-sand (Silica), lime and potash. Potash was obtained from burnt wood, but these days potash is mined. The natural sand had imperfections such as different forms of iron, resulting in ‘black’ glass, which was really dark green or dark amber colour. The ‘black’ glass was enhanced by residual carbon in the potash. Black glass is rarely used nowadays but most beer, wine, and liquors are still sold in dark coloured glass. Glass vessels were core-formed from around 1500 BC. An inner core with the vessel’s shape was formed around a rod using a porous material such as clay or dung. Molten glass was then modelled around the core and decorated. When the glass had cooled the vessel was immersed in water and the inner core became liquid and was washed out. Much more recently, bottlers were crafted by a glassblower using molten glass and a blow pipe together with other hand tools. Another method was using simple moulds, called dip moulds, that allowed the glass to be blown into the mould to form the base, then the glassblower would continue blowing free-form to shape the shoulders and neck. The bottle was then finished by applying a lip. These moulded bottles were more uniform in shape compared to the free-form bottles originally produced. English glassblowers in the mid-1800s were making some bottles with 2-piece and 3-piece moulds, some with a push-up style base, sometimes with embossing in the base as well. Improvements allowed the moulds to also have embossed and patterned sides, and straight sided shapes such as hexagons. Bottles made in full moulds usually displayed seam seams or lines. These process took skill and time, making the bottles valuable, so they were often recycled. By the early 20th century bottles were increasingly machine made, which greatly reduced the production time and cost. This bottle is historically significant as an example of a handmade, blown inscribed glass bottle manufactured in the mid-to-late 1800s for specific use as a liquor bottle. It is also historically significant as an example of liquor bottles imported into Colonial Victoria in the mid-to-late 1800s, giving a snapshot into history and social life that occurred during the early days of Victoria’s development, and the sea trade that visited the ports in those days. The bottle is also significant as one of a group of bottles recovered by John Chance, a diver in Victoria’s coastal waters in the late 1960s to early 1970s. Items that come from several wrecks have since been donated to the Flagstaff Hill Maritime Village’s museum collection of shipwreck artefacts by his family, illustrating this item’s level of historical value. Bottle, olive green glass, handmade. Tall slim, Gallon style liquor bottle. Applied double collar lip; square upper with flared lower. Neck is slightly bulged and there is a mould seam where shoulder joins base. Body tapers inward to base. Uneven base with deep push-up centre with small pontil mark. Scratches and imperfections in glass. Also encrustations on surface. flagstaff hill, warrnambool, flagstaff hill maritime museum, maritime museum, shipwreck coast, flagstaff hill maritime village, great ocean road, shipwreck artefact, john chance, glass bottle, antique bottle, gallon bottle, handmade, dip mould, mouth blown, pontil mark, blown bottle, liquor bottle, ale bottle, double collar, 19th century bottle, collectable -
 Flagstaff Hill Maritime Museum and Village
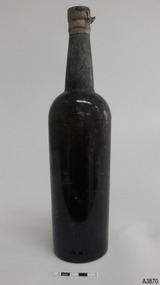
Container - Bottle, 1840s to 1910
This handmade ‘gallon’ style of bottle was generally used for storing and transporting wine and ale. Many bottles similar to this one have their bases embossed with “6 TO THE GALLON”. It is one of many artefacts recovered from unidentified shipwrecks along Victoria’s coast between the late 1960s and the early 1970s. It is now part of the John Chance Collection. The capacity of this is one-sixth of a gallon (imperial measure), which is equal to 758 ml. (American bottles were often inscribed “5 TO THE GALLON”, which is one-fifth of an American gallon, equal to 757 ml.) Contemporary home brewers can purchase new ‘6 to gallon’ bottles that hold 750 ml. and are sold in cases of 36 bottles, which is equal to 6 gallons of wine. Glass was made thousands of years ago by heating together quartz-sand (Silica), lime and potash. Potash was obtained from burnt wood, but these days potash is mined. The natural sand had imperfections such as different forms of iron, resulting in ‘black’ glass, which was really dark green or dark amber colour. The ‘black’ glass was enhanced by residual carbon in the potash. Black glass is rarely used nowadays but most beer, wine, and liquors are still sold in dark coloured glass. Glass vessels were core-formed from around 1500 BC. An inner core with the vessel’s shape was formed around a rod using a porous material such as clay or dung. Molten glass was then modelled around the core and decorated. When the glass had cooled the vessel was immersed in water and the inner core became liquid and was washed out. Much more recently, bottlers were crafted by a glassblower using molten glass and a blow pipe together with other hand tools. Another method was using simple moulds, called dip moulds, that allowed the glass to be blown into the mould to form the base, then the glassblower would continue blowing free-form to shape the shoulders and neck. The bottle was then finished by applying a lip. These moulded bottles were more uniform in shape compared to the free-form bottles originally produced. English glassblowers in the mid-1800s were making some bottles with 2-piece and 3-piece moulds, some with a push-up style base, sometimes with embossing in the base as well. Improvements allowed the moulds to also have embossed and patterned sides, and straight sided shapes such as hexagons. Bottles made in full moulds usually displayed seam seams or lines. These process took skill and time, making the bottles valuable, so they were often recycled. By the early 20th century bottles were increasingly machine made, which greatly reduced the production time and cost. This bottle is historically significant as an example of a handmade, blown inscribed glass bottle manufactured in the mid-to-late 1800s for specific use as a liquor bottle with a set measurement of one-sixth of gallon. It is also historically significant as an example of liquor bottles imported into Colonial Victoria in the mid-to-late 1800s, giving a snapshot into history and social life that occurred during the early days of Victoria’s development, and the sea trade that visited the ports in those days. The bottle is also significant as one of a group of bottles recovered by John Chance, a diver in Victoria’s coastal waters in the late 1960s to early 1970s. Items that come from several wrecks have since been donated to the Flagstaff Hill Maritime Village’s museum collection of shipwreck artefacts by his family, illustrating this item’s level of historical value. Bottle, olive green glass, handmade. Tall slim Gallon style liquor bottle. Applied double collar lip; square upper and flared lower. Mouth has remnants of tape and wire seal. Mould seam around shoulder. Body tapers slightly inward to the base. Push-up base has pontil mark and is embossed in large letters. Base is uneven. Embossed on base "6 TO THE GALLON"flagstaff hill, warrnambool, flagstaff hill maritime museum, maritime museum, shipwreck coast, flagstaff hill maritime village, great ocean road, shipwreck artefact, john chance, glass bottle, antique bottle, gallon bottle, 6 to the gallon bottle, handmade, dip mould, mouth blown, pontil mark, blown bottle, liquor bottle, ale bottle, double collar, 19th century bottle, collectable -
 Flagstaff Hill Maritime Museum and Village
Container - Bottle, 1840s to 1910
This handmade ‘gallon’ style of bottle was generally used for storing and transporting wine and ale. Many bottles similar to this one have their bases embossed with “6 TO THE GALLON”. However, this bottle is rare, in that the base has been embossed then over-embossed with the same text, letters overlapping. It is one of many artefacts recovered from unidentified shipwrecks along Victoria’s coast between the late 1960s and the early 1970s. It is now part of the John Chance Collection. The capacity of this is one-sixth of a gallon (imperial measure), which is equal to 758 ml. (American bottles were often inscribed “5 TO THE GALLON”, which is one-fifth of an American gallon, equal to 757 ml.) Contemporary home brewers can purchase new ‘6 to gallon’ bottles that hold 750 ml. and are sold in cases of 36 bottles, which is equal to 6 gallons of wine. Glass was made thousands of years ago by heating together quartz-sand (Silica), lime and potash. Potash was obtained from burnt wood, but these days potash is mined. The natural sand had imperfections such as different forms of iron, resulting in ‘black’ glass, which was really dark green or dark amber colour. The ‘black’ glass was enhanced by residual carbon in the potash. Black glass is rarely used nowadays but most beer, wine, and liquors are still sold in dark coloured glass. Glass vessels were core-formed from around 1500 BC. An inner core with the vessel’s shape was formed around a rod using a porous material such as clay or dung. Molten glass was then modelled around the core and decorated. When the glass had cooled the vessel was immersed in water and the inner core became liquid and was washed out. Much more recently, bottlers were crafted by a glassblower using molten glass and a blow pipe together with other hand tools. Another method was using simple moulds, called dip moulds, that allowed the glass to be blown into the mould to form the base, then the glassblower would continue blowing free-form to shape the shoulders and neck. The bottle was then finished by applying a lip. These moulded bottles were more uniform in shape compared to the free-form bottles originally produced. English glassblowers in the mid-1800s were making some bottles with 2-piece and 3-piece moulds, some with a push-up style base, sometimes with embossing in the base as well. Improvements allowed the moulds to also have embossed and patterned sides, and straight sided shapes such as hexagons. Bottles made in full moulds usually displayed seam seams or lines. These process took skill and time, making the bottles valuable, so they were often recycled. By the early 20th century bottles were increasingly machine made, which greatly reduced the production time and cost. This bottle is a rare find, in that the base has been over-embossed with the same lettering, letters overlapping one another. This bottle is historically significant as an example of a handmade, blown inscribed glass bottle manufactured in the mid-to-late 1800s for specific use as a liquor bottle with a set measurement of one-sixth of gallon. It is also historically significant as an example of liquor bottles imported into Colonial Victoria in the mid-to-late 1800s, giving a snapshot into history and social life that occurred during the early days of Victoria’s development, and the sea trade that visited the ports in those days. The bottle is also significant as one of a group of bottles recovered by John Chance, a diver in Victoria’s coastal waters in the late 1960s to early 1970s. Items that come from several wrecks have since been donated to the Flagstaff Hill Maritime Village’s museum collection of shipwreck artefacts by his family, illustrating this item’s level of historical value. Bottle, over embossed, brown glass, handmade, rare. Tall slim Gallon style liquor bottle. Applied double collar lip; square upper and flared lower. Mouth has sealing tape remnants around top. Mould seam around shoulder. Body tapers inwards to push-up base. Top edge of lip has application faults. There is also a rectangular indent in the upper edge of lip. Base is embossed and over embossed, with the letters overlapping each other. Embossed on base "6 TO THE GALLON", then over-embossed with the same "6 TO THE GALLON"flagstaff hill, warrnambool, flagstaff hill maritime museum, maritime museum, shipwreck coast, flagstaff hill maritime village, great ocean road, shipwreck artefact, john chance, glass bottle, antique bottle, gallon bottle, 6 to the gallon bottle, handmade, dip mould, mouth blown, pontil mark, blown bottle, liquor bottle, ale bottle, double collar, 19th century bottle, collectable, over embossed, rare -
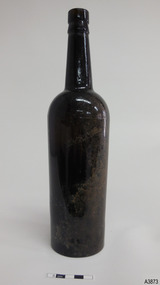 Flagstaff Hill Maritime Museum and Village
Container - Bottle, 1840s to 1910
This handmade ‘gallon’ style of bottle was generally used for storing and transporting wine and ale. Many bottles similar to this one have their bases embossed with “6 TO THE GALLON”. It is one of many artefacts recovered from an unidentified shipwrecks along Victoria’s coast between the late 1960s and the early 1970s. It is now part of the John Chance Collection. The capacity of this is one-sixth of a gallon (imperial measure), which is equal to 758 ml. (American bottles were often inscribed “5 TO THE GALLON”, which is one-fifth of an American gallon, equal to 757 ml.) Contemporary home brewers can purchase new ‘6 to gallon’ bottles that hold 750 ml. and are sold in cases of 36 bottles, which is equal to 6 gallons of wine. Glass was made thousands of years ago by heating together quartz-sand (Silica), lime and potash. Potash was obtained from burnt wood, but these days potash is mined. The natural sand had imperfections such as different forms of iron, resulting in ‘black’ glass, which was really dark green or dark amber colour. The ‘black’ glass was enhanced by residual carbon in the potash. Black glass is rarely used nowadays but most beer, wine, and liquors are still sold in dark coloured glass. Glass vessels were core-formed from around 1500 BC. An inner core with the vessel’s shape was formed around a rod using a porous material such as clay or dung. Molten glass was then modelled around the core and decorated. When the glass had cooled the vessel was immersed in water and the inner core became liquid and was washed out. Much more recently, bottlers were crafted by a glassblower using molten glass and a blow pipe together with other hand tools. Another method was using simple moulds, called dip moulds, that allowed the glass to be blown into the mould to form the base, then the glassblower would continue blowing free-form to shape the shoulders and neck. The bottle was then finished by applying a lip. These moulded bottles were more uniform in shape compared to the free-form bottles originally produced. English glassblowers in the mid-1800s were making some bottles with 2-piece and 3-piece moulds, some with a push-up style base, sometimes with embossing in the base as well. Improvements allowed the moulds to also have embossed and patterned sides, and straight sided shapes such as hexagons. Bottles made in full moulds usually displayed seam seams or lines. These process took skill and time, making the bottles valuable, so they were often recycled. By the early 20th century bottles were increasingly machine made, which greatly reduced the production time and cost. This bottle is historically significant as an example of a handmade, blown inscribed glass bottle manufactured in the mid-to-late 1800s for specific use as a liquor bottle with a set measurement of one-sixth of gallon. It is also historically significant as an example of liquor bottles imported into Colonial Victoria in the mid-to-late 1800s, giving a snapshot into history and social life that occurred during the early days of Victoria’s development, and the sea trade that visited the ports in those days. The bottle is also significant as one of a group of bottles recovered by John Chance, a diver in Victoria’s coastal waters in the late 1960s to early 1970s. Items that come from several wrecks have since been donated to the Flagstaff Hill Maritime Village’s museum collection of shipwreck artefacts by his family, illustrating this item’s level of historical value. Bottle, brown glass, Tall slim gallon style. Applied double collar lip; upper is straight, lower is flared. Lip has bumps around the top. Neck has slight taper towards shoulder, which has a shoulder seam from the mould. Body tapers inwards towards base. Push up base has a pontil mark. Base is embossed.Embossed on base "6 TO THE GALLON"flagstaff hill, warrnambool, flagstaff hill maritime museum, maritime museum, shipwreck coast, flagstaff hill maritime village, great ocean road, shipwreck artefact, john chance, glass bottle, antique bottle, gallon bottle, 6 to the gallon bottle, handmade, dip mould, mouth blown, pontil mark, blown bottle, liquor bottle, ale bottle, double collar, 19th century bottle, collectable -
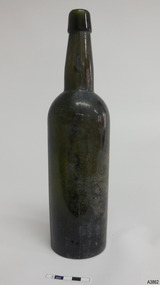 Flagstaff Hill Maritime Museum and Village
Container - Bottle, Mid-to-late 1800s
This olive green bottle was handmade by a glassblower and is the typical shape of a ‘gallon’ type liquor bottle, which has the capacity of one-sixth of an imperial gallon, about 750ml. It was made around the mid-to-late 1800s. The bottle was recovered from an unnamed shipwreck in the coastal water of Victoria. It is part of the John Chance Collection. Glassblowers made bottles like this one by blowing into a long metal pipe or reed with a blob of molten glass at the end of it. The shape of the glass would be blown out to fit into the shape of the mould. Once it set, the glass was removed from the mould and the glassblower would continue using the pipe to create the neck and another tool to finish the base. The bottle would be cracked off the end of the glassblower’s pipe and a blob of molten glass would be added to the top to form the mouth and lip of the bottle. The seal was usually a cork, often held in place with tape. Although the bottle is not linked to a particular shipwreck, it is recognised as being historically significant as an example of bottles imported for use in Colonial Victoria in the mid-to-late 1800s. The bottle is also significant as it was recovered by John Chance, a diver in Victoria’s coastal water in the late 1960s to early 1970s. Items that come from several wrecks have since been donated to the Flagstaff Hill Maritime Village’s museum collection by his family, illustrating this item’s level of historical value. Bottle, dark olive green glass, tall thin Gallon type. Lip is straight, deep, with thin horizontal lines in glass. Neck has gradual flare, body has side seams, heel has uneven thickness, and base is concave, without pontil mark. No inscriptions. Glass has imperfections. Handmade in mould. Body has score marks and is worn down one side. flagstaff hill, warrnambool, flagstaff hill maritime museum, maritime museum, shipwreck coast, flagstaff hill maritime village, great ocean road, shipwreck artefact, john chance, glass bottle, antique bottle, gallon bottle, handmade, mouth blown, pontil mark, blown bottle, liquor bottle, 19th century bottle, collectable, olive glass, green glass, mould, 1800s bottle -
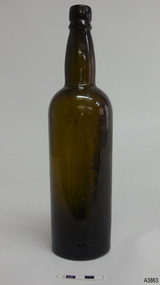 Flagstaff Hill Maritime Museum and Village
Container - Bottle, Mid-to-late 1800s
This olive green bottle was handmade by a glassblower and is the typical shape of a ‘gallon’ type liquor bottle, which has the capacity of one-sixth of an imperial gallon, about 750ml. It was made around the mid-to-late 1800s. The bottle was recovered from an unnamed shipwreck in the coastal water of Victoria. It is part of the John Chance Collection. Glassblowers made bottles like this one by blowing into a long metal pipe or reed with a blob of molten glass at the end of it. The shape of the glass would be blown out to fit into the shape of the mould. Once it set, the glass was removed from the mould and the glassblower would continue using the pipe to create the neck and another tool to finish the base. The bottle would be cracked off the end of the glassblower’s pipe and a blob of molten glass would be added to the top to form the mouth and lip of the bottle. The seal was usually a cork, often held in place with tape. Although the bottle is not linked to a particular shipwreck, it is recognised as being historically significant as an example of bottles imported for use in Colonial Victoria in the mid-to-late 1800s. The bottle is also significant as it was recovered by John Chance, a diver in Victoria’s coastal water in the late 1960s to early 1970s. Items that come from several wrecks have since been donated to the Flagstaff Hill Maritime Village’s museum collection by his family, illustrating this item’s level of historical value. Bottle, dark olive green glass, tall thin Gallon type. Lip is double; rounded upper, flared lower. Neck is slightly bulbous. Body has shoulder seam, then tapers inwards to base. Concave base with small pontil mark. No inscriptions. Handmade in mould. Body has sediment inside, top to bottom. Glass is worn down one side. flagstaff hill, warrnambool, flagstaff hill maritime museum, maritime museum, shipwreck coast, flagstaff hill maritime village, great ocean road, shipwreck artefact, john chance, glass bottle, antique bottle, gallon bottle, handmade, mouth blown, pontil mark, blown bottle, liquor bottle, 19th century bottle, collectable, olive glass, green glass, mould, 1800s bottle, bulbous neck -
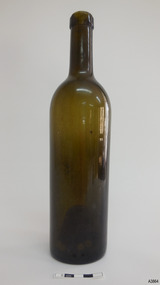 Flagstaff Hill Maritime Museum and Village
Container - Bottle, Mid-to-late 1800s
This olive green bottle was handmade by a glassblower and is the typical shape of a ‘gallon’ type liquor bottle, which has the capacity of one-sixth of an imperial gallon, about 750ml. It was made around the mid-to-late 1800s. The bottle was recovered from an unnamed shipwreck in the coastal water of Victoria. It is part of the John Chance Collection. The elongated bubbles in the glass are likely from the glass being blown into a mould. Glassblowers made bottles like this one by blowing into a long metal pipe or reed with a blob of molten glass at the end of it. The shape of the glass would be blown out to fit into the shape of the mould. Once it set, the glass was removed from the mould and the glassblower would continue using the pipe to create the neck and another tool to finish the base. The bottle would be cracked off the end of the glassblower’s pipe and a blob of molten glass would be added to the top to form the mouth and lip of the bottle. The seal was usually a cork, often held in place with tape. Although the bottle is not linked to a particular shipwreck, it is recognised as being historically significant as an example of bottles imported for use in Colonial Victoria in the mid-to-late 1800s. The bottle is also significant as it was recovered by John Chance, a diver in Victoria’s coastal water in the late 1960s to early 1970s. Items that come from several wrecks have since been donated to the Flagstaff Hill Maritime Village’s museum collection by his family, illustrating this item’s level of historical value. Bottle, dark olive green glass, tall thin Gallon type. Mouth is applied roughly, lip is straight and narrow. Body has no visible seams; tapers gently inwards to base. Concave base is deep and has a pontil mark. No inscriptions. Handmade bottle has elongated air bubbles and imperfections in glass.flagstaff hill, warrnambool, flagstaff hill maritime museum, maritime museum, shipwreck coast, flagstaff hill maritime village, great ocean road, shipwreck artefact, john chance, glass bottle, antique bottle, gallon bottle, handmade, mouth blown, pontil mark, blown bottle, liquor bottle, 19th century bottle, collectable, olive glass, green glass, mould, 1800s bottle -
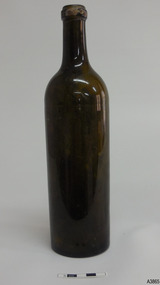 Flagstaff Hill Maritime Museum and Village
Container - Bottle, Mid-to-late 1800s
This olive green bottle was handmade by a glassblower and is the typical shape of a ‘gallon’ type liquor bottle, which has the capacity of one-sixth of an imperial gallon, about 750ml. It was made around the mid-to-late 1800s. The bottle was recovered from an unnamed shipwreck in the coastal water of Victoria. It is part of the John Chance Collection. This bottle has a pontil mark in the centre of the base and four pontil marks around the heel. It also has tape around its mouth and lip, adding a little more interest to its history. Glassblowers made bottles like this one by blowing into a long metal pipe or reed with a blob of molten glass at the end of it. The shape of the glass would be blown out to fit into the shape of the mould. Once it set, the glass was removed from the mould and the glassblower would continue using the pipe to create the neck and another tool to finish the base. The tool that the glassblower or his assistant used to steady the bottle left four marks in the heel of the bottle. The bottle would be cracked off the end of the glassblower’s pipe and a blob of molten glass would be added to the top to form the mouth and lip of the bottle. The seal was usually a cork, often held in place with tape. Although the bottle is not linked to a particular shipwreck, it is recognised as being historically significant as an example of bottles imported for use in Colonial Victoria in the mid-to-late 1800s. This bottle is a little more significant than other similar bottles in our collection because it has multiple pontil marks, four around the heel of the base as well as one in the centre of the base. These marks were left by the tool or tools used to hold or steady the bottle as the maker completed the process. The bottle is also significant as it was recovered by John Chance, a diver in Victoria’s coastal water in the late 1960s to early 1970s. Items that come from several wrecks have since been donated to the Flagstaff Hill Maritime Village’s museum collection by his family, illustrating this item’s level of historical value. Bottle, dark olive green glass, tall thin Gallon type. Applied mouth with remnants of tape around lip. Lip is straight and narrow. Low shoulder seam; glass above seam has more shine than below seam. Body tapers gently inwards to base. Rim of heel has four equidistant pontil marks. Base is concave with central pontil mark. No inscriptions. Handmade bottle. Sediment inside bottle on one side, top to bottom. flagstaff hill, warrnambool, flagstaff hill maritime museum, maritime museum, shipwreck coast, flagstaff hill maritime village, great ocean road, shipwreck artefact, john chance, glass bottle, antique bottle, gallon bottle, handmade, mouth blown, pontil mark, blown bottle, liquor bottle, 19th century bottle, collectable, olive glass, green glass, mould, 1800s bottle, multiple pontil marks -
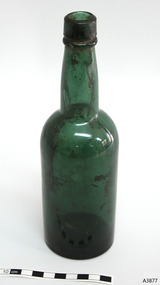 Flagstaff Hill Maritime Museum and Village
Container - Bottle, 1840s-1870s
This teal coloured bottle (blue-green, non-olive) has been handmade from about the 1840s-1870s. The bottle, possibly used to store soda or mineral water, was found in the coastal waters of Victoria about 100 years from when it was made. It is part of the John Chance Collection. The teal, or blue-green, colour of this bottle’s glass is reasonably rare. The colour is probably the result of a combination of cobalt (blue), iron (yellow-orange) and chromium (green) that may have been in the raw silica, or perhaps added to the glass sand before making the glass. Glassblowers made bottles like this one by blowing air through a long pipe into the molten glass blob at the end of the pipe. The glass was blown out to fit into the shape of the cylindrical dip mould. Once it hardened, the glass was removed from the mould and the glassblower would continue using the pipe to create the neck while carefully using a tool to hold the base. A ponty tool was used to complete the shape of the base. The bottle would be cracked off the end of the glassblower’s pipe and a blob of molten glass would be wrapped around the top of the neck and shaped to finish the lip of the bottle, sometimes using a tool to do this. The seal was usually a cork, often held in place with wax or wire with tape over it to seal the aerated drink inside. The gutter between the upper and lower lip was used to anchor the seal. This style of handmade bottles would often have horizontal bubbles in the applied finish, caused by twisting the glass, and vertical bubbles and diagonal lines in the neck and body from it being blown, and a mark in the base where the ponty tool had been attached. Although the bottle is not linked to a particular shipwreck, it is recognised as being historically significant as an example of handmade, mid-19th century bottles imported for use in Colonial Victoria in the mid-to-late 1800s. The bottle is significant for its rarity, as its teal, blue-green colour is unusual. It is a valuable addition to our collection of 1800s handmade bottles. The bottle is also significant as it was recovered by John Chance, a diver in Victoria’s coastal waters in the late 1960s to early 1970s. Items that come from several wrecks have since been donated to the Flagstaff Hill Maritime Village’s museum collection by his family, illustrating this item’s level of historical value. Bottle; unusual dark teal (blue-green, non-olive) opaque glass, medium size, cork-top style. Handmade with applied double-collar lip with straight side upper and a ring lower. The edge of the mouth is uneven. Neck is slightly bulbous. Body has shoulder seam, then tapers inwards to base, shallow base. Heel is uneven width. Base is shallow with glass of different density. Bubbles in the body and an elongated bubble at base of neck. Sediment inside bottle. Chip in lip. Scratched surface.flagstaff hill, warrnambool, flagstaff hill maritime museum, maritime museum, shipwreck coast, flagstaff hill maritime village, great ocean road, shipwreck artefact, john chance, glass bottle, antique bottle, handmade, mouth blown, blown bottle, 19th century bottle, collectable, bottle, green glass, blue-green glass, teal glass, non-olive green glass, dip mould, soda bottle