Showing 2485 items
matching bendigo city
-
 Eltham District Historical Society Inc
Journal, Peter Doughtery, ArtStreams: Whittlesea, Banyule, Darebin, Manningham, Nillumbik & Yarra; Vol. 9, No. 1, Mar-Apr 2004, 2004
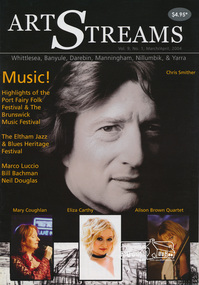
Vol. 9, No. 1, Mar-Apr 2004 CONTENTS Comment 2 Coming to a festival near you 3 Eltham Jazz and Blues Festival 7 Marco Luccio - printmaker, by Clive Dickson 8 Easy Living at Dizzy's by Odette Kelada 10 Reading Arcadia by John Jenkins 12 Poetry News by Ian McBryde 14 Local Colour - photography by Bill Bachman 16 Tributes to Melanie Shanahan 18 Nel Douglas & the Murrumbeena Connection 20 Book Reviews 22 CD Review 24 War Memorial Sculptures 25 Artin' About 26 Wining & Dining 30 Art Services and Classes 32 "Peter Dougherty has been involved in the local art scene for many years. As publisher and editor of the arts magazine Artstreams, his comments on the various branches of the arts are widely respected. His "The Arts" column in the Diamond Valley Leader presents a brief summary for a much wider cross section of the local community. Peter also operates his own gallery and the Artstreams Cafe at the St Andrews market. Peter has a wealth of knowledge about present day and historical aspects of local art and artists." - Eltham District Historical Society Newsletter No. 161, March 2005Colour front and back cover with feature articles and literary pieces with photographs and advertisements printed in black and white. 36 pages, 30 cm. Vol. 1, no. 1 (Nov. 1996) - Vol. 10, no. 5 (summer ed. 2005/06) art streams, city of whittlesea community festival, chris smither, mary coughlan, eliza carthy, alison brown quartet, music festivals, sushi wushi eltham, bundoora homestead, eltham jazz festival, marco luccio, warrandyte cafe, clive dickson, bahnhof cafe, montsalvat, eltham fullife pharmacy, nyora road gallery, john jenkins, latrobe university, poetry, ian mcbryde, potters, eltham gourmet poultry & game, eltham wiregrass gallery, bill bachman, melanie shanahan, neil douglas, murrumbeena collection, hurnall's decorative arts gallery, st andrews hotel, leigh conkie, greensborough war memorial park sculptures, il primo restaurant carlton, bulleen art & garden centre, northcote pottery, hurstbridge galleries, thompsons amcal pharmacy, bendigo bank, hurstbridge & districts community bank branch -
 Eltham District Historical Society Inc
Journal, Peter Doughtery, ArtStreams: Whittlesea, Banyule, Darebin, Manningham, Nillumbik & Yarra; Vol. 9, No. 2, May-Jun 2004, 2004
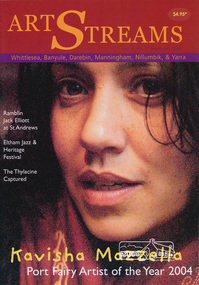
Vol. 9, No. 2, May-Jun 2004 CONTENTS Comment 2 Kavisha Mazzella 3 The Thylacine Captured 6 A Special Place & Special People 8 My Life as a Dyke at LaMama 11 Reading the teacups with Julie Tipene-O'Toole 12 Sculture as Calligraphy 14 Poetry News by Ian McBryde 15 Eltham Jazz & Heritage Festival 16 Ramblin Jack Elliot 18 A Correspondence with the Heart 19 A Pony Called Letter 20 Shakespeare at Montsalvat 22 Book Review 23 CD Reviews 24 Arti n' About 26 Wining & Dining 30 Art Services and Classes 32 "Peter Dougherty has been involved in the local art scene for many years. As publisher and editor of the arts magazine Artstreams, his comments on the various branches of the arts are widely respected. His "The Arts" column in the Diamond Valley Leader presents a brief summary for a much wider cross section of the local community. Peter also operates his own gallery and the Artstreams Cafe at the St Andrews market. Peter has a wealth of knowledge about present day and historical aspects of local art and artists." - Eltham District Historical Society Newsletter No. 161, March 2005Colour front and back cover with feature articles and literary pieces with photographs and advertisements printed in black and white. 36 pages, 30 cm. Vol. 1, no. 1 (Nov. 1996) - Vol. 10, no. 5 (summer ed. 2005/06) art streams, kavisha mazzella, art streams gallery, tim burstall, bundoora homestead, sushi wushi eltham, clive dickson, thylacine, hurstbridge & districts community bank branch, bendigo bank, montsalvat, rose mercer, bahnhof cafe, plenty of colour, eltham gourmet poultry & game, mercers restaurant, stephen mercer, warrandyte cafe, odette kelada, julie tipene-o'toole, eltham fullife pharmacy, dynamic vegies, sculpture, tony trembath, poetry, ian mcbryde, eltham jazz festival, jack elliott, isaac bergman, monique delaney, st andrews hotel, latrobe university, manningham gallery, northcote pottery, congo systems, bulleen art & garden centre, hurstbridge galleries, thompsons amcal pharmacy, organic produce store, city of whittlesea heritage program -
 Port Melbourne Historical & Preservation Society
Photograph - Group with Port Melbourne Community Bus on Calder Highway, Pat Grainger, Aug 1993
This group took the free community bus to Bendigo to see daffodils at Kyneton and woollen mills at Bendigo. Photographed at apple market along the highway by Pat Grainger. PMHPS members: Liana Thompson (3 from left; Wendy Morris (4 from left); Julie Allen (far right)Photograph black and white panoramic of group with Port Melbourne Community Bus on Calder Hwy August 1993transport - bus, kath morris, val salter (?), liana thompson, mayors, wendy morris - city librarian, beatrice (betty) goddard, julie allen -
Coal Creek Community Park & Museum
Tin, jam
... Golden Bar Jam Grapefruit Marmalade from the Golden City... sides. Golden Bar Jam Grapefruit Marmalade from the Golden City ...Cylindrical tin, sealed at both ends, with label depicting fruit in orange, light blue and dark blue around sides.Golden Bar Jam Grapefruit Marmalade from the Golden City of Bendigo. -
Coal Creek Community Park & Museum
Tin, jam
... Golden Bar Jam Light Plum Jam from the Golden City... sides. Golden Bar Jam Light Plum Jam from the Golden City ...Cylindrical tin, sealed at both ends, with label depicting fruit in orange, light blue and dark blue around sides. Golden Bar Jam Light Plum Jam from the Golden City of Bendigo. -
Coal Creek Community Park & Museum
Tin, jam
... Golden Bar Jam Sweet Orange Marmalade from the Golden City... the Golden City of Bendigo. ...Cylindrical tin, sealed at both ends, with label depicting fruits in orange, light blue and dark blue around sides. Golden Bar Jam Sweet Orange Marmalade from the Golden City of Bendigo. -
 Coal Creek Community Park & Museum
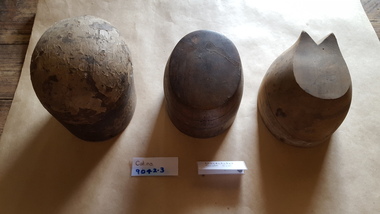
Functional object - Three hat blocks
Oliver Gilpin (1874-1942), chain store proprietor, was born on 8 July 1874 at Seven Creeks near Euroa, Victoria, fourth child and second son of William Gilpin, farmer, and his wife Dinah, née Barton, both from Tyrone, Ireland. He was educated at local state schools and became a draper's assistant at Euroa. A testimonial as 'an energetic, pushing salesman, a careful stock-keeper … honest and industrious' gained him city experience with Ball & Welch Ltd, drapers, in their Carlton store. He used an inheritance to open a drapery store at Korumburra, south Gippsland, in 1895, moving to Rutherglen in the upper Murray valley in 1899. Frustrated by irregular stock deliveries, he moved to Fitzroy, Melbourne, in 1902, seeking a warehouse and the benefits of combined supplies for effective development of country trading. By 1905 he was producing many stock items at Northcote and had established retail outlets at Bendigo and Warracknabeal. Branches at Echuca, Numurkah and Yarrawonga followed in 1906, with ten more in 1907. He moved his city establishment to East Malvern in 1911, and had opened forty shops by 1920 and seventy-four by 1928. All were managed by women, on a strictly cash basis. Drapery remained the main line, supplemented by ironmongery, crockery, school requisites and toys. Gilpin saw the Depression years as a challenge. Between 1928 and 1931 he established eighteen new branches, including two in Tasmania, at Devonport and Ulverstone. The chain included South Australian branches at Mount Gambier, Millicent and Renmark, twenty-five stores in southern and western New South Wales, and ten in suburban Melbourne. Gilpin's Chain Store News was issued monthly. In 1944 Foy & Gibson acquired a controlling interest in Gilpin's business and in 1951 the chain was bought by G. J. Coles & Co. Ltd for £1,250,000. Three wooden blocks used to display hats. 9042.1 Slightly head shaped on top 9042.2 Light timber, flat on top, a wedge at back. 9042.3 Dark timber, flat on top.hat blocks, millinery, haberdashery, gilpin, korumburra -
 City of Greater Bendigo - Civic Collection
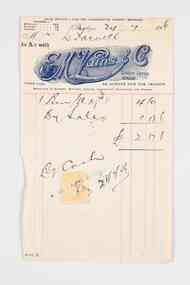
Financial record - Invoice, E.M Vains & Co
... City of Bendigo Mayor... of the Corona Lodge of Freemasons. City of Bendigo Mayor Mayor Vains ...Ernest Morton Vains (1881 - 1951) was a local business man and Bendigo councillor who arrived in Bendigo in 1897 aged 16 from Kerang. In 1916 he founded the firm E M Vains and Co with his brother Sidney and they operated from Hargreaves Street in Bendigo with branches in Elmore, Mitiamo, Dingee, Knowsley, Heathcote and Prairie. E. M. Vains was a member of the City Council from 1922 - 1926 and was elected Mayor on August 29th, 1924. He played a prominent role in many of the City's community and industry groups and was a member of the Rotary Club which was founded in 1925 and a member of the Corona Lodge of Freemasons. Single page invoice from E.M. Vains and Co Auctioneers, Stock and Station Agents Bendigo. Letterhead features the unique R M Vains & Co logo with a bulls head, printed in royal blue ink.city of bendigo mayor, mayor vains, city of greater bendigo commerce, making a nation exhibition, mayoress vains, freemason -
 Bendigo Military Museum
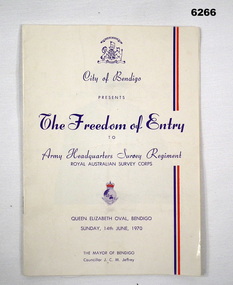
Booklet - City of Greater Bendigo Presents "The Freedom of Entry to Army Headquarters Survey Regiment", Army Headquarters Survey Regiment, 14.06.1970
... City of Greater Bendigo Presents "The Freedom of Entry to...City of Greater Bendigo Presents "The Freedom of Entry to...City of Greater Bendigo Presents "The Freedom of Entry ...This booklet is the program for the AHQ Survey Regiment Freedom of Entry to Bendigo on Sunday 14 Jun 1970 held at the Queen Elizabeth Oval, Bendigo. The ceremony was officiated by the Mayor of Bendigo Councillor CM JeffreyBooklet, B4 size, 11 pages, semi gloss paper, cover, red and blue text, contents, photos and text.army survey regiment, army svy regt, fortuna, royal australian survey corps, rasvy, asr -
 Ballarat Tramway Museum
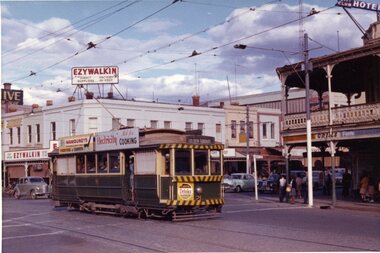
Slide - 35mm slide/s - set of 5, Noel Simons, 19/11/1962 12:00:00 AM
Set of 5 transparencies taken on 19/11/1962 on Kodak mounts. 1186.1 - Bendigo 21 bound for Golden Square at Charing Cross with The Beehive buildings and shops in Pall Mall in the background. Trams has an ad for Cohns drinks on front bumper, SEC Best for Cooking roof ad. and Mamouney's furniture roof ad. Two women passengers boarding. 1186.2 - Bendigo 26 crossing Pall Mall from Mitchell St. bound for Eaglehawk with "Ezywalkin" shop in background. Tram has an SEC 'Electric Cooking' roof ad and a 'Streets Ice cream' ad on front dash. 1186.3 - Bendigo 7 arriving at the Charing Cross stop, bound for North Bendigo. Has a Huttons dash panel ad, a Castrol roof ad. Buildings as for 1186.1. Passengers waiting at the stop. 1186.4 - Bendigo 19 leaving Charing Cross for Golden Square with City Club Hotel alongside and other buildings as for 1186.1 in the background. Tram has Briquettes ad on front dash and SEC 'Electric Cooking' roof ad. 1186.5 - Bendigo 21in High St. at corner of Short St. heading for Charing Cross. Destination half way between Depot and Railway Station. Tram has ads for Cohns Drinks on dash panel, SEC 'Cook with Electricity' and a Sandhurst Milk roof ads.Information written on in black ink and date stamped in purple ink. 1186.1 - "No. 21 in Pall Mall at Charing Cross, Bendigo" 1186.2 - "No. 26 arriving at Alexandra Fountain, Charing Cross, Bendigo" 1186.3 - "No. 7 in Pall Mall at Charing Cross, Bendigo" 1186.4 - "No. 19 in High St., Bendigo, leaving Charing Cross for Golden Square" 1186.5 - "No. 21 in High St. Bendigo, at corner of Short St." tramways, trams, bendigo, charing cross, pall mall, high st., tram 7, tram 19, tram 21, tram 26 -
 Ballarat Tramway Museum
Slide - 35mm slide/s, Noel Simons, 21/11/1962 12:00:00 AM
Set of 17 transparencies taken on 21/11/1962 on Kodak mounts. 1188.1 - Bendigo No. 11 at Depot Junction McCrae and Arnold St. with driver/conductor changing points. 1188.2 - Bendigo No. 4 at Charing Cross, side on photo, with City Club Hotel and Alexandra Fountain in the background. Tram has Castrol and SEC 'Electric Cooking' ads. 1188.3 - Bendigo No. 4 climbing View St. after tram has passed photographer. Tram has Streets Ice Cream and Cohns Soft Drinks ad on rear dash panel. In the background are the buildings in View St., including the Princess Theatre. Tram has destination of Eaglehawk. 1188.4 - Trams 2 and 4 crossing at the California Gully or Thorpe St Loop. 1188.5 - Bendigo 4 in Mt Korong Road. Tram inbound with destination of Quarry Hill, just leaving Garden Gully Loop. 1188.6 - Bendigo 4 and 17 crossing at the Hayes St. or Iron Bark Gully Loop. No. 17 bound for Eaglehawk, No. 4, Quarry Hill. 17 has two SEC roof ads and a white horse whiskey ad. 1188.7 - No. 17 bound for Eaglehawk, soon after leaving California Gully. Has large mullock heap in background. 1188.8 - Bendigo 2 and 17 crossing at the Thorpe St. or California Gully Loop. Has butchers shop in background. 1188.9 - Bendigo 17 at the Eaglehawk terminus. Has destination of Quarry Hill. In background is the hotel and shops at the terminus, showing ads for "Melbourne Bitter". Tram has two SEC 'Electric Cooking' ads. Driver and conductor about to assist two lady passengers with a pram and baby. 1188.10 - No. 17 at Eaglehawk terminus, awaiting departure. Has Eaglehawk Town Hall and Post Office in background. Tram has a Whitehorse Whiskey ad on the front dash panel. 1188.11 - No. 3 in High St. Eaglehawk, with destination of Eaglehawk. Has the shops on the south side of High St. in the background, including the Eaglehawk fish shop. Tram has two roof ads, one an SEC roof ad, and Cohns Drinks and Streets Ice cream ads on front dash panel. 1188.12 - as above, but after tram has passed photographer. Note the centre of the road poles. 1188.13 - No. 2 outbound for Eaglehawk at the intersection of Mt. Korong Road and the Calder Highway. Photo taken after the tram has passed the photographer. Has an Ampol service station in the background. 1188.14 - No. 11 leaving the Bendigo depot, crossing the bridge, with the Scrubber car in the background. 1188.15 - No. 21 at the North Bendigo terminus. Tram has destination of Golden Square and Cohns drink ad on front dash and two roof ads on side. 1188.16 - No. 11 on Golden Square route, in High St. at intersection with Old High St. 1188.17 - No. 11 at the Golden Square terminus, conductor turning the pole. Hotel on the left side of the photo. Note the road works barrier and red flag behind the tram. Slide has an end of roll mark on the right hand side of the image.Information written on in black ink and date stamped on purple ink. 1188.1 - "Birney car No. 11 in McCrae St. at Cnr of Arnold about to run into depot, Bendigo" 1188.2 - "No. 4 at Alexandra Fountain, Charing Cross Bendigo" 1188.3 - "No. 4 climbing the View St. Hill from Charing Cross, Bendigo (Eaglehawk Route)" 1188.4 - "No. 4 and 2 at Thorpe St. Loop, California Gully" 1188.5 - "No. 4 in Mt Korong Rd., Long Gully, Near Havilah Rd. (Bendigo) (Eaglehawk Route)" 1188.6 - "Nos. 17 and 4 crossing on Hayes St. Loop, Ironbark, Bendigo" 1188.7 - "No. 17 soon after leaving California Gully (Eaglehawk Route)" 1188.8 - "No.2 and 17 crossing on Thorpe St. Loop, California Gully (Eaglehawk Route)" 1188.9 - "No. 17 at Eaglehawk terminus" 1188.10 - "No. 17 at Eaglehawk terminus" 1188.11 - "No. 3 in High St. Eaglehawk" 1188.12 - "No. 3 nearing Eaglehawk terminus" 1188.13 - "No. 2 in Mt. Korong Rd., Ironbark. Calder highway on left (Eaglehawk route) 1188.14 - "Birney car No. 11 leaving Bendigo depot. Scrubber car at rear" 1188.15 - "No. 21 at North Bendigo Terminus" 1188.16 - "Birney car No. 11 in High St. Bendigo at intersection with Old High Street (Golden Square Route)" 1188.17 - "Birney Car No. 11 at Golden Square terminus, High St., Bendigo". tramways, trams, bendigo, depot junction, charing cross, view st., eaglehawk, north bendigo, golden square, tram 2, tram 3, tram 4, tram 11, tram 17, tram 21, tram scrubber -
 Ballarat Tramway Museum
Slide - 35mm slide/s, Noel Simons, Sep. 1971
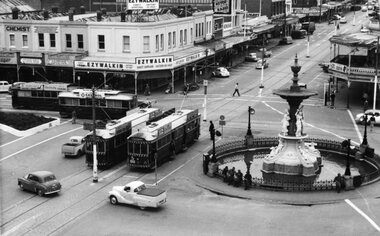
One slide on a Kodak Ready Mount made from the Association of Railway Enthusiast Provincial Tramways film strip, during September 1971 with a group of three trams at Charing Cross at dusk. Taken from an elevated position (the tower in the City Family Hotel) over looking the Alexandra fountain and looking towards the North on a wet evening. Two single truckers (1 possibly No. 6) and one bogie car waiting to proceed."Rainy evening at Charing Cross" in blue ink and "Sept 1971" in purple ink using a hand stamp.tramways, trams, charing cross, bendigo, tram 6 -
 Ballarat Tramway Museum
Slide - 35mm slide/s - set of 24, Noel Simons, 20/05/1971 12:00:00 AM
Set of 24 transparencies taken on 20/5/1971 on Kodak mounts. 1195.1 - Bendigo 19 arriving at Charing Cross en route to North Bendigo with Fountain Plaza and the City Family Hotel in the background. No. 19 has two roof ads for the SEC. -'Electricity better for cooking' and 'Everything's under control in my all electric kitchen' 1195.2 - as above, but standing at the Charing cross stop, with the Beehive Stores and other buildings along the east side of Pall Mall in the background. 1195.3 - No 21 ex Golden Square crossing View St. trackwork in front of No. 25 waiting to depart for Quarry Hill. No.21 has two roof ads (as for No.19 in 1195.1) and No.25 has one SEC roof ad and another. Ezywalkin sign in the background, and Fountain Plaza. 1195.4 - as for 1195.3, but after 21 has arrived and 25 left for Quarry Hill. Has Ezywalkin store and the Beehive store in the background. 1195.5 - No. 5 at the Eaglehawk terminus. Photo taken with a cannon in foreground looking along High St. Eaglehawk. Has shops on the west side of High St. in the background. 1195.6 - No. 5 at the Eaglehawk terminus, close up of the rear of the tram - note tow bar arrangement. Has destination of Quarry Hill. 1195.7-Nos.25 and 5 crossing at the Thorpe St. Loop, California Gully. No. 25 bound for Eaglehawk (has SEC Briquette and electric cooking roof ads) and 5 en route for Quarry Hill with a SEC and Cinzano roof ad. 1195.8 - as for 1195.7, but after trams have passed each other. Has Borough Auto Service building in the background. 1195.9 - No. 5 in Mt Korong Road, towards Bamard Street, photo taken after tram has passed photographer. 1195.10 - No. 30 at the Golden Square terminus with the Milk Bar on the right hand side of the photograph. 1195.11 - No. 30 inbound at Fire Station Loop, High St. Golden Square. Has old fire station in the background. Passengers are boarding the tramcar. 1195.12 - No. 30 in High St, bound for North Bendigo between Vine and Wattle Streets. 1195.13 - No. 5 bound for Eaglehawk waits at Iron Bark Gully Loop, at Hayes St. 1195.14 - No. 5 and No. 2 crossing at Iron Bark Gully Loop. 1195.15 - No. 5 bound for Eaglehawk leaving the Manchester Loop, Long gully. 1195.16 - No. 5 passing William Street, Long Gully en route to Eaglehawk. 1195.17 - No. 5 just before the California Gully Crossing Loop. 1195.18 - Nos. 5 and 26 crossing at California Gully crossing Loop. No. 5 heading to Eaglehawk, 26, Quarry Hill. 1195.19 - No. 5 in High St. Eaglehawk with Bob Moyle's Victoria Hotel and the TAB in the background. 1195.20 - No. 5 in High St. Eaglehawk approaching the terminus. Photo taken after the tram has passed the photographer. Has Foodland store and J. Best Fruit supply in the background, along with Eaglehawk Town Hall. 1195.21 - No. 5 at the Eaglehawk terminus, photo taken along seldom used track along High St. 1195.22 - as for 1195.22 - but at the very end of the track. 1195.23 - No. 5 en route for Quarry Hill climbs High St. Eaglehawk with the Victoria Hotel and Eaglehawk Town Hall in the background. 1195.24 - No. 5 and 25 crossing at Jobs Gully Loop. Note 25 has a black on white destination roll, while No. 5 has a white on black destination roll. Information written on in black ink and date stamped on purple ink. 1195.1 - "No. 19 arrives at Charing Cross Bendigo from Golden Square" 1195.2 - "No. 19 about to leave Charing Cross for North Bendigo" 1195.3 - "No. 25 awaiting departure for Quarry Hill, watches No. 21 arrive at Charring Cross from Golden Square" 1195.4 - "No. 21 on North Bendigo service and No. 25 on Quarry Hill run await departure at Charing Cross" 1195.5 - "No. 5 at Eaglehawk terminus" 1195.6 - "No. 5 at Eaglehawk terminus" 1195.7 - "Nos. 5 and 25 crossing at Thorpe St. Loop, California". 1195.8 - "Nos. 25 and 5 crossing Thorpe St. Loop, California Gully". 1195.9 - "No. 5 descending Mt Korong Rd. towards Bamard St." 1195.10 - "Birney car No. 30 at Golden Square terminus" 1195.11 - "Birney car No. 30 in High Street near Thistle Street (Fire Station Loop)" 1195.12 - "No. 30 in High St. between vine and Wattle Streets" 1195.13 - "No. 25 at Hayes Street Loop Iron Bark". 1195.14 - "Nos. 2 and 5 crossing at Hayes Street Loop Iron Bark" 1195.15 - "No. 5 at Manchester Loop opposite Havilah Road, Long Gully" 1195.16 - "No. 5 passing William Street, Long Gully". 1195.17 - "No. 5 at California Gully" 1195,18 - "Nos. 26 and 5 at Thorpe St. Loop, California Gully". 1195.19 - "No. 5 in High St. Eaglehawk". 1195.20 - "No. 5 approaching Eaglehawk terminus" 1195.21 - "No. 5 at Eaglehawk terminus" 1195.22 - "No. 5 at Eaglehawk terminus" 1195.23 - "No. 5 in High St. Eaglehawk" tramways, trams, bendigo, charing cross, eaglehawk, california gully, golden square, iron bark gully, jobs gully, tram 2, tram 5, tram 19, tram 21, tram 25, tram 26, tram 30 -
 Ballarat Tramway Museum
Slide - 35mm slide/s - set of 25, Noel Simons, 26/02/1972 12:00:00 AM
Set of 25 transparencies taken on 26/2/1972 on Kodak mounts. 1204.1 - Bendigo No. 5 - just arrived at Manchester Loop near Havilah Road, Long Gully. Photo taken after tram has passed photographer. 1204.2 - No. 26 in Backhaus St. Long Gully passing William St, en route to Quarry Hill. Photo taken after tram has passed photographer. 1204.3 - No. 5 climbing the High St. Hill Eaglehawk, heading for Quarry Hill with the buildings on the West side of High St. in the background, including the Eaglehawk Town Hall. 1204.4 - as for 1204.3, but tram close up. 1204.5 - as for 1204.3, but after tram has passed photographer. 1204.6 - No. 5 at intersection of Mt Korong Road Ironbark and Calder Highway, with the AMPOL service 'station in the background. Photo taken after tram has passed photographer. 1204.7 - No. 26 en route to Quarry Hill shortly after leaving Needle Loop, passing William St., Long Gully. 1204.8 - No. 5 at California Gully Loop, picking up a passenger, with the shops at Long Gully in the background. Photo taken after tram has passed photographer. 1204.9 - No. 5 in Long Gully, en route to Quarry Hill. Photo taken after tram has passed photographer. 1204.10 - No. 2 at Eaglehawk terminus with the Eaglehawk Town Hall and Post Office in the background. Tram has two SEC roof ads. 1204.11 - No. 2 at Eaglehawk terminus, close up. 1204.12 - as for 1204.11, but through the park gates. 1204.13 - as for 1204.11, but with tram stop shelters in the foreground and buildings on the West side of High St in the background. 1204.14 - No. 2 in Mt. Korong Rd, midway between California Gully Loop and Needle Loop. Photo taken after tram has passed photographer. 1204.15 - No. 5 in Long Gully, en route to Quarry Hill. 1204.16 - as for 1204.15, but with trams departed loop. Has an ESSO service station in the background. 1204.17 - No. 26 leaves Charing Cross up View St.. Photo taken after tram has passed photographer. Has Armstrong Tyre Service, Cohns Drinks ad on a building and the T&G building in the background. Also Firestone ads on the tyre service building. 1204.18 - No. 5 waits at Charing Cross with the Alexandra Fountain in the background. Tram has two SEC roof ads, 'Everything s fine in my all electric kitchen' and 'Electricity Best for Cooking'. Has RACV, Colonial Mutual Life buildings in the background and the planting areas around Charing Cross gardens in the foreground. 1204.19 - No. 21 en route to North Bendigo arrives at Charing Cross, with passengers waiting to board. No. 5 in the background. In the background is the Fountain Gate Plaza building and the City Family Hotel. 1204.20 - as for 1204.19, but with No. 7 en route to Golden Square. 1204.21 - as for 1204.19, but closer up. 1204.22 - as for 1204.18 1204.23 - No. 25 in Nolan St. near the crossing of Bendigo Creek, running a special tram tour. 1204.24 - No. 25 on a special charter, in Weeroona Ave. at Cnr of Caledonia St. passing the Gas works. 1204.25 - Nos. 25 (showing Golden Square), 7 and 26 at Charing Cross. Has fountain in the background.Information written on in blue ink and date stamped on purple ink. 1204.1 - "No. 5 at Manchester Loop, near Havilah Rd. Long Gully." 1204.2 - "No. 26 in Backhaus St. Long Gully passing William St." 1204.3 - "No. 5 in High St. Eaglehawk." 1204.4 - "No. 5 in High St. Eaglehawk." 1204.5 - "No. 5 in High St. Eaglehawk." 1204.6 - "No. 5 in Mt. Korong Rd., Ironbark, passing Calder Highway Junctn." 1204.7 - "No. 26 shortly after leaving Needle Loop, passing William St., Long Gully. No. 5 cresting hill in distance." 1204.8 - "No. 5 at California Gully Loop." 1204.9 - "No. 5 in Long Gully" 1204.10 - "No. 2 at Eaglehawk terminus." 1204.11 - "No. 2 at Eaglehawk terminus." 1204.12 - "No. 2 at Eaglehawk terminus." 1204.13 - "No. 2 at Eaglehawk terminus." 1204.14 - "No. 2 in Mt. Korong Rd, midway between California Gully Loop and Needle Loop. 1204.15 - "Nos. 2 and 26 crossing at Long Gully." 1204.16 - "No. 26 leaves Long Gully loop for Eaglehawk as No. 2 pulls out of the far end towards Bendigo" 1204.17 - "No. 26 beginning the climb up View St. from Charing Cross." 1204.18 - "No. 5 at Charing Cross." 1204.19 - "No 21 arrives at Charing Cross from Golden Square while No. 5 awaits departure time for Eaglehawk." 1204.20 - "Nos. 7, 21, and 2 (behind which is No. 5) at Charing Cross." 1204.21 - "Nos. 7, 21, and 2 at Charing Cross." 1204.22 - "No. 5 at Charing Cross." 1204.23 - "No. 25 in Nolan St. near Bendigo creek crossing" 1204.24 - "No. 25 in Weeroona Ave. at cnr of Caledonia St." 1204.25 - "Nos. 25, 7, 26 and 2 (behind 26) at Charing Cross."tramways, trams, bendigo, eaglehawk, long gully, california gully, charing cross, north bendigo, tram 2, tram 5, tram 7, tram 21, tram 25, tram 26 -
 Ballarat Tramway Museum
Slide - 35mm slide/s - set of 12, Noel Simons, 28 Feb. 1972
Set of 12 transparencies taken on 28/2/1972 on Kodak mounts. 1207.1 - Bendigo 26 and 2 at Charing Cross. 26 en route for Eaglehawk, 2 for Quarry Hill. Has the Colonial Mutual Life, Armstrong Tyre Service, and Australian Mutual Provident Society buildings and a Cohns Drinks ad. in the background. 1207.2 - as for 1207.1 but with Alexandra fountain in the foreground. 1207.3 - No. 2 in Mitchell St. heading for Quarry Hill. Photo taken after tram has passed photographer. Has buildings on either side of Mitchell St. in the background, including the Plaza Theatre. 1207.4 - No. 6 en route for Golden Square departing Charing Cross. Has the RACV and ANZ bank in the background. 1207.5 - No. 2 crossing Pall Mall to enter Charing Cross ex Quarry Hill, with the Fountain Plaza in the background. 1207.6 - No. 6 arriving Charing Cross ex Golden Square with No. 21 alongside. No. 21 has the SEC ad. 'Everything's fine in my all electric kitchen.' Has the City Family Hotel and the Fountain Plaza shopping centre in the background. 1207.7 - No. 5 at Charing Cross en route for Quarry Hill with No. 2 behind. No. 2 has two SEC roof ads, 'Everything s fine in my all electric kitchen' and 'Electricity best for cooking'. RACV building in the background. Tram crews are discussing the day in the front of the tram. 1207. 8 - No. 21 in High St. Bendigo with the Cathedral in the background. No. 21 has two SEC roof ads, 'Everything's fine in my all electric kitchen' and 'Electricity best for cooking'. 1207.9 - No. 6 in High St. Bendigo with the Cathedral in the background. 1207.10 - No. 6 in High St. Bendigo, just past Wattle St. Photo taken after the tram has passed the photographer from within the Highway Car Sales yard. 1207.11 - No. 26 bound for Eaglehawk at the end of the double track in View St., note signal contactors, tram stop and section signs mounted on pole. 1207.12 - No. 26 turning from View St. into Barnard St.Information written on in blue ink and date stamped on purple ink. 1207. 1- "Nos. 26 and 2 at Charing Cross." 1207.2 - "Nos. 26 and 2 at Charing Cross." 1207.3 - "No. 2 in Mitchell St. just after leaving Charing Cross." 1207.4 - "No.6 leaving Charing Cross for Golden Square." 1207.5 - "No. 2 arriving at Charing Cross from Quarry Hill." 1207.6 - "No. 21 waits at Charing Cross as No. 6 arrives from Golden Square." 1207.7 - "No 5 at Charing Cross with No. 2 lurking behind." 1207.8 - "No. 21 in High St. at cnr of Wattle St." 1207.9 - "No. 6 in High St. at cnr of Wattle St." 1207.10 - "No. 6 in High St. between Wattle and Vine Sts." 1207.11 - "No. 26 at end of double track in View St. near Barnard. St. 1207.12 - "No. 26 seen at dusk turning from View St. into Barnard St."tramways, trams, bendigo, charing cross, high st, view st., tram 2, tram 5, tram 6, tram 21, tram 26 -
 Ballarat Tramway Museum
Slide - 35mm slide/s - set of 4, Noel Simons, Apr. 1972
Set of 4 transparencies - copy slides - possibly ARE film strip dated March 1972. 1209.2 and 1209.4 on Kodak Readymount mounts. 1209.1 - Bendigo 5, 6 and 28 on a special tram service in bound to the City on a tour in Caledonia St. about to enter Lucan St, or White Hills Road or Weeroona Ave. (mis match in names in various maps). Gas works in the background. No. 5 has a white disk on the rear of the tram. 1209.2 - Nos 2 and 26 at Charing Cross with the Fountain Plaza in the background. Both trams have the destination of Quarry Hill, though 26 is on the Eaglehawk bound track. 1209.3 - No. 19 at the Golden Square terminus, with the conductor or driver swinging the pole and Billy Rodda's Golden Square hotel in the background. 1209.4 - No. 7 at Fire Station loop, en route to North Bendigo, picking up a passenger with a pram. Part of a set of 20 slides made by the Association of Railway Enthusiast Provincial Tramways film strip. Reference Item 2560 details the ARE Film Strip and provide references to other slides.Information written on in blue ink and date stamped on purple ink. 1209.1 - "Nos 5, 6 and 28 in Caledonia St. about to enter Weeroona Ave." 1209.2 - "Nos 2 and 26 at Charing Cross." 1209.3 - "Swinging the pole on No. 19 at Golden Square Terminus." 1209.4 - "No. 7 inward bound from Golden Square stops at Fire Station Loop."tramways, trams, bendigo, charing cross, golden square, gas works, special trams, tram 2, tram 5, tram 6, tram 7, tram 19, tram 28 -
 Ballarat Tramway Museum
Newspaper, The Courier Ballarat, "Reprieve for Trams", 31/10/1972 12:00:00 AM
Newspaper Clipping possibly from The Courier, Ballarat, 31/10/72, about the decision of the State Cabinet that Bendigo's trams will in the city for the time being. Follows the promise by the SEC of a Birney tram to South Australia - AETM. Quotes Premier, Mr. R. Hamer. No decision as yet on which trams to stay. Appears to be from the Courier, as starts with "MELBOURNE - (AUP)" credit."31/10/72" in blue ink on left hand side.trams, tramways, bendigo, birney, bendigo trust, r. j. hamer -
 Ballarat Tramway Museum
Document - Calendar, Topmill Pty Ltd, "Australian Trams 1999 Calendar", 1998
24 Page full colour calendar featuring Australian Trams, published by Top mill Pty Ltd. Cover (1299i5) features Sydney trams outside Central station in Eddy Ave. Other cities represented - Brisbane, Sydney, Adelaide, Perth, Fremantle, Bendigo, Ballarat, Sydney light rail, Hobart and Melbourne. Photos by Hugh Ballment, Dale Budd, Robert Merchant, Arthur Perry and the Sydney Tramway Museum. Priced at $9.95, and has "Parkholme Newsagency and Toys" sticker over bar code section, giving the same price. Distributed by Gordon and Gotch. Ballarat trams - 1299i1 - 33 at depot during hail storm on 20/8/1971 and 1299i2 - BTM trams 14 and 26 at Carlton St. during BTM operations 1970's or early 1980's. Used for month of June. Bendigo trams - 1299i3 - No. 4 at Eaglehawk terminus - 1/2/1971 and 1299i4 - trams 28, 2, 23 and two single truckers at Charing Cross 1970. Used for month of May.tramways, trams, australian trams, ballarat, bendigo, museums -
 Ballarat Tramway Museum
Photograph - Colour Photograph/s, B. Groves?, 7/12/1962 12:00:00 AM
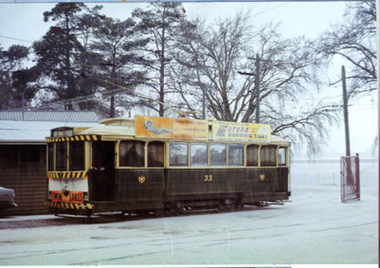
Colour print of five SECV Bendigo trams at the North Bendigo tram terminus during a 1962 tour. Tram 28 (Birney), another Birney and then three single truckers at the terminus. All have their poles turned to return to the City. Photo shows the nature of the location of the terminus; open paddocks. All trams have been fitted with dash canopy lights. Taken on AGFA paper. On rear is a stamped date "- 7.12.62", looks like a machine imprint.On rear "Tram Tour Bendigo / Mr. B. Groves / 333 Pascoe Vale Road / Essendon W5 / Vict." In top right hand corner is the number "1175" In the stamp appears " 110B / Photo / The? / -7.12.62"birney, bendigo, north bendigo, tram 28 -
 Ballarat Tramway Museum
Photograph - Colour Photograph/s, 21/11/1962 12:00:00 AM
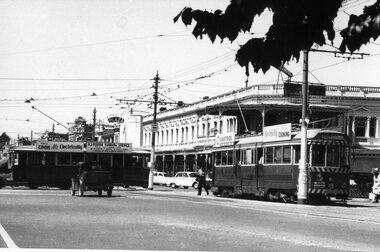
Colour print of Bendigo SECV Bendigo tram 21, leaving Charing Cross for Golden Square. On Kodacolor paper with a Kodak red ink stamp on rear. Tram has dash canopy lights, but no large white strip under the drivers windows. Tram has a good load of passengers on it, with all blinds drawn, showing destination "Golden Square". Fitted with roof ads "Electricity best for Cooking" and an ad Mamouneys - Furniture and Carpets. A Cohn's drinks ad is on the front dash panel. Photo has the Ezywalkin store in background and the City Club Hotel in the right hand side of the photo. Photo dated 21.11.1962.On rear top left hand corner "21 / 21.11.62" in very wavy handwriting, typical of an aged person.charing cross, bendigo, golden square, tram 21 -
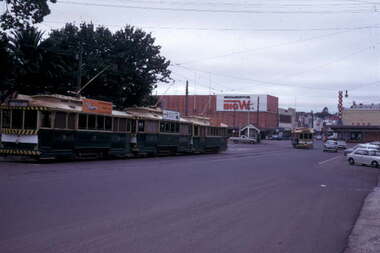
 Ballarat Tramway Museum
Photograph - Black & White Photograph/s set of 19, Mar. 1972
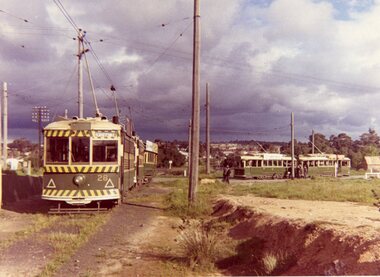
Set of 19 black and white prints, all 89mm square of Bendigo trams, date machine printed on print is "Mar 1972". 981.1 - Tram 21 at North Bendigo terminus, with level crossing in background. Has destination "Golden Square" and two SEC roof ads. 981.2 - tram 2? at Eaglehawk, with destination "Depot", two SEC roof ads and "Leo A. Hughes Photographer" on side of building in background. 981.3 - tram 2? at Eaglehawk, side on view. 981.4 - tram 26 at Quarry Hill terminus looking back into city. 981.5 - tram 7 en route to North Bendigo at the site of the Bridge St. loop. Has a Peters Ice Cream truck and Sandhurst Fruit Juices truck on right side of photograph. 981.6 - tram 2 at Quarry Hill terminus. 981.7 - tram 2? at one of the loops on the Eaglehawk line, inbound? 981.8 - bogie tram at Charing Cross with fountain in background. Side on view looking south. 981.9 -trams 7 and 21 on Golden Square/North Bendigo line with bogie tram in background, at Charing Cross. Same as item 972. 981.10 - bogie tram at Charing Cross - has buildings in south west corner in background, including Colonial Mutual Life and an advertisement for the Herald newspaper. 981.11 - trams 25, 7 and two other trams at Charing Cross. 981.12 - trams 2 and 26 and three others at Charing Cross. 981.13 - tram 25 at Golden Square terminus, with Rodda's Golden Square Hotel in the background. Tram showing destination of "Nth Bendigo" 981.14 - tram 24, showing "Special" on depot access track. Has two Johnnie Walker roof ads on side. 981.15 - as above, but tram on bridge outside depot. 981.16 - trams 25 and 28 at depot 981.17 - tram 24 showing "Special" on depot access track with a single truck car in background. 981.18 - trams 2 and 26 at Charing Cross. Has advertisements for "Armstrong Tyre Service" and "Cohn's drinks" on buildings in background. 981.19 - Bendigo 2 at location?, about to enter a loop or double track section. Has hotel in background. On rear of each photo in the top left hand corner is a print number 1 to 19 in ink and location notes, generally "Bendigo"trams, tramways, charing cross, bendigo, golden square, quarry hill, tram 2, tram 21, tram 7, tram 24, tram 26 -
 Ballarat Tramway Museum
Photograph - Black & White Photograph/s, early 1960's
Black and White print of Bendigo SECV Bendigo tram 18 at Charing Cross terminus for the Eaglehawk route with a single truck car crossing behind heading for Golden Square. Trams have dash canopy lights, but no large white strip under the drivers windows. Photo not dated but appears to be at during early 1960's. Tram 18 has White Horse Whiskey ad on front dash panel, SEC Roof ad "Electricity best for Cooking" and a "CASTROL" ad, and showing destination of "Eaglehawk". Single truck car has SEC roof ad "You'll Cook better electrically" and a roof ad for "B.J. Osborn Plumbing Service" ad. Has City Club Hotel and Plaza Theatre buildings in background. Single truck could be No. 20, based on roof ads, see 986.trams, tramways, charing cross, bendigo, tram 18, tram 20 -
 Ballarat Tramway Museum
Photograph - Black & White Photograph/s, early 1960's
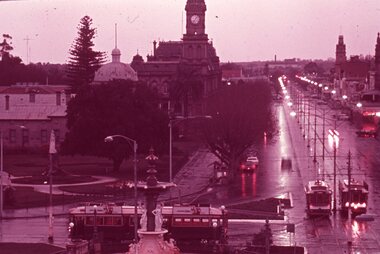
Black and White print of an aerial view of Bendigo SECV Bendigo tram 18 at Charing Cross terminus for the Eaglehawk route with another bogie tram and two single truck trams in the background. Trams have dash canopy lights, but no large white strip under the drivers windows. Photo not dated but appears to be at during early 1960's. Tram 18 has White Horse Whiskey ad on front dash panel, SEC Roof ads. Numbers of other trams cannot be determined. All trams have roof ads, including SEC ads and a CASTROL ad. Good view of the fountain and buildings on the north east corner. Has Ezywalkin store, City Club Hotel and other buildings. Shows traffic arrangements for cars to do a right turn from Pall Mall into Mitchell St. On a building in Mitchell St. is an advertisement for "ASTOR Radio"trams, tramways, charing cross, bendigo, mitchell st, aerial views, tram 18 -
 Ballarat Tramway Museum
Book, City of Ballaarat, "Mayors Special Report Ballarat Tramways", Sep. 1971
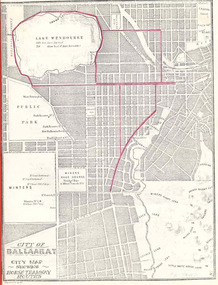
Historically significant for at the time it demonstrated aspects of the evolution of Ballarat Tramways and yields information about the formation of the tramways, the Councils viewpoint and has a strong association with the Mayor of the time.Twenty two page book, produced by photocopying, side stapled and bound with a red plastic binding, titled "Mayor's Special Report Ballarat Tramways", dated 20 September 1971 for presentation to the City of Ballaarat Council Meeting 27 Sept. 1971 and signed by the Mayor, J.A.Chisholm. Note pages 18 and 19 have been reversed. Comprises: Page 1 - map (image 1829i1) - of Ballarat (Ballaarat) showing the horse tram routes in red (appear to have been drawn in with a red pencil). Note the Sebastopol route terminates at Rubicon St. Page 3 - letter to the City Councillors from the Mayor Page 4 - Outline of the "The Ballarat Tramway System" Pages 5 - 7 - Conditions for tendering the horse tram system within the City of Ballarat" Pages 8 - 11 - Specifications and Agreement for the Ballaarat Tramways (horse trams). pages 12 - 19 - Memorandum of Agreement with the British Insulated Wire Company (later ESCo) Page 20 - Copy of letter from the Secretary of the SEC to the Minister of Fuel and Power, dated 10 Sept. 1971 advising of the formal abandonment of the Ballarat and Bendigo tramway systems. Page 21 - five photos (image 1829i3) of trams in Ballarat, including the bogie tram decorated for the Queens visit, courtesy of Mr. L. J. Denmead, Tramways Superintendent. Page 22 - Plan (image 1829i2) of Ballarat Bus Services, showing route numbers, destinations and existing tramway routes. 3rd copy added 16/7/2010trams, tramways, city of ballaarat, mayor's reports, ballaarat tramway company, british insulated wire company, esco, bus services, sec -
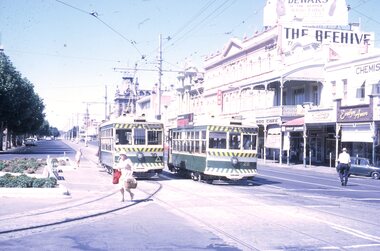 Ballarat Tramway Museum
Slide - 35mm slide/s - set of 4, Peter Moses, Jan. 1969
Set of four colour slides taken at Charing Cross Bendigo, Jan. 1969. .1 - Trams 30 and 28 travelling to North Bendigo and Golden Square respectively. Has the Beehive building in the background, along with W.M.I. Jones Chemist, Evelyn Amor shop, Dewars Whiskey rooftop advertisement. 28 has a SEC Briquettes roof advertisement. .2 - As above but with the front or bogie tram in the photo. Also has A. G. Treloar Optician's shop. Kodak cardboard mount slide, taken by Peter Moses, Jan. 1969. .3 - Close up photo of Birney No. 30, with 28 in the background. .4 - No. 28 leaving for Golden Square with the Plaza building, the Cenotaph, and the City Family Hotel in the background. Kodak cardboard mount slide, taken by Peter Moses, Jan. 1969.On the rear of all the slides "P. Moses" in black ink .1 - "Bendigo Charing Cross" and in red ink "19" .2 - "Bendigo three trams / Charing Cross" and in red ink "21" .3 - "Bendigo" and in red ink "23" .4 - "Bendigo Charing Cross" and in red ink "14". tramways, trams, bendigo, tram 28, tram 30 -
 Ballarat Tramway Museum
Slide - 35mm slide/s, Peter Moses, Jan. 1969
Photo of three single truckers, 31, 32, 21 parked in City Loop, with another single trucker, 26 or 28 entering Sturt St. 31 and 21 have SEC "Everything's under control in my all-electric kitchen", 32 - Wilkinson Sword?. In the background are Woolworths Big W store and Dickins supermarket. Kodak cardboard mount slide, taken by Peter Moses assumed Jan. 1969, dated only "Jan", but date lines up with Bendigo slides and type of numbering. Could be 1970.On the rear of the slide in black ink "P. Moses" along bottom right hand corner in black ink.tramways, trams, city loop, sturt st, grenville st, tram 31, tram 32, tram 21 -
 Ballarat Tramway Museum
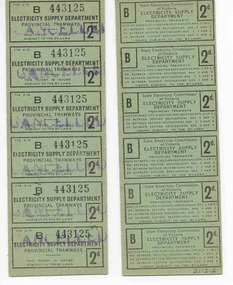
Ephemera - Ticket/s, State Electricity Commission of Victoria (SECV), SEC Provincial tramways pre purchase strip tickets, pre 1950's?
Sets of SEC Provincial tramways pre purchase strip tickets (known in Bendigo as Section tickets) consisting of 6 No. 2d tickets (1/- worth), printed on green 210 gsm pasteboard and blind perforated at each ticket to enable them to be torn off and cancelled. Each ticket strip has the same ticket number. Form TYE 2-16. Each strip consists of 6 tickets, except .11, which is two tickets. Tickets availability printed on back of ticket - City and Section 2 or 2 3, between 2 and 3, or between 2, 3 and 4 or between 3 and 4. Not known when in use at time of cataloguing. Pre 1950's? Each ticket has been stamped "CANCELLED" in purple ink. 2112.1 - Ticket No. B443118 .2 - B443119 .3 - B443120 .4 - B443121 .5 - B443122 .6 - B443123 .7 - B443124 .8 - B443125 .9 - B499762 .10 - B552697 .11 - B552700 (two tickets only) See Reg Item 3070 for Bendigo ticket.trams, tramways, secv, tickets, parcels -
 Ballarat Tramway Museum
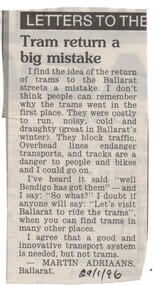
Newspaper, The Courier Ballarat, "Tram return a big mistake", 29/01/1996 12:00:00 AM
Letter to the Editor of The Courier, 29/1/1996 written by Martin Adriaans of Ballarat about all the problems of trams returning to Ballarat's streets and that Bendigo has them - so what!"29/1/96" in ink on the bottom edge.trams, tramways, letter to the editor, ballarat city tramway, ballarat revival -
 Ballarat Tramway Museum
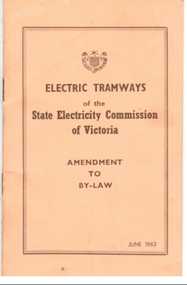
Book, State Electricity Commission of Victoria (SECV), "Electric Tramways Amendment to By-Law June 1963", Jun. 1963
Demonstrates aspects of the SEC governance system in issuing By-laws for the travelling public, as part of their Act. Yields information about fares charged for tram services in Ballarat and Bendigo. Issued to crews.Booklet with orange card cover and 12 pages, numbered 1 to 10, side stapled, off set printed giving details of fares, revised in June 1963 for both Ballarat and Bendigo, to come into force on 1/8/1963. Has details of sections etc. Was shown as being approved by the Governor in Council on 25/6/1963. Adjust the City Section fares only. See Alan Bradley notes in references re this. Full pdf copy added 28/5/2019. Alan Bradley advised 25/4/2005. In the "Courier" of 26/6/1963, the adjustments to fares from 1/8/1963 were announced. They were only for adjustments to city section fares. Fares outside the city area remained unchanged. The SEC promoted these as being cheaper city section fares. Tom Evans gave me a copy of a poster showing a Scotsman boarding a tram. The caption was: "Now! It's cheaper to travel by tram! Beats walking every time!" New economy city fares. From Dawson St to the Railway Station return, & from Dawson St to the east end of Bridge St or return, 4d. From the intersection of Lydiard & Sturt Sts - To Dawson St, east end Bridge St, to Railway Station 3d. trams, tramways, secv rules, by-laws, tickets, fares -
 Ballarat Tramway Museum
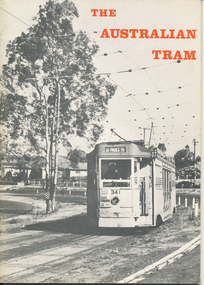
Book, Howard Clark and W. Laurie Williams, "The Australian Tram", 1969
Book - 24 pages, including heavier card covers, featuring photographs of trams in 11 Australian cities, glossy paper, with introduction and captions. Cities included: Sydney, Brisbane, Melbourne, Ballarat, Bendigo, Adelaide, Perth, Fremantle, Kalgoorlie, Launceston and Hobart. Five detailed scans added 19/8/2013.trams, tramways, sydney, brisbane, melbourne, ballarat, bendigo, adelaide, perth, fremantle, kalgoorlie, launceston, hobart