Showing 2063 items matching "crossings"
-
 Melbourne Tram Museum
Document - Folder with papers, Folder of memos and directions, c1940
Folder of Memos and directions (htd3207i1> htd3207i8) - Air raid precautions, covering painting, respirators, sheds, tools, kits, shelters, stacks , blackouts, trenches, emergency, air raid shelters (htd3207i9> htd3207i16) - Accidents, covering accidents and derailments, (htd3207i17) - Bridges – inspection of Victoria St bridge (htd3207i18) - Cable tracks, covering tarring, patching, top dressing of cable tracks (htd3207i19> htd3207i21) - Cartage, covering hired trucks, cartage of wood blocks, spoil, sleepers (htd3207i22> htd3207i23) - Contracts, blank page (no image) - Councils, covering track opening, storm water drain, bad roads (htd3207i24) - Costs, covering maintenance costs, construction costs, wet weather (htd3207i25> htd3207i26) - Depots, covering inspections, storage, paving, telephones, mail (htd3207i27> htd3207i30) - Derailments, covering controls, reports (htd3207i31) - Drainage (htd3207i32) - Eastern Lines, covering loading platforms, crossovers, work orders (htd3207i33> htd3207i34) - Eastern Lines Reconstruction (htd3207i35> htd3207i37) - Eastern Line Maintenance (htd3207i38> htd3207i40) - Estimates (htd3207i41) - Employment (htd3207i42) - Footscray Lines (htd3207i43) - Instructions (htd3207i44) - Journals, covering Engineering Journal and magazines (htd3207i45) - Materials – General, covering frames & covers, unloading stores, packing plates, petrol allowance, ashes at Preston workshops, electrodes, sleepers (htd3207i46> htd3207i50) - Maintenance – General, covering loading platforms, inspections, work orders, paving (htd3207i51> htd3207i57) - Northern Lines, covering greasing of curves, crossovers, loading platforms (htd3207i58> htd3207i61) - Northern Lines – Reconstruction, covering crossings, welding machines (htd3207i62> htd3207i64) - Northern Lines – Maintenance, covering repairs, crossings, lifting programme, fencing, curves, track inspection, repairs (htd3207i65> htd3207i70) - New Lines (htd3207i71> htd3207i80) - Plant – General (htd3207i81> htd3207i94) - Plant – Concrete Mixers (htd3207i95) - Plant – Motor Vehicles (htd3207i96> htd3207i100) - Plant – Rollers (htd3207i101> htd3207i103) - Plant – Grinders (htd3207i104) - Plant – Grinders & Scrubbers (htd3207i105> htd3207i110) - Plant – Compressors and Tie Tampers (htd3207i111) - Plant – Cleaner Cars (htd3207i112> htd3207i114) - Plant – Loaders (htd3207i115) - Plant – Tools (htd3207i116> htd3207i117) - Plant – Miscellaneous (htd3207i118) - Per Way – General (htd3207i119> htd3207i121) - Public Utilities (htd3207i122> htd3207i123) - Reconstruction – General (htd3207i124> htd3207i126) - Railways (htd3207i127> htd3207i129) See \dbtext\hawthorn\photo_collections\3207_Folder for scanned images.trams, tramways, instructions -
 Eltham District Historical Society Inc
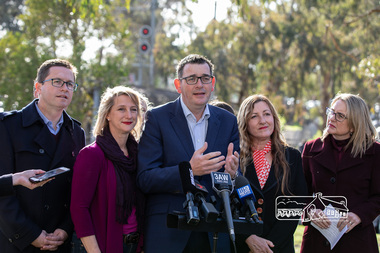
Photograph, Peter Pidgeon, Victorian Labor Government Press Release announcing planned upgrades to Hurstbridge line rail services and protection of historic Railway Trestle Bridge, Panther Place, Eltham, 1 August 2018, 1 Aug 2018
Announcement by Premier Daniel Andrews, Minister for Public Transport, Jacinta Allan and Member for Eltham, Vicki Ward mad alongside the Eltham Railway Trestle Bridge. MEDIA RELEASE "More Trains And Fewer Delays On The Hurstbridge Line" https://www.premier.vic.gov.au/wp-content/uploads/2018/08/180801-More-Trains-And-Fewer-Delays-On-The-Hurstbridge-Line-1.pdf Commuters on the Hurstbridge line will have more trains, more seats and fewer delays with a re-elected Andrews Labor Government to continue its massive upgrade of the Hurstbridge line. The Andrews Labor Government said it would deliver locals in Melbourne’s north-east more peak hour train services and less time stuck at boom gates, and we have. The first stage of the Hurstbridge Line Upgrade has been delivered – six months early and on budget. This includes the new Rosanna Station, duplicated track between Heidelberg and Rosanna and the removal of the dangerous level crossings at Alphington and Rosanna. There’s more to do and only Labor will deliver the next stage of the Hurstbridge Line Upgrade to give local commuters more train services and a more comfortable commute. The $530 million project will include a brand new train station at Greensborough and the duplication of three kilometres of track between Greensborough and Montmorency, and 1.5 kilometres of track between Diamond Creek and Wattle Glen to allow more train services during the morning peak. This will allow trains to run every six and a half minutes at Greensborough, every 10 minutes at Eltham and Montmorency, and every 20 minutes at Hurstbridge, Diamond Creek and Wattle Glen – as well as two extra Hurstbridge express services. Locals on the Labor Government’s new Mernda line will also get five extra train services during the morning peak, with a major upgrade of the Clifton Hill junction where the Mernda and Hurstbridge lines connect. Labor will also protect the Eltham Trestle Bridge – the last remaining timber bridge on Melbourne’s electric train network – which has local heritage protection and is an important part of the area’s character. The Liberals will leave this bridge to rot and demolish the nearby childcare centre and football club with their under-cooked and under-costed promise to upgrade the Hurstbridge line. Only Labor will protect this important piece of Melbourne’s history with planning work to be carried out for a long-term solution as part of the project. Stage two of the Hurstbridge Line Upgrade will create more than 950 jobs, with construction to start in 2020 and finish by 2022. Quotes attributable to Premier Daniel Andrews “We said we’d upgrade the Hurstbridge line and remove dangerous and congested level crossings at Rosanna and Alphington and we did – but there’s more to do.” “Only Labor will deliver the next stage of the Hurstbridge Line Upgrade with a new Greensborough Station and more trains, more often.” Quote attributable to Minister for Public Transport Jacinta Allan “The former Liberal Government promised new train lines but didn’t deliver a single kilometre of track – now they’re promising a half-baked upgrade of the Hurstbridge line with rubbery figures that don’t add up.” Quote attributable to Member for Eltham Vicki Ward “As a fifteen year old hopping on Red Rattlers at Eltham I wanted to do something to make the Hurstbridge line better. It’s taken me a few decades but finally our line will offer the frequency of services that are expected and needed in a 21st century city.”Born digital image (qty 27)jacinta allan, minister for public transport, panther place, premier daniel andrews, press announcement, railway line construction, trestle bridge, vicki ward mp for eltham, victorian parliament -
 Flagstaff Hill Maritime Museum and Village
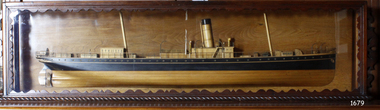
Craft - Ship Model, S.S. Nelson, 1877 - 1984
This beautifully made ship model is a side relief of the steam ship “S.S. Nelson”, which was launched in 1877. The model’s case stands out because of its ornately carved internal frame. Relief models of ships, sometimes called half models, were often built by the shipbuilders as an exact scale model of the finished ship. The shipbuilders would use the model to ensure that the design was balanced. They would use the model as a point of reference during building. Also, ship models were used to demonstrate the designs to prospective buyers. It is not known whether this model of the “S.S. Nelson” was made for these purposes. HISTORY of the “S.S. Nelson” During the period 1840-1890 shipping was the cheapest and most practical means of carrying produce and goods to and from coastal towns such as Warrnambool. In the 1850s regular domestic steamer services began and by 1870 the passenger trade was booming. Passengers were taken to the ship’s side in small boats called lighters, which took it to ships at anchorage in Lady Bay, then climbed aboard up ladders or gangways. Their fare covered accommodation Saloon/Cabin section (higher class and more expensive) or the Steerage section (lower class and less expensive, below deck level). Produce included livestock such as pigs and fowls, and dairy products, bales of wool, and potatoes. The goods were loaded from the Warrnambool Jetty into the lighters. The S.S. Nelson was built by Messrs Blackwood and Gordon of Port Glasgow for a cost £25,000 in 1877. She was an iron screw steamer with an overall length of 200 feet, beam 25.5 feet and a depth of hold of 19.4 feet, which gave her a gross measurement of 649 tons. Her engines gave her a best speed of 13 knots and a maintainable speed of 12 knots. She was described as a handsome, star decked, efficient steamship, fitted with accommodating for 75 first class passengers in a saloon, and 40 second class passengers in a cabin. The S.S. Nelson arrived in the colony of Victoria on March 9th, 1877. She was first registered in Warrnambool by the Warrnambool Steam Packet Company under the management of Mr William Evans, and employed in the coastal trade of south west Victoria. She was very popular in 1878, registered under the new ownership of the Western Steamship Navigation Company, trading between Melbourne, Warrnambool and Portland. Captained John Nicholson commanded the S.S. Nelson after the previous captain, Thomas Smith, was suspended in 1882 for six months by the Victorian Steam Navigation Board following the collision between the S.S. Nelson and the S.S. Julia Percy. Other Captains include S Drewet and John Thompson. The S.S. Nelson was sold to Messrs. Huddart, Parker and Co. and re-registered in Melbourne on June 23rd, 1890. The new owners intended to use her for their Bass Strait crossing between Melbourne, Victoria and Launceston, Tasmania. On the night of Friday, June 27th 1890, under the command of Captain Carrington, she was on her way to Launceston on her first crossing for her new owners. She had no passengers and very little cargo and was to return to Melbourne with passengers the following morning. She was only 21 hours out of the dock when she struck Porpoise Rock in the Tamar River. All crew of 25 were saved but the bulkheads gave way and she rapidly filled before keeling over and disappearing in approximately 130 feet of water. The new owners had fully insured the almost 14-year-old S.S. Nelson with the Australian Alliance Insurance Company and she had only been in their possession for four days. This ship model of the S.S. Nelson is significant for its connection with the steam screw ship S.S. Nelson, one of a fleet of vessels owned by the Warrnambool Steam Packet Company. The S.S. Nelson was specifically built and purchased for the Victorian coastal trade business of the late 19th century, when shipping was the cheapest and most practical means of transporting goods and passengers between Victoria’s coastal towns and the major port at Melbourne. Once the railway came to Warrnambool in 1889, the steam shipping industry began to decline.Ship model; relief of the S.S. Nelson, showing deck superstructure, ventilators and single funnel. Ship's name is painted on the bow "NELSON". Wood model, varnished finish over natural wood and black painted areas. Timber case with ornate edging and glass front and sides."NELSON" painted on bowflagstaff hill, warrnambool, shipwrecked-coast, flagstaff-hill, flagstaff-hill-maritime-museum, maritime-museum, shipwreck-coast, flagstaff-hill-maritime-village, s.s. nelson steam ship 1877, screw steamer, 1877 vessel, ship model s.s. nelson, blackwood and gordon port glasgow, warrnambool steam packet company, western steam navigation company, south west coast trader, sea transport melbourne to portland, victorian steam navigation board, s.s. julia percey, captain john nicholson, captain thomas smith, captain s drewet, captain john thompson, captain carrington, huddart, parker and co, bass strait crossing 1890, sea transport melbourne to launceston, porpoise rock tamar river, australian alliance insurance company, ship model making, vessels, victorian coastal trader -
 Wodonga & District Historical Society Inc
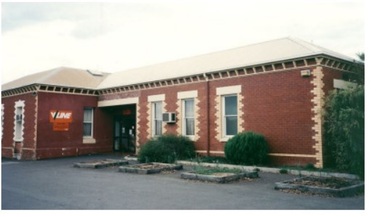
Photograph - Wodonga old Railway Station complex
\When the railway reached Wodonga from Melbourne on 19th November 1873 the first station building, which included a refreshment room and dining room, was a temporary structure. It was 300 ft. long and was removed and taken to Beechworth when the new station was built in 1874 by contractor J. Richardson. The Goods shed was 100 feet long and was built by Frew & Hill in 1873. One year later it was extended an additional 150 feet by James Nation. The date of the construction of the Locomotive shed is not known but predates 1883. It was a galvanised iron clad building which housed 4 engines on 2 tracks; in 1910 it was extended to 250 feet in length to house six more engines. The location of the railway tracks and station were a constant cause of congestion in the centre of Wodonga as the tracks crossed over Sydney Road (later named High Street). Lines of traffic were frequently banked up as the gates were closed to allow trains to cross. The Wodonga Rail Bypass project moved Wodonga station from the original central location to a position on a new line on the northern edge of the town. Not only did this release land in the middle of the city for commercial and public use, but also eliminated 10 level crossings. The project actually commenced in 2008 with the last passenger train passing through Wodonga on 8 November 2008. On 23 July 2010, the new rail bypass was opened, the original line through Wodonga closed and the station fell quiet. The area has now been redeveloped as Junction Place and the old buildings now house a restaurant, cafe and the Goods Shed Craft Beer Cafe.These images are of local, state and national significance as the Wodonga Railway complex formed a vital link in the Victorian state, interstate and national railway system.A collection of colour photos of the buildings at the former Wodonga Railway Stationwodonga railways, railway station wodonga, junction place wodonga -
 Wodonga & District Historical Society Inc
Photograph - Playing Fireman, c1900
This photograph was taken about 1900. Herbert Schlink, on the right of the image was born on 28 March 1883 in Wodonga, Victoria to German migrants Albert Joseph Schlink and Franziska Trudewind. He initially enrolled in Faculty of Arts at the University of Sydney, but after one year he transferred to medicine and graduated in 1907. This marked the beginning of a brilliant career. He was appointed as honorary gynaecological surgeon at Royal Prince Alfred, Sydney NSW from 1922. As a director of the hospital board from 1926, Schlink as chairman (1934-62) supervised the opening of Gloucester House, King George V Memorial Hospital for Mothers and Babies, Queen Mary Nurses' Home, the neurosurgical and psychiatric blocks, the (Sir Earle) Page Chest Pavilion and the hospital chapel. As a gynaecologist, Herbert pioneered the use of cobalt ray therapy in treating pelvic cancer and instigated the systematic follow-up of cancer patients. In 1954, Herbert was created Knight Bachelor for his public services and his service to medicine. He had previously received the Silver Jubilee Medal from his Majesty King George V, and the Coronation Medals of 1937 and 1953. Outside of his medical career, Dr Schlink was an enthusiastic skier. In 1926 he made the first winter crossing from Kiandra to Kosciusko. He was a foundation member of the Kosciusko Alpine Club and was directly responsible for the building of the first chalet at Charlotte Pass. Schlink Pass near Guthega in the Snowy Mountains is also named in his honour. Charlie Ryan is the boy on the left. He was to later become the editor of the Wodonga and Towong Sentinel after the death of his father in 1912.This image is of significant as it depicts a group of local boys including a preeminent medical professional who was born in Wodonga and a newspaper editor.A framed photo of a group of boys playing with a fire cart in Wodonga.Below photograph: "PLAYING FIREMEN / Young Charlie Ryan, left, with the boys of the village./ Herbert Schlink, probably the boy on the right, was to/ become Sir Herbert Schlink, on of the nations most/ distinguished men of medicine. Circa 1900. Photograph courtesy: Wodonga Historical Society"wodonga fire fighters, sir herbert schlink, charles henry ryan -
 Wodonga & District Historical Society Inc
Photograph - Michael "Mick" Mulqueeney Stock Agent, Wodonga
Mick Mulqueeney was born in Kilmore and arrived in Wodonga in 1886, when it was Australia's greatest store cattle market. It was not unusual to see 10,000 cattle sold in a single day. For a few years he spent time overlanding large mobs of cattle from Queensland and the back country of N.S.W He settled in Wodonga and began business as a stock and station agent at Wodonga. He was the Wodonga representative of Edward Trenchard and Co, and other Newmarket stock agents but also conducted auctions on his own account. For several years, he was in partnership with Mr A. L. Wright. Following the retirement of Mr. Wright in 1902, Mick Mulqueeney then joined with Harry H Peck under the trade name of Peck Sons and Mulqueeney. This partnership was dissolved after about 10 years and Mick was bought out by New Zealand Loan. Later he continued in stock and station agency on his own. During this time, he also conducted a very extensive stock forwarding agency where tens of thousands of stock of all classes were shipped owing to the break of gauge from N.S.W, into Victorian trucks and vice versa. He was regarded by stock owners as a genius among stock. Michael also had a sound knowledge of land in the Wodonga district and when the settlement of returned soldiers onto the land was taking place he was appointed valuer of properties being considered by the Repatriation Department. Mick also became a Government stock inspector on the Victorian side of any stock crossing the border. At this time his forwarding agency was carried on by his son, Mr. Jack Mulqueeney. Michael Mulqueeney died on 19th June 1929 and was buried at Yackandandah, VictoriaThis photo is significant because it depicts an important member of the Wodonga community and an vital industry in Wodonga.Two black and white images showing a portrait photo of Michael Mulqueeney and the Mulqueeney family home.michael mulqueeney, stock agents wodonga, livestock sales wodonga -
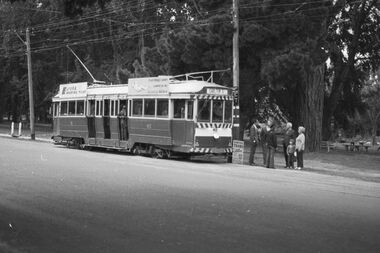 Ballarat Tramway Museum
Negative, Bruce Herbert, "Bendigo and Ballarat Trams (AETA Convention) 30 Mar 1975", 30/03/1975 12:00:00 AM
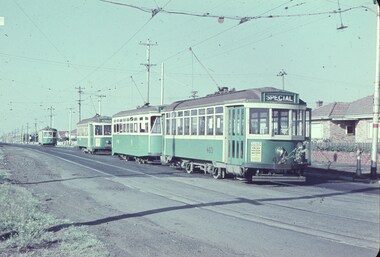
Negative folder - made by ROW1 International of West Germany containing 40 No. 35 mm negatives of the AETA 1975 Convention visit to Ballarat and Bendigo on 30-3-1975. 17 photos of Ballarat and 23 of Bendigo. Ballarat photos: 1 - 40 at the Wendouree Parade crossing loop showing trams stop signage and AETA members standing at the front of the tram. 2 - distant view of 27 in the loop and the "wide roadway" 3 - view of 40 northbound about to nearing loop with various cars in the view. 4 - 40 about to enter loop with 27 in background. 5 - 40 and 27 at loop 6 - 40 at St Aidans Drive 7 - 14 and 27 at loop with 40 in the background 8 - 27 leaving loop 9 - 14 leaving loop 10 - General view showing cars and 40 in the loop, looking north. 11 - as for 1 12 - ditto 13 - 40 northbound, 27 southbound at loop 14 - 27 at loop 15 - 26, 14 and 28 at depot including 1 road. 16 - ditto with people viewing the trams - shows the overhead on 1 road. 17 - X41 and B80 on train at Spencer St, probably the train the group travelled on. trams, tramways, btps, ballarat, aeta, bendigo, bendigo trust, wendouree parade, depot, gardens loop, motor vehicles, tram 40 tram 27 tram 26 tram 14 tram 28 -
 Ballarat Tramway Museum
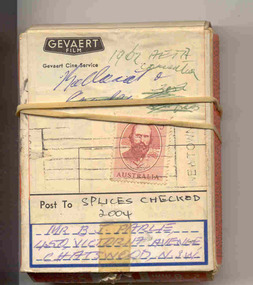
Film - Movie Film & Box, Gevaert, 1962
Yields information in movie film format of Ballarat trams in 1962, a enthusiast tour, how the system operated and was used by people., Yields information in movie film format of Ballarat trams in 1962, a enthusiast tour, how the system operated and was used by people.Movie film - 8mm, approx. 2.5mins, with green leader strip on a plastic reel, within a Gevaert film cardboard box, with a Harvin Film Laboratory, Marrickville NSW label and address to B.J. Parle, Chatswood and a 5d stamp. Titled "Ballarat 1962 AETA Convention". Has been transferred to DVD - see Reg item 4100 as Segment No. 5. Filmed and made by Ben Parle. Also transferred to DVD by Rod Cook Oct. 2015, via Roger Greenwood for use in his DVD, "The City of Ballarat Trams, Gardens & Gold" of 2016. See Reg Item 6883. Synopsis: based on time - Black and White film Title "Ballarat 1962 AETA Convention" 0:00 40 Sturt St, outbound 0:27 Bogie tram in Sturt St, inbound 0:39 No. 41, turning from Sturt into Drummond St. Nth 0:58 No. 37, turning from Sturt St, north track back into Drummond St Sth, 18 in the rear. 1:26 No. 18 departing Sebastopol and bouncing along. 1:46 No. 18 and 37 crossing Albert St Sebastopol 2:10 No. 18 and 37 arriving Grey St loop 2:33 endWritten labels giving title information on outside of box.trams, tramways, ballarat, drummond st, sturt st, sebastopol, tram 18, tram 37, tram 40 -
 Ballarat Tramway Museum
Photograph - Digital image Set of 10, Tony Smith, 1971
Yields information about Ballarat Tramways and trams prior to the closure of the tramway system.Set of 10 digital images of Ballarat trams prior to closure, scanned from original slides by Tony Smith, 1971 prior to closure of the system. .1 - 21 - night photo - at Sebastopol terminus .2 - 13 at Victoria St terminus .3 - 13 arriving at the Sturt St stop at Lydiard St, from Grenville St. Tram has the destination of Gardens via Sturt St West. Has the Commonwealth Bank and Mechanics institute in the background. .4 - 21 at Mill St loop, Drummond St Nth, enroute to Gardens via Drummond Nth. .5 - 26? about to turn from Drummond St Nth into Macarthur St with passengers boarding and leaving the tram. .6 - 21 northbound in Drummond St north at Mair St with an old hotel in the background. .7 - 33 at Lydiard St Nth, with many passengers boarding. Has the cemetery gates in the background. .8 - 26 waiting in the Martin Ave loop. Tram has the destination of Gardens via Drummond St Nth. .9 - 31 crossing 26 at the Martin Ave Loop. .10 - 26 at Gardens Loop with passengers getting off the tram. Tram has the destination of Mt Pleasant. The stop signage is visible to the right of the tram.trams, tramways, night photo, sebastopol, victoria st, sturt st, drummond st nth, mill st loop, macarthur st, mair st, lydiard st nth, martin ave, wendouree parade, tram 21, tram 13, tram 26, tram 31 -
 Ballarat Tramway Museum
Slide - 35mm slide/s - set of 13, Peter Moses, 1974
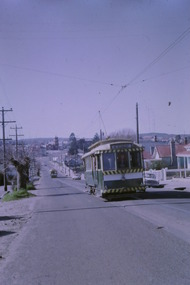
Set of 13 colour slides, 7 on Kodak cardboard mounts and 6 on Agfa colour plastic mounts. .1 - Bendigo Trust, Birney trams 28 and 30 at Central Deborah Mine terminus. No. 30 has a 3BO Roof advertisement. .2 - ditto .3 - ditto with the Central Deborah mine and buildings in the background. .4 - No. 30 inbound in High St. with Sacred Heart Cathedral in the background (spire under construction) .5 - Nos. 30 and 28 crossing at Charing Cross with the Fountain Plaza building and the fountain in the background. .6 - No. 28 north bound in Pall Mall, after leaving Charing Cross with the Shamrock Hotel in the background. .7 - Photo showing track and centre poles in View St. looking west - no overhead. Has AMOCO service station near McKenzie St. .8 - No. 28 taken from cab of No. 30, in McCrae St, at end of double track. .9 - No. 28 turning from McCrae St. into Nolan St. .10 - No. 28 in Nolan St. with Lake Weeroona rowing sheds in the background. .11 - No. 19 in now Tramway Ave (then Arnold St.) running into depot .12 - No. 19 outside Bendigo depot .13 - ditto Slides taken by Peter Moses, during the winter of 1974 (no leaves on the trees).On the rear of all the slides "P. Moses" in black ink. .1 - "1974 Bendigo Central Deborah Mine" in blue ink and in red ink “16”. .2 - "1974 Bendigo two Birney cars / Central Deborah Mine" in blue ink and in red ink “18”. .3 - "1974 Bendigo trams at Central Deborah Mine" in blue ink and in red ink “17”. .4 - "1974 Bendigo High St / tram near Sacred Hearth Cathedral" in blue ink and in red ink “15”. .5 - "1974 Bendigo two Birney cars / Charing Cross" in blue ink and in red ink “20”. .6 - "1974 Bendigo No. 28 Pall Mall" in blue ink and in red ink “8”. .7 - "1974 Bendigo / Old Tramline View St." in black ink and in red ink “5”. .8 - "1974 Bendigo, McRae St. (Pall Mall)" and in red ink "9". .9 - "1974 Bendigo, Lake Weeroona, / tram " and in red ink "10". .10 - "1974 Bendigo, Lake Weeroona" and in red ink “11”. .11 - "1974 Bendigo / Outside depot" and in red ink “24”. .12 - "1974 Bendigo / Outside depot" and in red ink “25”. .13 - "1974 Bendigo / Depot" and in red ink “26”.tramways, trams, bendigo, central deborah, bendigo trust, sacred hearth cathedral, north bendigo, depot, tram 19, tram 28, tram 30 -
 Ballarat Tramway Museum
Photograph - Digital image Set of 10, 1971
Yields information about Ballarat Tramways and trams prior to the closure of the tramway system.Set of 10 digital images of Ballarat trams prior to closure, scanned from original slides by Stuart Lodington, 1971 prior to closure of the system. .1 - No. 17 at the City Centre, Sturt St, south side, with Gardens via Sturt St on destination roll. Can see the ESCo switch box in the back and the stop and section sign on the adjacent pole. .2 - No. 26 at Sebastopol terminus alongside the Royal Mail Hotel. The tram has yet to turn the pole or the destination roll. Note the Bus Stop sign on the pole, just prior to closure. .3 - ditto .4 - No. 27 and 30 crossing in Skipton St at the Bell St loop (see also btm4975i3) .5 - No. 32, Gardens, about to enter the Carlton St loop, with Lake Wendouree in background, Wendouree Parade. .6 - No. 32 at Depot junction, good photo of depot trackwork entry area. .7 - No. 21, Wendouree Parade, Gardens area, north bound, showing Gardens via Sturt. .8 - No. 12, inbound on Sturt St west at a tram stop. Has destination of Mt. Pleasant. .9 - No. 27 at Lydiard St north terminus with the shelter in the background. .10 - No. 21 at Gardens Loop, tram has destination of Mt. Pleasant. Crews sitting in the saloon.trams, tramways, ballarat, sturt st, sebastopol, drummond st sth, wendouree parade, carlton st, depot, depot junction, trackwork, gardens, sturt st west, crews, tram 17, tram 26, tram 27, tram 32, tram 21, tram 12 -
 Melbourne Tram Museum
Slide - Set of 7, Keith Caldwell, 11/03/1962 12:00:00 AM
Set of 7 Agfa Colour slides, cardboard mounts, by Keith Caldwell dated 11.3.1962 of the transfer of cars from Footscray to the "Main System" the day after the system was closed. See Keith Kings history of Footscray notes. All trams running trolley wheels. .1 - Footscray depot cars X1 463, X2 678, X1 460 and X1 466 in Gordon St, about to turn into River Street. .2 - X2 678 turning from Nicholson St into Irving St. Footscray with the Rockmans Store in the background. This store was later demolished for the Ring Road. Also is J. Boltons Chemist shop advertising Kodak film and another shop advertising Darrell Lea Chocolates, Peters Icecream and ? Lopes fruit shop. .3 - X1 460 at same location. .4 - X2 678 crossing Maribyrnong River Bridge - note the person crouching down on the south side of the bridge behind the tram. .5 - X1 460 in Rosamond Road, just before the curve onto Williamson Rd. This site became the Bunnings site. The tram has a modified 21E truck. .6 - X2 468 as above with part of the curve in the view. Has an advertisement for Bon Stores of Hopkins St Footscray. .7 - X2 678 at ditto..1 - in ink - "Farewell Footscray" Sun 11.3.1962 - Footscray Depot cars departing areas en route to Main system." .2 - .7 all have "Footscray Sun 11.3.62"trams, tramways, footscray, closure, maribyrnong, gordon st, river st, irving st, maribyrnong river, bridges, x1 class, x2 class, rosamond rd, 21e trucks, tram 463, tram 678, tram 460, tram 466 -
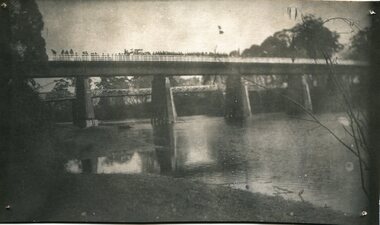
 Eltham District Historical Society Inc
Photograph, Steam locomotive J-521 with the Royal Train on the Wharf Spur line during a visit to Echuca by the new Governor of Victoria, His Excellency Sir Rohan Delacombe, c.May 1963
In this picture The Royal Train is passing through a railway crossing along the Wharf Spur line. The train has been shortened comprising steam locomotive J-521 and tender to which is attached the State car. The State car is in the design of the Spirit of Progress. George Coop advised that the occasion is the visit of the Governor of Victoria, Sir Rohan Delacombe to Echuca in 1963. Delacombe had replaced Sir Dallas Brooks in May 1963 who had departed for England on the liner Iberia,11 April 1963 (1963 'SIR DALLAS ON WAY TO U.K.', The Canberra Times (ACT : 1926 - 1995), 9 April, p. 9. , viewed 27 Jan 2020, http://nla.gov.au/nla.news-article104249252) George believes the Governor was doing a considerable formal train ride around the State and Echuca was on the schedule. The ‘platform’ was a special creation for such purposes, located on the wharf spur line that ran behind the Echuca Civic Centre. The large notice board commemorates the Queen’s visit on March 5th, 1954 for which the platform was initially built. From time to time it would get spruced up with pot plants, fresh paint and repaired hand rails for formal functions. George attended the Civic Reception held for the Governor. A picture of His Excellency Sir Rohan Delacombe, Governor of Victoria, and Lady Delacombe about to entrain at Spencer Street for a visit to western Victoria is available on page 4 of VICTORIAN RAILWAYS REPORT OF THE VICTORIAN RAILWAYS COMMISSIONERS FOR THE YEAR ENDED 30th JUNE, 1963. (http://www.victorianrailways.net/vr%20history/annual_reports/vrar1963.pdf) More information about the Victorian Railways Royal Train https://en.wikipedia.org/wiki/Victorian_Railways_Royal_Train State Car No. 5 https://www.pjv101.net/cd/pages/c160v06.htm Digital TIFF file Scan of 35mm Ilford FP3 black and white negative transparencyechuca, george coop collection, governor of victoria, j-521, railway crossing, royal train, sir rohan delacombe, state car no. 5, victorian railways, wharf spur line -
 Ballarat Tramway Museum
Slide - 35mm slide/s - set of 5, Noel Simons, 19/11/1962 12:00:00 AM
Set of 5 transparencies taken on 19/11/1962 on Kodak mounts. 1186.1 - Bendigo 21 bound for Golden Square at Charing Cross with The Beehive buildings and shops in Pall Mall in the background. Trams has an ad for Cohns drinks on front bumper, SEC Best for Cooking roof ad. and Mamouney's furniture roof ad. Two women passengers boarding. 1186.2 - Bendigo 26 crossing Pall Mall from Mitchell St. bound for Eaglehawk with "Ezywalkin" shop in background. Tram has an SEC 'Electric Cooking' roof ad and a 'Streets Ice cream' ad on front dash. 1186.3 - Bendigo 7 arriving at the Charing Cross stop, bound for North Bendigo. Has a Huttons dash panel ad, a Castrol roof ad. Buildings as for 1186.1. Passengers waiting at the stop. 1186.4 - Bendigo 19 leaving Charing Cross for Golden Square with City Club Hotel alongside and other buildings as for 1186.1 in the background. Tram has Briquettes ad on front dash and SEC 'Electric Cooking' roof ad. 1186.5 - Bendigo 21in High St. at corner of Short St. heading for Charing Cross. Destination half way between Depot and Railway Station. Tram has ads for Cohns Drinks on dash panel, SEC 'Cook with Electricity' and a Sandhurst Milk roof ads.Information written on in black ink and date stamped in purple ink. 1186.1 - "No. 21 in Pall Mall at Charing Cross, Bendigo" 1186.2 - "No. 26 arriving at Alexandra Fountain, Charing Cross, Bendigo" 1186.3 - "No. 7 in Pall Mall at Charing Cross, Bendigo" 1186.4 - "No. 19 in High St., Bendigo, leaving Charing Cross for Golden Square" 1186.5 - "No. 21 in High St. Bendigo, at corner of Short St." tramways, trams, bendigo, charing cross, pall mall, high st., tram 7, tram 19, tram 21, tram 26 -
 Ballarat Tramway Museum
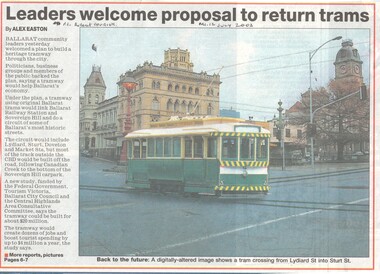
Newspaper, The Courier Ballarat, "Leaders welcome proposal to return trams", "Romantic image captures the city's imagination", 12/07/2002 12:00:00 AM
Set of three cuttings from The Courier, Ballarat dated Thursday 11/7/2002 regarding the reintroduction of trams to Ballarat. 2241.1 - Page 1 of The Courier, with page 1 titled "Leaders welcome proposal to return trams" with a digitally constructed image of No. 13 crossing Sturt St from Lydiard St. North. The item looks at the overall outcomes of the study and who funded it. See image No. 1. Text written by Alex Easton. 2241.2 - page 6 of The Courier, which joins with page 7 using the titled "Romantic image captures the city's imagination" reviewing reactions to the proposals from various politicians, business and community groups. Includes comments from Judy Verlin, former Mayor and impacts on traffic and parking issues. Also summarises in a Section "At a Glance" the pros and cons of the proposal. Has a photo of No. 31 at the intersection of Bridge, Victoria and Main Streets. Cartoon by Inkcinct, about the City Tramway and Sturt St redevelopment also on the page. 2241.3 - page 7 of The Courier, has Sections detailing the benefits of the proposals, inviting people to have their say and further summary information. Has a photo of Bendigo 5 in Pall Mall with destination of Eaglehawk and a photo of Christchurch No. 11 noting the economic benefits of trams in that city over the last seven years. Full Image and 2nd copy of sheets added 12-1-2016 from donation of Kathy Stanley. Second copy - Has date and page number written in under headline in ink.ballarat revival, christchurch, bendigo, ballarat city tramway -
 Ballarat Tramway Museum
Administrative record - Log book, Diary, Collins Bros, 1966
Yields information about the track maintenance activities of the track gang in Ballarat, the work they did, notes, names and other information.Collins Australian Diary, No. 324 printed by Collins Bros, dark red card covers, sewn sections with ruled sheets providing a diary for 1967, one week per double page. Has "useful information" sheets at from the diary. Used by the SEC Ballarat track gang to record their daily work, leave, welding, track cleaning, truck driver etc Loose contents 18/6/1967 - SEC Sub-Requisition - weld two VR rail joints, Doveton St level crossing 9am Sunday 25/6 2nd last page - note re leave entitlements and work over the Christmas period. Mark Clough Wiseman Weightman Smith Palmer Rose Blake Inside back cover 1. - Sub-requisition for tree cutting 2. - Memo dated 18/8/1966 re electrolysis and welding and testing of joints to Reg Item 3707.. 3. - memo dated 29/11/1967 re tree clearing in Bungaree 4 - Sub-requisition re truck use re tree clearing 5 - Weekly time sheet for R. Palmer - Track cleaner, dated 29/12/1967. 6 - Four requisitions for undertaking non tramway work 7 - List of invitees to a SEC safety coittee meeting - on rear a list of names and leave owing. tram, trams, sec, ballarat, depot, trackwork, rails, scrubber tram -
 Ballarat Tramway Museum
Slide - 35mm slide/s - set of 20, Eldon Hogan, 18/07/1972 12:00:00 AM
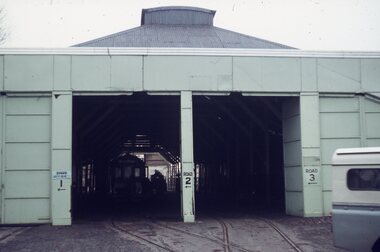
Set of 20 No. 35mm Agfa colour blue and white plastic mount slide - of the move of Ballarat trams 38 and 40 from the old SEC Depot to the new BTPS depot, via the temporary access track on Tuesday 18 July 1972. .1 - Front of SEC depot with 38 and 40 still in shed, with back part demolished. .2 - No. 40 towed out of the depot by John Withers land rover. Noel Gipps taking photo. .3 - ditto .4 - No. 38 being towed out. .5 - No. 40 being towed out .6 - No. 38 departing Depot Junction .7 - No. 40 departing Depot Junction - the last tram. .8 - ditto, being towed along Wendouree Parade .9 - ditto tow .10 - being towed through Gardens Loop .11 - No. 38 being slewed across Wendouree Parade on channels .12 - No. 38 onto the access track. .13 - ditto, with 40 still on Wendouree Parade. .14 - No. 40 is being readied. .15 - No. 38 well up the access track. .16 - No. 40 is slewed across the road. .17 - No. 40 at right angles to the track - note the pole. .18 - No. 38 near the level crossing, with 28 and 14 outside the depot. .19 - No. 14, Bob Davies truck, 38 and 40 on the access track. .20 - Nos. 28 and 14 waiting to go into No. 1 road. See Fares Please!, September 1972.tramways, trams, depot, btps, moving trams, wendouree parade, tram 38, tram 40, tram 28, tram 14 -
 Ballarat Tramway Museum
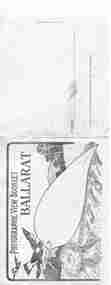
Postcard - Folder set, Valentine & Sons Publishing Co, "Photographic View Booklet Ballarat", early 1920's
Set of 15 black and white views of Ballarat printed on a folded strip, glued within a grey colour cardboard folder, titled "Photographic View Booklet Ballarat". Booklet printed with an address area within a leaf and on the rear, an area where the sender could write their name. Produced by The Valentine Publishing Co. Pty Ltd Melbourne. The rear has a slit on the rear cover that allowed the folder to be secured. Pictures are: 1. Statuary, Ballarat Gardens - the flight from Pompeii 2. Sturt St looking west from the Town Hall 3. Eureka Stockade monument 4. Lily Pond and Statuary House, Botanic Gardens 5. Sturt St from Lydiard St (with ESCo 17) 6. Lily Pond, Botanic Gardens 7. Sturt St from Grenville St with two ESCo trams in the view - similar image to btm761, but note Town Hall tower has been modified with a balcony. 8. The Old Curiosity Shop 9. Landing Place, Lake Wendouree 10. View from the Town Hall 11. Sturt St, Looking West, with ESCO car crossing Sturt St from Lydiard St 12. Along Lake Wendouree 13. In the Gardens 14. The Avenue of Honor (14 miles long) (Honour) 15. Post Office and Lydiard St Made early 1920's given The Avenue of Honor and other photographs with motor cars in the photo. trams, tramways, ballarat, postcards, sturt st, town hall, post office, gardens, esco -
 Ballarat Tramway Museum
Photograph - Digital image Set of 20, 9/12/1972 12:00:00 AM
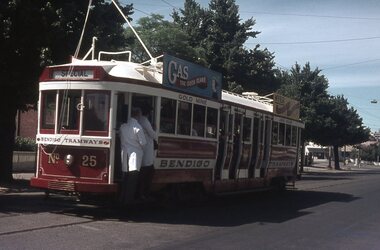
Set of 21 digital images of Bendigo Tramways, at the re-opening of the Bendigo tramways by the Bendigo Trust on 9/12/1972by Stuart Lodington. All trams in the first Bendigo Trust colours. .1 - No. 25 with Gas and Myer roof advertisements .2 - No. 30 with 3BO roof advert and a BP service station in the background. .3 - SEC single trucker at the Mine with a large "Tram Tours" sign on the front of the tram .4 - ditto .5 - No. 19 with a large group of passengers, Bendigo Motor Co and Sandhurst roof advertisements .6 - No. 30 in McCrae St .7 - view of opening march with band .8 - No. 19 in opening parade .9 - Opening Parade in High St with cathedral in the background .10 - No. 30 in Nolan St crossing bridge .11 - ditto .12 - No. 25 at the mine .13 - No. 30 leaving the mine .14 - No. 30 ditto with BCTV roof advert. .15 - Charing Cross with cenotaph, The Beehive building and Ezywalkin shoes and Coca Cola adverts .16 - No. 19 southbound in High St with City Centre Motel building in the background. .17 - No. 30 returning from North Bendigo .18 - No 25 in High St after leaving Gold Mine .19 - No. 30 at the Mine .20 - No. 30 in Nolan St .21 - No. 30 with 3BO roof advert and a BP service station in the background.trams, tramways, bendigo, north bendigo, charing cross, bendigo trust, central deborah, tram 25, tram 30, tram 19 -
 Ballarat Tramway Museum
Photograph - Digital image Set of 10, Tony Smith, 5/09/1971 12:00:00 AM
Yields information about Ballarat Tramways and trams prior to the closure of the tramway system.Set of 10 digital images of Ballarat trams prior to closure, scanned from original slides by Tony Smith, 1971 prior to closure of the system. This set of slides, possibly on the last weekend of Mt Pleasant services - closure took place on 5/9/1971. .1 - 13 outbound in Barkly St, Mt Pleasant - with another single trucker and the Ballarat Fire Station in the background. .2 - Bogie tram and single trucker at Grant St Loop. Has the Mobile service station on the right hand side. Note the family sitting on the steps of a house on the left side watching proceedings. .3 - 14 (Mt Pleasant) and 39 ditto. .4 - 27? and 39 crossing at the Morrison St loop. .5 - 14 and another single trucker at Mt Pleasant terminus. Has the corner store in the background with adverts for Robur Tea, Womens Weekly and Coca Cola. .6 - 39 and two single truckers at the Mt Pleasant terminus. .7 - View looking south along Ripon St from Mair St, with power station buildings on the right hand side. Shows the power distribution poles on the street. .8 - Scrubber tram on 0 road with tennis court alongside. .9 - 40 running special in Wendouree Parade, near the Haddon St intersection. .10 - 40 turning from Macarthur St into Drummond St Nth.trams, tramways, mt pleasant, barkly st, grant st, victoria park, sturt st west, ripon st, view st, depot, wendouree parade, drummond st nth, macarthur st, closure, tram 14, tram 39, tram 13, tram 26, tram scrubber, 40 -
 Surrey Hills Historical Society Collection
Work on paper - Vertical file, Box Hill Electorate (State)
1. ‘How to vote Liberal in the Box Hill district’, 2018, Robert Clark (1 page). 2. ‘How to vote for Paul Hamer Labor for Box Hill’, 2018 (1 page). 3. Vote 1 Greens, 2018, Sophia Sun (1page). 4. ‘Paul Hamer Labor for Box Hill’, 2018 (1 page,2 copies) AND Victorian Labor re level crossing removals (1 page). 5. ‘Paul Hamer, MP State member for Box Hill 2019 Budget update’, (1 page, 2 copies). 6. ‘Paul Hamer, MP State member for Box Hill Box Hill Bulletin’, c. 2019 (4 page brochure, 2 copies). 7. ‘Paul Hamer, MP State member for Box Hill Box Hill Bulletin’, Summer 2020/21 (4 page brochure, 2 copies). 8. Paul Hamer, MP State member for Box Hill letter to Mr. & Mrs. M & S Barnett, undated, (1 page). 9. ‘Getting on with the Metro Tunnel Project’, undated (1 page). 10. ‘What next for Surrey Hills ?’, SHNN No. 218, February/March, 2019 (1 page). 11. ‘Local Member’s Report – Robert Clark’, SHNN No. 138, October/November, 2005 (1 page). 12. ‘Who’d be a politician ?’, SHNN No. 150, October/November, 2007 (1 page). -
 Ballarat Tramway Museum
Slide - 35mm slide/s - set of 17, Noel Simons, 20/11/1962 12:00:00 AM
Set of 17 transparencies taken on 20/11/1962 on Kodak mounts. 1187.1 - Bendigo No. 2 at the Quarry Hill terminus, showing destination of Quarry Hill. Has Cohns Drinks and Streets Ice Cream ads on dash panel, a SEC 'electric cooking' roof ad and another roof ad. Shows the Y terminus at this location, but tram standing just before it. Overhead in position. 1187.2 - as above, but closer up. 1187.3 - as above, but from the north side, showing cemetery in the background. 1187.4 - Bendigo No.3 at Eaglehawk terminus. Tram showing destination of Quarry Hill. Has the various buildings at Eaglehawk in the background including the Foodland store. Has Streets Ice cream and White Horse Whiskey ads on the dash panel. 1187.5 - Bendigo No. 18 at Garden Gully crossing loop, in bound, with destination of Eaglehawk. Passengers waiting for an Eaglehawk tram at the stop. Has a white horse whiskey ad on dash panel and SEC roof ads. Conductor standing in doorway looking out. 1187.6 - Bendigo No. 7 inbound in Nolan St. at cnr of McCrae St. showing destination of Golden Square. Has Streets Ice cream ad on dash panel and a Castrol Roof ad. 1187.7 - Bendigo No. 19 at the North Bendigo terminus with railway level crossing in background. Tram has a Cohns Drinks ad and an SEC 'Electric Cooking' roof ad. 1187.8 - Bendigo No. 2 at the Quarry Hill terminus, looking back into Bendigo, showing destination of Eaglehawk. 1187.9 - Bendigo No. 21 in McCrae St, near Nolan St outbound for North Bendigo. Photo taken after tram has passed photographer. 1187.10 - Bendigo Nos. 4 and 26 at Charing Cross in View St. with fountain alongside and the Beehive, Ezywalkin Buildings in the background. No. 26 has a Sandhurst Milk and SEC 'Electric Cooking' roof ad. 1187.11 - close up of 22E maximum traction truck and folded footstep. 1187.12 - Bendigo No. 19 at Charing Cross terminus, after tram has passed photographer, showing destination of North Bendigo, with the Beehive building in the background and passengers boarding tram. 1187.13 - Bendigo No. 11, turning from View St. into Pall Mall, showing Special with the conductor holding point bar. Has the Beehive and Ezywalkin Buildings in the background. 1187.14 - No. 7 at Charing Cross terminus, in Pall Mall, bound for Golden Square. Has the Beehive and Ezywalkin buildings in the background and passengers waiting at the tram stop. 1187.15 - No. 18 at the Charing Cross terminus, bound for Eaglehawk. Has the Beehive and Ezywalkin buildings in the background and passengers waiting at the tram stop. Also has the 'Safety Zone' sign in the photograph. 1187.16 - No. 2 at Quarry Hill terminus, night or dusk photo. Tram showing destination of Depot. 1187.17 - No. 26 at Charing Cross, night photo. Tram has destination of Quarry Hill, but is on the line for Eaglehawk. Photo looks along Mitchell St. Also shows Safety Zone sign. Information written on in black ink and date stamped on purple ink. 1187.1 - "No. 2 at Quarry Hill terminus Bendigo" 1187.2 - "No. 2 at Quarry Hill terminus Bendigo" 1187.3 - "No. 2 at Quarry Hill terminus Bendigo" 1187.4 - "No. 3 at Eaglehawk terminus" 1187.5 - "No. 18 in Mt Korong Road, Long Gully at cnr of Havilah Road (Eaglehawk Route)" 1187.6 - "No. 7 in Nolan St. Bendigo, at Cnr of McCrae St., near lake Weeroona, (North Bendigo Route)' 1187.7 - "No. 19 at North Bendigo terminus" 1187.8 - "No. 2 at Quarry Hill terminus" 1187.9 - "No. 21 in McCrae St. Bendigo, near Nolan St. (North Bendigo Route) 1187.10 - "4 and 26 at Alexandra Fountain, Charing Cross Bendigo" 1187.11 - "Truck of Bogie Car, Bendigo Tramways" 1187.12 - "No. 19 in Pall Mall at Charing Cross, Bendigo" 1187.13 - "Birney car No. 11 entering Pall Mall from View St. at Charing Cross Bendigo" 1187.14 - "No. 7 in Pall Mall at Charing Cross, Bendigo" 1187.15 - "No. 18 at Alexandra Fountain, Charing Cross, Bendigo" 1187.16 - "No. 2 at Quarry Hill terminus, Bendigo" 1187.17 - "No. 26 at Alexandra Fountain, Charing Cross, Bendigo" tramways, trams, bendigo, quarry hill, eaglehawk, north bendigo, maximum traction, night photo, tram 2, tram 3, tram 4, tram 7, tram 11, tram 18, tram 19, tram 21, tram 26 -
 Melbourne Tram Museum
Document - Personal Papers, Melbourne Tramways Trust (MTT), "Notice Papers for 'The Melbourne Tramways Trust' meetings", 1885 - 1886
Set of 16 Notice Papers or Meeting Agendas - sent to Trust Members and others for The Melbourne Tramways Trust for period April 1886 to November 1890 as listed below. Printed by Ferguson and Moore or Edgerton and Moore for the Trust. Signed by the Secretary. Covers construction arrangements, appointments, financial, loans, debentures, legislation, arrangements with the Melbourne Tramway and Omnibus Company and other organisations including banks. Notes are the principal items shown in the Orders of the Day. Printed by Fergusson and Moore or Edgerton and Moore - different name on the 17/1/1890 meeting. 1886 – 1887 – Thomas O’Grady and T. Hamilton remain as Chairman and Secretary respectively. Meeting No. Date Notes 5 16/4/1886 Wages, supplier payments, accept tenders for mechanical stokers, construction of Carlton line, notice to construct a siding in Wellington Parade and purchase of land for the Brunswick Engine house. 1888 – 1890 – Cr. C.H Jennings Chairman, T. Hamilton Secretary Meeting No. Date Notes 3 17/1/1890 Wages, supplier payments, accept tenders for crossings, railway crossings, cement and that the Hawthorn House is completed and ready for traffic. 4 24/1/1890 Special meeting to consider communication from MTCo re opening of the Hawthorn horse tramway. 5 14/2/1890 Wages, supplier payments. 6 14/3/1890 Wages, supplier payments, dispute with David Munro over fine for the Hawthorn bridge and Collingwood council seeking to widen approach to Victoria St bridge. 7 18/4/1890 Wages, supplier payments, wood blocking of Hawthorn and Victoria bridge lines. 8 16/5/1890 Wages, supplier payments, proceed with Victoria Bridge approaches. 9 13/6/1890 Wages, supplier payments, reappointment of C. W. Ellis as auditor, protect Trust interest in reference to the Hoddle St tramway bill. 10 11/7/1890 Wages, supplier payments including hire of horses for threading of cable. 11 8/8/1890 Wages, supplier payments, call tenders etc for St Kilda Esplanade line. 12 5/9/1890 Wages, supplier payments 13 3/10/1890 Wages, supplier payments, letting of tenders for track materials, 2nd crossover for cars in Spencer St. 14 31/10/1890 Wages, supplier payments, acceptance of tenders for Esplanade line. 1890 – 1891 – Cr. C.H Jennings Chairman, T. Hamilton Secretary Meeting No. Date Notes 1 19/12/1890 Wages, supplier payments, accept of tenders for Esplanade including engines. 15 3/11/1890 Special meeting to consider letter from St Kilda council re widening of the Esplanade. 16 28/11/1890 Wages, supplier payments, accept of tenders for Esplanade including engine house and cable. For a word version - see: \dbtext\hawthtramcoll\images\htd2003doc.doctrams, tramways, mtt, cable trams, melbourne tramways trust, construction, finances, mto co -
![Junction of the Rivers Yarra and Watt, Near Healesville / [by] Nicholas Caire, circa 1876](/media/collectors/550653872162f11fb04854aa/items/577740e5d0cdd10a5c0de011/item-media/57774153d0cdd10a5c0e0662/item-fit-380x285.jpg) Kew Historical Society Inc
Kew Historical Society IncPhotograph, Anglo-Australasian Photographic Company, Junction of the Rivers Yarra and Watt, Near Healesville, c. 1876
Nicholas Caire was born on Guernsey in the Channel Islands in 1837. He arrived in Adelaide with his parents in about 1860. In 1867, following photographic journeys in Gippsland, he opened a studio in Adelaide. From 1870 to 1876 he lived and worked in Talbot in Central Victoria. In 1876 he purchased T. F. Chuck's studios in the Royal Arcade Melbourne. In 1885, following the introduction of dry plate photography, he began a series of landscape series, which were commercially successful. As a photographer, he travelled extensively through Victoria, photographing places few of his contemporaries had previously seen. He died in 1918. Reference: Jack Cato, 'Caire, Nicholas John (1837–1918)', Australian Dictionary of Biography.An original, rare photograph from the series 'Views of Victoria: General Series' by the photographer, Nicholas Caire (1837-1918). The series of 60 photographs that comprise the series was issued c. 1876 and reinforced a neo-Romantic view of the Australian landscape to which a growing nationalist movement would respond. Nicholas Caire was active as a photographer in Australia from 1858 until his death in 1918. His vision of the Australian bush and pioneer life had a counterpart in the works of Henry Lawson and other nationalist poets, authors and painters.Albumen Silver Photograph, mounted on Board.printed in ink on support l.c.: JUNCTION OF THE RIVERS YARRA AND WATT, NEAR HEALESVILLE. / COPYRIGHT REGISTERED. printed in ink on support reverse c.: VIEWS OF VICTORIA. / (GENERAL SERIES.) / No. 3. / JUNCTION OF THE RIVERS YARRA AND WATT, NEAR HEALESVILLE / The junction is situated about 3 miles from Healesville, and 35 miles from the mouth of the Yarra. The souces / of the Watt are to be found at the head of the Black Spur, and, being fed by a number of creeks and springs, its / waters gain considerable force for several miles before joining those of the Yarra. The "Old Bridge," at the junction, / is the name given to this crossing-place, which has been partly swept away by late floods. The depth of the Yarra here / is from 15 to 20 feet; that of the Watt, about 10 feet. printed in ink on support reverse l.c.l.: J.W. FORBES, Agent, printed in ink on support reverse l.c.: ANGLO-AUSTRALASIAN PHOTOGRAPHIC COMPANY, MELBOURNE. printed in ink on support reverse l.c.r.: 10 Temple Court, Collins Street West.nicholas caire (1837-1918), yarra river, watt river, bridge, wooden bridge, healesville -
 Orbost & District Historical Society
black and white photograph, July 1922
A new bridge over the Snowy River at Orbost was opened for traffic on June 20th 1922. It was designed for future joint use by road and railway traffic, but it was only used for road traffic. During the last few years the condition of an old suspension bridge [the 1893 bridge] which was the only vehicular crossing between the town of Orbost and the railway station, caused much concern. The structure was of timber, except for the wire suspension cables of its central span of about 100 feet. A design was prepared in 1914 for a permanent bridge with five spans of 85 feet composed of plate girders on concrete piers. With great increase in the price of steel work during the war, the cost of this design became prohibitive, and the need for a new structure becoming urgent, alternative proposals were investigated. As a result the present design was adopted as providing a sem-permanent bridge at moderate cost. The new bridge spans the river about 160 feet upstream from the old bridge on a slight skew, the piers being at an angle of 80 degrees with the centre line of the bridge. It has a camber of about 2 feet 5 inches in its total length of 527 feet. ( information from Newsletter March 2014 - Lois Crisp) The photograph shows Mrs James Cameron cutting the ribbon at the opening of the Orbost Pile Bridge in 1922. This second bridge, was built by the Victorian Railways and the Country Roads Board. Constructed at a cost of 35,000 pounds and used second-hand girders from the Flinders Street- Spencer Street viaduct. On July 4 1922 it was officially opened by Mrs James Cameron. Unfortunately, her husband, who had long championed the building of the bridge so that it would be ready for the railway to continue to the border, was too ill to attend the ceremony. In fact, James Cameron died on July 13 after a long and severe illness (ref. S.R.M. 20.7.1922). There is a section of this ribbon in the collection - Registration No. 366. This is a pictorial record of a significant event in Orbost's history.A black / white photograph of a pile bridge with a suspension bridge behind it. There are many people standing on the bridge.on back - "Opening of Pile Bridge - 1922"snowy-river-bridge ceremonies cameron-mrs -
 Eltham District Historical Society Inc
Slide, Maroondah Aqueduct, Research, Victoria, 22 Mar. 1981
An inspection tour of the Maroondah Aqueduct was undertaken by the Shire of Eltham Historical Society on Sunday, March 22nd, 1981, commening where the aqueduct crosses Main Rd., Research, just below Eltham College. The Maroondah Aqueduct was part of Melbourne’s water supply system. It carried water over the 66 km from the Maroondah Reservoir on the Watts River at Healesville to the Preston Reservoir. Of this length, 41 km were open channel, 10 km, tunnel through hills and 15 km in 14 inverted siphons across stream valleys. The route of the aqueduct is north of Tarrawarra and Yarra Glen, along the Yarra escarpment south of Christmas Hills and crossing Watsons Creek into the present Shire of Eltham near Henley Rd. The eastern part of the route lies entirely within the former boundaries of the shire. The aqueduct passes south of Kangaroo Ground to Research and crosses the Diamond Creek by siphon at Allendale Rd., Eltham North. It then extends to Reservoir via St. Helena, Greensborough North and Bundoora. Water first flowed through the aqueduct in February 1891 when it was fed by a diversion weir on the Watts River. Records of the building of the aqueduct indicate that it was a significant construction achievement. The present Maroondah Reservoir was completed in 1927 and the aqueduct was enlarged at that time to take increased flows. About 1971 the section of the aqueduct through and north of Research was replaced by a large pipe and that section of the channel is now unused. The channel has remained largely intact (unlike sections at Greensborough and Bundoora where long lengths of the disused aqueduct have been demolished or filled in). The M.M.B.W. relinquished control of the disused aqueduct reserve which is crown land and the Shire of Eltham took control of this section of the reserve as a linear park. The Maroondah Aqueduct is considered to be an important historic structure, not just to the local area but to the metropolitan area generally. It is considered important to preserve substantially intact long lengths of the disused aqueduct, together with its bridges and other associated structures. 35 mm colour positive transparency (1 of 5) Mount - Agfachrome Agfa CS System black 8 dotsactivities, heritage excursion, maroondah aqueduct, research (vic.), shire of eltham historical society -
Glen Eira Historical Society
Article - Grand Union Tramway Junction, Balaclava Road and Hawthorn Road
This file contains three items. 1. A three-page Caulfield Conservation Study of the Balaclava Road/Hawthorn Road Tramway Crossing, undertake by Andrew Ward and dated September 1994. Study includes a brief history of the junction and a statement of significance. Study also includes Four black and white photographs of the junction and of architectural details of the tram tracks. 2. A letter from the Conservation Manager of the National Trust of Australia (Victoria) to the manager of the Planning Section for the City of Glen Eira, dated 15/06/2001 and attached to a six-page Classification Report. The letter informs of the Classification of the Grand Union Junction at the intersection of Balaclava and Hawthorn Road by the national trust, signed by Conservation Manager Ian Pausacker. Classification Report includes details such as the date of construction, a statement of significance, history of the junction, physical description of the junction and the condition of the junction at the time of writing. Report also includes a map of the Melbourne Tram Network drafted by Keith Kings and dated 01/005/1956, with illustration of the layout of fifteen tram depots, and updated aerial illustration of the Grand Union Junction, and a further map of Melbourne Tramways developed by North Melbourne Electric Tramways and Lighting Co. and Prahran and Malvern Tramways Trust, drafted by Keith Kings and dated January 1914 with illustrations of three tram depots. 3. Two articles from the Caulfield Leader written by Aaron Langmaid and dated 13/02/2007 and the Melbourne Bayside Weekly dated 21/02/2007 written by Joanne Sim, both concerning the Grand Union Junction. The article from the Caulfield Leader includes a picture of Executive Officer of the council of Tramway Museum of Australia Craig Tooke in front of the intersection. The article from the Bayside Weekly includes a picture of a tram passing through the junction and a brief history of the junction and tram network in Caulfield. The article also refers to twp local tram shelters at the intersection of Dandenong Road and Alma Road and also Orrong Road and Balaclava Road.caulfield, caulfield conservation, study, balaclava road, hawthorn road, grand union junction, ward andrew, tramway crossings, transport, acland street, caulfield racecourse, tram tracks, race events, event, tram routes, thorough fares, melbourne and metropolitan tramways board, prahran and malvern tramway trust, prahran and malvern district tramways, caulfield electric tramways, caulfield city council, architectural detail, city of glen eira, balaclava road and hawthorn road intersection, balaclava road and hawthorn road junction, dandenong road, glenhuntly road, four-way tram junctions, access covers darling road, cast metal access covers, hadfields patent, caulfield park, tram systems, tram networks, heritage, tramway heritage, kings keith, tram depots, glenhuntly depot, maps, glen eira, melbourne electric tramways, north melbourne electric tramways and lighting co., prahran and malvern tramways trust, caulfield leader, bayside weekly, tooke craig, tourist attractions, grand union tramways junction, caulfield junction, cable car tramways, tram shelters, building, sheds, alma road, orrong road, caulfield electric line, balaclava junction, elsternwick railway station, caulfield station, caulfield station loop, tram services, transport establishments, thoroughfares, buildings, structures, establishments, parts of buildings or structures, documents, commercial industry, sites, historic sites, melbourne bayside weekly