Showing 2356 items
matching park st
-
 Ballarat Tramway Museum
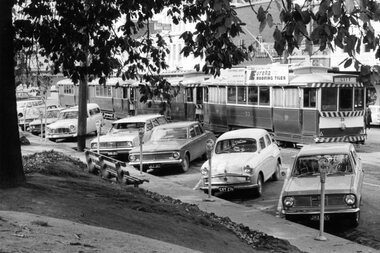
Photograph - Digital image Set of 8, George Coop, 1968 - 1970
Yields information about the City Loop area and its operation. Eight (8) Digital images taken by George Coop during the period 1968 - 1970, of trams at the City Loop. .1 - 33, 17 and two other single truckers parked in the loop with motor vehicles and parking meters. No. 33 has an Eureka Roofing Tile Advert. .2 - 28? passing two track workers cleaning the west end points with a bogie car and three single truckers in the loop. In the background are Patersons and Dickins Food Store. .3 - No. 12 parked at the east end of the loop, hard up against the tram in front. Shows the Section Insulator. .4 - As for .1, front on photo with the destination of City and a "Pay as You Enter". The Dickins sign can be seen. .5 - as for .2, No. 35 leads the queue. Has the Woolworths Big W store in the background. .6 - view from the rear (12, 30, 17) with No. 33 being driven out of the loop. .7 - View from the rear, 33 has moved out of view. Has the T&G (Temperance and General) building in the view. .8 - No. 31 moves over the points at the west end of the loop. The tram has the Destination of Gardens via Drummond North, a Twin Lakes advert and a SEC Electric Cooking Advert.trams, tramways, city loop, sturt st, trackwork, overhead, tram 33, tram 17, tram 26, tram 12, tram 35, tram 31 -
 Ballarat Tramway Museum
Photograph - Black & White Photograph/s - set of 6, Charles Craig, 1950s
Yields information about the appearance and use of the Ballarat Railway Station level crossing by trams prior to closure.Set of six black and white photographs of trams at the railway level crossing, Ballarat, Lydiard St North featuring the railway station, gates and signals, Reeds Coffee Palace and the Provincial Hotel. .1 - 28 heading south, with an R class and a K class locomotive in the view. .2 - 11, heading north - taken during the 1950's. .3 - 17 parked right up to the gates while K184 shunts at the station. .4 - single trucker (number obscured) - most likely 17 giving the passengers in the previous photo. .5 - Photo with two single truckers in the view and the gates being closed after the tram has passed. .6 - 11, at the gates with a bogie tram behind. No. 11 has a Briquettes roof advert and a Twin Lakes sign. Photo by Charles Craig - during 1971, except for .2, taken during the 1950's. trams, tramways, lydiard st north, railway station, signals, level crossings, tram 28, tram 11, tram 17 -
 Ballarat Tramway Museum
Photograph - Digital image, W. J. Llewelyn, c1971
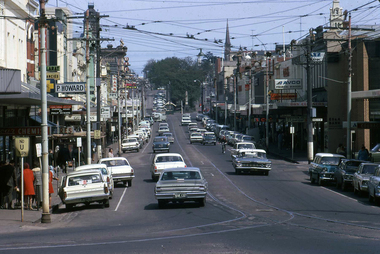
Yields information about the Royal Visit to Ballarat and the appearance of Bridge St during 1956 and just prior to the closure of the tramway.Set of three colour digital images taken of the Bridge St Ballarat by W. J. Llewelyn. .1 - Looking west along Bridge St from the Service Station, shows the various buildings, tram track, tram shelter and overhead. Appears to be c1971. .2 - Look east from Grenville St, 1954 with the Royal Visit decorations in the placed. Has the Dickins Self Service Grocery shop, Bucks Head Hotel and a sign for Morsheads store. Tram tracks and overhead apparent along with two trams in the far distance. .3 - Looking west along Sturt St from Bridge and Grenville St - shows the buildings in the background, tramway overhead, general congestion, letter box, tram stop shelter. A tram is parked in the loop. Has a Davies Bread advert on the Mechanics Institute building, also Thomas Jewellers, T& G and the Odeon Theatre sign.trams, tramways, bridge st, victoria st, stones corner, royal visit, grenville st, shelters, sturt st -
 Ballarat Tramway Museum
Photograph - Black & White Photograph/s, Negative, Ellis Collection, c1950
Yields information about the appearance of Bridge St and the use of the trams c1950.Black and white photograph of a bogie tram 22 west bound in Bridge St. Has a group of ladies on either side of the road waiting to board? Note the signs on the poles on either side of the roadway. Has the Waratah Motors, Roger David stores on the west side of the street. c1950. Note the road lifting over the Yarrowee River bridge. The two signs on either side of the road "No Parking over 1 hour Park 1 Foot from kerb" Negative number 1140. Negative scanned at 2400dpi. On the top edge of one of the prints "same as 1094"trams, tramways, ballarat, bridge st, signs, tram 22 -
 Ballarat Tramway Museum
Slide - 35mm slide/s, David Verrier, 6/10/1964 12:00:00 AM
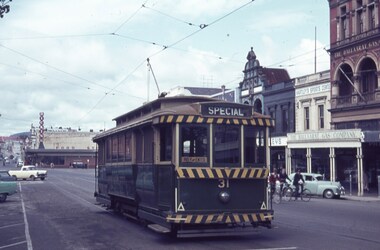
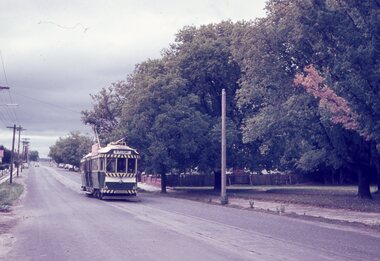
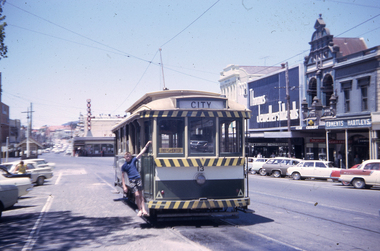
Yields information about the appearance of the tram 31 and the lower end of Sturt St in 1964.Agfa colour slide, white blue plastic mount. Photograph by David Verrier of Tram 31 parked in City Loop showing "Special". In the background is the Dickins Food Store, Hartley's Sports Centre and the Ballarat Gas Company office. Photo taken 6/10/1964.On back of slide in pencil "Tues 6/10/64 Ballarat No. 31 in Sturt St Layby Loop" tramways, trams, sturt st, city loop, tram 31 -
 Ballarat Tramway Museum
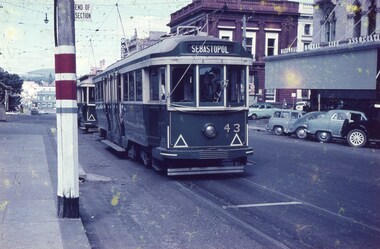
Slide - 35mm slide/s, Keith Caldwell, 8/03/1960 12:00:00 AM
Yields information about the city tram stop and the surround buildings.Agfa colour slide, white cardboard mount, photo by Keith Caldwell on 8/3/1960 of: Tram 43 at the city tram stop, Sturt and Lydiard St, with the destination of Sebastopol. Has trams parked in the City Loop, a single trucker behind No. 43. In the view are the Bucks Head Hotel, the Commonwealth Bank and the national Mutual Life buildings. Slide is blotchy and has mould marks.Stamped on bottom of slide "8 Mar 60"., In ink "BxAT"tramways, trams, sturt st, lydiard st, tram 43 -
 Ballarat Tramway Museum
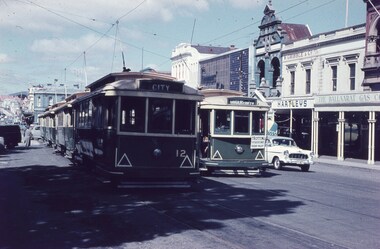
Slide - 35mm slide/s, Keith Caldwell, 8/03/1960 12:00:00 AM
Yields information about the City tram stop and the south side of Sturt St at Lydiard St.Agfa colour slide, white cardboard mount, photo by Keith Caldwell on 8/3/1960 of: Tram 12 parked in the city loop and No. 14 passing it on the way to the Gardens via Sturt St West and carrying a Trotting showgrounds Friday night auxiliary board. In the background is the Bucks head Hotel, Thomas Jewellers, W. Gribble & Co. Chemist, Hartley's sports store and the Ballaarat Gas Company buildings. Parked behind No.12 are three other single truckers. Stamped on bottom of slide "8 Mar 60". In ink "Ballarat Peak"tramways, trams, sturt st, city loop, grenville st, tram 14, tram 12 -
 Ballarat Tramway Museum
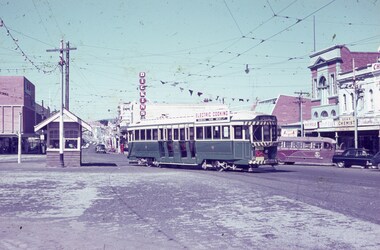
Slide - 35mm slide/s, Keith Caldwell, 16/03/1963 12:00:00 AM
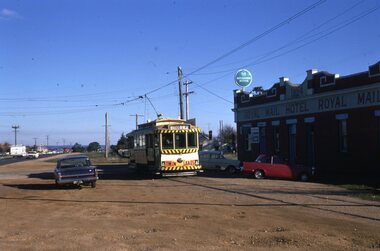
Yields information about tram 35 and the Grenville St and Sturt St intersection and the streetscape.Agfa colour slide, white cardboard mount, photo by Keith Caldwell on 16/3/1963 of: Tram 35 at the Grenville St stop on the south side of Sturt St. Tram has the destination of Special and a Dancing at Civic Hall dash panel advert. In the background is the Shelter, Dickens, Gear Chemist, Spot Cafe, L Lescott tea rooms and Maypole. Parked is a bus with Avoca, Leeton, Waubra, Learmonth and Ballarat written on the side. In ink "16.3.63"tramways, trams, sturt st, grenville st, buses, shelters, tram 35 -
 Ballarat Tramway Museum
Photograph - Black & White Photograph/s - set of 2, Richard Gilbert, c August 1971
Yields information about the appearance of Wendouree Parade, after a hail storm the day before the closure of the Victoria St line. Series of 2 Black and white photographs of tram operations following a heavy hail storm on Friday afternoon 21/8/1971. .1 - single trucker with a Twin Lakes sign westbound in Wendouree Parade, rounding the Haddon St curve. .2 - trams 12 and 21 parked on the SEC depot fan.trams, tramways, haddon st, wendouree parade, depot, tram 12, tram 21 -
 Ballarat Tramway Museum
Photograph - Black & White Photograph/s - set of 2, Richard Gilbert, c August 1971
... Russell St Victoria Park tram 12 tram 11? Series of 2 Black ...Yields information about tramway operations in Sturt St west. Series of 2 Black and white photographs of trams using the Hospital corner curves. .1 - No. 12 east bound in Sturt St West with the destination of Mt Pleasant. Has a Twin Lakes sign. Near the intersection with Russell or Morrison Streets at the Victoria Park loop. .2 - West bound (NO. 11?) about to enter the Victoria Park Loop trams, tramways, sturt st west, russell st, victoria park, tram 12, tram 11? -
 Ballarat Tramway Museum
Photograph - Digital image, John Ward, 2/01/1972 12:00:00 AM
Digital image of the Bendigo tram 29 turning from Pall Mall into Mitchell St with the destination of Railway Station. In the background is the Fountain Plaza, advertising Melba Frocks and Gidgette Boutique, the City Family Hotel, Park Lane chicken shop. In the foreground is the Inspector returning the point bar to its holder on a pole. Photo by John Ward 2-1-1972. Slide title "04771 020172 7210-F SECV Birney tram 29 Pall Mall to Mitchell St at High St & View St Charing Cross Bendigo Vic"trams, tramways, bendigo, pall mall, mitchell st, charing cross, tram 29 -
 Ballarat Tramway Museum
Photograph - Black & White Photograph/s - set of 3, Andrew Howlett, c1971
Yields information about the appearance of the city loop area and associated tramcar operations.Series of three Black and White photograph print of Four bogie trams parked in City Loop. .1 - four bogie trams parked in the loop - numbers unable to be read. .2 - ditto .3 - dittotrams, tramways, city loop, sturt st -
 Ballarat Tramway Museum
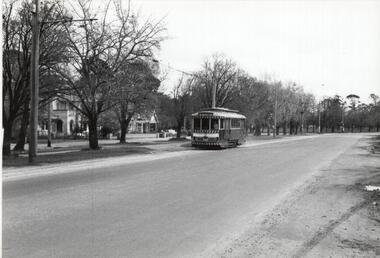
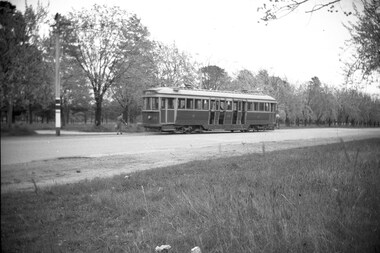
Negative, Wal Jack, mid to late 1940's
... Negative file of No. 34 westbound in Sturt St west, with Victoria... to Ballarat and Victoria Park. Trams tramways Sturt St West Victoria ...Yields information about the appearance of the ex Melbourne bogie trams, soon after they came to Ballarat and Victoria Park.Negative and Digital image of the Wal Jack Ballarat Negative file of No. 34 westbound in Sturt St west, with Victoria Park in the background. Has a lady passenger walking to board the tram. Photo mid to late 1940's.trams, tramways, sturt st west, victoria park, tram 34 -
 Ballarat Tramway Museum
Slide - 35mm slide/s, Robert Thomson, 28/04/1965 12:00:00 AM
Yields information about Ballarat's trams during 1965 and the Mt Pleasant line.AGFA blue / white plastic mount, colour slide of No. 37 inward bound in Barkly St Mt Pleasant, with the destination of Gardens via Drummond North. In the background is Pearce Park and a Caltex Service Station. Dated 28.4.1965"28.4.1965" in ink.tramways, trams, barkly st, mt pleasant, tram 37 -
 Ballarat Tramway Museum
Slide - 35mm slide/s, Robert Thomson, 5/04/1969 12:00:00 AM
Yields information about Ballarat's trams during 1969, the Mt Pleasant line.AGFA blue / white plastic mount, colour slide of No. 35 outward bound in Barkly St Mt Pleasant, alongside Pearce Park. Tram has the destination of Mt Pleasant."5.4.1969" in ink.tramways, trams, mt pleasant, barkly st, tram 35 -
 Ballarat Tramway Museum
Slide - 35mm slide/s, Robert Thomson, 5/04/1969 12:00:00 AM
Yields information about Ballarat's trams during 1969, the Mt Pleasant line.AGFA blue / white plastic mount, colour slide of No. 38 inward bound in Barkly St Mt Pleasant, alongside Pearce Park. Tram has the destination of Gardens via Drummond North. The driver has the controller at the full parallel position."5.4.1969" in ink.tramways, trams, mt pleasant, barkly st, tram 38 -
 Ballarat Tramway Museum
Book, Leon Marshall -Wood, "The Brighton Electric Line", 1956, 1958
.1 - Twenty page booklet on the history of the Brighton Electric Line by Leon Marshall-Wood, published 1956. Gives a brief history of the electric tramway operated by the Victorian Railways between St. Kilda Station and the Brighton Beach railway station, that commenced operation in 1905. The booklet was priced 2/-, published by the Traction Publications. Has 18 photographs, map 1905 and present day (when printed), rolling stock roster and notes and on the rear cover has details of the AETA. Front cover has horizontal crimson stripes. Has details of the AETA on the back cover and listing of some publications. Second copy from Ian Stanley added 24-1-2016. .2 - as for above - second edition, 1958, similar text, different photo layout and different front cover photo. See Reg Item 7631i for a scan of the 1966 edition.On front cover of first copy of .1 - top right hand corner; "N.Z.R.L.S / with compliments" and initials. Under title of book, "Price to Society 18/- Aust. per doz. / Retails 2/-" On page 3 of second copy of .1 - "Ian J Stanley 28 Park Road, South Camberwell, SE6, BK3746" On page 3 of .2 - "Ian J Stanley" in ink.trams, tramways, vr, melbourne, brighton, st kilda -
 Ballarat Tramway Museum
Ephemera - Timetable/s, Melbourne and Metropolitan Tramways Board (MMTB), Set of 24 MMTB Melbourne tram timetables, 1969
Set of 24 MMTB timetables for various routes, dated July 1969. Generally includes Sat and Suns, Good Friday and Christmas day as well as weekdays, unless noted otherwise. Also includes a map of the route, detailed time points, sections, connecting services, fares, and organisation address - 616 Little Collins St. Melbourne. Have been folded into ten portions. All on white paper unless noted otherwise. Items shown with an # - have a sticker modifying timetable information details on the front page. 1154.1 - Route 4 - Carnegie - City .2 - Route 4D - East Malvern (Darling Road) - City # .3 - Route 5 - Malvern Burk Road, - City # .4 - Route 6 - Glen Iris - City # .5 - Route 7 - Camberwell - City # .6 - Route 8 - Toorak - City # .7 - Routes 9, 10 and 12 - South Melbourne and St Kilda Beach - City (Brunswick St.) - via Collins St. .8 - Routes 10, 11 - West Preston and routes 9 & 9A Northcote .9 - Routes 15 & 22 - Moreland and 1 & 21 - East Coburg .10 - Route - 15 & 16 - St Kilda Beach and 1 & 2A - South Melbourne Beach - via Swanston St. .11 - Route 19 - North Coburg - City # .12 - Route 42 - Mont Albert - City # .13 - Routes 48 - North Balwyn and Burwood - City .14 - as above, but for Saturdays and Sundays on pink paper .15 - Routes 55 & 56, West Coburg - City - (William St.) - Domain Road. .16 - Route 57 - West Maribyrnong - City .17 - Route 59 - Essendon (Aerodrome) - City .18 - Route 64 & 65 - East Brighton - City .19 - Route 69 - Kew Cotham Road - St. Kilda Beach # .20 - Route 70 - Wattle Park - City # .21 - Routes 77 - Prahran - City, 78 - North Richmond - Prahran, 79 - North Richmond - St Kilda Beach .22 - Route 82 - Footscray to Moonee Ponds .23 - Route 88 - East Preston - City and Route 96, East Brunswick - City .24 - as above but for Saturdays and Sundays on pink paper. Images of a sample of documents added 16-11-2013.mmtb, timetables, melbourne -
 Ballarat Tramway Museum
Ephemera - Timetable/s, Melbourne and Metropolitan Tramways Board (MMTB), Set of 14 MMTB Melbourne bus timetables, 1969
Set of 14 MMTB timetables for various bus routes, dated July 1969. Generally includes Sat and Suns, Good Friday and Christmas day as well as weekdays, unless noted otherwise. Also includes a map of the route, detailed time points, sections, connecting services, fares, and organisation address - 616 Little Collins St. Melbourne. Have been folded into eight or ten portions. All on white paper unless noted otherwise. Items shown with an # - have a sticker modifying timetable information details on the front page. Items shown with a % are larger size sheets of paper, folded into 10. 1155.1 - Clifton Hill - Elsternwick # .2 - Garden City - City # .3 - Fishermen's Bend - City .4 - Box Hill - East Doncaster via Blackburn, Mitcham via Donvale PO and Mitcham - Ringwood via Eastland .5 - Warrandyte via Templestowe, via East Doncaster, Donvale PO - City % .6 - Warrandyte, Park Orchards Ringwood .7 - Williamstown Rd., Footscray Railway Station, Ballarat Rd # .8 - Latrobe University, Northland, West Heidelberg - City # % .9 - Deer Park, Sunshine Park, Sunshine, Footscray - City # .10 - as above, but for Saturdays and Sundays on pink paper # .11 - Box Hill, Heidelberg, Templestowe .12 - Box Hill, North Blackburn .13 - East Kew, Box Hill, Doncaster .14 - Bullen, North Kew - City # % Images of a sample of documents added 16-11-2013. mmtb, timetables, melbourne -
 Ballarat Tramway Museum
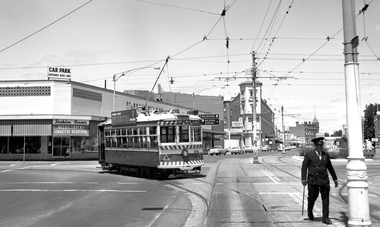
Slide - 35mm slide/s, Noel Simons, 1/01/1968 12:00:00 AM
Kodachrome transparency slide of Ballarat No. 13 parked in the City loop, with a young boy leaning from one of the doors. Has Thomas Jewellers Store in background, Edments and Hartleys and Dickins Supermarket in Grenville St. Slide has date of 1/68 written on, and has been stamped by Kodak as being processed Jul 68. It appears to be a hot day, during January as sun is quite high. Tram has large white strip under the dash canopy lighting. In red ink under number 15 "Ballarat 1/68" and on base in blue ink "City Loop"tramways, trams, sturt st., city loop, tram 13 -
 Ballarat Tramway Museum
Slide - 35mm slide/s - set of 6, Noel Simons, 22/05/1971 12:00:00 AM
Set of 6 Kodachrome transparencies taken on 22/5/1971. 1171.1 - Tram 33 at Sebastopol terminus, showing destination of Lydiard St. Nth, with Royal Mail Hotel in the background and three parked cars. Tram has "Twin Lakes" sign on front dash. 1171.2 - as for 1171.1 but taken from other side of tram, has hotel in part of photo. Shows arrangement of tram terminus signs on a pole in the background. 1171.3 - Tram 26 just after arrival at the Lydiard St. terminus, with passengers getting off and driver about to swap ends. Destination has been changed to Sebastopol. Has Lydiard St. shelter in the right edge of the photo. 1171.4 - as for 1171.3 - but with pole turned and looking back along street towards city. Shows the undulating nature of the street. 1171.5 - Tram 26 outbound in Albert St. for Sebastopol, crossing the street near Ophir St. Has a motor cyclist stopped for tram and shows tram stop on the west side of the road. 1171.6 - Tram 26, close up of tram at the Sebastopol terminus with two cars parked along side. Tram has destination of Lydiard St. Nth.1171.1 - "No. 33 at Sebastopol Terminus" and initials "BC" in bottom left hand corner. 1171.2 - "No. 33 at Sebastopol Terminus" and initials "BC" in bottom left hand corner. 1171.3 - "No. 26 at Lydiard St. North terminus" and initials "BC" in bottom left hand corner. 1171.4 - "No. 26 at Lydiard St. North terminus" and initials "BC" in bottom left hand corner. 1171.5 - "No. 26 crossing from left side of Albert St. Sebastopol to right side near Ophir St." and initials "BC" in bottom left hand corner. 1171.6 - No. 26 at Sebastopol Terminus" and initials "BC" in bottom left hand corner. All slides have date stamp of "22 May 1971" in purple ink and Kodak developing date of "Jun 71M7" in red ink. tramways, trams, sebastopol, lydiard st nth, royal mail hotel, tram stops, tram 33, tram 26 -
 Ballarat Tramway Museum
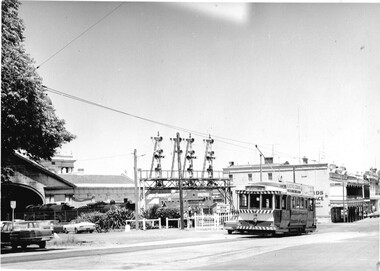
Slide - 35mm slide/s - set of 9, Noel Simons, Sept. 1971
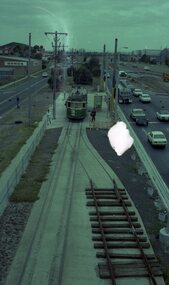
Set of 9 Kodak Ready-mount with slides made from the Association of Railway Enthusiast Provincial Tramways film strip. Reference Item 2560 details the ARE Film Strip, and provide references to other slides. See also Reg. item 1164. 1174.9 on plain white mount. 1174.1 - Tram 40 North bound for Lydiard St. North at the Railway Gates, with the gates closed. Tram carrying a heavy load of passengers. Railway station building and car park in background. Taken from the signal box. 1174.2 - Tram 12 bound for Gardens, photographed across the median strip plantation near Dawson St. Image i2a - adjusted 9/2021 to remove colour cast. 1174.3 - Tram 43 in bound along Wendouree Parade near Barrett Ave, passing a former tram stop and with "Warning Oncoming Trams" sign mounted on an adjacent pole. See also Reg. item 1172.1 for a photo taken in May 1971. This photo taken after the closure of the Victoria St. line, as the tram stop has been painted out. 1174.4 - Looking along the track to Sebastopol terminus on the west side of Albert St. - telephoto shot showing bogie tram in the far distance. Shows the nature of the track, poles, tram stop frequency and in the fare distance the terminus. Also show the trees that used to be along this section of the track. 1174.5 - No. 42 showing "Special" in Macarthur St. approaching Drummond St. north. Photo taken from under the verandah of a shop on the south side of the street that were many years later to become the Tramcar Restaurant. Note metal fence to cemetery. 1174.6 - Nos. 21 (Sebastopol) crossing 14 (Lydiard St. Nth) at the loop between Sayle and Grey St. Photo taken looking south. 1174.7 - No. 12 bound for Mt Pleasant, in Bridge St. about to stop at the junction for the two routes. Telephoto photo looking west along Bridge St. with many cars in the photo. Very few people on the street itself. 1174.8 - No. 30 and 17 at the City Terminus, on the north side of Sturt St. Taken from the Post Office corner with the Town Hall in the background. 1174.9 - No. 39 inbound along Sturt St. West. with many cars on the road. Bus stop on a pole on the other side of the road.1174.1 - "No. 40 on Lydiard St. North service waits at the level crossing at Ballarat Railway Station." 1174.2 - "No. 12 bound for 'Gardens' seen across the centre plantation in Sturt St." 1174.3 - "Barrett Ave." 1174.4 - "The Sebastopol route near the terminus" 1174.6 - "Nos. 21 and 14 crossing at Sayle St. Loop on Sebastopol route" 1174.7 - "No. 12 at Eastern end of Bridge St." 1174.8 - "Nos. 30 and 17 in Sturt St. at Cnr of Lydiard St." 1174.9 - "No. 39 City bound from 'Gardens" in Sturt St. West" All have date stamp of "Sep 1971" in black ink. Writing in blue ink.tramways, trams, lydiard st. nth, railway crossing, sturt st, wendouree parade, sebastopol, macarthur st., bridge st., sturt st. west, tram 12, tram 14, tram 17, tram 21, tram 30, tram 39, tram 40, tram 42, tram 43 -
 Ballarat Tramway Museum
Slide - 35mm slide/s - set of 6, Noel Simons, 27/02/1972 12:00:00 AM
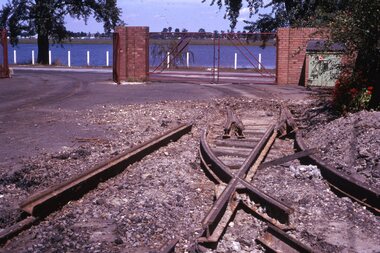
Has a strong association with the early days of the BTPS in preparing to move the tramcars from the depot and working at the former SEC depot itself. Yields information about the work done in the yard to recover materials.Set of 6 transparencies taken on 27/2/1972 on Kodak mounts. 1177.1 - photo of the dismantling of the points leading to "0" road at the SEC depot by the BTPS, looking south to Lake Wendouree. 1177.2 - view across depot front with No. 28 parked slightly outside and No. 40 inside door. Shows trackwork being dismantled and offices at front of depot. 1177.3 - view of No. 40 inside depot. 1177.4 - close up of the point blades leading to "0" road. 1177.5 - view of the front of the depot showing 40 and 28 parked outside, with dismantled point work in the foreground. 1177.6 - view of trackwork at part of Sturt and Drummond Sts. See also Reg Item 3533 for a similar series of photographs.Information written on in blue ink and date stamped on purple ink. 1177.1 - "Depot, Ballarat" 1177.2 - "Depot, Ballarat" 1177.3 - "Depot, Ballarat" 1177.4 - "Depot, Ballarat" 1177.5 - "Depot" 1177.6 - "Sturt and Drummond Sts"tramways, trams, wendouree parade, depot, sturt st, drummond st, pointwork, trackwork, o road, tram 28, tram 40 -
 Ballarat Tramway Museum
Slide - 35mm slide/s - set of 4, Noel Simons, Apr. 1967
Set of 2 slides made from the Association of Railway Enthusiast Provincial Tramways film strip, possibly during April 1967. 1192.1 and 1192.3 mounted in Kodak Ready Mounts. The others in plain white mounts. Slides dated Dec. 1968. 1192.1 - No. 21 out bound to Golden Square in High St., between Wattle and Vine Streets. Photo taken after tram has passed photographer. Has a sign for "Reid's Furnituorium" in the background. 1192.2 - Bendigo No. 28 dressed up as Myers Christmas tram, passing the Post Office and Courts in Pall Mall. 1192.3 - Bendigo No. 23 at Needle Loop en route to Eaglehawk. Tram has two SEC roof ads, one "Electric Cooking" and the other "Everything fine in my all electric kitchen". 1192.4 - Bendigo scrubber parked at the end of the main depot lead, alongside the depot office buildings.Details in blue ink, date hand stamped in purple ink. 1192.1 - "No. 21 heads along High St for Golden Square between Wattle and Vine Streets." 1192.2 - "Birney No. 28 in Christmas Garb, traverses Pall Mall en route to North Bendigo". 1192.3 - "No. 23 at Needle Loop on its run to Eaglehawk". 1192.4 - "Scrubber car at Bendigo Depot".tramways, trams, north bendigo, bendigo, bridge st loop, depot, tram 21, tram 23, tram 28, tram scrubber -
 Ballarat Tramway Museum
Slide - 35mm slide/s - set of 32, Noel Simons, 25/02/1971 12:00:00 AM
... of Mackenzie St. in photograph. 1201.4 - Tram stop and centre... - No. 7 in Nolan St. from across the park at Lake Weeroona ...Set of 31 transparencies taken on 25/2/1972 on Kodak mounts. 1201.1 - Bendigo No. 26 in Bond St. just after leaving Long Gully en route for Quarry Hill. Has Norris Supermarket in background. Has two SEC roof ads. 1201.2 - No. 26 climbing View St. from Charing Cross en route to Eaglehawk. Has ANZ bank and AMOCO service station in background. 1201.3 - as for 1201.3, but after tram has passed photographer. Has buildings west of Mackenzie St. in photograph. 1201.4 - Tram stop and centre of the road pole with two "CARS STOP BY REQUEST" signs mounted on pole at the corner of Mackenzie St. 1201.5 - same position as for 1201.3, but with No. 5 descending the street. 1201.6 - same position as for 1201.2, but with No. 5 descending the street. Photo taken after tram has passed photographer. 1201.7 - No. 7 in Nolan St. from across the park at Lake Weeroona. 1201.8 - No. 7 entering McCrae St from Nolan St. - distant view. Note "TRAM "sign on left hand side under tree and overhead in McCrae St. from former track that once was in this street. 1201.9 - No. 7 in High St. with Cathedral in background. Tram en route to North Bendigo. Note scaffolding around Cathedral main spire area. 1201.10 - No. 7 crossing Bendigo Creek bridge in High St. near Golden Square. Has a Caltex Service station in the background. 1201.11 - No. 7 at Golden Square terminus with Sunburst Fruit Juices and a Peters Ice cream delivery vans alongside. 1201.12 - as for 1201.11 but photo taken from behind tram, with the end of the rails in the photograph. 1201.13 - No. 7 and 21 in Pall Mall at Charing Cross with No. 5 in the background. Taken some distance away from the location. 1201.14 - No. 7 at Golden Square terminus, taken a short distance from the tram terminus. Shows Milk Bar on right hand side and the hotel on the left hand side. Taken from the south side of the roadway. 1201.15 - as from 1201.14 but taken from the north side of the roadway. 1201.16 - No 5 waiting at California Gully loop. Distant photo showing surrounds 1201.17 - No. 5 en route for Quarry Hill crossing No. 26 at California Gully. 1201.18 - No. 26 at Eaglehawk terminus with Eaglehawk Town Hall and Post Office in background. 1201.19 - No. 21 arriving at Charing Cross en route to North Bendigo. Has Alexandra Fountain in the background, ANZ bank RACV building, and other buildings on the north side of Pall Mall or Nolan St. 1201.20 - No. 26 en route for Quarry Hill at Charing Cross, with crew standing by front door. Has Colonial Mutual life building, Armstrong Tyre Service (Firestone) and a sign for Cohns Drinks in the background. 1201.21 - as for 1201.20 but with No. 5 en route to Eaglehawk now in photograph. 1201.22 - No. 26 at Quarry Hill terminus. 1201.23 - No. 26 at Quarry Hill terminus, view of front portion of tram only from a gate at the Bendigo cemetery. 1201.24 - Track at the end of the Quarry Hill line showing the point blades of the former "Y" terminus and the overhead for this. 1201.25 - No. 2 at the Quarry Hill terminus, looking along the former Trackwork. 1201.26 - as for 1201.25 1201.27 - number not used. 1201.28 - Golden Square terminus from some distance from the actual terminus, showing the Warning sign "TRAM" for motorists from the south. No. 7 at the terminus. 1201.29 - No. 7 passing through the Golden Square shopping centre. Numerous cars and pedestrians. Tram en route for North Bendigo. 1201.30 - No. 7 in High St. Golden Square, en route for North Bendigo. Photo taken after tram has passed photographer. 1201.31 - No. 7 in High St. just past Wattle St. with the Cathedral in the background. Tram has two SEC roof ads good side on photo, 'Everything's fine in my all electric kitchen' and 'Electrical cooking - clean, quick, economical'. 1201.32 - No. 7 in High St. nearing Wattle St. Has Cathedral in the background. Photo taken after tram has passed photographer.Information written on in black ink and date stamped on purple ink. 1201.1 - "No. 26 in Bond St just after leaving Long Gully" 1201.2 - "No. 26 climbing View St. from Charing Cross" 1201.3 - "No. 26 ascending View St. from Charing Cross (At Mackenzie St.)" 1201.4 - "View St. & Mackenzie St." 1201.5 - "No. 5 in View St. near Mackenzie St." 1201.6 - "No. 5 in View St. nearing Charing Cross." 1201.7 - "No. 7 in Nolan St. seen from Lake Weeroona Park." 1201.8 - "No. 7 entering McRae St. from Nolan St. Note "TRAM" warning sign on left. 1201.9 - "No. 7 in High St. passing Short St." 1201.10 - "No. 7 crossing Bendigo Creek bridge in High St. near Golden Square." 1201.11 - "No. 7 at Golden Square terminus" 1201.12 - "No. 7 at Golden Square terminus" 1201.13 - "No 7, 21 and 5 at Charing Cross" 1201.14 - "No. 7 at Golden Square terminus" 1201.15 - "No. 7 at Golden Square terminus" 1201.16 - "No 5 waiting at California Gully loop." 1201.17 - "Nos. 5 and 26 crossing at California Gully loop" 1201.18 - "No. 26 at Eaglehawk terminus" 1201.19 - "No. 21 arriving at Charing Cross from Golden Square" 1201.20 - "No. 26 at Charing Cross" 1201.21 - "Nos. 5 and 26 at Charing Cross." 1201.22 - "No. 26 at Quarry Hill terminus" 1201.23 - "No. 26 at Quarry Hill terminus seen through the gates of the Bendigo Cemetery." 1201.24 - "Quarry Hill terminus showing remains for former double track layout abandoned before 1964." 1201.25 - "No. 2 at Quarry Hill terminus" 1201.26 - "No. 2 at Quarry Hill terminus" 1201.28 - "The Southern approach to Golden Square with No. 7 standing at the terminus, "TRAM" warning sign on the left. 1201.29 - "No. 7 passing through Golden Square Shopping Centre" 1201.30 - "No. 7 in High St. Golden Square" 1201.31 - "No. 7 in High St. passing Wattle St." 1201.32 - "No. 7 in High St. nearing Wattle St."tramways, trams, bendigo, bond st., view st., nolan st., high st., eaglehawk, california gully, charing cross, quarry hill, trackwork, tram 2, tram 5, tram 7, tram 21, tram 26 -
 Ballarat Tramway Museum
Slide - 35mm slide/s - set of 25, Noel Simons, 26/02/1972 12:00:00 AM
Set of 25 transparencies taken on 26/2/1972 on Kodak mounts. 1204.1 - Bendigo No. 5 - just arrived at Manchester Loop near Havilah Road, Long Gully. Photo taken after tram has passed photographer. 1204.2 - No. 26 in Backhaus St. Long Gully passing William St, en route to Quarry Hill. Photo taken after tram has passed photographer. 1204.3 - No. 5 climbing the High St. Hill Eaglehawk, heading for Quarry Hill with the buildings on the West side of High St. in the background, including the Eaglehawk Town Hall. 1204.4 - as for 1204.3, but tram close up. 1204.5 - as for 1204.3, but after tram has passed photographer. 1204.6 - No. 5 at intersection of Mt Korong Road Ironbark and Calder Highway, with the AMPOL service 'station in the background. Photo taken after tram has passed photographer. 1204.7 - No. 26 en route to Quarry Hill shortly after leaving Needle Loop, passing William St., Long Gully. 1204.8 - No. 5 at California Gully Loop, picking up a passenger, with the shops at Long Gully in the background. Photo taken after tram has passed photographer. 1204.9 - No. 5 in Long Gully, en route to Quarry Hill. Photo taken after tram has passed photographer. 1204.10 - No. 2 at Eaglehawk terminus with the Eaglehawk Town Hall and Post Office in the background. Tram has two SEC roof ads. 1204.11 - No. 2 at Eaglehawk terminus, close up. 1204.12 - as for 1204.11, but through the park gates. 1204.13 - as for 1204.11, but with tram stop shelters in the foreground and buildings on the West side of High St in the background. 1204.14 - No. 2 in Mt. Korong Rd, midway between California Gully Loop and Needle Loop. Photo taken after tram has passed photographer. 1204.15 - No. 5 in Long Gully, en route to Quarry Hill. 1204.16 - as for 1204.15, but with trams departed loop. Has an ESSO service station in the background. 1204.17 - No. 26 leaves Charing Cross up View St.. Photo taken after tram has passed photographer. Has Armstrong Tyre Service, Cohns Drinks ad on a building and the T&G building in the background. Also Firestone ads on the tyre service building. 1204.18 - No. 5 waits at Charing Cross with the Alexandra Fountain in the background. Tram has two SEC roof ads, 'Everything s fine in my all electric kitchen' and 'Electricity Best for Cooking'. Has RACV, Colonial Mutual Life buildings in the background and the planting areas around Charing Cross gardens in the foreground. 1204.19 - No. 21 en route to North Bendigo arrives at Charing Cross, with passengers waiting to board. No. 5 in the background. In the background is the Fountain Gate Plaza building and the City Family Hotel. 1204.20 - as for 1204.19, but with No. 7 en route to Golden Square. 1204.21 - as for 1204.19, but closer up. 1204.22 - as for 1204.18 1204.23 - No. 25 in Nolan St. near the crossing of Bendigo Creek, running a special tram tour. 1204.24 - No. 25 on a special charter, in Weeroona Ave. at Cnr of Caledonia St. passing the Gas works. 1204.25 - Nos. 25 (showing Golden Square), 7 and 26 at Charing Cross. Has fountain in the background.Information written on in blue ink and date stamped on purple ink. 1204.1 - "No. 5 at Manchester Loop, near Havilah Rd. Long Gully." 1204.2 - "No. 26 in Backhaus St. Long Gully passing William St." 1204.3 - "No. 5 in High St. Eaglehawk." 1204.4 - "No. 5 in High St. Eaglehawk." 1204.5 - "No. 5 in High St. Eaglehawk." 1204.6 - "No. 5 in Mt. Korong Rd., Ironbark, passing Calder Highway Junctn." 1204.7 - "No. 26 shortly after leaving Needle Loop, passing William St., Long Gully. No. 5 cresting hill in distance." 1204.8 - "No. 5 at California Gully Loop." 1204.9 - "No. 5 in Long Gully" 1204.10 - "No. 2 at Eaglehawk terminus." 1204.11 - "No. 2 at Eaglehawk terminus." 1204.12 - "No. 2 at Eaglehawk terminus." 1204.13 - "No. 2 at Eaglehawk terminus." 1204.14 - "No. 2 in Mt. Korong Rd, midway between California Gully Loop and Needle Loop. 1204.15 - "Nos. 2 and 26 crossing at Long Gully." 1204.16 - "No. 26 leaves Long Gully loop for Eaglehawk as No. 2 pulls out of the far end towards Bendigo" 1204.17 - "No. 26 beginning the climb up View St. from Charing Cross." 1204.18 - "No. 5 at Charing Cross." 1204.19 - "No 21 arrives at Charing Cross from Golden Square while No. 5 awaits departure time for Eaglehawk." 1204.20 - "Nos. 7, 21, and 2 (behind which is No. 5) at Charing Cross." 1204.21 - "Nos. 7, 21, and 2 at Charing Cross." 1204.22 - "No. 5 at Charing Cross." 1204.23 - "No. 25 in Nolan St. near Bendigo creek crossing" 1204.24 - "No. 25 in Weeroona Ave. at cnr of Caledonia St." 1204.25 - "Nos. 25, 7, 26 and 2 (behind 26) at Charing Cross."tramways, trams, bendigo, eaglehawk, long gully, california gully, charing cross, north bendigo, tram 2, tram 5, tram 7, tram 21, tram 25, tram 26 -
 Ballarat Tramway Museum
Slide - 35mm slide/s set of 7, Noel Simons, 29 Feb. 1972
Set of 7 transparencies taken on 29/2/1972 on Kodak mounts. 1208.1 - Bendigo 18 (en route to Quarry Hill) and 2 (Eaglehawk) in the early morning at Charing cross with the Alexandra fountain and the Fountain Plaza building in the background. 1208.2 - No. 2 descending View St. Photo taken after tram has passed the photographer. 1208.3 - as for 1208.2 at Mackenzie St. intersection 1208.4 - No. 26 ascending View St. with the ANZ bank, T& G in the background. 1208.5 - as for 1208.4, but at Mackenzie St. intersection. Photo taken after tram has passed the photographer. 1208.6 - No. 18 in View St. seen from the lookout tower in Rosalind Park. 1208.7 - No. 7 en route to North Bendigo in Nolan St. Photographed across the Centenary Oval.Information written on in blue ink and date stamped on purple ink. 1208.1 - "Nos. 18 and 2 in the early morning sun at Charing Cross." 1208.2 - "No. 2 descending View St. towards Charing Cross." 1208.3 - "No. 2 in View St. passing Mackenzie St." 1208.4 - "No. 26 in View St. just after leaving Charing Cross." 1208.5 - "No. 26 climbing View St. past Mackenzie St." 1208.6 - "No. 18 climbing View St. seen from lookout tower in Rosalind Park." 1208.7 - "No. 7 in Nolan St. heading towards North Bendigo. / Last picture of a Bendigo tram."tramways, trams, bendigo, charing cross, view st., nolan st., tram 2, tram 7, tram 18, tram 26 -
 Ballarat Tramway Museum
Document - Report, Melbourne and Metropolitan Tramways Board (MMTB), "Report and Statement of Accounts" for year ended 30 June 1958, 1959, 1960, 1958-1960
1215.1 - Annual report of the MMTB for the year end 30/6/1958 - No. 39 - buff heavy paper cover with 56 pages on inside giving details of the MMTB Board, Officers, Balance Sheet, Statement of funds, operation, schedule of debenture, investments, Auditors reports, record of Annual traffic receipts, passengers, miles etc, tram and bus routes operated, statistical information, graphs and photographs. Photos include 2 of Influenza inoculations, traffic congestion in Collins St., new tram track in Malvern area, and new depot entrance at Camberwell. Has an insert inside front cover "With the Compliments of the Melbourne and Metropolitan Tramways Board." 1215.2 - 2 copies - Annual report of the MMTB for the year end 30/6/1959 - No. 40 - light green heavy paper cover with 60 pages on inside giving details of the MMTB Board, Officers, Balance Sheet, Statement of funds, operation, schedule of debenture, investments, Auditors reports, record of Annual traffic receipts, passengers, miles etc, tram and bus routes operated, statistical information, graphs and photographs. Photos include reconstruction of Batman Ave., laying special work at Kew Junction, pouring concrete in Johnston St., cable tramway abandonment, new thermit welding process, new dressing sheds at Wattle Park, illuminated tramcar for the City of Fitzroy centenary. Has an insert inside front cover "With the Compliments of the Melbourne and Metropolitan Tramways Board." 1215.3 - Annual report of the MMTB for the year end 30/6/1960 - No. 41 - light grey heavy paper cover with 60 pages on inside giving details of the MMTB Board, Officers, Balance Sheet, Statement of funds, operation, schedule of debenture, investments, Auditors reports, record of Annual traffic receipts, passengers, miles etc, tram and bus routes operated, statistical information, graphs and photographs. Photos include new St Kilda junction trackwork being assembled in Sth Melbourne yard, Flinders St. overpass under construction, - temporary trackwork, wheel welding machine at Preston, bus drivers school, new golf club house at Wattle Park, Q class tram decorated for Myers Christmas 1959. Has an insert inside front cover "With the Compliments of the Melbourne and Metropolitan Tramways Board." Printer not given on 1215.31215.1 - in ink on the front cover "Mr Major". On page 34 in pencil some notations re figures. 1215.2 - copy 2 - in ink on the front cover "Mr Major". 1215.3 - in light colour ink on front cover "Mr. B.F.Becher"trams, tramways, mmtb, melbourne, annual reports, operations, trackwork -
 Ballarat Tramway Museum
Photograph - Black & White Photograph/s, David Endacott, 14/08/1971 12:00:00 AM
Black and white photograph and negative of Sturt St, north side, looking to the east of Armstrong Street, Saturday 14 August 1971 at the corner of Armstrong St. Has two single truck trams at the intersection with Lydiard St. North and a few parked cars. Original print by David Endacott, duplicate print (1262A) by John Phillips 12/99. Second copy added 5/2001. Original neg scanned at hi res and updated 11/5/2020.On original print "From Cnr Sturt & Armstrong Sts / Sat 14 Aug 1971" in pencil.trams, tramways, ballarat, sturt st., armstrong st. -
 Ballarat Tramway Museum
Photograph - Colour print of donated negatives - set of 8, Ron E. Fluck, 27/01/1979 12:00:00 AM
Set of 8 colour laser printed copies of colour 35mm negatives featuring photographs of trams taken by Ron Fluck in Melbourne on 27/1/1979 and 28/1/1979 (1758.6 and 1758.7). 1758.1 - (Negative No. 251) - W2 340 at Airport West terminus. Sleepered track section on inbound track - must have been running single line at the time, following changeover to new terminus from Essendon Airport to Airport west. 1758.2 - NN253 - Z16 at Wattle Park terminus. 1758.3 - NN252 - VR 700 at Footscray terminus. 1758.4 - NN250 - W2 340 enroute to the Airport West terminus. New freeway arrangement being constructed on the left hand side of the tramway. 1758.5 - NN254 - Z1 11 at East Burwood Terminus 1758.6 - NN255 - W2 234 at Batman Ave terminus - one of the trams painted in "Transporting Art Program" 1758.7 - NN256 - W2 234 and SW6 912 at Batman Ave terminus. 1758.8 - NN257 - Z1 88 and W5 726 at corner of Bourke and Spencer St. Melbourne, with the Mail Exchange in the background. See Destination City 5th Editionmelbourne, essendon airport, princes bridge, footscray, east burwood, wattle park, transporting art, tram 11, tram 234, tram 340, tram 700, tram 16, tram 726, tram 88, tram 912