Showing 1818 items matching "colours"
-
 Bendigo Military Museum
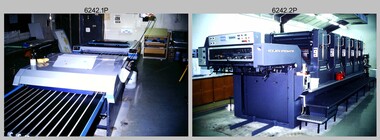
Photograph - Print Troop Equipment, Lithographic Squadron – Army Survey Regiment, Fortuna, Bendigo, c1990s
This is a set of 25 photograph of Print Troop Equipment in Lithographic Squadron, Army Survey Regiment at Fortuna, Bendigo, 1990. Photo .1P features the new Howson Algraphy Autoneg printing plate processor. It improved quality control and efficiency and allowed the conversion of printing plates for positive or negative use. The Heidelberg Speedmaster 102 shown in photos .2P to .4P was a computer-controlled five colour lithographic offset printing press. It provided the Royal Australian Survey Corps a vastly improved printing capability, as the five colours for a standard topographic map was printed in a single pass. The print room housing the Speedmaster printing press was named Wayzgoose Hall after a medieval printing house festival. Wayzgoose Hall and the Speedmaster printing capability was commissioned by the Commander of the 3rd Military District BRIG P. Davies AM, ADC on Wednesday 27th June 1990. This occasion is covered in more detail in page 145 of Valerie Lovejoy’s book 'Mapmakers of Fortuna – A history of the Army Survey Regiment’ ISBN: 0-646-42120-4. For additional photos, refer to item 6062.4P for more photos of the Heidelberg Speedmaster printing press. The Print Room’s Map Assessment and Colour Evaluation Stations in photos .5P to .12P provided the Printer Technician suitable viewing environments to perform quality assessments of map samples. See item 6151.34P for more information and photos of technicians using the equipment. The Print Room’s Map Handling Station in photo .15P to .20P provided ergonomic benefits to the Printer Technician and improved despatching productivity. See Item 6070.9P for more information and photos. The Wohlenberg MCS-2 guillotine seen in photos .21P & .22P was a heavy-duty guillotine integrated component of the Map Handling Station, to trim bulk printed map stock. See item 6069.6P for more information and photos of earlier types of guillotine equipment. This is a set of 25 photograph of Print Troop Equipment in Lithographic Squadron, Army Survey Regiment at Fortuna, Bendigo, 1990. The photographs are on 35mm colour slides and were scanned at 96 dpi. They are part of the Army Survey Regiment’s Collection. .1) - Photo, colour, c1990s, Howson Algraphy Autoneg printing plate processor .2) to .4) - Photo, colour, 1990. Heidelberg Speedmaster 102 computer-controlled five colour lithographic offset printing press .3) to .10) - Photo, colour, c1990s, Heidelberg Speedmaster CPC 1-04 control unit. .11) to .12) - Photo, colour, c1990s, Map Colour Evaluation Work Station. .13) to .14) - Photo, colour, c1990s, Linear printing plate registration punch. .15) to .20) - Photo, colour, c1990s, Print Room’s Map Handling Station. .21) to .22) - Photo, colour, c1990s, Wohlenberg MCS-2 guillotine. .23) - Photo, colour, c1990s, Print Room Power supply equipment. .24) to .25P - Photo, colour, c1990s, Print Room Crown Fork Lift..1P to .25P - There are no annotations stored with the 35mm slides.royal australian survey corps, rasvy, army survey regiment, army svy regt, fortuna, asr, printing, litho -
 Glen Eira City Council History and Heritage Collection
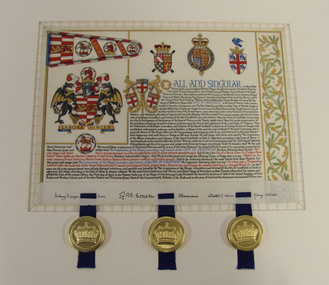
Letters Patent, Letters Patent for the Grant of Arms to the City of Caulfield presented on 1st May, 1977, 01/05/1977
Glen Eira has a long history of association with various heraldic forms. From its early years the municipality of Caulfield had used the armorial bearings of the Caulfield Family (the Charlemonts of Castle Caulfield) to represent the roads board and later the town and city. In 1969 Caulfield City Council began planning to apply for an official coat of arms for the City. In 1974 Horace Hall, a Balwyn North resident and member of the Heraldry Society in London advised Council that the current usage was illegal, and that the Houston family, current owners of the Caulfield Arms could take legal action against Council for 'usurping their arms'. Mr Hall was commissioned to develop new heraldry for the City, and in conjunction with J. P. Brooke Little at the College of Arms, London, he prepared an acceptable design for Caulfield's Coat of Arms. The Council paid an additional sum to have a standard painted on the Letters Patent and the municipality's new coat of arms was drawn up in June 1975. The Coat of Arms retains a number of heraldic elements from the original Caulfield family insignia, including the dragons, the colours and the elements of the shield. The newly registered coat of arms and Letters Patent document for the granting of arms was presented at a civic service to mark the granting of armorial ensigns and the city banner to the City of Caulfield on the 1st May 1977. Significant elements of the coat of arms granted by these Letters Patent are as follows: The motto 'Labore Vinces' translates to 'By our labours we will conquer'. The helmet represents the rank of the owner. Public authorities are granted an esquire's helmet. The brickwork on the crest is a recognised emblem of local government. The Letters Patent also display a banner and a badge, both official symbols of the City of Caulfield. The badge, which is displayed on the banner as well as on its own, features a bridled horse. This represents the importance of racing, the Caulfield racecourse and the Caulfield cup to the municipality. These letters patent officially proclaim the granting of the coat of arms to the City of Caulfield. They are highly significant to the City of Glen Eira as they are the primary document that signifies the official and ceremonial heraldic powers of the Coat of Arms of the City of Caulfield. Mounted Letters Patent illuminated document for the Grant of Arms to the City of Caulfield presented on 1st May, 1977. Hand written and hand painted on cream coloured parchment using different coloured inks, mainly black, blue, red and gouache and gold paint. The bottom edge is folded up over itself approx. 45mm revealing the flesh side of the parchment, which displays black ink signatures and three sets of two horizontal slits that hold three blue ribbon. The ribbons support three wax seals in round, gold coloured metal cases held by the wax through slots in the casing. Although covered by the cap top, each wax seal within displays a different flag emblem with a crown on top, surrounded by a ring of text (difficult to read), noted when the cases were opened during conservation treatment. See attached transcription.arms, symbol, heraldry, glen eira, council, caulfield -
 Warrnambool RSL Sub Branch
RSL BADGE COLLECTION _ Returned Sailors & Soldiers Imperial League Australia Badge and Returned Sailors' Soldiers' & Airmen's Imperial League Australia, RSL Membership Badges, Manufacturer - Stokes & Sons Melbourne for four badges, (Stokes closed in 1962). Small badges No 48030 (wiith 67 year clasp) has the makers inscription of - Property of League, Swann & Hudson VIC
donation source and providence unknown - common item issued to individual RSL Members across VictoriaAs an historic RSL Badge from WW1 & WW2 membership periods It is also in very good condition. The 'First Field Dressing' has a khaki cotton cover with a single stitched opening flap on the right hand end of the cover. The 'Contents' and 'Directions for Use' are written on the front exterior as follows: FIRST FIELD DRESSING TO OPEN: Outer. Cotton Break thread holding flap Inner. Waterproof Covers Tear apart at the uncemented corner (indicated by arrow). CONTENTS: Two dressings in Waterproof Covers,each consisting of gauze stitched to a bandage and a safety pin. Directions for Use - Take the folded ends of the bandage in each hand, and, keeping the bandage taut, apply the gauze pad to the wound and fix the bandage. one dressing to be used for each wound. In each case of head wounds when respirators have to be worn, care should be taken to adjust the pad so that it does not interfere with the fit of the facepiece. DO NOT HANDLE THE GAUZE OR WOUND Three x Large Badges (30mm (W) x 40mm (H) - With membership numbered on the rear of 45147, 70848, 74487 & 74642 stamped on the rear These badges a brass with white blue and red enamel inlay. The badge is in the shape of shield with a regal crown on top. The shield is white enamel, with a blue enamel circle (containing the words - Returned Sailors & Soldiers Imperial League. Below the circle a red enamel ribbon is depicted with the word - Australia enclosed. The brass centre of the badge has the figures of a Sailor & Soldier each carrying a rifle. Two x Small Badges (18mm (W) x 24mm (H) - The smaller badge has the same material and colours but includes the third figure of an Airmen holding a rifle in the centre. The location of the organisation name has changed to Returned Sailors' soldiers' & Airmen's in the blue circle and red ribbon contains - Imperial League Australia. One of the small badges has a green 67 year clasp fastened with three clasps around the crown. In this period Financial members received a new clasp for each year of financial membership. -
 Ballarat Tramway Museum
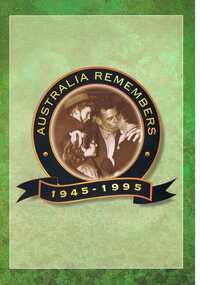
Book, Dept. of Veteran affairs for Australia remembers programme, Australia Remembers Information, 1995
Books, posters, letters and bromide sheets for background information and use in Australia Remembers (1995), commemoration - 50th anniversary of end of second world war. 255.1 - three copies - 1 item with 4 Velcro dots on rear, Australia Remembers logo poster - gloss paper, minor creases, three colours, 420 x 286. 255.2 - A4 size, 40 page and card cover background information book - "Australia Remembers", 1945 - 1995", published by Department of Veteran Affairs, 1994 Canberra. Gives brief history of Australia's involvement in Second World War, 297H x 210W, no damage. 255.3 - letter from Victorian Committee to BTPS dated 28/2/19905 - white paper with colour logo, A4, BTPS received stamp in top right hand corner - crease in top left hand corner. 255.4 - 8 page A4 size magazine format on Australia Remembers events, issued in Jan. 1995 - 297H x 210W - no damage. 255.5 - single sheet - A4 size, black and white, and colour bromides of Australia Remembers logos in various screens. Produced by Department of Veteran Affairs. Has been cut on left hand side. Images added 19/10/2013.trams, tramways, world war ii, australia remembers, 50th anniversary, commerations -
 Melbourne Tram Museum
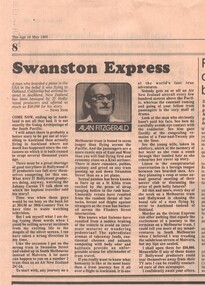
Newspaper, The Age, The Herald, "Swanston Express", "Its not easy losing green", "Keep our trams and buses green", 18/05/1985 12:00:00 AM
Series of newspaper clippings about travelling on Melbourne trams, people, conductors, and what can happen. .1 - Newspaper clipping titled "Swanston Express", from The Age 18/5/1985 by Alan Fitzgerald, about travelling on a tram and being on the wrong tram to an unusual destination and the things that can happen. Based around the story that a person was supposed to fly to Oakland USA but finished up in Auckland NZ. .2 - ditto titled "Its not easy losing green", from The Herald, 12/12/81 written by Lawrence Money about the loss of the green W's and their quirks - like sand on the floor, ticket butts, trap doors, peep holes, Melbourne habitats, compared to the orange trams. .3 - Letter to the Editor "Keep our trams and buses green", written by R Francis head of the graphic design, Swinburne Institute of Technology - regarding the colour of our vehicles, heritage and the craze of having orange colours - industrial design. Dated 8/5/1982. .4 - Editorial, 17/1/1995 - titled "Other peoples' trams" - The Age, about the reliance on Melbourne trams by its people, comparison with other large cities e.g. St Petersburg, cost of running it, finishes with the view that the system should be extended.trams, tramways, melbourne, behaviour, tramways, crews, tramcars, people and places, sanding equipment, compressors, livery, colour schemes -
 Federation University Historical Collection
Container - Artists' Book, Re_Designed / Solid, Liquid Gas, 2000
Promotional catalogue of third year, University of Ballarat, Bachelor of Visual Arts (Graphic Design / Multimedia) graduating student work, 2000. Custom designed plastic pack containing 20 sheets of recycled printed and overprinted student works, plus a CD Rom. The contents are representative of multiple variations across packs. The clear polypropylene pack is printed in yellow and a clear varnish. The original (1997) works are offset printed in black and silver, the overprint (2000) works are in full, four process colour. CD Rom printed two colours (yellow and very dark teal) single sided. Refer item 29168.1 for screen captures from this CD Rom. Third year, Bachelor of Visual Arts (Graphic Design / Multimedia) graduating class promotional pack. Students responded to the concept of "past, present and future". These new works (year 2000) were then overprinted onto unbound sheets of the 1997 graduating student project "Silver Screen" to create entirely different pieces to "challenge the conventional boundaries of the printed image" and elicit "environmental awareness". As such, each pack contained different combinations of original (silver and black) and overprint (full colour) designs. "Re-designed" (2000) overprinted works by Belinda Janetski, Ben Sanders, Angelina Teo, Selina Shillito, Justin Weyers, Andrew Strack, Debbie Ferris, Yuri Tanabe, Nandor Rakosi, Jason Grace, Wes Prendergast, Michael Fennelly, Brett van Lieshout, Derek Fong, Abby Vanstan, Vince Luc, Lynette Heenan, Van Sanders, Sam Harmer. Original (1997) "Silver Screen" works created by Ben Mangan, Russell Kerr, Luke Keys, Travis Prices, Karen Grinter, Rosie Busuttil, Peter Horvat, Felix Lee, Karl Chandler, Matt Bowman, Adam Laszczuk, Narelle Pietsch, Natasha Pietsch, Jenny Tyquin. Back cover lists sponsors. Custom designed plastic pack containing 20 sheets of recycled printed and overprinted student works, plus a CD Rom. The contents are representative of multiple variations across packs.university of ballarat, federation university, graphic design, multimedia, belinda janetski, ben sanders, angelina teo, selina shillito, justin weyers, andrew strack, debbie ferris, yuri tanabe, nandor rakosi, jason grace, wes prendergast, michael fennelly, brett van lieshout, derek fong, abby vanstan, vince luc, lynette heenan, van sanders, sam harmer -
 Duldig Studio museum + sculpture garden
Fabric, Mathilda Flogl, Falter designed by Mathilda Flogl 1924-31, 1924-31
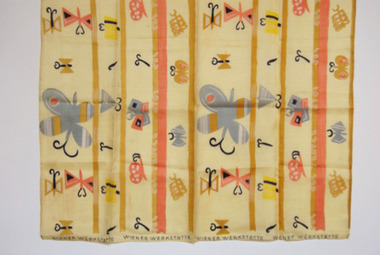
This piece of fabric, known Fälter (butterfly), was designed by Mathilda Flögl (1893-1958), who worked in the textile department of the Wiener Werkstätte in Vienna. It is a remnant of the fabric that was used to make a bedspread for Karl and Slawa’s bed in their Vienna apartment where it lay decoratively over a gold brocade eiderdown. The purchase demonstrated Slawa’s interest in and knowledge of modern design and her commitment to the idea of enriching everyday life with beautiful objects, a principal of the Viennese Secession. Following the Duldigs removal from Vienna, the original bedspread and remnant were safeguarded and preserved by Slawa’s sister, Rella, in the basement of her Paris apartment. In 1948 the bedspread and this remnant were sent to Australia. The bedspread was a much-loved item but deteriorated over the years. In 1955 it was made into curtains, which are held in the Duldig Studio Collection. The Photographs of the bedspread in its original location are also held in the collection. The remnant is in pristine condition. The Wiener Werkstätte (Vienna Workshop) was a guild of designers and craftsmen that was founded by the architect Josef Hoffman (1879-1956) and the designer Koloman Moser (1868-1918). The firm manufactured a range of interior furnishings between 1903 and 1932. The textile department opened in 1900, and produced about 1,800 designs, mainly for printed fabrics for furnishings and apparel. The designs were characterised by simplified forms and vivid colours, and inspired by Eastern European peasant art and geometric motifs in contemporary painting. The workshop had a profound impact of European art and design, and its work is still celebrated today. Mathilde Flögl was born in the Czech Republic in 1893, and studied at the Kunstgerwerbeschule in Vienna. In 1916 she began working at the Weiner Werkstätte, and where she designed more than 120 textile patterns. This fabric Fälter or Butterfly was designed in 1924. The butterfly was a favourite motif of Flögl. In this design she plays with a variety of whimsical abstractions and arrangement of both the butterfly and the snail on a background of abstract colour stripes and blocks. Ann Carew 2016The fabric is of great aesthetic interest as an example of the work of the Viennese workshops, and the noted designer textile designer Mathilde Flögl. The original pencil drawings, pencil and gouache designs, and fabric swatches for Fälter are held in the MAK Museum in Vienna, and the Victorian and Albert Museum in London have a sample of piece of the silk fabric in an alternate colour wave. The Museum of Applied Arts in Sydney holds a swatch book of textiles from the Wiener Werkstätte, however Flögl’s work is not represented. The National Gallery of Victoria holds a similar swatch book. The remnant has an excellent provenance, is associated with a powerful personal narrative, and is significant and rare item relating to history of the Wiener Werkstätte in Vienna, and the oeuvre of Matilda Flögl. Ann Carew 2016Remnant of a block-printed silk fabric used to make the bedspread for Karl Duldig and Slawa Horowitz-Duldig's bed in Vienna. -
 Bendigo Historical Society Inc.
Newspaper - HOWARD AND VIOLET JOLLEY COLLECTION: NEWSPAPER ARTICLES
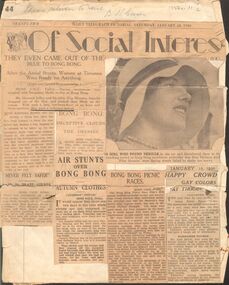
From THE DAILY TELEGRAPH items include from Jan 18 & 10, 1930 Of Social Interest. THEY EVEN CAME OUT OF THE BLUE TO BONG BONG, After the air-stunts, Women at Tirranna Were Ready For Anything, Racing excitement mingled with aeroplane thrills at Bong Bong; Barbara Aird as passenger, Never felt safer; LADY IN PLANE STUNTS; Gypsy Moth; Howard Jolley and pilot Guy Menzies, Dick Allen DECEPTIVE CLOUDS; THE DRESSES; AIR STUNTS OVER BONG BONG; AUTUMN CLOTHES; BONG BONG PICNIC RACES Bachelors bag won by Orwell Phillips. Alan Binnie, Lady de Chair, Lt Graham de Chair, Miss Susan Spencer, Mr & Mrs Blomfield; HAPPY CROWD GAY COLOURS AT TIRRANNA, two men wore fly nets, Mrs Alan Binnie remarked at the state of the ground. Binnie family rider Jack Melville had to borrow plumes as his riding kit had displaced from the car's running board on route to the races. From MONDAY 11th Nov 1929, Croppa Creek picnic races, history as Messrs Jolley & Leggatt arrived by plane. From Sydney Morning Herald of 18/3/1930 The Town Hall was densely packed last night for the Irish national concert held in connection with St Patrick's Day celebrations with programme numbers drawing enthusiastic applause. -
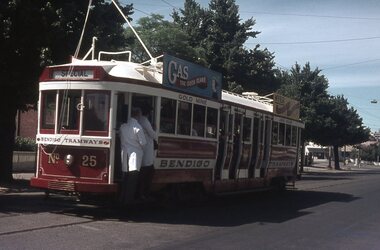 Ballarat Tramway Museum
Photograph - Digital image Set of 20, 9/12/1972 12:00:00 AM
Set of 21 digital images of Bendigo Tramways, at the re-opening of the Bendigo tramways by the Bendigo Trust on 9/12/1972by Stuart Lodington. All trams in the first Bendigo Trust colours. .1 - No. 25 with Gas and Myer roof advertisements .2 - No. 30 with 3BO roof advert and a BP service station in the background. .3 - SEC single trucker at the Mine with a large "Tram Tours" sign on the front of the tram .4 - ditto .5 - No. 19 with a large group of passengers, Bendigo Motor Co and Sandhurst roof advertisements .6 - No. 30 in McCrae St .7 - view of opening march with band .8 - No. 19 in opening parade .9 - Opening Parade in High St with cathedral in the background .10 - No. 30 in Nolan St crossing bridge .11 - ditto .12 - No. 25 at the mine .13 - No. 30 leaving the mine .14 - No. 30 ditto with BCTV roof advert. .15 - Charing Cross with cenotaph, The Beehive building and Ezywalkin shoes and Coca Cola adverts .16 - No. 19 southbound in High St with City Centre Motel building in the background. .17 - No. 30 returning from North Bendigo .18 - No 25 in High St after leaving Gold Mine .19 - No. 30 at the Mine .20 - No. 30 in Nolan St .21 - No. 30 with 3BO roof advert and a BP service station in the background.trams, tramways, bendigo, north bendigo, charing cross, bendigo trust, central deborah, tram 25, tram 30, tram 19 -
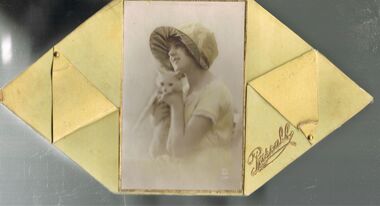 Bendigo Historical Society Inc.
Container - CHOCOLATE BOX COLLECTION: PASCALL BOX, 1920s
Object.Pascall 1920s Yellow Chocolate Box. Design Flanged Sexangular Box with Curved Sectional Top, Sepia Photograph with Subject's Hat and Dress tinted in Pale Yellow in Centre of Lid. Photograph Surrounded by Gold Border. Subject Young Woman & Her Pet Cat. Photograph has White Mark PC Parts in a circle and the number 524 underneath. Inside Lid Pascall 1 lb Net. Contained in Box Labels Packers No 493 and Checkers No 476. Packaging Brown Paper and Fine Paper Shavings in Pale & Dark Colours. Also Another Tag Buff Paper & Red Text In Top Left Hand Corner is the Pascall London Trademark Purity & Sweetness Seal & In The Top Right-hand Corner is A Floral Emblem & The Words Furzedown. The Title On This Tag Reads Co-operation Between The Manufacturer & Consumer. The Remaining Text Reads: - These chocolates were packed with the greatest care and left in our factory in perfect condition. Extremely hot weather or contact with steam pipes may turn these chocolates grey. This is not an indication of age but of the temperature to which they have been exposed. Goods are all packed full weight; the paper shavings used are for packing and protection only. If any complaint necessary please return this ticket with the goods. James Pascall, Ltd London England. Chocolates are also still contained within the box all these years later.domestic equipment, containers, decorative chocolate box -
 Kew Historical Society Inc
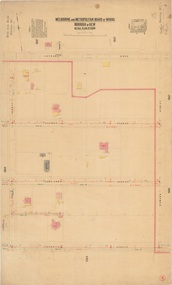
Plan, Melbourne & Metropolitan Board of Works : Borough of Kew : Detail Plan No.1568, 1905
The Melbourne and Metropolitan Board of Works (MMBW) plans were produced from the 1890s to the 1950s. They were crucial to the design and development of Melbourne's sewerage and drainage system. The plans, at a scale of 40 feet to 1 inch (1:480), provide a detailed historical record of Melbourne streetscapes and environmental features. Each plan covers one or two street blocks (roughly six streets), showing details of buildings, including garden layouts and ownership boundaries, and features such as laneways, drains, bridges, parks, municipal boundaries and other prominent landmarks as they existed at the time each plan was produced. (Source: State Library of Victoria)This plan forms part of a large group of MMBW plans and maps that was donated to the Society by the Mr Poulter, City Engineer of the City of Kew in 1989. Within this collection, thirty-five hand-coloured plans, backed with linen, are of statewide significance as they include annotations that provide details of construction materials used in buildings in the first decade of the 20th century as well as additional information about land ownership and usage. The copies in the Public Record Office Victoria and the State Library of Victoria are monochrome versions which do not denote building materials so that the maps in this collection are invaluable and unique tools for researchers and heritage consultants. A number of the plans are not held in the collection of the State Library of Victoria so they have the additional attribute of rarity.Original survey plan, issued by the MMBW to a contractor with responsibility for constructing sewers in the area identified on the plan within the Borough of Kew. The plan was at some stage hand-coloured, possibly by the contractor, but more likely by officers working in the Engineering Department of the Borough and later Town, then City of Kew. The hand-coloured sections of buildings on the plan were used to denote masonry or brick constructions (pink), weatherboard constructions (yellow), and public buildings (grey). Plan No.1568 covers the area bounded by Cotham Road, John Street, Sackville Street, and Edward Street. Alfred Street and Rowland Street are in shown in the middle of the plan. The two most notable buildings shown are ‘St Helliers’, the home of the Dumaresq family, and St Hilary’s Church and school. While the colours used to indicate St Hilary’s are grey as in other civic/public buildings, the first St Hilary’s Anglican Church was at this stage constructed in weatherboard. At the left of the plan, facing Sackville Street is a house named ‘Glencara’. The 1988 ‘Kew Conservation Study’ recorded that “The first documentary evidence of this house comes from Rate Books which record that in 1893 a Mrs Treadway was the owner of this building with an N.A.V. of £81? At that date the occupier of the house was Charles B. Kelly, a clerk, while by 1910 Kelly had become the owner of the property described in that year ‘as a six-roomed stone, brick and wood house with stables and outbuildings’”. Contrary to this description, the 1905 plan indicates that the house was entirely constructed of masonry.melbourne and metropolitan board of works, detail plans, mmbw 1568 -
 Federation University Historical Collection
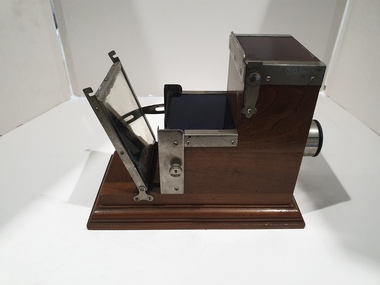
Equipment - Camera, The Junior Kromskop, c1899
The Kromskop (pronounced Chromescope) is one of the earliest commercial applications of colour photography, and was invented by Frederic Eugene Ives and announced around 1896, it is described in his English patent of 1895 and in a US patent of 1894. It was shown at a Camera Club in Britain in January 1896 and at the February Royal Photographic Society meeting, and was available for sale from early 1897. The Photochromoscope Syndicate was formed in 1896 or 97 to promote the viewer in Britain, and wound up in 1899. It was manufactured in south London.A monocular instrument used to reproduce colours, in a mahogany box The viewer combines stereo images from three-colour separation transparencies called Kromograms, these are viewed through red, green and blue filters. A Kromogram comprises three monochrome transparencies printed from three-colour separation negatives which are taped together. The order being red image, blue image, green image with a label and caption between the red and blue images. The red image lies horizontally on the top step of the viewer above a red filter, the blue image lies on the lower step above a blue filter, the green image stands vertically at the back of the viewer. The red and blue images are reflected into the eyepieces by transparent mirrors, these are coloured to absorb the light that they reflect to prevent a double image from the rear surface of the mirror, the mirror for the red image is coloured cyan/blue, that used for the blue filter is coloured green (the patent indicates a yellow filter). The green image is illuminated by a yellow reflector. As the mirror below the blue image is green there is no need for a green filter immediately in front of the green image. The viewer can be used in daylight, for some conditions a diffuser is used, this is hinged to the yellow reflector and laid across the steps. An artificial light was also available. The mirrors and image positions can be adjusted in the event that they become misaligned. (http://www.earlyphotography.co.uk/site/entry_V80.html, accessed 08 April 2022) The Junior Kromskop was a mono viewer Kromskop. henry sutton, photochromoscope syndicate, f.e. ives, camera club, photography, colour photography, kromskop, frederic eugene ives, junior kromskop, photographic equipment, camera -
 Ballarat Tramway Museum
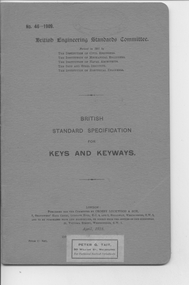
Book, British Engineering Standards Association, Set of four British Standards, 1918 to 1924
.1 - Book - 20 pages + light grey cover, side stapled, issued by the British Engineering Standards Committee, British Standard Specification for "Keys and Keyways". Dated April 1918. Has standard Number 46-1909. Provides materials specification, testing and an index. .2 - Book - 16 pages + light grey cover, cotton stitched on side, issued by the British Engineering Standards Association, British Standard Specification for "BS Fine Bolts, Hexagon Bolts, Set Screws, Nuts, split-pins, washers and studs". Dated Feb. 1925. Has standard Number 191-1924. Provides materials specification, tables, and an index. .3 - Book - 8 pages + light grey cover, cotton stitched on the side, issued by the British Engineering Standards Association, British Standard Specification for "Identification colors for Engine Room Piping". Dated May 1929. Has standard Number 3011-1924. Provides index and colours of piping to be used and Identification. .4 - Book - 16 pages + light grey cover, cotton stitched on side, issued by the British Engineering Standards Association, British Standard Specification for "BS Whitworth Bolts, Hexagon Bolts, Set Screws, Nuts, split-pins, washers and studs". Dated Feb. 1925. Has standard Number 190-1924. Provides materials specification, tables, and an index. Document scanned as a pdf 4/2025..1 has the stamp of the "Tait Book Co. 90 William St. Melbourne" on the lower edge and in the top right corner, the ESCo Ballarat company stamp. .2 - has the stamp of the Standard Association of Australia, endorsing the document as an Australian Standard, B49-1932, and has the ESCo Ballarat company stamp with dated 17 April 1934. .3 - has the stamp of the Standard Association of Australia, endorsing the document as an Australian Standard, F1 - 1931, the label of "J. Ewins & Sons, Booksellers, Ballarat on the lower left-hand corner of the cover and the name "R. S. Coy"? in pencil on the top right-hand corner. .4 - has the stamp of the Standard Association of Australia, endorsing the document as an Australian Standard, B48-1932 and has the ESCo Ballarat company stamp with dated 17 April 1934.trams, tramways, engineers, bolts, power station, workshops -
 Flagstaff Hill Maritime Museum and Village
Domestic object - Bowl, Late 19th or early 20th Century
The Process of Making Pottery Decorating, Firing, Glazing, Making, Technical There is a rhythm and flow to clay. It can’t be done all at once! Even the making process! It can take weeks to get everything done, especially if you can only work on your pottery once a week! Even though we have three hour classes, it’s often just not enough time! Here is an overview of some of the processes so you have a bit more grasp on some of the technical stuff! Step One – Design There are SO many ideas out there for making stuff in clay! From delicate porcelain jewellery, through to heavy sculptural work and everything in between. Deciding your direction is sometimes not that easy – when you first start, try everything, you will naturally gravitate to the style that you enjoy! The options and variations are endless and can get a wee bit overwhelming too! Check in with me before you start to ensure your ideas will work, what order you might do things, how you could achieve the look you are seeking and any other technical data required! Step Two – Making Clay is thixotropic. This means that as you work with it, the clay first gets sloppier and wetter, before is begins to dry in the atmosphere. For most things, you simply can’t do all parts of the project at once. An example of work order might look like: Get last weeks work out from the shelves Prepare clay for today’s work – roll your clay, prepare balls for throwing, make the first stage of a pinch pot) Clean up last week’s work and put it on the shelf for bisque firing Check that you have any glazing to do – and do enough of it that you will have time to finish your main project Do the next step of your next project – there might be a further step that can’t be complete immediately, in that case, wrap your work well and put onto the shelves. Letting your work rest for a while can really help keep your work clean and professional looking. Many things require bagging under plastic to keep it ready for work the next week – put your name on the outside of the bag so you can find your work easily. We have stickers and markers. Consider how you want to decorate your work – coloured slip can be applied at a fairly wet stage (remembering that it will make your work even wetter!). Trying to apply slip to dry clay won’t work! If you want to do sgraffito – you will need to keep the work leather hard (a state of dryness where you can still work the clay with a little effort and a little water and care). Step Three – Drying Most of the time your work can go into the rack uncovered to let it dry out for the following week. If you want to continue forming or shaping you will need to double bag your work – put your work on a suitable sized bat and put the bat in a bag so the base of the bag is under the bat, then put another bag over the top of the work and tuck the top of the bag under the bat. If you want to trim (or turn) your thrown work the following week, it should also be double bagged. If your work is large, delicate, or of uneven thicknesses, you should lightly cover your work for drying. When considering the drying process, bare in mind the weather, humidity and wind! The hotter and dryer, the faster things dry and work can dry unevenly in the shelves – this can lead to cracking – another time to lightly cover your work for drying. Step Four – Trimming and Cleaning Up Your work is dry! It is called greenware now and it is at it’s most fragile! Handle everything with two hands. I often refer to soft hands – keep everything gentle and with your fingers spread as much as possible. Try to not pick up things like plates too much, and always with both hands! Before your work can be bisque fired it should be “cleaned up”. You work won’t go into the kiln if it has sharp edges – when glazed, sharp edges turn into razor blades! Use a piece of fly wire to rub the work all over – this will scratch a little so be light handed. Use a knife or metal kidney to scrape any areas that require a bit more dynamic treatment than the fly wire offers! Finally, a very light wipe over with a slightly damp sponge can help soften and soothe all of your edges and dags! Trimming thrown work: If you are planning to trim (or turn) your thrown work (and you should be), make sure you bag it well – your work should be leather hard to almost dry for easiest trimming. Use this step to finish the work completely – use a metal kidney to polish the surface, or a slightly damp sponge to give a freshly thrown look. Wipe the sponge around the rim after trimming, and check the inside of the pot for dags! Trimming slip cast work: Usually I will trim the rims of your work on the wheel the following day to make that stage easier, however you will still need to check your work for lumps and bumps. Last but not least – check that your name is still clearly on the bottom of your work. Step Five – Bisque Firing When the work is completely dry it can go into the bisque kiln. The bisque kiln is fired to 1000°C. This process burns off the water in the clay as well as some of the chemically bound water. The structure of the clay is not altered that much at this temperature. Inside the bisque kiln, the work is stacked a little, small bowl inside a larger bowl and onto a heavy plate. Smaller items like decorations or drink coasters might get stacked several high. Consideration is paid to the weight of the stack and shape of the work. A bisque kiln can fire about one and a half times the amount of work that the glaze kiln can fire. The firing takes about 10 hours to complete the cycle and about two days to cool down. Once it has been emptied the work is placed in the glaze room ready for you to decorate! Step Six – Glazing Decorating your work with colour can be a lot of fun – and time consuming! There are three main options for surface treatment at this stage: Oxide Washes Underglazes Glazes Washes and underglazes do not “glaze” the work – It will still need a layer of glaze to fully seal the clay (washes don’t need glaze on surfaces not designed for food or liquid as they can gloss up a little on their own). Underglazes are stable colourants that turn out pretty much how they look in the jar. They can be mixed with each other to form other colours and can be used like water colours to paint onto your work. Mostly they should have a clear glaze on top to seal them. Oxides are a different species – the pink oxide (cobalt) wash turns out bright blue for instance. They don’t always need a glaze on top, and some glazes can change the colour of the wash! The glazes need no other “glaze” on top! Be careful of unknown glaze interactions – you can put any combination of glaze in a bowl or on a plate, but only a single glaze on the outside of any vertical surface! Glazes are a chemical reaction under heat. We don’t know the exact chemicals in the Mayco glazes we use. I can guess by the way they interact with each other, however, on the whole, you need to test every idea you have, and not run the test on a vertical surface! Simply put, glaze is a layer of glass like substance that bonds with the clay underneath. Clay is made of silica, alumina and water. Glaze is made of mostly silica. Silica has a melting point of 1700°C and we fire to 1240°C. The silica requires a “flux” to help it melt at the lower temperature. Fluxes can be all sorts of chemicals – a common one is calcium – calcium has a melting point of 2500°C, however, together they both melt at a much lower temperature! Colourants are metal oxides like cobalt (blue), chrome (green through black), copper (green, blue, even red!), manganese (black, purple and pink) iron (red brown), etc. Different chemicals in the glaze can have dramatic effects. for example, barium carbonate (which we don’t use) turns manganese bright pink! Other elements can turn manganese dioxide brown, blue, purple and reddish brown. Manganese dioxide is a flux in and of itself as well. So, glazes that get their black and purple colours, often interact with other glazes and RUN! Our mirror black is a good example – it mixes really well with many glazes because it fluxes them – causes them to melt faster. It will also bring out many beautiful colours in the glazes because it’s black colouring most definitely comes from manganese dioxide! Glaze chemistry is a whole subject on it’s own! We use commercial Mayco glazes on purpose – for their huge range of colour possibilities, stability, cool interactions, artistic freedom with the ability to easily brush the glazes on and ease of use. We currently have almost 50 glazes on hand! A major project is to test the interactions of all glazes with each other. That is 2,500 test tiles!!!! I’m going to make the wall behind the wheels the feature wall of pretty colours! Step Seven – Glaze (Gloss or sometimes called “Glost”) Firing Most of the time this is the final stage of making your creation (but not always!) The glaze kiln goes to 1240°C. This is called cone 6, or midrange. It is the low end of stoneware temperatures. Stoneware clays and glazes are typically fired at cone 8 – 10, that is 1260 – 1290°C. The energy requirement to go from 1240°C to 1280°C is almost a 30% more! Our clay is formulated to vitrify (mature, turn “glass-like”) at 1240°, as are our glazes. A glaze kiln take around 12 hours to reach temperature and two to three days to cool down. Sometimes a third firing process is required – this is for decoration that is added to work after the glaze firing. For example – adding precious metals and lustres. this firing temperature is usually around 600 – 800°C depending upon the techniques being used. There are many students interested in gold and silver trims – we will be doing this third type of firing soon! After firing your work will be in the student finished work shelves. Remember to pay for it before you head out the door! There is a small extra charge for using porcelain clay (it’s more than twice the price of regular clay), and for any third firing process! Once your work has been fired it can not turn back into clay for millennia – so don’t fire it if you don’t like it! Put it in the bucket for recycling. https://firebirdstudios.com.au/the-process-of-making-pottery/ The bowl is an example of kitchenware used in the 19th century and still in use today.Bowl white ceramic. Crack on side. Badly stained.Backstamp very faint and unable to be read.flagstaff hill, warrnambool, shipwrecked-coast, flagstaff-hill, flagstaff-hill-maritime-museum, maritime-museum, shipwreck-coast, flagstaff-hill-maritime-village, mixing bowl, food preparation, kitchen equipment, ceramic -
 Flagstaff Hill Maritime Museum and Village
Domestic object - Bowl
The Process of Making Pottery Decorating, Firing, Glazing, Making, Technical There is a rhythm and flow to clay. It can’t be done all at once! Even the making process! It can take weeks to get everything done, especially if you can only work on your pottery once a week! Even though we have three hour classes, it’s often just not enough time! Here is an overview of some of the processes so you have a bit more grasp on some of the technical stuff! Step One – Design There are SO many ideas out there for making stuff in clay! From delicate porcelain jewellery, through to heavy sculptural work and everything in between. Deciding your direction is sometimes not that easy – when you first start, try everything, you will naturally gravitate to the style that you enjoy! The options and variations are endless and can get a wee bit overwhelming too! Check in with me before you start to ensure your ideas will work, what order you might do things, how you could achieve the look you are seeking and any other technical data required! Step Two – Making Clay is thixotropic. This means that as you work with it, the clay first gets sloppier and wetter, before is begins to dry in the atmosphere. For most things, you simply can’t do all parts of the project at once. An example of work order might look like: Get last weeks work out from the shelves Prepare clay for today’s work – roll your clay, prepare balls for throwing, make the first stage of a pinch pot) Clean up last week’s work and put it on the shelf for bisque firing Check that you have any glazing to do – and do enough of it that you will have time to finish your main project Do the next step of your next project – there might be a further step that can’t be complete immediately, in that case, wrap your work well and put onto the shelves. Letting your work rest for a while can really help keep your work clean and professional looking. Many things require bagging under plastic to keep it ready for work the next week – put your name on the outside of the bag so you can find your work easily. We have stickers and markers. Consider how you want to decorate your work – coloured slip can be applied at a fairly wet stage (remembering that it will make your work even wetter!). Trying to apply slip to dry clay won’t work! If you want to do sgraffito – you will need to keep the work leather hard (a state of dryness where you can still work the clay with a little effort and a little water and care). Step Three – Drying Most of the time your work can go into the rack uncovered to let it dry out for the following week. If you want to continue forming or shaping you will need to double bag your work – put your work on a suitable sized bat and put the bat in a bag so the base of the bag is under the bat, then put another bag over the top of the work and tuck the top of the bag under the bat. If you want to trim (or turn) your thrown work the following week, it should also be double bagged. If your work is large, delicate, or of uneven thicknesses, you should lightly cover your work for drying. When considering the drying process, bare in mind the weather, humidity and wind! The hotter and dryer, the faster things dry and work can dry unevenly in the shelves – this can lead to cracking – another time to lightly cover your work for drying. Step Four – Trimming and Cleaning Up Your work is dry! It is called greenware now and it is at it’s most fragile! Handle everything with two hands. I often refer to soft hands – keep everything gentle and with your fingers spread as much as possible. Try to not pick up things like plates too much, and always with both hands! Before your work can be bisque fired it should be “cleaned up”. You work won’t go into the kiln if it has sharp edges – when glazed, sharp edges turn into razor blades! Use a piece of fly wire to rub the work all over – this will scratch a little so be light handed. Use a knife or metal kidney to scrape any areas that require a bit more dynamic treatment than the fly wire offers! Finally, a very light wipe over with a slightly damp sponge can help soften and soothe all of your edges and dags! Trimming thrown work: If you are planning to trim (or turn) your thrown work (and you should be), make sure you bag it well – your work should be leather hard to almost dry for easiest trimming. Use this step to finish the work completely – use a metal kidney to polish the surface, or a slightly damp sponge to give a freshly thrown look. Wipe the sponge around the rim after trimming, and check the inside of the pot for dags! Trimming slip cast work: Usually I will trim the rims of your work on the wheel the following day to make that stage easier, however you will still need to check your work for lumps and bumps. Last but not least – check that your name is still clearly on the bottom of your work. Step Five – Bisque Firing When the work is completely dry it can go into the bisque kiln. The bisque kiln is fired to 1000°C. This process burns off the water in the clay as well as some of the chemically bound water. The structure of the clay is not altered that much at this temperature. Inside the bisque kiln, the work is stacked a little, small bowl inside a larger bowl and onto a heavy plate. Smaller items like decorations or drink coasters might get stacked several high. Consideration is paid to the weight of the stack and shape of the work. A bisque kiln can fire about one and a half times the amount of work that the glaze kiln can fire. The firing takes about 10 hours to complete the cycle and about two days to cool down. Once it has been emptied the work is placed in the glaze room ready for you to decorate! Step Six – Glazing Decorating your work with colour can be a lot of fun – and time consuming! There are three main options for surface treatment at this stage: Oxide Washes Underglazes Glazes Washes and underglazes do not “glaze” the work – It will still need a layer of glaze to fully seal the clay (washes don’t need glaze on surfaces not designed for food or liquid as they can gloss up a little on their own). Underglazes are stable colourants that turn out pretty much how they look in the jar. They can be mixed with each other to form other colours and can be used like water colours to paint onto your work. Mostly they should have a clear glaze on top to seal them. Oxides are a different species – the pink oxide (cobalt) wash turns out bright blue for instance. They don’t always need a glaze on top, and some glazes can change the colour of the wash! The glazes need no other “glaze” on top! Be careful of unknown glaze interactions – you can put any combination of glaze in a bowl or on a plate, but only a single glaze on the outside of any vertical surface! Glazes are a chemical reaction under heat. We don’t know the exact chemicals in the Mayco glazes we use. I can guess by the way they interact with each other, however, on the whole, you need to test every idea you have, and not run the test on a vertical surface! Simply put, glaze is a layer of glass like substance that bonds with the clay underneath. Clay is made of silica, alumina and water. Glaze is made of mostly silica. Silica has a melting point of 1700°C and we fire to 1240°C. The silica requires a “flux” to help it melt at the lower temperature. Fluxes can be all sorts of chemicals – a common one is calcium – calcium has a melting point of 2500°C, however, together they both melt at a much lower temperature! Colourants are metal oxides like cobalt (blue), chrome (green through black), copper (green, blue, even red!), manganese (black, purple and pink) iron (red brown), etc. Different chemicals in the glaze can have dramatic effects. for example, barium carbonate (which we don’t use) turns manganese bright pink! Other elements can turn manganese dioxide brown, blue, purple and reddish brown. Manganese dioxide is a flux in and of itself as well. So, glazes that get their black and purple colours, often interact with other glazes and RUN! Our mirror black is a good example – it mixes really well with many glazes because it fluxes them – causes them to melt faster. It will also bring out many beautiful colours in the glazes because it’s black colouring most definitely comes from manganese dioxide! Glaze chemistry is a whole subject on it’s own! We use commercial Mayco glazes on purpose – for their huge range of colour possibilities, stability, cool interactions, artistic freedom with the ability to easily brush the glazes on and ease of use. We currently have almost 50 glazes on hand! A major project is to test the interactions of all glazes with each other. That is 2,500 test tiles!!!! I’m going to make the wall behind the wheels the feature wall of pretty colours! Step Seven – Glaze (Gloss or sometimes called “Glost”) Firing Most of the time this is the final stage of making your creation (but not always!) The glaze kiln goes to 1240°C. This is called cone 6, or midrange. It is the low end of stoneware temperatures. Stoneware clays and glazes are typically fired at cone 8 – 10, that is 1260 – 1290°C. The energy requirement to go from 1240°C to 1280°C is almost a 30% more! Our clay is formulated to vitrify (mature, turn “glass-like”) at 1240°, as are our glazes. A glaze kiln take around 12 hours to reach temperature and two to three days to cool down. Sometimes a third firing process is required – this is for decoration that is added to work after the glaze firing. For example – adding precious metals and lustres. this firing temperature is usually around 600 – 800°C depending upon the techniques being used. There are many students interested in gold and silver trims – we will be doing this third type of firing soon! After firing your work will be in the student finished work shelves. Remember to pay for it before you head out the door! There is a small extra charge for using porcelain clay (it’s more than twice the price of regular clay), and for any third firing process! Once your work has been fired it can not turn back into clay for millennia – so don’t fire it if you don’t like it! Put it in the bucket for recycling. https://firebirdstudios.com.au/the-process-of-making-pottery/ This bowl is an example of kitchenware used in the 19th century and still in use today.Bowl white ceramic plain that has two sets of edging around lip. Inside bowl has plaster designed to look like cooking mixture.flagstaff hill, warrnambool, shipwrecked-coast, flagstaff-hill, flagstaff-hill-maritime-museum, maritime-museum, shipwreck-coast, flagstaff-hill-maritime-village, kitchen equipment, ceramic -
 Flagstaff Hill Maritime Museum and Village
Domestic object - Bowl, J & G Meakin, Late 19th or early 20th Century
The Process of Making Pottery Decorating, Firing, Glazing, Making, Technical There is a rhythm and flow to clay. It can’t be done all at once! Even the making process! It can take weeks to get everything done, especially if you can only work on your pottery once a week! Even though we have three hour classes, it’s often just not enough time! Here is an overview of some of the processes so you have a bit more grasp on some of the technical stuff! Step One – Design There are SO many ideas out there for making stuff in clay! From delicate porcelain jewellery, through to heavy sculptural work and everything in between. Deciding your direction is sometimes not that easy – when you first start, try everything, you will naturally gravitate to the style that you enjoy! The options and variations are endless and can get a wee bit overwhelming too! Check in with me before you start to ensure your ideas will work, what order you might do things, how you could achieve the look you are seeking and any other technical data required! Step Two – Making Clay is thixotropic. This means that as you work with it, the clay first gets sloppier and wetter, before is begins to dry in the atmosphere. For most things, you simply can’t do all parts of the project at once. An example of work order might look like: Get last weeks work out from the shelves Prepare clay for today’s work – roll your clay, prepare balls for throwing, make the first stage of a pinch pot) Clean up last week’s work and put it on the shelf for bisque firing Check that you have any glazing to do – and do enough of it that you will have time to finish your main project Do the next step of your next project – there might be a further step that can’t be complete immediately, in that case, wrap your work well and put onto the shelves. Letting your work rest for a while can really help keep your work clean and professional looking. Many things require bagging under plastic to keep it ready for work the next week – put your name on the outside of the bag so you can find your work easily. We have stickers and markers. Consider how you want to decorate your work – coloured slip can be applied at a fairly wet stage (remembering that it will make your work even wetter!). Trying to apply slip to dry clay won’t work! If you want to do sgraffito – you will need to keep the work leather hard (a state of dryness where you can still work the clay with a little effort and a little water and care). Step Three – Drying Most of the time your work can go into the rack uncovered to let it dry out for the following week. If you want to continue forming or shaping you will need to double bag your work – put your work on a suitable sized bat and put the bat in a bag so the base of the bag is under the bat, then put another bag over the top of the work and tuck the top of the bag under the bat. If you want to trim (or turn) your thrown work the following week, it should also be double bagged. If your work is large, delicate, or of uneven thicknesses, you should lightly cover your work for drying. When considering the drying process, bare in mind the weather, humidity and wind! The hotter and dryer, the faster things dry and work can dry unevenly in the shelves – this can lead to cracking – another time to lightly cover your work for drying. Step Four – Trimming and Cleaning Up Your work is dry! It is called greenware now and it is at it’s most fragile! Handle everything with two hands. I often refer to soft hands – keep everything gentle and with your fingers spread as much as possible. Try to not pick up things like plates too much, and always with both hands! Before your work can be bisque fired it should be “cleaned up”. You work won’t go into the kiln if it has sharp edges – when glazed, sharp edges turn into razor blades! Use a piece of fly wire to rub the work all over – this will scratch a little so be light handed. Use a knife or metal kidney to scrape any areas that require a bit more dynamic treatment than the fly wire offers! Finally, a very light wipe over with a slightly damp sponge can help soften and soothe all of your edges and dags! Trimming thrown work: If you are planning to trim (or turn) your thrown work (and you should be), make sure you bag it well – your work should be leather hard to almost dry for easiest trimming. Use this step to finish the work completely – use a metal kidney to polish the surface, or a slightly damp sponge to give a freshly thrown look. Wipe the sponge around the rim after trimming, and check the inside of the pot for dags! Trimming slip cast work: Usually I will trim the rims of your work on the wheel the following day to make that stage easier, however you will still need to check your work for lumps and bumps. Last but not least – check that your name is still clearly on the bottom of your work. Step Five – Bisque Firing When the work is completely dry it can go into the bisque kiln. The bisque kiln is fired to 1000°C. This process burns off the water in the clay as well as some of the chemically bound water. The structure of the clay is not altered that much at this temperature. Inside the bisque kiln, the work is stacked a little, small bowl inside a larger bowl and onto a heavy plate. Smaller items like decorations or drink coasters might get stacked several high. Consideration is paid to the weight of the stack and shape of the work. A bisque kiln can fire about one and a half times the amount of work that the glaze kiln can fire. The firing takes about 10 hours to complete the cycle and about two days to cool down. Once it has been emptied the work is placed in the glaze room ready for you to decorate! Step Six – Glazing Decorating your work with colour can be a lot of fun – and time consuming! There are three main options for surface treatment at this stage: Oxide Washes Underglazes Glazes Washes and underglazes do not “glaze” the work – It will still need a layer of glaze to fully seal the clay (washes don’t need glaze on surfaces not designed for food or liquid as they can gloss up a little on their own). Underglazes are stable colourants that turn out pretty much how they look in the jar. They can be mixed with each other to form other colours and can be used like water colours to paint onto your work. Mostly they should have a clear glaze on top to seal them. Oxides are a different species – the pink oxide (cobalt) wash turns out bright blue for instance. They don’t always need a glaze on top, and some glazes can change the colour of the wash! The glazes need no other “glaze” on top! Be careful of unknown glaze interactions – you can put any combination of glaze in a bowl or on a plate, but only a single glaze on the outside of any vertical surface! Glazes are a chemical reaction under heat. We don’t know the exact chemicals in the Mayco glazes we use. I can guess by the way they interact with each other, however, on the whole, you need to test every idea you have, and not run the test on a vertical surface! Simply put, glaze is a layer of glass like substance that bonds with the clay underneath. Clay is made of silica, alumina and water. Glaze is made of mostly silica. Silica has a melting point of 1700°C and we fire to 1240°C. The silica requires a “flux” to help it melt at the lower temperature. Fluxes can be all sorts of chemicals – a common one is calcium – calcium has a melting point of 2500°C, however, together they both melt at a much lower temperature! Colourants are metal oxides like cobalt (blue), chrome (green through black), copper (green, blue, even red!), manganese (black, purple and pink) iron (red brown), etc. Different chemicals in the glaze can have dramatic effects. for example, barium carbonate (which we don’t use) turns manganese bright pink! Other elements can turn manganese dioxide brown, blue, purple and reddish brown. Manganese dioxide is a flux in and of itself as well. So, glazes that get their black and purple colours, often interact with other glazes and RUN! Our mirror black is a good example – it mixes really well with many glazes because it fluxes them – causes them to melt faster. It will also bring out many beautiful colours in the glazes because it’s black colouring most definitely comes from manganese dioxide! Glaze chemistry is a whole subject on it’s own! We use commercial Mayco glazes on purpose – for their huge range of colour possibilities, stability, cool interactions, artistic freedom with the ability to easily brush the glazes on and ease of use. We currently have almost 50 glazes on hand! A major project is to test the interactions of all glazes with each other. That is 2,500 test tiles!!!! I’m going to make the wall behind the wheels the feature wall of pretty colours! Step Seven – Glaze (Gloss or sometimes called “Glost”) Firing Most of the time this is the final stage of making your creation (but not always!) The glaze kiln goes to 1240°C. This is called cone 6, or midrange. It is the low end of stoneware temperatures. Stoneware clays and glazes are typically fired at cone 8 – 10, that is 1260 – 1290°C. The energy requirement to go from 1240°C to 1280°C is almost a 30% more! Our clay is formulated to vitrify (mature, turn “glass-like”) at 1240°, as are our glazes. A glaze kiln take around 12 hours to reach temperature and two to three days to cool down. Sometimes a third firing process is required – this is for decoration that is added to work after the glaze firing. For example – adding precious metals and lustres. this firing temperature is usually around 600 – 800°C depending upon the techniques being used. There are many students interested in gold and silver trims – we will be doing this third type of firing soon! After firing your work will be in the student finished work shelves. Remember to pay for it before you head out the door! There is a small extra charge for using porcelain clay (it’s more than twice the price of regular clay), and for any third firing process! Once your work has been fired it can not turn back into clay for millennia – so don’t fire it if you don’t like it! Put it in the bucket for recycling. https://firebirdstudios.com.au/the-process-of-making-pottery/This bowl was made by renowned pottery company J & G Meakin of England. The firm was established in the mid-1800's. The bowl is an example of kitchenware used in the 19th century and still in use today.Bowl; white ceramic, round and tapering inwards towards base. Made by J and G Meakin England.On base, 'Ironstone China Reg SOL 391413' with symbolflagstaff hill, flagstaff hill maritime museum and village, warrnambool, maritime museum, maritime village, great ocean road, shipwreck coast, mixing bowl, food preparation, j & g meakin, pottery, stoke-on-trent, kitchen equipment, ceramic -
 Flagstaff Hill Maritime Museum and Village
Domestic object - Plate
The Process of Making Pottery Decorating, Firing, Glazing, Making, Technical There is a rhythm and flow to clay. It can’t be done all at once! Even the making process! It can take weeks to get everything done, especially if you can only work on your pottery once a week! Even though we have three hour classes, it’s often just not enough time! Here is an overview of some of the processes so you have a bit more grasp on some of the technical stuff! Step One – Design There are SO many ideas out there for making stuff in clay! From delicate porcelain jewellery, through to heavy sculptural work and everything in between. Deciding your direction is sometimes not that easy – when you first start, try everything, you will naturally gravitate to the style that you enjoy! The options and variations are endless and can get a wee bit overwhelming too! Check in with me before you start to ensure your ideas will work, what order you might do things, how you could achieve the look you are seeking and any other technical data required! Step Two – Making Clay is thixotropic. This means that as you work with it, the clay first gets sloppier and wetter, before is begins to dry in the atmosphere. For most things, you simply can’t do all parts of the project at once. An example of work order might look like: Get last weeks work out from the shelves Prepare clay for today’s work – roll your clay, prepare balls for throwing, make the first stage of a pinch pot) Clean up last week’s work and put it on the shelf for bisque firing Check that you have any glazing to do – and do enough of it that you will have time to finish your main project Do the next step of your next project – there might be a further step that can’t be complete immediately, in that case, wrap your work well and put onto the shelves. Letting your work rest for a while can really help keep your work clean and professional looking. Many things require bagging under plastic to keep it ready for work the next week – put your name on the outside of the bag so you can find your work easily. We have stickers and markers. Consider how you want to decorate your work – coloured slip can be applied at a fairly wet stage (remembering that it will make your work even wetter!). Trying to apply slip to dry clay won’t work! If you want to do sgraffito – you will need to keep the work leather hard (a state of dryness where you can still work the clay with a little effort and a little water and care). Step Three – Drying Most of the time your work can go into the rack uncovered to let it dry out for the following week. If you want to continue forming or shaping you will need to double bag your work – put your work on a suitable sized bat and put the bat in a bag so the base of the bag is under the bat, then put another bag over the top of the work and tuck the top of the bag under the bat. If you want to trim (or turn) your thrown work the following week, it should also be double bagged. If your work is large, delicate, or of uneven thicknesses, you should lightly cover your work for drying. When considering the drying process, bare in mind the weather, humidity and wind! The hotter and dryer, the faster things dry and work can dry unevenly in the shelves – this can lead to cracking – another time to lightly cover your work for drying. Step Four – Trimming and Cleaning Up Your work is dry! It is called greenware now and it is at it’s most fragile! Handle everything with two hands. I often refer to soft hands – keep everything gentle and with your fingers spread as much as possible. Try to not pick up things like plates too much, and always with both hands! Before your work can be bisque fired it should be “cleaned up”. You work won’t go into the kiln if it has sharp edges – when glazed, sharp edges turn into razor blades! Use a piece of fly wire to rub the work all over – this will scratch a little so be light handed. Use a knife or metal kidney to scrape any areas that require a bit more dynamic treatment than the fly wire offers! Finally, a very light wipe over with a slightly damp sponge can help soften and soothe all of your edges and dags! Trimming thrown work: If you are planning to trim (or turn) your thrown work (and you should be), make sure you bag it well – your work should be leather hard to almost dry for easiest trimming. Use this step to finish the work completely – use a metal kidney to polish the surface, or a slightly damp sponge to give a freshly thrown look. Wipe the sponge around the rim after trimming, and check the inside of the pot for dags! Trimming slip cast work: Usually I will trim the rims of your work on the wheel the following day to make that stage easier, however you will still need to check your work for lumps and bumps. Last but not least – check that your name is still clearly on the bottom of your work. Step Five – Bisque Firing When the work is completely dry it can go into the bisque kiln. The bisque kiln is fired to 1000°C. This process burns off the water in the clay as well as some of the chemically bound water. The structure of the clay is not altered that much at this temperature. Inside the bisque kiln, the work is stacked a little, small bowl inside a larger bowl and onto a heavy plate. Smaller items like decorations or drink coasters might get stacked several high. Consideration is paid to the weight of the stack and shape of the work. A bisque kiln can fire about one and a half times the amount of work that the glaze kiln can fire. The firing takes about 10 hours to complete the cycle and about two days to cool down. Once it has been emptied the work is placed in the glaze room ready for you to decorate! Step Six – Glazing Decorating your work with colour can be a lot of fun – and time consuming! There are three main options for surface treatment at this stage: Oxide Washes Underglazes Glazes Washes and underglazes do not “glaze” the work – It will still need a layer of glaze to fully seal the clay (washes don’t need glaze on surfaces not designed for food or liquid as they can gloss up a little on their own). Underglazes are stable colourants that turn out pretty much how they look in the jar. They can be mixed with each other to form other colours and can be used like water colours to paint onto your work. Mostly they should have a clear glaze on top to seal them. Oxides are a different species – the pink oxide (cobalt) wash turns out bright blue for instance. They don’t always need a glaze on top, and some glazes can change the colour of the wash! The glazes need no other “glaze” on top! Be careful of unknown glaze interactions – you can put any combination of glaze in a bowl or on a plate, but only a single glaze on the outside of any vertical surface! Glazes are a chemical reaction under heat. We don’t know the exact chemicals in the Mayco glazes we use. I can guess by the way they interact with each other, however, on the whole, you need to test every idea you have, and not run the test on a vertical surface! Simply put, glaze is a layer of glass like substance that bonds with the clay underneath. Clay is made of silica, alumina and water. Glaze is made of mostly silica. Silica has a melting point of 1700°C and we fire to 1240°C. The silica requires a “flux” to help it melt at the lower temperature. Fluxes can be all sorts of chemicals – a common one is calcium – calcium has a melting point of 2500°C, however, together they both melt at a much lower temperature! Colourants are metal oxides like cobalt (blue), chrome (green through black), copper (green, blue, even red!), manganese (black, purple and pink) iron (red brown), etc. Different chemicals in the glaze can have dramatic effects. for example, barium carbonate (which we don’t use) turns manganese bright pink! Other elements can turn manganese dioxide brown, blue, purple and reddish brown. Manganese dioxide is a flux in and of itself as well. So, glazes that get their black and purple colours, often interact with other glazes and RUN! Our mirror black is a good example – it mixes really well with many glazes because it fluxes them – causes them to melt faster. It will also bring out many beautiful colours in the glazes because it’s black colouring most definitely comes from manganese dioxide! Glaze chemistry is a whole subject on it’s own! We use commercial Mayco glazes on purpose – for their huge range of colour possibilities, stability, cool interactions, artistic freedom with the ability to easily brush the glazes on and ease of use. We currently have almost 50 glazes on hand! A major project is to test the interactions of all glazes with each other. That is 2,500 test tiles!!!! I’m going to make the wall behind the wheels the feature wall of pretty colours! Step Seven – Glaze (Gloss or sometimes called “Glost”) Firing Most of the time this is the final stage of making your creation (but not always!) The glaze kiln goes to 1240°C. This is called cone 6, or midrange. It is the low end of stoneware temperatures. Stoneware clays and glazes are typically fired at cone 8 – 10, that is 1260 – 1290°C. The energy requirement to go from 1240°C to 1280°C is almost a 30% more! Our clay is formulated to vitrify (mature, turn “glass-like”) at 1240°, as are our glazes. A glaze kiln take around 12 hours to reach temperature and two to three days to cool down. Sometimes a third firing process is required – this is for decoration that is added to work after the glaze firing. For example – adding precious metals and lustres. this firing temperature is usually around 600 – 800°C depending upon the techniques being used. There are many students interested in gold and silver trims – we will be doing this third type of firing soon! After firing your work will be in the student finished work shelves. Remember to pay for it before you head out the door! There is a small extra charge for using porcelain clay (it’s more than twice the price of regular clay), and for any third firing process! Once your work has been fired it can not turn back into clay for millennia – so don’t fire it if you don’t like it! Put it in the bucket for recycling. https://firebirdstudios.com.au/the-process-of-making-pottery/Ceramics have evolved over thousands of years.White earthenware dinner plate. Crazing evident all over.Backstamped ‘Made in England S LTD’flagstaff hill, warrnambool, shipwrecked-coast, flagstaff-hill, flagstaff-hill-maritime-museum, maritime-museum, shipwreck-coast, flagstaff-hill-maritime-village, ceramics, tableware -
 Flagstaff Hill Maritime Museum and Village
Domestic object - Plate, Johnson Bros
The Process of Making Pottery Decorating, Firing, Glazing, Making, Technical There is a rhythm and flow to clay. It can’t be done all at once! Even the making process! It can take weeks to get everything done, especially if you can only work on your pottery once a week! Even though we have three hour classes, it’s often just not enough time! Here is an overview of some of the processes so you have a bit more grasp on some of the technical stuff! Step One – Design There are SO many ideas out there for making stuff in clay! From delicate porcelain jewellery, through to heavy sculptural work and everything in between. Deciding your direction is sometimes not that easy – when you first start, try everything, you will naturally gravitate to the style that you enjoy! The options and variations are endless and can get a wee bit overwhelming too! Check in with me before you start to ensure your ideas will work, what order you might do things, how you could achieve the look you are seeking and any other technical data required! Step Two – Making Clay is thixotropic. This means that as you work with it, the clay first gets sloppier and wetter, before is begins to dry in the atmosphere. For most things, you simply can’t do all parts of the project at once. An example of work order might look like: Get last weeks work out from the shelves Prepare clay for today’s work – roll your clay, prepare balls for throwing, make the first stage of a pinch pot) Clean up last week’s work and put it on the shelf for bisque firing Check that you have any glazing to do – and do enough of it that you will have time to finish your main project Do the next step of your next project – there might be a further step that can’t be complete immediately, in that case, wrap your work well and put onto the shelves. Letting your work rest for a while can really help keep your work clean and professional looking. Many things require bagging under plastic to keep it ready for work the next week – put your name on the outside of the bag so you can find your work easily. We have stickers and markers. Consider how you want to decorate your work – coloured slip can be applied at a fairly wet stage (remembering that it will make your work even wetter!). Trying to apply slip to dry clay won’t work! If you want to do sgraffito – you will need to keep the work leather hard (a state of dryness where you can still work the clay with a little effort and a little water and care). Step Three – Drying Most of the time your work can go into the rack uncovered to let it dry out for the following week. If you want to continue forming or shaping you will need to double bag your work – put your work on a suitable sized bat and put the bat in a bag so the base of the bag is under the bat, then put another bag over the top of the work and tuck the top of the bag under the bat. If you want to trim (or turn) your thrown work the following week, it should also be double bagged. If your work is large, delicate, or of uneven thicknesses, you should lightly cover your work for drying. When considering the drying process, bare in mind the weather, humidity and wind! The hotter and dryer, the faster things dry and work can dry unevenly in the shelves – this can lead to cracking – another time to lightly cover your work for drying. Step Four – Trimming and Cleaning Up Your work is dry! It is called greenware now and it is at it’s most fragile! Handle everything with two hands. I often refer to soft hands – keep everything gentle and with your fingers spread as much as possible. Try to not pick up things like plates too much, and always with both hands! Before your work can be bisque fired it should be “cleaned up”. You work won’t go into the kiln if it has sharp edges – when glazed, sharp edges turn into razor blades! Use a piece of fly wire to rub the work all over – this will scratch a little so be light handed. Use a knife or metal kidney to scrape any areas that require a bit more dynamic treatment than the fly wire offers! Finally, a very light wipe over with a slightly damp sponge can help soften and soothe all of your edges and dags! Trimming thrown work: If you are planning to trim (or turn) your thrown work (and you should be), make sure you bag it well – your work should be leather hard to almost dry for easiest trimming. Use this step to finish the work completely – use a metal kidney to polish the surface, or a slightly damp sponge to give a freshly thrown look. Wipe the sponge around the rim after trimming, and check the inside of the pot for dags! Trimming slip cast work: Usually I will trim the rims of your work on the wheel the following day to make that stage easier, however you will still need to check your work for lumps and bumps. Last but not least – check that your name is still clearly on the bottom of your work. Step Five – Bisque Firing When the work is completely dry it can go into the bisque kiln. The bisque kiln is fired to 1000°C. This process burns off the water in the clay as well as some of the chemically bound water. The structure of the clay is not altered that much at this temperature. Inside the bisque kiln, the work is stacked a little, small bowl inside a larger bowl and onto a heavy plate. Smaller items like decorations or drink coasters might get stacked several high. Consideration is paid to the weight of the stack and shape of the work. A bisque kiln can fire about one and a half times the amount of work that the glaze kiln can fire. The firing takes about 10 hours to complete the cycle and about two days to cool down. Once it has been emptied the work is placed in the glaze room ready for you to decorate! Step Six – Glazing Decorating your work with colour can be a lot of fun – and time consuming! There are three main options for surface treatment at this stage: Oxide Washes Underglazes Glazes Washes and underglazes do not “glaze” the work – It will still need a layer of glaze to fully seal the clay (washes don’t need glaze on surfaces not designed for food or liquid as they can gloss up a little on their own). Underglazes are stable colourants that turn out pretty much how they look in the jar. They can be mixed with each other to form other colours and can be used like water colours to paint onto your work. Mostly they should have a clear glaze on top to seal them. Oxides are a different species – the pink oxide (cobalt) wash turns out bright blue for instance. They don’t always need a glaze on top, and some glazes can change the colour of the wash! The glazes need no other “glaze” on top! Be careful of unknown glaze interactions – you can put any combination of glaze in a bowl or on a plate, but only a single glaze on the outside of any vertical surface! Glazes are a chemical reaction under heat. We don’t know the exact chemicals in the Mayco glazes we use. I can guess by the way they interact with each other, however, on the whole, you need to test every idea you have, and not run the test on a vertical surface! Simply put, glaze is a layer of glass like substance that bonds with the clay underneath. Clay is made of silica, alumina and water. Glaze is made of mostly silica. Silica has a melting point of 1700°C and we fire to 1240°C. The silica requires a “flux” to help it melt at the lower temperature. Fluxes can be all sorts of chemicals – a common one is calcium – calcium has a melting point of 2500°C, however, together they both melt at a much lower temperature! Colourants are metal oxides like cobalt (blue), chrome (green through black), copper (green, blue, even red!), manganese (black, purple and pink) iron (red brown), etc. Different chemicals in the glaze can have dramatic effects. for example, barium carbonate (which we don’t use) turns manganese bright pink! Other elements can turn manganese dioxide brown, blue, purple and reddish brown. Manganese dioxide is a flux in and of itself as well. So, glazes that get their black and purple colours, often interact with other glazes and RUN! Our mirror black is a good example – it mixes really well with many glazes because it fluxes them – causes them to melt faster. It will also bring out many beautiful colours in the glazes because it’s black colouring most definitely comes from manganese dioxide! Glaze chemistry is a whole subject on it’s own! We use commercial Mayco glazes on purpose – for their huge range of colour possibilities, stability, cool interactions, artistic freedom with the ability to easily brush the glazes on and ease of use. We currently have almost 50 glazes on hand! A major project is to test the interactions of all glazes with each other. That is 2,500 test tiles!!!! I’m going to make the wall behind the wheels the feature wall of pretty colours! Step Seven – Glaze (Gloss or sometimes called “Glost”) Firing Most of the time this is the final stage of making your creation (but not always!) The glaze kiln goes to 1240°C. This is called cone 6, or midrange. It is the low end of stoneware temperatures. Stoneware clays and glazes are typically fired at cone 8 – 10, that is 1260 – 1290°C. The energy requirement to go from 1240°C to 1280°C is almost a 30% more! Our clay is formulated to vitrify (mature, turn “glass-like”) at 1240°, as are our glazes. A glaze kiln take around 12 hours to reach temperature and two to three days to cool down. Sometimes a third firing process is required – this is for decoration that is added to work after the glaze firing. For example – adding precious metals and lustres. this firing temperature is usually around 600 – 800°C depending upon the techniques being used. There are many students interested in gold and silver trims – we will be doing this third type of firing soon! After firing your work will be in the student finished work shelves. Remember to pay for it before you head out the door! There is a small extra charge for using porcelain clay (it’s more than twice the price of regular clay), and for any third firing process! Once your work has been fired it can not turn back into clay for millennia – so don’t fire it if you don’t like it! Put it in the bucket for recycling. https://firebirdstudios.com.au/the-process-of-making-pottery/Ceramics have evolved over thousands of years.A white earthenware side plate with a gadroon edge. Has water marks and chips on front.‘Johnson Bros England Reg No 15587’flagstaff hill, warrnambool, shipwrecked-coast, flagstaff-hill, flagstaff-hill-maritime-museum, maritime-museum, shipwreck-coast, flagstaff-hill-maritime-village, johnson bros, ceramics, tableware -
 Flagstaff Hill Maritime Museum and Village
Domestic object - Plate, Alfred Meakin
The Process of Making Pottery Decorating, Firing, Glazing, Making, Technical There is a rhythm and flow to clay. It can’t be done all at once! Even the making process! It can take weeks to get everything done, especially if you can only work on your pottery once a week! Even though we have three hour classes, it’s often just not enough time! Here is an overview of some of the processes so you have a bit more grasp on some of the technical stuff! Step One – Design There are SO many ideas out there for making stuff in clay! From delicate porcelain jewellery, through to heavy sculptural work and everything in between. Deciding your direction is sometimes not that easy – when you first start, try everything, you will naturally gravitate to the style that you enjoy! The options and variations are endless and can get a wee bit overwhelming too! Check in with me before you start to ensure your ideas will work, what order you might do things, how you could achieve the look you are seeking and any other technical data required! Step Two – Making Clay is thixotropic. This means that as you work with it, the clay first gets sloppier and wetter, before is begins to dry in the atmosphere. For most things, you simply can’t do all parts of the project at once. An example of work order might look like: Get last weeks work out from the shelves Prepare clay for today’s work – roll your clay, prepare balls for throwing, make the first stage of a pinch pot) Clean up last week’s work and put it on the shelf for bisque firing Check that you have any glazing to do – and do enough of it that you will have time to finish your main project Do the next step of your next project – there might be a further step that can’t be complete immediately, in that case, wrap your work well and put onto the shelves. Letting your work rest for a while can really help keep your work clean and professional looking. Many things require bagging under plastic to keep it ready for work the next week – put your name on the outside of the bag so you can find your work easily. We have stickers and markers. Consider how you want to decorate your work – coloured slip can be applied at a fairly wet stage (remembering that it will make your work even wetter!). Trying to apply slip to dry clay won’t work! If you want to do sgraffito – you will need to keep the work leather hard (a state of dryness where you can still work the clay with a little effort and a little water and care). Step Three – Drying Most of the time your work can go into the rack uncovered to let it dry out for the following week. If you want to continue forming or shaping you will need to double bag your work – put your work on a suitable sized bat and put the bat in a bag so the base of the bag is under the bat, then put another bag over the top of the work and tuck the top of the bag under the bat. If you want to trim (or turn) your thrown work the following week, it should also be double bagged. If your work is large, delicate, or of uneven thicknesses, you should lightly cover your work for drying. When considering the drying process, bare in mind the weather, humidity and wind! The hotter and dryer, the faster things dry and work can dry unevenly in the shelves – this can lead to cracking – another time to lightly cover your work for drying. Step Four – Trimming and Cleaning Up Your work is dry! It is called greenware now and it is at it’s most fragile! Handle everything with two hands. I often refer to soft hands – keep everything gentle and with your fingers spread as much as possible. Try to not pick up things like plates too much, and always with both hands! Before your work can be bisque fired it should be “cleaned up”. You work won’t go into the kiln if it has sharp edges – when glazed, sharp edges turn into razor blades! Use a piece of fly wire to rub the work all over – this will scratch a little so be light handed. Use a knife or metal kidney to scrape any areas that require a bit more dynamic treatment than the fly wire offers! Finally, a very light wipe over with a slightly damp sponge can help soften and soothe all of your edges and dags! Trimming thrown work: If you are planning to trim (or turn) your thrown work (and you should be), make sure you bag it well – your work should be leather hard to almost dry for easiest trimming. Use this step to finish the work completely – use a metal kidney to polish the surface, or a slightly damp sponge to give a freshly thrown look. Wipe the sponge around the rim after trimming, and check the inside of the pot for dags! Trimming slip cast work: Usually I will trim the rims of your work on the wheel the following day to make that stage easier, however you will still need to check your work for lumps and bumps. Last but not least – check that your name is still clearly on the bottom of your work. Step Five – Bisque Firing When the work is completely dry it can go into the bisque kiln. The bisque kiln is fired to 1000°C. This process burns off the water in the clay as well as some of the chemically bound water. The structure of the clay is not altered that much at this temperature. Inside the bisque kiln, the work is stacked a little, small bowl inside a larger bowl and onto a heavy plate. Smaller items like decorations or drink coasters might get stacked several high. Consideration is paid to the weight of the stack and shape of the work. A bisque kiln can fire about one and a half times the amount of work that the glaze kiln can fire. The firing takes about 10 hours to complete the cycle and about two days to cool down. Once it has been emptied the work is placed in the glaze room ready for you to decorate! Step Six – Glazing Decorating your work with colour can be a lot of fun – and time consuming! There are three main options for surface treatment at this stage: Oxide Washes Underglazes Glazes Washes and underglazes do not “glaze” the work – It will still need a layer of glaze to fully seal the clay (washes don’t need glaze on surfaces not designed for food or liquid as they can gloss up a little on their own). Underglazes are stable colourants that turn out pretty much how they look in the jar. They can be mixed with each other to form other colours and can be used like water colours to paint onto your work. Mostly they should have a clear glaze on top to seal them. Oxides are a different species – the pink oxide (cobalt) wash turns out bright blue for instance. They don’t always need a glaze on top, and some glazes can change the colour of the wash! The glazes need no other “glaze” on top! Be careful of unknown glaze interactions – you can put any combination of glaze in a bowl or on a plate, but only a single glaze on the outside of any vertical surface! Glazes are a chemical reaction under heat. We don’t know the exact chemicals in the Mayco glazes we use. I can guess by the way they interact with each other, however, on the whole, you need to test every idea you have, and not run the test on a vertical surface! Simply put, glaze is a layer of glass like substance that bonds with the clay underneath. Clay is made of silica, alumina and water. Glaze is made of mostly silica. Silica has a melting point of 1700°C and we fire to 1240°C. The silica requires a “flux” to help it melt at the lower temperature. Fluxes can be all sorts of chemicals – a common one is calcium – calcium has a melting point of 2500°C, however, together they both melt at a much lower temperature! Colourants are metal oxides like cobalt (blue), chrome (green through black), copper (green, blue, even red!), manganese (black, purple and pink) iron (red brown), etc. Different chemicals in the glaze can have dramatic effects. for example, barium carbonate (which we don’t use) turns manganese bright pink! Other elements can turn manganese dioxide brown, blue, purple and reddish brown. Manganese dioxide is a flux in and of itself as well. So, glazes that get their black and purple colours, often interact with other glazes and RUN! Our mirror black is a good example – it mixes really well with many glazes because it fluxes them – causes them to melt faster. It will also bring out many beautiful colours in the glazes because it’s black colouring most definitely comes from manganese dioxide! Glaze chemistry is a whole subject on it’s own! We use commercial Mayco glazes on purpose – for their huge range of colour possibilities, stability, cool interactions, artistic freedom with the ability to easily brush the glazes on and ease of use. We currently have almost 50 glazes on hand! A major project is to test the interactions of all glazes with each other. That is 2,500 test tiles!!!! I’m going to make the wall behind the wheels the feature wall of pretty colours! Step Seven – Glaze (Gloss or sometimes called “Glost”) Firing Most of the time this is the final stage of making your creation (but not always!) The glaze kiln goes to 1240°C. This is called cone 6, or midrange. It is the low end of stoneware temperatures. Stoneware clays and glazes are typically fired at cone 8 – 10, that is 1260 – 1290°C. The energy requirement to go from 1240°C to 1280°C is almost a 30% more! Our clay is formulated to vitrify (mature, turn “glass-like”) at 1240°, as are our glazes. A glaze kiln take around 12 hours to reach temperature and two to three days to cool down. Sometimes a third firing process is required – this is for decoration that is added to work after the glaze firing. For example – adding precious metals and lustres. this firing temperature is usually around 600 – 800°C depending upon the techniques being used. There are many students interested in gold and silver trims – we will be doing this third type of firing soon! After firing your work will be in the student finished work shelves. Remember to pay for it before you head out the door! There is a small extra charge for using porcelain clay (it’s more than twice the price of regular clay), and for any third firing process! Once your work has been fired it can not turn back into clay for millennia – so don’t fire it if you don’t like it! Put it in the bucket for recycling. https://firebirdstudios.com.au/the-process-of-making-pottery/Ceramics have evolved over thousands of years.Earthenware dessert plate, cream colour. Made by Alfred Meakin, England. Backstamped ‘Alfred Meakin England’. flagstaff hill, warrnambool, shipwrecked-coast, flagstaff-hill, flagstaff-hill-maritime-museum, maritime-museum, shipwreck-coast, flagstaff-hill-maritime-village, alfred meakin, ceramics, earthenware, kitchenware -
 Flagstaff Hill Maritime Museum and Village
Domestic object - Jug
The Process of Making Pottery Decorating, Firing, Glazing, Making, Technical There is a rhythm and flow to clay. It can’t be done all at once! Even the making process! It can take weeks to get everything done, especially if you can only work on your pottery once a week! Even though we have three hour classes, it’s often just not enough time! Here is an overview of some of the processes so you have a bit more grasp on some of the technical stuff! Step One – Design There are SO many ideas out there for making stuff in clay! From delicate porcelain jewellery, through to heavy sculptural work and everything in between. Deciding your direction is sometimes not that easy – when you first start, try everything, you will naturally gravitate to the style that you enjoy! The options and variations are endless and can get a wee bit overwhelming too! Check in with me before you start to ensure your ideas will work, what order you might do things, how you could achieve the look you are seeking and any other technical data required! Step Two – Making Clay is thixotropic. This means that as you work with it, the clay first gets sloppier and wetter, before is begins to dry in the atmosphere. For most things, you simply can’t do all parts of the project at once. An example of work order might look like: Get last weeks work out from the shelves Prepare clay for today’s work – roll your clay, prepare balls for throwing, make the first stage of a pinch pot) Clean up last week’s work and put it on the shelf for bisque firing Check that you have any glazing to do – and do enough of it that you will have time to finish your main project Do the next step of your next project – there might be a further step that can’t be complete immediately, in that case, wrap your work well and put onto the shelves. Letting your work rest for a while can really help keep your work clean and professional looking. Many things require bagging under plastic to keep it ready for work the next week – put your name on the outside of the bag so you can find your work easily. We have stickers and markers. Consider how you want to decorate your work – coloured slip can be applied at a fairly wet stage (remembering that it will make your work even wetter!). Trying to apply slip to dry clay won’t work! If you want to do sgraffito – you will need to keep the work leather hard (a state of dryness where you can still work the clay with a little effort and a little water and care). Step Three – Drying Most of the time your work can go into the rack uncovered to let it dry out for the following week. If you want to continue forming or shaping you will need to double bag your work – put your work on a suitable sized bat and put the bat in a bag so the base of the bag is under the bat, then put another bag over the top of the work and tuck the top of the bag under the bat. If you want to trim (or turn) your thrown work the following week, it should also be double bagged. If your work is large, delicate, or of uneven thicknesses, you should lightly cover your work for drying. When considering the drying process, bare in mind the weather, humidity and wind! The hotter and dryer, the faster things dry and work can dry unevenly in the shelves – this can lead to cracking – another time to lightly cover your work for drying. Step Four – Trimming and Cleaning Up Your work is dry! It is called greenware now and it is at it’s most fragile! Handle everything with two hands. I often refer to soft hands – keep everything gentle and with your fingers spread as much as possible. Try to not pick up things like plates too much, and always with both hands! Before your work can be bisque fired it should be “cleaned up”. You work won’t go into the kiln if it has sharp edges – when glazed, sharp edges turn into razor blades! Use a piece of fly wire to rub the work all over – this will scratch a little so be light handed. Use a knife or metal kidney to scrape any areas that require a bit more dynamic treatment than the fly wire offers! Finally, a very light wipe over with a slightly damp sponge can help soften and soothe all of your edges and dags! Trimming thrown work: If you are planning to trim (or turn) your thrown work (and you should be), make sure you bag it well – your work should be leather hard to almost dry for easiest trimming. Use this step to finish the work completely – use a metal kidney to polish the surface, or a slightly damp sponge to give a freshly thrown look. Wipe the sponge around the rim after trimming, and check the inside of the pot for dags! Trimming slip cast work: Usually I will trim the rims of your work on the wheel the following day to make that stage easier, however you will still need to check your work for lumps and bumps. Last but not least – check that your name is still clearly on the bottom of your work. Step Five – Bisque Firing When the work is completely dry it can go into the bisque kiln. The bisque kiln is fired to 1000°C. This process burns off the water in the clay as well as some of the chemically bound water. The structure of the clay is not altered that much at this temperature. Inside the bisque kiln, the work is stacked a little, small bowl inside a larger bowl and onto a heavy plate. Smaller items like decorations or drink coasters might get stacked several high. Consideration is paid to the weight of the stack and shape of the work. A bisque kiln can fire about one and a half times the amount of work that the glaze kiln can fire. The firing takes about 10 hours to complete the cycle and about two days to cool down. Once it has been emptied the work is placed in the glaze room ready for you to decorate! Step Six – Glazing Decorating your work with colour can be a lot of fun – and time consuming! There are three main options for surface treatment at this stage: Oxide Washes Underglazes Glazes Washes and underglazes do not “glaze” the work – It will still need a layer of glaze to fully seal the clay (washes don’t need glaze on surfaces not designed for food or liquid as they can gloss up a little on their own). Underglazes are stable colourants that turn out pretty much how they look in the jar. They can be mixed with each other to form other colours and can be used like water colours to paint onto your work. Mostly they should have a clear glaze on top to seal them. Oxides are a different species – the pink oxide (cobalt) wash turns out bright blue for instance. They don’t always need a glaze on top, and some glazes can change the colour of the wash! The glazes need no other “glaze” on top! Be careful of unknown glaze interactions – you can put any combination of glaze in a bowl or on a plate, but only a single glaze on the outside of any vertical surface! Glazes are a chemical reaction under heat. We don’t know the exact chemicals in the Mayco glazes we use. I can guess by the way they interact with each other, however, on the whole, you need to test every idea you have, and not run the test on a vertical surface! Simply put, glaze is a layer of glass like substance that bonds with the clay underneath. Clay is made of silica, alumina and water. Glaze is made of mostly silica. Silica has a melting point of 1700°C and we fire to 1240°C. The silica requires a “flux” to help it melt at the lower temperature. Fluxes can be all sorts of chemicals – a common one is calcium – calcium has a melting point of 2500°C, however, together they both melt at a much lower temperature! Colourants are metal oxides like cobalt (blue), chrome (green through black), copper (green, blue, even red!), manganese (black, purple and pink) iron (red brown), etc. Different chemicals in the glaze can have dramatic effects. for example, barium carbonate (which we don’t use) turns manganese bright pink! Other elements can turn manganese dioxide brown, blue, purple and reddish brown. Manganese dioxide is a flux in and of itself as well. So, glazes that get their black and purple colours, often interact with other glazes and RUN! Our mirror black is a good example – it mixes really well with many glazes because it fluxes them – causes them to melt faster. It will also bring out many beautiful colours in the glazes because it’s black colouring most definitely comes from manganese dioxide! Glaze chemistry is a whole subject on it’s own! We use commercial Mayco glazes on purpose – for their huge range of colour possibilities, stability, cool interactions, artistic freedom with the ability to easily brush the glazes on and ease of use. We currently have almost 50 glazes on hand! A major project is to test the interactions of all glazes with each other. That is 2,500 test tiles!!!! I’m going to make the wall behind the wheels the feature wall of pretty colours! Step Seven – Glaze (Gloss or sometimes called “Glost”) Firing Most of the time this is the final stage of making your creation (but not always!) The glaze kiln goes to 1240°C. This is called cone 6, or midrange. It is the low end of stoneware temperatures. Stoneware clays and glazes are typically fired at cone 8 – 10, that is 1260 – 1290°C. The energy requirement to go from 1240°C to 1280°C is almost a 30% more! Our clay is formulated to vitrify (mature, turn “glass-like”) at 1240°, as are our glazes. A glaze kiln take around 12 hours to reach temperature and two to three days to cool down. Sometimes a third firing process is required – this is for decoration that is added to work after the glaze firing. For example – adding precious metals and lustres. this firing temperature is usually around 600 – 800°C depending upon the techniques being used. There are many students interested in gold and silver trims – we will be doing this third type of firing soon! After firing your work will be in the student finished work shelves. Remember to pay for it before you head out the door! There is a small extra charge for using porcelain clay (it’s more than twice the price of regular clay), and for any third firing process! Once your work has been fired it can not turn back into clay for millennia – so don’t fire it if you don’t like it! Put it in the bucket for recycling. https://firebirdstudios.com.au/the-process-of-making-pottery/The form of the jug has been in use for many centuries.Stoneware jug. Two tone brown glaze with pierced lip behind spout. Spout chipped.None.flagstaff hill, warrnambool, shipwrecked-coast, flagstaff-hill, flagstaff-hill-maritime-museum, maritime-museum, shipwreck-coast, flagstaff-hill-maritime-village, jug, ceramic jug -
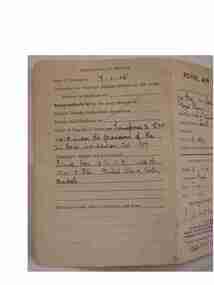 Red Cliffs Military Museum
Discharge Paper WW1, Copy of WW1 Discharge Paper in cover, (estimated); 1921
This is a part of the A.J. Roddy Collection. The Family have glued a piece on the envelope which says, "Dad's Discharge Paper/ Royal Irish Rifles & Royal Flying Corps./ 7-1-1915 to Dec 1921. Copy a the Discharge paper of Pte2 James Roddy, Royal Irish Rifles & Royal Flying Corps RAF 7-1-1915 to Dec 1921 and CoverCover: Cover for Certificates/ and other Documents of a/ soldier on Demobilization or Transfer to the Reseve/ or Discharge.// Front of Paper: Top right: Form 2067/ Royal Air Force/ Serial No/ Character Certificate of No 133458/ Rank Pte2 Name Roddy James/ Royal Flying Corp (Regiment (crossed out))/ Born in the Parish of / near the Town of South in the / County of ......... on the / Date 11.7.1897/ Trade as stated by him on Enlistment Postman/ 2 parallel lines/ * Description on Leaving the Colours/ Heoght 5ft 6in. Identification Marks:-/ Complexion Fresh Scar above 1st Lumbar/ Eyes Grey. Vertibrae/ Hair Brown/ Signature of Soldier/ (was signed J. Roddy/ * To prevent impersonation/ In the event of any doubt arising as to the bona fidis of the/ bearer, the above description and signature should be carefully compared with present appearance and hand writing. (16:957) WT 3183C/1875 5m.17/18. P&P Ltd/ Photostat copy of Original Opening the paper inside: The character here given is based on continous records of the holder's conduct and / employment throughout his Military Career./ This is to Certify that No 133458 Rank Pte2 Name Roddy James/ has served with the colours in the Royal Irish Rifles & Royal Flying Corps for 3 83/365 years. 1915-18/ Serving in the Royal Flying Corps as a Batman, and during/ the whole of this period carrying out his duites in a/ satisfactory manner/ There is no record of him having incurred any service/ entries on his conduct sheet during this period./ for service in the R.A.F. see form 280/ Signature ..... Squadron Leader/ Date December 1921 Commanding R.A.F. Records Ruislip/ If further particulars as to his character and record of service are required within three years of above date, apply to/ where he is registered for Civil Employment,/ afterwards to the Officer in Charge of Records./ * This space is intended to be filled in by any organisation which has registered the man's name and is prepared to/ supply further information.// Back of paper: Particulars of Service/ Date of Enlistement 7.1.15/ Preceeded on Furlough pending Transfer to the Army/ Reserve, or Discharge on... passed medically fit for the Army Reserve on/ Due for Final Discharge on../ Cause of Transfer or Discharge - Transferred to R.A.F. 1-4-18. under the provisions of the/ Air Force (Constitution) Act Oct. 1917./ Campaigns, Medals and Decorations/ France from 15.6.15 to 3.12.16/ 1914-15 Star, British War & Victory/ Medals. /Education and other Certificates and dates/corps, ww1, collection, royal, a j, roddy, flying, irish, rifles, pte2, james, 1915 -
 Eltham District Historical Society Inc
Photo album, Official Opening of the New Eltham Library, 22nd May,1994, 1994
Library Development The library building has been designed to reflect its parkland setting. External features include: the roof which includes interesting aspects when viewed from Main Road; verandahs which provide ramp access and give a sheltered entrance to the building; walls which feature locally-made mudbricks, conventional bricks and copper panels; and space for an outdoor courtyard/reading area which will be developed later. Internally there are a number of features. The building includes a foyer with a fireplace suitable for displays including artwork; a community multi-purpose room suitable for meetings or functions and an outdoor cafeteria. The ceilings are lined with Victorian Ash. The shapes for the ceiling give a free flowing form to the building. Brush Box has been used for the circulation and information desks. The tree trunk columns are Grey lronbark from New South Wales. Arches and and various-shaped windows add interest to the internal structure. The carpet design reflects the Eltham environment and compliments the natural colours and timbers used in the building. Tiles by artist Felix Bosari feature in the building and additional art by local artists will be added externally and internally to the building. The library floor area is approximately 1200 sq metres and houses a collection of 50,000 items. The community multi-purpose room, foyer and community display area totals approximately 300 sq metres. These areas will be available to the community for such events a~ meetings, displays, classes, functions and art exhibitions. The Toy Library and Adult Literacy Group will also be based in the new complex. The value of works/services and fittings/ furniture is $3,040,000 Project Team Project Director: John Stamp, Director - Major Projects Project Manager: Noel Mcinnes, Noel Mcinnes Project Management Pty Ltd Architects: Gregory Burgess and Peter Ryan, Gregory Burgess Pty Ltd Site Foreman - Building Works: John Mantel Site Foreman - Site Works and Foundations: Steven White, Shire of Eltham Surveyor: Gregory Slater, Shire of Eltham Builder: Shire of ElthamPhoto album of the new Eltham Library presented to the Society by Cr R.J. Manuell, Chairperson Eltham Library Redevelopment Special Committee, 28 Nov 1994 in recognition of the efforts and contribution made by the Shire of Eltham Historical Society to the construction of the Eltham Library complex.Black faux leather album cover, black pages, brass corners and screws, 10 page inserts separated by tissue, 12 photos and information sheets stuck to pages.eltham, eltham library, panther place, shire of eltham, yarra plenty regional library -
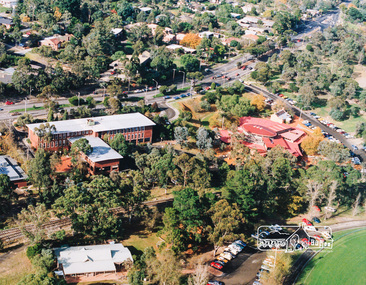 Eltham District Historical Society Inc
Photo album, Aerial view showing the Shire of Eltham office, new Eltham Library and relocated Shillinglaw Cottage, 1994, 1994
Library Development The library building has been designed to reflect its parkland setting. External features include: the roof which includes interesting aspects when viewed from Main Road; verandahs which provide ramp access and give a sheltered entrance to the building; walls which feature locally-made mudbricks, conventional bricks and copper panels; and space for an outdoor courtyard/reading area which will be developed later. Internally there are a number of features. The building includes a foyer with a fireplace suitable for displays including artwork; a community multi-purpose room suitable for meetings or functions and an outdoor cafeteria. The ceilings are lined with Victorian Ash. The shapes for the ceiling give a free flowing form to the building. Brush Box has been used for the circulation and information desks. The tree trunk columns are Grey lronbark from New South Wales. Arches and and various-shaped windows add interest to the internal structure. The carpet design reflects the Eltham environment and compliments the natural colours and timbers used in the building. Tiles by artist Felix Bosari feature in the building and additional art by local artists will be added externally and internally to the building. The library floor area is approximately 1200 sq metres and houses a collection of 50,000 items. The community multi-purpose room, foyer and community display area totals approximately 300 sq metres. These areas will be available to the community for such events a~ meetings, displays, classes, functions and art exhibitions. The Toy Library and Adult Literacy Group will also be based in the new complex. The value of works/services and fittings/ furniture is $3,040,000 Project Team Project Director: John Stamp, Director - Major Projects Project Manager: Noel Mcinnes, Noel Mcinnes Project Management Pty Ltd Architects: Gregory Burgess and Peter Ryan, Gregory Burgess Pty Ltd Site Foreman - Building Works: John Mantel Site Foreman - Site Works and Foundations: Steven White, Shire of Eltham Surveyor: Gregory Slater, Shire of Eltham Builder: Shire of ElthamShows the relationship of the the Shire of Eltham office which was built on the original location of Shillinglaw Cottage and relocated to Panther Place.The Shillinglaw trees visible, still in their original location, in front of the Shire offices. Photo album of the new Eltham Library presented to the Society by Cr R.J. Manuell, Chairperson Eltham Library Redevelopment Special Committee, 28 Nov 1994 in recognition of the efforts and contribution made by the Shire of Eltham Historical Society to the construction of the Eltham Library complex.Black faux leather album cover, black pages, brass corners and screws, 10 page inserts separated by tissue, 12 photos and information sheets stuck to pages.eltham, eltham library, panther place, shire of eltham, yarra plenty regional library, shillinglaw cottage -
 Eltham District Historical Society Inc
Photo album, Aerial view showing the new Eltham Library and relocated Shillinglaw Cottage, 1994, 1994
Library Development The library building has been designed to reflect its parkland setting. External features include: the roof which includes interesting aspects when viewed from Main Road; verandahs which provide ramp access and give a sheltered entrance to the building; walls which feature locally-made mudbricks, conventional bricks and copper panels; and space for an outdoor courtyard/reading area which will be developed later. Internally there are a number of features. The building includes a foyer with a fireplace suitable for displays including artwork; a community multi-purpose room suitable for meetings or functions and an outdoor cafeteria. The ceilings are lined with Victorian Ash. The shapes for the ceiling give a free flowing form to the building. Brush Box has been used for the circulation and information desks. The tree trunk columns are Grey lronbark from New South Wales. Arches and and various-shaped windows add interest to the internal structure. The carpet design reflects the Eltham environment and compliments the natural colours and timbers used in the building. Tiles by artist Felix Bosari feature in the building and additional art by local artists will be added externally and internally to the building. The library floor area is approximately 1200 sq metres and houses a collection of 50,000 items. The community multi-purpose room, foyer and community display area totals approximately 300 sq metres. These areas will be available to the community for such events a~ meetings, displays, classes, functions and art exhibitions. The Toy Library and Adult Literacy Group will also be based in the new complex. The value of works/services and fittings/ furniture is $3,040,000 Project Team Project Director: John Stamp, Director - Major Projects Project Manager: Noel Mcinnes, Noel Mcinnes Project Management Pty Ltd Architects: Gregory Burgess and Peter Ryan, Gregory Burgess Pty Ltd Site Foreman - Building Works: John Mantel Site Foreman - Site Works and Foundations: Steven White, Shire of Eltham Surveyor: Gregory Slater, Shire of Eltham Builder: Shire of ElthamPhoto album of the new Eltham Library presented to the Society by Cr R.J. Manuell, Chairperson Eltham Library Redevelopment Special Committee, 28 Nov 1994 in recognition of the efforts and contribution made by the Shire of Eltham Historical Society to the construction of the Eltham Library complex.Black faux leather album cover, black pages, brass corners and screws, 10 page inserts separated by tissue, 12 photos and information sheets stuck to pages.eltham, eltham library, panther place, shire of eltham, yarra plenty regional library, shillinglaw cottage -
 Eltham District Historical Society Inc
Photo album, Aerial view showing the new Eltham Library, 1994, 1994
Library Development The library building has been designed to reflect its parkland setting. External features include: the roof which includes interesting aspects when viewed from Main Road; verandahs which provide ramp access and give a sheltered entrance to the building; walls which feature locally-made mudbricks, conventional bricks and copper panels; and space for an outdoor courtyard/reading area which will be developed later. Internally there are a number of features. The building includes a foyer with a fireplace suitable for displays including artwork; a community multi-purpose room suitable for meetings or functions and an outdoor cafeteria. The ceilings are lined with Victorian Ash. The shapes for the ceiling give a free flowing form to the building. Brush Box has been used for the circulation and information desks. The tree trunk columns are Grey lronbark from New South Wales. Arches and and various-shaped windows add interest to the internal structure. The carpet design reflects the Eltham environment and compliments the natural colours and timbers used in the building. Tiles by artist Felix Bosari feature in the building and additional art by local artists will be added externally and internally to the building. The library floor area is approximately 1200 sq metres and houses a collection of 50,000 items. The community multi-purpose room, foyer and community display area totals approximately 300 sq metres. These areas will be available to the community for such events a~ meetings, displays, classes, functions and art exhibitions. The Toy Library and Adult Literacy Group will also be based in the new complex. The value of works/services and fittings/ furniture is $3,040,000 Project Team Project Director: John Stamp, Director - Major Projects Project Manager: Noel Mcinnes, Noel Mcinnes Project Management Pty Ltd Architects: Gregory Burgess and Peter Ryan, Gregory Burgess Pty Ltd Site Foreman - Building Works: John Mantel Site Foreman - Site Works and Foundations: Steven White, Shire of Eltham Surveyor: Gregory Slater, Shire of Eltham Builder: Shire of ElthamPhoto album of the new Eltham Library presented to the Society by Cr R.J. Manuell, Chairperson Eltham Library Redevelopment Special Committee, 28 Nov 1994 in recognition of the efforts and contribution made by the Shire of Eltham Historical Society to the construction of the Eltham Library complex.Black faux leather album cover, black pages, brass corners and screws, 10 page inserts separated by tissue, 12 photos and information sheets stuck to pages.eltham, eltham library, panther place, shire of eltham, yarra plenty regional library -
 Eltham District Historical Society Inc
Photo album, Exterior view of the new Eltham Library, 1994, 1994
Library Development The library building has been designed to reflect its parkland setting. External features include: the roof which includes interesting aspects when viewed from Main Road; verandahs which provide ramp access and give a sheltered entrance to the building; walls which feature locally-made mudbricks, conventional bricks and copper panels; and space for an outdoor courtyard/reading area which will be developed later. Internally there are a number of features. The building includes a foyer with a fireplace suitable for displays including artwork; a community multi-purpose room suitable for meetings or functions and an outdoor cafeteria. The ceilings are lined with Victorian Ash. The shapes for the ceiling give a free flowing form to the building. Brush Box has been used for the circulation and information desks. The tree trunk columns are Grey lronbark from New South Wales. Arches and and various-shaped windows add interest to the internal structure. The carpet design reflects the Eltham environment and compliments the natural colours and timbers used in the building. Tiles by artist Felix Bosari feature in the building and additional art by local artists will be added externally and internally to the building. The library floor area is approximately 1200 sq metres and houses a collection of 50,000 items. The community multi-purpose room, foyer and community display area totals approximately 300 sq metres. These areas will be available to the community for such events a~ meetings, displays, classes, functions and art exhibitions. The Toy Library and Adult Literacy Group will also be based in the new complex. The value of works/services and fittings/ furniture is $3,040,000 Project Team Project Director: John Stamp, Director - Major Projects Project Manager: Noel Mcinnes, Noel Mcinnes Project Management Pty Ltd Architects: Gregory Burgess and Peter Ryan, Gregory Burgess Pty Ltd Site Foreman - Building Works: John Mantel Site Foreman - Site Works and Foundations: Steven White, Shire of Eltham Surveyor: Gregory Slater, Shire of Eltham Builder: Shire of ElthamPhoto album of the new Eltham Library presented to the Society by Cr R.J. Manuell, Chairperson Eltham Library Redevelopment Special Committee, 28 Nov 1994 in recognition of the efforts and contribution made by the Shire of Eltham Historical Society to the construction of the Eltham Library complex.Black faux leather album cover, black pages, brass corners and screws, 10 page inserts separated by tissue, 12 photos and information sheets stuck to pages.eltham, eltham library, panther place, shire of eltham, yarra plenty regional library -
 Eltham District Historical Society Inc
Photo album, Entrance of the new Eltham Library from the front community display space, 1994, 1994
Library Development The library building has been designed to reflect its parkland setting. External features include: the roof which includes interesting aspects when viewed from Main Road; verandahs which provide ramp access and give a sheltered entrance to the building; walls which feature locally-made mudbricks, conventional bricks and copper panels; and space for an outdoor courtyard/reading area which will be developed later. Internally there are a number of features. The building includes a foyer with a fireplace suitable for displays including artwork; a community multi-purpose room suitable for meetings or functions and an outdoor cafeteria. The ceilings are lined with Victorian Ash. The shapes for the ceiling give a free flowing form to the building. Brush Box has been used for the circulation and information desks. The tree trunk columns are Grey lronbark from New South Wales. Arches and and various-shaped windows add interest to the internal structure. The carpet design reflects the Eltham environment and compliments the natural colours and timbers used in the building. Tiles by artist Felix Bosari feature in the building and additional art by local artists will be added externally and internally to the building. The library floor area is approximately 1200 sq metres and houses a collection of 50,000 items. The community multi-purpose room, foyer and community display area totals approximately 300 sq metres. These areas will be available to the community for such events a~ meetings, displays, classes, functions and art exhibitions. The Toy Library and Adult Literacy Group will also be based in the new complex. The value of works/services and fittings/ furniture is $3,040,000 Project Team Project Director: John Stamp, Director - Major Projects Project Manager: Noel Mcinnes, Noel Mcinnes Project Management Pty Ltd Architects: Gregory Burgess and Peter Ryan, Gregory Burgess Pty Ltd Site Foreman - Building Works: John Mantel Site Foreman - Site Works and Foundations: Steven White, Shire of Eltham Surveyor: Gregory Slater, Shire of Eltham Builder: Shire of ElthamPhoto album of the new Eltham Library presented to the Society by Cr R.J. Manuell, Chairperson Eltham Library Redevelopment Special Committee, 28 Nov 1994 in recognition of the efforts and contribution made by the Shire of Eltham Historical Society to the construction of the Eltham Library complex.Black faux leather album cover, black pages, brass corners and screws, 10 page inserts separated by tissue, 12 photos and information sheets stuck to pages.eltham, eltham library, panther place, shire of eltham, yarra plenty regional library