Showing 331 items
matching stations of the cross
-
 Ballarat Tramway Museum
Slide - 35mm slide/s - set of 6, Noel Simons, 28 Feb. 1972
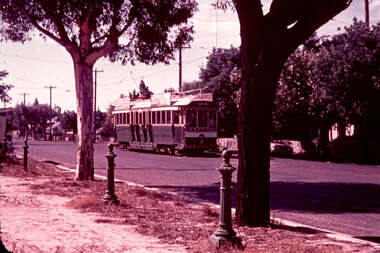
Set of 6 transparencies taken on 28/2/1972 on Kodak mounts. 1206.1 - Bendigo No. 5 at Hayes St. Loop, en route for Quarry Hill. 1206.2 - No. 5 at Garden Gully Loop, Mt. Korong road, Ironbark. en route to Quarry Hill. Note the water column in the background. 1206.3 - No. 5 in View St. Bendigo, with the Commodore Motel in the background. 1206.4 - No. 6 en route for Golden Square in Fire Station loop, with the fire station building in the background. Photo taken after tram has passed photographer. 1206.5 - No. 6 in High St., running through Golden Square Shopping Centre, en route for Golden Square. Photo taken after tram has passed photographer. 1206.6 - No. 6 arriving at Charing Cross, bound for North Bendigo, with the City Family Hotel, ANZ bank and the Cenotaph (war memorial) in the background.Information written on in blue ink and date stamped on purple ink. 1206.1 - "No. 5 at Hayes Loop, Ironbark." 1206.2 - "No. 5 at Garden Gully Loop, Mt. Korong road, Ironbark." 1206.3 - "No. 5 in View St. just after start of double track near Barnard St." 1206.4 - "No. 6 in High St. at Fire Station loop." 1206.5 - "No. 6 in High St. running through Golden Square shopping centre." 1206.6 - "No. 6 arriving at Charing Cross from Golden Square."tramways, trams, bendigo, hayes st. loop, garden gully loop, view st., golden square, charing cross, tram 5, tram 6 -
 Ballarat Tramway Museum
Slide - 35mm slide/s - set of 4, Noel Simons, Apr. 1972
Set of 4 transparencies - copy slides - possibly ARE film strip dated March 1972. 1209.2 and 1209.4 on Kodak Readymount mounts. 1209.1 - Bendigo 5, 6 and 28 on a special tram service in bound to the City on a tour in Caledonia St. about to enter Lucan St, or White Hills Road or Weeroona Ave. (mis match in names in various maps). Gas works in the background. No. 5 has a white disk on the rear of the tram. 1209.2 - Nos 2 and 26 at Charing Cross with the Fountain Plaza in the background. Both trams have the destination of Quarry Hill, though 26 is on the Eaglehawk bound track. 1209.3 - No. 19 at the Golden Square terminus, with the conductor or driver swinging the pole and Billy Rodda's Golden Square hotel in the background. 1209.4 - No. 7 at Fire Station loop, en route to North Bendigo, picking up a passenger with a pram. Part of a set of 20 slides made by the Association of Railway Enthusiast Provincial Tramways film strip. Reference Item 2560 details the ARE Film Strip and provide references to other slides.Information written on in blue ink and date stamped on purple ink. 1209.1 - "Nos 5, 6 and 28 in Caledonia St. about to enter Weeroona Ave." 1209.2 - "Nos 2 and 26 at Charing Cross." 1209.3 - "Swinging the pole on No. 19 at Golden Square Terminus." 1209.4 - "No. 7 inward bound from Golden Square stops at Fire Station Loop."tramways, trams, bendigo, charing cross, golden square, gas works, special trams, tram 2, tram 5, tram 6, tram 7, tram 19, tram 28 -
 Ballarat Tramway Museum
Slide - 35mm slide/s - set of 4, Noel Simons, Apr. 1972
Set of 4 transparencies - copy slides - possibly ARE film strip dated April 1972. 1210.3 on Kodak Readymount mount. 1210.1 - No. 3 arriving at Quarry Hill terminus. 1210.2 - Bogie car at Long Gully Loop, in the far distance, with a Hotel and the ESSO service station in between. Has Fosters Lager and Carlton signs on hotel. Note sign on the closet pole - "No standing between Notices" 1210.3 - Nos. 26 (Quarry Hill) and 25 (Eaglehawk) at Jobs Gully Loop. 1201.4 - No. 5 showing Charing Cross in bound for Charing Cross and No. 3 en route for Eaglehawk in View St. near the end of the double track. Appears to be SEC employee at the rear of No. 3. Part of a set of 20 slides made by the Association of Railway Enthusiast Provincial Tramways film strip. Reference Item 2560 details the ARE Film Strip and provide references to other slides.Information written on in blue ink and date stamped on purple ink. 1210.1 - "No. 3 arriving at Quarry Hill terminus." 1210.2 - "Bogie car at Long Gully Loop." 1210.3 - "Nos. 26 and 25 at Jobs Gully Loop." 1210.4 - "Nos 5 and 3 in View St. near the end of the double track."tramways, trams, bendigo, long gully, quarry hill, view st., tram 3, tram 5, tram 25, tram 26 -
 Ballarat Tramway Museum
Slide - 35mm slide/s set of 7, Noel Simons, 1972
... loop with ESSO service station on the right hand side. 1212.2... Cross. Tram has destination of "Rly Station". Has buildings ...Set of 7 transparencies undated on PAKON mounts - appear to be early 1970's. 1212.1 - No. 18 about to enter the Long Gully loop with ESSO service station on the right hand side. 1212.2 - No. 6 in Mitchell Street bound for Charing Cross. Tram has destination of "Rly Station". Has buildings on the east side of Mitchell St. in the background. 1212.3 - No. 7 (North Bendigo) and 29 (Golden Square) crossing. Actual location? 1212.4 - "No 6 showing 'SPECIAL' at Eaglehawk terminus. Has the Foodland store and Fruit shop in the background. 1212.5 - No. 19 at Eaglehawk terminus, on the extension to the normal Eaglehawk terminus. Tram has showing 'Eaglehawk'. Tram has two SEC roof ads. 1212.6 - No. 25 and another Bogie car at Quarry Hill terminus on last day. 1212.7 - No. 18 and 29 at Quarry Hill terminus. No.. 18 showing 'Quarry Hill' - has two SEC roof ads 'Electric Cooking - Matchless' and 'Everything's fine in my all electric kitchen' and No. 29 has a briquettes roof ad.Information typed onto a white label stuck on the slide. 1212.1 - "No. 18 at Long Gully" 1212.2 - "No. 6 in Mitchell Street." 1212.3 - "7 and 29 Lake View Hotel" 1212.4 - "No. 6 at Eaglehawk" 1212.5 - "No. 19 at Eaglehawk Term." 1212.6 - "Last cars Quarry Hill." 1212.7 - "18 & 29 Quarry Hill"tramways, trams, bendigo, long gully, mitchell st., eaglehawk, quarry hill, last tram, tram 6, tram 7, tram 18, tram 19, tram 25, tram 29 -
 Ballarat Tramway Museum
Document - Photocopies, Alan Bradley, "One Man Farebox cars, tokens and statistics of the Ballarat Tramways", 18/07/2001 12:00:00 AM
Photocopies of an article written by Bob Prentice made by Alan Bradley in relation to the use of Fare Tokens by the Electric Supply Co. of Victoria - See Reg. Item 1794. Photocopies made 18.07.2001. Photocopy of the article from his collection. Comprises three sheets stapled together in top left hand corner. Article contains details of the use of tokens, colours of discs or lights used on trams while running on the various routes, fares, sections, fare box operation, and when and where tokens were issued. Includes a photograph of Barkly St. looking South from the fire station tower. Also gives details of tokens in use, cost of manufacture from other materials (Haxite and Crystalate) and the number in circulation. Has copy of an advertisement for the Southern Cross Hotel, S.A. Brabner, Proprietor, notes that all trams STOP. See Reg. Item 2514 for H.P. James notes on the token system.Parts of letter have been highlighted by Alan re tokens and other interesting points.trams, tramways, tokens, fares, tickets, esco, southern cross hotel, costs -
 Ballarat Tramway Museum
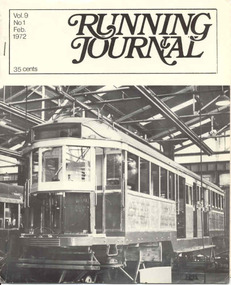
Magazine, Tramway Museum Society of Victoria (TMSV), "Running Journal Vol 9, No. 1, Feb. 1972", Feb. 1972
Demonstrates aspects of publication of material in an enthusiast based magazine for a Melbourne based organisation, with a detailed article on the overhaul of trams at Preston workshops for Melbourne.Feb. 1972 issue of "Running Journal", consisting of formally printed cover on glossy paper which has been folded, containing seven wax stencil cut, duplicated sheets, pages 3 to 16. Published by the Tramway Museum Society of Victoria. Sheets have been stapled into the folded covers. See condition notes also. Cover has W2 277 undergoing a "O2" overhaul at Preston workshops Page 2 - photos of 928, 733 and 921 undergoing various overhaul stages Pages 3 to 9 - article by Norm Cross on MMTB tramcar overhauls at Preston Workshops Page 9 - News from Ballarat (BTPS - foundations for new shed) Page 10 - 11 - Tramway Quiz Page 12 - 14 - TMSV Museum news (muses) Page 15 - Answers to quiz Page 16 - Back issues of Running Journal Page 17 - Photos of 980 and Museum activities Page 18 (back cover) - 18 in Sturt St., July 1970, Ballarat 18 - in Vickers St. Sebastopol shed, trams 31, 30 and 32 stored at the SEC Ballarat North Power station grounds awaiting transport, in October 1971 and MMTB 469 arriving as the last Footscray tram. Loose sheet - duplicated, advertising, Last Mail Covers - Bendigo Tramways, prior to closure on 16/4/1972. Second copy ex ARHS 9/2003 added 21/09/2006. 3rd copy added 28/10/2007, ex Graeme Breydon Collection.Has Graeme Breydon address stamp on front cover.trams, tramways, tmsv, running journal, ballarat, overhauls, preston, mmtb -
 Ballarat Tramway Museum
Photograph - B&W print of donated negative, Ron E. Fluck, 2/01/1959 12:00:00 AM
Black and white print of a donated negative. Print made 8/1998. Photo of SEC bogie tram 35, north bound in Lydiard St. North, about to cross the railway level crossing. Has the signal gantry in the background with part of the railway gates and Kennedy Murray Pty Ltd. General Carriers building in the background as well. Photo taken 2-1-1959. High Res scan of copy negative added 17/1/2019tramways, trams, railway station, lydiard st. north, ballarat, tram 35 -
 Ballarat Tramway Museum
Slide - 35mm slide/s - set of 13, Peter Moses, 1974
Set of 13 colour slides, 7 on Kodak cardboard mounts and 6 on Agfa colour plastic mounts. .1 - Bendigo Trust, Birney trams 28 and 30 at Central Deborah Mine terminus. No. 30 has a 3BO Roof advertisement. .2 - ditto .3 - ditto with the Central Deborah mine and buildings in the background. .4 - No. 30 inbound in High St. with Sacred Heart Cathedral in the background (spire under construction) .5 - Nos. 30 and 28 crossing at Charing Cross with the Fountain Plaza building and the fountain in the background. .6 - No. 28 north bound in Pall Mall, after leaving Charing Cross with the Shamrock Hotel in the background. .7 - Photo showing track and centre poles in View St. looking west - no overhead. Has AMOCO service station near McKenzie St. .8 - No. 28 taken from cab of No. 30, in McCrae St, at end of double track. .9 - No. 28 turning from McCrae St. into Nolan St. .10 - No. 28 in Nolan St. with Lake Weeroona rowing sheds in the background. .11 - No. 19 in now Tramway Ave (then Arnold St.) running into depot .12 - No. 19 outside Bendigo depot .13 - ditto Slides taken by Peter Moses, during the winter of 1974 (no leaves on the trees).On the rear of all the slides "P. Moses" in black ink. .1 - "1974 Bendigo Central Deborah Mine" in blue ink and in red ink “16”. .2 - "1974 Bendigo two Birney cars / Central Deborah Mine" in blue ink and in red ink “18”. .3 - "1974 Bendigo trams at Central Deborah Mine" in blue ink and in red ink “17”. .4 - "1974 Bendigo High St / tram near Sacred Hearth Cathedral" in blue ink and in red ink “15”. .5 - "1974 Bendigo two Birney cars / Charing Cross" in blue ink and in red ink “20”. .6 - "1974 Bendigo No. 28 Pall Mall" in blue ink and in red ink “8”. .7 - "1974 Bendigo / Old Tramline View St." in black ink and in red ink “5”. .8 - "1974 Bendigo, McRae St. (Pall Mall)" and in red ink "9". .9 - "1974 Bendigo, Lake Weeroona, / tram " and in red ink "10". .10 - "1974 Bendigo, Lake Weeroona" and in red ink “11”. .11 - "1974 Bendigo / Outside depot" and in red ink “24”. .12 - "1974 Bendigo / Outside depot" and in red ink “25”. .13 - "1974 Bendigo / Depot" and in red ink “26”.tramways, trams, bendigo, central deborah, bendigo trust, sacred hearth cathedral, north bendigo, depot, tram 19, tram 28, tram 30 -
 Ballarat Tramway Museum
Photograph - Colour Photograph/s, Jim Seletto, c1960
Colour Photograph of SEC tram No. 11, prior to fitting of dash Canopy lighting, c1960, at the intersection of Bridge and Main Streets. Tram No. 11 is arriving from Victoria St. and is about to cross the junction with the Mt. Pleasant line. Trams stops are visible on poles, as is the overhead arrangement, shops on both sides. Tram has large reflective triangles on cab front. Caltex service station sign on right side of photograph. On pole with tram stop sign is a sign with the Olympic rings, pointing way to Lake Wendouree.ballarat, bridge st, victoria st, olympics, tram 11 -
 Ballarat Tramway Museum
Photograph - Colour Photograph/s, Travis Jeffrey, 14/08/1971 12:00:00 AM
Colour photograph of Ballarat No.37 northbound in Lydiard St. North in Seymour St. loop, waiting to cross a southbound tram. Photo taken from southbound tramcar. No. 37 has destination Lydiard St. Nth. In the background is the Railway station precinct and houses on the west side of Lydiard St. North. Photo on Agfa Paper and taken on Friday 14 August 1971.Stamps with faded green ink: "Photo by Chris Jeffrey / Number" with number "104PC/08" in blue ink and date stamp "Friday 14 August 1971" also in faded green ink.lydiard st nth., seymour st loop, tram 37 -
 Ballarat Tramway Museum
Slide - 35mm slide/s - set of 8, Carolyn Dean, 24/09/1970 12:00:00 AM
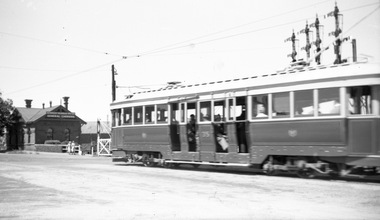
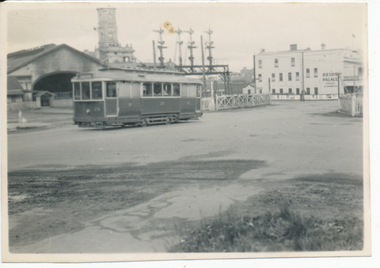
Set of photographs of operations, near the central area, in particular Charing Cross.Set of 13 Kodak slides, white cardboard of Bendigo trams. Taken 24.9.1970 by Carolyn Dean. .1 - "1" - No. 5 enroute to Eaglehawk passing former poppet head. .2 - "2" - Possibly No. 4 enroute to Eaglehawk - side on view (same ads shown on .4) .3 - "3" - View looking down onto Charing Cross from North East corner with single truck and Bogie car arriving. Has Ezywalkin, Maples and the Beehive buildings in the background. .4 - "7" - No 4, with destination of Eaglehawk, Mitchell St, near end of double track, with Shell Service station alongside. .5 - "8" - Alexandria Fountain, Charing Cross, with bogie tram behind. Has the Ezywalkin and The Beehive buildings in the view as well. .6 - "9" - No. 6 arriving at Charing Cross. Has the Ezywalkin and The Beehive buildings in the view as well. .7 - "10" - Bogie tram and single trucker at Charing Cross. Has the Ezywalkin and The Beehive buildings in the view as well. .8 - "11" - No. 7 departing ditto. Has the Ezywalkin and The Beehive buildings in the view as well. .Each slide has in corner a number in pencil and the first one the date of "24-9-70".tramways, trams, bendigo, charing cross, mitchell st, eaglehawk, tram 5, tram 4, tram 6, tram 7 -
 Ballarat Tramway Museum
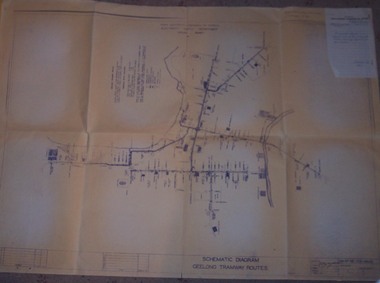
Drawing, State Electricity Commission of Victoria (SECV), "Schematic Diagram Geelong Tramway Routes", 1953
The drawing is very detailed showing streets, cross streets, route, loops, schools, woollen mills, ovals, sections, track phones, stops, route and track miles, pedestrian crossings, railway stations and notes on through route mileages.Print of a drawing showing in very good detail, the schematic layout of the Geelong Tram system. Produced in 1953 and sent to Tramway Supt. in 1970 for his records. Gives very detailed information on another SEC tramway system.Dyeline print of SEC Drawing No. GE-T13-8829, titled "Schematic Diagram Geelong Tramway Routes". Drawing prepared 27/8/1953. Stapled to the top right hand corner of the sheet is a SEC memo form from finance section, distribution services to the Dept. Tramway Superintendent, Ballarat, dated 6-2-1970 forwarding Les Denmead the plan. Was unstapled during the 1/2008 copying of the drawing. On top right hand corner of drawing, "Ballarat Tramway Preservation Society Catalogue No. 605" in ink and on rear in two places "Geelong Tramways" and one "BTPS 605"geelong, map, track layout, tram stops -
 Ballarat Tramway Museum
Photograph - Black & White Photograph/s, J. L. Southern Collection, late 1960's?
Demonstrates an aspect of Ballarat where trams crossed the railway level crossing in Lydiard St Nth.Black and White photograph of No. 39, north bound in Lydiard St Nth, mid 1960s, crossing railway level crossing. Tram has SEC roof advertisement of "Electric Cooking" and destination of Lydiard St Nth. Note the two numbers on the front of the tram - see also reg item 3601 for a 1969 photograph in the same location. Moody's Provincial Hotel in the background and the railway level crossing. in pencil on back "04381003"tramways, trams, railway station, level crossings, lydiard st nth, provincial hotel, tram 39 -
 Ballarat Tramway Museum
Photograph - Colour Photograph/s, John Stormont, 3/03/1968 12:00:00 AM
Demonstrates an aspect of Ballarat where trams crossed the railway level crossing in Lydiard St Nth.Colour photograph of SEC No. 11 crossing the railway level crossing Ballarat southbound in Lydiard St Nth. Shows the railway station building, the signal gantry and crossing gates. No. 11 has destination of Sebastopol, a Twin Lakes advertisement on the rear and a roof advertisement for SEC Briquettes. Photo taken 3-3-1968. On Kodak Paper. Photo by John Stormont.On rear, written on a label in ink "Car 11crossing tracks at Ballarat Station, 3 March 1968" and on the photo "John Stormont"level crossings, railway station, lydiard st nth, tram 11 -
 Ballarat Tramway Museum
Photograph - Black & White Photograph/s, c1915?
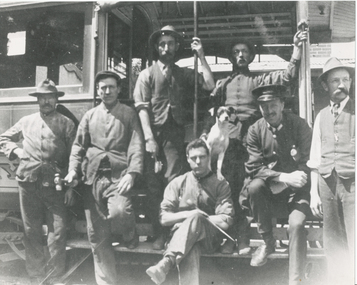
Has a strong association with the ESCo tram and power station staff, c1920? Published detail provides some names of the men photographed. Shows the style of clothing, the equipment used and details of the power station office building.Black and White copy photograph of some of the ESCo tram depot staff and one uniformed crew member, alongside an ESCo tram. Shows the details of the interior of the tram ceiling. See page 50 of The Golden City and its Tramways and for the photo itself. Gives some names of the people in the photograph. From the photo caption in the book: Extreme left is Bill Morgan, Harry Foy, Sy Barker, Robert Haines.tramways, trams, esco, staff, depot, cross bench tram -
 Ballarat Tramway Museum
Postcard, Ron Scholten, Bogie car at Railway Level crossing
Colour photograph, printed on a postcard back format of SEC Ballarat of No. 34? in bound in Lydiard St North about to cross the railway level crossing, with the Ballarat Railway Station and signals in the background. Note the very dirty end of the station canopy.trams, tramways, lydiard st nth, railway station, railway crossing, tram 33 -
 Ballarat Tramway Museum
Slide - 35mm slide/s, Travis Jeffrey, late 1960's or early 1970's
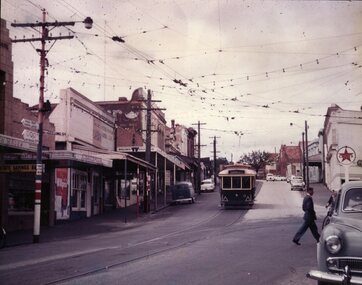
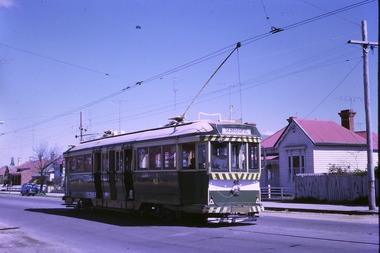
Agfa plastic mount (blue base, white cover) with a photo of Bendigo No. 19 in Pall Mall, nearing Charing Cross. Tram has the destination of Golden Square Photo taken late 1960's early 1970's. Photo has the Beehive, the Shamrock Hotel in the background. Radio station 3BO can be seen on the Beehive building. No. 19 has two SEC roof advertisements. Note the point bar on the pole on the right hand side of the photograph."BES 35" in penciltramways, trams, bendigo, pall mall, beehive building, tram 19 -
 Ballarat Tramway Museum
Photograph - Digital image Set of 20, Dec. 1970
Set of 20 digital images of Bendigo Tramways December 1970 by Stuart Lodington. .1 - Bendigo track gang renewing a joint, McCrae St, with welding truck alongside and Birney No. 29. .2 - No. 5 at Quarry Hill terminus? .3 - No. 24 at the depot .4 - No. 2 on the Quarry Hill line .5 - No. 5 approaching the Eaglehawk terminus .6 - No. 29? at the Golden Square Terminus with Bill Rodda's Golden Square hotel in the background. .7 - No. 3 inbound on the Quarry Hill line. .8 - trams crossing on the Eaglehawk line, through the window of one tram. .9 - side on view of a B23D controller in a bogie tram .10 - No. 5 at the Eaglehawk terminus .11 - No. 21 at No. 21 crossing on the Golden Square line. No. 29 showing special, No.21 - North Bendigo, Fire Station Loop? .12 - No. 29 and another tram - near work site? .13 - interior view from Birney looking at the front of another tram parked behind. .14 - No. 29, No. 6 crossing at .15 - No. 6, showing special at Charing Cross. .16 - No. 5 and another tram at North Bendigo on a Special .17 - No. 28 at Charing Cross .18 - No. 5 on Special at a Loop on the Eaglehawk line .19 - No. 28, and two other trams at the Myrtle St Loop .20 - No. 18 showing Quarry Hill and two other trams on View St.trams, tramways, bendigo, trackwork, mccrae st, depot, quarry hill, eaglehawk, golden square, controllers, north bendigo, view st, tram 29, tram 5, tram 24, tram 2, tram 3, tram 6, tram 28, tram 18 -
 Ballarat Tramway Museum
Photograph - Digital image Set of 20, 9/12/1972 12:00:00 AM
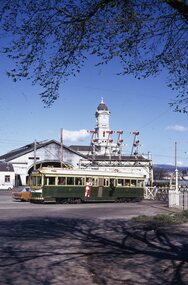
Set of 21 digital images of Bendigo Tramways, at the re-opening of the Bendigo tramways by the Bendigo Trust on 9/12/1972by Stuart Lodington. All trams in the first Bendigo Trust colours. .1 - No. 25 with Gas and Myer roof advertisements .2 - No. 30 with 3BO roof advert and a BP service station in the background. .3 - SEC single trucker at the Mine with a large "Tram Tours" sign on the front of the tram .4 - ditto .5 - No. 19 with a large group of passengers, Bendigo Motor Co and Sandhurst roof advertisements .6 - No. 30 in McCrae St .7 - view of opening march with band .8 - No. 19 in opening parade .9 - Opening Parade in High St with cathedral in the background .10 - No. 30 in Nolan St crossing bridge .11 - ditto .12 - No. 25 at the mine .13 - No. 30 leaving the mine .14 - No. 30 ditto with BCTV roof advert. .15 - Charing Cross with cenotaph, The Beehive building and Ezywalkin shoes and Coca Cola adverts .16 - No. 19 southbound in High St with City Centre Motel building in the background. .17 - No. 30 returning from North Bendigo .18 - No 25 in High St after leaving Gold Mine .19 - No. 30 at the Mine .20 - No. 30 in Nolan St .21 - No. 30 with 3BO roof advert and a BP service station in the background.trams, tramways, bendigo, north bendigo, charing cross, bendigo trust, central deborah, tram 25, tram 30, tram 19 -
 Ballarat Tramway Museum
Slide - 35mm slide/s - set of 4, Campbell Duncan, 1971 or 1972
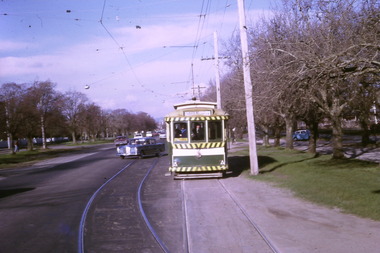
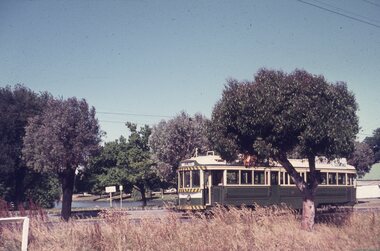
Set of four colour slide on Agfacolour - black and white plastic mounts. .1 - Bendigo No. 3 on a Quarry Hill service .2 - Bendigo No. 5, in High St Eaglehawk, inbound to Quarry Hill. Has a former Masonic Hall? in the background - now part of the Eaglehawk Primary School. .3. - Bendigo 26, en route to Quarry Hill, on Quarry hill line? with a BP service station in the background. .4 - Bendigo 5, descending View St to Charing Cross.tramways, trams, bendigo, quarry hill, eaglehawk, view st, tram 3, tram 5, tram 26 -
 Ballarat Tramway Museum
Slide - 35mm slide/s - set of 6, Campbell Duncan, 19/09/1971 12:00:00 AM
Yields information about the operations of the Ballarat Tramway system on the last day of SEC tramway operations in Ballarat.Set of 6 Kodak - Kodachrome slides - cardboard mounts - all taken on 19/9/1971, last day of operations prior to closure of the SEC operated tramway. .1 - Tram 40, waits at the level crossing gates - the gates are being opened. In the background is the station building and the signal gantry. Tram has the destination of Sebastopol. .2 - No. 42, with destination of Lydiard St north, northbound in Lydiard St, with railway station buildings and VRI in the background. .3 - No. 35 on inbound, Lydiard St North. .4 - No. 35, on inbound service, leaving Skipton St loop with another bogie in the background. .5 - No. 39 on inbound service, Albert St Sebastopol with the Sebastopol boundary sign and Binks Ford in the background. Tram has an everything under control in my all electric kitchen roof advert. .6 - No. 42, with destination of Sebastopol, Albert St Sebastopol.In ink on slide: .1 - Sun 19 Sept 71 - up Lydiard St Nth waits for gates to be opened after fast goods. .2 - Sun 19 Sept 1971, down Lydiard St Nth near VRI. .3 - Sun 19 Sept 1971, Up Lydiard St Nth .4 - Sun 19 Sept 1971, Up Sebastopol (supplementary service) has just crossed down in Skipton St near Drummond St. .5 - Sun 19 Sept 1971, Up Sebas at Ballarat / Sebastopol boundary. .6 - Sun 19 Sept 1971, c5.30pm down Sebas in Sebas shire.tramways, trams, lydiard st nth, railway station, level crossings, skipton st, albert st, sebastopol, closure, last day, tram 40, tram 42, tram 35, tram 39 -
 Ballarat Tramway Museum
Photograph - Digital image, Wal Jack, 6/06/1953 12:00:00 AM
Yields information the appearance of No. 25 and the Ballarat railway station precinct in the early 1950's.Digital image from the Wal Jack Ballarat Album of No 25 in bound in Lydiard St North, about to cross the railway tracks at Ballarat Railway station, has Reids Coffee Palace and the railway station in the background. Photo by Wal Jack 6-6-1953. Wal's album notes say tram has two aussie flags on roof. See image i2 for rear of photograph. See image i3 for hi res scan of print. See image i4 for hi res scan of negativeOn rear in ink "SEC Ballarat No. 25 with two aussie flags on roof, Lydiard St North 6-6-53" In top right hand corner is Wal Jack stamp with number T900. written in.trams, tramways, lydiard st north, railway station, level crossings, tram 25 -
 Ballarat Tramway Museum
Photograph - Black & White Photograph/s, Lydidard St level crossing and a picnic train, c1905 to 1906
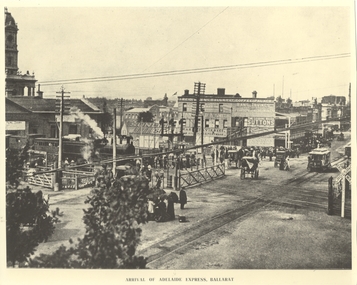
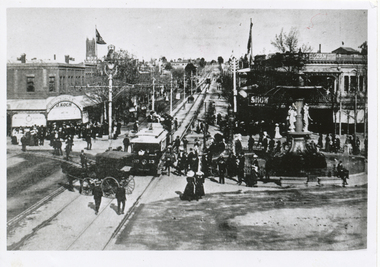
Yields information about the Lydiard St level crossing.Black and white photograph of No. ESCo No. 10 about to cross the Lydiard St level crossing. Photo has the title of "Arrival of Adelaide Express, Ballarat", which is not correct for the trains consist - more like a picnic special - this photo has been written up somewhere. D class loco, with two six wheel carriages behind the locomotive. Group of women with umbrellas (sun) waiting for the tram. Horse drawn carts, interlocked gates, signals prior to resignalling of the post and railway level crossing signs. In the background is Reids Coffee Palace, advertising Sunlight soap, Suttons Music, Pearson's Hard soap, Hans Irvines Champion Wines and Standard & Smith.trams, tramways, railway station, lydiard st north, reids coffee palace, esco, tram 10 -
 Ballarat Tramway Museum
Photograph - Digital image Set of 10, Tony Smith, 1971
Yields information about Ballarat Tramways and trams prior to the closure of the tramway system.Set of 10 digital images of Ballarat trams prior to closure, scanned from original slides by Tony Smith, 1971 prior to closure of the system. .1 - 13 at the Parker St loop, Sturt St west waiting for another tram to arrive - Mercedes Benz car pull out around the stationary tramcar. .2 - 13 and another single trucker at the City terminus, north side of Sturt St. Note the conductor in the distance with a point bar about to hop onto the tram turning into Lydiard St North. Has the Post Office in the background. .3 - 26 arriving at the City stop, with the Mechanics Institute and Cooks Provide Hotel in the background. Tram has destination of Gardens via Drummond St North. .4 - 33 and 12 in Lydiard St Nth at Sturt St. 33 (Lydiard St Nth), 12 (Sebastopol). Has the post office and other buildings in the background .5 - 12 and 26 at city stop, south side with Town Hall and Myers in the background. 12 has destination of Sebastopol. .6 - 12 at intersection of Drummond St and Sturt St with Mobil petrol station in background and ad for Marshall batteries. Has the tram stop sign on the left hand side. Tram has destination of Sebastopol and a Twin Lakes sign. .7 - 30 northbound in Drummond St south at Sturt St about to turn into Sturt St. Has destination of Lydiard St Nth. Has the Southern Cross hotel in the background. .8 - 31 turning from Drummond St North into Sturt St, en route to Victoria St with the Shell service station in the background. Hospital Corner. Tram has roof advertisements for Johnnie Walker whisky. .9 - 30 and 31 (from above photos) in Sturt St. .10 - Tony Smith standing on the doorstep of 26 at Mt Pleasant terminus. Has the store in the background with The Sun and Robur tea adverts. trams, tramways, parker st loop, sturt st west, sturt st, conductors, drummond st, hospital corner, mt pleasant, tram 13, tram 26, tram 12, tram 30, tram 33 -
 Ballarat Tramway Museum
Photograph - Digital image Set of 10, Tony Smith, 19/09/1971 12:00:00 AM
Yields information about Ballarat Tramways and trams prior to the closure of the tramway system.Set of 10 digital images of Ballarat trams prior to closure, scanned from original slides by Tony Smith, 1971 prior to closure of the system. This set of slides appears to be the last day of operations - 19/9/1971 .1 - 40 in Drummond St Nth. near Macarthur St, showing Sebastopol. .2 - 35 turning from Drummond St north into Sturt St with the Southern Cross hotel in the background. Note the shoes in the overhead. .3 - 42 in Drummond St North, showing Special, nearing Sturt St. .4 - 42 turning into Sturt St, with the Shell Service station on the left. .5 - 42 reversing on the Lydiard St Nth crossover with the post office in the background. Tram showing Sebastopol. .6 - 39 reversing at Grenville St, tram showing Special. Has the Dickins and the Gasometer in the background. the conductor adjusting the trolley ropes. .7 - 39 running from Bridge St into Sturt St - as above. .8 - 34 and 39? parked in the City Loop. Has Patersons furniture, Gear Chemist and Edments stores in the background. .9 - 43 showing special at the Sturt and Lydiard St stop with 39? about to leave Lydiard St Nth. Has the post office in the background. .10 - 40 at the Lydiard St North terminus, with passengers boarding. Cemetery gates in the background.trams, tramways, drummond st nth, macarthur st, sturt st, closure, lydiard st nth, grenville st, city loop, closure, tram 40, tram 35, tram 42, tram 39, tram 34 -
 Ballarat Tramway Museum
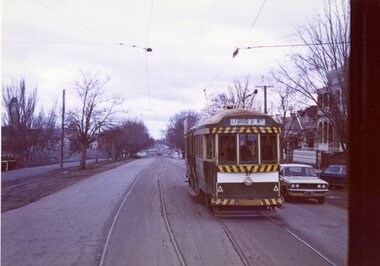
Slide - 35mm slide/s - set of 7, Eldon Hogan, Aug. 1964
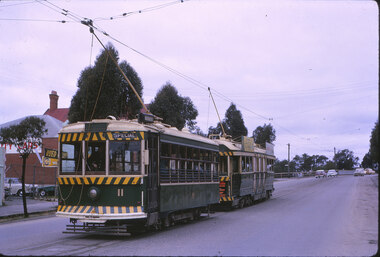
... Railway Station Eaglehawk Charing Cross Birney tram 11 tram 20 Set ...Set of seven Kodak cardboard mounted slides - featuring photos taken during a visit to Bendigo by Eldon Hogan. Slides have slide number (26 to 32) and date "Aug 64" stamped onto them. Possibly a Xavier College Cadets tour - Eldon was involved with them at the time, given slide No. 27. Scanned on the Canon scanner at the depot 15/12/1971 at the time of the installation of the scanner. .1 - No 11 and a bogie car at the Railway Station .2 - ditto - note uniformed person boarding (Xavier College Cadet?) .3 - No. 11 at Charing Cross, showing "special" .4 - No. 11 bound for Eaglehawk at a Crossing loop .5 - No. 20 in bound for Quarry Hill - at the above crossing loop? .6 - No. 11 crossing the Eaglehawk / Swan Hill railway line at the overbridge. .7 - No. 11, High St Eaglehawk.tramways, trams, bendigo, railway station, eaglehawk, charing cross, birney, tram 11, tram 20 -
 Ballarat Tramway Museum
Slide - 35mm slide/s - set of 11, Eldon Hogan, mid 1960's to early 1970's
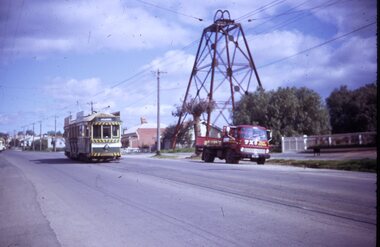
Set of 11 Agfa Plastic mounted slides - from the Eldon Hogan collection - possibly on an ARE Bendigo tours - mid 1960's (black destination rolls) and late 1960's or early 1970's. Scanned on the Canon scanner at the depot 15/12/1971 at the time of the installation of the scanner. .1 - No 18 with Lake Weeroona in the background - possibly at the same time as the tour with No. 18, though showing destination of Charing Cross. .2 - ditto .3 - No. 25 and two following trams on a special tour, note the white disc - Quarry Hill line? .4 - No. 29 on the Eaglehawk line at the Mt. Korong Road and the Calder Highway, with the Ampol Service station in the background. .5 - No. 29 passing Lake Weeroona with Destination of Nth Bendigo - has a Briquettes Roof Advertisement., .6 - No. 26 ditto - with two SEC Roof Advertisements. .7 - No. 24 leaving Charing Cross for Golden Square with The Beehive building, Ezywalkin, Coca Cola and the Fountain Shopping Centre in the background. .8 - No. 29 and a bogie tram at the Golden Square terminus with Golden Square Hotel and Victoria Bitter fence in the background. No. 29 has a SEC Briquettes roof advertisement. .9 - No. 29, with the Cathedral in background. Tram has a SEC Briquettes roof advertisement and destination of Golden Square. .10 - side view of a bogie tram on the Eaglehawk line? Tram has a Electric cooking roof advertisement. Photo has been over exposed. .11 - Single trucker, Violet St with the Central Deborah mine head in the background. Tram has two SEC Electric Cooking roof advertisements. tramways, trams, bendigo, lake weeroona, eaglehawk, golden square, charing cross, central deborah, tram 18, tram 25, tram 29, tram 24 -
 Ballarat Tramway Museum
Photograph - Black & White Photograph/s, The Bendigonian, Sep. 2005
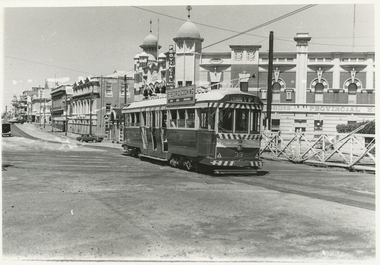
Black and White copy print contained within the Wal Jack Bendigo and Geelong Album, see Reg Item 5003 for more details. Photo of looking east along Mitchell St towards the Railway Station with tram No. 13 and a double deck trailer - has the centre poles along Mitchell St. in the photograph. In the background is a J. Koch and the Bendigo Supply Stores. Has fountain in photograph. Copied by Keith Kings from The Bendigonian 19/9/1905. On rear in ink " SA782, Bendigo, No. 13 - 3 window saloon Charing Cross. Note:- Crossover in Mitchell St.". Copied ex "The Bendigonian 19/9/1905."trams, tramways, bendigo, charing cross, horse trams, mitchell st -
 Otway Districts Historical Society
Photograph, R. Preston, Kawarren: Down goods with G42 shunting, 1955, 14 December 1955
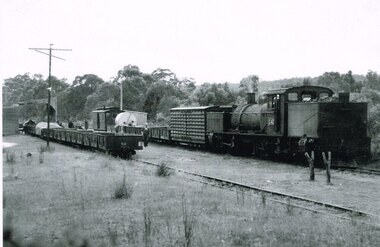
Originally known as Loves River it became Kawarren station on 16 June 1902. It consisted of a loop siding and combined office and passenger shelter. Goods loading was sawn timber (brought in on four tramways operating between 1905 and 1939), firewood, charcoal and limestone. In 1920 the limestone company built a store shed and a covered loading area at the terminus to assist operations. The company also requested the siding to be extended by three metres, which Victorian Railways did in the same year. This gave the loop a capacity of 21 trucks. Around 2,000 tonnes per year of limestone traffic kept the station busy until trade ceased in 1957. A postal motor started in October 1938, Kawarren being a point where the postal motor and trains were permitted to cross.B/W. G42 with a Down goods train at Kawarren on 14 December 1955. On No.2 Road empty NQR wagons proceeding to get filled at a covered lime loading operation. A three workmen are checking aspects of the train while a group appear to be clustered at the guard's van around an NKS motor trolley.kawarren; railways; limestone; timber; charcoal; -
 Bendigo Historical Society Inc.
Book - BENDIGO: VICTORIA'S GOLDEN CITY
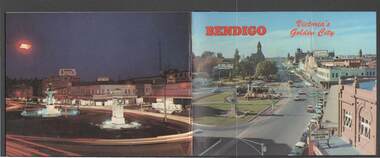
Coloured booklet of various scenes and buildings in and around Bendigo, titled Bendigo Victoria's Golden City. The front cover has a scene of Charing Cross looking towards Pall Mall. Inside the front cover is a very brief history and some Historical Buildings are mentioned. They are: Fortuna, Shamrock Hotel, Gold Mines Hotel, City Hall, Post Office, Law Courts, the Home for the Aged, Sacred Heart Cathedral, St. Paul's, Specimen Cottage, Log Lock-up and the Chinese Joss House. The coloured pictures inside are: The Central Deborah Gold Mine, Fortuna, Miner's Cottage, The Gold Mines Hotel, Victoria Hill, Bendigo Law Courts, Eaglehawk Log Lock-up, Look-out Tower Rosalind Park, Alexandra Fountain - Charing Cross, Conservatory Gardens with Law Courts in background, Inside the Conservatory, Bendigo Home & Hospital for the Aged - Victoria's 'White House', Sacred Heart Cathedral, Chinese Joss House, Chinese Joss House - Interior of the Main Temple, Bendigo Pottery - Potter at work, Bendigo Municipal Offices, Bendigo Institute of Technology at Flora Hill, Mt. Alvernia Hospital, Cobb & Co Coach, R Class Locomotive, Bendigo Tramcar, Lake Weeroona and Lake Eppalock Pumping Station. Some more attractions are mentioned inside the back cover. On the back cover is the Cenotaph - the only scale replica of the Whitehall Cenotaph - and Alexandra Fountain by night.Nucolorvue Productions Pty Ltdbendigo, tourism, photographs of bendigo icons, bendigo - victoria's golden city, fortuna, shamrock hotel, gold mines hotel, city hall, post office, law courts, home for the aged, victoria's 'white house', sacred heart cathedral, st paul's, specimen cottage, log lock-up, chinese joss house, charing cross, cenotaph, alexandra fountain, centra deborah gold mine, army cartographic unit, miner's cottage, harvey town, victoria hill, look-out tower rosalind park, conservatory gardens, conservatory, bendigo pottery, bendigo municipal offices, bendigo institute of technology, mt alvernia hospital, cobb & co coach, r class locomotive, bendigo railway station, bendigo tramcar, lake weeroona, lake eppalock pumping station, art gallery, historical museum eaglehawk, melville's caves, whitehall cenotaph, nucolorvue productins pty ltd, national library of australia