Showing 1030 items matching "steering"
-
 Flagstaff Hill Maritime Museum and Village
Equipment - Ships' Telegraph section, Milne Brothers, Copper and Brass Works, Early-to mid-20th century
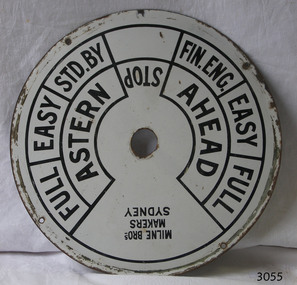
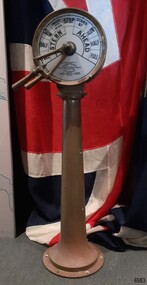
This Engine Room section of a ship's telegraph system was part of the equipment of the Ports and Harbour ship the SS Rip. The vessel serviced and maintained the lights and buoys at Port Phillip Bay and Queenscliffe. The SS Rip was possibly the former gunboat "Albert". The ship’s communication system that was used from the late 19th century to early-to-mid-20th-century is called an Engine Order Telegraph (E.O.T.) or ship’s telegraph. The system has two parts, the Bridge Section and the Engine Room Section. The Bridge Section is usually mounted on top of a pedestal, and the Engine Room Section is often attached to a vertical surface. The standard commands printed or stamped onto the dial are the directions of AHEAD and ASTERN, and the speeds of STOP, FULL, EASY, STD. BY. and FIN. ENG. The ship’s pilot on the Bridge of a vessel sends his Orders for speed and direction to the to the Engine Room with the E.O.T. He moves the lever or levers, depending on the number of engines the ship has, to change the indicator on the Bridge Section’s dial to point in the new direction and speed of travel. This change causes the Orders to be duplicated on the Engine Room Section’s dial and a bell to signal the change simultaneously. The engineer then adjusts the ship’s engines and steering equipment to follow the pilot’s Order. The manufacturer, Mulne Bros., was a copper and brass works at 166 Sussex Street Sydney, in December 1892, and previously from 1870 at 128 to 130 Sussex Street. The company made and sold a wide range of equipment including machinery and gauges for the Railways.The Engine Room section is significant for being part of the communications system on the ship SS Rip, owned by Melbourne's Ports & Harbours department and used to service and maintain the navigation signals of Port Phillip Bay and at Queenscliffe in the mid-20th century. The dial is an example of marine equipment made in Australia and used for the safety of Victorian vessels. It is also significant for being made by an early Australian manufacturer, Milne Brothers of Sydney.Engine Room Section of a ship’s telegraph or Engine Order Telegraph (E.O.T.). The round metal dial has inscriptions stamped around the edges. The inscriptions are nautical terms for direction and speed and include the maker’s details. The dial was made by Milne Bros. of Sydney. It was part of the equipment on the "SS Rip" in Victoria.Black paint around dial: "MILNE BROS. / MAKERS / SYDNEY" "FULL EASY STD. BY " "FIN ENG. EASY FULL" ""ASTERN" "STOP" "AHEAD"flagstaff hill, warrnambool, maritime museum, maritime village, great ocean road, shipwreck coast, marine technology, marine communications, engine order telegraph, e.o.t., ship’s telegraph, bridge section, engine room section, ship’s engine telegraph section, marine telegraph, milne bros., milne brothers, sydney, copper and brass works, ports & harbours ship, ss rip, gunboat albert, service ship, maintenance ship -
 Federation University Historical Collection
Document - Document - Correspondence, VIOSH: Letter inviting Derek Woolley to the meeting of the Tertiary Institutions Co-Ordinating Committee at Ballarat C.A.E., 1986
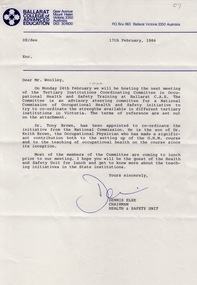
Victorian Institute of Occupational Safety and Health (VIOSH) Australia is the Asia-Pacific centre for teaching and research in occupational health and safety (OHS) and is known as one of Australia's leaders on the field. VIOSH has a global reputation for its innovative approach within the field of OHS management. VIOSH had its first intake of students in 1979. At that time the Institution was known as the Ballarat College of Advanced Education. In 1990 it became known as Ballarat University College, then in 1994 as University of Ballarat. It was 2014 that it became Federation University. VIOSH Australia students are safety managers, senior advisors and experienced OHS professionals. They come from all over Australia and industry. Students are taught active research and enquiry; rather than textbook learning and a one-size fits all approach. VIOSH accepts people into the Graduate Diploma of Occupational Hazard Management who have no undergraduate degree - on the basis of extensive work experience and knowledge. The letter details the hosting of the Tertiary Institutions Coordinating Committee to be held in Ballarat. The Committee is an advisory steering committee for a National Commission of Occupational Health and Safety initiative to try to co-ordinate the strengths available in different tertiary institutions in Victoria. Dr Tony Brown has been appointed to co-ordinate the initiative. He is the son of Dr Keith Brown, Occupational Physician at Ballarat and been a significant member in developing and teaching the course in OHM.Three pages type written. Letter with letterhead of BCAE. Two different printsLetterhead and signature of Dennis Else - Chairmanviosh, victorian institute of occupational safety and health, ballarat college of advanced education, tertiary institutions co-ordinating committee, national commission of occupational health and safety, dr tony brown, co-ordinator, dr keith brown, occupational physician -
 Trafalgar Holden Museum
Vehicle - VY Acclaim sedan, 2002
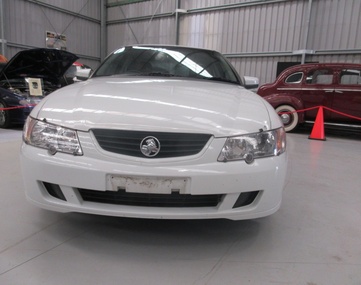
The front and rear of the body had minor restyling, with new front grille, headlights and taillights. The interior has been significantly upgraded. Interior upgrade includes a new instrument panel, centre console and steering wheel and new design transmission lever and handbrake.[2] There is also a new mobile phone power outlet under the centre console. The new instrument cluster features a large multi-function digital display (single or triple-window, depending on model), which displays information such as radio station display, PRND321 gear selected indicator, trip computer with stopwatch function, service reminders and a help facility. Standard features (on some models) now include "twilight sentinel" - automatic headlamp control, programmable headlamps off time delay, high feature Blaupunkt audio systems, road-speed sensitive intermittent wipers and passenger airbags. The VY Series II update added cruise control, front power windows variable front seat lumbar support, and revised interior trims. A 245 kW (329 hp) V8 was introduced to sports variants and a sportier repositioning of the Calais model. This repositioning included a subtle body kit, the option of a 235 kW V8 in place of the previous 225 kW (302 hp) and a firmer suspension tune (known as FE 1.5) that was not as stiff as the FE2 suspension on sports variants. Released in September 2002 and produced until August 2004 (with a Series II released in August 2003), the VY series was the first major design departure (both inside and out) of the third generation Commodore range released in August 1997. It launched at the same time as the Ford Falcon (BA).VY Holden 4 door sedan white paint with grey fabric upholsteryLion and stone emblem grille centre, V6 badge on mudguards, Commodore badge on boot LHS, Lion and stone badge on boot centre, Acclaim badge RHS of boot lidvehicle, commodore, car -
 Bendigo Historical Society Inc.
Document - BENDIGO SALEYARDS COLLECTION: FAT CATTLE SALE BENDIGO 17/10/95
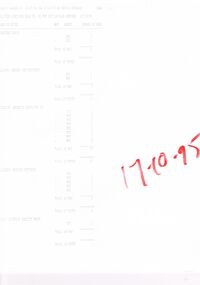
Continuous fifteen-page report and one page Statistics Report for Sale No. 82 Fat Cattle Sale Bendigo dated 17/10/95. Report issued on the 17/10/95 by Kerrie Crowley. Report lists the buyers name, and the number of head purchased each time from each agent and the total number purchased. Agents' names are abbreviated. Buyers names are: Newstead Meats, Barker Ken Butchery, Bennetts Meats Pty Ltd, Boydies Butchery, Clifford Quality Meats, Dalgety Farmers Ltd, Elders Ltd, Friswell K, RJ Gilbertson, Grefory J, Grenfell N, Hardwick GF & VC, G Harper, Highland, Maher L, Masons Meat Pty Ltd, JJ McAllister, McCasheney & Co, McGillivary GK & GV, McIvor Meats, Midfield Meat Wholesa, No Commercial Value, Newman Lilvestock Sales, Newman Lilvestock Sales N, Newman Lilvestock Sales N, Newman Lilvestock Sales 3, Newman Lilvestock Sale No, Newman Lilvestock Sales N, Oakey C/- T Newman, O'Connor G & K Pty Ltd, J H Ralph & Son, Safeway No 188, Andrew Schenk, Starr A, Top Meats, Victorian Producers C, D & K Webb, M/S K & J Wignall, RH Woodward & Co, Woodhead B, Woodward RH & Co Pty,R H Woodward & Co, Newstead Meats, Garfield, Phillip Watson and H Ford. Statistics Report lists the number of Steers, heifers, Vealer Bulls, Cows, Bulls, Cows & Calves and Total. Each has a column for Fat, Volume, Low, Average & High Price and Low, Average and High Value.bendigo, council, cattle markets, bendigo saleyards collection - fat cattle sale bendigo 17/10/95, kerrie crowley, newstead meats, barker ken butchery, bennetts meats pty ltd, boydies butchery, clifford quality meats, dalgety farmers ltd, elders ltd, friswell k, rj gilbertson, grefory j, grenfell n, hardwick gf & vc, g harper, highland, maher l, masons meat pty ltd, jj mcallister, mccasheney & co, mcgillivary gk & gv, mcivor meats, midfield meat wholesa, no commercial value, newman lilvestock sales, newman lilvestock sales n, newman lilvestock sales n, newman lilvestock sales 3, newman lilvestock sale no, newman lilvestock sales n, oakey c/- t newman, o'connor g & k pty ltd, j h ralph & son, safeway no 188, andrew schenk, starr a, top meats, victorian producers c, d & k webb, m/s k & j wignall, rh woodward & co, woodhead b, woodward rh & co pty, r h woodward & co, newstead meats, garfield, phillip watson, h ford -
 Ringwood and District Historical Society
Photograph, Ringwood State School - Group photograph, 1932
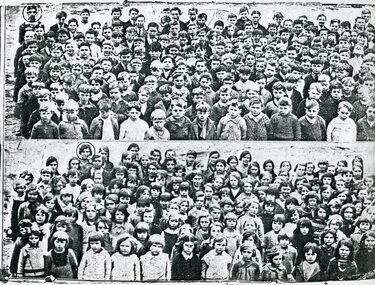
Black and white photograph - Group photograph, 1932. From the Weekly Times."Attached to photograph" Boys recognised - 1932 Charles Moulden, Alan Washusen, (?) Bomford, Ian (?), Reg Hill, Les Anderson, Jim Coombs, Stan Wilkins, Bob Prince, Bill Brown, (?) Tasker, Herbert Washusen, John Anderson, (?) Steer, Ted Dufty, Doug Jamieson, Norm Bissett, (?) Flintoff, Ken Ward, Lyndon Peake, Norm Jamieson, David Allen, Norm Hone, Tom Sampson, Fred Johnston, George Gunn, Ray Minahan, Fred Adolphson, Robert Adolphson, Geoffrey Alexander Read. Girls recognised - 1932 Gertie Stoel, Grace Wheeler, Alice Stoel, Enid Washusen, Dass Jamieson, Rosemary Jenkins, (?) Mc Alpin, Thelma Flintoff, Nellie Stevens, Gladys Goudge, Beryl Baker, Win Molden, Jenny Rowe, Isobel Gibbs, Lily Cope, Kathie Jackson, Winnie Wilkins, (?) Stawship, Isobell Young, (?) Robbins, Nancy Izard, (?) Hansey, Val Anderson, Grace Clegg, Mary Beilby, Marge Clegg, Josie Roberts, Mary Young, Jessie Walker, Doris Rutter, Ashley (?), Bessie Penn, Viv Martin, Joyce Read, Betty Adolphson. -
 Parks Victoria - Gabo Island Lightstation
Brackets
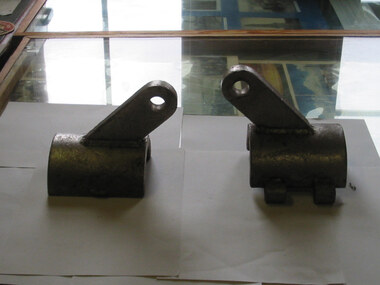
Stainless steel brackets off the wreck of the Gypsy Moth V, wrecked near the lighthouse on 19 December 1982. These brackets were used to hold wire stays to the mast or bowsprit. The comparatively recent relics have a reliable provenance to the yacht Gipsy Moth V, which ran ashore on rocks under the lighthouse on 18 December 1982. It was the yacht that carried Sir Francis Chichester (1901-1972) on his second world voyage in 1971. While sailing the 19m (63.5ft) vessel in the 1972 Transatlantic Race, Chichester became weakened by cancer and had to abandon the competition and died two months later. His son Giles sailed the yacht back to England. In December 1982 British skipper, Desmond Hampton chartered the yacht for the around the world, single handed race. He had been running second and was nearing the end of the second leg of the competition from Cape Town, South Africa to Sydney when the accident happened. After going to bed he set the yacht on self steering and it wedged itself into a crevice just below the lighthouse and broke up. Everything was salvaged except for the masts and the engine. Twenty five years later, in 2007, items salvaged from the wreck surfaced in regional Victoria in a display of the ‘Gipsy Moth V Collection’, which included wreckage as well as photographs. The information from the ‘Sail World’ website did not provide any further details about the exhibition or its organisers.Two similar stainless steel brackets; half tubes with diagonally protruding flat section with hole at end. End is rounded. -
 Royal District Nursing Service (now known as Bolton Clarke)
Photograph - Photograph, sepia, c.1920
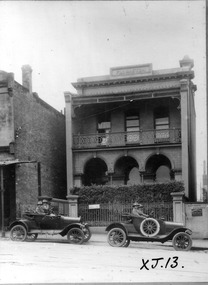
A public appeal was made to raise funds for Melbourne District Nursing Society (MDNS) so motor cars could be purchased to assist their Trained nurses, known as 'Nurse' in those days, with their visits during the Spanish Influenza epidemic of 1919. With donations from businesses and individuals four cars were available within a month, and this photograph shows two of them In 1919 parked outside 'Floraston', 39 Victoria Parade, Collingwood, which was the first MDNS Headquarters and Nursing Home purchased by the Society. The MDNS uniform was a grey cotton frock with white collar, a grey coat with lapels, and a grey brimmed hat with a red Maltese cross in the centre of the hatband. From its founding in 1885 until 1891 the Trained nurses, known as 'Nurse' in those days, of the Melbourne District Nursing Society (MDNS) worked from their own homes which were located in the vicinity of their areas (districts). In November 1891 MDNS was able to rent a two story terraced house at 66 Cardigan Street, Carlton, at £65 a year, which contained accommodation for three Nurses and one pupil nurse as well as being used as their Headquarters. They left from their Nurses Home each morning and returned at the end of their shift to write up their book work before retiring for the day. Three years later they moved into a larger terraced house at 49 Drummond Street Carlton which was rented at ‘a very moderate rental’. There was a Board room, apartments for the Nurses and pupil nurse, a large dispensary which patients could attend each evening to have prescriptions signed and bottles refilled with ‘homely remedies’ and elixirs, which were administered to for e.g. Consumptive cases. Doctor’s prescriptions were filled at the Pharmacy. Cupboards containing donated blankets and bedclothes for needy patients were kept in this room, and it was here where the Nurses kept their nursing bags which were refilled at the end of each shift ready for any emergency and for the next day. A list of Doctors the Nurses could call was kept by the telephone. The home also had a kitchen where nourishing soup was made and distributed twice a week to the needy. Milk was also distributed when needed. In 1902 they moved into rented premises at 188 Leicester Street, Carlton and two years later, in 1904, to premises at 5 Royal Terrace, Nicholson Street, Fitzroy. They remained there for ten years. In June 1914 at last the Society had sufficient funding to purchase their own terraced premises, ‘Floraston’ 39 Victoria Parade, Collingwood which was their Headquarters and Nurses Home. In 1926 the After-Care Home for recovering patients, (later called After-Care Hospital) was built by the Society next door, running from 41-47 Victoria Parade (became No. 45); the District nurses continued to live at No. 39. District Nursing has had various modes of transport over the last 130 plus years. At first, from 1885 as Melbourne District Nursing Society (MDNS), the Nurses walked the streets and lane ways amid the slums of central Melbourne. As the Society expanded public transport was used, and bicycles were bought by the Society in 1903 and used in inner areas until 1945. During the Spanish flu epidemic, in 1919, MDNS appealed for assistance to procure Motor vehicles so the Nurses could visit an influx of cases. Through trusts, grants and donations four 'Ford 'T Model' cars were procured which enabled the Nurses to triple their visits. Through constant use the cars were in such a poor state they were sold in 1927. A Motor Auxiliary was formed in 1929 to take Trained nurses, now called 'Sisters' to patients, and some Sisters used their own cars; even a motorcycle was used by one Sister in 1933. All these forms of transport were intermingled until MDNS and, having received Royal patronage, the now named Royal District Nursing Service (RDNS) had its own full fleet of vehicles.Sepia photograph on grey mounting board depicting four Melbourne District Nursing Society (MDNS) Trained nurses (Nurses) sitting in two motor vehicles in front of Melbourne District Nursing Society Headquarters and Nurses Home. In the foreground are the two Ford Model T vehicles with their soft hoods open. Each car has four spoked wheels. A frame where a spare wheel is attached can be seen attached to the rear car's running board. A spare wheel, with white tyre, can be seen standing up resting against the middle of the front car; the lower section of the tyre is sitting on the running board. The steering wheel can be seen on the right hand side of both cars with a Nurse sitting behind it with her hands resting on the wheel. The upper part seen of the two MDNS Nurses in each car shows they are wearing grey uniform coats over their frocks, the white collars of which can be seen. They are all looking at the camera, and are wearing grey hats with a central Maltese cross on the white hatband. Behind the cars the footpath and the metal spiked fence, with a square concrete columns at either end can be seen. '39' is near the top of the left hand column and a white oblong name plate is attached to the fence. On the far right of the photograph a wooden gate runs from the column. A dark name plate is attached with the words 'Patient Entrance' / - 'Melbourne District Nursing Society -/ For Nursing the Sick Poor'. Behind this are a row of shrubs forming a hedge and behind this the two storey terrace building with its three arched arcade veranda on the ground floor and three long widows on the top floor with a veranda with a metal scrolled safety rail. The building has a flat roof with a central raised section with 'Floraston', written in capital letters on it. XJ. 13. is written in black ink on the bottom right corner of the photographPhotographer's stamp on mounting boardmelbourne district nursing society, mdns, transport, nurses home, rdns, royal district nursing service -
 Ringwood and District Historical Society
Book, Valerie Polley, Wonderful Warrandyte - A Portrait, 2014
Soft-covered book by Valerie Polley, Warrandyte Historical Society, featuring photographs, sketches and text outlining early and contemporary development of Warrandyte township and community, first published in April 2014.Front cover - Peace Day celebrations in Warrandyte, July 1919. Acknowledgements: The book project Wonderful Warrandyte-A Portrait was made possible by a grant under the Australian Government's 2012-2013 Your Community Heritage Program (Your Community Heritage - Sharing Community Heritage Stories). Several members of the Warrandyte Historical Society were involved in this book project which evolved after several years of development ideas. Valerie Polley wrote the text and selected photographs. Special thanks go to the Steering Committee of Margaret Kelly, Andy Bevan-Jones, Richard Morton and Wayne Rankin for their knowledgeable input and beneficial editing advice, Murray Houghton for his specialised historical knowledge and advice on further references, and Diane Baird for editing. The book would not have been possible without all the dedicated work of the Society's members, past and present, who have contributed to the Society's substantial archive. All proceeds from the sale of this book go to the Warrandyde Historical Society. Photographs: Stephen Reynolds, Austin Polley, Valerie Polley, Wayne Rankin, Ron Harris, Merv Naughton. Flora and Fauna photography by Nth Warrandyte, Osborne Peninsula, Landcare, Inc. Maps: Jock Macneish -
 Williamstown Botanic Gardens- Hobsons Bay City Council
Photos - Cannons, 1970
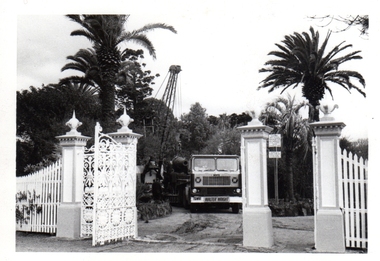
The Armstrong Cannons were originally placed at Fort Gellibrand, located at the southernmost tip of the Williamstown peninsula. The Fort was developed during the 1850s as part of a defensive system for the city and port of Melbourne. The importance of the Fort batteries declined from the 1890s, when they were effectively replaced by new facilities at Queenscliff and Point Nepean, but they were still used for gunnery practice. Local residents, through the Williamstown Town Council, complained to the Acting Minister for Defence that the concussion from the guns damaged windows, walls and foundations of buildings. The Armstrong Cannons were moved from Fort Gellibrand to the Gardens in 1906. A primary source of evidence of the cannons being in the Gardens. The cannons are remembered fondly as play equipment for the local children. Many tales have been told of climbing over them and pretending to be shot out of them A collection of seven black and white photographs documenting the removal of the cannons from the Gardens Photo 1 (a) Black and white landscape image. View is looking through the main gates looking at the front of the truck, which has the name Walter Wright across the front bumper, the crane and canon. The gates and fence are painted a light colour, probably white. Photo 2 (b) Black and white landscape image. Back of loader with cannon on it. Man standing on top of the cannon bending over either tying or untying ropes. Trunk of a palm tree is on the left side of the photo with a top of a palm tree in the background. Photo 3 (c) Black and portrait white image. A cannon being loaded by the crane on to trailer. Palm tree is in the background and fronds from a palm tree can be seen in the right top corner. Photo 4 (d) Black and white landscape image. Side on view of a cannon on the truck parked outside the grounds of the Gardens. The logo of the name of the trucking company is on the door of the truck above the words ‘WALTER H WRIGHT / TRANSPORT PTY LTD / S SCHULZ ST WEST MELB’. A second cannon can be seen in the background. A bus is in the background on the middle right side of the image. Photo 5 (e) Black and white landscape image. Truck with cannon on the back leaving the ground of the Gardens. Tree on the right side of the image and power pole is behind the truck. The logo of the name of the trucking company is on the door of the truck above the words ‘WALTER H WRIGHT / TRANSPORT PTY LTD / S SCHULZ ST WEST MELB’. ‘WALTER WRIGHT’ is on the front bumper Photo 6 (f) Black and white landscape image. Cannon tied down on the back of the truck as it is being driven across the street. Three houses in the background and two cars, one is a Volkswagen Photo 7 (g) Black and white landscape image. Cannon on the back of the truck which is parked over the street from the Gardens. Three houses are in the background. Two trees bare of leaves. The front of a car in in the foreground – it has a sun visor and the steering wheel is a light colour.armstrong cannons, williamstown botanic gardens, hobsons bay city council, 1970, walter h wright / transport pty ltd -
 Puffing Billy Railway
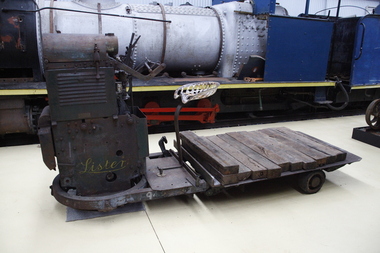
Lister Auto Truck
The Lister Auto-Truck was a small monowheel tractor built for moving light loads around factories, railway yards and similar sites. They were built by R A Lister and Company of Dursley, Gloucestershire, well known for their range of small stationary engines The Auto-Truck was one of several monowheel tractors to appear in the 1920s and '30s, with the availability of small, reliable petrol engines, as developed for motorcycles and the stationary engines for which Lister were already known. These were tricycle vehicles, with the single leading wheel used for both drive and steering. Their simple construction carried most of the mechanism on this wheel as a single unit, the chassis with the trailing wheels being little more than a trailer for balance. Simplicity was a key feature. The engines were single-cylinder and air-cooled. Ignition was by magneto, rather than requiring a battery and electrical system. One of these designs was produced in the 1920s by George Grist of the Auto Mower Co., Norton St Philip, Somerset. The engine was a JAP 600 cc four-stroke air-cooled sidevalve, a typical small engine of the time. The Auto Mower Co. were Lister agents and when Lister heard of this 'Auto-Truck' they bought one for use in their own factory. It was used to carry heavy engine castings from the foundry to the machine shop. Lister customers saw them and there was such interest in wanting to buy them that Lister negotiated with Auto Mower to build them under licence. Although Lister were already well known for their small petrol stationary engines, these were heavy cast-iron engines with water hopper cooling and unsuitable for vehicle use. Lister remained with the JAP engine for the Auto-Truck. The Auto-Truck was designed for use in factories or other places with smooth surfaces of concrete or tarmac. This allowed the use of small solid-tyred wheels with only simple suspension, making the vehicle simple, cheap and lightweight. They had little ability on soft surfaces though and could even topple over if driven carelessly across slopes. Their design was a compromise between the top-heavy nature of the tall engine grouping above its wheel and a well thought-out chassis for stability. The bearing between them was a large diameter ring roller bearing, mounted at the lowest part of the chassis. This gave rigidity and stability, even after long wear. A ring of rolled channel girder was attached to the engine group and rollers on the chassis carried the load upon this. On early Auto-Trucks this bearing is set very low, in line with the chassis members, and is covered by thin steel plates. The front panel of the engine cover is distinctive with large ventilation holes and a Lister signature cut through it. Strangely this panel is made of thick cast iron, providing substantial weight high on the engine and only adding to its top heaviness. To improve visibility of moving vehicles in noisy factories, this panel was often painted white, the rest of the vehicle being Lister's usual brunswick green. The driver was seated on a Brooks bicycle saddle, which in recognition of the lack of vehicle suspension, was carried on the end of a cantilevered bar that acted as a leaf spring. A wide handlebar on the engine group was used for steering. A squeeze bar the width of this handlebar engaged the clutch. Controls included a hand throttle, a gear lever with two forward and one reverse gears, and a large handbrake lever. The engine unit rotated freely for a full 360° rotation. When used in reverse, the Auto-Truck could either be driven from the saddle, looking backwards over the driver's shoulder; or they could dismount, swivel the engine unit around and control it as a pedestrian-controlled truck from behind. Under the engine cover were two equal diameter tanks, a fuel tank for petrol and a shorter oil tank. Engine and chain-drive lubrication used a total-loss oil system, controlled by a small pump and needle valve. Info Ref: Lister Auto-Truck - Wikipedia https://en.wikipedia.org/wiki/Lister_Auto-TruckHistoric - Industrial monowheel tractor for moving light loads around factories, railway yards and similar sites.The Lister Auto-Truck - small monowheel tractor Made of steel with three wheels. Powered by a J.A.P single cylinder petrol motor which is Hand Cranked to start.Lister puffing billy, lister, lister auto truck, monowheel tractor -
 Bendigo Historical Society Inc.
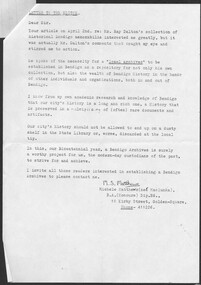
Document - Michele Matthews collection - documents re first attempt to establish an archive centre/\museum in Bendigo, from 25/04/1988 to 12/12/1988, 25/02/2025
Documents re first attempt to establish an archive centre/museum in Bendigo, from 25/04/1988 to 12/12/1988Michele Matthews collection - documents re first attempt to establish an archive centre/museum in Bendigo, from 25/04/1988 to 12/12/1988 25/04/1988 - handwritten and typed letter from Michele Matthews iniating an opinion to have a Bendigo Archives 21/04/1988 - letter for meeting of the Bendigo Archives / Museum Core Group on Wednesday June 1st at her home, 18 Kirby Street, Golden Square 16/05/1988 - letter signed by 20 members of the Australian Institute of Genealogical Studies "in full support of the proposed archives" 23/05/1988 - Minister of Property Services acknowledging the letter concerning the possibility of housing various public records in a proposed museum in Bendigo 24/05/1988 - five page letter from Wayne Gregson, Providence Cottage, RMD Barnadown Road, Goornong supporting the proposed museum 1/06/1988 - minutes of the archives and museum working party's inaugural meeting held on June 1st at 18 Kirby Street, Golden Square 2/06/1988 - two page flyer form Bruse Reid, Liberal Spokesman - Lister House could be Bendigo's Museum 17/06/1988 - letter from Diane Collier, acting archivist, advising of consulting archivist services 20/06/1988 - advising Bendigo City Council discussed the proposed Bendigo Regional Archives Museum on several occasions and "supports, in principle, the aims and objectives of the submission" 8/07/1988 - letter to Mr David Kennedy, Member for west Bendigo from the Minister for Property & Services, Peter Spyker M.P. 12/07/1988 - 14 page letter from David Kennedy M. L. A., referring the letter from Mr Spyker 14/11/1988 - minutes of a public meeting held at "Lister House", 37 Rowan Street, Bendigo to "establish interest in forming a steering committee....to promote the formation of a Bendigo & Regional Archive and Social History Museum at "Lister House" 1/11/1988 - three-page submission / proposal for thew establishment of a Bendigo Regional Archive and Social History Museum 24/11/1988 - from David Kennedy M.L.A. forwarding a reply from the Minister for Property & Services -
 Flagstaff Hill Maritime Museum and Village
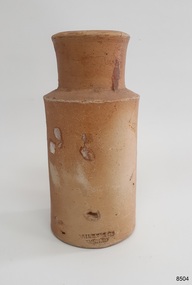
Container - Earthenware jar, Bailey & Co, circa 1878
The handmade earthenware jar was one of a group of artefacts in the McCulloch Collection that were recovered from the shipwreck Loch Ard. The jar could have been from the ship's cargo or personal effects. There are other jars in our collection that were recovered from the Loch Ard. The object is now one of the shipwreck artefacts in Flagstaff Hill’s Mc Culloch Collection, which includes items recovered from the wrecks of the Victoria Tower (wrecked in 1869) and Loch Ard (wrecked in 1878). They were salvaged by a diver in the early 1970s from the southwest coast of Victoria. Advanced marine technology had enabled divers to explore the depths of the ocean and gather its treasures before protective legislation was introduced by the Government. The artefacts were donated to Queensland’s Department of Environment and Heritage Protection (EHP) by a passionate shipwreck lover and their locations were verified by Bruce McCulloch. In 2017 the Department repatriated them to Flagstaff Hill where they joined our vast collection of artefacts from Victoria’s Shipwreck Coast. The Loch Ard: - The three-masted, square-rigged iron ship Loch Ard belonged to the famous Loch Line which sailed many ships from England to Australia. The ship was built in Glasgow in 1873. The Loch Ard made three trips to Australia and one trip to Calcutta before its final voyage. The Loch Ard left England on March 2, 1878, under the command of Captain Gibbs, bound for Melbourne with a crew of 37, plus 17 passengers and a load of cargo. The general cargo included straw hats, umbrellas, perfumes, clay pipes, pianos, clocks, confectionery, linen and candles, as well as a heavier load of railway irons, cement, lead and copper. There were items included that were intended for display in the 1880 Melbourne International Exhibition, including the famous Loch Ard Peacock. On June 1, 1878, Captain Gibbs was expecting to see land but visibility was reduced by fog. As it lifted, the sheer cliffs of Victoria's west coast came much closer than expected. The captain was unable to steer away and the ship struck a reef at the base of Mutton Bird Island, near Port Campbell. The top deck was loosened from the hull, the masts and rigging came down and knocked passengers and crew overboard, and even the lifeboat crashed into the side of the ship and capsized. Of the 54 people on board, only two survived: the apprentice, Tom Pearce and the young woman passenger, Eva Carmichael. The well-packed Minton porcelain peacock also survived, safe inside its crate. Much of the cargo was washed up, smashed and broken, and some was salvaged. Other cargo is still with the wreck at the base of Mutton Bird Island, now protected by Government law. The artefact is an example of cargo or personal items on board a ship in 1878. It provides a reference point for classifying and dating similar items. This artefact is significant for its association with the sailing ship Loch Ard, one of the best-known, and one of the worst, shipwrecks in Victoria’s history. Flagstaff Hill’s collection of artefacts from Loch Ard is significant for being one of the largest collections of artefacts from this shipwreck in Victoria. It is significant for its association with the shipwreck, which is on the Victorian Heritage Register (VHR S417). The collection is significant because of the relationship between the objects, as together they have a high potential to interpret the story of the Loch Ard. The Loch Ard collection is archaeologically significant as the remains of a large international passenger and cargo ship. It is historically significant for representing aspects of Victoria’s shipping history. Container, round brown earthenware jar with a wide mouth, thick lip, a wide neck that tapers slightly inwards towards the shoulder, and a body that tapers slightly inward towards the base. The glazed surface is rough. The variegated colours of the clay also has small dark speckles. There are several chips and dents on the jar. The inscription is stamped into the lower edge. Made by Bailey & Co., England. Recovered from the wreck of the Loch Ard.Inscription “Bailey [&] Co / ENGLAND” flagstaff hill, warrnambool, flagstaff hill maritime museum, maritime museum, shipwreck coast, flagstaff hill maritime village, great ocean road, white star line, victorian heritage register, sailing ship loch ard, loch line, loch ard, captain gibbs, eva carmichael, tom pearce, glenample station, mutton bird island, loch ard gorge, migrant ship 1878, cargo ship 1878, stoneware jar, domestic container, kitchenware, kitchen storage, bailey & co england, shipwreck artefact, wreck dive, mcculloch collection, bruce mcculloch, 1878, sailing ship, earthenware, stoneware, domestic jar -
 Flagstaff Hill Maritime Museum and Village
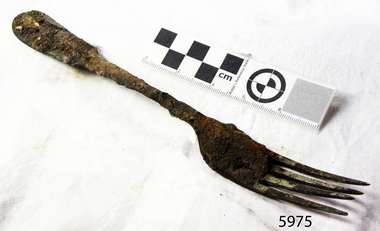
Domestic object - Fork
HISTORY OF THE LOCH ARD The LOCH ARD belonged to the famous Loch Line which sailed many ships from England to Australia. Built in Glasgow by Barclay, Curdle and Co. in 1873, the LOCH ARD was a three-masted square rigged iron sailing ship. The ship measured 262ft 7" (79.87m) in length, 38ft (11.58m) in width, 23ft (7m) in depth and had a gross tonnage of 1693 tons. The LOCH ARD's main mast measured a massive 150ft (45.7m) in height. LOCH ARD made three trips to Australia and one trip to Calcutta before its final voyage. LOCH ARD left England on March 2, 1878, under the command of Captain Gibbs, a newly married, 29 year old. She was bound for Melbourne with a crew of 37, plus 17 passengers and a load of cargo. The general cargo reflected the affluence of Melbourne at the time. On board were straw hats, umbrella, perfumes, clay pipes, pianos, clocks, confectionary, linen and candles, as well as a heavier load of railway irons, cement, lead and copper. There were items included that intended for display in the Melbourne International Exhibition in 1880. The voyage to Port Phillip was long but uneventful. At 3am on June 1, 1878, Captain Gibbs was expecting to see land and the passengers were becoming excited as they prepared to view their new homeland in the early morning. But LOCH ARD was running into a fog which greatly reduced visibility. Captain Gibbs was becoming anxious as there was no sign of land or the Cape Otway lighthouse. At 4am the fog lifted. A man aloft announced that he could see breakers. The sheer cliffs of Victoria's west coast came into view, and Captain Gibbs realised that the ship was much closer to them than expected. He ordered as much sail to be set as time would permit and then attempted to steer the vessel out to sea. On coming head on into the wind, the ship lost momentum, the sails fell limp and LOCH ARD's bow swung back. Gibbs then ordered the anchors to be released in an attempt to hold its position. The anchors sank some 50 fathoms - but did not hold. By this time LOCH ARD was among the breakers and the tall cliffs of Mutton Bird Island rose behind the ship. Just half a mile from the coast, the ship's bow was suddenly pulled around by the anchor. The captain tried to tack out to sea, but the ship struck a reef at the base of Mutton Bird Island, near Port Campbell. Of the 54 crew members and passengers on board, only two survived: the apprentice, Tom Pearce and the young woman passenger, Eva Carmichael, who lost all of her family in the tragedy. The LOCH ARD shipwreck is of State significance – Victorian Heritage Register S 417 Flagstaff Hill’s collection of artefacts from LOCH ARD is significant for being one of the largest collections of artefacts from this shipwreck in Victoria. It is significant for its association with the shipwreck, which is on the Victorian Heritage Register (VHR S417). The collection is significant because of the relationship between the objects, as together they have a high potential to interpret the story of the LOCH ARD. The LOCH ARD collection is archaeologically significant as the remains of a large international passenger and cargo ship. The LOCH ARD collection is historically significant for representing aspects of Victoria’s shipping history and its potential to interpret sub-theme 1.5 of Victoria’s Framework of Historical Themes (living with natural processes). The collection is also historically significant for its association with the LOCH ARD, which was one of the worst and best known shipwrecks in Victoria’s history. Silver plated copper alloy table fork from the wreck of the Loch Ard. William Pagewarrnambool, shipwrecked coast, flagstaff hill maritime museum, loch line, loch ard, mutton bird island, loch ard gorge, electroplated cutlery, fork -
 Flagstaff Hill Maritime Museum and Village
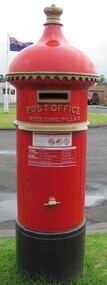
Post Office Receiving Pillar, 1885
This Post Office Receiving Pillar was restored in 1980 and is now a fully operational Australia Post mailbox. In early August 1980 Prime Minister Mr. Fraser posted Warrnambool’s first commemorative envelope into this restored Post Office Receiving Pillar at Flagstaff Hill Maritime Village. The special limited edition envelopes are numbered 1 – 7000. When posted, the envelopes would have the Flagstaff Hill Logo and Flagstaff Hill Maritime Village’s own postmark of a ship’s steering wheel surrounding a lighthouse and a sailing ship, and were dated August 3 on the First Day Cover. Amongst Flagstaff Hill’s collection is that very first letter posted by Prime Minister Fraser. HISTORY OF POST OFFICE RECEIVING PILLARS In 1851 ‘pillar boxes’ were installed at roadside locations in the island of Jersey, England; they had already been successful in several European countries. The use of new prepaid, adhesive postage stamps as well as the roadside pillar boxes meant there was no need for the public to take a trip to the Post Office just to post a letter. By 1855 London had installed its first six Pillar Boxes. In 1856 the pillar boxes were first introduced in Sydney. These were circular with a crown on the dome, supported by leaves. Early Victoria Mail was originally collected by ‘letter carriers’, first appointed in Melbourne in 1841, equipped with leather bag and hand bell. He wore a red coat with brass buttons and a black top hat! In 1844 two wooden receiving boxes were erected in Melbourne. The first cast iron boxes were installed in South Melbourne (Emerald Hill) and were still in service until 1967. They were a fluted circular design and made in England. In the early 1860’s the ‘low door round’ design posting box was introduced, being circular and surrounded by a crown, with two broad embossed bands around its circumference. The clearance door was in front of the box and low down. These were made in Australia. In the early 1870’s square boxes with a tapering top were being used. These too were made in Australia by different manufacturers with slight variations on style such as the orientation and number of slots. Next came the circular boxes again, similar to the ‘low door round’ but with the clearance door extending to just below the posting slot, often referred to as ‘high door round’. These boxes did not have embossed bands. In 1887 small cast iron boxes were introduced, attached to posts and poles and called ‘lamp post receivers’. Around 1930 a ‘London’ model was used in Victoria. It was copied from the flat-domed type in London but made in Tasmania. [References: Flagstaff Hill Maritime Village records, The Warrnambool Standard, August 1st, 1980, “Stamps.Au” http://www.stampsau.com, 4th April 2011 (Extracted from “Australian Street Posting Boxes” by Ken Sparks – out of print)] Post Office Receiving Pillar, or letterbox.1885 “High Door Round” design. Tall cast iron cylinder with decorative dome cap with crown on top. Side has a slot and a hinged door with handle shaped as a fist. Painted red with gold trim. “POST OFFICE / RECEIVING PILLAR” lettering cast into cylinder. Restored in 1980 and once again operating as an Australia Post mailbox. Commemorative plague on pillar.“POST OFFICE / RECEIVING PILLAR” lettering cast into cylinder. Flagstaff Hill Maritime Museum – Port of Warrnambool. This letter receiver was officially commissioned on 3rd August 1980 by the Prime Minister of Australia, the Right Honourable Malcolm Fraser M.P. on completion of 25 years’ service as the Federal Minister for Wannon.”flagstaff hill, warrnambool, shipwrecked coast, flagstaff hill maritime museum, maritime museum, shipwreck coast, flagstaff hill maritime village, great ocean road, post office receiving pillar, letterbox, mailbox, australia post -
 Flagstaff Hill Maritime Museum and Village
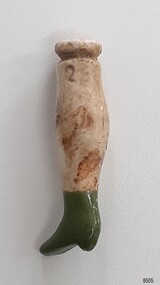
Leisure object - Doll's Leg, circa 1878
This doll's leg was one of a set of artefacts recovered from the shipwreck of the Loch Ard that were donated together. The doll's leg could have been from the ship's cargo or personal effects. Dolls from this era were often made from fabric, which would have quickly deteriorated in the ocean. Ceramic limbs were joined to the body by tightening the fabric around the grooves on the limbs. There are other doll's limbs in our collection that were recovered from the Loch Ard The object is now one of the shipwreck artefacts in Flagstaff Hill’s Mc Culloch Collection, which includes items recovered from the wrecks of the Victoria Tower (wrecked in 1869) and Loch Ard (wrecked in 1878). They were salvaged by a diver in the early 1970s from the southwest coast of Victoria. Advanced marine technology had enabled divers to explore the depths of the ocean and gather its treasures before protective legislation was introduced by the Government. The artefacts were donated to Queensland’s Department of Environment and Heritage Protection (EHP) by a passionate shipwreck lover and their locations were verified by Bruce McCulloch. In 2017 the Department repatriated them to Flagstaff Hill where they joined our vast collection of artefacts from Victoria’s Shipwreck Coast.The Loch Ard: - The three-masted, square-rigged iron ship Loch Ard belonged to the famous Loch Line which sailed many ships from England to Australia. The ship was built in Glasgow in 1873. The Loch Ard made three trips to Australia and one trip to Calcutta before its final voyage. The Loch Ard: - The Loch Ard left England on March 2, 1878, under the command of Captain Gibbs, bound for Melbourne with a crew of 37, plus 17 passengers and a load of cargo. The general cargo included straw hats, umbrellas, perfumes, clay pipes, pianos, clocks, confectionery, linen and candles, as well as a heavier load of railway irons, cement, lead and copper. There were items included that were intended for display in the 1880 Melbourne International Exhibition, including the famous Loch Ard Peacock. On June 1, 1878, Captain Gibbs was expecting to see land but visibility was reduced by fog. As it lifted, the sheer cliffs of Victoria's west coast came much closer than expected. The captain was unable to steer away and the ship struck a reef at the base of Mutton Bird Island, near Port Campbell. The top deck was loosened from the hull, the masts and rigging came down and knocked passengers and crew overboard, and even the lifeboat crashed into the side of the ship and capsized. Of the 54 people on board, only two survived: the apprentice, Tom Pearce and the young woman passenger, Eva Carmichael. The well-packed Minton porcelain peacock also survived, safe inside its crate. Much of the cargo was washed up, smashed and broken, and some was salvaged. Other cargo is still with the wreck at the base of Mutton Bird Island, now protected by Government law. The artefact is an example of cargo or personal items on board a ship in 1878. It provides a reference point for classifying and dating similar items. This artefact is significant for its association with the sailing ship Loch Ard, one of the best-known, and one of the worst, shipwrecks in Victoria’s history. Flagstaff Hill’s collection of artefacts from Loch Ard is significant for being one of the largest collections of artefacts from this shipwreck in Victoria. It is significant for its association with the shipwreck, which is on the Victorian Heritage Register (VHR S417). The collection is significant because of the relationship between the objects, as together they have a high potential to interpret the story of the Loch Ard. The Loch Ard collection is archaeologically significant as the remains of a large international passenger and cargo ship. It is historically significant for representing aspects of Victoria’s shipping history. Doll's leg, cream-coloured ceramic leg with two seams, a flat solid top and a glazed green ankle-length heeled boot. A shallow groove runs around the leg just below the top. An inscription is stamped into the leg below the groove. Recovered from the wreck of the Loch Ard. Inscribed "2"flagstaff hill, warrnambool, maritime village, maritime museum, flagstaff hill maritime museum and village, shipwreck coast, great ocean road, shipwreck artefact, wreck dive, mcculloch collection, bruce mcculloch, loch ard, 1878, loch line, victorian heritage register, sailing ship, captain gibbs, eva carmichael, tom pearce, mutton bird island, loch ard gorge, migrant ship 1878, cargo ship 1878, doll's leg, ceramic doll leg, porcelain doll leg, doll's limb, 1870s doll, 1870's toy, ceramic limb from doll, children's toy, children's recreation, doll's leg with green boot -
 Flagstaff Hill Maritime Museum and Village
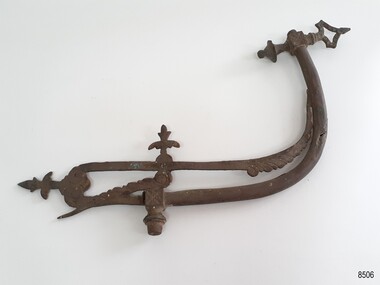
Functional object - Lamp Fitting, circa 1878
This gas pipe fitting was one of a group of artefacts in the McCulloch Collection that were recovered from the shipwreck Loch Ard and were donated together. The fitting could have been from the ship's cargo or a ship’s fitting. Lamps from this era were fuelled by gas. There are other gas lamp fittings in our collection that were recovered from the Loch Ard The object is now one of the shipwreck artefacts in Flagstaff Hill’s Mc Culloch Collection, which includes items recovered from the wrecks of the Victoria Tower (wrecked in 1869) and Loch Ard (wrecked in 1878). They were salvaged by a diver in the early 1970s from the southwest coast of Victoria. Advanced marine technology had enabled divers to explore the depths of the ocean and gather its treasures before protective legislation was introduced by the Government. The artefacts were donated to Queensland’s Department of Environment and Heritage Protection (EHP) by a passionate shipwreck lover and their locations were verified by Bruce McCulloch. In 2017 the Department repatriated them to Flagstaff Hill where they joined our vast collection of artefacts from Victoria’s Shipwreck Coast. The Loch Ard: - The three-masted, square-rigged iron ship Loch Ard belonged to the famous Loch Line which sailed many ships from England to Australia. The ship was built in Glasgow in 1873. The Loch Ard made three trips to Australia and one trip to Calcutta before its final voyage. The Loch Ard left England on March 2, 1878, under the command of Captain Gibbs, bound for Melbourne with a crew of 37, plus 17 passengers and a load of cargo. The general cargo included straw hats, umbrellas, perfumes, clay pipes, pianos, clocks, confectionery, linen and candles, as well as a heavier load of railway irons, cement, lead and copper. There were items included that were intended for display in the 1880 Melbourne International Exhibition, including the famous Loch Ard Peacock. On June 1, 1878, Captain Gibbs was expecting to see land but visibility was reduced by fog. As it lifted, the sheer cliffs of Victoria's west coast came much closer than expected. The captain was unable to steer away and the ship struck a reef at the base of Mutton Bird Island, near Port Campbell. The top deck was loosened from the hull, the masts and rigging came down and knocked passengers and crew overboard, and even the lifeboat crashed into the side of the ship and capsized. Of the 54 people on board, only two survived: the apprentice, Tom Pearce and the young woman passenger, Eva Carmichael. The well-packed Minton porcelain peacock also survived, safe inside its crate. Much of the cargo was washed up, smashed and broken, and some was salvaged. Other cargo is still with the wreck at the base of Mutton Bird Island, now protected by Government law. The artefact is an example of cargo or personal items on board a ship in 1878. It provides a reference point for classifying and dating similar items. This artefact is significant for its association with the sailing ship Loch Ard, one of the best-known, and one of the worst, shipwrecks in Victoria’s history. Flagstaff Hill’s collection of artefacts from Loch Ard is significant for being one of the largest collections of artefacts from this shipwreck in Victoria. It is significant for its association with the shipwreck, which is on the Victorian Heritage Register (VHR S417). The collection is significant because of the relationship between the objects, as together they have a high potential to interpret the story of the Loch Ard. The Loch Ard collection is archaeologically significant as the remains of a large international passenger and cargo ship. It is historically significant for representing aspects of Victoria’s shipping history. Brass decorative gas lamp fitting. Two flat arms of different lengths are joined on either side of a fitting that has a fleur-de-lis-like design. The shorter arm has a J-shaped brass pipe fitted to it with a decorative threaded cube joint part way along, and ends with a triangular tap and knob. The longer arm is also J-shaped and ends with a feather design on it. There are remnants of green paint on the cube fittings and the knob. Recovered from the wreck of the Loch Ard.flagstaff hill, warrnambool, maritime village, maritime museum, flagstaff hill maritime museum and village, shipwreck coast, great ocean road, shipwreck artefact, wreck dive, mcculloch collection, bruce mcculloch, loch ard, 1878, loch line, victorian heritage register, sailing ship, captain gibbs, eva carmichael, tom pearce, mutton bird island, loch ard gorge, migrant ship 1878, cargo ship 1878, lamp fitting, gas lamp fitting, ship’s fitting, ship’s lamp, brass lamp fitting, lighting, domestic lighting, ship’s lighting -
 Uniting Church Archives - Synod of Victoria
Photograph, Rev. Djiniyini Gondarra, 1986
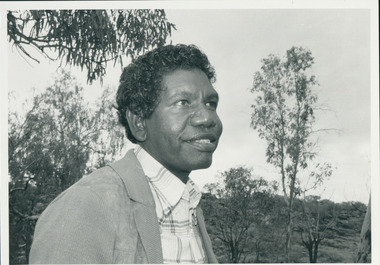
Rev Dr Djiniyini Gondarra OAM, was born in Milingimbi, eastern Arnhemland in 1945. He was educated at Milingimbi Mission School and pursued his theological education as a youth leader and Sunday School teacher through the Methodist Church, before attending college in Brisbane. In 1969 he trained as a Minister in Papua New Guinea and the Solomon Islands under the Uniting Church, before returning to Arnhemland to minister his own people at the Galiwin’ku parish, firstly as a lay pastor (1971-1972) and then as a Minister from 1976-1982. In 1983-84, Rev Djiniyini worked as a Lecturer in Theology at Nungalinya College, Darwin. He was honoured with a Diploma of Theology (Honorary) from there in 1984, and in 1991 received a Cultural Doctorate in Literature (Honorary) from the World University, Roundtable, Arizona USA. Rev Djiniyini was awarded the Order of Australia Medal (OAM) in 1995. As well as being the Chairman of ALPA since 1993, Rev Djiniyini is currently the Director of Duduy’ngu Pty Ltd, which provides consultancy and cross-cultural services. He is also Director of Yirrkala Business Enterprises. Over the years, Rev Djiniyini has served on many committees and councils including: Member of the Steering Committee of the Australian Indigenous Cultural Network (1998-2001), CEO of Aboriginal Resource and Development Services Inc (1998-2001), CEO of the Northern Regional Council of the Uniting Aboriginal and Islander Christian Congress (1998-2001), Director of Reconciliation Australia Limited (2000-2001), Member of Council for Aboriginal Reconciliation (1998-2000), Chairman of Uniting Aboriginal and Islander Christian Congress (1995-2000 & 1990-1993), Member of Central Committee of the World Council of Churches (1991-1994), Moderator of Northern Synod, Uniting Church in Australia (1985-1987), Secretary of newly formed Aboriginal Presbytery, Northern Synod, Uniting Church in Australia (1985), and Vice-President of Uniting Aboriginal and Islander Christian Congress Uniting Church in Australia (1983-1987). Rev Dr Djiniyini Gondarra OAM has also been extensively published, and his works include: • Information Papers (co authored), Aboriginal Resource and Development Services: • Confusion Between Cultures (1998) • MHead & Shoulders of Djiniyini Gondarra facing right of picture."Rev. Djiniyini Gondarra 1986. Moderator Northern Synod and Vice President of Uniting Aboriginal and Islander Christian Conference."gondarra, djiniyini, uaicc, northern synod uca -
 Eltham District Historical Society Inc
Film - Video (VHS), VideoCAM, Eltham Woods Children's Resource Centre Opening (Series 69, Item 5), 5 Mar 1988
Shire of Eltham Archives: Series 69, Item 5 Video opens with panning view of completed kinder from Frank Street followed by images of the centre under construction then opening day speeches. Introduction and welcome by Mandy Press (Executive Officer, Shire of Eltham) with speeches by the Hon. Pauline Toner, Member for Eltham and Shire president, Cr. Alan Baker. The Hon. Pauline Toner acknowledged Shire President Alan Baker and her parliamentary colleagues Vin Heffernan, Neil Brown and Bob Halderson and Councillors; three levels of Government which led to the achievement of the kinder, and gave special thanks to the Council and parents for the forward planning to accommodate children from babyhood to school with childcare, kinder and baby health facilities all combined in one facility in the middle of parkland in a residential area. Shire President Cr Alan Baker then followed to formally open the centre. The site had been identified in early 1985 at that stage only as a pre-school but with an opportunity to develop, the additional services were driven by Cr Baker. Though a very long name, its simple message is "Care for Kids." Designed by architect Neil Biggins of Clark, Hopkins and Clark. Cr Baker stated that the theme of "people living in the environment" was very much encapsulated by the facility. Cr Baker informed that the construction of the facility had led to some concerns with a reduction in open space and potential traffic generated to the facility and those users of the facility were asked to ensure their use is sensitive to the local residents. Cr Baker talked about the financial costs and how the Federal grant funding was no longer as plentiful as previous and that the Victorian Government had come to the assistance thanks to Pauline Toner covering some other costs as well as the ongoing running costs of around $40,000. The Federal Government contributed $233,000 out of a childcare component rather than preschool. Cr Baker thanked Mandy Press again as well as Shire Engineer, John Stanton. Cr Baker also acknowledged Ed Latanzio who was in charge of the project, along with his colleague Alan Lansdowne; Gary Bartlett and his team for the exterior surroundings to the facility. He mentioned that Neil Biggins the architect had said not many Shire Councils show the same commitment to the exterior surroundings as the interior which was a credit to the Council and Gary Bartlett. He also thanked Bev Vern, Council's preschool advisor who assisted in developing the programs; Grant Roberts from Federal Office of Childcare for assisting the Cooperative in setting up the funding program; the builders George Takola and George Apted; Michelle Matello who undertook the needs analysis that identified another preschool was required; Cathy King who assisted in the development of the childcare program; Pat Grundy and Susan Forbes, Council officers who assisted with the development of the services and the members of the preschool committee. In addition, local residents and in particular Helen, Peter and Chris who advised Council of their concerns and worked with Council to overcome these issues; members of the Interim Steering Committee and the Directors of the Childcare Co-op. Cr Baker stated that the Co-op nature of the facility and the location of the three services under one roof was unique and the task of the programs was to be led by Annie, Dianne and Lynn Afternoon tea and activities followed the unveiling of the plaque. The video shows some of the children's entertainment and their engagement as well as interior and exterior views.VHS Video cassette Converted to MP4 file format 00:26:02; 302MBshire of eltham, video recording, shire of eltham archives, eltham shire council, alan lansdowne, bev vern, bob halderson, cathy king, clark hopkins and clark, councillors, cr. alan baker, ed latanzio, eltham, eltham woods childcare co-operative, federal government, federal office of childcare, frank street, gary bartlett, george apted, george takola, grant roberts, john stanton, mandy press, michelle matello, neil biggins, neil brown, pat grundy, pauline toner, people living in the environment, susan forbes, victorian government, vin heffernan -
 Flagstaff Hill Maritime Museum and Village
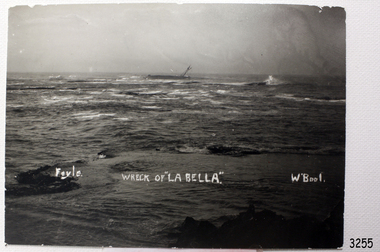
Photograph, Foyle Photographic Studio, Wreck of La Bella, about 11/11/1905
The photograph shows the wreck of La Bella in Lady Bay, Warrnambool, Australia. It was probably taken on 11th November 1905, the morning after she was wrecked. “Foyle” written on the photograph is the name of Foyle’s Photographic studio. At the time of the photograph the studio was owned by both Charles and Lilian Foyle (sometimes known as Lillian or Lily), either of whom could have taken this photograph. They also worked together at a later date on the photographs, sketches and paintings of the famous and historical Pioneers’ Honour Board, which is currently on view in the Warrnambool Library. Foyles Photography was the studio of James Charles Foyle. He owned “Foyle’s Photo Card Studios” in Liebig St , Warrnambool, which operated between 1889 – 1919 . A letter to the editor (by Mr Edward Vidler) in the Melbourne Argus, 3rd August, 1907, mentions that in that year Warrnambool would celebrate its 60th anniversary of its proclamation as a town, and that talented local artist Miss Lily Foyle would paint 200 portraits in watercolour of the pioneers who settled in the district prior to 1860. The Pioneer Honour Board can still be seen on display in the Warrnambool Library. In the Warrnambool Standard, Dec. 1917, “Mr Foyle’s studio was awarded contract to decorate rail cars on newly opened Trans-Continental railway, assisted by his sister, Miss Findlay.” The subject of the painting, La Bella, has its own tragic story. Read on for further details … On November 10th, 1905, the Norwegian-built barquentine La Bella approached Warrnambool at the end of her 37 day voyage. She was carrying a cargo of timber from Lyttleton, New Zealand, in heavy seas and evening mist. (On its only other visit to Warrnambool a year earlier the master had gone to shore to find a tow. He returned to the ship to find the crew drunk and unwilling to take up their posts, even though the ship was dragging its anchors and in a dangerous position.) As Captain Mylius steered La Bella to Lady Bay Channel the ship was tossed onto its side by heavy breakers and ran aground on what is now known as La Bella Reef. The sea was so rough that it wrenched a one-and-a- half ton anchor from the vessel. Several attempts were made by parties of volunteers in lifeboats to rescue the stricken sailors, but the rough conditions made this difficult for the boats to get close enough to the ship and the parties had to return to shore. The La Bella’s crew became exhausted and sailors were being washed overboard, one by one. By sunrise only five of the twelve crew still clung to the wreck. A local fisherman, 25 year old William Ferrier, rowed his small dingy through the heavy seas and managed to rescue the captain, whilst the volunteer lifeboat crew rescued a further three sailors, returning to shore. Ferrier made a final attempt at rescue and was able to reach its stern as the conditions eased slightly, saving the last remaining, terrified sailor just before the ship broke up and sank. William Ferrier became a national hero as news of the daring rescue spread. He was awarded the Silver Medal for bravery by the Royal Humane Society and was honoured by the Prime Minister and the Governor. He was presented with several other awards for his daring rescue. Ferrier’s rescue efforts are one of the most heroic in Victoria’s shipwreck history. The wreck now lies in 13m of water and is home to an abundance of marine life. Flagstaff Hill’s La Bella Collection includes a rail holder from La Bella, a photograph of William Ferrier with four of the five men rescued, a rail holder from the ship and the letter from the Prime Minister and other Members of Parliament that was sent to William Ferrier to commend him for his bravery. La Bella has been protected under the Commonwealth Historic Shipwrecks Act (1976) as a Historic Shipwreck since 23 April 1982 (VHR S401). It is archaeologically significant as the remains of an international and inter-colonial passenger and cargo ship. Flagstaff Hill’s collection of artefacts from the La Bella is of historical and archaeological significance because of its association with the La Bella, which is on the Victorian Heritage Register, and because of the relationship between the objects. The collection represents aspects of Victorian history, and the letter to William Ferrier demonstrates how important his rescue efforts were to Victoria and Australia. Black and white photograph of the wreck of the sailing ship La Bella in the bay at Warrnambool. The photograph shows the ship lying on its side in rough sea, with mast and rope rigging hanging loosely. Several large rocks are also visible. The photograph is a rectangle shape, mounted on heavy card, with slightly ragged edges. The photographer’s name, a title for the photograph and the location are hand written in white along the bottom third of the photograph. The back of the photograph is blank. Printed in white hand writing “Foyle”, “WRECK OF “LA BELLA”, “W’Bool”foyle, la bella, william ferrier, lady bay, lifeboats, lilian foyle, lillian foyle, charles foyle, james foyle, royal humane society medal, flagstaff hill, warrnambool, shipwrecked coast, flagstaff hill, flagstaff hill maritime museum, maritime museum, shipwreck coast, flagstaff hill maritime village -
 Flagstaff Hill Maritime Museum and Village
Equipment - Ship's Telegraph section, Chadburn & Sons, 1875-1898
This is the Bridge Section of a ship’s telegraph and is a Duplex Gong model, made by Chadburn & Son of Liverpool. This duplex gong model would sound two signals whenever the navigational commands were given by the ship’s pilot to change the speed or direction. The ship’s telegraph was installed on Flagstaff Hill’s exhibit of the 1909 Hobart, Tasmania, ferry “SS Rowitta” installed in 1975 and enjoyed for more than 40 years. Communication between the ship’s pilot and the engine room in the late 19th century to the mid-20th-century was made with a system called an Engine Order Telegraph (E.O.T.) or ship’s telegraph. The equipment has two parts, the Bridge Section and the Engine Room Section. The Bridge Section is usually mounted onto a pedestal, and the Engine Room Section is attached to a vertical surface. The standard marine commands are printed or stamped around the face of the dial and indicated by a pointer or arrow that is usually moved by a rotating brass section or handle. The ship’s pilot stationed on the Bridge of a vessel sends his Orders for speed and direction to the Engine Room with the E.O.T. He moves the lever or levers, depending on the number of engines the ship has, to change the indicator on the Bridge Section’s dial to point in the new direction and speed of travel. This change causes the Orders to be duplicated on the Engine Room Section’s dial and a bell or bells to signal the change at the same time. The engineer then adjusts the ship’s engines and steering equipment to follow the pilot’s Order. CHADBURN & SON, Liverpool- Chadburn Brothers, William and C.H., were joint inventors and well-established makers of optical and scientific instruments and marine gauges. The firm was granted the Prince Albert Royal Warrant in the late 19th century. In 1870 William Chadburn applied for a patent for his navigational communication device for use on ships. By 1875 Chadburn & Son was producing the brass Engine Order Telegraph in its plant at 71 Lord Street, Liverpool. In 1911 the ship RMS Titanic was launched, fitted with Chadburn & Sons E.O.T. The Chadburn Ship Telegraph Company Limited was registered in 1898 to take over Chadburn & Sons. In 1903 a large factory at Bootle, near Liverpool, and their products were being sold overseas. In 1920 electric-powered telegraphs were developed. In 1944 the name changed to Chadburn’s (Liverpool) Limited. In 1968 the company became Chadburn Bloctube Ltd. In 2000 the company, now Bloctube Marine Limited, was still manufacturing ship telegraphs. SS ROWITTA: - The 1909 steam ferry, SS Rowitta, was installed as an exhibit at Flagstaff Hill in 1975 and was enjoyed by many visitors for 40 years. Rowitta was a timber steam ferry built in Hobart in 1909 using planks of Huon and Karri wood. It was a favourite of sightseeing passengers along Tasmania’s Tamar and Derwent rivers for 30 years. Rowitta was also known as Tarkarri and Sorrento and had worked as a coastal trading vessel between Devonport and Melbourne, and Melbourne Queenscliff and Sorrento. In 1974 Rowitta was purchased by Flagstaff Hilt to convert into a representation of the Speculant, a historic and locally significant sailing ship listed on the Victorian Heritage Database. (The Speculant was built in Scotland in 1895 and traded timber between the United Kingdom and Russia. Warrnambool’s P J McGennan & Co. then bought the vessel to trade pine timber from New Zealand to Victorian ports and cargo to Melbourne. It was the largest ship registered with Warrnambool as her home port, playing a key role in the early 1900s in the Port of Warrnambool. In 1911, on her way to Melbourne, it was wrecked near Cape Otway. None of the nine crew lost their lives.) The promised funds for converting Rowitta into the Speculant were no longer available, so it was restored back to its original configuration. The vessel represented the importance of coastal traders to transport, trade and communication in Australia times before rail and motor vehicles. Sadly, in 2015 the time had come to demolish the Rowitta due to her excessive deterioration and the high cost of ongoing repairs. The vessel had given over 100 years of service and pleasure to those who knew her. This Bridge section of a ship’s Engine Order Telegraph, used with an Engine Room section, represents late-19th century change and progress in communication and navigation at sea. This type of equipment was still in use in the mid-20th century. The object is significant for its association with its maker, Chadburn & Son, of Liverpool, a well-known marine instrument maker whose work was recognised by English Royalty, and whose products were selected to supply similar equipment for use on the RMS Titanic. This ship’s telegraph is connected to the history of the Rowitta, which was a large exhibit on display at Flagstaff Hill Maritime Village from the museum’s early beginnings until the vessel’s end of life 40 years later. The display was used as an aid to maritime education. The Rowitta represents the importance of coastal traders to transport, trade and communication along the coast of Victoria, between states, and in Australia before rail and motor vehicles. The vessel was an example of a ferry built in the early 20th century that served many different roles over its lifetime of over 100 years. Bridge section of a Ship’s Telegraph or Engine Order Telegraph (E.O.T.). The round double-sided, painted glass dial is contained within a brass case behind glass. It is fitted onto an outward tapering brass pedestal with a round base. The brass indicator arrows between the handles point simultaneously to both sides of the dial when moved. An oval brass maker’s plate is attached to the top of the case. The dial’s faces have inscriptions that indicate speed and direction, and the front face and plate include the maker’s details. A serial number is stamped on the collar where the dial is fitted to the pedestal. The ship’s telegraph is a Duplex Gong model, made by Chadburn & Son of Liverpool. Dial, maker’s details: “PATENT “DUPLEX GONG” TELEGRAPH / CHADBURN & SON / TELEGRAPH WORKS / PATENTEES & MANUFACTURERS / 11 WATERLOO ROAD / LIVERPOOL” LONDON / 105 FENCHURCH STREET” “NEWCASTLE / 85 QUAY + SIDE” “GLASGOW / 69 ANDERSON QUAY” “PATENT” Dial instructions: “FULL / HALF/ SLOW / FINISHED WITH ENGINES / STOP STAND BY / SLOW / HALF / FULL / ASTERN / AHEAD” Maker’s plate: “CHADBURN / & SON / PATENT / LIVERPOOL” Serial number: “22073”flagstaff hill, warrnambool, maritime village, maritime museum, shipwreck coast, great ocean road, engine order telegraph, e.o.t., navigational instrument, communication device, ship’s telegraph, engine room section, bridge section, rms titanic, chadburn & son, chadburn brothers, william chadburn, chadburn ship telegraph company, chadburns, duplex gong, liverpool, ss rowitta, navigation, marine technology, pilot’s orders, steam power, hobart, tasmania, devonport, tasmanian-built, ferry, steam ferry, steamer, 1909, early 20th century vessel, passenger vessel, tamar trading company, launceston, george town, sorrento, tarkarri, speculant, peter mcgennan, p j mcgennan & co. port phillip ferries pty ltd, melbourne, coastal trader, timber steamer, huon, karri, freighter, supply ship, charter ferry, floating restaurant, prawn boat, lakes entrance -
 Flagstaff Hill Maritime Museum and Village
Postcard - People, Bill Ferrier - rescuer, 11th November, 1905
The postcard shows a photograph of William Ferrier, the 25-year-old Warrnambool fisherman from South Warrnambool whose rescue of two sailors from the wrecked La Bella made him an overnight National hero, quoted as “one of the most heroic rescues in Victoria’s shipwreck history”. The La Bella was wrecked on 10th November 1905 and the photograph was taken on the next day. In the photograph, William Ferrier is seated in the centre, with four of the five survivors beside him: (from left to right) Leonard Robertson, R. Payne, Oscar Rosenholme and Jack Noake. The photograph was taken by Foyle Photography Studio in Warrnambool, originally owned by James Charles Foyle. He previously had a photographic studio in Melbourne 1882 1887, then opened “Foyle’s Photo Card Studios” in Liebig St, Warrnambool. James Foyle died on 13th July 1905 and his son and daughter, Charles and Lilian Foyle continued on with the business until 1945. This photograph was most likely taken by either Charles or Lilian Foyle. The story of William Ferrier’s brave act follows on below … The ship from which the sailors were rescued was the three-masted, iron and steel barquentine the La Bella, built in Norway in 1893. She was one of two iron and steel ships by Johan Smith, the company was one of the leading shipping families in Tvedestrand, Norway. She was significant to Norwegian shipping, being one of only 27 iron and steel ships ever built in Norway. She was registered in New Zealand and engaged from 1902 in inter-colonial trading of timber in the Pacific, between New Zealand and Australia and was often in Port Phillip Bay, Victoria. On 5th October 1905, the twelve-year-old La Bella left Lyttleton, New Zealand carrying a cargo of timber bound for Warrnambool, Australia. She was manned by a crew of twelve: the Master, (Captain Mylius, previously 1st Mate of La Bella, appointed Captain to La Bella on 6th February 1903) 2 Mates, Cook, six able seamen, one ordinary seaman and a boy. Bad weather en route caused her to shelter at Burnie on Tasmania's North West coast. On November 10th, the 37th day of her journey, La Bella approached Warrnambool. Captain Mylius steered her towards Lady Bay Channel in heavy south-west seas and evening mist. He ordered the helmsman to steer for the light. As the ship came round, a tremendous sea struck her on the port quarter, causing her to breach broadside in a northwesterly direction into breakers. The helm was brought round twice more, but each time heavy seas broke over her, the third time throwing the La Bella on to a submerged reef in Lady Bay now known as La Bella Reef (about 100 yards from the Warrnambool breakwater). The sea was so rough that it even wrenched a one-and-a-half ton anchor from its fastenings and into the sea. As Captain Mylius headed to the steel wheelhouse, intending to send up a rocket flare, a huge sea slammed the steel door into him (resulting in massive bruising front and back) Despite his injuries he still managed to set off a blue light, which he held up in his hands. La Bella’s lifeboats were filled with seawater and broke up on their chocks. The blue light was the first indication to people on the shore that there was a ship in distress. The Harbour Master, Captain Roe (who lived in the Harbour Master’s House opposite Flagstaff Hill), organised a group of volunteers to crew the lifeboat because the trained crew was unavailable; the crewmen were working on a steamer in Port Fairy at the time. He then poured oil onto the water to try and smooth the sea. At around 11 pm three of the crew took shelter in the steel forecastle but the sea crashed into it and broke it up. While the rest of the crew and onlookers watched helplessly in the moonlight the bodies were washed away into the sea, never to be seen again. Some of the crew lashed themselves to the weather rail to keep from being washed away. Watson, the ordinary seaman, became tangled in the rigging lines and was too weak to move, so the 2nd Mate, Robertson, put a line onto him so that he wouldn’t wash off. Around 11 pm three of the crew were unconscious from exhaustion. The situation on La Bella was becoming dangerous. The 2nd Mate moved to the ‘house’ and soon afterwards the ship slipped in the heavy sea. The lashings of the 1st Mate and the ‘boy’ Denham had kept them safe until about 2 am when they were washed overboard; no one was able to help. One by one, the exhausted crew were being washed overboard, too weak to hold on any longer. During the night the La Bella had broken into two and the deckhouse ran out towards the sea. Two more men drowned when trying to reach the lifeboat. By sunrise, the only survivors of the twelve were the Master, 2nd Mate and three seamen. Early in the morning, Captain Roe used the rocket apparatus on shore to try and shoot a line to the ship for a safer rescue but each attempt fell short of the target. Several attempts were made by the lifeboat to rescue the stricken sailors, but the rough conditions made this difficult for the boat to get close enough to the ship and the lifeboat had to return to shore. During a final attempt to reach the ship Captain Mylius ordered his men to jump into the sea. Leonard Robertson, 2nd mate, jumped and swam towards the lifeboat, taking hold of the boat hook offered to him. Oscar Rosenholme managed to reach the boat floating on a piece of timber from the ship’s load and a third survivor, Noake, also made the boat. Along with the lifeboat rescue crew, 25-year-old William Ferrier rowed his small dingy through the heavy seas and managed to rescue the Captain, whom he landed on the breakwater. Ferrier then returned to the ship to attempt a final rescue, losing his oars and rowlocks into the high sea. Using just a spare paddle he skulled towards the La Bella, reaching her stern in time to cut loose the lone surviving sailor, Payne, from the lashing that held him to the ship; the terrified sailor dropped from the ship and into the dingy. Shortly after the last man was rescued, the La Bella was lifted by a huge wave and crashed back down on the reef; she broke up and sank. The ordeal had lasted ten hours. The survivors were taken to the nearby Bay View Hotel and gratefully received warm food and clothing, medical attention and a place to sleep. In the following days, an unidentified body of a young person had washed ashore; it was either Watson or Denham. The body was buried in the Warrnambool cemetery with an appropriate gravestone and inscription. William Ferrier became a national hero as news of the daring rescue spread. In recognition of his bravery in the two daring rescues, he was awarded the Silver Medal for Bravery by the Royal Humane Society and was honoured in the letter from the Prime Minister and the Parliament of the Commonwealth, telegrams and a cheque for £20 from the Governor-General, over £150 subscribed by the public, including Warrnambool and district and readers of The Argus, and a gold medal from the Glenelg Dinghy Club of South Australia. Ferrier’s rescue efforts are one of the most heroic in Victoria’s shipwreck history. (William Ferrier’s son, Frank, received a similar award almost fifty years later when he helped rescue four members of the crew on the yacht Merlan after it ran on to a reef near the Point Lonsdale Lighthouse. ) The wreck of La Bella now lies on her port side in 13 metres of sheltered water inside the reef she struck. The bow section is relatively intact and part of the stern has drifted north-easterly towards the mouth of the Hopkins River. The reef the La Bella struck now bears its name. Those five rescued from the La Bella were Captain George Mylius, Leonard Robertson (2nd Mate, 21 years old), R. Payne, Oscar Rosenholme and Jack Noake. Those seven who lost their lives were Mr Coulson (1st mate), Charles Jackman (cook) Gustave Johnson, Pierre Johann and Robert Gent (all able seamen), Harry Watson (ordinary seaman) and Jack Denham (ship’s boy), Captain Mylius was found guilty of careless navigation; he had sailed into the bay without the services of a pilot. His Master Certificate was suspended for twelve months. Later he was also charged with manslaughter of one of the crew who had died when the La Bella was wrecked but found not guilty. The event’s adverse publicity and damage to his career took a toll on his health and he died of a heart attack six months after the wreck; he was only thirty-seven. His body was buried in the Melbourne General Cemetery. The La Bella was “the best documented of all sailing ships owned in New Zealand”. Her record books, ship logs, correspondence and supporting papers are still available. At the time of the tragedy, she was owned by Messers David C.Turnbull and Co. of Timaru, New Zealand timber merchants and shipping agents, who had purchased her on 13th December 1901. A detailed account of the last journey of La Bella can be read in “Leonard Robertson, the Whangaroa & La Bella” written by Jack Churchouse, published in 1982 by Millwood Press Ltd, Wellington, NZ. As well as this postcard, Flagstaff Hill’s La Bella Collection includes a photograph of the wrecked La Bella, a brass rail holder and the letter from the Prime Minister and other Members of Parliament that was sent to William Ferrier to commend him for his bravery. Some 15 – 17 ships are believed to have sunk in Lady Bay, but only two have been discovered on the seafloor; the “La Bella” and the “Edinburgh Castle”. Both wrecks are popular diving sites and are preserved as significant historical marine and marine archaeological sites. This postcard is part of the La Bella Collection and is significant at both a local and state level. Its connection to the La Bella shipwreck and the rescue of five survivors highlights the dangers of Victoria’s Shipwreck Coast. The photograph of William Ferrier and four of the five survivors demonstrates the bravery of ordinary Australians who risked their lives to save victims of shipwrecks along the coast. The postcard is significant to the history of Warrnambool as it portrays William Ferrier, a local fisherman whose descendants continue to live in the area. It highlights the way of life of people who lived in coastal towns in 19th century Victoria and the effects of shipwrecks upon them. The postcard connects to the congratulatory letter which was sent to William Ferrier by the Prime Minister and Government of Australia and demonstrates the importance they attached to his efforts for Victoria and to Australia. The postcard is also an example of the photography of Foyle Photographers who were in the town of Warrnambool from the late 1800’s. Charles and Lillian Foyle took over the business when their father James died in 1905. Lillian Foyle is significant as the first woman photographer in Warrnambool. It is not known whether Charles of Lillian took this photograph. This postcard is significant because of its association with the sailing ship “La Bella”. The “La Bella” is of local and state and national significance. It is one of the only two shipwrecks discovered in Lady Bay, Warrnambool, out of the 15-17 shipwrecks in the bay. Sepia photograph of William (Bill) Ferrier (seated in the middle), heroic rescuer of two crew members of the La Bella, wrecked at Warrnambool. The photograph is a postcard and shows five men dressed formally in suits and hats. Printed below the photograph are the name and place of the photographer, a royal crest and the details of two patrons of the photographer. Also below the photograph are some handwritten words in black pen. On the back of the postcard is a handwritten message in the same writing as the front.Printed on the front of the card is “Foyle, WARRNAMBOOL” “PATRONS: / HIS ROYAL HIGHNESS THE DUKE OF CORNWALL & YORK. / HIS EXCELLENCY LORD BRAS_ EY, R.O.B.” Handwritten on the front of the card is “Bill Ferrier / rescuer / Oh my hero _ _ _ “ Handwritten on the back of the card is a message. “La Bella” Wrecked off W.Bool Breakwater Nov. 1906 (_ _ _ _ show night) Payne Noake Rosenholme Robertson and Capt Mylius (saved) (moonlight bright) Watson (_ _ _ _ boy) Richwoud [possibly Richmond] drowned” and signed “Desdewoua [possibly Desdemona] Slogos”la bella, foyle, william ferrier, bill ferrier, lady bay, 1905, 10th november 1905, 11th november 1905, parliament of the commonwealth, royal humane society medal, flagstaff hill, warrnambool, shipwrecked coast, flagstaff hill maritime museum, maritime museum, shipwreck coast, flagstaff hill maritime village -
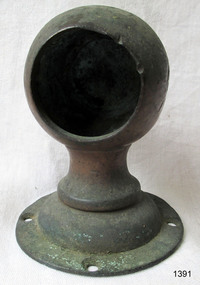 Flagstaff Hill Maritime Museum and Village
Functional object - Rail holder, About 1893, when the ship was made
This brass rail holder fixture would have been used to hold the end of a rail in place. There is no information as to where the fitting or rail would have been placed on the ship; sailing ships had many brass fittings. It was recovered from the wreck of the La Bella, which lies at the bottom of the Warrnambool Harbour. Some 15 ships are believed to have been wrecked in Lady Bay, but only two have been discovered on the sea floor; the La Bella and the Edinburgh Castle. Both wrecks are popular diving sites and are preserved as significant historical marine and marine archaeological sites. The story of the final voyage of the La Bella is summarised as follows … The ship from which the sailors were rescued was the three-masted, iron and steel barquentine the La Bella, built in Norway in 1893. She was one of two iron and steel ships by Johan Smith, the company being one of the leading shipping families in Tvedestrand, Norway. She was significant to Norwegian shipping, being one of only 27 iron and steel ships ever built in Norway. She was registered in New Zealand and engaged from 1902 in inter-colonial trading of timber in the pacific, between New Zealand and Australia and was often in Port Phillip Bay, Victoria. On 5th October, 1905, the twelve year old La Bella left Lyttleton, New Zealand carrying a cargo of timber bound for Warrnambool, Australia . She was manned by a crew of twelve: the Master, (Captain Mylius, previously 1st Mate of La Bella, appointed Captain to La Bella on 6th February 1903) 2 Mates, Cook, six able seamen, one ordinary seaman and a boy. . Bad weather en route caused her to shelter at Burnie on Tasmania's North West coast. On November 10th, the 37th day of her journey, La Bella approached Warrnambool. Captain Mylius steered her towards Lady Bay Channel in heavy south-west seas and evening mist. He ordered the helmsman to steer for the light. As the ship came round, a tremendous sea struck her on the port quarter, causing her to breach broadside in a north-westerly direction into breakers. The helm was brought round twice more, but each time heavy seas broke over her, the third time throwing the La Bella on to a submerged reef in Lady Bay now known as La Bella Reef (about 100 yards from the Warrnambool breakwater). The sea was so rough that it even wrenched a one-and-a-half ton anchor from its fastenings and into the sea. As Captain Mylius headed to the steel wheelhouse, intending to send up a rocket flare, a huge sea slammed the steel door into him (resulting in massive bruising front and back) Despite his injuries he still managed to set off a blue light, which he held up in his hands. La Bella’s lifeboats were filled with sea water and broke up on their chocks. The blue light was the first indication to people on shore that there was a ship in distress. The Harbour Master, Captain Roe (who lived in the Harbour Master’s House opposite Flagstaff Hill), organised a group of volunteers to crew the lifeboat because the trained crew was unavailable; the crewmen were working on a steamer in Port Fairy at the time. He then poured oil onto the water to try and smooth the sea. At around 11pm three of the crew took shelter in the steel forecastle but the sea crashed into it and broke it up. While the rest of the crew and onlookers watched helplessly in the moonlight the bodies were washed away into the sea, never to be seen again. Some of the crew lashed themselves to the weather rail to keep from being washed away. Watson, the ordinary seaman, became tangled in the rigging lines and was too weak to move, so the 2nd Mate, Robertson, put a line onto him so that he wouldn’t wash off. Around 11pm three of the crew were unconscious from exhaustion. The situation on La Bella was becoming dangerous. The 2nd Mate moved to the ‘house’ and soon afterwards the ship slipped in the heavy sea. The lashings of the 1st Mate and the ‘boy’ Denham had kept them safe until about 2am when they were washed overboard; no one was able to help. One by one, the exhausted crew were being washed overboard, too weak to hold on any longer. During the night the La Bella had broken into two and the deckhouse ran out towards the sea. Two more men drowned when trying to reach the lifeboat. By sunrise the only survivors of the twelve were the Master, 2nd Mate and three seamen. Early in the morning Captain Roe used the rocket apparatus on shore to try and shoot a line to the ship for a safer rescue but each attempt fell short of the target. Several attempts were made by the lifeboat to rescue the stricken sailors, but the rough conditions made this difficult for the boat to get close enough to the ship and the lifeboat had to return to shore. During a final attempt to reach the ship Captain Mylius ordered his men to jump into the sea. Leonard Robertson, 2nd mate, jumped and swam towards the lifeboat, taking hold of the boat hook offered to him. Oscar Rosenholme managed to reach the boat floating on a piece of timber from the ship’s load and a third survivor, Noake, also made the boat. Along with the lifeboat rescue crew, 25 year old William Ferrier rowed his small dingy through the heavy seas and managed to rescue the Captain, whom he landed on the breakwater. Ferrier then returned to the ship to attempt a final rescue, losing his oars and rowlocks into the high sea. Using just a spare paddle he skulled towards the La Bella, reaching her stern in time to cut loose the lone surviving sailor, Payne, from the lashing that held him to the ship; the terrified sailor dropped from the ship and into the dingy. Shortly after the last man was rescued, the La Bella was lifted by a huge wave and crashed back down on the reef; she broke up and sank. The ordeal had lasted ten hours. The survivors were taken to the nearby Bay View Hotel and gratefully received warm food and clothing, medical attention and a place to sleep. In the following days an unidentified body of a young person was washed ashore; it was either Watson or Denham. The body was buried in the Warrnambool cemetery with an appropriate gravestone and inscription. William Ferrier became a national hero as news of the daring rescue spread. In recognition of his bravery in the two daring rescues he was awarded the Silver Medal for Bravery by the Royal Humane Society and was honoured in the letter from the Prime Minister and the Parliament of the Commonwealth, telegrams and a cheque for £20 from the Governor General, over £150 subscribed by the public, including Warrnambool and district and readers of The Argus, and a gold medal from the Glenelg Dinghy Club of South Australia. Ferrier’s rescue efforts are one of the most heroic in Victoria’s shipwreck history. (William Ferrier’s son, Frank, received a similar award almost fifty years later, when he helped rescue four members of the crew on the yacht Merlan, after it ran on to a reef near the Point Lonsdale Lighthouse. ) The wreck of La Bella now lies on her port side in 13 metres of sheltered water inside the reef she struck. The bow section is relatively intact and part of the stern has drifted north-easterly towards the mouth of the Hopkins River. The reef the La Bella struck now bears its name. Those five rescued from the La Bella were Captain George Mylius, Leonard Robertson (2nd Mate, 21 years old), R. Payne, Oscar Rosenholme and Jack Noake. Those seven who lost their lives were Mr Coulson (1st mate), Charles Jackman (cook) Gustave Johnson, Pierre Johann and Robert Gent (all able seamen), Harry Watson (ordinary seaman) and Jack Denham (ship’s boy), Captain Mylius was found guilty of careless navigation; he had sailed into the bay without the services of a pilot. His Master Certificate was suspended for twelve months. Later he was also charged with manslaughter of one of the crew who had died when the La Bella was wrecked, but found not guilty. The event’s adverse publicity and damage to his career took a toll on his health and he died of a heart attack six months after the wreck; he was only thirty-seven. His body was buried in the Melbourne General Cemetery. The La Bella was “the best documented of all sailing ships owned in New Zealand”. Her record books, ship logs, correspondence and supporting papers are still available. At the time of the tragedy, she was owned by Messers David C.Turnbull and Co. of Timaru, New Zealand timber merchants and shipping agents, who had purchased her on 13th December 1901. A detailed account of the last journey of La Bella can be read in “Leonard Robertson, the Whangaroa & La Bella” written by Jack Churchouse, published in 1982 by Millwood Press Ltd, Wellington, NZ. Some 15 – 17 ships are believed to have sunk in Lady Bay, but only two have been discovered on the seafloor; the “La Bella” and the “Edinburgh Castle”. Both wrecks are popular diving sites and are preserved as significant historical marine and marine archaeological sites. As well as this letter, Flagstaff Hill’s La Bella Collection includes a photograph of the wrecked La Bella, a brass rail holder and a postcard of William Ferrier with four of the survivors. This original congratulatory letter sent to William Ferrier by the Prime Minister and Government of Australia demonstrates the importance attached to his efforts for Victoria and to Australia. The letter is part of the La Bella Collection and is significant at both a local and state level. Its connection to the La Bella shipwreck and the rescue of five survivors highlights the dangers of Victoria’s Shipwreck Coast. The letter to William Ferrier from the Australian Government acknowledges the bravery of ordinary Australians who risked their lives to save victims of shipwrecks along the coast. The letter is significant to the history of Warrnambool as it honours William Ferrier, a local fisherman whose descendants continue to live in the area. It highlights the way of life of people who lived in coastal towns in 19th century Victoria and the effects of shipwrecks upon them. The letter connects to the postcard of William Ferrier with four of the five rescued crew, the photograph of the wreck of the La Bella and the artefact from the wreck, the rail holder. This item is significant because of its association with the sailing ship “La Bella” . the “La Bella” is of local and state and national significance. It is one of the only two shipwrecks discovered in Lady Bay, Warrnambool, out of the 15-17 shipwrecks in the bay. Brass rail holder from the wreck "La Bella". This rail holder would have been used as a fitting for the end of a rail. It is made up of two parts and looks a little like a goblet in shape. The top is a hollow spherical shape with a circular hole cut out on one side, into which the end of a round rail would fit. There are two gouge marks close to each other on one side of the hole, about one centimetre apart, at 1 and 2 o’clock position. The sphere has a hollow pipe-like stem with a screw thread turned into the outside of the lower section and the bottom of the stem has been flared out after having the base fitted. The base is round and has a mound in the centre. The edge has four evenly spaced fixture holes around its edge. The metal shows signs of pitting and has mild encrustation. The fitting of the base is loose, allowing it to swivel in a complete circle. The top of the sphere is rough and has a dent in it. Underneath the base there is verdigris; some has flaked off and reveals a bright golden colour underneath. rail holder, brass rail holder, la bella, lady bay, norway, 1893, new zealand, captain mylius, william ferrier, flagstaff hill, warrnambool, shipwrecked coast, flagstaff hill maritime museum, maritime museum, shipwreck coast, flagstaff hill maritime village -
 Flagstaff Hill Maritime Museum and Village
Letter - William Ferrier, 14th November 1905
The letter to William Ferrier of South Warrnambool from the Prime Minister and the Parliament of the Commonwealth recognised the significance of William’s brave and courageous lifesaving act to the people of Australia; “They all feel that your conduct was worthy of the best deeds done by British sailors in the past and they are proud to know that Australia can produce such as you.” The story of that brave rescue follows on below … The ship from which the sailors were rescued was the three-masted, iron and steel barquentine the La Bella, built in Norway in 1893. She was one of two iron and steel ships by Johan Smith, The company was one of the leading shipping families in Tvedestrand, Norway. She was significant to Norwegian shipping, being one of only 27 iron and steel ships ever built in Norway. She was registered in New Zealand and engaged from 1902 in inter-colonial trading of timber in the Pacific, between New Zealand and Australia and was often in Port Phillip Bay, Victoria. On 5th October 1905, the twelve-year-old La Bella left Lyttleton, New Zealand carrying a cargo of timber bound for Warrnambool, Australia. She was manned by a crew of twelve: the Master, (Captain Mylius, previously 1st Mate of La Bella, appointed Captain to La Bella on 6th February 1903) 2 Mates, Cook, six able seamen, one ordinary seaman and a boy. Bad weather en route caused her to shelter at Burnie on Tasmania's North West coast. On November 10th, the 37th day of her journey, La Bella approached Warrnambool. Captain Mylius steered her towards Lady Bay Channel in heavy south-west seas and evening mist. He ordered the helmsman to steer for the light. As the ship came round, a tremendous sea struck her on the port quarter, causing her to breach broadside in a north-westerly direction into breakers. The helm was brought round twice more, but each time heavy seas broke over her, the third time throwing the La Bella on to a submerged reef in Lady Bay now known as La Bella Reef (about 100 yards from the Warrnambool breakwater). The sea was so rough that it even wrenched a one-and-a-half ton anchor from its fastenings and into the sea. As Captain Mylius headed to the steel wheelhouse, intending to send up a rocket flare, a huge sea slammed the steel door into him (resulting in massive bruising front and back) Despite his injuries he still managed to set off a blue light, which he held up in his hands. La Bella’s lifeboats were filled with seawater and broke up on their chocks. The blue light was the first indication to people on the shore that there was a ship in distress. The Harbour Master, Captain Roe (who lived in the Harbour Master’s House opposite Flagstaff Hill), organised a group of volunteers to crew the lifeboat because the trained crew was unavailable; the crewmen were working on a steamer in Port Fairy at the time. He then poured oil onto the water to try and smooth the sea. At around 11 pm three of the crew took shelter in the steel forecastle but the sea crashed into it and broke it up. While the rest of the crew and onlookers watched helplessly in the moonlight the bodies were washed away into the sea, never to be seen again. Some of the crew lashed themselves to the weather rail to keep from being washed away. Watson, the ordinary seaman, became tangled in the rigging lines and was too weak to move, so the 2nd Mate, Robertson, put a line onto him so that he wouldn’t wash off. Around 11 pm three of the crew were unconscious from exhaustion. The situation on La Bella was becoming dangerous. The 2nd Mate moved to the ‘house’ and soon afterwards the ship slipped in the heavy sea. The lashings of the 1st Mate and the ‘boy’ Denham had kept them safe until about 2 am when they were washed overboard; no one was able to help. One by one, the exhausted crew were being washed overboard, too weak to hold on any longer. During the night the La Bella had broken into two and the deckhouse ran out towards the sea. Two more men drowned when trying to reach the lifeboat. By sunrise, the only survivors of the twelve were the Master, 2nd Mate and three seamen. Early in the morning, Captain Roe used the rocket apparatus on shore to try and shoot a line to the ship for a safer rescue but each attempt fell short of the target. Several attempts were made by the lifeboat to rescue the stricken sailors, but the rough conditions made this difficult for the boat to get close enough to the ship and the lifeboat had to return to shore. During a final attempt to reach the ship Captain Mylius ordered his men to jump into the sea. Leonard Robertson, 2nd mate, jumped and swam towards the lifeboat, taking hold of the boat hook offered to him. Oscar Rosenholme managed to reach the boat floating on a piece of timber from the ship’s load and a third survivor, Noake, also made the boat. Along with the lifeboat rescue crew, 25-year-old William Ferrier rowed his small dingy through the heavy seas and managed to rescue the Captain, whom he landed on the breakwater. Ferrier then returned to the ship to attempt a final rescue, losing his oars and rowlocks into the high sea. Using just a spare paddle he skulled towards the La Bella, reaching her stern in time to cut loose the lone surviving sailor, Payne, from the lashing that held him to the ship; the terrified sailor dropped from the ship and into the dingy. Shortly after the last man was rescued, the La Bella was lifted by a huge wave and crashed back down on the reef; she broke up and sank. The ordeal had lasted ten hours. The survivors were taken to the nearby Bay View Hotel and gratefully received warm food and clothing, medical attention and a place to sleep. In the following days, an unidentified body of a young person has washed ashore; it was either Watson or Denham. The body was buried in the Warrnambool cemetery with an appropriate gravestone and inscription. William Ferrier became a national hero as news of the daring rescue spread. In recognition of his bravery in the two daring rescues, he was awarded the Silver Medal for Bravery by the Royal Humane Society and was honoured in the letter from the Prime Minister and the Parliament of the Commonwealth, telegrams and a cheque for £20 from the Governor-General, over £150 subscribed by the public, including Warrnambool and district and readers of The Argus, and a gold medal from the Glenelg Dinghy Club of South Australia. Ferrier’s rescue efforts are one of the most heroic in Victoria’s shipwreck history. (William Ferrier’s son, Frank, received a similar award almost fifty years later when he helped rescue four members of the crew on the yacht Merlan after it ran on to a reef near the Point Lonsdale Lighthouse. ) The wreck of La Bella now lies on her port side in 13 metres of sheltered water inside the reef she struck. The bow section is relatively intact and part of the stern has drifted north-easterly towards the mouth of the Hopkins River. The reef the La Bella struck now bears its name. Those five rescued from the La Bella were Captain George Mylius, Leonard Robertson (2nd Mate, 21 years old), R. Payne, Oscar Rosenholme and Jack Noake. Those seven who lost their lives were Mr Coulson (1st mate), Charles Jackman (cook) Gustave Johnson, Pierre Johann and Robert Gent (all able seamen), Harry Watson (ordinary seaman) and Jack Denham (ship’s boy), Captain Mylius was found guilty of careless navigation; he had sailed into the bay without the services of a pilot. His Master Certificate was suspended for twelve months. Later he was also charged with the manslaughter of one of the crew who had died when the La Bella was wrecked but found not guilty. The event’s adverse publicity and damage to his career took a toll on his health and he died of a heart attack six months after the wreck; he was only thirty-seven. His body was buried in the Melbourne General Cemetery. The La Bella was “the best documented of all sailing ships owned in New Zealand”. Her record books, ship logs, correspondence and supporting papers are still available. At the time of the tragedy, she was owned by Messers David C.Turnbull and Co. of Timaru, New Zealand timber merchants and shipping agents, who had purchased her on 13th December 1901. A detailed account of the last journey of La Bella can be read in “Leonard Robertson, the Whangaroa & La Bella” written by Jack Churchouse, published in 1982 by Millwood Press Ltd, Wellington, NZ. As well as this letter, Flagstaff Hill’s La Bella Collection includes a photograph of the wrecked La Bella, a brass rail holder and a postcard of William Ferrier with four of the survivors. Some 15 – 17 ships are believed to have sunk in Lady Bay, but only two have been discovered on the seafloor; the “La Bella” and the “Edinburgh Castle”. Both wrecks are popular diving sites and are preserved as significant historical marine and marine archaeological sites. This original congratulatory letter sent to William Ferrier by the Prime Minister and Government of Australia demonstrates the importance attached to his efforts for Victoria and to Australia. The letter is part of the La Bella Collection and is significant at both a local and state level. Its connection to the La Bella shipwreck and the rescue of five survivors highlights the dangers of Victoria’s Shipwreck Coast. The letter to William Ferrier from the Australian Government acknowledges the bravery of ordinary Australians who risked their lives to save victims of shipwrecks along the coast. The letter is significant to the history of Warrnambool as it honours William Ferrier, a local fisherman whose descendants continue to live in the area. It highlights the way of life of people who lived in coastal towns in 19th century Victoria and the effects of shipwrecks upon them. The letter connects to the postcard of William Ferrier with four of the five rescued crew, the photograph of the wreck of the La Bella and the artefact from the wreck, the rail holder. This letter is significant because of its association with the sailing ship “La Bella”. The “La Bella” is of local and state and national significance. It is one of the only two shipwrecks discovered in Lady Bay, Warrnambool, out of the 15-17 shipwrecks in the bay. Letter to William Ferrier of South Warrnambool from the Prime Minister and Members of Parliament commending him on his bravery. The printed letterhead includes a coat of arms in the top centre and the official address. The letter is very neatly hand written in black pen and includes 4 signatures of Members of Parliament. The rectangular paper is cream coloured with some yellow/brown discolouring. It has the letterhead on the right hand side of it and the written letter begins below the letterhead. The paper has been folded so that the right side becomes the cover page of the letter. The writing is continued onto the inside right hand page of the folded paper and the writing ends here. There is more recent writing on the bottom right hand corner of the back page. The paper has been officially folded in half a total 3 times and there is heavy discolouration on the sections that form the front and back of the folded letter. There is a 4th fold line that is less pronounced that the other folds and would make the paper the size to fit into a pocket. At several fold creases the paper has worn through. The edges of the paper have minor tears. The printed coat of arms is that of the House of Representatives. Underneath is printed “The Parliament of the Commonwealth, / Parliament House / Melbourne”. The hand written, letter is dated “14th November, 1905” and addressed to “Mr. William Ferrier / South Warrnambool” The letter begins “The Speaker, the Prime Minister and Members of the Ministry and its supporters, the Leader and Members of the Opposition, the Leader and Members of the Labour Party, being all the Members of the House of Representatives of the Federal Parliament of Australia” … It continues “desire to express to you their appreciation of your bravery in skulling out to the wreck of the “La Bella” at Warrnambool on Saturday, 11th November, 1905, and recovering therefrom two of the crew who were in imminent danger of their lives. They all feel that your conduct was worthy of the best deeds done by British sailors in the past and they are proud to know that Australia can produce such as you.” The letter is “Signed on behalf of the Members – Speaker (Frederick Holder ), Deputy Leader of the Opposition (Joseph Cook ), Prime Minister (Alfred Deakin), Leader of the Labour Party ( J.C. Watson)” On the back of the letter is blue ink handwriting “OWNER / G. FERRIER / TO. BE. PHOTOGRAPHED / 27-4-76”la bella, william ferrier, bill ferrier, lady bay, 1905, 10th november 1905, 11th november 1905, parliament of the commonwealth, prime minister, australian government, new zealand, flagstaff hill, warrnambool, shipwrecked coast, flagstaff hill maritime museum, maritime museum, shipwreck coast, flagstaff hill maritime village -
 Federation University Historical Collection
Ballarat Teachers' College (Year of 1947) correspondence, Ballarat Teachers' College (Year of 1947) correspondence relating to reunions, 1990s
All participants attended BTC (Ballarat Teacher's College) in 1947.Much of this document is handwritten so is significant as an example of teacher's handwritten letters.Two Ballarat Courier newspapers dated 5 June 1991 and 1 June 1991 bound at side with white contact adhesive. The newspapers are used as an alphabetical filing system for correspondence relating to reunions. They have been cut along the top edge to create an indented filing system with a number and name put onto each tab. .1) Newspaper dated 5 June 1991, comprising tabs 1 Athol/Aisbett - 27 Gleeson. The information contained in the pages is sometimes biographical, with names, addresses and occupations. * 1. Athol/Aisbett 6 pages * 2. Nancy Alexander (McDonald) 7 pages * 3. Jessie Batson 3 pages * 4. Eddie Blake - * 5. Phyllis Borley (Smith) 10 pages * 6. Keith Boyd 1 page * 7. Owen Brennan - * 8. Josie Bunning (Humphries) 1 page * 9. Ron Carless 15 pages * 10. Jean Clade (Courten Coster) * 11. John Collins 3 pages * 12. Kevin Collins 2 pages * 13. Colin Connelly 1 page * 14. David Cooper 9 pages * 15. Kath Crossnett (Ward) 1 page * 16. Norma Dally (Gittson) 4 pages * 17. inez Domaschenz (Reimers) 3 * 18. Dawn Doney (Spencer) 5 pages * 19. Fay Dreher (O'Toole) 6 pages * 20. John Ellifson - * 21. Jean Elliott (Elliott) 1page * 22. Ethel Esmore (White) 17 pages * 23. Marie Faulds 3 pages * 24. Hugh Fraser 2 pages * 25. Beatrice Freeman (Sanders) 6 pages * 26. Bob Giddings 2 pages * 27. Bill Gleeson 2 pages 15105.2 Newspaper dated 1 June 1991, comprising tabs 28. Gorrie/Gunning to 81. Williams/Witney, then names in alphabetical order and one tab "information" at back of newspaper filing system. The following pages are listed after the second name of the "tab" * 28. Val Gorrie (Lynch) * 29. Joan Gunning (Jennings) 17 pages * 30. Madeline Hannan (Meehan) * 31. Lindsay Harley 6 pages * 32. Bill Henderson * 33. Wal Henning 2 pages * 34. Tom Hill * 35. Jim Howlett 13 pages * 36. Claire Kennedy (McLachlan) * 37. Joyce Kennedy (Evans) 3 pages * 38. Nancy Kerr (Harley) * 39. Arthur Lelean 2 pages * 40. Beth Leslie (Only) (Stutterd) * 41. Pat Lewsin (Williams) 12 pages * 42. Joy Love (Robertson) * 43. Pat Luxford (Steer) 3 pages * 44. Lynette Lynch (vickery) (McCl;ure) * 45. Ann McKinnon (Oldfield) 29 pages * 46. Alex McLachlan * 47. Keith McLean 3 pages * 48. Alex Magill * 49. Jack Mallett 12 pages * 50. Fred Marshman * 51. Alan Martin 11 pages * 52. Joyce Mathison (fraser) * 53. Maurine Merlin (Carter) 9 pages * 54. Muriel Morrish * 55. Mary Murnane (Bergin) 15 pages * 56. George Nield * 57. John O'Shannessy 1 small note * 58. Margaret Palmer (Alexander) * 59. Gwen Pamphiton 20 pages * 60. Tom Pascoe * 61. Howard Pattenden 12 pages and two small notes * 62. Ruth Pearse (Marshall) * 63. Betty Ferry (Ellis) 7 pages plus small note * 64. Mavis Polard (Grant * 65. Bill Punshon 4 pages and 2 small notes * 66. Peggy Purdue (Wood) (Jakeman) * 67. Milton Rice 29 pages * 68. Thelma Ritchie * 69. Pat Robinson (Kloppenborg) 6 pages * 70. Burns roddis * 71. Elva Surman (Murphy) - nil * 72. Ray Terrill * 73. Kath Tobin (Hatfield) 2 pages * 74. Ruth Tozer * 75. Jack Tyers 10 pages * 76. Neila Vallance (Peart) * 77. Pat Watts (Knight) 12 plus 2 newspaper articles * 78. Lorna Welsh (Davis) * 79. Betty Williams (Maynard) 12 pages plus 2 small notes * 80. Jil Williams * 81. Val Witney (Kelm) 12 pages * Carl Bryan * Mattie Hayes (Uton) - nil * Beth Hughes * Trudi Kentish 7 pages * W. Lord - nil * Mephan McEwin - 12 pages plus newspaper obit * Monica Miller (Rawlings) 5 pages includes funeral booklet * Win O'Brien (Lloyd) 9 pages * Alan Sonsee - nil * Information - 25 pages of acceptances and addresses of students who attended BTC in 1947 Most of the notes and letters contained in this document are handwritten. All the tabs are handwritten, mostly in blue ink or biro.btc, ballarat, ballarat teachers' college, education, 1947, harley, tozer, pattenden, sonsee, lelean, miller -
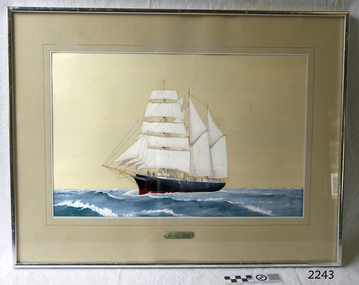 Flagstaff Hill Maritime Museum and Village
Painting - Maritime painting, The La Bella, 1980s
This painting of the “La Bella” is associated with Flagstaff Hill’s collection of artefacts from the wreck of the “La Bella”. It was painted around the 1980s by maritime artist Philip J. Gray. Some 15 – 17 ships are believed to have sunk in Lady Bay, but only two have been discovered on the seafloor; the “La Bella” and the “Edinburgh Castle”. Both wrecks are popular diving sites and are preserved as significant historical marine and marine archaeological sites. The Kosnar Picture Framing and Mirrors Shop identified the "GRAY 3135, Y04/111" as their job number for the framing and said that the label "ANOTHER KOSNAR FEATURE" was last used before about 1990. About artist Philip J. Gray “Philip is one of Australia’s leading maritime artists and his meticulous research and social commentary paintings of ships, such as, the Loch Ard and Schomberg form an important part of Warrnambool’s Flagstaff Hill Maritime Museum.” [Dr Marion Manifold, Artist and Art Historian, 2014] Philip James Gray was born in London but has lived most of his life in Australia. He graduated from a London school of art as an illustrator, specialising in technical and scientific illustration as well as other commercial and applied art. He was also a student for a time of Fyffe Christie - British figurative artist, mural painter and humanitarian – who had a great influence on his career. Philip has always worked as a professional artist and illustrator. Many publications on maritime history have featured his work. His paintings have been released and sold all over the world as limited edition prints. The State Library of Victoria’s ‘Latrobe Collection’ holds two of his paintings. His street painting of ‘The Ashes Contest’ decorates the brick wall of Old Bakery Laneway in Sunbury and a Sunbury café owner commissioned him to paint the ‘Sunbury Pop Festival’ as a remembrance of local history. Philip has been an active member of the Sunbury Art Society in Victoria for several years, serving on the committee for some of that time and being involved in exhibitions. He enjoys helping new artists and sharing his skills and experience. About the “La Bella” The wreck of the La Bella lies at the bottom of the Warrnambool Harbour in Lady Bay. Some 15 ships are believed to have been wrecked there but only two have been discovered on the sea floor; the La Bella and the Edinburgh Castle. Both wrecks are popular diving sites and are preserved as significant historical marine and marine archaeological sites. The story of the final voyage of the La Bella is summarised as follows … The ship from which the sailors were rescued was the three-masted, iron and steel barquentine the La Bella, built in Norway in 1893. She was one of two iron and steel ships by Johan Smith, the company being one of the leading shipping families in Tvedestrand, Norway. She was significant to Norwegian shipping, being one of only 27 iron and steel ships ever built in Norway. La Bella was registered in New Zealand and engaged from 1902 in inter-colonial trading of timber in the pacific, between New Zealand and Australia and was often in Port Phillip Bay, Victoria. On 5th October 1905 the twelve year old La Bella left Lyttleton, New Zealand carrying a cargo of timber bound for Warrnambool, Australia . She was manned by a crew of twelve: the Master, (Captain Mylius, previously 1st Mate of La Bella, appointed Captain to La Bella on 6th February 1903) 2 Mates, Cook, six able seamen, one ordinary seaman and a boy. Bad weather en-route caused her to shelter at Burnie on Tasmania's North West coast. On November 10th, the 37th day of her journey, La Bella approached Warrnambool. Captain Mylius steered her towards Lady Bay Channel in heavy south-west seas and evening mist. He ordered the helmsman to steer for the light. As the ship came round, a tremendous sea struck her on the port quarter, causing her to breach broadside in a north-westerly direction into breakers. The helm was brought round twice more, but each time heavy seas broke over her, the third time throwing the La Bella on to a submerged reef in Lady Bay now known as La Bella Reef (about 100 yards from the Warrnambool breakwater). The sea was so rough that it even wrenched a one-and-a-half ton anchor from its fastenings and into the sea. As Captain Mylius headed to the steel wheelhouse, intending to send up a rocket flare, a huge sea slammed the steel door into him (resulting in massive bruising front and back) Despite his injuries he still managed to set off a blue light, which he held up in his hands. La Bella’s lifeboats were filled with sea water and broke up on their chocks. The blue light was the first indication to people on shore that there was a ship in distress. The Harbour Master, Captain Roe (who lived in the Harbour Master’s House opposite Flagstaff Hill), organised a group of volunteers to crew the lifeboat because the trained crew was unavailable; the crewmen were working on a steamer in Port Fairy at the time. He then poured oil onto the water to try and smooth the sea. At around 11pm three of the crew took shelter in the steel forecastle but the sea crashed into it and broke it up. While the rest of the crew and onlookers watched helplessly in the moonlight the bodies were washed away into the sea, never to be seen again. Some of the crew lashed themselves to the weather rail to keep from being washed away. Watson, the ordinary seaman, became tangled in the rigging lines and was too weak to move, so the 2nd Mate, Robertson, put a line onto him so that he wouldn’t wash off. Around 11pm three of the crew were unconscious from exhaustion. The situation on La Bella was becoming dangerous. The 2nd Mate moved to the ‘house’ and soon afterwards the ship slipped in the heavy sea. The lashings of the 1st Mate and the ‘boy’ Denham had kept them safe until about 2am when they were washed overboard; no one was able to help. One by one, the exhausted crew were being washed overboard, too weak to hold on any longer. During the night the La Bella had broken into two and the deckhouse ran out towards the sea. Two more men drowned when trying to reach the lifeboat. By sunrise the only survivors of the twelve were the Master, 2nd Mate and three seamen. Early in the morning Captain Roe used the rocket apparatus on shore to try and shoot a line to the ship for a safer rescue but each attempt fell short of the target. Several attempts were made by the lifeboat to rescue the stricken sailors, but the rough conditions made this difficult for the boat to get close enough to the ship and the lifeboat had to return to shore. During a final attempt to reach the ship Captain Mylius ordered his men to jump into the sea. Leonard Robertson, 2nd mate, jumped and swam towards the lifeboat, taking hold of the boat hook offered to him. Oscar Rosenholme managed to reach the boat floating on a piece of timber from the ship’s load and a third survivor, Noake, also made the boat. Along with the lifeboat rescue crew, 25 year old William Ferrier rowed his small dingy through the heavy seas and managed to rescue the Captain, whom he landed on the breakwater. Ferrier then returned to the ship to attempt a final rescue, losing his oars and rowlocks into the high sea. Using just a spare paddle he skulled towards the La Bella, reaching her stern in time to cut loose the lone surviving sailor, Payne, from the lashing that held him to the ship; the terrified sailor dropped from the ship and into the dingy. Shortly after the last man was rescued, the La Bella was lifted by a huge wave and crashed back down on the reef; she broke up and sank. The ordeal had lasted ten hours. The survivors were taken to the nearby Bay View Hotel and gratefully received warm food and clothing, medical attention and a place to sleep. In the following days an unidentified body of a young person was washed ashore; it was either Watson or Denham. The body was buried in the Warrnambool cemetery with an appropriate gravestone and inscription. William Ferrier became a national hero as news of the daring rescue spread. In recognition of his bravery in the two daring rescues he was awarded the Silver Medal for Bravery by the Royal Humane Society and was honoured in the letter from the Prime Minister and the Parliament of the Commonwealth, telegrams and a cheque for £20 from the Governor General, over £150 subscribed by the public, including Warrnambool and district and readers of The Argus, and a gold medal from the Glenelg Dinghy Club of South Australia. Ferrier’s rescue efforts are one of the most heroic in Victoria’s shipwreck history. (William Ferrier’s son, Frank, received a similar award almost fifty years later, when he helped rescue four members of the crew on the yacht Merlan, after it ran on to a reef near the Point Lonsdale Lighthouse. ) The wreck of La Bella now lies on her port side in 13 metres of sheltered water inside the reef she struck. The bow section is relatively intact and part of the stern has drifted north-easterly towards the mouth of the Hopkins River. The reef the La Bella struck now bears its name. Those five rescued from the La Bella were Captain George Mylius, Leonard Robertson (2nd Mate, 21 years old), R. Payne, Oscar Rosenholme and Jack Noake. Those seven who lost their lives were Mr Coulson (1st mate), Charles Jackman (cook) Gustave Johnson, Pierre Johann and Robert Gent (all able seamen), Harry Watson (ordinary seaman) and Jack Denham (ship’s boy). Captain Mylius was found guilty of careless navigation; he had sailed into the bay without the services of a pilot. His Master Certificate was suspended for twelve months. Later he was also charged with manslaughter of one of the crew who had died when the La Bella was wrecked, but found not guilty. The event’s adverse publicity and damage to his career took a toll on his health and he died of a heart attack six months after the wreck; he was only thirty-seven. His body was buried in the Melbourne General Cemetery. The La Bella was “the best documented of all sailing ships owned in New Zealand”. Her record books, ship logs, correspondence and supporting papers are still available. At the time of the tragedy she was owned by Messers David C.Turnbull and Co. of Timaru, New Zealand timber merchants and shipping agents, who had purchased her on 13th December 1901. A detailed account of the last journey of La Bella can be read in “Leonard Robertson, the Whangaroa & La Bella” written by Jack Churchouse, published in 1982 by Millwood Press Ltd, Wellington, NZ.This painting of the La Bella by Philip J. Gray is part of the La Bella Collection and is significant at both a local and state level. Its connection to the La Bella shipwreck and the rescue of five survivors highlights the dangers of Victoria’s Shipwreck Coast. The painting connects with other objects and artefacts associated with the wreck of the La Bella. This painting is significant because of its association with the sailing ship “La Bella” . the “La Bella” is of local and state and national significance. It is one of the only two shipwrecks discovered in Lady Bay, Warrnambool, out of the 15-17 shipwrecks in the bay. Large framed painting of the three masted barquentine "La Bella" fully rigged. Painted by Phillip J Gray. A fine printed line squares off the painting. Beneath painting and line is a gold plate with black copper plate designating "La Bella" is encased in glass, surrounded by a silver-metal frame. Yellow and brown paper label is adhered to back of painting. Picture framed by Kosnar in Melbourne."The La Bella" on gold plaque Logo of "K" inside a brown square. "GRAY 3135, Y04/111", "ANOTHER KOSNAR FEATURE" flagstaff hill, warrnambool, shipwrecked-coast, flagstaff-hill, flagstaff-hill-maritime-museum, maritime-museum, shipwreck-coast, flagstaff-hill-maritime-village, painting, la bella, artist phillip j gray, maritime painting, lady bay warrnambool -
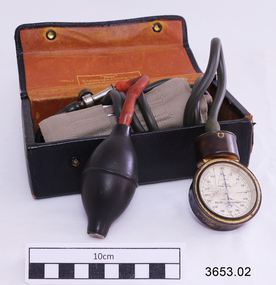 Flagstaff Hill Maritime Museum and Village
Instrument - Sphygmomanometer, Riester, 1948 -1969
This blood pressure monitor (sphygmomanometer) belonged to Dr William Roy Angus, surgeon and oculist. It was donated to Flagstaff Hill Maritime Village by his daughter, Berry McDade in January 2015. . It is part of the “W.R. Angus Collection” that includes historical medical equipment, surgical instruments and material once belonging to Dr Edward Ryan and Dr Thomas Francis Ryan, (both of Nhill, Victoria) as well as Dr Angus’ own belongings. The Collection’s history spans the medical practices of the two Doctors Ryan, from 1885-1926 plus that of Dr Angus, up until 1969. The approximate manufacture date of the blood pressure monitor coincides with the time when Doctor William Roy Angus had his practice in Warrnambool. The company Short & Mason Ltd. London used the brand name TYCOS between 1907-1969 and Rudolf Riester (the brand on the cuff) formed the company ‘Riester” in Germany in 1948, where he developed and produced the first mercury blood pressure monitors. In 1939 Dr Angus and his family moved to Warrnambool where he purchased “Birchwood,” the 1852 home and medical practice of Dr John Hunter Henderson, at 214 Koroit Street. (This property was sold in1965 to the State Government and is now the site of the Warrnambool Police Station.). Dr Angus was appointed on a part-time basis as Port Medical Officer (Health Officer) in Warrnambool and held this position until the 1940’s when the government no longer required the service of a Port Medical Officer in Warrnambool; he was thus Warrnambool’s last serving Port Medical Officer. (The duties of a Port Medical Officer were outlined by the Colonial Secretary on 21st June, 1839 under the terms of the Quarantine Act. Masters of immigrant ships arriving in port reported incidents of diseases, illness and death and the Port Medical Officer made a decision on whether the ship required Quarantine and for how long, in this way preventing contagious illness from spreading from new immigrants to the residents already in the colony.) Dr Angus was a member of the Australian Medical Association, for 35 years and surgeon at the Warrnambool Base Hospital 1939-1942, He served as a Surgeon Captain during WWII1942-45, in Ballarat, Victoria, and in Bonegilla, N.S.W., completing his service just before the end of the war due to suffering from a heart attack. During his convalescence he carved an intricate and ‘most artistic’ chess set from the material that dentures were made from. He then studied ophthalmology at the Royal Melbourne Eye and Ear Hospital and created cosmetically superior artificial eyes by pioneering using the intrascleral cartilage. Angus received accolades from the Ophthalmological Society of Australasia for this work. He returned to Warrnambool to commence practice as an ophthalmologist, pioneering in artificial eye improvements. He was Honorary Consultant Ophthalmologist to Warrnambool Base Hospital for 31 years. He made monthly visits to Portland as a visiting surgeon, to perform eye surgery. He represented the Victorian South-West subdivision of the Australian Medical Association as its secretary between 1949 and 1956 and as chairman from 1956 to 1958. In 1968 Dr Angus was elected member of Spain’s Barraquer Institute of Barcelona after his research work in Intrasclearal cartilage grafting, becoming one of the few Australian ophthalmologists to receive this honour, and in the following year presented his final paper on Living Intrasclearal Cartilage Implants at the Inaugural Meeting of the Australian College of Ophthalmologists in Melbourne. In his personal life Dr Angus was a Presbyterian and treated Sunday as a Sabbath, a day of rest. He would visit 3 or 4 country patients on a Sunday, taking his children along ‘for the ride’ and to visit with him. Sunday evenings he would play the pianola and sing Scottish songs to his family. One of Dr Angus’ patients was Margaret MacKenzie, author of a book on local shipwrecks that she’d seen as an eye witness from the late 1880’s in Peterborough, Victoria. In the early 1950’s Dr Angus, painted a picture of a shipwreck for the cover jacket of Margaret’s book, Shipwrecks and More Shipwrecks. She was blind in later life and her daughter wrote the actual book for her. Dr Angus and his wife Gladys were very involved in Warrnambool’s society with a strong interest in civic affairs. Their interests included organisations such as Red Cross, Rostrum, Warrnambool and District Historical Society (founding members), Wine and Food Society, Steering Committee for Tertiary Education in Warrnambool, Local National Trust, Good Neighbour Council, Housing Commission Advisory Board, United Services Institute, Legion of Ex-Servicemen, Olympic Pool Committee, Food for Britain Organisation, Warrnambool Hospital, Anti-Cancer Council, Boys’ Club, Charitable Council, National Fitness Council and Air Raid Precautions Group. He was also a member of the Steam Preservation Society and derived much pleasure from a steam traction engine on his farm. He had an interest in people and the community. He and his wife Gladys were both involved in the creation of Flagstaff Hill, including the layout of the gardens. After his death (28th March 1970) his family requested his practitioner’s plate, medical instruments and some personal belongings be displayed in the Port Medical Office surgery at Flagstaff Hill Maritime Village, and be called the “W. R. Angus Collection”. The W.R. Angus Collection is significant for still being located at the site it is connected with, Doctor Angus being the last Port Medical Officer in Warrnambool.. The collection of medical instruments and other equipment is culturally significant, being an historical example of medicine from late 19th to mid-20th century. Dr Angus assisted Dr Tom Ryan, a pioneer in the use of X-rays and in ocular surgery. Sphygmomanometer (blood pressure meter), from the collection of W.R. Angus. Brand TYCOS by Short & Mason Ltd, London. The case is of black leather with press-stud closure, lined in brown leather with gilded maker's embossing inside lid. The meter has a grey fabric cuff attached to two black rubber tubes, one tube has a pump bulb on a short brown extension tube on the end, the other has a round meter with glass covered dial on the end. Dial registers 20 – 300. There are maker's details on both meter and box."Patent 9535. No. 39370". Gold maker's stamp " "TYCOS" "SPHYGMOMANOMETER / SHORT & MASON LTD. LONDON / company’s logo”. Cloth label sewn on cuff "GERMANY / RIESTER"flagstaff hill, flagstaff hill warrnambool, maritime museum, shipwreck coast, flagstaff hill maritime village, great ocean road, sphygmomanometer, chemist equipment, dr w.r. angus, medical instrument, warrnambool base hospital, medical treatment, medical history -
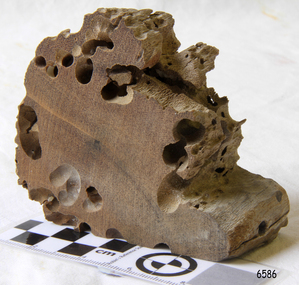 Flagstaff Hill Maritime Museum and Village
Memorabilia - Wood Sample, about 1871
The American wooden ship Eric the Red was named after the Icelandic Viking Eric 'the Red-Haired' Thorvaldsson, who was the first European to reach the shores of North America in 980 A.D. The ship Eric the Red was owned by the Sewall family of Bath, Maine, between 1873 and 1877 it operated in the coal trade between Britain and America. It then operated on the South American guano/ nitrates trade, before again trading between Europe and New York. On this voyage the Eric the Red had been chartered to carry a full cargo of American merchandise including many exhibits bound for the international exhibition to be held in Melbourne in 1880. Eighty-five days out from New York with 23 crew and two passengers, the Eric the Red approached Cape Otway nearing the end of its long voyage. At 1 am on 4 September the weather was hazy with a moderate north-westerly wind, Captain Jacques Allen had all sail set except for the mizzen-royal and the cross jack sails doing 8 knots, and was steering by the light to keep 5-6 miles offshore and clear of Otway Reef. Returning to the deck after consulting his charts the ship bumped as it ran onto the Otway Reef. It struck a second time and then a heavy sea carried away the wheel ropes and the man at the wheel. A third bump carried away the rudder, and shortly after this the ship completely broke up - within twelve minutes it had disappeared but for floating wreckage and cargo. Captain Jacques Allen recounted that: "The mizzen topmast fell with all the rigging, but strange to say, not a man was hurt by it, although they were all standing about. As soon as I found out there was no hope I said to Ned Sewell, the owner's son, and the third mate on board "Stick to me, and hang on to this mizzen mast". I peeled off everything I had on except my drawers thinking I would be able to swim better without my clothes; and Sewell and myself, clinging to the mast, were washed overboard...It was a fearful sea; I have never seen anything like it". Attempting to swim to a more substantial raft of wreckage, and losing touch with young Sewell in the process, Captain Allen struck out: " Just as I left the spar my drawers got down my legs, and entangled them, and down I went. I managed to clear one of my legs and on coming up I managed to get hold of some floating timber. There was a clear space of water between this timber and the deck, except for the spare royal yard, and I again started, but the surf struck me and I went over and over. I managed to get hold of the spare yard, and after holding on to it for some time I managed to get to the deck. When I was pulled on to it I could not move, being so numb and cramped with the cold. The men had some blankets and other things which they had got from the passengers' room in the deck house, and they wrapped me in these. Shortly after I got onto the wreck we made out the steamer's lights, and as soon as she was within hearing distance the men haled. This must have been about half-past four the Captain of the Dawn sent two of his boats to cruise about, and at daylight, they picked us up off the wreck. We had drifted about four miles from the reef where the ship struck, all those who were rescued were more or less bruised. One man had two or three ribs broken, and another had some fingers crushed off. My left foot is very much hurt, and I am black and blue from head to foot. I never knew such ten minutes as that of the wreck, and I thought the time had come for me to 'hand in my checks'. The ship was worth about £15,000, and neither it nor the freight was insured one dollar". (Argus 14/9/1880). Three of the crew and one of the passengers had been swept away and drowned. Fortunately for those clinging to the remains of the shattered hull and floating wreckage, the steamer SS Dawn passed close by and the crew heard the distressed cries of the survivors. Boats were lowered and the survivors were rescued. The Dawn stayed in the area for several hours searching for more survivors. One body was found washed up at Cape Otway and was buried in the lighthouse cemetery. The captain and crew of the Dawn later received rewards and thanks from the United States consul for their efforts. The hull and cargo were sold for £410, and large rafts of floating wreckage and cargo washed up all over the Victorian coast. A section of the hull lies buried in the sand at the Parker River beach, an anchor is on the rocks at Point Franklin, a second anchor is on display at the Cape Otway lighthouse and parts of the ship are on display at Bimbi Park and the Apollo Bay museum. Various wreckage is located in a concentration off Point Franklin, but suitable diving conditions are rare due to waves and strong currents. At the time of the wreck parts of its were salvaged and used in the construction of houses and sheds around Apollo Bay, including Milford House (since burnt down in bush fires), which had furniture and fittings from the ship, and the dining room floor made out of its timbers. A ketch the Apollo was also built from its timbers and subsequently used in Tasmanian waters.The Eric the Red is historically significant as one of Victoria's major 19th-century shipwrecks. The wreck led to the provision of an additional warning light placed below the Cape Otway lighthouse to alert mariners to the location of Otway Reef. The site is archaeologically significant for its remains of a large and varied cargo and ship's fittings being scattered over a wide area. The site is recreationally and aesthetically significant as it is one of the few sites along this coast where tourists can visit identifiable remains of a large wooden shipwreck and for its location set against the background of Cape Otway, Bass Strait, and the Cape Otway lighthouse. (Victorian Heritage Database Registration Number S 239, Official Number 8745 USA) Wood sample from the wreck of the ship Eric the Red the wood is dark in colour and is very light in weight. Noneflagstaff hill, warrnambool, shipwrecked-coast, flagstaff-hill, flagstaff-hill-maritime-museum, maritime-museum, shipwreck-coast, flagstaff-hill-maritime-village, shipwreck-artefact, eric-the-red, zaccheus-allen, sewall, 1880, melbourne-exhibition, cape-otway, otway-reef, wood-sample, s.s.-dawn -
 Flagstaff Hill Maritime Museum and Village
Photograph
HISTORY OF THE LOCH ARD The LOCH ARD belonged to the famous Loch Line which sailed many ships from England to Australia. Built in Glasgow by Barclay, Curdle and Co. in 1873, the LOCH ARD was a three-masted square rigged iron sailing ship. The ship measured 262ft 7" (79.87m) in length, 38ft (11.58m) in width, 23ft (7m) in depth and had a gross tonnage of 1693 tons. The LOCH ARD's main mast measured a massive 150ft (45.7m) in height. LOCH ARD made three trips to Australia and one trip to Calcutta before its final voyage. LOCH ARD left England on March 2, 1878, under the command of Captain Gibbs, a newly married, 29 year old. She was bound for Melbourne with a crew of 37, plus 17 passengers and a load of cargo. The general cargo reflected the affluence of Melbourne at the time. On board were straw hats, umbrella, perfumes, clay pipes, pianos, clocks, confectionary, linen and candles, as well as a heavier load of railway irons, cement, lead and copper. There were items included that intended for display in the Melbourne International Exhibition in 1880. The voyage to Port Phillip was long but uneventful. At 3am on June 1, 1878, Captain Gibbs was expecting to see land and the passengers were becoming excited as they prepared to view their new homeland in the early morning. But LOCH ARD was running into a fog which greatly reduced visibility. Captain Gibbs was becoming anxious as there was no sign of land or the Cape Otway lighthouse. At 4am the fog lifted. A man aloft announced that he could see breakers. The sheer cliffs of Victoria's west coast came into view, and Captain Gibbs realised that the ship was much closer to them than expected. He ordered as much sail to be set as time would permit and then attempted to steer the vessel out to sea. On coming head on into the wind, the ship lost momentum, the sails fell limp and LOCH ARD's bow swung back. Gibbs then ordered the anchors to be released in an attempt to hold its position. The anchors sank some 50 fathoms - but did not hold. By this time LOCH ARD was among the breakers and the tall cliffs of Mutton Bird Island rose behind the ship. Just half a mile from the coast, the ship's bow was suddenly pulled around by the anchor. The captain tried to tack out to sea, but the ship struck a reef at the base of Mutton Bird Island, near Port Campbell. Waves broke over the ship and the top deck was loosened from the hull. The masts and rigging came crashing down knocking passengers and crew overboard. When a lifeboat was finally launched, it crashed into the side of LOCH ARD and capsized. Tom Pearce, who had launched the boat, managed to cling to its overturned hull and shelter beneath it. He drifted out to sea and then on the flood tide came into what is now known as LOCH ARD Gorge. He swam to shore, bruised and dazed, and found a cave in which to shelter. Some of the crew stayed below deck to shelter from the falling rigging but drowned when the ship slipped off the reef into deeper water. Eva Carmichael had raced onto deck to find out what was happening only to be confronted by towering cliffs looming above the stricken ship. In all the chaos, Captain Gibbs grabbed Eva and said, "If you are saved Eva, let my dear wife know that I died like a sailor". That was the last Eva Carmichael saw of the captain. She was swept off the ship by a huge wave. Eva saw Tom Pearce on a small rocky beach and yelled to attract his attention. He dived in and swam to the exhausted woman and dragged her to shore. He took her to the cave and broke open case of brandy which had washed up on the beach. He opened a bottle to revive the unconscious woman. A few hours later Tom scaled a cliff in search of help. He followed hoof prints and came by chance upon two men from nearby Glenample Station three and a half miles away. In a state of exhaustion, he told the men of the tragedy. Tom returned to the gorge while the two men rode back to the station to get help. By the time they reached LOCH ARD Gorge, it was cold and dark. The two shipwreck survivors were taken to Glenample Station to recover. Eva stayed at the station for six weeks before returning to Ireland, this time by steamship. In Melbourne, Tom Pearce received a hero's welcome. He was presented with the first gold medal of the Royal Humane Society of Victoria and a £1000 cheque from the Victorian Government. Concerts were performed to honour the young man's bravery and to raise money for those who lost family in the LOCH ARD disaster. Of the 54 crew members and passengers on board, only two survived: the apprentice, Tom Pearce and the young woman passenger, Eva Carmichael, who lost all of her family in the tragedy. Ten days after the LOCH ARD tragedy, salvage rights to the wreck were sold at auction for £2,120. Cargo valued at £3,000 was salvaged and placed on the beach, but most washed back into the sea when another storm developed. The wreck of LOCH ARD still lies at the base of Mutton Bird Island. Much of the cargo has now been salvaged and some was washed up into what is now known as LOCH ARD Gorge. Cargo and artefacts have also been illegally salvaged over many years before protective legislation was introduced. One of the most unlikely pieces of cargo to have survived the shipwreck was a Minton porcelain peacock - one of only nine in the world. The peacock was destined for the Melbourne International Exhibition in 1880. It had been well packed, which gave it adequate protection during the violent storm. Today, the Minton peacock can be seen at the Flagstaff Hill Maritime Museum in Warrnambool. From Australia's most dramatic shipwreck it has now become Australia's most valuable shipwreck artefact and is one of very few 'objects' on the Victorian State Heritage Register. Flagstaff Hill’s collection of artefacts from LOCH ARD is significant for being one of the largest collections of artefacts from this shipwreck in Victoria. It is significant for its association with the shipwreck, which is on the Victorian Heritage Register (VHR S417). The collection is significant because of the relationship between the objects, as together they have a high potential to interpret the story of the LOCH ARD. The LOCH ARD collection is archaeologically significant as the remains of a large international passenger and cargo ship. The LOCH ARD collection is historically significant for representing aspects of Victoria’s shipping history and its potential to interpret sub-theme 1.5 of Victoria’s Framework of Historical Themes (living with natural processes). The collection is also historically significant for its association with the LOCH ARD, which was one of the worst and best known shipwrecks in Victoria’s history. Photograph of Loch Ard Gorge. Photograph taken some distance from the Gorge. Three men in the Gorge and outlines of steps can be seen. Right hand side of the photograph is written "Loch Ard Gorge"flagstaff hill, warrnambool, shipwrecked coast, flagstaff hill maritime museum, maritime museum, shipwreck coast, flagstaff hill maritime village, great ocean road, loch line, loch ard, captain gibbs, eva carmichael, tom pearce, glenample station, mutton bird island, loch ard gorge, photograph of loch ard gorge, photograph -
 Flagstaff Hill Maritime Museum and Village
Painting
HISTORY OF THE LOCH ARD The LOCH ARD belonged to the famous Loch Line which sailed many ships from England to Australia. Built in Glasgow by Barclay, Curdle and Co. in 1873, the LOCH ARD was a three-masted square rigged iron sailing ship. The ship measured 262ft 7" (79.87m) in length, 38ft (11.58m) in width, 23ft (7m) in depth and had a gross tonnage of 1693 tons. The LOCH ARD's main mast measured a massive 150ft (45.7m) in height. LOCH ARD made three trips to Australia and one trip to Calcutta before its final voyage. LOCH ARD left England on March 2, 1878, under the command of Captain Gibbs, a newly married, 29 year old. She was bound for Melbourne with a crew of 37, plus 17 passengers and a load of cargo. The general cargo reflected the affluence of Melbourne at the time. On board were straw hats, umbrella, perfumes, clay pipes, pianos, clocks, confectionary, linen and candles, as well as a heavier load of railway irons, cement, lead and copper. There were items included that intended for display in the Melbourne International Exhibition in 1880. The voyage to Port Phillip was long but uneventful. At 3am on June 1, 1878, Captain Gibbs was expecting to see land and the passengers were becoming excited as they prepared to view their new homeland in the early morning. But LOCH ARD was running into a fog which greatly reduced visibility. Captain Gibbs was becoming anxious as there was no sign of land or the Cape Otway lighthouse. At 4am the fog lifted. A man aloft announced that he could see breakers. The sheer cliffs of Victoria's west coast came into view, and Captain Gibbs realised that the ship was much closer to them than expected. He ordered as much sail to be set as time would permit and then attempted to steer the vessel out to sea. On coming head on into the wind, the ship lost momentum, the sails fell limp and LOCH ARD's bow swung back. Gibbs then ordered the anchors to be released in an attempt to hold its position. The anchors sank some 50 fathoms - but did not hold. By this time LOCH ARD was among the breakers and the tall cliffs of Mutton Bird Island rose behind the ship. Just half a mile from the coast, the ship's bow was suddenly pulled around by the anchor. The captain tried to tack out to sea, but the ship struck a reef at the base of Mutton Bird Island, near Port Campbell. Waves broke over the ship and the top deck was loosened from the hull. The masts and rigging came crashing down knocking passengers and crew overboard. When a lifeboat was finally launched, it crashed into the side of LOCH ARD and capsized. Tom Pearce, who had launched the boat, managed to cling to its overturned hull and shelter beneath it. He drifted out to sea and then on the flood tide came into what is now known as LOCH ARD Gorge. He swam to shore, bruised and dazed, and found a cave in which to shelter. Some of the crew stayed below deck to shelter from the falling rigging but drowned when the ship slipped off the reef into deeper water. Eva Carmichael had raced onto deck to find out what was happening only to be confronted by towering cliffs looming above the stricken ship. In all the chaos, Captain Gibbs grabbed Eva and said, "If you are saved Eva, let my dear wife know that I died like a sailor". That was the last Eva Carmichael saw of the captain. She was swept off the ship by a huge wave. Eva saw Tom Pearce on a small rocky beach and yelled to attract his attention. He dived in and swam to the exhausted woman and dragged her to shore. He took her to the cave and broke open case of brandy which had washed up on the beach. He opened a bottle to revive the unconscious woman. A few hours later Tom scaled a cliff in search of help. He followed hoof prints and came by chance upon two men from nearby Glenample Station three and a half miles away. In a state of exhaustion, he told the men of the tragedy. Tom returned to the gorge while the two men rode back to the station to get help. By the time they reached LOCH ARD Gorge, it was cold and dark. The two shipwreck survivors were taken to Glenample Station to recover. Eva stayed at the station for six weeks before returning to Ireland, this time by steamship. In Melbourne, Tom Pearce received a hero's welcome. He was presented with the first gold medal of the Royal Humane Society of Victoria and a £1000 cheque from the Victorian Government. Concerts were performed to honour the young man's bravery and to raise money for those who lost family in the LOCH ARD disaster. Of the 54 crew members and passengers on board, only two survived: the apprentice, Tom Pearce and the young woman passenger, Eva Carmichael, who lost all of her family in the tragedy. Ten days after the LOCH ARD tragedy, salvage rights to the wreck were sold at auction for £2,120. Cargo valued at £3,000 was salvaged and placed on the beach, but most washed back into the sea when another storm developed. The wreck of LOCH ARD still lies at the base of Mutton Bird Island. Much of the cargo has now been salvaged and some was washed up into what is now known as LOCH ARD Gorge. Cargo and artefacts have also been illegally salvaged over many years before protective legislation was introduced. One of the most unlikely pieces of cargo to have survived the shipwreck was a Minton porcelain peacock - one of only nine in the world. The peacock was destined for the Melbourne International Exhibition in 1880. It had been well packed, which gave it adequate protection during the violent storm. Today, the Minton peacock can be seen at the Flagstaff Hill Maritime Museum in Warrnambool. From Australia's most dramatic shipwreck it has now become Australia's most valuable shipwreck artefact and is one of very few 'objects' on the Victorian State Heritage Register. Flagstaff Hill’s collection of artefacts from LOCH ARD is significant for being one of the largest collections of artefacts from this shipwreck in Victoria. It is significant for its association with the shipwreck, which is on the Victorian Heritage Register (VHR S417). The collection is significant because of the relationship between the objects, as together they have a high potential to interpret the story of the LOCH ARD. The LOCH ARD collection is archaeologically significant as the remains of a large international passenger and cargo ship. The LOCH ARD collection is historically significant for representing aspects of Victoria’s shipping history and its potential to interpret sub-theme 1.5 of Victoria’s Framework of Historical Themes (living with natural processes). The collection is also historically significant for its association with the LOCH ARD, which was one of the worst and best known shipwrecks in Victoria’s history. Painting of The Loch Ard oil on board depicting wreck. It shows stormy sea and coastline in background. Ship appears to be capsized.flagstaff hill, warrnambool, shipwrecked coast, flagstaff hill maritime museum, maritime museum, shipwreck coast, flagstaff hill maritime village, great ocean road, loch line, loch ard, captain gibbs, eva carmichael, tom pearce, glenample station, mutton bird island, loch ard gorge, painting -
 Flagstaff Hill Maritime Museum and Village
Photograph
HISTORY OF THE LOCH ARD The LOCH ARD belonged to the famous Loch Line which sailed many ships from England to Australia. Built in Glasgow by Barclay, Curdle and Co. in 1873, the LOCH ARD was a three-masted square rigged iron sailing ship. The ship measured 262ft 7" (79.87m) in length, 38ft (11.58m) in width, 23ft (7m) in depth and had a gross tonnage of 1693 tons. The LOCH ARD's main mast measured a massive 150ft (45.7m) in height. LOCH ARD made three trips to Australia and one trip to Calcutta before its final voyage. LOCH ARD left England on March 2, 1878, under the command of Captain Gibbs, a newly married, 29 year old. She was bound for Melbourne with a crew of 37, plus 17 passengers and a load of cargo. The general cargo reflected the affluence of Melbourne at the time. On board were straw hats, umbrella, perfumes, clay pipes, pianos, clocks, confectionary, linen and candles, as well as a heavier load of railway irons, cement, lead and copper. There were items included that intended for display in the Melbourne International Exhibition in 1880. The voyage to Port Phillip was long but uneventful. At 3am on June 1, 1878, Captain Gibbs was expecting to see land and the passengers were becoming excited as they prepared to view their new homeland in the early morning. But LOCH ARD was running into a fog which greatly reduced visibility. Captain Gibbs was becoming anxious as there was no sign of land or the Cape Otway lighthouse. At 4am the fog lifted. A man aloft announced that he could see breakers. The sheer cliffs of Victoria's west coast came into view, and Captain Gibbs realised that the ship was much closer to them than expected. He ordered as much sail to be set as time would permit and then attempted to steer the vessel out to sea. On coming head on into the wind, the ship lost momentum, the sails fell limp and LOCH ARD's bow swung back. Gibbs then ordered the anchors to be released in an attempt to hold its position. The anchors sank some 50 fathoms - but did not hold. By this time LOCH ARD was among the breakers and the tall cliffs of Mutton Bird Island rose behind the ship. Just half a mile from the coast, the ship's bow was suddenly pulled around by the anchor. The captain tried to tack out to sea, but the ship struck a reef at the base of Mutton Bird Island, near Port Campbell. Waves broke over the ship and the top deck was loosened from the hull. The masts and rigging came crashing down knocking passengers and crew overboard. When a lifeboat was finally launched, it crashed into the side of LOCH ARD and capsized. Tom Pearce, who had launched the boat, managed to cling to its overturned hull and shelter beneath it. He drifted out to sea and then on the flood tide came into what is now known as LOCH ARD Gorge. He swam to shore, bruised and dazed, and found a cave in which to shelter. Some of the crew stayed below deck to shelter from the falling rigging but drowned when the ship slipped off the reef into deeper water. Eva Carmichael had raced onto deck to find out what was happening only to be confronted by towering cliffs looming above the stricken ship. In all the chaos, Captain Gibbs grabbed Eva and said, "If you are saved Eva, let my dear wife know that I died like a sailor". That was the last Eva Carmichael saw of the captain. She was swept off the ship by a huge wave. Eva saw Tom Pearce on a small rocky beach and yelled to attract his attention. He dived in and swam to the exhausted woman and dragged her to shore. He took her to the cave and broke open case of brandy which had washed up on the beach. He opened a bottle to revive the unconscious woman. A few hours later Tom scaled a cliff in search of help. He followed hoof prints and came by chance upon two men from nearby Glenample Station three and a half miles away. In a state of exhaustion, he told the men of the tragedy. Tom returned to the gorge while the two men rode back to the station to get help. By the time they reached LOCH ARD Gorge, it was cold and dark. The two shipwreck survivors were taken to Glenample Station to recover. Eva stayed at the station for six weeks before returning to Ireland, this time by steamship. In Melbourne, Tom Pearce received a hero's welcome. He was presented with the first gold medal of the Royal Humane Society of Victoria and a £1000 cheque from the Victorian Government. Concerts were performed to honour the young man's bravery and to raise money for those who lost family in the LOCH ARD disaster. Of the 54 crew members and passengers on board, only two survived: the apprentice, Tom Pearce and the young woman passenger, Eva Carmichael, who lost all of her family in the tragedy. Ten days after the LOCH ARD tragedy, salvage rights to the wreck were sold at auction for £2,120. Cargo valued at £3,000 was salvaged and placed on the beach, but most washed back into the sea when another storm developed. The wreck of LOCH ARD still lies at the base of Mutton Bird Island. Much of the cargo has now been salvaged and some was washed up into what is now known as LOCH ARD Gorge. Cargo and artefacts have also been illegally salvaged over many years before protective legislation was introduced. One of the most unlikely pieces of cargo to have survived the shipwreck was a Minton porcelain peacock - one of only nine in the world. The peacock was destined for the Melbourne International Exhibition in 1880. It had been well packed, which gave it adequate protection during the violent storm. Today, the Minton peacock can be seen at the Flagstaff Hill Maritime Museum in Warrnambool. From Australia's most dramatic shipwreck it has now become Australia's most valuable shipwreck artefact and is one of very few 'objects' on the Victorian State Heritage Register. Flagstaff Hill’s collection of artefacts from LOCH ARD is significant for being one of the largest collections of artefacts from this shipwreck in Victoria. It is significant for its association with the shipwreck, which is on the Victorian Heritage Register (VHR S417). The collection is significant because of the relationship between the objects, as together they have a high potential to interpret the story of the LOCH ARD. The LOCH ARD collection is archaeologically significant as the remains of a large international passenger and cargo ship. The LOCH ARD collection is historically significant for representing aspects of Victoria’s shipping history and its potential to interpret sub-theme 1.5 of Victoria’s Framework of Historical Themes (living with natural processes). The collection is also historically significant for its association with the LOCH ARD, which was one of the worst and best known shipwrecks in Victoria’s history. Photograph of Loch Ard Gorge c1900flagstaff hill, warrnambool, shipwrecked coast, flagstaff hill maritime museum, maritime museum, shipwreck coast, flagstaff hill maritime village, great ocean road, loch line, loch ard, captain gibbs, eva carmichael, tom pearce, glenample station, mutton bird island, loch ard gorge, photograph of loch ard gorge, photograph