Showing 2019 items
matching loops
-
 Ballarat Tramway Museum
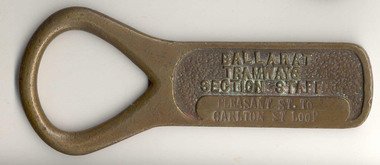
Functional Object - Section Staff, Electric Supply Co. of Vic (ESCo), "Pleasant St to Carlton St Loop"
Demonstrates aspects of Safeworking on the Ballarat Tramway system from 1960 to c1936 when replaced by electric signs. Yields Information about the operation of Ballarat's trams and safeworking procedures.Cast brass item with a flat part recessed section with the words "BALLARAT TRAMWAYS SECTION STAFF" cast into the surface and a flat section underneath, flush with the outside edges in which the words "PLEASANT ST TO CARLTON ST LOOP " stamped in. Has an open rounded end which forms a handle or a point where it could be hung on a peg. Used as a means of authorising a tramcar to have sole use of the track between the named points to avoid head on collisions. Safeworking object - known as a section staff. Not known when made, but in use until the introduction of the electric signalling in the mid 1930's by the SEC. See also Reg Items 934 and 988 for details of use and other examples are at 1851, to 53, 2473 and 4444 to 4448, , 4996 and 4497 and Reg item 934 and 988 for articles on the safeworking systems.trams, tramways, staff, safeworking, tramway staffs, sec, signals -
 Melbourne Tram Museum
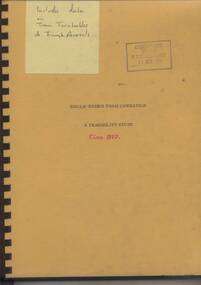
Document - Report, Melbourne & Metropolitan Tramways Board (MMTB), "Single-ended tram operations - a Feasibility study", mid 1970's
Report - 104 pages, with orange card and plastic covers, bound with a black coloured comb binder titled "Single-ended tram operations - A Feasibility study". Looks at the background for the proposal, operational issues, including loading and unloading, a CBD loop, capital costs, traffic issues, implementation, vehicle design. Report notes it has many advantages and disadvantages, but the concept was supportive that single ended vehicles should be introduced. Report not dated as such, but discusses the ordering of new tramcars in 1977/78, dated c1977. See Also Reg Item 337. On front cover is a post-it notes commenting about report - see image. See Reg Item 4388 for the contract tender document for the Z3 class trams which included the option for a single ended tram.Stamped on cover and inside page "Discarded from PTC Library 19 Oct 1989".trams, tramways, single ended tramcars, mmtb, bourke st, collins st, turning loops, swanston st, william st -
 Melbourne Tram Museum
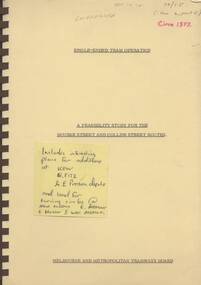
Document - Report, Melbourne & Metropolitan Tramways Board (MMTB), "Single-ended tram operations - A Feasibility study for the Bourke St and Collins Street routes", mid 1970's
Sixty five page, plus manila covers, bound with a brown coloured comb binder report titled "Single-ended tram operations - A Feasibility study for the Bourke St and Collins Street routes". Looks at the background for the proposal, operational issues and an economic evaluation, including loading and unloading, a CBD loop and capital costs. Report has a note on page 2 that it was prepared prior to tendering for new trams. Report not dated as such but on front cover has a date "c1977", though based on the note done prior to ordering new trams could be c1976. See also Reg Item 338. On front cover is a post-it notes commenting about report - see image. See Reg Item 4388 for the contract tender document for the Z3 class trams which included the option for a single ended tram.Various pencil notes on front cover, and inside page.trams, tramways, single ended tramcars, mmtb, bourke st, collins st, turning loops -
 Ballarat Tramway Museum
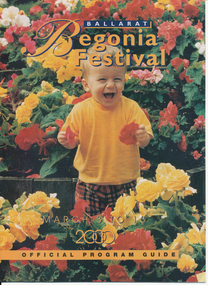
Memorabilia - Event Materials, The Courier Ballarat, "Ballarat Begonia Festival - Official Program Guide", 31/03/2000 12:00:00 AM
Forty page full colour printed program for the 2000 Begonia Festival. Includes festival events, maps, details of related events. On page 38 is an half page item on the Ballarat Tramway Museum. First photo features Stephen Butler in the cab of tramcar, with another tramcar (40) in the background - taken at depot junction, some details on the Ballarat Tramway system and details of the BTM itself. A second photograph features four trams at the Loop (40, 671, 13 and 26) during Boxing Day 1999. Details of the program production on page 3. Images items include reproductions of each photograph and the general layout of the item itself. See 1347i4 for image of the front cover. See also Reg Item 5466.1 to 5466.3 for other year 2000 brochures.trams, tramways, btm, begonia festival, festival program -
 Ballarat Tramway Museum
Photograph - Black & White Photograph/s, The Courier Ballarat, 20/04/1968 12:00:00 AM
Demonstrates nature and size of gang undertaking overhead repairs to the tramway in Drummond St. Nth..Black and White copy photograph of a newspaper photograph taken by The Courier, taken 20/4/1968, published 22/4/1968, of repairs to damaged overhead wire, Drummond St North. Shows the tower truck with two men on the truck, one below and an SEC truck parked adjacent. Photo taken at the south end of the Mill St loop. Tram in the photo has probably reversed and showing Victoria St as a destination. Inspector standing adjacent to tram. Photo possibly taken through the windscreen of the car, given the level of the photograph and reflections? in the photo. Collected by Alan Bradley from the Ballarat Courier early 1980's. See Excel file "Record of Ballarat Courier Photos SEC era" (Archive Documents) for source of details.On rear stamped "Copyright, The Ballarat Courier Proprietary Limited."tramways, trams, drummond st nth, overhead, sec -
 Ballarat Tramway Museum
Slide - 27 mm sq slide/s - set of 4, Lilian Butler, Scenes of Sturt St, c1971
Yields information about tram operations in the city area of Ballarat.Set of 4 colour slides - Kodachrome white cardboard mounts - slide mounts dated August to September 1971. .1 - Photo of No. 37 at the intersection of Sturt and Lydiard Streets with the Town Hall in the background and the tramway shelter. Has detailed street signs - Government Tourist Bureau, Art Gallery and street name and a sign "Danger Cross Streets at Right Angles" .2 - No. 30 with the destination of City, westbound in Sturt St with the Town Hall, Fletcher Jones and Coles stores in the background. .3 - Nos. 30 and 21 parked in the City Loop. .4 - view of the south side of Sturt St just to west of Grenville St with the Family Footwear, Spot Cafe, Bill Valpied Fruit, Union Hotel and Thomas Jewellers buildings in the view. Photo from the collection of Lilian Butler. .2 and .3 have in pencil "Photo to America" written on them in pencil.ballarat, tramways, trams, sturt st, city loop, lydiard st north, city, signs, tram 30, tram 21 -
 Ballarat Tramway Museum
Document - Instruction, State Electricity Commission of Victoria (SECV), "Forest City Signals", late 1960's?
Yields information about the instructions about Signalling system on Wendouree Parade and Bridge St - Forest City signals.Five page, foolscap duplicated document, stapled in the top left hand corner, titled Forest City Signals, undated, has letters S4 in top right hand corner of first sheet, giving details about the Forest City signalling system installed in Ballarat, particularly around Wendouree Parade and the depot. Explains how the system operates, gives instructions, details of the system, location of the loops, trams following each other, power failure. Also gives details of how the Bridge St system operated and the switch at Grenville St. Note: The locations of the signals may not be not as detailed as in the Driver Training Manual - See Reg Item 3486. Does not provide instructions for Lydiard St North or Sebastopol routes. See also Reg Item 3456 for another similar copy.trams, tramways, signals, crossing loop, forest city signals, grenville st, wendouree parade -
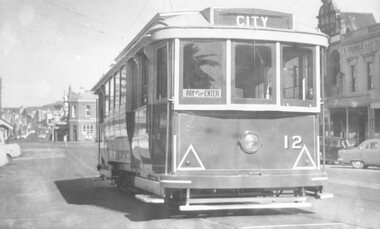 Ballarat Tramway Museum
Negative - Black and white print from negative, Travis Jeffrey, 12/12/1958?
Negative No. N375 and black and white print made by a laser printer (stored in folder) of Ballarat No. 12 in City or Grenville St Loop with Grenville St and Bridge St. in the background. Date thought to be 12/12/1958. Tram has destination of City. Can see the Bucks Head Hotel in the background and the full length of Bridge St., with Victoria St. hill as well. W. Gribble & Co. building on the right hand side of the photograph. Although folder dated 23/2/62, the photo is taken before 12/1960, as tram has not been fitted with dash canopy lights, so date taken as for photograph BA1, Reg. No. 2381 - note angle of shadow. hi res scan made and image updated 23/5/2020. Paper folder that contained the negative had "NR64A" in red ink, "BA2" in pencil, date stamp of "23 Sep 62" on front, and on rear date stamps "26 Sep 1962" and "6 Oct 1962".trams, tramways, city loop, grenville st, bridge st, sturt st, tram 12 -
 Woodend RSL
Uniform - Hat, 1968-69
Possibly Vietnam era hat, based on date of manufacture. This hat is an example of Vietnam era military headwear. Hat, or military peak cap of olive drab fabric. Base of cap has four metal rimmed air holes at rear above band. Cap has brown leather chin strap with double band of leather across the front of visor secured by a single leather loop on each side. The chinstrap is attached to the cap at both ends, with gold buttons featuring Australian army insignia. Inside of cap has a brown leather band, attached with brown thread in a zig zag stitch; the other end of brown headband is unstitched. The cap is lined with olive green fabric which is synthetic in appearance, and covered with a clear sweat shield. A manufacturer’s label in white fabric is sewn to the centre of the inner liner. A white, rectanguar identification label is attached to the inner band.‘MADE EXPRESSLY FOR DEPARTMENT OF SUPPLY 1968-69 “EMERCO” MELBOURNE’ on inner leather band in gold. ‘M. REINER &CO.PTY LTD SIZE (BLUE ARROW LOGO DENOTING DEPARTMENT OF DEFENCE) 6 5/8 VICTORIA AUSTRALIA’ on label in blue print at centre of inner cap. ‘REGIMENTAL NO.______________ NAME____________’ in black print, side of cap.emerco, military, hat, cap, headwear, peak, war, fashion, outfit, department of supply, vietnam. -
 Ballarat Tramway Museum
Photograph - Black & White Photograph/s - set of 2, H.H.Matthews, c1922
684.1 - black and white photo of NSW steam motor No. 5A and trailer on the Parramatta to Castle Hill line. Has driver on front platform of motor, and conductor on the trailer. In background is high voltage power poles and behind the tram, a pole with switchgear on it. (Is this the Woollen Mills?) Taken by H.H. Matthews. 684.2 - black and white photo of two steam trams side by side. Tram Motor 83A has destination of "CASTLE HILL" with two crew on platform. The other tram consists of two trailers and a motor, facing the other direction. Either at a crossing loop or a terminus. Building on the right side has the words "Refresh" in image. Photographer unknown. Castle Hill line closed 27/1/1923. See Tramways of Sydney, Keenan, Transit Press, 1979 for date of closure of Castle HillOn 684.1, stamped in red ink "H.H. Matthews Photo No. ...." and "231" written in black ink.trams, tramways, sydney, steam trams, castle hill, parramatta , tram 5a, 83a -
 Ballarat Tramway Museum
Photograph - Black & White Photograph/s, The Courier Ballarat, 13/08/1971 12:00:00 AM
Yields information about special trams that were operated on the system prior to its closure for the benefit of school children.Black and White copy photograph of a newspaper photograph taken by The Courier - photo taken 13/8/1971, published 14/8/1971of Nos. 13 & 32 on a school tram tour, No. 27 on normal service, Gardens Loop, Wendouree Parade. No. 27 has the destination of Gardens via Sturt St West, whilst the other tram are showing "Special". Photo taken after a shower of rain. See Reg Item 2814 and 2918 for copies of the actual newspaper cutting. Collected by Alan Bradley from the Ballarat Courier early 1980's. See Excel file "Record of Ballarat Courier Photos SEC era" (Archive Documents) for source of details. 2nd copy added 22/7/2012 - from Alan Bradley 20/7/2012.On rear stamped "Copyright, The Ballarat Courier Proprietary Limited."tramways, trams, wendouree parade, gardens loop, tours, special trams, tram 13, tram 32, tram 27 -
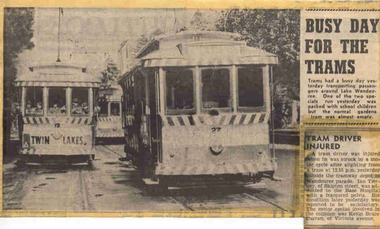 Ballarat Tramway Museum
Newspaper, The Courier Ballarat, "Busy day for the trams", "Tram driver injured", 14/08/1971 12:00:00 AM
Set of two newspaper clippings from The Courier, Ballarat, dated about 14/8/1971, that have been taped together. 1. Titled "Busy day for the trams" featured a photo of Ballarat trams 13, 27 and another single truck at Gardens Loop the previous day carrying school children on special trams. See Reg Item 3764 for actual print of photograph. 2. Titled "Tram driver injured" reports on the injury to SEC Driver Ian Tierney of Skipton St. who was severely injured after being hit by a motorcycle outside the SEC Wendouree Parade depot at 12.55pm the previous day. One of a large group of newspaper cuttings from John Bainbridge, 7/4/02. Has cutting date separate from item.special trams, gardens loop -
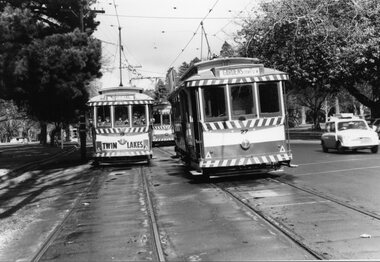
 Ballarat Tramway Museum
Postcard, Bascands Ltd. Christchurch NZ, SECV Ballarat trams 27 and 38, 1980-1981
Colour postcard of SECV Ballarat trams 27 and 38 crossing at Gardens Loop in Wendouree Parade during the early 1980's by John Phillips for a BTPS postcard. Tram 27 has a "Brambles" advertisement and a "TWIN LAKES" sign. Both trams showing St Aidans Drive destination and "TRAM RIDES" signs. Trams in SECV livery. See also Reg. item 2787 for a similar photograph taken at the same time. On rear is a note regarding the trams, the tramway operations, printers name, logo and number (M508) and photographers name, with place for stamp and address. Four copies held. BTPS Annual Report 1980-1981. Used in postcard display 2017-2018 See image i1 for a copy of the original photo - refer to Reg Item 8193 for an associated email.trams, tramways, wendouree parade, btps, postcards, gardens loop, tram 913, tram 345 -
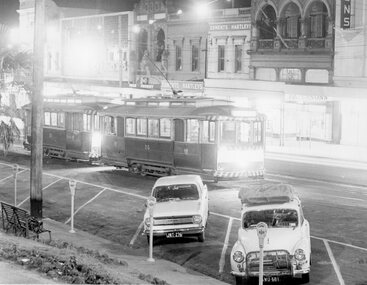 Ballarat Tramway Museum
Photograph - Black & White Photograph/s, Dave Macartney, 23/12/1967 12:00:00 AM
Black and white photograph of SEC Trams 26 and 28 in the City Loop on 23.12.1967 in the evening. Both trams have their lights on. Two motor cars parked with parking meters. In rear are the buildings on the south side of Sturt St to the west of Grenville St. Buildings in view are "Edments Hartleys", "Gear Chemist" and "Patersons". Photo by Dave Macartney - 23/12/1967. Copy1 - Photocopy made 4/1999 for display purposes. Copy 2 - made by enlarging photo to an approx. A4 print by colour photocopying and laminated for display purposes. Made July 2000 for the Trams at Night exhibition in the depot. Made by W.Doubleday. Has four Velcro dots on rear. Overall size 203H x 268W. Stored in same box at rear of large photos area in an A4 plastic folder.trams, tramways, sturt st, city loop, night photo, tram 26, tram 28 -
 Melbourne Tram Museum
Document - Report, The Metropolitan Transportation Committee, "Melbourne Transportation Study - The Transportation Plan - Volume 3", 1969
Report titled "Melbourne Transportation Study - The Transportation Plan - Volume 3", presented in a black vinyl covered slip case, paper cover, bound, sewn with end papers, fold out maps, 74 pages. Each sheet within the report has rounded edges. Contained within a printed cardboard packing case. Includes many tables, graphs, charts and coloured sheets. Report prepared by The Metropolitan Transportation Committee - 1969, looking at the planning of all forms of transport for Melbourne with a timeframe of 1985. Chaired by Vernon Wilcox, Minister of Transport. Included Robert Risson - Chairman of MMTB. Set the basis for a very extensive freeway system that was only partly followed. Includes trams, trains (city loop), buses, parking, travel and population predictions, costs and implementation.Has numerous AETA stamps throughout the book. Inside front cover and on packing case "A12" in red ink.trams, tramways, melbourne, road transport, tramways, railways, public transport, transportation plan -
 Bendigo Military Museum
Uniform - SHIRT, TROUSERS, WORK DRESS - ARMY, Australian Defence Industries, pre-2004
DPCU (Disruptive Pattern Camouflage Uniform). Work dress, colours light to dark greens through to light to dark brown. Cotton/polyester fabric. Khaki colour plastic buttons. 1. Shirt - older style female work dress. Collar, shoulder epaulettes, two front pockets with concealed button closure flaps. White polyester fabric manufacturers label, back below collar. Print illegible. 2. Trousers - older style female work dress. Two side pockets, two large patch side pockets with nylon and metal zipper closure, one back pocket with buttons. Belt loops and nylon and metal zipper fly. Khaki colour cotton fabric pocket lining. Elastic ankle drawstring with plastic lock clip.Manufacturers information on label - print illegible. 1. Handwritten in black ink pen "12/ 12/ 77R".uniform, army, work dress, dpcu -
 Bendigo Military Museum
Uniform - UNIFORM , CAMOUFLAGE, ARMY, Australian Defence Industries, 1989 - 1990
Uniformissued to and worn by D. Angus.1. Shirt - camouflage jungle pattern green and brown colours, polyester/cotton fabric with long sleeves, shoulder epaulettes, two front pockets with button down flap, green plastic buttons. Left shoulder patch with Rising Sun, Crown and 'THE AUSTRALIAN ARMY". Two rank insignia on sleeve - one stripe - Lance Corporal, Cotton manufacturers label, green with black print information, very faded. 2. Trousers - camouflage jungle pattern green and brown, polyester/cotton fabric. Green colour plastic buttons. Five button fly, two front inside pockets with two button down flaps. two side pockets, button down belt loops. Waist and pocket lining - polyester/cotton fabric. Green cotton manufacturers label on side pocket lining.1. & 2. Green cotton fabric label information - black ink print. 1. "ADI/VICTORIA 1989/^/ 8415.66.130.0028/ SIZE 100 S/ NAME/ SERVICE NO/ MACHINE WASHABLE/ DRIP DRY ONLY/ DO OT IRON/ DO NOT STARCH/ DO NOT BLEACH" Handwritten red ink "ANGUS" . 2. "ADI P/L/ VICTORIA/ 1996/ 6/ 8415.66.130.004 ?/ SIZE 92S/ NAME/ SERVICE NO/ MACHINE WASHABLE/ DRIP DRY ONLY/ DO NOT IRON/ DO NOT STARCH/ DO NOT BLEACH."uniform, army, camouflage work dress\ -
 Bendigo Military Museum
Uniform - BELT, SAM BROWNE, ARMY
Part of the Kevin John Herdman, No. 397661, Collection. See Catalogue No. 5942P for details of his service record..1) Brown leather Sam Browne belt fitted with a double clawed brass buckle. A brass stud and leather loop secure the free end of the belt tongue. A pair of brass rings are attached to the top edge of the belt for the attachment of the shoulder strap. A pair of squared “D”rings and a brass flat hook are located on the lower edge of the belt on the left side for the attachment of a sword frog. .2) Brown leather shoulder strap is attached at the front and rear of the belt by a brass stud and eyelet. Adjustment via a brass buckle. .3) Brown leather sword frog stitched on both sides with a brass “D” ring attached to the top. A brass post is placed at the centre where the supporting straps meet in a V. Two straps for attaching to the belt have two brass buckles for adjustment.sam browne, uniform, sword frog, kevin john herdman -
 Bendigo Historical Society Inc.
Clothing - WEDDING DRESS - BODICE, 1902
Clothing. Wedding Dress - Bodice.Cream coloured bodice of wedding dress. ''Japanese silk with transparent yolk of chiffon tucked Russian Body'' ( Quote from newspaper of the day).Long pintucked sleeves. Fine ribbon trim and bows at wrists. Two flounces of silk, trimmed with ribbon at elbows. Front panel fastened at side with metal hooks and hand made loops, to show a centre panel trimmed with chiffon frills. Pearl beaded motifs at front. Sash at waistline ties at the side - finished with pearl beading, and and a stand up chiffon collar. Worn by Mary Smith who was the daughter of Felix Smith. He built the Wycheproof Court House, Post Office and Royal Mail Hotel. Mary and John Keane lived in a mud brick house after they their marriage. See also 11400.75, & 11400.77.costume, female, wedding dress bodice -
 Bendigo Historical Society Inc.
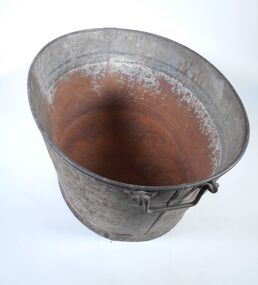
Domestic object - Wash Tub
Before hot and cold water was easily available children were bathed in small tubs. An oval metal wash tub. The base has a four centmetres metal band around it that extends two and a half centimetres below the bottom of the tub. The bottom of the tub is an oval 50 centimetres long and 40 centimeters wide. The wall is 29 centimetres high with rolled rim half a centimetre wide on the top, it's made in two pieces that are folded together at each end. The top of the tub is an oval 62 centimetres long and 49 centimetres wide. There are identical metal handles at the top of the tub at each end, they are made of a one centimetre diameter metal rode, they have a nine centimetres long grip, a four centimetre piece at right angles on each end and a two centimetre long piece at the opposite right angle on the end which is inserted into a two centimetre loop that's attached to the tub. wash tub, personal hygiene -
 Bendigo Historical Society Inc.
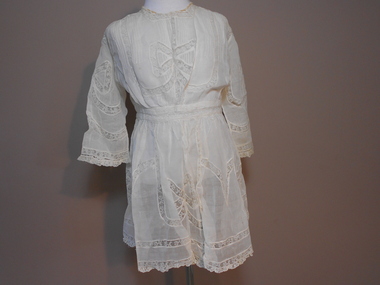
Clothing - CHILD'S CREAM COLOURED WAISTED ORGANZA DRESS
Clothing. Child's cream coloured waisted organza dress. U shaped neckline with 1.5 cm lace trim with eyelet edge. Silk ribbon (1cm) threaded through eyelet lace. Organza fabric and bows. Large bow pattern of on centre front of bodice, on each sleeve and four bows around skirt connected with trailing ribbon pattern. Front bodice has decorative vertical pin tucks.Back bodice has vertical pin stripes and lace strip inserts. Centre back opening (35 cm) fastened with ribbon at neckline and five metal hooks with cotton loops. Two horizontal strips of lace around waistline. Long straight sleeves trimmed with 1.5 cm lace at wrist. Hem is trimmed with 1.5 cm lace. Dress is unlined.costume, children's, child's cream coloured linen petticoat -
 Bendigo Historical Society Inc.
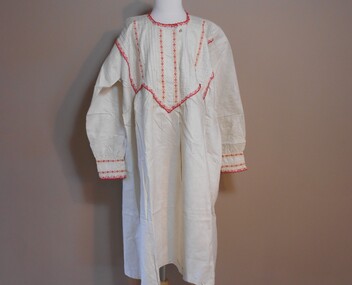
Clothing - WOMEN'S CREAM COLOURED LONG SLEEVED LINEN NIGHTGOWN
Clothing. Women's cream coloured long sleeved linen nightgown. High round neckline trimmed with 1cm red and white lace with scalloped edge. Front bib section below neckline (44 cm X 35 cm) of vertical red and white ribbon strips and pin tucks. Lower edge of bib section has zig zag shape dipping to V shape at centre front. Bib section edged with red and white lace.Front opening left of centre (24 cm) fastened with 2 X 0ne cm plastic buttons and cotton loops. Long straight sleeves gathered into cuff of red and white ribbon strips, lace with red and white pleated lace frill. Fabric yoke across shoulders at back below fabric yoke. ''A'' shaped garment widening to hemcostume, female, women's long sleeved linen nightgown -
 Bendigo Historical Society Inc.
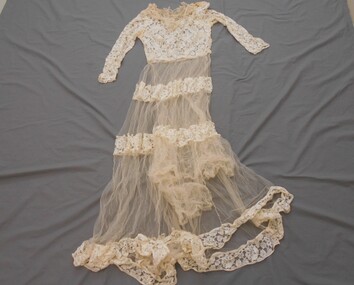
Clothing - WEDDING DRESS, 1950
Wedding Dress. A very delicate, beautiful dress, in a very fragile state, worn over a satin petticoat(11400.1154). Lace bodice, and full length tapered, lace sleeves. Boat shaped neckline, outlined with a tulle insert, that brings the neckline to a high round neckline at the throat. This fastens with two metal press-studs on the left shoulder. This high yoke is edged at the bodice edge with an 8 cm deep frill of tulle, edged at both sides with a narrow frill of tulle, and sewn to the yoke to give a scalloped effect. Skirt is sheer and made from two layers of tulle. A band of lace, 9 cm deep borders the hemline, at knee level and at hip level. Three metal hooks and stitched loops fasten a placket on the left hand side.costume, female, cream tulle and lace wedding dress -
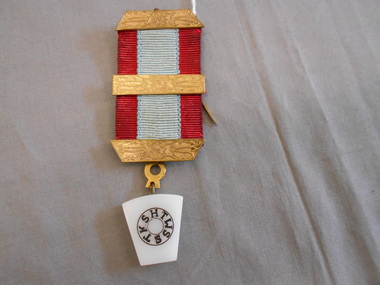 Bendigo Historical Society Inc.
Accessory - JOHN FREDERICK HARPER COLLECTION: BRASS AND RIBBON LAPEL BADGE, 1950-1990's
Object. A 5 cm long ribbon, woven in a heavy weave, with a .75 cm red vertical stripe on each side, and a 1.5 cm vertical light blue stripe in the centre. Three .75 cm bands of brass metal - a shaped strip at top and bottom of the fabric, with a rectangular shaped clasp in the centre. These three clasps have decorative engraved patterns. The lower clasp- called a suspender, has a circular hook at the bottom, from which is suspended a circular brass fitting, holding a metal link, which is attached to a four sided shape, with letters in a circular shape - HTWSSTKS, Lodge symbols are on each side of this perspex shaped hanging. A 6 cm long pin attached to a loop on the top bar would fasten the badge to a suit jacket lapel, or other regalia.organisation, masonic lodge, brass and ribbon lapel badge -
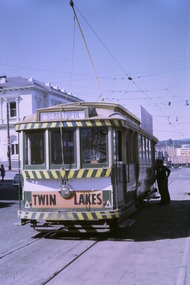 Ballarat Tramway Museum
Photograph - Digital image Set of 10, Tony Smith, 5/09/1971 12:00:00 AM
Yields information about Ballarat Tramways and trams prior to the closure of the tramway system.Set of 10 digital images of Ballarat trams prior to closure, scanned from original slides by Tony Smith, 1971 prior to closure of the system. This set of slides, possibly on the last weekend of Mt Pleasant services - closure took place on 5/9/1971. . .1 - 17 at the City terminus, north side. Tram showing the destination of Sebastopol and has a Twin Lakes sign. .2 - 26 at the city terminus, south side with Geommola's Pharmacy and Kodak Film advert and Town Hall in the background. .3 - 43 at the City terminus, north side, with destination of Mt Pleasant. Has a number of men at the tram stop. .4 - 14 leaving Bridge St, crossing Grenville St into Sturt St, with destination of City. Has the Dickins and Woolworths Big W store in the background. .5 - 43 at Mt Pleasant terminus with conductor boarding the tram. Tram has destination of Gardens via Sturt St West. In the background is the corner store with adverts for The Sun, Womens Weekly, Coca Cola and Robur Tea. .6 - 43 and 26 Barkly St, about to arrive at the Grant St loop. Both trams inbound. .7 - 43, 26 and 27 at Grant St loop. .8 - 12 (Lydiard St Nth) and another bogie tram at the city terminus north with the Town Hall in the background. .9 - 39 outbound in Barkly St to Mt Pleasant - note the new bus stop signs on either side of the tram. 10 - 27 (City) and 26 turning from Barkly St into Main St with the Ampol petrol station, a general store advertising Escort cigarettes and The Age in the background . On the right hand side is a fish and chips shop advertising crays and drinks.trams, tramways, sturt st, city, grenville st, bridge st, mt pleasant, barkly st, grant st, main st, closure, tram 17, tram 26, tram 43, tram 14, tram 12, tram 27, tram 39 -
 Ballarat Tramway Museum
Slide - 35mm slide/s - set of 32, Noel Simons, 25/02/1971 12:00:00 AM
Set of 31 transparencies taken on 25/2/1972 on Kodak mounts. 1201.1 - Bendigo No. 26 in Bond St. just after leaving Long Gully en route for Quarry Hill. Has Norris Supermarket in background. Has two SEC roof ads. 1201.2 - No. 26 climbing View St. from Charing Cross en route to Eaglehawk. Has ANZ bank and AMOCO service station in background. 1201.3 - as for 1201.3, but after tram has passed photographer. Has buildings west of Mackenzie St. in photograph. 1201.4 - Tram stop and centre of the road pole with two "CARS STOP BY REQUEST" signs mounted on pole at the corner of Mackenzie St. 1201.5 - same position as for 1201.3, but with No. 5 descending the street. 1201.6 - same position as for 1201.2, but with No. 5 descending the street. Photo taken after tram has passed photographer. 1201.7 - No. 7 in Nolan St. from across the park at Lake Weeroona. 1201.8 - No. 7 entering McCrae St from Nolan St. - distant view. Note "TRAM "sign on left hand side under tree and overhead in McCrae St. from former track that once was in this street. 1201.9 - No. 7 in High St. with Cathedral in background. Tram en route to North Bendigo. Note scaffolding around Cathedral main spire area. 1201.10 - No. 7 crossing Bendigo Creek bridge in High St. near Golden Square. Has a Caltex Service station in the background. 1201.11 - No. 7 at Golden Square terminus with Sunburst Fruit Juices and a Peters Ice cream delivery vans alongside. 1201.12 - as for 1201.11 but photo taken from behind tram, with the end of the rails in the photograph. 1201.13 - No. 7 and 21 in Pall Mall at Charing Cross with No. 5 in the background. Taken some distance away from the location. 1201.14 - No. 7 at Golden Square terminus, taken a short distance from the tram terminus. Shows Milk Bar on right hand side and the hotel on the left hand side. Taken from the south side of the roadway. 1201.15 - as from 1201.14 but taken from the north side of the roadway. 1201.16 - No 5 waiting at California Gully loop. Distant photo showing surrounds 1201.17 - No. 5 en route for Quarry Hill crossing No. 26 at California Gully. 1201.18 - No. 26 at Eaglehawk terminus with Eaglehawk Town Hall and Post Office in background. 1201.19 - No. 21 arriving at Charing Cross en route to North Bendigo. Has Alexandra Fountain in the background, ANZ bank RACV building, and other buildings on the north side of Pall Mall or Nolan St. 1201.20 - No. 26 en route for Quarry Hill at Charing Cross, with crew standing by front door. Has Colonial Mutual life building, Armstrong Tyre Service (Firestone) and a sign for Cohns Drinks in the background. 1201.21 - as for 1201.20 but with No. 5 en route to Eaglehawk now in photograph. 1201.22 - No. 26 at Quarry Hill terminus. 1201.23 - No. 26 at Quarry Hill terminus, view of front portion of tram only from a gate at the Bendigo cemetery. 1201.24 - Track at the end of the Quarry Hill line showing the point blades of the former "Y" terminus and the overhead for this. 1201.25 - No. 2 at the Quarry Hill terminus, looking along the former Trackwork. 1201.26 - as for 1201.25 1201.27 - number not used. 1201.28 - Golden Square terminus from some distance from the actual terminus, showing the Warning sign "TRAM" for motorists from the south. No. 7 at the terminus. 1201.29 - No. 7 passing through the Golden Square shopping centre. Numerous cars and pedestrians. Tram en route for North Bendigo. 1201.30 - No. 7 in High St. Golden Square, en route for North Bendigo. Photo taken after tram has passed photographer. 1201.31 - No. 7 in High St. just past Wattle St. with the Cathedral in the background. Tram has two SEC roof ads good side on photo, 'Everything's fine in my all electric kitchen' and 'Electrical cooking - clean, quick, economical'. 1201.32 - No. 7 in High St. nearing Wattle St. Has Cathedral in the background. Photo taken after tram has passed photographer.Information written on in black ink and date stamped on purple ink. 1201.1 - "No. 26 in Bond St just after leaving Long Gully" 1201.2 - "No. 26 climbing View St. from Charing Cross" 1201.3 - "No. 26 ascending View St. from Charing Cross (At Mackenzie St.)" 1201.4 - "View St. & Mackenzie St." 1201.5 - "No. 5 in View St. near Mackenzie St." 1201.6 - "No. 5 in View St. nearing Charing Cross." 1201.7 - "No. 7 in Nolan St. seen from Lake Weeroona Park." 1201.8 - "No. 7 entering McRae St. from Nolan St. Note "TRAM" warning sign on left. 1201.9 - "No. 7 in High St. passing Short St." 1201.10 - "No. 7 crossing Bendigo Creek bridge in High St. near Golden Square." 1201.11 - "No. 7 at Golden Square terminus" 1201.12 - "No. 7 at Golden Square terminus" 1201.13 - "No 7, 21 and 5 at Charing Cross" 1201.14 - "No. 7 at Golden Square terminus" 1201.15 - "No. 7 at Golden Square terminus" 1201.16 - "No 5 waiting at California Gully loop." 1201.17 - "Nos. 5 and 26 crossing at California Gully loop" 1201.18 - "No. 26 at Eaglehawk terminus" 1201.19 - "No. 21 arriving at Charing Cross from Golden Square" 1201.20 - "No. 26 at Charing Cross" 1201.21 - "Nos. 5 and 26 at Charing Cross." 1201.22 - "No. 26 at Quarry Hill terminus" 1201.23 - "No. 26 at Quarry Hill terminus seen through the gates of the Bendigo Cemetery." 1201.24 - "Quarry Hill terminus showing remains for former double track layout abandoned before 1964." 1201.25 - "No. 2 at Quarry Hill terminus" 1201.26 - "No. 2 at Quarry Hill terminus" 1201.28 - "The Southern approach to Golden Square with No. 7 standing at the terminus, "TRAM" warning sign on the left. 1201.29 - "No. 7 passing through Golden Square Shopping Centre" 1201.30 - "No. 7 in High St. Golden Square" 1201.31 - "No. 7 in High St. passing Wattle St." 1201.32 - "No. 7 in High St. nearing Wattle St."tramways, trams, bendigo, bond st., view st., nolan st., high st., eaglehawk, california gully, charing cross, quarry hill, trackwork, tram 2, tram 5, tram 7, tram 21, tram 26 -
 Montmorency/Eltham RSL Sub Branch
Medal - Medal Group, British War & Victory
Ancestor of Sub Branch memberPte. Dempster was an ancestor of a Montmorency/Eltham sub-branch member.British War Medal Silver disc with a straight clasp suspender without a swivel Ribbon (in clasp) - wide central watered stripe of orange, flanked by two narrow white stripes, which are in turn flanked by two black pin-stripes, further flanked by two outer stripes of blue Obverse ... bare headed effigy of King George V (by Sir Bertram Mackennal) facing left with the legend around circumference Reverse ... St. George on horseback trampling shield of eagle (symbol of "Central Powers"); above is rising sun of victory. Victory Medal Bronze disc with circular loop which is threaded with ribbon Ribbon - a ‘two rainbow’ design, with the violet from each rainbow on the outside edges moving through to a central red stripe where both rainbows meet Obverse ... image of "winged Victory" Reverse ... inscription surrounded by laurel reathBritish War Medal Obverse ... GEORGIVS V BRITT OMN : REX ET IND. IMP. (George V, King of all the British Isles and Emperor of India) Reverse ... 1914 1918 Rim ... Pte J. H. Dempster, 24 BN AIF Victory Medal Obverse ... no inscription Reverse ... THE GREAT WAR FOR CIVILIZATION 1914 - 1919 Rim ... Pte J. H. Dempster, 24 BN AIFwar service medals, ww1 -
Frankston RSL Sub Branch
Medallion, Peace 1919
Circular with a plain edge and integral suspension loop. The obverse features a symbolic female figure of Peace, holding a sword and standing on a plinth marked 'PEACE 1919'. Behind her flies a dove, and at her left and right feet are two figures freed from their shackles. The reverse features a central panel surrounded by laurel leaves, surmounted by the King's Crown with the word 'VICTORY' over the rays of the rising sun. A sailor and a digger stand at ease on either side of the panel on which is cast 'THE / TRIUMPH / OF / LIBERTY / AND / JUSTICE'. Below the leaves is a very small panel with the words 'THE PEACE OF 1919' and the manufacturer's name. 'The Peace of 1919' medallion was issued by the Defence Department to school children throughout Australia to commemorate the signing of the Versailles Peace Treaty in 1919. The medals were originally suspended from a narrow piece of red, white and blue striped cotton ribbon.refer to description -
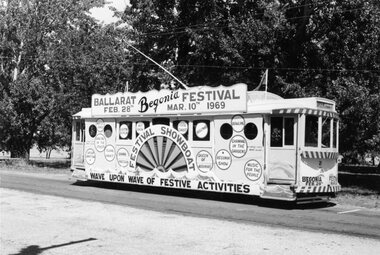 Ballarat Tramway Museum
Photograph - Black & White Photograph/s, Brian Weedon, 2/03/1969 12:00:00 AM
Black and white photograph of SEC Ballarat No. 21 decorated for the 1969 Ballarat Begonia Festival. Photographed at a Wendouree Parade crossing loop by Brian Weedon 2/3/1969. Tram is painted white - based on the Myer's Christmas tram of 1968 (See Reg. Item 1881) and used later for the Ballarat Base Hospital Appeal May 1969 Begonia Festival (See Reg. Item 1885). Theme: Festival Showboat. Tram has destination of "Gardens via Drummond Nth", a sign under the headlight "Begonia Festival Feb. 28 Mar. 10". On the side of the tram has the various festival activities within circles and a paddle wheel with the words around it of "Festival Showboat" The roof advertisement board says "Ballarat Begonia Festival Feb. 28 March 10th 1969" and on the base of the sides a sign saying "Wave upon Wave of Festive Activities". On rear in black ink "Ballarat 2nd March 1969 / Photo by Brian Weedon" and hand stamped two processing items, including a date "11.3.69".trams, tramways, begonia festival, decorated trams, wendouree parade, festival, tram 21 -
 Ballarat Tramway Museum
Album - Photo Album, Ron Scholton, "661", c1989
A photo album, spiral bound with 10 cardboard sheets with photos of late Alf Twentyman cable car set on covers. Each sheet coated with a glue and overlain by a plastic sheet. Album contains 34 photos of BTM W3 661operating in Melbourne 1989 on a charter for Yapper Tours. - no date on photos. Photos taken at Preston depot, South Melbourne loop, Camberwell depot, Thornbury depot, Preston Workshop gates, Sth Melb. depot, Victoria Parade, St Kilda, Brunswick depot, Victoria Market and Kew depot. Also six photos of W1 427 at Kooyong and Dandenong Roads, St Kilda, Batman Avenue, Swan St. bridge, Hawthorn and Wattle Park. See also Reg Item 5986 for a larger more formal album of photographs. Sample of images added 19-12-2016trams, tramways, w3 class, melbourne, w1 class, yapper tours