Showing 3749 items
matching passengers
-
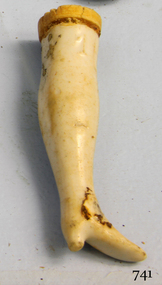
![Ceramic doll]s leg, cream and beige, with shape of shoe on the end](/media/collectors/4f729f6597f83e03086016ea/items/521602bb19403a17c4b9fa5a/item-media/52a7cc472162ef1d94e8449b/item-fit-380x285.jpg) Flagstaff Hill Maritime Museum and Village
Flagstaff Hill Maritime Museum and VillageLeisure object - Doll's Leg, ca 1878/
This is part of a child's toy, a doll with ceramic legs. It was recovered from the wreck of the Loch Ard. A brief history of the Loch Ard (1873-1878): - The sailing ship Loch Ard was one of the famous Loch Line ships that sailed from England to Australia. Barclay, Curdle and Co. built the three-masted iron vessel in Glasgow in 1873. It had sailed three trips to Australia and one trip to Calcutta before its fateful voyage. Loch Ard left England on March 2, 1878, under the command of recently married, 29-year-old Captain Gibbs. It was bound for Melbourne with a crew of 37, plus 17 passengers. The general cargo reflected the affluence of Melbourne at the time. Onboard were straw hats, umbrellas, perfumes, clay pipes, pianos, clocks, confectionery, linen and candles, and a heavier load of railway irons, cement, lead and copper. Other cargo included items intended for display in the Melbourne International Exhibition of 1880. The Loch Ard had been sailing for three months and was close to its destination on June 1, 1878. Captain Gibbs had expected to see land at about 3 am but the Loch Ard ran into a fog that greatly reduced visibility and there was no sign of land or the Cape Otway lighthouse. The fog lifted at 4 am and the sheer cliffs of Victoria's west coast were much closer to them than Captain Gibbs expected. He tried to manage the vessel but failed and the ship struck a reef at the base of Mutton Bird Island, near Port Campbell. The top deck loosened from the hull, and the masts and rigging crashed down, knocking passengers and crew overboard. The lifeboat was launched by Tom Pearce but crashed into the side of Loch Ard and capsized. He clung onto its overturned hull and sheltered under it. He drifted out to sea and the tide brought him back to what is now called Loch Ard Gorge. He swam to shore and found a cave for shelter. A passenger, Eva Carmichael, had raced onto the deck to find out what was happening and was confronted by towering cliffs above the ship. She was soon swept off the ship by a huge wave. Eva saw Tom Pearce on a small rocky beach and yelled to attract his attention. He swam out and dragged her to the shelter of the cave. He revived her with a bottle of brandy from a case that had washed up on the beach. Tom scaled a cliff in search of help and followed some horse hoof prints. He came from two men from Glenample Station, three and a half miles away. He told the men of the tragedy and then returned to the gorge while the two men rode back to the station to get help. They reached Loch Ard Gorge and took the two shipwreck survivors to Glenample Station to recover. Eva stayed at the station for six weeks before returning to Ireland by steamship. In Melbourne, Tom Pearce received a hero's welcome and was presented with a medal and some money. Of the 54 crew members and passengers on board, only two survived: the apprentice, Tom Pearce and the young woman passenger, Eva Carmichael, who lost her family in the tragedy. Flagstaff Hill’s collection of artefacts from LOCH ARD is significant for being one of the largest collections of artefacts from this shipwreck in Victoria. It is significant for its association with the shipwreck, which is on the Victorian Heritage Register (VHR S417). The collection is significant because of the relationship between the objects, as together they have a high potential to interpret the story of the LOCH ARD. The LOCH ARD collection is archaeologically significant as the remains of a large international passenger and cargo ship. The LOCH ARD collection is historically significant for representing aspects of Victoria’s shipping history and its potential to interpret sub-theme 1.5 of Victoria’s Framework of Historical Themes (living with natural processes). The collection is also historically significant for its association with the LOCH ARD, which was one of the worst and best known shipwrecks in Victoria’s history. China doll's leg, cream and beige ceramic, foot shaped at the end of the leg. Recovered from the wreck of the Loch Ard. flagstaff hill, warrnambool, shipwrecked coast, flagstaff hill maritime museum, maritime museum, shipwreck coast, flagstaff hill maritime village, great ocean road, loch line, loch ard, captain gibbs, eva carmichael, tom pearce, glenample station, mutton bird island, loch ard gorge, china dolls leg, doll's leg, china doll's leg, doll's limb, ceramic doll -
 Flagstaff Hill Maritime Museum and Village
Leisure object - Doll's Leg, ca 1878
This ceramic leg is part of a child's doll. It was recovered from the wreck of the Loch Ard. A brief history of the Loch Ard (1873-1878): - The sailing ship Loch Ard was one of the famous Loch Line ships that sailed from England to Australia. Barclay, Curdle and Co. built the three-masted iron vessel in Glasgow in 1873. It had sailed three trips to Australia and one trip to Calcutta before its fateful voyage. Loch Ard left England on March 2, 1878, under the command of recently married, 29-year-old Captain Gibbs. It was bound for Melbourne with a crew of 37, plus 17 passengers. The general cargo reflected the affluence of Melbourne at the time. Onboard were straw hats, umbrellas, perfumes, clay pipes, pianos, clocks, confectionery, linen and candles, and a heavier load of railway irons, cement, lead and copper. Other cargo included items intended for display in the Melbourne International Exhibition of 1880. The Loch Ard had been sailing for three months and was close to its destination on June 1, 1878. Captain Gibbs had expected to see land at about 3 am but the Loch Ard ran into a fog that greatly reduced visibility and there was no sign of land or the Cape Otway lighthouse. The fog lifted at 4 am and the sheer cliffs of Victoria's west coast were much closer to them than Captain Gibbs expected. He tried to manage the vessel but failed and the ship struck a reef at the base of Mutton Bird Island, near Port Campbell. The top deck loosened from the hull, and the masts and rigging crashed down, knocking passengers and crew overboard. The lifeboat was launched by Tom Pearce but crashed into the side of Loch Ard and capsized. He clung onto its overturned hull and sheltered under it. He drifted out to sea and the tide brought him back to what is now called Loch Ard Gorge. He swam to shore and found a cave for shelter. A passenger, Eva Carmichael, had raced onto the deck to find out what was happening and was confronted by towering cliffs above the ship. She was soon swept off the ship by a huge wave. Eva saw Tom Pearce on a small rocky beach and yelled to attract his attention. He swam out and dragged her to the shelter of the cave. He revived her with a bottle of brandy from a case that had washed up on the beach. Tom scaled a cliff in search of help and followed some horse hoof prints. He came from two men from Glenample Station, three and a half miles away. He told the men of the tragedy and then returned to the gorge while the two men rode back to the station to get help. They reached Loch Ard Gorge and took the two shipwreck survivors to Glenample Station to recover. Eva stayed at the station for six weeks before returning to Ireland by steamship. In Melbourne, Tom Pearce received a hero's welcome and was presented with a medal and some money. Of the 54 crew members and passengers on board, only two survived: the apprentice, Tom Pearce and the young woman passenger, Eva Carmichael, who lost her family in the tragedy. Flagstaff Hill’s collection of artefacts from LOCH ARD is significant for being one of the largest collections of artefacts from this shipwreck in Victoria. It is significant for its association with the shipwreck, which is on the Victorian Heritage Register (VHR S417). The collection is significant because of the relationship between the objects, as together they have a high potential to interpret the story of the LOCH ARD. The LOCH ARD collection is archaeologically significant as the remains of a large international passenger and cargo ship. The LOCH ARD collection is historically significant for representing aspects of Victoria’s shipping history and its potential to interpret sub-theme 1.5 of Victoria’s Framework of Historical Themes (living with natural processes). The collection is also historically significant for its association with the LOCH ARD, which was one of the worst and best known shipwrecks in Victoria’s history. China doll's leg, cream colour with beige top. Shoe shape is formed at the end of the leg. .Recovered from the wreck of the Loch Ard.flagstaff hill, warrnambool, shipwrecked coast, flagstaff hill maritime museum, maritime museum, shipwreck coast, flagstaff hill maritime village, great ocean road, loch line, loch ard, captain gibbs, eva carmichael, tom pearce, glenample station, mutton bird island, loch ard gorge, china dolls leg, doll's leg, ceramic doll leg, porcelain doll's leg -
 Flagstaff Hill Maritime Museum and Village
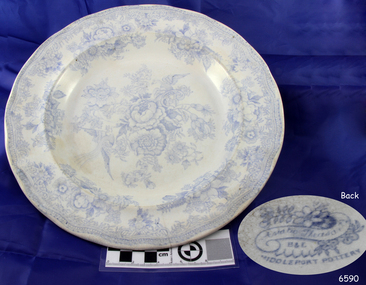
Ceramic - Plate, Minton Potteries, ca 1878
This plate is one of a collection of plates with the Asiatic Pheasant design from recovered from the wreck o the Loch Ard. A brief history of the Loch Ard (1873-1878): - The sailing ship Loch Ard was one of the famous Loch Line ships that sailed from England to Australia. Barclay, Curdle and Co. built the three-masted iron vessel in Glasgow in 1873. It had sailed three trips to Australia and one trip to Calcutta before its fateful voyage. Loch Ard left England on March 2, 1878, under the command of recently married, 29-year-old Captain Gibbs. It was bound for Melbourne with a crew of 37, plus 17 passengers. The general cargo reflected the affluence of Melbourne at the time. Onboard were straw hats, umbrellas, perfumes, clay pipes, pianos, clocks, confectionery, linen and candles, and a heavier load of railway irons, cement, lead and copper. Other cargo included items intended for display in the Melbourne International Exhibition of 1880. The Loch Ard had been sailing for three months and was close to its destination on June 1, 1878. Captain Gibbs had expected to see land at about 3 am but the Loch Ard ran into a fog that greatly reduced visibility and there was no sign of land or the Cape Otway lighthouse. The fog lifted at 4 am and the sheer cliffs of Victoria's west coast were much closer to them than Captain Gibbs expected. He tried to manage the vessel but failed and the ship struck a reef at the base of Mutton Bird Island, near Port Campbell. The top deck loosened from the hull, and the masts and rigging crashed down, knocking passengers and crew overboard. The lifeboat was launched by Tom Pearce but crashed into the side of Loch Ard and capsized. He clung onto its overturned hull and sheltered under it. He drifted out to sea and the tide brought him back to what is now called Loch Ard Gorge. He swam to shore and found a cave for shelter. A passenger, Eva Carmichael, had raced onto the deck to find out what was happening and was confronted by towering cliffs above the ship. She was soon swept off the ship by a huge wave. Eva saw Tom Pearce on a small rocky beach and yelled to attract his attention. He swam out and dragged her to the shelter of the cave. He revived her with a bottle of brandy from a case that had washed up on the beach. Tom scaled a cliff in search of help and followed some horse hoof prints. He came from two men from Glenample Station, three and a half miles away. He told the men of the tragedy and then returned to the gorge while the two men rode back to the station to get help. They reached Loch Ard Gorge and took the two shipwreck survivors to Glenample Station to recover. Eva stayed at the station for six weeks before returning to Ireland by steamship. In Melbourne, Tom Pearce received a hero's welcome and was presented with a medal and some money. Of the 54 crew members and passengers on board, only two survived: the apprentice, Tom Pearce and the young woman passenger, Eva Carmichael, who lost her family in the tragedy. This plate is significant for its connection to the potters Minton. It is also significant for its connection with the wreck of the sailing ship Loch Ard. The Loch Ard shipwreck is significant for Victoria and is registered on the Victorian Heritage Register (S 417). Flagstaff Hill has a varied collection of artefacts from Loch Ard and its collection is significant for being one of the largest accumulations of artefacts from this notable Victorian shipwreck. The group gives a snapshot of history, enabling us to interpret the story of this tragic event and the lives of the people involved. The collection is also archaeologically significant as it represents aspects of Victoria's shipping history that allow us to interpret Victoria's social and historical themes of the time. The collection's historical significance is that it is associated unfortunately with the worst and best-known shipwreck in Victoria's history.China dinner plate, scalloped rim. Floral arrangement with Asiatic Pheasant design, made by Middleport Pottery. Recovered from the wreck of the Loch Ard. Within cartouche "B & L / MIDDLEPORT POTTERY" and an 'L" handwritten in black pen.flagstaff hill, warrnambool, flagstaff hill maritime museum and village, shipwreck coast, great ocean road, plate, minton, loch ard, asiatic pheasant design -
 Flagstaff Hill Maritime Museum and Village
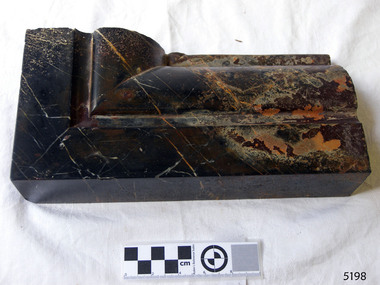
Decorative object - Marble, Before 1878
A brief history of the Loch Ard (1873-1878): - The sailing ship Loch Ard was one of the famous Loch Line ships that sailed from England to Australia. Barclay, Curdle and Co. built the three-masted iron vessel in Glasgow in 1873. It had sailed three trips to Australia and one trip to Calcutta before its fateful voyage. Loch Ard left England on March 2, 1878, under the command of recently married, 29-year-old Captain Gibbs. It was bound for Melbourne with a crew of 37, plus 17 passengers. The general cargo reflected the affluence of Melbourne at the time. Onboard were straw hats, umbrellas, perfumes, clay pipes, pianos, clocks, confectionery, linen and candles, and a heavier load of railway irons, cement, lead and copper. Other cargo included items intended for display in the Melbourne International Exhibition of 1880. The Loch Ard had been sailing for three months and was close to its destination on June 1, 1878. Captain Gibbs had expected to see land at about 3 am but the Loch Ard ran into a fog that greatly reduced visibility and there was no sign of land or the Cape Otway lighthouse. The fog lifted at 4 am and the sheer cliffs of Victoria's west coast were much closer to them than Captain Gibbs expected. He tried to manage the vessel but failed and the ship struck a reef at the base of Mutton Bird Island, near Port Campbell. The top deck loosened from the hull, and the masts and rigging crashed down, knocking passengers and crew overboard. The lifeboat was launched by Tom Pearce but crashed into the side of Loch Ard and capsized. He clung onto its overturned hull and sheltered under it. He drifted out to sea and the tide brought him back to what is now called Loch Ard Gorge. He swam to shore and found a cave for shelter. A passenger, Eva Carmichael, had raced onto the deck to find out what was happening and was confronted by towering cliffs above the ship. She was soon swept off the ship by a huge wave. Eva saw Tom Pearce on a small rocky beach and yelled to attract his attention. He swam out and dragged her to the shelter of the cave. He revived her with a bottle of brandy from a case that had washed up on the beach. Tom scaled a cliff in search of help and followed some horse hoof prints. He came from two men from Glenample Station, three and a half miles away. He told the men of the tragedy and then returned to the gorge while the two men rode back to the station to get help. They reached Loch Ard Gorge and took the two shipwreck survivors to Glenample Station to recover. Eva stayed at the station for six weeks before returning to Ireland by steamship. In Melbourne, Tom Pearce received a hero's welcome and was presented with a medal and some money. Of the 54 crew members and passengers on board, only two survived: the apprentice, Tom Pearce and the young woman passenger, Eva Carmichael, who lost her family in the tragedy. The shipwreck of the Loch Ard is of significance for Victoria and is registered on the Victorian Heritage Register ( S 417). Flagstaff Hill has a varied collection of artefacts from Loch Ard and its collection is significant for being one of the largest accumulation of artefacts from this notable Victorian shipwreck. The collections object is to also give us a snapshot into history so we are able to interpret the story of this tragic event. The collection is also archaeologically significant as it represents aspects of Victoria's shipping history that allows us to interpret Victoria's social and historical themes of the time. The collections historically significance is that it is associated unfortunately with the worst and best-known shipwreck in Victoria's history. Piece of marble cut from the corner of a fireplace surround. Black marble with brown highlights. Carved boarder. Recovered rom the Loch Ard. Noneflagstaff hill, warrnambool, shipwrecked coast, flagstaff hill maritime museum, maritime museum, shipwreck coast, flagstaff hill maritime village, great ocean road, loch line, loch ard, captain gibbs, eva carmichael, tom pearce, glenample station, mutton bird island, loch ard gorge, fireplace surround, marble, black marble -
 Flagstaff Hill Maritime Museum and Village
Domestic object - Wine Glass Stem and Base, ca 1878
The wine glass has been handblown, as shown by the ripple effect in the stem and base. A brief history of the Loch Ard (1873-1878): - The sailing ship Loch Ard was one of the famous Loch Line ships that sailed from England to Australia. Barclay, Curdle and Co. built the three-masted iron vessel in Glasgow in 1873. It had sailed three trips to Australia and one trip to Calcutta before its fateful voyage. Loch Ard left England on March 2, 1878, under the command of recently married, 29-year-old Captain Gibbs. It was bound for Melbourne with a crew of 37, plus 17 passengers. The general cargo reflected the affluence of Melbourne at the time. Onboard were straw hats, umbrellas, perfumes, clay pipes, pianos, clocks, confectionery, linen and candles, and a heavier load of railway irons, cement, lead and copper. Other cargo included items intended for display in the Melbourne International Exhibition of 1880. The Loch Ard had been sailing for three months and was close to its destination on June 1, 1878. Captain Gibbs had expected to see land at about 3 am but the Loch Ard ran into a fog that greatly reduced visibility and there was no sign of land or the Cape Otway lighthouse. The fog lifted at 4 am and the sheer cliffs of Victoria's west coast were much closer to them than Captain Gibbs expected. He tried to manage the vessel but failed and the ship struck a reef at the base of Mutton Bird Island, near Port Campbell. The top deck loosened from the hull, and the masts and rigging crashed down, knocking passengers and crew overboard. The lifeboat was launched by Tom Pearce but crashed into the side of Loch Ard and capsized. He clung onto its overturned hull and sheltered under it. He drifted out to sea and the tide brought him back to what is now called Loch Ard Gorge. He swam to shore and found a cave for shelter. A passenger, Eva Carmichael, had raced onto the deck to find out what was happening and was confronted by towering cliffs above the ship. She was soon swept off the ship by a huge wave. Eva saw Tom Pearce on a small rocky beach and yelled to attract his attention. He swam out and dragged her to the shelter of the cave. He revived her with a bottle of brandy from a case that had washed up on the beach. Tom scaled a cliff in search of help and followed some horse hoof prints. He came from two men from Glenample Station, three and a half miles away. He told the men of the tragedy and then returned to the gorge while the two men rode back to the station to get help. They reached Loch Ard Gorge and took the two shipwreck survivors to Glenample Station to recover. Eva stayed at the station for six weeks before returning to Ireland by steamship. In Melbourne, Tom Pearce received a hero's welcome and was presented with a medal and some money. Of the 54 crew members and passengers on board, only two survived: the apprentice, Tom Pearce and the young woman passenger, Eva Carmichael, who lost her family in the tragedy. The shipwreck of the Loch Ard is of significance for Victoria and is registered on the Victorian Heritage Register ( S 417). Flagstaff Hill has a varied collection of artefacts from Loch Ard and its collection is significant for being one of the largest accumulation of artefacts from this notable Victorian shipwreck. The collections object is to also give us a snapshot into history so we are able to interpret the story of this tragic event. The collection is also archaeologically significant as it represents aspects of Victoria's shipping history that allows us to interpret Victoria's social and historical themes of the time. The collections historically significance is that it is associated unfortunately with the worst and best-known shipwreck in Victoria's history. Wine glass part, stem and base only. Glass has been hand blown. Recovered from the Loch Ard wreck.Noneflagstaff hill, warrnambool, shipwrecked coast, flagstaff hill maritime museum, maritime museum, shipwreck coast, flagstaff hill maritime village, great ocean road, loch line, loch ard, captain gibbs, eva carmichael, tom pearce, glenample station, mutton bird island, loch ard gorge, wine glass, handmade drinking glass, blown glass -
 Wodonga & District Historical Society Inc
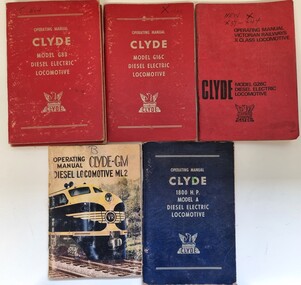
Manual - Operating Manuals for Clyde Diesel Locomotives
This collection of Diesel Locomotive Manuals was published by the Clyde EngineeringA collection of 5 manuals for a range of Clyde Diesel Locomotives. The collection includes instructions for the Clyde G8B, G16C, G26C, 1800 HP Model A and the Clyde Mailiner Model 2. On the cover of each manual, the owner has written the letter for the name of class which the relevant locomotive was ascribed in Victoria. The Clyde Engineering Company Limited was registered on 30 September 1898 in New South Wales. It was one of the iconic Australian engineering firms whose history spanned just over a century and was one of the few locomotive and rolling stock builders in the world that transitioned from steam to diesel to electric traction. The company was formed by Walter Maplesden Noakes who purchased the works of Hudson Brothers Limited in the Sydney suburb of Granville, which had been established by in 1882. The manuals refer to the following locomotives:- Clyde Model G8B which operated in Victoria as the new T class locomotive. It was introduced in 1955 and was the most numerous class of diesel locomotive used in Victoria. This model continued in operation until 1968, although many were modified for continued service. Clyde Model G16C, later superseded by the G26C operated in Victoria as the X class locomotive between 1966 and 1976. Clyde Model 1800HP Model A became the S class locomotives in Victoria. Additional numbers were purchased in preparation for the opening of the standard gauge line between Melbourne and Albury, They entered service between 1957 and 1961. Clyde Mainline Model 2 became the B class in Victoria. The B class were the first mainline diesel-electric locomotives in Victoria entering service in June 1952. They were initially used on the main passenger and freight services, before moving out to other areas. They remained in service until the early 1990s.fiction This collection of Diesel Locomotive Manuals was published by the Clyde Engineeringclyde engineering, diesel locomotives, locomotives victoria -
 Flagstaff Hill Maritime Museum and Village
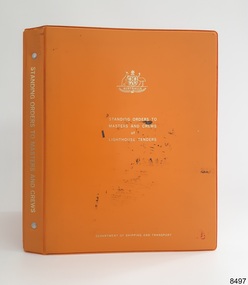
Book - Manual, Standing Orders, Department of Shipping and Transport, Standing Orders to Masters and Crews of Lighthouse Tenders, 1968
This book is a mid-20th century updated version of a manual with regulations and instructions for lighthouse staff and the supply of equipment and other goods that are necessary. It includes lists such as protective clothing required, fuel, when to raise a flag at half-mast, how communication must be carried out, the testing of equipment, and other similar information. It also contains templates for the Certificates of Service of various ranks such as Master and Mate. Australia no longer has manned lighthouses although some still have caretakers that report on the weather. The last manned lighthouse was in Tasmania and was de-manned in December 1995.The ultimate purpose of the book was to set down instructions that would be used to carry out life saving procedures, and to avoid shipwrecks. It confirms some earlier methods and updates others. The information within the book is similar to the information referred to by the 19th century and early 20th century lighthouse keepers and staff, and others involved in the preservation of life, such as those published by the Department of Ports and Harbours. The book is a valuable resource to those researching the evolving of maritime history from Colonial Australia to the modern day.Book, orange vinyl surface sealed cover on hard covered ring-binder. Gold embossed title on spine and front cover. Contains cream loose-leaf pages with rounded corners. Pages are printed with text, tables and diagrams, and are numbered with serial page and paragraph numbers. There is a Table of Contents and an Index. The cover displays the Coat of Arms of the Commonwealth of Australia. Published by the Commonwealth of Australia in 1968 for the Department of Shipping and Transport, the book contains the Standing Orders to Masters and Crews of Lighthouse Tenders. It has examples for Certificates of Service for various ranks, a list of books and forms, protective clothing, rates for passengers, and a Scheme of Colour Painting for Lighthouse Tenders.Coat of Arms [Commonwealth of Australia] "COMMONWEALTH OF AUSTRALIA" "DEPARTMENT OF SHIPPING AND TRANSPORT" "STANDING ORDERS / TO / MASTERS AND CREWS OF LIGHTHOUSE TENDERS" "No 1/1968" "No.2/1968"flagstaff hill, flagstaff hill maritime museum and village, warrnambool, maritime museum, maritime village, great ocean road, shipwreck coast, shipwrecks, life saving, lifesaving, shiipping and transport, commonwealth of australia, standing orders, lighthouse crew, lighthouse tenders, masters and crews, 1968 -
 Ballarat Tramway Museum
Photograph - Colour Photograph/s, 21/11/1962 12:00:00 AM
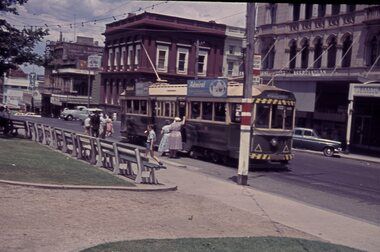
Colour print of Bendigo SECV Bendigo tram 21, leaving Charing Cross for Golden Square. On Kodacolor paper with a Kodak red ink stamp on rear. Tram has dash canopy lights, but no large white strip under the drivers windows. Tram has a good load of passengers on it, with all blinds drawn, showing destination "Golden Square". Fitted with roof ads "Electricity best for Cooking" and an ad Mamouneys - Furniture and Carpets. A Cohn's drinks ad is on the front dash panel. Photo has the Ezywalkin store in background and the City Club Hotel in the right hand side of the photo. Photo dated 21.11.1962.On rear top left hand corner "21 / 21.11.62" in very wavy handwriting, typical of an aged person.charing cross, bendigo, golden square, tram 21 -
 Ballarat Tramway Museum
Photograph - Colour Photograph/s, 21/11/1962 12:00:00 AM
Colour print of Bendigo SECV Bendigo trams 2 and 4 at Charing Cross. On Kodacolor paper with a Kodak red ink stamp on rear. Trams have dash canopy lights, but no large white strip under the drivers windows. Photo dated 21.11.1962. Buildings on corner of Pall Mall and Mitchell St in background. Both trams fitted with roof ads and dash canopy ads - White Horse Whiskey. Shows "safety zone" arrangements. No. 2 has destination of "Quarry Hill" while 4 has destination of "Eaglehawk". Has a number of passengers boarding trams. Note "PYE" name on radio tower mast.On rear top left hand corner "2 and 4 / 21.11.62" in very wavy handwriting, typical of an aged person.charing cross, bendigo, mitchell st., safety zone, tram 2, tram 4 -
 Ballarat Tramway Museum
Photograph - Black & White Photograph/s, Geoff Grant, 25/06/1955 12:00:00 AM
Black and white photograph of the some of the passengers in front of the last bus to Northcote, ex Bourke St. prior to commencement of tram services. Destination showing "NORTHCOTE" and route no. "77". Has a wreath on the radiator "LAST BUS BOURKE ST. 25-6-1955, REPLACED BY ELECTRIC TRAMS". (See also catalogue item No. 493 and 1610). Charles Craig, 2nd from right, Ian Brady 5th from right, Len Clark (?) squatting down under radiator. Crew names - see 493. Negative No. N342 on file, 680i1 scanned from negative. See Dave Macartney re names on 31/8/97.On rear on typed paper "Last bus to Northcote with some of the crowd that travelled on it, June 25 1955.", in pencil "RK-1" and in but rh corner stamped "Geoff Grant / 189 Murrumbeena Rd. Murrumbeena, S.E.9 Victoria."trams, tramways, bourke st, melbourne, last bus, northcote -
 Ballarat Tramway Museum
Photograph - Black & White Photograph/s, 1890s?
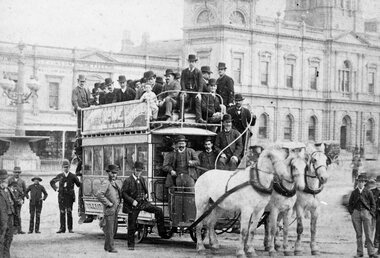
Yields information about the working of trams with three horses up the Sturt St hill, with the Town Hall in the background and the dress of the passengers and the advertising carried - the Vine Hotel.Black and white photograph of Ballaarat Tramway Company horse tram in Lydiard St. North with Town Hall in background. Horse tram has three horses in harness, with about 30 men and boys, passengers, standing around or on the horse tram. Vine Hotel advertisement on the modesty panel of the tramcar. Both copies of the print have been laminated for display purposes. Copy 3 - unlaminated, added 29/5/2007 from Alan Bradley collection of photographs, to the depot 5/2007. See Reg Item 5109 for a framed photo of this print. copy negative scanned 18/5/2020 and image replaced.trams, tramways, town hall, horse trams, lydiard st. north, ballaarat tramway company , tram horse tram -
 Ballarat Tramway Museum
Slide - 35mm slide/s, Travis Jeffrey, 1961
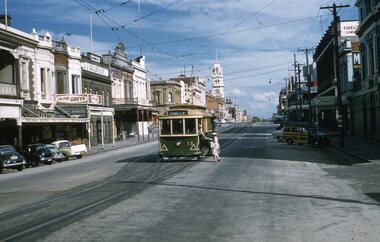
Agfa plastic mount (blue base, white cover) of a photograph of No. 41 at City terminus, on the south side outbound with passengers boarding the tramcar and others walking up to it. Tram is in the process of being fitted with dash canopy lights and tiger strips and has roof advertisements for Admiral TV and other electrical products. Tram has destination of Gardens via Drummond North. Photo taken early 1961. Has Commonwealth Bank and Mutual Life building in the background. Slide rescanned at 3200 dpi 24-10-2020, jpg replaced, tiff file retained. This file was scanned in 2003 and may show colour changes."BAS 19" in penciltramways, trams, city terminus, sturt st, tram 41 -
 Ballarat Tramway Museum
Negative - Black and white print from negative, Travis Jeffrey, 23/02/1962 12:00:00 AM
Negative No. N389 and black and white print made by a laser printer (stored in folder) of Ballarat tram No. 39 at the City terminus, north side of Sturt St. Has tram No. 32 behind approaching the rear of No. 39. Driver or motorman standing by the front of the tram, with a passenger standing alongside the tram. No. 39 has destination of Victoria St and has a SEC Electric Cooking roof advertisement. Tram alongside the short pole tram stop. In the background is the Baby shop, the SEC offices and Tunbridge's buildings. Date of photo on folder - 23/2/1962. Original negative rescanned 24/5/2020 and image file updated. Paper folder that contained the negative had "NR61A" in red ink, "BA17" in pencil, date stamp of "23 Feb 1962" on front, and on rear date stamps "26 Sep 1962" and "6 Oct 1962".trams, tramways, sturt st, city terminus, tram 39 -
 Ballarat Tramway Museum
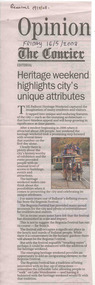
Newspaper, The Courier Ballarat, "Heritage weekend highlights city's unique attributes", 16/05/2008 12:00:00 AM
Yields information about the Museum's activities and has a strong association with the crews and passengers of the day.Set of two newspaper clippings from The Courier, Ballarat regarding the 2008 Heritage Festival which featured the Museum and the Horse Tram. 4113.1 - Editorial from The Courier, Friday 16/5/2008 discussing the heritage festival, features a photo of the horse tram operating in Wendouree Parade. 4113.2 - Pages 4 and 5 of The Courier, Monday 12 May 2008 providing a report on the Heritage Festival featuring a photo of the crew and passengers on the horse tram. Stories on family trees (Joan Hunt) and bell ringing in the Town Hall. Photo of horse tram features Len Millar, Lyle Drayton, Worthington Coffield, Theo Kuiler.On 4113.1 in black ink "Friday 16/5/2008"heritage, festival, horse tram -
 Ballarat Tramway Museum
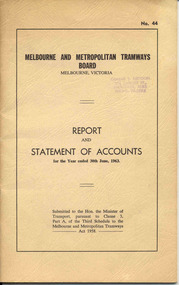
Document - Report, Melbourne and Metropolitan Tramways Board (MMTB), "Report and Statement of Accounts" for year ended 30 June 1963, 1963
Annual report of the MMTB for the year end 30/6/1963 - No. 44 - buff heavy paper cover with 52 pages on inside giving details of the MMTB Board, Officers, Balance Sheet, Statement of funds, operation, schedule of debenture, investments, Auditors reports, record of Annual traffic receipts, passengers, miles etc, tram and bus routes operated, statistical information, graphs and photographs. Photos include site preparation for new Doncaster depot, decorated tramcar for Melbourne cup carnival Nov. 1962, MMTB float - Melbourne Moomba festival Feb. 1963 and Demonstration model of Underground Tramway Intersection.4950 - has Graeme Breydon's address stamp on front cover.trams, tramways, mmtb, melbourne, annual reports, operations, trackwork -
 Ballarat Tramway Museum
Slide - 35mm slide/s, Ben Parle, 5/04/1958 12:00:00 AM
Kodachrome Transparency - 35mm slide - cardboard mount, with one side with red border and words "Kodachrome Transparency / Processed by Kodak" top and bottom. Photo taken by Ben Parle 5/4/1958. Has slide No. "17" stamped in red in top corner and date stamped on slide. Photo of the No. 17 in Lydiard St. North, at the end of the double track, with a passenger loading a suitcase on to the tram. The tram has the destination of Lydiard St. North. In the background are J.J. Collier's building, Grey's cigarettes advertising, a wholesale grocer and other buildings in Lydiard St. North. Photo taken late in the afternoon. For high resolution scan see btm2846h.tif"Lydiard St" "-5 APR 1958"tramways, trams, lydiard st, double track, tram 17 -
 Ballarat Tramway Museum
Slide - 35mm slide/s, Ben Parle, 8/04/1958 12:00:00 AM
Kodachrome Transparency - 35mm slide - cardboard mount, with one side with red border and words "Kodachrome Transparency / Processed by Kodak" top and bottom. Photo taken by Ben Parle 8/4/1958, date stamped onto slide. Has slide No. "2" stamped in red in top corner. Photo of Ballarat 34 at the City Terminus, south side. Tram has the destination of Gardens via Drummond North. A number of passengers boarding the tram. Has the Commonwealth bank, National Mutual Life Association building, Berry Anderson and Odeon Theatre in the background. For high resolution scan see btm2875.tif"Sturt St / Lydiard St" / "8-4-58"tramways, trams, sturt st, city terminus, lydiard st, tram 34 -
 Bendigo Historical Society Inc.
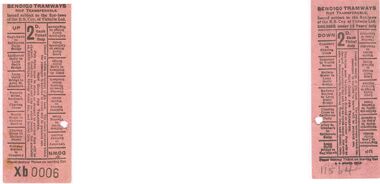
Memorabilia - BENDIGO TRAMWAYS TICKET
BHS CollectionBendigo Tramways Ticket: Pink card with black print no. Xb0006. It reads * Bendigo Tramways not Transferable. Issued subject to the Bye-laws of the E. S. Coy of Victoria Ltd. 2d Cash Ticket Only*. Print in the centre is *Issued to adults on receipt of 2d cash. The points between which the passenger is entitled to travel will be punched out. Not Good For Transfer. This ticket must be shown on demand or another Fare will be charged. Etc. Also lists Tram stops front and back. At the bottom is says *Please destroy ticket when leaving car. One hole punched at Hallam Street to Charing Cross. Box 625bendigo, tramways, tram ticket, bendigo tramways -
 Melbourne Tram Museum
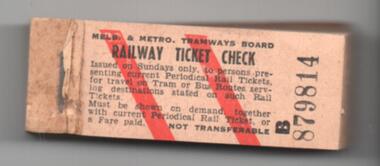
Ephemera - Ticket Blocks, Melbourne & Metropolitan Tramways Board (MMTB), "Railway Check Ticket", c1970s
Block of tickets - paper printed paper stapled too a cardboard back with a top retaining piece, "Railway Check Tickets" printed in black on off white paper with two red diagonal stripes, numbers B879814 to 879999. Used for passengers who travelled by tram or bus on railway issued tickets. Has the terms of use printed on the tickets, only available on Sundays. Issued by the MMTB. The only line that these were used on was Route 19, for the Upfield line. See Reg Item 2371 for a timetable where tram/bus used only on Sundays and 2378 when it was in the evenings Monday to Saturday and all day Sunday.trams, tramways, upfield, tram replacement, buses, railways, tickets -
 Melbourne Tram Museum
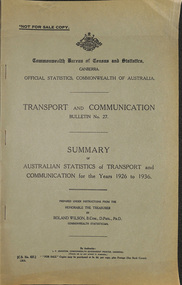
Document - Report, Bureau of Census and Statistics, "Summary of Australian Statistics for Transport and Communication for the Years 1926 to 1936", 1936, 1971
.1 - Report - 60 pages within a grey cover stapled on the side titled "Summary of Australian Statistics for Transport and Communication for the Years 1926 to 1936", Bulletin No. 27, prepared by the Government Statistician Roland Wilson. Details statistics for Railways, tramways, motor vehicles, aviation, traffic accidents, shipping, posts, telegraphs and telephones and wireless communications. The tramway pages have been scanned. .2 - Photocopy of a similar document for June 1971 - for Tramways, Trolley-bus, Omnibus and Ferry Services. private railways, Gives tables of route miles, vehicle miles, rolling stock, passengers, revenue and expenses, employees and accidents.trams, tramways, statistics, australian trams, melbourne, victoria, ballarat, bendigo -
 Melbourne Tram Museum
Document - Report, Yarra Trams, "100 years of electric trams in Melbourne", 2005 - 2006
Set of two presentations or printout of a PowerPoint presentation, 6 slides per sheet and two position descriptions. .1 - Three page report (part of a larger report - page 9 to 11) results of a survey of various routes, KPI's - surveys, customer feedback, and incidents, service delivery. .2 - four page report about the Love Your Trams campaign presented by Flash Group, the objective, concept, the message, graffiti reduction and messages from passengers and staff. .3 - Two page Yarra Tram position description for Customer Relations and Marketing Officer, Camberwell. .4 - ditto for Customer Relations Assistant Camberwell.On top of each document are notes in blue ink.trams, tramways, yarra trams, accidents, melbourne, depots, marketing, staff -
 Melbourne Tram Museum
Photograph - Black & White Photograph/s, c1900
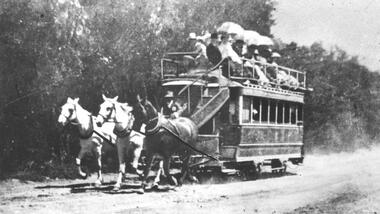
Black and white photograph of an illustration of the Beaumaris Horse Tram. The photo shows the tram being pulled by 3 horses with several passengers on the top level. The Beaumaris Tramway Company commenced operations in 1887 between Sandringham and Cheltenham railway stations, and managed to survive until 1914. The tramway was operated by Charles Henry James in an attempt to sell land developed by him at Black Rock, Sandringham and Mentone. Stamped on the back "...The Argus...negative No P2225" See also Reg Item 5014 for another photograph of a horse tram. 2nd copy from Keith Kings added 6/8/2020 - see images i2 and i3.trams, tramways, argus, beaumaris horse tram, horse trams -
 Melbourne Tram Museum
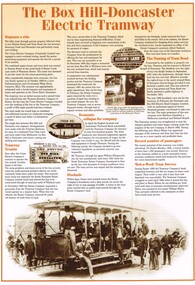
Pamphlet, City of Whitehorse, "The Box Hill - Doncaster Electric Tramway", 1998
Two colour pamphlet describing the history of the Australia's first electric tram service - Box Hill to Doncaster in 1889. A3 Pamphlet folded into 6, with photos and copy of timetable. Includes extensive notes on the tramway history, economics, passengers, services and notes on Henry Hilton. Includes notes o Tram Road and Hilton's Lane. Document has been laminated. Notes that the document was published in 1998 by the City of Whitehorse. Printed on off-white paper, with a reddish brown colour partly through the sheet. See Reg Item 2146 for a full set of these pamphlets - earlier versions. See Reg Item 869 for an DL version.trams, tramways, box hill, centenary, exhibitions, tramways, doncaster, city of box hill -
 Melbourne Tram Museum
Document - Report, Melbourne & Metropolitan Tramways Board (MMTB), "A discussion on fundamental aspects of underground tram operations that are of importance for the preliminary design', Jul. 1966
Report - Foolscap 21 typed pages, 18 bound sheets of diagrams and 1 loose diagram, with card covers, with red binding strips, titled "A discussion on fundamental aspects of underground tram operations that are of importance for the preliminary design', dated July 1966. Looks at the design aspects, tunnel sections, size, passenger access (all stairs), direction of operation - allowed for reversal of running, curvature, turnouts and cross overs, gradients, storage sidings, freight, ventilation and emergency uses. A loose sheet of a doubled deck Liverpool tram. Vehicles modelled included double deck buses and suburban trains including W class trams.In top left hand corner "Lees" in penciltrams, tramways, trackwork, melbourne, underground tramways, crossover -
 Ballarat Tramway Museum
Document - Report, Alan Bradley, "A Further Lease of Life ", Sep. 2003
Eight page printed document or report titled "A Further Lease of Life " written for BTM magazine Fares Please!, in September 2003. The document is a transcript of a memo prepared by the Ballarat Tramways Branch Superintendent dated 7 May 1948. Written by A. V. Mawby. The document examines the running condition of the Ballarat Tramway system, including the rolling stock, buildings, permanent way, overhead equipment, passenger numbers. The document was written to advise the Ballarat SEC Branch Manager what would be required for extended operation of the system. Eight sheets of A4 paper stapled in top left hand corner. Images added 29/11/2016.trams, tramways, ballarat, reports, permanent way, rolling stock -
 Ballarat Tramway Museum
Slide - 35mm slide/s - set of 5, Noel Simons, 19/11/1962 12:00:00 AM
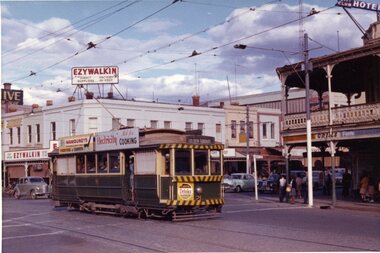
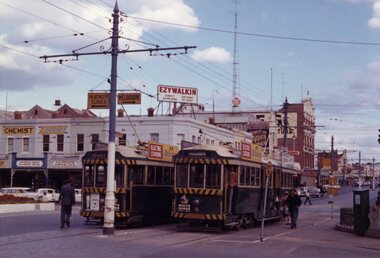
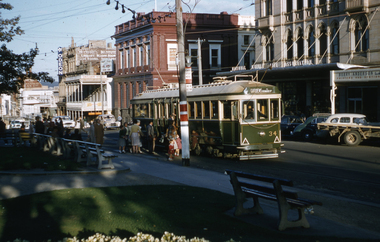
Set of 5 transparencies taken on 19/11/1962 on Kodak mounts. 1186.1 - Bendigo 21 bound for Golden Square at Charing Cross with The Beehive buildings and shops in Pall Mall in the background. Trams has an ad for Cohns drinks on front bumper, SEC Best for Cooking roof ad. and Mamouney's furniture roof ad. Two women passengers boarding. 1186.2 - Bendigo 26 crossing Pall Mall from Mitchell St. bound for Eaglehawk with "Ezywalkin" shop in background. Tram has an SEC 'Electric Cooking' roof ad and a 'Streets Ice cream' ad on front dash. 1186.3 - Bendigo 7 arriving at the Charing Cross stop, bound for North Bendigo. Has a Huttons dash panel ad, a Castrol roof ad. Buildings as for 1186.1. Passengers waiting at the stop. 1186.4 - Bendigo 19 leaving Charing Cross for Golden Square with City Club Hotel alongside and other buildings as for 1186.1 in the background. Tram has Briquettes ad on front dash and SEC 'Electric Cooking' roof ad. 1186.5 - Bendigo 21in High St. at corner of Short St. heading for Charing Cross. Destination half way between Depot and Railway Station. Tram has ads for Cohns Drinks on dash panel, SEC 'Cook with Electricity' and a Sandhurst Milk roof ads.Information written on in black ink and date stamped in purple ink. 1186.1 - "No. 21 in Pall Mall at Charing Cross, Bendigo" 1186.2 - "No. 26 arriving at Alexandra Fountain, Charing Cross, Bendigo" 1186.3 - "No. 7 in Pall Mall at Charing Cross, Bendigo" 1186.4 - "No. 19 in High St., Bendigo, leaving Charing Cross for Golden Square" 1186.5 - "No. 21 in High St. Bendigo, at corner of Short St." tramways, trams, bendigo, charing cross, pall mall, high st., tram 7, tram 19, tram 21, tram 26 -
 Ballarat Tramway Museum
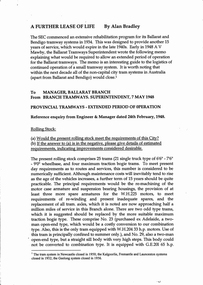
Functional Object - Ticket punch, Railway Register Manufacturing Company, 1880's
Melbourne Tramway & Omnibus Co. Bell Punch No. D1902. A heavy nickel plated steel ticket or fare strip cancelling / registering mechanism used on Melbourne cable trams. When a fare was sold, the bell would ring advising the passenger that their fare have registered. "An ingenious device resembling in principle the ticket punch of a railway porter. It is carried by the conductor who wears pinned to his coat a 'trip-slip'. He punches this once for every fare received; the action is simultaneously registered on a dial inside the punch and bell rings to appraise the passenger of the fact. The punch is provided with a patent lock, the secret of which is known only at headquarters and effective system of check is thus secured." (" A story of the Melbourne Cable Tramway System" - page 54). Used by the MT&O and MMTB until 1922/23 when replaced by the check ticket system. Manufactured by the Railway Register Manufacturing Company. Lock number IDMA - see btm6. Has "TB" - Tramways Board - stamped on one side along with patent dates. See also Reg Item 72 and 72.1 for other examples. See "A story of the Melbourne Cable Tramway System 11/11/1885 to 26/10/1940" C.N. Govett and A. E. Twentyman. Copy held in the Hawthorn Tramway Depot collection. See Notes on opening from the Hawthorn Tramway Depot collection - see related documents.Has "D 1902" punched above ticket entry slot (both sides), "1902" on handle, "TB" stamped on numbering registering face. trams, tramways, ticket punch, tickets, fares, cable trams -
 Ballarat Tramway Museum
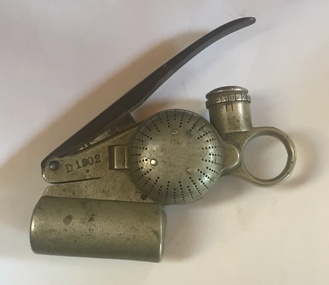
Functional Object - Ticket punch, Railway Register Manufacturing Company, 1880's
72 - Melbourne Tramway & Omnibus Co. Bell Punch No. D1335. A heavy nickel plated steel ticket or fare strip cancelling / registering mechanism used on Melbourne cable trams. When a fare was sold, the bell would ring advising the passenger that their fare have registered. "An ingenious device resembling in principle the ticket punch of a railway porter. It is carried by the conductor who wears pinned to his coat a 'trip-slip'. He punches this once for every fare received; the action is simultaneously registered on a dial inside the punch and bell rings to appraise the passenger of the fact. The punch is provided with a patent lock, the secret of which is known only at headquarters and effective system of check is thus secured." (" A story of the Melbourne Cable Tramway System" - page 54). Used by the MT&O and MMTB until 1922/23 when replaced by the check ticket system. Manufactured by the Railway Register Manufacturing Company. Lock number not known. Has "MT& ..." stamped on one side along with patent dates. 72.1 - as above but for punch number D1338 - added 17/12/12. See also Reg Item 6437 for another sample - punch No. D1902. see - \dbtext\museum\documents\htd242i.pdf for opening instructions. See "A story of the Melbourne Cable Tramway System 11/11/1885 to 26/10/1940" C.N. Govett and A. E. Twentyman. Copy held in the Hawthorn Tramway Depot collection. Has "D 1335" punched above ticket entry slot (both sides), "335" on handle, "MT& ..." stamped on numbering registering face. 72.1 - As above with number "D1338" punched in. The M.T.& Co" is more visible.trams, tramways, ticket punch, tickets, fares, cable trams -
 Flagstaff Hill Maritime Museum and Village
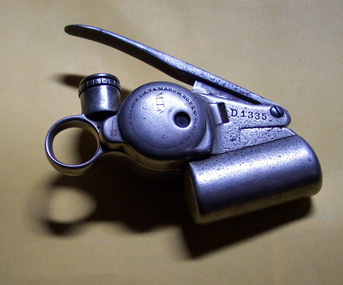
Domestic object - Fork
HISTORY OF THE LOCH ARD The LOCH ARD belonged to the famous Loch Line which sailed many ships from England to Australia. Built in Glasgow by Barclay, Curdle and Co. in 1873, the LOCH ARD was a three-masted square rigged iron sailing ship. The ship measured 262ft 7" (79.87m) in length, 38ft (11.58m) in width, 23ft (7m) in depth and had a gross tonnage of 1693 tons. The LOCH ARD's main mast measured a massive 150ft (45.7m) in height. LOCH ARD made three trips to Australia and one trip to Calcutta before its final voyage. LOCH ARD left England on March 2, 1878, under the command of Captain Gibbs, a newly married, 29 year old. She was bound for Melbourne with a crew of 37, plus 17 passengers and a load of cargo. The general cargo reflected the affluence of Melbourne at the time. On board were straw hats, umbrella, perfumes, clay pipes, pianos, clocks, confectionary, linen and candles, as well as a heavier load of railway irons, cement, lead and copper. There were items included that intended for display in the Melbourne International Exhibition in 1880. The voyage to Port Phillip was long but uneventful. At 3am on June 1, 1878, Captain Gibbs was expecting to see land and the passengers were becoming excited as they prepared to view their new homeland in the early morning. But LOCH ARD was running into a fog which greatly reduced visibility. Captain Gibbs was becoming anxious as there was no sign of land or the Cape Otway lighthouse. At 4am the fog lifted. A man aloft announced that he could see breakers. The sheer cliffs of Victoria's west coast came into view, and Captain Gibbs realised that the ship was much closer to them than expected. He ordered as much sail to be set as time would permit and then attempted to steer the vessel out to sea. On coming head on into the wind, the ship lost momentum, the sails fell limp and LOCH ARD's bow swung back. Gibbs then ordered the anchors to be released in an attempt to hold its position. The anchors sank some 50 fathoms - but did not hold. By this time LOCH ARD was among the breakers and the tall cliffs of Mutton Bird Island rose behind the ship. Just half a mile from the coast, the ship's bow was suddenly pulled around by the anchor. The captain tried to tack out to sea, but the ship struck a reef at the base of Mutton Bird Island, near Port Campbell. Of the 54 crew members and passengers on board, only two survived: the apprentice, Tom Pearce and the young woman passenger, Eva Carmichael, who lost all of her family in the tragedy. The LOCH ARD shipwreck is of State significance – Victorian Heritage Register S 417 Flagstaff Hill’s collection of artefacts from LOCH ARD is significant for being one of the largest collections of artefacts from this shipwreck in Victoria. It is significant for its association with the shipwreck, which is on the Victorian Heritage Register (VHR S417). The collection is significant because of the relationship between the objects, as together they have a high potential to interpret the story of the LOCH ARD. The LOCH ARD collection is archaeologically significant as the remains of a large international passenger and cargo ship. The LOCH ARD collection is historically significant for representing aspects of Victoria’s shipping history and its potential to interpret sub-theme 1.5 of Victoria’s Framework of Historical Themes (living with natural processes). The collection is also historically significant for its association with the LOCH ARD, which was one of the worst and best known shipwrecks in Victoria’s history. Silver plated copper alloy table fork from the wreck of the Loch Ard. William Pagewarrnambool, shipwrecked coast, flagstaff hill maritime museum, loch line, loch ard, mutton bird island, loch ard gorge, electroplated cutlery, fork -
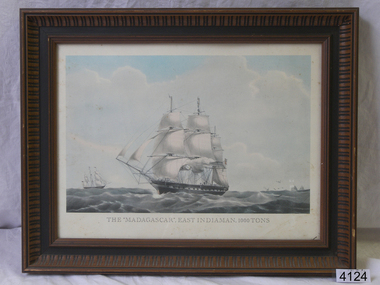 Flagstaff Hill Maritime Museum and Village
Print - Lithograph Picture, Madagascar Indiaman, Unknown
Madagascar was a large British merchant ship built for the trade to India and China in 1837 that disappeared on a voyage from Melbourne to London in 1853. The disappearance of Madagascar was one of the great maritime mysteries of the 19th century and has probably been the subject of more speculation than any other 19th-century maritime puzzle, except for the Mary Celeste. Madagascar, the second Blackwall Frigate, was built for George and Henry Green at the Blackwall Yard, London, a shipyard that they co-owned with the Wigram family. A one-eighth share in the vessel was held throughout her 16-year career by her first master Captain William Harrison Walker Walker. Madagascar carried freight, passengers, and troops between England and India until the end of 1852. In addition to her normal crew, she also carried many boys being trained as officers for the merchant marine. Known as midshipmen from naval practice, their parents or guardians paid for their training, and they only received a nominal wage of usually a shilling a month. Due to the Victorian Gold Rush, Madagascar, under the command of Captain Fortescue William Harris, was sent to Melbourne with emigrants. She left Plymouth on 11 March 1853 and, after an uneventful passage of 87 days, reached Melbourne on 10 June. Fourteen of her 60 crew jumped ship for the diggings, and it is believed only about three replacements were signed on. She then loaded a cargo that included wool, rice, and about two tonnes of gold valued at £240,000, and took on board about 110 passengers for London. On Wednesday 10 August, just as she was preparing to sail, police went on board and arrested a bushranger John Francis, who was later found to have been one of those responsible for robbing on 20th July the Melbourne Private Escort between the McIvor goldfield at Heathcote, Victoria and Kyneton. On the following day, the police arrested two others, one on board the ship and the other as he was preparing to board. As a result of these arrests, Madagascar did not leave Melbourne until Friday 12 August 1853. After she left Port Phillip Heads Madagascar was never seen again. When the ship became overdue many theories were floated, including spontaneous combustion of the wool cargo, hitting an iceberg and, most controversially, being seized by criminal elements of the passengers and/or crew and scuttled, with the gold being stolen and the remaining passengers and crew murdered. There have been many rumors as to what happened to Madagascar over the years but what really happened is still a mystery. The lithograph was made around 1950 from an original painting of Madagascar a Vessel with a notorious past and is interesting and a significant item for the ships part in early Victorian history. The picture is it’s self not valuable or can be associated with a significant person in history. The interest lies in the events that are linked to the ship in the mid 19th century.Lithograph of the ship Madagascar, in a wooden frameThe Madagascar East Indiaman 1000 tonsflagstaff hill, warrnambool, shipwrecked-coast, flagstaff-hill, flagstaff-hill-maritime-museum, maritime-museum, shipwreck-coast, flagstaff-hill-maritime-village, lithograph, the madagascar, east indiaman