Showing 273 items
matching armstrong st.
-
 Ballarat Tramway Museum
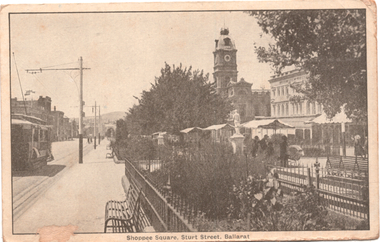
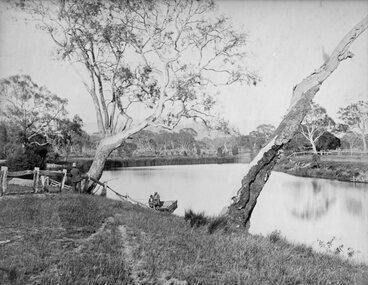
Postcard, R.E.M Series Melbourne, "Shoppee Square Sturt Street Ballarat", c1915
Photograph - looking east along Sturt Street between Doveton and Armstrong Streets, shows an ESCo tram eastbound. On the right is the Shoppee Square "market" place with awnings open. Wal Jack's note: "Part of the old type trams on the "up" track or north side of Sturt St from Doveton St. Date about 1914-16 period. Iron railings have long disappeared"Yields information about the streetscape of Sturt St and Lydiard Streets c1915.Postcard black and white, divided back, used, REM SeriesSee image 2 for Wal Jack's notes on the image. tramways, trams, esco, sturt st, shoppee's square -
 Ballarat Tramway Museum
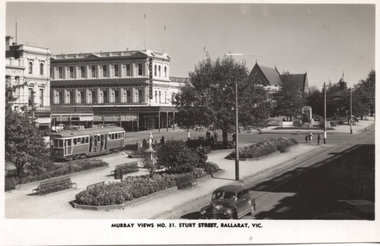
Postcard, Murray Views, "Murray Views No. 31 Sturt Street, Ballarat Vic", 1948
... Photo features the corner of Sturt and Doveton St, looking... of Sturt and Doveton St, looking South West. Has SEC Tram 22 ...Photo features the corner of Sturt and Doveton St, looking South West. Has SEC Tram 22 westbound. Has the Harry Davies "Big Store" in the view, along with the Gardens in the central median strip. Note written by Wal Jack and card sent to Ken Magor of Newcastle - "Ballarat 1948, Bogie Tram No. 22 to "Gardens via Sturt St West at Doveton St. Photo taken between Armstrong & Doveton Sts, looking west."Yields information about Ballarat 's 29 decorated for the 1939 Ballarat Floral Festival and its appearance and its use and publicity and demonstrates its colours of the flowers used.Postcard black and white, plain back, with a handwritten note on rear.See image 2 and notes for details of the handwritten note. tramways, trams, sturt st, tram 22, doveton st. -
 Ballarat Tramway Museum
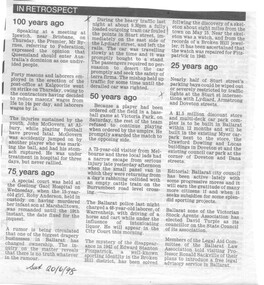
Newspaper, The Courier Ballarat, "In retrospect", 20/06/1998 12:00:00 AM
... at the intersections of Sturt St. with Lydiard, Armstrong and Doveton Streets.... at the intersections of Sturt St. with Lydiard, Armstrong and Doveton Streets ...Newspaper cutting from The Courier, Ballarat, Saturday 20/6/1998 in the 'In Retrospect' section of the newspaper, of the report 75 years ago of the derailment of a tram car, fully loaded at intersection of Sturt and Lydiard Streets. Notes passengers left quickly and that traffic was delayed for some time. Another item also mentions of the plans, 25 years ago, of traffic lights at the intersections of Sturt St. with Lydiard, Armstrong and Doveton Streets.In bottom right hand corner in ink, "Sat 20/6/98", and ink markings on either side of the tramway item.trams, tramways, in retrospect, accidents, derailments, traffic lights -
 Ballarat Tramway Museum
Slide - 35mm slide/s - set of 32, Noel Simons, 25/02/1971 12:00:00 AM
Set of 31 transparencies taken on 25/2/1972 on Kodak mounts. 1201.1 - Bendigo No. 26 in Bond St. just after leaving Long Gully en route for Quarry Hill. Has Norris Supermarket in background. Has two SEC roof ads. 1201.2 - No. 26 climbing View St. from Charing Cross en route to Eaglehawk. Has ANZ bank and AMOCO service station in background. 1201.3 - as for 1201.3, but after tram has passed photographer. Has buildings west of Mackenzie St. in photograph. 1201.4 - Tram stop and centre of the road pole with two "CARS STOP BY REQUEST" signs mounted on pole at the corner of Mackenzie St. 1201.5 - same position as for 1201.3, but with No. 5 descending the street. 1201.6 - same position as for 1201.2, but with No. 5 descending the street. Photo taken after tram has passed photographer. 1201.7 - No. 7 in Nolan St. from across the park at Lake Weeroona. 1201.8 - No. 7 entering McCrae St from Nolan St. - distant view. Note "TRAM "sign on left hand side under tree and overhead in McCrae St. from former track that once was in this street. 1201.9 - No. 7 in High St. with Cathedral in background. Tram en route to North Bendigo. Note scaffolding around Cathedral main spire area. 1201.10 - No. 7 crossing Bendigo Creek bridge in High St. near Golden Square. Has a Caltex Service station in the background. 1201.11 - No. 7 at Golden Square terminus with Sunburst Fruit Juices and a Peters Ice cream delivery vans alongside. 1201.12 - as for 1201.11 but photo taken from behind tram, with the end of the rails in the photograph. 1201.13 - No. 7 and 21 in Pall Mall at Charing Cross with No. 5 in the background. Taken some distance away from the location. 1201.14 - No. 7 at Golden Square terminus, taken a short distance from the tram terminus. Shows Milk Bar on right hand side and the hotel on the left hand side. Taken from the south side of the roadway. 1201.15 - as from 1201.14 but taken from the north side of the roadway. 1201.16 - No 5 waiting at California Gully loop. Distant photo showing surrounds 1201.17 - No. 5 en route for Quarry Hill crossing No. 26 at California Gully. 1201.18 - No. 26 at Eaglehawk terminus with Eaglehawk Town Hall and Post Office in background. 1201.19 - No. 21 arriving at Charing Cross en route to North Bendigo. Has Alexandra Fountain in the background, ANZ bank RACV building, and other buildings on the north side of Pall Mall or Nolan St. 1201.20 - No. 26 en route for Quarry Hill at Charing Cross, with crew standing by front door. Has Colonial Mutual life building, Armstrong Tyre Service (Firestone) and a sign for Cohns Drinks in the background. 1201.21 - as for 1201.20 but with No. 5 en route to Eaglehawk now in photograph. 1201.22 - No. 26 at Quarry Hill terminus. 1201.23 - No. 26 at Quarry Hill terminus, view of front portion of tram only from a gate at the Bendigo cemetery. 1201.24 - Track at the end of the Quarry Hill line showing the point blades of the former "Y" terminus and the overhead for this. 1201.25 - No. 2 at the Quarry Hill terminus, looking along the former Trackwork. 1201.26 - as for 1201.25 1201.27 - number not used. 1201.28 - Golden Square terminus from some distance from the actual terminus, showing the Warning sign "TRAM" for motorists from the south. No. 7 at the terminus. 1201.29 - No. 7 passing through the Golden Square shopping centre. Numerous cars and pedestrians. Tram en route for North Bendigo. 1201.30 - No. 7 in High St. Golden Square, en route for North Bendigo. Photo taken after tram has passed photographer. 1201.31 - No. 7 in High St. just past Wattle St. with the Cathedral in the background. Tram has two SEC roof ads good side on photo, 'Everything's fine in my all electric kitchen' and 'Electrical cooking - clean, quick, economical'. 1201.32 - No. 7 in High St. nearing Wattle St. Has Cathedral in the background. Photo taken after tram has passed photographer.Information written on in black ink and date stamped on purple ink. 1201.1 - "No. 26 in Bond St just after leaving Long Gully" 1201.2 - "No. 26 climbing View St. from Charing Cross" 1201.3 - "No. 26 ascending View St. from Charing Cross (At Mackenzie St.)" 1201.4 - "View St. & Mackenzie St." 1201.5 - "No. 5 in View St. near Mackenzie St." 1201.6 - "No. 5 in View St. nearing Charing Cross." 1201.7 - "No. 7 in Nolan St. seen from Lake Weeroona Park." 1201.8 - "No. 7 entering McRae St. from Nolan St. Note "TRAM" warning sign on left. 1201.9 - "No. 7 in High St. passing Short St." 1201.10 - "No. 7 crossing Bendigo Creek bridge in High St. near Golden Square." 1201.11 - "No. 7 at Golden Square terminus" 1201.12 - "No. 7 at Golden Square terminus" 1201.13 - "No 7, 21 and 5 at Charing Cross" 1201.14 - "No. 7 at Golden Square terminus" 1201.15 - "No. 7 at Golden Square terminus" 1201.16 - "No 5 waiting at California Gully loop." 1201.17 - "Nos. 5 and 26 crossing at California Gully loop" 1201.18 - "No. 26 at Eaglehawk terminus" 1201.19 - "No. 21 arriving at Charing Cross from Golden Square" 1201.20 - "No. 26 at Charing Cross" 1201.21 - "Nos. 5 and 26 at Charing Cross." 1201.22 - "No. 26 at Quarry Hill terminus" 1201.23 - "No. 26 at Quarry Hill terminus seen through the gates of the Bendigo Cemetery." 1201.24 - "Quarry Hill terminus showing remains for former double track layout abandoned before 1964." 1201.25 - "No. 2 at Quarry Hill terminus" 1201.26 - "No. 2 at Quarry Hill terminus" 1201.28 - "The Southern approach to Golden Square with No. 7 standing at the terminus, "TRAM" warning sign on the left. 1201.29 - "No. 7 passing through Golden Square Shopping Centre" 1201.30 - "No. 7 in High St. Golden Square" 1201.31 - "No. 7 in High St. passing Wattle St." 1201.32 - "No. 7 in High St. nearing Wattle St."tramways, trams, bendigo, bond st., view st., nolan st., high st., eaglehawk, california gully, charing cross, quarry hill, trackwork, tram 2, tram 5, tram 7, tram 21, tram 26 -
 Ballarat Tramway Museum
Slide - 35mm slide/s - set of 25, Noel Simons, 26/02/1972 12:00:00 AM
Set of 25 transparencies taken on 26/2/1972 on Kodak mounts. 1204.1 - Bendigo No. 5 - just arrived at Manchester Loop near Havilah Road, Long Gully. Photo taken after tram has passed photographer. 1204.2 - No. 26 in Backhaus St. Long Gully passing William St, en route to Quarry Hill. Photo taken after tram has passed photographer. 1204.3 - No. 5 climbing the High St. Hill Eaglehawk, heading for Quarry Hill with the buildings on the West side of High St. in the background, including the Eaglehawk Town Hall. 1204.4 - as for 1204.3, but tram close up. 1204.5 - as for 1204.3, but after tram has passed photographer. 1204.6 - No. 5 at intersection of Mt Korong Road Ironbark and Calder Highway, with the AMPOL service 'station in the background. Photo taken after tram has passed photographer. 1204.7 - No. 26 en route to Quarry Hill shortly after leaving Needle Loop, passing William St., Long Gully. 1204.8 - No. 5 at California Gully Loop, picking up a passenger, with the shops at Long Gully in the background. Photo taken after tram has passed photographer. 1204.9 - No. 5 in Long Gully, en route to Quarry Hill. Photo taken after tram has passed photographer. 1204.10 - No. 2 at Eaglehawk terminus with the Eaglehawk Town Hall and Post Office in the background. Tram has two SEC roof ads. 1204.11 - No. 2 at Eaglehawk terminus, close up. 1204.12 - as for 1204.11, but through the park gates. 1204.13 - as for 1204.11, but with tram stop shelters in the foreground and buildings on the West side of High St in the background. 1204.14 - No. 2 in Mt. Korong Rd, midway between California Gully Loop and Needle Loop. Photo taken after tram has passed photographer. 1204.15 - No. 5 in Long Gully, en route to Quarry Hill. 1204.16 - as for 1204.15, but with trams departed loop. Has an ESSO service station in the background. 1204.17 - No. 26 leaves Charing Cross up View St.. Photo taken after tram has passed photographer. Has Armstrong Tyre Service, Cohns Drinks ad on a building and the T&G building in the background. Also Firestone ads on the tyre service building. 1204.18 - No. 5 waits at Charing Cross with the Alexandra Fountain in the background. Tram has two SEC roof ads, 'Everything s fine in my all electric kitchen' and 'Electricity Best for Cooking'. Has RACV, Colonial Mutual Life buildings in the background and the planting areas around Charing Cross gardens in the foreground. 1204.19 - No. 21 en route to North Bendigo arrives at Charing Cross, with passengers waiting to board. No. 5 in the background. In the background is the Fountain Gate Plaza building and the City Family Hotel. 1204.20 - as for 1204.19, but with No. 7 en route to Golden Square. 1204.21 - as for 1204.19, but closer up. 1204.22 - as for 1204.18 1204.23 - No. 25 in Nolan St. near the crossing of Bendigo Creek, running a special tram tour. 1204.24 - No. 25 on a special charter, in Weeroona Ave. at Cnr of Caledonia St. passing the Gas works. 1204.25 - Nos. 25 (showing Golden Square), 7 and 26 at Charing Cross. Has fountain in the background.Information written on in blue ink and date stamped on purple ink. 1204.1 - "No. 5 at Manchester Loop, near Havilah Rd. Long Gully." 1204.2 - "No. 26 in Backhaus St. Long Gully passing William St." 1204.3 - "No. 5 in High St. Eaglehawk." 1204.4 - "No. 5 in High St. Eaglehawk." 1204.5 - "No. 5 in High St. Eaglehawk." 1204.6 - "No. 5 in Mt. Korong Rd., Ironbark, passing Calder Highway Junctn." 1204.7 - "No. 26 shortly after leaving Needle Loop, passing William St., Long Gully. No. 5 cresting hill in distance." 1204.8 - "No. 5 at California Gully Loop." 1204.9 - "No. 5 in Long Gully" 1204.10 - "No. 2 at Eaglehawk terminus." 1204.11 - "No. 2 at Eaglehawk terminus." 1204.12 - "No. 2 at Eaglehawk terminus." 1204.13 - "No. 2 at Eaglehawk terminus." 1204.14 - "No. 2 in Mt. Korong Rd, midway between California Gully Loop and Needle Loop. 1204.15 - "Nos. 2 and 26 crossing at Long Gully." 1204.16 - "No. 26 leaves Long Gully loop for Eaglehawk as No. 2 pulls out of the far end towards Bendigo" 1204.17 - "No. 26 beginning the climb up View St. from Charing Cross." 1204.18 - "No. 5 at Charing Cross." 1204.19 - "No 21 arrives at Charing Cross from Golden Square while No. 5 awaits departure time for Eaglehawk." 1204.20 - "Nos. 7, 21, and 2 (behind which is No. 5) at Charing Cross." 1204.21 - "Nos. 7, 21, and 2 at Charing Cross." 1204.22 - "No. 5 at Charing Cross." 1204.23 - "No. 25 in Nolan St. near Bendigo creek crossing" 1204.24 - "No. 25 in Weeroona Ave. at cnr of Caledonia St." 1204.25 - "Nos. 25, 7, 26 and 2 (behind 26) at Charing Cross."tramways, trams, bendigo, eaglehawk, long gully, california gully, charing cross, north bendigo, tram 2, tram 5, tram 7, tram 21, tram 25, tram 26 -
 Ballarat Tramway Museum
Slide - 35mm slide/s - set of 12, Noel Simons, 28 Feb. 1972
Set of 12 transparencies taken on 28/2/1972 on Kodak mounts. 1207.1 - Bendigo 26 and 2 at Charing Cross. 26 en route for Eaglehawk, 2 for Quarry Hill. Has the Colonial Mutual Life, Armstrong Tyre Service, and Australian Mutual Provident Society buildings and a Cohns Drinks ad. in the background. 1207.2 - as for 1207.1 but with Alexandra fountain in the foreground. 1207.3 - No. 2 in Mitchell St. heading for Quarry Hill. Photo taken after tram has passed photographer. Has buildings on either side of Mitchell St. in the background, including the Plaza Theatre. 1207.4 - No. 6 en route for Golden Square departing Charing Cross. Has the RACV and ANZ bank in the background. 1207.5 - No. 2 crossing Pall Mall to enter Charing Cross ex Quarry Hill, with the Fountain Plaza in the background. 1207.6 - No. 6 arriving Charing Cross ex Golden Square with No. 21 alongside. No. 21 has the SEC ad. 'Everything's fine in my all electric kitchen.' Has the City Family Hotel and the Fountain Plaza shopping centre in the background. 1207.7 - No. 5 at Charing Cross en route for Quarry Hill with No. 2 behind. No. 2 has two SEC roof ads, 'Everything s fine in my all electric kitchen' and 'Electricity best for cooking'. RACV building in the background. Tram crews are discussing the day in the front of the tram. 1207. 8 - No. 21 in High St. Bendigo with the Cathedral in the background. No. 21 has two SEC roof ads, 'Everything's fine in my all electric kitchen' and 'Electricity best for cooking'. 1207.9 - No. 6 in High St. Bendigo with the Cathedral in the background. 1207.10 - No. 6 in High St. Bendigo, just past Wattle St. Photo taken after the tram has passed the photographer from within the Highway Car Sales yard. 1207.11 - No. 26 bound for Eaglehawk at the end of the double track in View St., note signal contactors, tram stop and section signs mounted on pole. 1207.12 - No. 26 turning from View St. into Barnard St.Information written on in blue ink and date stamped on purple ink. 1207. 1- "Nos. 26 and 2 at Charing Cross." 1207.2 - "Nos. 26 and 2 at Charing Cross." 1207.3 - "No. 2 in Mitchell St. just after leaving Charing Cross." 1207.4 - "No.6 leaving Charing Cross for Golden Square." 1207.5 - "No. 2 arriving at Charing Cross from Quarry Hill." 1207.6 - "No. 21 waits at Charing Cross as No. 6 arrives from Golden Square." 1207.7 - "No 5 at Charing Cross with No. 2 lurking behind." 1207.8 - "No. 21 in High St. at cnr of Wattle St." 1207.9 - "No. 6 in High St. at cnr of Wattle St." 1207.10 - "No. 6 in High St. between Wattle and Vine Sts." 1207.11 - "No. 26 at end of double track in View St. near Barnard. St. 1207.12 - "No. 26 seen at dusk turning from View St. into Barnard St."tramways, trams, bendigo, charing cross, high st, view st., tram 2, tram 5, tram 6, tram 21, tram 26 -
 Ballarat Tramway Museum
Photograph - Colour Photograph/s set of 2, Carolyn Dean, 7/11/1992 12:00:00 AM
Yields information about the first operation of the horse tram in Wendouree Parade by the BTPS and has a strong association with those involved.Colour photo of Horse Tram No. 1 at Carlton St. terminus, on 7 November 1992. Tram standing for photographs. On Agfa paper. 745.1 - ditto Wendouree Parade - used for publication in November 1992 issue of Fares Please! Item records - under the control of Bernard Armstrong and Edward Kennedy. Horses were Ajax and Herc. See November 1992, Fares Please!On rear "25 7.11.92, Photo C.Dean" in blue ink. 745.1 - ditto, "23 7-11-92"horse tram no. 1, tramcars, reconstruction, btps, tram 1 -
 Ballarat Tramway Museum
Newspaper, The Courier Ballarat, "Mair St. Traffic lights were Ballarat's first", 12/08/1995 12:00:00 AM
Cutting from the "For the Record" section of The Courier, Ballarat's weekend magazine of Saturday August 12, 1995 about the location of Ballarat's first set of traffic lights. Were at the corners Mair St. with the intersection of Doveton, Armstrong and Lydiard Streets. The latter had trams at the time. They became operational about May 1970. Generally understood not installed at other streets at the times because of the complexity of the tramway system and its impending closure. Item written by Danny Roberts.trams, tramways, traffic lights, lydiard st. north, ballarat -
 Ballarat Tramway Museum
Photograph - Digital image Set of 20, 1971-72
Set of 20 digital images of Bendigo Tramways, 1972 at or before closure while on a tram tour by Stuart Lodington. .1 - No. 29 at the North Bendigo terminus .2 - No. 29 just past the Bendigo end of the double track in High St Eaglehawk, with a BP dealer in the background. .3 - Night photo of No. 18 at a terminus, showing "Eaglehawk" .4 - ditto .5 - Night photo of No. 24 at Eaglehawk with Leo A Hughes Photographer in the background. The Tram has "Johnnie Walker whiskey" roof adverts. .6 - No. 29 outbound in Thunder St with a train passing over the bridge in the background. .7 - view from the front window of a tram on the Eaglehawk line with a large "display event float" in the foreground and tram approaching a crossing loop. .8 - No. 29 at North Bendigo .9 - view of High St Eaglehawk looking east from the terminus, showing the track and centre poles. .10 - No. 29 outbound on the North Bendigo line turning from either Nolan St or Caledonia St, running a special. .11 - No. 7 departing North Bendigo for Golden Square. .12 - No. 3 and 18 at Charing Cross. No. 3 has two SEC roof Advertisements .13 - No. 7 at North Bendigo with the trolley pole being reversed. .14 - No. 24 at Quarry Hill with Northern Terrazzo in the background with the driver alongside .15 - No. 7 and No.6 at Charing Cross with the Beehive buildings in the background. .16 - No. 7 at North Bendigo terminus .17 - ditto .18 - No. 24 at Quarry Hill with Northern Terrazzo in the background with the conductor alongside. .19 - ditto .20 - No. 26 and other bogie tram in View St near Charing Cross with the Armstrong Tyre Service building and signs for Cohn's Drinks and T&G in the view.trams, tramways, bendigo, eaglehawk, quarry hill, golden square, depot, north bendigo, charing cross, tram 29, tram 18, tram 24, tram 3, tram 7, tram 6, tram 26 -
 Ballarat Tramway Museum
Photograph - Digital image Set of 20, 1971-72
... - No 26 and 3 in View St, with the Armstrong Tyre Service building... line. .10 - No 26 in View St, with the Armstrong Tyre Service ...Set of 22 digital images of Bendigo Tramways, 1972 at or before closure while on a tram tour by Stuart Lodington. .1 - No. 7 arriving at North Bendigo .2 - No. 5 departing Charing Cross along View St, with a Firestone tyres in the background. .3 - front view of a tram in View St with a blurred background image. .4 - No. 24 showing Eaglehawk destination .5 - No 26 and 3 in View St, with the Armstrong Tyre Service building in the background and signs for T&G and Cohn's Drinks. .6 - ditto .7 - No. 3 arriving at Charing Cross from Eaglehawk in View St, with a Quarry Hill destination. .8 - No. 3 and 18 at Charing Cross. .9 - No. 24 on the Quarry Hill line. .10 - No 26 in View St, with the Armstrong Tyre Service building in the background and signs for T&G and Cohn's Drinks. .11 - ditto, with fountain in view, Colonial Mutual building and a newsagent with a Herald sign on the building. .12 - No. 7 at North Bendigo terminus .13 - ditto with pole being reversed. .14 - No. 18 at Quarry Hill terminus with Northern Terrazzo sign in the background. .15 - No. 24 at Quarry Hill terminus .16 - No. 18 arriving at Charring Cross, with Fountain Plaza and Bendigo Pharmacy in the background. .17 - No. 3 and 18 at Charing Cross. .18 - No. 7 at North Bendigo terminus with pole being placed on the overhead. .19 - No. 26 in View St inbound, with Sandhurst Trustees sign in the background. .20 - No. 6 leaving Charing Cross in Pall Mall with Myer and other buildings in the background. .21 - No. 7 at North Bendigo .22 - Single trucker with two roof Advertisements crossing View St with fountain in view, Colonial Mutual building and a newsagent with a Herald sign on the building.trams, tramways, bendigo, eaglehawk, quarry hill, north bendigo, charing cross, view st, tram 7, tram 5, tram 24, tram 26, tram 5, tram 3, tram 18, tram 6 -
 Ballarat Tramway Museum
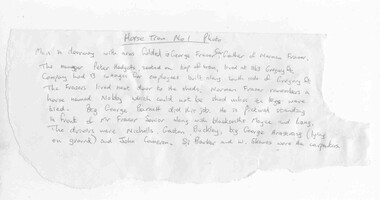
Document - Report, Dave Macartney, "Horse Tram No. 1 Photo", c1985
Yields information about the people around the photograph of the Horse Tram at the depot with the Duncan and Fraser name board in front and has a strong association with the people named in the document.Piece of torn paper headed "Horse Tram No. 1 Photo" listing details of the men around the photograph of Horse Tram No. 1 at the depot with the Duncan and Fraser name board in the front. Handwritten by Dave Macartney c1985 as advised by Norman Fraser (a relation to Farser of the Duncan and Fraser family) See Reg Item 765. "Man in doorway with arms folded is George Fraser Snr, father of Norman Fraser. The manager Peter Hodgetts, seated on top of tram, lived at 1163 Gregory St. Company had 13 cottages for employees building along south side of Gregory St. The Frasers lived next door to the sheds. Norman Fraser remembers a horse named Nobby which could not be shod unless its legs were tied. Big George Barnett did the job. He is pictured standing in from of Mr Fraser Senior along with blacksmiths Moyce and Lang. The drivers were Nicholls, Gaston, Buckley, big George Armstrong (lying on the ground) and John Cameron. Si Barker and W. Skewes were the carpenters." trams, tramways, horse trams, duncan fraser, depot -
 Ballarat Tramway Museum
Photograph - Black & White Photograph/s, c1907
Yields information about Sturt and Armstrong Streets with a toast rack tram and Snows Buildings on the left.Black and white historic photograph downloaded from a picture resource website within a decorative frame. Printed with an inkjet printer. Titled "Looking down Lydiard Street North Ballarat, circa:" shows a view looking north along the street from outside the Mining Exchange. Shows the centre poles in the street, the Federal Hotel, Cobb & Co building, blue stone gutters, gutter crossings and telephone wires. Original photo from a postcard - not currently (June 2010) in Museum's collection.trams, tramways, lydiard st north, horse drawn vehicle -
 Bendigo Historical Society Inc.
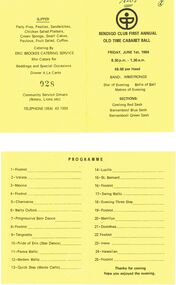
Document - PETER ELLIS COLLECTION: BENDIGO CLUB FIRST ANNUAL OLD TIME BALL, 1st June, 1984
Yellow folded card. P.Ellis and 2 in circle hand written at top on front. Circular Emblem. Bendigo Club First Annual Old Time Cabaret Ball Friday, June 1st, 1984 8.30 p.m. - 1.30 a.m. $8.00 per head Band: Armstrongs. Star of Evening Belle of Ball Matron of evening. Sections: Geelong Red Sash Warnambool Blue Sash Warnambool Green Sash. Inside reads: Programme 1 Foxtrot 2 Valeta 3 Maxina 4 Foxtrot 5 Charmaine 6 Waltz Oxford 7 Progressive Barn Dance 8 Foxtrot 9 Tangoette 10 Pride of Erin (Star Dance) 11 Parma Waltz 12 Modern Waltz 13 Quick Step (Monte Carlo) 14 Lucile 15 St. Bernard 16 Foxtrot 17 Swing Waltz 18 Evening Three Step 19 Foxtrot 20 Merrilyn 21 Dorothea 22 Foxtrot 23 Irene 24 Hawaiian 25 Foxtrot Thanks for coming hope you enjoyed the evening. Rear reads: Supper Party Pies, Pasties, Sandwiches, Chicken Salad Platters, Cream Sponge, Small cakes, Pavlova, Fruit Salad, Coffee. Catering by Eric Brookes Catering Service who caters for Weddings and Special Occasions Dinner A La Carte 028 Community Service Groups (Rotary, Lions etc) Telephone (054) 43 1359person, individual, peter ellis oam -
 Bendigo Historical Society Inc.
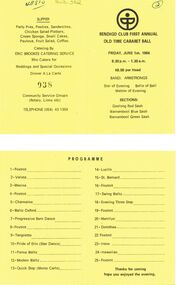
Document - PETER ELLIS COLLECTION: BENDIGO CLUB FIRST ANNUAL OLD TIME BALL, 1st June, 1984
Yellow card Black stick figure drawing in circle. 2 in circle handwritten in top right hand corner. Bendigo Club First Annual Old Time Cabaret Ball Friday, June 1st, 1984 8.30 p.m. - 1.30 a.m. $8.00 per Head Band Armstrongs Star of Evening Belle of Ball Matron of Evening Sections: Geelong Red Sash Warnambool Blue Sash Warnambool Green Sash. Programme 1 Foxtrot 2 Valeta 3 Maxina 4 Foxtrot 5 Charmaine 6 Waltz Oxford 7 Progressive Barn Dance 8 Foxtrot 9 Tangoette 10 Pride of Erin (Star Dance) 11 Parma Waltz 12 Modern Waltz 13 Quick Step (Monte Carlo) 14 Lucile 15 St. Bernard 16 Foxtrot 17 Swing Waltz 18 Evening Three Step 19 Foxtrot 20 Merrilyn 21 Dorothea 22 Foxtrot 23 Irene 24 Hawaiian 25 Foxtrot Thanks for coming hope you enjoyed the evening. Supper Party Pies, Pasties, Sandwiches, Chicken Salad Platters, Cream Sponge, Small Cakes, Pavlova, Fruit Salad, Coffee. Catering By Eric Brookes Catering Service Who Caters for Weddings and Special Occasions Dinner A La Carte 038 Community Service Groups (Rotary, Lions etc) Telephone (054) 43 1359. 411510 handwritten on back.person, individual, peter ellis oam -
 Queenscliffe Maritime Museum
Document - Passenger List, P&O Passenger List RMS Strathaird
RMS Strathaird was the second of a pair to be built and was completed on January 10, 1932. She was preceded by her identical sister the RMS Strathnaver completed on September 2, 1931. They were built by Vickers-Armstrong Ltd, in Barrow-in-Furness, England.RMS Strathaird departed Tilbury on her maiden voyage on February 12 1932, bound for Brisbane Australia sailing via Port Said, Aden, Bombay, Colombo, Fremantle, Adelaide, Melbourne, Sydney and Brisbane, a service she would remain on until the war would put an end to her passenger’s service for six long years! After the Mediterranean had been declared safe in late 1943, the Strathaird was the very first ship to sail through the Suez Canal in 1943. In 1945 she returned to Australia and New Zealand with their troops heading home. The RMS Strathaird was handed back to P&O in December 1947 and after a major refit she departed Tilbury on January 5, 1948. She returned to her regular Australian service but also continued to operate the occasional cruises. Due to demand and the migrant trade, in 1954 the Strathaird was converted to become a one-class liner, accommodating a good 1,252 passengers. Upon completion she departed Tilbury for her first voyage on April 8, 1954. TSS Strathaird departed Tilbury for Australia on March 28, 1961 and she then departed Sydney on May 9. As she sailed from Australia and had passed through the Suez Canal and was now in the Mediterranean she passed P&O’s newest superliner, the 42,570 GRT SS Canberra that had departed the UK on June 2, for Australia and New Zealand.A PDF doc of a Passenger List from the 'RMS Strathaird' passenger list dated September 1952P&O Passenger Listrms strathaird, passenger liners, migrant ships, cruise liners, british travellers -
 Stawell Historical Society Inc
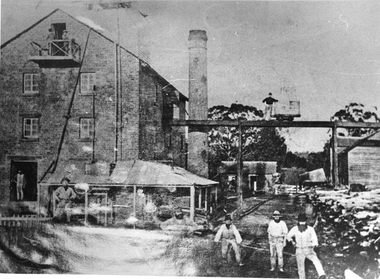
Photograph, Fountain Head Brewery in Armstrong is established by Mr Jens Kofoed
Photo of four story brick building with brick chimney stack and overhead tramway. Fountain Head Brewery Armstrong. Established by Jens Kofoed Brewery Armstrongstawell industry ararat -
 Stawell Historical Society Inc
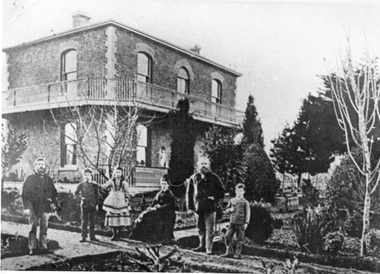
Photograph, Mr Jens Kofoed & family at their home in Armstrong
Two storey brick building and garden with family in front. Jens Kofoed’s Home Armstrong.stawell ararat house -
 Stawell Historical Society Inc
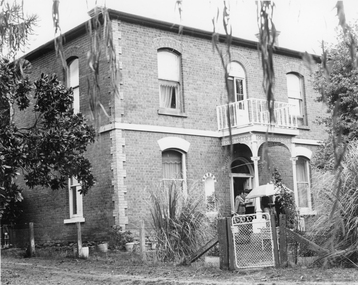
Photograph, Mr Jens Kofoed’s home in Armstrong
Jens Kofoed’s Home Armstrong Balcony on first floor with wire fence and white gate in frontstawell ararat house -
 Stawell Historical Society Inc
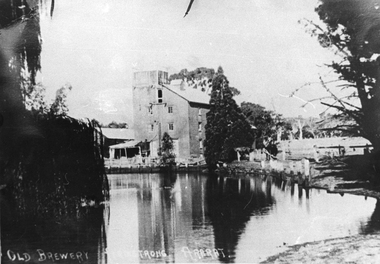
Photograph, Mr Jens Kofoed’s Fountain Gate Brewery in Armstrong
Jens Kofoed’s Brewery Armstrong Reflected in pond at front of photo. Fountain Gate Brewery.stawell ararat industry -
 Stawell Historical Society Inc
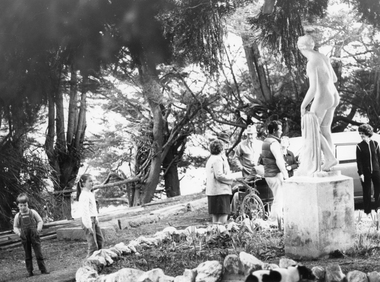
Photograph, MrJens Kofoed’s Garden at Armstrong
Jens Kofoed’s Garden at Armstrong with Statue stawell houses -
 Stawell Historical Society Inc
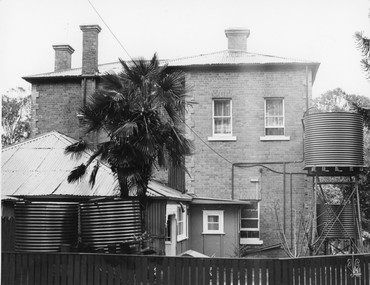
Photograph, Mr Jens Kofoed’s Home in Armstrong -- Rear View
Jens Kofoed’s Home Armstrong (Rear View) tanks and Palm Tree in foreground.stawell -
 Stawell Historical Society Inc
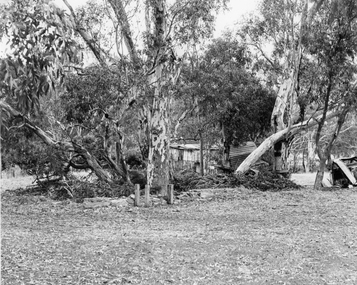
Photograph, Fountain Head Brewery at Armstrong featuring a Slab Hut
Slab Hut Bush scene Brewery Site Fountain Head Brewery at Armstrongstawell -
 Stawell Historical Society Inc
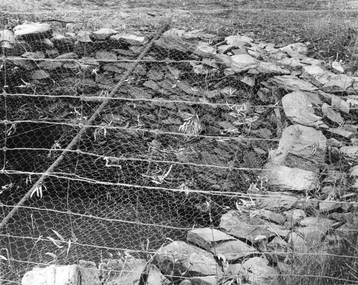
Photograph, Mr Jens Kofoed’s Fountain Head Brewery in Armstrong's Water Well
Water Well Kofoed’s Brewery Armstrong covered in netting and wire stawell -
 Stawell Historical Society Inc
Memorabilia - Realia, c1880's
Mens Metal Belt Clips with Cricket Scene from Armstrong's Area stawell -
 Stawell Historical Society Inc
Memorabilia - Realia, c1880's
Women's Metal Belt Clip with Raised Flower Pattern from Armstrong's Area stawell -
 Stawell Historical Society Inc
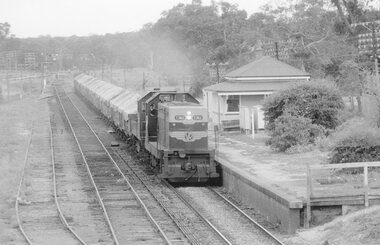
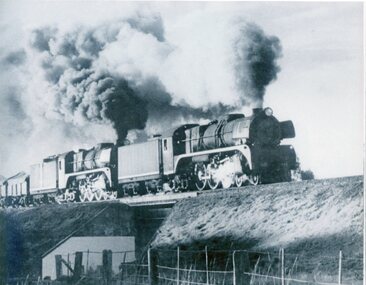
Photograph, Armstrong Railway Station & a Diesel Engine 1981
... Stawell Historical Society Inc 46 Longfield St Stawell ...Armstrong Rail Station & Diesel Engine 1981.1011 is a colour photograph of a freight train number T362 at the Armstrong Railway Station. Cream painted building with a red corrugated roof, windows right across the front of the building. 1011.1 is a black and white photograph of the front of the Armstrong railway Station. Shosw the station building, small sheds, toilets, tank. and seatArmstrong Railway Station - 1981stawell -
 Stawell Historical Society Inc
Photograph, Scene near Lake Lonsdale at Rosehill Station 1872
Scene near Lake Lonsdale 1872 at Rosehill Station (Scoullar and Brinkman) Taken for the Philadelphian Exhibition Similar to Cat No 1309 photo taken by Armstrong 1866Lake Scene with lake and men in punt. Gentleman in top Hat near tree on left.Part of Rosehill Station near Grampians Mountains (Scoullar and Brinkman) Taken for the Philadelphia Exhibition 1872stawell -
Stawell Historical Society Inc
Archive - CD/DVD, Trains from Greg - Trains Armstrong, Deep Lead, Glenorchy, Great Western, Stawell, 2007
stawell -
 Stawell Historical Society Inc
Photograph, Steam Trains at the Underpass at Armstrong
Steam Trains at Armstrong'sstawell -
 Royal District Nursing Service (now known as Bolton Clarke)
Photograph - Photograph, colour, c.1980
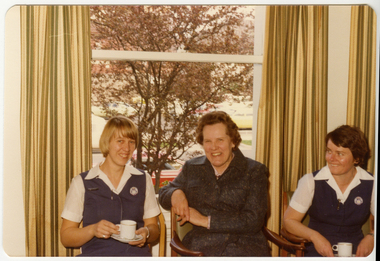
The photograph is taken at a function in the Board Room of RDNS Headquarters, 452 St. Kilda Road, Melbourne. Miss Mary Evans was the RDNS Director of Nursing from 1963-1978,From its founding in 1885 until 1891, the Trained nurses (Nurses) of the Melbourne District Nursing Society (MDNS) worked from their own homes which were located in the vicinity of their areas (districts). The Committee meetings were held at the Religious Tract Society rooms at Queen’s walk, off Swanston Street and then at the Library Room at the Melbourne Town Hall. The Annual General Meeting was held at the Town Hall. In November 1891 MDNS was able to rent a two story terraced house at 66 Cardigan Street, Carlton, at £65 a year, which contained accommodation for three Nurses and one pupil nurse as well as being used as their Headquarters. They left from their Nurses Home each morning and returned at the end of their shift to write up their book work before retiring for the day. Three years later they moved into a larger terraced house at 49 Drummond Street Carlton which was rented at ‘a very moderate rental’. There was a Board room, apartments for the Nurses and pupil nurse, a large dispensary which patients could attend each evening to have prescriptions signed and bottles refilled with ‘homely remedies’ and elixirs, which were administered for e.g. to Consumptive cases. Doctor’s prescriptions were filled at the Pharmacy. Cupboards containing donated blankets and bedclothes for needy patients were kept in this room, and it was here where the Nurses kept their nursing bags which were refilled at the end of each shift ready for any emergency and for the next day. A list of Doctors the Nurses could call was kept by the telephone. The home also had a kitchen where nourishing soup was made and distributed twice a week to the needy. Milk was also distributed when needed. In 1902 they moved into rented premises at 188 Leicester Street, Carlton and two years later, in 1904, to premises at 5 Royal Terrace, Nicholson Street, Fitzroy where they remained for ten years. In June 1914 at last the Society had sufficient funds to purchase their own terraced premises, ‘Floraston’ 39 Victoria Parade, Collingwood which was their Headquarters and Nurses Home. In 1926 the After-Care Home for recovering patients, (later called After-Care Hospital) was built by the Society next door, running from 41-47 Victoria Parade (became No. 45); the District nurses (Sisters) continued to live at No. 39. In November 1953 the District Nursing Division moved into their new Headquarters and Nurses Home at 452 St. Kilda Road, Melbourne. As RDNS expanded and now, with Centres opening throughout the suburbs, the Sisters lived in their own homes and the Nurses Home at 452 closed and those rooms used for administrative purposes. On April the 1st 1996 RDNS Head Office relocated to 31 Alma Road, St. Kilda. Coloured photograph taken at a function in a room at Royal District Nursing Service (RDNS). It shows, left to right, Sister Bev Armstrong, who has short blonde hair, Miss Mary Evans, who has short curled brown hair and another RDNS Sister who has short dark hair. The two RDNS Sisters are wearing the RDNS summer uniform of a white blouse under a royal blue V neck tunic style dress with the RDNS insignia on the left hand side. Miss Evans, is wearing a long dark coat. The three are smiling and the Sister on the right is looking at Miss Evans who is turned slightly and has part of her right arm resting over the top of the back of the chair. They are sitting in front of a window and opened gold long curtains. A tree is seen through the window. Both RDNS Sisters have cups in their hands.royal district nursing service, rdns, rdns headquarters, miss mary evans, sister bev armstrong