Showing 352 items
matching bendigo quarry
-
 Ballarat Tramway Museum
Slide - 35mm slide/s set of 7, Noel Simons, 29 Feb. 1972
Set of 7 transparencies taken on 29/2/1972 on Kodak mounts. 1208.1 - Bendigo 18 (en route to Quarry Hill) and 2 (Eaglehawk) in the early morning at Charing cross with the Alexandra fountain and the Fountain Plaza building in the background. 1208.2 - No. 2 descending View St. Photo taken after tram has passed the photographer. 1208.3 - as for 1208.2 at Mackenzie St. intersection 1208.4 - No. 26 ascending View St. with the ANZ bank, T& G in the background. 1208.5 - as for 1208.4, but at Mackenzie St. intersection. Photo taken after tram has passed the photographer. 1208.6 - No. 18 in View St. seen from the lookout tower in Rosalind Park. 1208.7 - No. 7 en route to North Bendigo in Nolan St. Photographed across the Centenary Oval.Information written on in blue ink and date stamped on purple ink. 1208.1 - "Nos. 18 and 2 in the early morning sun at Charing Cross." 1208.2 - "No. 2 descending View St. towards Charing Cross." 1208.3 - "No. 2 in View St. passing Mackenzie St." 1208.4 - "No. 26 in View St. just after leaving Charing Cross." 1208.5 - "No. 26 climbing View St. past Mackenzie St." 1208.6 - "No. 18 climbing View St. seen from lookout tower in Rosalind Park." 1208.7 - "No. 7 in Nolan St. heading towards North Bendigo. / Last picture of a Bendigo tram."tramways, trams, bendigo, charing cross, view st., nolan st., tram 2, tram 7, tram 18, tram 26 -
 Ballarat Tramway Museum
Slide - 35mm slide/s - set of 4, Noel Simons, Apr. 1972
Set of 4 transparencies - copy slides - possibly ARE film strip dated March 1972. 1209.2 and 1209.4 on Kodak Readymount mounts. 1209.1 - Bendigo 5, 6 and 28 on a special tram service in bound to the City on a tour in Caledonia St. about to enter Lucan St, or White Hills Road or Weeroona Ave. (mis match in names in various maps). Gas works in the background. No. 5 has a white disk on the rear of the tram. 1209.2 - Nos 2 and 26 at Charing Cross with the Fountain Plaza in the background. Both trams have the destination of Quarry Hill, though 26 is on the Eaglehawk bound track. 1209.3 - No. 19 at the Golden Square terminus, with the conductor or driver swinging the pole and Billy Rodda's Golden Square hotel in the background. 1209.4 - No. 7 at Fire Station loop, en route to North Bendigo, picking up a passenger with a pram. Part of a set of 20 slides made by the Association of Railway Enthusiast Provincial Tramways film strip. Reference Item 2560 details the ARE Film Strip and provide references to other slides.Information written on in blue ink and date stamped on purple ink. 1209.1 - "Nos 5, 6 and 28 in Caledonia St. about to enter Weeroona Ave." 1209.2 - "Nos 2 and 26 at Charing Cross." 1209.3 - "Swinging the pole on No. 19 at Golden Square Terminus." 1209.4 - "No. 7 inward bound from Golden Square stops at Fire Station Loop."tramways, trams, bendigo, charing cross, golden square, gas works, special trams, tram 2, tram 5, tram 6, tram 7, tram 19, tram 28 -
 Ballarat Tramway Museum
Slide - 35mm slide/s set of 7, Noel Simons, 1972
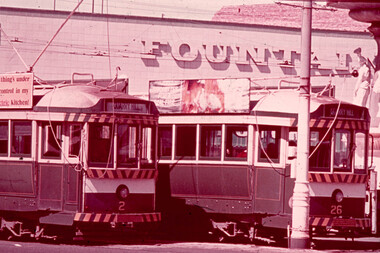
Set of 7 transparencies undated on PAKON mounts - appear to be early 1970's. 1212.1 - No. 18 about to enter the Long Gully loop with ESSO service station on the right hand side. 1212.2 - No. 6 in Mitchell Street bound for Charing Cross. Tram has destination of "Rly Station". Has buildings on the east side of Mitchell St. in the background. 1212.3 - No. 7 (North Bendigo) and 29 (Golden Square) crossing. Actual location? 1212.4 - "No 6 showing 'SPECIAL' at Eaglehawk terminus. Has the Foodland store and Fruit shop in the background. 1212.5 - No. 19 at Eaglehawk terminus, on the extension to the normal Eaglehawk terminus. Tram has showing 'Eaglehawk'. Tram has two SEC roof ads. 1212.6 - No. 25 and another Bogie car at Quarry Hill terminus on last day. 1212.7 - No. 18 and 29 at Quarry Hill terminus. No.. 18 showing 'Quarry Hill' - has two SEC roof ads 'Electric Cooking - Matchless' and 'Everything's fine in my all electric kitchen' and No. 29 has a briquettes roof ad.Information typed onto a white label stuck on the slide. 1212.1 - "No. 18 at Long Gully" 1212.2 - "No. 6 in Mitchell Street." 1212.3 - "7 and 29 Lake View Hotel" 1212.4 - "No. 6 at Eaglehawk" 1212.5 - "No. 19 at Eaglehawk Term." 1212.6 - "Last cars Quarry Hill." 1212.7 - "18 & 29 Quarry Hill"tramways, trams, bendigo, long gully, mitchell st., eaglehawk, quarry hill, last tram, tram 6, tram 7, tram 18, tram 19, tram 25, tram 29 -
 Ballarat Tramway Museum
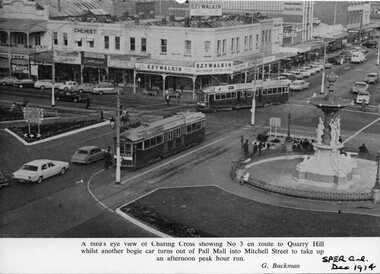
Photograph - Illustration/s, Bendigo Charing Cross
Black and white illustration from the South Pacific Electric Railway Co-op (Sydney Tramway Museum) - Dec.. 1974 calendar of Charing Cross Bendigo from an elevated viewpoint. Overlooks intersection has tram 3 waiting to proceed to Quarry Hill while another bogie tram turns from Pall Mall into Mitchell St. Photo undated, but most likely during the early 1970's. Photo by G. Buckman Has the EZYWALKIN store and other stores in the background.On bottom right hand corner "SPER Calendar Dec. 1974"trams, tramways, bendigo, charing cross, pall mall, mitchell st. -
 Ballarat Tramway Museum
Postcard, Nucolorvue postcards - Bendigo
Series of six (6) Nucolorvue postcards with serrated edges of scenes around Bendigo featuring Bendigo trams under the operation of either the SECV or the Bendigo Trust. 963.1 - "The Cenotaph and Alexandra Fountain" at Charing Cross. Has Bendigo bogie car in background. Also the Beehive building and Ezywalkin shoes. Nucolorvue postcard BE41 on rear and other information in green ink. 963.2 - "Tram No. 25, a maximum traction car built in 1916. Now operated by The Bendigo Trust between Central Deborah Mine and Emu Point." Features No. 25 in Bendigo Trust colours with Coca Cola and Bendigo Timber Co ads on the roof. On nearby pole is a "Bendigo Talking Vintage Tram" signs. In background is the Beehive building and other buildings near Charing Cross. Nucolorvue postcard BE52 on rear and other information in green ink. 963.3 - "Birney Tram No. 30 decorated for a Royal Tour occasion. The Bendigo trust operates this tram and others on a tourist service between Central Deborah Mine and the Chinese Joss House at Emu Point." Features No. 30 decorated for a visit of Prince Charles, 26/10/1974 with crown, Australian and English flags. Has Myer building in the background. On adjacent pole are two signs "Cars stop on Request". Nucolorvue postcard BE 44 on rear and information in green ink. 963.4 - "The Central Deborah Gold Mine and a vintage tram operated by the Bendigo Trust" Features Birney No. 28 at the mine terminus. Nucolorvue postcard BE48 on rear and other information in green ink. 963.5 - "Charing Cross Bendigo Vic." featuring SECV trams 5, 19 and other bogie car crossing street heading for Quarry Hill. Has Fountain Plaza building in background. Nucolorvue and other information in brown ink. 963.6 - "The Sacred Heart Cathedral looking from High St." Has tram 25 in Bendigo Trust colour running along street in front of Cathedral. Work to complete the spire on the Cathedral underway. Nucolorvue postcard BE47 and other information on rear in green ink. Bendigo Vintage Talking Trams - K.S.Kingstrams, tramways, bendigo, the bendigo trust, charing cross, royal visit, tram 37 -
 Ballarat Tramway Museum
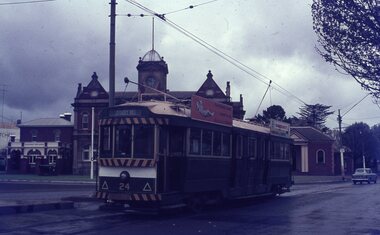
Photograph - Colour Photograph/s, 23/11/1962 12:00:00 AM
967.1 - Colour postcard size print of SEC Bendigo trams 4 and 17 at a crossing Loop on the Eaglehawk line. Photo dated 21.11.1962. Printed on AGFA paper. Both trams fitted with dash canopy lighting, but no large white strip under the driver's windows. 17 showing destination of "Eaglehawk", has two SEC ads on the side re Electric Cook and a White Horse whiskey ad on front panel. Tram 4 showing destination of "Quarry Hill", has two ad panels on roof and two ads on front panel including one Cohn's' Drinks. 967.2 - Colour postcard size print of SEC Bendigo tram 26 in Mitchell St. crossing Hargreaves St. heading for Charing Cross. Photo dated 21.11.1962. Printed on AGFA paper. Trams fitted with dash canopy lighting, but no large white strip under the driver's windows. Has two roof ads and one ad on rear drivers panel. In background of photo are the buildings along Mitchell St. looking down along Mitchell St and into View St. Has Plaza theatre sign in photo above tram. On right hand side, is a van marked "Carrier M. Slattery". Tram has destination of "Quarry Hill" in rear box. 967.3 - Colour postcard size print of SEC Bendigo tram 19 on the North Bendigo line. Photo dated 21.11.1962. Printed on AGFA paper. Trams fitted with dash canopy lighting, but no large white strip under the driver's windows. Has destination "Nth Bendigo" and SEC roof ads and drivers panel ad for Briquettes.On rear top left hand corner "21.11.62" in very wavy handwriting typical of an aged person.bendigo, eaglehawk, mitchell st., north bendigo, tram 4, tram 17, tram 26, tram 19 -
 Ballarat Tramway Museum
Photograph - Colour Photograph/s, 23/11/1962 12:00:00 AM
Colour postcard size print of SEC Bendigo trams 2 and 17 at the California or Thorne St. Loop on the Eaglehawk line. Photo dated 21.11.1962. Printed on AGFA paper. Both trams fitted with dash canopy lighting, but no large white strip under the driver's windows. 17 showing destination of "Eaglehawk", has two SEC ads on the side re Electric Cooking . Tram 2 showing destination of "Quarry Hill", has various ads. On rear top left hand corner "21.11.62" in very wavy handwriting typical of an aged person.bendigo, eaglehawk, tram 2, tram 17 -
 Ballarat Tramway Museum
Photograph - Colour Photograph/s, 21/11/1962 12:00:00 AM
Colour print of Bendigo SECV Bendigo trams 2 and 4 at Charing Cross. On Kodacolor paper with a Kodak red ink stamp on rear. Trams have dash canopy lights, but no large white strip under the drivers windows. Photo dated 21.11.1962. Buildings on corner of Pall Mall and Mitchell St in background. Both trams fitted with roof ads and dash canopy ads - White Horse Whiskey. Shows "safety zone" arrangements. No. 2 has destination of "Quarry Hill" while 4 has destination of "Eaglehawk". Has a number of passengers boarding trams. Note "PYE" name on radio tower mast.On rear top left hand corner "2 and 4 / 21.11.62" in very wavy handwriting, typical of an aged person.charing cross, bendigo, mitchell st., safety zone, tram 2, tram 4 -
 Ballarat Tramway Museum
Photograph - Colour Photograph/s, 21/11/1962 12:00:00 AM
Colour print of Bendigo SECV Bendigo tram 17 at Eaglehawk Terminus. On Kodacolor paper with a Kodak red ink stamp on rear. Tram has dash canopy lights, but no large white strip under the drivers windows. Photo not dated but appears to be at about the same time as 977, 21.11.1962. Has Eaglehawk Town Hall and Post office in background and war memorial. Tram showing destination of "Quarry Hill". Photo shows how tram line extended past the town hall with the white posts visible. Tram has White Horse Whiskey ad on front dash panel and two SEC "Electric Cooking" ads.On rear top left hand corner "17".eaglehawk, bendigo, town hall, post office, tram 17 -
 Ballarat Tramway Museum
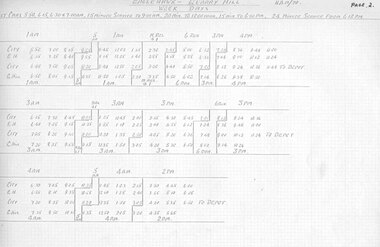
Ephemera - Timetable/s, State Electricity Commission of Victoria (SECV), Timetable as from 29 June 1970 - Bendigo, 1970
Two page Gestetner copy of an amended timetable for tram services in Bendigo for the SECV issued 29 June 1970. Gives times for the departure from the City and the terminus for the Eaglehawk, Quarry Hill, Golden Square and North Bendigo routes. Page 1 for Monday to Friday, page 2 for Saturday and on the bottom of page 2, details of Sunday services commencing from 2pm, until about 10.30pm. May have been the last timetable issued for Bendigo. On Gestetner foolscap sized paper, stapled in the top left corner. Headed the "Northern Electricity Supply Branch / Bendigo Tramways - Amended Timetable - 29th June, 1970" 1637.1 - 2nd copy added 22/08/04 - has two staples in top left hand corner. See pdf documents for good quality scans and history of record for details of source.bendigo, secv, timetables, tram services -
 Ballarat Tramway Museum
Slide - 35mm slide/s, Peter Moses, Jan. 1969
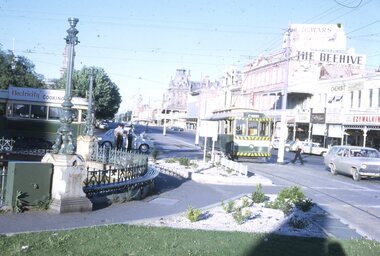
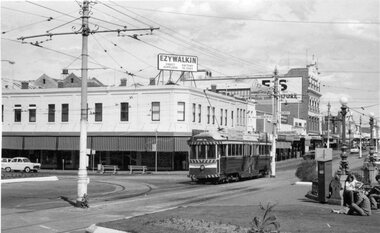
Photo of SEC Bendigo No. 6 crossing Mitchell St, north bound for North Bendigo, while a bogie tram waits to depart Charing Cross, east bound for Quarry Hill. Three SEC crew members standing by the front of the bogie tram and an inspector crossing the road near No. 6. Has part of the fountain in the view. Also in the photo are The Beehive building, and advertisement for Dewars whiskey and a shop front for "Ezywalkin" shoes. The bogie tram has a SEC roof advertisement "Electricity Best for cooking". Kodak cardboard mount slide, taken by Peter Moses, Jan. 1969.On the rear of the slide "Jan. 1969 Bendigo:" in blue ink, "P. Moses" in black ink and other side of the slide in red ink “22”.tramways, trams, bendigo, charing cross, tram 6 -
 Ballarat Tramway Museum
Slide - 35mm slide/s, Wal Jack, 6/01/1963 12:00:00 AM
Bendigo No. 7 at Eaglehawk tram terminus, 6-1-1963. Tram has been fitted with lights and warning stripes. On front panel is Hutton's hams, and roof ads for Ilford film and 'Cook with electricity'. In background is park, shops on the north side of the terminus, including a large 'Olympic' tyres advertisement. Tram has destination of 'Quarry Hill''Ex Ballarat 19, SEC Bendigo No. 7, at Eaglehawk terminus, 6-1-63'tramways, trams, bendigo, eaglehawk, tram 7 -
 Ballarat Tramway Museum
Slide - 35mm slide/s, Wal Jack, 17/06/1962 12:00:00 AM
Bendigo, Birney No. 28 turning into Mitchell St from Pall Mall, heading for Quarry Hill. Photo taken after tram has passed, looks along Mitchell Street towards railway station, with centre of the road poles. Not well in focus. Tram has Briquettes roof ad.'SEC Bendigo, Birney No. 28 in Mitchell St. 17-6-62'tramways, trams, bendigo, mitchell st, tram 28 -
 Ballarat Tramway Museum
Ephemera, Travis Jeffrey, Ballarat tram timetables, 1960's
Notebook, with three sections of 16 pages each, two pink, one blue, stapled individually onto a yellow coloured card cover and then covered with a printed black and gold patterned sheet to cover the staples. Shown in a tabular form are the timetables for each of the Ballarat and Bendigo routes in the 1960's, for Mondays to Fridays, Saturdays and Sundays. Gives the run number, times at various points, special workings, terminals, short workings. The tables for Sundays in Bendigo has been prepared but not filled in. In the blue section has various notes on Ballarat weekday runs, timetables. Image 1 - cover, 2 - inside front cover and timetable for Lydiard St - Sebastopol, 3 - Stones Corner - View Point, Sebastopol - Depot and Eaglehawk to Quarry Hill, 4 - blue pages run details. On inside back cover in ink, addresses, calculations and street names.trams, tramways, ballarat, bendigo, rosters, employees, shifts, timetables -
 Ballarat Tramway Museum
Slide - 35mm slide/s - set of 4, Travis Jeffrey, c1970
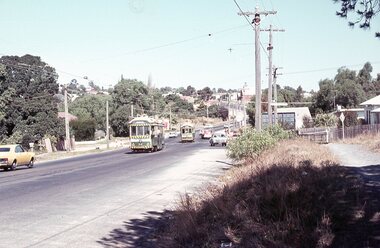
A set of five plastic mount (black base, white cover) of Bendigo trams, c1970. Photo by Travis Jeffrey. .1 - BE46 - 558 - No. 24 in Jobs Gully Loop from the front window of another bogie tram. No. 24 has the destination of Quarry Hill. .2 - BE45 - 557 - No. 25 arriving at Charing Cross, from the window of another tram. .3 - BE61 - 574 - Looking west along View St with two bogie trams in the distance. .4 - BE49 - 561 - No. 26 in Mitchell St, from the front window of another tram with a Newsagent selling The Age, The Sun, The Bendigo Advertiser and The Herald in the background. .5 - BE20 - three trams at a loop, at the top of a hill on the Eaglehawk line - c1960 - 15, 17 and another bogie tram. tramways, trams, bendigo, jobs gully, charing cross, mitchell st, view st, tram 24, tram 25, tram 26, tram 15, tram 17 -
 Ballarat Tramway Museum
Document - Roster, State Electricity Commission of Victoria (SECV), Rosters for Bendigo, 1970
Significant in being a almost complete set of rosters for Bendigo prior to closure - appear to be have been copied for a discussion or information document for management at Ballarat. Need to ascertain whether they line up with the actual last timetable. No Sunday tables given - probably did not change them.Set of photocopies of Rosters for Bendigo. Not sure whether these were actually used or were at the stage of a discussion document - see sheet 30. Photocopied onto foolscap size heat sensitive paper and some loosing information. Sheets have been numbered. Generally dated "HAM/70" Page 1 not location 2 - Eaglehawk - Quarry Hill Weekdays 3 - ditto - continued 4 - Golden Square - North Bendigo Weekdays - two different rosters given on two separate sheets. 5 - Eaglehawk - Quarry Hill Saturdays 6 - ditto continued 7 - Golden Square - North Bendigo - Saturdays 8 - Tables - 1AM, 2AM, 3AM 9 - Tables - 4AM, 5AM, 9AM - second sheet gives slightly different arrangements for 5AM 10 - Tables - 10AM, 11AM, 9Assist - second sheet gives slightly different arrangements for 10 & 11AM 11 - Tables - 2PM, 3PM, 4PM 12 - Tables - 6 run, Meal relief & 1, 11 Assist 13 - Tables - 9PM, 10PM, 16 Assist 14 - Tables - 1AM, 2AM, 3AM Conductors 15 - Tables - 4AM, 5AM, 6 run Conductors 16 - Tables - 2PM, 3PM, 4PM Conductors 17 - Tables - 12 Assist Motorman and 13 Assist Conductor - 2 sheets, can't see a difference. 18 - Tables - Saturday, 1AM, 2AM, 3AM 19 - Tables - Saturday, 4AM, 5AM, 9AM 20 - Tables - Saturday, 10AM, 11AM, 1st relief motorman 21 - Tables - Saturday, 9 Assist, 10 Assist, 14 Assist, 15 Assist 22 - Tables - Saturday, 1PM, 2PM, 3PM 23 - Tables - Saturday, 9PM, 10PM, Gol. Sq. relief Motorman 24 - Tables - Saturday, 1AM, 2AM, 3AM conductors 25 - Tables - Saturday, 4AM, 5AM, 1st Meal relief conductor 26 - Tables - Saturday, 1PM, 2PM, 3PM, conductors 27 - Tables - Saturday, 11 Assist, 12 Assist, 13 Assist - conductor 28 - Standby chart - Weekdays and Saturdays 29 - Rotation Roster for Motorman and Conductors - dated 12/5/1970 30 - Comparisons of Present Roster and proposed roster - includes cost impact analysis - 2 copies held. 31 - folded sheet - Weekday Instructions - poor order photocopied - 2nd copy - minor changes 32 - folded sheet - Saturday Instructions - poor order photocopied 33 - Daily hours of Motorman conductors - Weekdays and Saturday 33A - Hours of Motorman and Conductors - Sunday 34 - Weekly Hours - for motorman and conductors - poor order photocopied and data filled in on photocopy. 39 - Tramways - Motorman and Conductors Rotation Roster - dated 5-3-1970trams, tramways, rosters, timetables, sec, bendigo -
 Ballarat Tramway Museum
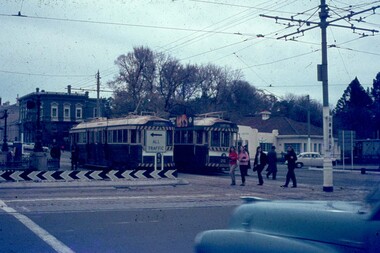
Photograph - Black & White Photograph/s - set of 2, George Bishop, Dec. 1971
Set of two Black and white photographs of Bendigo No. 3 leaving Charing Cross for Quarry Hill 12/1971. Photos by George Bishop. Both have the Ezywalkin sign and building in the background and people sitting on the ground by the fountain.On the back of two of the photos in ink or pencil "No. 3, Charing Cross December/ G. Bishop photo" On the rear of .2 is a label "No. 3 at Charing Cross Bendigo, December 1971"tramways, trams, bendigo, charing cross, tram 3 -
 Ballarat Tramway Museum
Slide - 35mm slide/s, Bob Wilson, May. 1972
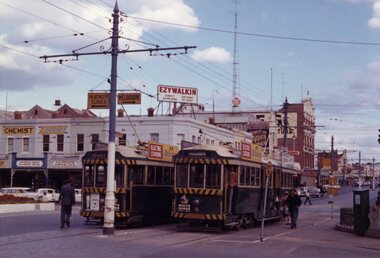
White cardboard mount, 35mm slide, from the Association of Railway Enthusiast's film strip titled "Provincial Tramway Film Strip" of Bendigo bogie tramcars Nos. 2 and 26 at Charing Cross, with the Fountain Plaza building in the background. Both trams have the destination of "Quarry Hill" No. 26 has the older type of destination roll and is fitted with a SEC Briquettes roof advertisement. The film strip notes (Reg. Item 2560), provided the following caption details: "The hub of the Bendigo system was at Charing Cross, where the "Quarry HILL" - "EAGLEHAWK "and "'GOLDEN SQUARE" - "NORTH BENDIGO" routes crossed at right angles. It was customary for trams for all four routes to meet at the CROSS. Here cars 2 & 26 (showing a wrong dest- -ination) meet by the fountain. -Mar '72 (Bob Wilson)" See image btm2580p.tif for high level scan of image. Stamped on base of slide "11789" and written in ink on top edge "No. 2 & 26 Charing Cross Bendigo"tramways, trams, are, film strip, charing cross, bendigo, tram 2, tram 26 -
 Ballarat Tramway Museum
Slide - 35mm slide/s, Graham Evans, Apr. 1972
White cardboard mount, 35mm slide, from the Association of Railway Enthusiast's film strip titled "Provincial Tramway Film Strip" of a Bendigo No. 26 descending the Bendigo end of the bridge over the railway near Eaglehawk near Jobs Gully loop. Tram has the destination of Quarry Hill and has four roof advertisements. The film strip notes (Reg. Item 2560), provided the following caption details: "Bogie cars 26 drops down the Bendigo side of the bridge over the Eaglehawk railway, on the long journey to "QUARRY HILL". - Apr ' 72 (Graham Evans)" See image btm2596p.tif for high level scan of image. Stamped on base of slide "11806" and written in ink on top edge "26 Eaglehawk"tramways, trams, are, film strip, jobs gully, eaglehawk, railway bridge, tram 26 -
 Ballarat Tramway Museum
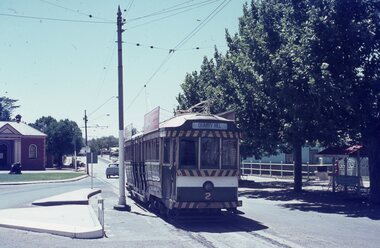
Slide - 35mm slide/s - set of 5, 1970's
Series of five 35mm slides in a yellow colour "Peter Fox Collins St. Melbourne" cardboard mounts, of view of Bendigo trams. Each slide along the top edge has the details while the bottom edge, has a number in the details area. 2599.1 - No. 9420, No. 24 at Quarry Hill - photo at dusk, poor quality, has surface damage all over slide. 2599.2 - No. 9421, ditto 2599.3 - No. 10132, No. 19 in Bendigo Trust operation colours at intersection of McCrae St & Nolan St, some surface damage around the top and bottom edges. Has Gillies Pies roof advertisement. Tram has destination of North Bendigo. 2599.4 - No. 10133, No. 25, High St, south of Charing Cross - some surface damage around the top and bottom edges. Tram has roof advertisements for "Gas" and "Myers". Has destination of Joss House 2599.5 - No. 10134, No. 19, Pall Mall, some slight surface damage. Tram has destination of Golden Square and has a roof advertisement for Sandhurst Milk and one other company. In blue ink on each slide; number as above in bottom edge. 2599.1 and .2 - "No. 24 Quarry Hill" 2599.3 & .5 - "No. 19 Nth Bendigo" 2599.4 - "No. 25 Nth Bendigo"tramways, trams, bendigo, pall mall, bendigo trust, nolan st, tram 24, tram 19, tram 25 -
 Ballarat Tramway Museum
Slide - 35mm slide/s, Travis Jeffrey, c1962
Agfa plastic mount (blue base, white cover) with a photo of Bendigo 7 and possibly No. 29 in Pall Mall Bendigo, with passengers boarding the Birney tram car and the conductor observing them. The Bendigo has the destination of Quarry Hill and No. 7, North Bendigo. Photo taken c1962."BES 8" in penciltramways, trams, bendigo, charing cross, pall mall, tram 7, tram 29 -
 Ballarat Tramway Museum
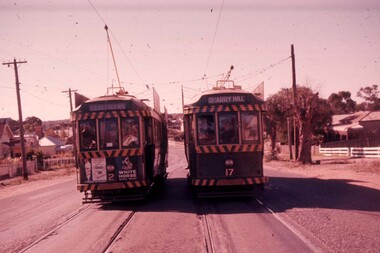
Slide - 35mm slide/s, Travis Jeffrey, c1962
Agfa plastic mount (blue base, white cover) with a photo of Bendigo 2, with destination of Eaglehawk, crossing No. 17 at Jobs Gull loop on the Eaglehawk line. No. 17 has destination of Quarry Hill. Has a Streets Ice cream and Whitehorse Whisky advertisements on the rear panel. Photo taken c1962."BES 27" in penciltramways, trams, bendigo, eaglehawk, jobs gully, tram 2, tram 17 -
 Ballarat Tramway Museum
Slide - 35mm slide/s, Travis Jeffrey, late 1960's or early 1970's
Agfa plastic mount (blue base, white cover) with a photo of Bendigo 24 at the Eaglehawk terminus, with the Eaglehawk Town Hall / Post Office in the background. Tram has the destination of Quarry Hill and roof advertisements for SEC "Everything's under control in my all electric kitchen" and one for Mamouney's Furniture Company. Photo taken late 1960's early 1970's."BES 32" in penciltramways, trams, bendigo, eaglehawk, tram 24 -
 Ballarat Tramway Museum
Slide - 35mm slide/s, Travis Jeffrey, late 1960's or early 1970's
Agfa plastic mount (blue base, white cover) with a photo of Bendigo No. 2 at Eaglehawk terminus, looking along the terminal track. Photo has the traffic island arrangements, and shows the waiting shelter on the right hand side of the photo. Photo taken late 1960's early 1970's. No. 2 has the destination of Quarry Hill and two SEC roof advertisements on the tram."BES 39" in penciltramways, trams, bendigo, eaglehawk, tram 2 -
 Ballarat Tramway Museum
Slide - 35mm slide/s, Travis Jeffrey, late 1960's or early 1970's
Agfa plastic mount (blue base, white cover) with a photo of Bendigo Nos. 3 and 26 at Charing Cross. The trams are bound for Eaglehawk, Quarry Hill respectively. Photo shows the traffic arrangements at Charing Cross prior to closure. Photo taken late 1960's early 1970's from the window of another tram. No. 3 has two roof advertisement racks which are empty, while No. 26 has a SEC briquettes roof advertisement."BES 48" in pencil.tramways, trams, bendigo, charing cross, tram 3, tram 26 -
 Ballarat Tramway Museum
Photograph - Digital image Set of 20, Dec. 1970
Set of 20 digital images of Bendigo Tramways December 1970 by Stuart Lodington. .1 - Bendigo track gang renewing a joint, McCrae St, with welding truck alongside and Birney No. 29. .2 - No. 5 at Quarry Hill terminus? .3 - No. 24 at the depot .4 - No. 2 on the Quarry Hill line .5 - No. 5 approaching the Eaglehawk terminus .6 - No. 29? at the Golden Square Terminus with Bill Rodda's Golden Square hotel in the background. .7 - No. 3 inbound on the Quarry Hill line. .8 - trams crossing on the Eaglehawk line, through the window of one tram. .9 - side on view of a B23D controller in a bogie tram .10 - No. 5 at the Eaglehawk terminus .11 - No. 21 at No. 21 crossing on the Golden Square line. No. 29 showing special, No.21 - North Bendigo, Fire Station Loop? .12 - No. 29 and another tram - near work site? .13 - interior view from Birney looking at the front of another tram parked behind. .14 - No. 29, No. 6 crossing at .15 - No. 6, showing special at Charing Cross. .16 - No. 5 and another tram at North Bendigo on a Special .17 - No. 28 at Charing Cross .18 - No. 5 on Special at a Loop on the Eaglehawk line .19 - No. 28, and two other trams at the Myrtle St Loop .20 - No. 18 showing Quarry Hill and two other trams on View St.trams, tramways, bendigo, trackwork, mccrae st, depot, quarry hill, eaglehawk, golden square, controllers, north bendigo, view st, tram 29, tram 5, tram 24, tram 2, tram 3, tram 6, tram 28, tram 18 -
 Ballarat Tramway Museum
Photograph - Digital image Set of 20, 16/04/1972 12:00:00 AM
Set of 20 digital images of Bendigo Tramways, of the last running day of the Eaglehawk to Quarry Hill line 16 April 1972, .1 - No. 24 outbound to Eaglehawk .2 - No. 3? at Manchester Loop .3 - No. 24 outbound to Eaglehawk .4 - bogie tram crossing the rail over bridge from Eaglehawk .5 - No. 18 in View St .6 - No. 24 outbound to Eaglehawk .7 - No 18 at Eaglehawk with destination roll being changed, and shopping centre in the background. .8 - No. 24 crossing the railway overbridge, going to Eaglehawk .9 - No. 3 outbound to Eaglehawk .10 - No. 24 crossing the railway overbridge, going to Eaglehawk .11 - No. 3 and 24 crossing at Long Gully .12 - No. 18 at Eaglehawk with Leo A Hughes photographer building in the background and a CFA truck passing the tram. Tram SEC roof advertisement and a banner for "German -?- Circus" at Eaglehawk and dates. .13 - No. 3 inbound on the Eaglehawk line. .14 - No. 18 outbound to Eaglehawk .15 - ditto .16 - No. 18 at Eaglehawk terminus with the Mechanics Institute in the background. .17 - No. 24 at the Eaglehawk terminus .18 - No 24 at the intersection with Taylor St .19 - No. 24 at the Eaglehawk terminus .20 - dittotrams, tramways, bendigo, eaglehawk, long gully, manchester loop, tram 24, tram 18, tram 3 -
 Ballarat Tramway Museum
Photograph - Digital image Set of 20, 16/04/1972 12:00:00 AM
Set of 22 digital images of Bendigo Tramways, of the last running day of the Eaglehawk to Quarry Hill line 16 April 1972, .1 - No. 3 and 24 crossing at Long Gully .2 - No. 3 turning at the Cricket ground, Barnard and View Sts, inbound to the City and Quarry Hill .3 - No. 3 in bound to the City and Quarry Hill, Long Gully area .4 - No. 18 inbound to the City and Quarry Hill crossing the railway bridge from Eaglehawk. .5 - Manchester Loop .6 - No. 18 inbound to the City and Quarry Hill crossing the railway bridge from Eaglehawk. .7 - No. 18 about to enter Jobs Gully Loop .8 - No. 3 about to turn at the Cricket ground, Barnard and View Sts inbound to the City and Quarry Hill .9 - No. 3 turning at the Cricket ground, Barnard and View Sts, inbound to the City and Quarry Hill .10 - No. 18 at Eaglehawk terminus with the Mechanics Institute in the background. .11 - No. 3 in bound, Ironbark area. .12 - No. 3 at Long Gully Loop .13 - No. 3 outbound to Eaglehawk. .14 - No. 18 at Eaglehawk with German circus banner on tram .15 - No. 18 on the Eaglehawk line at Jobs Gully Loop .16 - No. 24 outbound to Eaglehawk at Taylor St .17 - No. 18 inbound to the City and Quarry Hill crossing the railway bridge from Eaglehawk. .18 - No. 3 at Manchester Loop .19 - No. 18 at Eaglehawk terminus .20 - No. 18 at Eaglehawk with German circus banner on tram .21 - bogie tram at Long Gully Loop. .22 - No. 24 outbound to Eaglehawk at Taylor Sttrams, tramways, bendigo, eaglehawk, long gully, jobs gully, manchester loop, tram 24, tram 18, tram 3 -
 Ballarat Tramway Museum
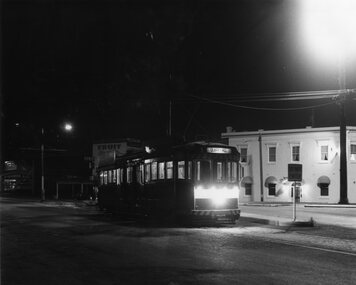
Photograph - Black & White Photograph/s, Chris Wurr, Jan. 1971
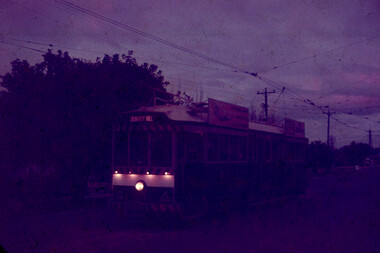
Black and White Photograph of Bendigo No. 2 at the Eagle Hawk terminus, Jan. 1971, night photograph. Tram has the destination of Quarry Hill. In the background is the Foodland Store, a Milk bar. The tram has arrived at the terminus, the trolley pole has been turned, but the headlights and dash canopy lights have yet to be turned. Tram has the destination of Quarry Hill. Photo Chris Wurr, early 1970's. "Photo by Chris Wurr" stamped on the rear. In top left hand corner, in ink "71)" and "Bendigo (SEC) Tramways / 1.1971 / Eaglehawk Terminus"trams, tramways, bendigo, eaglehawk, night photo, tram 2 -
 Ballarat Tramway Museum
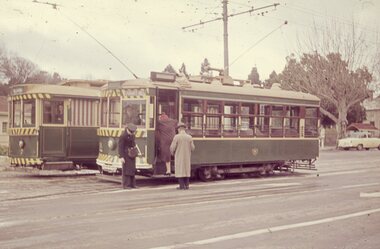
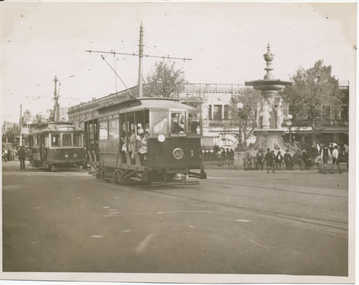
Photograph - Black & White Photograph/s, Wal Jack, Easter Saturday 1941
Black and White print contained within the Wal Jack Bendigo and Geelong Album, see Reg Item 5003 for more details. Photograph of ESCo tram No. 1 (carrying a white disc) and No. 2 at Charing Cross, Easter Saturday 1941. No. 1 is on the "wrong line", about to run through the cross over in front of the tram. No. 2 has the destination of Quarry Hill. i1 - scan of print in the album i2 - rear of image i3 - scan of negative at 3200dpi added 6/6/2020. On rear in ink "T196, Bendigo Tramways, No. 1 Original Class, No. 2 - ex MMTB A class, Charing Cross, Easter Saturday 1941. Wal Jack Photo.trams, tramways, bendigo, esco, secv, charing cross, tram 1, tram 2