Showing 270 items
matching hill street bridge
-
 Ballarat Tramway Museum
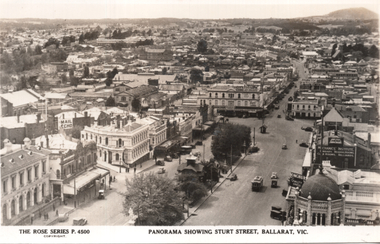
Postcard, Rose Stereograph Co, "Panorama showing Sturt Street, Ballarat Vic.", 1940s
The photo is a Panorama showing Sturt Street, taken from the Town Hall, looking north east with Mount Warrenheip and Black Hill in the view. Shows the buildings east of Lydiard St, including Bridge St, Camp St and part of Victoria St. One tram is westbound, about to cross Lydiard St. Rose Series P4500. Has signs for the "Mail Echo", Plume petrol, ANA, the Mechanics Institute, and Longhurs Bread. On the rear Wal Jack has written extensive notes for Ken Magor noting the streets in the view and the Ballarat East loco depot and Goods shed. Wal has dated the photo 1940 to 1944, though the trams do not have white bumper bars that featured from 1941 to 1945.Yields information about Ballarat during the 1940sPostcard black and white, divided back, with a handwritten note on rear.See image 2 for details of the handwritten note by Wal Jack on the rear. tramways, trams, bridge st, sturt st, ballarat east, rose postcards -
 Ballarat Tramway Museum
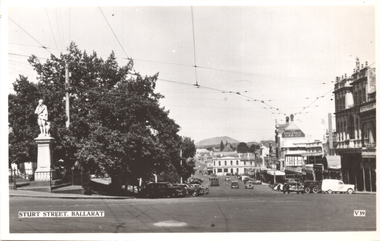
Postcard, Valentine & Sons Publishing Co, "Sturt Street, Ballarat", c1950
The photo shows the view of the south side of Sturt Street from Lydiad St, looking east. The Robbie Burns statue is on the left of the card, along with the Mechanics Institute, The Ballarat Gas Co, Buckshead Hotel. There is one tram parked in the parking loop. On the rear, Wal Jack in a note to Ken Magor has written: "4 wheeler (No. 30 or 33?) in parking loop. Lower Sturt St from Lydiard St, looking east showing narrow Bridge St and Victoria St hill. Mt Warrenheip 4 miles away." Has a sketch of the tram tracks as well. C1950Yields information about Ballarat during the late 1940s or early 1950s.Postcard black and white, undivided back, with a handwritten note on rear. Card No. V39.See image 2 for details of the handwritten note by Wal Jack on the rear. tramways, trams, sturt st, valentine -
 Ballarat Tramway Museum
Slide - 35mm slide/s - set of 20, Noel Simons, 21/05/1971 12:00:00 AM
Set of 20 transparencies taken on 21/5/1971 on Kodak mounts. 1197.1 - Bendigo No. 5 en route to Eaglehawk at Creeth St Long Gully. Tram has a SEC roof ad and Cinzano roof ad. 1197.2 - No 5 approaching Needle Loop between Long Gully and California Gully. On left hand side is the City of Bendigo sign, indicating city boundary. 1197.3 - As for 1197.2 but actually entering loop. Photo taken after tram has passed photographer. 1197.4 - No. 26 bound for Eaglehawk descending the railway bridge near Eaglehawk, at Jobs Gully. 1197.5 - as for 1197.4, but after crossing bridge, now ascending a hill. Photo taken after tram has passed photographer. 1197.6 - No. 26 climbing High St. hill Eaglehawk, nearing end of Double track, bound for Quarry Hill. Shows centre of the road poles. 1197.7 - As for 1197.6, with tram entering single track section. Photo taken after tram has passed photographer. Has a BP service station in the background. 1197.8 - No. 26 (bound for Quarry Hill) crossing No. 17 (Eaglehawk) at Job's Gully Loop. 1197.9 - No. 17 climbing railway bridge at Job's Gully, en route to Eaglehawk. Photo taken after tram has passed photographer. 1197.10 - No.26 bound for Quarry Hill, leaving Long Gully Loop? Has the Creeth St. church in l197.l in the far background. Photo taken after tram has passed photographer. 1197.11 - Tramway Point work at the northern end of Long Gully Loop. 1197.12 - No. 17 en route for Quarry Hill turning into View St. from Bamard St. Tram has SEC roof ads "Everything fine in my all electric Kitchen' and 'Electric Cooking is Matchless'. 1197.13 - as for 1197.12, but tram has turned into View St and about to enter the double line track. Photo taken after tram has passed photographer. 1197.14 - No. 21 enters Nolan St after turning from MacRae St. en route to Bendigo. Note sign on its own post noting tram turns "Beware Tram Turns" and stop sign on adjacent pole "Trams stop on Request". No. 21 has two SEC roof ads. 1197.15 - No. 21 in Nolan St. after turning from Bridge St. (White Hills Road). Note signal light for Bridge St. loop on pole corner of street. Photo taken after tram has passed photographer. 1197.16 - No. 2 bound for Eaglehawk at unknown location. 1197.17 - Tram stop sign on a pole "CARS STOP BY REQUEST" 1197.18 - No. 5 in Carpenter St.? en route to Quarry Hill. 1197.19 - No. 28 has just arrive at Golden Square terminus, passengers are disembarking and the trolley pole is being turned. Golden Square Hotel in the background. 1197.20 - No. 28 at Golden Square terminus. Has a "Nothing beats Briquettes for hear roof ad. Information written on in black ink and date stamped on purple ink. 1197.1 - "No. 5 at Creeth St. Long Gully" 1197.2 - "No. 5 approaching Needle Loop between Long Gully and California Gully" 1197.3 - "No. 5 at Needle Loop between Long Gully and California Gully" 1197.4 - "No. 26 crossing railway bridge at Job's Gully near Eaglehawk" 1197.5 - "No. 26 just after crossing railway bridge at Job's Gully near Eaglehawk/ 1197.6 - "No. 26 in High St. Eaglehawk" 1197.7 - "No. 26 at end of double track in High St. Eaglehawk" 1197.8 - "Nos. 26 and 17 crossing at Job's Gully Loop" 1197.9 - "No. 17 crossing railway bridge at Job's Gully near Eaglehawk". 1197.10 - "No. 26 at Long Gully" 1197.11 - 'Northern end of points at Long Gully Loop". 1197.12 - "No. 17 turning into View St. from Bamard St. Bendigo". 1197.13 -'No. 17 at beginning of double track in View St. after leaving Bamard St. Bendigo. 1197.14 - "No. 21 enters Nolan St. from MacRae St. Bendigo." 1197.15 - "No. 21 in Nolan St. Bendigo just after leaving White Hills Road." 1197.16 - "No. 2" 1197.18 - "No. 5" 1197.19 - "Birney car No. 28 at Golden Square Terminus" 1197.20 "Birney car No. 28 at Golden Square Terminus" tramways, trams, bendigo, long gully, railway bridge, jobs gully, trackwork, nolan st, quarry hill, tram stops, golden square, tram 2, tram 5, tram 17, tram 21, tram 26, tram 28 -
 Ballarat Tramway Museum
Photograph - Black & White Photograph/s, Peter Bruce, c1970
Black and white photograph of Barkly St. Mt Pleasant taken with a long telephoto lens. Single truck Tram on the top of a hill at terminus, with the photographer on or near the top of the`next hill in centre of track. Four cars travelling towards photographer. Sign of Caltex Service station on right side of photograph. with trees on left. Shows nature of street construction - deep gutters with "bridge" crossings. See also item No. 559, possibly tram No. 31. Would appear to be taken at about the same time, not parked Holden station wagon on left hand side of photo.trams, tramways, ballarat, barkly st, mt pleasant -
 Ballarat Tramway Museum
Film - Movie Film & Box, Kodak, 1960
Yields information in movie film format of Ballarat trams in 1960, how the system operated and was used by people., Yields information in movie film format of Ballarat trams in 1960, how the system operated and was used by people.Movie film - 8mm, approx. 30mins, with leader strip on a plastic reel, within a black and white plastic box, titled "Ballarat No. 1. 1960". Has been transferred to DVD - see Reg item 4100 as Segment No. 2. Made by Ben Parle. Also transferred to DVD by Rod Cook Oct. 2015, via Roger Greenwood for use in his DVD, "The City of Ballarat Trams, Gardens & Gold" of 2016. See Reg Item 6883. Synopsis: based on time. 0:00 View of typed introduction, noting that this is a pictorial record of Ballarat. 0:10 Title “The Tramways of Ballarat 1960, Part 1” 0:16 13, showing “View Point” at Stones Corner, Bridge St, east end, with trolley pole being turned, while another single trucker heads out towards Mt Pleasant. 0:25 13 leaving Stones Corner, short approach and then longer trailing shot of the tram going towards the City in Bridge St. 0:44 View out of front of tram in Bridge St heading towards the City, with cars in the photo, then passing through city Loop, no trams in the loop and running up to Lydiard St Nth and crossing the road. 1:22 Running up Sturt St from Armstrong St, passes over Dawson St X-over and up to the next intersection, Lyons St. 1:54 Title “The View Point Line” 1:59 19 inbound, in Ripon St, from crossing Mair St, towards camera and then passing away and turning into Sturt St. 2:49 View of a “Warning Oncoming Trams” sign 2:52 19 in Ripon St, going to View Point, crossing Webster St towards camera, then going away through the disconnected Victoria Ave loop, pass the “Warning Oncoming Trams” sign. Note very windy scene with people running across roads. 3:17 19 in Wendouree Parade, in bound, though showing destination View Point, going away from the camera, past the View Point Hotel. 3:39 19 coming towards camera near Excerpt or Devon St and then going away towards the terminus. 4:04 19 at the terminus, stationary, with a single trucker 3?, passing from Macarthur St into Wendouree Parade, behind 19. 4:20 33 coming towards camera in Wendouree Parade from St Aidans Drive, stopping to pick up passenger at Forest St and then going away towards the City, photographed from near the depot, on a wet and windy day. 4:54 35 in Wendouree Parade, coming towards the Camera from St Aidans Drive and then going away with the Gardens Loop area in the background. Tram stops at stop to let a passenger off. 5:28 21 leaving Gardens Loop for the City via the Depot, green light in signal can be seen. 5:43 28?, closely followed by 26 turn from Drummond St South into Sturt St. 6:18 Scene opens with shot of “Sebastopol” destination on a bogie tram. 6:21 Title “The Sebastopol Line” 6:24 21 turning from Sturt St into Drummond St Sth with destination of Bell St and then going away from the camera. 6:55 38 in Drummond St Sth, coming towards the camera and then passing the camera with Sturt St just in the view. 7:10 21, showing Gregory St, in Drummond St Sth, approaching and then going away, entering the Urquhart St Loop, 7:39 34 in Drummond St Sth (location check required (Latrobe?)), approaches camera, picks up passengers and the goes away. 8:09 39 at ? Street, turns from Drummond St Sth into Skipton St, after picking up and setting down passengers, bound for Sebastopol 8:55 35 inbound in Skipton St passes through the Bell Street Loop, and then goes away from the camera. 9:33 42 outbound in Skipton St, approaches the camera, passes and then crosses over the half the road into Albert St. 10:00 39 inbound in Albert St – location? 10:31 34 outbound for Sebastopol, approaches camera and just starts to pass by. 10:36 34 in Grey St crossing loop, crosses 42 inbound. 10:59 39 outbound in Albert St, with shopping centre in bound, approaches camera, passes and then crosses over Albert St. Mid morning scene. 11:39 39 inbound, Albert St south, approaches camera and then passes and the crosses over Albert St. 12:16 41 outbound in Albert St passes the camera, and pulls into the terminus with the conductor getting out on the back bumper to pull the pole down as the tram stops and a passenger walks into the Royal Hotel. 12:39 Title “The Lydiard Street North Line” 12:44 Filmed from the Hotel balcony, 21 inbound in Lydiard St Nth passes over Mair St, stops while 33 passes in the other direction. 13:18 With the red light showing on the Seymour St loop signal, 33 inbound for Sebastopol stops and picks up many passengers, passes the camera and runs past the VRI building in the background and through the loop. Possibly filmed on a Sunday given the ladies dresses and quieter streets. 14:01 30 outbound, passes the camera and stops at Macarthur St. Filmed alongside the brick wall of the cutting. 14:28 30 inbound arrives, passes through the Gregory St loop and then proceeds past the camera, making a stop to pick up passengers. 15:14 28 in Lydiard St Nth – location?, approaches and goes away from the camera, north of Gregory St. 15:34 28 ditto location? 15:53 21 arrives at the terminus with passengers getting on and off. 16:11 View of the a vertical positioned “End of Section” sign on a pole at the terminus and then lifting the camera to see the timetable board and the stop sign. 16:33 31 in Bridge St passing Morseheads and then turning into Sturt St, stops at the Grenville St stop, while another single trucker comes down to the stop from the City. 16:58 31 outbound in Bridge St, with destination of Victoria St. 17:14 Title “The Victoria Street Line” 17:18 31 outbound to Victoria St from Stones Corner. Starts with an overhead shot, shows clock at the Caltex service station,. 17:37 31 inbound approaching Bakery Hill and then descending to the junction after it passes camera. 18:09 25 climbing outbound in Victoria St, passing the camera, to then pass through the King St loop. 18:47 25 inbound in Victoria St, passing the camera, then pass through the King St loop, with St Alypius Church in the background. 19:36 14 approaching the rail bridge in Victoria St and stopping at the 2nd last stop to left of passengers. 20:01 14 leaving the terminus and approaching the camera and the a short sequence going away, to the next stop to pick up quite a few passengers. 20:14 “Trams Stop Here” sign, metal wrap around on a steel pole. 20:16 Title “The Mount Pleasant Line” 20:21 11 inbound in Main St, with a passenger leaping off the tramcar and another getting off just before the junction. 20:45 11 passes the junction and then proceeds away from the camera in Bridge St. 21:04 30 outbound in Main St, then turns into Barkly St, a bus (Eclipse Motors) passes in Main St just before the sequence ends. 21:31 30 inbound near Steinfield St. (exact location?) 21:49 25 approaches the camera, then proceeds away and passes through the Grant St. loop. 22:29 25 inbound, windy day, between Grant and Cobden, (exact location?), with a horse drawn bread van in the view and the breadman walking behind the tram as it passes. 23:02 11 outbound in Barkly St, (exact location?) 23:37 11 inbound in Barkly St (exact location?) 23:44 Mt Pleasant terminus signage 23:50 30 approaches the terminus and then stops with the conductor alighting turning the pole, passengers getting on and off and the driver appearing at the other end. 24:32 Title “The Gardens Via Sturt St. West Line” 24:35 21 outbound in Sturt St near Raglan St, approaches and passes the Camera. 25:09 12, showing City Oval, approaches and passes the camera, outbound near Windermere St. 25:33 13 showing View Point, goes away from the camera – location? 25:44 12 comes from St. West, inbound passes the camera and then stop as the next stop next Talbot St? 26:21 Short sequence of a “Warning Oncoming Trams” sign 26:28 42 inbound in Sturt St West, just before Ripon St, view coming towards camera and then going away to cross Ripon St. 27:10 34 passes through the Parker St loop 27:25 35 or 39 inbound past the college in Sturt St West 28:04 41 outbound at the Russell St curve, passes away from the camera. 28:11 35? inbound passes away from the camera through the Victoria Park or Morrison St loop, swinging out into the roadway. 28:29 View of timetable sign at Hamilton Ave. 28:37 35 turning from Sturt St West into Hamilton Ave, can see the conductor changing over the barrier rails. 29:11 42 inbound, crosses another bogie tram (35?) at Carlton St loop then passes the camera and goes past the Olympic rings monument. 29:42 12 approaches the Carlton St gates. 30:07 12 outbound, crosses a bogie tram in the loop with both trams then leaving the loop. 30:20 Title “End of Part One” Written labels giving title information on outside of box.trams, tramways, ballarat, sebastopol, lydiard st north, victoria st, mt pleasant, sturt st west -
 Ballarat Tramway Museum
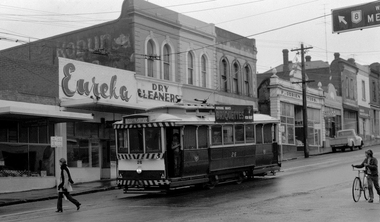
Photograph - Digital image, 1970s
Yields information about the Bakery St Hill on the Victoria St route.Digital image, black and white, of No. 26 at Stones Corner, junction of Bridge, Victoria and Main St, Bakery Hill. No the young girl in slacks walking in front of the tram, the boy wheeling the bike down the street and the young boy standing in the front door of the tram. In the background is Eureka Dry Cleaners, an old Robur tea ad on a building, F. O'Brien Motors. The tram has the destination of Gardens via Sturt St West and a SEC Briquettes Roof advert. Photo taken by Peter Bruce 1970's and 1971, prior to the closure of the Ballarat tramway system. Peter's Title of image: "No. 26 Victoria and Bridge"trams, tramways, stones corner, bakery hill, victoria st, bridge st, tram 26 -
 Bendigo Historical Society Inc.
Newspaper - PETER ELLIS COLLECTION: NEWSPAPER ARTICLE, 22nd May, 2015
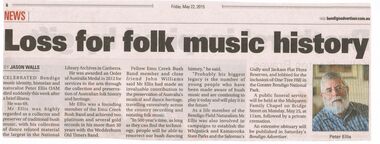
Newspaper article from the Bendigo Advertiser stuck on A4 printer paper. Article is dated Friday, May 22, 2015. Article is accompanied by a picture of Peter Ellis and is captioned as such. Article is written by Jason Walls and is titled Loss for folk music history. Article reads: Celebrated Bendigo Music identity, historian and naturalist Peter Ellis OAM died suddenly this week after a brief illness. He was 69. Mr Ellis was highly regarded as a collector and preserver of traditional bush music, with his collection of dance related material the largest in the National Library Archives in Canberra. He was award an Order of Australia Medal in 2012 for services to the arts through the collection and preservation of Australian folk history and heritage. Mr Ellis was a founding member of the Emu Creek Bush Band and achieved two platinum and several gold records in his more than 30 years with the Wedderburn Old Timers Band. Fellow Emu Creek Bush Band member and close friend John Williams said Mr Ellis had made an invaluable contribution to the preservation of Australia's musical and dance heritage, travelling extensively across the country recording and notating folk music. 'In 500 year's time, as long as they can find the technology, people will be able to resurrect our bush dancing history,' he said. 'Probably his biggest legacy is the number of young people who have been made aware of bush music and are continuing to play it today and will play it in the future.' As a life member of the Bendigo Field Naturalists Mr Ellis was also involved in campaigns to establish the Whipstick and Kamarooka State Parks and the Saloman's Gully and Jackass Flat Flora Reserves, and lobbied for the inclusion of One Tree Hill in the Greater Bendigo National Park. A public funeral service will beheld at the Mulqueen Family Chapel on Bridge Street on Monday, May 25, at 11am, followed by a private cremation. An extensive obituary will be published in Saturday's Bendigo Advertiser.person, individual, peter ellis oam -
 Bendigo Historical Society Inc.
Document - PETER ELLIS COLLECTION: PETER ELLIS FUNERAL PROGRAM, 27th March, 1946
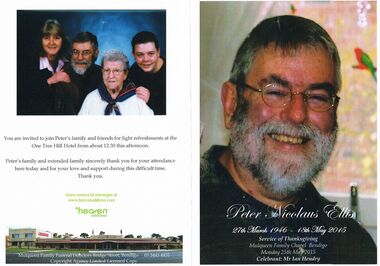
Peter Ellis funeral program. Peter Nicolaus Ellis. 27th March 1946 - 18th May 2015. Service for thanksgiving. Mulqueen Family Chapel Bendigo. Monday 25th May 2015. Celebrant: Mr Ian Hendry. Coffin Bearers Brian Edelbohle, John Cockfield, Doug Colt, Rick Bambridge, Ryan Hearps, Garry Lovejoy. Entrance Music: Live from The Emu Creek Bush Band. Welcome. Condolences. Celebrant's comments. Tributes: Brian Edelbohle, John Williams, Rob Willis, Rob Moors, Ryan Hearps. A time of reflection. Announcements. Celebrant's comments. Committal. Recessional Music: Live from The Emu Creek Band. You are invited to join Peter's family and friends for light refreshments at the One Tree Hill Hotel from about 12.30 this afternoon. Peter's family and extended family sincerely thank you for your attendance here today and for your love and support during this difficult time. Thank you. Leave memorial messages at www.heavenaddress.com @heaven address. Mulqueen family funeral directors Bridge street, Bendigo 03 5443 4455. Copyright Agency Limited Licensed Copy. Photo of Peter Ellis on front. Boy with dog fishing inside left. Photo of Peter Family and another of Mulqueen Funeral Home.person, individual, peter ellis oam -
 Bendigo Historical Society Inc.
Book - MERLE HALL COLLECTION: ROSALIND PARK CREATIVE VILLAGE BENDIGO PROJECT BOOK, 1995
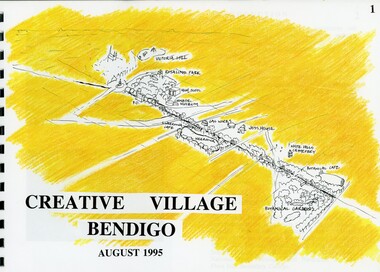
Merle Hall Collection: Rosalind Park Creative Village Bendigo Project Book. August 1995 Book contains a description, aims of the programme and a linking plan. 35 Pages: Cover Intoduction, The Design Team, Acknowledgement Project Brief Map of Linked Park The Linking Plan described Linking plan graphic Golden Beacon Design Concept Bridge Beacon Entrance to Linear Park Gasworks Café Pavillion Gasworks layout plan Golden Beacons Concept Botanical Gardens Café Botanical Gardens layout plan Victoria Hill Interpretation Centre Victoria Hill layout Victoria Hill plan Victoria Hill continued Victoria Hill continued Rosalind Park Lookout Method 3D Road Map 3D Road Map Continued Implementation Community Participation Oppurtunities, Mosaic Works Appropriate sites Appropriate sites continued Consultaion Summary and Issues Ideas Areas for further consideration Graphic The Design Team - Grant Fink, Jane Marriott, Laszo Biro, James Brearley Graphic Layoutbook -
 Bendigo Historical Society Inc.
Document - LYDIA CHANCELLOR COLLECTION: BENDIGO METHODIST CHURCHES PLAN 1905 AND CHURCH OFFICIALS, 1905
LYDIA CHANCELLOR COLLECTION: Bendigo Methodist Churches Plan 1905 and church officials Quarterly Pastoral Visitation of Classes Circuit plan for Forest St, Golden square, Eaglehawk West, Eaglehawk East, California Hill, California Gully, Long Gully, McKenzie St, Galvin St, Rowan St, Arnold St, Iron Bark, Buckly St, Specimen Hill, Quarry Hill, Bridge St, Retreat Road, Kangaroo Flat, Lockwood, East Shelbourne, White Hills, Epsom, Huntly, Bagshot, fosterville, Strathfieldsaye, Axe Creek, sheepwash, Nerring, Leichardt, Leichardt East, Marong, Golden Fleece, Golden Gully, Dowling St Mission, Benevolent Asylum, Hospital Income and Expenditure List of stewards Notices Pastorates Evangelistic Bandsbendigo, history, schooling -
 Buninyong & District Historical Society
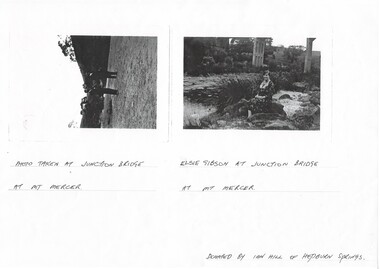
Photograph - Photocopy of two original B/W photographs, Mt Mercer Junction Bridge, photocopy made in 1995
Photos taken of the Junction Bridge at Mt Mercer, documenting the location, date unknown.The photos document the physical status of the location of the Junction Bridge at Mt Mercer at the time of photography, date unknown.Mt Mercer Junction Bridge. Photo 1 shows two men on the river bed probably looking at the bridge. Photo 2 shows Elsie Gibson sitting on the river bank with the bridge in the background.Photo 1. Photo taken at Junction Bridge at Mt Mercer. Photo 2. Elsie Gibson at Junction Bridge at Mt Mercer. Donated by Ian Hill of Hepburn Springsjunction bridge, mt mercer, bridge, elsie gibson, gibson, landscape -
 Kew Historical Society Inc
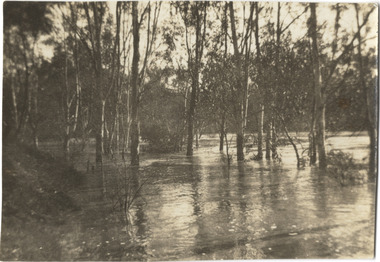
Photograph, Marnie McLeod, Floods of the River Yarra at Kew, 1916
The donation was accompanied by the following letter from the donor: "Hi. I found these in with family photos. Taken by family as Mamie McLeod was living in Fellows Street, Kew, so would be near there. Retain (or discard) as you see fit." [Donor's name and address withheld from public view]. To gain an insight into the flood levels at Kew, it is worth reading newspaper accounts of the event. The Age published an article - Valuable Gardens Destroyed at Kew - on 25 September 1916: "VALUABLE GARDENS DESTROYED AT KEW. From the heights of Studley Park, Kew, a splendid view of the flood waters can be obtained, and yesterday afternoon, despite continuous rain, crowds of citizens assembled there to witness the spectacle. There is a vast stretch of water some 300 or 400 yards broad, above the foot bridge connecting Gipps-street, Collingwood, and Studley Park. The river is only about 3 feet from the top of the embankment connecting with the ramp of the bridge on the Studiey Park side. When the upper llood waters come down it is almost a certainty that tne embankment will be submerged and the bridge rendered impassible. Below the bridge the waters again stretch out, and have submerged all the low-lying land on the Collingwood side and invaded the back premises ot the Kodak Co., Phoenix Biscuit Factory, a tannery adjoining thereto, the Shamrock Brewery, and Chinese gardens in the vicinity. At Walmer-street-bridge, at the end of Studley Park, the low-lying land on the Kew side is covered with water to the depth of many feet. Tlie land in question is owned in a great part by Mr Frank Lavers who haa gone in for intense culture on a pretty liberal scale on both the slopes of the hill and on the river flat. On the latter he is cultivating many acres of asparagus, and has at a considerable cost spent three years in preparing the ground and installing an irrigation system, reticulated from the Yan Yean water supply. This year the asparagus was put down, and the plants were in a promising condition. Tlie flood waters are now flowing fast over the land. The crop is ruined, and three years' work and expenditure destroyed. Mr. Laver's private residence fortunately is high above flood level, but two houses he owns off Young-street have been flooded out. Having been warned in time, the tenants removed their furniture hefore the water came down to Mr. Laver's residence, where they themselves have been given accommodation in the meantime. All the river flats in East Kew are under water. One or two low-lying houses have been flooded. Chipperfield's boat shed at Willsmere is nearly covered, and some Chinese gardens in the vicinity are several feet under water."This, and the other three photographs donated of floods in Kew are believed to be the earliest in the collection. Together with our original MMBW River Yarra map showing flood levels, these items, when compared allow researchers to gain a visual perspective of the extent of the flood in 1916. Black and white photograph of flooded trees in Kew with rising dry ground in distance.Inscription on reverse in pencil: "Flood River Yarra Kew Vic"river yarra, kew, floods 1916 -
 Kew Historical Society Inc
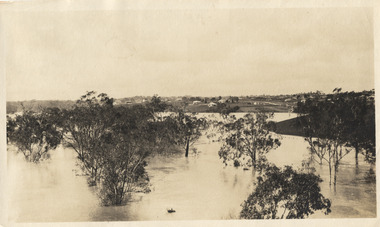
Photograph, Marnie McLeod, Floods on the River Yarra at Kew, 1916
The donation was accompanied by the following letter from the donor: "Hi. I found these in with family photos. Taken by family as Mamie McLeod was living in Fellows Street, Kew, so would be near there. Retain (or discard) as you see fit." [Donor's name and address withheld from public view]. To gain an insight into the flood levels at Kew, it is worth reading newspaper accounts of the event. The Age published an article - Valuable Gardens Destroyed at Kew - on 25 September 1916: "VALUABLE GARDENS DESTROYED AT KEW. From the heights of Studley Park, Kew, a splendid view of the flood waters can be obtained, and yesterday afternoon, despite continuous rain, crowds of citizens assembled there to witness the spectacle. There is a vast stretch of water some 300 or 400 yards broad, above the foot bridge connecting Gipps-street, Collingwood, and Studley Park. The river is only about 3 feet from the top of the embankment connecting with the ramp of the bridge on the Studiey Park side. When the upper llood waters come down it is almost a certainty that tne embankment will be submerged and the bridge rendered impassible. Below the bridge the waters again stretch out, and have submerged all the low-lying land on the Collingwood side and invaded the back premises ot the Kodak Co., Phoenix Biscuit Factory, a tannery adjoining thereto, the Shamrock Brewery, and Chinese gardens in the vicinity. At Walmer-street-bridge, at the end of Studley Park, the low-lying land on the Kew side is covered with water to the depth of many feet. Tlie land in question is owned in a great part by Mr Frank Lavers who haa gone in for intense culture on a pretty liberal scale on both the slopes of the hill and on the river flat. On the latter he is cultivating many acres of asparagus, and has at a considerable cost spent three years in preparing the ground and installing an irrigation system, reticulated from the Yan Yean water supply. This year the asparagus was put down, and the plants were in a promising condition. Tlie flood waters are now flowing fast over the land. The crop is ruined, and three years' work and expenditure destroyed. Mr. Laver's private residence fortunately is high above flood level, but two houses he owns off Young-street have been flooded out. Having been warned in time, the tenants removed their furniture hefore the water came down to Mr. Laver's residence, where they themselves have been given accommodation in the meantime. All the river flats in East Kew are under water. One or two low-lying houses have been flooded. Chipperfield's boat shed at Willsmere is nearly covered, and some Chinese gardens in the vicinity are several feet under water."This, and the other three photographs donated of floods in Kew are believed to be the earliest in the collection. Together with our original MMBW River Yarra map showing flood levels, these items, when compared allow researchers to gain a visual perspective of the extent of the flood in 1916. Panoramic view, believed to be looking north towards Fairfield from the Zig-Zag Bridge on the River Yarra. The inscription on the reverese identifies it as taken before 1920.Inscription on reverse in ink "(pre 1920) Flood from Zig-zag bridge Yarra River, Kew Vic."river yarra, kew, floods 1916, zig-zag bridge -
 Kew Historical Society Inc
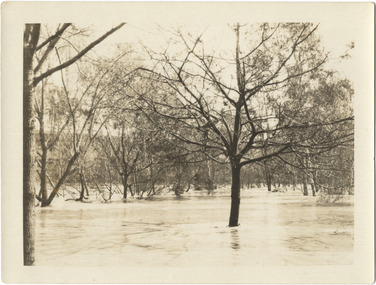
Photograph, Marnie McLeod, Flood, River Yarra, Kew, 1916
The donation was accompanied by the following letter from the donor: "Hi. I found these in with family photos. Taken by family as Mamie McLeod was living in Fellows Street, Kew, so would be near there. Retain (or discard) as you see fit." [Donor's name and address withheld from public view]. To gain an insight into the flood levels at Kew, it is worth reading newspaper accounts of the event. The Age published an article - Valuable Gardens Destroyed at Kew - on 25 September 1916: "VALUABLE GARDENS DESTROYED AT KEW. From the heights of Studley Park, Kew, a splendid view of the flood waters can be obtained, and yesterday afternoon, despite continuous rain, crowds of citizens assembled there to witness the spectacle. There is a vast stretch of water some 300 or 400 yards broad, above the foot bridge connecting Gipps-street, Collingwood, and Studley Park. The river is only about 3 feet from the top of the embankment connecting with the ramp of the bridge on the Studiey Park side. When the upper llood waters come down it is almost a certainty that tne embankment will be submerged and the bridge rendered impassible. Below the bridge the waters again stretch out, and have submerged all the low-lying land on the Collingwood side and invaded the back premises ot the Kodak Co., Phoenix Biscuit Factory, a tannery adjoining thereto, the Shamrock Brewery, and Chinese gardens in the vicinity. At Walmer-street-bridge, at the end of Studley Park, the low-lying land on the Kew side is covered with water to the depth of many feet. Tlie land in question is owned in a great part by Mr Frank Lavers who haa gone in for intense culture on a pretty liberal scale on both the slopes of the hill and on the river flat. On the latter he is cultivating many acres of asparagus, and has at a considerable cost spent three years in preparing the ground and installing an irrigation system, reticulated from the Yan Yean water supply. This year the asparagus was put down, and the plants were in a promising condition. Tlie flood waters are now flowing fast over the land. The crop is ruined, and three years' work and expenditure destroyed. Mr. Laver's private residence fortunately is high above flood level, but two houses he owns off Young-street have been flooded out. Having been warned in time, the tenants removed their furniture hefore the water came down to Mr. Laver's residence, where they themselves have been given accommodation in the meantime. All the river flats in East Kew are under water. One or two low-lying houses have been flooded. Chipperfield's boat shed at Willsmere is nearly covered, and some Chinese gardens in the vicinity are several feet under water."This, and the other three photographs donated of floods in Kew are believed to be the earliest in the collection. Together with our original MMBW River Yarra map showing flood levels, these items, when compared allow researchers to gain a visual perspective of the extent of the flood in 1916. Small black and white photograph of flooded trees in Kew.Inscription on reverse in ink "Flood R. Yarra Kew Vicriver yarra, kew, floods 1916 -
Kew Historical Society Inc
Archive (Sub-series) - Subject File, Kew Historical Society, Houses [Kew], 1980
Various partiesReference, Research, InformationSecondary Values (KHS Imposed Order)Assorted printed materials, some published, such as: ‘What House is That? A guide to Victorian housing’ (Heritage Victoria, 2004), and guidelines for researching the history of a house (Fact Sheet, City of Boroondara). There is an article from the Progress Press about the demolition of Ellesmore, 80 Princess Street in 1977 (the article includes photographs of the demolition), Elizabeth Mackie’s notes on Myrtle Hill, and an article on the restoration of Mynda, Molesworth Street that was published in the Trust News (1987). Mrs Sewell of Stawell Street wrote handwritten notes/recollections about Cradley in Studley Park Road in 1981. In the photocopy about Ellesmore, there is also a separate article on the proposed replacement of the Walmer Street Bridge. There is also correspondence and an article on Stanhope on the corner of Burke and Cotham Roads. The file includes general real estate information and data.kew historical society - archives, kew - history, myrtle hill (kew), ellesmore - 80 princess street - kew (vic), mynda - molesworth street - kew (vic), stanhope - burke road - cotham road - kew (vic), cradley - studley park road - kew (vic), 17 queen street - kew (vic.)kew historical society - archives, kew - history, myrtle hill (kew), ellesmore - 80 princess street - kew (vic), mynda - molesworth street - kew (vic), stanhope - burke road - cotham road - kew (vic), cradley - studley park road - kew (vic), 17 queen street - kew (vic.) -
 Kew Historical Society Inc
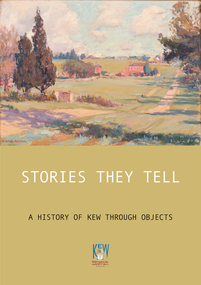
Book, Stories They Tell : A history of Kew through objects, 2022
'Stories They Tell : A history of Kew through objects' explores diverse narratives from European settlement to the first decades of the twenty-first century. These stories use as their starting point artworks, texts and artefacts from the nationally significant collection of the Kew Historical Society. Limited to 100 copies.117 pp : illustrated : Appendices Chapters: Preface / Robert Baker p4. The collection / Robert Baker p5. Cartwheel penny / Robert Baker p6. Creek and old watering stage / David White p10. John Carson: Mayor 1863–4 1 / Julie King p4. Wedding dress / Suzanne McWha p18. Back to Kew 1875 / Judith Scurfield p22. Barnard’s clock / Margaret Robinson p26. Denbigh quilt / Suzanne McWha p28. Fragments of art decoration / Robert Baker p32. Mr Richardson’s sock / Felicity Renowden p36. Kew Volunteer Fire Brigade / David White p38. Kew Where We Live / Judith Scurfield p42. [MMBW} Detail Plan No. 1580 / Judith Scurfield p46. Adeney Avenue / Suzanne McWha p50. Young Workers’ Patriotic Guild / Margaret Robinson p54. Roll of Honor [Thomas Rand] / Robert Baker p56. Alice Anderson in her tourer / Felicity Renowden p60. Kew War Memorial / David White p62. Beaded dance dress / Suzanne McWha p 66. The great flood of 1934 / Desley Reid p68. Depression-era toolbox / Robert Baker p72. War Savings Street / Julie King p74. Kew Public L.ibrary / Suzanne McWha p78. Signature supper cloth / Desley Reid p82. View from the garden of Rockingham / Desley Reid p86. Cr Marie Dalley / Felicity Renowden p90. Centenary of Kew / Robert Baker p94. Doris Dickinson’s gown / Julie King p98. [Model Dairy] Milk bottles / Robert Baker p100. Kew Civic Centre / David White p102. Bicentennial tapestries / Margaret Robinson p106. Crest of the City of Kew / Desley Reid p110. Town Crier [outfit] / Desley Reid p112. Acknowledgements p114. List of works p115.non-fiction'Stories They Tell : A history of Kew through objects' explores diverse narratives from European settlement to the first decades of the twenty-first century. These stories use as their starting point artworks, texts and artefacts from the nationally significant collection of the Kew Historical Society. Limited to 100 copies.collection -- kew historical society, museum catalogues, henty family, cartwheel pennies, kew lunatic asylum, patchwork quilts, john carson, george bouchier richardson, gb richardson, coombs family, james dannock, back to kew 1875, francis barnard, denbigh family, cullis hill & co, ordsall, southesk, kew volunteer fire brigade, jfc farquhar, henry kellett, mmbw detail plan 1580, william nicholls anderson, young workers patriotic guild, roll of honor -- town of kew, alice anderson, kew war memorial, flapper dresses, fairfield bridge, chandler highway bridge, warren trestrail, furniture -- 1930s, war savings streets, kew library, children's libraries, voluntary aid detachments - kew (vic.), rockingham, james govett, centenary of kew, mayoresses -- kew (vic.), model dairy -- kew (vic.), doris dickinson, crests -- city of kew (vic.), town criers -- kew (vic.), joy stewart, australian bicentennial -- kew (vic.), kew civic centre, ak lines mcfarlane marshall, adeney avenue -- kew, wwi -
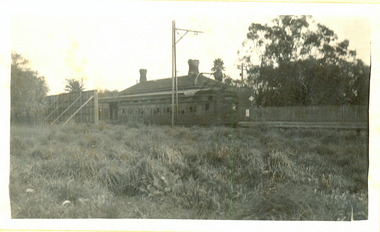
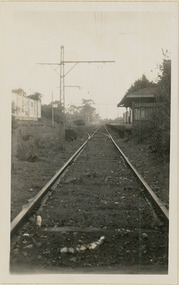
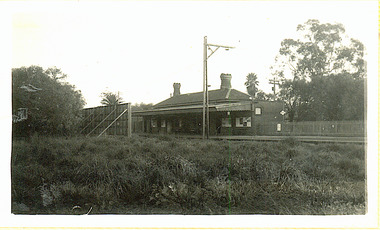 Kew Historical Society Inc
Photograph - The last train at Barker Station, 1952
The Kew railway was opened in 1887, and diverged from the main (Box Hill–Lilydale) line about half-way between Hawthorn and Glenferrie. From the point of divergence the line was slightly less than one mile long, and it had only one intermediate station — Barker. There were four road over-bridges and two level crossings, including one over the busy Barkers Road. The line supported a passenger and goods service, and was electrified in December 1922, at the same time as the main line to Box Hill. There were a number of peak hour services which ran from Flinders Street station (Melbourne) to Kew, but in 1938 all but one of these were diverted to the Ashburton line, where traffic was growing. This had an adverse effect on Kew traffic, as passengers from Kew needed to cross over a footbridge at Hawthorn to change trains, and the main line trains were usually already crowded by the time they reached Hawthorn. At about the same time the off-peak trains were replaced by road buses. In 1952 all passenger trains were withdrawn, but the road bus service continued for many years. Goods trains were finally withdrawn in 1957, and the railway was dismantled in 1958-59. (Source: Frank Stamford, 'The Hawthorn - Kew Railway')Small black and white snapshot of the last passenger train at Barker Railway Station in 1952. The photograph, one of 12, is part of a larger album of newspaper clippings, timetables, tickets and photos relating to the Kew Railway Line, taken and compiled by Lachlan Richardson, while a resident of Kew. The album dates from the 1950s. The album is part of a larger subject file on the Kew Line, compiled over time by members of the Kew Historical Society."Last train at Barker Station / 1 August 1952"kew railway line, transport -- railways -- kew (vic.), barker railway station, kew branch line -
 Kew Historical Society Inc
Photograph - Barker Station, August 1952
The Kew railway was opened in 1887, and diverged from the main (Box Hill–Lilydale) line about half-way between Hawthorn and Glenferrie. From the point of divergence the line was slightly less than one mile long, and it had only one intermediate station — Barker. There were four road over-bridges and two level crossings, including one over the busy Barkers Road. The line supported a passenger and goods service, and was electrified in December 1922, at the same time as the main line to Box Hill. There were a number of peak hour services which ran from Flinders Street station (Melbourne) to Kew, but in 1938 all but one of these were diverted to the Ashburton line, where traffic was growing. This had an adverse effect on Kew traffic, as passengers from Kew needed to cross over a footbridge at Hawthorn to change trains, and the main line trains were usually already crowded by the time they reached Hawthorn. At about the same time the off-peak trains were replaced by road buses. In 1952 all passenger trains were withdrawn, but the road bus service continued for many years. Goods trains were finally withdrawn in 1957, and the railway was dismantled in 1958-59. (Source: Frank Stamford, 'The Hawthorn - Kew Railway')Small black and white snapshot of the last passenger train at Barker Railway Station in 1952. The photograph, one of 12, is part of a larger album of newspaper clippings, timetables, tickets and photos relating to the Kew Railway Line, taken and compiled by Lachlan Richardson, while a resident of Kew. The album dates from the 1950s. The album is part of a larger subject file on the Kew Line, compiled over time by members of the Kew Historical Society."Barker Station / August 1952"kew railway line, transport -- railways -- kew (vic.), barker railway station, kew branch line -
 Kew Historical Society Inc
Photograph - Kew Railway Station: Denmark Street entrance, 1952
The Kew railway was opened in 1887, and diverged from the main (Box Hill–Lilydale) line about half-way between Hawthorn and Glenferrie. From the point of divergence the line was slightly less than one mile long, and it had only one intermediate station — Barker. There were four road over-bridges and two level crossings, including one over the busy Barkers Road. The line supported a passenger and goods service, and was electrified in December 1922, at the same time as the main line to Box Hill. There were a number of peak hour services which ran from Flinders Street station (Melbourne) to Kew, but in 1938 all but one of these were diverted to the Ashburton line, where traffic was growing. This had an adverse effect on Kew traffic, as passengers from Kew needed to cross over a footbridge at Hawthorn to change trains, and the main line trains were usually already crowded by the time they reached Hawthorn. At about the same time the off-peak trains were replaced by road buses. In 1952 all passenger trains were withdrawn, but the road bus service continued for many years. Goods trains were finally withdrawn in 1957, and the railway was dismantled in 1958-59. (Source: Frank Stamford, 'The Hawthorn - Kew Railway')Small black and white snapshot of the entrance to Kew Station from Denmark Street in 1952. The photograph, one of 12, is part of a larger album of newspaper clippings, timetables, tickets and photos relating to the Kew Railway Line, taken and compiled by Lachlan Richardson, while a resident of Kew. The album dates from the 1950s. The album is part of a larger subject file on the Kew Line, compiled over time by members of the Kew Historical Society.kew railway line, transport -- railways -- kew (vic.), kew branch line, kew railway station -
 Kew Historical Society Inc
Photograph - Kew Station 22/4/51, F3
The Kew railway was opened in 1887, and diverged from the main (Box Hill–Lilydale) line about half-way between Hawthorn and Glenferrie. From the point of divergence the line was slightly less than one mile long, and it had only one intermediate station — Barker. There were four road over-bridges and two level crossings, including one over the busy Barkers Road. The line supported a passenger and goods service, and was electrified in December 1922, at the same time as the main line to Box Hill. There were a number of peak hour services which ran from Flinders Street station (Melbourne) to Kew, but in 1938 all but one of these were diverted to the Ashburton line, where traffic was growing. This had an adverse effect on Kew traffic, as passengers from Kew needed to cross over a footbridge at Hawthorn to change trains, and the main line trains were usually already crowded by the time they reached Hawthorn. At about the same time the off-peak trains were replaced by road buses. In 1952 all passenger trains were withdrawn, but the road bus service continued for many years. Goods trains were finally withdrawn in 1957, and the railway was dismantled in 1958-59. (Source: Frank Stamford, 'The Hawthorn - Kew Railway')Small black and white snapshot of Kew Railway Station, looking south to Barker Station. The photograph, one of 12, is part of a larger album of newspaper clippings, timetables, tickets and photos relating to the Kew Railway Line, taken and compiled by Lachlan Richardson, while a resident of Kew. The album dates from the 1950s. The album is part of a larger subject file on the Kew Line, compiled over time by members of the Kew Historical Society.kew railway line, transport -- railways -- kew (vic.), kew branch line, kew railway station -
 Kew Historical Society Inc
Photograph - Kew Branch Line : The Hawthorn Grove crossing, August 1952
The Kew railway was opened in 1887, and diverged from the main (Box Hill–Lilydale) line about half-way between Hawthorn and Glenferrie. From the point of divergence the line was slightly less than one mile long, and it had only one intermediate station — Barker. There were four road over-bridges and two level crossings, including one over the busy Barkers Road. The line supported a passenger and goods service, and was electrified in December 1922, at the same time as the main line to Box Hill. There were a number of peak hour services which ran from Flinders Street station (Melbourne) to Kew, but in 1938 all but one of these were diverted to the Ashburton line, where traffic was growing. This had an adverse effect on Kew traffic, as passengers from Kew needed to cross over a footbridge at Hawthorn to change trains, and the main line trains were usually already crowded by the time they reached Hawthorn. At about the same time the off-peak trains were replaced by road buses. In 1952 all passenger trains were withdrawn, but the road bus service continued for many years. Goods trains were finally withdrawn in 1957, and the railway was dismantled in 1958-59. (Source: Frank Stamford, 'The Hawthorn - Kew Railway')Small black and white snapshot of the Hawthorn Grove crossing, August 1952. The photograph, one of 12, is part of a larger album of newspaper clippings, timetables, tickets and photos relating to the Kew Railway Line, taken and compiled by Lachlan Richardson, while a resident of Kew. The album dates from the 1950s. The album is part of a larger subject file on the Kew Line, compiled over time by members of the Kew Historical Society.kew railway line, transport -- railways -- kew (vic.), kew branch line, hawthorn grove -- hawthorn (vic.), railway crossings -
 Kew Historical Society Inc
Photograph - Seven Carriage Train at Barker Station
The Kew railway was opened in 1887, and diverged from the main (Box Hill–Lilydale) line about half-way between Hawthorn and Glenferrie. From the point of divergence the line was slightly less than one mile long, and it had only one intermediate station — Barker. There were four road over-bridges and two level crossings, including one over the busy Barkers Road. The line supported a passenger and goods service, and was electrified in December 1922, at the same time as the main line to Box Hill. There were a number of peak hour services which ran from Flinders Street station (Melbourne) to Kew, but in 1938 all but one of these were diverted to the Ashburton line, where traffic was growing. This had an adverse effect on Kew traffic, as passengers from Kew needed to cross over a footbridge at Hawthorn to change trains, and the main line trains were usually already crowded by the time they reached Hawthorn. At about the same time the off-peak trains were replaced by road buses. In 1952 all passenger trains were withdrawn, but the road bus service continued for many years. Goods trains were finally withdrawn in 1957, and the railway was dismantled in 1958-59. (Source: Frank Stamford, 'The Hawthorn - Kew Railway')Small black and white snapshot of a seven carriage train approaching Barker Railway Station. The photograph, one of 12, is part of a larger album of newspaper clippings, timetables, tickets and photos relating to the Kew Railway Line, taken and compiled by Lachlan Richardson, while a resident of Kew. The album dates from the 1950s. The album is part of a larger subject file on the Kew Line, compiled over time by members of the Kew Historical Society."Seven Carriage Train at Barker Station"kew railway line, transport -- railways -- kew (vic.), barker railway station, kew branch line -
 Kew Historical Society Inc
Photograph - Farewell to 'Our Lady of Fatima'. Xavier College 22/4/51
The Kew railway was opened in 1887, and diverged from the main (Box Hill–Lilydale) line about half-way between Hawthorn and Glenferrie. From the point of divergence the line was slightly less than one mile long, and it had only one intermediate station — Barker. There were four road over-bridges and two level crossings, including one over the busy Barkers Road. The line supported a passenger and goods service, and was electrified in December 1922, at the same time as the main line to Box Hill. There were a number of peak hour services which ran from Flinders Street station (Melbourne) to Kew, but in 1938 all but one of these were diverted to the Ashburton line, where traffic was growing. This had an adverse effect on Kew traffic, as passengers from Kew needed to cross over a footbridge at Hawthorn to change trains, and the main line trains were usually already crowded by the time they reached Hawthorn. At about the same time the off-peak trains were replaced by road buses. In 1952 all passenger trains were withdrawn, but the road bus service continued for many years. Goods trains were finally withdrawn in 1957, and the railway was dismantled in 1958-59. (Source: Frank Stamford, 'The Hawthorn - Kew Railway')Small black and white snapshot of a train leaving Kew Station with the Xavier Chapel on the hill in the background, hence the ironic title provided by the photographer. The photograph, one of 12, is part of a larger album of newspaper clippings, timetables, tickets and photos relating to the Kew Railway Line, taken and compiled by Lachlan Richardson, while a resident of Kew. The album dates from the 1950s. The album is part of a larger subject file on the Kew Line, compiled over time by members of the Kew Historical Society."Farewell to 'Our Lady of Fatima'. Xavier College 22/4/51"kew railway line, transport -- railways -- kew (vic.), kew branch line, xavier college, kew railway station -
 Kew Historical Society Inc
Photograph - Kew Branch Line: Looking along cutting towards Barker Station 22/4/51
The Kew railway was opened in 1887, and diverged from the main (Box Hill–Lilydale) line about half-way between Hawthorn and Glenferrie. From the point of divergence the line was slightly less than one mile long, and it had only one intermediate station — Barker. There were four road over-bridges and two level crossings, including one over the busy Barkers Road. The line supported a passenger and goods service, and was electrified in December 1922, at the same time as the main line to Box Hill. There were a number of peak hour services which ran from Flinders Street station (Melbourne) to Kew, but in 1938 all but one of these were diverted to the Ashburton line, where traffic was growing. This had an adverse effect on Kew traffic, as passengers from Kew needed to cross over a footbridge at Hawthorn to change trains, and the main line trains were usually already crowded by the time they reached Hawthorn. At about the same time the off-peak trains were replaced by road buses. In 1952 all passenger trains were withdrawn, but the road bus service continued for many years. Goods trains were finally withdrawn in 1957, and the railway was dismantled in 1958-59. (Source: Frank Stamford, 'The Hawthorn - Kew Railway')Small black and white snapshot looking along cutting towards Barker Station 22/4/51. The photograph, one of 12, is part of a larger album of newspaper clippings, timetables, tickets and photos relating to the Kew Railway Line, taken and compiled by Lachlan Richardson, while a resident of Kew. The album dates from the 1950s. The album is part of a larger subject file on the Kew Line, compiled over time by members of the Kew Historical Society."Looking along cutting towards Barker Station 22/4/51"kew railway line, transport -- railways -- kew (vic.), barker railway station, kew branch line -
 Kew Historical Society Inc
Photograph - The last train at Kew Station, August 1952
The Kew railway was opened in 1887, and diverged from the main (Box Hill–Lilydale) line about half-way between Hawthorn and Glenferrie. From the point of divergence the line was slightly less than one mile long, and it had only one intermediate station — Barker. There were four road over-bridges and two level crossings, including one over the busy Barkers Road. The line supported a passenger and goods service, and was electrified in December 1922, at the same time as the main line to Box Hill. There were a number of peak hour services which ran from Flinders Street station (Melbourne) to Kew, but in 1938 all but one of these were diverted to the Ashburton line, where traffic was growing. This had an adverse effect on Kew traffic, as passengers from Kew needed to cross over a footbridge at Hawthorn to change trains, and the main line trains were usually already crowded by the time they reached Hawthorn. At about the same time the off-peak trains were replaced by road buses. In 1952 all passenger trains were withdrawn, but the road bus service continued for many years. Goods trains were finally withdrawn in 1957, and the railway was dismantled in 1958-59. (Source: Frank Stamford, 'The Hawthorn - Kew Railway')Small black and white snapshot of the last passenger train at Kew Railway Station in 1952. The photograph, one of 12, is part of a larger album of newspaper clippings, timetables, tickets and photos relating to the Kew Railway Line, taken and compiled by Lachlan Richardson, while a resident of Kew. The album dates from the 1950s. The album is part of a larger subject file on the Kew Line, compiled over time by members of the Kew Historical Society."The last train at Kew Station, August 1952"kew railway line, transport -- railways -- kew (vic.), kew branch line, kew railway station -
 Kew Historical Society Inc
Photograph - Kew Branch Line: Weeds at Kew Station 14/51
The Kew railway was opened in 1887, and diverged from the main (Box Hill–Lilydale) line about half-way between Hawthorn and Glenferrie. From the point of divergence the line was slightly less than one mile long, and it had only one intermediate station — Barker. There were four road over-bridges and two level crossings, including one over the busy Barkers Road. The line supported a passenger and goods service, and was electrified in December 1922, at the same time as the main line to Box Hill. There were a number of peak hour services which ran from Flinders Street station (Melbourne) to Kew, but in 1938 all but one of these were diverted to the Ashburton line, where traffic was growing. This had an adverse effect on Kew traffic, as passengers from Kew needed to cross over a footbridge at Hawthorn to change trains, and the main line trains were usually already crowded by the time they reached Hawthorn. At about the same time the off-peak trains were replaced by road buses. In 1952 all passenger trains were withdrawn, but the road bus service continued for many years. Goods trains were finally withdrawn in 1957, and the railway was dismantled in 1958-59. (Source: Frank Stamford, 'The Hawthorn - Kew Railway')Small black and white snapshot of how the Kew Branch Line was allowed to run down. The photograph, one of 12, is part of a larger album of newspaper clippings, timetables, tickets and photos relating to the Kew Railway Line, taken and compiled by Lachlan Richardson, while a resident of Kew. The album dates from the 1950s. The album is part of a larger subject file on the Kew Line, compiled over time by members of the Kew Historical Society.kew railway line, transport -- railways -- kew (vic.), barker railway station, kew branch line -
 Kew Historical Society Inc
Photograph - Kew Railway Station, May 1950
The Kew railway was opened in 1887, and diverged from the main (Box Hill–Lilydale) line about half-way between Hawthorn and Glenferrie. From the point of divergence the line was slightly less than one mile long, and it had only one intermediate station — Barker. There were four road over-bridges and two level crossings, including one over the busy Barkers Road. The line supported a passenger and goods service, and was electrified in December 1922, at the same time as the main line to Box Hill. There were a number of peak hour services which ran from Flinders Street station (Melbourne) to Kew, but in 1938 all but one of these were diverted to the Ashburton line, where traffic was growing. This had an adverse effect on Kew traffic, as passengers from Kew needed to cross over a footbridge at Hawthorn to change trains, and the main line trains were usually already crowded by the time they reached Hawthorn. At about the same time the off-peak trains were replaced by road buses. In 1952 all passenger trains were withdrawn, but the road bus service continued for many years. Goods trains were finally withdrawn in 1957, and the railway was dismantled in 1958-59. (Source: Frank Stamford, 'The Hawthorn - Kew Railway')Small black and white snapshot of Kew Railway Station inMay 1950. The photograph, one of 12, is part of a larger album of newspaper clippings, timetables, tickets and photos relating to the Kew Railway Line, taken and compiled by Lachlan Richardson, while a resident of Kew. The album dates from the 1950s. The album is part of a larger subject file on the Kew Line, compiled over time by members of the Kew Historical Society."Kew Railway Station, May 1950"kew railway line, transport -- railways -- kew (vic.), kew branch line, kew railway station -
 Kew Historical Society Inc
Photograph - Kew Railway Station, 1951
The Kew railway was opened in 1887, and diverged from the main (Box Hill–Lilydale) line about half-way between Hawthorn and Glenferrie. From the point of divergence the line was slightly less than one mile long, and it had only one intermediate station — Barker. There were four road over-bridges and two level crossings, including one over the busy Barkers Road. The line supported a passenger and goods service, and was electrified in December 1922, at the same time as the main line to Box Hill. There were a number of peak hour services which ran from Flinders Street station (Melbourne) to Kew, but in 1938 all but one of these were diverted to the Ashburton line, where traffic was growing. This had an adverse effect on Kew traffic, as passengers from Kew needed to cross over a footbridge at Hawthorn to change trains, and the main line trains were usually already crowded by the time they reached Hawthorn. At about the same time the off-peak trains were replaced by road buses. In 1952 all passenger trains were withdrawn, but the road bus service continued for many years. Goods trains were finally withdrawn in 1957, and the railway was dismantled in 1958-59. (Source: Frank Stamford, 'The Hawthorn - Kew Railway')Small black and white snapshot of Kew Railway Station in 1950. The photograph, one of 12, is part of a larger album of newspaper clippings, timetables, tickets and photos relating to the Kew Railway Line, taken and compiled by Lachlan Richardson, while a resident of Kew. The album dates from the 1950s. The album is part of a larger subject file on the Kew Line, compiled over time by members of the Kew Historical Society."Kew Station / 14/51 / 22/4/51 F5"kew railway line, transport -- railways -- kew (vic.), kew branch line, kew railway station -
 Kew Historical Society Inc
Postcard, R McGeehan, The Effect of Storm. Train Passing Through Flood Waters, South Yarra, 25-1-07, 1907
SHARP DOWNPOUR. ONE INCH IN 45 MINUTES. SOUTHERN SUBURBS DELUGED. TRAIN STOPPED AT SOUTH YARRA. One of the sudden downpours of rain which occasionally fall in Melbourne occurred yesterday afternoon, when nearly an inch of rain fell in the course of three quarters of an hour, and caused a flood for an hour or two in certain localities. During the early part of the day, the sky had been clouded over, but there was nothing to indicate a storm of such intensity as that which followed. At about half-past 1 o'clock residents of South Yarra, South Melbourne, Prahran, and St. Kilda noticed a few drops of rain. Still, it appeared unlikely that there would be anything exceptional, until with startling suddenness at about 10 minutes to 1 o'clock, one of the heaviest downpours within the memory of residents burst upon those suburbs. A strange feature of the storm was that it was practically confined to an area of about three miles square. The city was but little affected, though at a spot as close as the Observatory 86 points of rain were recorded in three-quarters of an hour. Thunder and lightning accompanied the downpour, which was cyclonic in character, the rain driving heavily from all points of the compass as the cyclone passed. It was in South Yarra and Prahran that the rain fell heaviest. Within a few minutes after it commenced, the low-lying portions of Toorak-road and practically the whole length of Chapel-street were under water. The depression at the intersection of Toorak-road and Darling-street speedily filled to the dimensions of a small lake. Several shops were inundated, while the water from the higher levels rushed down like a mountain torrent, and in several in-stances swept through the rear of houses and shops, carrying furniture in a floating mass against the further walls. In one case a footbridge was carried bodily away and dashed to pieces. Darling-street itself Great Davis-street, and other low-lying and flat thoroughfares in the vicinity became flooded from kerb to kerb, while on the other side of the railway-bridge the valley between Kensington-road and River-street became filled for some minutes to a depth of several feet. Meanwhile the waters from South Yarra hill, seeking a lower level, found it in the railway cutting, and the excavations from South Yarra station to Prahran on the one line, and to the Chapel-street bridge on the other, were converted into a couple of canals. At the platforms at South Yarra the water was two feet deep on the permanent way, and towards Hawksburn, at the sudden depression under Chapel-street bridge, it was at one time deep enough to cover a tall man's head. Into this swirling mass of water the 1:50 p.m. train from Oakleigh plunged on its way to Melbourne. The impact caused a mighty fountain of water to rise to a height of about 20 feet above the level of Chapel-street and send clouds of spray in all directions. Under the belief that a terrible explosion had occurred residents braved the rain and rushed to the spot, only to find that the train had been brought to a stand-still in the middle of what seemed to be a river. The water was so high that it had entered the fire-box from below, extinguishing the fires and cutting off the steam supply. In the meantime the officials at the South Yarra station had been preparing for emergencies. Inspectors were on duty at intervals along the line, and the moment the alarm was given an extra engine was backed carefully down and continued on to connect with the stranded train without losing its own power. There was a delay of about ten minutes in the service for an hour or two, but by 5 o'clock all the trains were running on time again, and the water had run off all but the spot beneath the Chapel-street bridge. Here the water remained about four feet deep until nightfall, and throughout the afternoon several hundreds of people including biograph operators and photographers, were gathered around watching each train pass through. Even with the water two feet lower, this was a work attended with considerable difficulty. Each train had to absolutely force its way through the weight of water, almost enveloped by the spray thrown up, and it was only just able to negotiate the "ford" by using every ounce of steam. ... The Argus, 26 January 1907, p19.The item forms part of the Laurie Bennett collection of thirty-six postcards and photographs of Kew and early Melbourne, donated to the Kew Historical Society in 1980. The postcards in the Bennett collection, like other images in the Society's holdings date from the 1890s to the present and comprehensively indicate points-of-view or scenes considered historically, aesthetically or socially significant in the period in which they were produced.Postcard depicting a flood at South Yarra Station in 1907. The title and photographer's name are identified on the front of the postcard. Donated by L. Bennett, 1980flood - south yarra, trains - melbourne, postcards, r mcgeehan - prahran -
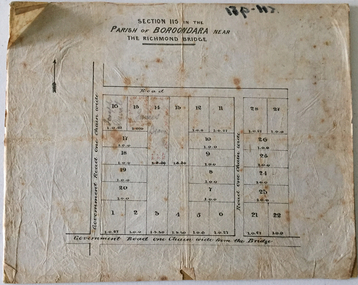 Kew Historical Society Inc
Plan - Subdivision Plan, J Hurrey, Section 115 in the Parish of Boroondara Near Richmond Bridge, 1853
Despite the plans claims that it is a subdivision near the Richmond Bridge, Section 115 was located at what is now Camberwell Junction. While the plan only lists government roads rather than named streets, the section was located on the east side of Burke Road, stretching up the hill from the current Junction. Research on Trove, conducted by Kerry Fairbank, discovered an advertisement for unsold lots in Section 115 which clarifies the extent and location of subsequent land sales in the original section. The original article can be viewed through the link in the catalogue record. The interesting link to Kew is the reference to James Beavan as the purchaser of lots 14 and 15. The historian Gwen McWilliam has notes that a Mr Beavan changed his name from Bevan. The Bevans were descendants of the Derricks family of Kew. This subdivision plan is the earliest original map or plan in the collection which shows parts of what is now the City of Boroondara, dating from circa 1853. It provides important information for researchers on subsequent subdivisions following the original land sales in [Camberwell] Boroondara. The site, on the east side of Burke Road is a highly-significant and historic site. This is believed to be the only extant copy of the subdivision in public collections.A small plan on parchment listing 28 lots, between one and two acres each, for sale in Section 115 in the Parish of Boroondara, dating from 1853 when the portion was subdivided.Obverse: Lot 16 "Joseph Duval", Lots 14 & 15 "James Beavan". Other annotations (measurements) are unreadable. Reverse: "KH-981 / Section 115 in the Parish of Boroondara / Near Richmond Bridge / 1640T. / J Duval / 14-15 J. Beavanparish of boroondara, subdivision plans - camberwell, section 115 - boroondara, subdivision plans -- camberwell (vic), riverscape road, burke road, camberwell junction