Showing 2327 items
matching hawthorn east
-
 Melbourne Tram Museum
Slide - Set of 5, John Webster, 17/10/1959 12:00:00 AM
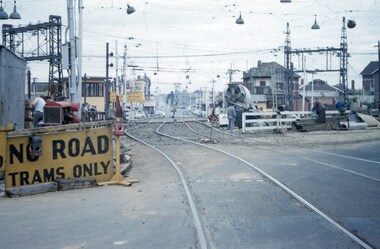
Set of five Colour slides, Kodak, brown cardboard of the removal of the Elsternwick Level crossing on 17-10-1959 .1 - looking east along Glenhuntly Road, showing the level crossing, concrete truck and road protection signs and the temporary track. .2 - W2 287 traversing the temporary track over the level crossing. Tram has the destination of route 4B, Sth Caulfield via Glenhuntly Road. Also has adverts for APEX and Fitwear socks. .3 - ditto on the crossing. .4 - ditto past the crossing. .5 - W2 551 (Carnegie Route 4) and L 103 (City route 4B) on the level crossing. 551 has adverts for Castle Vintage Sherry and Apex. 103 has adverts for Remy Martin Brandy, Alongside is a Victorian Railways sign advertising trains to the city.Hand writing on rear in ink; .1 - 17-10-59 - KFH1 .2 - KFH 1a .3 - KFH 1b .4 - KFH 1c .5 - KFH 1etrams, tramways, elsternwick, level crossings, railway squares, w2 class, l class, carnegie, south caulfield, glenhuntly rd, tram 287, tram 551, tram 103 -
 Melbourne Tram Museum
Photograph - Black and White photograph, early 1940
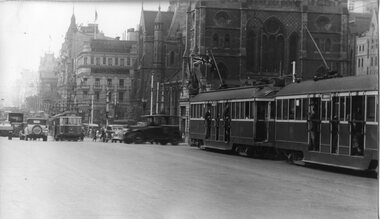
Black and white photograph white a grey and green border of possibly tram W2 class 219, southbound in St Kilda Road with one parked car on the left hand side. Shows the nature of St Kilda Road during the winter. Photo during the early 1940's with the tram having white stripes for war time. The tram has the destination of East Brighton, Route 64.trams, tramways, st kilda rd, route 64, east brighton, tram 219 ?, w2 class, world war 2 -
 Melbourne Tram Museum
Photograph - Black and White photograph, 1908
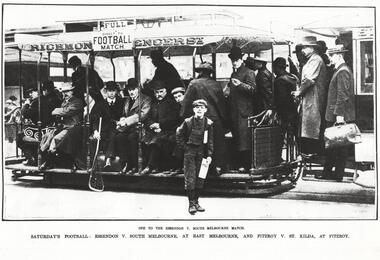
Black and white photograph of a cable car set, c1908, of a well loaded grip car on the Richmond - Spencer St line, with an auxiliary board "Direct to Football Match" Has a paper boy standing in front of the tram, Would appear that the conductor is at the front of the tram, collecting fares. Has the caption "Off to the Essendon v South Melbourne Match - Saturday's Football Essendon V South Melbourne at East Melbourne and Fitzroy v St Kilda at Fitzroy"in ink in the corners "Australasian" and "2008" and photograph measurements for printing.trams, tramways, richmond, football, sports, papers, cable trams, conductors -
 Melbourne Tram Museum
Photograph - Set of 2 Black and White photograph, c1900
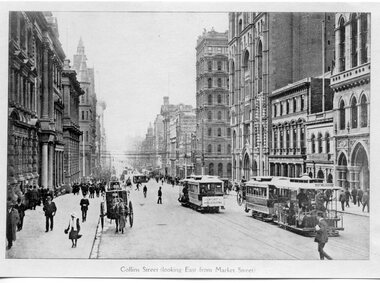
Black and white photograph of Collins St, looking east from Market St. Has two cable sets showing the destination of Port Melbourne. 2nd copy from Keith Kings added 6/8/2020 - see images i2 and i3. - different crop. .1 - Black & White Photograph of a postcard made by the TMSV Sales - better version.in ink in the corners "La Trobe" and number 512 45trams, tramways, cable trams, port melbourne, collins st -
 Melbourne Tram Museum
Photograph - Black and White photograph, Rose Stereograph Co, late 1930's or 1940
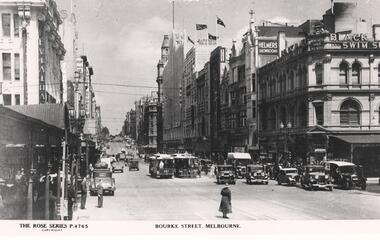
Black and white photograph of Bourke St from just east of Swanston St looking west with two cable sets (trailer 457) in the view along with many motor cars, including a number doing hook turns. In the photo are the Leviathan, London, Buckley and Nunn and Myer stores, Helmers Showrooms. Rose Series Postcard - P4765/ see Charles Craig series for original postcard - CC81Has "51260" on the rear in ink.trams, tramways, cable trams, swanston st, bourke st, tram 457 -
 Melbourne Tram Museum
Photograph - Photocopy and Black and White photograph, late 1930's or 1940
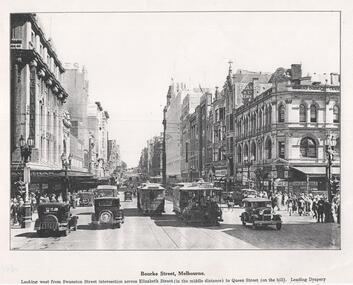
Black and white photocopy of a photograph of Bourke St from just east of Swanston St looking west with two cable sets (trailer 283) in the view along with many motor cars. The intersection is fitted with traffic lights. In the photo are the Leviathan, London, Buckley and Nunn and Myer stores, Francis and Co chemist. Titled "Bourke St Melbourne", with a subheading of "Looking west from Swanston St intersection, Elizabeth Street (in the middle distance) to Queen Street (on the hill)." .1 - Black & White Photograph of a postcard made by the TMSV Sales of the same view.trams, tramways, cable trams, swanston st, bourke st, tram 283 -
 Melbourne Tram Museum
Photograph - Set of 4 Black & White Photograph/s, c1973
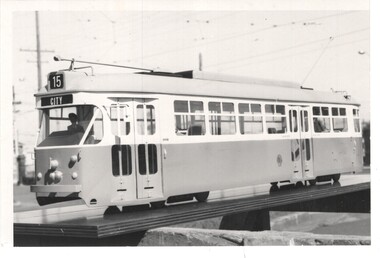
Set of four Black and White photographs of the model of prototype 1041 at Preston Workshops. .1 - photographed in the open area within Preston Workshops to give the impression that it was connected to the overhead. Showing Route 15, City - 110H x 165W .2 - Similar photograph but without the driver. Showing Route 88, East Preston - 166H x 217W (not imaged) .3 - Similar photograph, showing Route 64, E. Brighton - 110H x 165W .4 - Similar photograph, possibly different colour, appears to be darker, showing Mont Albert Route 42 - 124H x 203W.trams, tramways, 1041, preston workshops, models, tram 1041 -
 Melbourne Tram Museum
Postcard - Nu-color-Vue - Flinders St Station, Nucolorvue Publishing, Bustling Flinders St Station, Early 1970's
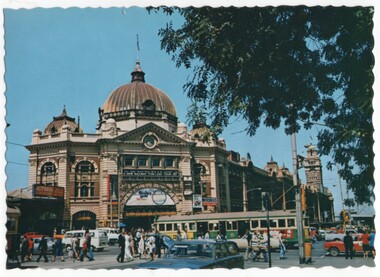
One of a series of postcards produced by Nu-color-vue. Shows W2 327 in Swanston St crossing Flinders St. The station building has the area above the clocks promoting Flinders Gate, a future project that occupied the former Princes Bridge station site. As well adverts for Mitchells Brushes, the Arts Centre fund raising, a five day east coast tour and Astoria Rent-a-carYields information about the appearance of Flinders Station building in the early 1970's and shows a busy or bustling intersection prior to the construction of the City Rail Loop.Postcard - Nu-color-Vue - Flinders St Station early 1970's - serrated edges of Flinders and Swanston St. ML 138swantson st, flinders st, w2 class, tram 327, nucolorvue, postcard, souvenir, trams, tramways -
 Melbourne Tram Museum
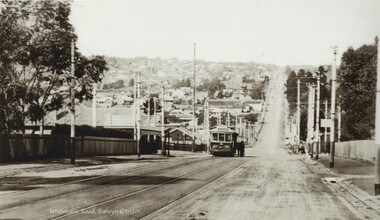
Photograph - Black and white - Whitehorse Road, Balwyn c1920's
Shows B class tram number 90, east bound in Whitehorse Road, at the intersection with Burke Road. Photo has a caption "Whitehorse Road Balwyn c1920s". Tram has the PMTT style destination board. There are a number of people standing on the right hand side of the tram. Note the shelter on the left hand side. This shelter remains in same position (2022). Tram No. 90, was built by James Moore during 1917-1918 and was sold to the Electric Supply Co of Victoria in 1931 and became Bendigo No 7.Yields information about the location, the landscape and the trams in use at the time.Black and white photograph of an outbound tram in Whitehorse Road c1920s, looking east.tramways, balwyn, whitehorse road, tram 90, shelters, pmtt, james moore, b class -
 Melbourne Tram Museum
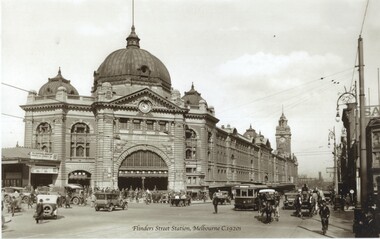
Photograph - Black and white - Flinders St Station c1920's
Shows H class tram number 57, east bound in Flinders St with the Flinders Street Railway station in the background. Has a number of horse drawn vehicles in the view along with motor cars and trucks, some of them doing a hook turn. A policeman is on point duty. Photo taken after Flinders St converted to electric trams from cable trams in 1927. Commercial print from a SLV photo.Yields information about the location, the streetscape and the trams and vehicles in use at the time. Original photo taken from a Rose Series - Southern Cross Series No. 5. See State Library of Victorian Collection - H2011.27DBlack and white photograph of Flinders St Station Melbourne, late 1920's with H class tram 57 in the view."RSCP 327" & "C1929" in pencil and "H57" in red ink on rear.tramways, h class, trams, tram 57, flinders st, flinders st station, horse drawn vehicles, mmtb -
 Melbourne Tram Museum
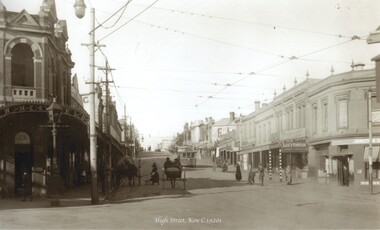
Photograph - Black and white - High St Kew c1920's
Shows High St Kew, looking east from the junction with a four wheel tram approaching the intersection with people waiting to board the tram. On the right is a sign "Happy Thoughts - the trade supplied" and under it "Lucy Hinton Tobacco"Yields information about the location, the streetscape and the trams and vehicles in use at the time. Black and white photograph of High St Kew, looking east with a four wheel tram in the view."RSCP 328" & "C1918" in pencil on rear.tramways, trams, kew junction, high st kew, tram stops -
 Melbourne Tram Museum
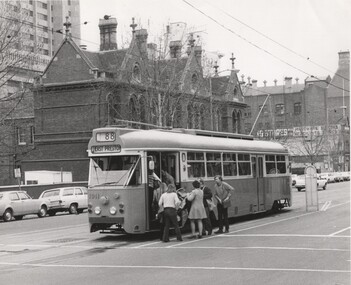
Photograph - Black and White - PCC 1041 - Bourke St 1973
Photograph of PCC car 1041 (Route 88, West Preston) built by the MMTB in 1973 as a prototype for the Z class tram at the King St tram stop, loading passengers through the front door. In the background is Melbourne West or Bourke St West Police Station. Yields information about the location, the streetscape and the prototype tram in use at the time. Black and white photograph of PCC 1041 - Bourke St at Kings St 1973 on rear in ink "RSCP330" and "1973"tramways, trams, tram 1041, mmtb, bourke st, route 88, east preston, bourke street west police station, pcc class -
 Melbourne Tram Museum
Photograph - Black and White Swanston St 1931/32, 1931/32
Photograph of a busy Swanston St taken from the Swanston St/ St Kilda Road overbridge at Flinders St Railway Station looking north. In the background is St Paul's Cathedral. Has W2 442 (East Coburg, Route 1), northbound, W2 586 and another W2 southbound. Note the crowded trams and people leaning on the drop bars that "closed" the tram off on the wrong or "off side" side and decorative "flower pots" in the street between Little Flinders and Collins St. Tram 442 later became the first Melbourne Restaurant tram.Demonstrates a busy streetscape and Yields information about the use of the Flinders / Swanston St in the early 1930's.Black and White photograph of Swanston St looking north from Batman Ave 1931/32Has the stamp of the "Abbotsford Photographics" on the rear and "1931/32" in inktrams, tramways, st pauls cathedral, st kilda road, swanston street, w2 class, tram 442, tram 586, route 1 -
 Melbourne Tram Museum
Slide - Colour - reproduction postcard - Bourke St - GPO
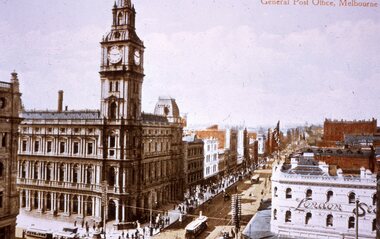
Reproduction slide of a hand coloured postcard showing the intersection of Bourke and Elizabeth Streets, featuring the General Post Office - GPO - looking east along Bourke St, prior to the construction of the Myer store. Has the London store on the bottom right hand side. There are cable trams in the view.Yields information about Bourke St prior to the construction of the Myer store and the GPO.Kodachrome cardboard duplicate slide - Colour - reproduction postcard - Bourke St - GPO c1900 "CB19" in penciltrams, tramways, cable cars, cable trams, bourke street, elizabeth sreet, london stores, gpo, post office, myer -
 Melbourne Tram Museum
Slide - Black and white reproduction photograph - Elizabeth St Melbourne, 1920c
Photograph - looking south along Elizabeth Street Melbourne to towards Flinders Street station. Has three cable trams in the photo, including one shunting at the terminus. Has signs for the London Cafe and Federal Cafe in the view, along with many horse-drawn vehicles and a few motor cars. There is a telegraph/telephone line on the east side of the street. Original photo by Rose Stereograph Co. P 957 - see reference. Yields information about the south end of Elizabeth St and the cable tram terminus.Kodachrome cardboard duplicate slide - Black and white reproduction photograph - Elizabeth St c1920 "CB9" in penciltrams, tramways, cable trams, elizabeth street, flinders st station -
 Melbourne Tram Museum
Postcard - Bourke St looking east from near Queen Street, National View by Murfett Publishing, mid 1960s
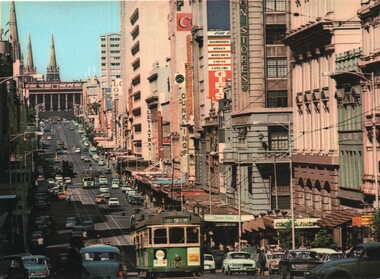
Postcard Bourke St looking east from about Queens St towards Parliament House. Has six W class trams in the view, including W7 1026 (East Preston Route 88). Photo prior to the construction of the Bourke St Mall which commenced in 1978. Possibly mid 1960s. Has the State Savings Bank of Victoria, London Stores, Leviathon, Duncklings, Coles stores and the Odeon Theatre in the view. National View by Murfett Card number 1084-4.Yields information about a busy Bourke Street Melbourne during the 1960s.Postcard colour - Bourke St looking east from near Queen Street - National View - Murfett publishingtrams, tramways, w7 class tram, tram 1026, bourke street -
 Melbourne Tram Museum
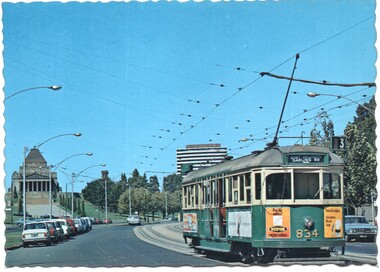
Postcard - Nu-color-Vue - St Kilda Road, Shrine of Remembrance W5 834, Nucolorvue Publishing, 1970s
Postcard - image looking south in St Kilda Road, with the Shrine of Remembrance and BP House in the view. Tram W5 834 (East Malvern Darling Road Route 3).Demonstrates an iconic Melbourne image, St Kilda Road, the Shrine and a W class tram.Postcard colour - serrated edge, Nu-color-Vue - St Kilda Road, Shrine of RemembranceW5 834, ML 132,, Divided back.trams, tramways, shrine of remembrance, st kilda road, sw5 class tram, tram 834 -
 Melbourne Tram Museum
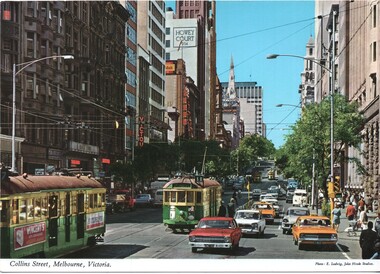
Postcard - Collins Street - Biscay A1 239, Biscay Greetings, late 1980's
Postcard looking west along Collins Street. just to the east of Swanston Street. At the time of the photograph all trams have been converted to The Met colour scheme. Swanston Street was converted into Swanston walk during 1992, so photo is late 1980's or early 1990's. There are seven trams in the view: A1 239 (City Route 42), SW5 749 in Swanston Street, A1 232 (Mont Albert Route 42), two advertising cars. Collins Street is busy. Note the Hook Turn signs supported off the overhead wires.Yields information about Collins Street late 1980's or early 1990s prior to the construction of Swanston WalkPostcard - red boarders, Collins Street - Biscay Greetings, BG 275collins street, swanston street, a1 class tram, sw5 class trams, tram 239, tram 232, tram 749, trams, tramways -
 Melbourne Tram Museum
Postcard - Collins St at Elizabeth St - John Hinde Studios - W2 class trams, John Hinde Studios, early 1970's
... Melbourne Tram Museum 8 Wallen Road Hawthorn melbourne ...Postcard looking east along tree lined Collins St from Elizabeth Street with many now demolished buildings in the view. Buildings at the time include Block Court, Victour, Kodak, Souther Cross, Howey Court. Trams in the view are W2 224, W2 253 (Spencer Street Route 11) and three other W2 class trams. Appears to be an Inspector standing at the west end of the Safety Zone.Yields information about Collins Street early 1970s and the motor car traffic.Postcard - Collins St at Elizabeth St - John Hinde Studios 2 AUS 34trams, tramways, safety zones, traffic, w2 class trams, tram 224, tram 253, victour, kodak, block court, collins st -
 Melbourne Tram Museum
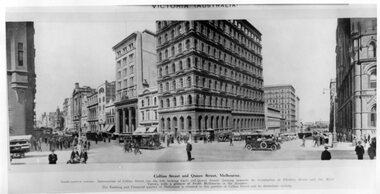
Photograph - Illustration, Collins Street and Queen Street Melbourne
Illustration titled - "Collins Street and Queen Street Melbourne" from the northwest corner looking east along Collins Street and then south along Queen Street, possibly around the time of the first world war. A policeman is on point duty. Shows some of the financial buildings that were located on this street. On one wall is written "Wallace Stockbrokers Reuters Office"Yields information about the Collins Street Melbourne financial district about the time of the first world war.Black and white print of a published Illustration - Collins Street and Queen Street Melbournecable trams, collins street, queen street, reuters -
 Melbourne Tram Museum
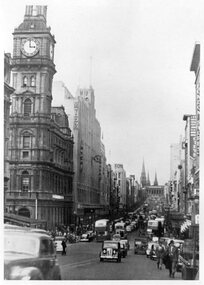
Photograph - Black and White - Bourke St early 1950s
Photograph, from a publication, of Bourke St looking east from the south side between Queen and Elizabeth Streets. The cable tram tracks can be seen in the street pavement. Has many double deck and some single deck buses. Very busy and congested traffic scene between Elizabeth and Swanston Streets. In the view are the General Post Office, the Myer Store, Foys, Parliament House and London Stores.Yields information about Bourke Street prior to conversion to electric trams.Black and white photograph of Bourke St looking east early 1950'stramways, mmtb, buses, double deck buses, bourke street, cable trams, traffic -
 Melbourne Tram Museum
Photograph - Black and White - Bourke Street looking east 1920s
Photo of Bourke St looking east from near the Post Office, with motor cars and cable cars. The cable car set has saloon car 175 with the destination of Preston. In the background is the Leviathan store and Coles Book Arcade. The destination of Preston was short lived, introduced after the amalgamation of the Clifton Hill and Northcote lines in 1925 - see notes.Yields information about Bourke St in the late 1920's between Elizabeth and Swanston Streets.Photograph - Black and White - Bourke Street looking east - late 1920stramways, trams, cable cars, bourke street, tram 175, coles book arcade, leviathan store -
 Melbourne Tram Museum
Photograph - Black and White - Flinders St looking east - 1915c
Photo of Flinders St looking east from about Queen Street, c1915. Has many horse drawn vehicles and one cable tram with two ladies riding on the front of the grip car. In the view are Robert Reid & Co, Commerce House, Finks building and Flinders St Station. The station was completed in 1909. Commerce House or the Commercial Travellers Association building was completed in 1913 - see reference.Yields information about Flinders Street between Queen and Elizabeth Streets.Photograph - Black and White - Flinders St looking east - 1915c from near Queen Street.tramways, trams, cable cars, flinders street, commerce house, cta building, flinders street station -
 Melbourne Tram Museum
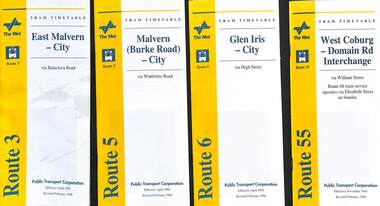
Ephemera - Timetable - The Met - set of 13, The Met, 1996
Set of 13 The Met timetables, with an image of the relevant depot manager, details of hiring a tram, The Met fare system, and a diagrammatic map. All are revised issues of earlier timetables and dated Feb. 1996 unless noted otherwise. 1 - Route 3 - East Malvern - City 2 - Route 5 - Malvern Burke Road - City 3 - Route 6 - Glen Iris - City 4 - Route 55 - West Coburg - Domain Interchange 5 - Route 57 - West Maribyrnong - City 6 - Route 59 - Airport West - City 7 - Route 69 - Kew Cotham Road - St Kilda Beach 8 - Route 70 - Wattle Park - Princes Bridge 9 - Route 72 - Camberwell - Melbourne Uni - Dec. 1996 10 - Route 78, 79, North Richmond - St Kilda Beach or Prahran 11 - Route 82 - Moonee Ponds - Footscray 12 - Route 96 - St Kilda Beach - East Brunswick 13 - Route 34 - La Trobe St Services - includes routes that served La Trobe St.Yields information about some of The Met tram services Feb. 1996Set of 13 The Met timetables, DL size, printed in two colours.timetables, the met, route 3, route 5, route 6, route 55, rout 57, route 59, route 69, route 70, route 72, route 78, route 79, route 82, route 96, route 34, la trobe st -
 Melbourne Tram Museum
Slide - Set of 23 - MMTB Tram substations and offices, Robert Green, 3/1990
Set of 23 colour slides of MMTB tramway substations and the Victoria St Office, by Robert Green Mar 1990. 1 - Carlton Substation - Queensberry St. 2 - Carlton Substation - Queensberry St. 3 - Coburg - Moore St 4 - Glen Huntly Depot substation 5 - Fitzroy - Young St. 6 - Fitzroy - Young St. 7 - Station St Camberwell 8 - Malvern Tram depot 9 - Brunswick Rd, Brunswick 10 - Brunswick Rd, Brunswick 11 - Brunswick Rd, Brunswick 12 - Holden St North Fitzroy 13 - Holden St North Fitzroy 14 - East Kew - High St. 15 - East Kew - High St. 16 - East Kew - High St. 17 - East Kew - High St. 18 - Little Bourke St Melbourne 19 - Former branch offices - Victoria Parade Fitzroy 20 - Former branch offices - Victoria Parade Fitzroy 21 - Former branch offices - Victoria Parade Fitzroy 22 - Former branch offices - Victoria Parade Fitzroy - 2004 23 - Former branch offices - Victoria Parade Fitzroy = 2004Yields information about Melbourne tramway substationsSet of 23 Kodak colour slides in plastic mounts.All slides have their location marked on them in black ink.tramways, mmtb, substations, carlton, queensberry st, coburg, glen huntly, north fitzroy, young st, camberwell, malvern depot, brunswick road, brunswick, holden st, east kew, little bourke st, branch offices, victoria parade -
 Melbourne Tram Museum
Ephemera - Christmas Card - PCC 1041, Melbourne & Metropolitan Tramways Board (MMTB), 1973
Card features PCC Class tram 1041 in Bourke St at a tram stop on route 96 to East Brunswick. The tram entered service during August 1973, so presumed this card was printed in 1973. The tram is on display at the Museum at Hawthorn depot.Demonstrates a MMTB Christmas Card issued with a photo of prototype tram 1041.Card printed - 8 pages glued - colour photograph and gold front with MMTB logo. Two copies held.tramways, mmtb, tram 1041, pcc class, christmas, greeting cards, bourke st, route 96 -
 Melbourne Tram Museum
Ephemera - Timetable - The Met - set of 16, The Met, 1993
SSet of 16 The Met timetables, diagrammatic map, major stops and contact details. All dated May 1993 unless noted otherwise. 1 - Route 3 - East Malvern - City with a note that route 377 bus service replaces trams on Sunday. 2 - Route 5 - Malvern (Burke Rd) - City 3 - Route 6 - Glen Iris - City 4 - Route 8 - Toorak - City 5 - Route 10 - Sth Melbourne Beach and St Kilda Beach - West Preston 6 - Route 19 - North Coburg - City with a note that route 319 bus service to Gowrie and Upfield was included - ran Saturday afternoons and Sundays only. 7 - Route 42 - Mont Albert - City 8 - Route 48 - North Balwyn - City 9 - Route 55 - West Coburg - Domain Road interchange - with a note that route 68 operates via Elizabeth St on Sunday. 10 - Route 57- West Maribyrnong - City - with a note that route 357 bus services replaces trams on Sunday 11 - Route 59 - Airport West - City 12 - Route 64 - East Brighton - City 13 - Route 69 - Kew (Cotham Rd) - St Kilda Beach via Glenferrie Road 14 - Route 70 - Wattle Park - Princes Bridge 15 - Route 72 - Camberwell - City 16 - Route 82 - Moonee Ponds - Footscray and that route 223 bus replaces trams on Saturday afternoons and all day Sunday,Yields information about some of The Met tram services May 1993Set of 16 The Met timetables, DL size, printed in two colours.timetables, the met, route 8, route 3, route 5, route 6, route 10, route 19, route 42, route 48, route 55, route 57, route 59, route 64, route 69, route 70, route 72, route 82 -
 Melbourne Tram Museum
Ephemera - Timetables - Route 96 and 111, The Met, 12/1992
Light Rail Timetables from 6 Dec. 1992 for routes 96 East Brunswick to St Kilda Beach and route 111 - Port Melbourne to Exhibition St. Gives frequency of the trams for weekdays and weekends. Has the depot locations and numbers for further information.Demonstrates a set of The Met timetable for routes 96 and 111 for 1992.Timetable - set of two A4 printed sheets.tramways, the met, route 111, route 96, timetables, light rail -
 Melbourne Tram Museum
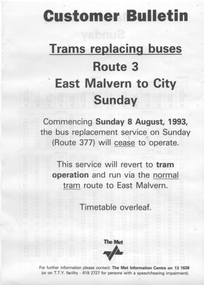
Ephemera, The Met, "Trams replacing buses - Route 3", 8/1993
Customer Bulletin - "Trams replacing buses - Route 3" - East Malvern - City from Sunday 8/8/1993 advising that the replacement bus, route 377 will cease to operate. This was part of an industrial agreement with the State Government after the big 1990 strike. Gives the timetable at various timing points to Melbourne University. See item 7578 for a similar notice for routes 57 and 82.Demonstrates a notice advising trams replacing buses on route 3.Timetable - A4 printed sheet.tramways, the met, timetables, route 3, buses, east malvern -
 Melbourne Tram Museum
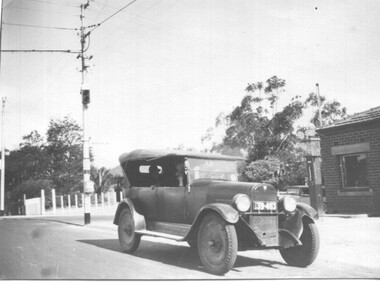
Photograph - 1926 Hudson Super 6 - Riversdale and Warragul Roads, Ray Pearson, 1930s
Photograph of a 1926 Hudson Super 6 parked at the tea room/kiosk on the intersection of Riversdale Road and Warragul Road. Distinguishing features of the car include the triangular badge on the radiator and the unusual disc wheels. The 1926 Hudson also had horizontal radiator shutters. On this vehicle, a finer mesh has been attached in front of the shutters. This is normal practice when insects such as locusts are in plague. At the time, Warragul Road was known as East Boundary Road. Behind the car on the tramway pole is a colour light tramway signal for the single-line section between Warragul Road and the terminus. On 1 July 1928, the Wattle Park line was extended from Boundary Road via Riversdale Road to Elgar Road. It was built as a single track with a passing loop about halfway along, plus a passing loop at the former Boundary Road terminus. The tramway pole has a stop sign and a telephone box as well. In a box of negatives received is an envelope noting the car was owned by Ray Pearson and photo taken during the 1930s. Inside the motor car are two people, the driver, and a lady. In the background is part of the tea rooms located at this corner with a Shell gravity-fed petrol bowser. At the time, petrol was not sold at Service Stations on a Sunday - Sunday trading laws, but they allowed Tea Rooms or kiosks to be open.Yields information the intersection of Warragul and Riversdale Road and MMTB single line signals.Black and white photograph on Velox paper.On rear in pencil "Colour light signal Wattle Park Route, down end loop line, corner of Riversdale and East Boundary Roads".trams, tramways, riversdale road, wattle park, warragul road, motor cars, hudson super 6, shell fuel, signalling, single line, ray pearson