Showing 3140 items
matching routes
-
 Melbourne Tram Museum
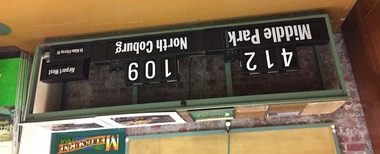
Functional object - Tramcar component, C. Brose Wuppertal Germany, Set of destination indicator equipment that was fitted to Z3 and A class trams, c1985
Set of destination indicator equipment that was fitted to Z3 and A class trams. Each item consists of various electronic parts contained within a metal case that could have been cabled together. Equipment manufactured by (Carl) C. Brose of Wuppertal Germany and maintained by Font Electronics of Melbourne - some items have the manufacturers details on them along with the details of the maintenance company and serial numbers etc. Photo .1 - shows the set of equipment as placed on display in the training room. .1 - set of two route number boxes, three individual controlled blinds, driven by a motor and control gear. Has a Fluro light fitted internally. See images .2 to .5 .2 - Small side destination indicator, with driven blind, electronic equipment with motor on the underside of the box - for use in Z class trams - see images .6 to .9 .3 - as for .2, but with motor mounted right side, used in A class trams, see images .10 to .12 .4 - set of two control panels with selection equipment for selecting the destination (by number) and route number with indicators and start button - see image .13 to 14 .5 - set of two long main rolls indicators, with control gear and Fluro light internally, driven by an internal electric motor - see images 17 and 18 .6 - set of two linking mechanism for the various boxes with large cables cut off for each of the four tram boxes. Would have been control panel item .4 - see image 15 and 16. See e-mail from Simon dated 17/11/2014. See reg Item 4617 for a small side destination roll.trams, tramways, destination indicators, a class, z3 class, transport equipment -
 Ballarat Tramway Museum
Slide - 35mm slide/s - set of 24, Noel Simons, 20/05/1971 12:00:00 AM
Set of 24 transparencies taken on 20/5/1971 on Kodak mounts. 1195.1 - Bendigo 19 arriving at Charing Cross en route to North Bendigo with Fountain Plaza and the City Family Hotel in the background. No. 19 has two roof ads for the SEC. -'Electricity better for cooking' and 'Everything's under control in my all electric kitchen' 1195.2 - as above, but standing at the Charing cross stop, with the Beehive Stores and other buildings along the east side of Pall Mall in the background. 1195.3 - No 21 ex Golden Square crossing View St. trackwork in front of No. 25 waiting to depart for Quarry Hill. No.21 has two roof ads (as for No.19 in 1195.1) and No.25 has one SEC roof ad and another. Ezywalkin sign in the background, and Fountain Plaza. 1195.4 - as for 1195.3, but after 21 has arrived and 25 left for Quarry Hill. Has Ezywalkin store and the Beehive store in the background. 1195.5 - No. 5 at the Eaglehawk terminus. Photo taken with a cannon in foreground looking along High St. Eaglehawk. Has shops on the west side of High St. in the background. 1195.6 - No. 5 at the Eaglehawk terminus, close up of the rear of the tram - note tow bar arrangement. Has destination of Quarry Hill. 1195.7-Nos.25 and 5 crossing at the Thorpe St. Loop, California Gully. No. 25 bound for Eaglehawk (has SEC Briquette and electric cooking roof ads) and 5 en route for Quarry Hill with a SEC and Cinzano roof ad. 1195.8 - as for 1195.7, but after trams have passed each other. Has Borough Auto Service building in the background. 1195.9 - No. 5 in Mt Korong Road, towards Bamard Street, photo taken after tram has passed photographer. 1195.10 - No. 30 at the Golden Square terminus with the Milk Bar on the right hand side of the photograph. 1195.11 - No. 30 inbound at Fire Station Loop, High St. Golden Square. Has old fire station in the background. Passengers are boarding the tramcar. 1195.12 - No. 30 in High St, bound for North Bendigo between Vine and Wattle Streets. 1195.13 - No. 5 bound for Eaglehawk waits at Iron Bark Gully Loop, at Hayes St. 1195.14 - No. 5 and No. 2 crossing at Iron Bark Gully Loop. 1195.15 - No. 5 bound for Eaglehawk leaving the Manchester Loop, Long gully. 1195.16 - No. 5 passing William Street, Long Gully en route to Eaglehawk. 1195.17 - No. 5 just before the California Gully Crossing Loop. 1195.18 - Nos. 5 and 26 crossing at California Gully crossing Loop. No. 5 heading to Eaglehawk, 26, Quarry Hill. 1195.19 - No. 5 in High St. Eaglehawk with Bob Moyle's Victoria Hotel and the TAB in the background. 1195.20 - No. 5 in High St. Eaglehawk approaching the terminus. Photo taken after the tram has passed the photographer. Has Foodland store and J. Best Fruit supply in the background, along with Eaglehawk Town Hall. 1195.21 - No. 5 at the Eaglehawk terminus, photo taken along seldom used track along High St. 1195.22 - as for 1195.22 - but at the very end of the track. 1195.23 - No. 5 en route for Quarry Hill climbs High St. Eaglehawk with the Victoria Hotel and Eaglehawk Town Hall in the background. 1195.24 - No. 5 and 25 crossing at Jobs Gully Loop. Note 25 has a black on white destination roll, while No. 5 has a white on black destination roll. Information written on in black ink and date stamped on purple ink. 1195.1 - "No. 19 arrives at Charing Cross Bendigo from Golden Square" 1195.2 - "No. 19 about to leave Charing Cross for North Bendigo" 1195.3 - "No. 25 awaiting departure for Quarry Hill, watches No. 21 arrive at Charring Cross from Golden Square" 1195.4 - "No. 21 on North Bendigo service and No. 25 on Quarry Hill run await departure at Charing Cross" 1195.5 - "No. 5 at Eaglehawk terminus" 1195.6 - "No. 5 at Eaglehawk terminus" 1195.7 - "Nos. 5 and 25 crossing at Thorpe St. Loop, California". 1195.8 - "Nos. 25 and 5 crossing Thorpe St. Loop, California Gully". 1195.9 - "No. 5 descending Mt Korong Rd. towards Bamard St." 1195.10 - "Birney car No. 30 at Golden Square terminus" 1195.11 - "Birney car No. 30 in High Street near Thistle Street (Fire Station Loop)" 1195.12 - "No. 30 in High St. between vine and Wattle Streets" 1195.13 - "No. 25 at Hayes Street Loop Iron Bark". 1195.14 - "Nos. 2 and 5 crossing at Hayes Street Loop Iron Bark" 1195.15 - "No. 5 at Manchester Loop opposite Havilah Road, Long Gully" 1195.16 - "No. 5 passing William Street, Long Gully". 1195.17 - "No. 5 at California Gully" 1195,18 - "Nos. 26 and 5 at Thorpe St. Loop, California Gully". 1195.19 - "No. 5 in High St. Eaglehawk". 1195.20 - "No. 5 approaching Eaglehawk terminus" 1195.21 - "No. 5 at Eaglehawk terminus" 1195.22 - "No. 5 at Eaglehawk terminus" 1195.23 - "No. 5 in High St. Eaglehawk" tramways, trams, bendigo, charing cross, eaglehawk, california gully, golden square, iron bark gully, jobs gully, tram 2, tram 5, tram 19, tram 21, tram 25, tram 26, tram 30 -
 Flagstaff Hill Maritime Museum and Village
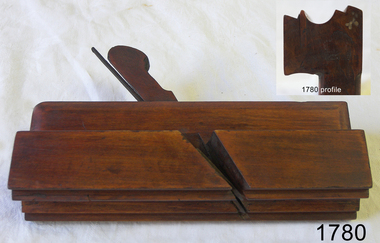
Tool - Complex Moulding Plane, Joseph Gleave & Sons, Late 19th to Early 20th Century
Joseph Gleave & Sons was working as a plane maker in Manchester from 1832 and was at Oldham Street from 1854 to 1868 and (as Joseph Gleave & Son) from 1868 to 1913. The company made complex wood planes of which the subject item is an early example. The company sold tools from other makers as well and was based in Oldham Street Manchester. Since that time the company has adapted and mutated and is still buying and selling tools and industrial supplies to this day. However the company stopped making complex wood planes in 1926. A vintage tool made by a known maker, this item was made commercially for firms and individuals that worked in wood and needed a tool that could produce an ornamental finish to timber. The tool was used before routers and spindle moulders came into general use after World War ll, a time when to produce a decorative moulding for a piece of furniture, door trims, etc. or other items had to be accomplished using hand tools and in particular one of these types of planes. These profiled planes came in various shapes and sizes to achieve a decorative finish.A significant tool from the late 19th to early 20th century that today is quite rare and sought after by collectors. It gives us a snapshot of how furniture and other decorative finishes were created on timber by the use of hand tools. Tools that were themselves handmade shows the craftsmanship used during this time not only to make a tool such as the subject item but also the craftsmanship needed to produce a decorative finish that was needed to be made for any decorative timber item.Complex Moulding Plane, Torus Bead. Stamped J. Gleave (Maker), No 7 & T. Moody (owner)flagstaff hill, warrnambool, flagstaff-hill, flagstaff-hill-maritime-museum, maritime-museum, shipwreck-coast, flagstaff-hill-maritime-village, josphe, joseph gleave & sons, complex plane makers, carpenders tools, woodworking tool -
 Wodonga & District Historical Society Inc
Photograph - The River Port of Red Bank
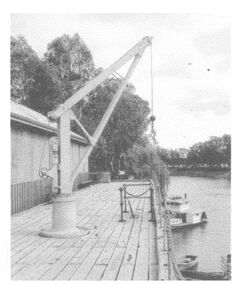
THE RIVER PORT OF REDBANK During the 1870s, Red Bank would have been one of the busiest ports on the Murray River. When the railway line was being built from Melbourne to Wodonga all the railway material was brought up river from Echuca by paddle steamer and barge and unloaded at Red Bank. The material was loaded onto horse teams or bullock wagons and taken along the route of the spur line. During the 187 MacCulloch & Co. handled 3000 tons of railway material here' The port was operational from approximately 1870 until 1874. THE FIG TREES The fig trees and a small bank of gravel are the only visible reminders of where the spur line from the wharf at Red Bank met the main line. It was at this point that all the material for the mainline was transferred from the small locomotives and wagons from Red Bank. It would have been carried by bullock wagons and horse teams and unloaded at different places as the line progressed. After the line was completed in 1873 the fettlers from Wodonga would patrol this length of the line.These images are significant because they document an important stage in the development of transportation in North East Victoria.Images of the River Port of Red bank near Wodonga on the Murray River. 1. The wharf 2. All that remainsred bank port, historic wharf wodonga, river transport -
 Melbourne Legacy
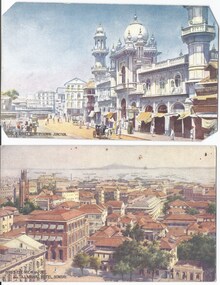
Postcard, Postcards of India
Postcards were a common form of souvenirs for soldiers who were travelling either during World War 1, or just after, or while returning to Australia. These postcard scenes are from Bombay which is a stop on the route from Australia to Europe. India was often the first time young soldiers saw a different culture on their way to the first World War. These were with other World War 1 memorabilia that has come from Private John Basil McLean, 2nd Reinforcements, 37th Battalion, A.I.F. There was a large collection of postcards so he may have been collecting them as souvenirs (none of these have been written on or posted). J.B. McLean (Service No. 13824) was from near Maffra, Victoria and enlisted on 22 January 1916. He embarked on 16 December 1916 for Europe. His full war record is available from AWM. He spent time with the Australian Field Artillery (Pack Section). At the end of the war he worked for a year at the A.I.F. Headquarters in London before returning to Australia on the 'Ceramic', (which stopped in Bombay), arriving Portsea in 1920.Postcards were a very common form of communication in the first World War. Postcards as souvenirs or as correspondence would have been familiar to the first Legatees as they had served in World War 1. These places in Bombay, India could have been visited by the first Legatees when they were soldiers in World War 1.Postcards x 7 with images from Bombay in India.01139.1 Bombay - A street scene, Pydowni Junction 01139.2 Bird's eye view of Fort from Taj Mahal Hotel, Bombay 01139.3 Cuffe Parade - Bombay 01139.4 General Post Office - Bombay 01139.5 Bombay - Queen's Road showing palms 01139.6 A woman tapping rubber tree (possibly from Sri Lanka as it was printed in Colombo). 01139.7 Bombay from Harbour Each one has the word POST CARD on the reverse with room for an address and an area for Correspondence. Different makers.souvenir, world war one -
 Seaworks Maritime Museum
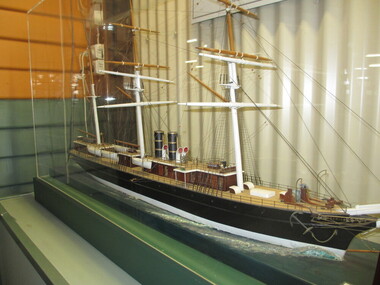
Model ship, SS Iberia, 1873
SS Iberia (1873-1903) was built by John Elder & Co. (Govan yard no.162 Glasgow) and launched 6 December 1873 at a cost £151,600. However, due to strike delays, her maiden voyage was not until 21 October 1874. The Iberia was one of the last of the barque-rigged, clipper-bow type of steamer built for the Pacific Steam Navigation Company. At the time, she was also the second largest ship in world, after the Great Eastern. In 1877, a joint Orient Line and Pacific Steam Navigation Co. venture began a fortnightly mail service, first sailing between England and Australia on 12 May 1880, via Gibraltar, Naples, Port Said, Ismalia, Suez, Colombo, Albany, Adelaide, Melbourne, Sydney. Details: - Tonnage: 4,671 g, 2,982 n. - Dimensions: 433ft 6in (132.13m) x 45ft (13.72m) x 35ft 1in (10.69m). - Powered by a single screw, compound inverted 2 cylinder; 750 NHP; 4,000 IHP engine with steam pressure of 70 lbs, 4 cylindrical boilers, 2 to each funnel. - Speed 14 knots - 1873 Passengers: 100 1st, 150 2nd, 340 3rd Class. - 1893 Passengers: 140 first, 50 second, 800 third Some significant dates in her history include: - 1881: Replaced "Aconcagua" as standby vessel on the London - Suez- Melbourne - Sydney route - 1882: Government transport during the Egyptian Arabi Pasha Campaigns - 1883 Jan 25: Placed on regular service to Australia - 1890 Jun 11: Reverted to the Liverpool - Valparaiso route - 1893: Iberia sailed to Australia to replace a disabled ship. The journey via the Cape was non-stop at 14 knots in 32 days - 1893- Fitted with triple expansion engine; 3 cylinders, 600 NHP; 4 cylindrical boilers; 13 knots; fitted by J.Rollo & Sons, Liverpool - 1903: Broken up at Genoa. 1873 single screw, compound inverted, 2 cylinder; 750 NHP, 4000 IHP, Steam pressure 70 lbs, 4 cylindrical boilers, 2 to each funnel, 14 knots. Second largest ship in the world in 1874 (after the Great Eastern). Cost 151, 600 pounds. 1893 Triple expansion engine fitted. 3 cylinders 600 NHP, 4 cylindrical boilers, 15 knots, fitted by D Rollo and Sons, LiverpoolThe body of the model is carved and molded wood painted in black and white, the planked deck with detailed fittings and rigging, raised on a wooden base with simulated waves. At this time yards removed. "Iberia" -
 Flagstaff Hill Maritime Museum and Village
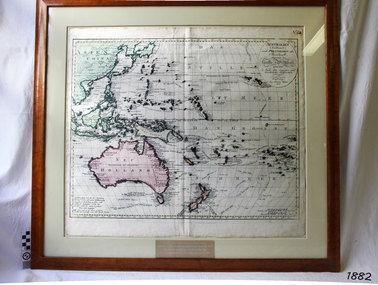
Map, Australien (Sudland) auch Polynesien oder Inselwelt, insgemein der funfte Welltheil, c.1990
This map is a reprint of Johann (Johannes) Walch’s “Australien (Sudland) auch Polynesien oder Inselwelt, insgemein der funfte Welltheil”, published in 1802. It shows Australia, New Zealand, South East Asia and the Pacific Islands shows a large number of places names, many of which have changed since the map was drawn. The map includes the routes and dates of the voyages of Tasman, Cook, Bougainville, Carteret, Byron, and others up to 1802. The shapes of the lands on this early map show that some of the areas had not yet been charted. The map was donated to Flagstaff Hill Maritime Village in April 1990 by the Group Study Exchange Team from Rotary District 233, Sweden. It was framed and presented by Rotary District 978 and presented by Barry Lange, the Governor of District 978 in 1989-90. (District 978, Geelong East, is now District 9780.) Johann (Johannes) Walch Johann Walch, painter and engraver, was born in 1757. He was well known for creating miniature portraits. He gained his training in Geneva, Venice and Rome. His publications include atlases and sheet maps, many of which were reprinted after his death in 1816. This reprint of an 1802 is significant for its historical and geographical contant, showing the voyages of many early explorers to the southern regions of the world including Australia. It also shows the early names used for countries and towns and is a valuable reference to historical interpretation. The map itself is a fine example of hand drawn and hand coloured maps of the early 19th century, the method of production, detail included, layout, symbols and so forth.Map, reprint of Johann (Johannes) Walch’s “Australien (Sudland) auch Polynesien oder Inselwelt, insgemein der funfte Welltheil “, first published by in Ausburg in 1802. The image on this Map No 5B, shows Australia and the south Pacific. The timber framed, glass covered, printed and coloured map was created in two sections and joined. Brass plaque at base of map states that the map was presented to Flagstaff Hill by Rotary International in April 1990. Feint lines used for aligning lettering can be seen on the map and there are large erased letters such as a “D” and “S” that are almost obscured.Plague “ROTARY INTERNATIONAL / THE MAP WAS DONATED BY THE GROUP STUDY EXCHANGE TEAM / FROM ROTARY DISTRICT 233 SWEDEN IN APRIL 1990 / AND WAS FRAMED AND PRESENTED BY ROTARY DISTRICT 978 / BARRY LANGE – GOVERNOR DISTRICT 978 1989/90” Stamped on back “ELLIMINOOK FRAMES / MRS. JILL FALKINER / ELLIMINOOK / BIRREGURRA, VIC. 3242 / PHONE: (052) 36 2080” flagstaff hill, warrnambool, shipwrecked coast, flagstaff hill maritime museum, maritime museum, shipwreck coast, flagstaff hill maritime village, great ocean road, australien (sudland) auch polynesien oder inselwelt, insgemein der funfte welltheil, johann (johannes) walch, cartographer johann (johannes) walch, ausburg publisher johann (johannes) walch, johann (johannes) walch map number 5b, 1802 map of australia and south pacific, rotary international group study exchange team, rotary district 233 sweden, elliminook frames, voyages of tasman, voyages of cook, voyages of bougainville, voyages of carteret, voyages of byron, barry lange, painter of miniature portraits johann (johannes) walch -
 Kew Historical Society Inc
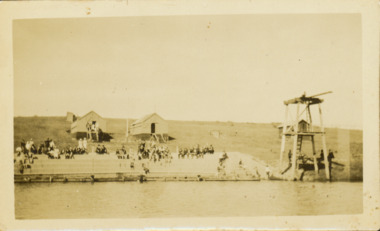
Photograph - Deep Rock Swimming Pool and Clubrooms on the Yarra, c.1925
The former Deep Rock Swimming Pool was about 500 yards [457 metres] above Dight’s Falls. It was there that the Deep Rock Swimming Club was established in 1906. This initial club was expanded in 1916 to incorporate a life-saving club. In 1918, John Wren, the president of the club offered the club £1000, and undertook to sponsor a patriotic carnival in March 1918, at which swimming champions would take part. The ‘pool’ was to achieve fame as the venue for a world record-breaking ‘swallow dive’ of 205 feet 9 inches [63 metres] by ‘Prince Wickyama’, [aka Alec Wickham], a Solomon Islander. The dive from a special platform on the west side of the Yarra was reputedly viewed by between 50,000-100,000 spectators, with funds going to the State War Council. The Herald, 25 March 1918, claimed that the wide area occupied by spectators made more precise estimates impossible. In the 1980s, the construction of the Eastern Freeway, and the consequent re-routing of the Yarra River led to the site of the Deep Rock Pool being obliterated. A small cairn and plaque on the Fairfield side of the river now marks its former site.Very rare early photograph off the Deep Rock swimming pool. The pool and its built structures are historically and socially important to the people of Collingwood, Fairfield and Kew. Small, faded, Gelatin Silver print positive photograph of the Deep Rock Swimming Pool situated on the Yarra at Collingwood and Fairfield. The famous diving tower is at the right of the photo. The built structures were constructed for the Deep Rock Swimming and Life Saving Club. People are sitting on the terraces above the river. "Bathing Club. Deep Rock on the Yarra. Studley Park Melbourne. Please credit E.J. Thomasson Collection"deep rock swimming pool, deep rock swimming club, deep rock lifesaving club, swimming -- river yarra, river yarra -
 Surrey Hills Historical Society Collection
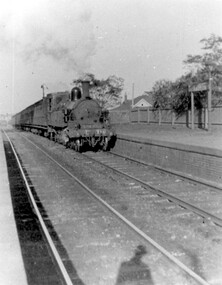
Photograph, D716 steam train at Mont Albert Station, 1919, 1919
The photo was taken at 8.15am on Friday 12 September 1919. The D class was a passenger and mixed traffic steam locomotive which operated on the Victorian Railways from 1902 to 1974. Originally it was introduced on mainline express passenger services, but they were quickly superseded by the much larger A2 class and were relegated to secondary and branch line passenger and goods service, where they continued in service for the next fifty years. The D716 was probably built at the Newport Workshops, post 1910 and before 1914. The expansion of Melbourne's population into new suburbs early in the 20th century, and the delay of the suburban electrification project, meant there was the need for faster and more powerful steam locomotives for the suburban rail network. In 1908, the basic design was adapted to create a more powerful locomotive. They were put to work on longer and hillier suburban routes including the Lilydale line. A total of 58 were built between 1908 and 1913. See wikipedia for a more detailed history of the D class locomotives. Electric trains replaced steam in 1922. Mr William Holmes of 'Lugano', Mont Albert Road was in charge of the design and introduction of the electrification of the Melbourne rail system.Black and white photo of a steam train approaching the platform at Mont Albert station. Rear in blue biro in Jocelyn Hall's handwriting: "Hamilton St Mont Albert / probably 1919".mont albert station, railways, trains, d class locomotives, norman carter, steam trains -
 Federation University Historical Collection
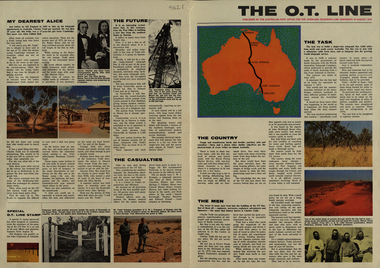
Newspaper, Overland Telegraph Centenary, 1972, 1972
.1) Overland Centenary Supplement to The Australian. Six pages of information and images including the Roper River Camp, First Telegraph Pole at Port Darwin, Route of the Overland Telegraph, Australian Telecommunications Development Association, Alice Springs, Frew's Ponds. Charles Todd, Alice ToddFrank Kraegen, Pony Express. .2) 'The O.T. Line' - four page coloured news shhet published of by the Australian Post Office for the Overland Telegraph Line Centenary, 22 August 1972. Includes articles and images such as J.A.G. Little (Darwin Poatmaster), Robert Patterson, Charles Todd, A.J. Mitchell (surveyor), Maps of the sections (Begot's contract, Central Sections, Darwent and Dalwood contract, Patterson contract), planting of the first pole at Darwin, Roper River Camp, Charles Todd, Alice Todd, Alice Springs Repeater Station, Grave of Kavenagh, Roper River, Frank Kraegem, Maryvale station.roper river camp, telegraph pole, port darwin, overland telegraph route, australian telecommunications development association, alice springs, frew's ponds, charles todd, alice todd, frank kraegen, pony express -
 Bendigo Historical Society Inc.
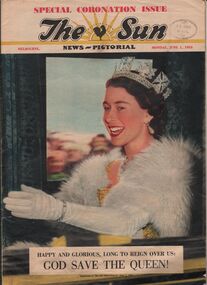
Newspaper - AILEEN AND JOHN ELLISON COLLECTION: THE SUN PICTORIAL CORONATION ISSUE 1953
Special coronation issue of the sun news - pictorial dated Monday, June 1st, 1953. on the front a photo of queen Elizabeth II in her royal carriage with the words " happy and glorious, long to reign over us: God Save The Queen!" On the back a photo of Queen Elizabeth II and Philip, Duke of Edinburgh. With the words underneath: The Queen and her consort in state dress. with her robe and garter collar, the Queen wears the diamond tiara-crown which from tomorrow will be replaced on high occasions by the Imperial State Crown. Contents: Elizabeth is crowned - Chair and stone of destiny - The coronation story - The queen's reign - The regalia and its history - King George VI - The royal romance - The royal family tree - Princess Margaret - The royal children - The queen and the people - The mountbattens - Queen Mary - The first Elizabeth - The economics of royalty - Empire/Commonwealth - The coronation route.newspaper, sun news -pictorial, coronation issue -
 Ballarat Tramway Museum
Photograph - Black & White Photograph/s, c1956
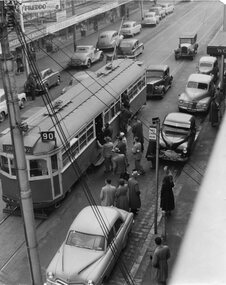
Black and white photograph of W6 994 in Smith St. Collingwood/Fitzroy, in bound on route 90 to City - Spencer St., picking up passengers at a tram stop. Pole obscuring front of tram. Tram has destination "City Spencer St" and run number "P44" Tram appears to be fairly crowded already. Photo taken c1956 with a number of motor cars in the street including some Holdens. In the background are a number of shop fronts, with signs for "Singer Sewing Machines", "Freddo frogs", "Peters Ice Cream", Davies Hardware, John Cornish. On the side of the photograph is the first part of a Woolworths store front. The address of the John Cornish, Mercer, was 205 Smith St. Fitzroy and Woolworths were at 182 -184 Smith St. Collingwood. See 1968 Sands and McDougal Director of Victoria for Smith St. details.trams, tramways, mmtb, smith st., w6 class, bourke st., tram w6 994 -
 Ballarat Tramway Museum
Slide - 35mm slide/s - set of 4, Noel Simons, Apr. 1972
Set of 4 transparencies - copy slides - possibly ARE film strip dated April 1972. 1210.3 on Kodak Readymount mount. 1210.1 - No. 3 arriving at Quarry Hill terminus. 1210.2 - Bogie car at Long Gully Loop, in the far distance, with a Hotel and the ESSO service station in between. Has Fosters Lager and Carlton signs on hotel. Note sign on the closet pole - "No standing between Notices" 1210.3 - Nos. 26 (Quarry Hill) and 25 (Eaglehawk) at Jobs Gully Loop. 1201.4 - No. 5 showing Charing Cross in bound for Charing Cross and No. 3 en route for Eaglehawk in View St. near the end of the double track. Appears to be SEC employee at the rear of No. 3. Part of a set of 20 slides made by the Association of Railway Enthusiast Provincial Tramways film strip. Reference Item 2560 details the ARE Film Strip and provide references to other slides.Information written on in blue ink and date stamped on purple ink. 1210.1 - "No. 3 arriving at Quarry Hill terminus." 1210.2 - "Bogie car at Long Gully Loop." 1210.3 - "Nos. 26 and 25 at Jobs Gully Loop." 1210.4 - "Nos 5 and 3 in View St. near the end of the double track."tramways, trams, bendigo, long gully, quarry hill, view st., tram 3, tram 5, tram 25, tram 26 -
 Ballarat Tramway Museum
Photograph - Black & White Photograph/s, early 1960's
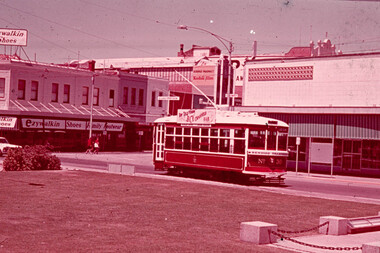
Black and White print of an aerial view of Bendigo SECV Bendigo tram 18 at Charing Cross terminus for the Eaglehawk route with another bogie tram and two single truck trams in the background. Trams have dash canopy lights, but no large white strip under the drivers windows. Photo not dated but appears to be at during early 1960's. Tram 18 has White Horse Whiskey ad on front dash panel, SEC Roof ads. Numbers of other trams cannot be determined. All trams have roof ads, including SEC ads and a CASTROL ad. Good view of the fountain and buildings on the north east corner. Has Ezywalkin store, City Club Hotel and other buildings. Shows traffic arrangements for cars to do a right turn from Pall Mall into Mitchell St. On a building in Mitchell St. is an advertisement for "ASTOR Radio"trams, tramways, charing cross, bendigo, mitchell st, aerial views, tram 18 -
 Ballarat Tramway Museum
Poster, Australia Post, "Australia's Historic Tramways", 1989
Colour poster on glossy white paper advertising a new stamp issue on Australia's Historic tramways, 1989. On the poster's background is a Melbourne cable tram set on the Prahran route, printed in black and white, has "Australia Historic Tramways" as a banner, "New Stamp Issue" in the form of a cancellation stamp with a Melbourne tram in the centre and featuring in enlarged full colour reproductions the following 41c stamps that were the special issue: Adelaide Horse Tram - 1878 Sydney Steam Tram - 1884 Melbourne cable tram - 1886 Hobart double deck electric tram - 1893 Brisbane combination electric tram - 1901. On the base of the poster is an announcement concerning the stamp show at the Melbourne Exhibition buildings 18-22 October. 1989. See Reg. Item 3143 for an example of the Melbourne cable tram stamp and 8545 for collector's cards and an envelope.trams, tramways, stamps, australian trams, steam trams, horse trams, australia post -
 Ballarat Tramway Museum
Ephemera - Timetable/s, State Electricity Commission of Victoria (SECV), Timetable as from 29 June 1970 - Bendigo, 1970
Two page Gestetner copy of an amended timetable for tram services in Bendigo for the SECV issued 29 June 1970. Gives times for the departure from the City and the terminus for the Eaglehawk, Quarry Hill, Golden Square and North Bendigo routes. Page 1 for Monday to Friday, page 2 for Saturday and on the bottom of page 2, details of Sunday services commencing from 2pm, until about 10.30pm. May have been the last timetable issued for Bendigo. On Gestetner foolscap sized paper, stapled in the top left corner. Headed the "Northern Electricity Supply Branch / Bendigo Tramways - Amended Timetable - 29th June, 1970" 1637.1 - 2nd copy added 22/08/04 - has two staples in top left hand corner. See pdf documents for good quality scans and history of record for details of source.bendigo, secv, timetables, tram services -
 Ballarat Tramway Museum
Newspaper, Geelong Advertiser, "One Man Trams", "Tram-men's Protest", "Road Operators' Meeting", 27/10/1952 12:00:00 AM
Yields information about industrial issues in Geelong over one man trams and rosters, and that Ballarat was keep advised of the situation.Set of three (two copies of each), newspaper clippings from the Geelong Advertiser, 27/10/1952 cut out and pasted onto blue paper, with the Newspaper Name and date type on each piece. News items were: "One Man Trams" - quoting Mr. T. A. Farr, Manager SEC Geelong re the proposed introduction of one-man trams. alterations to through routing and effects of this. "Tram-men's Protest" - resolution passed against proposed new roster, one-man trams, quotes union Secretary Mr. C. McDonald, and details of the resolution. "Road Operators' Meeting", about a proposed meeting of road operators to form a Geelong Sub-branch of the Road Transport Development Association of Victoria on 28 October. Over 250 invitations sent out. Quotes the president Mr. S. V. Leslie.one man trams, geelong, unions, rosters, road transport -
 Ballarat Tramway Museum
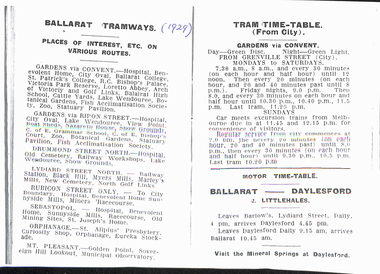
Document - Photocopy, Keith Stodden, 1929 Guide to Ballarat, Dec. 2006
Eleven sheets - photocopy and covering letter - from a 1929 Guide to Ballarat, detailing timetable for trams and buses on various routes. Tram timetables - gives Gardens via Convent, Gardens via Ripon, Drummond St North, Lydiard St North, Rubicon St, Sebastopol, Orphanage, Mount Pleasant and associated return timetables. Gives details of first cars, frequency and times past each hour basis and changes in service frequency. Details colours of the discs that the trams carry to identify them to passengers, day and night. Gives Bus timetables and operator names for: Daylesford (J. Littlehales), Monastery Bus Service (W. Wilson), Ballarat Nth and New Cemetery via Doveton St (H. W. Smith), Victoria Park via Doveton and Eyre St (Robinson), South St bus service to Western oval and racecourse (A. Sproule) and Ballarat to Elmhurst (Sandlants).trams, tramways, timetables, buses, ballarat, esco -
 Ballarat Tramway Museum
Slide - 35mm slide/s, Bob Wilson, Dec. 1972
White cardboard mount, 35mm slide, from the Association of Railway Enthusiast's film strip titled "Provincial Tramway Film Strip" of a Bendigo Trust Birney tram, December 1972 at Charing Cross, outbound to the mine. Tram painted in the Bendigo Trust colour scheme and is fitted with a Bendigo Television BCV roof advertisement. "For Television BCV Channel 8 & 11" and underneath the roof advertisement a route sign "Gold Mine - Joss House". Photo has the Ezywalkin store in the background, Fountain Plaza in the foreground. The film strip notes (Reg. Item 2560), provided the following caption details: "The Bendigo Trust operates a tourist service over the former "NORTH BENDIGO" and part of the "GOLDEN SQUARE" lines using severally visually restored cars, such as Birney No. 30 at Charing Cross - Dec ' 72 (Bob Wilson) See image btm2598p.tif for high level scan of image. Stamped on base of slide "11808" and written in ink on top edge "No. 30 Charing Cross"tramways, trams, are, film strip, charing cross, bendigo trust, tram 30 -
 Ballarat Tramway Museum
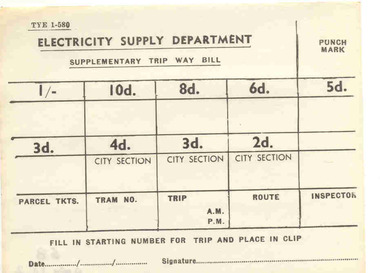
Document - Form/s, State Electricity Commission of Victoria (SECV), "Supplementary Trip Way Bill", early 1960's
Yields information about the form used in Ballarat and Bendigo by the SEC to enabling ticket checking by Inspectors on the trams.Single sheet of paper titled "Supplementary Trip Way Bill", form No. TYE 1-580, for filling in ticket starting numbers, for tickets from 2d (City Section) through to 1/- value. Also allows for parcel tickets, tram no, trip, route, inspector and punch marks. Has line for filling in date and signature at base of ticket. Used in early 1960's. Max. fare 1/- Item was on display in cabinet of 39 until 10/2004, ex filing cabinet 1992. Two copies held. See also Reg. Item 279. See also Reg. Item 3062 for another sample - 15c max value. See Also Reg Item 4144 for a MMTB version, very similar in style, SEC probably copied it. See Also Reg item 5692 for a pack of 250 of these.trams, tramways, secv rules, by laws, tickets, fares, ballarat, bendigo -
 Kew Historical Society Inc
Photograph - Bridge over the Tambo River, 1926
Henry Beater Christian (1886-1962) , was a descendant of one of the earliest settler families in Kew. Employed at the Kew Asylum as a 'public servant', he was a skilled amateur photographer, photographing numerous scenes in Kew and on his travels around Victoria. The majority of his photographs date from 1916 to 1929. His finest photographs are housed in two photograph albums. Digital copy of a photograph from page 31 of the 47-page photograph album containing 261 gelatinous silver images, loaned by Diane Washfold with permission given to digitise and hold a copy in our collection. John Chapman has written in 'Bushwalking Clubs - A Brief History', about the establishment in Victoria of the first bushwalking club in 1888, and the popularisation of bushwalking during the interwar period. Henry Christian's 'walks' appear to have been undertaken solely or with a companion/s. This black and white photo is part of a group of six photos taken on an 18 kilometre walking trip between Bruthen and Swan Reach in East Gippsland in 1926. The route of the walk followed the Tambo River. The photographer has focussed the view on a ruined bridge, presumably caused by a flood, crossing the river. Sections of the left hand pier and span can be seen in the river."BRUTHEN TO SWAN REACH 1926"henry beater christian (1886-1962), landscape photography, christian-washfold collection, photograph albums, bushwalking, bruthen, swan reach, tambo river, east gippsland -
 Melbourne Tram Museum
Document - Research Notes, Don Storey, "Melbourne electric Tramways - Gunzel Notes - a timeline of the Melbourne Electric Tramways", 2003
Research Report titled - "Melbourne electric Tramways - Gunzel Notes - a timeline of the Melbourne Electric Tramways", 94 A4 unbound pages, secured by a fold back clip. Gives a summary of the periods between 1884 and 1904, 1904 to 1920, 1920 to 1983, 1983 to 1997. Has appendences for route numbers, tram allocation, depot lists, trams sold to Ballarat, Bendigo or Geelong and Preserved track. Index note an appendix for track maps but not within document. Has been scanned into two pdf (unsearchable files) pages 1-49 and 50-96 - see image files. See also Reg Item 715 for a similar document published by the ARE in 1997. See http://www.classicaustraliantv.com/Gunzel.htm - accessed 1-11-2016 Prepared by Don Storey See also Reg item 2922 for another version of the depot allocation lists.trams, tramways, melbourne, history, mmtb, the met, ptc, cable trams, history, depot allocation, preserved trams, route numbers -
 Melbourne Tram Museum
Drawing, Melbourne & Metropolitan Tramways Board (MMTB), "Plan of Tramway System - showing route mileage of electric tramways", Late 1960's
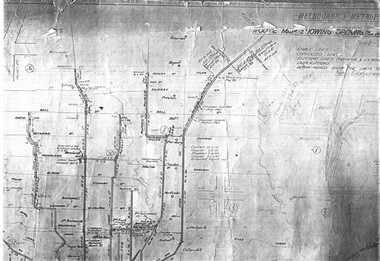
Set of 9 A3 photocopy of a drawing - of a dyeline print that had been mounted onto a cloth backing and had been kept up to date with regard to extensions and closures or opening and closing - titled - "Plan of Tramway System - showing route mileage of electric tramways" - Principal Junctions and intersections shown diagrammatically. Map of system shown at 40 chains to the inch. Copy of Drawing No. P6050. Shows crossovers, signal cabins, automatic points, closed cable tram lines in the city area, Port Melbourne, roads, railways and stations. Has extensions to Mill Park up to April 1987. Shows the Port Melbourne, North Melbourne (Spencer and Abbotsford Sts) and Collingwood cable lines, the Footscray system lines and the Point Ormond lines. See also Reg Item 1561 for a late 1960's print and 3642 for a 1941 version.trams, tramways, mmtb, trackwork, tramways, junction, map -
 Melbourne Tram Museum
Drawing, Melbourne & Metropolitan Tramways Board (MMTB), "Modal Interchange Huntingdale Railway Station", 1973
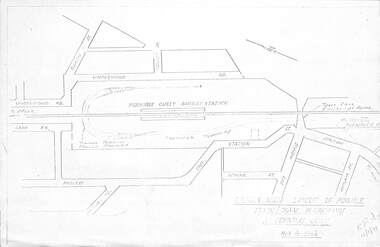
Set of four foolscap and folded sheets illustrating model interchange at the Ferntree Gully Railway station to serve Monash University and further west. .1 - Photocopy of a sketch titled "Approximate layout of possible train tram interchange at Ferntree Gully" - dated 16/11/1973 Shows North Road, railway line, railway station and possible tram line. .2 - P14532 - sketch of a schematic layout at Huntingdale showing trains at either platform face along with a tram. Dated 11-12-1973. Has figure 10 along the bottom edge. .3 - P14536 - dated Dec. 1973, showing a possible route to Modal Interchange at Ferntree Gully railway station using Forest Road. .4 - P14537 - ditto, but using Station St. See Reg Item 3806 for sketches at the Huntingdale Railway Station and Monash University.trams, tramways, ferntree gully, new tramway, railways, wellington rd, monash university -
 Melbourne Tram Museum
Slide - Set of 5, Ron Scholten, May. 1973
Set of five colour slides, white/red cardboard, Duplicates by Pacific Film Laboratories of tram 912 in the City area testing clearances around safety zones, as part of the development of the Z class tram. Done on a Sunday morning. .1 - Bourke St showing the various equipment or protrusions attached to the tram in order to test clearances to safety zones at crossings. .2 - about to travel through a crossover. .3 - using the Queen or William St crossover. Tram has adverts for Tolleys Brandy and PGF Golf clubs. .4 - ditto - with tram 1021 running a route 97 to North Fitzroy Park St. .5 - ditto- with adverts for Williamson Real Estate and All Saints winery. See also Reg Item 3795 for Black and White and Reg Item 4611 for photos of the event and the use of car 1018.All have a running number "1204" to "1208" and "912" written on the slide.trams, tramways, sw6 class, testing, safety zone, bourke st, safety, z class, north fitzroy, route 97, tram 912 -
 Melbourne Tram Museum
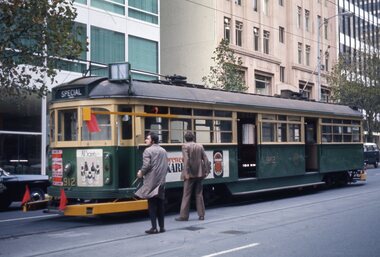
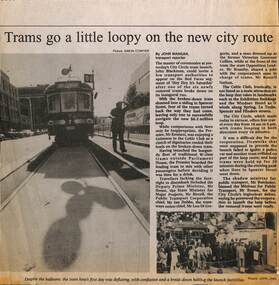
Newspaper, The Age, Geelong Advertiser, "Jolly pollies in trolley folly", "The tram, the launch, the Premier and his stout", "Trams go a little loop on the new city route", 29/04/1994 12:00:00 AM
Set of three photocopies of newspaper articles and photographs of the launch of the City Circle tram service and the breakdown of tram No. 1000 on its launch by the Minister for Transport Mr. Brown. Also reports of other incidents involved with the launch of the tram. Quotes Mr. Brown and Jeff Kennett. Also details of the sources of funding - Federal Government Better Cities Program. .1 - The Age - 29/4/1994 - with a photograph of 1000. .2 - Geelong Advertiser - 29/4/1994 - "Jolly pollies in trolley folly". .3 - The Age 29/4/1994 - titled "The tram, the launch, the Premier and his stout" - lists those involved. .4 - The Age, different edition with a different arrangement and headline - titled "Trams go a little loop on the new city route" item written by John Mangan, photo Simon O' Dwyer and John Lambtrams, tramways, city circle, launch, accidents, tram 1000 -
 Melbourne Tram Museum
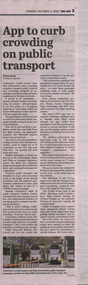
Newspaper, The Age, “App to curb crowding on public transport”, 6/10/2020 12:00:00 AM
Newspaper clippings titled: “App to curb crowding on public transport” by Timna Jacks Newspaper clipping from the Age 6/10/2020 Trial of new technology designed to encourage social distancing on public transport for buses and trains. Article also refers to government announcement on proposed spending on tram rolling stock. $26M to be spent on life extension works for A and Z-class trams. Works will maintain electrical, braking and traction systems on trams running on 17 routes across Melbourne, about 1/3 of the city's fleet. Government has ordered 50 E-class trams since 2015, with 89 of total order of 100 trams now in use. 111 Z-class 3 trams and 69 A-class trams are still in use. PTUA spokesman Daniel Bowen comments on need for maintenance of older trams and calls for newer, air conditioned trams.trams, tramways, a class, e class, z3 class, myki, ptua, covid-19 -
 Melbourne Tram Museum
Photograph - Digital Image, W6 1000 on the opening day of the service in Bourke St, 26/06/1955 12:00:00 AM
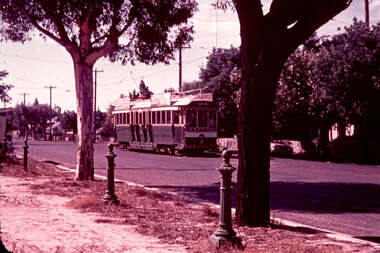
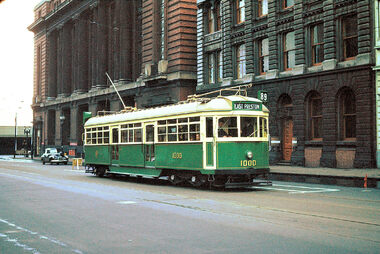
Set of 4 digital images of W6 1000 on the opening day of the service in Bourke St via High St Northcote to East Preston on 26/6/1955. .1 - 1000 (East Preston route 89) at Spencer St, note the sign behind the tram and the newly painted safety zone. Has the Mail Exchange in the background. .2 - ditto at Spencer St with Carlyon's Hotel and the Spencer St Railway station in the background. .3 - tram arriving at the East Preston depot leads - has adverts for Milo, Kiwi boot polish and Pleshur's shoes. .4 - ditto with a Book Repairs Shop, R. P Evans, Goweville Hotel advertising Fosters Lager, and the Melody Picture theatre, In the background is Bell St with a set of clock traffic lights and two tower wagons and a Pura Milk truck just behind the tram.trams, tramways, w6 class, opening, route 89, bourke st, east preston, high st, northcote, tower trucks, traffic lights, bell st, tram 1000 -
 Melbourne Tram Museum
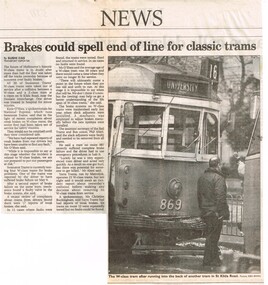
Newspaper, The Age, "Brakes could spell the end of line for classic trams", 2/06/2000 12:00:00 AM
Newspaper clipping from The Age, (2/6/2000?), about an accident in St Kilda Road when a W class tram collided with a Z class tram. Article reports on the withdrawal of W class trams by Swanston St tram immediately. Titled "Brakes could spell the end of line for classic trams" Hugh Waldron's Transit Australia notes (Reg Item 5359 for June 2000) reports "After an accident between “SW6” 869 and “Z1” 75 at about 4pm on Thursday 1st June 2000 all Swanston “W” class trams were instructed to shunt at the closest crossover and return special to the Depot. " Article buy Sushi Das and photo by Ken Irwin of the front of Sw5 869 (University route 16). Quotes from Kevin O'Shea of National Express (Swanston Trams), Phil Alteri (RTBU) and Christine Buckingham of Yarra Tramstrams, tramways, w class, sw5 class, accidents, route 16, st kilda rd, tram 869 -
 Melbourne Tram Museum
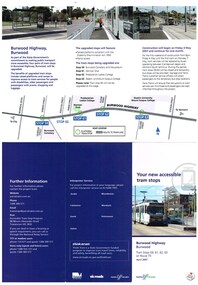
Pamphlet, Yarra Trams, "Your new accessible tram stops", Apr. 2007
Set of five Pamphlets - DL - 3 fold, full gloss paper titled "Your new accessible tram stops" about the introduction in April 2007 of upgrades stops in Burwood Highway - stops 59, 61, 62, and 63 to Superstops. Has VicRoads logos as well as Vic Government and Yarra Trams. Two copies held. 1 -2 fold DL - for stops 124A on routes 96, 109, and 112 - on the Specert St Bridge over the Yarra River - has map. 2 - 3 fold DL for stops 38, 42, 48 and 52 Dandenong Road - Nov. 2007 3 - 3 fold DL for stops 22, 23, 24 and 26 Queens Parade Fitzroy North, Nov. 2008 4 - 3 fold DL for stops 53 to 59 - Matthews Ave Airport West April 2008trams, tramways, yarra trams, burwood, vermont south, superstops, route 75, spencer st, route 96, route 109, route 112