Showing 918 items
matching brown c.
-
 Learmonth and District Historical Society Inc.
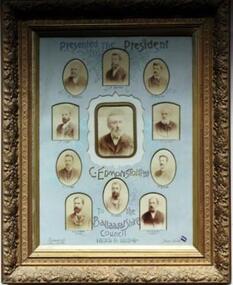
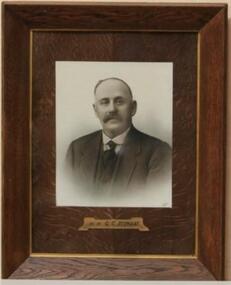
Photo - Edmonston/councilors, Richards & Co. Photos Ballaarat, Ballarat Shire Councilors 1893 - 1894, 1894 (estimated)
Photo of C.Edmonston, Shire President 1893/1894 and Councilors Harding, Baird, Dobson, Lester, Butler, H.T.Hughes/Rate Collector,White, W.P.Steane/Engineer, Symons, Spiers.Original Historical photos of former Ballarat Shire President and Councilors covering the financial year 1893 to 1894.Sepia Photos on blue background of C.Edmonston, Shire President,and Councilors 1893/1894.Presented by the Shire President to the Ballarat Shire Council in 1893/1894.Set in ornate brown frame.Shire Councilors and Shire President 1893/1894.shire, ballarat, edmonston c, 1893 1894 councilors -
 Learmonth and District Historical Society Inc.
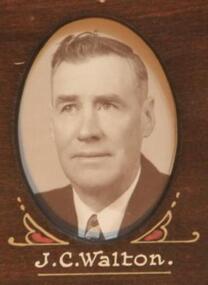
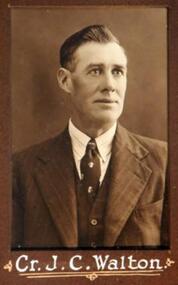
Photo _ Walton, Thornton Richards & Co Ballarat, Walton. J.C, 1954 (exact)
Councilor J.C.Walton was elected to council in 1940 until 1955. He served two terms as Shire President, 1945 - 46 and 1951 - 52.This photo, which is part of a collection of photos, was taken to commemorate the 1954 visit of Her Majesty Queen Elizabeth 11, and was presented by the Shire President, G.A.Fraser, to mark the occaision.Section of the Original Historical Photo of Councilors For The financial year 1954. Sepia/brown photo of Councilor J.C.Walton, Situated middle of second row of composite photo of Councilors for the year 1954. PRESENTED TO BALLARAT SHIRE COUNCIL BY SHIRE PRESIDENT TO COMMEMORATE THE VISIT OF HER MOST GRACIOUS MAJESTY QUEEN ELIZABETH 11,1954ballarat shire council, visit of her majesty queen elizabeth 11 1954, councilor j c walton -
 Learmonth and District Historical Society Inc.
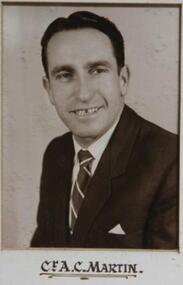
Photo - Martin A.C, Possibly Drummond Studios, Martin. A.C. Councilor 1959, "Circa 1959"
Councilor A.C.Martin was elected to Ballarat Shire Council in 1957 serving till1960.Original Historic photo of all councilors for the year 1959.Councilor A.C.Martin,sepia photo,(rectangular),on white mount,situated second from left,middle row of commposite photos of all councilors for the year 1959.Presented by Ballarat Shire President Charles Edward,"Ted", brown to commemorate the opening of the Wendouree Municiple Centre,20th November 1959.ballarat shire council 1959, wendouree municiple centre opening 20th november 1959, martin a c councilor -
 Learmonth and District Historical Society Inc.
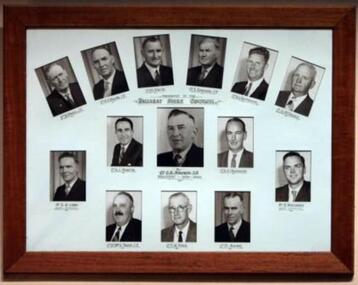
Photo - Brown C.E. & Councilors, Drummond Studios, Shire President C.E.Brown,(J.P.), Councilors and Staff, for the year 1959-1960, "Circa 1960"
... c e ted brown... shire president 1959 60 c e ted brown Presented to the Ballarat ...This collection of photos depicts Councilor Charles Edward "Ted" Brown, and Councilors W.Powell(J.P.),W.A.Walton (J.P.),D.I.White,E.Edwards,(J.P.),H.A.Patterson,A.McDonald,Mr K.S. Lane, (Shire secretary),A.C.Martin,A.Doug.Moverly,Mr. Rex Hollioake,(Shire Engineer),W.MacG.Troup,(J.P.)T.W.Ford, D.Baird.It was presented to the Ballarat Shire Council by Councilor C.E.Brown (J.P.),President 1959-60 (History of these Councilors and staff can be found under catalogue number 014/11 to 014.14 / 11,except for Councilor A.McDonald.) Original Historic Photo of all Councilors and staff for the year 1959-60Sepia photo of Shire President Charles Edward "Ted", Brown (J.P.), and all councilors and staff,set in a plain brown frame with white mount.Presented to the Ballarat Shire Council by Councilor C.E.Brown,(J.P.).President 1959-1960.ballarat shire council, shire president 1959 60, c e ted brown -
 Learmonth and District Historical Society Inc.
Photo - Walton J.C, Thornton Richards & Co, Walton,J.C. Councilor 1942-43, "Circa 1943"
Councilor J.C.Walton was elected as a member of council in 1940 serving until 1955.He was Shire President in 1945-46 and 1951-52. Original Historic photo of Councilors for the year 1942-43.Sepia photo,(rectangular),in brown mount, of Councilor J.C.Walton,situated left hand side of third row. Part of collection of photos of all councilors for the year 1942-43.Presented to the Ballarat Shire Council by Councilor R.T.White,(J.P.).President 1942-43.walton j c, ballarat shire council 1942 43 -
 Learmonth and District Historical Society Inc.
Photo - Stewart G.C, Richards & Co.Ballarat, Councilor G.C Stewart
Councilor G.C.Stewart was elected as a member to Ballarat Shire Council in 1915 until 1927.He served a term as Shire President in 1921-22.In 1924-25 he served the balance of term after the death of Councilor D.Walton. Original Historic Photo.This Sepia photo of Councilor G.C.Stewart,is set in wide brown frame with a brown "watermark" mount,rectangular in shape.Ex Councilor G.C.Stewart.ballarat shire council, 1915 1927, stewart g c -
 Learmonth and District Historical Society Inc.
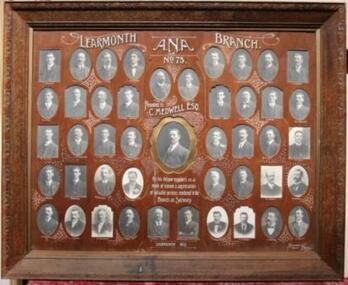
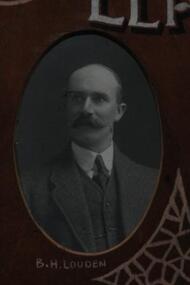
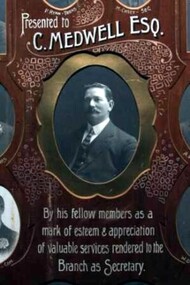
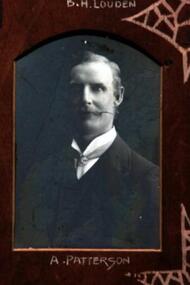
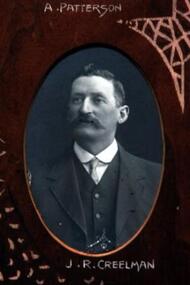
Photo. - ANA.no.75,1912, Richards & Co.Photos, C.Medwell.Esq.and Learmonth A.N.A. Branch No 75 members, 1912
This collection of photos depicts the members of the Learmonth A.N.A. Branch No.75,in 1912.It was presented to C.Medwell Esq.(Secretary),by his fellow members in appreciation of services to the branch as Secretary.The members are C.Hamilton, B.H.Louden, J.Ritchie, W.R.Sara, M.Baird, A.Patterson, A.E.Medwell, R.E.Sara - Assistant Secretary, R.Dowler, J.R.Creelman, J.Leys - commmitee, J.Doolan - President, J.Whately, T.Whately, M.Donovan - commitee, T.E.Connelly - commitee, W.McCubbin, D.Doyle, E.C.Kinnersley, M.Ryan - Trustee, P.Ryan - Treasurer, M.Casey - Secretary, J.Medwell - Trustee, Dr C.A.Courtney - Medical Officer, J.Tonks, J.C.Robertson, J.Yates, J.Curran, P.Casey - commitee,R.L.Medwell, D.Baird, A.E.Stewart, A.Whately - Vice President, H.A.Page - commitee, W.H.Lang, H.Lang, W.D.Sara - Auditor, W.T.Hamilton - Auditor, R.Jarrett, A.Medwell, F.Kinnersley, W.W.Walker, J.Barnes, J.Parker. Original photo showing members belonging to the Learmonth A.N.A. Branch no.75 in 1912Black and white photos of A.N.A.members in 1912,set in wide dark brown frame with carved decorative outer edge,the mount is lighter brown wood. The main photo of C.Medwell Esq.Secretary, is surrounded by a decorative gold trim and between each photo there are decorative markings in white.The Inscriptions are white edged in black.The photos vary in shape,oval, rectangular,rectangular with curved top and rectangular with shaped cut top. LEARMONTH A.N.A. BRANCH N0.75. PRESENTED TO C. MEDWELL Esq. BY HIS FELLOWS MEMBERS AS A MARK OF ESTEEM & APPRECIATION OF VALUABLE SERVICES RENDERED TO THE BRANCH AS SECRETARY. LEARMONTH 1912. Richards & Co. Photos.learmonth ana branch no 75, c medwell 1912 -
 Learmonth and District Historical Society Inc.
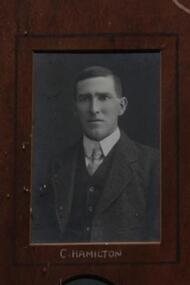
Photo - Hamilton.C, Richards & Co. Photos, C.Hamilton, Learmonth A.N.A.Branch No 75, 1912, "circa 1912"
In 1912 C.Hamilton was a member of the Learmonth A.N.A.Branch No 75 .Original collection of photos showing all members of Learmonth A.N.A. Branch No 75 in 1912.This black and white photo of C.Hamilton,is rectangular in shape and set in a brown woodgrain mount with a black line around cutout. Placed at the top left corner of the top row,it forms part of a Collection of photos showing all Learmonth A.N.A members for 1912.LEARMONTH A.N.A. BRANCH No.75. PRESENTED TO C. MEDWELL BY HIS FELLOW MEMBERS AS A MARK OF ESTEEM & APPRECIATION OF VALUABLE SERVICES RENDERED TO THE BRANCH AS SECRETARY. LEARMONTH 1912.c hamilton, learmonth ana branch no 75 1912 -
 Learmonth and District Historical Society Inc.
Photo - Louden, Richards & Co.Photos, B.H.Louden,Learmonth A.N.A Branch No 75,1912, "circa 1912"
In 1912 Mr B.H.Louden was a member of the Learmonth ANA Branch No 75Original photo of all members of the Learmonth ANA Branch No 75 in 1912.Black and white photo of B.H.Louden is oval and set in a brown woodgrain mount,His name is incribed in white at the base of mount. at the bottom right corner is a decorative feature in white.Photo is set second from left, top row and forms part of a collection of photos of all membes of the 1912 Learmonth ANA Branch No 75. LEARMONTH ANA BRANCH NO 75. PRESENTED TO C. MEDWELL ESQ. BY HIS FELLOW MEMBERS AS A MARK OF ESTEEM & APPRECIATION OF VALUABLE SERVICES RENDERED TO THE BRANCH AS SECRETARY. LEARMONTH 1912. 1912, learmonth ana branch no 75, b h louden -
 Learmonth and District Historical Society Inc.
Photo - Medwell C, Richards & Co. Photos, C.Medwell,Esq.Learmonth ANA Branch No75, 1912, "circa 1912"
In 1912 C.Medwell Esq. was presented,by his fellow members, with this set of photos showing all members of the Learmonth ANA Branch No 75,in recognition of his services to the branch as secretary.Original collection of photos of 1912 Learmonth ANA members.This oval photo of C.Medwell Esq. is in the centre of a collection of photos of all members of Learmonth ANA Branch No 75,1912.It is set in a brown woodgrain mount and photo is surrounded bya gold shaped mount,On the brown mount are decorative markings in white ,inscriptions are also in white.LEARMONTH ANA BRANCH NO 75.PRESENTED TO C. EDWELL ESQ. BY HIS FELLOW MEMBERS AS A MARK OF ESTEEM & APPRECIATION OF VALUABLE SERVICES RENDERED TO THE BRANCH AS SECRETARY. LEARMONTH 1912.1912, learmonth ana branch no 75, c medwell esq -
 Learmonth and District Historical Society Inc.
Photo - Patterson, Richards & Co. Photos, Mr. A. Patterson.1912, "circa 1912 "
In 1912 Mr. A. Patterson was a member of the Learmonth ANA Branch No 75 Original Historic photo depicting all members of the Learmonth ANA Branch No 75 in 1912Black and white photo of Mr. A. Patterson, rectangular with a curved top, is set in a brown woodgrain mount.Around the left and right sides are decorative features in white and his name is inscribed at the bottom.The photo is second from left in second row of collection of photos of all Learmonth ANA Branch No 75 Members of 1912. LEARMONTH ANA BRANCH NO 75, PRESENTED TO C. MEDWELL ESQ. BY HIS FELLOW MEMBERS AS A MARK OF ESTEEM & APPRECIATION OF VALUABLE SERVICES RENDERED TO THE BRANCH AS SECRETARY. LEARMONTH 1912.learmonth ana branch no 75 1912, mr a patterson 1912 -
 Learmonth and District Historical Society Inc.
Photo - Creelman J.R, Richards & Co Photos, Mr. J.R.Creelman. Learmonth ANA Branch No 75,1912, "Circa 1912"
In 1912 Mr. J.R.Creelman was a member of the Learmonth ANA Branch No75.This photo is a section of the original photo showing all the members of the Learmonth ANA Branch No 75 in 1912. This black and white photo of Mr J.R.Creelman, oval in shape, is set in a brown woodgrain mount.To the top right and bottom left are painted decorative features in white and his name is inscribed in white at the base.It forms part of a collection of photos of all members of the Learmonth ANA Branch No 75 in 1912.The photo is second from left in third row.LEARMONTH ANA BRANCH NO 75. PRESENTED TO C. MEDWELL ESQ. BY HIS FELLOW MEMBERS AS A MARK OF ESTEEM & APPRECIATION OF VALUABLE SERVICES RENDERED TO THE BRANCH AS SECRETARY. LEARMONTH 1912.learmonth ana branch no 75, mr l r creelman 1912 -
 Learmonth and District Historical Society Inc.
Photo - Donovan.M, Richards & Co.Photos, M. Donovan, Learmonth ANA Branch No 75 1912, "Circa 1912"
For the year 1912 Mr. M.Donovan served as a commitee member of the Learmonth ANA Branch No 75.This photo forms part of a collecion of original photos which show all members of the Learmonth ANA Branch No 75 in 1912.Black and white photo is of Mr. M Donovan. It is rectangular in shape and set in a brown woodgrain mount.To the right of photo,(top and bottom),is painted decorative features in white,with his name inscribed at the base.It forms a part of a collection of photos showing all Learmonth ANA Branch No 75 members for 1912. LEARMONTH ANA BRANCH NO 75. PRESENTED TO C. MEDWELL ESQ.BY HIS FELLOW MEMBERS AS A MARK OF RESPECT & APPRIECIATION OF VALUABLE SERVICES RENDERED TO THE BRANCH AS SECRETARY.LEARMONTH 1912. learmonth ana branch no 75, m donovan commitee member 1912 -
 Learmonth and District Historical Society Inc.
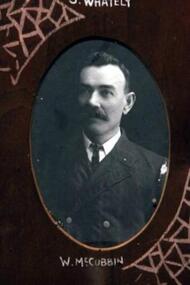
Photo - McCubbin.W, Richards & Co Photos, W.McCubbin, "Circa 1912"
In 1912 W.McCubbin was a member of the Learmonth ANA Branch No 75.Photo is part of original collection of photos showing all members of the Learmonth ANA Branch No75 in 1912.Black and white photo is of W.McCubbin. It is oval and set in a brown woodgrain look mount.Around the photo are decorative features painted in white with his name inscribed at the base.It is at the left of the bottom row in a collection of photos showing all members of the Learmonth ANA Branch No 75 in 1912.LEARMONTH ANA BRANCH NO 75,PRSENTED TO C. MEDWELL ESQ. BY HIS FELLOW MEMBERS AS A MARK OF ESTEEM & APPRECIATION OF VALUABLE SERVICES RENDERED TO THE BRANCH AS SECRETARY. LEARMONTH 1912.w mccubbin 1912, learmonth ana branch no75 -
 Learmonth and District Historical Society Inc.
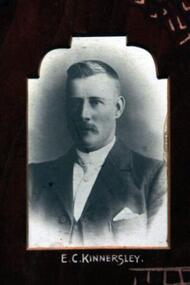
Photo - Kinnersley.E.C, Richards & Co Photos, E.C.Kinnersley, Learmonth ANA Branch No 75,1912, "Circa 1912"
In the year 1912 Mr. E.C.Kinnersley was a member of the Learmonth ANA Branch No 75.This photo is part of a the original collection of photos which show all members of the 1912 Learmonth ANA Branch No 75 Black and white photo is of E.C.Kinnersley and is rectangular with a shaped top and set in a brown woodgrain look mount. His name is inscribed in white at the base,and it is fourth from left on bottom row of a collection photos depicting all Learmonth ANA Branch No 75 members in 1912.LEARMONTH ANA BRANCH NO 75. PRESENTED TO C.MEDWELL ESQ. BY HIS FELLOW MEMBERS AS A MARK OF ESTEEM & APPRECIATION OF VALUABLE SERVICES RENDERED TO THE BRANCH AS SECRETARY.LEARMONTH 1912.learmonth ana branch no 75, e c kinnersley 1912 -
 Learmonth and District Historical Society Inc.
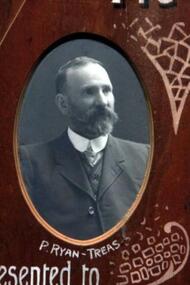
Photo - Ryan.P, Richards & Co. Photos, P.Ryan.Treasurer of Learmonth ANA Branch No 75. 1912, "Circa 1912"
In 1912 Mr. P. Ryan was the Treasurer for the Learmonth ANA Branch No 75.Section of original group of photos showing all members of the Learmonth ANA Branch No 75 in1912.Black and white photo is of Mr.P.Ryan,oval in shape and set in a brown woodgrain look mount.His name is inscribed in white at the base and surrounding the photo are decorative flourishes.It is on the top left of the centre section of a photo collection depicting all members of the 1912 Learmonth ANA Branch No 75. 1912 LEARMONTH ANA BRANCH NO 75. PRESENTED TO C. MEDWELL ESQ. BY HIS FELLOW MEMBERS AS A MARK OF ESTEEM & APPRECIATIONOF VALUABLE SERVICES RENDERED TO THE BRANCH AS SECRETARY. LEARMONTH 1912.p ryan treasurer 1912, learmonth ana branch no 75 -
 Learmonth and District Historical Society Inc.
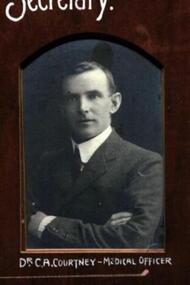
Photo - Courtney.C.A, Richards & Co Photos, Dr. C.A.Courtney, Medical Officer, Learmonth ANA Branch N0 75, "Circa 1912"
In 1912 Dr. C.A.Courtney was the Medical Officer for the Learmonth ANA Branch No 75.He also had his Medical Practice in High Street Learmonth.This photo is part of the original set of photos depicting all 1912 members of the Learmonth ANA Branch No 75.Black and white photo is of Dr. C.A.Courtney. Rectangular with a curved top and set in a brown woodgrain look mount,his name is inscribed in white at the base.It is at the bottom right of the centre section of collection of photos showing all members of the 1912 Learmonth ANA branch No 75.LEARMONTH ANA BRANCH NO 75. PRESENTED TO C.MEDWELL ESQ. BY HIS FELLOW MEMBERS AS A MARK OF ESTEEM & APPRECIATION OF VALUABL;E SERVICES RENDERED TO THE BRANCH AS SECRETARY.LEARMONTH 1912.dr c a courtney medical officer, learmonth ana branch no 75 1912 -
 Learmonth and District Historical Society Inc.
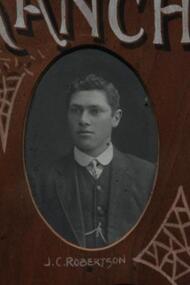
Photo - Robertson.J.C, Richards & Co Photos, Mr.J.C.Robertson, Learmonth ANA Branch No 75, "Circa 1912"
In 1912 Mr. J.C.Robertson was an active member of the Learmonth ANA Branch No 75.Part of a collection of original photos which depict all 1912 members of the Learmonth ANA Branch No 75. Black and white photo of Mr.J.C.Robertson,oval in shape and set in a brown woodgrain look mount.Surounding the photo are decorative features inn white ink, his name is inscribed in white at the base.It is placed in the top row third from the right and is a section of a collection of photos showing all members of the 1912 Learmonth ANA Branch No 75 in 1912.LEARMONTH ANA BRANCH NO 75. PRESENTED TO C.MEDWELL ESQ. BY HIS FELLOW MEMBERS AS A MARK OF ESTEEM & APPRECIATIONOF VALUABLE SERVICES RENDERED TO THE BRANCH AS SECRETARY. LEARMONTH 1912.j c robertson, learmonth ana branch no 75 1912 -
 Learmonth and District Historical Society Inc.
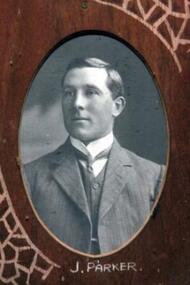
Photo - J.Parker, Richards & Co. Photos Ballaarat, Mr. J.Parker,Learmonth ANA Branch No 75,1912, "Circa 1912"
In 1912 Mr. J.Parker was a serving member of the Learmonth ANA Branch No 75.This photo is part of the original Collection 0f photos which show all Learmonth ANA Branch No 75 in 1912.Black and white photo of J.Parker,(oval),is set in a brown woodgrain look mount.Surounding the photo are decorative features in white and black.His name is inscribed in white at the base.It is on the right of the bottom row in a collection of photos showing all 1912 members of the Learmonth ANA Branch No 75. LEARMONTH ANA BRANCH NO 75.PRESENTED TO C. MEDWELL ESQ.BY HIS FELLOW MEMBERSAS A MARK OF ESTEEM & APPRECIATION OF VALUABLE SERVICES RENDERED TO THE BRANCH AS SECRETARY. LEARMONTH 1912.j parker, learmonth ana branch no 75 1912 -
 Orbost & District Historical Society
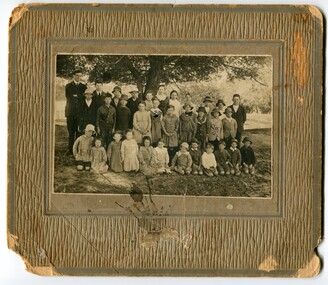
Photograph - Jarrahmond School & pupils c.1914
The Jarrahmond State School No. 2745 near Orbost was one of the earliest in this district. It opened in 1886 at the same time as Orbost and shared a teacher (Campbell McKay who was shortly afterwards replaced by John Rowe who stayed in this position until 1908). The building was financed and built by local farmers on the Stapley property. After a large and damaging flood in the nearby Snowy River in 1893 , the building was shifted to a new location. In 1926, a new building was constructed by the Vic Ed Dept. where it remained until the school was closed in 1948 and children from the Jarrahmond area were then bused to Orbost. Historical significance as one of the earliest photos of Jarrahmond School students.A b/w photo of a group of children and one adult in front of a tree. Children in the front are sitting on the ground, others are standing behind. Photo is mounted onto brown cardboard. On back of photo: Jarrahmond School c.1914. Sally Cole, Angus Cole.education, jarrahmond school, orbost -
 Flagstaff Hill Maritime Museum and Village
Machine - Pulley, Ca 1889
Wooden pulley wheel section from the wreck “Newfield”. The Newfield was a three-masted iron and steel barque, built in Dundee, Scotland, in 1889 by Alexander Stephen and Sons. It was owned by the Newfield Ship Company in 1890 and later that year It was registered in Liverpool to owners Brownells and Co. The Newfield left Sharpness, Scotland, on 28th May 1892 with a crew of 25 under the command of Captain George Scott and on 1st June left Liverpool. She was bound for Brisbane, Australia, with a cargo of 1850 tons of fine rock salt, the main export product of Sharpness. At about 9pm on 28th August 1892, in heavy weather, Captain Scott sighted, between heavy squalls, the Cape Otway light on the mainland of Victoria but, due to a navigational error (the ship’s chronometers were wrong), he assumed it to be the Cape Wickham light on King Island, some 40 miles south. He altered his course to the north, expecting to enter Bass Strait. The ship was now heading straight for the south west Victorian coast and at about 1:30am ran aground on a reef about 100 yards from shore and one mile east of Curdie’s Inlet, Peterborough. The ship struck heavily three times before grounding on an inner shoal with 6 feet of water in the holds. Rough sea made the job of launching lifeboats very difficult. The first two lifeboats launched by the crew were smashed against the side of the ship and some men were crushed or swept away. The third lifeboat brought eight men to shore. It capsized when the crew tried to return it to the ship for further rescue The Port Campbell rocket crew arrived and fired four rocket lines, none of which connected with the ship. A local man, Peter Carmody, volunteered to swim one mile to the ship with a line to guide the fourth and final lifeboat safely to shore. Seventeen men survived the shipwreck but the captain and eight of his crew perished. The Newfield remained upright on the reef with sails set for a considerable time as the wind slowly ripped the canvas to shreds and the sea battered the hull to pieces. The Marine Board inquiry found the wreck was caused by a "one man style of navigation" and that the Captain had not heeded the advice of his crew. According to Jack Loney ‘… when the drama was over . . the Newfield was deserted except for the Captain’s dog and two pigs.’ Flagstaff Hill Maritime Museum has several artefacts that have been salvaged from the wreck. See also other items in the Flagstaff Hill Newfield Collection.The report from SHP documented the following in regards to the Newfield collection: Flagstaff Hill’s collection of artefacts from the Newfield is of historical and archaeological significance at a State level, because of its association with the shipwreck, which is on the Victorian Heritage Register. The collection is significant because of its relationship between the objects. The Newfield collection is archaeologically significant as it is the remains of an international cargo ship. The Newfield collection is historically significant for representing aspects of Victoria’s shipping history and its potential to interpret sub-theme 1.5 (Living with natural processes). The collection is also historically significant for its association with the shipwreck. The Newfield collection meets the following criteria for assessment: Criteria A: Importance to the course, or pattern, of Victoria’s cultural history Criteria B: Possession of uncommon, rare or endangered aspects of Victoria’s cultural history Criteria C: Potential to yield information that will contribute to an understanding of Victoria’s cultural history This item is an oval-shaped brown and orange wooden shell from a ship’s pulley. The original wooden material is now petrified but the lighter coloured concentric rings of the wood's grain are still visible. A metal sheave or drum is fitted into the centre hole and some of the edge of its sheave’s collar has corroded and broken away. The collar has three holes of equal size that are evenly spaced around it. The bearing ring is now detached but still connected to the pulley with a string on which a label is attached. Most of the six cylindrical metal roller bearings are sand encrusted but some are still visible. Recovered from the wreck of the ship NEWFIELD.The pulley has a string through it that attaches it to the bearing. The label on the string bears the handwritten words “PULLEY WHEEL / NEWFIELD / PETER ROLAND”.block, flagstaff hill, maritime museum, shipwreck coast, warrnambool, peter carmody, carmody, newfield, shipwreck, pulley, wheel, pulley block, sheave, drum, peterborough, south west victoria, rocket, rocket crew, shipwreck artefact, flagstaff hil maritime museum -
 Flagstaff Hill Maritime Museum and Village
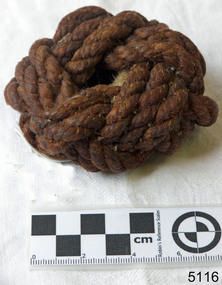
Textile - Rope Sample, After September 1891
The light line or rope used to construct this Turk’s Head knot was part of the line line-throwing apparatus used by the Rocket Rescue Crew. In normal operation a rocket carrying the line was fired over a ship, fastened to the ship, then hauled by the crew to pull a heavier rope from shore, which would have a canvas ‘breaches buoy’ attached to it. A tripod or triangle would be used to keep it free from breakers and rocks. One by one the crew on the wreck would sit in the buoy and be hauled safely back to shore. The three-masted iron barque Fiji had been built in Belfast, Ireland, in 1875 by Harland and Wolfe for a Liverpool based shipping company. The ship departed Hamburg on 22nd May 1891 bound for Melbourne, under the command of Captain William Vickers with a crew of 25. The ship’s manifest shows that she was loaded with a cargo of 260 cases of dynamite, pig iron, steel goods, spirits (whisky, schnapps, gin, brandy), sailcloth, tobacco, coiled fencing wire, concrete, 400 German pianos (Sweet Hapsburg), concertinas and other musical instruments, artists supplies including brushes, porcelain, furniture, china, and general cargo including candles. There were also toys in anticipation for Christmas, including wooden rocking horses, miniature ships, dolls with china limbs and rubber balls. On September 5th, one hundred days out from Hamburg in squally and boisterous south west winds the Cape Otway light was sighted on a bearing differing from Captain Vickers’ calculation of his position. At about 2:30am, Sunday 6th September 1891 land was reported 4-5 miles off the port bow. The captain tried to put the ship on the other tack, but she would not respond. He then tried to turn her the other way but just as the manoeuvre was being completed the Fiji struck rock only 300 yards (274 metres) from shore. The place is known as Wreck Bay, Moonlight Head. Blue lights were burned and rockets fired whilst an effort was made to lower boats but all capsized or swamped and smashed to pieces. Two of the younger crewmen volunteered to swim for the shore, taking a line. One, a Russian named Daniel Carkland, drowned after he was swept away when the line broke. The other, 17 year old able seaman Julius Gebauhr, a German, reached shore safely on his second attempt but without the line, which he had cut lose with his sheath-knife when it become tangled in kelp. He rested on the beach a while then climbed the steep cliffs in search of help. At about 10am on the Sunday morning a party of land selectors - including F. J. Stansmore, Leslie Dickson (or Dixon) and Mott - found Gebauhr. They were near Ryans Den, on their travels on horseback from Princetown towards Moonlight Head, and about 5km from the wreck. Gebauhr was lying in the scrub in a poor state, bleeding and dressed only in singlet, socks and a belt with his sheath-knife, ready for all emergencies. At first they were concerned about his wild and shaggy looking state and what seemed to be gibberish speech, taking him to be an escaped lunatic. They were reassured after he threw his knife away and realised that he was speaking half-English, half-German. They gave him food and brandy and some clothing and were then able to gain information about the wreck. Some of the men took him to Rivernook, a nearby guest house owned by John Evans, where he was cared for. Stansmore and Dickson rode off to try and summon help. Others went down to the site of the wreck. Messages for rescuing the rest of the crew were sent both to Port Campbell for the rocket rescue crew and to Warrnambool for the lifeboat. The S.S. Casino sailed from Portland towards the scene. After travelling the 25 miles to the scene, half of the Port Campbell rocket crew and equipment arrived and set up the rocket tripod on the beach below the cliffs. By this time the crew of the Fiji had been clinging to the jib-boom for almost 15 hours, calling frantically for help. Mr Tregear from the Rocket Crew fired the line. The light line broke and the rocket was carried away. A second line was successfully fired across the ship and made fast. The anxious sailors then attempted to come ashore along the line but, with as many as five at a time, the line sagged considerably and some were washed off. Others, nearly exhausted, had to then make their way through masses of seaweed and were often smothered by waves. Only 14 of the 24 who had remained on the ship made it to shore. Many onlookers on the beach took it in turns to go into the surf and drag half-drowned seamen to safety. These rescuers included Bill (William James) Robe, Edwin Vinge, Hugh Cameron, Fenelon Mott, Arthur Wilkinson and Peter Carmody. (Peter Carmody was also involved in the rescue of men from the Newfield.) Arthur Wilkinson, a 29 year old land selector, swam out to the aid of one of the ship’s crewmen, a carpenter named John Plunken. Plunken was attempting to swim from the Fiji to the shore. Two or three times both men almost reached the shore but were washed back to the wreck. A line was thrown to them and they were both hauled aboard. It was thought that Wilkinson struck his head on the anchor before s they were brought up. He remained unconscious. The carpenter survived this ordeal but Wilkinson later died and his body was washed up the next day. It was 26 year old Bill Robe who hauled out the last man, the captain, who had become tangled in the kelp. The wreck of the Fiji was smashed apart within 20 minutes of the last man being brought ashore, and it settled in about 6m of water. Of the 26 men on the Fiji, 11 in total lost their lives. The remains of 7 bodies were washed onto the beach and their coffins were made from timbers from the wrecked Fiji. They were buried on the cliff top above the wreck. The survivors were warmed by fires on the beach then taken to Rivernook and cared for over the next few days. Funds were raised by local communities soon after the wreck in aid of the sufferers of the Fiji disaster. Captain Vickers was severely reprimanded for his mishandling of the ship. His Masters Certificate was suspended for 12 months. At the time there was also a great deal of public criticism at the slow and disorganised rescue attempt to save those on board. The important canvas ‘breech buoy’ or ‘bucket chair’ and the heavy line from the Rocket Rescue was in the half of the rocket outfit that didn’t make it in time for the rescue: they had been delayed at the Gellibrand River ferry. Communications to Warrnambool were down so the call for help didn’t get through on time and the two or three boats that had been notified of the wreck failed to reach it in time. Much looting occurred of the cargo that washed up on the shore, with nearly every visitor leaving the beach with bulky pockets. One looter was caught with a small load of red and white rubber balls, which were duly confiscated and he was ‘detained’ for 14 days. Essence of peppermint mysteriously turned up in many settlers homes. Sailcloth was salvaged and used for horse rugs and tent flies. Soon after the wreck “Fiji tobacco” was being advertised around Victoria. A Customs officer, trying to prevent some of the looting, was assaulted by looters and thrown over a steep cliff. He managed to cling to a bush lower down until rescued. In 1894 some coiled fencing wire was salvaged from the wreck. Hundreds of coils are still strewn over the site of the wreck, encrusted and solidified. The hull is broken but the vessel’s iron ribs can be seen along with some of the cargo of concrete and pig iron. Captain Vickers presented Bill Robe with his silver-cased pocket watch, the only possession that he still had, as a token for having saved his life and the lives of some of the crew. (The pocket watch came with 2 winding keys, one to wind it and one to change the hands.) Years later Bill passed the watch to his brother-in-law Gib (Gilbert) Hulands as payment of a debt and it has been passed down the family to Gilbert Hulands’ grandson, John Hulands. Seaman Julius Gebauhr later gave his knife, in its hand crafted leather sheath, to F. J. Stansmore for caring for him when he came ashore. The knife handle had a personal inscription on it. A marble headstone on the 200m high cliffs overlooking Wreck Beach, west of Moonlight Head, paying tribute to the men who lost their lives when Fiji ran aground. The scene of the wreck is marked by the anchor from the Fiji, erected by Warrnambool skin divers in 1967.This rope is part of the collection of artefacts from the wreck of the Fiji. Flagstaff Hill’s Fiji collection is of historical significance at a State level because of its association with the wreck Fiji, which is on the Victorian Heritage Register VHR S259. The Fiji is archaeologically significant as the wreck of a typical 19th century international sailing ship with cargo. It is educationally and recreationally significant as one of Victoria's most spectacular historic shipwreck dive sites with structural features and remains of the cargo evident. It also represents aspects of Victoria’s shipping history and its potential to interpret sub-theme 1.5 of Victoria’s Framework of Historical Themes (living with natural processes). The Fiji collection meets the following criteria for assessment: Criterion A: Importance to the course, or pattern, of Victoria’s cultural history. Criterion B: Possession of uncommon, rare or endangered aspects of Victoria’s cultural history Criterion C: Potential to yield information that will contribute to an understanding of Victoria’s cultural history. Rope salvaged from the distress rocket rope line used in the rescue of the crew of the sailing ship “Fiji”. The light-weight brown rope has been crafted into a decorative 'Monkey fist' or 'Turk’s head' knot using three interwoven strands. 1891, shipwrecked coast, flagstaff hill, flagstaff hill maritime museum, maritime museum, shipwrecked artefact, flagstaff hill maritime village, shipwreck coast, warrnambool, rope, moonlight head, wreck bay, distress rocket, line, light line, rocket rescue apparatus, rocket equipment, rocket line -
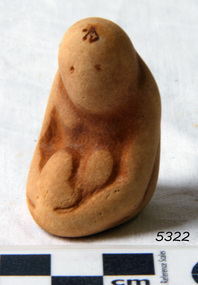 Flagstaff Hill Maritime Museum and Village
Monkey, 19th century
This toy monkey was part of the cargo from the Fiji and amongst the articles salvaged from the wreck. The three-masted iron barque Fiji had been built in Belfast, Ireland, in 1875 by Harland and Wolfe for a Liverpool based shipping company. The ship departed Hamburg on 22nd May 1891 bound for Melbourne, under the command of Captain William Vickers with a crew of 25. The ship’s manifest shows that she was loaded with a cargo of 260 cases of dynamite, pig iron, steel goods, spirits (whisky, schnapps, gin, brandy), sailcloth, tobacco, coiled fencing wire, concrete, 400 German pianos (Sweet Hapsburg), concertinas and other musical instruments, artists supplies including brushes, porcelain, furniture, china, and general cargo including candles. There were also toys in anticipation for Christmas, including wooden rocking horses, miniature ships, dolls with china limbs and rubber balls. On September 5th, one hundred days out from Hamburg in squally and boisterous south west winds the Cape Otway light was sighted on a bearing differing from Captain Vickers’ calculation of his position. At about 2:30am, Sunday 6th September 1891 land was reported 4-5 miles off the port bow. The captain tried to put the ship on the other tack, but she would not respond. He then tried to turn her the other way but just as the manoeuvre was being completed the Fiji struck rock only 300 yards (274 metres) from shore. The place is known as Wreck Bay, Moonlight Head. Blue lights were burned and rockets fired whilst an effort was made to lower boats but all capsized or swamped and smashed to pieces. Two of the younger crewmen volunteered to swim for the shore, taking a line. One, a Russian named Daniel Carkland, drowned after he was swept away when the line broke. The other, 17 year old able seaman Julius Gebauhr, a German, reached shore safely on his second attempt but without the line, which he had cut lose with his sheath-knife when it become tangled in kelp. He rested on the beach a while then climbed the steep cliffs in search of help. At about 10am on the Sunday morning a party of land selectors - including F. J. Stansmore, Leslie Dickson (or Dixon) and Mott - found Gebauhr. They were near Ryans Den, on their travels on horseback from Princetown towards Moonlight Head, and about 5km from the wreck. Gebauhr was lying in the scrub in a poor state, bleeding and dressed only in singlet, socks and a belt with his sheath-knife, ready for all emergencies. At first they were concerned about his wild and shaggy looking state and what seemed to be gibberish speech, taking him to be an escaped lunatic. They were reassured after he threw his knife away and realised that he was speaking half-English, half-German. They gave him food and brandy and some clothing and were then able to gain information about the wreck. Some of the men took him to Rivernook, a nearby guest house owned by John Evans, where he was cared for. Stansmore and Dickson rode off to try and summon help. Others went down to the site of the wreck. Messages for rescuing the rest of the crew were sent both to Port Campbell for the rocket rescue crew and to Warrnambool for the lifeboat. The S.S. Casino sailed from Portland towards the scene. After travelling the 25 miles to the scene, half of the Port Campbell rocket crew and equipment arrived and set up the rocket tripod on the beach below the cliffs. By this time the crew of the Fiji had been clinging to the jib-boom for almost 15 hours, calling frantically for help. Mr Tregear from the Rocket Crew fired the line. The light line broke and the rocket was carried away. A second line was successfully fired across the ship and made fast. The anxious sailors then attempted to come ashore along the line but, with as many as five at a time, the line sagged considerably and some were washed off. Others, nearly exhausted, had to then make their way through masses of seaweed and were often smothered by waves. Only 14 of the 24 who had remained on the ship made it to shore. Many onlookers on the beach took it in turns to go into the surf and drag half-drowned seamen to safety. These rescuers included Bill (William James) Robe, Edwin Vinge, Hugh Cameron, Fenelon Mott, Arthur Wilkinson and Peter Carmody. (Peter Carmody was also involved in the rescue of men from the Newfield.) Arthur Wilkinson, a 29 year old land selector, swam out to the aid of one of the ship’s crewmen, a carpenter named John Plunken. Plunken was attempting to swim from the Fiji to the shore. Two or three times both men almost reached the shore but were washed back to the wreck. A line was thrown to them and they were both hauled aboard. It was thought that Wilkinson struck his head on the anchor before s they were brought up. He remained unconscious. The carpenter survived this ordeal but Wilkinson later died and his body was washed up the next day. It was 26 year old Bill Robe who hauled out the last man, the captain, who had become tangled in the kelp. The wreck of the Fiji was smashed apart within 20 minutes of the captain being brought ashore, and it settled in about 6m of water. Of the 26 men on the Fiji, 11 in total lost their lives. The remains of 7 bodies were washed onto the beach and their coffins were made from timbers from the wrecked Fiji. They were buried on the cliff top above the wreck. The survivors were warmed by fires on the beach then taken to Rivernook and cared for over the next few days. Funds were raised by local communities soon after the wreck in aid of the sufferers of the Fiji disaster. Captain Vickers was severely reprimanded for his mishandling of the ship. His Masters Certificate was suspended for 12 months. At the time there was also a great deal of public criticism at the slow and disorganised rescue attempt to save those on board. The important canvas ‘breech buoy’ or ‘bucket chair’ and the heavy line from the Rocket Rescue was in the half of the rocket outfit that didn’t make it in time for the rescue: they had been delayed at the Gellibrand River ferry. Communications to Warrnambool were down so the call for help didn’t get through on time and the two or three boats that had been notified of the wreck failed to reach it in time. Much looting occurred of the cargo that washed up on the shore, with nearly every visitor leaving the beach with bulky pockets. One looter was caught with a small load of red and white rubber balls, which were duly confiscated and he was ‘detained’ for 14 days. Essence of peppermint mysteriously turned up in many settlers homes. Sailcloth was salvaged and used for horse rugs and tent flies. Soon after the wreck “Fiji tobacco” was being advertised around Victoria. A Customs officer, trying to prevent some of the looting, was assaulted by looters and thrown over a steep cliff. He managed to cling to a bush lower down until rescued. In 1894 some coiled fencing wire was salvaged from the wreck. Hundreds of coils are still strewn over the site of the wreck, encrusted and solidified. The hull is broken but the vessel’s iron ribs can be seen along with some of the cargo of concrete and pig iron. Captain Vickers presented Bill Robe with his silver-cased pocket watch, the only possession that he still had, as a token for having saved his life and the lives of some of the crew. (The pocket watch came with 2 winding keys, one to wind it and one to change the hands.) Years later Bill passed the watch to his brother-in-law Gib (Gilbert) Hulands as payment of a debt and it has been passed down the family to Gilbert Hulands’ grandson, John Hulands. Seaman Julius Gebauhr later gave his knife, in its hand crafted leather sheath, to F. J. Stansmore for caring for him when he came ashore. The knife handle had a personal inscription on it. A marble headstone on the 200m high cliffs overlooking Wreck Beach, west of Moonlight Head, paying tribute to the men who lost their lives when Fiji ran aground. The scene of the wreck is marked by the anchor from the Fiji, erected by Warrnambool skin divers in 1967. Amongst the artefacts salvaged from the Fiji are bisque (or china) toys, (including miniature animals, limbs from small bisque dolls), rubber balls, a slate pencil, a glass bottle, sample of rope from the distress rocket and a candlestick holder. These items are now part of the Fiji collection at Flagstaff Hill Maritime Museum, along with Captain Vickers’ pocket watch and Julius Gebauhr’s sheath knife. This toy monkey is classified as Fiji 5 on the SWR Flagstaff Hill’s Fiji collection is of historical significance at a State level because of its association with the wreck Fiji, which is on the Victorian Heritage Register VHR S259. The Fiji is archaeologically significant as the wreck of a typical 19th century international sailing ship with cargo. It is educationally and recreationally significant as one of Victoria's most spectacular historic shipwreck dive sites with structural features and remains of the cargo evident. It also represents aspects of Victoria’s shipping history and its potential to interpret sub-theme 1.5 of Victoria’s Framework of Historical Themes (living with natural processes). The Fiji collection meets the following criteria for assessment: Criterion A: Importance to the course, or pattern, of Victoria’s cultural history. Criterion B: Possession of uncommon, rare or endangered aspects of Victoria’s cultural history Criterion C: Potential to yield information that will contribute to an understanding of Victoria’s cultural history. China toy monkey salvaged from the wreck of the Fiji. The monkey is in a seated pose with its arms around its knees. This solid, moulded toy is made of bisque (sometimes described as bisque or porcelain) and the material is an pinkish brown colour with darker orange in its lap. The surface is worn and slightly pitted.1891, china, shipwrecked coast, flagstaff hill, flagstaff hill maritime museum, maritime museum, shipwrecked artefact, flagstaff hill maritime village, shipwreck coast, warrnambool, porcelain, moonlight head, wreck bay, cargo, bisque, toys, miniature animals, monkey -
 Flagstaff Hill Maritime Museum and Village
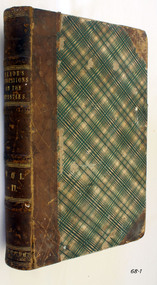
Literary work - Religious Book, C. & J. Revington, Annotations on the Epistles, Volume 2, 1824 (Second Edition)
An epistle from the Greek (epistolē, meaning "letter") is a writing directed or sent to a person or group of people, usually an elegant and formal didactic letter. The epistle genre of letter-writing was common in ancient Egypt as part of the scribal schools writing curriculum. The letters in the New Testament from Apostles to Christians are usually referred to as epistles. Those traditionally attributed to Paul are known as Pauline epistles and the others as catholic or "general" epistles. The subject volume is titled "Annotations on the Apocalypse" and was intended as a sequel to those originally written by Mr. Elsley on the Gospels and of Mr. Prebendary Slade on the Epistles, and thus aimed to complete a series of comments on the whole of the New Testament, for the use of students in prophetical scrip this book, "Annotations on the Apocalypse was intended as a sequel to those of Mr. Elsley on the Gospels and of Mr. Prebendary Slade on the Epistles", by John Chappel Woodhouse, is a second edition of the book originally published before 1824. These pair of books were part of Tom Wicking's collection and represent the type of literature published and read in the early 1800s and up to the present day for the religious instruction of priests. Spine has “Slades Annotations on the Epistles, Vol II”. Covers have green and cream diagonal tartan with brown binding decorated with gold. Annotations on the Epistles, being a continuation of Mr. Elsley’s Annotations and Principally Designed for the use of Candidates for the Holy Orders, by the Rev. James Slade, M.A., vicar of Bolton, and Prebendary of Chester; late Fellow and Tutor of Emmanuel College, Cambridge; and Examining Chaplain to the Lord Bishop of Chester. In two volumes, Vol. II, second edition. Printed in 1824 for C. & J. Rivington, St Paul’s church-yard, and Waterloo-place, Pall Mall, London . The pair of books is part of the Tom Wicking Collection.Marked inside cover "J. Lewis Glenview to Mrs MacLean S. Broadwater" Marked (illegible) "Maclean "Roger" Poet Diary (misspelt dairy)"flagstaff hill, warrnambool, shipwrecked coast, flagstaff hill maritime museum, maritime museum, shipwreck coast, flagstaff hill maritime village, great ocean road, book, annotations on the epistles vol 2, rev. james slade, c. & j. revington, religious book, mrs maclean, j lewis of glenview, tom wicking collection -
 Flagstaff Hill Maritime Museum and Village
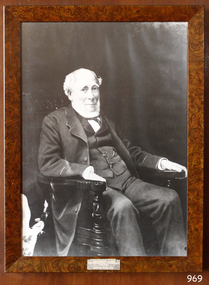
Photograph - Portrait, David Charles McArthur, Superintendent, Bank of Australasia 1867-1876
The subject of this photograph, David Charteris McArthur was the founding manager of the Bank of Australasia in Port Phillip (Melbourne). McArthur was born in 1808 in Gloucester, England, and educated in Scotland. He worked for an insurance firm in Edinburgh where in 1835 he married Caroline nee Wright. McArthur and his family party sailed from the U.K. to arrive in Sydney in October 1835, where he joined the Bank of Australasia when it opened in Sydney in December. McArthur sailed to Melbourne in August 1838 with 3000 pounds in coins, protected by armed guards and two bulldogs, to open the Melbourne branch of the Bank of Australasia. The branch grew quickly, servicing both private and government customers. He opened many branches in the goldfields during the1850’s. In 1862 he was appointed as general inspector of branches. He spent time with the bank in New Zealand. On his return to Melbourne, at age 57, he was put in charge of the entire bank. McArthur lived in the hills of Heidelburg, Melbourne. He was the first chairman of Associated Banks and was advisor to politicians and merchants. He was retired in October 1876 by the London directors and given a free trip to London, an annuity and a seat on the bank’s Advisory Board. McArthur was active in the community, being a member of the Mechanics’ Institute, on the committee that advised Governor Hotham on the Colony’s finances, chairman of the Heidelburg Road Board, one of the original trustees of the Library of Victoria in 1853 and president of trustees of the Public Library, Museums and National Gallery of Victoria in 1880-83. He was also on many other community organisations. He died in his home “Charterisville” in East Ivanhoe in 1887. He and Caroline had no children. The Melbourne branch of Australia and New Zealand Bank has a portrait of McArthur in its boardroom. St John's Church, Heidelberg, commemorates him with a stained-glass window entitled 'King David'. The McArthur Gallery in the National Gallery of Victoria is also named after him. (David's brother, Donald, moved from Sydney to Melbourne in 1836 with the first government survey team.) ABOUT THE BANK OF AUSTRALASIA In 1836 the Bank of Australasia was established in London by Royal Charter. In 1951 the bank merged with the Union Bank of Australia, to form ANZ Bank Limited. In 1970 it merged with the English, Scottish and Australian Bank to become Australia and New Zealand Banking Group Limited. Since that time the ANZ has acquired other banks and introduced Internet banking and mobile banking. BANK OF AUSTRALASIA IN WARRNAMBOOL The Bank of Australasia first opened in Warrnambool in July 1854 in a building on Merri Street. The manager was Mr Samuel Hannaford. The bank then purchased and moved to a stone building on the corner of Timor and Gibson Streets, previously owned by Cramond and Dickson and almost opposite the Examiner’s office. In January 1957 Mr W.H. Palmer became the new manager and was there until November 1869. The bank then built its own building on the corner of Timor and Kepler Streets in 1859. Mr Basil Spence, the teller, was appointed acting manager in 1869 and Mr H.B. Chomley was the next appointed manager, in April 1873 and was still manager in 1886. The municipality of Warrnambool first banked with the Bank of Australasia from 1856 to April 1857. David Charteris McArthur was the founding manager of the Bank of Australasia. This photograph of him represents the beginnings of Warrnambool's commercial history, with the municipality using the Bank of Australasia as its bank from 1856-April 1857.Photograph; portrait of David Charteris McArthur. Heavily retouched black and white print in plain brown varnished frame, behind glass, with plaque on lower edge and inscription lower left corner.Lower left corner "A-H 1-9". Engraved on plaque "DAVID CHARTERS MCARTHUR \ SUPERINTENDENT \ BANK OF AUSTRALASIA \ 1867-1876"flagstaff hill, warrnambool, shipwrecked-coast, flagstaff-hill, flagstaff-hill-maritime-museum, maritime-museum, shipwreck-coast, flagstaff-hill-maritime-village, bank of australasia, david charteris mcarthur, superintendent bank of australasia, colonial commerce, manager bank of australasia melbourne, colonial bank, warrnambool bank of australasia, shipwrecked coast, flagstaff hill maritime museum, maritime museum, shipwreck coast, flagstaff hill maritime village, great ocean road, boa, union bank, australia & new zealand bank, anz bank, david charters mcarthur, d c mcarthur -
 Flagstaff Hill Maritime Museum and Village
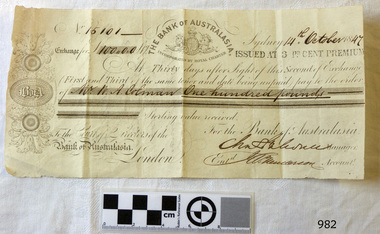
Currency - Bank exchange note, Perkins, Bacon and Perch, 14-10--1847
This exchange note was issued by the Bank of Australasia to Mr N A Coleman for one hundred pounds paid n 14th October 1847 at the Sydney branch. The interest rate was three per cent. This exchange note displays the insignia of the Bank of Australasia, which was incorporated by Royal Charter of England in March 1834. The bank began in Australia on 14th December 1835, opening in Sydney. The Acting Superintendent of the bank at that time was David Charters McArthur. He was Superintendent from 1867-to 1876. The Melbourne branch opened on 28th August 1838 in a two-roomed brick cottage on the north side of Little Collins Street, where two huge mastiff dogs were used at night to guard the bank. The government also provided an armed military sentinel. Due to the bank's rapid growth, a new building for the Melbourne branch was opened in 1840 at 75 Collins Street West. By 1879 the bank had been upgraded to a magnificent two-storey building on the corners of Collins and Queens Streets, with the entry on Collins Street. In 1951 the Bank of Australasia amalgamated with the Union Bank to form the Australia and New Zealand Bank, now known as the ANZ. Then in 1970, the ANZ merged with both the ES&A and the London Bank of Australia to form the ANZ Banking Group Limited. The ANZ Banking Group Ltd kindly donated a variety of historic items from the Bank of Australasia. BANK of AUSTRALASIA, WARRNAMBOOL – In 1854 Warrnambool had two banks, the Union Bank and the Bank of Australasia. Later, completely different bank businesses opened; in 1867 the National Bank of Australasia, then in 1875 the Colonial Bank of Australasia. The original Warrnambool branch of the Bank of Australasia was established in July 1854, and operated from a leased cottage on Merri Street, close to Liebig Street. The bank next bought a stone building previously erected by drapers Cramond & Dickson on the corner of Timor and Gibson Streets. Samuel Hannaford was a teller and then Manager at the Warrnambool branch from 1855 to 1856 and the Warrnambool Council chose that bank for its dealings during 1856-57. In 1859 Roberts & Co. was awarded the contract to build the new Bank of Australasia branch for the sum of £3,000. The land was on a sand hill on the northeast corner of Timor and Kepler Streets and had been bought in 1855 from investor James Cust. The new building opened on May 21, 1860. The bank continued to operate there until 1951 when it merged with the Union Bank to form the ANZ Bank, which continued operating from its Liebig Street building. Warrnambool City Council purchased the former Bank of Australasia building in 1971 and renovated it, then on 3rd December 1973 it was officially opened as the Art Gallery by Cr. Harold Stephenson and Gallery Director John Welsh. The Gallery transferred to the purpose-built building in Liebig Street in 1986 and the old bank building is now the Gallery club. Staff at the Bank of Australasia in Warrnambool included the following men but others were also involved: Samuel Hannaford, Teller then Manager from 1855-1856; W H Palmer, Manager from January 1857 until November 1869 when the Teller Basil Spence was promoted to Manager; H B Chomley, Manager from April 1873 and still there in 1886; A Butt, Manager in 1895-1904; J R McCleary Accountant and Acting Manager for 12 months, until 1900; A Kirk, Manager 1904; J Moore, staff until his transfer to Bendigo in December 1908; J S Bath was Manager until 1915; C C Cox, Manager until April 1923; Richard C Stanley, Manager 1923 to April 1928. The bank exchange note has significance through its association with the Bank of Australasia. The early Australian bank was established in 1834 by Royal Charter and opened in Sydney, Australia, in Sydney in 1835. The bank had many Australian offices in November 1877, particularly on the east and south coasts. Victoria had 45 percent of all Offices. The object is locally significant for its association with the Warrnambool Bank of Australasia, which was established in 1854. It was Warrnambool Council’s first bank. The bank continued to operate until the organisation's merger in 1951 when it became the ANZ Bank Group today. The Bank was an integral part of the growth of local commerce and the community.Bank exchange note for the Bank of Australasia, Sydney, manufactured by Perkins, Bacon and Perch, printed in brown. Insignia depicts a heraldic shield with a lion and unicorn on either side and another insignia with "B of A". Exchange note paid on 14th October 1847. Issued for one hundred pounds and paid to Mr N A Coleman.. Inscriptions include the document number, the date, the amount paid, the receiving person, signatures and a stamp with the interest rate.Handwritten number "15101" "One hundred pounds" "14th October [18] 47" "Mr N A Coleman" Black stamp "ISSUED AT 3 PR CENT PREMIUM" Signatures of [Manager] and [Accountant].flagstaff hill, warrnambool, shipwrecked-coast, flagstaff-hill, flagstaff-hill-maritime-museum, maritime-museum, shipwreck-coast, flagstaff-hill-maritime-village, banknote, currency, exchange note, commerce, banking, finances, bank of australasia, n a coleman, 1847, shipwrecked coast, flagstaff hill maritime museum, maritime museum, shipwreck coast, flagstaff hill maritime village, great ocean road, boa, union bank, australia & new zealand bank, anz bank, david charters mcarthur, d c mcarthur, sydney, new south wales, legal tender -
 Flagstaff Hill Maritime Museum and Village
Domestic object - Bowl, Late 19th or early 20th Century
The Process of Making Pottery Decorating, Firing, Glazing, Making, Technical There is a rhythm and flow to clay. It can’t be done all at once! Even the making process! It can take weeks to get everything done, especially if you can only work on your pottery once a week! Even though we have three hour classes, it’s often just not enough time! Here is an overview of some of the processes so you have a bit more grasp on some of the technical stuff! Step One – Design There are SO many ideas out there for making stuff in clay! From delicate porcelain jewellery, through to heavy sculptural work and everything in between. Deciding your direction is sometimes not that easy – when you first start, try everything, you will naturally gravitate to the style that you enjoy! The options and variations are endless and can get a wee bit overwhelming too! Check in with me before you start to ensure your ideas will work, what order you might do things, how you could achieve the look you are seeking and any other technical data required! Step Two – Making Clay is thixotropic. This means that as you work with it, the clay first gets sloppier and wetter, before is begins to dry in the atmosphere. For most things, you simply can’t do all parts of the project at once. An example of work order might look like: Get last weeks work out from the shelves Prepare clay for today’s work – roll your clay, prepare balls for throwing, make the first stage of a pinch pot) Clean up last week’s work and put it on the shelf for bisque firing Check that you have any glazing to do – and do enough of it that you will have time to finish your main project Do the next step of your next project – there might be a further step that can’t be complete immediately, in that case, wrap your work well and put onto the shelves. Letting your work rest for a while can really help keep your work clean and professional looking. Many things require bagging under plastic to keep it ready for work the next week – put your name on the outside of the bag so you can find your work easily. We have stickers and markers. Consider how you want to decorate your work – coloured slip can be applied at a fairly wet stage (remembering that it will make your work even wetter!). Trying to apply slip to dry clay won’t work! If you want to do sgraffito – you will need to keep the work leather hard (a state of dryness where you can still work the clay with a little effort and a little water and care). Step Three – Drying Most of the time your work can go into the rack uncovered to let it dry out for the following week. If you want to continue forming or shaping you will need to double bag your work – put your work on a suitable sized bat and put the bat in a bag so the base of the bag is under the bat, then put another bag over the top of the work and tuck the top of the bag under the bat. If you want to trim (or turn) your thrown work the following week, it should also be double bagged. If your work is large, delicate, or of uneven thicknesses, you should lightly cover your work for drying. When considering the drying process, bare in mind the weather, humidity and wind! The hotter and dryer, the faster things dry and work can dry unevenly in the shelves – this can lead to cracking – another time to lightly cover your work for drying. Step Four – Trimming and Cleaning Up Your work is dry! It is called greenware now and it is at it’s most fragile! Handle everything with two hands. I often refer to soft hands – keep everything gentle and with your fingers spread as much as possible. Try to not pick up things like plates too much, and always with both hands! Before your work can be bisque fired it should be “cleaned up”. You work won’t go into the kiln if it has sharp edges – when glazed, sharp edges turn into razor blades! Use a piece of fly wire to rub the work all over – this will scratch a little so be light handed. Use a knife or metal kidney to scrape any areas that require a bit more dynamic treatment than the fly wire offers! Finally, a very light wipe over with a slightly damp sponge can help soften and soothe all of your edges and dags! Trimming thrown work: If you are planning to trim (or turn) your thrown work (and you should be), make sure you bag it well – your work should be leather hard to almost dry for easiest trimming. Use this step to finish the work completely – use a metal kidney to polish the surface, or a slightly damp sponge to give a freshly thrown look. Wipe the sponge around the rim after trimming, and check the inside of the pot for dags! Trimming slip cast work: Usually I will trim the rims of your work on the wheel the following day to make that stage easier, however you will still need to check your work for lumps and bumps. Last but not least – check that your name is still clearly on the bottom of your work. Step Five – Bisque Firing When the work is completely dry it can go into the bisque kiln. The bisque kiln is fired to 1000°C. This process burns off the water in the clay as well as some of the chemically bound water. The structure of the clay is not altered that much at this temperature. Inside the bisque kiln, the work is stacked a little, small bowl inside a larger bowl and onto a heavy plate. Smaller items like decorations or drink coasters might get stacked several high. Consideration is paid to the weight of the stack and shape of the work. A bisque kiln can fire about one and a half times the amount of work that the glaze kiln can fire. The firing takes about 10 hours to complete the cycle and about two days to cool down. Once it has been emptied the work is placed in the glaze room ready for you to decorate! Step Six – Glazing Decorating your work with colour can be a lot of fun – and time consuming! There are three main options for surface treatment at this stage: Oxide Washes Underglazes Glazes Washes and underglazes do not “glaze” the work – It will still need a layer of glaze to fully seal the clay (washes don’t need glaze on surfaces not designed for food or liquid as they can gloss up a little on their own). Underglazes are stable colourants that turn out pretty much how they look in the jar. They can be mixed with each other to form other colours and can be used like water colours to paint onto your work. Mostly they should have a clear glaze on top to seal them. Oxides are a different species – the pink oxide (cobalt) wash turns out bright blue for instance. They don’t always need a glaze on top, and some glazes can change the colour of the wash! The glazes need no other “glaze” on top! Be careful of unknown glaze interactions – you can put any combination of glaze in a bowl or on a plate, but only a single glaze on the outside of any vertical surface! Glazes are a chemical reaction under heat. We don’t know the exact chemicals in the Mayco glazes we use. I can guess by the way they interact with each other, however, on the whole, you need to test every idea you have, and not run the test on a vertical surface! Simply put, glaze is a layer of glass like substance that bonds with the clay underneath. Clay is made of silica, alumina and water. Glaze is made of mostly silica. Silica has a melting point of 1700°C and we fire to 1240°C. The silica requires a “flux” to help it melt at the lower temperature. Fluxes can be all sorts of chemicals – a common one is calcium – calcium has a melting point of 2500°C, however, together they both melt at a much lower temperature! Colourants are metal oxides like cobalt (blue), chrome (green through black), copper (green, blue, even red!), manganese (black, purple and pink) iron (red brown), etc. Different chemicals in the glaze can have dramatic effects. for example, barium carbonate (which we don’t use) turns manganese bright pink! Other elements can turn manganese dioxide brown, blue, purple and reddish brown. Manganese dioxide is a flux in and of itself as well. So, glazes that get their black and purple colours, often interact with other glazes and RUN! Our mirror black is a good example – it mixes really well with many glazes because it fluxes them – causes them to melt faster. It will also bring out many beautiful colours in the glazes because it’s black colouring most definitely comes from manganese dioxide! Glaze chemistry is a whole subject on it’s own! We use commercial Mayco glazes on purpose – for their huge range of colour possibilities, stability, cool interactions, artistic freedom with the ability to easily brush the glazes on and ease of use. We currently have almost 50 glazes on hand! A major project is to test the interactions of all glazes with each other. That is 2,500 test tiles!!!! I’m going to make the wall behind the wheels the feature wall of pretty colours! Step Seven – Glaze (Gloss or sometimes called “Glost”) Firing Most of the time this is the final stage of making your creation (but not always!) The glaze kiln goes to 1240°C. This is called cone 6, or midrange. It is the low end of stoneware temperatures. Stoneware clays and glazes are typically fired at cone 8 – 10, that is 1260 – 1290°C. The energy requirement to go from 1240°C to 1280°C is almost a 30% more! Our clay is formulated to vitrify (mature, turn “glass-like”) at 1240°, as are our glazes. A glaze kiln take around 12 hours to reach temperature and two to three days to cool down. Sometimes a third firing process is required – this is for decoration that is added to work after the glaze firing. For example – adding precious metals and lustres. this firing temperature is usually around 600 – 800°C depending upon the techniques being used. There are many students interested in gold and silver trims – we will be doing this third type of firing soon! After firing your work will be in the student finished work shelves. Remember to pay for it before you head out the door! There is a small extra charge for using porcelain clay (it’s more than twice the price of regular clay), and for any third firing process! Once your work has been fired it can not turn back into clay for millennia – so don’t fire it if you don’t like it! Put it in the bucket for recycling. https://firebirdstudios.com.au/the-process-of-making-pottery/ The bowl is an example of kitchenware used in the 19th century and still in use today.Bowl white ceramic. Crack on side. Badly stained.Backstamp very faint and unable to be read.flagstaff hill, warrnambool, shipwrecked-coast, flagstaff-hill, flagstaff-hill-maritime-museum, maritime-museum, shipwreck-coast, flagstaff-hill-maritime-village, mixing bowl, food preparation, kitchen equipment, ceramic -
 Flagstaff Hill Maritime Museum and Village
Domestic object - Bowl
The Process of Making Pottery Decorating, Firing, Glazing, Making, Technical There is a rhythm and flow to clay. It can’t be done all at once! Even the making process! It can take weeks to get everything done, especially if you can only work on your pottery once a week! Even though we have three hour classes, it’s often just not enough time! Here is an overview of some of the processes so you have a bit more grasp on some of the technical stuff! Step One – Design There are SO many ideas out there for making stuff in clay! From delicate porcelain jewellery, through to heavy sculptural work and everything in between. Deciding your direction is sometimes not that easy – when you first start, try everything, you will naturally gravitate to the style that you enjoy! The options and variations are endless and can get a wee bit overwhelming too! Check in with me before you start to ensure your ideas will work, what order you might do things, how you could achieve the look you are seeking and any other technical data required! Step Two – Making Clay is thixotropic. This means that as you work with it, the clay first gets sloppier and wetter, before is begins to dry in the atmosphere. For most things, you simply can’t do all parts of the project at once. An example of work order might look like: Get last weeks work out from the shelves Prepare clay for today’s work – roll your clay, prepare balls for throwing, make the first stage of a pinch pot) Clean up last week’s work and put it on the shelf for bisque firing Check that you have any glazing to do – and do enough of it that you will have time to finish your main project Do the next step of your next project – there might be a further step that can’t be complete immediately, in that case, wrap your work well and put onto the shelves. Letting your work rest for a while can really help keep your work clean and professional looking. Many things require bagging under plastic to keep it ready for work the next week – put your name on the outside of the bag so you can find your work easily. We have stickers and markers. Consider how you want to decorate your work – coloured slip can be applied at a fairly wet stage (remembering that it will make your work even wetter!). Trying to apply slip to dry clay won’t work! If you want to do sgraffito – you will need to keep the work leather hard (a state of dryness where you can still work the clay with a little effort and a little water and care). Step Three – Drying Most of the time your work can go into the rack uncovered to let it dry out for the following week. If you want to continue forming or shaping you will need to double bag your work – put your work on a suitable sized bat and put the bat in a bag so the base of the bag is under the bat, then put another bag over the top of the work and tuck the top of the bag under the bat. If you want to trim (or turn) your thrown work the following week, it should also be double bagged. If your work is large, delicate, or of uneven thicknesses, you should lightly cover your work for drying. When considering the drying process, bare in mind the weather, humidity and wind! The hotter and dryer, the faster things dry and work can dry unevenly in the shelves – this can lead to cracking – another time to lightly cover your work for drying. Step Four – Trimming and Cleaning Up Your work is dry! It is called greenware now and it is at it’s most fragile! Handle everything with two hands. I often refer to soft hands – keep everything gentle and with your fingers spread as much as possible. Try to not pick up things like plates too much, and always with both hands! Before your work can be bisque fired it should be “cleaned up”. You work won’t go into the kiln if it has sharp edges – when glazed, sharp edges turn into razor blades! Use a piece of fly wire to rub the work all over – this will scratch a little so be light handed. Use a knife or metal kidney to scrape any areas that require a bit more dynamic treatment than the fly wire offers! Finally, a very light wipe over with a slightly damp sponge can help soften and soothe all of your edges and dags! Trimming thrown work: If you are planning to trim (or turn) your thrown work (and you should be), make sure you bag it well – your work should be leather hard to almost dry for easiest trimming. Use this step to finish the work completely – use a metal kidney to polish the surface, or a slightly damp sponge to give a freshly thrown look. Wipe the sponge around the rim after trimming, and check the inside of the pot for dags! Trimming slip cast work: Usually I will trim the rims of your work on the wheel the following day to make that stage easier, however you will still need to check your work for lumps and bumps. Last but not least – check that your name is still clearly on the bottom of your work. Step Five – Bisque Firing When the work is completely dry it can go into the bisque kiln. The bisque kiln is fired to 1000°C. This process burns off the water in the clay as well as some of the chemically bound water. The structure of the clay is not altered that much at this temperature. Inside the bisque kiln, the work is stacked a little, small bowl inside a larger bowl and onto a heavy plate. Smaller items like decorations or drink coasters might get stacked several high. Consideration is paid to the weight of the stack and shape of the work. A bisque kiln can fire about one and a half times the amount of work that the glaze kiln can fire. The firing takes about 10 hours to complete the cycle and about two days to cool down. Once it has been emptied the work is placed in the glaze room ready for you to decorate! Step Six – Glazing Decorating your work with colour can be a lot of fun – and time consuming! There are three main options for surface treatment at this stage: Oxide Washes Underglazes Glazes Washes and underglazes do not “glaze” the work – It will still need a layer of glaze to fully seal the clay (washes don’t need glaze on surfaces not designed for food or liquid as they can gloss up a little on their own). Underglazes are stable colourants that turn out pretty much how they look in the jar. They can be mixed with each other to form other colours and can be used like water colours to paint onto your work. Mostly they should have a clear glaze on top to seal them. Oxides are a different species – the pink oxide (cobalt) wash turns out bright blue for instance. They don’t always need a glaze on top, and some glazes can change the colour of the wash! The glazes need no other “glaze” on top! Be careful of unknown glaze interactions – you can put any combination of glaze in a bowl or on a plate, but only a single glaze on the outside of any vertical surface! Glazes are a chemical reaction under heat. We don’t know the exact chemicals in the Mayco glazes we use. I can guess by the way they interact with each other, however, on the whole, you need to test every idea you have, and not run the test on a vertical surface! Simply put, glaze is a layer of glass like substance that bonds with the clay underneath. Clay is made of silica, alumina and water. Glaze is made of mostly silica. Silica has a melting point of 1700°C and we fire to 1240°C. The silica requires a “flux” to help it melt at the lower temperature. Fluxes can be all sorts of chemicals – a common one is calcium – calcium has a melting point of 2500°C, however, together they both melt at a much lower temperature! Colourants are metal oxides like cobalt (blue), chrome (green through black), copper (green, blue, even red!), manganese (black, purple and pink) iron (red brown), etc. Different chemicals in the glaze can have dramatic effects. for example, barium carbonate (which we don’t use) turns manganese bright pink! Other elements can turn manganese dioxide brown, blue, purple and reddish brown. Manganese dioxide is a flux in and of itself as well. So, glazes that get their black and purple colours, often interact with other glazes and RUN! Our mirror black is a good example – it mixes really well with many glazes because it fluxes them – causes them to melt faster. It will also bring out many beautiful colours in the glazes because it’s black colouring most definitely comes from manganese dioxide! Glaze chemistry is a whole subject on it’s own! We use commercial Mayco glazes on purpose – for their huge range of colour possibilities, stability, cool interactions, artistic freedom with the ability to easily brush the glazes on and ease of use. We currently have almost 50 glazes on hand! A major project is to test the interactions of all glazes with each other. That is 2,500 test tiles!!!! I’m going to make the wall behind the wheels the feature wall of pretty colours! Step Seven – Glaze (Gloss or sometimes called “Glost”) Firing Most of the time this is the final stage of making your creation (but not always!) The glaze kiln goes to 1240°C. This is called cone 6, or midrange. It is the low end of stoneware temperatures. Stoneware clays and glazes are typically fired at cone 8 – 10, that is 1260 – 1290°C. The energy requirement to go from 1240°C to 1280°C is almost a 30% more! Our clay is formulated to vitrify (mature, turn “glass-like”) at 1240°, as are our glazes. A glaze kiln take around 12 hours to reach temperature and two to three days to cool down. Sometimes a third firing process is required – this is for decoration that is added to work after the glaze firing. For example – adding precious metals and lustres. this firing temperature is usually around 600 – 800°C depending upon the techniques being used. There are many students interested in gold and silver trims – we will be doing this third type of firing soon! After firing your work will be in the student finished work shelves. Remember to pay for it before you head out the door! There is a small extra charge for using porcelain clay (it’s more than twice the price of regular clay), and for any third firing process! Once your work has been fired it can not turn back into clay for millennia – so don’t fire it if you don’t like it! Put it in the bucket for recycling. https://firebirdstudios.com.au/the-process-of-making-pottery/ This bowl is an example of kitchenware used in the 19th century and still in use today.Bowl white ceramic plain that has two sets of edging around lip. Inside bowl has plaster designed to look like cooking mixture.flagstaff hill, warrnambool, shipwrecked-coast, flagstaff-hill, flagstaff-hill-maritime-museum, maritime-museum, shipwreck-coast, flagstaff-hill-maritime-village, kitchen equipment, ceramic -
 Flagstaff Hill Maritime Museum and Village
Domestic object - Bowl, J & G Meakin, Late 19th or early 20th Century
The Process of Making Pottery Decorating, Firing, Glazing, Making, Technical There is a rhythm and flow to clay. It can’t be done all at once! Even the making process! It can take weeks to get everything done, especially if you can only work on your pottery once a week! Even though we have three hour classes, it’s often just not enough time! Here is an overview of some of the processes so you have a bit more grasp on some of the technical stuff! Step One – Design There are SO many ideas out there for making stuff in clay! From delicate porcelain jewellery, through to heavy sculptural work and everything in between. Deciding your direction is sometimes not that easy – when you first start, try everything, you will naturally gravitate to the style that you enjoy! The options and variations are endless and can get a wee bit overwhelming too! Check in with me before you start to ensure your ideas will work, what order you might do things, how you could achieve the look you are seeking and any other technical data required! Step Two – Making Clay is thixotropic. This means that as you work with it, the clay first gets sloppier and wetter, before is begins to dry in the atmosphere. For most things, you simply can’t do all parts of the project at once. An example of work order might look like: Get last weeks work out from the shelves Prepare clay for today’s work – roll your clay, prepare balls for throwing, make the first stage of a pinch pot) Clean up last week’s work and put it on the shelf for bisque firing Check that you have any glazing to do – and do enough of it that you will have time to finish your main project Do the next step of your next project – there might be a further step that can’t be complete immediately, in that case, wrap your work well and put onto the shelves. Letting your work rest for a while can really help keep your work clean and professional looking. Many things require bagging under plastic to keep it ready for work the next week – put your name on the outside of the bag so you can find your work easily. We have stickers and markers. Consider how you want to decorate your work – coloured slip can be applied at a fairly wet stage (remembering that it will make your work even wetter!). Trying to apply slip to dry clay won’t work! If you want to do sgraffito – you will need to keep the work leather hard (a state of dryness where you can still work the clay with a little effort and a little water and care). Step Three – Drying Most of the time your work can go into the rack uncovered to let it dry out for the following week. If you want to continue forming or shaping you will need to double bag your work – put your work on a suitable sized bat and put the bat in a bag so the base of the bag is under the bat, then put another bag over the top of the work and tuck the top of the bag under the bat. If you want to trim (or turn) your thrown work the following week, it should also be double bagged. If your work is large, delicate, or of uneven thicknesses, you should lightly cover your work for drying. When considering the drying process, bare in mind the weather, humidity and wind! The hotter and dryer, the faster things dry and work can dry unevenly in the shelves – this can lead to cracking – another time to lightly cover your work for drying. Step Four – Trimming and Cleaning Up Your work is dry! It is called greenware now and it is at it’s most fragile! Handle everything with two hands. I often refer to soft hands – keep everything gentle and with your fingers spread as much as possible. Try to not pick up things like plates too much, and always with both hands! Before your work can be bisque fired it should be “cleaned up”. You work won’t go into the kiln if it has sharp edges – when glazed, sharp edges turn into razor blades! Use a piece of fly wire to rub the work all over – this will scratch a little so be light handed. Use a knife or metal kidney to scrape any areas that require a bit more dynamic treatment than the fly wire offers! Finally, a very light wipe over with a slightly damp sponge can help soften and soothe all of your edges and dags! Trimming thrown work: If you are planning to trim (or turn) your thrown work (and you should be), make sure you bag it well – your work should be leather hard to almost dry for easiest trimming. Use this step to finish the work completely – use a metal kidney to polish the surface, or a slightly damp sponge to give a freshly thrown look. Wipe the sponge around the rim after trimming, and check the inside of the pot for dags! Trimming slip cast work: Usually I will trim the rims of your work on the wheel the following day to make that stage easier, however you will still need to check your work for lumps and bumps. Last but not least – check that your name is still clearly on the bottom of your work. Step Five – Bisque Firing When the work is completely dry it can go into the bisque kiln. The bisque kiln is fired to 1000°C. This process burns off the water in the clay as well as some of the chemically bound water. The structure of the clay is not altered that much at this temperature. Inside the bisque kiln, the work is stacked a little, small bowl inside a larger bowl and onto a heavy plate. Smaller items like decorations or drink coasters might get stacked several high. Consideration is paid to the weight of the stack and shape of the work. A bisque kiln can fire about one and a half times the amount of work that the glaze kiln can fire. The firing takes about 10 hours to complete the cycle and about two days to cool down. Once it has been emptied the work is placed in the glaze room ready for you to decorate! Step Six – Glazing Decorating your work with colour can be a lot of fun – and time consuming! There are three main options for surface treatment at this stage: Oxide Washes Underglazes Glazes Washes and underglazes do not “glaze” the work – It will still need a layer of glaze to fully seal the clay (washes don’t need glaze on surfaces not designed for food or liquid as they can gloss up a little on their own). Underglazes are stable colourants that turn out pretty much how they look in the jar. They can be mixed with each other to form other colours and can be used like water colours to paint onto your work. Mostly they should have a clear glaze on top to seal them. Oxides are a different species – the pink oxide (cobalt) wash turns out bright blue for instance. They don’t always need a glaze on top, and some glazes can change the colour of the wash! The glazes need no other “glaze” on top! Be careful of unknown glaze interactions – you can put any combination of glaze in a bowl or on a plate, but only a single glaze on the outside of any vertical surface! Glazes are a chemical reaction under heat. We don’t know the exact chemicals in the Mayco glazes we use. I can guess by the way they interact with each other, however, on the whole, you need to test every idea you have, and not run the test on a vertical surface! Simply put, glaze is a layer of glass like substance that bonds with the clay underneath. Clay is made of silica, alumina and water. Glaze is made of mostly silica. Silica has a melting point of 1700°C and we fire to 1240°C. The silica requires a “flux” to help it melt at the lower temperature. Fluxes can be all sorts of chemicals – a common one is calcium – calcium has a melting point of 2500°C, however, together they both melt at a much lower temperature! Colourants are metal oxides like cobalt (blue), chrome (green through black), copper (green, blue, even red!), manganese (black, purple and pink) iron (red brown), etc. Different chemicals in the glaze can have dramatic effects. for example, barium carbonate (which we don’t use) turns manganese bright pink! Other elements can turn manganese dioxide brown, blue, purple and reddish brown. Manganese dioxide is a flux in and of itself as well. So, glazes that get their black and purple colours, often interact with other glazes and RUN! Our mirror black is a good example – it mixes really well with many glazes because it fluxes them – causes them to melt faster. It will also bring out many beautiful colours in the glazes because it’s black colouring most definitely comes from manganese dioxide! Glaze chemistry is a whole subject on it’s own! We use commercial Mayco glazes on purpose – for their huge range of colour possibilities, stability, cool interactions, artistic freedom with the ability to easily brush the glazes on and ease of use. We currently have almost 50 glazes on hand! A major project is to test the interactions of all glazes with each other. That is 2,500 test tiles!!!! I’m going to make the wall behind the wheels the feature wall of pretty colours! Step Seven – Glaze (Gloss or sometimes called “Glost”) Firing Most of the time this is the final stage of making your creation (but not always!) The glaze kiln goes to 1240°C. This is called cone 6, or midrange. It is the low end of stoneware temperatures. Stoneware clays and glazes are typically fired at cone 8 – 10, that is 1260 – 1290°C. The energy requirement to go from 1240°C to 1280°C is almost a 30% more! Our clay is formulated to vitrify (mature, turn “glass-like”) at 1240°, as are our glazes. A glaze kiln take around 12 hours to reach temperature and two to three days to cool down. Sometimes a third firing process is required – this is for decoration that is added to work after the glaze firing. For example – adding precious metals and lustres. this firing temperature is usually around 600 – 800°C depending upon the techniques being used. There are many students interested in gold and silver trims – we will be doing this third type of firing soon! After firing your work will be in the student finished work shelves. Remember to pay for it before you head out the door! There is a small extra charge for using porcelain clay (it’s more than twice the price of regular clay), and for any third firing process! Once your work has been fired it can not turn back into clay for millennia – so don’t fire it if you don’t like it! Put it in the bucket for recycling. https://firebirdstudios.com.au/the-process-of-making-pottery/This bowl was made by renowned pottery company J & G Meakin of England. The firm was established in the mid-1800's. The bowl is an example of kitchenware used in the 19th century and still in use today.Bowl; white ceramic, round and tapering inwards towards base. Made by J and G Meakin England.On base, 'Ironstone China Reg SOL 391413' with symbolflagstaff hill, flagstaff hill maritime museum and village, warrnambool, maritime museum, maritime village, great ocean road, shipwreck coast, mixing bowl, food preparation, j & g meakin, pottery, stoke-on-trent, kitchen equipment, ceramic -
 Flagstaff Hill Maritime Museum and Village
Book - Religious Book, James Semple, The Holy Bible: The Old Testament and The New Testament, c. 1875
A Holy Bible of this size and design was a common possession to be brought to Australia with migrating families. Part of family routine in a Victorian home would included the head of the family reading a passage from the Bible to the family. A Bible was a prized possession. It often included inserts of family records, and children would use the text to learn to read.This Bible is of cultural significance, representing part of family routine, religious beliefs and basic life principals.Book, the Holy Bible, has hard brown, heavily bound cover with gold embossing. The book has two brass locking clips on the open side. Pages have gilt edges. Printed in Glasgow by James Semple. The book has additional notes by Rev Gen Leo Haydock. It has been translated from the Latin Vulgate. Published c. 1875flagstaff hill, warrnambool, shipwrecked-coast, flagstaff-hill, flagstaff-hill-maritime-museum, maritime-museum, shipwreck-coast, flagstaff-hill-maritime-village, the holy bible the old testament and the new testament, bible, book, religion, holy bible, rev geo leo haydock, latin vulgate, family bible