Showing 28322 items
matching black street
-
 Orbost & District Historical Society
hat pin cushion, !920's - 1930's
A handmade pink rayon crocheted pincushion. It is circular with two circular pieces - one large, one small - to resemble a hat. The top section is to be padded. It is threaded with pink ribbon. Two hatpins have been stuck unto it. One has a white pearl knob and the other a black pearl knob. -
 Orbost & District Historical Society
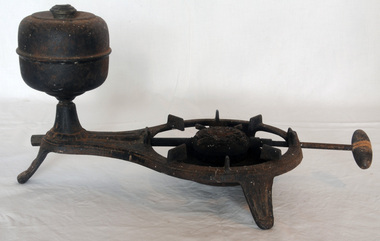
stove/burner, C 1905
A black camp stove, single burner, which uses alcohol fuel. It is made of iron and has a steel reservoir for the fuel. There is a wooden handle for fuel control. Embossed on centre of burner: ”Brilliant / D.R. Patent”.stove burner fuel-stove cooking food-preparation -
 Orbost & District Historical Society
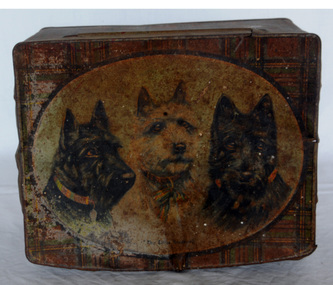
biscuit tin, C 1930's - 1950's
A large tin with a hinged lid that has a photo of three Scottie dogs in an oval frame. There are two black dogs with a white dog between them and below them is written "the three scotties". On all side is a tartan pattern in red/green/blue and yellow. The front of the tin is slightly curved. It may have contained shortbread biscuits. -
 Orbost & District Historical Society
bottle, C 1935-1950
Glass bottles were refillable until the 1960s, creating a demand for their collection and onsale back to beverage manufacturers via ‘bottle merchants’.A clear glass soft drink bottle with an in ternal screw in top of red plastic and black rubber. It contained 30 fluid ounces. The bottle has a diamond pattern at the top and bottom. The label is painted on the front in red and white.Base- AGM 12 M Label - Serve Icy Cold Preservative Added MARCHANTS Artificially Coloured It's the most Net Contents 30 fl ozs The container is not soldmarchants soft-drinks bottle beverages -
 Orbost & District Historical Society
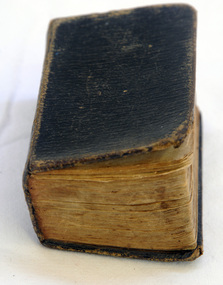
book, 1850's
A very small book with a black leather cover. It contains Methodist hymns. The book was authored by Rev. John Wesley.In front - indecipherable - date only - 1858 -
 Orbost & District Historical Society
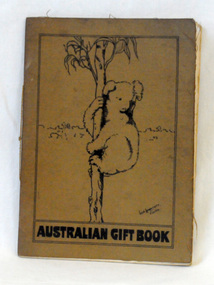
gift book, Australian armed Forces, Australian Gift Book, 1916
Early in World War I local women's groups in Australia began working to provide provide tobacco, cakes, puddings, condensed milk, sugar, biscuits, newspapers and other 'luxury' items to supplement the Australian soldier's army rations. These fund-raising bodies were amalgamated in 1916 to form a national body, The Australian Comforts Fund (ACF), which undertook to provide 'comforts' to all Australians abroad. Sales of this book raised funds for The Australian Comforts Fund.A thin book with a brown fabric cover. On the cover is a black line drawing of a koala in a tree. It contains a summary of the work done by the Australian Comforts Funds at the front, Anzac and Mudros, at the camps in Egypt with a summary of gifts and statement of accounts.The book sold for 3/- or 15 P.T. in aid of the A.C.F. It was edited by William Beit. -
 Orbost & District Historical Society
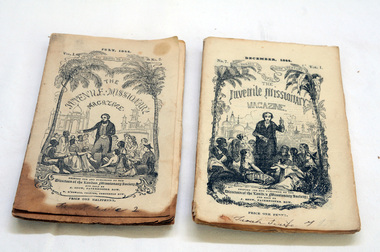
magazines, Juvenile Missionary, 1844
The Juvenile Missionary Magazine was a 19th century publication of the London Missionary Society. The Juvenile Missionary Magazine began in 1844, and ran until 1887. Two small paper magazines. On the front covers are black and white illustrations of a preacher holding a sermon among young children. 608.1 is Vol 1 No. 2 July 1844. 608.2 is Vol. 1 No.7 December 1844.magazine religion religious-text -
 Orbost & District Historical Society
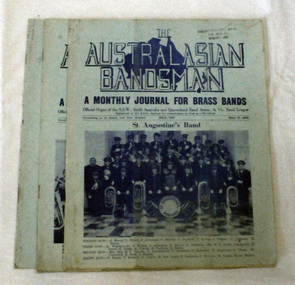
jounals, Australasian Bandsman, July, October, November 1966
The Australasian Bandsman was a monthly journal devoted to bands. It began in the 1890's and was still being published in 2013.The various Orbost bands over the years played a major role in community activities providing entertainment and musical experiences for the many members. Primary Significance Criteria Three journals of the Australasian Bandsman. All have blue covers with darker blue print. Inside are white pages with black text. All are published by E. V. Simons P.O. Box 16 Portland New South Wales. 2085.1 July 1966 2085.2 October 1966 2085.3 November 1966Stamped with ORBOST MUNICIPAL BANDjournal magazine australasian-bandsman music -
 Orbost & District Historical Society
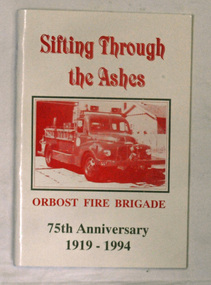
books, Sifting Through The Ashes, 1994
The book was collated by Debbie Hall. Orbost Fire brigade was founded in 1919. The first captain was George Hodgson, assisted by Lieutenant Reg Macalister, Secretary J.F.McCoy and fifteen members. .As there was no fire station the ree l ( a cast off fro m the Bairnsdale Brigade ) w as kep t in the shed at the back of the Council Chambers until the present Station was built in 1922 in its present location in Gladstone Street, Orbost. This book is a written record of the first one hundred years of the Orbost Fire Brigade.Two copies of a paperback book with a white cover and red print. On the cover is a photo of a fire truck in a rectangular frame. The book was produced for the 75th Anniversary of Orbost Fire Brigade 1919-1994. The book contains black and white photographs of Fire brigade activities and extracts from the "Snowy River Mail".In blue pen - "Presented to the Orbost Historical Society from Orbost Fire Brigade - November 12th 1994"book orbost-fire-brigade -
 Orbost & District Historical Society
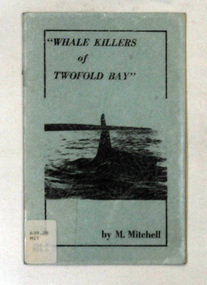
books, Whale Killers of Twofold Bay, circa 1960
Author, Mary Mitchell was the daughter of Charles Wellings early resident of Eden. Charles took many of the early photos of Eden while his brother, Henry, did the research on the Imlay Bros (very early settlers of Orbost) and early Twofold Bay settlers. Mary Wellings married Roy Mitchell of Lower Towamba. In Eden there are streets and a park named for both families.These books record the history of the whaling industry on the south coast of New South Wales.Two copies of a small thin ten page booklet with blue laminated covers. It has black print and a black photo of a whale tail on the front cover.It was written by Mary Mitchell. The book relates the history of whaling at Twofold Bay on the south coast of New South Wales.2116.1 - has a library sticker on the front cove - bottom left hand cornertwofold-bay whaling mitchell-mary welliings -
 Orbost & District Historical Society
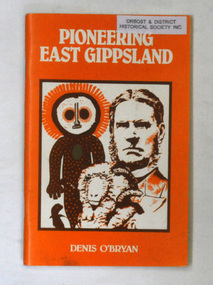
book, Pioneering East Gippsland, 1983
The author, Denis O'Bryan was an assistant forester in Orbost, 1977/78.This book is a chronological history of East Gippsland.A small paperback book with a bright orange front cover. It has a stylised picture with historical drawings of a settler, sheep and Aboriginal art. The book was written by Denis O'Bryan and is a chronological account of the history of East Gippsland. It contains black and white photos.In pen - Marina Johnson $5.95 stamp of Orbost Historical Society Box 344 2190 Orb ostpionering-east-gippsland o'bryan-denis history-east-gippsland -
 Orbost & District Historical Society
book, Farming In East Gippsland - Past, Present and Future, 1985
This seminar was organized by a committee as part of Victoria's 150th anniversary celebrations. It was published by the Dept. of Agriculture for East Gippsland Primary Industry Committee in 1985. Victoria's 150th anniversary was celebrated in 1984-1985. A 136 pp book with a black spine and a white cover. On the cover in black print is a logo created for the sesquicentenary of Melbourne and Victoria. Underneath the logo is VICTORIA 150 and Growing Together 1984-85. The book contains the records of the seminar, "Farming in East Gippsland - Past, Present and Future". At the bottom of this page is "Bairnsdale May 1 1985. In the bottom left corner is a library sticker from Orbost Secondary College.agriculture east-gippsland victoria-150 -
 Orbost & District Historical Society
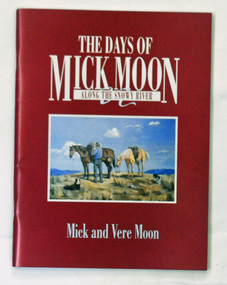
book, The Days of Mick Moon - along the Snowy River, 1988
A 47 pp book containing anecdotes of frontier life around Buchan, stories and line drawings. It has a dark red cover with the title in white print. In a frame is a painting of a stockman adjusting the saddle on a brown horse with white horse standing next to it. There are two black and white dogs lying nearby. The setting is the alpine region of Victoria. the book was authored by Mick and Vere Moon.snowy-river moon-mick buchan -
 Orbost & District Historical Society
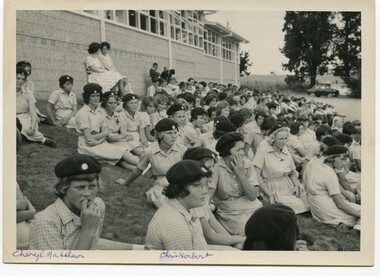
black and white photograph, 13 March 1962
The photograph shows students watching the Orbost High School Golden Jubilee celebrations . Two girls in the front are Cheryl Matthews and Chris Herbert who are still local women.Orbost High School / Orbost Secondary College has played a significant part in the education of senior students in the Orbost district . It is the sole senior educational institution. This item is representative of its historyA black / white photograph of studentssitting on lawns outside the Orbost High School.on back - "Orbost H.S. Golden Jubilee 1962" on front - " Cheryl Matthews, Chris Herbert"education-orbost orbost-high-school-golden-jubilee -
 Orbost & District Historical Society
black and white photograph, 13 March 1962
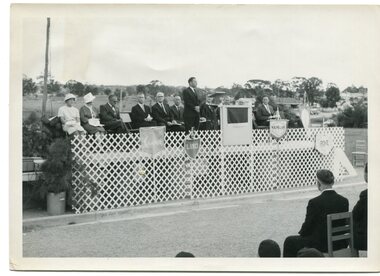
The photograph shows Mary Gilbert, Nan Pardew, Alex McDonald (head of Dept of Education), Harry Perry, Bruce Osborne (Head Master), Bruce Evans (M.L.C.), Peter Nixon (minister For the Interior), Mr Truscott (Orbost Shire Councillor) and Colin Lyons (Senior Master) at the Orbost High School Golden Jubilee celebrations 1962.Orbost High School / Orbost Secondary College has played a significant part in the education of senior students in the Orbost district . It is the sole senior educational institution. This item is representative of its historyA black / white photograph of a man on an outside stage addressing an audience with other officials sitting on the stage behind him,on back - " Nam??" Golden Jubilee 1962" -
 Orbost & District Historical Society
black and white photograph, March 13 1962
The photo shows the Orbost Marching Girls at the Golden Jubilee of the Orbost High School in 1962.Orbost High School / Orbost Secondary College has played a significant part in the education of senior students in the Orbost district . It is the sole senior educational institution. This item is representative of its historyA black / white photograph of female students marching at the Orbost High School with a crowd watching.front bottom - "1962 Back To + High School Gold Jubilee opening new block" on back - "Golden Jubilee 1962. Girls marching"education- orbost orbost-high-school-golden-jubilee orbost--marching-girls -
 Orbost & District Historical Society
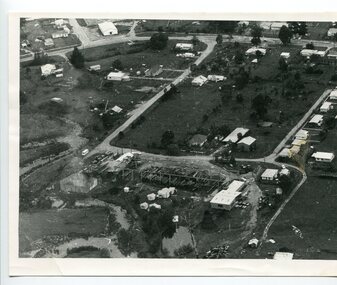
black and white photograph
A black / white aerial photograph of a sawmill in Orbost.timber-industry-orbost sawmill -
 Orbost & District Historical Society
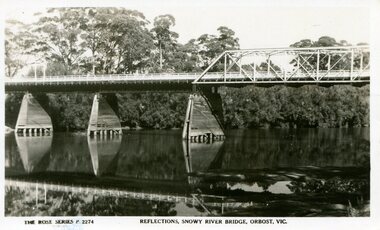
postcard, C1920-1940
This photograph shows the second major bridge across the Snowy River at Orbost. The current Snowy River bridge is the fourth to provide a crossing to the township of Orbost. The first, in 1891, lasted just two years before it succumbed to flood waters. The bridge in this photograph was built in the 1920s as a road and rail bridge, and was again partly washed away by flood waters in 1934. After the end of the first World War the Victorian Railways considered an extension of the railhead across the river at Orbost, and in 1922 a new timber and steel girder structure, a joint Country Roads Board — Victorian Railways venture, was built and completed at a cost of £41,000 (the steel girders came from the Flinders Street viaduct reconstruction). Subsequently it was decided not to take the railway across the river, and the bridge was only used by road traffic. It was severely battered by floods during its life. and after the 1971 floods was eventually replaced by the current bridge in 1975. (info from Newletter 54N by John Phillips) This item is an early pictorial record of the previous Snowy River bridge at Orbost.A postcard with a black / white photograph of a bridge - timber and steel girder structure - across the Snowy River at Orbost, Reflections of the bridge are seen in the water.snowy-river-bridge-orbost -
 Orbost & District Historical Society
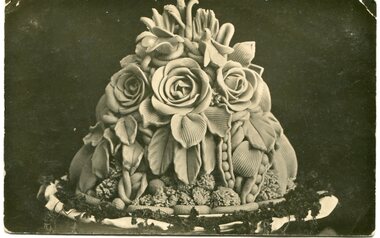
black and white photograph, Sherwood, Herbert, 1900
This display of butter was created by Mrs Jessie Petterson for the Harvest Festival. Ten pounds of butter was used. The Harvest Festival display was always put together by the church ladies ( Orbost Presbyterian Church) and was a family friendly festival celebrating the end of summer. The Harvest Festivals were regular community events in Orbost during the first half of the 20th century. This photograph is associated with that time.A black / white photograph postcard of a butter sculpture, a flower arrangement carved out of butter.on back - "display of butter by Mrs Jessie Petterson, 1900"harvert-festival sculpture-butter petterson-jessie -
 Orbost & District Historical Society
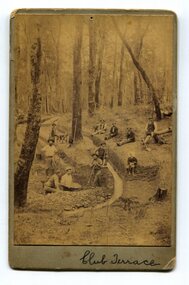
black and white photograph, 1890's
This item was found in the collection with no information recorded. On the back is a short message wishing a happy Christmas to Bessie and Jack from M.W. The photograph shows miners at Club Terrace.This item is a pictorial record of the gold mining history of East Gippsland.A yellowed black / white photograph on grey buff card. It is of men panning for gold and digging trenches.on front - " Club Terrace" on back - " To Bessie, Jack from M.W."club-terrace gold-mining gold-panning gold -
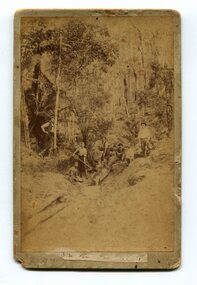 Orbost & District Historical Society
black and white photograph, 1897
The photo shows miners looking for gold at Dead Horse Creek at Club Terrace. The subjects are unknown.This is a pictorial record of gold mining in East Gippsland in the late 19th century.A yellowed black / white photograph on grey buff card. It is of seven men in the bush mining for gold.on back - "Dead Horse Creek - Club Terrace, 1897"gold-mining gold-panning-club-terrace dead-horse-creek-gold -
 Orbost & District Historical Society
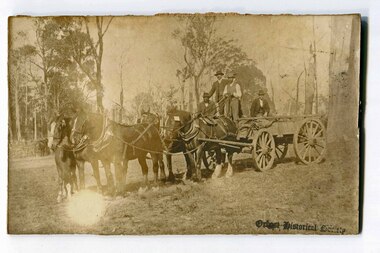
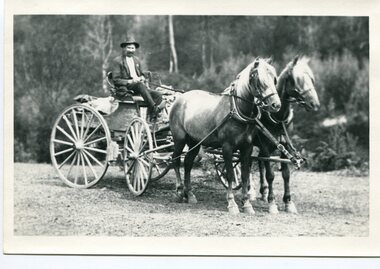
black and white photograph, second half 19th century?
This photograph is a record of the time when horse drawn vehicles were the main form of transport.A black / white photograph of five well - dressed men on a four horse drawn cart. It is on a rough bush track. Three men are standing, the others sitting. There are trees and bush in the background There is another horse - drawn vehicle on the left in the background.transport horse-drawn-vehicle -
 Orbost & District Historical Society
black and white photograph, C 1920s
... of the Orbost Club Hotel in Nicholson Street, Orbost.. black and white ...The photograph shows the coach owned by Mr Tom Malinn of Sardine Creek. It is in front of the Orbost Club Hotel in Nicholson Street, Orbost. On lst Juy 1926, Tom Malin took over the horse drawn coach run from Orbost to Delegate. After a few years he obtained an International 2-3 ton truck. On his first trip to Bendoc he did not carry mail, but brought Miss Cunning, the first lady head teacher and collected ballot boxes. On his next trip (March 1930) he made history as the first mailman on this route to deliver mail in a motor vehicle. (info. Bendoc History) Tom and Sophie Malinn farmed at Martin’s Creek. Sophie (nee Jensen) married Tom Malinn in 1926. Sophie’s family had run the historic “Danebo Hotel” at Martin’s Creek for many years, and in 1931, Tom and Sophie began farming at Martin’s Creek, initially cropping maize and beans. The first hotel built in Orbost was the Club in 1885, an old wooden place on the corner built for J. A. Petersen of the Mitchell Hotel Bairnsdale, now known as the Victoria Hotel. Tom Maguire, a stepson of the late Mr. Petersen, carried on the club Hotel Orbost for 5 or 6 years. The property then came into the possession of Alfred Cooper, a Yorkshireman who purchased the freehold about 1890, pulled the building down and erected the present structure.This is a pictorial history horse-drawn transport used widely in Orbost until the late 1920sA black / white photograph of a horse-drawn buggy with four men on the buggy and two mmen standing beside it, It is in front of the Orbost Club Hotel in Nicholson Street, Orbost..on back - "Tom Malinn on coach run"malinn-tom club-hotel-orbost transport-orbost -
 Orbost & District Historical Society
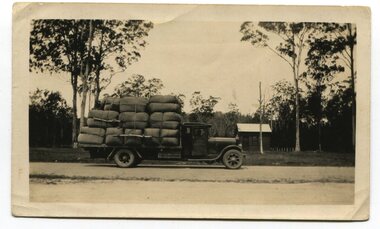
black and white photograph, first half 20th century
The photograph shows a loaded truck outside the Noorinbee Store. This is a pictorial record of early road transport in East Gippsland.A black / white photograph of a large truck loaded with large bundles. It is in front of a small store at Noorinbee on the main road.on back - "in front of Noorinbee Store"transport noorinbee -
 Orbost & District Historical Society
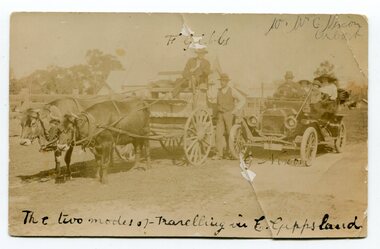
black and white photograph, C1915
The photograph shows two modes of transport in the early 1900s. Mr F. Gibbs is driving the bullock team and Mr G. Nixon and his family are in the car.This is a pictorial record of transport in Orbost in the early 20th century.A black / white photograph post card showing a bullock team and a motor car.on front at top - " F Gibbs; W.W. G. Nixon, Orbost." on front at bottom - "The two modes of travelling in East Gippsland" on back is a letter from "Jack & Nell to "Alice" transport bullock-team nixon-george -
 Orbost & District Historical Society
black and white photograph, C1900
Harry Ingram delivered milk, bread, groceries and meat to towns between Delegate and Orbost with his eldest son. The pair generally drove a four wheeled wagon pulled by five horses along a hand carved winding track through the mountains. This is a pictorial record of transport in the early 20th century in Orbost. It is associated with the Ingram family settlers in Orbost from 1938.A black / white photograph of a man on a horse drawn cart.on back - "Harry Ingram"ingram-harry transport-c19th -
 Orbost & District Historical Society
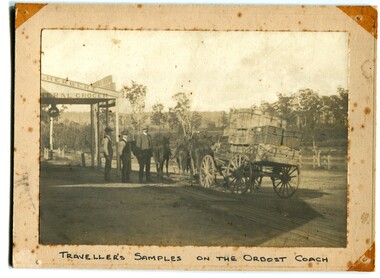
black and white photograph, C 1890s
The photograph shows the Royal Mail wagon outside Herbert's General Store in the main street of Orbost. Lancelot Herbert came to Orbost in 1886, taking up a partnership with local store-owner George Temple. After Mr Temple’s death in 1891, Lancelot took over the store and progressively developed Herberts Snowy River Stores which grew into a department store of several shops along Nicholson StThis is a pictorial record of transport in 19th century Orbost. It is associated with the Herbert family.A black / white photograph of a travelling salesman and his samples on the Orbost Coach outside Herbert's grocery store. Two other men are standing nearby. The photograph is on a cream buff card.on front - "Traveller's Samples on Orbost Coach"herbert's-store transport -
 Orbost & District Historical Society
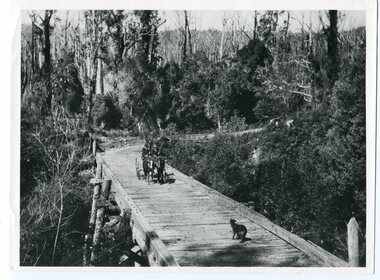
black and white photograph, 1913
This photograph is of the low level bridge across the Bemm River about 50 km east of Orbost in East Gippsland.This is a pictorial record of the 1913 low level bridge across the Bemm River, East Gippsland.A large black / white photograph of a horse - drawn wagon on the low level Bemm River bridge. In the foreground on the bridge is a dog.on back - "Country Roads Board Princes Highway low level bridge" -
 Orbost & District Historical Society
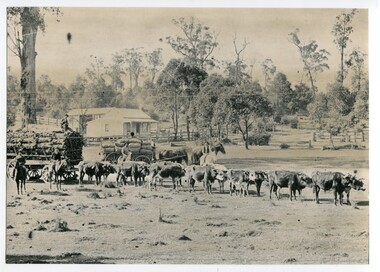
black and white photograph, 1889
This photograph shows a large bullock team at the foot (eastern side?) of the Orbost township.This is a pictorial record of transport used in the late 19th century in Orbost.A large black / white photograph of a bullock team pulling a laden cart. A man is sitting on top of the freight. In the background is a horse - drawn cart loaded with sacks (maize?) with a man on a horse to the side and another standing on the shafts. In the foreground are two men on horses. There is a small house and barn in the background.on back - " At the foot of the township - 1889"orbost transport-bullock-teams horse-drawn-transport -
 Orbost & District Historical Society
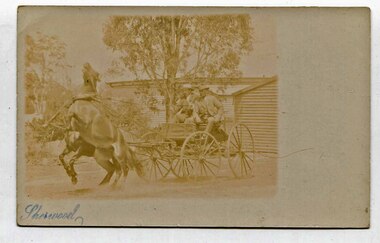
black and white photograph, Sherwood, Herbert
There is currently no information on this item.A faded black / white photograph / postcard of a horse - drawn cart with one of the two horses rearing up. Two men are on the cart. on front - "Sherwood"transport-horse-drawn