Showing 288 items
matching colouring
-
 The Beechworth Burke Museum
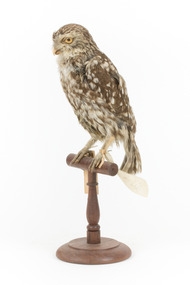
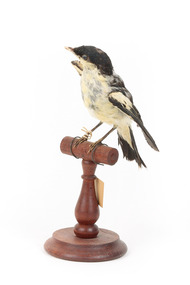
Animal specimen - Diurnal Owl / Ural Owl
Little owls (also known as the owl of Athena or owl of Minerva) usually prefer the warmer parts of Europe, North Africa and Asia, enjoying open country and agricultural land with high trees to swoop down upon their prey from. Their diet includes amphibians, small mammals, reptiles and insects that they also hunt from small holes in the ground. Little owls are monogamous and while they're usually solitary creatures, pairs who breed together will often stay together past breeding season. An Athene Noctua would usually be slightly smaller than this specimen. The colouring of browns and whites speckling the feathers is an accurate representation however the posture of a typical little owl would be more crouched, not so thin and tall. This specimen is part of a collection of almost 200 animal specimens that were originally acquired as skins from various institutions across Australia, including the Australian Museum in Sydney and the National Museum of Victoria (known as Museums Victoria since 1983), as well as individuals such as amateur anthropologist Reynell Eveleigh Johns between 1860-1880. These skins were then mounted by members of the Burke Museum Committee and put-on display in the formal space of the Museum’s original exhibition hall where they continue to be on display. This display of taxidermy mounts initially served to instruct visitors to the Burke Museum of the natural world around them, today it serves as an insight into the collecting habits of the 19th century.This specimen is part of a significant and rare taxidermy mount collection in the Burke Museum. This collection is scientifically and culturally important for reminding us of how science continues to shape our understanding of the modern world. They demonstrate a capacity to hold evidence of how Australia’s fauna history existed in the past and are potentially important for future environmental research. This collection continues to be on display in the Museum and has become a key part to interpreting the collecting habits of the 19th century.This Athene Nuctua (The Little Owl) is dark to medium brown with white specks all over the feathers. Large white spots are located on their wings/back. This specimen has some inconsistencies with how it has been styalised by the taxidermist. The tail curls in under itself where it should be straight and flat. There are several feathers which appear disheveled on the chest, shoulder and wing. The specimen is mounted on a wooden stand with paper and metal tags attached to the legs. Swing tag: 41. / Allied to / Diurnal Owl / Catalogue page 53 / Other tag: 31 / Strix Noctua / Holland Metal tag: 4061 /taxidermy mount, taxidermy, animalia, burke museum, beechworth, australian museum, skin, bird, owl, little owl, athene noctua -
 Ararat Gallery TAMA
Mixed media, Inga Hunter, Iboriis Robe of the Keeper of the Dead, 1986-1989
“The Keeper looks after the shrines of the dead and he is responsible for their wellbeing, to make sure that their spirits do not return to make trouble for the living. Beyond their grave there is no blame, so he keeps all the dead, criminal, foreign etc. Keepers are not often seen because they live well away from all social groups, being supposed to spend most of their time in the nether world. The Keeper’s Robes carry complex amulets or protection from the dead, who he both guards and fears. He must also stop the living from using his charges against one another. His life is almost totally ritual, given over to chants and spells. He will never marry, but will breed by impregnating a selected mate in order to carry on the line, the office is hereditary. When his children are old enough, they are apprenticed to him and must live apart from the community, looked after by a nurse and taught all the rituals necessary for their future career. Very occasionally, a child is chosen from the community because of some special characteristic - precognition, albino colouring, special interest in the dead etc. At any time there might be up to twelve apprentices of various ages who assist the Keeper in his work. These children are taboo to all others, who must close their eyes if they accidentally catch sight of an apprentice.” -Inga Hunter -
 The Beechworth Burke Museum
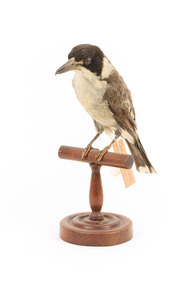
Animal specimen - Grey Butcherbird, Trustees of the Australian Museum, 1860-1880
Grey Butcherbirds live in wooded habitats, including suburban areas, from the north of Western Australia, across different parts of the top of the country, through to mid-eastern Queensland, and then south along the eastern side of the country all the way down to Tasmania. They have a 'lovely, lilting song', and are fiercely protective of their nests and chicks, swooping at presumed attackers with enough strength to sometimes draw blood. Adult Grey Butcher Birds are typically a light grey colour with dark heads and white underparts, while their young are typically olive-brown. The mix of these two types of colouring on this animal suggests that it is a younger bird. This bird appears thinner than most Grey Butcher Birds, but it is unclear if this is because of its age or because of inaccurate taxidermy. This specimen is part of a collection of almost 200 animal specimens that were originally acquired as skins from various institutions across Australia, including the Australian Museum in Sydney and the National Museum of Victoria (known as Museums Victoria since 1983), as well as individuals such as amateur anthropologist Reynell Eveleigh Johns between 1860-1880. These skins were then mounted by members of the Burke Museum Committee and put-on display in the formal space of the Museum’s original exhibition hall where they continue to be on display. This display of taxidermy mounts initially served to instruct visitors to the Burke Museum of the natural world around them, today it serves as an insight into the collecting habits of the 19th century.This specimen is part of a significant and rare taxidermy mount collection in the Burke Museum. This collection is scientifically and culturally important for reminding us of how science continues to shape our understanding of the modern world. They demonstrate a capacity to hold evidence of how Australia’s fauna history existed in the past and are potentially important for future environmental research. This collection continues to be on display in the Museum and has become a key part to interpreting the collecting habits of the 19th century. This specimen is particularly special in the Burke Museum Collection as it is part of a male/female pair (see Relationships). Many birds in the collection were originally donated in male/female pairs, but at least one specimen has been lost, leaving these as one of the few surviving sets.This Grey Butcherbird (likely male, based on size) has a bill that is dark grey at the front with a sharp hook but becomes lighter towards the face. The majority of the feathers on its back are light brown with some grey feathers around the lower half. It's crown area is a dark black colour and its tail is a dark grey. The feathers of its underparts and a small patch on either side of the neck are a yellow-white colour. There are also grey feathers coming through on its underparts. The eyes are brown. The bird stands on a brown, wooden perch with a circular bar, curved stand, and circular base. It has an identification tag tied around its left leg.19a / Collared Crow. Shrike / See Catalogue, Page 10 /taxidermy mount, taxidermy, animalia, burke museum, beechworth, australian museum, skin, australian birds, butcher bird, butcherbird, grey butcherbird, collared crow-shrike, australian butcherbird, tasmanian butcherbird, tasmania, bird pair -
 The Beechworth Burke Museum
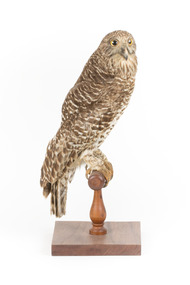
Animal specimen - Wedgetail Eagle
The Wedgetail Eagle (aquila audax) is one of the largest birds of prey located in Australia, Indonesia and Papa New Guinea. It feasts mostly on rabbits but can target mammals as large as koalas, wombats, possums and small kangaroos. The darker the colouring, the older the bird is. A mostly dark brown feathering can suggest over 10 years old, though females are usually paler. This species mates monogamously for life. They circle high in the sky to avoid temperatures close to the ground and to assert their dominance over their territory. This specimen is lighter than many documented photographs of the species. They're usually less patchy / speckled with lighter colours on the chest and back. Documenting the wingspan of this specimen would be of interest because some have been measured up to 230cm. This specimen is part of a collection of almost 200 animal specimens that were originally acquired as skins from various institutions across Australia, including the Australian Museum in Sydney and the National Museum of Victoria (known as Museums Victoria since 1983), as well as individuals such as amateur anthropologist Reynell Eveleigh Johns between 1860-1880. These skins were then mounted by members of the Burke Museum Committee and put-on display in the formal space of the Museum’s original exhibition hall where they continue to be on display. This display of taxidermy mounts initially served to instruct visitors to the Burke Museum of the natural world around them, today it serves as an insight into the collecting habits of the 19th century.This specimen is part of a significant and rare taxidermy mount collection in the Burke Museum. This collection is scientifically and culturally important for reminding us of how science continues to shape our understanding of the modern world. They demonstrate a capacity to hold evidence of how Australia’s fauna history existed in the past and are potentially important for future environmental research. This collection continues to be on display in the Museum and has become a key part to interpreting the collecting habits of the 19th century.This wedgetail eagle is posed with the head turned to the left. It has mostly dark brown feathers which is common for older birds in this species. Speckled light brown and white feathers cover it's neck, chest and a middle strip across the wings. This specimen stands upon a wooden platform. The bill is light grey and long legs dark brown. taxidermy mount, taxidermy, animalia, burke museum, beechworth, australian museum, skin, reynell eveleigh johns, bird, wedgetail eagle, aquila audax, birds of prey, australian bird, eagle -
 Federation University Historical Collection
Booklet, Ballarat School of Mines Prospectus A and B, 1916-7, c1917
The Ballarat Technical Art School was part of the Ballarat School of Mines.1) Ballarat School of Mines Prospectus A .2) Ballarat School of Mines Prospectus B Contents includes teaching staff, school hours, curriculum, fee list, Travelling concessions, school library, classification of subjects. scholarships, Full art and Craft Courses (Industrial Design; Figure, Modelling, Painting and Design; Figure Drawing, Modelling, Painting and Design; Fashion Plate Drawing; Black and White Illustration; Modelling; Wood Carving and Lettering; Art Metal Work; Retouching, colouring, &c; Architectural Diploma; Draughtsmen's Courses; Art Teachers' Courses; Outdoor Sketching Classes; Photography; Building Construction and Architectural Drawing; Ticketwriting; Signwriting and Decorating COurse; Dressmaking, Needlework, etc; Preparatory Technical Classes for Girls; Day Commercial Classes; Other Branches of the School's Activities, examination results; Art Teachers' Certificate. Includes an image of W.H. Middleton, President of the Ballarat School of Mines; Staff of the Ballarat School of Minesballarat school of mines, ballarat technical art school, design, modelling, figure drawing, fashion plate drawing, black and white illustration, wood carving, lettering, art metal work, retouching, architecture, architectural diploma, draughtsmen's courses, art teachers' courses, outdoor sketching classes, photography, building construction, architectural drawing, ticketwriting, signwriting and decorating, dressmaking, needlework, art teachers' certificate. -
 Ballarat Tramway Museum
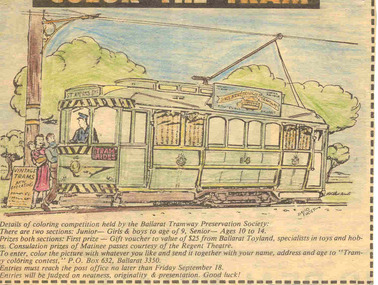
Domestic object - Competition Entry, The Courier Ballarat, "Colour the Tram", Sep. 1981
Set of three entries for the BTPS celebrations, colouring competition. Based on the newspaper clipping from The News, (published by The Courier) Ballarat, 2/9/1981, "Colour the Tram", as part of the colour competition by the BTPS for the 20th anniversary of the closure of the tramways in Ballarat. Has a drawing by David Frost of No. 14 picking up passengers. Detailed the closing date, judging criteria and the prizes. See Reg. item 3178 for originals of the form. 3329.1 - Entry by Angela Venville, 9 Ophir St. Sebastopol, 6 1/2 years - written on rear in blue ink. 3329.2 - Entry by Bernadette Ryan, "Sunrise", Blowhard RSD A201, age 11 - written on a piece of paper stapled to the entry. 3329.3 - Entry by Paul Hawker, RMB 635 Yankee Flat Road, Buninyong. Age 10. label on rear of entry and staple to rear. Mounted on light blue paper within a blue diamond. tram, trams, btps, anniversary, colouring competition -
Bendigo Historical Society Inc.
Document - BENDIGO OPERATIC SOCIETY COLLECTION, OLIVER LEAFLET, JUNE 1973
A leaflet for the Bendigo Operatic Society's play Oliver in the Capital Theatre, 13th June, 1973. Featuring Mark Edebone and Micheal Frayne as Oliver, shane Brennan and Bruce Ashman as the Artful Dodger, Patricia Lyon and Douglas Sayle as Widow Corney and Mr. Bumble. David Daene and Marion Wright as Bill Sikes and Bet. Gary Burns and Ann Ball as Mr and Mrs Sowerberry.Annette Beckwith and Graeme Daws as Charlotte and Noah Claypole. Ray Edebone and John Beaumont as Mr Brownlow and Dr Grimwig. Jill James and Valerie Griffiths as Mrs Bedwyn and Old Sally. Also featuring an add for Rodd Coiffure, Beauty Salon in Allans Walk "Allans Walk Bendigo - Phone 43 4963 We specialize in hair colouring, Styling, body, waving, and will take special care in attending to your Wigs and Wiglets. For dry and lifeless hair we recommend you have a 'Steam Treatment and Massage. OPEN THURSDAY EVENINGS BY APPOINTMENT Cambridge Press Bendigo"bendigo, entertainment, capital theatre, bendigo operatic society, operah, oliver play. -
 The Beechworth Burke Museum
Animal specimen - Powerful Owl, Trustees of the Australian Museum, 1860- 1880
The Powerful owl is native to south-eastern and eastern Australia and is the largest owl on the continent. It is found in coastal areas and in the Great Dividing Range rarely more than 200 km (120 mi) inland. An apex predator in its narrow distribution, the Powerful owl is often an opportunist like most predators, but generally hunts arboreal mammals, in particular small to medium-sized marsupials. It is a typically territorial raptorial bird that maintains a large home range and has long intervals between egg-laying and hatching of clutches. Unlike most raptorial birds, male Powerful owls are larger and stronger than females and so the male takes the dominant position in the mating pair, which extends to food distribution. This example of a Powerful Owl show lighter brown coloured feathers and slight discolouration. The Powerful Owl has darker colourings and whiter feathers in real life. This example also show discolouration in the feet and they are brighter yellow in colour in real life. This specimen is part of a collection of almost 200 animal specimens that were originally acquired as skins from various institutions across Australia, including the Australian Museum in Sydney and the National Museum of Victoria (known as Museums Victoria since 1983), as well as individuals such as amateur anthropologist Reynell Eveleigh Johns between 1860-1880. These skins were then mounted by members of the Burke Museum Committee and put-on display in the formal space of the Museum’s original exhibition hall where they continue to be on display. This display of taxidermy mounts initially served to instruct visitors to the Burke Museum of the natural world around them, today it serves as an insight into the collecting habits of the 19th century.This specimen is part of a significant and rare taxidermy mount collection in the Burke Museum. This collection is scientifically and culturally important for reminding us of how science continues to shape our understanding of the modern world. They demonstrate a capacity to hold evidence of how Australia’s fauna history existed in the past and are potentially important for future environmental research. This collection continues to be on display in the Museum and has become a key part to interpreting the collecting habits of the 19th centuryThis Powerful Owl has medium brown to dark grey-brown above, with white barring, and off-white front. The glass eyes are yellow, set in a dark grey/brown facial mask. The legs are feathered with yellow feet and talons. The specimen stands upon a wooden platform and has no identification tags attached. Swing-tag: n/a Metal tag: n/a Mount: no markings taxidermy mount, taxidermy, animalia, burke museum, beechworth, australian museum, skin, reynell eveleigh johns, bird, owl, powerful owl -
 The Beechworth Burke Museum
Animal specimen - Powerful Owl, Trustees of the Australian Museum, 1086- 1880
The Powerful owl is native to south-eastern and eastern Australia and is the largest owl on the continent. It is found in coastal areas and in the Great Dividing Range rarely more than 200 km (120 mi) inland. An apex predator in its narrow distribution, the Powerful owl is often an opportunist like most predators, but generally hunts arboreal mammals, in particular small to medium-sized marsupials. It is a typically territorial raptorial bird that maintains a large home range and has long intervals between egg-laying and hatching of clutches. Unlike most raptorial birds, male Powerful owls are larger and stronger than females and so the male takes the dominant position in the mating pair, which extends to food distribution. This example of a Powerful Owl show lighter brown coloured feathers and slight discolouration. The Powerful Owl has darker colourings and whiter feathers in real life. This example also show discolouration in the feet and they are brighter yellow in colour in real life. This specimen is part of a collection of almost 200 animal specimens that were originally acquired as skins from various institutions across Australia, including the Australian Museum in Sydney and the National Museum of Victoria (known as Museums Victoria since 1983), as well as individuals such as amateur anthropologist Reynell Eveleigh Johns between 1860-1880. These skins were then mounted by members of the Burke Museum Committee and put-on display in the formal space of the Museum’s original exhibition hall where they continue to be on display. This display of taxidermy mounts initially served to instruct visitors to the Burke Museum of the natural world around them, today it serves as an insight into the collecting habits of the 19th century.This specimen is part of a significant and rare taxidermy mount collection in the Burke Museum. This collection is scientifically and culturally important for reminding us of how science continues to shape our understanding of the modern world. They demonstrate a capacity to hold evidence of how Australia’s fauna history existed in the past and are potentially important for future environmental research. This collection continues to be on display in the Museum and has become a key part to interpreting the collecting habits of the 19th century.This Powerful Owl has medium brown to dark grey-brown on its wings and back, lighter patterning on its chest lightening with white barring, and off-white front. The eyes are yellow, set in a dark grey/brown facial mask. The legs are feathered with yellow/browning feet and talons. The specimen stands upon a wooden platform and has no identification tags attached. Swing-tag: n/a Metal tag: n/a Mount: wooden with no markings.taxidermy mount, taxidermy, animalia, burke museum, beechworth, australian museum, skin, reynell eveleigh johns, bird, owl, powerful owl -
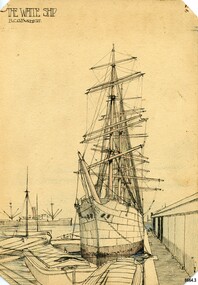 Flagstaff Hill Maritime Museum and Village
Artwork, other - Pen and Wash Painting, Beni Carr Glyn Burnett, The White Ship, circa 1933
Beni Carr Glyn Burnett (also known as B. C. G. Burnett or Beni Burnett) was born in 1889 to missionary parents in Mongolia. When he was 15 years old he began training as an architect with a firm in Shanghai. He worked in Singapore, Japan and China before moving to Australia around 1933. In 1937 he was appointed as the Commonwealth principal architect in the Northern Territory. He went on to design a series of houses for senior public servants and military personnel which became very popular as they were specifically designed for the tropics - incorporating louvres, high ceilings and good ventilation. When Darwin was bombed in February 1942, he was evacuated to Alice Springs where he continued to work as an architect. He also became a Magistrate and Coroner in Alice Springs. In later life he was well known for sketching clientele in public bars. He died in 1955. Beni Burnett was living in Sydney in 1933 when he produced these three artworks. There were several photography firms operating in Sydney at this time who specialised in photographing ships and the shipping trade (e.g. Samuel J. Hood and William James Hall) and whose photographs were used by artists to produce ship portraits. Both of these photographers took photographs of the two ships in B. C. G. Burnett's watercolours This ship depicted by B. C. G. Burnett in his pen and wash sketch labelled "The White Ship" exactly matches a photograph pasted into his personal scrapbook which is in the "Library and Archives N. T.". The name of the ship is unknown and B. C. G. Burnett may have taken some artistic licence with the colouring as in the original photograph, the ship had a dark hull.This artwork (one of a set of three small artworks) is significant as an example of shipping (particularly the use of sailing ships) that were still being used as late as the 1930's in Australia. It is also important as its creator (B. C. G. Burnett) went on to become a well-known public figure in the Northern Territory in the late 1930's due to his innovative approach to designing homes for the tropical climate.An ink sketch of an unknown sailing ship moored to a dock. There are several small boats tied up near the sailing ship and a large steel freighter can be seen in the background. There is a faint wash of colour on parts of the sketch - the bottom of the ship, the masts and booms and the water at the end of the pier. The title (The White Ship) and the artist's name (B. C. G. Burnett) are written in ink in the top left corner. The back of the sketch is black card with faint pencil marks (overwritten in red ink) that appear to read "1842 A". A page from an album belonging to Beni Burnett displays five black and white photos including three photographs of ships. The photograph on the bottom right is an exact match for the pen and wash drawing. front - "THE WHITE SHIP / B. C. G. BURNETT" back - difficult to read "1842 A"flagstaff hill maritime museum and village, warrnambool, great ocean road, sailing ships, ships, barque, magdalene vinnen, winterhude, beni carr glyn burnett, b. c. g. burnett, beni burnett, painting, watercolour painting, sketch, ink sketch, sydney harbour, architect, darwin, burnett house, photography, samuel j. hood, william james hall -
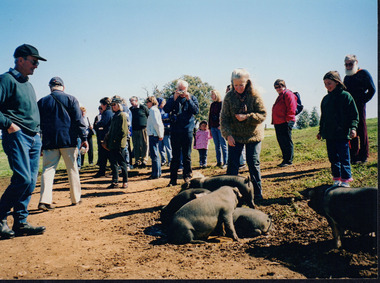 Wooragee Landcare Group
Photograph, 5 September 2004
This photograph was taken at Samaria Farm on Sunday the 5th of September when Wooragee Landcare Group took a bus trip to the Tatong area (near Benalla) to look at land use on small farms. The day trip was organised to observe land use on small farms as well as a social event for the Group. Samaria Farm at the time was a nine-hectare property located in northeast Victoria, near Mount Samaria, 130 km Northeast of Melbourne. The photograph features several pigs believed to be the breed called Large Black. The Large Black Pig breed is a traditional, heritage breed that was first imported to Australia from the UK in the early 1900's. It is believed to have originated from the Old English Hog of the 16th and 17th Centuries. The first reference to them in the Australian Pure Bred Pig Herd Book was in 1912. They are a black pig with lop ears and were prized for their superior milking and mothering abilities and soon became popular with early Dairy Farmers who fed them whey from separated milk as part of their butter making process. They proved economical to keep and, being excellent grazing pigs, were also used to pick up windfall fruit in orchards. Their black colouring also enabled them to withstand the hot Australian summers and avoid sunburn which combined with their hardiness and docile temperament made them highly suitable for free-range pork production, however Large Black pigs tend to get very fat and were not suitable for intensive farming so were often crossed with other breeds for pork production. They are now quite rare as a pure breed having been on the edge of extinction for some time. They were rescued in the early 1990s by a rare breeds farmer in the Yarra Ranges. These days they are also the focus of a small conversation effort with six registered breeders currently in Australia. For biosecurity reasons there are no imports of live pigs or pig semen permitted into Australia. This photograph shows a group of people attending one of the events that Wooragee Landcare Group has organized within the educational framework of promoting best land management practices for all types of land uses and ensuring sustainability, in addition to encouraging community interaction via social events. The Large Black pig breed is significant because of their role in early Victorian farming. They are now quite rare as a pure breed having been on the edge of extinction for some time. These days they are the focus of a small conversation effort with six registered breeders currently in Australia. For biosecurity reasons there are no imports of live pigs or pig semen permitted into Australia. Wooragee Landcare Group is important to local community landcare and environmental management practices.Colour rectangular photograph printed on paperObverse: WAN NA EONA2N2. ANN+ 3 4240/ (No. 17) 370samaria farm, wooragee landcare, wooragee landcare group, tatong, benalla, black pigs, large black, traditional breed, heritage breed, pigs, lop ears, free range pork production, early victorian farming -
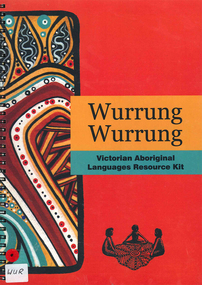 Victorian Aboriginal Corporation for Languages
Book, Alexandra Blaszak, Wurrung Wurrung Victorian Aboriginal languages resource kit, 2008
The Wurrung Wurrung Kit is designed to introduce students at all levels to the heritage of Aboriginal languages within the area now known as Victoria. The kit aims to: Create awareness of Victorian Aboriginal languages in the past and present. The kit is not designed for the teaching of languages, Develop students' understanding of the relationship between the languages and culture of Victorian Indigenous people, or Koories, Create awareness of the importance of language to indigenous communities today and to foster respect for these communities and their languages, Highlight the diversity within Aboriginal Victoria and Australia in terms of languages and culture, Provide resources for students and teachers that can be used either as a window into Aboriginal culture generally, or to complement a broader unit of work in indigenous studies. Resources for teachers Purpose of this kit Using this kit Terminology Pronunciation Facts about Aboriginal languages in Victoria Language and Aboriginal culture Revitalizatoin of Aboriginal languages Language Alive in the community Community protocols Understanding the Language Map VELS and Curriculum links Teaching Framework Resources and contacts Activities for students Animal names Colouring in Possum Koala Kangaroo Code breaker What do yo know? Concentration Sounds, spellings and symbols Kinship Different things, different words Koorie Garden Timeline Story of Victorian Languages Language on the Mission Role Play Traditional Owners Placenames Graffiti Wall Map References.maps, b&w photographs, b&w illustrations, colour illustrations, games, referenceswoiwurrung, boonwurrung, gunnai kurnai, djadjawurrung, wathaurong, keerraywoorroong, jardwadjali, wergaia, ladjiladji, taungurung, dhudhuroa, kulin -
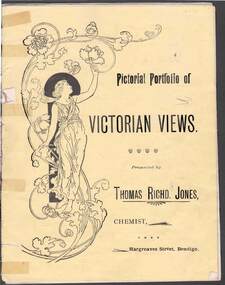 Bendigo Historical Society Inc.
Document - PICTORIAL PORTFOLIO OF VICTORIAN VIEWS
Yellow covered nine page booklet containing 19th Century views of Bendigo and Ballarat presented by Thomas Richard Jones, Chemist of Hargreaves Street Bendigo. Art Noveau figure of woman on front cover. Inside cover features T R Jones Dispensing Chemist and Druggist printed beside man holding a horse. List of Veterinary products supplied by Jones. Farmer's requisites included Strychnine, Toxa, Phosphorus, Poisoined wheat, Bi-sulphide of Carbon. Egg preserving fluid and milk preserving powder Rennet and butter colouring along with Drenches and Cattle medicenes supplied. View No1. Moorabel Falls Ballarat. View No 2. Statues of Leda and Spring Ballarat. View No 3. A Giant Palm Bendigo. View No 4. View from St Paul's Bendigo. View No 5. Unveiling 'The first Public Statue' Bendigo P/Office in background. View No 6. Statue Presented to the City of Bendigo by Cr Harkness. [Reclining greek beside dog fighting lion] View No 7. 'On the Campaspe, near Bendigo. View No 8 The Pine Avenue, Rosalind Park. View No 9. Scenes on Lake Wendouree, Ballarat. View No 10. Statuary in The Botanical Gardens Ballarat. View No 11. Statues of Burns & Moore Ballarat. View No 12. Botanical Gardens, Ballarat. Inside back cover features list of T R Jones products. Outside back cover features advertisement for T R Jones Universal Corn Cure, and Jone's Compound Pectoral Balm.Printed by Periodicacls Publishing Co, 21 Elizabeth Street Melbourne.bendigo, parks and gardens, bendigo chemist and local views. -
 The Beechworth Burke Museum
Animal specimen - White Winged Triller, 1860-1880
The White Winged Triller is a small member of the Campephagidae family. They can be found all over the Australian mainland, but there have also been sightings in Tasmania, Papua New Guinea and Indonesia. Their breeding season is from September to December, when they migrate to southern Australia for the warmer months. The males can be very noisy during this time, when they 'trill' all day, granting them their name. Throughout the winter they can be found in northern Australia. This species can be found in open areas with shrub and lots of ground cover, in woodlands, forests, scrub and waterways. The males and females are noticeably different, particularly when breeding. Breeding males are the most conspicuous, with black on their heads, bodies and wing coverts, with a white body, lower face and lower wings. Females are brown, with a light body, a faint brow and a dark line through their eyes. When not in the breeding season, males are similar to females, though they have a greyer rump. These birds have a netted pattern on their wings. When in flight they undulate, and when they land they often shuffle and re-fold their wings. This species predominantly forage for insects on the ground or tree foliage, but also 'hawks' insects from higher perches. They build nests on horizontal branches or forks, and can be found sometimes using empty nests of other birds. Many of these birds can be found nesting in the same tree as a colony, and both parents incubate and brood their two to three nestlings. This specimen is a male White Winger Triller, which is apparent from his black and white colouring. While missing some plumage, the distinction between black wings, tail, cap and wing covert are still clear against his white body and under-wings. This specimen is part of a collection of almost 200 animal specimens that were originally acquired as skins from various institutions across Australia, including the Australian Museum in Sydney and the National Museum of Victoria (known as Museums Victoria since 1983), as well as individuals such as amateur anthropologist Reynell Eveleigh Johns between 1860-1880. These skins were then mounted by members of the Burke Museum Committee and put-on display in the formal space of the Museum’s original exhibition hall where they continue to be on display. This display of taxidermy mounts initially served to instruct visitors to the Burke Museum of the natural world around them, today it serves as an insight into the collecting habits of the 19th century.This specimen is part of a significant and rare taxidermy mount collection in the Burke Museum. This collection is scientifically and culturally important for reminding us of how science continues to shape our understanding of the modern world. They demonstrate a capacity to hold evidence of how Australia’s fauna history existed in the past and are potentially important for future environmental research. This collection continues to be on display in the Museum and has become a key part to interpreting the collecting habits of the 19th century.This male White Winged Triller has a black cap on its head. It has black wings with black wing coverts, and a black tail. It has a white lower face and body, a white shoulder bar and white under-wings. This specimen stands upon a wooden post, attached to a wooden post and has an identification tag tied around its leg. Swing-tag: 22a / White shouldered Campephagidae/ See catalogue, page 11. /taxidermy mount, taxidermy, animalia, burke museum, beechworth, australian museum, skin, reynell eveleigh johns, bird, triller, white winged triller, campephagidae, australian birds -
 Flagstaff Hill Maritime Museum and Village
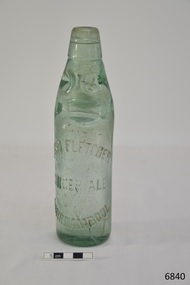
Container - Bottle, c. 1905
This bottle once contained John Fletcher’s ginger cordial. It was found in August 2014 in the sand dunes at Levy's Point, near McKinnon's quarry, Warrnambool. ABOUT JOHN FLETCHER of WARRNAMBOOL John Fletcher Cordial (or Beverage) Co . Warrnambool, supplied cordial and aerated drinks to the Western district of Victoria. John Fletcher was named as a cordial manufacturer in the Warrnambool Standard of June 13th 1895, when he attended a Publican’s Association meeting. Mr John Fletcher, aerated water and cordial manufacturer of Koroit Street Warrnambool, had a summary of his factory printed in a short article in the Advocate, Melbourne, in February 1901. The article said “one of the most complete plants outside the metropolis … spacious … well appointed …old-established business … noted for the excellence of the quality … a trial [of the beverage] is solicited.” John Fletcher and Harold Caffin, trading as J.S. Rowley & co cordial manufacturers in 1903; were prosecuted in September 1903 when the Board of Health found an analysed sample of Raspberry Vinegar to contain coal tar colouring, which could be injurious to health, particularly to the kidneys. The factory was still in operation in December 1924, when sadly, Mr S. Fletcher, who was carrying bottles of aerated water at Mr John Fletcher’s cordial factory, sustained an eye injury when one of the bottles burst. Later the eye had to be removed at the Warrnambool Base Hospital. ABOUT CODD BOTTLES During the mid-to-late 1800s there were many inventions to keep the fizz in carbonated drinks such as ginger ale, soda water and fruit drinks. Hiram Codd, an English engineer invented a successful process that he patented as “Codd’s patented globe stopper bottle” in 1872. The Codd-neck bottle (commonly called Codd or marble bottle) is manufactured in two parts. The body of the bottle is cast in two sections. At the time of joining the sections a glass marble and rubber seal are inserted into the neck section. The lip is then applied to the top of the bottle. The Codd bottle is filled upside down as the pressure of the gas from the carbonated liquid holds the marble up and out of the way. When the bottle stands upright the gas pushes the marble up against the washer, creating a firm seal to keep the fizz inside. The bottle is opened by pushing the marble down firmly to allow some of the gas to escape. The marble drops down and is caught in a depression formed in the neck. When the bottle is tilted to pour or drink the liquid the marble rests in a dimple. Some have said that the bottle as a character, the shape having a face with its mouth keeping the marble out of the drink and eyes that catch the marble so that it doesn’t roll into the mouth of the drinker. The Codd bottle was expensive to produce and children loved to destroy the marbles to play with the marbles inside. Many shops and factories added a deposit to the cost of buying the drink to encourage children to return the bottles rather than break it for the marble. Codd bottles are still being produced in India and Japan for soft drinks. A Codd bottle with the same markings as this one is valued on today’s Australian auction sites from $35 - $75 AUD. Bottle, aqua/green glass, with glass marble inside. John Fletcher's Ginger Ale, Warrnambool. Container is often called a "Codd neck bottle", “marble bottle” or “Codd’s patent bottle”. Bottle made by Dobson. Inscription on bottle and base. c. 1905Marks moulded into glass; "JOHN FLETCHER / GINGER ALE / WARRNAMBOOL" and “DOBSON” and on base “G”. flagstaff hill, warrnambool, shipwrecked coast, flagstaff hill maritime museum, maritime museum, shipwreck coast, flagstaff hill maritime village, great ocean road, codd bottle, codd neck bottle, marble bottle, ginger beer bottle, john fletcher soft drinks, warrnambool soft drinks and cordials, john fletcher cordial (or beverage) co ., codd neck bottle, glass stopper bottle, hiram codd, antique bottle, harold caffin, john fletcher -
 Flagstaff Hill Maritime Museum and Village
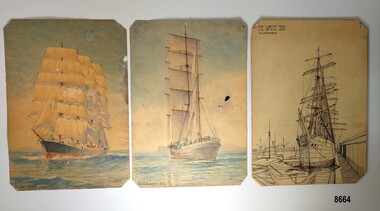
Painting - Paintings - set of three, Beni Carr Glyn Burnett, 1933
Beni Carr Glyn Burnett (also known as B. C. G. Burnett or Beni Burnett) was born in 1889 to missionary parents in Mongolia. When he was 15 years old he began training as an architect with a firm in Shanghai. He worked in Singapore, Japan and China before moving to Australia around 1933. In 1937 he was appointed as the Commonwealth principal architect in the Northern Territory. He went on to design a series of houses for senior public servants and military personnel which became very popular as they were specifically designed for the tropics - incorporating louvres, high ceilings and good ventilation. When Darwin was bombed in February 1942, he was evacuated to Alice Springs where he continued to work as an architect. He also became a Magistrate and Coroner in Alice Springs. In later life he was well known for sketching clientele in public bars. He died in 1955. Beni Burnett was living in Sydney in 1933 when he produced these three artworks. There were several photography firms operating in Sydney at this time who specialised in photographing ships and the shipping trade (e.g. Samuel J. Hood and William James Hall) and whose photographs were used by artists to produce ship portraits. Both of these photographers took photographs of the two ships in B. C. G. Burnett's watercolours. The "Magdalene Vinnen" was photographed by Samuel J Hood in a series of photos taken in March 1933. It was a 4 masted steel barque, built in 1921 in Kiel, Germany and for almost 80 years was the largest traditional sailing ship in operation. It was used extensively as a cargo ship. It sailed into Sydney Harbour on 27th Feb 1933, loaded with almost 16,000 bales of wool destined for Falmouth, England. In March 1933 (whilst in Sydney) the German Republic flag (on orders from Adolph Hitler) was lowered and replaced with the old monarchist flag which was then to be the official flag and beside it the Nazi flag was to be flown on all ceremonial occasions. It visited Australia again in 1935 with its cargo being wheat from Port Broughton, S. A. In 1936 it was renamed "Kommodore Johnsen" and in 1945 (after WW2) the ship was awarded to the Soviet Union as war compensation and renamed "STS Sedov". The "Winterhude" (originally called "Mabel Rickmers) was a three masted Finnish barque built in 1898 by Rickers - Werft Bremerhaven for use on the East India rice trade and later the South American nitrate trade. After WW1 it came under French control as war compensation. It was also sold several times and at one stage was called "Selma Hemsoth" but in 1925 it was bought by Gustaf Erikson who restored the name "Winterhude" and the vessel became a regular transport in the Australian wheat trade. In 1944 it was sold to the German navy before being taken over by the British at the end of WW2. It was photographed in Sydney by William James Hall in 1931 on its way to Port Lincoln, South Australia to load wheat for Europe. The third ship depicted by B. C. G. Burnett is a pen and wash sketch labelled "The White Ship" and exactly matches a photograph pasted into his personal scrapbook which is in the "Library and Archives N. T.". The name of the ship is unknown and B. C. G. Burnett may have taken some artistic licence with the colouring as in the original photograph, the ship had a dark hull.This set of three small artworks is significant as examples of shipping (particularly the use of sailing ships) that were still being used as late as the 1930's in Australia. They are also important because their creator (B. C. G. Burnett) went on to become a well-known public figure in the Northern Territory in the late 1930's due to his innovative approach to designing homes for the tropical climate.A set of three artworks by B. C. G. Burnett of sailing ships in Sydney Harbour. They are all on rectangular watercolour paper with small diagonal edges at each corner. Painting 1 is a watercolour painting of a sailing ship called "Magdalene Vinnen". It shows a 4 masted barque with a blue and red steel hull in full sail heading towards the viewer. The painter's name (B. C. G. Burnett) and date (1933) are written on the bottom left-hand corner of the painting. Painting 2 is a watercolour painting of a sailing ship called "Winterhude". It shows a 3-masted barque with a blue and red steel hull in full sail heading away from the viewer. A small figure can be seen at the wheel at the rear of the ship. The painter's name (B. C. G. Burnett) and date (1933) are written on the bottom left-hand corner of the painting. Sketch 3 is an ink sketch of an unknown sailing ship moored to a dock. There are several small boats tied up near the sailing ship and a large steel freighter can be seen in the background. There is a faint wash of colour on parts of the sketch - the bottom of the ship, the masts and booms and the water at the end of the pier. The title (The White Ship) and the artist's name (B. C. G. Burnett) are written in ink in the top left corner. 1 (front) - "B. C. G. BURNETT. 1933 2 (front) - "B. C. G. BURNETT. 1933" 3 (front) - "THE WHITE SHIP / B. C. G. BURNETT"flagstaff hill maritime museum and village, warrnambool, great ocean road, sailing ships, ships, barque, magdalene vinnen, winterhude, beni carr glyn burnett, b. c. g. burnett, beni burnett, painting, watercolour painting, sketch, ink sketch, sydney harbour, architect, darwin, burnett house, photography, samuel j. hood, william james hall, sedov, kommodore johnsen, mabel rickmers -
 Flagstaff Hill Maritime Museum and Village
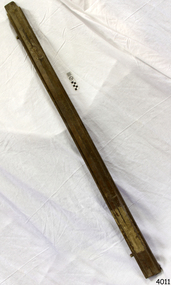
Tool - Wood Sample, Before 1878
On a piece of paper subsequently glued near one end of its curved upper face, this length of planed and polished hardwood timber bears the inscription: “A [p]iece of w[r]ec[k] of the Loch Ard wrecked near Sherbroke River”. The timber is carefully worked with rich dark colouring and a uniformly moulded design, suggesting that it was part of a fitting or furnishing that was publicly visible and prominent. If the artefact is what it is declared to be, then it is possible that it formed part of the ship’s railings or companionway stairs. The LOCH ARD was a 1,693 ton, 3 masted barque, built on the Clyde in 1873. In an age of increasing competition for the emigrant passenger trade from steam-driven vessels, special attention was paid to her wooden furnishings and fittings. The Loch Line owners prided themselves on their attractive, distinctively painted, sailing ships. Below decks, where cargo and third class passengers were stowed, was made of iron. But everything above deck, and on show to the saloon and second class passengers, was carved and varnished timber. Captain Daish’s 1878 report for the ship’s underwriters notes “a quantity of general Cargo washed up in a confused mass” in the cove and “a number of Cases, Casks and Bales; also deals and boards floating about in some of the gorges” further west of the shipwreck. Contemporary newspaper accounts also reported a large quantity of cargo and timber washed ashore in the days following the LOCH ARD shipwreck, adding “but those were speedily removed by persons who came down from Port Campbell, Scott’s Creek and other places with carts and pack horses”. The appearance and good condition of this wood artefact, and the aged patina and dated hand-writing style of its pasted on inscription, support the suggestion that it was ‘souvenired’ from the floating debris of the LOCH ARD at or near the 1878 date of its foundering off Mutton Bird Island. HISTORY OF THE LOCH ARD The LOCH ARD belonged to the famous Loch Line which sailed many ships from England to Australia. Built in Glasgow by Barclay, Curdle and Co. in 1873, the LOCH ARD was a three-masted square rigged iron sailing ship. The ship measured 262ft 7" (79.87m) in length, 38ft (11.58m) in width, 23ft (7m) in depth and had a gross tonnage of 1693 tons. The LOCH ARD's main mast measured a massive 150ft (45.7m) in height. LOCH ARD made three trips to Australia and one trip to Calcutta before its final voyage. LOCH ARD left England on March 2, 1878, under the command of Captain Gibbs, a newly married, 29 year old. She was bound for Melbourne with a crew of 37, plus 17 passengers and a load of cargo. The general cargo reflected the affluence of Melbourne at the time. On board were straw hats, umbrella, perfumes, clay pipes, pianos, clocks, confectionary, linen and candles, as well as a heavier load of railway irons, cement, lead and copper. There were items included that intended for display in the Melbourne International Exhibition in 1880. The voyage to Port Phillip was long but uneventful. At 3am on June 1, 1878, Captain Gibbs was expecting to see land and the passengers were becoming excited as they prepared to view their new homeland in the early morning. But LOCH ARD was running into a fog which greatly reduced visibility. Captain Gibbs was becoming anxious as there was no sign of land or the Cape Otway lighthouse. At 4am the fog lifted. A man aloft announced that he could see breakers. The sheer cliffs of Victoria's west coast came into view, and Captain Gibbs realised that the ship was much closer to them than expected. He ordered as much sail to be set as time would permit and then attempted to steer the vessel out to sea. On coming head on into the wind, the ship lost momentum, the sails fell limp and LOCH ARD's bow swung back. Gibbs then ordered the anchors to be released in an attempt to hold its position. The anchors sank some 50 fathoms - but did not hold. By this time LOCH ARD was among the breakers and the tall cliffs of Mutton Bird Island rose behind the ship. Just half a mile from the coast, the ship's bow was suddenly pulled around by the anchor. The captain tried to tack out to sea, but the ship struck a reef at the base of Mutton Bird Island, near Port Campbell. Waves broke over the ship and the top deck was loosened from the hull. The masts and rigging came crashing down knocking passengers and crew overboard. When a lifeboat was finally launched, it crashed into the side of LOCH ARD and capsized. Tom Pearce, who had launched the boat, managed to cling to its overturned hull and shelter beneath it. He drifted out to sea and then on the flood tide came into what is now known as LOCH ARD Gorge. He swam to shore, bruised and dazed, and found a cave in which to shelter. Some of the crew stayed below deck to shelter from the falling rigging but drowned when the ship slipped off the reef into deeper water. Eva Carmichael had raced onto deck to find out what was happening only to be confronted by towering cliffs looming above the stricken ship. In all the chaos, Captain Gibbs grabbed Eva and said, "If you are saved Eva, let my dear wife know that I died like a sailor". That was the last Eva Carmichael saw of the captain. She was swept off the ship by a huge wave. Eva saw Tom Pearce on a small rocky beach and yelled to attract his attention. He dived in and swam to the exhausted woman and dragged her to shore. He took her to the cave and broke open case of brandy which had washed up on the beach. He opened a bottle to revive the unconscious woman. A few hours later Tom scaled a cliff in search of help. He followed hoof prints and came by chance upon two men from nearby Glenample Station three and a half miles away. In a state of exhaustion, he told the men of the tragedy. Tom returned to the gorge while the two men rode back to the station to get help. By the time they reached LOCH ARD Gorge, it was cold and dark. The two shipwreck survivors were taken to Glenample Station to recover. Eva stayed at the station for six weeks before returning to Ireland, this time by steamship. In Melbourne, Tom Pearce received a hero's welcome. He was presented with the first gold medal of the Royal Humane Society of Victoria and a £1000 cheque from the Victorian Government. Concerts were performed to honour the young man's bravery and to raise money for those who lost family in the LOCH ARD disaster. Of the 54 crew members and passengers on board, only two survived: the apprentice, Tom Pearce and the young woman passenger, Eva Carmichael, who lost all of her family in the tragedy. Ten days after the LOCH ARD tragedy, salvage rights to the wreck were sold at auction for £2,120. Cargo valued at £3,000 was salvaged and placed on the beach, but most washed back into the sea when another storm developed. The wreck of LOCH ARD still lies at the base of Mutton Bird Island. Much of the cargo has now been salvaged and some was washed up into what is now known as LOCH ARD Gorge. Cargo and artefacts have also been illegally salvaged over many years before protective legislation was introduced. One of the most unlikely pieces of cargo to have survived the shipwreck was a Minton porcelain peacock - one of only nine in the world. The peacock was destined for the Melbourne International Exhibition in 1880. It had been well packed, which gave it adequate protection during the violent storm. Today, the Minton peacock can be seen at the Flagstaff Hill Maritime Museum in Warrnambool. From Australia's most dramatic shipwreck it has now become Australia's most valuable shipwreck artefact and is one of very few 'objects' on the Victorian State Heritage Register. The Loch Ard wreck is of state significance – Victorian Heritage Register S417. However there is a lack of documented provenance that limits the interpretive value of this piece of timber (for example, its potential to interpret nineteenth century souveniring and scavenging from shipwrecks along the south west coast of Victoria). Flagstaff Hill’s collection of artefacts from LOCH ARD is significant for being one of the largest collections of artefacts from this shipwreck in Victoria. It is significant for its association with the shipwreck, which is on the Victorian Heritage Register (VHR S417). The collection is significant because of the relationship between the objects, as together they have a high potential to interpret the story of the LOCH ARD. The LOCH ARD collection is archaeologically significant as the remains of a large international passenger and cargo ship. The LOCH ARD collection is historically significant for representing aspects of Victoria’s shipping history and its potential to interpret sub-theme 1.5 of Victoria’s Framework of Historical Themes (living with natural processes). The collection is also historically significant for its association with the LOCH ARD, which was one of the worst and best known shipwrecks in Victoria’s history. A length of hardwood timber, planed and varnished to smooth finish on three sides, with two unfinished tongues protruding from each end (one broken off), possibly from the wreck of the LOCH ARD. The front or upper face is moulded and routed to a regular, linear (skirting board type) design along its entire length, the two sides flat planed. One side contains two inserted dowel rods that have been broken off. The bottom face has not been finished to the same standard. The sample is good quality wood that has retained its density and weight and shows no evidence of having been submerged in seawater for any length of time. Glued on to the upper face of the length of timber near the right hand end is a deteriorated square of paper bearing an inscription. The paper, peeling back and with torn edges, is stuck over an original wood stain but under a subsequent layer of varnish. The faded ink words are indecipherable where paper is missing, but written carefully in an old fashioned cursive script.The inscription on the paper reads: “A [p]iece of w[r]ec[k] of the Loch Ard wrecked near Sherbroke River”. flagstaff hill, warrnambool, shipwrecked coast, flagstaff hill maritime museum, maritime museum, shipwreck coast, flagstaff hill maritime village, great ocean road, loch line, loch ard, captain gibbs, eva carmichael, tom pearce, glenample station, mutton bird island, loch ard gorge, nineteenth-century souveniring, shipwreck scavenging, loch line sailing ships, wood sample -
 Flagstaff Hill Maritime Museum and Village
Domestic object - Bowl, Late 19th or early 20th Century
The Process of Making Pottery Decorating, Firing, Glazing, Making, Technical There is a rhythm and flow to clay. It can’t be done all at once! Even the making process! It can take weeks to get everything done, especially if you can only work on your pottery once a week! Even though we have three hour classes, it’s often just not enough time! Here is an overview of some of the processes so you have a bit more grasp on some of the technical stuff! Step One – Design There are SO many ideas out there for making stuff in clay! From delicate porcelain jewellery, through to heavy sculptural work and everything in between. Deciding your direction is sometimes not that easy – when you first start, try everything, you will naturally gravitate to the style that you enjoy! The options and variations are endless and can get a wee bit overwhelming too! Check in with me before you start to ensure your ideas will work, what order you might do things, how you could achieve the look you are seeking and any other technical data required! Step Two – Making Clay is thixotropic. This means that as you work with it, the clay first gets sloppier and wetter, before is begins to dry in the atmosphere. For most things, you simply can’t do all parts of the project at once. An example of work order might look like: Get last weeks work out from the shelves Prepare clay for today’s work – roll your clay, prepare balls for throwing, make the first stage of a pinch pot) Clean up last week’s work and put it on the shelf for bisque firing Check that you have any glazing to do – and do enough of it that you will have time to finish your main project Do the next step of your next project – there might be a further step that can’t be complete immediately, in that case, wrap your work well and put onto the shelves. Letting your work rest for a while can really help keep your work clean and professional looking. Many things require bagging under plastic to keep it ready for work the next week – put your name on the outside of the bag so you can find your work easily. We have stickers and markers. Consider how you want to decorate your work – coloured slip can be applied at a fairly wet stage (remembering that it will make your work even wetter!). Trying to apply slip to dry clay won’t work! If you want to do sgraffito – you will need to keep the work leather hard (a state of dryness where you can still work the clay with a little effort and a little water and care). Step Three – Drying Most of the time your work can go into the rack uncovered to let it dry out for the following week. If you want to continue forming or shaping you will need to double bag your work – put your work on a suitable sized bat and put the bat in a bag so the base of the bag is under the bat, then put another bag over the top of the work and tuck the top of the bag under the bat. If you want to trim (or turn) your thrown work the following week, it should also be double bagged. If your work is large, delicate, or of uneven thicknesses, you should lightly cover your work for drying. When considering the drying process, bare in mind the weather, humidity and wind! The hotter and dryer, the faster things dry and work can dry unevenly in the shelves – this can lead to cracking – another time to lightly cover your work for drying. Step Four – Trimming and Cleaning Up Your work is dry! It is called greenware now and it is at it’s most fragile! Handle everything with two hands. I often refer to soft hands – keep everything gentle and with your fingers spread as much as possible. Try to not pick up things like plates too much, and always with both hands! Before your work can be bisque fired it should be “cleaned up”. You work won’t go into the kiln if it has sharp edges – when glazed, sharp edges turn into razor blades! Use a piece of fly wire to rub the work all over – this will scratch a little so be light handed. Use a knife or metal kidney to scrape any areas that require a bit more dynamic treatment than the fly wire offers! Finally, a very light wipe over with a slightly damp sponge can help soften and soothe all of your edges and dags! Trimming thrown work: If you are planning to trim (or turn) your thrown work (and you should be), make sure you bag it well – your work should be leather hard to almost dry for easiest trimming. Use this step to finish the work completely – use a metal kidney to polish the surface, or a slightly damp sponge to give a freshly thrown look. Wipe the sponge around the rim after trimming, and check the inside of the pot for dags! Trimming slip cast work: Usually I will trim the rims of your work on the wheel the following day to make that stage easier, however you will still need to check your work for lumps and bumps. Last but not least – check that your name is still clearly on the bottom of your work. Step Five – Bisque Firing When the work is completely dry it can go into the bisque kiln. The bisque kiln is fired to 1000°C. This process burns off the water in the clay as well as some of the chemically bound water. The structure of the clay is not altered that much at this temperature. Inside the bisque kiln, the work is stacked a little, small bowl inside a larger bowl and onto a heavy plate. Smaller items like decorations or drink coasters might get stacked several high. Consideration is paid to the weight of the stack and shape of the work. A bisque kiln can fire about one and a half times the amount of work that the glaze kiln can fire. The firing takes about 10 hours to complete the cycle and about two days to cool down. Once it has been emptied the work is placed in the glaze room ready for you to decorate! Step Six – Glazing Decorating your work with colour can be a lot of fun – and time consuming! There are three main options for surface treatment at this stage: Oxide Washes Underglazes Glazes Washes and underglazes do not “glaze” the work – It will still need a layer of glaze to fully seal the clay (washes don’t need glaze on surfaces not designed for food or liquid as they can gloss up a little on their own). Underglazes are stable colourants that turn out pretty much how they look in the jar. They can be mixed with each other to form other colours and can be used like water colours to paint onto your work. Mostly they should have a clear glaze on top to seal them. Oxides are a different species – the pink oxide (cobalt) wash turns out bright blue for instance. They don’t always need a glaze on top, and some glazes can change the colour of the wash! The glazes need no other “glaze” on top! Be careful of unknown glaze interactions – you can put any combination of glaze in a bowl or on a plate, but only a single glaze on the outside of any vertical surface! Glazes are a chemical reaction under heat. We don’t know the exact chemicals in the Mayco glazes we use. I can guess by the way they interact with each other, however, on the whole, you need to test every idea you have, and not run the test on a vertical surface! Simply put, glaze is a layer of glass like substance that bonds with the clay underneath. Clay is made of silica, alumina and water. Glaze is made of mostly silica. Silica has a melting point of 1700°C and we fire to 1240°C. The silica requires a “flux” to help it melt at the lower temperature. Fluxes can be all sorts of chemicals – a common one is calcium – calcium has a melting point of 2500°C, however, together they both melt at a much lower temperature! Colourants are metal oxides like cobalt (blue), chrome (green through black), copper (green, blue, even red!), manganese (black, purple and pink) iron (red brown), etc. Different chemicals in the glaze can have dramatic effects. for example, barium carbonate (which we don’t use) turns manganese bright pink! Other elements can turn manganese dioxide brown, blue, purple and reddish brown. Manganese dioxide is a flux in and of itself as well. So, glazes that get their black and purple colours, often interact with other glazes and RUN! Our mirror black is a good example – it mixes really well with many glazes because it fluxes them – causes them to melt faster. It will also bring out many beautiful colours in the glazes because it’s black colouring most definitely comes from manganese dioxide! Glaze chemistry is a whole subject on it’s own! We use commercial Mayco glazes on purpose – for their huge range of colour possibilities, stability, cool interactions, artistic freedom with the ability to easily brush the glazes on and ease of use. We currently have almost 50 glazes on hand! A major project is to test the interactions of all glazes with each other. That is 2,500 test tiles!!!! I’m going to make the wall behind the wheels the feature wall of pretty colours! Step Seven – Glaze (Gloss or sometimes called “Glost”) Firing Most of the time this is the final stage of making your creation (but not always!) The glaze kiln goes to 1240°C. This is called cone 6, or midrange. It is the low end of stoneware temperatures. Stoneware clays and glazes are typically fired at cone 8 – 10, that is 1260 – 1290°C. The energy requirement to go from 1240°C to 1280°C is almost a 30% more! Our clay is formulated to vitrify (mature, turn “glass-like”) at 1240°, as are our glazes. A glaze kiln take around 12 hours to reach temperature and two to three days to cool down. Sometimes a third firing process is required – this is for decoration that is added to work after the glaze firing. For example – adding precious metals and lustres. this firing temperature is usually around 600 – 800°C depending upon the techniques being used. There are many students interested in gold and silver trims – we will be doing this third type of firing soon! After firing your work will be in the student finished work shelves. Remember to pay for it before you head out the door! There is a small extra charge for using porcelain clay (it’s more than twice the price of regular clay), and for any third firing process! Once your work has been fired it can not turn back into clay for millennia – so don’t fire it if you don’t like it! Put it in the bucket for recycling. https://firebirdstudios.com.au/the-process-of-making-pottery/ The bowl is an example of kitchenware used in the 19th century and still in use today.Bowl white ceramic. Crack on side. Badly stained.Backstamp very faint and unable to be read.flagstaff hill, warrnambool, shipwrecked-coast, flagstaff-hill, flagstaff-hill-maritime-museum, maritime-museum, shipwreck-coast, flagstaff-hill-maritime-village, mixing bowl, food preparation, kitchen equipment, ceramic -
 Flagstaff Hill Maritime Museum and Village
Domestic object - Bowl
The Process of Making Pottery Decorating, Firing, Glazing, Making, Technical There is a rhythm and flow to clay. It can’t be done all at once! Even the making process! It can take weeks to get everything done, especially if you can only work on your pottery once a week! Even though we have three hour classes, it’s often just not enough time! Here is an overview of some of the processes so you have a bit more grasp on some of the technical stuff! Step One – Design There are SO many ideas out there for making stuff in clay! From delicate porcelain jewellery, through to heavy sculptural work and everything in between. Deciding your direction is sometimes not that easy – when you first start, try everything, you will naturally gravitate to the style that you enjoy! The options and variations are endless and can get a wee bit overwhelming too! Check in with me before you start to ensure your ideas will work, what order you might do things, how you could achieve the look you are seeking and any other technical data required! Step Two – Making Clay is thixotropic. This means that as you work with it, the clay first gets sloppier and wetter, before is begins to dry in the atmosphere. For most things, you simply can’t do all parts of the project at once. An example of work order might look like: Get last weeks work out from the shelves Prepare clay for today’s work – roll your clay, prepare balls for throwing, make the first stage of a pinch pot) Clean up last week’s work and put it on the shelf for bisque firing Check that you have any glazing to do – and do enough of it that you will have time to finish your main project Do the next step of your next project – there might be a further step that can’t be complete immediately, in that case, wrap your work well and put onto the shelves. Letting your work rest for a while can really help keep your work clean and professional looking. Many things require bagging under plastic to keep it ready for work the next week – put your name on the outside of the bag so you can find your work easily. We have stickers and markers. Consider how you want to decorate your work – coloured slip can be applied at a fairly wet stage (remembering that it will make your work even wetter!). Trying to apply slip to dry clay won’t work! If you want to do sgraffito – you will need to keep the work leather hard (a state of dryness where you can still work the clay with a little effort and a little water and care). Step Three – Drying Most of the time your work can go into the rack uncovered to let it dry out for the following week. If you want to continue forming or shaping you will need to double bag your work – put your work on a suitable sized bat and put the bat in a bag so the base of the bag is under the bat, then put another bag over the top of the work and tuck the top of the bag under the bat. If you want to trim (or turn) your thrown work the following week, it should also be double bagged. If your work is large, delicate, or of uneven thicknesses, you should lightly cover your work for drying. When considering the drying process, bare in mind the weather, humidity and wind! The hotter and dryer, the faster things dry and work can dry unevenly in the shelves – this can lead to cracking – another time to lightly cover your work for drying. Step Four – Trimming and Cleaning Up Your work is dry! It is called greenware now and it is at it’s most fragile! Handle everything with two hands. I often refer to soft hands – keep everything gentle and with your fingers spread as much as possible. Try to not pick up things like plates too much, and always with both hands! Before your work can be bisque fired it should be “cleaned up”. You work won’t go into the kiln if it has sharp edges – when glazed, sharp edges turn into razor blades! Use a piece of fly wire to rub the work all over – this will scratch a little so be light handed. Use a knife or metal kidney to scrape any areas that require a bit more dynamic treatment than the fly wire offers! Finally, a very light wipe over with a slightly damp sponge can help soften and soothe all of your edges and dags! Trimming thrown work: If you are planning to trim (or turn) your thrown work (and you should be), make sure you bag it well – your work should be leather hard to almost dry for easiest trimming. Use this step to finish the work completely – use a metal kidney to polish the surface, or a slightly damp sponge to give a freshly thrown look. Wipe the sponge around the rim after trimming, and check the inside of the pot for dags! Trimming slip cast work: Usually I will trim the rims of your work on the wheel the following day to make that stage easier, however you will still need to check your work for lumps and bumps. Last but not least – check that your name is still clearly on the bottom of your work. Step Five – Bisque Firing When the work is completely dry it can go into the bisque kiln. The bisque kiln is fired to 1000°C. This process burns off the water in the clay as well as some of the chemically bound water. The structure of the clay is not altered that much at this temperature. Inside the bisque kiln, the work is stacked a little, small bowl inside a larger bowl and onto a heavy plate. Smaller items like decorations or drink coasters might get stacked several high. Consideration is paid to the weight of the stack and shape of the work. A bisque kiln can fire about one and a half times the amount of work that the glaze kiln can fire. The firing takes about 10 hours to complete the cycle and about two days to cool down. Once it has been emptied the work is placed in the glaze room ready for you to decorate! Step Six – Glazing Decorating your work with colour can be a lot of fun – and time consuming! There are three main options for surface treatment at this stage: Oxide Washes Underglazes Glazes Washes and underglazes do not “glaze” the work – It will still need a layer of glaze to fully seal the clay (washes don’t need glaze on surfaces not designed for food or liquid as they can gloss up a little on their own). Underglazes are stable colourants that turn out pretty much how they look in the jar. They can be mixed with each other to form other colours and can be used like water colours to paint onto your work. Mostly they should have a clear glaze on top to seal them. Oxides are a different species – the pink oxide (cobalt) wash turns out bright blue for instance. They don’t always need a glaze on top, and some glazes can change the colour of the wash! The glazes need no other “glaze” on top! Be careful of unknown glaze interactions – you can put any combination of glaze in a bowl or on a plate, but only a single glaze on the outside of any vertical surface! Glazes are a chemical reaction under heat. We don’t know the exact chemicals in the Mayco glazes we use. I can guess by the way they interact with each other, however, on the whole, you need to test every idea you have, and not run the test on a vertical surface! Simply put, glaze is a layer of glass like substance that bonds with the clay underneath. Clay is made of silica, alumina and water. Glaze is made of mostly silica. Silica has a melting point of 1700°C and we fire to 1240°C. The silica requires a “flux” to help it melt at the lower temperature. Fluxes can be all sorts of chemicals – a common one is calcium – calcium has a melting point of 2500°C, however, together they both melt at a much lower temperature! Colourants are metal oxides like cobalt (blue), chrome (green through black), copper (green, blue, even red!), manganese (black, purple and pink) iron (red brown), etc. Different chemicals in the glaze can have dramatic effects. for example, barium carbonate (which we don’t use) turns manganese bright pink! Other elements can turn manganese dioxide brown, blue, purple and reddish brown. Manganese dioxide is a flux in and of itself as well. So, glazes that get their black and purple colours, often interact with other glazes and RUN! Our mirror black is a good example – it mixes really well with many glazes because it fluxes them – causes them to melt faster. It will also bring out many beautiful colours in the glazes because it’s black colouring most definitely comes from manganese dioxide! Glaze chemistry is a whole subject on it’s own! We use commercial Mayco glazes on purpose – for their huge range of colour possibilities, stability, cool interactions, artistic freedom with the ability to easily brush the glazes on and ease of use. We currently have almost 50 glazes on hand! A major project is to test the interactions of all glazes with each other. That is 2,500 test tiles!!!! I’m going to make the wall behind the wheels the feature wall of pretty colours! Step Seven – Glaze (Gloss or sometimes called “Glost”) Firing Most of the time this is the final stage of making your creation (but not always!) The glaze kiln goes to 1240°C. This is called cone 6, or midrange. It is the low end of stoneware temperatures. Stoneware clays and glazes are typically fired at cone 8 – 10, that is 1260 – 1290°C. The energy requirement to go from 1240°C to 1280°C is almost a 30% more! Our clay is formulated to vitrify (mature, turn “glass-like”) at 1240°, as are our glazes. A glaze kiln take around 12 hours to reach temperature and two to three days to cool down. Sometimes a third firing process is required – this is for decoration that is added to work after the glaze firing. For example – adding precious metals and lustres. this firing temperature is usually around 600 – 800°C depending upon the techniques being used. There are many students interested in gold and silver trims – we will be doing this third type of firing soon! After firing your work will be in the student finished work shelves. Remember to pay for it before you head out the door! There is a small extra charge for using porcelain clay (it’s more than twice the price of regular clay), and for any third firing process! Once your work has been fired it can not turn back into clay for millennia – so don’t fire it if you don’t like it! Put it in the bucket for recycling. https://firebirdstudios.com.au/the-process-of-making-pottery/ This bowl is an example of kitchenware used in the 19th century and still in use today.Bowl white ceramic plain that has two sets of edging around lip. Inside bowl has plaster designed to look like cooking mixture.flagstaff hill, warrnambool, shipwrecked-coast, flagstaff-hill, flagstaff-hill-maritime-museum, maritime-museum, shipwreck-coast, flagstaff-hill-maritime-village, kitchen equipment, ceramic -
 Flagstaff Hill Maritime Museum and Village
Domestic object - Bowl, J & G Meakin, Late 19th or early 20th Century
The Process of Making Pottery Decorating, Firing, Glazing, Making, Technical There is a rhythm and flow to clay. It can’t be done all at once! Even the making process! It can take weeks to get everything done, especially if you can only work on your pottery once a week! Even though we have three hour classes, it’s often just not enough time! Here is an overview of some of the processes so you have a bit more grasp on some of the technical stuff! Step One – Design There are SO many ideas out there for making stuff in clay! From delicate porcelain jewellery, through to heavy sculptural work and everything in between. Deciding your direction is sometimes not that easy – when you first start, try everything, you will naturally gravitate to the style that you enjoy! The options and variations are endless and can get a wee bit overwhelming too! Check in with me before you start to ensure your ideas will work, what order you might do things, how you could achieve the look you are seeking and any other technical data required! Step Two – Making Clay is thixotropic. This means that as you work with it, the clay first gets sloppier and wetter, before is begins to dry in the atmosphere. For most things, you simply can’t do all parts of the project at once. An example of work order might look like: Get last weeks work out from the shelves Prepare clay for today’s work – roll your clay, prepare balls for throwing, make the first stage of a pinch pot) Clean up last week’s work and put it on the shelf for bisque firing Check that you have any glazing to do – and do enough of it that you will have time to finish your main project Do the next step of your next project – there might be a further step that can’t be complete immediately, in that case, wrap your work well and put onto the shelves. Letting your work rest for a while can really help keep your work clean and professional looking. Many things require bagging under plastic to keep it ready for work the next week – put your name on the outside of the bag so you can find your work easily. We have stickers and markers. Consider how you want to decorate your work – coloured slip can be applied at a fairly wet stage (remembering that it will make your work even wetter!). Trying to apply slip to dry clay won’t work! If you want to do sgraffito – you will need to keep the work leather hard (a state of dryness where you can still work the clay with a little effort and a little water and care). Step Three – Drying Most of the time your work can go into the rack uncovered to let it dry out for the following week. If you want to continue forming or shaping you will need to double bag your work – put your work on a suitable sized bat and put the bat in a bag so the base of the bag is under the bat, then put another bag over the top of the work and tuck the top of the bag under the bat. If you want to trim (or turn) your thrown work the following week, it should also be double bagged. If your work is large, delicate, or of uneven thicknesses, you should lightly cover your work for drying. When considering the drying process, bare in mind the weather, humidity and wind! The hotter and dryer, the faster things dry and work can dry unevenly in the shelves – this can lead to cracking – another time to lightly cover your work for drying. Step Four – Trimming and Cleaning Up Your work is dry! It is called greenware now and it is at it’s most fragile! Handle everything with two hands. I often refer to soft hands – keep everything gentle and with your fingers spread as much as possible. Try to not pick up things like plates too much, and always with both hands! Before your work can be bisque fired it should be “cleaned up”. You work won’t go into the kiln if it has sharp edges – when glazed, sharp edges turn into razor blades! Use a piece of fly wire to rub the work all over – this will scratch a little so be light handed. Use a knife or metal kidney to scrape any areas that require a bit more dynamic treatment than the fly wire offers! Finally, a very light wipe over with a slightly damp sponge can help soften and soothe all of your edges and dags! Trimming thrown work: If you are planning to trim (or turn) your thrown work (and you should be), make sure you bag it well – your work should be leather hard to almost dry for easiest trimming. Use this step to finish the work completely – use a metal kidney to polish the surface, or a slightly damp sponge to give a freshly thrown look. Wipe the sponge around the rim after trimming, and check the inside of the pot for dags! Trimming slip cast work: Usually I will trim the rims of your work on the wheel the following day to make that stage easier, however you will still need to check your work for lumps and bumps. Last but not least – check that your name is still clearly on the bottom of your work. Step Five – Bisque Firing When the work is completely dry it can go into the bisque kiln. The bisque kiln is fired to 1000°C. This process burns off the water in the clay as well as some of the chemically bound water. The structure of the clay is not altered that much at this temperature. Inside the bisque kiln, the work is stacked a little, small bowl inside a larger bowl and onto a heavy plate. Smaller items like decorations or drink coasters might get stacked several high. Consideration is paid to the weight of the stack and shape of the work. A bisque kiln can fire about one and a half times the amount of work that the glaze kiln can fire. The firing takes about 10 hours to complete the cycle and about two days to cool down. Once it has been emptied the work is placed in the glaze room ready for you to decorate! Step Six – Glazing Decorating your work with colour can be a lot of fun – and time consuming! There are three main options for surface treatment at this stage: Oxide Washes Underglazes Glazes Washes and underglazes do not “glaze” the work – It will still need a layer of glaze to fully seal the clay (washes don’t need glaze on surfaces not designed for food or liquid as they can gloss up a little on their own). Underglazes are stable colourants that turn out pretty much how they look in the jar. They can be mixed with each other to form other colours and can be used like water colours to paint onto your work. Mostly they should have a clear glaze on top to seal them. Oxides are a different species – the pink oxide (cobalt) wash turns out bright blue for instance. They don’t always need a glaze on top, and some glazes can change the colour of the wash! The glazes need no other “glaze” on top! Be careful of unknown glaze interactions – you can put any combination of glaze in a bowl or on a plate, but only a single glaze on the outside of any vertical surface! Glazes are a chemical reaction under heat. We don’t know the exact chemicals in the Mayco glazes we use. I can guess by the way they interact with each other, however, on the whole, you need to test every idea you have, and not run the test on a vertical surface! Simply put, glaze is a layer of glass like substance that bonds with the clay underneath. Clay is made of silica, alumina and water. Glaze is made of mostly silica. Silica has a melting point of 1700°C and we fire to 1240°C. The silica requires a “flux” to help it melt at the lower temperature. Fluxes can be all sorts of chemicals – a common one is calcium – calcium has a melting point of 2500°C, however, together they both melt at a much lower temperature! Colourants are metal oxides like cobalt (blue), chrome (green through black), copper (green, blue, even red!), manganese (black, purple and pink) iron (red brown), etc. Different chemicals in the glaze can have dramatic effects. for example, barium carbonate (which we don’t use) turns manganese bright pink! Other elements can turn manganese dioxide brown, blue, purple and reddish brown. Manganese dioxide is a flux in and of itself as well. So, glazes that get their black and purple colours, often interact with other glazes and RUN! Our mirror black is a good example – it mixes really well with many glazes because it fluxes them – causes them to melt faster. It will also bring out many beautiful colours in the glazes because it’s black colouring most definitely comes from manganese dioxide! Glaze chemistry is a whole subject on it’s own! We use commercial Mayco glazes on purpose – for their huge range of colour possibilities, stability, cool interactions, artistic freedom with the ability to easily brush the glazes on and ease of use. We currently have almost 50 glazes on hand! A major project is to test the interactions of all glazes with each other. That is 2,500 test tiles!!!! I’m going to make the wall behind the wheels the feature wall of pretty colours! Step Seven – Glaze (Gloss or sometimes called “Glost”) Firing Most of the time this is the final stage of making your creation (but not always!) The glaze kiln goes to 1240°C. This is called cone 6, or midrange. It is the low end of stoneware temperatures. Stoneware clays and glazes are typically fired at cone 8 – 10, that is 1260 – 1290°C. The energy requirement to go from 1240°C to 1280°C is almost a 30% more! Our clay is formulated to vitrify (mature, turn “glass-like”) at 1240°, as are our glazes. A glaze kiln take around 12 hours to reach temperature and two to three days to cool down. Sometimes a third firing process is required – this is for decoration that is added to work after the glaze firing. For example – adding precious metals and lustres. this firing temperature is usually around 600 – 800°C depending upon the techniques being used. There are many students interested in gold and silver trims – we will be doing this third type of firing soon! After firing your work will be in the student finished work shelves. Remember to pay for it before you head out the door! There is a small extra charge for using porcelain clay (it’s more than twice the price of regular clay), and for any third firing process! Once your work has been fired it can not turn back into clay for millennia – so don’t fire it if you don’t like it! Put it in the bucket for recycling. https://firebirdstudios.com.au/the-process-of-making-pottery/This bowl was made by renowned pottery company J & G Meakin of England. The firm was established in the mid-1800's. The bowl is an example of kitchenware used in the 19th century and still in use today.Bowl; white ceramic, round and tapering inwards towards base. Made by J and G Meakin England.On base, 'Ironstone China Reg SOL 391413' with symbolflagstaff hill, flagstaff hill maritime museum and village, warrnambool, maritime museum, maritime village, great ocean road, shipwreck coast, mixing bowl, food preparation, j & g meakin, pottery, stoke-on-trent, kitchen equipment, ceramic -
 Flagstaff Hill Maritime Museum and Village
Domestic object - Plate
The Process of Making Pottery Decorating, Firing, Glazing, Making, Technical There is a rhythm and flow to clay. It can’t be done all at once! Even the making process! It can take weeks to get everything done, especially if you can only work on your pottery once a week! Even though we have three hour classes, it’s often just not enough time! Here is an overview of some of the processes so you have a bit more grasp on some of the technical stuff! Step One – Design There are SO many ideas out there for making stuff in clay! From delicate porcelain jewellery, through to heavy sculptural work and everything in between. Deciding your direction is sometimes not that easy – when you first start, try everything, you will naturally gravitate to the style that you enjoy! The options and variations are endless and can get a wee bit overwhelming too! Check in with me before you start to ensure your ideas will work, what order you might do things, how you could achieve the look you are seeking and any other technical data required! Step Two – Making Clay is thixotropic. This means that as you work with it, the clay first gets sloppier and wetter, before is begins to dry in the atmosphere. For most things, you simply can’t do all parts of the project at once. An example of work order might look like: Get last weeks work out from the shelves Prepare clay for today’s work – roll your clay, prepare balls for throwing, make the first stage of a pinch pot) Clean up last week’s work and put it on the shelf for bisque firing Check that you have any glazing to do – and do enough of it that you will have time to finish your main project Do the next step of your next project – there might be a further step that can’t be complete immediately, in that case, wrap your work well and put onto the shelves. Letting your work rest for a while can really help keep your work clean and professional looking. Many things require bagging under plastic to keep it ready for work the next week – put your name on the outside of the bag so you can find your work easily. We have stickers and markers. Consider how you want to decorate your work – coloured slip can be applied at a fairly wet stage (remembering that it will make your work even wetter!). Trying to apply slip to dry clay won’t work! If you want to do sgraffito – you will need to keep the work leather hard (a state of dryness where you can still work the clay with a little effort and a little water and care). Step Three – Drying Most of the time your work can go into the rack uncovered to let it dry out for the following week. If you want to continue forming or shaping you will need to double bag your work – put your work on a suitable sized bat and put the bat in a bag so the base of the bag is under the bat, then put another bag over the top of the work and tuck the top of the bag under the bat. If you want to trim (or turn) your thrown work the following week, it should also be double bagged. If your work is large, delicate, or of uneven thicknesses, you should lightly cover your work for drying. When considering the drying process, bare in mind the weather, humidity and wind! The hotter and dryer, the faster things dry and work can dry unevenly in the shelves – this can lead to cracking – another time to lightly cover your work for drying. Step Four – Trimming and Cleaning Up Your work is dry! It is called greenware now and it is at it’s most fragile! Handle everything with two hands. I often refer to soft hands – keep everything gentle and with your fingers spread as much as possible. Try to not pick up things like plates too much, and always with both hands! Before your work can be bisque fired it should be “cleaned up”. You work won’t go into the kiln if it has sharp edges – when glazed, sharp edges turn into razor blades! Use a piece of fly wire to rub the work all over – this will scratch a little so be light handed. Use a knife or metal kidney to scrape any areas that require a bit more dynamic treatment than the fly wire offers! Finally, a very light wipe over with a slightly damp sponge can help soften and soothe all of your edges and dags! Trimming thrown work: If you are planning to trim (or turn) your thrown work (and you should be), make sure you bag it well – your work should be leather hard to almost dry for easiest trimming. Use this step to finish the work completely – use a metal kidney to polish the surface, or a slightly damp sponge to give a freshly thrown look. Wipe the sponge around the rim after trimming, and check the inside of the pot for dags! Trimming slip cast work: Usually I will trim the rims of your work on the wheel the following day to make that stage easier, however you will still need to check your work for lumps and bumps. Last but not least – check that your name is still clearly on the bottom of your work. Step Five – Bisque Firing When the work is completely dry it can go into the bisque kiln. The bisque kiln is fired to 1000°C. This process burns off the water in the clay as well as some of the chemically bound water. The structure of the clay is not altered that much at this temperature. Inside the bisque kiln, the work is stacked a little, small bowl inside a larger bowl and onto a heavy plate. Smaller items like decorations or drink coasters might get stacked several high. Consideration is paid to the weight of the stack and shape of the work. A bisque kiln can fire about one and a half times the amount of work that the glaze kiln can fire. The firing takes about 10 hours to complete the cycle and about two days to cool down. Once it has been emptied the work is placed in the glaze room ready for you to decorate! Step Six – Glazing Decorating your work with colour can be a lot of fun – and time consuming! There are three main options for surface treatment at this stage: Oxide Washes Underglazes Glazes Washes and underglazes do not “glaze” the work – It will still need a layer of glaze to fully seal the clay (washes don’t need glaze on surfaces not designed for food or liquid as they can gloss up a little on their own). Underglazes are stable colourants that turn out pretty much how they look in the jar. They can be mixed with each other to form other colours and can be used like water colours to paint onto your work. Mostly they should have a clear glaze on top to seal them. Oxides are a different species – the pink oxide (cobalt) wash turns out bright blue for instance. They don’t always need a glaze on top, and some glazes can change the colour of the wash! The glazes need no other “glaze” on top! Be careful of unknown glaze interactions – you can put any combination of glaze in a bowl or on a plate, but only a single glaze on the outside of any vertical surface! Glazes are a chemical reaction under heat. We don’t know the exact chemicals in the Mayco glazes we use. I can guess by the way they interact with each other, however, on the whole, you need to test every idea you have, and not run the test on a vertical surface! Simply put, glaze is a layer of glass like substance that bonds with the clay underneath. Clay is made of silica, alumina and water. Glaze is made of mostly silica. Silica has a melting point of 1700°C and we fire to 1240°C. The silica requires a “flux” to help it melt at the lower temperature. Fluxes can be all sorts of chemicals – a common one is calcium – calcium has a melting point of 2500°C, however, together they both melt at a much lower temperature! Colourants are metal oxides like cobalt (blue), chrome (green through black), copper (green, blue, even red!), manganese (black, purple and pink) iron (red brown), etc. Different chemicals in the glaze can have dramatic effects. for example, barium carbonate (which we don’t use) turns manganese bright pink! Other elements can turn manganese dioxide brown, blue, purple and reddish brown. Manganese dioxide is a flux in and of itself as well. So, glazes that get their black and purple colours, often interact with other glazes and RUN! Our mirror black is a good example – it mixes really well with many glazes because it fluxes them – causes them to melt faster. It will also bring out many beautiful colours in the glazes because it’s black colouring most definitely comes from manganese dioxide! Glaze chemistry is a whole subject on it’s own! We use commercial Mayco glazes on purpose – for their huge range of colour possibilities, stability, cool interactions, artistic freedom with the ability to easily brush the glazes on and ease of use. We currently have almost 50 glazes on hand! A major project is to test the interactions of all glazes with each other. That is 2,500 test tiles!!!! I’m going to make the wall behind the wheels the feature wall of pretty colours! Step Seven – Glaze (Gloss or sometimes called “Glost”) Firing Most of the time this is the final stage of making your creation (but not always!) The glaze kiln goes to 1240°C. This is called cone 6, or midrange. It is the low end of stoneware temperatures. Stoneware clays and glazes are typically fired at cone 8 – 10, that is 1260 – 1290°C. The energy requirement to go from 1240°C to 1280°C is almost a 30% more! Our clay is formulated to vitrify (mature, turn “glass-like”) at 1240°, as are our glazes. A glaze kiln take around 12 hours to reach temperature and two to three days to cool down. Sometimes a third firing process is required – this is for decoration that is added to work after the glaze firing. For example – adding precious metals and lustres. this firing temperature is usually around 600 – 800°C depending upon the techniques being used. There are many students interested in gold and silver trims – we will be doing this third type of firing soon! After firing your work will be in the student finished work shelves. Remember to pay for it before you head out the door! There is a small extra charge for using porcelain clay (it’s more than twice the price of regular clay), and for any third firing process! Once your work has been fired it can not turn back into clay for millennia – so don’t fire it if you don’t like it! Put it in the bucket for recycling. https://firebirdstudios.com.au/the-process-of-making-pottery/Ceramics have evolved over thousands of years.White earthenware dinner plate. Crazing evident all over.Backstamped ‘Made in England S LTD’flagstaff hill, warrnambool, shipwrecked-coast, flagstaff-hill, flagstaff-hill-maritime-museum, maritime-museum, shipwreck-coast, flagstaff-hill-maritime-village, ceramics, tableware -
 Flagstaff Hill Maritime Museum and Village
Domestic object - Plate, Johnson Bros
The Process of Making Pottery Decorating, Firing, Glazing, Making, Technical There is a rhythm and flow to clay. It can’t be done all at once! Even the making process! It can take weeks to get everything done, especially if you can only work on your pottery once a week! Even though we have three hour classes, it’s often just not enough time! Here is an overview of some of the processes so you have a bit more grasp on some of the technical stuff! Step One – Design There are SO many ideas out there for making stuff in clay! From delicate porcelain jewellery, through to heavy sculptural work and everything in between. Deciding your direction is sometimes not that easy – when you first start, try everything, you will naturally gravitate to the style that you enjoy! The options and variations are endless and can get a wee bit overwhelming too! Check in with me before you start to ensure your ideas will work, what order you might do things, how you could achieve the look you are seeking and any other technical data required! Step Two – Making Clay is thixotropic. This means that as you work with it, the clay first gets sloppier and wetter, before is begins to dry in the atmosphere. For most things, you simply can’t do all parts of the project at once. An example of work order might look like: Get last weeks work out from the shelves Prepare clay for today’s work – roll your clay, prepare balls for throwing, make the first stage of a pinch pot) Clean up last week’s work and put it on the shelf for bisque firing Check that you have any glazing to do – and do enough of it that you will have time to finish your main project Do the next step of your next project – there might be a further step that can’t be complete immediately, in that case, wrap your work well and put onto the shelves. Letting your work rest for a while can really help keep your work clean and professional looking. Many things require bagging under plastic to keep it ready for work the next week – put your name on the outside of the bag so you can find your work easily. We have stickers and markers. Consider how you want to decorate your work – coloured slip can be applied at a fairly wet stage (remembering that it will make your work even wetter!). Trying to apply slip to dry clay won’t work! If you want to do sgraffito – you will need to keep the work leather hard (a state of dryness where you can still work the clay with a little effort and a little water and care). Step Three – Drying Most of the time your work can go into the rack uncovered to let it dry out for the following week. If you want to continue forming or shaping you will need to double bag your work – put your work on a suitable sized bat and put the bat in a bag so the base of the bag is under the bat, then put another bag over the top of the work and tuck the top of the bag under the bat. If you want to trim (or turn) your thrown work the following week, it should also be double bagged. If your work is large, delicate, or of uneven thicknesses, you should lightly cover your work for drying. When considering the drying process, bare in mind the weather, humidity and wind! The hotter and dryer, the faster things dry and work can dry unevenly in the shelves – this can lead to cracking – another time to lightly cover your work for drying. Step Four – Trimming and Cleaning Up Your work is dry! It is called greenware now and it is at it’s most fragile! Handle everything with two hands. I often refer to soft hands – keep everything gentle and with your fingers spread as much as possible. Try to not pick up things like plates too much, and always with both hands! Before your work can be bisque fired it should be “cleaned up”. You work won’t go into the kiln if it has sharp edges – when glazed, sharp edges turn into razor blades! Use a piece of fly wire to rub the work all over – this will scratch a little so be light handed. Use a knife or metal kidney to scrape any areas that require a bit more dynamic treatment than the fly wire offers! Finally, a very light wipe over with a slightly damp sponge can help soften and soothe all of your edges and dags! Trimming thrown work: If you are planning to trim (or turn) your thrown work (and you should be), make sure you bag it well – your work should be leather hard to almost dry for easiest trimming. Use this step to finish the work completely – use a metal kidney to polish the surface, or a slightly damp sponge to give a freshly thrown look. Wipe the sponge around the rim after trimming, and check the inside of the pot for dags! Trimming slip cast work: Usually I will trim the rims of your work on the wheel the following day to make that stage easier, however you will still need to check your work for lumps and bumps. Last but not least – check that your name is still clearly on the bottom of your work. Step Five – Bisque Firing When the work is completely dry it can go into the bisque kiln. The bisque kiln is fired to 1000°C. This process burns off the water in the clay as well as some of the chemically bound water. The structure of the clay is not altered that much at this temperature. Inside the bisque kiln, the work is stacked a little, small bowl inside a larger bowl and onto a heavy plate. Smaller items like decorations or drink coasters might get stacked several high. Consideration is paid to the weight of the stack and shape of the work. A bisque kiln can fire about one and a half times the amount of work that the glaze kiln can fire. The firing takes about 10 hours to complete the cycle and about two days to cool down. Once it has been emptied the work is placed in the glaze room ready for you to decorate! Step Six – Glazing Decorating your work with colour can be a lot of fun – and time consuming! There are three main options for surface treatment at this stage: Oxide Washes Underglazes Glazes Washes and underglazes do not “glaze” the work – It will still need a layer of glaze to fully seal the clay (washes don’t need glaze on surfaces not designed for food or liquid as they can gloss up a little on their own). Underglazes are stable colourants that turn out pretty much how they look in the jar. They can be mixed with each other to form other colours and can be used like water colours to paint onto your work. Mostly they should have a clear glaze on top to seal them. Oxides are a different species – the pink oxide (cobalt) wash turns out bright blue for instance. They don’t always need a glaze on top, and some glazes can change the colour of the wash! The glazes need no other “glaze” on top! Be careful of unknown glaze interactions – you can put any combination of glaze in a bowl or on a plate, but only a single glaze on the outside of any vertical surface! Glazes are a chemical reaction under heat. We don’t know the exact chemicals in the Mayco glazes we use. I can guess by the way they interact with each other, however, on the whole, you need to test every idea you have, and not run the test on a vertical surface! Simply put, glaze is a layer of glass like substance that bonds with the clay underneath. Clay is made of silica, alumina and water. Glaze is made of mostly silica. Silica has a melting point of 1700°C and we fire to 1240°C. The silica requires a “flux” to help it melt at the lower temperature. Fluxes can be all sorts of chemicals – a common one is calcium – calcium has a melting point of 2500°C, however, together they both melt at a much lower temperature! Colourants are metal oxides like cobalt (blue), chrome (green through black), copper (green, blue, even red!), manganese (black, purple and pink) iron (red brown), etc. Different chemicals in the glaze can have dramatic effects. for example, barium carbonate (which we don’t use) turns manganese bright pink! Other elements can turn manganese dioxide brown, blue, purple and reddish brown. Manganese dioxide is a flux in and of itself as well. So, glazes that get their black and purple colours, often interact with other glazes and RUN! Our mirror black is a good example – it mixes really well with many glazes because it fluxes them – causes them to melt faster. It will also bring out many beautiful colours in the glazes because it’s black colouring most definitely comes from manganese dioxide! Glaze chemistry is a whole subject on it’s own! We use commercial Mayco glazes on purpose – for their huge range of colour possibilities, stability, cool interactions, artistic freedom with the ability to easily brush the glazes on and ease of use. We currently have almost 50 glazes on hand! A major project is to test the interactions of all glazes with each other. That is 2,500 test tiles!!!! I’m going to make the wall behind the wheels the feature wall of pretty colours! Step Seven – Glaze (Gloss or sometimes called “Glost”) Firing Most of the time this is the final stage of making your creation (but not always!) The glaze kiln goes to 1240°C. This is called cone 6, or midrange. It is the low end of stoneware temperatures. Stoneware clays and glazes are typically fired at cone 8 – 10, that is 1260 – 1290°C. The energy requirement to go from 1240°C to 1280°C is almost a 30% more! Our clay is formulated to vitrify (mature, turn “glass-like”) at 1240°, as are our glazes. A glaze kiln take around 12 hours to reach temperature and two to three days to cool down. Sometimes a third firing process is required – this is for decoration that is added to work after the glaze firing. For example – adding precious metals and lustres. this firing temperature is usually around 600 – 800°C depending upon the techniques being used. There are many students interested in gold and silver trims – we will be doing this third type of firing soon! After firing your work will be in the student finished work shelves. Remember to pay for it before you head out the door! There is a small extra charge for using porcelain clay (it’s more than twice the price of regular clay), and for any third firing process! Once your work has been fired it can not turn back into clay for millennia – so don’t fire it if you don’t like it! Put it in the bucket for recycling. https://firebirdstudios.com.au/the-process-of-making-pottery/Ceramics have evolved over thousands of years.A white earthenware side plate with a gadroon edge. Has water marks and chips on front.‘Johnson Bros England Reg No 15587’flagstaff hill, warrnambool, shipwrecked-coast, flagstaff-hill, flagstaff-hill-maritime-museum, maritime-museum, shipwreck-coast, flagstaff-hill-maritime-village, johnson bros, ceramics, tableware -
 Flagstaff Hill Maritime Museum and Village
Domestic object - Plate, Alfred Meakin
The Process of Making Pottery Decorating, Firing, Glazing, Making, Technical There is a rhythm and flow to clay. It can’t be done all at once! Even the making process! It can take weeks to get everything done, especially if you can only work on your pottery once a week! Even though we have three hour classes, it’s often just not enough time! Here is an overview of some of the processes so you have a bit more grasp on some of the technical stuff! Step One – Design There are SO many ideas out there for making stuff in clay! From delicate porcelain jewellery, through to heavy sculptural work and everything in between. Deciding your direction is sometimes not that easy – when you first start, try everything, you will naturally gravitate to the style that you enjoy! The options and variations are endless and can get a wee bit overwhelming too! Check in with me before you start to ensure your ideas will work, what order you might do things, how you could achieve the look you are seeking and any other technical data required! Step Two – Making Clay is thixotropic. This means that as you work with it, the clay first gets sloppier and wetter, before is begins to dry in the atmosphere. For most things, you simply can’t do all parts of the project at once. An example of work order might look like: Get last weeks work out from the shelves Prepare clay for today’s work – roll your clay, prepare balls for throwing, make the first stage of a pinch pot) Clean up last week’s work and put it on the shelf for bisque firing Check that you have any glazing to do – and do enough of it that you will have time to finish your main project Do the next step of your next project – there might be a further step that can’t be complete immediately, in that case, wrap your work well and put onto the shelves. Letting your work rest for a while can really help keep your work clean and professional looking. Many things require bagging under plastic to keep it ready for work the next week – put your name on the outside of the bag so you can find your work easily. We have stickers and markers. Consider how you want to decorate your work – coloured slip can be applied at a fairly wet stage (remembering that it will make your work even wetter!). Trying to apply slip to dry clay won’t work! If you want to do sgraffito – you will need to keep the work leather hard (a state of dryness where you can still work the clay with a little effort and a little water and care). Step Three – Drying Most of the time your work can go into the rack uncovered to let it dry out for the following week. If you want to continue forming or shaping you will need to double bag your work – put your work on a suitable sized bat and put the bat in a bag so the base of the bag is under the bat, then put another bag over the top of the work and tuck the top of the bag under the bat. If you want to trim (or turn) your thrown work the following week, it should also be double bagged. If your work is large, delicate, or of uneven thicknesses, you should lightly cover your work for drying. When considering the drying process, bare in mind the weather, humidity and wind! The hotter and dryer, the faster things dry and work can dry unevenly in the shelves – this can lead to cracking – another time to lightly cover your work for drying. Step Four – Trimming and Cleaning Up Your work is dry! It is called greenware now and it is at it’s most fragile! Handle everything with two hands. I often refer to soft hands – keep everything gentle and with your fingers spread as much as possible. Try to not pick up things like plates too much, and always with both hands! Before your work can be bisque fired it should be “cleaned up”. You work won’t go into the kiln if it has sharp edges – when glazed, sharp edges turn into razor blades! Use a piece of fly wire to rub the work all over – this will scratch a little so be light handed. Use a knife or metal kidney to scrape any areas that require a bit more dynamic treatment than the fly wire offers! Finally, a very light wipe over with a slightly damp sponge can help soften and soothe all of your edges and dags! Trimming thrown work: If you are planning to trim (or turn) your thrown work (and you should be), make sure you bag it well – your work should be leather hard to almost dry for easiest trimming. Use this step to finish the work completely – use a metal kidney to polish the surface, or a slightly damp sponge to give a freshly thrown look. Wipe the sponge around the rim after trimming, and check the inside of the pot for dags! Trimming slip cast work: Usually I will trim the rims of your work on the wheel the following day to make that stage easier, however you will still need to check your work for lumps and bumps. Last but not least – check that your name is still clearly on the bottom of your work. Step Five – Bisque Firing When the work is completely dry it can go into the bisque kiln. The bisque kiln is fired to 1000°C. This process burns off the water in the clay as well as some of the chemically bound water. The structure of the clay is not altered that much at this temperature. Inside the bisque kiln, the work is stacked a little, small bowl inside a larger bowl and onto a heavy plate. Smaller items like decorations or drink coasters might get stacked several high. Consideration is paid to the weight of the stack and shape of the work. A bisque kiln can fire about one and a half times the amount of work that the glaze kiln can fire. The firing takes about 10 hours to complete the cycle and about two days to cool down. Once it has been emptied the work is placed in the glaze room ready for you to decorate! Step Six – Glazing Decorating your work with colour can be a lot of fun – and time consuming! There are three main options for surface treatment at this stage: Oxide Washes Underglazes Glazes Washes and underglazes do not “glaze” the work – It will still need a layer of glaze to fully seal the clay (washes don’t need glaze on surfaces not designed for food or liquid as they can gloss up a little on their own). Underglazes are stable colourants that turn out pretty much how they look in the jar. They can be mixed with each other to form other colours and can be used like water colours to paint onto your work. Mostly they should have a clear glaze on top to seal them. Oxides are a different species – the pink oxide (cobalt) wash turns out bright blue for instance. They don’t always need a glaze on top, and some glazes can change the colour of the wash! The glazes need no other “glaze” on top! Be careful of unknown glaze interactions – you can put any combination of glaze in a bowl or on a plate, but only a single glaze on the outside of any vertical surface! Glazes are a chemical reaction under heat. We don’t know the exact chemicals in the Mayco glazes we use. I can guess by the way they interact with each other, however, on the whole, you need to test every idea you have, and not run the test on a vertical surface! Simply put, glaze is a layer of glass like substance that bonds with the clay underneath. Clay is made of silica, alumina and water. Glaze is made of mostly silica. Silica has a melting point of 1700°C and we fire to 1240°C. The silica requires a “flux” to help it melt at the lower temperature. Fluxes can be all sorts of chemicals – a common one is calcium – calcium has a melting point of 2500°C, however, together they both melt at a much lower temperature! Colourants are metal oxides like cobalt (blue), chrome (green through black), copper (green, blue, even red!), manganese (black, purple and pink) iron (red brown), etc. Different chemicals in the glaze can have dramatic effects. for example, barium carbonate (which we don’t use) turns manganese bright pink! Other elements can turn manganese dioxide brown, blue, purple and reddish brown. Manganese dioxide is a flux in and of itself as well. So, glazes that get their black and purple colours, often interact with other glazes and RUN! Our mirror black is a good example – it mixes really well with many glazes because it fluxes them – causes them to melt faster. It will also bring out many beautiful colours in the glazes because it’s black colouring most definitely comes from manganese dioxide! Glaze chemistry is a whole subject on it’s own! We use commercial Mayco glazes on purpose – for their huge range of colour possibilities, stability, cool interactions, artistic freedom with the ability to easily brush the glazes on and ease of use. We currently have almost 50 glazes on hand! A major project is to test the interactions of all glazes with each other. That is 2,500 test tiles!!!! I’m going to make the wall behind the wheels the feature wall of pretty colours! Step Seven – Glaze (Gloss or sometimes called “Glost”) Firing Most of the time this is the final stage of making your creation (but not always!) The glaze kiln goes to 1240°C. This is called cone 6, or midrange. It is the low end of stoneware temperatures. Stoneware clays and glazes are typically fired at cone 8 – 10, that is 1260 – 1290°C. The energy requirement to go from 1240°C to 1280°C is almost a 30% more! Our clay is formulated to vitrify (mature, turn “glass-like”) at 1240°, as are our glazes. A glaze kiln take around 12 hours to reach temperature and two to three days to cool down. Sometimes a third firing process is required – this is for decoration that is added to work after the glaze firing. For example – adding precious metals and lustres. this firing temperature is usually around 600 – 800°C depending upon the techniques being used. There are many students interested in gold and silver trims – we will be doing this third type of firing soon! After firing your work will be in the student finished work shelves. Remember to pay for it before you head out the door! There is a small extra charge for using porcelain clay (it’s more than twice the price of regular clay), and for any third firing process! Once your work has been fired it can not turn back into clay for millennia – so don’t fire it if you don’t like it! Put it in the bucket for recycling. https://firebirdstudios.com.au/the-process-of-making-pottery/Ceramics have evolved over thousands of years.Earthenware dessert plate, cream colour. Made by Alfred Meakin, England. Backstamped ‘Alfred Meakin England’. flagstaff hill, warrnambool, shipwrecked-coast, flagstaff-hill, flagstaff-hill-maritime-museum, maritime-museum, shipwreck-coast, flagstaff-hill-maritime-village, alfred meakin, ceramics, earthenware, kitchenware -
 Flagstaff Hill Maritime Museum and Village
Domestic object - Jug
The Process of Making Pottery Decorating, Firing, Glazing, Making, Technical There is a rhythm and flow to clay. It can’t be done all at once! Even the making process! It can take weeks to get everything done, especially if you can only work on your pottery once a week! Even though we have three hour classes, it’s often just not enough time! Here is an overview of some of the processes so you have a bit more grasp on some of the technical stuff! Step One – Design There are SO many ideas out there for making stuff in clay! From delicate porcelain jewellery, through to heavy sculptural work and everything in between. Deciding your direction is sometimes not that easy – when you first start, try everything, you will naturally gravitate to the style that you enjoy! The options and variations are endless and can get a wee bit overwhelming too! Check in with me before you start to ensure your ideas will work, what order you might do things, how you could achieve the look you are seeking and any other technical data required! Step Two – Making Clay is thixotropic. This means that as you work with it, the clay first gets sloppier and wetter, before is begins to dry in the atmosphere. For most things, you simply can’t do all parts of the project at once. An example of work order might look like: Get last weeks work out from the shelves Prepare clay for today’s work – roll your clay, prepare balls for throwing, make the first stage of a pinch pot) Clean up last week’s work and put it on the shelf for bisque firing Check that you have any glazing to do – and do enough of it that you will have time to finish your main project Do the next step of your next project – there might be a further step that can’t be complete immediately, in that case, wrap your work well and put onto the shelves. Letting your work rest for a while can really help keep your work clean and professional looking. Many things require bagging under plastic to keep it ready for work the next week – put your name on the outside of the bag so you can find your work easily. We have stickers and markers. Consider how you want to decorate your work – coloured slip can be applied at a fairly wet stage (remembering that it will make your work even wetter!). Trying to apply slip to dry clay won’t work! If you want to do sgraffito – you will need to keep the work leather hard (a state of dryness where you can still work the clay with a little effort and a little water and care). Step Three – Drying Most of the time your work can go into the rack uncovered to let it dry out for the following week. If you want to continue forming or shaping you will need to double bag your work – put your work on a suitable sized bat and put the bat in a bag so the base of the bag is under the bat, then put another bag over the top of the work and tuck the top of the bag under the bat. If you want to trim (or turn) your thrown work the following week, it should also be double bagged. If your work is large, delicate, or of uneven thicknesses, you should lightly cover your work for drying. When considering the drying process, bare in mind the weather, humidity and wind! The hotter and dryer, the faster things dry and work can dry unevenly in the shelves – this can lead to cracking – another time to lightly cover your work for drying. Step Four – Trimming and Cleaning Up Your work is dry! It is called greenware now and it is at it’s most fragile! Handle everything with two hands. I often refer to soft hands – keep everything gentle and with your fingers spread as much as possible. Try to not pick up things like plates too much, and always with both hands! Before your work can be bisque fired it should be “cleaned up”. You work won’t go into the kiln if it has sharp edges – when glazed, sharp edges turn into razor blades! Use a piece of fly wire to rub the work all over – this will scratch a little so be light handed. Use a knife or metal kidney to scrape any areas that require a bit more dynamic treatment than the fly wire offers! Finally, a very light wipe over with a slightly damp sponge can help soften and soothe all of your edges and dags! Trimming thrown work: If you are planning to trim (or turn) your thrown work (and you should be), make sure you bag it well – your work should be leather hard to almost dry for easiest trimming. Use this step to finish the work completely – use a metal kidney to polish the surface, or a slightly damp sponge to give a freshly thrown look. Wipe the sponge around the rim after trimming, and check the inside of the pot for dags! Trimming slip cast work: Usually I will trim the rims of your work on the wheel the following day to make that stage easier, however you will still need to check your work for lumps and bumps. Last but not least – check that your name is still clearly on the bottom of your work. Step Five – Bisque Firing When the work is completely dry it can go into the bisque kiln. The bisque kiln is fired to 1000°C. This process burns off the water in the clay as well as some of the chemically bound water. The structure of the clay is not altered that much at this temperature. Inside the bisque kiln, the work is stacked a little, small bowl inside a larger bowl and onto a heavy plate. Smaller items like decorations or drink coasters might get stacked several high. Consideration is paid to the weight of the stack and shape of the work. A bisque kiln can fire about one and a half times the amount of work that the glaze kiln can fire. The firing takes about 10 hours to complete the cycle and about two days to cool down. Once it has been emptied the work is placed in the glaze room ready for you to decorate! Step Six – Glazing Decorating your work with colour can be a lot of fun – and time consuming! There are three main options for surface treatment at this stage: Oxide Washes Underglazes Glazes Washes and underglazes do not “glaze” the work – It will still need a layer of glaze to fully seal the clay (washes don’t need glaze on surfaces not designed for food or liquid as they can gloss up a little on their own). Underglazes are stable colourants that turn out pretty much how they look in the jar. They can be mixed with each other to form other colours and can be used like water colours to paint onto your work. Mostly they should have a clear glaze on top to seal them. Oxides are a different species – the pink oxide (cobalt) wash turns out bright blue for instance. They don’t always need a glaze on top, and some glazes can change the colour of the wash! The glazes need no other “glaze” on top! Be careful of unknown glaze interactions – you can put any combination of glaze in a bowl or on a plate, but only a single glaze on the outside of any vertical surface! Glazes are a chemical reaction under heat. We don’t know the exact chemicals in the Mayco glazes we use. I can guess by the way they interact with each other, however, on the whole, you need to test every idea you have, and not run the test on a vertical surface! Simply put, glaze is a layer of glass like substance that bonds with the clay underneath. Clay is made of silica, alumina and water. Glaze is made of mostly silica. Silica has a melting point of 1700°C and we fire to 1240°C. The silica requires a “flux” to help it melt at the lower temperature. Fluxes can be all sorts of chemicals – a common one is calcium – calcium has a melting point of 2500°C, however, together they both melt at a much lower temperature! Colourants are metal oxides like cobalt (blue), chrome (green through black), copper (green, blue, even red!), manganese (black, purple and pink) iron (red brown), etc. Different chemicals in the glaze can have dramatic effects. for example, barium carbonate (which we don’t use) turns manganese bright pink! Other elements can turn manganese dioxide brown, blue, purple and reddish brown. Manganese dioxide is a flux in and of itself as well. So, glazes that get their black and purple colours, often interact with other glazes and RUN! Our mirror black is a good example – it mixes really well with many glazes because it fluxes them – causes them to melt faster. It will also bring out many beautiful colours in the glazes because it’s black colouring most definitely comes from manganese dioxide! Glaze chemistry is a whole subject on it’s own! We use commercial Mayco glazes on purpose – for their huge range of colour possibilities, stability, cool interactions, artistic freedom with the ability to easily brush the glazes on and ease of use. We currently have almost 50 glazes on hand! A major project is to test the interactions of all glazes with each other. That is 2,500 test tiles!!!! I’m going to make the wall behind the wheels the feature wall of pretty colours! Step Seven – Glaze (Gloss or sometimes called “Glost”) Firing Most of the time this is the final stage of making your creation (but not always!) The glaze kiln goes to 1240°C. This is called cone 6, or midrange. It is the low end of stoneware temperatures. Stoneware clays and glazes are typically fired at cone 8 – 10, that is 1260 – 1290°C. The energy requirement to go from 1240°C to 1280°C is almost a 30% more! Our clay is formulated to vitrify (mature, turn “glass-like”) at 1240°, as are our glazes. A glaze kiln take around 12 hours to reach temperature and two to three days to cool down. Sometimes a third firing process is required – this is for decoration that is added to work after the glaze firing. For example – adding precious metals and lustres. this firing temperature is usually around 600 – 800°C depending upon the techniques being used. There are many students interested in gold and silver trims – we will be doing this third type of firing soon! After firing your work will be in the student finished work shelves. Remember to pay for it before you head out the door! There is a small extra charge for using porcelain clay (it’s more than twice the price of regular clay), and for any third firing process! Once your work has been fired it can not turn back into clay for millennia – so don’t fire it if you don’t like it! Put it in the bucket for recycling. https://firebirdstudios.com.au/the-process-of-making-pottery/The form of the jug has been in use for many centuries.Stoneware jug. Two tone brown glaze with pierced lip behind spout. Spout chipped.None.flagstaff hill, warrnambool, shipwrecked-coast, flagstaff-hill, flagstaff-hill-maritime-museum, maritime-museum, shipwreck-coast, flagstaff-hill-maritime-village, jug, ceramic jug -
 Ringwood and District Historical Society
Newspaper - Clippings, Ringwood Mail, First Speech Night - Norwood High School, Ringwood, Victoria, 1958
Ringwood Mail newspaper article clipped from pages 9 and 14, 23 December, 1958.Norwood's First Speech Night FOR its first Annual Speech Night Norwood High School put on a remarkably smooth and entertaining performance. It even broke new ground for these occasions by staging a junior Mannequin Parade. In the appreciative audience were the Mayor and Mayoress of Ringwood (Cr. and Mrs. R. 0. Spencer), Cr.and Mrs. Peter Vergers, Cr.and Mrs. Doug Baxter, Cr.and Mrs. Ben Hubbard, and Mr. George Ormandy (Head Master of Ringwood High School) and Mrs. Ormandy. After the singing of the Norwood High School Song,'Fidelis', the Mayor, as Chairman, gave high praise to the school for its 'mighty effort on its first Speech Night.' It was an historic night, he said, an event which would live in the minds of the boys and girls of the school for as long as they lived. Education was a live issue today, the Mayor said, and it was as well to reflect on what the teaching staff of a school was asked to do. They were asked to teach the children how to play their part in life, to make decent men and women of them. And if the children were a future disappointment to their parents the Head Master and the staff could not be blamed. On behalf of the Council and citizens of Ringwood, the Mayor offered congratulations and good wishes for a happy Christmas. In his report the Head Master (Mr. J. A. Gibson, B.A.) said the school colours of purple and gold had been appropriately chosen because of the golden wattle and purple sarsaparilla which rioted through the district. The badge design was a transition of Nowood to Northward, a symbolic representation of the magnetic compass which formed the central motif of the badge. The fact that the compass is used by travellers as a reliable guide gave the school the motto 'Fidelis' which combined the ideas of faithfulness trustworthiness and dependability. The word was easy to remember and to say, and its meaning set a worthy ideal which the boys and girls of the school could strive to attain. For House names native words had been chosen and they were associated with features of the district. The names Kalinda, Maroondah, Mullum and Yarra had already acquired a special significance for everyone associated -with the school. School traditions were also being established, the report went on, by the holding of annual swimming and athletic meetings and the awarding of prizes, and the school had been helped here by the generosity of certain good people of the community who had presented trophies. In the field of inter-house activities the Couche family had presented to the school the Couche Cup for Swimming Contests, and the Warrandyte cup for aggregate points earned in all sports; Mr. Avison had presented the Norwood Cup. for Athletics Contests, and Mr. and Mrs. Jack Godbehear the Rosebank Shield for award to the House gaining the highest aggregate score each year. Members of the Mackinlay family had perpetuated the name of the early owner of the property on which the school is built by donating a sum of money, the interest of which would provide the William and Elizabeth Mackinlay Prize each year for the Dux of Norwood High School. ATHLETIC SUCCESS The gross enrolment of 117, included 52 boys and 65 girls, who were divided into three forms of approx equal ability. The curriculum had been broadened to include excursions to the Art Gallery and Museum, to Orchestral concerts, and trips to Warrandyte, the Maroondah Dam and Healesville Wild Life Sanctuary. The school had taken part in inter-school sports contests during the year and came first in their section of the Swimming Contests held at Olympic Pool, also gaining second place at the Athletic Meeting at Olympic Park late in the year. A Social Service League had been formed in the school and had raised £36/7/3. This had been distributed to the Anti-Cancer Campaign, the Lord Mayor's Hospital Appeal, and Yooralla Crippled Children's Appeal. A Parents and Citizens Association had also been formed which had already raised more than £90 towards school funds. Mr. Gibson expressed the school's appreciation to the Head Master, staff and pupils of Boronia High School where Norwood pupils had been guests, and hoped that Norwood would be able to look after Mitcham High School as well in the coming year. After an informative explanation of the 'Importance and Responsibilities of a High School Advisory Council given by Inspector of Schools, Mr. H. W. Hopkins, B.A., the big moment of the evening arrived—the presentation of prizes and certificates by the Hon. J. W. Manson, MLA. Mr. Manson said the purpose of a school was twofold. It was to teach the children to fend for themselves and to live with one another. He congratulated Norwood High on its good start for the year and also those who didn't win prizes because, he said, they had learnt the most important lesson of all — not to win but to keep on trying. Second half of the program was purely entertainment. The School Drama Club presented a Christmas Nativity tableau and an adaptation of Charles Dickens' 'Christmas Carol' with considerable talent. The unique Dress Parade, conducted on the usual professional lines with a running commentary, was both amusing in its sophistication and delightful for the youthful charm of the mannequins and the excellence of the garments displayed. Attractive winter and summer school uniforms were displayed by boys and girls and featured the purple and gold colouring of the school. The girls' summer uniforms were fresh and cool looking with narrow lavender and white stripes. Gold Cesarine sports frocks were distinguished by a purple cord sash. Garments were made by girls in the Needlework Classes and reflected the greatest credit on both pupils and teachers. Cooking aprons, skirts, frocks and knitted sweaters and cardigans showed a wide variety and charm and the school uniforms were practical and smart. There was a bracket of rollicking folk dancing and a Making Music Interlude in which a group of boys and girls, in full hillbilly rig put on a turn with home-made instruments, penny whistles and their own fresh young voices. Teamwork was very good and the whole thing most amusing. Under the direction of Mr.J. A. Collins, the School choir sang delightfully; the traditional 'Greensleeves' and 'Gaudeums Igitur' being particularly effective. PRESENTATION PRIZES FORM 1A PASS CERTIFICATES — Margaret Forder, Noala Fullarton,Karen Gill, Jeanette Hamilton, Maureen Ing, Phyllis Kellar, Marie Knee, Norma Leslie, Mary Mackay, Valerie Quaife, Beverley Rimmer, Elizabeth Stubbs, Heather Trout, Gail Waugh, Brigitte Wieneroider, Jacqueline Wilson, Jeffrey Barnes, Stuart Dickson, Donald Duff, Brian Fitzgrald, Patrick Ford, Ian .Holt, Robert Jenkins, Allan Meyland, Ross Perkins, David Pullen, Denis Wise, John Wright. HONOUR CERTIFICATES; Lois Dewar, 89; Pauline Harmer 86.9, Brian Horswell 87.2. PASS CERTIFICATE and MOST IMPROVED: Willy Hoogstraat. HONOUR CERTIFICATE and DUX: Anne Luscombe, 94.9. FORM IB PASS CERTIFICATES: Faye Alsop, Helen Ashton, Joan Bedford, Carole Bonnett, Hazle Collins, Eileen Gunn, Gloria Lander, Meryn Longmire, Dianne Mclntyre, Geraldine McWilliam, Leslie Mahoney, Dawn Marley-, Judith Miller, Ann Morgan, Lucia Pruis, Dianne Whitehead, Jeffrey Aus, Peter Buckthorpe, Donald Falkingham, Brian Girvan, Nicholas Lobb, Graham Prime, Keith Purdie, Ronald Ryan, Colin Standfield, Kerry Stuart, Michael Toppin, Ian Weist, Terrence West, James Wilson. HONOLTR CERTIFICATES: Anne Couche 85.2; Susan Rule, 93.1; Dianne Thompson 92.1. PASS CERTIFICATE and MOST IMPROVED: Anne Bottomley. HONOUR CERTIFICATE and DUX: Arno Haemmerlea. FORM 1C PASS CERTIFICATES: Caroline Andrew, Ann Blower, Dianne Brown, Glenda Farrall, Judith Gibson, Jane Godbehear, Deidre Harding, Helen Morris, Margaret Patterson, Beverley Vergers, Heike Wenzel, Naomi Willshire. Beverley Wilson, Linda Woolan, Geoffrey David, Rowan Don, Timothy Donovan, Anthony Johnston, Michael Lavey, Frank Noble, Michael Parks, Graham Rogers, Gordon Stark, Angus Stark, David Williams. HONOUR, CERTIFICATES: Jennifer Coombs 87.1; Janice Cooke, 85.3; Merlyn Robertson 89.4; Richard Bell, 88.5; Peter Van Den Heuvel, 92.9; John Kerr, 89.3. PASS CERTIFICATE and MOST IMPROVED: Phillip Brown. HONOUR CERTTFICATE and DUX; Helena Lobb. ART PRIZE: Merlyn Robertson, 1C. NEEDLEWORK PRIZE: Judith Gibson, 1C. WILLIAM and ELIZABETH MACKINLAY PRIZE for Dux of the School: Anne Luscombe, 34.8. ATHLETICS CHAMPIONS. Norma Leslie (Mullum) under 13, girls. Dianne Whitehead (Yarra), 13 yrs and over girls, Don Falkingham (Kalinda), under 13, yrs, boys, Denis Wise (Maroondah), 13 years and over. HOUSE AWARDS Couche Cup for House Swimming Competition: Maroondah. Norwood Cup for House Athletics; Mullum. Warrandyte Cup for House Sport: Yarra. Rosebank Shield, for total House Points scored during year: Mullum. -
 Federation University Historical Collection
Photograph - Colour Photograph, Federation University Mount Helen Campus Entrance, 21/05/2010
Colour photograph the walkway and dam at Mpount Helen Campus.buildings, mount helen campus, the flags, autumn colouring -
 Federation University Historical Collection
Photograph - Colour Photograph, Federation University Mount Helen Campus Entrance, 21/05/2010
Colour photograph the walkway and dam at Mpount Helen Campus.buildings, mount helen campus, the flags, autumn colouring -
 Federation University Historical Collection
Photograph - Colour Photograph, Federation University Mount Helen Campus Entrance, 21/05/2010
Colour photograph the walkway and dam at Mpount Helen Campus.buildings, mount helen campus, the flags, autumn colouring -
 Federation University Historical Collection
Photograph - Colour Photograph, Federation University Mount Helen Campus Entrance, 21/05/2010
Colour photograph the walkway and dam at Mpount Helen Campus.buildings, mount helen campus, the flags, autumn colouring -
 Federation University Historical Collection
Photograph - Colour Photograph, Federation University Mount Helen Campus Entrance, 21/05/2010
Colour photograph the walkway and dam at Mpount Helen Campus.buildings, mount helen campus, the flags, autumn colouring