Showing 430 items
matching garden tour
-
 Ballarat Tramway Museum
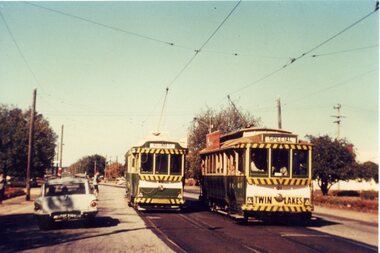
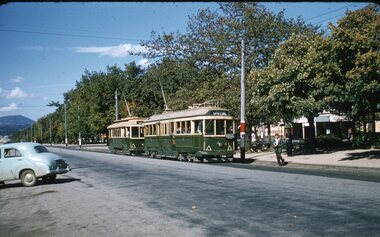
Postcard, Ron Scholten, SEC Ballarat No. 40, Victoria St
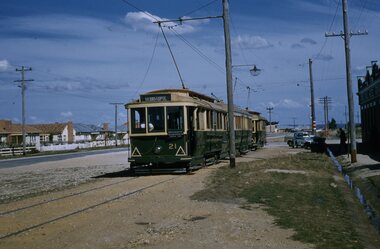
Colour photograph, printed on a postcard back format of SEC Ballarat No. 40 crossing No. 21 at the King St. loop. No. 40 outward bound, with destination of Victoria St, and No. 21, showing Special - tram tour. No. 21 has a yellow background Twin Lakes sign on front dash panel.trams, tramways, king st, victoria st, tram 41, tram 42 -
 Ballarat Tramway Museum
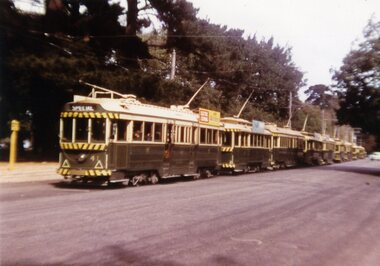
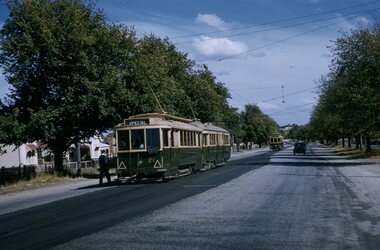
Postcard, Ron Scholten, Ballarat - Wendouree Parade - special trams
Colour photograph, printed on a postcard back format of SEC Ballarat of a line up of about 9 trams, lead by No. 41 in Wendouree Parade, Gardens area, early 1960's for a special tour.trams, tramways, wendouree parade, gardens, tram 40 -
 Ballarat Tramway Museum
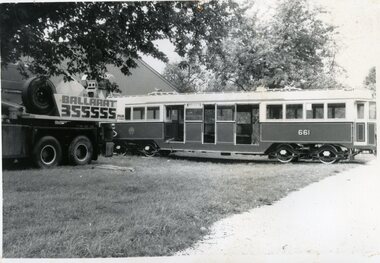
Photograph - Black & White Photograph/s - set of 2, Apr. 1989
Set of two black and white photographs of No. 661 being loaded at the rear of the depot to go to Melbourne for Yapper Tours, April 1989. (For actual date see Car log book). Photographer unknown. .1 - Tram at rear of depot, with Barry James Crane. .2 - Being loaded onto the truck, under the tram, with bogie off tracked. tramways, trams, btm depot, loading trams, tram 661 -
 Ballarat Tramway Museum
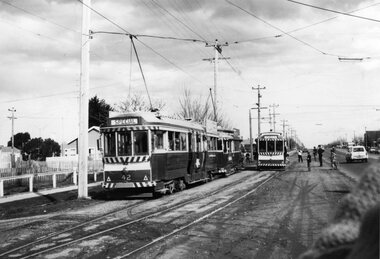
Photograph - Black & White Photograph/s, c1970
Black and white photograph of three trams crossing at Gray St. loop on the Sebastopol line in Albert St. No. 21, northbound is entering the loop, while a single trucker and No. 42 showing "Special" wait. A number of photographers are photographing the event indicating a enthusiast special. Probably taken early 1970's Item from the ARHS Archives dated 14/7/2004 via Bill Kingsley. No indication of original source, date or photographer.tramways, trams, sebastopol, gray st, special tours, albert st, tram 42, tram 21 -
 Ballarat Tramway Museum
Slide - 35mm slide/s, Ben Parle, 5/04/1958 12:00:00 AM
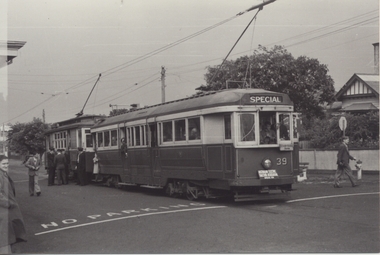
Kodachrome Transparency - 35mm slide - cardboard mount, with one side with red border and words "Kodachrome Transparency / Processed by Kodak" top and bottom. Photo taken by Ben Parle 5/4/1958. Has slide No. "14" stamped in red in top corner and date stamped on slide. Photo of the No. 41 and 21 on an AETA tour, Sturt St. at Drummond St., facing the wrong way on the Sturt St track. Would appear the trip has terminated in Sturt St and about to reverse to another route. Tram 41 has destination of Special and is carrying the AETA special car sign. For high resolution scan see btm2843h.tif"Sturt St / Drummond St" "-5 APR 1958"tramways, trams, sturt st, drummond st, aeta, tram 41, tram 21 -
 Ballarat Tramway Museum
Slide - 35mm slide/s, Ben Parle, 5/04/1958 12:00:00 AM
Kodachrome Transparency - 35mm slide - cardboard mount, with one side with red border and words "Kodachrome Transparency / Processed by Kodak" top and bottom. Photo taken by Ben Parle 5/4/1958. Has slide No. "15" stamped in red in top corner and date stamped on slide. Photo of the No. 41 and 21 on an AETA tour, Skipton St. at Bell St. loop, crossing inbound tram, No. 30. No. 21 has the AETA Special tram sign and the destination Special. For high resolution scan see btm2844h.tif"Sebastopol line" "-5 APR 1958"tramways, trams, skipton st, bell st, aeta, tram 41, tram 21, tram 30 -
 Ballarat Tramway Museum
Slide - 35mm slide/s, Ben Parle, 5/04/1958 12:00:00 AM
Kodachrome Transparency - 35mm slide - cardboard mount, with one side with red border and words "Kodachrome Transparency / Processed by Kodak" top and bottom. Photo taken by Ben Parle 5/4/1958. Has slide No. "16" stamped in red in top corner and date stamped on slide. Photo of the No. 41 and 21 on an AETA tour, at the Sebastopol terminus, with another single trucker waiting at the end of the track. Note the new houses in the background, the lamp guard around the street lamp to the right of No. 21. No. 21 has the destination of Sebastopol and the AETA special tram sign. For high resolution scan see btm2845h.tif"Sebastopol terminus" "-5 APR 1958"tramways, trams, aeta, sebastopol, albert st, tram 41, tram 21 -
 Ballarat Tramway Museum
Slide - 35mm slide/s, Ben Parle, 5/04/1958 12:00:00 AM
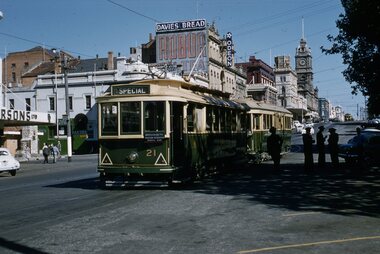
Kodachrome Transparency - 35mm slide - cardboard mount, with one side with red border and words "Kodachrome Transparency / Processed by Kodak" top and bottom. Photo taken by Ben Parle 5/4/1958. Has slide No. "13" stamped in red in top corner. Photo of the No. 21 and 41in the Sturt St. City Loop, with a number of SEC crewmen standing in the shadows, while on the AETA tour. No. 21 has destination of Special. Both trams are carrying the AETA special car auxiliary signs. Trams have been reversed in the loop, and possibly to run "bang road" to Bridge St. Has the Odeon theatre in the background, advertisements for Robur Tea, Davies Bread. Note the Pie / Pasties sign on the building behind 21. For high resolution scan see btm2847h.tif"City Loop" "-5-4-58"tramways, trams, sturt st, city loop, tram 21, tram 41 -
 Ballarat Tramway Museum
Photograph - Colour Photograph/s - set of 2, Carolyn Dean, 22/11/2000 12:00:00 AM
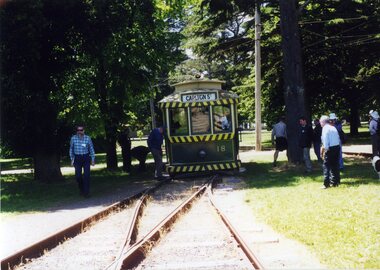
Set of two colour prints of Ballarat Tram No. 18 derailed just prior to the 2/3 roads points on 22/11/2000 during the COTMA Conference tour open day. Photographs by Carolyn Dean. See also Reg. Item 2696 for other photographs as well. Printed on Kodak paper.On rear of each print is "263.1 22.11.00" in ink.btm, derailments, cotma, depot, tram 18 -
 Ballarat Tramway Museum
Document - Report, Alan Bradley, "50 Years Ago ", Apr. 2004
Four page printed document or report titled "50 Years Ago" written for BTM magazine Fares Please!, in April 2004. Should be "60 Years Ago". The document or report written by Alan Bradley looks at the 1954 Royal Tour, accidents in 1954, featuring No. 37 and 24 when it ran into the Bucks Head Hotel. Mentions in article, Frank Callahan, Dave Kellett, Les Edwards, Hodgson, Herb Knight. Four sheets of A4 paper stapled in top left hand corner. Images added 28/11/2016.trams, tramways, ballarat, royal visit, accidents, bucks head hotel -
 Ballarat Tramway Museum
Slide - 35mm slide/s, Eldon Hogan, Oct. 1966
Colour slide of four Birney Trams on the North Bendigo line, Oct. 1966, SPER Tour, lead by tram No. 11, followed by No. 30. People alongside the tram on a wet day. Photographer Eldon Hogan, AGFA Slide, blue plastic with white plastic on reverse.In ink "SPER Bendigo Oct. '66"tramways, trams, sper, bendigo, birney, tram 11, tram 30 -
 Ballarat Tramway Museum
Slide - 35mm slide/s, Eldon Hogan, mid 1970's
Colour slide of Birney tram No. 30 at the North Bendigo Terminus in Bendigo Trust colours, mid 1970's and a SEC Bogie tram behind. Possibly on an ARE tour. Photographer Eldon Hogan, AGFA Slide, blue plastic with white plastic on reverse.tramways, trams, sper, bendigo, birney, north bendigo, tram 30 -
 Ballarat Tramway Museum
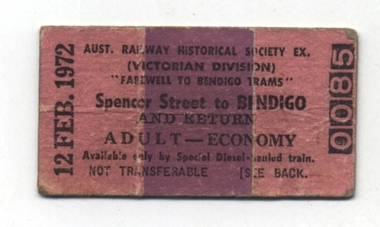
Ephemera - Ticket/s, Victorian Railways, ARHS tour to Farewell Bendigo, 1972
Has a strong association with the tours to mark the closure of the Bendigo Tramway system and Graeme Breydon.Edmondson pasteboard railway ticket, No. 0085, dated 12 Feb. 1972, for use on an ARHS tour to Farewell Bendigo prior to the closure of the system. Ticket base is pink with a thick purple stripe, which is printed in landscape format. Ticket number in reverse. Adult - Economy, available on the day of travel only and on the special train. On the rear of the ticket is the reserved seat and carriage number. Ticket used by Graeme Breydon on the day of the tour. See History of the Object for further details. Two copies held. trams, tramways, arhs, tmsv, tickets, closure -
 Ballarat Tramway Museum
Photograph - Digital image Set of 20
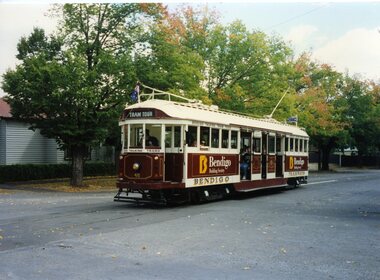
Set of 20 digital images of Bendigo Tramways, 1972 at or before closure while on a tram tour by Stuart Lodington. .1 - No. 28 and 5 at Eaglehawk terminus .2 - No. 28 leaving Charing Cross and travelling into View St with Armstrong Type Service building in background and Firestone Advertisements. .3 - No. 29 with Eaglehawk Town Hall and Post Office in background. .4 - No. 26 and 29 at start of double track, High St Eaglehawk .5 - No. 29 leaving Eaglehawk with shops in the background, Foodland, J. Bests .6 - No. 29 and 23 crossing Manchester Loop with Manchester Arms Hotel in the background and an old poppet head. .7 - No. 29 at ditto with poppet head in the background. .8 - No. 28 and two other trams at the Quarry Hill terminus. .9 - No. 29 in High St Bendigo with the Cathedral and Golden Gate Hotel in the background. .10 - No. 3 with destination Eaglehawk, in bound Carpenter St? .11 - No. 29 following a single trucker through a loop or the end of the double track near the depot. .12 - No. 23?, at Eaglehawk terminus, with Eaglehawk Town Hall in the background. .13 - Birney tram crossing the bridge at the Depot entrance - No. 29 .14 - No. 29 on the Eaglehawk line? .15 - as for .13 .16 - No. 29 entering the depot. .17 - No. 23, inbound from Eaglehawk, at Jobs Gully Loop with the railway overbridge in the background. .18 - No. 28 and two other trams (see also Reg Item 4982) for the same tram tour at Myrtle St. Loop. .19 - No. 21 with North Bendigo on the destination approaching the Golden Square terminus. .20 - No. 7 at Golden Square terminustrams, tramways, bendigo, eaglehawk, quarry hill, golden square, depot, tram 5, tram 29, tram 28, tram 26, tram 23, tram 7, tram 21 -
 Ballarat Tramway Museum
Photograph - Digital image Set of 20, 1971-72
Set of 20 digital images of Bendigo Tramways, 1972 at or before closure while on a tram tour by Stuart Lodington. .1 - No. 7 at Golden Square terminus .2 - ditto .3 - No. 26 in bound on the Eaglehawk line with a crossing loop behind. .4 - Birney crossing the bridge by the tram depot. .5 - No. 29 running a special on the Eaglehawk line with a HBA billboard in the background. .6 - No. 29 with a driver walking in front of the tram at the above location. .7 - No. 29 on the Eaglehawk line .8 - ditto waiting for a tram at Manchester Loop with poppet head in the background. .9 - No. 29 on the Eaglehawk line .10 - Eaglehawk Town Hall at night. .11 - No. 7 at the depot junction in McCrae St, with Golden Square destination. .12 - No. 29 with the Camp Hotel Eaglehawk in the background. Also a Newsagent with The Sun, The Bendigo Advertiser and The Age signs on the building, High St .13 - No. 29 Mt Korong Rd, with the railway overbridge in the background. .14 - interior photo of Birney tram roof .15 - interior view of controls of Birney at Eaglehawk .16 - No. 29 outbound at the Depot Junction McCrae St. .17 - No. 18 at the Eaglehawk terminus .18 - close up view of No. 29 front. .19 - No. 29 in Nolan St, crossing the bridge, outbound. .20 - No. 18 at the Eaglehawk terminus with the Eaglehawk Town Hall, Post Office in the background. Has a circus banner on the side.trams, tramways, bendigo, eaglehawk, quarry hill, golden square, depot, mccrae st, nolan st, tram 7, tram 26, tram 29, tram 18 -
 Ballarat Tramway Museum
Photograph - Digital image Set of 20, 1971-72
Set of 20 digital images of Bendigo Tramways, 1972 at or before closure while on a tram tour by Stuart Lodington. .1 - No. 29 at the North Bendigo terminus .2 - No. 29 just past the Bendigo end of the double track in High St Eaglehawk, with a BP dealer in the background. .3 - Night photo of No. 18 at a terminus, showing "Eaglehawk" .4 - ditto .5 - Night photo of No. 24 at Eaglehawk with Leo A Hughes Photographer in the background. The Tram has "Johnnie Walker whiskey" roof adverts. .6 - No. 29 outbound in Thunder St with a train passing over the bridge in the background. .7 - view from the front window of a tram on the Eaglehawk line with a large "display event float" in the foreground and tram approaching a crossing loop. .8 - No. 29 at North Bendigo .9 - view of High St Eaglehawk looking east from the terminus, showing the track and centre poles. .10 - No. 29 outbound on the North Bendigo line turning from either Nolan St or Caledonia St, running a special. .11 - No. 7 departing North Bendigo for Golden Square. .12 - No. 3 and 18 at Charing Cross. No. 3 has two SEC roof Advertisements .13 - No. 7 at North Bendigo with the trolley pole being reversed. .14 - No. 24 at Quarry Hill with Northern Terrazzo in the background with the driver alongside .15 - No. 7 and No.6 at Charing Cross with the Beehive buildings in the background. .16 - No. 7 at North Bendigo terminus .17 - ditto .18 - No. 24 at Quarry Hill with Northern Terrazzo in the background with the conductor alongside. .19 - ditto .20 - No. 26 and other bogie tram in View St near Charing Cross with the Armstrong Tyre Service building and signs for Cohn's Drinks and T&G in the view.trams, tramways, bendigo, eaglehawk, quarry hill, golden square, depot, north bendigo, charing cross, tram 29, tram 18, tram 24, tram 3, tram 7, tram 6, tram 26 -
 Ballarat Tramway Museum
Photograph - Digital image Set of 20, 1971-72
Set of 22 digital images of Bendigo Tramways, 1972 at or before closure while on a tram tour by Stuart Lodington. .1 - No. 7 arriving at North Bendigo .2 - No. 5 departing Charing Cross along View St, with a Firestone tyres in the background. .3 - front view of a tram in View St with a blurred background image. .4 - No. 24 showing Eaglehawk destination .5 - No 26 and 3 in View St, with the Armstrong Tyre Service building in the background and signs for T&G and Cohn's Drinks. .6 - ditto .7 - No. 3 arriving at Charing Cross from Eaglehawk in View St, with a Quarry Hill destination. .8 - No. 3 and 18 at Charing Cross. .9 - No. 24 on the Quarry Hill line. .10 - No 26 in View St, with the Armstrong Tyre Service building in the background and signs for T&G and Cohn's Drinks. .11 - ditto, with fountain in view, Colonial Mutual building and a newsagent with a Herald sign on the building. .12 - No. 7 at North Bendigo terminus .13 - ditto with pole being reversed. .14 - No. 18 at Quarry Hill terminus with Northern Terrazzo sign in the background. .15 - No. 24 at Quarry Hill terminus .16 - No. 18 arriving at Charring Cross, with Fountain Plaza and Bendigo Pharmacy in the background. .17 - No. 3 and 18 at Charing Cross. .18 - No. 7 at North Bendigo terminus with pole being placed on the overhead. .19 - No. 26 in View St inbound, with Sandhurst Trustees sign in the background. .20 - No. 6 leaving Charing Cross in Pall Mall with Myer and other buildings in the background. .21 - No. 7 at North Bendigo .22 - Single trucker with two roof Advertisements crossing View St with fountain in view, Colonial Mutual building and a newsagent with a Herald sign on the building.trams, tramways, bendigo, eaglehawk, quarry hill, north bendigo, charing cross, view st, tram 7, tram 5, tram 24, tram 26, tram 5, tram 3, tram 18, tram 6 -
 Ballarat Tramway Museum
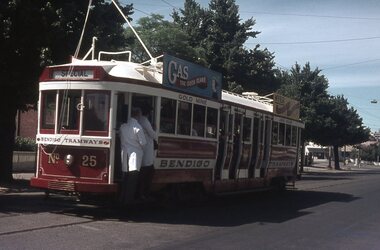
Photograph - Digital image Set of 20, 9/12/1972 12:00:00 AM
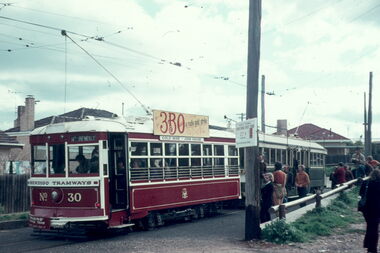
Set of 21 digital images of Bendigo Tramways, at the re-opening of the Bendigo tramways by the Bendigo Trust on 9/12/1972by Stuart Lodington. All trams in the first Bendigo Trust colours. .1 - No. 25 with Gas and Myer roof advertisements .2 - No. 30 with 3BO roof advert and a BP service station in the background. .3 - SEC single trucker at the Mine with a large "Tram Tours" sign on the front of the tram .4 - ditto .5 - No. 19 with a large group of passengers, Bendigo Motor Co and Sandhurst roof advertisements .6 - No. 30 in McCrae St .7 - view of opening march with band .8 - No. 19 in opening parade .9 - Opening Parade in High St with cathedral in the background .10 - No. 30 in Nolan St crossing bridge .11 - ditto .12 - No. 25 at the mine .13 - No. 30 leaving the mine .14 - No. 30 ditto with BCTV roof advert. .15 - Charing Cross with cenotaph, The Beehive building and Ezywalkin shoes and Coca Cola adverts .16 - No. 19 southbound in High St with City Centre Motel building in the background. .17 - No. 30 returning from North Bendigo .18 - No 25 in High St after leaving Gold Mine .19 - No. 30 at the Mine .20 - No. 30 in Nolan St .21 - No. 30 with 3BO roof advert and a BP service station in the background.trams, tramways, bendigo, north bendigo, charing cross, bendigo trust, central deborah, tram 25, tram 30, tram 19 -
 Ballarat Tramway Museum
Album - Photo Album, Wal Jack, MMTB No. 2, 1950's
Includes pages on 980, decorated trams, Birney, PMTT, HTT works, S, T, Footscray, AETA Tours, Q, U, W's, Works cars, opening of Bourke St, Essendon, Flinders St overpass, Kingsway, Point Ormond, G class bodies. For details of each photograph and layouts see - Wal Jack Melbourne Album Reg Item 5001 listingHas a strong association with Wal Jack and tramway developments within Australasia until 1964 and given their extent particular significance. Features M&MTB Melbourne Trams.Dark brown binder cloth covered folder, brass screw binders (2 of 3 in position), grey paper inside covers holding some 44 manila cover foolscap size sheets of card on which photos have been mounted using photo corners so various types, captions in black ink. Has a colour illustration of Flinders St station with three trams on inside front cover. de of covers, some 157 black and white photographs.. trams, tramways, mmtb, tramcars, melbourne, wal jack -
 Ballarat Tramway Museum
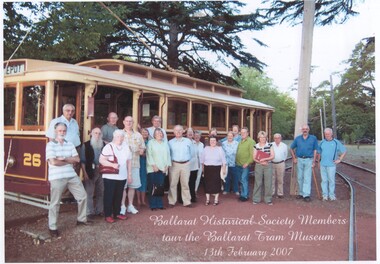
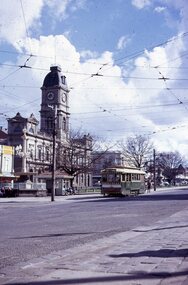
Photograph - Colour Print, Ballarat Historical Society, 13/02/2007 12:00:00 AM
Colour print of the visit by the Ballarat Historical Society members to the Museum standing alongside No. 28 on the 13 Feb. 2007. Photograph from the BHS to the Museum March 2007. Has Richard Gilbert and Warren Doubleday standing on the right hand side of the photograph. Has a caption embedded into the photograph.Niltrams, tramways, btm, ballarat historical society, tours, visitors, tram 26 -
 Ballarat Tramway Museum
Photograph - Digital image, c1971
Yields information about Ballarat streetscape and its trams in the closing days of the SEC tramway system.Digital image from a black and white print of tram 12 north bound in Lydiard St North after crossing the level crossing - has Ballarat Railway Station in the background. A large number of people in the photograph indicating a possible rail tour. Photo taken from the balcony of the Victoria Guest House. Photo by Marc Dahlstrom c1971.On rear is the Marc Dahlstrom stamp.trams, tramways, railway station, lydiard st nth, level crossings, tram 12 -
 Ballarat Tramway Museum
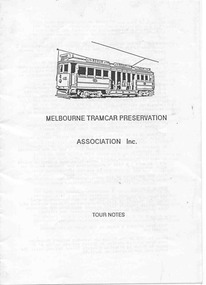
Programme, Craig Tooke, "Melbourne Tramcar Preservation Association Inc Tour Notes", Mar. 1988
Twelve page A5 booklet, stapled, folded, titled "Melbourne Tramcar Preservation Association Inc Tour Notes", for a tour to the BTPS Haddon site, written by Craig Tooke 26/3/1989. Gives details of the museum safety, tramcars, buses and details of the association and its history, site map and how to get there from Ballarat.trams, tramways, mtpa, haddon, tours -
 Ballarat Tramway Museum
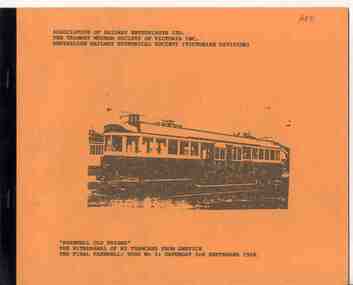
Programme, Association of Railway Enthusiasts (ARE), "Farewell Old Friend", Aug. 1989
Five page duplicated document contained within orange colour card covers with one of the 3 copies side bound with plastic binding. Titled "Farewell Old Friend", "The withdrawal of W2 tramcars from Service, The final Farewell, Tour No. 3, Sat. 3 September 1988". Provides a welcome aboard, a safety message, organiser details, notes on the W2, a plan showing the route, route information and photo stops and on the rear cover, the route for tour 3 and previous tours. Tour organised by the Association of Railway Enthusiasts, Tramway Museum Society of Victoria and the Australian Railway Historical Society Vic Div.on Front cover of bound copy "ARE"trams, tramways, are, arhs, tmsv, w2 class, tours -
 Ballarat Tramway Museum
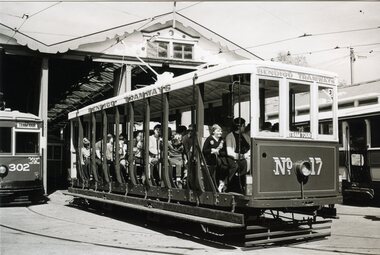
Photograph - Black & White Photograph/s, William. F. Scott, 3/04/1983 12:00:00 AM
Yields information about the appearance of Bendigo Birney trams at the time of the opening of the tram services and Eaglehawk Town Hall.Black and white photograph, of Toastrack, Bendigo 17, with passengers outside the Bendigo Depot, photo by William F Scott 3/4/1983."22" in pencil in top left hand corner, and along bottom edge in ink "Bendigo Trust, car on tour 3/4/1983, William F. Scott photo".trams, tramways, bendigo, depot, tram 17 -
 Ballarat Tramway Museum
Photograph - Colour Photograph/s, William. F. Scott, Easter 1991
Colour photograph, of W2, 470, painted in Bendigo tram tour colours, advertising the Bendigo Bank, Tramways Ave Bendigo, before turning into McCrae St, Bendigo, Easter 1991. Photograph by William F Scott."79" in blue ink in top left hand corner, and a "Bendigo Trust / Car 470 in Tramways Ave, heading for McCrae, William F. Scott photo". and in bottom right hand corner "Easter 91 / WFS".trams, tramways, bendigo, depot, tramways ave, mccrae st, tram 470 -
 Ballarat Tramway Museum
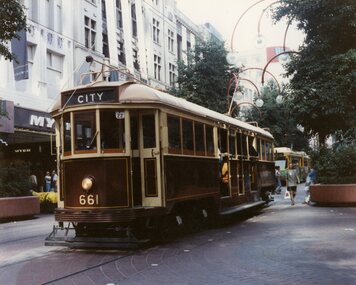
Photograph - Black & White Photograph/s - set of 3, William. F. Scott, 1989
Yields information about the appearance of Geelong's trams and the railway station area and the conversion to a one-man tram.Set of three colour photographs of BTPS owned W3 661 operating in Bourke St Melbourne. Presumed taken at the same time as the front cover of the annual report, 1988-1989 - 29/4/1989. Has Myer building in the background. .2 - ditto - crossing an articulated tram. .3 - westbound in Bourke Street with the Priceline Centrepoint building in the background and Medicare office. Printed on Kodak paper.In pencil on the rear "William F Scott".trams, tramways, btps, bourke st, yapper tours, tram 661 -
 Ballarat Tramway Museum
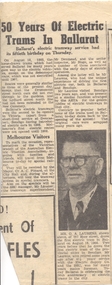
Newspaper, The Courier Ballarat, "50 Years of electric trams in Ballarat", 20/08/1955 12:00:00 AM
Yields information about the celebration of the Golden Jubilee of electric trams in Ballarat by the AETA and those who attended a dinner.Newspaper clipping from The Courier, 20/8/1955, titled "50 Years of electric trams in Ballarat", about the visit of the AETA, civic reception, to celebrate the event. Also attending is Mr. G. A. Laurens, who drove the first electric tram in Ballarat. Cr. A. C. Pittard, the Mayor to host the civic reception. See also Reg Item 5349 for associated photograph. Contained originally within Reg Item 5507 at the back of the binder. For items see btm5507 loose items list.pdf aeta, tours, golden jubilee of trams, civic reception -
 Ballarat Tramway Museum
Photograph - Black & White Photograph/s, Postcard, 2/04/1955 12:00:00 AM
Yields information about a Geelong tram that was later to become a Ballarat tram.Black and white print of Geelong No. 39 and a single truck tram at the Newtown terminus while operating the Australian Electric Traction Association's special tram tour of Geelong on 2/4/1955. Tram has destination of "SPECIAL" and an auxiliary board of "CHARTERED" and AETA tour board on bumper bar. See also Reg items 486 and 1549 for similar photographs.On rear in ink "Chilwell PMTT MMTB E39, Geelong 39 Ball 41"trams, tramways, geelong, aeta, newtown, tram 39 -
 Ballarat Tramway Museum
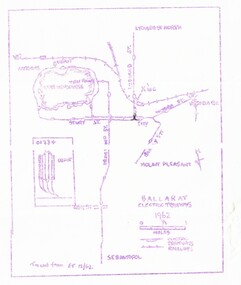
Map, Ballarat and Bendigo tram systems, 1962 and 1965
Set of two spirit duplicated maps of the Ballarat and Bendigo tram systems, showing the track layout for both cities. .1 - Ballarat - dated 1962, noted as being traced from Electric Traction 12/62. .2 - Bendigo - dated 1965, noted as being tracked from ET 6/65. Most likely used for tour notes or other similar productions.trams, tramways, map, ballarat, bendigo -
 Ballarat Tramway Museum
Slide - 35mm slide/s - set of 2, Campbell Duncan, 22/08/1971 12:00:00 AM
Yields information about the operations of the Ballarat Tramway system prior to closure and some of the tours that were operated.Set of two Kodak - Kodachrome slide - cardboard mounts .1 - tram 13, at Tramway Centre, with Ballarat Town Hall in background. Photo shows the tram stop shelter, the fountain. Tram has a "Twin Lakes" sign. A number of people are waiting on seats. Photo taken 22/8/1971. .2 - SEC tram parked at depot loop Wendouree Parade? with possibly Eldon Hogan cleaning the destination box. - 22/8/1971.In ink on slide: .1 - "22 Aug 71, Tramway centre (Lydiard St), Town Hall behind." .2 - "Sun 22 Aug 71, whilst waiting for up, for cross"tramways, trams, wendouree parade, destination roll, depot loop, tram 13