Showing 339 items
matching set square
-
 Ballarat Tramway Museum
Photograph - Digital image Set of 20, 1971-72
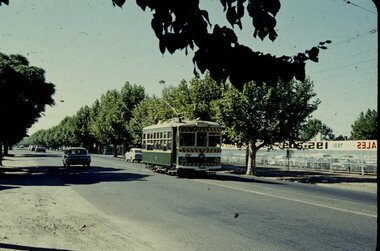
Set of 20 digital images of Bendigo Tramways, 1972 at or before closure while on a tram tour by Stuart Lodington. .1 - No. 29 at the North Bendigo terminus .2 - No. 29 just past the Bendigo end of the double track in High St Eaglehawk, with a BP dealer in the background. .3 - Night photo of No. 18 at a terminus, showing "Eaglehawk" .4 - ditto .5 - Night photo of No. 24 at Eaglehawk with Leo A Hughes Photographer in the background. The Tram has "Johnnie Walker whiskey" roof adverts. .6 - No. 29 outbound in Thunder St with a train passing over the bridge in the background. .7 - view from the front window of a tram on the Eaglehawk line with a large "display event float" in the foreground and tram approaching a crossing loop. .8 - No. 29 at North Bendigo .9 - view of High St Eaglehawk looking east from the terminus, showing the track and centre poles. .10 - No. 29 outbound on the North Bendigo line turning from either Nolan St or Caledonia St, running a special. .11 - No. 7 departing North Bendigo for Golden Square. .12 - No. 3 and 18 at Charing Cross. No. 3 has two SEC roof Advertisements .13 - No. 7 at North Bendigo with the trolley pole being reversed. .14 - No. 24 at Quarry Hill with Northern Terrazzo in the background with the driver alongside .15 - No. 7 and No.6 at Charing Cross with the Beehive buildings in the background. .16 - No. 7 at North Bendigo terminus .17 - ditto .18 - No. 24 at Quarry Hill with Northern Terrazzo in the background with the conductor alongside. .19 - ditto .20 - No. 26 and other bogie tram in View St near Charing Cross with the Armstrong Tyre Service building and signs for Cohn's Drinks and T&G in the view.trams, tramways, bendigo, eaglehawk, quarry hill, golden square, depot, north bendigo, charing cross, tram 29, tram 18, tram 24, tram 3, tram 7, tram 6, tram 26 -
 Ballarat Tramway Museum
Slide - 35mm slide/s - set of 10, Campbell Duncan, Jan. 1971
Set of 10 Ferraniacolor slides - cardboard mounts taken on either 10/1/71 or 16/1/71. .1 - Birney No. 30, Golden Square line, inbound near Cathedral with car yard in background. .2 - ditto, with Cathedral gardens in background. .3 - single trucker, with two SEC roof adverts, entering Nolan St enroute to North Bendigo. Shows the driver sitting in a side on shot. A 4 square store in the background, with a fading advert for "Peeled Tomatoes". .4 - No. 6 turning from Nolan St into McCrae St with 4 square store in background. .5 - No. 26 at Quarry Hill with cemetery in background. .6 - No. 6 at the North Bendigo Terminus .7 - No. 26 outbound to Eaglehawk on the Railway Overbridge, Mt Korong Road. .8 - No. 17 (inbound to City and Quarry Hill) and another bogie crossing at a loop on the Eaglehawk line. Both trams have SEC roof adverts. The driver of the outbound car is boarding the tram. Based on .9, it is No. 3 at Long Gully. .9 - No. 3 waiting at Long Gully Loop . .10 - No. 26 at Quarry Hill terminus, with destination of Eaglehawk.In ink on slide: .1 - "1/2 mile out on Golden Square line - 10/1/71 (Sun)." .2 - "1/2 mile out on Golden Square line - 10/1/71" .3 - "Has just rounded curve near lake Weeroona on North Bendigo line - 10/1/71 (Sun)." .4 - "16/1/71" .5 - " 10/1/71 (Sun)." .6 - "North Bendigo terminus, 16/1/71 (Sat)" .7 - "10/1/71 (Sun) c 3pm" .8 - "Cross Eaglehawk line - 10/1/71 (Sun)." .9 - "Jackson St Loop on E'Hk line awaiting up - 10/1/71 " .10 - "Quarry Hill terminus Bendigo - - 10/1/71"tramways, trams, bendigo, golden square, high st, nolan st, north bendigo, quarry hill, long gully, railway bridge, tram 30, tram 6, tram 26, tram 17, tram 3 -
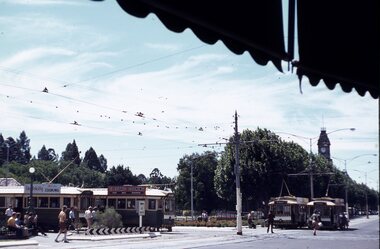
 Ballarat Tramway Museum
Slide - 35mm slide/s - set of 20, Eldon Hogan, 22/05/1971 12:00:00 AM
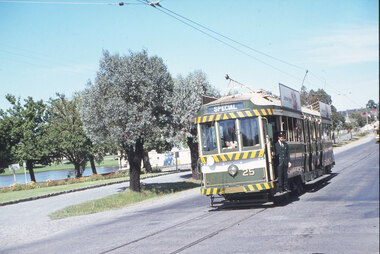
Set of 20 35mm Agfa colour blue and white plastic mount slide - featuring photos taken during an Association of Railway Enthusiasts Tour by Eldon Hogan. Folder had the date "22/5/1971" on it. Scanned on the Canon scanner at the depot 15/12/2005 at the time of the installation of the scanner. .1 - No. 25 in Nolan St with Lake Weeroona in the background. .2 - Three Birneys at the Depot junction, 30 and 29 with Conoles Hotel, McCrae St in the background. .3 - No. 5 in front of the Shamrock Hotel, Pall Mall .4 - No. 29 in front of the Shamrock Hotel with Stonemasons sign in the background. .5 - No. 18 ditto .6 - No. 30 and another Birney at the Quarry Hill terminus .7 - No. 24 southbound High St at the Violet St intersection with a "Mine Open" sign in the foreground and the Cathedral in the background. .8 - No. 19 at the Golden Square terminus, with the Golden Square Hotel in the background. .9 - No. 29 - side on view, North Bendigo line? Thunder St? .10 - No. 30 crossing the railway overbridge, inbound from Eaglehawk with a number of photographers in the foreground. .11 - No. 29? ditto .12 - No. 5 outbound - side on view, Thunder St, North Bendigo line? .13 - No. 29 and 30 at the intersection of High St and Brazier St with Church or School hall in the background. .14 - ditto .15 - ditto .16 - No. 25 and the two Birneys at the Eaglehawk terminus. .17 - No. 29 and two other trams at ditto .18 - No. 30 and 19 adjacent to the Lake View Hotel, McCrae St .19 - No. 5 and 25 crossing on the Eaglehawk Line, Ironbark? .20 - No. 29 at Quarry Hilltramways, trams, bendigo, lake weeroona, pall mall, golden square, eaglehawk, quarry hill, tram 25, tram 30, tram 29, tram 5, tram 18, tram 19, tram 24, tram 25 -
 Ballarat Tramway Museum
Slide - 35mm slide/s - set of 11, Eldon Hogan, mid 1960's to early 1970's
Set of 11 Agfa Plastic mounted slides - from the Eldon Hogan collection - possibly on an ARE Bendigo tours late 1960's or early 1970's with No. 18 Scanned on the Canon scanner at the depot 15/12/1971 at the time of the installation of the scanner. .1 - No 18 at Golden Square terminus with Billy Rodda's Golden Square Hotel in the background. .2 - ditto and the Victoria Bitter fence alongside the hotel. .3 - ditto and another single trucker. .4 - No. 18 at the Fire Station Loop, Golden Square line, with destination of Railway Station. .5 - No. 18 passing the Central Deborah mine, Violet St. Tram has a Briquette advertisement on the roof - the flaming briquettes. .6 - Another bogie tram at ditto. .7 - No. 18 and No. 6 crossing McCrae St loop near the depot junction? .8 - ditto .9 - No. 18 and a single trucker at the North Bendigo terminus. .10 - ditto .11 - with the single trucker leaving.tramways, trams, bendigo, golden square, central deborah, north bendigo, mccrae st, tram 18, tram 6 -
 Ballarat Tramway Museum
Slide - 35mm slide/s - set of 11, Eldon Hogan, mid 1960's to early 1970's
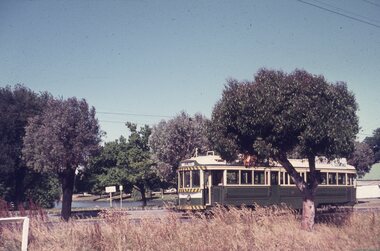
Set of 11 Agfa Plastic mounted slides - from the Eldon Hogan collection - possibly on an ARE Bendigo tours - mid 1960's (black destination rolls) and late 1960's or early 1970's. Scanned on the Canon scanner at the depot 15/12/1971 at the time of the installation of the scanner. .1 - No 18 with Lake Weeroona in the background - possibly at the same time as the tour with No. 18, though showing destination of Charing Cross. .2 - ditto .3 - No. 25 and two following trams on a special tour, note the white disc - Quarry Hill line? .4 - No. 29 on the Eaglehawk line at the Mt. Korong Road and the Calder Highway, with the Ampol Service station in the background. .5 - No. 29 passing Lake Weeroona with Destination of Nth Bendigo - has a Briquettes Roof Advertisement., .6 - No. 26 ditto - with two SEC Roof Advertisements. .7 - No. 24 leaving Charing Cross for Golden Square with The Beehive building, Ezywalkin, Coca Cola and the Fountain Shopping Centre in the background. .8 - No. 29 and a bogie tram at the Golden Square terminus with Golden Square Hotel and Victoria Bitter fence in the background. No. 29 has a SEC Briquettes roof advertisement. .9 - No. 29, with the Cathedral in background. Tram has a SEC Briquettes roof advertisement and destination of Golden Square. .10 - side view of a bogie tram on the Eaglehawk line? Tram has a Electric cooking roof advertisement. Photo has been over exposed. .11 - Single trucker, Violet St with the Central Deborah mine head in the background. Tram has two SEC Electric Cooking roof advertisements. tramways, trams, bendigo, lake weeroona, eaglehawk, golden square, charing cross, central deborah, tram 18, tram 25, tram 29, tram 24 -
 Ballarat Tramway Museum
Slide - 35mm slide/s - set of 10, Eldon Hogan, mid 1960's to early 1970's
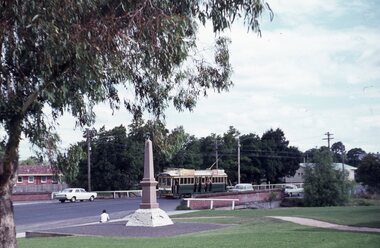
Set of 10 Agfa Plastic mounted slides - from the Eldon Hogan collection - possibly on an ARE Bendigo tours - mid 1960's (black destination rolls) and late 1960's or early 1970's. Scanned on the Canon scanner at the depot 15/12/1971 at the time of the installation of the scanner. .1 - No. 24 in bound along High St Bendigo with the discovery of gold monument in the foreground, Golden Sq route. .2 - ditto .3 - No. 26 outbound at the above location. .4 - No. 24 at the corner of Short St and High St, with the Technical college building? in the background. .5 - No. 26 at ditto, outbound for Golden Square. .6 - No. 24, High St Bendigo, with the Cathedral in the background. Tram has two Johnnie Walker Whiskey roof advertisements. .7 - Three trams, Pall Mall, Charing Cross, with the Beehive building in the background. Trams have SEC roof advertisement. .8 - ditto with Coca Cola ad on the Beehive building, turning around. .9 - No. 29 and a bogie tram at the Golden Square terminus with Billy Rodda's Golden Square Hotel in the background. Just past the tram is a large truck carrying boxes. .10 - Nos, 18, a bogie tram, 21 and 29 at the Quarry Hill terminus. tramways, trams, bendigo, tram 18, tram 24, tram 26, tram 21, tram 29 -
 Ballarat Tramway Museum
Slide - 35mm slide/s - set of 11, Eldon Hogan, mid 1960's to early 1970's
Set of 11 Agfa Plastic mounted slides - from the Eldon Hogan collection - possibly on an ARE Bendigo tours - mid 1960's (black destination rolls) and late 1960's or early 1970's. Scanned on the Canon scanner at the depot 15/12/1971 at the time of the installation of the scanner. .1 - front of depot -26, 19, 24, 29 and 28 amongst those present. .2 - ditto .3 - 24 departing depot .4 - 26 at Eaglehawk .5 - No. 5 turning from Pall Mall into Mitchell St with town hall in background. .6 - No. 5 using crossover in Mitchell St - with Maples, CBA Bank, Astor, Homecrafts, Roger David shops or signs in the background. .7 - ditto .8 - bogie car at Charing Cross with the Fountain Plaza shopping centre in the background. .9 - Charing Cross, with the fountain in the foreground, The Beehive and three trams in the view. .10 - No. 24 outbound, Golden Square line crossing the bridge over the creek, adjacent to the discovery of Gold Monument. .11 - ditto. tramways, trams, bendigo, eaglehawk, depot, charing cross, golden square, tram 26, tram 19, tram 24, tram 29, tram 28, tram 26, tram 5 -
 Ballarat Tramway Museum
Slide - 35mm slide/s - set of 11, Eldon Hogan, mid 1960's to early 1970's
Set of 11 Agfa Plastic mounted slides - from the Eldon Hogan collection - featuring an ARE tour with Nos. 21, 29 and 25 to Bendigo, mid 1960's. Scanned on the Canon scanner at the depot 15/12/1971 at the time of the installation of the scanner. .1 - No. 29 passing the Institute of Technology building, McCrae St. .2 - ditto .3 - Nos. 21 and 29 Lake Weeroona .4 - Nos. 29, 21 and 25 at the Golden Square Terminus with the Golden Square Hotel, Victoria Bitter fence in the background. .5 - ditto with a service car? .6 - ditto .7 - No. 21 with the Central Deborah mine poppet head in the background, Violet St. .8 - ditto with 21 and 29 .9 - ditto with 29 .10 - ditto with 21 and 29 .11 - 21, 29 and 25? at depot junction. Trams have SEC roof advertisements. tramways, trams, bendigo, lake weeroona, golden square, central deborah, tram 21, tram 29, tram 25 -
 Ballarat Tramway Museum
Slide - 35mm slide/s - set of 11, Eldon Hogan, mid 1960's to early 1970's
Set of 11 Agfa Plastic mounted slides - from the Eldon Hogan collection - featuring an ARE tour with Nos. 21, 29 and 25 to Bendigo, mid 1960's. Scanned on the Canon scanner at the depot 15/12/1971 at the time of the installation of the scanner. .1 - four trams at Charing Cross - includes 19 and 25. .2 - 21 and 25 at the depot junction. .3 - 21 and 29 Quarry Hill route? .4 - 29 ditto .5 - 24 at Golden Square terminus - photo taken from the city side - note all the little shops and buildings on the left hand side of the photograph. .6 - 29, 21 and 25 at Eaglehawk .7 - 29 - side on view - Eaglehawk line? .8 - ditto with 21 .9 - 29 - North Bendigo line? - side on view .10 - 29 and 21 - vacant paddocks - Eaglehawk line .11 - 29 crossing the railway overbridge, Eaglehawk line, in bound. Trams have SEC roof advertisements. tramways, trams, bendigo, eaglehawk, charing cross, golden square, tram 21, tram 29, tram 25, tram 19 -
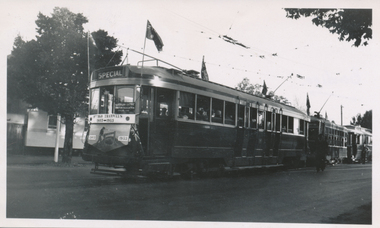 Ballarat Tramway Museum
Photograph - Black & White Photograph/s - set of 2, Keith Kings, 11/04/1953 12:00:00 AM
Black and White prints contained within the Wal Jack Bendigo and Geelong Album, see Reg Item 5003 for more details. Set of two photographs of the AETA Special trams Golden Jubilee Anniversary Saturday 11-4-1953, by Keith Kings. .1 - Bogie 23 and Birney 29 and service car 20 at Golden Square. .2 - Birney 29, Bogie 23 at Quarry Hill. On the rear in blue ink .1 - "Bendigo, AETA specials Bogie 23 & Birney 29 (also service car 20), at Golden Square, Saturday 11/4/53. /Golden Jubilee Celebrations. (Two flags broken off drop centre roof by centre pole notices!!!!)" .2 - "Bendigo, AETA specials Bogie 23 & Birney 29, at Quarry Hill, Saturday 11/4/53. /Golden Jubilee Celebrations." Both have the K. S. Kings copyright stamp in the top right hand corner, and the numbers H(f)(iii) and H(e)(ii) written in respectively.trams, tramways, bendigo, decorated trams, gold tram, quarry hill, golden square, aeta -
 Queenscliffe Maritime Museum
Postcard - Port Phillip Sea Pilots Postcards
PPSP operating licence was granted to founder George Tobin by Governor Gipps of New South Wales (pre Federation) on condition that “the appointment must not bring any expense on the Government”. The service is unique in that it is fully Australian- owned and operated by its pilots in keeping with the terms of the original appointment.A set of 7 postcards from the Port Phillip Sea Pilots showing Pilot Stations in Queenscliff and Westernport, 3 pilot launches; Hawk II, Petrel, Thorsen and launches welcoming square rigger 'Dar Mlodziezy' in 1988postcards, pilot station building, pilot launches -
 Otway Districts Historical Society
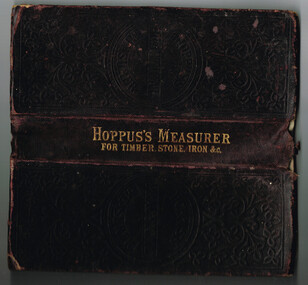
Book, Hoppus's Practical Measurer
Manufactured by E. Hoppus the Hoppus's Practical Measurer, or measuring made easy by a new set of tables which show by looking the solid content of any piece of timber, stone, etc, either square, round or unequally sided, and the value at any price of cubic feet. The book also gives the superficial comtent of boards, glass, painting and plastering with explanations of the uses and applications of the tables. The contents are given in feet, inches, quarters and twelfth parts of an inch. It includes the measurment of timber by several dimensions together with tables showing the weight of iron by measure.Hoppus's Practical Measurer; or, Measuring made easy by a new set of tables, which show, at sight, the solid content of any piece of timber, stone, &c. W. Nicholson & Sons; London; nd. 238 p. Hard cover.e. hoppus; measurment; timber; stone; boards; glass; painting; plastering, iron; -
 Bendigo Historical Society Inc.
Slide - Images by Arthur Pulfer, 1957-1970
1965 fire at the Bendigo Railway Station A dull explosion in the refreshment room about 1:30 p.m. touched off the blaze, which quickly spread and burnt out the station in less than an hour. Just before the explosion a train carrying more than 200 Melbourne-bound holiday makers pulled out of the station. Scores of railways employees in other parts of the station did not realise the refreshment room was on fire until a signal box attendant gave the alarm. Early estimates place damage at more than £100,000. Quick work by station staff saved many thousands of pounds worth of equipment before flames engulfed the building from end to end. At the height of the blaze, a Bendigo fire brigade Station Officer, Vin Lapsley, fell 18 feet – and miraculously landed on his feet – after being overcome by smoke while directing a hose from a ladder on to the roof. Mr. Lapsley was later treated for a broken bone in his right leg.Many images from by Arthur Pulfer copied to slides. Nineteen Slides of Bendigo images: Bendigo Railway Station after fire 1965 New Bendigo Railway Station after the fire Bendigo Town Hall and Bull Street Bendigo Law Courts and Police Station from the conservatory gardens Gold Panners Monument with the Bendigo Technical school in the background Bendigo Cenotaph - set up for an event - Charing Cross - 1957 New Bendigo Chinese Dragon 'Loong' 1970 Easter Procession 1957 Golden Square High School September 1965 Hattam Street Bendigo Opening of Golden Oaks retirement village September 1965 - Hattam Street Bendigo High Street Golden Square, Bendigo - monument to the founding of gold in the area Bendigo Showgrounds with the Benevolent Home and the Base Hospital in the background Old Base Hospital Lucan Street Bendigo Arnold Street former shop Bendigo Alexandra Fountain Charing Cross Bendigo Banner - Bendigo Training Centre Bendigo House - address unknownhistory, bendigo, james lerk collection, bendigo conservatory, conservatory gardens bendigo, bendigo town hall, bull street bendigo, bendigo railway station fire, golden square high school, golden oaks village bendigo, dragon loong, bendigo cenotaph, alexandra fountain bendigo, bendigo base hospital, bendigo benevolent home, bendigo easter procession -
 Bendigo Historical Society Inc.
Photograph - Ravenswood Picnic
... Square stall, which always set up to sell lollies, etc... C of E Golden Square stall, which always set up to sell ...Bendigo and District Sunday Schools would travel by train to Ravenswood on Melbourne Cup Day, first Tuesday in November; for the Annual Sunday Schools Picnic.Annual Sunday Schools Picnic Day to Ravenswood 8552.2 This photo was taken of St Marks C of E Golden Square stall, which always set up to sell lollies, etc. and drinks (Note the drinks on ice). The photo shows Messrs. Heyes & Vapiopolus. The photo was taken by the Collier family. 8552.2 Ravenswood Sunday School Picnic - St Marks C of E stall, circa November 1948. Front row: Denis Potter, Fred Clayton and John Simpson.stall set up for sunday schools ravenswood picnic day 1943, annual event sunday schools pincic to ravenswood, ravenswood sunday school picnic 1948 -
 Bayside Gallery - Bayside City Council Art & Heritage Collection
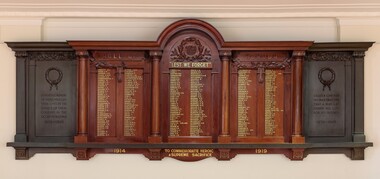
Honour Board, H. Goldman Pty Ltd, Brighton Honour Board, 1928
On 19 April 1915, Brighton City Councillor T. Wilson moved to install a roll of honour in the Brighton Town Hall. "The men who had gone to the war deserved all the praise and consideration that could be given them. Nothing could be said too highly in their favour." The Roll of honour was unveiled at the Brighton Town Hall on Armistice Day, 11 November 1928, by the mayor, Cr. H.E. Pullman. It contained the names of the men of the municipality who gave their lives in World War I. A service was conducted by the Brighton Ministers' Association, under the presidency of the Rev. H. B. Hewitt, of St. Andrew's Church, Brighton. The roll of honour was made by H. Goldman Pty, Ltd, a Melbourne cabinet maker and designer who worked exclusively in Australian timbers. The two metal panels/tablets on either side of the honour roll were added at a later date and commemorate those who died in World War II.Polished wood and metal honour board attached to wall in the Brighton Town Hall. The board is a rectangular shape with a semi-circular curved top at the centre. The central section is a dark carved timber Honour Roll for WWI listing the names of Brighton residents who gave their lives in service 1914—1919. To the left and right of the honour roll are black metal panels/tablets that were added at a later date which commemorate those who died in WWII 1939—1945. The central section contains the honour roll of 228 names which are inscribed in gold with black shadow across three panels which are divided by four decorative round columns. The middle panel is arched at the top and under the arch is a decorative wreath in relief containing the City of Brighton crest within it, below which is "LEST WE FORGET" in gold lettering. The top of the left and right wooden panels each have carved decorative eucalyptus foliage and a bow hanging in the middle. A piece of metal with an incised quote "AT THE GOING DOWN OF THE SUN AND IN THE MORNING WE WILL REMEMBER THEM" is attached to the bottom edge of the central section. Below the metal bar on the left and right panels are the dates 1914 and 1919 in gold lettering, and in the centre "TO COMMEMORATE HEROIC & SUPREME SACRIFICE". The cast metal side panels are set back slightly from the central section and contain decorative wreaths at the top and quotes under them. The left panel has the incised inscription "IN GRATEFUL MEMORY OF THOSE WHO GAVE THEIR LIVES IN THE SERVICE OF THEIR COUNTRY IN THE SECOND WORLD WAR 1939—1945" and the right panel reads "GREATER LOVE HATH NO MAN THAN THIS THAT A MAN LAY DOWN HIS LIFE FOR HIS FRIENDS 1939—1945". They have square columns on their far ends and the capital of the columns and top and base decorations mimic the original timber design. brighton, roll of honour, honour board, lest we forget, brighton town hall, commemoration, wwi, world war i, wwii, world war ii, brighton city council, bayside, military, service, war memorial, h. goldman, harry goldman, h. goldman manufacturing company -
 Bendigo Historical Society Inc.
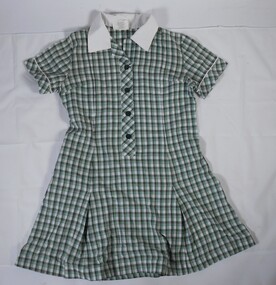
Uniform - GSSC School Dress
Golden Square High School in the city of Bendigo, was established in temporary accommodation at Camp Hill Primary School in central Bendigo in 1960. With the completion of the new school's buildings, it moved to Golden Square in 1962, providing for Forms 1 to 6, now known as years 7 to 12. In 1978 it became a 7–10 school and was one of the original feeder schools to Bendigo Senior High School. In 1986, a Hearing Impaired Unit was established and in 1990 it underwent a name change to become Golden Square Secondary College. The Golden Square Secondary College campus closed on 28 November 2008. It merged with Kangaroo Flat and Flora Hill secondary colleges as part of the implementation of the Bendigo Education Plan. Its buildings were demolished. (Wikipedia https://en.wikipedia.org/wiki/Golden_Square_Secondary_College) This uniform collection belonged to Anna Matthews, daughter of the donor, who attended GSSC as part of the last group enrolled before the school closed in 2008. Golden Square Secondary College school dress made from green and white cotton and polyester check fabric. There is a thin yellow line at edges of check pattern. Short set in sleeves with a cuff edged with piping. White flat collar. The dress has a front placket opening to the waist fastened with four dark green buttons. Bust darts on both sides. Front and back below the waist have two inverted pleats. On the right hand side there is an internal pocket with a zip fastener. At centre back is a decorative half belt with diagonal check. Machine hemmed.Tag below collar. Front. "PREFECT Value Based Apparel. NAME _ _ _ _ _ _ _ " Reverse "65% Polyester 35% Cotton. Washing Instructions."gssc, golden square secondary college, uniform, bendigo education plan., school dress -
 Bendigo Historical Society Inc.
Uniform - GSSC School Windcheater
Golden Square High School in the city of Bendigo, was established in temporary accommodation at Camp Hill Primary School in central Bendigo in 1960. With the completion of the new school's buildings, it moved to Golden Square in 1962, providing for Forms 1 to 6, now known as years 7 to 12. In 1978 it became a 7–10 school and was one of the original feeder schools to Bendigo Senior High School. In 1986, a Hearing Impaired Unit was established and in 1990 it underwent a name change to become Golden Square Secondary College. The Golden Square Secondary College campus closed on 28 November 2008. It merged with Kangaroo Flat and Flora Hill secondary colleges as part of the implementation of the Bendigo Education Plan. Its buildings were demolished. (Wikipedia https://en.wikipedia.org/wiki/Golden_Square_Secondary_College) This uniform collection belonged to Anna Matthews, daughter of the donor, who attended GSSC as part of the last group enrolled before the school closed in 2008. Golden Square Secondary College dark green fleece school windcheater with yoke and set in sleeves. Half zip at centre front. Two internal side pockets with zip openings. Collar lined with red fabric. Size 12. GSSC red, green, yellow and white logo on LHS."DUX by DOBSONS" "Ph. 03 9819 1122" "Name Anna Matthews".gssc, golden square secondary college, uniform, bendigo education plan., windcheater -
 Bendigo Historical Society Inc.
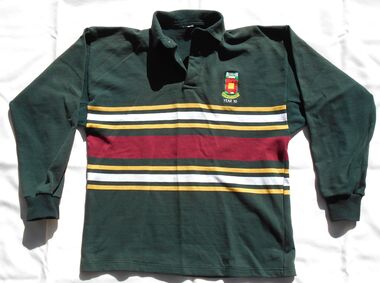
Uniform - GSSC School Rugby Top
Golden Square High School in the city of Bendigo, was established in temporary accommodation at Camp Hill Primary School in central Bendigo in 1960. With the completion of the new school's buildings, it moved to Golden Square in 1962, providing for Forms 1 to 6, now known as years 7 to 12. In 1978 it became a 7–10 school and was one of the original feeder schools to Bendigo Senior High School. In 1986, a Hearing Impaired Unit was established and in 1990 it underwent a name change to become Golden Square Secondary College. The Golden Square Secondary College campus closed on 28 November 2008. It merged with Kangaroo Flat and Flora Hill secondary colleges as part of the implementation of the Bendigo Education Plan. Its buildings were demolished. (Wikipedia https://en.wikipedia.org/wiki/Golden_Square_Secondary_College) This uniform collection belonged to Anna Matthews, daughter of the donor, who attended GSSC as part of the last group enrolled before the school closed in 2008. Golden Square Secondary College long sleeved dark green rugby top. Set in long sleeves. Fold over collar. Ribbed knit fabric with ribbed cuffs on sleeves. 22 cm band of yellow, white and red stripes across the body back and front. GSSC Year 10 logo on LHS.gssc, golden square secondary college, uniform, bendigo education plan., rugby top -
 Bendigo Historical Society Inc.
Booklet - Bendigo Yesterday & Today by Ken Arnold, 2017
70-page soft cover booklet of colour and sepia photos of Bendigo past and present. Designed and set up for printing by Ken Arnold 2017. Published by Crown Castleton Publishers, 359 High St Golden Square, 3555. Printed in China by Asia Pacific Offset Ltd. Sepia and colour photo on front cover of Alexendra Fountain at View Point. M & J Qualtrough sticker on title pagebendigo, architecture -
 Bendigo Historical Society Inc.
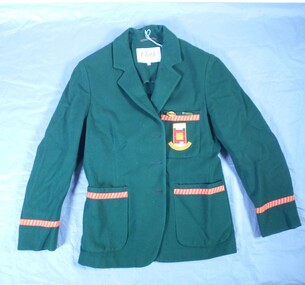
Textile - High School Blazer
Golden Square High School in the city of Bendigo, was established in temporary accommodation at Camp Hill Primary School in central Bendigo in 1960. With the completion of the new school's buildings, it moved to Golden Square in 1962, providing for Forms 1 to 6, now known as years 7 to 12. In 1978 it became a 7–10 school and was one of the original feeder schools to Bendigo Senior High School. In 1986, a Hearing Impaired Unit was established and in 1990 it underwent a name change to become Golden Square Secondary College. The Golden Square Secondary College campus closed on 28 November 2008. It merged with Kangaroo Flat and Flora Hill secondary colleges as part of the implementation of the Bendigo Education Plan. Its buildings were demolished. (Wikipedia https://en.wikipedia.org/wiki/Golden_Square_Secondary_College)Golden Square High School Blazer. The green blazer has one upper and two lower pockets, each lined at the top with a strip of gold fabric with diagonal red stripes and a row of red stitching bordering the strip. The top pocket shows the school emblem i colours of green, gold, red and white in square and rectangular block formation. "High School" is written in gold against a white background at the top of the emblem and "Golden Square" is embroidered in part circle below the emblem. The name is dark gold against a fainter gold background. The Blazer is fastened with three buttons. Only one button remains attached. Another button is in a pocket. A label under the collar reads "Tailored by Clark in Pure wool' "Size 34". Two badges are pinned to the top pocket. "PREFECT" . Reflecting the school colours - gold lettering on red on a green rectangle set against a gold oval shape. "S.R.C." Gold lettering on green background.Written on the label "K Jeffrey 7G". Also written in pen on the lining inside of the upper arm. There is also another crossed out name.gssc, school uniform -
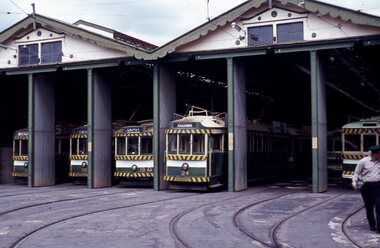
 Ballarat Tramway Museum
photograph - Set of 4 Black & White - Bendigo tramways, Peter Duckett, late 1940s
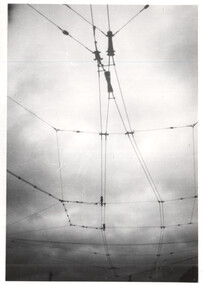
Set of four photographs of Bendigo trams and infrastructure photographed by Peter Duckett, late 1940s 1 - double trolley wire at a "Y" terminus showing the details of dual trolley wire - Could be either Quarry Hill or Golden Square. 2 - Bendigo trams 24 and 22 at Quarry Hill terminus - note the cream rocker panels. 3 - Bendigo 6 at Charing Cross. 4 - Bendigo 16 - after conversion to one man tram.Yields information about Bendigo trams late 1940sSet of four black and white photographs by Peter Duckett.Details the image on the rear of the print in ink.bendigo, tramcars, bendigo tramways, overhead, double trolley wire, terminals, tram 24, tram 22, tram 6, tram 16, quarry hill, charing cross -
 Ballarat Tramway Museum
photograph - Set of 4 Black & White - Bendigo tramways, Peter Duckett, late 1940s
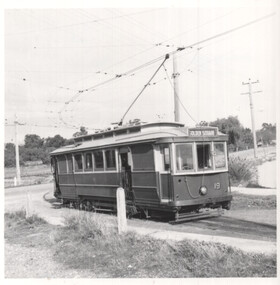
Set of four photographs of Bendigo trams and infrastructure photographed by Peter Duckett, early 1950 1 - Bendigo 19 at North Bendigo terminus - tram has destination of Golden Square 2 - Birney No. 30 leaving the depot for North Bendigo 3 - Depot entrance from Arnold St (now Tramway Ave) across Hargraves St 4- North Bendigo terminus overhead wiringYields information about Bendigo trams early 1950sSet of four black and white photographs by Peter Duckett.Details the image on the rear of the print in ink.bendigo, tramcars, bendigo tramways, overhead, double trolley wire, terminals, quarry hill, charing cross, tram 19, tram 30 -
 Ballarat Tramway Museum
Photograph - Black & White Photograph/s - set of 2, 19/06/1955 12:00:00 AM
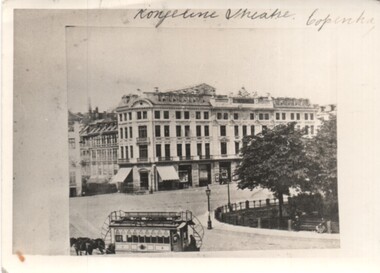
337.1 - copy photograph of a photograph showing a double deck horse tram, no cover - open deck by the 'Kongeline Theatre' Copenhagen, in a main square. 337.2 - as above, but horse tram has a roof cover and different body type - less ornate.On rear of both photos are hand written notes: 337.1 - '4' in a circle and 'Horse Tram Copenhagen, Denmark/Bob Prentice Collection. 337.2 - '5' in a circle, 'Another view of horse tram in Copenhagen - Denmark/Bob Prentice Collection'trams, tramways, horse trams, copenhagen, denmark, europe -
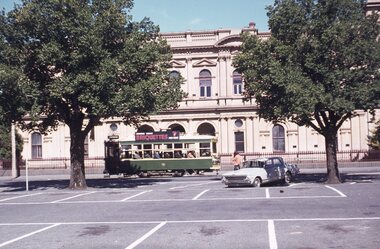
 Ballarat Tramway Museum
Photograph - Black & White Photograph/s - set of 3, Chris Phillips, 28/12/1967 12:00:00 AM
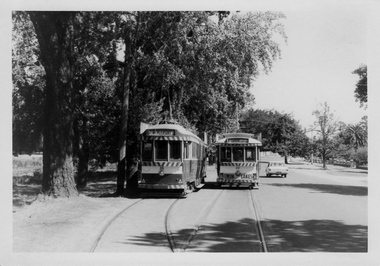
Photo of two trams crossing each other at Carlton St loop, out of sequence running, normally crossed at Gardens loop Typical of the operation and the street scene at the time. The background trees were later removed.Bogie tram 36 and single trucker (20) crossing at Carlton St. Loop, early 1970's. View looking down track, towards south. No. 36 with Mt Pleasant destination, and No. 20 with Gardens via Sturt St. West on western track. Trees full with leaves. Note V crossing of frog, one made up by SEC? No. 20 has Twin Lakes sign under headlight. Image not square onto photo paper. 358.1 - duplicate copy from William F Scott, smaller print. 358.2 - as above - but mid size print.358.1 - On rear in ink "SEC Ballarat Tramways. Cars on Carlton Street loop, just outside the southern entrance to the Botanical Gardens" and in pencil "Christopher D Phillips, 113 Windermere Street Ballarat (053) 31 6075" and "12/1967" 358.2 - "44)" in top left hand corner, William F Scott address label in bottom right hand corner, trimming marks top and bottom. Label centrally, "photo page 40, Reduce to 5 1/2" and 3 1/4" " and along bottom :Ballarat Tramways (SEC) Christopher D Phillips "28.12.1967"trams, tramways, ballarat, carlton st., wendouree parade , tram 36, 20 -
 Tennis Australia
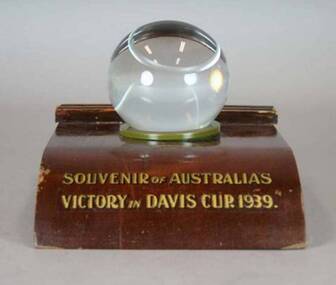
Paperweight, 1939
Desk set consisting of an almost square wooden base, and glass paperweight in the form of a tennis ball. Inscription across base, below the Dunlop 'Maxply' logo: SOUVENIR OF AUSTRALIA'S/VICTORY IN DAVIS CUP. 1939. Materials: Glass, Wood, Ink, Lacquertennis -
 Tennis Australia
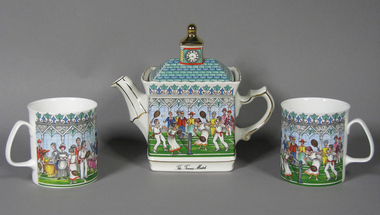
Dishware, Circa 1990
Five piece painted ceramic tea set, decorated with lawn tennis motif. (.1 and .2) mugs printed with 'WINDSOR/MADE IN ENGLAND' on bases (.3) square teapot (1/2) with lid (2/2) with text 'THE TENNIS MATCH' and printed with 'SADLER/CHAMPIONSHIPS/MADE IN ENGLAND' on base; (.4) Sadler Classic Collection brochure. Materials: Ceramic, Pigment, Paper, Inktennis -
 Kew Historical Society Inc
Photograph - Royal Hotel, Sunbury, C.H.R. Christianson, 1890s
This item is part of a larger collection donated to the Kew Historical Society by Anna French. The collection includes personal items from the donor's family, as well as items given to the donor and her mother by a family friend, Lucy Merritt (Jean) Hornby. The item is from that part of the collection inherited or assembled by Jean Hornby. The collection is significant given Jean Hornby's mother's descent from Robert Hornby (1854-1935) and Eva Merritt (1865-1959); her mother the chid of a family who settled in Kew in the 1850s, this providing a chain of provenance for items dating to the mid-nineteenth century, when her maternal forebears arrived in Melbourne. Other items represent Jean Hornby's contribution to her local and wider community.This 19th century photograph includes significant architectural details of an important hotel in Sunbury, Victoria. Additionally, it was taken by a local photographer - CHR Christianson - who operated the Sunbury [photographic] Studio. Silver albumen print, mounted on board, of the original Royal Hotel on the corner of Brook and Evans Streets, Sunbury, Victoria.The single-storey, rendered brick building with a corrugated galvanised iron roof includes a number of pieces of information that may assist in dating the photograph. The licensee's name above the door appears to be M.A. Williams. To the left of the door on the external wall is a painted sign: 'BILLIARDS". Another painted sign on the front of the building reads "ROYAL HOTEL [illegible] BILLIARDS." An attached building at right may be the residence of the licensee. Specific architectural features of the building include a corner doorway with a lamp above, three sash windows and a larger square lead-light window to the right of the doorway. The latter identifies the space behind as the "BAR". On the footpath in front of this building is a grill set into the footpath to enable deliveries to a cellar. At least four figures can be identified in the photograph: a woman in the doorway, a man to her right, leaning against the wall, and two other men at the right hand side of the building. Beyond the boundary of the building is a sloping footpath to a bluestone edged gutter. An elm [sic] within a protective, picketed surround is in front of the building. C.H.R. Christianson is identified on the reverse as the photographer. Reverse in pencil: Royal Hotel Billards Sunbury / CHR Christianson photographerroyal hotel -- sunbury (vic.), chr christianson -- photographer, hotels -- sunbury (vic.), recreation -- billiards -
 Kew Historical Society Inc
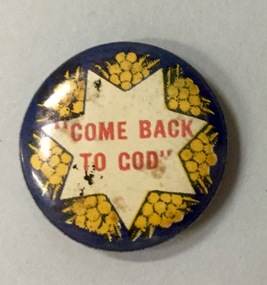
Badge, Come Back to God, 1915-1920
Most of the civic and sporting ephemera assembled by Francis Rigg were patriotic buttons. The use of these buttons as a means of raising revenue through patriotic sentiment occurred soon after Australia pledged allegiance to Empire. Buttons reflected ‘public sentiment, courage, patriotism, generosity and several [un- named] virtues’ such as the martyred mother of a ‘fallen’ hero. Attention was paid to attractiveness of design, encoded symbolism and high quality of production. Expressing ‘loyalty’, they were tokens to be kept for perpetuity. Female labour was used to operate the die that compressed the tin backing, photographic print and celluloid cover together. The pin was applied by hand. Women, of all ages, entered into the spirit of voluntary sales. Often they were sold at the entry and exit points of major pedestrian thoroughfares. The women of Kew set up a kiosk in front of the Post Office and the Railway Station to solicit their round, oval and square shaped wares. Pride in salesmanship was affected by publishing the name of the woman and her fiscal achievement in the major newspapers of the day. The badges form part of a collection of ephemera originally purchased by Francis Horace Rigg (19/10/1882-05/03/1946) of 50 Belford Road, Kew (Vic.). Frances Rigg was a local business identity in Kew, ultimately managing the local branch of the English, Scottish and Australian (ES&A) Bank at 175 High Street, Kew from c. 1920 until the 1940s. After Francis Rigg’s death, the collection of buttons and badges was inherited by his son, Ken Rigg (14/11/1922-19/01/2014). The collection was subsequently donated to the Kew Historical Society in 2015 by his grandson Adrian Rigg during the Gallipoli and Beyond Commemoration.The collection covers a period of almost 40 years. The majority of the badges are patriotic buttons, issued and sold during and immediately after World War 1 to raise funds for national and overseas causes. The collection also includes a number of locally significant sporting event buttons and sporting club medallions, issued in the 1920s and 1930s.The use of common symbols for a range of purposes is sometimes a feature of wartime and post-war fundraising buttons. Like the ‘Hospital Day 1919’ badge, the ‘Come Back to God’ badge is within a seven pointed star on a dark blue ground with sprays of wattle; attempting to harness nationalism with religion.Come back to Godbutton -
 Kew Historical Society Inc
Badge - Fundraising Button, Hospital Day, 1914-1918
Most of the civic and sporting ephemera assembled by Francis Rigg were patriotic buttons. The use of these buttons as a means of raising revenue through patriotic sentiment occurred soon after Australia pledged allegiance to Empire. Buttons reflected ‘public sentiment, courage, patriotism, generosity and several [un- named] virtues’ such as the martyred mother of a ‘fallen’ hero. Attention was paid to attractiveness of design, encoded symbolism and high quality of production. Expressing ‘loyalty’, they were tokens to be kept for perpetuity. Female labour was used to operate the die that compressed the tin backing, photographic print and celluloid cover together. The pin was applied by hand. Women, of all ages, entered into the spirit of voluntary sales. Often they were sold at the entry and exit points of major pedestrian thoroughfares. The women of Kew set up a kiosk in front of the Post Office and the Railway Station to solicit their round, oval and square shaped wares. Pride in salesmanship was affected by publishing the name of the woman and her fiscal achievement in the major newspapers of the day. The button forms part of a collection of ephemera originally purchased by Francis Horace Rigg (19/10/1882-05/03/1946) of 50 Belford Road, Kew (Vic.). Frances Rigg was a local business identity in Kew, ultimately managing the local branch of the English, Scottish and Australian (ES&A) Bank at 175 High Street, Kew from c. 1920 until the 1940s. After Francis Rigg’s death, the collection of buttons and badges was inherited by his son, Ken Rigg (14/11/1922-19/01/2014). The collection was subsequently donated to the Kew Historical Society in 2015 by his grandson Adrian Rigg during the Gallipoli and Beyond Commemoration. The collection covers a period of almost 40 years. The majority of the badges are patriotic buttons, issued and sold during and immediately after World War 1 to raise funds for national and overseas causes. The collection also includes a number of locally significant sporting event buttons and sporting club medallions, issued in the 1920s and 1930s.Round metal button in red, white, blue and gold showing a sun setting over the sea with words printed in red around border and on lower outer rim.hospital day, patriotic buttons, first world war (1914-18) -
 Friends of Westgarthtown
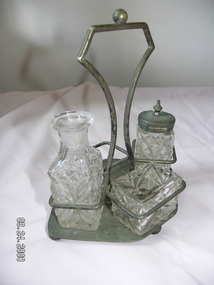
Set, condiments
Condiments set including stand made of brass (?) with four ball feet, flat base, wire frame and handle to fit four glass containers. 1st glass container: rectangular glass box (no lid) with moulded geometric pattern. 2nd glass container: square base with round neck, same geometric pattern, broken stopper. 3rd glass container: square with metal hinged lid with knob.E.P.N.S., 1' (Electro-Plated Nickel Silver), embossed on frame and metal lid of 3rd itemdomestic items, food and drink consumption, condiments, glass, rack, e.p.n.s., metalwork