Showing 455 items matching "station sign"
-
 Ballarat Tramway Museum
Photograph - Digital image, W. J. Llewelyn, c1971
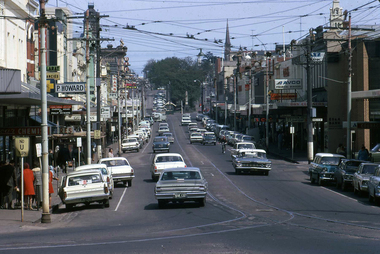
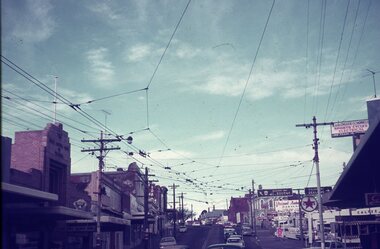
Yields information about the Royal Visit to Ballarat and the appearance of Bridge St during 1956 and just prior to the closure of the tramway.Set of three colour digital images taken of the Bridge St Ballarat by W. J. Llewelyn. .1 - Looking west along Bridge St from the Service Station, shows the various buildings, tram track, tram shelter and overhead. Appears to be c1971. .2 - Look east from Grenville St, 1954 with the Royal Visit decorations in the placed. Has the Dickins Self Service Grocery shop, Bucks Head Hotel and a sign for Morsheads store. Tram tracks and overhead apparent along with two trams in the far distance. .3 - Looking west along Sturt St from Bridge and Grenville St - shows the buildings in the background, tramway overhead, general congestion, letter box, tram stop shelter. A tram is parked in the loop. Has a Davies Bread advert on the Mechanics Institute building, also Thomas Jewellers, T& G and the Odeon Theatre sign.trams, tramways, bridge st, victoria st, stones corner, royal visit, grenville st, shelters, sturt st -
 Ballarat Tramway Museum
Photograph - Black & White Photograph/s - set of 5 - tram operations on the Victoria St, Richard Gilbert, c August 1971
Yields information about the appearance of the Victoria St line shortly before the closure of the Victoria St line. Series of 5 Black and white photographs of tram operations on the Victoria St line prior to its closure in August 1971. .1 - View of the Victoria St terminus as you arrive in Ballarat from Melbourne, with the divided highway and a tram warning sign. Has a tram at the terminus. .2 - Tram 39, running a special tour with St Alipius church in the background. A new bus stop sing has been positioned. Another tram has departed the King St loop. .3 - No. 13, (Gardens via Sturt St West and a Twin Lakes sign) entering the King St loop. .4 - No. 31 (to Gardens crossing No. 39) at the King St loop. .5 - No. 31 leaving Stones Corner for Victoria St with Stones Corner building in the background along with the Caltex service station and Viscount Ambassador caravans.trams, tramways, victoria st, king st, stones corner, tram 39, tram 13, tram 31 -
 Ballarat Tramway Museum
Slide - 35mm slide/s - set of 9, Noel Simons, Sept. 1971
Set of 9 Kodak Ready-mount with slides made from the Association of Railway Enthusiast Provincial Tramways film strip. Reference Item 2560 details the ARE Film Strip, and provide references to other slides. See also Reg. item 1164. 1174.9 on plain white mount. 1174.1 - Tram 40 North bound for Lydiard St. North at the Railway Gates, with the gates closed. Tram carrying a heavy load of passengers. Railway station building and car park in background. Taken from the signal box. 1174.2 - Tram 12 bound for Gardens, photographed across the median strip plantation near Dawson St. Image i2a - adjusted 9/2021 to remove colour cast. 1174.3 - Tram 43 in bound along Wendouree Parade near Barrett Ave, passing a former tram stop and with "Warning Oncoming Trams" sign mounted on an adjacent pole. See also Reg. item 1172.1 for a photo taken in May 1971. This photo taken after the closure of the Victoria St. line, as the tram stop has been painted out. 1174.4 - Looking along the track to Sebastopol terminus on the west side of Albert St. - telephoto shot showing bogie tram in the far distance. Shows the nature of the track, poles, tram stop frequency and in the fare distance the terminus. Also show the trees that used to be along this section of the track. 1174.5 - No. 42 showing "Special" in Macarthur St. approaching Drummond St. north. Photo taken from under the verandah of a shop on the south side of the street that were many years later to become the Tramcar Restaurant. Note metal fence to cemetery. 1174.6 - Nos. 21 (Sebastopol) crossing 14 (Lydiard St. Nth) at the loop between Sayle and Grey St. Photo taken looking south. 1174.7 - No. 12 bound for Mt Pleasant, in Bridge St. about to stop at the junction for the two routes. Telephoto photo looking west along Bridge St. with many cars in the photo. Very few people on the street itself. 1174.8 - No. 30 and 17 at the City Terminus, on the north side of Sturt St. Taken from the Post Office corner with the Town Hall in the background. 1174.9 - No. 39 inbound along Sturt St. West. with many cars on the road. Bus stop on a pole on the other side of the road.1174.1 - "No. 40 on Lydiard St. North service waits at the level crossing at Ballarat Railway Station." 1174.2 - "No. 12 bound for 'Gardens' seen across the centre plantation in Sturt St." 1174.3 - "Barrett Ave." 1174.4 - "The Sebastopol route near the terminus" 1174.6 - "Nos. 21 and 14 crossing at Sayle St. Loop on Sebastopol route" 1174.7 - "No. 12 at Eastern end of Bridge St." 1174.8 - "Nos. 30 and 17 in Sturt St. at Cnr of Lydiard St." 1174.9 - "No. 39 City bound from 'Gardens" in Sturt St. West" All have date stamp of "Sep 1971" in black ink. Writing in blue ink.tramways, trams, lydiard st. nth, railway crossing, sturt st, wendouree parade, sebastopol, macarthur st., bridge st., sturt st. west, tram 12, tram 14, tram 17, tram 21, tram 30, tram 39, tram 40, tram 42, tram 43 -
 Ballarat Tramway Museum
Slide - 35mm slide/s - set of 20, Noel Simons, 21/05/1971 12:00:00 AM
Set of 20 transparencies taken on 21/5/1971 on Kodak mounts. 1197.1 - Bendigo No. 5 en route to Eaglehawk at Creeth St Long Gully. Tram has a SEC roof ad and Cinzano roof ad. 1197.2 - No 5 approaching Needle Loop between Long Gully and California Gully. On left hand side is the City of Bendigo sign, indicating city boundary. 1197.3 - As for 1197.2 but actually entering loop. Photo taken after tram has passed photographer. 1197.4 - No. 26 bound for Eaglehawk descending the railway bridge near Eaglehawk, at Jobs Gully. 1197.5 - as for 1197.4, but after crossing bridge, now ascending a hill. Photo taken after tram has passed photographer. 1197.6 - No. 26 climbing High St. hill Eaglehawk, nearing end of Double track, bound for Quarry Hill. Shows centre of the road poles. 1197.7 - As for 1197.6, with tram entering single track section. Photo taken after tram has passed photographer. Has a BP service station in the background. 1197.8 - No. 26 (bound for Quarry Hill) crossing No. 17 (Eaglehawk) at Job's Gully Loop. 1197.9 - No. 17 climbing railway bridge at Job's Gully, en route to Eaglehawk. Photo taken after tram has passed photographer. 1197.10 - No.26 bound for Quarry Hill, leaving Long Gully Loop? Has the Creeth St. church in l197.l in the far background. Photo taken after tram has passed photographer. 1197.11 - Tramway Point work at the northern end of Long Gully Loop. 1197.12 - No. 17 en route for Quarry Hill turning into View St. from Bamard St. Tram has SEC roof ads "Everything fine in my all electric Kitchen' and 'Electric Cooking is Matchless'. 1197.13 - as for 1197.12, but tram has turned into View St and about to enter the double line track. Photo taken after tram has passed photographer. 1197.14 - No. 21 enters Nolan St after turning from MacRae St. en route to Bendigo. Note sign on its own post noting tram turns "Beware Tram Turns" and stop sign on adjacent pole "Trams stop on Request". No. 21 has two SEC roof ads. 1197.15 - No. 21 in Nolan St. after turning from Bridge St. (White Hills Road). Note signal light for Bridge St. loop on pole corner of street. Photo taken after tram has passed photographer. 1197.16 - No. 2 bound for Eaglehawk at unknown location. 1197.17 - Tram stop sign on a pole "CARS STOP BY REQUEST" 1197.18 - No. 5 in Carpenter St.? en route to Quarry Hill. 1197.19 - No. 28 has just arrive at Golden Square terminus, passengers are disembarking and the trolley pole is being turned. Golden Square Hotel in the background. 1197.20 - No. 28 at Golden Square terminus. Has a "Nothing beats Briquettes for hear roof ad. Information written on in black ink and date stamped on purple ink. 1197.1 - "No. 5 at Creeth St. Long Gully" 1197.2 - "No. 5 approaching Needle Loop between Long Gully and California Gully" 1197.3 - "No. 5 at Needle Loop between Long Gully and California Gully" 1197.4 - "No. 26 crossing railway bridge at Job's Gully near Eaglehawk" 1197.5 - "No. 26 just after crossing railway bridge at Job's Gully near Eaglehawk/ 1197.6 - "No. 26 in High St. Eaglehawk" 1197.7 - "No. 26 at end of double track in High St. Eaglehawk" 1197.8 - "Nos. 26 and 17 crossing at Job's Gully Loop" 1197.9 - "No. 17 crossing railway bridge at Job's Gully near Eaglehawk". 1197.10 - "No. 26 at Long Gully" 1197.11 - 'Northern end of points at Long Gully Loop". 1197.12 - "No. 17 turning into View St. from Bamard St. Bendigo". 1197.13 -'No. 17 at beginning of double track in View St. after leaving Bamard St. Bendigo. 1197.14 - "No. 21 enters Nolan St. from MacRae St. Bendigo." 1197.15 - "No. 21 in Nolan St. Bendigo just after leaving White Hills Road." 1197.16 - "No. 2" 1197.18 - "No. 5" 1197.19 - "Birney car No. 28 at Golden Square Terminus" 1197.20 "Birney car No. 28 at Golden Square Terminus" tramways, trams, bendigo, long gully, railway bridge, jobs gully, trackwork, nolan st, quarry hill, tram stops, golden square, tram 2, tram 5, tram 17, tram 21, tram 26, tram 28 -
 Ballarat Tramway Museum
Slide - 35mm slide/s - set of 32, Noel Simons, 25/02/1971 12:00:00 AM
Set of 31 transparencies taken on 25/2/1972 on Kodak mounts. 1201.1 - Bendigo No. 26 in Bond St. just after leaving Long Gully en route for Quarry Hill. Has Norris Supermarket in background. Has two SEC roof ads. 1201.2 - No. 26 climbing View St. from Charing Cross en route to Eaglehawk. Has ANZ bank and AMOCO service station in background. 1201.3 - as for 1201.3, but after tram has passed photographer. Has buildings west of Mackenzie St. in photograph. 1201.4 - Tram stop and centre of the road pole with two "CARS STOP BY REQUEST" signs mounted on pole at the corner of Mackenzie St. 1201.5 - same position as for 1201.3, but with No. 5 descending the street. 1201.6 - same position as for 1201.2, but with No. 5 descending the street. Photo taken after tram has passed photographer. 1201.7 - No. 7 in Nolan St. from across the park at Lake Weeroona. 1201.8 - No. 7 entering McCrae St from Nolan St. - distant view. Note "TRAM "sign on left hand side under tree and overhead in McCrae St. from former track that once was in this street. 1201.9 - No. 7 in High St. with Cathedral in background. Tram en route to North Bendigo. Note scaffolding around Cathedral main spire area. 1201.10 - No. 7 crossing Bendigo Creek bridge in High St. near Golden Square. Has a Caltex Service station in the background. 1201.11 - No. 7 at Golden Square terminus with Sunburst Fruit Juices and a Peters Ice cream delivery vans alongside. 1201.12 - as for 1201.11 but photo taken from behind tram, with the end of the rails in the photograph. 1201.13 - No. 7 and 21 in Pall Mall at Charing Cross with No. 5 in the background. Taken some distance away from the location. 1201.14 - No. 7 at Golden Square terminus, taken a short distance from the tram terminus. Shows Milk Bar on right hand side and the hotel on the left hand side. Taken from the south side of the roadway. 1201.15 - as from 1201.14 but taken from the north side of the roadway. 1201.16 - No 5 waiting at California Gully loop. Distant photo showing surrounds 1201.17 - No. 5 en route for Quarry Hill crossing No. 26 at California Gully. 1201.18 - No. 26 at Eaglehawk terminus with Eaglehawk Town Hall and Post Office in background. 1201.19 - No. 21 arriving at Charing Cross en route to North Bendigo. Has Alexandra Fountain in the background, ANZ bank RACV building, and other buildings on the north side of Pall Mall or Nolan St. 1201.20 - No. 26 en route for Quarry Hill at Charing Cross, with crew standing by front door. Has Colonial Mutual life building, Armstrong Tyre Service (Firestone) and a sign for Cohns Drinks in the background. 1201.21 - as for 1201.20 but with No. 5 en route to Eaglehawk now in photograph. 1201.22 - No. 26 at Quarry Hill terminus. 1201.23 - No. 26 at Quarry Hill terminus, view of front portion of tram only from a gate at the Bendigo cemetery. 1201.24 - Track at the end of the Quarry Hill line showing the point blades of the former "Y" terminus and the overhead for this. 1201.25 - No. 2 at the Quarry Hill terminus, looking along the former Trackwork. 1201.26 - as for 1201.25 1201.27 - number not used. 1201.28 - Golden Square terminus from some distance from the actual terminus, showing the Warning sign "TRAM" for motorists from the south. No. 7 at the terminus. 1201.29 - No. 7 passing through the Golden Square shopping centre. Numerous cars and pedestrians. Tram en route for North Bendigo. 1201.30 - No. 7 in High St. Golden Square, en route for North Bendigo. Photo taken after tram has passed photographer. 1201.31 - No. 7 in High St. just past Wattle St. with the Cathedral in the background. Tram has two SEC roof ads good side on photo, 'Everything's fine in my all electric kitchen' and 'Electrical cooking - clean, quick, economical'. 1201.32 - No. 7 in High St. nearing Wattle St. Has Cathedral in the background. Photo taken after tram has passed photographer.Information written on in black ink and date stamped on purple ink. 1201.1 - "No. 26 in Bond St just after leaving Long Gully" 1201.2 - "No. 26 climbing View St. from Charing Cross" 1201.3 - "No. 26 ascending View St. from Charing Cross (At Mackenzie St.)" 1201.4 - "View St. & Mackenzie St." 1201.5 - "No. 5 in View St. near Mackenzie St." 1201.6 - "No. 5 in View St. nearing Charing Cross." 1201.7 - "No. 7 in Nolan St. seen from Lake Weeroona Park." 1201.8 - "No. 7 entering McRae St. from Nolan St. Note "TRAM" warning sign on left. 1201.9 - "No. 7 in High St. passing Short St." 1201.10 - "No. 7 crossing Bendigo Creek bridge in High St. near Golden Square." 1201.11 - "No. 7 at Golden Square terminus" 1201.12 - "No. 7 at Golden Square terminus" 1201.13 - "No 7, 21 and 5 at Charing Cross" 1201.14 - "No. 7 at Golden Square terminus" 1201.15 - "No. 7 at Golden Square terminus" 1201.16 - "No 5 waiting at California Gully loop." 1201.17 - "Nos. 5 and 26 crossing at California Gully loop" 1201.18 - "No. 26 at Eaglehawk terminus" 1201.19 - "No. 21 arriving at Charing Cross from Golden Square" 1201.20 - "No. 26 at Charing Cross" 1201.21 - "Nos. 5 and 26 at Charing Cross." 1201.22 - "No. 26 at Quarry Hill terminus" 1201.23 - "No. 26 at Quarry Hill terminus seen through the gates of the Bendigo Cemetery." 1201.24 - "Quarry Hill terminus showing remains for former double track layout abandoned before 1964." 1201.25 - "No. 2 at Quarry Hill terminus" 1201.26 - "No. 2 at Quarry Hill terminus" 1201.28 - "The Southern approach to Golden Square with No. 7 standing at the terminus, "TRAM" warning sign on the left. 1201.29 - "No. 7 passing through Golden Square Shopping Centre" 1201.30 - "No. 7 in High St. Golden Square" 1201.31 - "No. 7 in High St. passing Wattle St." 1201.32 - "No. 7 in High St. nearing Wattle St."tramways, trams, bendigo, bond st., view st., nolan st., high st., eaglehawk, california gully, charing cross, quarry hill, trackwork, tram 2, tram 5, tram 7, tram 21, tram 26 -
 Ballarat Tramway Museum
Slide - 35mm slide/s - set of 4, Noel Simons, Apr. 1972
Set of 4 transparencies - copy slides - possibly ARE film strip dated April 1972. 1210.3 on Kodak Readymount mount. 1210.1 - No. 3 arriving at Quarry Hill terminus. 1210.2 - Bogie car at Long Gully Loop, in the far distance, with a Hotel and the ESSO service station in between. Has Fosters Lager and Carlton signs on hotel. Note sign on the closet pole - "No standing between Notices" 1210.3 - Nos. 26 (Quarry Hill) and 25 (Eaglehawk) at Jobs Gully Loop. 1201.4 - No. 5 showing Charing Cross in bound for Charing Cross and No. 3 en route for Eaglehawk in View St. near the end of the double track. Appears to be SEC employee at the rear of No. 3. Part of a set of 20 slides made by the Association of Railway Enthusiast Provincial Tramways film strip. Reference Item 2560 details the ARE Film Strip and provide references to other slides.Information written on in blue ink and date stamped on purple ink. 1210.1 - "No. 3 arriving at Quarry Hill terminus." 1210.2 - "Bogie car at Long Gully Loop." 1210.3 - "Nos. 26 and 25 at Jobs Gully Loop." 1210.4 - "Nos 5 and 3 in View St. near the end of the double track."tramways, trams, bendigo, long gully, quarry hill, view st., tram 3, tram 5, tram 25, tram 26 -
 Ballarat Tramway Museum
Negative, Geoff Grant, 25/06/1955 12:00:00 AM
Negative No. N349 and black and white print made by a laser printer (stored in folder ) of W7 1001 on AETA tour (Australian Electric Traction Association) on 25/6/1955 at Spencer St. terminus. Tram has AETA tour signs and the slogan "Save traffic congestion, Move People not vehicles". In route number box is letter "B". In Carlyon's Hotel and Spencer St. station in background. Also a bus standing by the Hotel verandah. Negative scanned hi res and imaged updated 22/5/2020.trams, tramways, melbourne, bourke st, spencer st, aeta tour, tram w7 1001 -
 Ballarat Tramway Museum
Newspaper, Herald Sun, "Holding the Line", 8/03/1998 12:00:00 AM
Newspaper Clipping from the centre page of the Melbourne Herald Sun, Sunday 8 March 1998, pages 44 and 45, featuring photographs and text from the book 'Melbourne's Marvellous Trams" by Dale Budd and Randal Wilson, University of NSW Press. Reproduces nine photographs of trams, including cable trams and a ex Melbourne W2 in Denver. In bottom left hand corner is a photo of the intersection of Main and Barkly St. with two Ballarat single truck trams in bound from Mt Pleasant, taken from the Ballarat Fire Station tower in 1971. Also has seven other photo reproductions from the Book itself of various tramway signs. Image is supplied by Randal Wilson in an email of 15/10/2019 Text of email from Randal Wilson of 15/10/2019: Hi Warren We managed to track down a digital version of the photo taken by the late Bill McNiven of the trams on the Mount Pleasant line (page 76 of The Melbourne Tram Book). We contacted UNSW Press, the book's publisher, which provided the following explanation. Apparently, the team there could not find the scan of the slide submitted for the book. However, a member of the team was able to capture a jpg of page 76 of the book. From my recollection of the original photo, the attached image is very close in terms of its reproduction quality. We trust this is of use to you and BTM. Regards Randall and Dalemelbourne, mt pleasant, barkly st -
 Ballarat Tramway Museum
Slide - 35mm slide/s, Travis Jeffrey, late 1960's
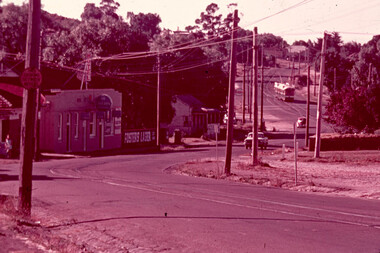
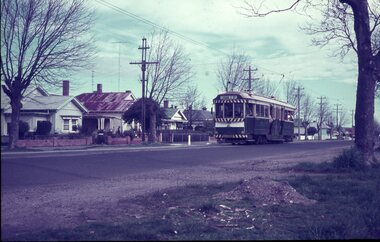
Agfa plastic mount (blue base, white cover) of a photograph of No. 12?, Macarthur St, just past the High St. or Macarthur St. Loop. Has a Service Station in the background. Tram has Twin Lakes sign on the front on the front of the tram. Photo taken late 1960s'. Slide rescanned at 3200 dpi 25-10-2020, jpg replaced, tiff file retained. This file was scanned in 2003 and may show colour changes."BAS 44" in penciltramways, trams, macarthur st, high st, tram 12 -
 Ballarat Tramway Museum
Photograph - Black & White Photograph/s, Peter Bruce, c1970
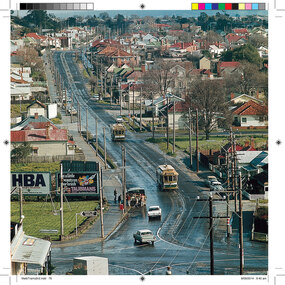
... . Sign of Caltex Service station on right side of photograph... towards photographer. Sign of Caltex Service station on right side ...Black and white photograph of Barkly St. Mt Pleasant taken with a long telephoto lens. Single truck Tram on the top of a hill at terminus, with the photographer on or near the top of the`next hill in centre of track. Four cars travelling towards photographer. Sign of Caltex Service station on right side of photograph. with trees on left. Shows nature of street construction - deep gutters with "bridge" crossings. See also item No. 559, possibly tram No. 31. Would appear to be taken at about the same time, not parked Holden station wagon on left hand side of photo.trams, tramways, ballarat, barkly st, mt pleasant -
 Ballarat Tramway Museum
Document - Photocopy, Neville Gower, "Mayor's Report 1951-1952", Jul. 1997
Yields information about the City of Ballaarat the time of the Mayor's report to the City Council, about the events, industry, transport and other issues within the City.Photocopy of part of City of Ballaarat's Mayor's Report for 1951 - 1952. Originals held in the Ballarat Library. Seven pages covering trams, railways, telephones, one page item and artists impression of new SEC Power Station Ballarat "B" then under construction and photo looking from Town Hall - showing a sign "orderly parking".trams, tramways, city of ballaarat, trams, railways, civic history -
 Ballarat Tramway Museum
Slide - 35mm slide/s, Glen Mills, Nov. 1970
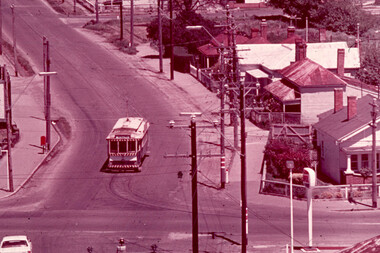
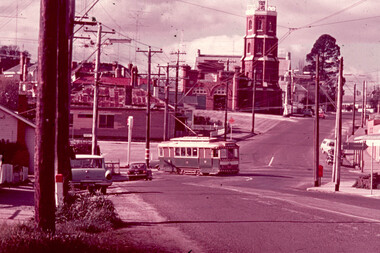
Agfa plastic mount (blue base, white cover) of a photograph of No. 21 or could be 27 taken from the Ballarat (Ballarat East) Fire Station tower. Photo taken Nov. 1970. Has the sign of the AMPOL service station in the foreground. Has destination of Special. Tram at the intersection of Main St and Barkly Street. One of a set of 20 slides made by the Association of Railway Enthusiast Provincial Tramways film strip. Reference Item 2560 details the ARE Film Strip and provide references to other slides. Photo Glen Mills Slide rescanned at 3200 dpi 25-10-2020, jpg replaced, tiff file retained. This file was scanned in 2003 and may show colour changes."BAS 69" in pencil.tramways, trams, mt pleasant, barkly st, main st, tram 21 or tram 27 -
 Ballarat Tramway Museum
Slide - 35mm slide/s, Glen Mills, Nov. 1970
White cardboard mount, 35mm slide, from the Association of Railway Enthusiast's film strip titled "Provincial Tramway Film Strip" of No. 21 or could be 27 taken from the Ballarat (Ballarat East) Fire Station tower. Photo taken Nov. 1970. Has the sign of the AMPOL service station in the foreground. Has destination of Special. Tram at the intersection of Main and Barkly Streets. The film strip notes (Reg. Item 2560), provided the following caption details: "Another 1/2 mile or so saw the "Mt PLEASANT" line turn sharply from the Midland Highway and head towards its terminus in the southern suburbs. - Nov. '70 (Glen Mills)" See image btm2564p.tif for high level scan of image. Stamped on base of slide "11772" and written in ink on top edge "12 Mt Pleasant Line Ballarat"tramways, trams, are, film strip, mt pleasant, barkly st -
 Ballarat Tramway Museum
Photograph - Colour Print/s - set of 30, Carolyn Dean, 2004
Set of 30 colour prints, taken by C. Dean from 30/10/2004 to 2/1/2005 of the rebuilding of the sub-station and initial tramway operations. .1 - Interior view of substation after transformer removed - 30/10/2004 .2 - ditto .3 - ditto .4 - ditto .5 - G.Wood, A. Reither working on the re-building of the walls. .6 - Temporary door .7 - Sign on No. 39 - "There are no trams running today". .8 - COTMA Storage shed frame at Bungaree - 2/12/2004 .9 - 38 outside shed, pending delivery of the transformer - 17/12/2004 .10 - 38 and 1 ditto .11 - ditto .12 - The box arrives - with forklift and G. Wood .13 - unpacked .14 - ditto - with P.Mong .15 - ditto .16 - ditto .17 - P.Mong checking delivery .18 - moving into position - G.Wood and P.Mong .19 - ditto .20 - ditto with Pallet mover. .21 - In position .22 - ditto .23 - No. 40 being repainted .24 - 38 and 1 outside the shed .25 - framing the new walls .26 - ditto .27 - new device frame .28 - The BTM big band - re-opening day - 26/12/2004 .29 - ditto - Sam Boon .30 - No. 26 and that road traffic - cars! - Wendouree Parade - 2/1/2005Each photo has on rear in ink "date", "number" and "Photo by Carolyn Dean"btm depot, substation, wendouree parade, tram 38, tram 1 -
 Ballarat Tramway Museum
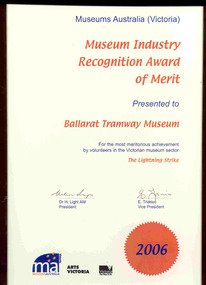
Certificate - Framed Certificate, Museums Australia, "Museum Industry Award of Merit", May. 2006
Significant for the BTM in winning a Museum Industry Recognition Award, by Museums Australia for its achievements in replacing the sub-station and fundraising. The Certificate of the award.Framed Certificate, black frame, glass front, fibre board back and swing out stand with metal clips, titled "Museum Industry Award of Merit", awarded to the BTM as part of the 2006 MIRA Awards on 25-5-2006. Sub titled "The Lightning Strike". Award presented by Museums Australia, Vic Div. Has logos for Museums Australia, Arts Victoria, Vic. Govt. Logo. Signed by Dr. Helen Light as President and Elizabeth Triarico as Vice President. Refer to June 2006 issue of Fares Please! for ceremony photographs.trams, tramways, btm, substation, awards, museums australia -
 Ballarat Tramway Museum
Photograph - Colour Photograph/s, Warren Doubleday, mid 12/1997
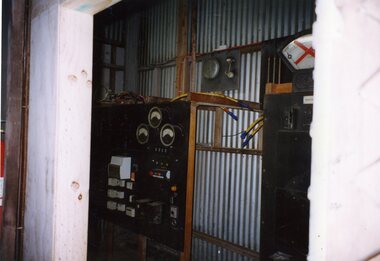
Yields information about a piece of the original equipment from the ESCo Ballarat power station.Colour photograph of the ESCo Wendouree Parade power station - DC face plate starter for one of the rotary converters - DC hand operated drum and multiple lever panel" - see Jan. 1998 issue of Fares Please! for details of the donation and a copy of the photograph as used. Photo taken by Warren Doubleday. Printed on Kodak Paper. Photo taken mid Dec. 1997. Photos of cabinet with doors opened and signs added 2/4/2018. Images .1 - Brookhirst makers plate with Patent Nos. .2 - Machine with doors open .3 - wiring diagram .4 - Brookirst cabinet latch at the bottom of the machine. .5 - Safety sign re opening the doors. .6 - bottom section of cabinet with cable found in machine .7 - top half of machine .8 - similar to .6 .9 - close up of the cable. See January 1998 Fares Please!esco, power station, rotary converters -
 Ballarat Tramway Museum
Film - Movie Film & Box, Kodak, 1960
Yields information in movie film format of Ballarat trams in 1960, how the system operated and was used by people., Yields information in movie film format of Ballarat trams in 1960, how the system operated and was used by people.Movie film - 8mm, approx. 30mins, with leader strip on a plastic reel, within a black and white plastic box, titled "Ballarat No. 1. 1960". Has been transferred to DVD - see Reg item 4100 as Segment No. 2. Made by Ben Parle. Also transferred to DVD by Rod Cook Oct. 2015, via Roger Greenwood for use in his DVD, "The City of Ballarat Trams, Gardens & Gold" of 2016. See Reg Item 6883. Synopsis: based on time. 0:00 View of typed introduction, noting that this is a pictorial record of Ballarat. 0:10 Title “The Tramways of Ballarat 1960, Part 1” 0:16 13, showing “View Point” at Stones Corner, Bridge St, east end, with trolley pole being turned, while another single trucker heads out towards Mt Pleasant. 0:25 13 leaving Stones Corner, short approach and then longer trailing shot of the tram going towards the City in Bridge St. 0:44 View out of front of tram in Bridge St heading towards the City, with cars in the photo, then passing through city Loop, no trams in the loop and running up to Lydiard St Nth and crossing the road. 1:22 Running up Sturt St from Armstrong St, passes over Dawson St X-over and up to the next intersection, Lyons St. 1:54 Title “The View Point Line” 1:59 19 inbound, in Ripon St, from crossing Mair St, towards camera and then passing away and turning into Sturt St. 2:49 View of a “Warning Oncoming Trams” sign 2:52 19 in Ripon St, going to View Point, crossing Webster St towards camera, then going away through the disconnected Victoria Ave loop, pass the “Warning Oncoming Trams” sign. Note very windy scene with people running across roads. 3:17 19 in Wendouree Parade, in bound, though showing destination View Point, going away from the camera, past the View Point Hotel. 3:39 19 coming towards camera near Excerpt or Devon St and then going away towards the terminus. 4:04 19 at the terminus, stationary, with a single trucker 3?, passing from Macarthur St into Wendouree Parade, behind 19. 4:20 33 coming towards camera in Wendouree Parade from St Aidans Drive, stopping to pick up passenger at Forest St and then going away towards the City, photographed from near the depot, on a wet and windy day. 4:54 35 in Wendouree Parade, coming towards the Camera from St Aidans Drive and then going away with the Gardens Loop area in the background. Tram stops at stop to let a passenger off. 5:28 21 leaving Gardens Loop for the City via the Depot, green light in signal can be seen. 5:43 28?, closely followed by 26 turn from Drummond St South into Sturt St. 6:18 Scene opens with shot of “Sebastopol” destination on a bogie tram. 6:21 Title “The Sebastopol Line” 6:24 21 turning from Sturt St into Drummond St Sth with destination of Bell St and then going away from the camera. 6:55 38 in Drummond St Sth, coming towards the camera and then passing the camera with Sturt St just in the view. 7:10 21, showing Gregory St, in Drummond St Sth, approaching and then going away, entering the Urquhart St Loop, 7:39 34 in Drummond St Sth (location check required (Latrobe?)), approaches camera, picks up passengers and the goes away. 8:09 39 at ? Street, turns from Drummond St Sth into Skipton St, after picking up and setting down passengers, bound for Sebastopol 8:55 35 inbound in Skipton St passes through the Bell Street Loop, and then goes away from the camera. 9:33 42 outbound in Skipton St, approaches the camera, passes and then crosses over the half the road into Albert St. 10:00 39 inbound in Albert St – location? 10:31 34 outbound for Sebastopol, approaches camera and just starts to pass by. 10:36 34 in Grey St crossing loop, crosses 42 inbound. 10:59 39 outbound in Albert St, with shopping centre in bound, approaches camera, passes and then crosses over Albert St. Mid morning scene. 11:39 39 inbound, Albert St south, approaches camera and then passes and the crosses over Albert St. 12:16 41 outbound in Albert St passes the camera, and pulls into the terminus with the conductor getting out on the back bumper to pull the pole down as the tram stops and a passenger walks into the Royal Hotel. 12:39 Title “The Lydiard Street North Line” 12:44 Filmed from the Hotel balcony, 21 inbound in Lydiard St Nth passes over Mair St, stops while 33 passes in the other direction. 13:18 With the red light showing on the Seymour St loop signal, 33 inbound for Sebastopol stops and picks up many passengers, passes the camera and runs past the VRI building in the background and through the loop. Possibly filmed on a Sunday given the ladies dresses and quieter streets. 14:01 30 outbound, passes the camera and stops at Macarthur St. Filmed alongside the brick wall of the cutting. 14:28 30 inbound arrives, passes through the Gregory St loop and then proceeds past the camera, making a stop to pick up passengers. 15:14 28 in Lydiard St Nth – location?, approaches and goes away from the camera, north of Gregory St. 15:34 28 ditto location? 15:53 21 arrives at the terminus with passengers getting on and off. 16:11 View of the a vertical positioned “End of Section” sign on a pole at the terminus and then lifting the camera to see the timetable board and the stop sign. 16:33 31 in Bridge St passing Morseheads and then turning into Sturt St, stops at the Grenville St stop, while another single trucker comes down to the stop from the City. 16:58 31 outbound in Bridge St, with destination of Victoria St. 17:14 Title “The Victoria Street Line” 17:18 31 outbound to Victoria St from Stones Corner. Starts with an overhead shot, shows clock at the Caltex service station,. 17:37 31 inbound approaching Bakery Hill and then descending to the junction after it passes camera. 18:09 25 climbing outbound in Victoria St, passing the camera, to then pass through the King St loop. 18:47 25 inbound in Victoria St, passing the camera, then pass through the King St loop, with St Alypius Church in the background. 19:36 14 approaching the rail bridge in Victoria St and stopping at the 2nd last stop to left of passengers. 20:01 14 leaving the terminus and approaching the camera and the a short sequence going away, to the next stop to pick up quite a few passengers. 20:14 “Trams Stop Here” sign, metal wrap around on a steel pole. 20:16 Title “The Mount Pleasant Line” 20:21 11 inbound in Main St, with a passenger leaping off the tramcar and another getting off just before the junction. 20:45 11 passes the junction and then proceeds away from the camera in Bridge St. 21:04 30 outbound in Main St, then turns into Barkly St, a bus (Eclipse Motors) passes in Main St just before the sequence ends. 21:31 30 inbound near Steinfield St. (exact location?) 21:49 25 approaches the camera, then proceeds away and passes through the Grant St. loop. 22:29 25 inbound, windy day, between Grant and Cobden, (exact location?), with a horse drawn bread van in the view and the breadman walking behind the tram as it passes. 23:02 11 outbound in Barkly St, (exact location?) 23:37 11 inbound in Barkly St (exact location?) 23:44 Mt Pleasant terminus signage 23:50 30 approaches the terminus and then stops with the conductor alighting turning the pole, passengers getting on and off and the driver appearing at the other end. 24:32 Title “The Gardens Via Sturt St. West Line” 24:35 21 outbound in Sturt St near Raglan St, approaches and passes the Camera. 25:09 12, showing City Oval, approaches and passes the camera, outbound near Windermere St. 25:33 13 showing View Point, goes away from the camera – location? 25:44 12 comes from St. West, inbound passes the camera and then stop as the next stop next Talbot St? 26:21 Short sequence of a “Warning Oncoming Trams” sign 26:28 42 inbound in Sturt St West, just before Ripon St, view coming towards camera and then going away to cross Ripon St. 27:10 34 passes through the Parker St loop 27:25 35 or 39 inbound past the college in Sturt St West 28:04 41 outbound at the Russell St curve, passes away from the camera. 28:11 35? inbound passes away from the camera through the Victoria Park or Morrison St loop, swinging out into the roadway. 28:29 View of timetable sign at Hamilton Ave. 28:37 35 turning from Sturt St West into Hamilton Ave, can see the conductor changing over the barrier rails. 29:11 42 inbound, crosses another bogie tram (35?) at Carlton St loop then passes the camera and goes past the Olympic rings monument. 29:42 12 approaches the Carlton St gates. 30:07 12 outbound, crosses a bogie tram in the loop with both trams then leaving the loop. 30:20 Title “End of Part One” Written labels giving title information on outside of box.trams, tramways, ballarat, sebastopol, lydiard st north, victoria st, mt pleasant, sturt st west -
 Ballarat Tramway Museum
Postcard, Ron Scholten, Ballarat No. 18 waiting at the Lydiard St. gates, 1960s
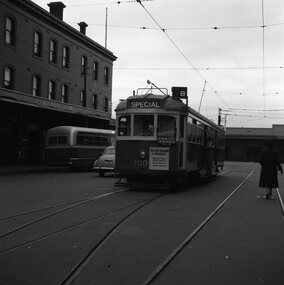
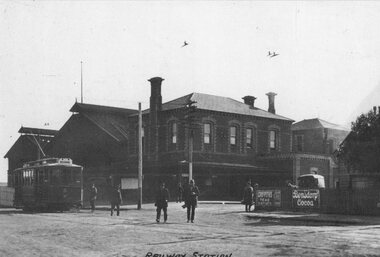
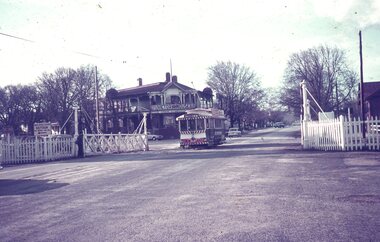
... waiting at the Lydiard St. gates with the Ballarat station ...Photo of Ballarat No. 18 waiting at the Lydiard St. gates with the Ballarat station building in the background, and a R class hauled train in No. 2 platform. Shows the signal gantry. No. 18 has the destination of city and has a an auxiliary board advertising a Fete - see also Reg. Item 2020 for 18 with the same sign.Colour photograph, printed on a postcard back format.On the rear in pencil "Ball 18 Railway Stn / Ron Scholten Collection for BTM archives".trams, tramways, railway station, lydiard st nth, tram 18 -
 Ballarat Tramway Museum
Ephemera - Tour Notes, Victorian Railways (VR), BTPS Tour to Mirboo North, Sep.1973
Set of three foolscap size sheets, for BTPS Tour to Mirboo North on 27/9/1973, stapled in top left hand corner. 1. Ticket circular - giving travel arrangements and meeting point at Flinders St. Station. 2. Victorian Railways "S" circular, number S.2515/73 advising of a BTPS excursion from Morwell to Mirboo North on Thursday 27/9/1973 (Showroom Day). Noted that a BW carriage to be attached to the Mirboo North goods at Traralgon at the rear in front of the brake van, pick up passengers at Morwell, the train to Mirboo North would have an altered schedule, passengers would travel to Morwell by the 7.20am passenger ex Melbourne and return by the Gippslander ex Morwell, that passengers would have specially printed tickets and signed by J. C. Crute as Chief Traffic Manager. Issued on 24/9/1974. Printed on foolscap size paper. 3. Tour Notes for the BTPS Tour - details of line history, passenger services, early public timetables at time of opening. Tour organisers R.Gilbert and G.Cargeeg. See Reg Item 4676 for a group photo. Images of document added 27-08-12.btps, tours, morwell - mirboo north, special trains -
 Ballarat Tramway Museum
Ephemera - Tour Notes, Victorian Railways (VR), Victorian Railways "S" circular, 30/01/1975 12:00:00 AM
Victorian Railways "S" circular, number S.162/75, for the additional stop of the 8.30am train from Spencer St to Horsham to set down at Wendouree Station and for the 2.45pm ex Horsham to pick up at Wendouree Station at 5.38pm, on the day of the Opening by of the Tourist Tramway at Lake Wendouree for the BTPS. Signed by M. Ronald as Chief Traffic Manager. Printed on half a quarto sheet. Images of document added 27-08-12.btps, opening, wendouree station, railways -
 Ballarat Tramway Museum
Slide - 35mm slide/s, Graham Evans, Sept. 1971
White cardboard mount, 35mm slide, from the Association of Railway Enthusiast's film strip titled "Provincial Tramway Film Strip" of No. 12 turning from Main St into Barkly St. with the Ballarat (Ballarat East) Fire Station in the background. Photo taken Sept. 1971. Has the sign of the AMPOL service station in the background. The film strip notes (Reg. Item 2560), provided the following caption details: "No. 12 squeals around the same curve, overseen by the Ballarat Fire Station. - (Sept. '71 (Graham Evans)" See image btm2565p.tif for high level scan of image. Stamped on base of slide "11773" and written in ink on top edge "12 Mt Pleasant Line Ballarat"tramways, trams, are, film strip, mt pleasant, barkly st, tram 12 -
 Ballarat Tramway Museum
Slide - 35mm slide/s, Graham Evans, Apr. 1972
White cardboard mount, 35mm slide, from the Association of Railway Enthusiast's film strip titled "Provincial Tramway Film Strip" of a Bogie car at Long Gully Loop, in the far distance, with a Hotel and the ESSO service station in between. Has Fosters Lager and Carlton signs on hotel. Note sign on the closet pole - "No standing between Notices". The film strip notes (Reg. Item 2560), provided the following caption details: "Meandering roadway and centre road track were a feature of the long "EAGLEHAWK" line. Here an inbound car negotiates the Long Gully Loop. - April '72 (Graham Evans)" See image btm2593p.tif for high level scan of image. Stamped on base of slide "11803" and written in ink on top edge "Eaglehawk line"tramways, trams, are, film strip, long gully, eaglehawk -
 Ballarat Tramway Museum
Photograph - Digital image Set of 11, Stuart Loddington, 10 images of Ballarat trams prior to closure, 1971
Yields information about Ballarat Tramways and trams prior to the closure of the tramway system.Set of 11 digital images, comprising 1 donation text image and 10 images of Ballarat trams prior to closure, scanned from original slides by Stuart Lodington, 1971 prior to closure of the system. .1 - Donation text slide. .2 - No. 26 southbound in Lydiard St North, with the Ballarat Railway Station level crossing gates in the background. .3 - No. 27 and 30 crossing at Bell St Loop, Skipton St. (see also btm4976i4) .4 - No. 17 Wendouree Parade, near Gardens Loop .5 - Single truck tram at Victoria St terminus, taken from the west side of the Buninyong Rail line bridge, with CRB Roadwork sign, Eureka Caravan Park and Meagher Hotel in the background, possibly No. 11, see entry for .10 .6 - No. 12 and 30 crossing at the Urquhart St Loop, Drummond St South. .7 - No. 12 westbound in Sturt St, with Grenville St in the background. .8 - No. 17 at Gardens Loop with the Trolley pole being reversed. .9 - No. 30, Lydiard St North with Reid's Palace building in the background. .10 - No. 11 passing over the Buninyong rail line bridge, with Gardens via Sturt St West and a Twin Lakes sign. Has a number of children alongside the driver. .11 - No. 21 heading northbound in Wendouree Parade, Gardens, just to the north of the now BTM depot junction.trams, tramways, ballarat, level crossings, buninyong railway, lydiard st north, bell st, victoria st, wendouree parade, gardens, drummond st, sturt st, tram 26, tram 27, tram 30, tram 17, tram 12, tram 21, tram 11 -
 Ballarat Tramway Museum
Photograph - Digital image Set of 20, 9/12/1972 12:00:00 AM
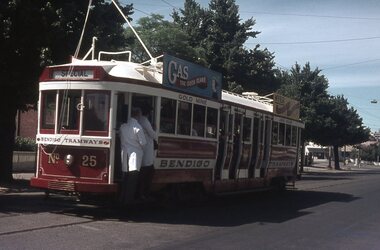
Set of 21 digital images of Bendigo Tramways, at the re-opening of the Bendigo tramways by the Bendigo Trust on 9/12/1972by Stuart Lodington. All trams in the first Bendigo Trust colours. .1 - No. 25 with Gas and Myer roof advertisements .2 - No. 30 with 3BO roof advert and a BP service station in the background. .3 - SEC single trucker at the Mine with a large "Tram Tours" sign on the front of the tram .4 - ditto .5 - No. 19 with a large group of passengers, Bendigo Motor Co and Sandhurst roof advertisements .6 - No. 30 in McCrae St .7 - view of opening march with band .8 - No. 19 in opening parade .9 - Opening Parade in High St with cathedral in the background .10 - No. 30 in Nolan St crossing bridge .11 - ditto .12 - No. 25 at the mine .13 - No. 30 leaving the mine .14 - No. 30 ditto with BCTV roof advert. .15 - Charing Cross with cenotaph, The Beehive building and Ezywalkin shoes and Coca Cola adverts .16 - No. 19 southbound in High St with City Centre Motel building in the background. .17 - No. 30 returning from North Bendigo .18 - No 25 in High St after leaving Gold Mine .19 - No. 30 at the Mine .20 - No. 30 in Nolan St .21 - No. 30 with 3BO roof advert and a BP service station in the background.trams, tramways, bendigo, north bendigo, charing cross, bendigo trust, central deborah, tram 25, tram 30, tram 19 -
 Ballarat Tramway Museum
Photograph - Digital image, c1971
Yields information about Ballarat streetscape and its trams in the closing days of the SEC tramway system.Digital image from a black and white print of tram 11 outbound in Lydiard St North, crossing the railway level crossing. Has the Reid's Palace building and the railway station and signal gantry in the background. The tram has a "Bliss Bombs" (Make Bliss not Love) roof advertisement and a Twin Lakes sign. Photo by Marc Dahlstrom c1971. On rear is the Marc Dahlstrom stamp.trams, tramways, lydiard st, railway station, level crossings, tram 11 -
 Ballarat Tramway Museum
Photograph - Geelong No. 5 at the Railway Station, 1915
Photo of Geelong No.5 at the Railway Station, c 1915, Railway station in the background, prior to the extension and the construction of the awning over No. 1 platform area. Has title "Railway Station" along the bottom edge. In the view are signs for Griffiths teas and Bensdorp Cocoa. On the rear "Geelong Historical Post Card Series No. 9 Railway station with No. 5 Tramcar ready to depart for West Geelong 1915" Publisher not known. See also Reg item 4408 for another reproduction of this photograph. Illustration has been cut from a magazine.Yields information about Geelong Railway Station and tram No. 5 in 1915.Sepia-toned print of a postcard and an illustration of the same photograph.trams, tramways, geelong, railway station, tram 5 -
 Ballarat Tramway Museum
Slide - 35mm slide/s - set of 6, Campbell Duncan, 19/09/1971 12:00:00 AM
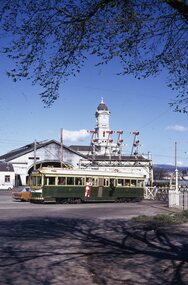
Yields information about the operations of the Ballarat Tramway system on the last day of SEC tramway operations in Ballarat.Set of 6 Kodak - Kodachrome slides - cardboard mounts - all taken on 19/9/1971, last day of operations prior to closure of the SEC operated tramway. .1 - Tram 40, waits at the level crossing gates - the gates are being opened. In the background is the station building and the signal gantry. Tram has the destination of Sebastopol. .2 - No. 42, with destination of Lydiard St north, northbound in Lydiard St, with railway station buildings and VRI in the background. .3 - No. 35 on inbound, Lydiard St North. .4 - No. 35, on inbound service, leaving Skipton St loop with another bogie in the background. .5 - No. 39 on inbound service, Albert St Sebastopol with the Sebastopol boundary sign and Binks Ford in the background. Tram has an everything under control in my all electric kitchen roof advert. .6 - No. 42, with destination of Sebastopol, Albert St Sebastopol.In ink on slide: .1 - Sun 19 Sept 71 - up Lydiard St Nth waits for gates to be opened after fast goods. .2 - Sun 19 Sept 1971, down Lydiard St Nth near VRI. .3 - Sun 19 Sept 1971, Up Lydiard St Nth .4 - Sun 19 Sept 1971, Up Sebastopol (supplementary service) has just crossed down in Skipton St near Drummond St. .5 - Sun 19 Sept 1971, Up Sebas at Ballarat / Sebastopol boundary. .6 - Sun 19 Sept 1971, c5.30pm down Sebas in Sebas shire.tramways, trams, lydiard st nth, railway station, level crossings, skipton st, albert st, sebastopol, closure, last day, tram 40, tram 42, tram 35, tram 39 -
 Ballarat Tramway Museum
Slide - 35mm slide/s - set of 4, Dave Simpson, late 1960's early 1970's
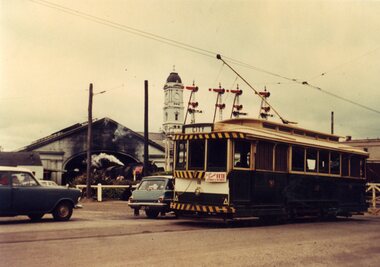
Yields information about Stones Corner and the traffic situation in Bridge St.Set of four 35mm slides - Anscochrome white plastic mounts of Stones Corner, corner of Bridge St, Victoria St and Main Road. .1 - shows the overhead arrangements, with a tram about to enter Bridge St from Main Road. Has the Caltex service station in the background, also advert or roof signs for Viscount Ambassador Caravans, K&O (Digger) Schonell Sports Cycles and Electrical store. .2 - No. 26 inbound with many passengers - showing Mt Pleasant - could be running a Special. .3 - ditto with many cars in the photograph. .4 - tram 39 about to enter Bridge St from Main Road - has a red letter box on corner.tramways, trams, main road, bridge st, victoria st, stones corner, tram 26, tram 39 -
 Ballarat Tramway Museum
Slide - 35mm slide/s - set of 6, Dave Simpson, late 1960's early 1970's
Yields information about Railway Level crossing in Lydiard St North and some of the trains that used it.Set of six 35mm slides - Hanimex light grey white plastic mounts or AGFA dark blue / white plastic mounts of trams and trains crossing the level crossing at Lydiard St North Ballarat. .1 - tram 33 with destination of Lydiard St North, just after crossing the rail tracks - has a Twin Lakes sign with Victoria House in the background. .2 - tram 40 with destination of Lydiard St North, waiting at the level crossing with S303 entering the station. .3 - ditto, but with S304 in the photograph under the signal gantry. .4 - tram 17 crossing the crossing with the signal box and Victoria House in the background. .5 - ditto - tram has a Twin Lakes signs and a "Make Bliss No Love" roof advert for Bliss Bombs. .6 - ditto - with the S. F. Motors Pty Ltd Mercedes Benz dealership in the background.tramways, trams, railway station, lydiard st north, level crossings, victorian railways, tram 33, tram 40, tram 17 -
 Ballarat Tramway Museum
Slide - 35mm slide/s - set of 4, Dave Simpson, late 1960's early 1970's
Yields information about Drummond St south and its use by trams.Set of four 35mm slides - AGFA dark blue / white plastic mounts of trams in Drummond St south. .1 - No. 40 with destination of Lydiard St North near the intersection with Eyre St. .2 - at the intersection. .3 - No. 40, southbound with the destination of Sebastopol, near La Trobe St. .4 - No. 39, northbound with the destination of Lydiard St North at the intersection with Darling St and now the Midland Highway. Has a Shell petrol station in the background. Note the Give Way sign.tramways, trams, drummond st sth, darling st, tram 40, tram 39