Showing 292 items
matching trolley pole
-
 Ballarat Tramway Museum
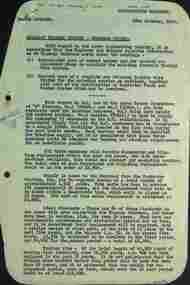
Document, State Electricity Commission of Victoria, "Ballarat Tramway Inquiry - Overhead System", 10/1962
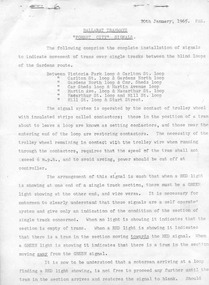
... the status of the rectifiers at Ballarat A, steel poles, trolley wire... the status of the rectifiers at Ballarat A, steel poles, trolley wire ...Report or document titled "Ballarat Tramway Inquiry - Overhead System", dated 18/10/1962 prepared by the SECV Distribution Engineer of the Ballarat Branch about the cost of refurbishing the Ballarat tramway electrical system including the status of the rectifiers at Ballarat A, steel poles, trolley wire, use of the DC system by customers in central Ballarat, and the cost of new recitifier systems.Yields information about the cost of refurbishing the Ballarat Electrical system for trams in 1962.Carbon copy on green paper with rounded and or cut corners, pinned with hand written notes.Three hand written notes regarding distribution.tramways, state electricity commission of victoria, secv, electrical engineering, rotary converters, trolley wire, overhead, poles -
 Ballarat Tramway Museum
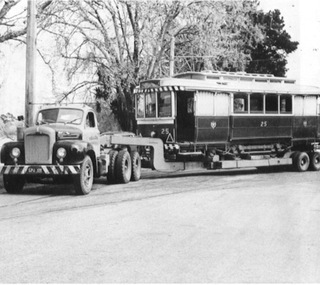
Photograph - Black & White Photograph/s, Wal Jack, Ballarat 25 leaving for Bendigo
... appear trolley pole base has been removed. Gives photographer... the windows. Also would appear trolley pole base has been removed ...Yields information about the loading and departure of Ballarat No. 25 to Bendigo in 1960.Reproduction of illustration of Ballarat No. 25 leaving the Wendouree Parade depot for Bendigo on 6/10/1960. As printed in Newsrail, April 1984 issue on page 111. Photo shows Yellow Express Mack prime mover GPU 328 with Ballarat Tram No. 25 loaded and leaving the depot. Tram has destination box removed. Also the process of fitting the dash canopy lighting had commenced, with the small white stripe painted under the windows. Also would appear trolley pole base has been removed. Gives photographer as Doug Colquhoun Pages 111 to 114 of the magazine, centre page of the April issue only. Centre page photo of train at the Apex siding, Kilmore East. 1478.1 - Same photo - digital image from the Wal Jack album. Wal's notes gives the time of the photograph as 10.40am. 1478.2 - same photo - print supplied to Alan Bradley by Doug Colquhoun. See image i4 for the rear of the photograph. See Reg Items 1478, 5241, 5242, 7759 and 7766 for a series of 5 photos of this event..1 - On rear of photograph in ink "SEC, Ballarat Loading No. 25 on Yellow Express Loader outside Wendouree Depot before leaving for Bendigo. 6-10-1960." and in top Right hand corner Wal Jack stamp with "Neg to Doug" written in. .2 - has Douglas A. Colquhoun stamp on rear - with details - see image i4. trams, tramways, yellow express, transporting trams, moving trams, bendigo -
 Ballarat Tramway Museum
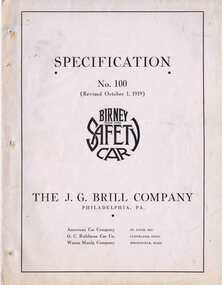
Document - Specification, J.C. Brill Co. of Philadelphia, "Specification No. 100 - Birney Safety Car", 1919
... with the tramcar. First photo shows the Birney car without a trolley... without a trolley pole, lettered for the KC Rys. Co. The second ...Specification document comprising printed cover, eight typewritten pages (black carbon copy) and two photo pages of a J.G. Brill Co. of Philadelphia PA, Birney Safety Car. Specification No. 100, revised 1/10/1919. On the printed cover, which has three holes for a clip on the left hand side, printed with the Birney Safety Car trade mark, the names of the J. G. Brill associated companies (American Car Company of St. Louis, G. C. Kuhlman Car Co. of Cleveland Ohio, and Wason Manufacturing Company of Springfield, Massachusetts). On the inside of the front cover and on the outer back cover is the Brill logo. On the inside of the back cover is a floor / seating plan of the Birney Safety Car, giving overall dimensions, location of equipment etc. Item secured with one brass clip in the top left hand corner. The eight typed pages details the specification of the construction of the tramcar, equipment details etc for a single truck, double end Birney Safety (tram) car. Gives dimensions of the tramcar, materials, construction methods, finishes, equipment, glass, etc. Also details additional items that could be ordered with the tramcar. First photo shows the Birney car without a trolley pole, lettered for the KC Rys. Co. The second photo shows an interior view of the tramcar. Scanned for COTMA Website - pdf version.trams, tramways, birney, j. c. brill co., tramcar specifications, tramcar construction -
 Ballarat Tramway Museum
Photograph - Digital image Set of 11, Stuart Loddington, 10 images of Ballarat trams prior to closure, 1971
... in the background. .8 - No. 17 at Gardens Loop with the Trolley pole being... with the Trolley pole being reversed. .9 - No. 30, Lydiard St North ...Yields information about Ballarat Tramways and trams prior to the closure of the tramway system.Set of 11 digital images, comprising 1 donation text image and 10 images of Ballarat trams prior to closure, scanned from original slides by Stuart Lodington, 1971 prior to closure of the system. .1 - Donation text slide. .2 - No. 26 southbound in Lydiard St North, with the Ballarat Railway Station level crossing gates in the background. .3 - No. 27 and 30 crossing at Bell St Loop, Skipton St. (see also btm4976i4) .4 - No. 17 Wendouree Parade, near Gardens Loop .5 - Single truck tram at Victoria St terminus, taken from the west side of the Buninyong Rail line bridge, with CRB Roadwork sign, Eureka Caravan Park and Meagher Hotel in the background, possibly No. 11, see entry for .10 .6 - No. 12 and 30 crossing at the Urquhart St Loop, Drummond St South. .7 - No. 12 westbound in Sturt St, with Grenville St in the background. .8 - No. 17 at Gardens Loop with the Trolley pole being reversed. .9 - No. 30, Lydiard St North with Reid's Palace building in the background. .10 - No. 11 passing over the Buninyong rail line bridge, with Gardens via Sturt St West and a Twin Lakes sign. Has a number of children alongside the driver. .11 - No. 21 heading northbound in Wendouree Parade, Gardens, just to the north of the now BTM depot junction.trams, tramways, ballarat, level crossings, buninyong railway, lydiard st north, bell st, victoria st, wendouree parade, gardens, drummond st, sturt st, tram 26, tram 27, tram 30, tram 17, tram 12, tram 21, tram 11 -
 Ballarat Tramway Museum
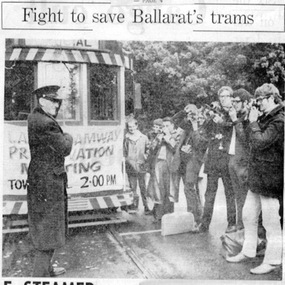
Newspaper, The Courier Ballarat and The Age, "Fight to save Ballarat trams", "Paddle Steamer Study Planned", 1971
... the trolley pole rope. Notes that they hope to keep six trams going... taking a photo of the driver (Mr. Les Bird) holding the trolley ...Set of two newspaper clippings pasted onto a single sheet of paper with two Punch holes on the left hand side. First clipping from The Age, p4, dated May 31, 1971 of the setting up of the BTPS by a group of young people the previous day. Has photo of a group taking a photo of the driver (Mr. Les Bird) holding the trolley pole rope. Notes that they hope to keep six trams going, tram to be operated on a voluntary basis similar to Puffing Billy, many of the group were Melbourne students and that the Ballarat contingent was consciously small. The first cutting also has a small piece on the top edge, cut out from the same newspaper referring to the article on page 4, titled "TRAMS". (Source newspaper advised by Alan Bradley 5/7/02 and updated). Second is from The Courier, Ballarat, 8/6/1971, about a Murray River paddle steamer company writing to the City of Ballaarat offering to undertake a feasibility study and discuss with Council the operation of pleasure craft on Lake Wendouree, Also mentions the establishment of the BTPS and its proposals and its letter to Council. See Reg, Item 2487 for print of photograph supplied by the AGE newspaper July 2002. Second copy from donation of the Tom Murray Estate added 20-11-2016. Full image of newspaper article added as image i2. See also Reg Item 7033 for other photographs and tramcar notes.In red ink on the second cutting, below the first paragraph "8-6-71"trams, tramways, paddle steamer, lake wendouree, charters, museum establishment -
 Melbourne Tram Museum
Negative - Set of 8, Travis Jeffrey, Jun. 1960
... the trolley pole around. NOTE: - dates are not as marked on some... Factory Somerville Rd Trolley Poles Crews Drivers Conductors tram ...1. B&W negative of tram 468 in Ballarat Rd Footscray. Tram has destination Explosives Factory. Driver stepping down from cab and passenger walking from tram to kerb. 2. B&W negative of tram 468 in Ballarat Rd at Gordon St Footscray. Tram has destination Railway Station. Tram shelter shown in front of Powell Hotel. 3. B&W negative of tram 468 in Gordon St Footscray. Tram has destination Railway Station. Tram is shown at corner of River St on wrong side of road, so appears to be ready for shunting. 4. B&W negative of tram 468 at Ordnance Factory West Maribyrnong. Tram has destination Ordnance Factory. W2 454 is in background. 5. B&W negative of tram 468 in River St Footscray. Tram has destination Explosives Factory. 6. B&W negative of tram 468 in Raleighs Rd West Maribyrnong. Tram has destination Explosives Factory. Tram is shunting. 7. B&W negative of tram 468 in Somerville Rd Footscray. Tram has destination Russell St. Tram is shown with driver and female conductor posing for photographer. 8. B&W negative of tram 468 at Ordnance Factory West Maribyrnong. Tram has destination Explosives Factory. 2nd unidentified Tram is shown in background. Female conductor walking the trolley pole around. NOTE: - dates are not as marked on some photo envelopes recorded below as the Footscray closed March 1961.1. Paper folder that contained the negative had "NR30A" written in red ink, "F9" written in pencil, "20A" written in blue ink, and date stamped 11 Jun 1960. On rear, dates stamped 26 Sep 1962 (twice). 2. Paper folder that contained the negative had "NR36A" written in red ink, "F8" in pencil, "26A" in blue ink, and date stamped 11 Jun 1960. On rear, dates stamped 26 Sep 1962 and 6 Oct 1962. 3. Paper folder that contained the negative had "NR47A" written in red ink, "F10" in pencil, "37A" in blue ink, and date stamped 23 Sep 1961. 4. Paper folder that contained the negative had "NR32A" written in red ink, "F14" in pencil, "22A" in blue ink, and date stamped 11 Jun 1960. On rear, dates stamped 26 Sep 1962 and 6 Oct 1962. 5. Paper folder that contained the negative had "NR54A" written in red ink, "F15" written in pencil, "44A" written in blue ink, and date stamped 28 Sep 1961. On rear, dates stamped 26 Sep 1962 and 6 Oct 1962. 6. Paper folder that contained the negative had "NR56A" written in red ink, "F13" in pencil, "46A" in blue ink, and date stamped 28 Sep 1961.2. 7. Paper folder that contained the negative had "NR64A" and "NR105A" written in red ink, "F11" in pencil, "64A" in green ink, and date stamped 1 Jan 1963. On rear, date stamped 26 Sep 1962. 8. Paper folder that contained the negative had "NR62A" written in red ink, "F12" in pencil, "52A" in blue ink, "damaged" in purple ink, and date stamped 11 Jun 1960.trams, tramways, x1 class, footscray, ballarat rd, gordon st, ordnance factory, somerville rd, trolley poles, crews, drivers, conductors, tram 468, tram 454 -
 Ballarat Tramway Museum
Slide - 35mm slide/s - set of 14, Noel Simons, 23/11/1962 12:00:00 AM
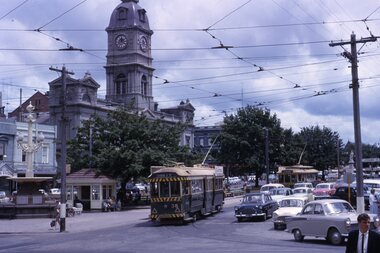
... , but with trolley pole turned around. Has SEC Briquettes roof ad...". Has a Twin Lakes sign 1162.13 - ditto, but with trolley pole ...Set of 14 Kodachrome transparencies taken on 23/11/1962. 1162.1 - tram 38 turning into Lydiard St. North from Sturt St. with tram 20 in background. Many motor vehicles in photo. 1162.2 - as above, but a minute of so later. Has Mutual Life building in background as well as Town Hall. 1162.3 - No. 40 entering Albert St. from Skipton St. outbound to Sebastopol. 1162.4 - No. 40 near start of side of the road running in Albert St. heading to Sebastopol. 1162.5 - No. 40 at the City terminus, on the South side of Sturt St. Has Town Hall and other buildings along the south side of Sturt St. in the background. 1162.6 - No. 40 at Sebastopol terminus - shows arrangement of the signs at the terminus. 1162.7 - No. 40 and No. 38 crossing at loop between Sayle and Grey St. No. 40 inbound. 1162.8 - No. 40 turning from Drummond St. South to Sturt St. at Hospital Corner with Southern Cross Hotel in background. 1162.9 - No. 18 in Wendouree Parade near Forest St. heading east with destination of "Victoria St." 1162.10 - Nos 41 and 39 at Depot Junction. Both trams have SEC ads. 1162.11 - No. 39 turning into the depot from Wendouree Parade - showing destination of "Gardens via Drummond Nth" 1162.12- No. 17 at Lydiard St. North terminus, showing destination of "Grey St. Sebas". Has a Twin Lakes sign 1162.13 - ditto, but with trolley pole turned around. Has SEC Briquettes roof ad and Whitehorse whiskey ad on rear dash panel. 1162.14 - No. 40 outbound to Sebastopol crossing Albert St. 1162.1 -"Nos. 38 and 20 in Sturt St. Ballarat at corner of Lydiard St." 1162.2 - "No. 38 turns into Lydiard St. as No. 20 waits at stop in Sturt St. Ballarat" 1162.3 - "No. 40 entering Albert St. from Skipton St. Redan on Sebastopol route." 1162.4 - "No 40 at beginning of reserved track on Sebastopol route, Albert St. Redan." 1162.5 - "No. 40 in Sturt St. Ballarat near cnr. of Armstrong St." 1162.6 - "No. 40 at Sebastopol terminus" 1162.7 - "No. 38 and 40 crossing at Sayle St. Loop on Albert St. reserved track, Sebastopol route" 1162.8 - "No. 40 turning into Sturt St. from Drummond St." 1162.9 - "No. 18 in Wendouree Pde. Ballarat near tramway depot" 1162.10 - "No. 41 and 39 outside Ballarat tramway depot, Lake Wendouree in background" 1162.11 - "No. 39 entering tramway depot from Wendouree Parade, Ballarat" 1162.12 - "No 17 at Lydiard St. North terminus, Ballarat North" 1162.13 - "No 17 at Lydiard St. North terminus, Ballarat North" 1162.14 - "No. 40 crossing Albert St. Sebastopol as reserved track switches from left to right of road" All have date stamp of "23 Nov. 1962" in purple ink. All black ink unless otherwise noted.tramways, trams, ballarat, albert st., sturt st., sebastopol, grey st., hospital corner, wendouree parade, depot junction, lydiard st. north, tram 17, tram 18, tram 20, tram 38, tram 39, tram 40, tram 41 -
 Ballarat Tramway Museum
Photograph - Digital image Set of 20, 1971-72
... Bendigo with the trolley pole being reversed. .14 - No. 24... with the trolley pole being reversed. .14 - No. 24 at Quarry Hill ...Set of 20 digital images of Bendigo Tramways, 1972 at or before closure while on a tram tour by Stuart Lodington. .1 - No. 29 at the North Bendigo terminus .2 - No. 29 just past the Bendigo end of the double track in High St Eaglehawk, with a BP dealer in the background. .3 - Night photo of No. 18 at a terminus, showing "Eaglehawk" .4 - ditto .5 - Night photo of No. 24 at Eaglehawk with Leo A Hughes Photographer in the background. The Tram has "Johnnie Walker whiskey" roof adverts. .6 - No. 29 outbound in Thunder St with a train passing over the bridge in the background. .7 - view from the front window of a tram on the Eaglehawk line with a large "display event float" in the foreground and tram approaching a crossing loop. .8 - No. 29 at North Bendigo .9 - view of High St Eaglehawk looking east from the terminus, showing the track and centre poles. .10 - No. 29 outbound on the North Bendigo line turning from either Nolan St or Caledonia St, running a special. .11 - No. 7 departing North Bendigo for Golden Square. .12 - No. 3 and 18 at Charing Cross. No. 3 has two SEC roof Advertisements .13 - No. 7 at North Bendigo with the trolley pole being reversed. .14 - No. 24 at Quarry Hill with Northern Terrazzo in the background with the driver alongside .15 - No. 7 and No.6 at Charing Cross with the Beehive buildings in the background. .16 - No. 7 at North Bendigo terminus .17 - ditto .18 - No. 24 at Quarry Hill with Northern Terrazzo in the background with the conductor alongside. .19 - ditto .20 - No. 26 and other bogie tram in View St near Charing Cross with the Armstrong Tyre Service building and signs for Cohn's Drinks and T&G in the view.trams, tramways, bendigo, eaglehawk, quarry hill, golden square, depot, north bendigo, charing cross, tram 29, tram 18, tram 24, tram 3, tram 7, tram 6, tram 26 -
 Ballarat Tramway Museum
Functional Object - Trolley Wire Sample
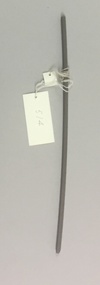
... ) taken from north bound trolley wire between poles 9 and 17 (Loop... copper) taken from north bound trolley wire between poles 9 ...Piece of worn trolley wire (copper, probably cadmium copper) taken from north bound trolley wire between poles 9 and 17 (Loop and St. Aidans Drive) on 4/3/1997 during replacement operations. Is badly worn on one side. OK on the other side - slightly curve with worn side on the outside of the curve. Green (Oxidized) and sides, dark brown on top. Has been cut at either end. Images added 3-12-2016 See p14 of Section 65 of ICS Manual Tramway systems etc. London c1921.ballarat, overhead, fittings, trolley wire -
 Ballarat Tramway Museum
Film - Movie Film & Box, Kodak, 1960 to 1971
... in the background, trolley pole being turned and then with 39 following tram... in the background, trolley pole being turned and then with 39 following tram ...Yields information in movie film format of Ballarat trams in 1960 through to 1971, how the system operated and was used by people, including special trams., Yields information in movie film format of Ballarat trams in 1960 through to 1971, how the system operated and was used by people, including special trams.Movie film - 8mm, approx. 15 mins, without leader strip on a plastic reel, within a clear plastic case - Standard 8, titled "Ballarat Trams". See Reg Item 4957 for DVD and Mini DVD. Has been transferred to DVD - see Reg item 4957 Made by Arthur Hill. Also transferred to DVD by Rod Cook Oct. 2015, via Roger Greenwood for use in his DVD, "The City of Ballarat Trams, Gardens & Gold" of 2016. See Reg Item 6883. In Arthur's letter - on file - Made between 1960 and August 1971. Synopsis: based on time. Between 1960 and 1968 0:00 Trams Ahead sign before the Victoria St terminus with 20 at terminus 0.14 - No. 20 leaving Victoria St terminus and being followed along Victoria St by car and then passengers jointing the tram at a tram stop. 00.40 - No. 12 (c1960) in bound along Lydiard St North and arriving in the Gregory St loop. 00.56 - No. 12 and 14 crossing at Gregory St. 01.20 - No. 33 and a bogie car crossing at depot loop. 01.31 - No. 18 travelling along Wendouree Parade with the Lake in the background. 01.42 - No 41 at depot junction and running into the depot No. 2 road with a short sequence of a tramway signal. 02.17 - SEC Sign at the depot gate, shot of 41 in No. 2 road, with the lights other way around, Caution beware of trams sign and a red signal. 02.31- Timetable sign at Gardens Loop 02.36 - No. 30 arriving at Loop and view of a signal with no lights showing. 02.48 - Destination roll being changed through a number of destinations. 03.26 - No. 20 arriving at Carlton St loop with the Olympic monument in the background and the red signal light going out. 03.31 - a lady standing at the front of No. 20, with an ice cream in hand, and No. 17 arriving at the Carlton St loop with a short sped up sequence and No. 20 departing from the loop, followed by No. 17 leaving the loop, heading into the city. 03.41 - No. 13 inbound from Sebastopol crossing Albert St and heading into the city. 04.12 - view of signal and contactor, the light going green and the tram passing underneath. 04.24 - No. 12 at the Sebastopol terminus and departing. 04.51 - No. 12 crossing Albert St Sebastopol. 05.16 - Following No. 12 along Albert St, with Borough Offices in background initially. 05.28 - No. 12 arriving at the Grey St loop with No. 14 arriving at the loop from the city and both trams departing. March 1971 05.58 - No. 30 being followed along Barkly St, Mt Pleasant and the pole being turned at the terminus 06.32 - No. 30 picking up a lady passenger. 06.38 - view from the front of a tram, with the drivers hand and a cigarette, view from the back of the tram, along the Mt Pleasant route and running through the loop and then turning into Main St - has the Ballarat (East) fire station in one sequence, and finally running along Main St. 07.35 - view from tram, with car turning into Bridge St. and then running into Sturt St passed the Parking Loop, and along Sturt St. 08.32 - Points at Drummond St North being changed, doors changed over and the tram running along Drummond St. North, through the Mill St loop and into Macarthur St and in Wendouree Parade, with the Lake Wendouree in view and crossing No. 12 at the Depot Loop, with crews chatting, past the depot, a lady passenger getting off the tram near Forest St., and arriving at Gardens Loop with the same lady passenger who got on in Barkly St, getting off the tram. 11.09 - view of No. 30 at Gardens Loop, departing the loop. August 1971 11.30 - R761 crossing Melton (Exford Wier) on the special train to Ballarat and then the bridge between Ballan and Gordon Stations. 12.16 - View from the front of a tram, following No. 26 along Lydiard St North, crossing at Gregory St and returning to the City. 12.39 - No. 14 and one other tram running along Albert St to Sebastopol, crossing No. 21 at Grey St and then to Sebastopol terminus, crossing Albert St and return and running along Albert St. 13.36 - No. 26, 39 crossing 13 at Gardens Loop. 14.00 - view looking across Lake Wendouree. 14.07 - 26 arriving at Victoria St, running part of Destination roll, passengers getting off with hotel in the background, trolley pole being turned and then with 39 following tram along Victoria St, crossing at the King St Loop. 15.07 - view of a trolley pole tracking through the overhead at curve 15.10 - end. Written labels giving title information on reel.trams, tramways, ballarat, sebastopol, lydiard st north, victoria st, mt pleasant, lake wendouree, depot, tram 12, tram 13, tram 14, tram 17, tram 18, tram 21, tram 26, tram 33, tram 39, tram 41 -
 Ballarat Tramway Museum
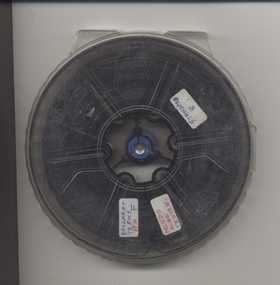
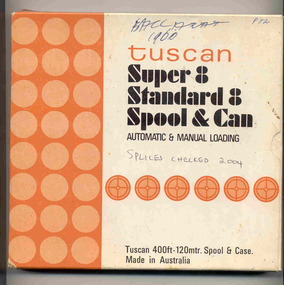
Film - Movie Film & Box, Kodak, 1960
... Scenes” 13:19 View of a trolley pole and then 13 leaving..., destination showing “View Point”. 13:54 View of trolley pole ...Yields information in movie film format of Ballarat trams in 1960, how the system operated and was used by people., Yields information in movie film format of Ballarat trams in 1960, how the system operated and was used by people.Movie film - 8mm, approx. 17.5 mins, with leader strip on a plastic reel, within a black and white plastic box, titled "Ballarat No. 1. 1960" contained with a cardboard box, 'Tuscan Super 8 and Standard 8 Spool and Can' . Has been transferred to DVD - see Reg item 4100 as Segment No. 1. Filmed and made by Ben Parle. Also transferred to DVD by Rod Cook Oct. 2015, via Roger Greenwood for use in his DVD, "The City of Ballarat Trams, Gardens & Gold" of 2016. See Reg Item 6883. Synopsis: based on time. 0:00 Starts with bogies cars crossing railway level crossing (34?, 39?) 0:30 SEC Logo 0:45 Ballarat Station sign and intro “Some City Scenes” 0:49 35 turning from Lydiard St Nth to Sturt St towards Grenville St with Commonwealth Bank in view. and then 42 returning 1:19 42 showing Mt Pleasant, turns from Sturt St into Lydiard St Nth 1:53 Tramway road works in Lydiard St Nth, near intersection with Mair St with Jelbart Road roller in use, starts with an SEC roadworks sign. 2:12 39 passing the works out bound to Lydiard St Nth. 2:46 Good view of the roller working before 35 arrives. 3:01 35 passing the works in bound with 3:29 14 crossing Lydiard St in Sturt St, towards Grenville St 3:47 Trams in City Loop 3:55 21 coming up the hill 4:04 31 entering Bridge St from Sturt St with Bucks Head Hotel in the background. 4:27 Overhead work at corner of Sturt and Lydiard, with view of the sign at the City terminus “Trams leave here for Sebastopol, Gardens, View Point.” 4:34 Passengers getting off and then onto 38, ex Lydiard St Nth at city terminus including a young lady wearing gloves and a wheeling a pram hurriedly the photographer. A number of other prams in the view as well as. The Conductor helps to unload the pram. 5:07 41 proceeding up Sturt St, appears to have just rained. 5:26 11 using the Dawson St crossover, with a motor car doing a U turn as well. 6:00 14 descending Sturt St towards the City, filmed at Dawson St. 6:11 Title “The Gardens via Drummond St North Line” 6:16 19 showing Victoria St, turning from Drummond St Nth into Sturt St. 6:28 30 inbound in Drummond St Nth, approach and trailing shots. Trailing shot ahs the hospital in the background. 6:49 31 outbound, Drummond St Nth, approach and trailing shots, trees are in autumn colours. 7:04 12, inbound Drummond St Nth, with Macarthur St in the background, stopping to pick up a lady, approach and trailing shots and then entering the Mill St crossing loop. 7:53 14 outbound in Drummond St Nth, dropping a lady passenger off and then turning into Macarthur St and then tram going away. 8:37 View of overhead junction at View Point Jtn. 8:45 View of “Cars Stop Here” sign and pole sign “To City Only” 8:55 30 inbound in Wendouree Parade, stops to pick up passenger, and then a trailing shot of tram entering Macarthur St loop 9:37 View of “Cars Stop Here”, “End of Section” and timetable boards at Haddon St. 9:50 34, pausing at Haddon St and then proceeding towards depot – approach and trailing shots, with “Warning Oncoming Trams” sign in shot. 10:27 “Warning Oncoming Trams” sign 10:32 34 crossing 12 at the Martin Ave loop 10:48 39? Wendouree Parade, near Barrett Ave, stopping and letting off passengers. 11:24 30 passing depot junction and then trailing shot of it entering Tram Sheds or Depot Loop and then proceeding towards the City. 12:11 Shot of the “Caution Beware of Trams” sign at the depot. 12:14 25 stopping at depot junction and then trailing shot of it going toward Forrest St. 12:47 12 passing Depot Junction, trailing shot. 13:07 Shot of :Electricity Supply Department, Ballarat Branch” sign at depot. 13:13 View of a destination showing “Depot” on a bogie tram 13:15 Title “Some Depot Scenes” 13:19 View of a trolley pole and then 13 leaving the depot through the gates, destination showing “View Point”. 13:54 View of trolley pole and then 32 stopping at the depot gates. 14:08 12 (Sunny view) running out onto Wendouree Parade and then a bogie tram approaching Depot Loop. 14:43 View of 42 running in with a single trucker behind in Wendouree Parade, and another single trucker running out. 15:02 Title “Some Scenes in the Gardens” 15:05 25 running through the Gardens, approach and trailing shots, near our Depot Junction. 15:55 View of “No Parking East of Loop” sign 15:59 View of overhead and then trackwork (with points removed), but overhead still in position at the Old Gardens Loop or Gardens South Loop and then 12 entering the loop from the south and then a trailing shot looking along the Parade. 16:33 View of “Cars Stop Here” and “End of Section” and then timetable boards at Gardens Loop. 16:55 View of 34 leaving the loop 17:14 Title “The End”Written labels giving title information on outside of box.trams, tramways, ballarat, sebastopol, lydiard st north, victoria st, mt pleasant, sturt st west -
 Ballarat Tramway Museum
Slide - 35mm slide/s - set of 20, Noel Simons, 21/05/1971 12:00:00 AM
... terminus, passengers are disembarking and the trolley pole is being... and the trolley pole is being turned. Golden Square Hotel ...Set of 20 transparencies taken on 21/5/1971 on Kodak mounts. 1197.1 - Bendigo No. 5 en route to Eaglehawk at Creeth St Long Gully. Tram has a SEC roof ad and Cinzano roof ad. 1197.2 - No 5 approaching Needle Loop between Long Gully and California Gully. On left hand side is the City of Bendigo sign, indicating city boundary. 1197.3 - As for 1197.2 but actually entering loop. Photo taken after tram has passed photographer. 1197.4 - No. 26 bound for Eaglehawk descending the railway bridge near Eaglehawk, at Jobs Gully. 1197.5 - as for 1197.4, but after crossing bridge, now ascending a hill. Photo taken after tram has passed photographer. 1197.6 - No. 26 climbing High St. hill Eaglehawk, nearing end of Double track, bound for Quarry Hill. Shows centre of the road poles. 1197.7 - As for 1197.6, with tram entering single track section. Photo taken after tram has passed photographer. Has a BP service station in the background. 1197.8 - No. 26 (bound for Quarry Hill) crossing No. 17 (Eaglehawk) at Job's Gully Loop. 1197.9 - No. 17 climbing railway bridge at Job's Gully, en route to Eaglehawk. Photo taken after tram has passed photographer. 1197.10 - No.26 bound for Quarry Hill, leaving Long Gully Loop? Has the Creeth St. church in l197.l in the far background. Photo taken after tram has passed photographer. 1197.11 - Tramway Point work at the northern end of Long Gully Loop. 1197.12 - No. 17 en route for Quarry Hill turning into View St. from Bamard St. Tram has SEC roof ads "Everything fine in my all electric Kitchen' and 'Electric Cooking is Matchless'. 1197.13 - as for 1197.12, but tram has turned into View St and about to enter the double line track. Photo taken after tram has passed photographer. 1197.14 - No. 21 enters Nolan St after turning from MacRae St. en route to Bendigo. Note sign on its own post noting tram turns "Beware Tram Turns" and stop sign on adjacent pole "Trams stop on Request". No. 21 has two SEC roof ads. 1197.15 - No. 21 in Nolan St. after turning from Bridge St. (White Hills Road). Note signal light for Bridge St. loop on pole corner of street. Photo taken after tram has passed photographer. 1197.16 - No. 2 bound for Eaglehawk at unknown location. 1197.17 - Tram stop sign on a pole "CARS STOP BY REQUEST" 1197.18 - No. 5 in Carpenter St.? en route to Quarry Hill. 1197.19 - No. 28 has just arrive at Golden Square terminus, passengers are disembarking and the trolley pole is being turned. Golden Square Hotel in the background. 1197.20 - No. 28 at Golden Square terminus. Has a "Nothing beats Briquettes for hear roof ad. Information written on in black ink and date stamped on purple ink. 1197.1 - "No. 5 at Creeth St. Long Gully" 1197.2 - "No. 5 approaching Needle Loop between Long Gully and California Gully" 1197.3 - "No. 5 at Needle Loop between Long Gully and California Gully" 1197.4 - "No. 26 crossing railway bridge at Job's Gully near Eaglehawk" 1197.5 - "No. 26 just after crossing railway bridge at Job's Gully near Eaglehawk/ 1197.6 - "No. 26 in High St. Eaglehawk" 1197.7 - "No. 26 at end of double track in High St. Eaglehawk" 1197.8 - "Nos. 26 and 17 crossing at Job's Gully Loop" 1197.9 - "No. 17 crossing railway bridge at Job's Gully near Eaglehawk". 1197.10 - "No. 26 at Long Gully" 1197.11 - 'Northern end of points at Long Gully Loop". 1197.12 - "No. 17 turning into View St. from Bamard St. Bendigo". 1197.13 -'No. 17 at beginning of double track in View St. after leaving Bamard St. Bendigo. 1197.14 - "No. 21 enters Nolan St. from MacRae St. Bendigo." 1197.15 - "No. 21 in Nolan St. Bendigo just after leaving White Hills Road." 1197.16 - "No. 2" 1197.18 - "No. 5" 1197.19 - "Birney car No. 28 at Golden Square Terminus" 1197.20 "Birney car No. 28 at Golden Square Terminus" tramways, trams, bendigo, long gully, railway bridge, jobs gully, trackwork, nolan st, quarry hill, tram stops, golden square, tram 2, tram 5, tram 17, tram 21, tram 26, tram 28 -
 Ballarat Tramway Museum
Film - Movie Film & Box, Kodak, 1960
... end, with trolley pole being turned, while another single..., Bridge St, east end, with trolley pole being turned, while ...Yields information in movie film format of Ballarat trams in 1960, how the system operated and was used by people., Yields information in movie film format of Ballarat trams in 1960, how the system operated and was used by people.Movie film - 8mm, approx. 30mins, with leader strip on a plastic reel, within a black and white plastic box, titled "Ballarat No. 1. 1960". Has been transferred to DVD - see Reg item 4100 as Segment No. 2. Made by Ben Parle. Also transferred to DVD by Rod Cook Oct. 2015, via Roger Greenwood for use in his DVD, "The City of Ballarat Trams, Gardens & Gold" of 2016. See Reg Item 6883. Synopsis: based on time. 0:00 View of typed introduction, noting that this is a pictorial record of Ballarat. 0:10 Title “The Tramways of Ballarat 1960, Part 1” 0:16 13, showing “View Point” at Stones Corner, Bridge St, east end, with trolley pole being turned, while another single trucker heads out towards Mt Pleasant. 0:25 13 leaving Stones Corner, short approach and then longer trailing shot of the tram going towards the City in Bridge St. 0:44 View out of front of tram in Bridge St heading towards the City, with cars in the photo, then passing through city Loop, no trams in the loop and running up to Lydiard St Nth and crossing the road. 1:22 Running up Sturt St from Armstrong St, passes over Dawson St X-over and up to the next intersection, Lyons St. 1:54 Title “The View Point Line” 1:59 19 inbound, in Ripon St, from crossing Mair St, towards camera and then passing away and turning into Sturt St. 2:49 View of a “Warning Oncoming Trams” sign 2:52 19 in Ripon St, going to View Point, crossing Webster St towards camera, then going away through the disconnected Victoria Ave loop, pass the “Warning Oncoming Trams” sign. Note very windy scene with people running across roads. 3:17 19 in Wendouree Parade, in bound, though showing destination View Point, going away from the camera, past the View Point Hotel. 3:39 19 coming towards camera near Excerpt or Devon St and then going away towards the terminus. 4:04 19 at the terminus, stationary, with a single trucker 3?, passing from Macarthur St into Wendouree Parade, behind 19. 4:20 33 coming towards camera in Wendouree Parade from St Aidans Drive, stopping to pick up passenger at Forest St and then going away towards the City, photographed from near the depot, on a wet and windy day. 4:54 35 in Wendouree Parade, coming towards the Camera from St Aidans Drive and then going away with the Gardens Loop area in the background. Tram stops at stop to let a passenger off. 5:28 21 leaving Gardens Loop for the City via the Depot, green light in signal can be seen. 5:43 28?, closely followed by 26 turn from Drummond St South into Sturt St. 6:18 Scene opens with shot of “Sebastopol” destination on a bogie tram. 6:21 Title “The Sebastopol Line” 6:24 21 turning from Sturt St into Drummond St Sth with destination of Bell St and then going away from the camera. 6:55 38 in Drummond St Sth, coming towards the camera and then passing the camera with Sturt St just in the view. 7:10 21, showing Gregory St, in Drummond St Sth, approaching and then going away, entering the Urquhart St Loop, 7:39 34 in Drummond St Sth (location check required (Latrobe?)), approaches camera, picks up passengers and the goes away. 8:09 39 at ? Street, turns from Drummond St Sth into Skipton St, after picking up and setting down passengers, bound for Sebastopol 8:55 35 inbound in Skipton St passes through the Bell Street Loop, and then goes away from the camera. 9:33 42 outbound in Skipton St, approaches the camera, passes and then crosses over the half the road into Albert St. 10:00 39 inbound in Albert St – location? 10:31 34 outbound for Sebastopol, approaches camera and just starts to pass by. 10:36 34 in Grey St crossing loop, crosses 42 inbound. 10:59 39 outbound in Albert St, with shopping centre in bound, approaches camera, passes and then crosses over Albert St. Mid morning scene. 11:39 39 inbound, Albert St south, approaches camera and then passes and the crosses over Albert St. 12:16 41 outbound in Albert St passes the camera, and pulls into the terminus with the conductor getting out on the back bumper to pull the pole down as the tram stops and a passenger walks into the Royal Hotel. 12:39 Title “The Lydiard Street North Line” 12:44 Filmed from the Hotel balcony, 21 inbound in Lydiard St Nth passes over Mair St, stops while 33 passes in the other direction. 13:18 With the red light showing on the Seymour St loop signal, 33 inbound for Sebastopol stops and picks up many passengers, passes the camera and runs past the VRI building in the background and through the loop. Possibly filmed on a Sunday given the ladies dresses and quieter streets. 14:01 30 outbound, passes the camera and stops at Macarthur St. Filmed alongside the brick wall of the cutting. 14:28 30 inbound arrives, passes through the Gregory St loop and then proceeds past the camera, making a stop to pick up passengers. 15:14 28 in Lydiard St Nth – location?, approaches and goes away from the camera, north of Gregory St. 15:34 28 ditto location? 15:53 21 arrives at the terminus with passengers getting on and off. 16:11 View of the a vertical positioned “End of Section” sign on a pole at the terminus and then lifting the camera to see the timetable board and the stop sign. 16:33 31 in Bridge St passing Morseheads and then turning into Sturt St, stops at the Grenville St stop, while another single trucker comes down to the stop from the City. 16:58 31 outbound in Bridge St, with destination of Victoria St. 17:14 Title “The Victoria Street Line” 17:18 31 outbound to Victoria St from Stones Corner. Starts with an overhead shot, shows clock at the Caltex service station,. 17:37 31 inbound approaching Bakery Hill and then descending to the junction after it passes camera. 18:09 25 climbing outbound in Victoria St, passing the camera, to then pass through the King St loop. 18:47 25 inbound in Victoria St, passing the camera, then pass through the King St loop, with St Alypius Church in the background. 19:36 14 approaching the rail bridge in Victoria St and stopping at the 2nd last stop to left of passengers. 20:01 14 leaving the terminus and approaching the camera and the a short sequence going away, to the next stop to pick up quite a few passengers. 20:14 “Trams Stop Here” sign, metal wrap around on a steel pole. 20:16 Title “The Mount Pleasant Line” 20:21 11 inbound in Main St, with a passenger leaping off the tramcar and another getting off just before the junction. 20:45 11 passes the junction and then proceeds away from the camera in Bridge St. 21:04 30 outbound in Main St, then turns into Barkly St, a bus (Eclipse Motors) passes in Main St just before the sequence ends. 21:31 30 inbound near Steinfield St. (exact location?) 21:49 25 approaches the camera, then proceeds away and passes through the Grant St. loop. 22:29 25 inbound, windy day, between Grant and Cobden, (exact location?), with a horse drawn bread van in the view and the breadman walking behind the tram as it passes. 23:02 11 outbound in Barkly St, (exact location?) 23:37 11 inbound in Barkly St (exact location?) 23:44 Mt Pleasant terminus signage 23:50 30 approaches the terminus and then stops with the conductor alighting turning the pole, passengers getting on and off and the driver appearing at the other end. 24:32 Title “The Gardens Via Sturt St. West Line” 24:35 21 outbound in Sturt St near Raglan St, approaches and passes the Camera. 25:09 12, showing City Oval, approaches and passes the camera, outbound near Windermere St. 25:33 13 showing View Point, goes away from the camera – location? 25:44 12 comes from St. West, inbound passes the camera and then stop as the next stop next Talbot St? 26:21 Short sequence of a “Warning Oncoming Trams” sign 26:28 42 inbound in Sturt St West, just before Ripon St, view coming towards camera and then going away to cross Ripon St. 27:10 34 passes through the Parker St loop 27:25 35 or 39 inbound past the college in Sturt St West 28:04 41 outbound at the Russell St curve, passes away from the camera. 28:11 35? inbound passes away from the camera through the Victoria Park or Morrison St loop, swinging out into the roadway. 28:29 View of timetable sign at Hamilton Ave. 28:37 35 turning from Sturt St West into Hamilton Ave, can see the conductor changing over the barrier rails. 29:11 42 inbound, crosses another bogie tram (35?) at Carlton St loop then passes the camera and goes past the Olympic rings monument. 29:42 12 approaches the Carlton St gates. 30:07 12 outbound, crosses a bogie tram in the loop with both trams then leaving the loop. 30:20 Title “End of Part One” Written labels giving title information on outside of box.trams, tramways, ballarat, sebastopol, lydiard st north, victoria st, mt pleasant, sturt st west -
 Ballarat Tramway Museum
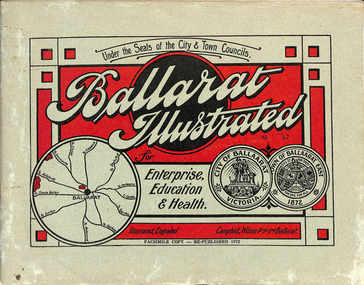
Book, "Ballarat Illustrated", 1972
... double trolley wire on poles, and style of insulators. No trams... St. Aidans Drive. Note double trolley wire on poles ...Original c 1914 (see below), facsimile copy - re-published 1972. Original features photos of Ballarat City and Town, its buildings, parks and the various industries and organisations that were in Ballarat at the time of publication, including ESCo. Many photos features ESCo trams. Photos sepia toned. Has some red colour block printing on the front cover and rear, for Star Oil Engines. On inside back cover is a map with the places of interest and tram route map, marked in red. Pages are un-numbered. Original published by Ballarat East Town Council and Ballaarat City Council. On cover has number stamped in black in, "No. 87" (assume facsimile copy No.). Photos with publication show tram No. 21, built 1913 and ESCo photo page shows Mr. Pringle as Manager. Mr Pringle became manager in January 1911, As there is no photos of the "Avenue of Honour", or other mention of the first world war, assume original published about 1913 or 1914. Original shows Engravings and printing by "Campbell Wilson Prop Ltd, Ballarat". See Other Information as well for more listing details. High Resolution image added 31/8/2012 of i2 of ESCo page and i3 for Ballarat identies and sheet i4 extracted for Mr Pringle. PDF scan of full document added 21/5/2019 - see images btm633-1i.pdf and btm633-2i.pdf Notes on "Ballarat Illustrated" Reg. Item No. 733 From notes made by Neville Gower 12/1/1997 Cover: Inside front cover: Last paragraph, "Facilities for Travelling" - Electric trams serve all parts of Ballarat. Page 3: Street Scene, Municipal Town Hall, showing tram wiring Page 7: Street Scene, Lydiard St. North, intersection and tramway centre, with ESCo tram No. 21 in the bottom photo. Other photos features trams as well in Sturt St and Lydiard St. North. Page 9: Street Scene, Top photo of Sturt St. from Lydiard St. looking east, shows piles on right-hand side of road. Car parked by Post Office has a car registration number "9007". Bottom photo, an tram climbing hill, shows double trolley in the street, with early English type of pull offs. Page 13: Street Scenes and Historic Buildings: One of five photos, shows Victoria St. looking East, with tram track prominent in photo and how stone work was set up about the rails and overhead poles. Page 23: Street scene, Gardens North Entrance gates, shows details of gates near St. Aidans Drive. Note double trolley wire on poles, and style of insulators. No trams in photo, three ladies walking down the track. Page 37: Street Scene; Lydiard St views, top left hand photo, shows Railway station and railway gates with signal gantry and horse drawn vehicles. Tram tracks apparent. Bottom left hand photo shows Lydiard St. North, near Post Office, double track with centre poles - Single wire per track. Top right hand photo, showing Cemetery gates in background. Bottom right hand photo - from north end of Lydiard St. South, looking north, with an ESCo tram in background. Also has a parked car on left hand side. Page 45: Street Scenes - Bridge St; top photo at west end of Bridge St. with ESCo No. 11 with possibly double trolley wire in photo. Bottom photo at east end of Bridge St. with tram in background, shows junction. Double trolley heading out to Mt. Pleasant, single trolley for Victoria St. Page 45: Street Scenes - Bridge St; top photo at west end of Bridge St. with ESCo No. 11 with possibly double trolley wire in photo. Bottom photo at east end of Bridge St. with tram in background, shows junction. Double trolley heading out to Mt. Pleasant, single trolley for Victoria St. Page 61: Street Scenes and Historic Buildings - Public Institutions Ballarat - top left hand photo of the Hospital shows some tram track in foreground, with double trolley wire. Top right photo is of the Orphanage, the name of the tram terminus for many years. Page 68: Electric Supply Co. of Victoria's pages - top photo showing powerhouse in background, across the lake, can hardly see anything for the trees, except for the chimney. Bottom photos of the steam Turbo Generators and the switchboard. Gives Mr. P.J. Pringle as Chief Engineer and General Manager. He took over in Jan. 1911. Page 69: Ballarat East Views - features photo of Black Hill open cut, Ballarat East Railway Station, Ballarat Fire Station and "Victoria St. looking East", repeat of photo printed on page 12, but slightly darker. Image on system includes fire station and railway station, - Ballarat East. Page 78: Series of photos of various Ballarat VIP's of the era, fourth one in on top line features "P.J.Pringle, Electric Supply Co." Inside Back cover - map of Ballarat including tram lines and places of interest marked in red. Gives a detailed photographic presentation of Ballarat in 1914.80 page book with, in addition, light green card covers, titled "Ballarat Illustrated". Loose copy of page 9 and 10 held.trams, tramways, ballarat, local history, heritage buildings, esco -
 Ballarat Tramway Museum
Album - Postcards & Photographs - Vic Solomons and others - Australian Tramways, Vic Solomons, 2023
... with side trolley pole running Unknown Sydney 164 Photo George St... with side trolley pole running Unknown Sydney 164 Photo George St ...Contains 184 images of postcards and photographs collected primarily by Vic Solomons of Sydney, with others from the collection of Wal Jack and Warren Doubleday. Covers almost all of Australia's tramway systems. 1 Post Card Hay St Perth Looking East No 3 Unknown Perth 2 Post Card Cars 30 & 90 both on Route 19 pass in Barrack St looking South Perth WA 1935.02.18 Perth 3 Post Card Hay St Looking East Perth WA Unknown Perth 4 Post Card William St Perth WA Unknown Perth 5 Post Card Perth from Shaftsbury Hotel Unknown Perth 6 Post Card Hay St Perth WA Looking East Unknown Perth 7 Post Card Barrack St Perth Unknown Perth 8 Post Card Murray Views No 3 High St Showing Town Hall Fremantle WA Unknown Fremantle 9 Post Card High St Fremantle WA Unknown Fremantle 10 Post Card View of Bolder City Golden Mile in the Background (Section No 1) 1908.08.20 Kalgoolie 11 Post Card Hannan St Kalgoolie 1900.08.19 Kalgoolie 12 Post Card Hannan St Kalgoolie WA (No 2) Unknown Kalgoolie 13 Post Card Intersection Hannan & Maritana Sts Kalgoolie WA Unknown Kalgoolie 14 Post Card Hannan St Kalgoolie Unknown Kalgoolie 15 Post Card Lane Street Bolder City Unknown Kalgoolie 16 Post Card Hobart Double Deck Tram Unknown Hobart 17 Post Card Macquarie St Hobart Unknown Hobart 18 Photo Liverpool Street Hobart Unknown Hobart 19 Photo Hobart 21 Unknown Hobart 20 Photo Hobart 14 in Elizabeth St Hobart Unknown Hobart 21 Post Card Macquarie St Hobart Unknown Hobart 22 Post Card Macquarie St Hobart Tas Unknown Hobart 23 Photo Double Decker Tram 3 at G.P.O. Hobart Tas No 31 Unknown Hobart 24 Post Card Double Decker Tram 19 Hobart Tas A B Series No 24 Unknown Hobart 25 Photo Hobart Municipal Tramways Tas No 95 Unknown Hobart 26 Post Card Elizabeth St Hobart Unknown Hobart 27 Post Card Elizabeth St Hobart Unknown Hobart 28 Post Card Elizabeth St Hobart Unknown Hobart 29 Post Card Elizabeth St Hobart Tas Unknown Hobart 30 Post Card HMT 21 with crew at Beach Road Terminus Unknown Hobart 31 Post Card HMT 9 & another with crew at Beach Road Terminus. Front cover photo of Destination GPO 1921.01.00 Hobart 32 Post Card Cascade Road and Mount Wellington Hobart Unknown Hobart 33 Post Card Elizabeth St Hobart Unknown Hobart 34 Post Card Elizabeth St Hobart Unknown Hobart 35 Post Card Elizabeth St Hobart 1915.04.07 Hobart 36 Post Card Macquarie St Hobart Tas Unknown Hobart 37 Post Card Macquarie St showing Post Office Hobart 1908.03.12 Hobart 38 Post Card Hobart Municipal Tramways 21 Unknown Hobart 39 Post Card Elizabeth St Hobart Tas Unknown Hobart 40 Post Card Liverpool Street Hobart Unknown Hobart 41 Post Card Electric Tram Launceston Tas 446 W J Little Photo 1919.02.08 Launbceston 42 Post Card Launceston Tram no 3 1911.08.30 Launbceston 43 Post Card Launceston Tram no 3 passes tram No 1 Unknown Launbceston 44 Post Card Tram 6 at Trevallyn a popular suburb Launceston Tasmania Unknown Launbceston 45 Post Card Tram 7 at Trevallyn Road Terminus Launceston Tasmania Unknown Launbceston 46 Post Card Tram 4 in Brisbane St Launceston Unknown Launbceston 47 Post Card Tram 9 in Brisbane St Launceston Tasmania Unknown Launbceston 48 Post Card Camerom Street Launceston Tasmania Unknown Launbceston 49 Post Card Murray Views No 15 Jetty Road Glenelg Terminus 1962-02-08 Adelaide 50 Post Card Bay Tram at Jetty Road Terminus Glenelg SA Unknown Adelaide 51 Post Card Tram 3 in King William Street Adelaide S Aust Unknown Adelaide 52 Post Card Valentine Series No 3065 The Old Horse Tram Victor Harbour Unknown Victor Harbour 53 Post Card Bourke Street Melbourne with Cable Car Looking East 1904.04.25 Melbourne 54 Post Card Opening of New Electric Tramway Elsternwick 1913-11-13 Melbourne 55 Post Card Cable trams in Clarendon St Sth Melb Unknown Melbourne 56 Post Card Pall Mall from Charing Cross Bendigo Unknown Bendigo 57 Post Card Tram 4 & 7 pass at The Fountain and Mitchell Street Bendigo Vic Rose Series P 3198 Unknown Bendigo 58 Post Card M&MTB 133 at Charing Cross bound for Eaglehawk Bendigo Vic Murray Views No 45 Unknown Bendigo 59 Post Card Pall Mall Bendigo Vic Unknown Bendigo 60 Post Card Charing Cross & Mitchell St Bendigo Trams passing 1919.00.00 Bendigo 61 Post Card Pall Mall Looking East Unknown Bendigo 62 Post Card Electric Trams and City Hotel Bendigo Vic Unknown Bendigo 63 Post Card Moorabool Street Geelong V 23 Unknown Geelong 64 Post Card Murray Views No 3 Moorabool Street Geelong Vic Unknown Geelong 65 Post Card The Rose Series P 2487 Ryrie Street Geelong Vic Unknown Geelong 66 Post Card Southern Cross Series 2696 Ryrie Stret Geelong Vic Unknown Geelong 67 Post Card The Rose Series P 1490 Ryrie Street Geelong Vic 1920-03-04 Geelong 68 Post Card Valentine Series No 1568 Lower Sturt Street Ballarat Unknown Ballarat 69 Post Card Rose Series P 1710 Sturt Street Ballarat Victoria Unknown Ballarat 70 Post Card Sturt Street Ballarat Victoria Unknown Ballarat 71 Post Card Horse Tram In Sturt Street Ballarat 1905.11.10 Ballarat 72 Post Card Sturt Street Ballarat Looking North-West Unknown Ballarat 73 Post Card Shoppes Square Sturt Street Ballarat Looking North Unknown Ballarat 74 Post Card Junction Sturt and Lydiard Streets Ballarat 1909-09-01 Ballarat 75 Post Card The Electric Supply Co Souvenir Tram Ticket No 3085of the opening of Electric System August 18 1905 1905.08.18 Ballarat 76 Post Card Sturt Street Ballarat Victoria 1907.11.25 Ballarat 77 Post Card Off to the Gardens Electric Tram Ballarat Unknown Ballarat 78 Post Card Sturt Street Ballarat 1907.04.16 Ballarat 79 Post Card Sturt Street Ballarat Looking East Electric tram with Double Deck Trailer 1911.04.17 Ballarat 80 Post Card Sturt Street Ballarat Looking East Unknown Ballarat 81 Post Card Sturt Street Ballarat Looking West 1911.03.01 Ballarat 82 Post Card Town Hall and Sturt Street Ballarat Unknown Ballarat 83 Post Card Lydiard Street Ballarat 1906.11.23 Ballarat 84 Post Card Looking North along Adelaide Street from George Street Brisbane Sidues Series No 764 Unknown Brisbane 85 Post Card Looking South along Queen Street from the Creek Street Intersection Brisbane Qld Sirues Series No 1379 Unknown Brisbane 86 Post Card George Street from near Supreme Court Brisbane Unknown Brisbane 87 Post Card Queen and Eagle Streets Brisbane 1907.07.04 Brisbane 88 Post Card Queen Street showing His Majesty’s Theatre Brisbane Unknown Brisbane 89 Post Card Queen Street Treasury Building 1908.01.20 Brisbane 90 Post Card G P O and Queen Street Brisbane Unknown Brisbane 91 Post Card Queen Street Brisbane Looking from Wharf Street Unknown Brisbane 92 Post Card Customs House Brisbane 1905.02.16 Brisbane 93 Post Card Queen St Brisbane 1905.09.16 Brisbane 94 Post Card Queen St Brisbane 1907.11.19 Brisbane 95 Post Card Treasury Buildings Brisbane Unknown Brisbane 96 Post Card Queen and Eagle Streets Brisbane Unknown Brisbane 97 Post Card The Valley Corner Brisbane Unknown Brisbane 98 Post Card Brisbane Queen Street opposite General Post Office Unknown Brisbane 99 Post Card North Quay and Milton Beach Brisbane Q Unknown Brisbane 100 Post Card Victoria Bridge Brisbane South Side 1907.08.14 Brisbane 101 Post Card Victoria Bridge Brisbane Unknown Brisbane 102 Post Card Breakfast Creek Bridge Brisbane Q Unknown Brisbane 103 Post Card Melbourne Street Station South Brisbane Queensland Unknown Brisbane 104 Post Card General Post Office Queen Street Brisbane 1955.09.23 Brisbane 105 Post Card Customs House Brisbane 1904.11.04 Brisbane 106 Post Card Queen St Brisbane 1919.11.00 Brisbane 107 Post Card Queen St Brisbane Sidues Series No 627 Unknown Brisbane 108 Post Card Creek Street Brisbane Queensland Unknown Brisbane 109 Post Card Customs House and Garden Reach Brisbane Queensland 1910.00.08 Brisbane 110 Post Card Queen and Creek Streets Brisbane 1909.06.07 Brisbane 111 Post Card Queensland National Bank andd Queen Street Brisbane Queensland Unknown Brisbane 112 Post Card Queen Street and Treasury Buildings Brisbane 0000.09.07 Brisbane 113 Post Card Queen Street showing “Courier” Buildings Brisbane Unknown Brisbane 114 Post Card Intersection George & Roma Streets Brisbane Q 1916.05.11 Brisbane 115 Post Card Adelaide Street Brisbane Q Unknown Brisbane 116 Post Card G P O Queen Street Brisbane Q Unknown Brisbane 117 Post Card Treasury Building Brisbane 1906.03-20 Brisbane 118 Post Card Queen and Eagle Streets Brisbane 1907.02.01 Brisbane 119 Post Card Queen St Brisbane Unknown Brisbane 120 Post Card Queen St Brisbane Q Unknown Brisbane 121 Post Card Victoria Bridge Brisbane 1906.07.30 Brisbane 122 Post Card An Unusual View showing Head of Queen Street Victoria Bridge & South SideSuburbs Brisbane Q Unknown Brisbane 123 Post Card Petries Bight Brisbane Q Unknown Brisbane 124 Post Card South End Victoria Bridge Brisbane Q Unknown Brisbane 125 Post Card Customs House Brisbane Unknown Brisbane 126 Post Card Photo of toastrack car circa 1910 Unknown Brisbane 127 Post Card Treasury Buildings Brisbane Unknown Brisbane 128 Post Card East Street Rockhampton with Steam Tram & trailer Unknown Rockhampton 129 Post Card Post Office Rockhampton with steam tram Unknown Rockhampton 130 Post Card East Street Rockhampton with Steam Trams Rose Series P 7154 Unknown Rockhampton 131 Post Card William Street Rockhampton Rose Series P 7156 Unknown Rockhampton 132 Post Card Central East Street Rockhampton Q with Steam Trams Unknown Rockhampton 133 Photo Sturt St Ballarat Unknown Ballarat 134 Photo Bridge Street Ballarat Unknown Ballarat 135 Post Card George St Sydney Unknown Sydney 136 Post Card Elizabeth St Sydney Unknown Sydney 137 Post Card Railway Square Unknown Sydney 138 Post Card Sydney Harbor Bridge - pending receipt 139 Post Card Kings Cross - Mowbray Series with description on rear from C Roy G Field Unknown Sydney 140 Post Card Kings Cross - Mowbray Series with description on rear from C Roy G Field Unknown Sydney 141 Post Card Central Railway Station Sydney - Rose Series P6033 1954-01-26 Sydney 142 Post card William Street Darlinghurst looking towards City - Rose Series P6602 unknown Sydney 143 Post Card Circular Quay Sydney - Rose Series P6680 Unknown Sydney 144 Post Card View at Manly NSW - Rose Series B1003 Unknown Sydney 145 Post Card Hunter St Newcastle NSW - Rose Series P7843 Unknown Newcastle 146 Post Card Bank Corner Newcastle NSW - Mowbray Series No. 155 Unknown Newcastle 147 Post Card Hunter St Newcastle NSW Unknown Newcastle 148 Post Card Criterion Hotel Hunter St Newcastle NSW Unknown Newcastle 149 Photo Horse tram at Newtown Station 1894 to 1898 - PTC photo c1894 Newtown 150 Photo Steam tram motor No 3 at Railway Square 1879 1879 Sydney 151 Photo Railway steam tram c1900 with a horse drawn double deck bus c1900 Sydney 152 Photo Steam motor 5A and doubled deck bus Unknown Sydney 153 Photo Steam motor 53A with detail notes on rear 1922 Sydney 154 Photo Cable tram set at Milsons Point ferry terminal c1900 Sydney 155 Photo Early Sydney electric car - Ocean St - Rose Bay Unknown Sydney 156 Photo George St looking souoth c1905 c1905 Sydney 157 Photo Tram 165 at Circular Quay Unknown Sydney 158 Photo Tramcar ferry or transporter at The Spit Unknown Sydney 159 Photo tram 882 George St at Marti Place, 1937 1937 Sydney 160 Photo Tram 826 Railway Sq area Unknown Sydney 161 Photo Railway Sq in background, Broadway with double decker bus and toastrack car late 1930s Sydney 162 Photo Coupled St Pitt St? - photo Ben Parle Feb. 1950 Sydney 163 Photo Electric tram No. 2 - North Sydney with side trolley pole running Unknown Sydney 164 Photo George St - Horden's Corner Unknown Sydney 165 Photo George St at Martin Place c1920 Sydney 166 Photo Castlereagh St Sydney c1928 c1928 Sydney 167 Photo Railway Sqare c1920 c1920 Sydney 168 Photo Darling St Countereweight Unknown Sydney 169 Photo Trolley bus depot Unknown Sydney 170 Photo Trolley bus No. 14 Unknown Sydney 171 Photo Newcastle Railway Station with steam tram - Wharf Road?? Unknown Newcastle 172 Photo High St West Maitland - steam tram Unknown Maitland 173 Photo High St West Maitland - steam tram Unknown Maitland 174 Post Card Argent St near tram terminal Broken Hill NSW c1900 Broken Hill 175 postcard Argent St looking south Broken Hill - with Ken Magor's notes on rear Unknown Broken Hill 176 Photo Toronto - steam tram 61A Unknown Toronto 177 Photo 124A trial run 1911? Sutherland - Cronulla line 1911 Sutherland 178 Photo 103A at a tram stop Unknown Sydney 179 Photo Cable tram set at Crows Nest terminus grip car 12, trailer 22 Unknown Sydney 180 Photo Cable tram Queens Square Sydney 1903 Sydney 181 Photo cars 2078 and 2077 Chatswood late 1950s Sydney 182 Photo car 1877 Balmain area late 1950s Sydney 183 Photo Trolley bus - Rockdale destination Late 1950s Sydney 184 Photo Broken Hill steam tram - motor 18A North Tram Unknown Broken Hill 185 Photo Millars Point Sydney NSW - ferry/tram interchange, unknown Sydney All items imaged including the rear or back where there was writing of information. All files stored on the Museum's Photo Collections directory. Demonstrates through the medium of many images, Australian tramway systems and Ballarat's place in them.Album - heavy card covers, plastic lined with postcard or 6x4 photo sleeves.australia, tramways, postcards, photographs, steam trams, horse trams, cable trams, trolley buses -
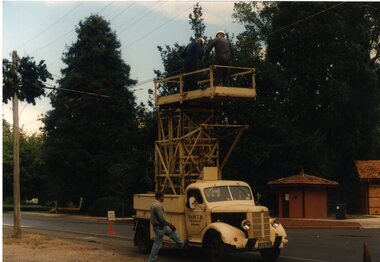
 Bendigo Historical Society Inc.
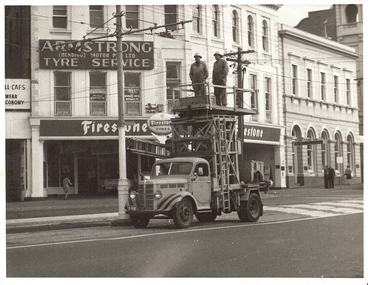
Photograph - CHARING CROSS, ARMSTRONG TYRE SERVICE
Black and white photograph. Truck with elevated platform on back. Two men wearing overalls and helmets on platform Truck on tram lines in View Point with Armstrong Tyre Service in background. Support pole for wires. Two men and one woman on footpath in background. Inscriptions: in image - 'Armstrong Bendigo Motor Pty Ltd Tyre Service', 'Firestone', 'Firestone Tyres', No. place on truck 'V916/80' On Back 'S'. History of object: James Lerk 18.2.2000 'State Electricity Commission inspecting tram trolley wire, Charing Cross'.place, streetscape, charing cross -
 Ballarat Tramway Museum
Photograph - Digital image Set of 2, Graham Parry, 1971
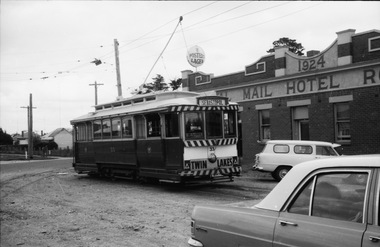
... Sebastopol Trolley Poles tram 33 Digital image of photograph of trams ...Yields information about the Sebastopol terminus and tram operations in 1971.Digital image of photograph of trams in Ballarat during 1971 prior to closure of the system by Graham Parry. All images from the scanned negative. .1 - tram 33 arriving at the Sebastopol terminus with the Royal Mail Hotel in the background. There is a Fosters Lager sign. and a number of parked cars. The tram has a Twin Lakes sign. .2 - ditto with the driver turning the poletrams, tramways, sebastopol, trolley poles, tram 33 -
 Ballarat Tramway Museum
Slide - 27 mm sq slide/s - set of 7, Lilian Butler, Mt Pleasant line, Sep. 1971
... Trolley Poles tram 41 Set of seven Colour 27 x 27 mm slide ...Yields information about the streetscapes of Stones Corner to Mt Pleasant route and in particular buildings and people that crewed the trams.Set of seven Colour 27 x 27 mm slide in a Kodachrome cardboard mount. .1 - Tram turning onto the Mt Pleasant line at Stones Corner - Bridge St, Main Road .2 - Main Road looking south with Inland Body Works building on the left and Ampol Service Station .3 - Mt Pleasant terminus with the butcher shop on the left and the diary on the right - shows the terminating tram track .4 - Conductor changing pole. .5 - Putting pole on the overhead .6 - Conductor (D O'Leary - No. 38) standing in front of tram and Motorman or driver (N. Hall - No. 43) .7 - ditto with number visible. See Reg item 3425 for crew lists. Slide mount date September 1971. Photo from the collection of Lilian Butler.ballarat, tramways, trams, stones corner, main road, mt pleasant, crews, drivers, conductors, trolley poles, tram 41 -
 Ballarat Tramway Museum
Slide - 35mm slide/s - set of 8, John Theodore, 1972 - 1974
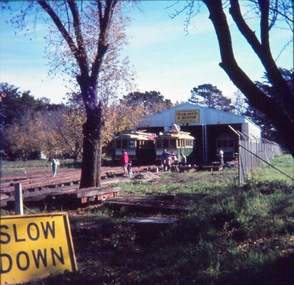
... Trolley Poles Interiors tram 26 tram 27 Various notations by John ...Yields information about depot activities of the BTPS in building the depot fan and access track.Set of 8 AGFA blue and white plastic mount 27mm sq slides of various works at the BTPS depot during 1972 / 1974. .1 - View looking from roadway showing depot, and various works at the depot - 26 and 27 out front. .2 - Sawing timber sleepers to length - Noel Forster, Barry McCandlish, Bill Kingsley .3 - Ballasting the access track - Rolf Jinks and Clyde Croft .4 - working on the roof of 27 - Geoff Cargeeg and others. .5 - break time. .6 - Bob Prentice and Geoff Cargeeg? on roof of 27 .7 - ditto .8 - Interior photo of 27Various notations by John as to the slide number and the trams in pencil and ink.tramways, trams, btps, depot, track construction, trolley poles, interiors, tram 26, tram 27 -
 Ballarat Tramway Museum
Photograph - Black & White Photograph/s - set of 2, Richard Gilbert, c August 1971
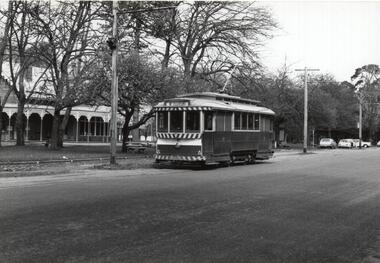
... Loop Wendouree Parade Mt Pleasant Drivers Trolley Poles tram 17 ...Yields information about tramway operations at the Gardens Loop. Series of 2 Black and white photographs of trams using the Gardens Loop in Wendouree Parade. .1 - No. 17 arriving at the Gardens Loop. Destination shows Mt Pleasant. The Gardens Kiosk is in the background. .2 - Single trucker leaving the loop with the crewman placing the pole on the overhead. Did the tram in .1 reverse in the loop? Tram has the destination of Mt Pleasant. trams, tramways, gardens loop, wendouree parade, mt pleasant, drivers, trolley poles, tram 17 -
 Ballarat Tramway Museum
Photograph - Colour Photograph/s set of 5, Carolyn Dean, 4/03/1997 12:00:00 AM
Set of five colour photographs of Trolley Wire replacement in Wendouree Parade sent to the Editor of Trolley Wire - 2 used in the May 1997 issue of Trolley Wire. All photos by Carolyn Dean. All photos taken on 4-3-1997. All photos on AGFA paper. 1139.1 - Working on the trolley wire just to the north of Gardens Loop 1139.2 - Alan Snowball's Ute and trailer with wire reel, North Gardens area. 1139.3 - Replacing wire -group photo around behind truck - used on page 38 of Trolley Wire. 1139.4 - General photo of work with Ute and trailer in foreground and tower truck in background. Wire run out for a number of pole lengths - used on page 38 of Trolley Wire. 1139.5 - Photo of work on trolley wire replacement with tower truck. All have in black ink "4.3.97" and "Photo by / Carolyn Dean". 1139.3 has "Gardens Loop" in blue ink on top edge, and white sticker with "Photo 56 / 14.4 x 9.5cm" written on in black ink. 1139.4 - has white sticker with "Photo 57 / 14.5 and 7cm" written on in black ink.trolley wire, btm, wendouree parade, overhead -
 Ballarat Tramway Museum
Photograph - Black & White Photograph/s, late 1960's
... Trolley Poles Twin Lakes tram 11 Black and white photograph of SEC ...Black and white photograph of SEC No. 11 at the Mt Pleasant terminus, with the Conductor swinging the pole and school children boarding the tram. Destination showing "Gardens via Drummond Nth". Tram has a "Twin Lakes" sign on the front dash panel and a SEC Briquettes advertisement. Colour photocopy, laminated, of this photograph on display 5/2000 at 02-02-06trams, tramways, mt pleasant, trolley poles, twin lakes, tram 11 -
 Ballarat Tramway Museum
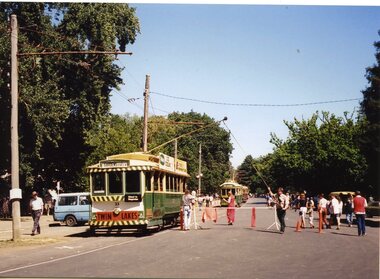
Photograph - Colour Photograph/s, William. F. Scott, 11/03/1996 12:00:00 AM
Photo of BTM trams 33, 38 and 661 at Gardens Loop on the afternoon of the 11.3.1996, while running the Begonia Festival service. Show road closure barriers etc. Clayton Giles turning pole. Was used in the May 1996 issue of Trolley Wire on page 26. Larger version of print shifted to A4 box AS Box 51.On rear, stamped on 'William F. Scott, 5.3.1996, 18', 'photo page 26, same size, with cropping markings and a green dot with '4' in top corner.ballarat, begonia festival, tram 33, tram 38, tram 661 -
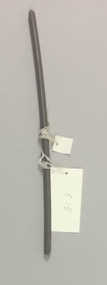 Ballarat Tramway Museum
Functional Object - Trolley Wire Sample
Piece of partly worn trolley wire taken from North bound wire between poles 9 and 17 (Loop & St Aidans Drive) on 4/3/97, during replacement operations. Is slightly curved, and only partly worn, both grooves are still good. Has been cut from other wire. See sketch on original worksheet for colours of wire. Images added 3-12-2016ballarat, overhead, fittings, trolley wire -
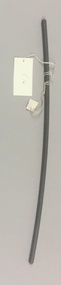 Ballarat Tramway Museum
Functional Object - Trolley Wire Sample
Piece of trolley wire taken from North bound wire between poles 1 & 9 - curved, worn on underside, with longer or sharper groove on inside than normal, probably due to metal flow. Has been cut from wire. See Reg. Item 514 for original wire size and notes. Images added 3-12-2016ballarat, overhead, fittings, trolley wire -
 Ballarat Tramway Museum
Document - Instruction, State Electricity Commission of Victoria (SECV), "Forest City Signals", 20/01/1965 12:00:00 AM
... that was operated by the tram's trolley pole. Details of the locations ...Significant in being a detailed set of instructions for the Forest City signalling system that was operated by the tram's trolley pole. Details of the locations and crossing loops where used, primarily around the loop and through Bridge St. and how it operated. Prepared and printed by the SEC during 1965.Five page, foolscap duplicated document, stapled in two locations along the top edge, titled Forest City Signals, and dated 20-1-1965, giving details about the Forest City signalling system installed in Ballarat. Explains how the system operates, gives instructions, details of the system, location of the loops, trams following each other, power failure. Also gives details of how the Bridge St system operated and the switch at Grenville St. Gives instructions for running out of the depot. Note: The locations of the signals are not as detailed as in the Driver Training Manual - See Reg Item 3486 See also Reg Item 5373 for another similar copy and fully scanned copy.trams, tramways, signals, crossing loop, forest city signals, grenville st, wendouree parade -
 Ballarat Tramway Museum
Photograph - B&W print of donated negative, John Webster, 21/08/1955 12:00:00 AM
Black and white digital print from scan of a donated negative showing the overhead and pole arrangements in Ryrie St near the intersection with Moorabool St. Shows the bracket arms, isolators, overhead. Has the National Mutual, ANZ and Bank of NSW in the background. Assumed photo taken on the same day as the others - 21-8-1955. Black and White prints made from scan of negative. Original Negative stored with Negatives. Negative scanned at hi res 4/6/2020 and image updated.On left hand side of the negatives in ink is "EI 14"tramways, trams, geelong, overhead, trolley wire, ryrie st -
 Ballarat Tramway Museum
Photograph - Black & White Photograph/s, Chris Wurr, 1971
... bar in the background, people and the trolley pole being ...Yields information about the streetscape at the terminus of the Mount Pleasant route with the milk bar in the background, people and the trolley pole being turned.Black and White photograph of a trammie commencing to swing the pole at the Mt Pleasant terminus of No. 31, with the Milk Bar at the terminus in the background along with other people. The tram has two roof advertisements for Johnnie Walker Whiskey and a front dash panel advertisement for "Twin Lakes". The Milk bar has advertisements for Robur Tea, Peters Ice Cream, Women's Weekly, Coca Cola and The Sun Newspaper (obscured). Stamped on rear in black ink "Donated to BTPS by and Photo By" / "Chris Wurr 12 Truscott Street, Ararat 3377 (053) 52 3403.tramways, trams, mt pleasant, milk bar, trolley poles, tram 31 -
 Ballarat Tramway Museum
Photograph - Black & White Photograph/s, Chris Wurr, 1971
... of a bogie tram. tramways trams Depot Junction Bogie Trams Trolley ...Yields information about the stop arrangements at depot junction and the details of one end of a bogie tram.Black and White photograph of No. 42 at the depot junction points. Tram has the Destination 'Gardens via Drummond St Nth'. The points are set for the depot. On the pole adjacent is the tram stop and the street sign for Stafford Court. Shows the detail of the one of the ends of No. 42 and how the trolley rope was positioned by the crews. Stamped on rear in black ink "Donated to BTPS by and Photo By" / "Chris Wurr 12 Truscott Street, Ararat 3377 (053) 52 3403.tramways, trams, depot junction, bogie trams, trolley poles, tram 42 -
 Ballarat Tramway Museum
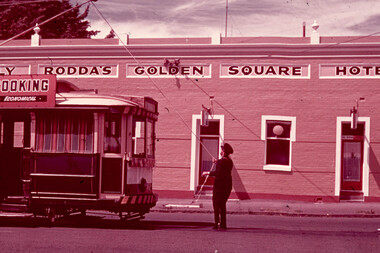
Slide - 35mm slide/s, Graham Evans, Mar. 1972
... Golden Square Trolley Poles Crews tram 19 Stamped on base ...White cardboard mount, 35mm slide, from the Association of Railway Enthusiast's film strip titled "Provincial Tramway Film Strip" of a crew member reversing the pole of Bendigo No. 19 at the Golden Square terminus with the Golden Square hotel in the background. The film strip notes (Reg. Item 2560), provided the following caption details: ""Swinging the pole" was a ritual performed every time a single trucker reversed direction. Here No. 19 is dealt with at "GOLDEN SQUARE" - Mar '72 (Graham Evans)" See image btm2585p.tif for high level scan of image. Stamped on base of slide "11794" and written in ink on top edge "No. 19 Golden Square Bendigo"tramways, trams, are, film strip, golden square, trolley poles, crews, tram 19