Showing 46 items matching " eaglehawk bridge"
-
 Bendigo Historical Society Inc.
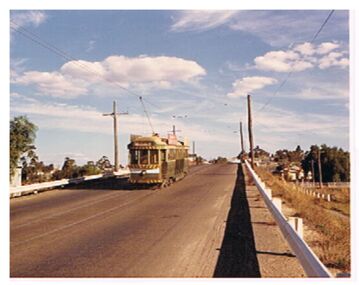
Photograph - TRAM ON EAGLEHAWK BRIDGE
... TRAM ON EAGLEHAWK BRIDGE...... Eaglehawk bridge...Photo: tram on Eaglehawk Bridge....History House 11 Mackenzie Street Bendigo goldfields BENDIGO Hospital Bendigo tram Eaglehawk bridge Photo: tram on Eaglehawk Bridge. ...Photo: tram on Eaglehawk Bridge.bendigo, hospital, bendigo, tram, eaglehawk bridge -
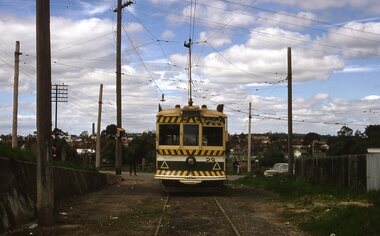
 Ballarat Tramway Museum
Slide - 35mm slide/s, Graham Evans, Apr. 1972
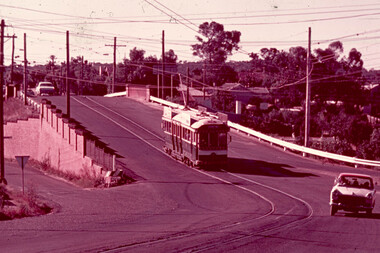
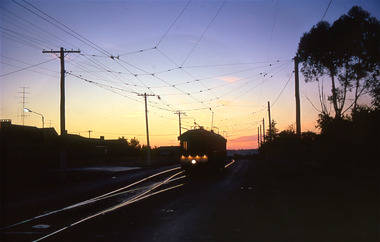
... Eaglehawk... Railway Bridge...White cardboard mount, 35mm slide, from the Association of Railway Enthusiast's film strip titled "Provincial Tramway Film Strip" of a Bendigo No. 26 descending the Bendigo end of the bridge over the railway near Eaglehawk near Jobs Gully loop. ...Tramways trams ARE Film Strip Jobs Gully Eaglehawk Railway Bridge tram 26 Stamped on base of slide "11806" and written in ink on top edge "26 Eaglehawk" White cardboard mount, 35mm slide, from the Association of Railway Enthusiast's film strip titled "Provincial Tramway Film Strip" of a Bendigo No. 26 descending the Bendigo end of the bridge over the railway near Eaglehawk near Jobs Gully loop. ...White cardboard mount, 35mm slide, from the Association of Railway Enthusiast's film strip titled "Provincial Tramway Film Strip" of a Bendigo No. 26 descending the Bendigo end of the bridge over the railway near Eaglehawk near Jobs Gully loop. Tram has the destination of Quarry Hill and has four roof advertisements. The film strip notes (Reg. Item 2560), provided the following caption details: "Bogie cars 26 drops down the Bendigo side of the bridge over the Eaglehawk railway, on the long journey to "QUARRY HILL". - Apr ' 72 (Graham Evans)" See image btm2596p.tif for high level scan of image. Stamped on base of slide "11806" and written in ink on top edge "26 Eaglehawk"tramways, trams, are, film strip, jobs gully, eaglehawk, railway bridge, tram 26 -
 Bendigo Historical Society Inc.
Photograph - HARRY BIGGS COLLECTION: LONG GULLY TOWNSHIP
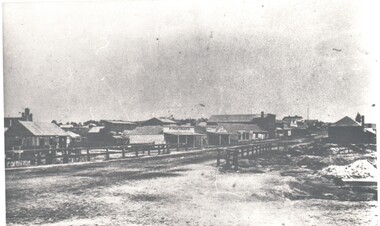
... A wooden bridge can be seen over the creek. Long Gully Township looking from Eaglehawk to Bendigo near bridge (written on the back)....A wooden bridge can be seen over the creek. Long Gully Township looking from Eaglehawk to Bendigo near bridge (written on the back). ...Photograph. Harry Biggs Collection. 1 black & white photo of Long Gully township looking from Eaglehawk towards Bendigo near the bridge. On 1 shop can be seen P Pentreath. A wooden bridge can be seen over the creek. Long Gully Township looking from Eaglehawk to Bendigo near bridge (written on the back).photograph, streetscape, long gully, harry biggs collection, long gully township -
 Ballarat Tramway Museum
Photograph - Digital image Set of 20, 16/04/1972 12:00:00 AM
... Set of 22 digital images of Bendigo Tramways, of the last running day of the Eaglehawk to Quarry Hill line 16 April 1972, .1 - No. 3 and 24 crossing at Long Gully .2 - No. 3 turning at the Cricket ground, Barnard and View Sts, inbound to the City and Quarry Hill .3 - No. 3 in bound to the City and Quarry Hill, Long Gully area .4 - No. 18 inbound to the City and Quarry Hill crossing the railway bridge from Eaglehawk. .5 - Manchester Loop .6 - No. 18 inbound to the City and Quarry Hill crossing the railway bridge from Eaglehawk. .7 - No. 18 about to enter Jobs Gully Loop .8 - No. 3 about to turn at the Cricket ground, Barnard and View Sts inbound to the City and Quarry Hill .9 - No. 3 turning at the Cricket ground, Barnard and View Sts, inbound to the City and Quarry Hill .10 - No. 18 at Eaglehawk terminus with the Mechanics Institute in the background. .11 - No. 3 in bound, Ironbark area. .12 - No. 3 at Long Gully Loop .13 - No. 3 outbound to Eaglehawk. .14 - No. 18 at Eaglehawk with German circus banner on tram .15 - No. 18 on the Eaglehawk line at Jobs Gully Loop .16 - No. 24 outbound to Eaglehawk at Taylor St .17 - No. 18 inbound to the City and Quarry Hill crossing the railway bridge from Eaglehawk. .18 - No. 3 at Manchester Loop .19 - No. 18 at Eaglehawk terminus .20 - No. 18 at Eaglehawk with German circus banner on tram .21 - bogie tram at Long Gully Loop. .22 - No. 24 outbound to Eaglehawk at Taylor St...Ballarat Tramway Museum South Gardens Reserve Wendouree Parade Ballarat Ballarat goldfields Trams tramways Bendigo Eaglehawk Long Gully Jobs Gully Manchester Loop tram 24 tram 18 tram 3 Set of 22 digital images of Bendigo Tramways, of the last running day of the Eaglehawk to Quarry Hill line 16 April 1972, .1 - No. 3 and 24 crossing at Long Gully .2 - No. 3 turning at the Cricket ground, Barnard and View Sts, inbound to the City and Quarry Hill .3 - No. 3 in bound to the City and Quarry Hill, Long Gully area .4 - No. 18 inbound to the City and Quarry Hill crossing the railway bridge from Eaglehawk. .5 - Manchester Loop .6 - No. 18 inbound to the City and Quarry Hill crossing the railway bridge from Eaglehawk. .7 - No. 18 about to enter Jobs Gully Loop .8 - No. 3 about to turn at the Cricket ground, Barnard and View Sts inbound to the City and Quarry Hill .9 - No. 3 turning at the Cricket ground, Barnard and View Sts, inbound to the City and Quarry Hill .10 - No. 18 at Eaglehawk terminus with the Mechanics Institute in the background. .11 - No. 3 in bound, Ironbark area. .12 - No. 3 at Long Gully Loop .13 - No. 3 outbound to Eaglehawk. .14 - No. 18 at Eaglehawk with German circus banner on tram .15 - No. 18 on the Eaglehawk line at Jobs Gully Loop .16 - No. 24 outbound to Eaglehawk at Taylor St .17 - No. 18 inbound to the City and Quarry Hill crossing the railway bridge from Eaglehawk. .18 - No. 3 at Manchester Loop .19 - No. 18 at Eaglehawk terminus .20 - No. 18 at Eaglehawk with German circus banner on tram .21 - bogie tram at Long Gully Loop. .22 - No. 24 outbound to Eaglehawk at Taylor St Photograph Digital image Set of 20 ...Set of 22 digital images of Bendigo Tramways, of the last running day of the Eaglehawk to Quarry Hill line 16 April 1972, .1 - No. 3 and 24 crossing at Long Gully .2 - No. 3 turning at the Cricket ground, Barnard and View Sts, inbound to the City and Quarry Hill .3 - No. 3 in bound to the City and Quarry Hill, Long Gully area .4 - No. 18 inbound to the City and Quarry Hill crossing the railway bridge from Eaglehawk. .5 - Manchester Loop .6 - No. 18 inbound to the City and Quarry Hill crossing the railway bridge from Eaglehawk. .7 - No. 18 about to enter Jobs Gully Loop .8 - No. 3 about to turn at the Cricket ground, Barnard and View Sts inbound to the City and Quarry Hill .9 - No. 3 turning at the Cricket ground, Barnard and View Sts, inbound to the City and Quarry Hill .10 - No. 18 at Eaglehawk terminus with the Mechanics Institute in the background. .11 - No. 3 in bound, Ironbark area. .12 - No. 3 at Long Gully Loop .13 - No. 3 outbound to Eaglehawk. .14 - No. 18 at Eaglehawk with German circus banner on tram .15 - No. 18 on the Eaglehawk line at Jobs Gully Loop .16 - No. 24 outbound to Eaglehawk at Taylor St .17 - No. 18 inbound to the City and Quarry Hill crossing the railway bridge from Eaglehawk. .18 - No. 3 at Manchester Loop .19 - No. 18 at Eaglehawk terminus .20 - No. 18 at Eaglehawk with German circus banner on tram .21 - bogie tram at Long Gully Loop. .22 - No. 24 outbound to Eaglehawk at Taylor Sttrams, tramways, bendigo, eaglehawk, long gully, jobs gully, manchester loop, tram 24, tram 18, tram 3 -
 Bendigo Historical Society Inc.
Photograph - Robert Green Collection - Photos of Bendigo Tramways - Sheet B of 10, 1960s
... Photos: 11147.10a Tram in the darkness, sunset or morning 11147.10b Coming off the railway Line bridge towards Eaglehawk 11147.10c Coming on to the railway Line bridge from Eaglehawk 11147.10d The Quarry Hill and Eaglehawk trams waiting to leave the fountain 11147.10e No 18 from Quarry Hill arrives at the fountain 11147.10f Getting ready to leave the fountain for Eaglehawk 11147.10g Policeman on point duty and tram at the fountain, Charing Cross 11147.10h Eaglehawk and Quarry Hill trams at the fountain 11147.10i Policeman on point duty and tram at the fountain, Charing Cross, looking down Pall Mall 11147.10j No 3 roars up View Street at the corner of McKenzie Street 11147.10k From the Rifle Brigade Hotel the Eaglehawk tram comes past the Queen Elizabeth Oval down View Street 11147.10l From the Rifle Brigade Hotel the Eaglehawk tram comes past the Queen Elizabeth Oval down View Street 11147.10m From the Rifle Brigade Hotel the Eaglehawk tram up View Street opposite the Masonic Hall 11147.10n From the Rifle Brigade Hotel the Eaglehawk tram goes past the Queen Elizabeth Oval up View Street 11147.10o From the Rifle Brigade Hotel the Eaglehawk tram comes up View Street opposite the Masonic Hall 11147.10p From the Victoria Hotel Balcony, the Eaglehawk No 18 arrives 11147.10q From the Victoria Hotel Balcony, the Eaglehawk No 18 departs towards Bendigo 11147.10r Tram No 2 arrives into Eaglehawk 11147.10s Tram No 2 heads to Quarry Hill from California Gully (Probable) 11147.1t Tram on its way out of Long Gully along Mt Korong (Eaglehawk) Road towards Eaglehawk. ...Photos: 11147.10a Tram in the darkness, sunset or morning 11147.10b Coming off the railway Line bridge towards Eaglehawk 11147.10c Coming on to the railway Line bridge from Eaglehawk 11147.10d The Quarry Hill and Eaglehawk trams waiting to leave the fountain 11147.10e No 18 from Quarry Hill arrives at the fountain 11147.10f Getting ready to leave the fountain for Eaglehawk 11147.10g Policeman on point duty and tram at the fountain, Charing Cross 11147.10h Eaglehawk and Quarry Hill trams at the fountain 11147.10i Policeman on point duty and tram at the fountain, Charing Cross, looking down Pall Mall 11147.10j No 3 roars up View Street at the corner of McKenzie Street 11147.10k From the Rifle Brigade Hotel the Eaglehawk tram comes past the Queen Elizabeth Oval down View Street 11147.10l From the Rifle Brigade Hotel the Eaglehawk tram comes past the Queen Elizabeth Oval down View Street 11147.10m From the Rifle Brigade Hotel the Eaglehawk tram up View Street opposite the Masonic Hall 11147.10n From the Rifle Brigade Hotel the Eaglehawk tram goes past the Queen Elizabeth Oval up View Street 11147.10o From the Rifle Brigade Hotel the Eaglehawk tram comes up View Street opposite the Masonic Hall 11147.10p From the Victoria Hotel Balcony, the Eaglehawk No 18 arrives 11147.10q From the Victoria Hotel Balcony, the Eaglehawk No 18 departs towards Bendigo 11147.10r Tram No 2 arrives into Eaglehawk 11147.10s Tram No 2 heads to Quarry Hill from California Gully (Probable) 11147.1t Tram on its way out of Long Gully along Mt Korong (Eaglehawk) Road towards Eaglehawk. ...This collection contains eight archive sheets (Sheet 1 to Sheet 8) of strips of original 35mm black and white negatives of photographs taken during the 1960s and early 1970s by Robert Green, of the Bendigo State Electricty Commission of Victoria Tramways prior to their abandonment The collection also includes two archive quality sheets (Sheet A and Sheet B) of original 35mm colour slides taken by Robert Green during the same period. Sheet B also contains one slide taken by Robert's friend Keigh S King (1928-2019) who was the author of the book 'The Bendigo Tramways an illustrated history, published by the Australian Railway Historical Society Victorian Division Melbourne in February 1972; BHS Item no. 5052. The collection also includes one USB stick which contains images of all photographs described above, except for one colour slide taken by Keith S Kings. Sixteen black and white prints from the images are also included.Robert Green Collection, this item contains 20 Colour Slides of the trams at various locations around Bendigo. Photos: 11147.10a Tram in the darkness, sunset or morning 11147.10b Coming off the railway Line bridge towards Eaglehawk 11147.10c Coming on to the railway Line bridge from Eaglehawk 11147.10d The Quarry Hill and Eaglehawk trams waiting to leave the fountain 11147.10e No 18 from Quarry Hill arrives at the fountain 11147.10f Getting ready to leave the fountain for Eaglehawk 11147.10g Policeman on point duty and tram at the fountain, Charing Cross 11147.10h Eaglehawk and Quarry Hill trams at the fountain 11147.10i Policeman on point duty and tram at the fountain, Charing Cross, looking down Pall Mall 11147.10j No 3 roars up View Street at the corner of McKenzie Street 11147.10k From the Rifle Brigade Hotel the Eaglehawk tram comes past the Queen Elizabeth Oval down View Street 11147.10l From the Rifle Brigade Hotel the Eaglehawk tram comes past the Queen Elizabeth Oval down View Street 11147.10m From the Rifle Brigade Hotel the Eaglehawk tram up View Street opposite the Masonic Hall 11147.10n From the Rifle Brigade Hotel the Eaglehawk tram goes past the Queen Elizabeth Oval up View Street 11147.10o From the Rifle Brigade Hotel the Eaglehawk tram comes up View Street opposite the Masonic Hall 11147.10p From the Victoria Hotel Balcony, the Eaglehawk No 18 arrives 11147.10q From the Victoria Hotel Balcony, the Eaglehawk No 18 departs towards Bendigo 11147.10r Tram No 2 arrives into Eaglehawk 11147.10s Tram No 2 heads to Quarry Hill from California Gully (Probable) 11147.1t Tram on its way out of Long Gully along Mt Korong (Eaglehawk) Road towards Eaglehawk. Houses in the foreground, on the left is 245 Eaglehawk Road and on the right 241 Eaglehawk Road.keith s king, bendigo, trams, robert green -
 Ballarat Tramway Museum
Photograph - Digital image Set of 20, 16/04/1972 12:00:00 AM
... at Manchester Loop .3 - No. 24 outbound to Eaglehawk .4 - bogie tram crossing the rail over bridge from Eaglehawk .5 - No. 18 in View St .6 - No. 24 outbound to Eaglehawk .7 - No 18 at Eaglehawk with destination roll being changed, and shopping centre in the background. .8 - No. 24 crossing the railway overbridge, going to Eaglehawk .9 - No. 3 outbound to Eaglehawk .10 - No. 24 crossing the railway overbridge, going to Eaglehawk .11 - No. 3 and 24 crossing at Long Gully .12 - No. 18 at Eaglehawk with Leo A Hughes photographer building in the background and a CFA truck passing the tram. ...at Manchester Loop .3 - No. 24 outbound to Eaglehawk .4 - bogie tram crossing the rail over bridge from Eaglehawk .5 - No. 18 in View St .6 - No. 24 outbound to Eaglehawk .7 - No 18 at Eaglehawk with destination roll being changed, and shopping centre in the background. .8 - No. 24 crossing the railway overbridge, going to Eaglehawk .9 - No. 3 outbound to Eaglehawk .10 - No. 24 crossing the railway overbridge, going to Eaglehawk .11 - No. 3 and 24 crossing at Long Gully .12 - No. 18 at Eaglehawk with Leo A Hughes photographer building in the background and a CFA truck passing the tram. ...Set of 20 digital images of Bendigo Tramways, of the last running day of the Eaglehawk to Quarry Hill line 16 April 1972, .1 - No. 24 outbound to Eaglehawk .2 - No. 3? at Manchester Loop .3 - No. 24 outbound to Eaglehawk .4 - bogie tram crossing the rail over bridge from Eaglehawk .5 - No. 18 in View St .6 - No. 24 outbound to Eaglehawk .7 - No 18 at Eaglehawk with destination roll being changed, and shopping centre in the background. .8 - No. 24 crossing the railway overbridge, going to Eaglehawk .9 - No. 3 outbound to Eaglehawk .10 - No. 24 crossing the railway overbridge, going to Eaglehawk .11 - No. 3 and 24 crossing at Long Gully .12 - No. 18 at Eaglehawk with Leo A Hughes photographer building in the background and a CFA truck passing the tram. Tram SEC roof advertisement and a banner for "German -?- Circus" at Eaglehawk and dates. .13 - No. 3 inbound on the Eaglehawk line. .14 - No. 18 outbound to Eaglehawk .15 - ditto .16 - No. 18 at Eaglehawk terminus with the Mechanics Institute in the background. .17 - No. 24 at the Eaglehawk terminus .18 - No 24 at the intersection with Taylor St .19 - No. 24 at the Eaglehawk terminus .20 - dittotrams, tramways, bendigo, eaglehawk, long gully, manchester loop, tram 24, tram 18, tram 3 -
 Ballarat Tramway Museum
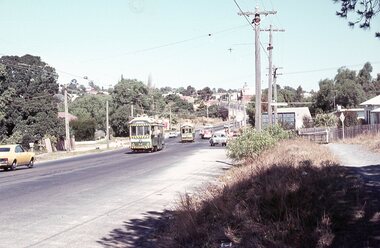
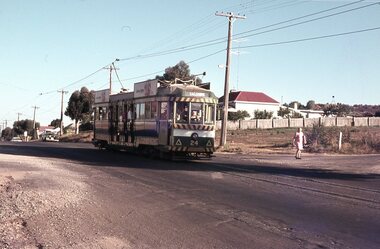
Slide - 35mm slide/s - set of 20, Noel Simons, 21/05/1971 12:00:00 AM
... Photo taken after tram has passed photographer. 1197.4 - No. 26 bound for Eaglehawk descending the railway bridge near Eaglehawk, at Jobs Gully. 1197.5 - as for 1197.4, but after crossing bridge, now ascending a hill. ...Long Gully" 1197.2 - "No. 5 approaching Needle Loop between Long Gully and California Gully" 1197.3 - "No. 5 at Needle Loop between Long Gully and California Gully" 1197.4 - "No. 26 crossing railway bridge at Job's Gully near Eaglehawk" 1197.5 - "No. 26 just after crossing railway bridge at Job's Gully near Eaglehawk/ 1197.6 - "No. 26 in High St. ...Photo taken after tram has passed photographer. 1197.4 - No. 26 bound for Eaglehawk descending the railway bridge near Eaglehawk, at Jobs Gully. 1197.5 - as for 1197.4, but after crossing bridge, now ascending a hill. ...Set of 20 transparencies taken on 21/5/1971 on Kodak mounts. 1197.1 - Bendigo No. 5 en route to Eaglehawk at Creeth St Long Gully. Tram has a SEC roof ad and Cinzano roof ad. 1197.2 - No 5 approaching Needle Loop between Long Gully and California Gully. On left hand side is the City of Bendigo sign, indicating city boundary. 1197.3 - As for 1197.2 but actually entering loop. Photo taken after tram has passed photographer. 1197.4 - No. 26 bound for Eaglehawk descending the railway bridge near Eaglehawk, at Jobs Gully. 1197.5 - as for 1197.4, but after crossing bridge, now ascending a hill. Photo taken after tram has passed photographer. 1197.6 - No. 26 climbing High St. hill Eaglehawk, nearing end of Double track, bound for Quarry Hill. Shows centre of the road poles. 1197.7 - As for 1197.6, with tram entering single track section. Photo taken after tram has passed photographer. Has a BP service station in the background. 1197.8 - No. 26 (bound for Quarry Hill) crossing No. 17 (Eaglehawk) at Job's Gully Loop. 1197.9 - No. 17 climbing railway bridge at Job's Gully, en route to Eaglehawk. Photo taken after tram has passed photographer. 1197.10 - No.26 bound for Quarry Hill, leaving Long Gully Loop? Has the Creeth St. church in l197.l in the far background. Photo taken after tram has passed photographer. 1197.11 - Tramway Point work at the northern end of Long Gully Loop. 1197.12 - No. 17 en route for Quarry Hill turning into View St. from Bamard St. Tram has SEC roof ads "Everything fine in my all electric Kitchen' and 'Electric Cooking is Matchless'. 1197.13 - as for 1197.12, but tram has turned into View St and about to enter the double line track. Photo taken after tram has passed photographer. 1197.14 - No. 21 enters Nolan St after turning from MacRae St. en route to Bendigo. Note sign on its own post noting tram turns "Beware Tram Turns" and stop sign on adjacent pole "Trams stop on Request". No. 21 has two SEC roof ads. 1197.15 - No. 21 in Nolan St. after turning from Bridge St. (White Hills Road). Note signal light for Bridge St. loop on pole corner of street. Photo taken after tram has passed photographer. 1197.16 - No. 2 bound for Eaglehawk at unknown location. 1197.17 - Tram stop sign on a pole "CARS STOP BY REQUEST" 1197.18 - No. 5 in Carpenter St.? en route to Quarry Hill. 1197.19 - No. 28 has just arrive at Golden Square terminus, passengers are disembarking and the trolley pole is being turned. Golden Square Hotel in the background. 1197.20 - No. 28 at Golden Square terminus. Has a "Nothing beats Briquettes for hear roof ad. Information written on in black ink and date stamped on purple ink. 1197.1 - "No. 5 at Creeth St. Long Gully" 1197.2 - "No. 5 approaching Needle Loop between Long Gully and California Gully" 1197.3 - "No. 5 at Needle Loop between Long Gully and California Gully" 1197.4 - "No. 26 crossing railway bridge at Job's Gully near Eaglehawk" 1197.5 - "No. 26 just after crossing railway bridge at Job's Gully near Eaglehawk/ 1197.6 - "No. 26 in High St. Eaglehawk" 1197.7 - "No. 26 at end of double track in High St. Eaglehawk" 1197.8 - "Nos. 26 and 17 crossing at Job's Gully Loop" 1197.9 - "No. 17 crossing railway bridge at Job's Gully near Eaglehawk". 1197.10 - "No. 26 at Long Gully" 1197.11 - 'Northern end of points at Long Gully Loop". 1197.12 - "No. 17 turning into View St. from Bamard St. Bendigo". 1197.13 -'No. 17 at beginning of double track in View St. after leaving Bamard St. Bendigo. 1197.14 - "No. 21 enters Nolan St. from MacRae St. Bendigo." 1197.15 - "No. 21 in Nolan St. Bendigo just after leaving White Hills Road." 1197.16 - "No. 2" 1197.18 - "No. 5" 1197.19 - "Birney car No. 28 at Golden Square Terminus" 1197.20 "Birney car No. 28 at Golden Square Terminus" tramways, trams, bendigo, long gully, railway bridge, jobs gully, trackwork, nolan st, quarry hill, tram stops, golden square, tram 2, tram 5, tram 17, tram 21, tram 26, tram 28 -
 Bendigo Historical Society Inc.
Document - DAHLIA & ARTS FESTIVAL, EAGLEHAWK, 16 March 1995
... Eaglehawk Heritage Society-Display. Bridge to Park...Eaglehawk Heritage Society-Display. Bridge to Park, foot race. ...Eaglehawk Heritage Society-Display. Bridge to Park foot race. ...Dahlia & Arts Festival, Eaglehawk.16th - 26th March, 1995. Programme. Debutante Ball (1), 'The Festival' Exhibition at the Borough Galleries. Debutant Ball (2). Art Preview and Presentation of Awards. Craft Market. Displays of Cake Decorating. Sidewalk Busking Competition. Gala Fair. Eaglehawk Fire Brigade open day. Porcelain Art and Craft Show. Art Show. Display of Memorabilia-Cornish Assoc. Static Display-Irish Assoc. Children's Multi-Dimensional Art Exhibition. Children's Photographic Display. Flower Show. Photographic Print Competition. Eaglehawk Heritage Society-Display. Bridge to Park, foot race. Street Procession. O'Shea-Ryan Bendigo Irish Dancing School and O'Shea-Ryan Academy of Irish Dance - Melbourne Performance. 2nd Seasons Fashion Show. 13th Annual Dahlia & Arts Half Marathon. Ecumenical Church Service. Picnic Lunch. Free Concert-Guinness Show Band. Cycling Criterium. Mining Heritage Tour of Eaglehawk. Dahlia Diner. Variety Concert. ''High Jinx On The High Seas''. Childrens Fancy Dress Parade. Gala Charity Old Time Ball. Brass Instrument Solo/Party Competition. 'Gardening Through The Drought'-Guided Tour. California Hill Church Open Day Craft & Devonshire Teas. Traditional Cornish Concert. 'A Time to Remember'. Annual Croquet & Bowls Tournaments. Festival Guest of Honor Mr Wayne Gregson - Journalist. Editor - Bendigo Advertiser. Festival President, Mr Noel Thomas. Vice Presidents Alan Bull, Kevin Herdman. Executive Officer Jeanette Moss. Treasurer Lorna Thomas. Acknowledgements and sponsors on back page.event, entertainment, eaglehawk dahlia & arts festival, dahlia & arts festival, eaglehawk.16th - 26th march, 1995. programme. debutante ball (1), 'the festival' exhibition at the borough galleries. debutant ball (2). art preview presentation of awards. craft market. displays of cake decorating. sidewalk busking competition. gala fair. eaglehawk fire brigade open day. porcelain art and craft show. art show. display of memorabilia-cornish assoc. static display-irish assoc. children's multi-dimensional art exhibition. children's photographic display. flower show. photographic print competition. eaglehawk heritage society-display. bridge to park, foot race. street procession. o'shea-ryan bendigo irish dancing school and o'shea-ryan academy of irish dance - melbourne performance. 2nd seasons fashion show. 13th annual dahlia & arts half marathon. ecumenical church service. picnic lunch. free concert-guinness show band. cycling criterium. mining heritage tour of eaglehawk. dahlia diner. variety concert. ''high jinx on the high seas''. childrens fancy dress parade. gala charity old time ball. brass instrument solo/party competition. 'gardening through the drought'-guided tour. california hill church open day craft & devonshire teas. traditional cornish concert. 'a time to remember'. annual croquet & bowls tournaments. festival guest of honor mr wayne gregson - journalist. editor - bendigo advertiser. festival president, mr noel thomas. vice presidents alan bull, kevin herdman. executive officer jeanette moss. treasurer lorna thomas. acknowledgements and sponsors -
 Bendigo Historical Society Inc.
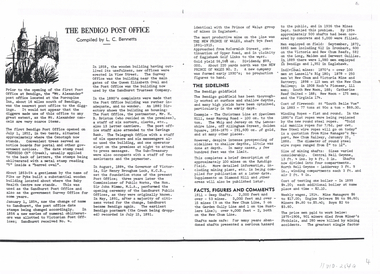
Document - BASIL MILLER COLLECTION: TRAMS, RAILWAY PICNICS, c1961
... Down the sides are listed cemetery, railway station, Rodney St, Charing Cross, through to California Gully Bridge and Eaglehawk. The fare was 2d. On the back a Beehive advertisement. ...Down the sides are listed cemetery, railway station, Rodney St, Charing Cross, through to California Gully Bridge and Eaglehawk. The fare was 2d. On the back a Beehive advertisement. ...Newspaper clipping. Bendigo Advertiser. Saturday October 14, 1961. Early Railway Picnics Recalled. Article includes photo of souvenir tram ticket number 3588. Springtime, 1905 was Railway picnic time. And what a time it was - with packed trains from the metropolis and country towns, and Bendigo, thronged with the crowds of gay holiday-makers. Souvenir ticket belongs to rear Mrs. A. Bolitho, 5 Webster Street, Bendigo, issued by Electric Supply Coy. Of Victoria Ltd., Bendigo Tramways. Railway Picnic September 16, 1905. The ticket belong to Mrs Bolitho's father, the late Mr J H P Ellis, who lived in McIntyre Street. Post card size, printed in sepia on cream, bears photographs of the power house, engine room, a tram (we presume one of the first models) and the boiler room. Down the sides are listed cemetery, railway station, Rodney St, Charing Cross, through to California Gully Bridge and Eaglehawk. The fare was 2d. On the back a Beehive advertisement. 'Half-Century With Trams' is a history as remembered by Mr W J Evans of Mt. Korong Road, California Gully. 'Boisterous' is a history as remembered by Mr W Bolton of the firm of Bolton Bros. recalled the early picnics as 'boisterous' affairs. 'riff-raff' used to gather at Spencer St Station, arriving in Bendigo-after having spent the night drinking. The picnicers certainly had a right royal time in those early days. Railway Picnic was also boronia time, Mr Bolton said - and bunches of fragrant West Australian borania were sold on the streets. Bolton Bros always printed the tram tickets in Bendigo in those early years. A report in the 'Bendigonian' of the 1903 Railway Picnic period told that 20 special trams came to Bendigo on Saturday morning, September 15, 1903. Railway Picnic Committee: J Southern, Mrs Tait, Mrs Hudson, Mrs Fitzpatrick, Cr J H Curnow, Sir John Quick and many members of parliament. Fare from Melbourne costing 5/ for a day return, or 7/6 for the week.organization, business, bendigo trams -
 Bendigo Historical Society Inc.
Document - LONG GULLY HISTORY GROUP COLLECTION: THE BENDIGO POST OFFICE
... Eaglehawk - 60 years ago and the role the pubs played in daily living. They were where theatres, concerts and dances were held, and the meeting rooms for clubs and lodges, even church benefits. Listed is a number of Bendigo hotels. Some even had a few names. Names of the pubs are: The Freemasons, The Courthouse, The Commercial Law Courts, The Hamburg, The European, The Prince Bismark, The Lord Kitchener, The Bendigo, The Rosalind Park, The Showgrounds, Atheneum Club, Olivers, Bridge Hotel, Bourkes, The Globe, The Hibernia, Albert, Albion, Abbotts, Australian, Belvidere, Beehive, British Queen, Black Eagle, British and American, Brian Boru, Bakers Arms, Butchers Arms, Brick Layers Arms, Bull and Mouth, Cresent, Clarence, Back Creek Bridge, Cape Clear, Crooked Billet, Cambridgeshire Arms, Camp, Coach and Horses, Cricketers Arms, Diggers Rest, Ellesmere, Five Lions, Franklyn, Golden Square, Golden Gate, Golden Gully, Golden Age, Golden Vine, Gumtree, Glasgow Reef, Great Britain, Haymarket, Daniel O'Connell, Half Way House, Fleece Inn, Ironbark, Johnsons Reef, Lancashire, Live and Let Live, Manchester Arms, Gold Mines, Metropolitan, Crown, National, New Chum, Honeysuckle Street, Pavilion, Napier Arms, Quartz Miners Arms, Retreat Inn, Rainbow, Rose of Australia, Lake View, Robin Hood, Fountain, Southern Cross, Bath, Berlin, Spring Gully, Star, Sir Charles Hotham, Silvermines, Royal Oak, Suburban, Town Hall, Temperance, Ship Inn, View Point, View Bend, Victoria, Exchange, American, Arcade, Belfast, All Nations, Union, United Kingdom, Union Jack, Westend, Washington, Waterloo, Wellington, Whitehorse, Wheat Sheaf, Yorkshire, Niagra and Noahs Ark....Eaglehawk - 60 years ago and the role the pubs played in daily living. They were where theatres, concerts and dances were held, and the meeting rooms for clubs and lodges, even church benefits. Listed is a number of Bendigo hotels. Some even had a few names. Names of the pubs are: The Freemasons, The Courthouse, The Commercial Law Courts, The Hamburg, The European, The Prince Bismark, The Lord Kitchener, The Bendigo, The Rosalind Park, The Showgrounds, Atheneum Club, Olivers, Bridge Hotel, Bourkes, The Globe, The Hibernia, Albert, Albion, Abbotts, Australian, Belvidere, Beehive, British Queen, Black Eagle, British and American, Brian Boru, Bakers Arms, Butchers Arms, Brick Layers Arms, Bull and Mouth, Cresent, Clarence, Back Creek Bridge, Cape Clear, Crooked Billet, Cambridgeshire Arms, Camp, Coach and Horses, Cricketers Arms, Diggers Rest, Ellesmere, Five Lions, Franklyn, Golden Square, Golden Gate, Golden Gully, Golden Age, Golden Vine, Gumtree, Glasgow Reef, Great Britain, Haymarket, Daniel O'Connell, Half Way House, Fleece Inn, Ironbark, Johnsons Reef, Lancashire, Live and Let Live, Manchester Arms, Gold Mines, Metropolitan, Crown, National, New Chum, Honeysuckle Street, Pavilion, Napier Arms, Quartz Miners Arms, Retreat Inn, Rainbow, Rose of Australia, Lake View, Robin Hood, Fountain, Southern Cross, Bath, Berlin, Spring Gully, Star, Sir Charles Hotham, Silvermines, Royal Oak, Suburban, Town Hall, Temperance, Ship Inn, View Point, View Bend, Victoria, Exchange, American, Arcade, Belfast, All Nations, Union, United Kingdom, Union Jack, Westend, Washington, Waterloo, Wellington, Whitehorse, Wheat Sheaf, Yorkshire, Niagra and Noahs Ark. ...Article titled The Bendigo Post Office, compiled by L C Bennetts. Mentioned is the history of the Bendigo Post Office and postmarks, some information on mining, Bendigo foundries, Underground connections of mines, expenses and shaft sinking costs. Also mentioned is Bendigo and Eaglehawk - 60 years ago and the role the pubs played in daily living. They were where theatres, concerts and dances were held, and the meeting rooms for clubs and lodges, even church benefits. Listed is a number of Bendigo hotels. Some even had a few names. Names of the pubs are: The Freemasons, The Courthouse, The Commercial Law Courts, The Hamburg, The European, The Prince Bismark, The Lord Kitchener, The Bendigo, The Rosalind Park, The Showgrounds, Atheneum Club, Olivers, Bridge Hotel, Bourkes, The Globe, The Hibernia, Albert, Albion, Abbotts, Australian, Belvidere, Beehive, British Queen, Black Eagle, British and American, Brian Boru, Bakers Arms, Butchers Arms, Brick Layers Arms, Bull and Mouth, Cresent, Clarence, Back Creek Bridge, Cape Clear, Crooked Billet, Cambridgeshire Arms, Camp, Coach and Horses, Cricketers Arms, Diggers Rest, Ellesmere, Five Lions, Franklyn, Golden Square, Golden Gate, Golden Gully, Golden Age, Golden Vine, Gumtree, Glasgow Reef, Great Britain, Haymarket, Daniel O'Connell, Half Way House, Fleece Inn, Ironbark, Johnsons Reef, Lancashire, Live and Let Live, Manchester Arms, Gold Mines, Metropolitan, Crown, National, New Chum, Honeysuckle Street, Pavilion, Napier Arms, Quartz Miners Arms, Retreat Inn, Rainbow, Rose of Australia, Lake View, Robin Hood, Fountain, Southern Cross, Bath, Berlin, Spring Gully, Star, Sir Charles Hotham, Silvermines, Royal Oak, Suburban, Town Hall, Temperance, Ship Inn, View Point, View Bend, Victoria, Exchange, American, Arcade, Belfast, All Nations, Union, United Kingdom, Union Jack, Westend, Washington, Waterloo, Wellington, Whitehorse, Wheat Sheaf, Yorkshire, Niagra and Noahs Ark.bendigo, history, long gully history group, the long gully history group - the bendigo post office, l c bennetts, mt alexander post office, porcupine inn, cenotaph, pike or pyke, baby health centre, sandhurst post office, government survey office, queen elizabeth oval, sandhurst trustees company, mr h b briston, savings bank, telegraph office, the sub-treasury, sir henry brougham lock kcb, sir john nimmo mla, prince of wales group of mines, the new prince of wales, eaglehawk golf links, new prince of wales no 2, the whip and jersey, mines department, lansell's big 180, new chum and victoria mine and battery, new chum railway, koch's pioneer, south new moon, catherine reef united, new moon, the virginia, south bell vue, central nell gwynne, north nell gwynne, miner's phthisis, hercules engine house, ironbark, new chum syncline, hercules energetic, roberts & sons, harkness & co, horwoods, great southern, ulster, carlisle, lansells big 180, victoria quartz, new st mungo, duchess tribute, south devonshire, hopewell mine, saxby mine, mcnair & co, shamrock, mr king, burke and wills expedition, sandhurst hotel, courthouse, hiberian, the freemasons, the courthouse, the commercial law courts, the hamburg, the european, the prince bismark, the lord kitchener, the bendigo, the rosalind park, the showgrounds, atheneum club, olivers, bridge hotel, bourkes, the globe, the hibernia, albert, albion, abbotts, australian, belvidere, beehive, british queen, black eagle, british and american, brian boru, bakers arms, butchers arms, brick layers arms, bull and mouth, cresent, clarence, back creek bridge, cape clear, crooked billet, cambridgeshire arms, camp, coach and horses, cricketers arms, diggers rest, ellesmere, five lions, franklyn, golden square, golden gate, golden gully, golden age, golden vine, gumtree, glasgow reef, great britain, haymarket, daniel o'connell, half way house, fleece inn, ironbark, johnsons reef, lancashire, live and let live, manchester arms, gold mines, metropolitan, crown, national, new chum, honeysuckle street, pavilion, napier arms, quartz miners arms, retreat inn, rainbow, rose of australia, lake view, robin hood, fountain, southern cross, bath, berlin, spring gully, star, sir charles hotham, silvermines, royal oak, suburban, town hall, temperance, ship inn, view point, view bend, victoria, exchange, american, arcade, belfast, all nations, union, united kingdom, union jack, westend, washington, waterloo, wellington, whitehorse, wheat sheaf, yorkshire, niagra, noahs ark -
 Bendigo Historical Society Inc.
Document - LONG GULLY HISTORY GROUP COLLECTION: EAGLEHAWK & NOTED EVENTS
... Eaglehawk & Noted Events... H Biggs... June Parry... James Mouat... Joseph Crook... Marong District Roads Board... Camp Hotel... Charles Sherratt... Mt Alexander North Run... Grice and Heape... Ravenswood... Gibson and Fenton... Mrs John Kennedy... Mrs Patrick Farrel... MR J A Paton... Mr Lachlan McLachlan (Bendigo Mac)... Bendigo Hospital... Bendigo Advertiser... Theatre Royal... Lieutenant Governor Sir Charles and Lady Hotham... Harney's Bridge...History House 11 Mackenzie Street Bendigo goldfields BENDIGO History long gully history group The Long Gully History Group - Eaglehawk & Noted Events H Biggs June Parry James Mouat Joseph Crook Marong District Roads Board Camp Hotel Charles Sherratt Mt Alexander North Run Grice and Heape Ravenswood Gibson and Fenton Mrs John Kennedy Mrs Patrick Farrel MR J A Paton Mr Lachlan McLachlan (Bendigo Mac) Bendigo Hospital Bendigo Advertiser Theatre Royal Lieutenant Governor Sir Charles and Lady Hotham Harney's Bridge E J Ennor Sandhurst Fire Brigade Mr Townsend Bendigo Water Works Cornish & Co Post Office Bendigo Pottery Bendiog Agricultural Society Benevolent Asylum Bendigo Gas Company Cattle yards Coliban Water Supply Scheme Cr W V Simons J Mouat Sir Henry Barkly Sandhurst Borough Eaglehawk Borough Cr John McIntyre Duke of Edinburgh Latham and Watson's Mine Galatea (model ship) St Paul's Church of England Rev G P Despard Bendog Rifle Association Strathfieldsaye Shire Hall Corporate High School Bendigonian Society Richard Andrews Easter Fair G Aspinall J Burnsides Viscount Canterbury (Sir H Manners sutton) Beehive Stores Mining Exchanges Annual Waverley Prize Bendigo Water Works City Fire Brigade City Family Hotel Bendigo United Friendly Society Medical Institute and Dispensary Jewish Synagogue Masonic Hall School of Mines J H Abbott Australian Natives Association Temperance Hall Royal Princess Theatre Albion Hall Central State School High School Gravel Hill State School Early Trams Electricity Commission Notes on Eaglehawk compiled by H Biggs mentions early settlement, discovery of gold, separation of Eaglehawk from the Marong District Roads Board, Nominations for Council and Newspapers. ...Notes on Eaglehawk compiled by H Biggs mentions early settlement, discovery of gold, separation of Eaglehawk from the Marong District Roads Board, Nominations for Council and Newspapers. Noted Events compiled by June Parry mention events from 1839 to 1876 and some in 1928. These included early settlement, gold discovery at The Rocks, Churches, hospital, Bendigo Advertiser, Theatre Royal, Police Office, Post Office, Census, First Council Works, Telegraph, Mining Company, Mining Board, Public Market, various buildings built, Rates, Schools, and very early trams.bendigo, history, long gully history group, the long gully history group - eaglehawk & noted events, h biggs, june parry, james mouat, joseph crook, marong district roads board, camp hotel, charles sherratt, mt alexander north run, grice and heape, ravenswood, gibson and fenton, mrs john kennedy, mrs patrick farrel, mr j a paton, mr lachlan mclachlan (bendigo mac), bendigo hospital, bendigo advertiser, theatre royal, lieutenant governor sir charles and lady hotham, harney's bridge, e j ennor, sandhurst fire brigade, mr townsend, bendigo water works, cornish & co, post office, bendigo pottery, bendiog agricultural society, benevolent asylum, bendigo gas company, cattle yards, coliban water supply scheme, cr w v simons, j mouat, sir henry barkly, sandhurst borough, eaglehawk borough, cr john mcintyre, duke of edinburgh, latham and watson's mine, galatea (model ship), st paul's church of england, rev g p despard, bendog rifle association, strathfieldsaye shire hall, corporate high school, bendigonian society, richard andrews, easter fair, g aspinall, j burnsides, viscount canterbury (sir h manners sutton), beehive stores, mining exchanges, annual waverley prize, bendigo water works, city fire brigade, city family hotel, bendigo united friendly society medical institute and dispensary, jewish synagogue, masonic hall, school of mines, j h abbott, australian natives association, temperance hall, royal princess theatre, albion hall, central state school, high school, gravel hill state school, early trams, electricity commission -
 Bendigo Historical Society Inc.
Newspaper - LONG GULLY HISTORY GROUP COLLECTION: BENDIGO'S CENTURY VOLUME SEVEN: 1960 - 1969
... Bridge Street Chinese Quarter... Bendigo City Hall... Cr R F Turner... Cr Tom Flood... Victorian Inland Meat Authority... New Zealand Insurance Co... Mrtropolitan Security Service... Bendigo Easter Fair Society... Golden Square High School... Eaglehawk...Dispensary Gillies Famous Pies William Basil Ashman Golden Gate Hotel Grieves Family Bendigo Town Hall Mr R R Anderson Mr E H Brown Cr Neville Oliver Cr Tom Flood Traffic Commission Lansell FAmily ABEV-1 Bendigo Ordnance Factory ACTU Bendigo Trades Hall Council The Ramsay Report Bendigo Benevolent Home Bendigo Home and Hospital for the Aged Princess Theatre Amoco Lake Eppalock Bendigo Training Prison Bendigo Police Station Lock-up Shamrock Hotel Rifle Brigade Hotel Hopetoun Hotel ANZ Bank Marong Shire Offices Sir Rohan Delacombe St Paul's Church Que O'Hoy Waldron Family Windermere Hotel Aids & Appliance Shop Anne Caudle Centre E C Thompson Mayfair Hams Sandhurst Guest House Lyric Theatre Chinese Joss House Ordnance Factory Sir John Jenson Bridge Street Chinese Quarter Bendigo City Hall Cr R F Turner Cr Tom Flood Victorian Inland Meat Authority New Zealand Insurance Co Mrtropolitan Security Service Bendigo Easter Fair Society Golden Square High School Eaglehawk High School Bendigo Technical College Mr Ralph W Birrell Bendigo Fountain Plaza The Bethlehem Home for the Aged Dick Hazeldene Victorian Egg Board Bendigo United Cricket Club South Bendigo United Cricket Club Western Mining Corporation Les Priest Alexandra Fountain Bendigo Advertiser Cr W Cambridge Bendigo Council Eaglehawk Council Strathfieldsaye Shire Huntly Shire Marong Shire David Thomas Senator John Gorton Bendigo's College of Advanced Education Bank of New South Wales Harp and Shamrock Hotel The Honorable Leslie William Galvin Kurmala Cain Government Hanro Knitting Mills Myer Store Sidney Myer Davey Brothers Grocery Store National Trust Myer Emporium Myer's Ltd Cox Bros (Australia) Ltd Dame Merlyn Myer Baillieu Myer Frank Greenaway Institute of Technology Gas & Fuel Corporation Bendigo Railway Station ANZ Bank City Family Hotel TAB Branch Senior Constable Alfred Herbert Wright Senior Constable Allan Raymond Brown Victorian Football League Bendigo Police Barracks Camp Hill State School State Electricity Commission The Country Party The Labor Party Transport Regulation Board Stuart Anderson Grose FAmily Jean Theodore De Ravin Kyneton Shire Sir William McDonald Mines Department The Loddon Hospitals Region group Laundry and Central Linen Service Kevin Wynne Albert Vivian Gray Bradford Cotton Mills Ltd Bradmill Industries Ltd Victoria Hill Bendigo and District Tourist Association Professor Brian Lewis Melbourne University Victorian Chinese Community Loong Sun Loong Stafford Ellinson Coles' Store North Deborah Mining Company NL Noel Beaton MHR Durham Ox Hotel Taylor Family Supplement to the Bendigo Advertiser, December 15, 1999 Volume Seven: 1960-1969 titled Bendigo's Century. ...Supplement to the Bendigo Advertiser, December 15, 1999 Volume Seven: 1960-1969 titled Bendigo's Century. The front has a photo of the BCV 8 Studio. Contains photos and local news, council matters, planning, Who's Who, Weather, Sport and Business and some Advertisements. Photos include Early stages in the construction of the Eppalock tower and bridge pillars, Christine Wiseman, TV8's first news reader Ron Alderton, Dr Albert L Beischer, Advertiser buiding, fire at the Advertiser building, Oscar Flight, Bendigo Town Hall, William Basil Ashman, Lake Eppalock, Premier Henry Bolte, Que O'Hoy, Sandhurst Guest House, The Lyric Theatre, E C Thompson, The elm tree in Market Square, Leslie Galvin, The original Myer Store, The Joss House, Sidney Myer, Bendigo Police Barracks, Bunratty Castle, Albert Vivian Gray, The Victoria Hill site, Architects drawing of the new council administrative offices and Noel Beaton MHR.bendigo, history, long gully history group, the long gully history group - bendigo's century volume seven: 1960 - 1969, bendigo advertiser, bcv 8, eppalock dam, premier henry bolte, the criterion hotel, mccarthy family, teachers training college, bendigo original teachers college, long gully state school, stramit, bendigo university site committee, mrs christine wiseman, bendigo city council, the broadcasting control board, general television pty ltd, bendigo central victoria telecasters pty ltd, mr davidson, bennett's arcade, woolworth's, white hills swimming pool, herb elliott, sailor's guide, toni riley pharmacies, rising sun hotel, ron alderton, dr albert l beischer, channel 8, melbourne herald, 3bo, bendigo advertiser officeslyceum theatre, junior technical school white hills, mount alvernia hospital, most reverend dr b d stewart, sisters of the franciscan missionaries of the divine motherhood, lazarus family, bendigo's tramways, state electricity commission, george pethard, lance pethard, bendigo advertiser fire 29/7/1962, riverine herald, the herald and weekly times, bendigo art gallery, oscar flight, hollands foundry, eaglehawk u.f.s. dispensary, gillies famous pies, william basil ashman, golden gate hotel, grieves family, bendigo town hall, mr r r anderson, mr e h brown, cr neville oliver, cr tom flood, traffic commission, lansell family, abev-1, bendigo ordnance factory, actu, bendigo trades hall council, the ramsay report, bendigo benevolent home, bendigo home and hospital for the aged, princess theatre, amoco, lake eppalock, bendigo training prison, bendigo police station lock-up, shamrock hotel, rifle brigade hotel, hopetoun hotel, anz bank, marong shire offices, sir rohan delacombe, st paul's church, que o'hoy, waldron family, windermere hotel, aids & appliance shop, anne caudle centre, e c thompson, mayfair hams, sandhurst guest house, lyric theatre, chinese joss house, ordnance factory, sir john jenson, bridge street chinese quarter, bendigo city hall, cr r f turner, cr tom flood, victorian inland meat authority, new zealand insurance co, mrtropolitan security service, bendigo easter fair society, golden square high school, eaglehawk high school, bendigo technical college, mr ralph w birrell, bendigo fountain plaza, the bethlehem home for the aged, dick hazeldene, victorian egg board, bendigo united cricket club, south bendigo united cricket club, western mining corporation, les priest, alexandra fountain, bendigo advertiser, cr w cambridge, bendigo council, eaglehawk council, strathfieldsaye shire, huntly shire, marong shire, david thomas, senator john gorton, bendigo's college of advanced education, bank of new south wales, harp and shamrock hotel, the honorable leslie william galvin, kurmala, cain government, hanro knitting mills, myer store, sidney myer, davey brothers grocery store, national trust, myer emporium, myer's ltd, cox bros (australia) ltd, dame merlyn myer, baillieu myer, frank greenaway, institute of technology, gas & fuel corporation, bendigo railway station, anz bank, city family hotel, tab branch, senior constable alfred herbert wright, senior constable allan raymond brown, victorian football league, bendigo police barracks, camp hill state school, state electricity commission, the country party, the labor party, transport regulation board, stuart anderson, grose family, jean theodore de ravin, kyneton shire, sir william mcdonald, mines department, the loddon hospitals region group laundry and central linen service, kevin wynne, albert vivian gray, bradford cotton mills ltd, bradmill industries ltd, victoria hill, bendigo and district tourist association, professor brian lewis, melbourne university, victorian chinese community, loong, sun loong, stafford ellinson, coles' store, north deborah mining company nl, noel beaton mhr, durham ox hotel, taylor family -
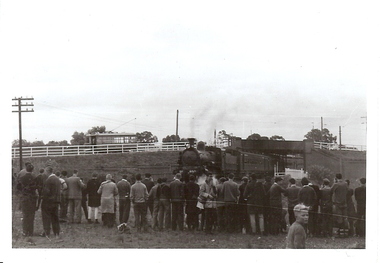 Bendigo Historical Society Inc.
Photograph - BASIL MILLER COLLECTION: JOB'S GULLY RAILWAY BRIDGE
... bridge. From centre left of picture heading into Eaglehawk. '875' stamped in black in on back....bridge. From centre left of picture heading into Eaglehawk. '875' stamped in black in on back. ...BHS CollectionBlack and white photo of group of people watching train pass under Job's Gully railway bridge. From centre left of picture heading into Eaglehawk. '875' stamped in black in on back.person, individual, basil miller -
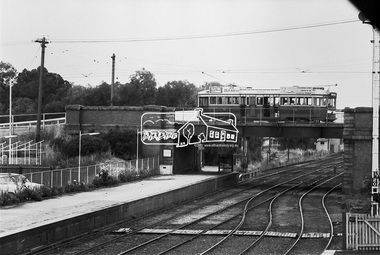 Eltham District Historical Society Inc
Photograph, Bendigo Tramways No. 2 en route to Quarry Hill passes over the Mitchell Street Railway Bridge, Bendigo, January 1972, Jan 1972
... Eltham District Historical Society Inc 728 Main Rd Eltham melbourne Bendigo, Bendigo Railway Station, Bendigo Tramways No. 2, Eaglehawk, George Coop Collection, Mitchell Street, Railway Line, Tram Digital TIFF file Scan of 35mm Ilford FP3 black and white negative transparency Bendigo Tramways No. 2 en route to Quarry Hill passes over the Mitchell Street Railway Bridge, Bendigo, January 1972 Photograph George Coop George Coop ...Digital TIFF file Scan of 35mm Ilford FP3 black and white negative transparencybendigo, bendigo railway station, bendigo tramways no. 2, eaglehawk, george coop collection, mitchell street, railway line, tram -
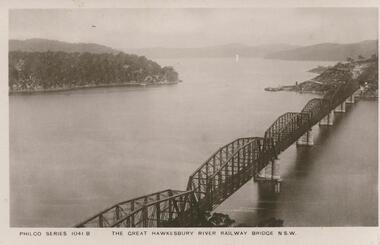 Bendigo Historical Society Inc.
Postcard - THE GREAT HAWKESBURY RIVER RAILWAY BRIDGE N.S.W
... Bridge N.S.W. Rear. Addressed to Miss Absalom c/- Mr Dempsey, Sailors Gully Eaglehawk....Bridge N.S.W. Rear. Addressed to Miss Absalom c/- Mr Dempsey, Sailors Gully Eaglehawk. ...Postcard The Great Hawkesbury River Railway Bridge N.S.W. Rear. Addressed to Miss Absalom c/- Mr Dempsey, Sailors Gully Eaglehawk. -
 Bendigo Historical Society Inc.
Document - LYDIA CHANCELLOR COLLECTION: BENDIGO METHODIST CHURCHES PLAN 1905 AND CHURCH OFFICIALS, 1905
... LYDIA CHANCELLOR COLLECTION: Bendigo Methodist Churches Plan 1905 and church officials Quarterly Pastoral Visitation of Classes Circuit plan for Forest St, Golden square, Eaglehawk West, Eaglehawk East, California Hill, California Gully, Long Gully, McKenzie St, Galvin St, Rowan St, Arnold St, Iron Bark, Buckly St, Specimen Hill, Quarry Hill, Bridge St, Retreat Road, Kangaroo Flat, Lockwood, East Shelbourne, White Hills, Epsom, Huntly, Bagshot, fosterville, Strathfieldsaye, Axe Creek, sheepwash, Nerring, Leichardt, Leichardt East, Marong, Golden Fleece, Golden Gully, Dowling St Mission, Benevolent Asylum, Hospital Income and Expenditure List of stewards Notices Pastorates Evangelistic Bands...History House 11 Mackenzie Street Bendigo goldfields BENDIGO History schooling LYDIA CHANCELLOR COLLECTION: Bendigo Methodist Churches Plan 1905 and church officials Quarterly Pastoral Visitation of Classes Circuit plan for Forest St, Golden square, Eaglehawk West, Eaglehawk East, California Hill, California Gully, Long Gully, McKenzie St, Galvin St, Rowan St, Arnold St, Iron Bark, Buckly St, Specimen Hill, Quarry Hill, Bridge St, Retreat Road, Kangaroo Flat, Lockwood, East Shelbourne, White Hills, Epsom, Huntly, Bagshot, fosterville, Strathfieldsaye, Axe Creek, sheepwash, Nerring, Leichardt, Leichardt East, Marong, Golden Fleece, Golden Gully, Dowling St Mission, Benevolent Asylum, Hospital Income and Expenditure List of stewards Notices Pastorates Evangelistic Bands Document LYDIA CHANCELLOR COLLECTION: BENDIGO METHODIST CHURCHES PLAN 1905 AND CHURCH OFFICIALS ...LYDIA CHANCELLOR COLLECTION: Bendigo Methodist Churches Plan 1905 and church officials Quarterly Pastoral Visitation of Classes Circuit plan for Forest St, Golden square, Eaglehawk West, Eaglehawk East, California Hill, California Gully, Long Gully, McKenzie St, Galvin St, Rowan St, Arnold St, Iron Bark, Buckly St, Specimen Hill, Quarry Hill, Bridge St, Retreat Road, Kangaroo Flat, Lockwood, East Shelbourne, White Hills, Epsom, Huntly, Bagshot, fosterville, Strathfieldsaye, Axe Creek, sheepwash, Nerring, Leichardt, Leichardt East, Marong, Golden Fleece, Golden Gully, Dowling St Mission, Benevolent Asylum, Hospital Income and Expenditure List of stewards Notices Pastorates Evangelistic Bandsbendigo, history, schooling -
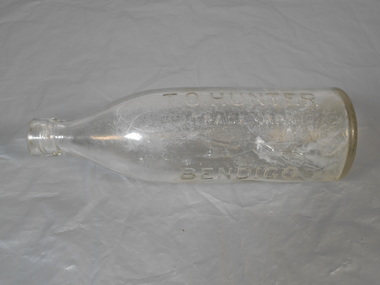 Bendigo Historical Society Inc.
Domestic object - Bottle
... Advertisements show the following:- 1891- manufacturer of aerated water and cordial. 1893 had a stock of ales and stout 1908 - joined with his brother Frederick and became Hunter Bros. 1912 - Brewer 1915 - Combined with Steward Bros. of Eaglehawk and the company became Steward and Hunter Pty Ltd. The site of manufacturing was the Kent Brewery in Bridge St., Bendigo...Advertisements show the following:- 1891- manufacturer of aerated water and cordial. 1893 had a stock of ales and stout 1908 - joined with his brother Frederick and became Hunter Bros. 1912 - Brewer 1915 - Combined with Steward Bros. of Eaglehawk and the company became Steward and Hunter Pty Ltd. The site of manufacturing was the Kent Brewery in Bridge St., Bendigo Bottle Glass T.O.HUNTER TRADEMARK (EMBOSSED GREYHOUND) BENDIGO. ...Thomas Oliver Hunter was born in1867 and died in Bendigo in 1941. Advertisements show the following:- 1891- manufacturer of aerated water and cordial. 1893 had a stock of ales and stout 1908 - joined with his brother Frederick and became Hunter Bros. 1912 - Brewer 1915 - Combined with Steward Bros. of Eaglehawk and the company became Steward and Hunter Pty Ltd. The site of manufacturing was the Kent Brewery in Bridge St., BendigoBottle Glass with marking on one side and down the bottom T.O.HUNTER TRADEMARK (EMBOSSED GREYHOUND) BENDIGO. THIS BOTTLE IS THE PROPERTY OF T.O. HUNTER BENDIGO AND CANNOT BE LEGALLY USED BY OTHERSbottle, glass -
 Bendigo Historical Society Inc.
Document - GOLD RUSHES AROUND BENDIGO
... Eaglehawk Police Station... Mr W Perry... Log Lock-ups... John Fry... Charles Fry... Bendigo Advertiser 30/3/1949... Alex H Stone... Bendigo Advertiser 20/41949... Milburn's Coffee Palace... Shell Service Station... Bridge...Eaglehawk and White Hills and where the idea came from. Also the cost of building and source of logs. Bells In and Around Bendigo tell of a tram employee ringing a bell and shouting to all that the tram terminus at the Railway Station was discontinued. When this was sufficiently known the bell went to the Bridge...Eaglehawk and White Hills and where the idea came from. Also the cost of building and source of logs. Bells In and Around Bendigo tell of a tram employee ringing a bell and shouting to all that the tram terminus at the Railway Station was discontinued. When this was sufficiently known the bell went to the Bridge ...Typed and hand written notes on 'Gold Rushes around Bendigo', Eaglehawk Police Station, Bells In and Around Bendigo, Bendigo Historical Society Newsletter, Mr Henry Jones - Gold Buyer, and Sir John Quick. Gold Rushes Around Bendigo tells of some gold finds around Bendigo. Eaglehawk Police Station tells of the Building of the Log Lockups at Eaglehawk and White Hills and where the idea came from. Also the cost of building and source of logs. Bells In and Around Bendigo tell of a tram employee ringing a bell and shouting to all that the tram terminus at the Railway Station was discontinued. When this was sufficiently known the bell went to the Bridge Street Methodist Church. The BHS Newsletter mentions business men's names and connection with their trade. Mr Henry jones - Gold Buyer mentions where his office was and that you could buy gold and money could be exchanged as well. Sir John Quick page tells of the early life of Sir John Quick and his self-education, of the A. N. A. opening in Victoria.document, names of bendigo pioneers, bendigo goldfields, gold rushes around bendigo, caltex oil co, matt egan, thos fleck, knight's brick kiln, water commission, work shops, l king, r king, j mumberry, a kelly, 'auld dart', robert fallon, mrs jane stinton, joch, vol 1 gold nuggets literary society files (manuscript written 1852-1882.), john o'c hattam, eaglehawk police station, mr w perry, log lock-ups, john fry, charles fry, bendigo advertiser 30/3/1949, alex h stone, bendigo advertiser 20/41949, milburn's coffee palace, shell service station, bridge street methodist church, mr don hargreaves, bendigo historical society newsletter, mr buzza, mr ankle, mr foote, mr scales, mr bull, mr mutton, mr body, mr satori, mr tankard, mr punch, mr snowball, mr sweet, mr goody, mr pallett, mr frame, mr henry jones, bendigo advertiser centenary of bendigo supplement 1951, sir john quick, a w llewelyn, australian natives association, friendly society, virginia battery, commonwealth parliament, federation league, mr alfred deakin, mr d'esterre taylor, mr peacock, mr barret, mr george reid, corowa conference 1893, poet gay, bendigo cemetery, centenary history ana 1871-1971, john e menadue -
 Bendigo Historical Society Inc.
Document - RESEARCH NOTES: ONE TREE HILL, STORMWATER CHANNEL, ANTHONY TROILLOPE, HORSE TRAMWAY TO GOLDEN SQUARE
... Eaglehawk Logs... Bendigo Advertiser 19/10/1858... Damaging the Stormwater Channel... Bendigo Advertiser 11/8/1872... Harneys Bridge...History House 11 Mackenzie Street Bendigo goldfields DOCUMENT Various Notes Eaglehawk Logs Bendigo Advertiser 19/10/1858 Damaging the Stormwater Channel Bendigo Advertiser 11/8/1872 Harneys Bridge Gas Works Constable Rogers Constable James Bradley Joch John O'C Hattam One Tree Hill Ryan Trollope's Fabulous Bendigo Anthony Trollope 'Trollope’s Australia' Nelson Press Alex H Stone Bendigo Advertiser 5/7/1897 Mr Peter Ellis Cr Hoskins Horse Tramway Historical Society Water Wheel Flour Mill June Parry Mr Pat Wodetzki Mr Leo Wodetzki Neil Murray Mr K Hester Mr Wes Harry Mr I Hendry Mr henry Jackson Mr Connelly Mr Irons Mr Harney Dr Smith Dr Hoyle Rev Dr Bachaus Rev Dr Nish Rev Joseph Dare Hon Angus Mackay Mr Haverfield Mr J K Robshaw W P Neal Mr George Lansell Hon J H Abbott M L C MR J Casey Dr James Boyd Dr Atkinson Dr Easie Mr T H Henderson Old Beehive Francis Brothers Mr John Crowley MR Jacob Cohn Art Gallery Mr Hugh McDevitt Mr Alexander Bayne Mr F Sciallero Camp Reserve Hon W I Winter-Irvine MR George Avery Fletcher Great Central Goldfield of Victoria Safety Cages Bendigo Advertiser J H Seymour Mr Horwood New Chum and Victoria Tribute Company James Watson Seymour's Patent Safety Cage Londerry Tribute National Show Sandhurst H Banfield Mr A Llewllyn 'Dear Old Bendigo' Thomas Bracken Mr William Heffernan Mr Edward (Ned) Ryan Mr Samuel Bastard Mr Charles Bird McPherson and Co Fern Hill Club Mr George Tolhurst Tolhurst Brothers Union Bank Mr Lawrence Ryan Mr Shadrack Jones Charley Armstrong Armstrong Brothers Mr Abraham Solomen Mr Bladiere Mr R T Wheeler Typed and handwritten notes. ...Typed and handwritten notes. Mentioned are: - Some Notes Concerning The Eaglehawk Logs, Damaging the Stormwater Channel, where some Chinese were digging away the Creek, the cutting down of the giant gum tree which gave One Tree Hill its name, How Anthony Trollope saw Bendigo in the 1870's, A Proposed Horse Tramway to Golden Square, Society’s' Trip to Bridgewater Flour Mill, A talk on a trip to Malaya by Mr D Hester, Society News and Happenings, Old Bendigonians and Safety Cages,document, various notes, eaglehawk logs, bendigo advertiser 19/10/1858, damaging the stormwater channel, bendigo advertiser 11/8/1872, harneys bridge, gas works, constable rogers, constable james bradley, joch, john o'c hattam, one tree hill, ryan, trollope's fabulous bendigo, anthony trollope, 'trollope’s australia', nelson press, alex h stone, bendigo advertiser 5/7/1897, mr peter ellis, cr hoskins, horse tramway, historical society, water wheel flour mill, june parry, mr pat wodetzki, mr leo wodetzki, neil murray, mr k hester, mr wes harry, mr i hendry, mr henry jackson, mr connelly, mr irons, mr harney, dr smith, dr hoyle, rev dr bachaus, rev dr nish, rev joseph dare, hon angus mackay, mr haverfield, mr j k robshaw, w p neal, mr george lansell, hon j h abbott, m l c, mr j casey, dr james boyd, dr atkinson, dr easie, mr t h henderson, old beehive, francis brothers, mr john crowley, mr jacob cohn, art gallery, mr hugh mcdevitt, mr alexander bayne, mr f sciallero, camp reserve, hon w i winter-irvine, mr george avery fletcher, great central goldfield of victoria, safety cages, bendigo advertiser, j h seymour, mr horwood, new chum and victoria tribute company, james watson, seymour's patent safety cage, londerry tribute, national show sandhurst, h banfield, mr a llewllyn, 'dear old bendigo', thomas bracken, mr william heffernan, mr edward (ned) ryan, mr samuel bastard, mr charles bird, mcpherson and co, fern hill club, mr george tolhurst, tolhurst brothers, union bank, mr lawrence ryan, mr shadrack jones, charley armstrong, armstrong brothers, mr abraham solomen, mr bladiere mr r t wheeler -
 Bendigo Historical Society Inc.
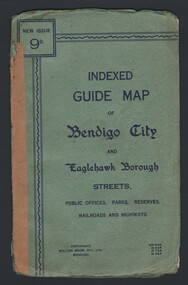
Map - INDEXED GUIDE MAP OF BENDIGO CITY & EAGLEHAWK BOROUGH, Early to mid 1920's
... Map shows the location of Sailors Gully, Peg Leg Gully, California Gully, Long Gully, Eaglehawk Creek, Bendigo Creek, Ironbark Creek. Shows location of Showgrounds between Park St, Baxter Street, Barnard St and Bridge Lane. ...Map shows the location of Sailors Gully, Peg Leg Gully, California Gully, Long Gully, Eaglehawk Creek, Bendigo Creek, Ironbark Creek. Shows location of Showgrounds between Park St, Baxter Street, Barnard St and Bridge Lane. ...Map. Indexed Guide Map of Bendigo City & Eaglehawk Borough. Folded map contained within blue booklet. Booklet is light blue printed with dark blue ink. Copyright Bolton Bros. Pty. Ltd. Bendigo. Printed on front. Map shows the location of Sailors Gully, Peg Leg Gully, California Gully, Long Gully, Eaglehawk Creek, Bendigo Creek, Ironbark Creek. Shows location of Showgrounds between Park St, Baxter Street, Barnard St and Bridge Lane. Shows location of Golden Square Railway Station between Panton St and Allingham St. Shows what is now known as Creek St. Nth & Sth as Clark St Nth & Sth. Also shows Tramway Terminus along Carpenter St and Golden Square Tram Terminus on High St, Golden Square. Map has a street index and an index for Public Offices, Parks and Reserves.map, bendigo, township, indexed guide map of bendigo city and eaglehawk borough -
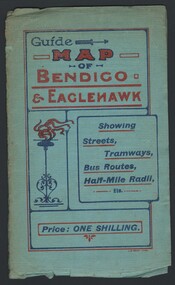
 Bendigo Historical Society Inc.
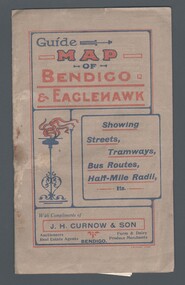
Map - GUIDE MAP OF BENDIGO & EAGLEHAWK, Late 1920's
... Eaglehawk. Outer cover is printed in blue and red ink and states - With compliments of J H Curnow & Son, Auctioneers, Real Estate Agents, Farm & Dairy Produce Merchants, Bendigo. Printed by J B Young, Lithographer. Map shows tramways & bus routes. Map shows Agricultural Showgrounds located between Park Street, Water Street, Barnard Street and Bridge...Eaglehawk. Outer cover is printed in blue and red ink and states - With compliments of J H Curnow & Son, Auctioneers, Real Estate Agents, Farm & Dairy Produce Merchants, Bendigo. Printed by J B Young, Lithographer. Map shows tramways & bus routes. Map shows Agricultural Showgrounds located between Park Street, Water Street, Barnard Street and Bridge ...Map. Guide Map of Bendigo & Eaglehawk. Light brown coloured booklet containing folded map of Bendigo and Eaglehawk. Outer cover is printed in blue and red ink and states - With compliments of J H Curnow & Son, Auctioneers, Real Estate Agents, Farm & Dairy Produce Merchants, Bendigo. Printed by J B Young, Lithographer. Map shows tramways & bus routes. Map shows Agricultural Showgrounds located between Park Street, Water Street, Barnard Street and Bridge Lane. Also shows Acclimitization Reserve located behind The Botanical Gardens at White Hills. Shows the location of Sailors Gully, Peg-Leg Gully, Jobs Gully, California Gully, Long Gully, Ironbark Gully, Golden Gully, Poverty Gully, Sheepshead Gully, Charcoal Gully, Eaglehawk Creek, Bendigo Creek and Back Creek. Contains interesting facts about Bendigo - Area 7,900 acres. Population - 26,000. First Council elected - 1855. Proclaimed a Borough - 1863. Proclaimed a City - 1871. Gold Rush broke out - 1851. For first 10 years gold yield averaged 8,600 ozs. per week . Total gold yield to 1923 - 572 tons valued at 82,000,000 pounds. Deepest mines - Victoria Quartz 4,614 ft., New Chum Railway 4,318 ft. 13 mines over 3.000 ft. deep. 53 mines over 2,000 ft. deep. Sewering of City commenced 1922, all principal buildings now sewered. Map printed by Arnall & Jackson, General Printers, Stationers & Engravers, 476 Collins Street. Map displays advertisement for J H Curnow & Son, Bendigo's leading Auctioneer and Estate Agents, Mitchell & Queen Sts. Bendigo. Map Scale 20 chs. = 1 in.cottage, miners, guide map of bendigo and eaglehawk -
 Bendigo Historical Society Inc.
Map - GUIDE MAP OF BENDIGO & EAGLEHAWK, Late 1920's
... Eaglehawk. Map shows tramways, bus routes and cost one shilling. Map shows Agricultural Showgrounds located between Park Street, Water Street, Barnard Street and Bridge Lane. ...Eaglehawk. Map shows tramways, bus routes and cost one shilling. Map shows Agricultural Showgrounds located between Park Street, Water Street, Barnard Street and Bridge Lane. ...Map. Guide map of Bendigo & Eaglehawk. Folded map of Bendigo & Eaglehawk with blue outer cover booklet. Map is compiled by E E Parker, Eaglehawk. Map shows tramways, bus routes and cost one shilling. Map shows Agricultural Showgrounds located between Park Street, Water Street, Barnard Street and Bridge Lane. Also shows Acclimitization Reserve located behind the Botanical Gardens at White Hills. Shows the location of Sailors Gully, Peg-Leg Gully, Jobs Gully, California Gully, Long Gully, Ironbark Gully, Golden Gully, Poverty Gully, Sheepshead Gully, Charcoal Gully, Eaglehawk Creek, Bendigo Creek and Back Creek.Contains interesting facts about Bendigo:- Area - 7,900 acres, Population - 26,000, First Council elected - 1855, Proclaimed a City - 1871. Gold Rush broke out - 1851. For first 10 years gold yield averaged 8,600 ozs. Per week. Total gold yield to 1923 - 572 tons valued at 82,000,000 pounds. Deepest mines - Victoria Quartz 4,614 ft., New Chum Railway 4,318 ft., 13 mines over 3,000ft. deep, 53 mines over 2,000 ft. deep. Sewering of City commenced 1922. All principal buildings now sewered. Map printed by Arnall & Jackson, General Printers, Stationers & Engravers, 476 Collins Street. Outer map blue cover printed in red and blue ink by J B Young, Lithographer. Map displays advertisement for Bendigo Timber Co. Outer blue cover displays advertisement for Campbell Connelly & Co. Pty. Ltd, Ironmongers, Timware Manufacturers, Plumbers, Sewerage Contractors, High and Forest Sts, Bendigo 9outside back cover) and for Hartleys ( J L Shoosmith) Bendigo, displaying Indian Motor Cycles (inside back cover).map, bendigo, township, guide map of bendigo & eaglehawk -
Bendigo Historical Society Inc.
Document - HARRY BIGGS COLLECTION: A LETTER FROM H BIGGS TO EDITOR OF BENDIGO ADVERTISER, 29/4/1970
... Mr Biggs in the article is stressing the importance of time & money being spent on such projects as the Joss House, Police Barracks, Central Deborah Mine, Victoria Hill Project, Eaglehawk Logs, Museum & Chinese Project in Bridge Street....Mr Biggs in the article is stressing the importance of time & money being spent on such projects as the Joss House, Police Barracks, Central Deborah Mine, Victoria Hill Project, Eaglehawk Logs, Museum & Chinese Project in Bridge Street. Document HARRY BIGGS COLLECTION: A LETTER FROM H BIGGS TO EDITOR OF BENDIGO ADVERTISER ...Document. Harry Biggs Collection. H. Biggs, 121 King St. Bendigo 29/4/70. Sent a letter to the Editor of the Bendigo Advertiser asking if he would publish 'the following' in the paper. In the article he congratulates the Bendigo Advertiser for a well balanced view presented in its leading article 'It's worth the effort'. Mr Biggs in the article is stressing the importance of time & money being spent on such projects as the Joss House, Police Barracks, Central Deborah Mine, Victoria Hill Project, Eaglehawk Logs, Museum & Chinese Project in Bridge Street.H. Biggsorganization, club/society, community, harry biggs collection, a letter from h biggs to editor of bendigo advertiser -
 Ballarat Tramway Museum
Slide - SECV Bendigo trams operations - set of 9, Warren Doubleday, 31/1/1972
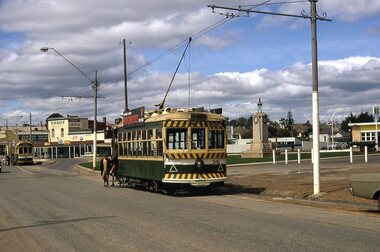
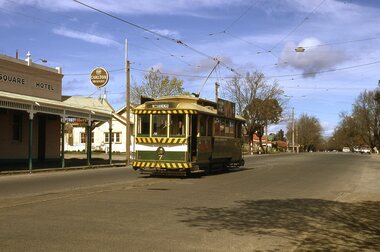
... Set of 9 photos of Bendigo tramway operations taken on 31/1/1972: 1 - tram 3 on the Eaglehawk line for Quarry Hill 2 - Birney 29 on North Bendigo crossing bridge 3 - Charing Cross with trams 29, 6, 3 and 5 4 - Tram 29 at Golden Square with the Golden Square Hotel on the left 5 - tram 29 passing the Fire Station 6 - tram 29 on the North Bendigo line 7 - tram 6 passing the Cathedral 8 - tram 5 on its way to Quarry Hill 9 - tram 18 on its way to Eaglehawk ...Ballarat Tramway Museum South Gardens Reserve Wendouree Parade Ballarat Ballarat goldfields Set of 9 photos of Bendigo tramway operations taken on 31/1/1972: 1 - tram 3 on the Eaglehawk line for Quarry Hill 2 - Birney 29 on North Bendigo crossing bridge 3 - Charing Cross with trams 29, 6, 3 and 5 4 - Tram 29 at Golden Square with the Golden Square Hotel on the left 5 - tram 29 passing the Fire Station 6 - tram 29 on the North Bendigo line 7 - tram 6 passing the Cathedral 8 - tram 5 on its way to Quarry Hill 9 - tram 18 on its way to Eaglehawk Yields information about Bendigo tramways operations in Jan. 1972 tramways Bendigo tram 6 tram 18 tram 5 tram 29 tram 3 Have the photographer's slide number written on them. "2/72/25 to 34" Colour Slide - Kodak cardboard mounts - set of 9 Slide SECV Bendigo trams operations - set of 9 Warren Doubleday ...Set of 9 photos of Bendigo tramway operations taken on 31/1/1972: 1 - tram 3 on the Eaglehawk line for Quarry Hill 2 - Birney 29 on North Bendigo crossing bridge 3 - Charing Cross with trams 29, 6, 3 and 5 4 - Tram 29 at Golden Square with the Golden Square Hotel on the left 5 - tram 29 passing the Fire Station 6 - tram 29 on the North Bendigo line 7 - tram 6 passing the Cathedral 8 - tram 5 on its way to Quarry Hill 9 - tram 18 on its way to Eaglehawk Yields information about Bendigo tramways operations in Jan. 1972Colour Slide - Kodak cardboard mounts - set of 9Have the photographer's slide number written on them. "2/72/25 to 34"tramways, bendigo, tram 6, tram 18, tram 5, tram 29, tram 3 -
 Ballarat Tramway Museum
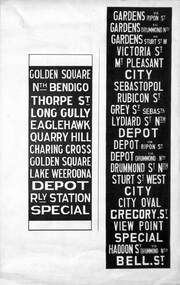
Sign - Sign - Destination Blinds, Tram Destination Blinds for various areas - Ballarat and Bendigo
... Bridger was an avid collector of items related to transport, predominately Trams. These items include newspaper cuttings, pamphlets, reports, timetables, fares prices plus special items relating to events. Items from Melbourne and regional Victoria, interstate - Adelaide and Sydney, plus overseas, make up this collection. Two country areas are shown - Ballarat and Bendigo. Bendigo blind has destinations to Golden Square, North Bendigo, long Gully, Eaglehawk...Bridger was an avid collector of items related to transport, predominately Trams. These items include newspaper cuttings, pamphlets, reports, timetables, fares prices plus special items relating to events. Items from Melbourne and regional Victoria, interstate - Adelaide and Sydney, plus overseas, make up this collection. Two country areas are shown - Ballarat and Bendigo. Bendigo blind has destinations to Golden Square, North Bendigo, long Gully, Eaglehawk ...Ron Bridger was an avid collector of items related to transport, predominately Trams. These items include newspaper cuttings, pamphlets, reports, timetables, fares prices plus special items relating to events. Items from Melbourne and regional Victoria, interstate - Adelaide and Sydney, plus overseas, make up this collection. Two country areas are shown - Ballarat and Bendigo. Bendigo blind has destinations to Golden Square, North Bendigo, long Gully, Eaglehawk, Quarry Hill, Lake Weeroona, Railway Station, Depot and Special. The Ballarat tram blind shows Gardens vis Ripon Street, Drummond Street North, Sturt Street West, Mt Pleasant, City, Sebastopol, Rubicon Street Grey St Sebastopol, Lydiard Street North, Sturt Street West, city, City Oval, Gregory Street, View Point, Bells Street Haddon Street Special. The Depot stop is via Ripon Street and via Drummond Street.Sheet showing destination routes for Bendigo area and Ballarat area. Blinds are black with white print. Name of stopping places for each routeas box 48a, destination blinds, bendigo, golden square, thorpe street, long gully, eaglehawk, quarry hill, charing cross, lake weeroona, depot, railway station, special, gardens, rippon street, drummond street, sturt street, city, sebastopol, rubicon street, grey street-sebas'tl, lydiard straat north, victoria street, mt pleasant, depot via ripon st, depot via drummond st, sturt street west, city oval, gregory street, view point, haddon street, bell street, ron bridger collection -
 Ballarat Tramway Museum
Photograph - Digital image Set of 20
... , at Eaglehawk terminus, with Eaglehawk Town Hall in the background. .13 - Birney tram crossing the bridge at the Depot entrance - No. 29 .14 - No. 29 on the Eaglehawk line? ..., at Eaglehawk terminus, with Eaglehawk Town Hall in the background. .13 - Birney tram crossing the bridge at the Depot entrance - No. 29 .14 - No. 29 on the Eaglehawk line? ...Set of 20 digital images of Bendigo Tramways, 1972 at or before closure while on a tram tour by Stuart Lodington. .1 - No. 28 and 5 at Eaglehawk terminus .2 - No. 28 leaving Charing Cross and travelling into View St with Armstrong Type Service building in background and Firestone Advertisements. .3 - No. 29 with Eaglehawk Town Hall and Post Office in background. .4 - No. 26 and 29 at start of double track, High St Eaglehawk .5 - No. 29 leaving Eaglehawk with shops in the background, Foodland, J. Bests .6 - No. 29 and 23 crossing Manchester Loop with Manchester Arms Hotel in the background and an old poppet head. .7 - No. 29 at ditto with poppet head in the background. .8 - No. 28 and two other trams at the Quarry Hill terminus. .9 - No. 29 in High St Bendigo with the Cathedral and Golden Gate Hotel in the background. .10 - No. 3 with destination Eaglehawk, in bound Carpenter St? .11 - No. 29 following a single trucker through a loop or the end of the double track near the depot. .12 - No. 23?, at Eaglehawk terminus, with Eaglehawk Town Hall in the background. .13 - Birney tram crossing the bridge at the Depot entrance - No. 29 .14 - No. 29 on the Eaglehawk line? .15 - as for .13 .16 - No. 29 entering the depot. .17 - No. 23, inbound from Eaglehawk, at Jobs Gully Loop with the railway overbridge in the background. .18 - No. 28 and two other trams (see also Reg Item 4982) for the same tram tour at Myrtle St. Loop. .19 - No. 21 with North Bendigo on the destination approaching the Golden Square terminus. .20 - No. 7 at Golden Square terminustrams, tramways, bendigo, eaglehawk, quarry hill, golden square, depot, tram 5, tram 29, tram 28, tram 26, tram 23, tram 7, tram 21 -
 Ballarat Tramway Museum
Photograph - Digital image Set of 20, 1971-72
... Also a Newsagent with The Sun, The Bendigo Advertiser and The Age signs on the building, High St .13 - No. 29 Mt Korong Rd, with the railway overbridge in the background. .14 - interior photo of Birney tram roof .15 - interior view of controls of Birney at Eaglehawk .16 - No. 29 outbound at the Depot Junction McCrae St. .17 - No. 18 at the Eaglehawk terminus .18 - close up view of No. 29 front. .19 - No. 29 in Nolan St, crossing the bridge, outbound. .20 - No. 18 at the Eaglehawk terminus with the Eaglehawk Town Hall, Post Office in the background. ...Also a Newsagent with The Sun, The Bendigo Advertiser and The Age signs on the building, High St .13 - No. 29 Mt Korong Rd, with the railway overbridge in the background. .14 - interior photo of Birney tram roof .15 - interior view of controls of Birney at Eaglehawk .16 - No. 29 outbound at the Depot Junction McCrae St. .17 - No. 18 at the Eaglehawk terminus .18 - close up view of No. 29 front. .19 - No. 29 in Nolan St, crossing the bridge, outbound. .20 - No. 18 at the Eaglehawk terminus with the Eaglehawk Town Hall, Post Office in the background. ...Set of 20 digital images of Bendigo Tramways, 1972 at or before closure while on a tram tour by Stuart Lodington. .1 - No. 7 at Golden Square terminus .2 - ditto .3 - No. 26 in bound on the Eaglehawk line with a crossing loop behind. .4 - Birney crossing the bridge by the tram depot. .5 - No. 29 running a special on the Eaglehawk line with a HBA billboard in the background. .6 - No. 29 with a driver walking in front of the tram at the above location. .7 - No. 29 on the Eaglehawk line .8 - ditto waiting for a tram at Manchester Loop with poppet head in the background. .9 - No. 29 on the Eaglehawk line .10 - Eaglehawk Town Hall at night. .11 - No. 7 at the depot junction in McCrae St, with Golden Square destination. .12 - No. 29 with the Camp Hotel Eaglehawk in the background. Also a Newsagent with The Sun, The Bendigo Advertiser and The Age signs on the building, High St .13 - No. 29 Mt Korong Rd, with the railway overbridge in the background. .14 - interior photo of Birney tram roof .15 - interior view of controls of Birney at Eaglehawk .16 - No. 29 outbound at the Depot Junction McCrae St. .17 - No. 18 at the Eaglehawk terminus .18 - close up view of No. 29 front. .19 - No. 29 in Nolan St, crossing the bridge, outbound. .20 - No. 18 at the Eaglehawk terminus with the Eaglehawk Town Hall, Post Office in the background. Has a circus banner on the side.trams, tramways, bendigo, eaglehawk, quarry hill, golden square, depot, mccrae st, nolan st, tram 7, tram 26, tram 29, tram 18 -
 Ballarat Tramway Museum
Photograph - Digital image Set of 20, 1971-72
... Eaglehawk with Leo A Hughes Photographer in the background. The Tram has "Johnnie Walker whiskey" roof adverts. .6 - No. 29 outbound in Thunder St with a train passing over the bridge in the background. .7 - view from the front window of a tram on the Eaglehawk line with a large "display event float" in the foreground and tram approaching a crossing loop. .8 - No. 29 at North Bendigo .9 - view of High St Eaglehawk looking east from the terminus, showing the track and centre poles. .10 - No. 29 outbound on the North Bendigo line turning from either Nolan St or Caledonia St, running a special. .11 - No. 7 departing North Bendigo for Golden Square. .12 - No. 3 and 18 at Charing Cross. ...Eaglehawk with Leo A Hughes Photographer in the background. The Tram has "Johnnie Walker whiskey" roof adverts. .6 - No. 29 outbound in Thunder St with a train passing over the bridge in the background. .7 - view from the front window of a tram on the Eaglehawk line with a large "display event float" in the foreground and tram approaching a crossing loop. .8 - No. 29 at North Bendigo .9 - view of High St Eaglehawk looking east from the terminus, showing the track and centre poles. .10 - No. 29 outbound on the North Bendigo line turning from either Nolan St or Caledonia St, running a special. .11 - No. 7 departing North Bendigo for Golden Square. .12 - No. 3 and 18 at Charing Cross. ...Set of 20 digital images of Bendigo Tramways, 1972 at or before closure while on a tram tour by Stuart Lodington. .1 - No. 29 at the North Bendigo terminus .2 - No. 29 just past the Bendigo end of the double track in High St Eaglehawk, with a BP dealer in the background. .3 - Night photo of No. 18 at a terminus, showing "Eaglehawk" .4 - ditto .5 - Night photo of No. 24 at Eaglehawk with Leo A Hughes Photographer in the background. The Tram has "Johnnie Walker whiskey" roof adverts. .6 - No. 29 outbound in Thunder St with a train passing over the bridge in the background. .7 - view from the front window of a tram on the Eaglehawk line with a large "display event float" in the foreground and tram approaching a crossing loop. .8 - No. 29 at North Bendigo .9 - view of High St Eaglehawk looking east from the terminus, showing the track and centre poles. .10 - No. 29 outbound on the North Bendigo line turning from either Nolan St or Caledonia St, running a special. .11 - No. 7 departing North Bendigo for Golden Square. .12 - No. 3 and 18 at Charing Cross. No. 3 has two SEC roof Advertisements .13 - No. 7 at North Bendigo with the trolley pole being reversed. .14 - No. 24 at Quarry Hill with Northern Terrazzo in the background with the driver alongside .15 - No. 7 and No.6 at Charing Cross with the Beehive buildings in the background. .16 - No. 7 at North Bendigo terminus .17 - ditto .18 - No. 24 at Quarry Hill with Northern Terrazzo in the background with the conductor alongside. .19 - ditto .20 - No. 26 and other bogie tram in View St near Charing Cross with the Armstrong Tyre Service building and signs for Cohn's Drinks and T&G in the view.trams, tramways, bendigo, eaglehawk, quarry hill, golden square, depot, north bendigo, charing cross, tram 29, tram 18, tram 24, tram 3, tram 7, tram 6, tram 26 -
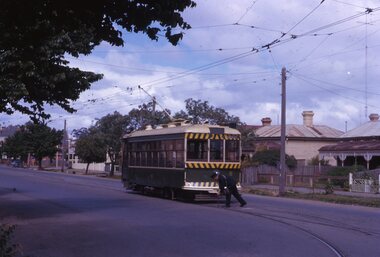 Ballarat Tramway Museum
Slide - 35mm slide/s, Noel Simons, 21/11/1962 12:00:00 AM
... Eaglehawk at the intersection of Mt. Korong Road and the Calder Highway. Photo taken after the tram has passed the photographer. Has an Ampol service station in the background. 1188.14 - No. 11 leaving the Bendigo depot, crossing the bridge, with the Scrubber car in the background. 1188.15 - No. 21 at the North Bendigo terminus. ...Eaglehawk at the intersection of Mt. Korong Road and the Calder Highway. Photo taken after the tram has passed the photographer. Has an Ampol service station in the background. 1188.14 - No. 11 leaving the Bendigo depot, crossing the bridge, with the Scrubber car in the background. 1188.15 - No. 21 at the North Bendigo terminus. ...Set of 17 transparencies taken on 21/11/1962 on Kodak mounts. 1188.1 - Bendigo No. 11 at Depot Junction McCrae and Arnold St. with driver/conductor changing points. 1188.2 - Bendigo No. 4 at Charing Cross, side on photo, with City Club Hotel and Alexandra Fountain in the background. Tram has Castrol and SEC 'Electric Cooking' ads. 1188.3 - Bendigo No. 4 climbing View St. after tram has passed photographer. Tram has Streets Ice Cream and Cohns Soft Drinks ad on rear dash panel. In the background are the buildings in View St., including the Princess Theatre. Tram has destination of Eaglehawk. 1188.4 - Trams 2 and 4 crossing at the California Gully or Thorpe St Loop. 1188.5 - Bendigo 4 in Mt Korong Road. Tram inbound with destination of Quarry Hill, just leaving Garden Gully Loop. 1188.6 - Bendigo 4 and 17 crossing at the Hayes St. or Iron Bark Gully Loop. No. 17 bound for Eaglehawk, No. 4, Quarry Hill. 17 has two SEC roof ads and a white horse whiskey ad. 1188.7 - No. 17 bound for Eaglehawk, soon after leaving California Gully. Has large mullock heap in background. 1188.8 - Bendigo 2 and 17 crossing at the Thorpe St. or California Gully Loop. Has butchers shop in background. 1188.9 - Bendigo 17 at the Eaglehawk terminus. Has destination of Quarry Hill. In background is the hotel and shops at the terminus, showing ads for "Melbourne Bitter". Tram has two SEC 'Electric Cooking' ads. Driver and conductor about to assist two lady passengers with a pram and baby. 1188.10 - No. 17 at Eaglehawk terminus, awaiting departure. Has Eaglehawk Town Hall and Post Office in background. Tram has a Whitehorse Whiskey ad on the front dash panel. 1188.11 - No. 3 in High St. Eaglehawk, with destination of Eaglehawk. Has the shops on the south side of High St. in the background, including the Eaglehawk fish shop. Tram has two roof ads, one an SEC roof ad, and Cohns Drinks and Streets Ice cream ads on front dash panel. 1188.12 - as above, but after tram has passed photographer. Note the centre of the road poles. 1188.13 - No. 2 outbound for Eaglehawk at the intersection of Mt. Korong Road and the Calder Highway. Photo taken after the tram has passed the photographer. Has an Ampol service station in the background. 1188.14 - No. 11 leaving the Bendigo depot, crossing the bridge, with the Scrubber car in the background. 1188.15 - No. 21 at the North Bendigo terminus. Tram has destination of Golden Square and Cohns drink ad on front dash and two roof ads on side. 1188.16 - No. 11 on Golden Square route, in High St. at intersection with Old High St. 1188.17 - No. 11 at the Golden Square terminus, conductor turning the pole. Hotel on the left side of the photo. Note the road works barrier and red flag behind the tram. Slide has an end of roll mark on the right hand side of the image.Information written on in black ink and date stamped on purple ink. 1188.1 - "Birney car No. 11 in McCrae St. at Cnr of Arnold about to run into depot, Bendigo" 1188.2 - "No. 4 at Alexandra Fountain, Charing Cross Bendigo" 1188.3 - "No. 4 climbing the View St. Hill from Charing Cross, Bendigo (Eaglehawk Route)" 1188.4 - "No. 4 and 2 at Thorpe St. Loop, California Gully" 1188.5 - "No. 4 in Mt Korong Rd., Long Gully, Near Havilah Rd. (Bendigo) (Eaglehawk Route)" 1188.6 - "Nos. 17 and 4 crossing on Hayes St. Loop, Ironbark, Bendigo" 1188.7 - "No. 17 soon after leaving California Gully (Eaglehawk Route)" 1188.8 - "No.2 and 17 crossing on Thorpe St. Loop, California Gully (Eaglehawk Route)" 1188.9 - "No. 17 at Eaglehawk terminus" 1188.10 - "No. 17 at Eaglehawk terminus" 1188.11 - "No. 3 in High St. Eaglehawk" 1188.12 - "No. 3 nearing Eaglehawk terminus" 1188.13 - "No. 2 in Mt. Korong Rd., Ironbark. Calder highway on left (Eaglehawk route) 1188.14 - "Birney car No. 11 leaving Bendigo depot. Scrubber car at rear" 1188.15 - "No. 21 at North Bendigo Terminus" 1188.16 - "Birney car No. 11 in High St. Bendigo at intersection with Old High Street (Golden Square Route)" 1188.17 - "Birney Car No. 11 at Golden Square terminus, High St., Bendigo". tramways, trams, bendigo, depot junction, charing cross, view st., eaglehawk, north bendigo, golden square, tram 2, tram 3, tram 4, tram 11, tram 17, tram 21, tram scrubber -
 Ballarat Tramway Museum
Slide - 35mm slide/s - set of 13, Noel Simons, 24/05/1971 12:00:00 AM
... Bridge St. into Nolan St. Photo taken after tram has passed photographer. Tram has a briquettes roof ad. 1200.2 - No. 21 in McCrae St. just before Nolan St. Photo taken after tram has passed photographer. 1200.3 - No. 7 in Nolan St at corner with McCrae St. Passenger boarding tram at a tram stop. 1200.4 - No 7 turning from Nolan into McCrae St. with Golden Fleece service station in background. 1200.5 - No. 7 in Thunder St en route to North Bendigo. Photo taken after tram has passed photographer. 1200.6 - No. 5 en route to Eaglehawk...Information written on in black ink and date stamped on purple ink. 1200.1 - "No. 7 entering Nolan St. from Bridge St." 1200.2 -"No. 21 in McRae St. about to turn into Nolan St." 1200.3 - "No. 7 in Nolan St. at corner of McRae St." 1200.4 - "No. 7 turning from Nolan St. into McRae St." 1200.5 - "No. 7 in Thunder St. just after turning from Caledonia St." 1200.6 - "No. 5 just after leaving Needle Loop between Long Gully and California Gully. 1200.7 - "No. 5 in High St. Eaglehawk...Eaglehawk terminus."\ 1200.11 - "No. 5 in McCrae St. about to enter Arnold St." 1200.12 - "No. 5 in Arnold St." 1200.13 - "Entrance to Bendigo Tram Depot, No. 5 running into shed." Set of 13 transparencies taken on 24/5/1971 on Kodak mounts. 1200.1 - No. 7 en route to Golden Square turning from Bridge St. into Nolan St. ...Set of 13 transparencies taken on 24/5/1971 on Kodak mounts. 1200.1 - No. 7 en route to Golden Square turning from Bridge St. into Nolan St. Photo taken after tram has passed photographer. Tram has a briquettes roof ad. 1200.2 - No. 21 in McCrae St. just before Nolan St. Photo taken after tram has passed photographer. 1200.3 - No. 7 in Nolan St at corner with McCrae St. Passenger boarding tram at a tram stop. 1200.4 - No 7 turning from Nolan into McCrae St. with Golden Fleece service station in background. 1200.5 - No. 7 in Thunder St en route to North Bendigo. Photo taken after tram has passed photographer. 1200.6 - No. 5 en route to Eaglehawk just after leaving Needle Loop between Long Gully and California Gully. 1200.7 - No. 5 at the start of the double track in High St. Eaglehawk. 1200.8 - No. 5 at Eaglehawk terminus showing "Depot" with Leo A Hughes Photographer advertisement on building in background. 1200.9 - No. 5 at Eaglehawk terminus. Has two SEC roof ads 'Everything's fine in my all electric kitchen' and 'Electricity best for cooking'. 1200.10 - No. 5 at Eaglehawk terminus, with canon, war memorial outside Town Hall and Leo A Hughes Photographer advertisement on building in background. 1200.11 - No. 5 in McCrae St. about to enter Arnold St. and depot. Tram showing depot, has driver changing points. 1200.12 - No. 5 in Arnold St. Photo taken looking up the centre of the access track - shows the overhead at depot junction. 1200.13 - Depot entrance with signage at depot entrance and depot building in background.Information written on in black ink and date stamped on purple ink. 1200.1 - "No. 7 entering Nolan St. from Bridge St." 1200.2 -"No. 21 in McRae St. about to turn into Nolan St." 1200.3 - "No. 7 in Nolan St. at corner of McRae St." 1200.4 - "No. 7 turning from Nolan St. into McRae St." 1200.5 - "No. 7 in Thunder St. just after turning from Caledonia St." 1200.6 - "No. 5 just after leaving Needle Loop between Long Gully and California Gully. 1200.7 - "No. 5 in High St. Eaglehawk at start of double track." 1200.8 - "No. 5 at Eaglehawk terminus" 1200.9 - "No. 5 at Eaglehawk terminus" 1200.10 - "No. 5 at Eaglehawk terminus."\ 1200.11 - "No. 5 in McCrae St. about to enter Arnold St." 1200.12 - "No. 5 in Arnold St." 1200.13 - "Entrance to Bendigo Tram Depot, No. 5 running into shed."tramways, trams, bendigo, mccrae st, north bendigo, california gully, eaglehawk, depot, tram 5, tram 7, tram 21