Showing 264 items matching " king robert"
-
 Glenelg Shire Council Cultural Collection
Book, HENRY WORDSWORTH LONGFELLOW, The Falcon of Ser Federigo & King Robert of Sicily, c. 1919
... The Falcon of Ser Federigo & King Robert of Sicily...Soft cover, tan, black print The Falcon of Ser Federigo & King Robert of Sicily Book Book HENRY WORDSWORTH LONGFELLOW ...Two poems by Longfellow, edited by Ethel G Skeat. Soft cover, tan, black printpoetry, poem -
 Federation University Historical Collection
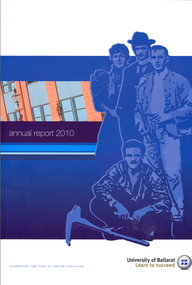
Book, University of Ballarat Annual Report, 2010, 2010
... king...robert h.t. smith...Contents include: David Battersby, Catherine King, Robert Hook, Jannine Bennett, Clare Gervasoni, Geoffrey Blainey, Robert H. ...Contents include: David Battersby, Catherine King, Robert Hook, Jannine Bennett, Clare Gervasoni, Geoffrey Blainey, Robert H. ...In 2010 the University of Ballarat celebrated 140 years of technical education on 26 October.Blue and white soft covered book featuring an image of three men and a woman. Contents include: David Battersby, Catherine King, Robert Hook, Jannine Bennett, Clare Gervasoni, Geoffrey Blainey, Robert H. T. Smith, charter, honorary doctorate Wai Man-Woo, David Suzuki, beer awards, Equine Centre, Science and Engineering Building, Aboriginal Education Centre, E. J. Barker Library refurbishment, Ashley Toth, Golden Key, Indigenous Education, William Harvey, Robyn Brandenburg, Diane Clinging, David Gao, Bronwyn Blaiklock, UB Technology Park, university of ballarat, ballarat school of mines, annual report, 2010, anniversary, 140th anniversary, david battersby, catherine king, robert h.t. smith, ted lovett, shirley morgan, tim stares, e.j. barker library refurbishment, geoffrey blainey research centre, geoffrey blainey research centre opening, geoffrey blaing, e.j. barker, ashley toth, tom gleeson, graeme hood, bronwyn blaiklock, robyn brandenberg, diane clingin -
 Ringwood and District Historical Society
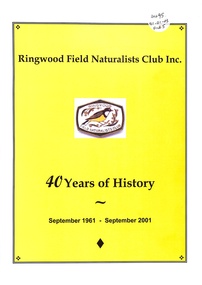
Book, Ringwood Field Naturalists Club Inc, 2001
... ...Robert King...Book Book Ringwood Field Naturalists Club Inc. Graham Cooke Robert King ...Ringwood Field Naturalists Club Inc. 40 Years of History September 1961 - September 2001 -
Glen Eira Historical Society
Document - Glen Eira College
... ... King Robert...Glen Eira College Booran Road Caulfield East Murrumbeena High School Prahran High School Caulfield High School McMullen Adele Lamb Lesley King Robert Kennedy Chris Panakos Debbie Caulfield South Document Glen Eira College ...Various documents related to Glen Eira College: 1/Researched details by Claire Barton 15/06/2012 on beginning dates of Glen Eira College and head teachers names. 2/Five Advertising articles from 2010 to May 2012 giving schools course outlines and other curricular activities on the schools various courses.glen eira college, booran road, caulfield east, murrumbeena high school, prahran high school, caulfield high school, mcmullen adele, lamb lesley, king robert, kennedy chris, panakos debbie, caulfield south -
 Bendigo Historical Society Inc.
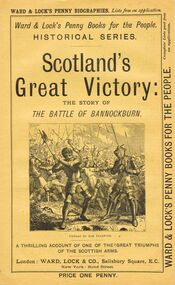
Book - LYDIA CHANCELLOR COLLECTION: SCOTLAND'S GREAT VICTORY. THE STORY OF THE BATTLE OF BANNOCKBURN
... ... King Robert Bruce...History House 11 Mackenzie Street Bendigo goldfields BOOKS Biography scotland Lydia Chancellor collection Ward & Lock's Penny Books for the People Ward & Lock's Penny Biographies Historical Series history biographies Scotland Scottish history Battle of Bannockburn advertisements book books King Robert Bruce penny books A book titled 'Scotland's Great Victory: The story of the Battle of Bannockburn. ...A book titled 'Scotland's Great Victory: The story of the Battle of Bannockburn. A thrillling account of one of the great triumphs of the Scottish arms.' London : Ward, Lock & Co., Salisbury Square, E.C. New York : Bond Street. 225 - 240 pgs. (ill.). This booklet is one of a series of 37 ' Ward & Lock's Penny Books for the People.' 'Historical Series.' Price one penny. There are also advertisements of note.books, biography, scotland, lydia chancellor, collection, ward & lock's penny books for the people, ward & lock's penny biographies, historical series, history, biographies, scotland, scottish history, battle of bannockburn, advertisements, book, books, king robert bruce, penny books -
 Vision Australia
Photograph - Image, Foto Group, Images shortlisted for inclusion in Lighthouse on the Boulevard, 2004
... King...Robert Toseland...Hogarth Neil Westh Trudi Westh Augusta Tutton Jeremy King Robert Toseland Mary Pipczak Anita Sun Maria Robinson George Dyer Malcolm Brodie Trevor Anderson David Blyth Don Draffin Bruce Allen Kevin Murfitt Peter Ward Eileen Ayre Rosanne Cunningham Reverend William Moss David Palmer George Findlay Ormond Hall Blind Soldiers 59 scanned photographs of RVIB, blind people and buildings Images shortlisted for inclusion in Lighthouse on the Boulevard Photograph Image Foto Group ...This selection of images was shortlisted for inclusion in the book 'Lighthouse on the Boulevard' by Judith Buckrich. They include items from the State Library of Victoria collection, as well as those in the archives. The final edition of the book did not include all of them, but those that were have indications in the individual description page for each image. 59 scanned photographs of RVIB, blind people and buildingsroyal victorian institute for the blind, buildings, leal house, employment, tilly aston, aaron solomon, annie rose drummond, j.t. hogarth, neil westh, trudi westh, augusta tutton, jeremy king, robert toseland, mary pipczak, anita sun, maria robinson, george dyer, malcolm brodie, trevor anderson, david blyth, don draffin, bruce allen, kevin murfitt, peter ward, eileen ayre, rosanne cunningham, reverend william moss, david palmer, george findlay, ormond hall, blind soldiers -
 Ballarat Heritage Services
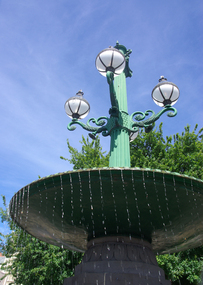
Photograph - Colour, Burke and Wills Fountain, Sturt Street Gardens, 2011, 29/12/2011
... king...robert o'hara burke...Ballarat Heritage Services PO Box 2209 Bakery Hill Post Office goldfields The fontain was once lit with gas and stocked with goldfish and tortoises. burke and wills burke and wills memorial sturt street ballarat explorers john king robert o'hara burke Plaque "Robert O'hara Burke, Leader. ...The fontain was once lit with gas and stocked with goldfish and tortoises.Colour photographs of the Burke and Wills Fountain in Sturt Street Balllarat.Plaque "Robert O'hara Burke, Leader. Died 30th June, 1861. William John Wills, Second. Died 30th June, 1861. Ludwig Becker, Naturalist. Died 29th April, 1861. Charles Grey, Assistant. Sied 17th April, 1861."burke and wills, burke and wills memorial, sturt street, ballarat, explorers, john king, robert o'hara burke -
 Rutherglen Historical Society
Photograph - Document / Image, Royal Burgh of Rutherglen, Charter, 1960-1985 (Approximate)
... Under the picture of Charter "Royal Burgh of Rutherglen / Charter / Granted to the Burgh by King Robert the Bruce, Dated at Berwick-on-Tweed, 20th April, 1323" On back - signature "Gordon, Alistair R"...Rutherglen Historical Society Murray Street Rutherglen high-country Part of a set of information on Rutherglen, Scotland rutherglen scotland royal burgh of rutherglen charter Under the picture of Charter "Royal Burgh of Rutherglen / Charter / Granted to the Burgh by King Robert the Bruce, Dated at Berwick-on-Tweed, 20th April, 1323" On back - signature "Gordon, Alistair R" Photograph of Charter of Royal Burgh of Rutherglen, Glasgow, Scotland, granted by Robert the Bruce 1323. ...Part of a set of information on Rutherglen, ScotlandPhotograph of Charter of Royal Burgh of Rutherglen, Glasgow, Scotland, granted by Robert the Bruce 1323. Written in Latin with translation on reverse.Under the picture of Charter "Royal Burgh of Rutherglen / Charter / Granted to the Burgh by King Robert the Bruce, Dated at Berwick-on-Tweed, 20th April, 1323" On back - signature "Gordon, Alistair R"rutherglen scotland, royal burgh of rutherglen, charter -
 Eltham District Historical Society Inc
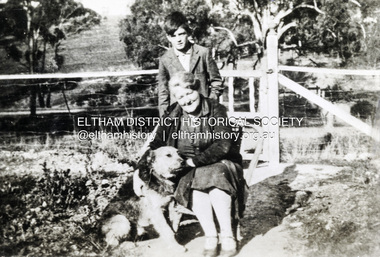
Photograph, Beatrice Arrowsmith (nee Quigley) and Robert Arrowsmith and King the dog at front gate of 523 Main Road, Eltham
... Beatrice Arrowsmith (nee Quigley) and Robert Arrowsmith and King the dog at front gate of 523 Main Road, Eltham......King (dog)...Robert...Robert was a POW in Changi Shows the area of Fitzsimons Lane prior to development eltham main road fitzsimons lane porter street castledine Beatrice Arrowsmith (nee Quigley) King (dog) Robert Arrowsmith Joan Castledine Collection Black and white photograph - digital file Beatrice Arrowsmith (nee Quigley) and Robert Arrowsmith and King the dog at front gate of 523 Main Road, Eltham Photograph ...View is looking south west from inside the front gate. Main Road is running across the picture just past the trees and the open area is where the current day Fitzsimons Lane runs. Porter street is adjacent to the property on the right of image. Robert was a POW in ChangiShows the area of Fitzsimons Lane prior to developmentBlack and white photograph - digital fileeltham, main road, fitzsimons lane, porter street, castledine, beatrice arrowsmith (nee quigley), king (dog), robert arrowsmith, joan castledine collection -
 Geelong RSL Sub Branch
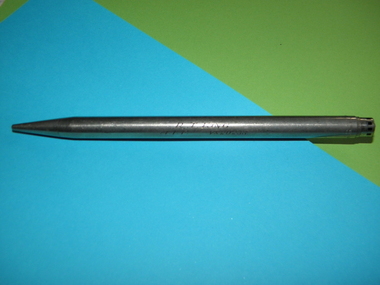
Clutch Pencil, The Wahl Co
... The pencil is enscribed R T King VX20233, Robert Teague King served in the 2nd AIF....Geelong RSL Sub Branch 50 Barwon Heads Road Belmont geelong-and-the-bellarine-peninsula The pencil is enscribed R T King VX20233, Robert Teague King served in the 2nd AIF. ...The pencil is enscribed R T King VX20233, Robert Teague King served in the 2nd AIF.The pencil has belonged to VX20233 R T King, who served in the 2nd AIF.A silver coloured metal clutch pencil.R T King AIF VX20233vx20233 r t king, clutch pencil -
 Rutherglen Historical Society
Postcard, 1980 (Approximate)
... Rutherglen, Scotland made a Royal Burgh by King Robert the Bruce of Scotland in 1323. In 1975 Rutherglen became part of the City of Glasgow....Rutherglen, Scotland made a Royal Burgh by King Robert the Bruce of Scotland in 1323. In 1975 Rutherglen became part of the City of Glasgow. rutherglen scotland royal burgh glasgow john wallace On address side of postcard: "© Glasgow Museums and Art Galleries" Postcard showing picture of coat of arms of the Royal Burgh of Rutherglen, Scotland with written explanation. ...Coat of arms of the Royal Burgh of Rutherglen in Scotland - the home of John Wallace, who gave its name to Rutherglen in Victoria. Rutherglen, Scotland made a Royal Burgh by King Robert the Bruce of Scotland in 1323. In 1975 Rutherglen became part of the City of Glasgow.Postcard showing picture of coat of arms of the Royal Burgh of Rutherglen, Scotland with written explanation. Part of a set of information on Rutherglen, ScotlandOn address side of postcard: "© Glasgow Museums and Art Galleries"rutherglen scotland, royal burgh, glasgow, john wallace -
 Bendigo Historical Society Inc.
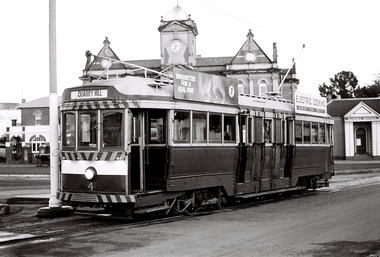
Photograph - Robert Green Collection - Photos of Bendigo Tramways - Sheet 1 of 8, 1960s
... king...bendigo...trams...robert...Sheet B also contains one slide taken by Robert's friend Keigh S King (1928-2019) who was the author of the book 'The Bendigo Tramways an illustrated history, published by the Australian Railway Historical Society Victorian Division Melbourne in February 1972; BHS Item no. 5052. ...Sixteen black and white prints from the images are also included. keith s king bendigo trams robert green Robert Green Collection, this item contains thirty three Black and White Negatives of trams at various locations around Bendigo. ...This collection contains eight archive sheets (Sheet 1 to Sheet 8) of strips of original 35mm black and white negatives of photographs taken during the 1960s and early 1970s by Robert Green, of the Bendigo State Electricty Commission of Victoria Tramways prior to their abandonment The collection also includes two archive quality sheets (Sheet A and Sheet B) of original 35mm colour slides taken by Robert Green during the same period. Sheet B also contains one slide taken by Robert's friend Keigh S King (1928-2019) who was the author of the book 'The Bendigo Tramways an illustrated history, published by the Australian Railway Historical Society Victorian Division Melbourne in February 1972; BHS Item no. 5052. The collection also includes one USB stick which contains images of all photographs described above, except for one colour slide taken by Keith S Kings. Sixteen black and white prints from the images are also included.Robert Green Collection, this item contains thirty three Black and White Negatives of trams at various locations around Bendigo. Photos: 11147.1a and 11147.1b Tram on its way out of Long Gully along Mt Korong (Eaglehawk) Road towards Eaglehawk. Houses in the foreground, on the left is 245 Eaglehawk Road and on the right 241 Eaglehawk Road. 11147.1c Birney Car Tram on its way out of Long Gully along Mt Korong (Eaglehawk) Road towards Eaglehawk, looking back ove the Long Gully township. 11147.1d Birney Car Tram on its way out of Long Gully along Mt Korong (Eaglehawk) Road towards Eaglehawk. Houses in the foreground, on the left is 245 Eaglehawk Road and on the right 241 Eaglehawk Road. 11147.1e No 28 Birney Car Special 11147.1f No 28 Birney Car Special and No 2 possibly in Eaglehawk 11147.1g No 18 roars up Eaglehawk Road into Iron Bark 11147.1h Tram crossing the railway at Jobs Gully, on its way to Bendigo 11147.1i Tram crossing the railway at Jobs Gully, on its way to Eaglehawk 11147.1j Central Deborah Gold Mine 11147.1k The intersection of Reginald and Houston St, with the Cemetery on the left. 11147.1l Tram Stop on Pall Mall opposite Ezywalkins Conrner of Mitchell St 11147.1m Electrical Cable junction box 11147.1n Electrical Cable junction box 11147.1o No 18 at Canterbury Park Terminus Eaglehawk 11147.1p No 26 at the top of Mitchell St on its way to Quarry Hill 11147.1q Nos 26 and 18 at the Railway Station stop in Mitchell St 11147.1r No 18 coming down Mitchell St 11147.1s No 5 possibly in Carpenter St 11147.1t No 5 at the Cemetery Gates ready to depart the terminus 11147.1u No 5 at the Cemetery Gates ready to depart the terminus 11147.1v No 5 at the Cemetery Gates ready to depart the terminus 11147.1w Nos 18 and 5 crossover at the Fountain 11147.1x Nos 18 and 5 crossover at the Fountain 11147.1y Nos 18 and 5 crossover at the Fountain 11147.1z Heading into Long Gully past the Manchester Arms Hotel 11147.1aa No 5 loading passengers at the Eaglehawk Terminus next to Canterbury Park 11147.1ab Traffic conjestion at the loop on the way back to Bendigo 11147.1ac The Eaglehawk Terminus next to Canterbury Park 11147.1ad The Eaglehawk Terminus next to Canterbury Park 11147.1ae The Eaglehawk Terminus next to Canterbury Park 11147.1af The Eaglehawk Terminus next to Canterbury Parkkeith s king, bendigo, trams, robert green -
 Bendigo Historical Society Inc.
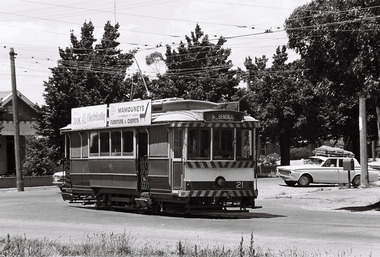
Photograph - Robert Green Collection - Photos of Bendigo Tramways - Sheet 3 of 8, 1960s
... king...bendigo...trams...robert...Sheet B also contains one slide taken by Robert's friend Keigh S King (1928-2019) who was the author of the book 'The Bendigo Tramways an illustrated history, published by the Australian Railway Historical Society Victorian Division Melbourne in February 1972; BHS Item no. 5052. ...Sixteen black and white prints from the images are also included. keith s king bendigo trams robert green Robert Green Collection, this item contains 35 Black and White Negatives of the trams at various locations around Bendigo. ...This collection contains eight archive sheets (Sheet 1 to Sheet 8) of strips of original 35mm black and white negatives of photographs taken during the 1960s and early 1970s by Robert Green, of the Bendigo State Electricty Commission of Victoria Tramways prior to their abandonment The collection also includes two archive quality sheets (Sheet A and Sheet B) of original 35mm colour slides taken by Robert Green during the same period. Sheet B also contains one slide taken by Robert's friend Keigh S King (1928-2019) who was the author of the book 'The Bendigo Tramways an illustrated history, published by the Australian Railway Historical Society Victorian Division Melbourne in February 1972; BHS Item no. 5052. The collection also includes one USB stick which contains images of all photographs described above, except for one colour slide taken by Keith S Kings. Sixteen black and white prints from the images are also included.Robert Green Collection, this item contains 35 Black and White Negatives of the trams at various locations around Bendigo. Photos: 11147.3a No 21 turns out of McRae St into Nolan Street, on its way to North Bendigo 11147.3b No 5 on the way to Eaglehawk 11147.3c No 21 leaves Charing Cross towards North Bendigo, City Family Hotel in the background 11147.3d No 18 completes its run from Eaglehawk at the fountain, and is returning to the depot 11147.3e No 18 turns from McRae St into Tramway Avenue and the depot 11147.3f No 18 turns from McRae St into Tramway Avenue and the depot 11147.3g No 28 at the depot 11147.3h No 6 on its way to Golden Square 11147.3i No 6 at the Golden square Terminus, High and Maple Streets 11147.3j No 25 from Quarry Hill at the intersection of Wills and Mitchell Street 11147.3k No 2 leaves the Mitchell St railway bridge into Carpenter Street on its way to Quarry Hill 11147.3l No 21 comes into the Golden square Terminus, steeple of the Methodist church in the background 11147.3m Tram heading along McRae St in front of the School of Mines 11147.3n Tram heading along McRae St towards Pall Mall in front of the School of Mines 11147.o No 24 heading to Eaglehawk at the corner of Barnard and Forest Streets 11147.3p Three trams lined up in the depot, possible early morning or evening 11147.3q Tram No 21 at the North Bendigo Terminus, possible early morning or evening 11147.3s Tram leaving the Eaglehawk Town Hall in the dark 11147.3t View up Pall Mall towards the fountain from Mundy Street intersection 11147.3u Birney Car No 28 Special leaving the depot, crossing the Back Creek 11147.3w Birney Car No 28 Special at Eaglehawk Canterbury Park 11147.3x No 28 Birney Car Special hading to Eaglehawk at Iron Bark, just past the Marong Road turn-off at Iron Bark 11147.3y No 28 Birney Car Special heading to Eaglehawk at Long Gully, opposite the Manchester Arms Hotel 11147.3z No 28 Birney Car Special 11147aa No 28 Birney Car Special comes into the Eaglehawk Terminus 11147ab No 28 Birney Car Special heads down view St past the Rifle Brigade Hotel 11147ac No 28 Birney Car Special heads down Pall Mall past the Court House Hotel 11147.3ad No 5 to Eaglehawk runs up McCrae St in front of the School of Mines 11147.3ae No 28 Birney Car passes the Mundy St intersection with McRae St heading to the fountain 11147.3af No 3 passes the Mundy St intersection with McRae St heading to Eaglehawk 11147.3ah Tram passes the School of Mines in McRae St heading to the fountain 11147.3ai Birney Car Tram passes the School of Mines in McRae St heading to the fountain 11147.3aj Tramways High Electrical termination boxkeith s king, bendigo, trams, robert green -
 Bendigo Historical Society Inc.
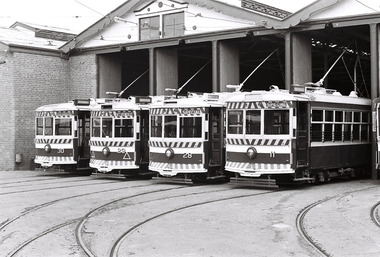
Photograph - Robert Green Collection - Photos of Bendigo Tramways - Sheet 2 of 8, 1960s
... king...bendigo...trams...robert...Sheet B also contains one slide taken by Robert's friend Keigh S King (1928-2019) who was the author of the book 'The Bendigo Tramways an illustrated history, published by the Australian Railway Historical Society Victorian Division Melbourne in February 1972; BHS Item no. 5052. ...Sixteen black and white prints from the images are also included. keith s king bendigo trams robert green Robert Green Collection, this item contains 34 Black and White Negatives of the trams at various locations around Bendigo. ...This collection contains eight archive sheets (Sheet 1 to Sheet 8) of strips of original 35mm black and white negatives of photographs taken during the 1960s and early 1970s by Robert Green, of the Bendigo State Electricty Commission of Victoria Tramways prior to their abandonment The collection also includes two archive quality sheets (Sheet A and Sheet B) of original 35mm colour slides taken by Robert Green during the same period. Sheet B also contains one slide taken by Robert's friend Keigh S King (1928-2019) who was the author of the book 'The Bendigo Tramways an illustrated history, published by the Australian Railway Historical Society Victorian Division Melbourne in February 1972; BHS Item no. 5052. The collection also includes one USB stick which contains images of all photographs described above, except for one colour slide taken by Keith S Kings. Sixteen black and white prints from the images are also included.Robert Green Collection, this item contains 34 Black and White Negatives of the trams at various locations around Bendigo. Photos: 11147.2a No 30, 29, 28 and 11 Birney Cars lined up at the Depot 11147.2b No 30, 29, 28 and 11 Birney Cars lined up at the Depot 11147.2c No 30, 29, 28 and 11 Birney Cars lined up at the Depot 11147.2d No 30, 29, 28 and 11 Birney Cars lined up at the Depot 11147.2e No 30, 29, 28 and 11 Birney Cars lined up at the Depot 11147.2f No 30, 29, 28 Birney Cars lined up at the Depot 11147.2g No 30, 29, 28 and 11 Birney Cars lined up at the Depot 11147.2h No 30, 29, 28 and 11 Birney Cars lined up at the Depot 11147.2i No 30, 29, 28 and 11 Birney Cars and No 25 lined up at the Depot 11147.2j No 30, 29, 28 and 11 Birney Cars and No 25 lined up at the Depot 11147.2k No 28 and 11 Birney Cars lined up at the Depot 11147.2l No 30 Special leaves the depot watched by the photographer 11147.2m No 29 Special leaves the depot 11147.2n Driver and passenger inside a Birney Car 11147.2o Driver and passenger inside a Birney Car heading up Pall Mall 11147.2p The four Birney Cars in Carpenter Street, Quarry Hill Terminus at the Cemetery Gates 11147.2q The four Birney Cars in Carpenter Street, Quarry Hill Terminus at the Cemetery Gates 11147.2r The four Birney Cars in Carpenter Street, Quarry Hill Terminus at the Cemetery Gates 11147.2s The four Birney Cars in Carpenter Street, Quarry Hill Terminus at the Cemetery Gates 11147.2t The four Birney Cars at the Carpenter Street, Quarry Hill Loop 11147.2u No 28 Special Birney Car 11147.2v No 30 Special Birney Car 11147.2w The four Birney Cars at the fountain side by side getting reading to depart to Eaglehawk 11147.2x The four Birney Cars at Eaglehawk beside Canterbury Park 11147.2y The four Birney Cars at Eaglehawk beside Canterbury Park with the Drivers and the Inspector 11147.2z The four Birney Cars at Eaglehawk beside Canterbury Park 11147.2aa The four Birney Cars at Eaglehawk beside Canterbury Park 11147.2ab The four Birney Cars at Eaglehawk beside the town hall 11147.2ac Birney Car 28 passes 17 at the Long gully Manchester Arms Hotel Loop 11147.2ad No 21 and two others at the North Bendigo terminus 11147.2af Four trams heading to Golden Square in High Street 11147.2ag Four trams heading to Golden Square in High Street 11147.2ah Four trams heading at the Golden Square Terminus at Maple High Streetskeith s king, bendigo, trams, robert green -
Bendigo Historical Society Inc.
Mixed media - Robert Green Collection - Photos of Bendigo Tramways - USB of Images, 1960s
... king...bendigo...trams...robert...Sheet B also contains one slide taken by Robert's friend Keigh S King (1928-2019) who was the author of the book 'The Bendigo Tramways an illustrated history, published by the Australian Railway Historical Society Victorian Division Melbourne in February 1972; BHS Item no. 5052. ...Sixteen black and white prints from the images are also included. keith s king bendigo trams robert green Robert Green Collection: This item is a USB Stick 11147.11a which contains images scanned from eight plastic archival sheets of black and white negatives and colour slides. ...This collection contains eight archive sheets (Sheet 1 to Sheet 8) of strips of original 35mm black and white negatives of photographs taken during the 1960s and early 1970s by Robert Green, of the Bendigo State Electricty Commission of Victoria Tramways prior to their abandonment The collection also includes two archive quality sheets (Sheet A and Sheet B) of original 35mm colour slides taken by Robert Green during the same period. Sheet B also contains one slide taken by Robert's friend Keigh S King (1928-2019) who was the author of the book 'The Bendigo Tramways an illustrated history, published by the Australian Railway Historical Society Victorian Division Melbourne in February 1972; BHS Item no. 5052. The collection also includes one USB stick which contains images of all photographs described above, except for one colour slide taken by Keith S Kings. Sixteen black and white prints from the images are also included.Robert Green Collection: This item is a USB Stick 11147.11a which contains images scanned from eight plastic archival sheets of black and white negatives and colour slides. It contains all the images in 11147.1 to 11147.11keith s king, bendigo, trams, robert green -
Bendigo Historical Society Inc.
Mixed media - Robert Green Collection - Photos of Bendigo Tramways - Black and White Prints, 1968
... king...bendigo...trams...robert...Sheet B also contains one slide taken by Robert's friend Keigh S King (1928-2019) who was the author of the book 'The Bendigo Tramways an illustrated history, published by the Australian Railway Historical Society Victorian Division Melbourne in February 1972; BHS Item no. 5052. ...Sixteen black and white prints from the images are also included. keith s king bendigo trams robert green Robert Green Collection, this item 11147.12 contains 20 printed photos scanned from eight plastic archival sheets of black and white negatives, also one PDF Document entitled "Bendigo's Last Tram Mail" 11147.12v PDF The day before permanent closure of the Bendigo tramways on Sunday 16 April 1972, the Tramway Museum Society of Victoria Inc (TMSV) arranged for “Last Tram Mail” to be carried along the Eaglehawk line to simulate the once regular transport of mail around the city by tram. 5.5 x 3.5 Inch Photo Prints 11147.12a Print from Sheet 3 (11147.3ac) No 28 Birney Car Special heads down Pall Mall past the Court House Hotel 11147.12b Print from Sheet 8 (11147.8c) No 18 passing the View Street and Rowan Street intersection 11147.12c Print from Sheet 8 (11147.8u) No 25 at the Bendigo Cemetery Terminus 11147.12d Print from Sheet 5 (11147.5e) No 18 and old shop front 11147.12e Print from Sheet 7 (11147.7s) Passing Trams 11147.12f Print from Sheet 3 (11147.3s) Tram leaving the Eaglehawk Town Hall in the dark 11147.12g Print from Sheet 5 (11147.5m) No 21 returning to the Tramways Avenue Depot with the scrubber tram on the left 11147.12l Print from Sheet 6 (11147.6ag) Four trams and one driver at the depot TMS Bendigo Tour 24 March 1968. 11147.12m Print from Sheet 2 (11147.2ac) Birney Car 28 passes 17 at the Long gully Manchester Arms Hotel Loop TMS Bendigo Tour 24 March 1968 11147.12n Print from Sheet 2 (11147.2u) No 28 Special Birney Car on the Quarry Hill Line TMS Bendigo Tour 24 March 1968 11147.12o Print from Sheet 2 (11147.2v) No 30 Special Birney Car on the Quarry Hill Line TMS Bendigo Tour 24 March 1968 11147.12q Print from Sheet 2 (11147.2ab) The four Birney Cars at Eaglehawk beside the town hall TMS Bendigo Tour 24 March 1968 11147.12r Print from Sheet 6 (11147.6z) Birney Car 11 and two others arriving at the depot TMS Bendigo Tour 24 March 1968 11147.12s Print from Sheet 2 (11147.2t) The four Birney Cars at the Carpenter Street, Quarry Hill Loop TMS Bendigo Tour 24 March 1968 11147.12t Print from Sheet 2 (11147.2h) No 30, 29, 28 and 11 Birney Cars lined up at the Depot TMS Bendigo Tour 24 March 1968 11147.12u Print from Sheet 2 (11147.2ad) No 21 and two others at the North Bendigo terminus TMS Bendigo Tour 24 March 1968 8 x 10 Inch Photo Prints 11147.12h Print from Sheet 3 (11147.3ai) Birney Car Tram passes the School of Mines in McRae St heading to the fountain 11147.12i Print from Sheet 2 (11147.2a) No 30, 29, 28 and 11 Birney Cars lined up at the Depot 11147.12j Print from Sheet 2 (11147.2a) No 30, 29, 28 and 11 Birney Cars lined up at the Depot 11147.12k Print from Sheet 2 (11147.2a) No 30, 29, 28 and 11 Birney Cars lined up at the Depot Mixed media Robert Green Collection - Photos of Bendigo Tramways - Black and White Prints ...This collection contains eight archive sheets (Sheet 1 to Sheet 8) of strips of original 35mm black and white negatives of photographs taken during the 1960s and early 1970s by Robert Green, of the Bendigo State Electricty Commission of Victoria Tramways prior to their abandonment The collection also includes two archive quality sheets (Sheet A and Sheet B) of original 35mm colour slides taken by Robert Green during the same period. Sheet B also contains one slide taken by Robert's friend Keigh S King (1928-2019) who was the author of the book 'The Bendigo Tramways an illustrated history, published by the Australian Railway Historical Society Victorian Division Melbourne in February 1972; BHS Item no. 5052. The collection also includes one USB stick which contains images of all photographs described above, except for one colour slide taken by Keith S Kings. Sixteen black and white prints from the images are also included.Robert Green Collection, this item 11147.12 contains 20 printed photos scanned from eight plastic archival sheets of black and white negatives, also one PDF Document entitled "Bendigo's Last Tram Mail" 11147.12v PDF The day before permanent closure of the Bendigo tramways on Sunday 16 April 1972, the Tramway Museum Society of Victoria Inc (TMSV) arranged for “Last Tram Mail” to be carried along the Eaglehawk line to simulate the once regular transport of mail around the city by tram. 5.5 x 3.5 Inch Photo Prints 11147.12a Print from Sheet 3 (11147.3ac) No 28 Birney Car Special heads down Pall Mall past the Court House Hotel 11147.12b Print from Sheet 8 (11147.8c) No 18 passing the View Street and Rowan Street intersection 11147.12c Print from Sheet 8 (11147.8u) No 25 at the Bendigo Cemetery Terminus 11147.12d Print from Sheet 5 (11147.5e) No 18 and old shop front 11147.12e Print from Sheet 7 (11147.7s) Passing Trams 11147.12f Print from Sheet 3 (11147.3s) Tram leaving the Eaglehawk Town Hall in the dark 11147.12g Print from Sheet 5 (11147.5m) No 21 returning to the Tramways Avenue Depot with the scrubber tram on the left 11147.12l Print from Sheet 6 (11147.6ag) Four trams and one driver at the depot TMS Bendigo Tour 24 March 1968. 11147.12m Print from Sheet 2 (11147.2ac) Birney Car 28 passes 17 at the Long gully Manchester Arms Hotel Loop TMS Bendigo Tour 24 March 1968 11147.12n Print from Sheet 2 (11147.2u) No 28 Special Birney Car on the Quarry Hill Line TMS Bendigo Tour 24 March 1968 11147.12o Print from Sheet 2 (11147.2v) No 30 Special Birney Car on the Quarry Hill Line TMS Bendigo Tour 24 March 1968 11147.12q Print from Sheet 2 (11147.2ab) The four Birney Cars at Eaglehawk beside the town hall TMS Bendigo Tour 24 March 1968 11147.12r Print from Sheet 6 (11147.6z) Birney Car 11 and two others arriving at the depot TMS Bendigo Tour 24 March 1968 11147.12s Print from Sheet 2 (11147.2t) The four Birney Cars at the Carpenter Street, Quarry Hill Loop TMS Bendigo Tour 24 March 1968 11147.12t Print from Sheet 2 (11147.2h) No 30, 29, 28 and 11 Birney Cars lined up at the Depot TMS Bendigo Tour 24 March 1968 11147.12u Print from Sheet 2 (11147.2ad) No 21 and two others at the North Bendigo terminus TMS Bendigo Tour 24 March 1968 8 x 10 Inch Photo Prints 11147.12h Print from Sheet 3 (11147.3ai) Birney Car Tram passes the School of Mines in McRae St heading to the fountain 11147.12i Print from Sheet 2 (11147.2a) No 30, 29, 28 and 11 Birney Cars lined up at the Depot 11147.12j Print from Sheet 2 (11147.2a) No 30, 29, 28 and 11 Birney Cars lined up at the Depot 11147.12k Print from Sheet 2 (11147.2a) No 30, 29, 28 and 11 Birney Cars lined up at the Depotkeith s king, bendigo, trams, robert green -
 Bendigo Historical Society Inc.
Photograph - Robert Green Collection - Photos of Bendigo Tramways - Sheet B of 10, 1960s
... king...bendigo...trams...robert...Sheet B also contains one slide taken by Robert's friend Keigh S King (1928-2019) who was the author of the book 'The Bendigo Tramways an illustrated history, published by the Australian Railway Historical Society Victorian Division Melbourne in February 1972; BHS Item no. 5052. ...Sixteen black and white prints from the images are also included. keith s king bendigo trams robert green Robert Green Collection, this item contains 20 Colour Slides of the trams at various locations around Bendigo. ...This collection contains eight archive sheets (Sheet 1 to Sheet 8) of strips of original 35mm black and white negatives of photographs taken during the 1960s and early 1970s by Robert Green, of the Bendigo State Electricty Commission of Victoria Tramways prior to their abandonment The collection also includes two archive quality sheets (Sheet A and Sheet B) of original 35mm colour slides taken by Robert Green during the same period. Sheet B also contains one slide taken by Robert's friend Keigh S King (1928-2019) who was the author of the book 'The Bendigo Tramways an illustrated history, published by the Australian Railway Historical Society Victorian Division Melbourne in February 1972; BHS Item no. 5052. The collection also includes one USB stick which contains images of all photographs described above, except for one colour slide taken by Keith S Kings. Sixteen black and white prints from the images are also included.Robert Green Collection, this item contains 20 Colour Slides of the trams at various locations around Bendigo. Photos: 11147.10a Tram in the darkness, sunset or morning 11147.10b Coming off the railway Line bridge towards Eaglehawk 11147.10c Coming on to the railway Line bridge from Eaglehawk 11147.10d The Quarry Hill and Eaglehawk trams waiting to leave the fountain 11147.10e No 18 from Quarry Hill arrives at the fountain 11147.10f Getting ready to leave the fountain for Eaglehawk 11147.10g Policeman on point duty and tram at the fountain, Charing Cross 11147.10h Eaglehawk and Quarry Hill trams at the fountain 11147.10i Policeman on point duty and tram at the fountain, Charing Cross, looking down Pall Mall 11147.10j No 3 roars up View Street at the corner of McKenzie Street 11147.10k From the Rifle Brigade Hotel the Eaglehawk tram comes past the Queen Elizabeth Oval down View Street 11147.10l From the Rifle Brigade Hotel the Eaglehawk tram comes past the Queen Elizabeth Oval down View Street 11147.10m From the Rifle Brigade Hotel the Eaglehawk tram up View Street opposite the Masonic Hall 11147.10n From the Rifle Brigade Hotel the Eaglehawk tram goes past the Queen Elizabeth Oval up View Street 11147.10o From the Rifle Brigade Hotel the Eaglehawk tram comes up View Street opposite the Masonic Hall 11147.10p From the Victoria Hotel Balcony, the Eaglehawk No 18 arrives 11147.10q From the Victoria Hotel Balcony, the Eaglehawk No 18 departs towards Bendigo 11147.10r Tram No 2 arrives into Eaglehawk 11147.10s Tram No 2 heads to Quarry Hill from California Gully (Probable) 11147.1t Tram on its way out of Long Gully along Mt Korong (Eaglehawk) Road towards Eaglehawk. Houses in the foreground, on the left is 245 Eaglehawk Road and on the right 241 Eaglehawk Road.keith s king, bendigo, trams, robert green -
 Bendigo Historical Society Inc.
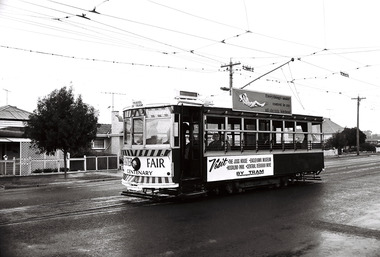
Photograph - Robert Green Collection - Photos of Bendigo Tramways - Sheet 5 of 8, 1960s
... king...bendigo...trams...robert...Sheet B also contains one slide taken by Robert's friend Keigh S King (1928-2019) who was the author of the book 'The Bendigo Tramways an illustrated history, published by the Australian Railway Historical Society Victorian Division Melbourne in February 1972; BHS Item no. 5052. ...Sixteen black and white prints from the images are also included. keith s king bendigo trams robert green Robert Green Collection, this item contains 23 Black and White Negatives of the trams at various locations around Bendigo. ...This collection contains eight archive sheets (Sheet 1 to Sheet 8) of strips of original 35mm black and white negatives of photographs taken during the 1960s and early 1970s by Robert Green, of the Bendigo State Electricty Commission of Victoria Tramways prior to their abandonment The collection also includes two archive quality sheets (Sheet A and Sheet B) of original 35mm colour slides taken by Robert Green during the same period. Sheet B also contains one slide taken by Robert's friend Keigh S King (1928-2019) who was the author of the book 'The Bendigo Tramways an illustrated history, published by the Australian Railway Historical Society Victorian Division Melbourne in February 1972; BHS Item no. 5052. The collection also includes one USB stick which contains images of all photographs described above, except for one colour slide taken by Keith S Kings. Sixteen black and white prints from the images are also included.Robert Green Collection, this item contains 23 Black and White Negatives of the trams at various locations around Bendigo. Photos: 11147.5a Birney car decked out in advertising for the Bendigo Easter Fair 11147.5b Birney car decked out in advertising for the Bendigo Easter Fair heading to North Bendigo in Mcrae St 11147.5c Birney car decked out in advertising for the Bendigo Easter Fair heading to North Bendigo in Mcrae St passing No 17 and another tram approaching from the depot 11147.5d Birney car decked out in advertising for the Bendigo Easter Fair heading into the depot in Tramway Avenue 11147.5e No 18 and old shop front 11147.5f Tram Turning into Tramways Avenue from Mcrae St 11147.5g Three trams at the Golden Square Terminus in High Street 11147.5h No 18 tram in Mcrae Street passing by Tramways Avenue to North Bendigo 11147.5i No 21 returning to the Tramways Avenue Depot off Mcrae Street 11147.5j No 21 returning to the Tramways Avenue Depot off Mcrae Street 11147.5k No 21 returning to the Tramways Avenue Depot crossing the Back Creek 11147.5l No 21 returning to the Tramways Avenue Depot 11147.5m No 21 returning to the Tramways Avenue Depot with the scrubber tram on the left 11147.5n No 21 in the Tramways Avenue Depot 11147.5o Nos 18 and 17 pass at the Golden Square Terminus in High St 11147.5p No 17 on its way to the North Bendigo Terminus 11147.5q No 17 turns from the North Bendigo Terminus into Finn Street 11147.5r No 17 heading to the North Bendigo Terminus along Thunder Street 11147.5s No 17 at the North Bendigo Terminus off Finn Street 11147.5t Train heading from the Swan Hill direction to Bendigo off the Finn Street crossing 11147.5u No 25 heading to Golden Square 11147.5v No 25 turns from Weeroona Avenue into Caledonia Street 11147.5w The Easter Fair, intersection of Pall Mall and Williamson St with Myer Stores in the backgroundkeith s king, bendigo, trams, robert green -
 Bendigo Historical Society Inc.
Photograph - Robert Green Collection - Photos of Bendigo Tramways - Sheet 8 of 10, 1960s
... king...bendigo...trams...robert...Sheet B also contains one slide taken by Robert's friend Keigh S King (1928-2019) who was the author of the book 'The Bendigo Tramways an illustrated history, published by the Australian Railway Historical Society Victorian Division Melbourne in February 1972; BHS Item no. 5052. ...Sixteen black and white prints from the images are also included. keith s king bendigo trams robert green Robert Green Collection, this item contains 22 Black and White Negatives of the trams at various locations around Bendigo. ...This collection contains eight archive sheets (Sheet 1 to Sheet 8) of strips of original 35mm black and white negatives of photographs taken during the 1960s and early 1970s by Robert Green, of the Bendigo State Electricty Commission of Victoria Tramways prior to their abandonment The collection also includes two archive quality sheets (Sheet A and Sheet B) of original 35mm colour slides taken by Robert Green during the same period. Sheet B also contains one slide taken by Robert's friend Keigh S King (1928-2019) who was the author of the book 'The Bendigo Tramways an illustrated history, published by the Australian Railway Historical Society Victorian Division Melbourne in February 1972; BHS Item no. 5052. The collection also includes one USB stick which contains images of all photographs described above, except for one colour slide taken by Keith S Kings. Sixteen black and white prints from the images are also included.Robert Green Collection, this item contains 22 Black and White Negatives of the trams at various locations around Bendigo. Photos: 11147.8a No 4 outside the Eaglehawk Town Hall 11147.8b No 7 at the North Bendigo Terminus 11147.8c No 18 passing the View Street and Rowan Street intersection 11147.8d No 24 and driver at the fountain 11147.8e No 7 at the fountain 11147.8f No 24 and at the fountain 11147.8g No 24 and driver at Eaglehawk 11147.8h Picking up passengers at North Bendigo Terminus 11147.8i Birney Car 30 in Finn Street North Bendigo 11147.8j No 30 has just crossed the Bendigo Creek in high St Golden Square 11147.8k No 30 has just crossed the Bendigo Creek in High St Golden Square and is passing No 2 11147.8l Nos 29 and 19 at the depot with two drivers 11147.8m No 29 comes up Pall Mall past the Williamson St intersection 11147.8n No 29 comes up Pall Mall 11147.8o No 29 at the Golden Square Terminus loop 11147.8p No 29 and another at the Golden Square Terminus 11147.8q The Pahran and Malvern Tramways Trust Logo 11147.8r Passing No 6 on the High St Loop 11147.8s Passing No 6 on the High St Loop, Sacred Heart Cathedral Spire being buit in the background 11147.8t At the Cemetery Gate Quarry Hill 11147.8u No 25 at the Bendigo Cemetery Terminus 11147.8v At the Quarry Hill Gates in Carpenter Streetkeith s king, bendigo, trams, robert green -
 Bendigo Historical Society Inc.
Photograph - Robert Green Collection - Photos of Bendigo Tramways - Sheet 6 of 8, 1960s
... king...bendigo...trams...robert...Sheet B also contains one slide taken by Robert's friend Keigh S King (1928-2019) who was the author of the book 'The Bendigo Tramways an illustrated history, published by the Australian Railway Historical Society Victorian Division Melbourne in February 1972; BHS Item no. 5052. ...Sixteen black and white prints from the images are also included. keith s king bendigo trams robert green Robert Green Collection, this item contains 33 Black and White Negatives of the trams at various locations around Bendigo. ...This collection contains eight archive sheets (Sheet 1 to Sheet 8) of strips of original 35mm black and white negatives of photographs taken during the 1960s and early 1970s by Robert Green, of the Bendigo State Electricty Commission of Victoria Tramways prior to their abandonment The collection also includes two archive quality sheets (Sheet A and Sheet B) of original 35mm colour slides taken by Robert Green during the same period. Sheet B also contains one slide taken by Robert's friend Keigh S King (1928-2019) who was the author of the book 'The Bendigo Tramways an illustrated history, published by the Australian Railway Historical Society Victorian Division Melbourne in February 1972; BHS Item no. 5052. The collection also includes one USB stick which contains images of all photographs described above, except for one colour slide taken by Keith S Kings. Sixteen black and white prints from the images are also included.Robert Green Collection, this item contains 33 Black and White Negatives of the trams at various locations around Bendigo. Photos: 11147.6a Two trams passing at the loop in Eaglehawk Road at the Philpot Street intersection 11147.6b Two trams passing at the loop in Eaglehawk Road at the Philpot Street intersection 11147.6c Two trams passing at the loop in Eaglehawk Road at the Philpot Street intersection 11147.6d Two trams leave the loop in Eaglehawk Road at the Philpot Street intersection 11147.6e No 18 heading out of Iron Bark to Long Gully along Eaglehawk Road 11147.6f No 25 Special head down View Street at the McKenzie Street intersection 11147.6g The No 25 Special from Eaglehawk arrives at the fountain 11147.h No 2 to Eaglehawk comes up View Street past the Infant Welfare Centre 11147.6i The Quarry Hill tram passes the Carpenter and Houston St intersection at the corner of the cemetery 11147.6j The Quarry Hill tram passes the Carpenter and Houston St intersection at the corner of the cemetery 11147.6k The Quarry Hill tram approached the terminus at the Cemetery gates 11147.6l The Quarry Hill tram at the terminus at the Cemetery gates picking up passengers 11147.6m The Quarry Hill tram at the terminus at the Cemetery gates picking up passengers 11147.6n The Quarry Hill tram at the terminus at the Cemetery gates picking up passengers 11147.6o Tram and large crown in front of the Eaglehawk Town Hall 11147.6p Tram and large crown in front of the Eaglehawk Town Hall 11147.6q Tram and large crown in front of the Eaglehawk Town Hall 11147.6q Two Trams and large crown in front of the Eaglehawk Town Hall 11147.6r Two Trams and large crown in front of the Eaglehawk Town Hall 11147.6s Passengers on the "Last Tram" 11147.6t Passengers on the "Last Tram" 11147.6u Passengers on the "Last Tram" 11147.6v Two trams leaving the depot crossing the Back Creek 11147.6w The Scrubber tram in the depot 11147.6x Birney Car 30 tram in the depot 11147.6y Birney Car 29 and two others arriving at the depot 11147.6z Birney Car 11 and two others arriving at the depot 11147.6aa No 11 Birney Car at the depot 11147.6ab No 28 Birney Car at the depot 11147.6ac Nos 29, 11 and 25 at the depot 11147.6ad Birney Car 28 arrives at the depot 11147.6ae Birney Cars Nos 30 and 29 in the depot 11147.6af The Scrubber Car at the depot 11147.6ag Four trams and one driver at the depot TMS Bendigo Tour 24 March 1968keith s king, bendigo, trams, robert green -
 Bendigo Historical Society Inc.
Photograph - Robert Green Collection - Photos of Bendigo Tramways - Sheet 7 of 8, 1960s
... king...bendigo...trams...robert...Sheet B also contains one slide taken by Robert's friend Keigh S King (1928-2019) who was the author of the book 'The Bendigo Tramways an illustrated history, published by the Australian Railway Historical Society Victorian Division Melbourne in February 1972; BHS Item no. 5052. ...Sixteen black and white prints from the images are also included. keith s king bendigo trams robert green Robert Green Collection, this item contains 28 Black and White Negatives of the trams at various locations around Bendigo. ...This collection contains eight archive sheets (Sheet 1 to Sheet 8) of strips of original 35mm black and white negatives of photographs taken during the 1960s and early 1970s by Robert Green, of the Bendigo State Electricty Commission of Victoria Tramways prior to their abandonment The collection also includes two archive quality sheets (Sheet A and Sheet B) of original 35mm colour slides taken by Robert Green during the same period. Sheet B also contains one slide taken by Robert's friend Keigh S King (1928-2019) who was the author of the book 'The Bendigo Tramways an illustrated history, published by the Australian Railway Historical Society Victorian Division Melbourne in February 1972; BHS Item no. 5052. The collection also includes one USB stick which contains images of all photographs described above, except for one colour slide taken by Keith S Kings. Sixteen black and white prints from the images are also included.Robert Green Collection, this item contains 28 Black and White Negatives of the trams at various locations around Bendigo. Photos: 11147.7a No 6 to Golden Square in Mcrae Street 11147.7b No 21 to North Bendigo in Mcrae Street 11147.7c No 7 to North Bendigo in Mcrae Street 11147.7d No 7 to North Bendigo in Mcrae Street passes No 21 to Golden Square on the loop 11147.7e The Depot and Back Creek bridge 11147.7f The Depot and Back Creek bridge 11147.7g Nos 25, 23 and 30 in the depot 11147.7h The photographer in Thunder Street North Bendigo, railway line in the background 11147.7i No 21 coming up to the North Bendigo terminus in Thunder or Finn street 11147.7j No 21 leaving the North Bendigo terminus in Thunder or Finn street 11147.7k The Photographer in Thunder Street, North Bendigo 11147.7l No 21 in Thunder or Finn street 11147.7m No 21 in Thunder or Finn street 11147.7n No 17 in Eaglehawk 11147.7o No 17 in Eaglehawk 11147.7p No 26 at the top of Mitchell Street 11147.7q No 26 heading to Eaglehawk in the rain 11147.7r No 2 to Quarry Hill in the rain at the Manchester Arms Loop 11147.7s Passing Trams 11147.7t No 30 Birney Car to Quarry Hill in the rain at the Manchester Arms Loop 11147.7u No 7 to North Bendigo, the rowing Club in the background, Thunder Street 11147.7v No 7 turns into Finn Street from the North Bendigo Terminus 11147.7w The Birney Car turns into the North Bendigo Terminus from Finn Street 11147.7x The Birney Car turns into the North Bendigo Terminus from Finn Street 11147.7y Two trams at the North Bendigo Terminus 11147.7z No 24 approaches the Cemetery gates and horse hitching posts in Quarry Hill 11147.7aa The Cemetery and horse hitching posts in Quarry Hill 11147.7ab No 24 and horse hitching post in Quarry Hillkeith s king, bendigo, trams, robert green -
 Bendigo Historical Society Inc.
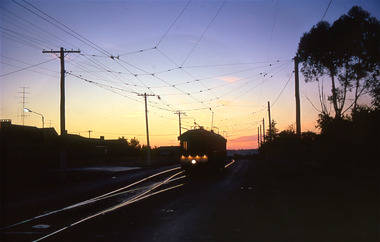
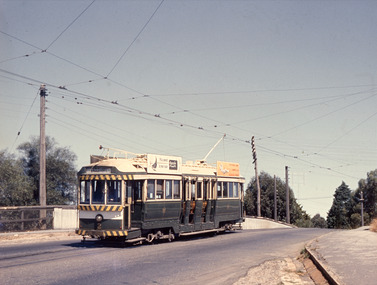
Photograph - Robert Green Collection - Photos of Bendigo Tramways - Sheet A of 10, 1972
... king...bendigo...trams...robert...Sheet B also contains one slide taken by Robert's friend Keigh S King (1928-2019) who was the author of the book 'The Bendigo Tramways an illustrated history, published by the Australian Railway Historical Society Victorian Division Melbourne in February 1972; BHS Item no. 5052. ...Sixteen black and white prints from the images are also included. keith s king bendigo trams robert green Robert Green Collection, this item contains Colour Slides of the trams at various locations around Bendigo. ...This collection contains eight archive sheets (Sheet 1 to Sheet 8) of strips of original 35mm black and white negatives of photographs taken during the 1960s and early 1970s by Robert Green, of the Bendigo State Electricty Commission of Victoria Tramways prior to their abandonment The collection also includes two archive quality sheets (Sheet A and Sheet B) of original 35mm colour slides taken by Robert Green during the same period. Sheet B also contains one slide taken by Robert's friend Keigh S King (1928-2019) who was the author of the book 'The Bendigo Tramways an illustrated history, published by the Australian Railway Historical Society Victorian Division Melbourne in February 1972; BHS Item no. 5052. The collection also includes one USB stick which contains images of all photographs described above, except for one colour slide taken by Keith S Kings. Sixteen black and white prints from the images are also included.Robert Green Collection, this item contains Colour Slides of the trams at various locations around Bendigo. Photos: 11147.9a No 2 to Eaglehawk leaves Carpenter Street, crosses the railway line and enters Mitchell Street 11147.9b Two Birney Cars ready to depart in Pall Mall 11147.9c Nos 30 and 28 Birney Cars ready to depart in Pall Mall 11147.9d No 30 to North Bendigo turns off Weeroona Avenue into Caledonia St at the Gas Works 11147.9e No 5 comes up View Street past Dudley House and the Masonic Hall 11147.9f No 28 Birney Car 11147.9g No 3 comes into Eaglehawk 11147.9h Nos 2 and 3 cross over at the Eaglehawk Road and Cuneen Streets Loop in Long Gully 11147.9j No 30 Birney Car crosses the Munday St and Pall Mall intersection heading for the fountain 11147.9k No 28 Birney Car comes down Nolan Street past the Lake Weeroona 11147.9l No 30 Birney Car in the darkness 11147.9m The Scrubber Car comes up Mitchell Street 11147.9n The Scrubber Car 11147.9o No 18 at Eaglehawk, Bendigo T.M.S of Vic. Ltd Photo, Sat 15 April 1972. Robert Green and John Fitzsimons holding "Last Tram Mail" 1/125 f8. Taken at 9am on the second last day of the trams.keith s king, bendigo, trams, robert green -
 Bendigo Historical Society Inc.
Photograph - Robert Green Collection - Photos of Bendigo Tramways - Sheet 4 of 8, 1960s
... king...bendigo...trams...robert...Sheet B also contains one slide taken by Robert's friend Keigh S King (1928-2019) who was the author of the book 'The Bendigo Tramways an illustrated history, published by the Australian Railway Historical Society Victorian Division Melbourne in February 1972; BHS Item no. 5052. ...Sixteen black and white prints from the images are also included. keith s king bendigo trams robert green Robert Green Collection, this item contains 22 Black and White Negatives of the trams at various locations around Bendigo. ...This collection contains eight archive sheets (Sheet 1 to Sheet 8) of strips of original 35mm black and white negatives of photographs taken during the 1960s and early 1970s by Robert Green, of the Bendigo State Electricty Commission of Victoria Tramways prior to their abandonment The collection also includes two archive quality sheets (Sheet A and Sheet B) of original 35mm colour slides taken by Robert Green during the same period. Sheet B also contains one slide taken by Robert's friend Keigh S King (1928-2019) who was the author of the book 'The Bendigo Tramways an illustrated history, published by the Australian Railway Historical Society Victorian Division Melbourne in February 1972; BHS Item no. 5052. The collection also includes one USB stick which contains images of all photographs described above, except for one colour slide taken by Keith S Kings. Sixteen black and white prints from the images are also included.Robert Green Collection, this item contains 22 Black and White Negatives of the trams at various locations around Bendigo. Photos: 11147.4a Tram at Carpenter St Quarry Hill, Cemetery Gates Terminus 11147.4b Tram and Conductor at Carpenter St Quarry Hill, Cemetery Gates Terminus 11147.4c Overhead Pole, wires and tram stop sign; and end of section sign 11147.4d Overhead Pole, wires and tram stop sign; and end of section sign, in View Street 11147.4e Quarry Hill, Eaglehawk and Golden Square Trams meeting at the Fountain, Charing Cross 11147.4f Quarry Hill, Eaglehawk trams and overhead sign at the fountain roundabout 11147.4g Tram line Point at the Fountain 11147.4h All lines cross at the fountain 11147.4i Turning Caution sign at Tramways Avenue (to the depot) and McRae Street 11147.4j Trams stop by request sign 11147.4k No 4 at the intersection of Eaglehawk and Havilah Roads, Long Gully 11147.4l No 4 to Quarry Hill picking up passengers in Eaglehawk Road 11147.4m No 30 Birney Car heading to Golden Square 11147.4n Birney Car crossing the creek 11147.4o Birney Car No 30 leaving Golden Square in High Street 11147.4p No 3 heading to Eaglehawk 11147.4q No 25 heading to Quarry Hill in Carpenter St possibly 11147.4r Three trams at the loop in Carpenter St Quarry Hill 11147.4s Two trams at the Quarry Hill Terminus Carpenter St 11147.4t Two trams at Canterbury Park Eaglehawk 11147.4u Birney Car 29 Special at Eaglehawk Terminus 11147.4v Passing No 26 at Eaglehawkkeith s king, bendigo, trams, robert green -
 Greensborough Historical Society
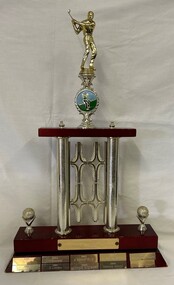
Award - Trophy, Thomastown Golf Club, Thomastown Golf Club. Club Champion Nett Score, 1981-2004
... Robert Burke. On back of stand: 1995 Kevin Hamilton; 1996 Kevin King; 1997 Nigel Livock; 1998 Kevin King; 1999 Kevin King; 2000 Robert Burke; 2001 Scott Eldridge; 2002 Graham Catteral; 2003 Robert Burke; 2004 Robert Talevski....Robert Burke. On back of stand: 1995 Kevin Hamilton; 1996 Kevin King; 1997 Nigel Livock; 1998 Kevin King; 1999 Kevin King; 2000 Robert Burke; 2001 Scott Eldridge; 2002 Graham Catteral; 2003 Robert Burke; 2004 Robert Talevski. ...Perpetual golf trophy awarded by the Thomastown Golf Club for the Club Champion Nett Score. Winners are recorded on small plaques. On front: 1981 S. Sia; 1982 Darrell Mills; 1983 M. Sanders; 1984 D. Lindrea; 1985 K. Bousfield; 1986 George Stewart; 1987 Alan Almond; 1988 Graham Woods; 1989 Wayne Pallpratt; 1990 Jason Pallpratt. On sides: 1991 Peter Gibson; 1993 Dina Almond; 1994 Robert Burke. On back of stand: 1995 Kevin Hamilton; 1996 Kevin King; 1997 Nigel Livock; 1998 Kevin King; 1999 Kevin King; 2000 Robert Burke; 2001 Scott Eldridge; 2002 Graham Catteral; 2003 Robert Burke; 2004 Robert Talevski.Thomastown Golf Club was a social club formed in 1976. This is part of the Robert (Bob) Jones collection of Club memorabilia.Golf trophy, plastic golfer on timber and plastic stand with timber base. 23 small engraved plaques attached."T.G.C. Club Champion Nett Score." engraved on plaque attached to front of base.thomastown golf club, golf trophies, bob jones, robert jones -
Clunes Museum
Photograph - PHOTOGRAPHS
... Commencement of this redevelopment was in 2012 Team Members; Catherine Jenkins, Frank Harris, Reg Kennedy, Maureen Harris, Lyn Anmad, Betty Duncan, Karen Byrnes, Kerryn Quemard, Rob Anderson, Reg Kinnersley, Judith Fawcett, Ann Merrett, Marg McFarlane, Andy Hill, Ruth Duncan, Pat Cook, Phil Taig, Ian McFarlane, Barb Adam, Norah Campbell, Jane McClure, Anne Mielke, Marcia Harris, Catherine King, Betty Duncan, Robert Campbell...Commencement of this redevelopment was in 2012 Team Members; Catherine Jenkins, Frank Harris, Reg Kennedy, Maureen Harris, Lyn Anmad, Betty Duncan, Karen Byrnes, Kerryn Quemard, Rob Anderson, Reg Kinnersley, Judith Fawcett, Ann Merrett, Marg McFarlane, Andy Hill, Ruth Duncan, Pat Cook, Phil Taig, Ian McFarlane, Barb Adam, Norah Campbell, Jane McClure, Anne Mielke, Marcia Harris, Catherine King, Betty Duncan, Robert Campbell clunes museum redevelopment 2012 Nil 24 Colour photographs of people preparing to move the Clunes Museum collection Photograph PHOTOGRAPHS ...Clunes Museum packed their collection and it was placed into storage whilst the redevelopment of the building at 36 Fraser Street, Clunes was undertaken. Commencement of this redevelopment was in 2012 Team Members; Catherine Jenkins, Frank Harris, Reg Kennedy, Maureen Harris, Lyn Anmad, Betty Duncan, Karen Byrnes, Kerryn Quemard, Rob Anderson, Reg Kinnersley, Judith Fawcett, Ann Merrett, Marg McFarlane, Andy Hill, Ruth Duncan, Pat Cook, Phil Taig, Ian McFarlane, Barb Adam, Norah Campbell, Jane McClure, Anne Mielke, Marcia Harris, Catherine King, Betty Duncan, Robert Campbell24 Colour photographs of people preparing to move the Clunes Museum collection Nilclunes museum redevelopment, 2012 -
Federation University Historical Collection
Document, Dianne Campbell, Ballarat Lawyers 1853-1895 Research Folders, c2000-2021
... Pearson, Mondle Emmanuel Phillips, Robert King Piers, Robert King Piers, Pinkerton, Frank Pinkerton, Martha Pinkerton, Charles Purcell, R.H. ...Pearson, Mondle Emmanuel Phillips, Robert King Piers, Robert King Piers, Pinkerton, Frank Pinkerton, Martha Pinkerton, Charles Purcell, R.H. ...Folders of research notes on Ballarat Lawyers, including newspaper clippings, website information, etc. .1) Ballarat Lawyers - A (Australian Law Firm histories, Jamaican in Australia, History of the Court System, University of Melbourne Law Students c1870s, Melanie Senior, Cinque Oakley Senior Lawyers, 19th Century Castlemaine Police Courts, New Victorian County Court, Scots and the Law in Scotland, Solicitor online encyclopedia, Alfred Akehurst, Artur Akehurst, J.T. Ansdell, Butler Cole Aspinall, Alfred James Bailey, Henry Stephen Bailey, Matthew Baird, Hugh Sutherland Barrett, William Field Barrett, Redmond Barry, George Elliott Barton, George Frederick Bartrop, John Bell, Thomas Bellas, George Booker) .2) Ballarat Lawyers B (Hugh Sunderland Barrett, Peter Beckford, William Beckford, John T.F. Bowker, William Box, George Boyd, William Boykett, B. Browne, Richard Archer Burton, Alfred Butler) .3) Ballarat Lawyers C-E (Thomas B.S. Carwithen, J.B. Cathcart, John Alfred Chalk, David Clarke, John Collins, Matthew Combe, Thomas Spemcer Cope, Richard. Crouch, Charles Curwan-Walker, Frank H. Cole, John Rowland Davies, Charles J. Dawson, Christopher John Dease, J.E. Dixon, Robert Willian Dobson, Roy Dobson, Edward Doward, Charles R. Doward, Edgar R. Doward,) .4) Ballarat Lawyers F-G (Charles B. Finlayson, Peter T. Finn, John Findlay, John Fitzgerald, John Olsen Foss, Alexander Fraser, J.A. Doane, Andrew Garran, George Garrard, David Gaunson, William Gaunt, MAry Gaunt, F.T. Gell) .5) Ballarat Lawyers H-J: (Frederick Ham, Jeremy Harper, John H. Harris, solicitors, Amelia Harris, J. Henry Harris, Peter Blake, Henry Plomer, Arthur Plomer, Ballarat Chamber of Commerce, Freemasons, White Flat Drainage and Mining Company, Henry R. Nicholls, Francis Ham, Richard T. Harvey, Edward Heady, Peter Heinz, T.t. Hollway. Thomas tuke hollway, William Higgins, James V.M. Hitchins, frederick Hitchins, James Hitchins, Edward Hockley, Robert W. Holmes, Catherine Kain, JOhn Ireland, Richard D. Ireland, Peter Jacobs) .6) T.C. Williams, John Kidahl, Arthur W. King, Pendrell family, M.A. Lazarus, Edward Lewis, W.H. McCormick, Soho Foundry, Henry S, Ochiltree, James V. McCormick, McDonnell, Townsend MacDermott, Morgan McDOnnell, Percy McDonnell, Cyprian McDonnell, John McFarland, Samuel W, McGowan, Bill McGregor, David Madden, Charles Holthouse, J. Madden, Samuel Mann, Samuel F. Mann, Tobias Furneaux, Samuel Mann, Agar Wynne, thomas Mann, Henry MacDermott, Archibald Midnie, Arthur Nevett, Arthur H. Nevett, Alfred Mitchell, William Mitchell, H.W. Morrow, William Mitchell, Norman P. Must, George F. Oakley.) .7) Ballarat Lawyer Q-R (Henry S. Ochiltree, W.B. Ochiltree, Edward G. Ochiltree, J.J.P. O'Dee, Bernard O'Dowd, John Ogier, Cornish Lawyers in Central Victoria Q-R, John Bateman Paynter, J.B. Pearson, Mondle Emmanuel Phillips, Robert King Piers, Robert King Piers, Pinkerton, Frank Pinkerton, Martha Pinkerton, Charles Purcell, R.H. Ramsay, Henry Randall, James Randall, Thomas Randall, John Warrington Rogers, John M. S. Rodd, George Rutler) .8) Lawyers in Central Victoria S-W (Charles Salter, H. Holmes, George Staveley, Charles Salter, George T. Boyd, Edward Sandford, Henry G. Shaw, Thomas W. Snape, Thomas S. Standish, Charles Snape, Frederick C. Standish, Edith Snape, James Snape, Thomas Snape, Philip Snape, George Staveley, John G. Stoker, William Stone, Henry Sturt, Matthew W. Taylor, Bread and Cheese Club, R.D. Thompson, Roger D. Thompson, R.H. Ramsay, R.G. Turner, F.H. Tuthill, W.M.K. Vale, William Vale, May Vale, William L. Vardy, Gordon Vardy, William S. Vardy, Charles Von Ende) .9) Lawyers in Central Victoria W-Z (Henry Walker, Andrew Wallace, John Wellesley, Brereton Watson, C.G.M. Watson, James Watson, George Armytage, Thomas Watson, Patricius Welsh, John Westmore, Theodore Whipham, Arthur Whipham, Thomas H. Whipham, Frances Whipham, Thomas Bellas, James L. Willoughby, John Noble Williams, James Wisewould, Horace Wright, H.M. Wright, William Wright, Henry J. Wrixon, Agar Wynne, Samuel Young) . ballarat lawyers, ballarat, dianne campbell goldfields lawyers collection -
 Ringwood and District Historical Society
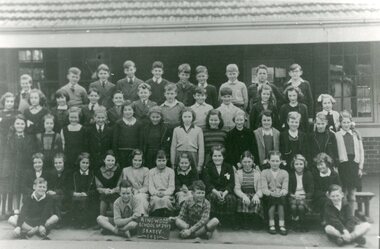
Photograph, Ringwood State School -Class photograph - Grade 5, 1951
... , John Allsop, Ronald Young, Peter Conway, Victor Greenham, Ray Horsey. 2nd Row - L to R: Glenys Rackham, Jenny Baton, Jenny Morris, Graham Huxley, Leo King, Wayne Mariner, Robert Hand, Oliver, Ashton, Ian Herd, Jennifer Miller, Coral Skurrie, Maureen Dyball. 3rd Row - L to R: Linda Wilson, Janet Phillips, Jeanette, Goodwin, Margaret Mitchell, Heather Anderson, Helen Parker, Margaret Bennett, Wendy Whittle, Marilyn Houghton, Joy Pease, Corinna Taylor, Janice Pateman, Faye White, Helen Wigley. ..., John Allsop, Ronald Young, Peter Conway, Victor Greenham, Ray Horsey. 2nd Row - L to R: Glenys Rackham, Jenny Baton, Jenny Morris, Graham Huxley, Leo King, Wayne Mariner, Robert Hand, Oliver, Ashton, Ian Herd, Jennifer Miller, Coral Skurrie, Maureen Dyball. 3rd Row - L to R: Linda Wilson, Janet Phillips, Jeanette, Goodwin, Margaret Mitchell, Heather Anderson, Helen Parker, Margaret Bennett, Wendy Whittle, Marilyn Houghton, Joy Pease, Corinna Taylor, Janice Pateman, Faye White, Helen Wigley. ...Black and white photograph - Grade 5, 1951"Attached to photograph" Back Row- L to R: ?, Ian Morris, Peter Kuibley, ?, Bruce (?), John Allsop, Ronald Young, Peter Conway, Victor Greenham, Ray Horsey. 2nd Row - L to R: Glenys Rackham, Jenny Baton, Jenny Morris, Graham Huxley, Leo King, Wayne Mariner, Robert Hand, Oliver, Ashton, Ian Herd, Jennifer Miller, Coral Skurrie, Maureen Dyball. 3rd Row - L to R: Linda Wilson, Janet Phillips, Jeanette, Goodwin, Margaret Mitchell, Heather Anderson, Helen Parker, Margaret Bennett, Wendy Whittle, Marilyn Houghton, Joy Pease, Corinna Taylor, Janice Pateman, Faye White, Helen Wigley. Front Row - L to R: Judy Young, Margaret Dennis, Wendy Caughey, Iris Allen, Barbara Hardstaff, Jennifer Pickford, Valerie Noble, Fay Taylor, Norma Springett, Heather Taylor, Jean Hall, Rosalie Read. Front Row - L to R: Geoffrey Halgar, Ray Davidson, Robert Sinclair, George Jenkins. Teacher: -
 Bendigo Military Museum
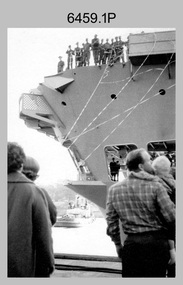
Photograph - A Section, 1st Topographic Survey Troop, Vung Tau, Vietnam, 1966
... The ten RA Svy technical personnel from 1st Topo Svy Tp deployed were: WO2 David Christie, SGT Stan Campbell, SGT Dave King, CPL Jim Roberts, CPL Dennis Duquemin, CPL Des Ceruti, SPR Derek Chambers, SPR Brian Firns, SPR Joe O’Connor and SPR Ron Smith. ...The ten RA Svy technical personnel from 1st Topo Svy Tp deployed were: WO2 David Christie, SGT Stan Campbell, SGT Dave King, CPL Jim Roberts, CPL Dennis Duquemin, CPL Des Ceruti, SPR Derek Chambers, SPR Brian Firns, SPR Joe O’Connor and SPR Ron Smith. ...This is a set of 12 photographs of A Section, 1st Topographic Survey Troop taken from the 25th of May to the 12th of June 1966 during their deployment to Vung Tau, Vietnam. Led by OC CAPT Bob Skitch, the ten personnel from A Section 1st Topo Svy Tp and six personnel from supporting units were the first contingent from the Royal Australian Survey Corps deployed to provide topographic support to the Australian Task Force in Vietnam. They arrived in Saigon, Vietnam on the 10th of June 1966 enroute to the Australian Reinforcement Unit (ARU) “back beach” camp in Vung Tau. The ten RA Svy technical personnel from 1st Topo Svy Tp deployed were: WO2 David Christie, SGT Stan Campbell, SGT Dave King, CPL Jim Roberts, CPL Dennis Duquemin, CPL Des Ceruti, SPR Derek Chambers, SPR Brian Firns, SPR Joe O’Connor and SPR Ron Smith. External personnel deployed were: WO2 Snow Rollston from Northern Command Field Survey Unit, T/CPL Peter Clarke – orderly room corporal, T/CPL Alan Carew – Technical Storeman, SPR Stan Johns – Map Storeman, SPR Boots Campbell – batman/driver and PTE BNF Brunning – cook. The ship featured in photos .1P and .2P was the aircraft carrier HMAS Sydney on its 4th voyage to Vietnam. On board were SGT Stan Campbell and SPR Brian Firns, tasked to manage A Section’s stores and equipment. The rest of A Section deployed to Vietnam by air on the chartered Qantas 707B ‘City of Longreach'. A Section’s main tasks were to establish a Theatre Grid, map compilation and map revision; Engineer Survey Support in the camp and to the civil community; give assistance to the Cordon Search Missions by producing large scale plots from aerial photos with every house and fence etc plotted; and then reproduce these by silk screening usually, within a 24-hour period. RA Svy’s support concluded with the withdrawal of Australian troops from Vietnam in 1972. More information on the A Section, 1st Topographic Survey Troop and the Army Survey Regiment’s supporting role is provided in pages 89 to 94 of Valerie Lovejoy’s book 'Mapmakers of Fortuna – A history of the Army Survey Regiment’ ISBN: 0-646-42120-4.This is a set of 12 photographs of A Section, 1st Topographic Survey Troop (1st Topo Svy Tp), taken from the 25th of May to the 12th of June 1966 during their deployment to Vung Tau, Vietnam. The black and white photographs were printed on photographic paper and are part of the Army Survey Regiment’s Collection. The photographs were scanned at 300 dpi. .1) &.2) - Photo, black & white, 1966. HMAS Sydney departing Woolloomooloo wharf en-route to Vietnam. .3) - Photo, black & white, 1966. A Section 1 Topo Svy Tp relaxing in a bar before deployment. OC CAPT Bob Skitch in centre of photo. .4) - Photo, black & white, 1966. Unidentified A Section 1 Topo Svy Tp personnel and troops from other units relaxing in a bar before deployment. .5) - Photo, black & white, 1966. A Section 1 Topo Svy Tp personnel arrival by bus at Saigon (Tan Son Nhut) Airport. OC CAPT Bob Skitch 4th from right. .6) - Photo, black & white, 1966. A Section 1 Topo Svy Tp personnel boarding the USAF Hercules aircraft enroute from Saigon (Tan Son Nhut) Airport to Vung Tau Airfield. OC CAPT Bob Skitch on left. .7) - Photo, black & white, 1966. A Section 1 Topo Svy Tp personnel and troops from other units boarding the USAF Hercules aircraft enroute from Saigon (Tan Son Nhut) Airport to Vung Tau Airfield. .8) & .9) - Photo, black & white, 1966. A Section 1 Topo Svy Tp personnel arrive at the Australian Reinforcement Unit (ARU) “back beach” camp. .10) - Photo, black & white, 1966. A Section 1 Topo Svy Tp personnel in oppressive conditions work on map products. .11) - Photo, black & white, 1966. Group photo of A Section 1 Topo Svy Tp. OC CAPT Bob Skitch on far right. .12) - Photo, black & white, 1966. Group photo of A Section 1 Topo Svy Tp. OC CAPT Bob Skitch 3rd from right.Annotated with the photo set - ‘ DET 1 Topo Svy Tp Vung Tau 25 May to 12 of Jun 66’royal australian survey corps, rasvy, army survey regiment, army svy regt, fortuna, asr, 1st topographical survey troop -
 Flagstaff Hill Maritime Museum and Village
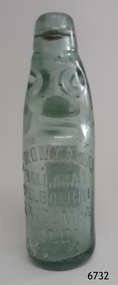
Domestic object - Codd neck bottle, E. Rowlands, 1921
... In the meantime, the Melbourne concern had progressed so rapidly that in 1888 a magnificent factory embodying all the latest ideas and equipment was built in King Street Melbourne. Robert Lewis was a fellow Welshman born in 1816, and he arrived in Port Phillip in 1853 and became a partner in the early day with Evan Rowland but with lesser and shorter involvement in the firm, from which he retired in 1876. ...In the meantime, the Melbourne concern had progressed so rapidly that in 1888 a magnificent factory embodying all the latest ideas and equipment was built in King Street Melbourne. Robert Lewis was a fellow Welshman born in 1816, and he arrived in Port Phillip in 1853 and became a partner in the early day with Evan Rowland but with lesser and shorter involvement in the firm, from which he retired in 1876. ...The design of the bottle is called a Codd, sometimes referred to as a marble bottle or "Codd's patent bottle". During the mid-to-late 1800s, there were many inventions to keep the fizz in carbonated drinks such as ginger ale, soda water, and fruit drinks. Hiram Codd, an English engineer invented a successful process that he patented as "Codd's patented globe stopper bottle" in 1872. The Codd-neck bottle (commonly called Codd or marble bottle) is manufactured in two parts. The body of the bottle is cast in two sections. At the time of joining the sections, glass marble and rubber seal are inserted into the neck section. The lip is then applied to the top of the bottle. The Codd bottle is filled upside down as the pressure of the gas from the carbonated liquid holds the marble up and out of the way. When the bottle stands upright the gas pushes the marble up against the washer, creating a firm seal to keep the fizz inside. The bottle is opened by pushing the marble down firmly to allow some of the gas to escape. The marble drops down and is caught in a depression formed in the neck. When the bottle is tilted to pour or drink the liquid the marble rests in a dimple. Two Ballarat miners, Evan Rowland and Robert Lewis started manufacturing mineral and aerated waters, bitters, cordials, and liqueurs in 1854, in a tent on the shores of Lake Wendouree Ballarat. Another 13 firms at that time employed manual operations, whereas they introduced Taylor's No. 1 machine that speeded up the process and laid the foundation for their fortune. Evan Rowland was a pioneer in the aerated water trade in Australia. He was born on August 2, 1826, in North Wales. In 1852, during the gold rush, he emigrated to Melbourne, and in 1854 he went to Ballarat and formed a partnership with Robert Lewis, the firm being called ‘‘Rowlands & Lewis’’. Their next step was to secure a supply of pure water. Using mineral Waters that they found via a natural spring at Warrenheip, Victoria. From the outset, the beverages made from this water gained repute and were in great demand. Their business prospered so well that in 1858 they were able to build a factory at the corner of Sturt and Dawson Streets, Ballarat, and to fit with the most up-to-date machinery then in use. By 1870 their business had increased so much and demand had grown to such an extent that Mr. Rowlands erected another factory, covering over an acre of ground at the corner of Dana and Doveton Streets, costing £13,000. The factory was fitted with the most modern equipment of the time to manufacture cordials and aerated water. In 1873 Rowlands established an agency at 116 Collins St, Melbourne, because the demand for the products of the Melbourne factory became so large. The company expanded to Sydney opening a factory at the corner of Burns & Hay Streets Darling Harbour obtaining spring water to supply this plant from Katoomba in the Blue Mountains. The water was brought to Sydney by rail. In the meantime, the Melbourne concern had progressed so rapidly that in 1888 a magnificent factory embodying all the latest ideas and equipment was built in King Street Melbourne. Robert Lewis was a fellow Welshman born in 1816, and he arrived in Port Phillip in 1853 and became a partner in the early day with Evan Rowland but with lesser and shorter involvement in the firm, from which he retired in 1876. Robert Lewis was perhaps better known as Ballarat's first mayor and a Member of the Legislative Assembly. He was a strong supporter of local charities, president/treasurer of the Eisteddfod Committee, a major force in the development of the Ballarat Hospital, and he was the mayor of Ballarat five times, the first in 1863, (having been a counsellor as early as 1859) and for the last time in 1881. Lewis died in 1884 of a stroke in Ballarat. Rowlands continued in the firm and invented and patented an improved soda water bottle. The water used in Rowlands products was filtered four times but his attempts to use local corks failed on quality grounds. He was a stickler for quality, which was so good that many outside Victoria were prepared to pay the 'premium' imposed by inter-colonial customs duty payable at that time. By the 1890s, Rowlands had factories in Ballarat, Melbourne, Sydney, and Newcastle. He died in 1894 but his company continued until well after the Second World War when it was sold to Schweppes. Bottles such as this popular brand, containing soda water, were often used on paddle steamers for refreshments.An early manufacturing process producing the first mineral waters in Australia was invented and developed by an early Welsh migrant to Australia. The Evan Rowlands story gives an insight into the early development of manufacturing industries in Australia that allowed their workers and the towns they were situated in to prosper and develop into what they are today. A good example of hand blown glass.Bottle; clear glass Codd neck bottle with small marble in top. Once contained soda water or soft drink. Manufactured in 1921 by E. Rowlands of Ballarat, Melbourne, Katoomba and Sydney. The bottle is 'recyclable' - the message on the base says that it remains the property of E. Rowlands Pty Ltd. Inscriptions on three adhesive labels at time of donation"E. ROWLANDS BALLARAT MELBOURNE KATOOMBA AND SYDNEY". Imprinted into bas "1921" "THIS BOTTLE REMAINS THE PROPERTY OF E. ROWLANDS PTY LTD" On adhesive labels (3) " 1921 ON BASE (LASTED 1924) CODD PATENT 702" "SMALL SIZE. MARBLE TOP SODA WATER PAPER LABEL. USED" "ON PADDLE STEAMERS. POPULAR BRAND"flagstaff hill, warrnambool, shipwrecked-coast, flagstaff-hill, flagstaff-hill-maritime-museum, maritime-museum, shipwreck-coast, flagstaff-hill-maritime-village, bottle, codd bottle, hiram codd, glass marble bottle, e. rowlands bottle manufacturer, soda bottle australia, early recyclable bottle, codd's patent bottle, marble bottle, refreshments, soda water, marble top, 1920s, codd patent 702, handmade, blown -
 Warrnambool and District Historical Society Inc.
Book, Hodder and Staughton, Corporal Cameron, 1912
... Robert Giles (1895-1967) was born in Wangoom and went to the Wangoom State School and the Warrnambool Agricultural High School. He served in World War One and worked at the State Savings Bank in Warrnambool from 1911 to 1921 (excluding war service). He later worked in banks in Koroit, other Victorian country districts and Melbourne and retired to Mailors Flat. He was married to Vera King...Robert Giles (1895-1967) was born in Wangoom and went to the Wangoom State School and the Warrnambool Agricultural High School. He served in World War One and worked at the State Savings Bank in Warrnambool from 1911 to 1921 (excluding war service). He later worked in banks in Koroit, other Victorian country districts and Melbourne and retired to Mailors Flat. He was married to Vera King ...This book belonged to Robert Giles. He obtained it in 1914 and the bookseller was Mrs Tilly Rowan who was a well-known businesswoman in Warrnambool with a book shop and newsagency in the Oddfellows Hall in Koroit Street. Robert Giles (1895-1967) was born in Wangoom and went to the Wangoom State School and the Warrnambool Agricultural High School. He served in World War One and worked at the State Savings Bank in Warrnambool from 1911 to 1921 (excluding war service). He later worked in banks in Koroit, other Victorian country districts and Melbourne and retired to Mailors Flat. He was married to Vera King and they had one child, Joyce Aurelin. A Warrnambool branch of the Savings Bank was opened in Warrnambool in 1859 and it moved into a new building in Timor Street in 1885. (This building in now part of the Archie Graham Senior Citizens’ Centre). The State Savings Bank became the State Bank of Victoria in 1980 and in 1990 was subsumed into the Commonwealth Bank of Australia. This book is retained because it belonged to Robert Giles who lived in the Warrnambool area for part of his life and who worked at the State Savings Bank in Warrnambool early in the 20th century. This is a hard cover book of 408 pages. The cover is red with a gold-coloured image of a horse and a mounted policeman on the front cover and gold printing on the spine. The book has 25 chapters of text. Two labels of the book’s seller are affixed to the front cover and a title page. The cover is much scuffed.‘July 9th 1914 Robert P. Giles State Savings Bank Warrnambool’giles family, warrnambool, state savings bank warrnambool, history of warrnambool