
Showing 23 items matching " korong street"
-
 Glen Eira Historical Society
Document - Palmyra, 88 Orrong Road, Elsternwick
... ... Korong Street...Orrong Road Palmyra Gardiner Alexander Elizabeth Street Elsternwick Altona Little A. D. Korong Street King Street Caulfield Architectural Styles Ward Andrew Edwardian Style Document Palmyra, 88 Orrong Road, Elsternwick ...Partial conservation study by Andrew Ward dated September 1994. Gives property’s history and owner/occupancy til 1925. Notes that Palmyra is significant as an early arts and craft influenced villa in Caulfield.orrong road, palmyra, gardiner alexander, elizabeth street, elsternwick, altona, little a. d., korong street, king street, caulfield, architectural styles, ward andrew, edwardian style -
Glen Eira Historical Society
Article - Elsternwick Congregational Church – Caulfield Union Church
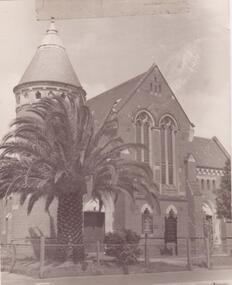
... ... Korong Street...Mary’s Church of England Elsternwick Korong Street King Street De Lacy Evans G. McMurtie McNaughton and Stewart Copland Osric Rev. ...A two page article Elsternwick Congregational Church by J. O’Donnell, No. 12 October 1974 describing the church’s history. Includes references and exterior photograph. Undated typed Short History of Elsternwick Congregational Church by Jim McLoghlin. Brief handwritten note dated August 1984 by Jim McLoghlin about the church’s history. Brief typed, undated, unattributed not about the church’s early history. Brief undated, handwritten note by Jim McLoghlin about the church’s history in the 1970s and 1980s. Photocopy of a page from A Coming Together, entitled Elsternwick Congregational Church: Some Memories by Jim McLoghlin dated 01/01/1989. Two pages of undated typed and handwritten notes by Trevor Hart concerning the early history of the church including The Fincham Organ. Printout of brief biographical details of Rev. William Poole, first resident pastor at Caulfield Union Church, from a website. URL is included. Photocopy of brief article from The Southern Baptist of 26/01/1911 describing the life of Rev. John Reid, an early pastor at Caulfield Union Church after his recent death. Undated, unattributed handwritten brief note of rate book entries from 1879 and 1888 for the Caulfield Union Church site.elsternwick congregational church, o’donnell j., caulfield union church, watts thomas, black chapel, hawthorn road, balaclava road, glen eira road, orrong road, fulton thomas, rolfe g., jordan w.f., macartney h.b. rev., st. mary’s church of england, elsternwick, korong street, king street, de lacy evans g., mcmurtie mcnaughton and stewart, copland osric rev., day edwin rev., day louisa, day annie, day jeanie, cromarty school for girls, sandham street, presentation convent, pedler b.r., st. john’s uniting church, clarke g., clarke graham, mcloghlin jim, prahran grove, garden street, poole j.l. rev., poole william, old grammar school, regent street, little kids contact, st. john’s presbyterian church, pedler b.r., mills miss, shaw mary, mcloghlin mrs., martin les, riddle rev., cromarty girls school, gregson w. rev., mcnaughton mcmurtie and stewart, de lacy evans g., fincham geo., fletcher rich rev., reid john, beauchamp mr., jubilee hall st. mary’s anglican church, architectural styles, architectural features, gothic revival architecture, fonts, clergy, religious groups, sunday schools, congregational church, religious structures and establishments -
 Glen Eira Historical Society
Document - Elsternwick Congregational Church – Caulfield Union Church
... ... Korong Street...Elsternwick Congregational Church Caulfield Union Church Orrong Road Architectural Features Architectural Styles Gothic Revival Architecture Elsternwick Towers Korong Street Glen Eira Road King Street De Lacy Evans G. ...Photocopy of extract of Caulfield Conservation Study by Andrew Ward dated September 1994. Includes brief history and description of Elsternwick Congregational Church and black and white exterior photograph and references. Printed page, dated and source unknown, with sketch of the church and a brief history. Five colour, one black and white exterior, photographs date and photographer unknown.elsternwick congregational church, caulfield union church, orrong road, architectural features, architectural styles, gothic revival architecture, elsternwick, towers, korong street, glen eira road, king street, de lacy evans g., mcmurtie mcnaughton and stewart, copland osric rev., uniting church, congregational church, corrong street, religious structures and establishments -
Glen Eira Historical Society
Document - Elsternwick Congregational Church – Caulfield Union Church
... ... Korong Street...Mary’s Caulfield Orrong Road Korong Street Glen Eira Road Millar William Beckley G.A. ...Photocopies of one page printed history of Caulfield Union Church dated 01/11/1889 by William Millar. Photocopies of printed four-page annual report of the Caulfield Union Church for the year ending 31/10/1890. Photocopy of four-page handwritten document dated 11/07/1894 dissolving the Caulfield Union Church and selling the land, buildings and effects, includes signatures.caulfield union church, glen eira road union church, caulfield, poole w. rev., reid john rev., day edwin rev., gregson john rev., macartney h.b. rev., st. mary’s caulfield, orrong road, korong street, glen eira road, millar william, beckley g.a., woodward thomas, chambers j.s., sargood f.t. sir., webb mr. justice, de lacy evans mr., gladman f. ernest, slatter herbert thomas, anderson adam, burgess arthur, religious groups -
Glen Eira Historical Society
Document - Hopetoun, Hopetoun Street, 2, Elsternwick
... ... Korong Street...Italianate style Hopetoun Melrose Hospitals Verandahs Mansions Towers Architectural features Architectural styles Webb Charles Architects Glenhuntly Road Elsternwick Cutts Joseph Korong Street King Street Hopetoun Street Geoghegan Hanbury Webb Alfred Kopat Pty Ltd Webb Florence Mabel O’Brien Annie Reeve Charles Haines Edith Thomas Albert Ward Andrew Hopetoun Private Hospital Document Hopetoun, Hopetoun Street, 2, Elsternwick ...Photocopy of Caulfield Conservation Study for this address, conducted in September 1994. It outlines a description of the Italianate villa architectural aspects of Hopetoun Private Hospital, the history of the owners of the property and the recommendations for inclusion on the National Estate Register and for the planning Scheme control. By Andrew Ward. Includes two photocopied photographs of the exterior of the exterior.italianate style, hopetoun, melrose, hospitals, verandahs, mansions, towers, architectural features, architectural styles, webb charles, architects, glenhuntly road, elsternwick, cutts joseph, korong street, king street, hopetoun street, geoghegan hanbury, webb alfred, kopat pty ltd, webb florence mabel, o’brien annie, reeve charles, haines edith, thomas albert, ward andrew, hopetoun private hospital -
Glen Eira Historical Society
Document - Hopetoun Street, 10, Elsternwick
... Street... Elsternwick... Weatherboard house... Garages... Korong...Lee Flora Lee George Ralph Hopetoun Street Elsternwick Weatherboard house Garages Korong Road King Street Glenhuntly Road Morton Street Orong Road Orrong Road Kooyong Road Lee George Callaghan Edward J K S P Simmonds Real Estate Agents Auctioneer Scott W V Timber houses Murray Street Document Hopetoun Street, 10, Elsternwick ...Three items relating to valuations for this property: 1/One page typed letter from Weigall and Crowther Solicitors to S P Simmonds Estate Agency on behalf of Flora Lee, dated 03/10/1962, requesting valuation of 10 Hopetoun Street, Elsternwick re the Estate of G R Lee. 2/Four page typed valuation of 10 Hopetoun Street, Elsternwick, by Edward J K Callaghan, dated 10/10/1962. The valuation includes property measurements, title particulars, zoning, detailed information about the facilities in the surrounding area and also expansive details about the house on the property and other improvements. 3/Copy of a two page typed letter, from valuator WV Scott to George Lee, dated 22/12/1971, to Mr George Lee providing another later valuation of 10 Hopetoun Street, Elsternwick re the Estate late Flora Lee. Accompanying is a one page handwritten, undated and unattributed document of working notes.lee flora, lee george ralph, hopetoun street, elsternwick, weatherboard house, garages, korong road, king street, glenhuntly road, morton street, orong road, orrong road, kooyong road, lee george, callaghan edward j k, s p simmonds real estate agents auctioneer, scott w v, timber houses, murray street -
 Bendigo Historical Society Inc.
Map - LONG GULLY HISTORY GROUP COLLECTION: MAP OF LONG GULLY AREA
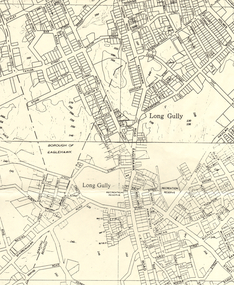
... Map shows Eaglehawk Road from Don Street to Weatherall Street, then Mt Korong Road to Dowding Street. Some contour lines on the map....Map shows Eaglehawk Road from Don Street to Weatherall Street, then Mt Korong Road to Dowding Street. Some contour lines on the map. ...BHS CollectionMap of Long Gully area printed on yellow paper. Map shows Eaglehawk Road from Don Street to Weatherall Street, then Mt Korong Road to Dowding Street. Some contour lines on the map.bendigo, history, long gully history group, the long gully history group - map of long gully area, borough of eaglehawk -
 Bendigo Historical Society Inc.
Map - MINING REPORTS - MAP OF COLLMANN AND TACCHI SHAFT
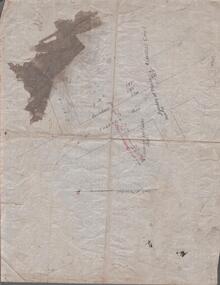
... Collman and Tacchi shaft drawn on map corner of Dowding Street and Mt. Korong Road, California Gully, Bendigo. ...It is beside Mt Korong Road, near Dowding Street. Some boundary lines are drawn. ...It is beside Mt Korong Road, near Dowding Street. Some boundary lines are drawn. ...Collman and Tacchi shaft drawn on map corner of Dowding Street and Mt. Korong Road, California Gully, Bendigo. Mt Korong Road later became Eaglehawk Road. Hand drawn map showing the Collmann and Tacchi Shaft with No 17 Crosscut with the distances in feet and inches and the compass bearing of each leg. It is beside Mt Korong Road, near Dowding Street. Some boundary lines are drawn. Also on the map is Lansell's C and T across the road.map, bendigo, goldfields, mining reports, map of collmann and tachi shaft, collmann and tacchi shaft, lansell's c and t -
 Bendigo Historical Society Inc.
Newspaper - NEWSPAPER CLIPPINGS EARLY PHOTOGRAPHS OF BENDIGO STREETSCAPE, Unknown
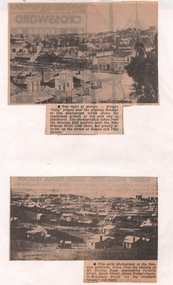
... Streets and Knipe's Folly in top right of image. (Photograph 2) An early photograph of the Bendigo Goldfields the suburb of Ironbark taken from the vicinity of Mt. Korong...Korong Road, overlooking Victoria Street and Quick Street. Image shows Knipe's Castle in Boundary Street ''on the Ironbark Ranges'' top right. ...Two Black & White Early Photographs of Bendigo. (Photograph 1) Panorama is taken from the Masonic Hall location with the Rifle Brigade Hotel on the corner of Rowan and View Streets and Knipe's Folly in top right of image. (Photograph 2) An early photograph of the Bendigo Goldfields the suburb of Ironbark taken from the vicinity of Mt. Korong Road, overlooking Victoria Street and Quick Street. Image shows Knipe's Castle in Boundary Street ''on the Ironbark Ranges'' top right.bendigo, streetscape, rowan & view st, mt korong rd -
 Ballarat Tramway Museum
Slide - 35mm slide/s - set of 24, Noel Simons, 20/05/1971 12:00:00 AM
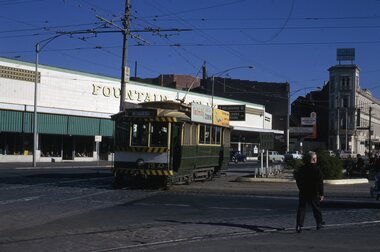
... Has Borough Auto Service building in the background. 1195.9 - No. 5 in Mt Korong Road, towards Bamard Street, photo taken after tram has passed photographer. 1195.10 - No. 30 at the Golden Square terminus with the Milk Bar on the right hand side of the photograph. 1195.11 - No. 30 inbound at Fire Station Loop, High St. ...Loop, California Gully". 1195.9 - "No. 5 descending Mt Korong Rd. towards Bamard St." 1195.10 - "Birney car No. 30 at Golden Square terminus" 1195.11 - "Birney car No. 30 in High Street near Thistle Street (Fire Station Loop)" 1195.12 - "No. 30 in High St. between vine and Wattle Streets" 1195.13 - "No. 25 at Hayes Street Loop Iron Bark". 1195.14 - "Nos. 2 and 5 crossing at Hayes Street Loop Iron Bark" 1195.15 - "No. 5 at Manchester Loop opposite Havilah Road, Long Gully" 1195.16 - "No. 5 passing William Street, Long Gully". 1195.17 - "No. 5 at California Gully" 1195,18 - "Nos. 26 and 5 at Thorpe St. ...Has Borough Auto Service building in the background. 1195.9 - No. 5 in Mt Korong Road, towards Bamard Street, photo taken after tram has passed photographer. 1195.10 - No. 30 at the Golden Square terminus with the Milk Bar on the right hand side of the photograph. 1195.11 - No. 30 inbound at Fire Station Loop, High St. ...Set of 24 transparencies taken on 20/5/1971 on Kodak mounts. 1195.1 - Bendigo 19 arriving at Charing Cross en route to North Bendigo with Fountain Plaza and the City Family Hotel in the background. No. 19 has two roof ads for the SEC. -'Electricity better for cooking' and 'Everything's under control in my all electric kitchen' 1195.2 - as above, but standing at the Charing cross stop, with the Beehive Stores and other buildings along the east side of Pall Mall in the background. 1195.3 - No 21 ex Golden Square crossing View St. trackwork in front of No. 25 waiting to depart for Quarry Hill. No.21 has two roof ads (as for No.19 in 1195.1) and No.25 has one SEC roof ad and another. Ezywalkin sign in the background, and Fountain Plaza. 1195.4 - as for 1195.3, but after 21 has arrived and 25 left for Quarry Hill. Has Ezywalkin store and the Beehive store in the background. 1195.5 - No. 5 at the Eaglehawk terminus. Photo taken with a cannon in foreground looking along High St. Eaglehawk. Has shops on the west side of High St. in the background. 1195.6 - No. 5 at the Eaglehawk terminus, close up of the rear of the tram - note tow bar arrangement. Has destination of Quarry Hill. 1195.7-Nos.25 and 5 crossing at the Thorpe St. Loop, California Gully. No. 25 bound for Eaglehawk (has SEC Briquette and electric cooking roof ads) and 5 en route for Quarry Hill with a SEC and Cinzano roof ad. 1195.8 - as for 1195.7, but after trams have passed each other. Has Borough Auto Service building in the background. 1195.9 - No. 5 in Mt Korong Road, towards Bamard Street, photo taken after tram has passed photographer. 1195.10 - No. 30 at the Golden Square terminus with the Milk Bar on the right hand side of the photograph. 1195.11 - No. 30 inbound at Fire Station Loop, High St. Golden Square. Has old fire station in the background. Passengers are boarding the tramcar. 1195.12 - No. 30 in High St, bound for North Bendigo between Vine and Wattle Streets. 1195.13 - No. 5 bound for Eaglehawk waits at Iron Bark Gully Loop, at Hayes St. 1195.14 - No. 5 and No. 2 crossing at Iron Bark Gully Loop. 1195.15 - No. 5 bound for Eaglehawk leaving the Manchester Loop, Long gully. 1195.16 - No. 5 passing William Street, Long Gully en route to Eaglehawk. 1195.17 - No. 5 just before the California Gully Crossing Loop. 1195.18 - Nos. 5 and 26 crossing at California Gully crossing Loop. No. 5 heading to Eaglehawk, 26, Quarry Hill. 1195.19 - No. 5 in High St. Eaglehawk with Bob Moyle's Victoria Hotel and the TAB in the background. 1195.20 - No. 5 in High St. Eaglehawk approaching the terminus. Photo taken after the tram has passed the photographer. Has Foodland store and J. Best Fruit supply in the background, along with Eaglehawk Town Hall. 1195.21 - No. 5 at the Eaglehawk terminus, photo taken along seldom used track along High St. 1195.22 - as for 1195.22 - but at the very end of the track. 1195.23 - No. 5 en route for Quarry Hill climbs High St. Eaglehawk with the Victoria Hotel and Eaglehawk Town Hall in the background. 1195.24 - No. 5 and 25 crossing at Jobs Gully Loop. Note 25 has a black on white destination roll, while No. 5 has a white on black destination roll. Information written on in black ink and date stamped on purple ink. 1195.1 - "No. 19 arrives at Charing Cross Bendigo from Golden Square" 1195.2 - "No. 19 about to leave Charing Cross for North Bendigo" 1195.3 - "No. 25 awaiting departure for Quarry Hill, watches No. 21 arrive at Charring Cross from Golden Square" 1195.4 - "No. 21 on North Bendigo service and No. 25 on Quarry Hill run await departure at Charing Cross" 1195.5 - "No. 5 at Eaglehawk terminus" 1195.6 - "No. 5 at Eaglehawk terminus" 1195.7 - "Nos. 5 and 25 crossing at Thorpe St. Loop, California". 1195.8 - "Nos. 25 and 5 crossing Thorpe St. Loop, California Gully". 1195.9 - "No. 5 descending Mt Korong Rd. towards Bamard St." 1195.10 - "Birney car No. 30 at Golden Square terminus" 1195.11 - "Birney car No. 30 in High Street near Thistle Street (Fire Station Loop)" 1195.12 - "No. 30 in High St. between vine and Wattle Streets" 1195.13 - "No. 25 at Hayes Street Loop Iron Bark". 1195.14 - "Nos. 2 and 5 crossing at Hayes Street Loop Iron Bark" 1195.15 - "No. 5 at Manchester Loop opposite Havilah Road, Long Gully" 1195.16 - "No. 5 passing William Street, Long Gully". 1195.17 - "No. 5 at California Gully" 1195,18 - "Nos. 26 and 5 at Thorpe St. Loop, California Gully". 1195.19 - "No. 5 in High St. Eaglehawk". 1195.20 - "No. 5 approaching Eaglehawk terminus" 1195.21 - "No. 5 at Eaglehawk terminus" 1195.22 - "No. 5 at Eaglehawk terminus" 1195.23 - "No. 5 in High St. Eaglehawk" tramways, trams, bendigo, charing cross, eaglehawk, california gully, golden square, iron bark gully, jobs gully, tram 2, tram 5, tram 19, tram 21, tram 25, tram 26, tram 30 -
Glen Eira Historical Society
Document - Hopetoun, Hopetoun Street, 2, Elsternwick
... Korong Road... Duffy Frank Gavan... Geoghegan Hanbury C... Cutts Joseph E... Hopetoun Street...Hopetoun Private Hospital Hospitals Elsternwick Charles Webb and Son Melrose Italianate style Architectural features Glenhuntly Road Korong Road Duffy Frank Gavan Geoghegan Hanbury C Cutts Joseph E Hopetoun Street Koorong Road Caulfield Mansions Caulfield Historical Society City of Caulfield Webb Charles Architectural styles Hopetoun Lord Webb Alfred William Webb Florence Mabel Cordner Florence Mabel O’Brien Annie May Reeve Charles Frederick Haines Edith Faith Thomas Albert Edward Kopat Pty Ltd Cordner L Document Hopetoun, Hopetoun Street, 2, Elsternwick ...Two items about the inclusion of this property on the National Trust's Register: 1/1 copy of one page of typed correspondence and six page enclosure from T Chandler for Ian Wight, Assistant Administrator (Conservation) of the National Trust of Australia (Victoria), dated 19/07/1991 to the Chief Executive Officer, City of Caulfield, outlining that the Hopetoun Private Hospital has been classified in the National Trust’s Register and also noting a cc for Caulfield Historical Society. The enclosure is a six page typed classification report on Hopetoun by the National Trust and includes a reference list. 2/1 copy of one page of typed correspondence and six page enclosure from T Chandler for Ian Wight, Assistant Administrator (Conservation) of the National Trust of Australia (Victoria), dated 19/07/1991 to Kopat P/L, outlining that the Hopetoun Private Hospital has been classified in the National Trust’s Register. The enclosure is the same six page typed classification report on Hopetoun by the National Trust which includes a reference list.hopetoun private hospital, hospitals, elsternwick, charles webb and son, melrose, italianate style, architectural features, glenhuntly road, korong road, duffy frank gavan, geoghegan hanbury c, cutts joseph e, hopetoun street, koorong road, caulfield, mansions, caulfield historical society, city of caulfield, webb charles, architectural styles, hopetoun lord, webb alfred william, webb florence mabel, cordner florence mabel, o’brien annie may, reeve charles frederick, haines edith faith, thomas albert edward, kopat pty ltd, cordner l -
 Bendigo Historical Society Inc.
Photograph - David Bernoth Rail Photographs - Korong Vale, March 2012
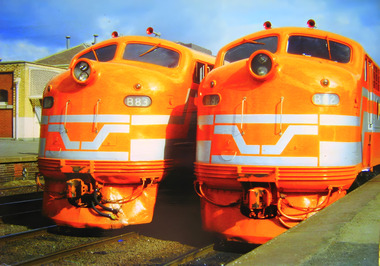
... About the only structure now remaining is the water tank on the down side of the Vernon street level crossing. bendigo railways david bernoth collection korong vale DVD. ...Korong Vale was a speck of a town with a population of just 238 people in 1981 and most of them would have been railway employees. It was the junction for the Sea Lake and Robinvale lines, during wheat season it was common to send relieving crews there to cope with the heavy traffic. Loaded wheat could be dispatched to either Bendigo where it would travel on to Melbourne and Geelong or it could go to Dunnoly, a large inland wheat storage facility. It had two signalboxes, (A box controlled 2 sets of interlocked gates), loco depot and 8 track marshalling yard as well as the usual goods shed, livestock loading facilities and weighbridge. Perusal of the signal diagrams (link above) will show the extent of the yard tracks. It all ended in 1983 when practically everything you see in the following photos was demolished. About the only structure now remaining is the water tank on the down side of the Vernon street level crossing.DVD. David Bernoth Rail photographs - Six Photos This item contains the following photos: 6847.2a Colour photo of two diesels Nos. 883 and 882 at a station 6847.2b Black and white photo of a sign at Korong Vale railway station. 6847.c Colour photo of Korong Vale A Signal Box and the level crossing gates 6847.2d Black and white photo of a loco van at Korong Vale 6847.2e Black and white photo of Workman's Vehicle at Korong Vale 6847.2f Black and white photo of the top front view of Engine 761bendigo, railways, david bernoth collection, korong vale -
 Bendigo Historical Society Inc.
Document - MCCOLL, RANKIN AND STANISTREET COLLECTION: MINING LEASE NO 10173 GARDEN GULLY SHAFT, 9th March, 1934
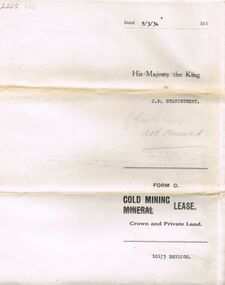
... Mining lease 5 page document for lease application 10173, dated 9th March 1934, within area bounded by Don, Barnard Streets up to Mt. Korong Road, area 10 acres. Document signed by John Jepson Stanistreet in the presence of W.A. ...GOLD Mining Garden Gully Shaft Mining lease 5 page document for lease application 10173, dated 9th March 1934, within area bounded by Don, Barnard Streets up to Mt. Korong Road, area 10 acres. Document signed by John Jepson Stanistreet in the presence of W.A. ...Mining lease 5 page document for lease application 10173, dated 9th March 1934, within area bounded by Don, Barnard Streets up to Mt. Korong Road, area 10 acres. Document signed by John Jepson Stanistreet in the presence of W.A. Kell, Warden's Clerk, Bendigo. Hand coloured plan of lease appended to document, yellow section refers to lease. Marked on map Central Garden Gully shaft. On front of lease ' entered in the Register Book Vol 303 Fol 33698' On back ' His Majesty the King to J.P. Stanistreet (Cent G Gully not renewed written in pencil) Form C Gold Mining Lease Crown and Private Land'gold, mining, garden gully shaft -
 Bendigo Historical Society Inc.
Plan - Central Blue Gold Mine, Unknown
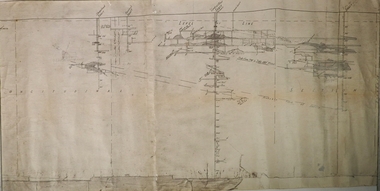
... Lansell's Little 180 gold mine was located on the corner of Alley Street and Mt. Korong Road. ...Lansell's Little 180 gold mine was located on the corner of Alley Street and Mt. Korong Road. gold mining gold Bendigo central blue Longitudinal plan of Central Blue and Little 180 gold mines underground workings. ...Lansell's Little 180 gold mine was located on the corner of Alley Street and Mt. Korong Road. Longitudinal plan of Central Blue and Little 180 gold mines underground workings. Hand drawn in pencil, with shadings. Shafts marked: Central Blue and Sheepshead shaft. Plan forms part of the Margaret Roberts Collection.gold mining, gold, bendigo, central blue -
 Bendigo Historical Society Inc.
Photograph - Robert Green Collection - Photos of Bendigo Tramways - Sheet B of 10, 1960s
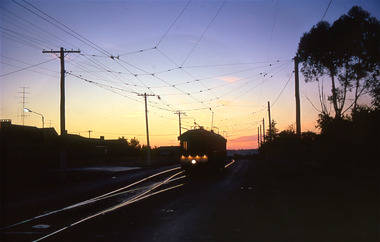
... Photos: 11147.10a Tram in the darkness, sunset or morning 11147.10b Coming off the railway Line bridge towards Eaglehawk 11147.10c Coming on to the railway Line bridge from Eaglehawk 11147.10d The Quarry Hill and Eaglehawk trams waiting to leave the fountain 11147.10e No 18 from Quarry Hill arrives at the fountain 11147.10f Getting ready to leave the fountain for Eaglehawk 11147.10g Policeman on point duty and tram at the fountain, Charing Cross 11147.10h Eaglehawk and Quarry Hill trams at the fountain 11147.10i Policeman on point duty and tram at the fountain, Charing Cross, looking down Pall Mall 11147.10j No 3 roars up View Street at the corner of McKenzie Street 11147.10k From the Rifle Brigade Hotel the Eaglehawk tram comes past the Queen Elizabeth Oval down View Street 11147.10l From the Rifle Brigade Hotel the Eaglehawk tram comes past the Queen Elizabeth Oval down View Street 11147.10m From the Rifle Brigade Hotel the Eaglehawk tram up View Street opposite the Masonic Hall 11147.10n From the Rifle Brigade Hotel the Eaglehawk tram goes past the Queen Elizabeth Oval up View Street 11147.10o From the Rifle Brigade Hotel the Eaglehawk tram comes up View Street opposite the Masonic Hall 11147.10p From the Victoria Hotel Balcony, the Eaglehawk No 18 arrives 11147.10q From the Victoria Hotel Balcony, the Eaglehawk No 18 departs towards Bendigo 11147.10r Tram No 2 arrives into Eaglehawk 11147.10s Tram No 2 heads to Quarry Hill from California Gully (Probable) 11147.1t Tram on its way out of Long Gully along Mt Korong (Eaglehawk) Road towards Eaglehawk. ...Photos: 11147.10a Tram in the darkness, sunset or morning 11147.10b Coming off the railway Line bridge towards Eaglehawk 11147.10c Coming on to the railway Line bridge from Eaglehawk 11147.10d The Quarry Hill and Eaglehawk trams waiting to leave the fountain 11147.10e No 18 from Quarry Hill arrives at the fountain 11147.10f Getting ready to leave the fountain for Eaglehawk 11147.10g Policeman on point duty and tram at the fountain, Charing Cross 11147.10h Eaglehawk and Quarry Hill trams at the fountain 11147.10i Policeman on point duty and tram at the fountain, Charing Cross, looking down Pall Mall 11147.10j No 3 roars up View Street at the corner of McKenzie Street 11147.10k From the Rifle Brigade Hotel the Eaglehawk tram comes past the Queen Elizabeth Oval down View Street 11147.10l From the Rifle Brigade Hotel the Eaglehawk tram comes past the Queen Elizabeth Oval down View Street 11147.10m From the Rifle Brigade Hotel the Eaglehawk tram up View Street opposite the Masonic Hall 11147.10n From the Rifle Brigade Hotel the Eaglehawk tram goes past the Queen Elizabeth Oval up View Street 11147.10o From the Rifle Brigade Hotel the Eaglehawk tram comes up View Street opposite the Masonic Hall 11147.10p From the Victoria Hotel Balcony, the Eaglehawk No 18 arrives 11147.10q From the Victoria Hotel Balcony, the Eaglehawk No 18 departs towards Bendigo 11147.10r Tram No 2 arrives into Eaglehawk 11147.10s Tram No 2 heads to Quarry Hill from California Gully (Probable) 11147.1t Tram on its way out of Long Gully along Mt Korong (Eaglehawk) Road towards Eaglehawk. ...This collection contains eight archive sheets (Sheet 1 to Sheet 8) of strips of original 35mm black and white negatives of photographs taken during the 1960s and early 1970s by Robert Green, of the Bendigo State Electricty Commission of Victoria Tramways prior to their abandonment The collection also includes two archive quality sheets (Sheet A and Sheet B) of original 35mm colour slides taken by Robert Green during the same period. Sheet B also contains one slide taken by Robert's friend Keigh S King (1928-2019) who was the author of the book 'The Bendigo Tramways an illustrated history, published by the Australian Railway Historical Society Victorian Division Melbourne in February 1972; BHS Item no. 5052. The collection also includes one USB stick which contains images of all photographs described above, except for one colour slide taken by Keith S Kings. Sixteen black and white prints from the images are also included.Robert Green Collection, this item contains 20 Colour Slides of the trams at various locations around Bendigo. Photos: 11147.10a Tram in the darkness, sunset or morning 11147.10b Coming off the railway Line bridge towards Eaglehawk 11147.10c Coming on to the railway Line bridge from Eaglehawk 11147.10d The Quarry Hill and Eaglehawk trams waiting to leave the fountain 11147.10e No 18 from Quarry Hill arrives at the fountain 11147.10f Getting ready to leave the fountain for Eaglehawk 11147.10g Policeman on point duty and tram at the fountain, Charing Cross 11147.10h Eaglehawk and Quarry Hill trams at the fountain 11147.10i Policeman on point duty and tram at the fountain, Charing Cross, looking down Pall Mall 11147.10j No 3 roars up View Street at the corner of McKenzie Street 11147.10k From the Rifle Brigade Hotel the Eaglehawk tram comes past the Queen Elizabeth Oval down View Street 11147.10l From the Rifle Brigade Hotel the Eaglehawk tram comes past the Queen Elizabeth Oval down View Street 11147.10m From the Rifle Brigade Hotel the Eaglehawk tram up View Street opposite the Masonic Hall 11147.10n From the Rifle Brigade Hotel the Eaglehawk tram goes past the Queen Elizabeth Oval up View Street 11147.10o From the Rifle Brigade Hotel the Eaglehawk tram comes up View Street opposite the Masonic Hall 11147.10p From the Victoria Hotel Balcony, the Eaglehawk No 18 arrives 11147.10q From the Victoria Hotel Balcony, the Eaglehawk No 18 departs towards Bendigo 11147.10r Tram No 2 arrives into Eaglehawk 11147.10s Tram No 2 heads to Quarry Hill from California Gully (Probable) 11147.1t Tram on its way out of Long Gully along Mt Korong (Eaglehawk) Road towards Eaglehawk. Houses in the foreground, on the left is 245 Eaglehawk Road and on the right 241 Eaglehawk Road.keith s king, bendigo, trams, robert green -
 Bendigo Historical Society Inc.
Document - CONNELLY, TATCHELL, DUNLOP COLLECTION: RETURNED LETTERS
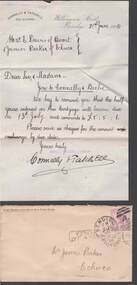
... Forest Street, Bendigo. C. Mr. G. U Segard, Raywood. D. Mr. W. Tonkin, Korong Vale. ...Forest Street, Bendigo. C. Mr. G. U Segard, Raywood. D. Mr. W. Tonkin, Korong Vale. ...Unclaimed letters returned to Connelly & Tatchell: a. Mr James Parker, Echuca; b. Mr. F. Richardson, c/- R.J. Moorhead Esq. Forest Street, Bendigo. C. Mr. G. U Segard, Raywood. D. Mr. W. Tonkin, Korong Vale. Envelopes contain accounts etc. Two penny franked stamps on envelopes.business, legal, connelly & tatchell, connelly & tatchell -
 Bendigo Historical Society Inc.
Map - LONG GULLY HISTORY GROUP COLLECTION: MAP OF LONG GULLY/CALIFORNIA GULLY AREA
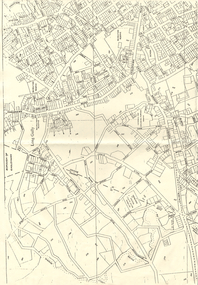
... It shows Eaglehawk Road from Craig Street then Mr Korong Road,to the Murray Valley Highway to just past Avenue Street. ...It shows Eaglehawk Road from Craig Street then Mr Korong Road,to the Murray Valley Highway to just past Avenue Street. ...BHS CollectionTwo copies of a map, printed on yellow paper, of the Long Gully/California Gully Area. It shows Eaglehawk Road from Craig Street then Mr Korong Road,to the Murray Valley Highway to just past Avenue Street. Sandhurst Road and Holmes Road are to the right. To the left is California Gully Road. Water Supply Purposes Reserve, Mental Hygiene Authority, Comet Hill State School Reserve, Agricultural Showgrounds and Recreation Reserve, Rubbish Reserve and two un-named State Schools are shown. Some contours are also shown.bendigo, history, long gully history group, the long gully history group - map of long gully/california gully area -
 Bendigo Historical Society Inc.
Document - LONG GULLY HISTORY GROUP COLLECTION: J SEMMENS
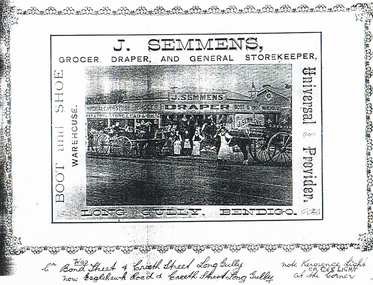
... In 1895 he lived at McIntyre Street, Long Gully; 1901 Mt Korong Road and 1905 Crn Bond and Creeth Streets, Long Gully. ...In 1895 he lived at McIntyre Street, Long Gully; 1901 Mt Korong Road and 1905 Crn Bond and Creeth Streets, Long Gully. ...James Semmens was born in Cornwall. He married Elizabeth Ann Marks. In 1895 he lived at McIntyre Street, Long Gully; 1901 Mt Korong Road and 1905 Crn Bond and Creeth Streets, Long Gully. By the time he left Bendigo (approx 1915) he also had a store in View Street, Bendigo. He served on the Bendigo Council as a representative of the Barkly Ward and as the Mayor 1906/7.Black and white photocopy of a photo of J. Semmens, Grocer, Draper, and General Storekeeper, Long Gully, Bendigo. Photo shows the store with the name, J Semmens, Grocer, Draper, Boot and Shoe Warehouse. In front of the shop is a number of people and two horse drawn vehicles. Written under the photo is: Cr was Bond Street & Creeth Street Long Gully, now Eaglehawk Road & Creeth Street, Long Gully. Note - Kerosene Light or Gas Light at Corner.bendigo, history, long gully history group, the long gully history group - j semmens, j semmens draper -
 Bendigo Historical Society Inc.
Document - VICTORIA HILL - PLAN OF THE VICTORIA REEF GOLD MINES COMPANY
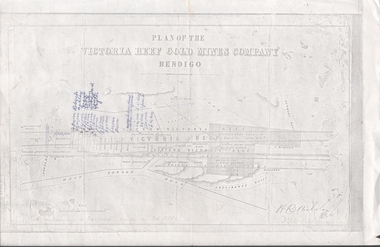
... Streets, gullies and leases drawn in. Some amounts of money and names have been written on the page. Signed by H. B. Nicholas. Locations of Ballerstedt's, Luffsman's, Wittscheibe's, Midway Co and Rae's engines are shown. Ironbark, Derwent, Providence and Long Gullies are shown. Also Mount Korong...Streets, gullies and leases drawn in. Some amounts of money and names have been written on the page. Signed by H. B. Nicholas. Locations of Ballerstedt's, Luffsman's, Wittscheibe's, Midway Co and Rae's engines are shown. Ironbark, Derwent, Providence and Long Gullies are shown. Also Mount Korong ...Plan of the Victoria Reef Gold Mines Company, Bendigo showing the Eastern Victoria Reef, Victoria Reef and the Western Victoria Reef. Streets, gullies and leases drawn in. Some amounts of money and names have been written on the page. Signed by H. B. Nicholas. Locations of Ballerstedt's, Luffsman's, Wittscheibe's, Midway Co and Rae's engines are shown. Ironbark, Derwent, Providence and Long Gullies are shown. Also Mount Korong Road. Leases mentioned are: Jackson, Burrows, Wybarndt, Ballerstedt, Luffsman, Roberts, Ashley, Grant, Troy, Tezeau, Woodward, Croath, Taylor, Cranshaw, Gou?d & Co, Midway, Wittscheibe, Specimen Hill Co, Endeavour, Albert Co, Ballerstedt & Son, Hy? Co, and Wheadon.document, gold, victoria hill, plan of the victoria reef gold mines company, h b nicholas, spiers, jackson, burrows, wybarndt, ballerstedt, luffsman, roberts, ashley, grant, troy, tezeau, woodward, croath, taylor, cranshaw, gou?d & co, midway, wittscheibe, specimen hill co, endeavour, albert co, ballerstedt & son, hy? co, and wheadon -
 Bendigo Historical Society Inc.
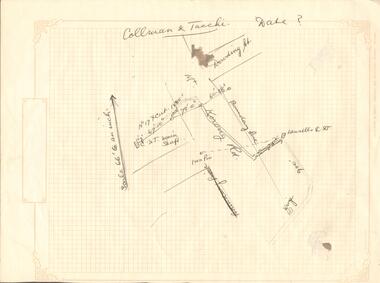
Document - COLLMAN & TACCHE - MAP
... Korong Rd. and Dowding St. drawn in. Broken line drawn from Lansells C & T to Iron Pin. Further away another line drawn from C & T Main Shaft to a point 67 ft 10 in. away, then 78 ft 10 in away, then another point 60 ft 3.5 in away. No date on drawing. Drawn on decorated graph paper, Lawson Series printed by Lawson & Bray (Sales) 58 Margaret Street...Korong Rd. and Dowding St. drawn in. Broken line drawn from Lansells C & T to Iron Pin. Further away another line drawn from C & T Main Shaft to a point 67 ft 10 in. away, then 78 ft 10 in away, then another point 60 ft 3.5 in away. No date on drawing. Drawn on decorated graph paper, Lawson Series printed by Lawson & Bray (Sales) 58 Margaret Street ...Hand drawn map on heavyweight decorated graph paper. Map has parts of Mt. Korong Rd. and Dowding St. drawn in. Broken line drawn from Lansells C & T to Iron Pin. Further away another line drawn from C & T Main Shaft to a point 67 ft 10 in. away, then 78 ft 10 in away, then another point 60 ft 3.5 in away. No date on drawing. Drawn on decorated graph paper, Lawson Series printed by Lawson & Bray (Sales) 58 Margaret Street, Sydney.mine, gold, collman & tacche, collman & tacche, map, lansells c & t, mt korong rd, dowding st. -
 Bendigo Historical Society Inc.
Photograph - HARRY BIGGS COLLECTION: J T DITCHBURN FARRIER & BLACKSMITH
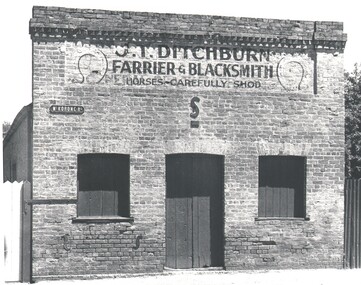
... A street sign is also nailed to the building -Mt Korong Rd. - Also 1 negative Ditchburn Farrier California Gully....A street sign is also nailed to the building -Mt Korong Rd. - Also 1 negative Ditchburn Farrier California Gully. ...Photograph. Harry Biggs Collection. 4 black & white copies J. T. Ditchburn Farrier & Blacksmith: Horses carefully shod. A brick building, flat roofed with 2 windows & a door boarded up. There are 2 distinctive horse shoes nailed onto the sign. A street sign is also nailed to the building -Mt Korong Rd. - Also 1 negative Ditchburn Farrier California Gully.organization, business, commercial, harry biggs collection, j t ditchburn farrier & blacksmith, california gully -
 Bendigo Historical Society Inc.
Document - BASIL MILLER COLLECTION: TRAMS, RAILWAY PICNICS, c1961
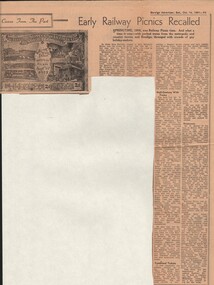
... Street. Post card size, printed in sepia on cream, bears photographs of the power house, engine room, a tram (we presume one of the first models) and the boiler room. Down the sides are listed cemetery, railway station, Rodney St, Charing Cross, through to California Gully Bridge and Eaglehawk. The fare was 2d. On the back a Beehive advertisement. 'Half-Century With Trams' is a history as remembered by Mr W J Evans of Mt. Korong...Street. Post card size, printed in sepia on cream, bears photographs of the power house, engine room, a tram (we presume one of the first models) and the boiler room. Down the sides are listed cemetery, railway station, Rodney St, Charing Cross, through to California Gully Bridge and Eaglehawk. The fare was 2d. On the back a Beehive advertisement. 'Half-Century With Trams' is a history as remembered by Mr W J Evans of Mt. Korong ...Newspaper clipping. Bendigo Advertiser. Saturday October 14, 1961. Early Railway Picnics Recalled. Article includes photo of souvenir tram ticket number 3588. Springtime, 1905 was Railway picnic time. And what a time it was - with packed trains from the metropolis and country towns, and Bendigo, thronged with the crowds of gay holiday-makers. Souvenir ticket belongs to rear Mrs. A. Bolitho, 5 Webster Street, Bendigo, issued by Electric Supply Coy. Of Victoria Ltd., Bendigo Tramways. Railway Picnic September 16, 1905. The ticket belong to Mrs Bolitho's father, the late Mr J H P Ellis, who lived in McIntyre Street. Post card size, printed in sepia on cream, bears photographs of the power house, engine room, a tram (we presume one of the first models) and the boiler room. Down the sides are listed cemetery, railway station, Rodney St, Charing Cross, through to California Gully Bridge and Eaglehawk. The fare was 2d. On the back a Beehive advertisement. 'Half-Century With Trams' is a history as remembered by Mr W J Evans of Mt. Korong Road, California Gully. 'Boisterous' is a history as remembered by Mr W Bolton of the firm of Bolton Bros. recalled the early picnics as 'boisterous' affairs. 'riff-raff' used to gather at Spencer St Station, arriving in Bendigo-after having spent the night drinking. The picnicers certainly had a right royal time in those early days. Railway Picnic was also boronia time, Mr Bolton said - and bunches of fragrant West Australian borania were sold on the streets. Bolton Bros always printed the tram tickets in Bendigo in those early years. A report in the 'Bendigonian' of the 1903 Railway Picnic period told that 20 special trams came to Bendigo on Saturday morning, September 15, 1903. Railway Picnic Committee: J Southern, Mrs Tait, Mrs Hudson, Mrs Fitzpatrick, Cr J H Curnow, Sir John Quick and many members of parliament. Fare from Melbourne costing 5/ for a day return, or 7/6 for the week.organization, business, bendigo trams -
 Ballarat Tramway Museum
Slide - 35mm slide/s, Noel Simons, 21/11/1962 12:00:00 AM
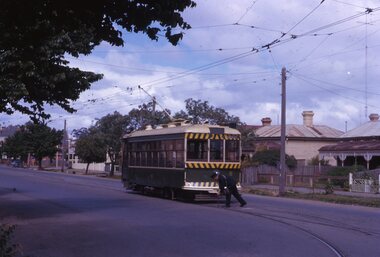
... Tram has two roof ads, one an SEC roof ad, and Cohns Drinks and Streets Ice cream ads on front dash panel. 1188.12 - as above, but after tram has passed photographer. Note the centre of the road poles. 1188.13 - No. 2 outbound for Eaglehawk at the intersection of Mt. Korong...Korong Rd., Ironbark. Calder highway on left (Eaglehawk route) 1188.14 - "Birney car No. 11 leaving Bendigo depot. Scrubber car at rear" 1188.15 - "No. 21 at North Bendigo Terminus" 1188.16 - "Birney car No. 11 in High St. Bendigo at intersection with Old High Street...Korong Rd., Ironbark. Calder highway on left (Eaglehawk route) 1188.14 - "Birney car No. 11 leaving Bendigo depot. Scrubber car at rear" 1188.15 - "No. 21 at North Bendigo Terminus" 1188.16 - "Birney car No. 11 in High St. Bendigo at intersection with Old High Street ...Set of 17 transparencies taken on 21/11/1962 on Kodak mounts. 1188.1 - Bendigo No. 11 at Depot Junction McCrae and Arnold St. with driver/conductor changing points. 1188.2 - Bendigo No. 4 at Charing Cross, side on photo, with City Club Hotel and Alexandra Fountain in the background. Tram has Castrol and SEC 'Electric Cooking' ads. 1188.3 - Bendigo No. 4 climbing View St. after tram has passed photographer. Tram has Streets Ice Cream and Cohns Soft Drinks ad on rear dash panel. In the background are the buildings in View St., including the Princess Theatre. Tram has destination of Eaglehawk. 1188.4 - Trams 2 and 4 crossing at the California Gully or Thorpe St Loop. 1188.5 - Bendigo 4 in Mt Korong Road. Tram inbound with destination of Quarry Hill, just leaving Garden Gully Loop. 1188.6 - Bendigo 4 and 17 crossing at the Hayes St. or Iron Bark Gully Loop. No. 17 bound for Eaglehawk, No. 4, Quarry Hill. 17 has two SEC roof ads and a white horse whiskey ad. 1188.7 - No. 17 bound for Eaglehawk, soon after leaving California Gully. Has large mullock heap in background. 1188.8 - Bendigo 2 and 17 crossing at the Thorpe St. or California Gully Loop. Has butchers shop in background. 1188.9 - Bendigo 17 at the Eaglehawk terminus. Has destination of Quarry Hill. In background is the hotel and shops at the terminus, showing ads for "Melbourne Bitter". Tram has two SEC 'Electric Cooking' ads. Driver and conductor about to assist two lady passengers with a pram and baby. 1188.10 - No. 17 at Eaglehawk terminus, awaiting departure. Has Eaglehawk Town Hall and Post Office in background. Tram has a Whitehorse Whiskey ad on the front dash panel. 1188.11 - No. 3 in High St. Eaglehawk, with destination of Eaglehawk. Has the shops on the south side of High St. in the background, including the Eaglehawk fish shop. Tram has two roof ads, one an SEC roof ad, and Cohns Drinks and Streets Ice cream ads on front dash panel. 1188.12 - as above, but after tram has passed photographer. Note the centre of the road poles. 1188.13 - No. 2 outbound for Eaglehawk at the intersection of Mt. Korong Road and the Calder Highway. Photo taken after the tram has passed the photographer. Has an Ampol service station in the background. 1188.14 - No. 11 leaving the Bendigo depot, crossing the bridge, with the Scrubber car in the background. 1188.15 - No. 21 at the North Bendigo terminus. Tram has destination of Golden Square and Cohns drink ad on front dash and two roof ads on side. 1188.16 - No. 11 on Golden Square route, in High St. at intersection with Old High St. 1188.17 - No. 11 at the Golden Square terminus, conductor turning the pole. Hotel on the left side of the photo. Note the road works barrier and red flag behind the tram. Slide has an end of roll mark on the right hand side of the image.Information written on in black ink and date stamped on purple ink. 1188.1 - "Birney car No. 11 in McCrae St. at Cnr of Arnold about to run into depot, Bendigo" 1188.2 - "No. 4 at Alexandra Fountain, Charing Cross Bendigo" 1188.3 - "No. 4 climbing the View St. Hill from Charing Cross, Bendigo (Eaglehawk Route)" 1188.4 - "No. 4 and 2 at Thorpe St. Loop, California Gully" 1188.5 - "No. 4 in Mt Korong Rd., Long Gully, Near Havilah Rd. (Bendigo) (Eaglehawk Route)" 1188.6 - "Nos. 17 and 4 crossing on Hayes St. Loop, Ironbark, Bendigo" 1188.7 - "No. 17 soon after leaving California Gully (Eaglehawk Route)" 1188.8 - "No.2 and 17 crossing on Thorpe St. Loop, California Gully (Eaglehawk Route)" 1188.9 - "No. 17 at Eaglehawk terminus" 1188.10 - "No. 17 at Eaglehawk terminus" 1188.11 - "No. 3 in High St. Eaglehawk" 1188.12 - "No. 3 nearing Eaglehawk terminus" 1188.13 - "No. 2 in Mt. Korong Rd., Ironbark. Calder highway on left (Eaglehawk route) 1188.14 - "Birney car No. 11 leaving Bendigo depot. Scrubber car at rear" 1188.15 - "No. 21 at North Bendigo Terminus" 1188.16 - "Birney car No. 11 in High St. Bendigo at intersection with Old High Street (Golden Square Route)" 1188.17 - "Birney Car No. 11 at Golden Square terminus, High St., Bendigo". tramways, trams, bendigo, depot junction, charing cross, view st., eaglehawk, north bendigo, golden square, tram 2, tram 3, tram 4, tram 11, tram 17, tram 21, tram scrubber
