Showing 130 items matching "c wheeler"
-
 Moorabbin Air Museum
Book - MILITARY AIRCRAFT MARKINGS & PROFILES, BARRY C WHEELER, 1990
... BARRY C WHEELER...Moorabbin Air Museum Moorabbin Airport 12 First Street Moorabbin melbourne MILITARY AIRCRAFT MARKINGS & PROFILES Book MILITARY AIRCRAFT MARKINGS & PROFILES BARRY C WHEELER Golden Press Pty Ltd ... -
 Narre Warren and District Family History Group
Programme, Masonic Lodge Lang Lang No 236 Installation of Bro. Stanley Worthington dated Wednesday 5th October 1932
... ...C Wheeler...Narre Warren and District Family History Group 110 High Street Berwick melbourne Dr S T Appleford G R Burhop Herbert Clark W Cole W P Cole W R L Currie Frank M Dale M F Dale M Dally Joseph F Davis W Eason A G Gill G T Gill A G Glasscock Len Greaves Wallace G Greaves E Chas Hartshorne R Hawley N Jaboor Chas Jones W H Koetsveld Lang Lang Masonic Lodge Jas Longmuir P J McGay D N McMillan C Potter Wm C Sim H Thomas Keith Thomson Wm C Tibballs W A Tomlison A H Turner T R Vizard C Wheeler J A Wiltshire E N Wiseman Stanley Wothington Booklet produced by the Lang Lang Masonic Lodge 236 on the occasion of the Installation of Bro. ...Booklet produced by the Lang Lang Masonic Lodge 236 on the occasion of the Installation of Bro. Stanley Worthington as Worshipful Master and Investiture of Officers 5 October 1932. Booklet is made up of one page folded in half to make up four pages, and is made of thickened cream paper with a frilled edge on the front page. Front page shows the masonic square and compass symbol in gold print, with information on the ceremony in blue ink, surrounded by a raised embossed border. All text printed in blue ink. Page 2 lists past masters from 1915 to 1931.Page 3 is titled The Festive Board and page 4 has a list of officers 1932-33.dr s t appleford, g r burhop, herbert clark, w cole, w p cole, w r l currie, frank m dale, m f dale, m dally, joseph f davis, w eason, a g gill, g t gill, a g glasscock, len greaves, wallace g greaves, e chas hartshorne, r hawley, n jaboor, chas jones, w h koetsveld, lang lang masonic lodge, jas longmuir, p j mcgay, d n mcmillan, c potter, wm c sim, h thomas, keith thomson, wm c tibballs, w a tomlison, a h turner, t r vizard, c wheeler, j a wiltshire, e n wiseman, stanley wothington -
Tatura Irrigation & Wartime Camps Museum
Certificate, Certificate of Discharge Sergeant Wheeler, 27 February 1946
... ...sgt c l wheeler...Clarrie Wheeler was a local (Tatura) Farmer, married to May Wheeler. certificates raaf certificate of discharge sgt c l wheeler Wood framed photocopy of a certificate of discharge with crest of Australia at top & signatures at bottom. ...The recipient of the Certificate of Discharge, SGT. Wheeler C.L. V374575, served in the Volunteer Defence Corps on part time war service. Clarrie Wheeler was a local (Tatura) Farmer, married to May Wheeler.Wood framed photocopy of a certificate of discharge with crest of Australia at top & signatures at bottom. Black printing. No 39219certificates, raaf, certificate of discharge, sgt c l wheeler -
 Leopold Tennis Club
Photograph, Robert Pockley Studios, Bellarine Peninsula Tennis Association Leopold Tennis Club Grade 16 Premiers - Season 1982-83, 1983
... Sloan (Capt.), G. Whitten, C. Wheeler Seated, Miss M. Tatasciore, Miss K. ...Sloan (Capt.), G. Whitten, C. Wheeler Seated, Miss M. Tatasciore, Miss K. ...Image taken of the Bellarine Peninsula Tennis Association Grade 16 Premiers for Season 1982-83.1 photograph of Premiership tennis teamStanding, C. Knight, R. Sloan (Capt.), G. Whitten, C. Wheeler Seated, Miss M. Tatasciore, Miss K. Henderson, Miss M. Fitzgeraldleopold tennis club, bellarine peninsula tennis association, c knight, r sloan, m tatasciore, k henderson, m fitzgerald, gareth whitten, craig wheeler -
 Leopold Tennis Club
Photograph, Robert Pockley Studios, Geelong Lawn Tennis Association Leopold Tennis Club Junior A Grade Champions - Season 1980, 1980
... ...C Thomson...L Wheeler...C. Thomson Seated, Miss M. Stacey, Miss A. Perez, Miss R. Colegrave, Miss L. Wheeler...Leopold Tennis Club Geelong Lawn Tennis Association M Lock R Thomson C Thomson L Wheeler Robyn Colegrave Melinda Stacey Ana Perez Standing, M. ...Image taken of the Geelong Lawn Tennis Association Junior A Grade Champions for Season 1980.1 photograph of Premiership tennis teamStanding, M. Lock, R. Thomson (Capt.), C. Thomson Seated, Miss M. Stacey, Miss A. Perez, Miss R. Colegrave, Miss L. Wheelerleopold tennis club, geelong lawn tennis association, m lock, r thomson, c thomson, l wheeler, robyn colegrave, melinda stacey, ana perez -
 Leopold Tennis Club
Photograph, Robert Pockley Studios, Bellarine Peninsula Tennis Association Leopold Tennis Club Junior C2 Grade Premiers - Season 1980-81, 1981
... Standing, D. Evans, C. Wheeler, S. Krafft, S. Gration Seated, Miss R. ...Leopold Tennis Club Bellarine Peninsula Tennis Association D Evans S Krafft S Gration R Dawson F Edwards J McLeod Fiona Egberts Craig Wheeler Standing, D. Evans, C. Wheeler, S. Krafft, S. Gration Seated, Miss R. ...Image taken of the Bellarine Peninsula Tennis Association Junior C2 Grade Premiers for Season 1980-81.1 photograph of Premiership tennis teamStanding, D. Evans, C. Wheeler, S. Krafft, S. Gration Seated, Miss R. Dawson, Miss F. Edwards (Capt.), Miss F. Egberts, Miss J. McLeodleopold tennis club, bellarine peninsula tennis association, d evans, s krafft, s gration, r dawson, f edwards, j mcleod, fiona egberts, craig wheeler -
 Supreme Court of Victoria Library
Portrait, Sir Frederick Mann
... Signed upper left C. Wheeler. Plaque identifies Sir Frederick Mann, the Hon. ...Signed upper left C. Wheeler. Plaque identifies Sir Frederick Mann, the Hon. ...The portrait was presented by the legal profession ot the Court in 1946. It would appear to have been commissioned at the time of Chief Justice Mann's retirement. Charles Wheeler, had won the Archibald prize in 1933 and was the head of the art gallery schools during World War two. Chief Justice Sir Frederick Mann (1869-1958) studied the law and worked at the Crown Law Department before his stint in the Army during the Boer War. After the war, he practised as a barrister, mainly working in the common law and equity area including appearences in the High Court on constitutional matters. He was appointed to the bench in 1919 along with William Schutt, to help remedy a shortfall in the number of judges on the Bench, after measures of economy during World War One. He became Chief Justice in 1935 following the retirement of Sir William Irvine, and retired in 1944.The portrait is of interest because of whom it portrayed, it is a well executed work by a well known artist of the period.Half Length portriat painting in oils of Sir Frederick Mann, seated and balancing a book on his knee. He sits of a chair with carved arms. The frame is painted dull gold.Signed upper left C. Wheeler. Plaque identifies Sir Frederick Mann, the Hon. Sir Frederick Wollaston Mann, KCMG, a Justice of the Supreme Court 1919-1935, Chief Justice 1935-1944 -
 Whitehorse Historical Society Inc.
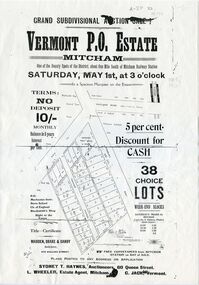
Document, Vermont P.O. Estate, 1926 0r 1915
... Auctioneers: Sydney T. Haynes, L. Wheeler, C. Jack....Auctioneers: Sydney T. Haynes, L. Wheeler, C. Jack. Vermont P.O. Estate Document Document ...Brochure advertising auction of Vermont P.O. EstateBrochure advertising auction of Vermont P.O. Estate, 38 lots, 1 May 1920. Auctioneers: Sydney T. Haynes, L. Wheeler, C. Jack.Brochure advertising auction of Vermont P.O. Estateauctions, vermont post office estate, canterbury road, vermont, boronia road, frances avenue -
 Leopold Tennis Club
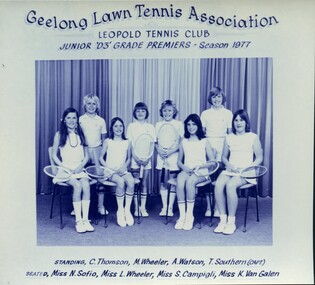
Photograph, Robert Pockley Studios, Geelong Lawn Tennis Association Leopold Tennis Club Junior D3 Grade Premiers - Season 1977, 1977
... Standing: C. Thomson, M. Wheeler, A. Watson, T. Southern (Capt.) ...Leopold Tennis Club Geelong Lawn Tennis Association C Thomson A Watson T Southern L Wheeler S Campigli K Van Galen Nicole Sofio Mark Wheeler Standing: C. ...Image taken of the Geelong Lawn Tennis Association Junior D3 Grade Premiers for Season 1977.1 photograph of Premiership tennis teamStanding: C. Thomson, M. Wheeler, A. Watson, T. Southern (Capt.) Seated: Miss N. Sofio, Miss L. Wheeler, Miss S. Campigli, Miss K. Van Galenleopold tennis club, geelong lawn tennis association, c thomson, a watson, t southern, l wheeler, s campigli, k van galen, nicole sofio, mark wheeler -
 Ringwood and District Historical Society
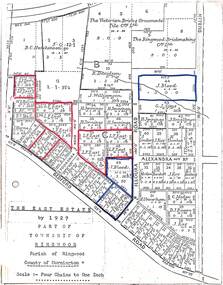
Map, The East Estate, Township of Ringwood, Victoria - 1927
... Hosking, D.J. Rogers, C. Wheeler, H. Frost, G.G. Miller, L. Winchcombe. ...Hosking, D.J. Rogers, C. Wheeler, H. Frost, G.G. Miller, L. Winchcombe. ...Photocopied page - partial Parish map of Ringwood labeled The East Estate, showing street names and properties marked with names of individual owners or businesses.Page titled The East Estate by 1927 Part of Township of Ringwood, Parish of Ringwood, County of Mornington, Scale: Four Chains to One Inch. L.F. East blocks are marked by red outline. J. Blood blocks are marked by blue outline. Other names include B.C. Hutchinson & Co., The Victorian Brick & Ornamental Tile Coy., Ltd., The Ringwood Brickmaking Coy., Ltd., R. Davidson, J. Williamson, W.E. Bower, H. Jennings, G.J. Sims, J. Smallman, J. Horne, J. Lindsay, J. Kay, H. Unverhan, B.C. Hutchinson, M.A. Williamson, J.S. Woodworth, J. Price, C. Medew, S.W. Burchett, B.J. Hosking, D.J. Rogers, C. Wheeler, H. Frost, G.G. Miller, L. Winchcombe. Streets include Dublin Road, Illoura Road, Alexandra Road, and Bedford Road. -
 National Wool Museum
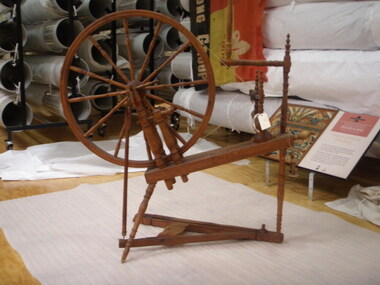
Spinning Wheel
... Mrs Fabb purchsed the wheel c. 1985-1990 from a secondhand/antique shop in Para Road, Greensborough, Melbourne. ...Mrs Fabb purchsed the wheel c. 1985-1990 from a secondhand/antique shop in Para Road, Greensborough, Melbourne. ...The wheel came in a container from Liechenstein - Anitque Export Establishment (P.O. Box 21 498, FI - 9493 Mauren, Liechtenstein). It came with a number of dressers and tables. The flax on the original bobbin was present when Mrs Fabb purchased the wheel. Mrs Fabb purchsed the wheel c. 1985-1990 from a secondhand/antique shop in Para Road, Greensborough, Melbourne. The wheel was repaired by Mr Carrington (Zakrzewski) He made two more bobbins and the last piece on the distaff (which was missing when Mrs Fabb acquired it).handicrafts - history flax, spinning wheels, spinning, zakrzewski, mr wlodzimierz, denmark, handicrafts - history, flax -
 Orbost & District Historical Society
sewing machine, late 1860's - 1870's
... It has a backwards C-shaped body. The wheel and base are decorated with a gold pattern. ...It has a backwards C-shaped body. The wheel and base are decorated with a gold pattern. ...The early settlers of Orbost had to be self sufficient making their own clothes, tableware, bed coverings, furnishings and equipment. Many women were skilled dressmakers and craft workers. This item reflects that time.A small black hand-cranked lockstitch sewing machine. It has a backwards C-shaped body. The wheel and base are decorated with a gold pattern. On the end above the needle assembly is a brass plate The balance wheel has a handle. The pattern on the wheel is a gold border with two gold, red and green stars formed by interwoven triangles. On the cloth plate is stamped "Patent March 1867 Heron Gresham" with some indecipherable marks.sewing-machine needlework -
 Southern Sherbrooke Historical Society Inc.
Photograph - Cissie Johns in jinker, c.1913
... A small shed can be seen beside the driveway, partly obscured by the jinker's wheel. Dated c.1913. ...A small shed can be seen beside the driveway, partly obscured by the jinker's wheel. Dated c.1913. Photograph Cissie Johns in jinker, c.1913 ...B&W photo shows Cissie Johns and another person who may be her brother Percy, sitting in a jinker. A dark horse with a white blaze is harnessed to the jinker. Cissie is seated nearest the camera. She is wearing a pale wide-brimmed hat and pale clothing. Her long fair hair is loose around her shoulders. The other person is holding the reins and is wearing a dark hat and pale shirt. This photo may have been taken at the same time as M0104. The subjects are facing south. The sun is shining. They are on a flat expanse of grass. Beyond them are several cypress trees. These are most likely part of the cypress hedges lining the driveway to Glen Park Farm farmhouse. In the background is the eastern flank of Black Hill. A small shed can be seen beside the driveway, partly obscured by the jinker's wheel. Dated c.1913. -
 Puffing Billy Railway
D21 - Diesel Mechanical locomotive, 1968
... Ten have been preserved: V1 by the Bellarine Peninsula Railway, Victoria V2 by the Don River Railway V4 by the Hotham Valley Railway, Western Australia V5 by the Hotham Valley Railway, Western Australia V7 by the Derwent Valley Railway V8 by the Bellarine Peninsula Railway, Victoria V9 by the West Coast Wilderness Railway V12 by the Puffing Billy Railway, Victoria (regauged to 760 mm gauge and numbered D21) V13 by the Zig Zag Railway, New South Wales, sold to the West Coast Wilderness Railway, renumbered D2 22 by the West Coast Wilderness Railway, renumbered D1 Tasmanian Government Railways V class Manufacturer Vulcan Foundry Tasmanian Government Railways Entered service 1948 Number built 14 Number preserved 10 Fleet numbers TGR: V1-V13 Emu Bay: 22 Power: 152kW (204hp) or 114kW (153hp) Motor: Gardner 8L3 (V) or Gardner 6L3 (VA) Wheel Arrangement: - C - Weight: 25.6t Allowable load on 1:40 grade: 170t Length over headstocks: 6.8m (22ft 6in) Introduced: 1948 Built By: Vulcan Foundry, England; TGR Workshops, Launceston; Using parts supplied by Drewry Car Co (UK) Number Preserved: 10 Number In Service: 0 Total Number Built: 14...Ten have been preserved: V1 by the Bellarine Peninsula Railway, Victoria V2 by the Don River Railway V4 by the Hotham Valley Railway, Western Australia V5 by the Hotham Valley Railway, Western Australia V7 by the Derwent Valley Railway V8 by the Bellarine Peninsula Railway, Victoria V9 by the West Coast Wilderness Railway V12 by the Puffing Billy Railway, Victoria (regauged to 760 mm gauge and numbered D21) V13 by the Zig Zag Railway, New South Wales, sold to the West Coast Wilderness Railway, renumbered D2 22 by the West Coast Wilderness Railway, renumbered D1 Tasmanian Government Railways V class Manufacturer Vulcan Foundry Tasmanian Government Railways Entered service 1948 Number built 14 Number preserved 10 Fleet numbers TGR: V1-V13 Emu Bay: 22 Power: 152kW (204hp) or 114kW (153hp) Motor: Gardner 8L3 (V) or Gardner 6L3 (VA) Wheel Arrangement: - C - Weight: 25.6t Allowable load on 1:40 grade: 170t Length over headstocks: 6.8m (22ft 6in) Introduced: 1948 Built By: Vulcan Foundry, England; TGR Workshops, Launceston; Using parts supplied by Drewry Car Co (UK) Number Preserved: 10 Number In Service: 0 Total Number Built: 14 Historic - Tasmanian Government Railways - Diesel Mechanical locomotive - V12 / Puffing Billy Railway Diesel Mechanical locomotive D21 diesel mechanical locomotive puffing billy d21 v12 diesel mechanical locomotive d21 diesel mechanical locomotive tasmanian government railways D21 D21 - Diesel Mechanical locomotive made of steel D21 - Diesel Mechanical locomotive Tasmanian Government Railways ...D21 - Diesel Mechanical locomotive Date built - 1968 Original owner - TGR Original gauge - 1067mm Withdrawn - 1983 Built to 3'6" gauge in 1968 by the Tasmanian Government Railways and numbered V12, ownership of this Diesel Mechanical locomotive was transferred to Australian National Railways (Tas.) in 1978. It was withdrawn and sold to the E.T.R.B. in 1983 1968 - D21 ex-Tasmanian Government Railways (TGR) V class No.12, built by the TGR Launceston Workshops in 1968 to a design of Vulcan-Drewry (England). Tasmanian Government Railways V class The V class were the first diesel locomotives operated by the Tasmanian Government Railways (TGR) with four delivered by the Vulcan Foundry in 1948 to a design by the Drewry Car Co. They were a narrow gauge version of the British Rail Class 04. In 1951 a fellow two were delivered followed by another two in 1955. Between 1959 and 1968 the TGR built a further four at its Launceston Workshops. Two identical locomotives were purchased by the Mount Lyell Mining and Railway Company in 1953. When it closed in 1963, 2405 was sold to the Emu Bay Railway as number 22, while 2406 went to the TGR as V13. All the TGR units were withdrawn between 1983 and 1987 while the Emu Bay unit remained in service until 2000. Ten have been preserved: V1 by the Bellarine Peninsula Railway, Victoria V2 by the Don River Railway V4 by the Hotham Valley Railway, Western Australia V5 by the Hotham Valley Railway, Western Australia V7 by the Derwent Valley Railway V8 by the Bellarine Peninsula Railway, Victoria V9 by the West Coast Wilderness Railway V12 by the Puffing Billy Railway, Victoria (regauged to 760 mm gauge and numbered D21) V13 by the Zig Zag Railway, New South Wales, sold to the West Coast Wilderness Railway, renumbered D2 22 by the West Coast Wilderness Railway, renumbered D1 Tasmanian Government Railways V class Manufacturer Vulcan Foundry Tasmanian Government Railways Entered service 1948 Number built 14 Number preserved 10 Fleet numbers TGR: V1-V13 Emu Bay: 22 Power: 152kW (204hp) or 114kW (153hp) Motor: Gardner 8L3 (V) or Gardner 6L3 (VA) Wheel Arrangement: - C - Weight: 25.6t Allowable load on 1:40 grade: 170t Length over headstocks: 6.8m (22ft 6in) Introduced: 1948 Built By: Vulcan Foundry, England; TGR Workshops, Launceston; Using parts supplied by Drewry Car Co (UK) Number Preserved: 10 Number In Service: 0 Total Number Built: 14Historic - Tasmanian Government Railways - Diesel Mechanical locomotive - V12 / Puffing Billy Railway Diesel Mechanical locomotive D21D21 - Diesel Mechanical locomotive made of steel D21diesel mechanical locomotive, puffing billy, d21, v12 diesel mechanical locomotive, d21 diesel mechanical locomotive, tasmanian government railways -
 Wangaratta High School
WHS Sporting Honour Board, 1985-2013
... C. JONES J. DOODY Jnr 1998 J. MORONEY R. GLOVER L. RITCHENS T. LAMBERT E. BRIGGS J. PORTER M. DEFAZIO J. KIKER Jnr 1999 T. WINZER R. GLOVER K. GOODEY B. SOLIMO A. COOTE D. COOTE D. COLES J. USSHER K. KIKER Jnr 2000 A. POTTER S. GANNON K. WHEELER...C. JONES J. DOODY Jnr 1998 J. MORONEY R. GLOVER L. RITCHENS T. LAMBERT E. BRIGGS J. PORTER M. DEFAZIO J. KIKER Jnr 1999 T. WINZER R. GLOVER K. GOODEY B. SOLIMO A. COOTE D. COOTE D. COLES J. USSHER K. KIKER Jnr 2000 A. POTTER S. GANNON K. WHEELER ...Square wooden honour board with gold text, cut corners and a protrusion at the top with a simplified WHS logo and heading.JUNIOR HOUSE CAPTAINS YEAR OVENS KING MERRIWA WAREENA GIRLS BOYS GIRLS BOYS GIRLS BOYS GIRLS BOYS Jnr 1985 L. REID J. DOWLING M. FLYNN B. MARTIN J. FISHER J. BOULTON R. WARREN D. BARHAM Jnr 1986 K. DODSON C. LEWIS A. PLUMRIDGE J. HODSON J. FISHER J. ARCRI R. WARREN D. McDONALD Jnr 1987 S. SCHOLZ C. DERRICK T HEMPEL B. DERRICK M. WILLIAMSON M. DOBROWOLSKI J. BECHAZ S. CLAYTON Jnr 1988 K. McCORMACK A. CLARK M. IMRIE M. GREGORY J. O'FLYNN S. NORMAN M. HERTIC C. GOULD Jnr 1989 K. SOUTHERN L. SCHOLES D. McLAUGHLIN M. MOSCROP A. GREALY O. ROODENBURG H. NOLAN D. ILOTT Jnr 1990 J. SHERIDAN C. CLARK C. NORTON B. MORRIS G. WOODWARD D. PRESTON D. FRASCA A. ROSSER Jnr 1991 K. WELCH D. DEMAJ J. STEPHENS B. MORRIS K. JENKINSON P. FLYNN N. WILLIAMS A. ROSSER Jnr 1992 K. WELCH R. GRAHAM K. GLENISTER A. WISE L. REA D. FURNELL D. BIGGER R. JOHNSON Jnr 1993 R. STEFANIAC T. LEWIS C. HORN A. BARROW R. BARROW M. STAMP A. NOLAN A. WHOLERS Jnr 1994 B. SPASOJEVIC R. ROSSER M. CHILCOTT H. FULTON J. HARRISON S. HIBBERSON L. HILDEBRAND R. WOODWARD Jnr 1995 D. SMITHERAM D. FURSE M. CHILCOTT J. McCORMICK J. HARRISON D. CONSTANTINO S. KNOX A. BROWN Jnr 1996 D. SMITHERAM J. MULLINS K. DOUSSET J. FISHER K. GRAHAM S. CHALLMAN K. BREW D. OATES Jnr 1997 R. CONROY H. STAMP N. EVERITT M. BELL R. HOGARTH D. BREESE C. JONES J. DOODY Jnr 1998 J. MORONEY R. GLOVER L. RITCHENS T. LAMBERT E. BRIGGS J. PORTER M. DEFAZIO J. KIKER Jnr 1999 T. WINZER R. GLOVER K. GOODEY B. SOLIMO A. COOTE D. COOTE D. COLES J. USSHER K. KIKER Jnr 2000 A. POTTER S. GANNON K. WHEELER C. FURZE K. WHITE C. WHITE H. OLIVER A. SHELDRICK Jnr 2000 R. GILBERT R.GOLVER K. GOODEY B. SOLIMO G. JONES D. COLES A. NAISH C. DOUG Inter 2001 K. O'BRIEN S. GANNON K. WILLIAMS M. CONROY V. STEWART J. AMMITZBOLL H. OLIVER C. MANGUBAT Jnr 2002 J. BORDIGNON T. SORRAGHAN N. TAVARE M. ANDERSON B. KERLIN D. GAUT K. SURACE M. GLOVER Inter 2002 A. POTTER S. GANNON S. DAWS T. CHIVERS M. WATKINS D. MORGAN H. OLIVER J. PATRICK Jnr 2003 S. PENNY N. PORTER E. NEWMAN A. ROBERTSON S. McSWINEY B. REVELL K. SURACE B. McMILLAN Inter 2003 R. CLARKSON D. McCULLOUGH S. ANDERSON M. CONROY G. ATKINSON T. CROCKETT H. OLIVER D. SEYMOUR Jnr 2004 C. WESLEY R. STONE E. PANE J. DWYER G. BLANCH M. GATHERCOLE C. BODLER R. LUGG Inter 2004 A. VELJANOSKA D. McCULLOUGH N. TAVARE D. BAKKER E. HARRINGTON J. AMMITZBOLL M. BASSIER M. GLOVER Jnr 2005 E. KEIR J. PARTINGTON A. WESCOMBE J. SIRIANNI A. MARTIN R. ALLEN J. SCHULZ-BAHLEBURS D. SCOTT Inter 2005 J. ROBBINS T. STAFFORD E. PANE J. DWYER K. GRAHAM M. GATHERCOLE K. SURACE M. MACLEISH Jnr 2006 M. BRUCE S. ALDOUS H, PANE L. BRABAZON C. TYLER J. ANDERSON O. HUTCHINGSON B. MORTIMER Inter 2006 L. TINDILL J. DAVENPORT E. PANE D. MORGAN A. FULLER M. GATHERCOLE S. COOTE S. CARUSO DONATED BY P.A.S.T.A. 1988 -
 Emerald Museum & Nobelius Heritage Park
Machine - Chaff cutter, Bentalls, 1913
... C. T. Alexander in 1920. A chaff cutter was an essential piece of equipment in early farms - of which there were many in the Emerald area - which were highly dependent on horsepower for agricultural work until the widespread use of tractors in the second half of the twentieth century. Alexander Emerald Chaff cutter early 20th century Bentall Agricultural machinery Embossed on main chassis: 'BENTALL'S IMPROVED CHAFF CUTTER / 1913 / MALDON ENGLAND'. Embossed on wheel ...Chaff cutter. Bentall - 1913. Used to cut straw or hay into small pieces before being mixed together with other forage and fed to horses and cattle. Used on a small mixed farm in Emerald originally purchased by C. T. Alexander in 1920.A chaff cutter was an essential piece of equipment in early farms - of which there were many in the Emerald area - which were highly dependent on horsepower for agricultural work until the widespread use of tractors in the second half of the twentieth century.Chaff cutter with cast iron frame containing two sets of teeth which are connected to gears which are connected to a large wheel operated by hand. Missing from this particular chaff cutter are the cover for the gears, part of the handle, and the wooden chute into which the stalks were fed.Embossed on main chassis: 'BENTALL'S IMPROVED CHAFF CUTTER / 1913 / MALDON ENGLAND'. Embossed on wheel: 'BENTALL'S HEYBRIDGE MALDON ENGLAND / 1382'. Embossed on cover over feeder teeth: 'CDC BENTALL'. Embossed on feeder entrance: '947'.alexander, emerald, chaff cutter, early 20th century, bentall, agricultural machinery -
 Bendigo Military Museum
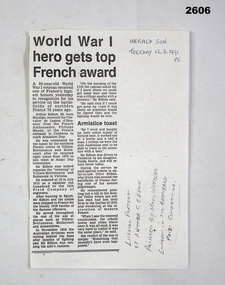
Newspaper - NEWSPAPER CUTTING, Herald Sun, 12.11.1991
... Top RH corner: "Herald Sun Tuesday 12.11.1991 p5" Bottom RH corner: Life size portrait of "ARTHUR C EBDON painted by Mary Wheeler. Entered in Archibald prize Competition"...Bendigo Military Museum 37 - 39 Pall Mall Bendigo goldfields See also: 2605.2, 2607, 2608.3 Article details the awarding of the French Chevallier de Legion d'Honneur (Legion of Honour) to ARTHUR EBDON and the reason of awarding. documents - newspapers military history Passchendaele barracks trust Top RH corner: "Herald Sun Tuesday 12.11.1991 p5" Bottom RH corner: Life size portrait of "ARTHUR C EBDON painted by Mary Wheeler. Entered in Archibald prize Competition" Newspaper article reporting the awarding of the Legion of Honour to ARTHUR EBDON. ...See also: 2605.2, 2607, 2608.3 Article details the awarding of the French Chevallier de Legion d'Honneur (Legion of Honour) to ARTHUR EBDON and the reason of awarding.Newspaper article reporting the awarding of the Legion of Honour to ARTHUR EBDON.Top RH corner: "Herald Sun Tuesday 12.11.1991 p5" Bottom RH corner: Life size portrait of "ARTHUR C EBDON painted by Mary Wheeler. Entered in Archibald prize Competition"documents - newspapers, military history, passchendaele barracks trust -
 Victoria Police Museum
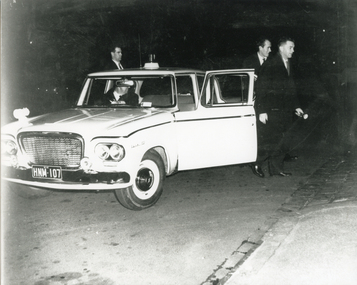
Photograph (police car)
... Front - S/C Ken Chandler Studebaker Lark Wireless Patrol car registration number HNM-107 with three men leaving the car and the driver remaining behind the wheel. ...Studebaker Lark Wireless Patrol car registration number HNM-107 with three men leaving the car and the driver remaining behind the wheel. Circa 1962Rear - Cliff Schwab, driver. R/Rear - Rod Sheddon. Front - S/C Ken Chandlerpolice vehicles; wireless patrol; motor transport branch; studebaker lark car; sheddon, rod; chandler, ken; schwab, cliff -
 Federation University Historical Collection
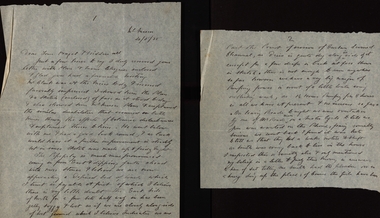
Letter, Letters from Richard Squire to his son Tom 1935
... C. Hayes...Illness...Poppet...Carburetor...Shaft...Balance Weight...Pearson...Pulleys...Syndicate...Goon...Suction...Lease...Reports...Estimates...Flat Fields...Reef...Banagwanth...Trucks...Pipeclay...Sandstone...Suction Pipe...Valves...Honeycomb Rock...Mr Kermode...Yarrowee...Ballarat...Reef Combs...Cheques...Earthquake...Yellow Slate...Leigh River...Dyke...The Madame Bay Coy...Allendale...Berry West...Quartz...Ballarat Deep Leads...Ballarat Deep Leads Extension...Bore...Reads...Bedrock...J. Hayes...Harmen Premier Distributors...Middletons...Cemented Sand...Electricity commission...G M of A...Gold Mines of Australia...Dick Harry...Pearsons...Hawksburn...Crown Wheel...C. Hayes Illness Poppet Carburetor Shaft Balance Weight Pearson Pulleys Syndicate Goon Suction Lease Reports Estimates Flat Fields Reef Banagwanth Trucks Pipeclay Sandstone Suction Pipe Valves Honeycomb Rock Mr Kermode Yarrowee Ballarat Reef Combs Cheques Earthquake Yellow Slate Leigh River Dyke The Madame Bay Coy Allendale Berry West Quartz Ballarat Deep Leads Ballarat Deep Leads Extension Bore Reads Bedrock J. Hayes Harmen Premier Distributors Middletons Cemented Sand Electricity commission G M of A Gold Mines of Australia Dick Harry Pearsons Hawksburn Crown Wheel ...In 1905 Richard Squire was manager of the West Berry Consols at Allendale, and developed an improved system of mine ventilation, which was supported in "The Age." He was successful in combating and remedying the gas and ventilation troubles of the Deep Mines of Creswick and Allendale Districts after all had failed. MINE MANAGERS’ ASSOCIATION. Ballarat Branch. ... Mr R. B. Squire, manager of the West Berry Consols, at Allendale, submitted a paper detailing what he had done tor the betterment of ventilation in the alluvial mines of Smeaton and Mary borough districts- Members gave Mr Squire every credit for the results that he claimed to have effected; the adoption of his ideas had testified to their value to mine-owners. It was painted out, however, that for want of a thorough debate of the subject with experienced men the author had unwittingly included some general statements that required modifying in some points and extending in others, in justice to other workers among the earlier and the present day managers of mines. It was decided to invite the author to meet a sub-committee on this subject!Various handwritten Letters from Richard Squire to his son Tom 1935richard squire, tom squire, hazel squire, jack squire, jim squire, ned, mt mercer, basil, plant, skids, pump, c. hayes, illness, poppet, carburetor, shaft, balance weight, pearson, pulleys, syndicate, goon, suction, lease, reports, estimates, flat fields, reef, banagwanth, trucks, pipeclay, sandstone, suction pipe, valves, honeycomb rock, mr kermode, yarrowee, ballarat, reef combs, cheques, earthquake, yellow slate, leigh river, dyke, the madame bay coy, allendale, berry west, quartz, ballarat deep leads, ballarat deep leads extension, bore, reads, bedrock, j. hayes, harmen premier distributors, middletons, cemented sand, electricity commission, g m of a, gold mines of australia, dick harry, pearsons, hawksburn, crown wheel, rice's paddock, liz the car, volcanic ridge, lrg coy, mcnaughton's paddock, madison's lead, cameron & sutherland, crabhole, rokewood, glenfine, mrs gibbs, dobson, booth, shiels, thomas mitchell, mcpherson's reward, haddon, trunk lead mine, elaine, pitfield plains, mr clarke, daylesford, kuchel, shelford, geoff squire, lode, quartz reef, bladder attack, kidneys, income tax, reginald murray, grenville, blasting, john b. dennison, martin t. taylor, durham and buninyong deep lead, sebastopol plateau, mr wilkie, the premier petrol distributing agency of ballarat, lawaluk, ryan's western leads, mr nichol, mr hodge, knox schlapp and co., dr griffiths, state accident insurance office, magdala mine stawell, mining -
Federation University Historical Collection
Book, Education Department Certificates 1908 - 1922
... Barker Library (top floor) Mount Helen goldfields School of Mines Ballarat was a predecessor of Federation University Education Department School of Mines Ballarat Leslie Bennett Eulali Perry Hector Osborne Doris McDougall Mary Mullins John McLean Mary Morrish Francis Kelly Robert Gullan Henry Bull Clara Clegg John David Albert Ferguson Ina Westcott Vera Walker Agnes Walker Eileen Tremain Florence Smith Lizzie Pier Annie Reynolds Charles Peverill William Pearson Doris Patterson Rebecca McPhan Constance McHenry Jean McGregor Florence Mingst Gwen Mann Roz Kelly Edward Jones Freddi Jacobi Percy Baker Doris Carter Stephen Chambers Ruth Catt Arthur Dousey D'Arcy Bessie Doncaster Alan Eggleston Lena Featherstone Clarice Fisher Sylvia Williams James Walker Annie Treloar Shearer Cora Sandberg Elsie Pearce Jan McGregor Cyril McGibbon Margaret Moore Thomas Kierce William James Alice Horan Lucy Hamilton Beatrice Blake Catherine Bowers Mona Callow Lillian Cameron Joyce Dopel Iva Denovan William Thompson Irene Hewitt Catheriine Kardens Beatrice Stuart Hugh Ross Mavis Regelhuth Isabelle Bell Melba Perriman Vera Muny Alan Bernaldo Kathleen Conway Dorothy Darling Walter Dunston Mary Dwyer Agnes Fraser Enid Gates Maude Williams Violet Wheeler Jean Tunbridge Maud Auberry John B. Allen Rose C. Andrews Willie Banagwanath John N. ...School of Mines Ballarat was a predecessor of Federation UniversityBlack cloth covered book with handwritten pages and loose foolscap pages at the front and sticer on front cover with CERTIFICATES written on it.education department, school of mines ballarat, leslie bennett, eulali perry, hector osborne, doris mcdougall, mary mullins, john mclean, mary morrish, francis kelly, robert gullan, henry bull, clara clegg, john david, albert ferguson, ina westcott, vera walker, agnes walker, eileen tremain, florence smith, lizzie pier, annie reynolds, charles peverill, william pearson, doris patterson, rebecca mcphan, constance mchenry, jean mcgregor, florence mingst, gwen mann, roz kelly, edward jones, freddi jacobi, percy baker, doris carter, stephen chambers, ruth catt, arthur dousey, d'arcy, bessie doncaster, alan eggleston, lena featherstone, clarice fisher, sylvia williams, james walker, annie treloar, shearer, cora sandberg, elsie pearce, jan mcgregor, cyril mcgibbon, margaret moore, thomas kierce, william james, alice horan, lucy hamilton, beatrice blake, catherine bowers, mona callow, lillian cameron, joyce dopel, iva denovan, william thompson, irene hewitt, catheriine kardens, beatrice stuart, hugh ross, mavis regelhuth, isabelle bell, melba perriman, vera muny, alan bernaldo, kathleen conway, dorothy darling, walter dunston, mary dwyer, agnes fraser, enid gates, maude williams, violet wheeler, jean tunbridge, maud auberry, john b. allen, rose c. andrews, willie banagwanath, john n. bennett, alfred bayley, geo h. blake, ida bolte, allison brown, eva brown, harold r. brown, henry f. bull, arthur burge, olive cotton, gertrude f coxon, alice culph, curtain, r.l. cutter, florence davis, w.m davies, helen dempster, ed dopel, l.c.m. dovey, ernest duncan, hugh elliott, nelson h. ferguson, mary featherstone, amelia field, david cochrane, phyllis polson, frederick proctor, geoff richards, bessie robertson, catherine ronald, cora saudberg, mary sheppard, scott smith, leonard steele, j.b. suttcliffe, nellie thornhill, vernon fisher, gordon fletcher, elsie ford, constance furness, grace m. geddes, ada giacometti, mary gleeson, v. hall, harold herm, dorothy hambley, clemence hill, evelyn hodgson, annie holmes, glynis humphreys, augus henderson, joseph james, queenie johnson, harold jolly, francis n. king, william knott, mary kinnear, adelaide leash, doris lonie, a lilbourne, f.j. llewellyn, herb malui, muriel mathew, nellie moloney, mabel morris, ernest morshead, w.k. moss, winifred moyley, eileen mcinerney, jack mclean, chas mcnamara, maryanne medwell, alice osbourne, elsie pitts, percy trompf, basil tunbridge, david walker, ruby walton, annie whitla, kenneth whittle, walter wilberforce, alb e williams, masie wise, amy wolff, olive wunhym, beryl atkins, hector ashby, geo banagwanath, g.n.j. barker, marion r. bailey, kathleen bowe, lelia brough, cecil campbell, basil craddock, ida chapman, iris campbell, una campbell, eileen cleary, reg m.l. cuttter, lyle eves, violet elston, eric embling, violet evans, f.l. ellsworth, vera fisher, una fowles, colin graham, victor greenhalgh, clarence grose, dororthy hall, margaret hannaby, leslie henderson, harold herbert, effie holmes, herbert hopkins -
 Waverley RSL Sub Branch
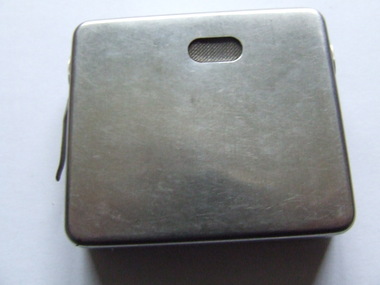
Calaid Hearing aid, ¬1955
... The were also used for the large number of children who had impaired hearing due to the Rubella epidemic in Australia during WWII. http://www.acoustics.asn.au/journal/2000/2000_28_3_Upfold_Piesse.pdf Issued to Henry Claude Roussac a veteran of both WWI and WWII calaid hearing aid australian acoustic laboratories roussac gallipoli repatriation department cal C of A CALAID D11849 Steel square case with a white plastic thumb wheel with volume marks on the side and two holes for the insertion of the earpiece plug, front contains a small (10mm x 5mm) microphone covered by a wire grill.There is a small retaining clip on each side to clip the unit into a shirt pocket Calaid Hearing aid ...Made by Commonwealth of Australia (Commonwealth Acoustic laboratories) to address the problem of providing hearing aids to ex-service men with impaired hearing due to war related events. They were issued by the then Repatriation Department a cheaper alternative to imported more expensive but lower quality units. The were also used for the large number of children who had impaired hearing due to the Rubella epidemic in Australia during WWII. http://www.acoustics.asn.au/journal/2000/2000_28_3_Upfold_Piesse.pdfIssued to Henry Claude Roussac a veteran of both WWI and WWIISteel square case with a white plastic thumb wheel with volume marks on the side and two holes for the insertion of the earpiece plug, front contains a small (10mm x 5mm) microphone covered by a wire grill.There is a small retaining clip on each side to clip the unit into a shirt pocketC of A CALAID D11849calaid, hearing aid, australian acoustic laboratories, roussac, gallipoli, repatriation department, cal -
Glen Eira Historical Society
Article - Joyous Gard
... C... Gilbert Webb... The Wheel...The file also includes eight coloured photographs (100mm x 150mm) of the Wheel of Life sculpture now located in the Medical School of the University of Melbourne, date and photographer unknown, probably 1990s. Negatives are also included. Springthorpe Memorial Boroondara Cemetery Gilbert Web C ...Two copies of a one page photocopy from the book Australian Sculptors (1980) by Ken Scarlett, describing the Springthorpe Memorial at Boroondara Cemetery, Kew. The file also includes a photocopy of an article by Chrys Spicer, date and source unknown, about the Springthorpe Memorial. The article includes seven photographs of the memorial. A research note by Chloe Stapleton, dated 31/08/12, suggests a possible source for this article. The file also includes a copy of a typed letter from Allan M Doble to Melbourne University Art Curator Heather Lowe, dated 24/03/1995, concerning the history of the Wheel of Life Sculpture originally located at Joyous Gard. The file also includes a copy of a typed letter, dated 19/05/1995, from Allan Doble to the Melbourne University Gallery with information about the Wheel of Life sculpture Also included in the file are photocopies of two Melway maps showing the location of Joyous Gard and Springthorpe Reserve with notes by Allan Doble, dated 24/03/1995. The file also includes eight coloured photographs (100mm x 150mm) of the Wheel of Life sculpture now located in the Medical School of the University of Melbourne, date and photographer unknown, probably 1990s. Negatives are also included.springthorpe memorial, boroondara cemetery, gilbert web c, gilbert webb, the wheel of life, springthorpe john william, inglis annie constance, springthorpe dorothy, springthorpe annie constance, springthorpe enid, springthorpe lancelot, springthorpe guy, joyous gard, doble allan m, doble mrs allan, murrumbeena primary school, springthorpe reserve, joyous gard court, tyers s w, outer circle railway, boyd park, wahroonga crescent, murrumbeena, caulfield city council, boyd’s pottery, linear park -
 Bendigo Historical Society Inc.
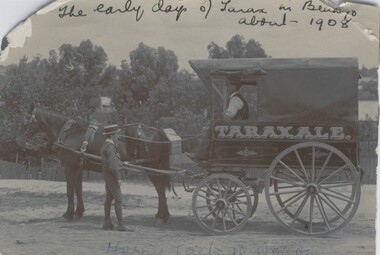
Photograph - HORSE DRAWN VEHICLE WITH MAN AND BOY, c.1908
... wheeled horse drawn vehicle. Adult male driver, boy standing near horse. Inscriptions: on front - hand written across top 'The early days of Tarax in Bendigo about 1908' Hand written across bottom 'Harry Laity (may be Tait) in wagon'. Painted on wagon 'Taraxale'. History of object: James Lerk 2000 - 'The original DELIVERY CART FOR George Pethard's soft drink firm which he commenced in Panton Street, Golden Square. The 'Taraxale' wagon belonged to Harry Laity (or Tait). Photographed c...wheeled horse drawn vehicle. Adult male driver, boy standing near horse. Inscriptions: on front - hand written across top 'The early days of Tarax in Bendigo about 1908' Hand written across bottom 'Harry Laity (may be Tait) in wagon'. Painted on wagon 'Taraxale'. History of object: James Lerk 2000 - 'The original DELIVERY CART FOR George Pethard's soft drink firm which he commenced in Panton Street, Golden Square. The 'Taraxale' wagon belonged to Harry Laity (or Tait). Photographed c ...Black and white photograph of four wheeled horse drawn vehicle. Adult male driver, boy standing near horse. Inscriptions: on front - hand written across top 'The early days of Tarax in Bendigo about 1908' Hand written across bottom 'Harry Laity (may be Tait) in wagon'. Painted on wagon 'Taraxale'. History of object: James Lerk 2000 - 'The original DELIVERY CART FOR George Pethard's soft drink firm which he commenced in Panton Street, Golden Square. The 'Taraxale' wagon belonged to Harry Laity (or Tait). Photographed c.1908. Photographed for Bendigo Advertiser 4.7.2000organization, business, taraxale -
 Bendigo Historical Society Inc.
Photograph - BURNT GULLY PHOTOS, 1924
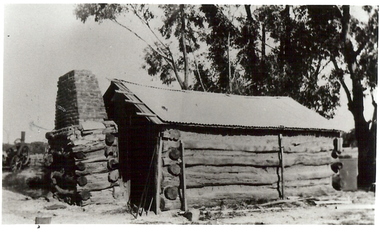
... wheel 6 feet in diameter. b. Pilcher's thresher on Robert Riley's farm, Burnt Gully. Bullock drivers Bill Pilcher, Paddy Mulcair. Bullock drawn threshing machine, large group of men standing alongside and to rear of machine. Two men standing on top of thresher. Steam traction engine on far left of photo. c...wheel 6 feet in diameter. b. Pilcher's thresher on Robert Riley's farm, Burnt Gully. Bullock drivers Bill Pilcher, Paddy Mulcair. Bullock drawn threshing machine, large group of men standing alongside and to rear of machine. Two men standing on top of thresher. Steam traction engine on far left of photo. c ...Burnt Gully - possibly near Woodvale. a. Black and white photo: men standing behind, alongside bagged grain. Steam farm engine on RH side. Written on rear of photo: threshing team at lunch engine Ruston Procter steam. 8 horse power, single cylinder, working pressure 75 lbs per square inch. 80 revs per minte. Fly wheel 6 feet in diameter. b. Pilcher's thresher on Robert Riley's farm, Burnt Gully. Bullock drivers Bill Pilcher, Paddy Mulcair. Bullock drawn threshing machine, large group of men standing alongside and to rear of machine. Two men standing on top of thresher. Steam traction engine on far left of photo. c. Pioneer log cabin Burnt Gully, the home of the Grafton family, demolished about 1930. Hut of slab construction, with corruated iron roof over timber slats. Chimney of logs and slabs topped with bricks on LH side of house. Steam farm machine in background on LH side.unknownagriculture, farm, grafton familyh, robert riley, bill pilcher, paddy mulcair, burnt gully. -
 Mission to Seafarers Victoria
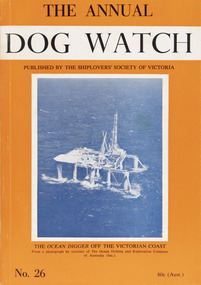
Journal (item) - Periodicals-Annual, Shiplovers' Society of Victoria, The Annual Dog Watch, 1969
... Wheel - Captain W. E. Eglen - 34 A Very Near Thing - Ralph Ingram - 37 The Time Charter - Captain Ruben Fogelstrom - 49 Ninety Years Under the Sea - J. M. MacKenzie - 53 Many hogs and Three Serpents - Captain C...Wheel - Captain W. E. Eglen - 34 A Very Near Thing - Ralph Ingram - 37 The Time Charter - Captain Ruben Fogelstrom - 49 Ninety Years Under the Sea - J. M. MacKenzie - 53 Many hogs and Three Serpents - Captain C ...This journal provides the reader with glimpses of the adventures and hardships of a seaman's life. Many of the stories are of sailing ships.Contributes to our knowledge of the importance of shipping and places on record those stories of the sea which would otherwise be lost.Contents Foreword - Commodore Michael Parker, C.V.O. - 8 Editorial - S.A.E.S. - 17 An Unusual Cruise Through Bass Strait - T. E. Goldfinch - 23 Reminiscences in Sai - George Oakes - 27 My First Christmas in the Service - Lt.-Com. H. A. Willian, M.B.E., V.R.D., R.A.N.R. (Ret) - 30 Fortune's Wheel - Captain W. E. Eglen - 34 A Very Near Thing - Ralph Ingram - 37 The Time Charter - Captain Ruben Fogelstrom - 49 Ninety Years Under the Sea - J. M. MacKenzie - 53 Many hogs and Three Serpents - Captain C. E. Parkes - 58 Feathered Navigators - Arthur E. Woodley - 60 Human Radar - T. F. Roberts - 65 The Wreck of the Dutch Ship "Vergulde Draeck" - C. Halls - 67 The Port of Portland -- Victoria - - 78 The Barque "Carrazal" - From the papers of the late Captain J. Bull - 81 Pilots (verse) - C. E. Bonwick - 83 Hazards of Sail - A letter from Commodore John Rodgers, U.S.N. - 84 Dhows - C. W. Hawkins - 88 "Full Astern" Without "Stand-by" - S. F. P. Brown - 98 The "Lightning" Passage - More extracts of the Diary of a Passenger - 103 The "Royal Charter" - J. M. Mackie - 114 More on the "Royal Charter" - Dr. H. Cohen. C.B.E. 115 An Echo of Courage - a letter from J. S. Matthews - 117 A Wartime Passage - T. S. Shoesmith - 120 Book Reviews - - 130sailing ships, steamships, shipping, seafaring life, shiplovers' society of victoria, dog watch -
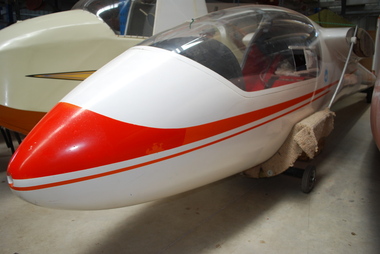 Australian Gliding Museum
Machine - Glider – Sailplane, 1969
... The Phoebus C is the open class version of the type that was introduced in 1967. It has a 17 metre wing span, retractable wheel and tail brake parachute. ...The Phoebus C is the open class version of the type that was introduced in 1967. It has a 17 metre wing span, retractable wheel and tail brake parachute. ...The Phoebus is a fibreglass composite sailplane that was designed by H. Nagele, R. Linder and R. Eppler in the early 1960s for competition flying. It is a derivative from the Akaflieg Stuttart Phonix which was the first sailplane to be built of fibreglass. The first Phoebus, a Standard Class design with a 15 metre wingspan, flew in 1964. The Phoebus C is the open class version of the type that was introduced in 1967. It has a 17 metre wing span, retractable wheel and tail brake parachute. Several hundred Phoebus sailplanes (all versions) were made by the manufacturer Bolkow at Ottobrun in Germany before production ended in 1970. The Museum’s Phoebus C, serial number 866, was built in 1969. It was donated to the Museum by Ian Cohn in 2008. Early fibreglass design that was manufactured in numbers. The Phoebus is a modern looking single seat glass fibre sailplane with a ‘T’ tailplane. It is finished in white with light red detailing including thin red stripe on wings and some red striping on fuselage sides from nose to underneath wings.Serial number 866 on plate affixed inside cockpit – registration VH-GSW which has been painted on the sides of the fuselage rear of the wings. A Freistaat Bayern crest has been applied to each side of the vertical stabilizer. australian gliding, glider, sailplane, bolkow, phoebus, cohn, nagele, linder, eppler -
 Creswick Museum
Photograph, Herman Moser, 1867
... Wheel of Fortune; Sunny’s ? ; skittles, Dancing excellent string band Monster balloon ascends last day, sent by J. Moore at conclusion of sport. Full brass band. Easter Sports Committee; H. Piening treasurer; C...Wheel of Fortune; Sunny’s ? ; skittles, Dancing excellent string band Monster balloon ascends last day, sent by J. Moore at conclusion of sport. Full brass band. Easter Sports Committee; H. Piening treasurer; C ...Photograph, Sepia, Easter Sports 22 and 23rd April 1867 in aid of Creswick Hospital. Structures in order from gate 1 No. 3 Publican’s Booth- W. Davies. 2 Richardson’s Show 50’ x 25’ inside platform 14’ outside 21’ x 18’ (Braganzro (?) provide poles) 3 Refreshment Booth 50’ x 12 ½ ‘ shingle roof, bazaar and wheel of fortune (J. Hook) 4 No. 1 Publican Booth, T. W. Anthony 40’ x 20'. 5 Storage for donations. Secretary’s office, Steward’s room 60’ x 13’. 6 Dancing Booth 80’ x 30’ floored with such boards; contains 8,000’ of ?? 7 No. 2 Publican’s Booth W. J. Whatman. Sports commenced 1 p.m. 2 large swings at south end of ground; running was 300 yards round platform for dancing in center; skittle alley fenced off near entrance; portion roped off on East side and provided with seats for ladies; entrance 1/- children 6d A. M. Wilson- Aunt Sally; Mr. Rowell- Doodlem Buck ; 3 shils a penny; Bobbly Down; Wheel of Fortune; Sunny’s ? ; skittles, Dancing excellent string band Monster balloon ascends last day, sent by J. Moore at conclusion of sport. Full brass band. Easter Sports Committee; H. Piening treasurer; C. Whiffle; E. Williams; J. Machiman; H. Williams; G. Frazer; B. Trevan; W. Johnson. W. Pobjoy Hon. Sec. Refreshement Booth; Mesdames Geljon, H. Williams, Moore, Sedon (2), Burke, Grigan, Whalley.Lennon Troupe: Lennon, Burrel, & Carroll Taming a Tiger. Photograph taken from Water street about intersection with East side of Roger street. Photo taken by H. Moser Monday 22nd April 1867) Easter Sports 22 and 23rd April 1867 in aid of Creswick Hospital. Photograph, Sepia, 1 No. 3 Publican’s Booth- W. Davies. 2 Richardson’s Show 50’ x 25’ inside platform 14’ outside 21’ x 18’ (Braganzro (?) provide poles) 3 Refreshment Booth 50’ x 12 ½ ‘ shingle roof, bazaar and wheel of fortune (J. Hook) 4 No. 1 Publican Booth, T. W. Anthony 40’ x 20'. 5 Storage for donations. Secretary’s office, Steward’s room 60’ x 13’. 6 Dancing Booth 80’ x 30’ floored with such boards; contains 8,000’ of ?? 7 No. 2 Publican’s Booth W. J. Whatman.photograph, h. moser, easter sports, creswick -
 Bendigo Historical Society Inc.
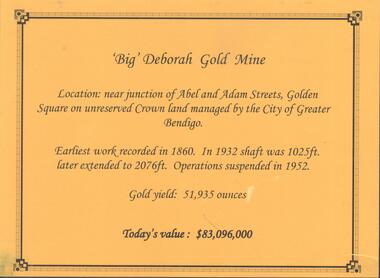
Photograph - DEBORAH GOLD MINE, GOLDEN SQUARE
... c. Corrugated iron shed constructed over the stampers. Steel mesh front. d. Steel poppet head, no winding wheel at top. ...c. Corrugated iron shed constructed over the stampers. Steel mesh front. d. Steel poppet head, no winding wheel at top. ...Information display card regarding the 'Big' Deborah Gold Mine, located near the junction of Abel and Adam Street, Golden Square. Earliest work recorded 1860. Shaft 2076 feet. Operations suspended in 1952. Gold yield 51,935 ounces. Battery shed still on site containing a 5 head stamper which was originally a 20 head stamper. The battery was manufactured by Horwood's Foundry, Bendigo. Photos of mine site taken in 2012: a.Engine room concrete footings, iron work visible. Pepper corn trees in background. Pampas grass in foreground. Steel mesh fence on RH side, enclosing the poppet head site. b. Concrete footings, peppercorn tree in background. c. Corrugated iron shed constructed over the stampers. Steel mesh front. d. Steel poppet head, no winding wheel at top. Pampas grass in foreground. e.. Stamper shed and steel poppet legs in background enclosing dilapidated wooden poppet head legs. f. Close up image of weights in stamper room g.Winding wheel on stampers h.Looking upwards to top of stampersbendigo, mining, deborah gold mine -
 Bendigo Historical Society Inc.
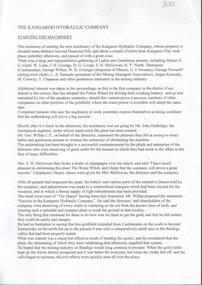
Document - KANGAROO HYDRAULIC COMPANY OPENING 25TH JANUARY 1894
... wheel. Thompson and Co., Castlemainer were involved in the build of the plant. Mr. C...wheel. Thompson and Co., Castlemainer were involved in the build of the plant. Mr. C ...4 page typed document, typed copy of article in Bendigo Advertiser 25th January, 1894. The Kangaroo Hydraulic Company had its plant south of Diamond Hill and 'a couple of miles from Kangaroo Flat'. The company had a Pelton Wheel to drive the crushing battery, 'one of the first in the colony'. Extensive detail on the operation. John Delbridge mechanical engineer was the engineer under who 'the plant has been erected' Mrs McGowan broke a bottle of champagne over the wheel. Thompson and Co., Castlemainer were involved in the build of the plant. Mr. C. Jorgensen was commended for his work.Bendigo Advertiserbendigo, mining, kangaroo hydraulic company -
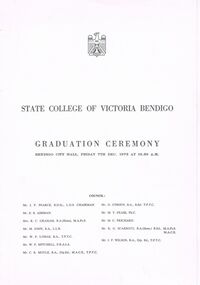 Bendigo Historical Society Inc.
Document - LA TROBE UNIVERSITY BENDIGO COLLECTION: STATE COLLEGE OF VICTORIA BENDIGO GRADUATION CEREMONY 1978
... C. T. Dillon. Music - Mr. B. R. Reed, Mrs. B. P. Hyett, Miss E. A. McConnell, Mrs. M. P. Hibberd. Physical Education - Mr. R. Colliss, Miss J. de Ferranti, Mr. A. J. McIntosh, Mrs. S. M. Wheeler...C. T. Dillon. Music - Mr. B. R. Reed, Mrs. B. P. Hyett, Miss E. A. McConnell, Mrs. M. P. Hibberd. Physical Education - Mr. R. Colliss, Miss J. de Ferranti, Mr. A. J. McIntosh, Mrs. S. M. Wheeler ...A white document titled 'State College of Victoria Bendigo Graduation Ceremony.' Bendigo City Hall, Friday 7th Dec. 1973 at 10.30 A.M. Council: Mr. J. P. Pearce, Mr. E. B. Ashman, Mrs. R. C. Graham, Mr. M. John, Mr. W. P. Lomas, Mr. W. P. Mitchell, Mr. C. R. Moyle, Mr. D. O'Brien, Mr. M. T. Pease, Mr. M. C. Prichard, Mr. K. G. Scarrott and Mr. J. P. Wilson. On the inside cover is a list of the Staff: Principal: Mr. K. G. Scarrott. Vice-Principal: Miss A. Downard and Warden for Men: Mr. F. M. Courtis. Art Staff - Mr. F. M. Courtis, Mr. B. A. Clemson, Mr. K. G. Harrison, Mr. K. W. Endersby, Mr. L. J. Langan, Mr. R. N. Bruce, Mr. D. J. Watson, Mr. R. J. Harris, Mrs. M. M. Clemson. Education - Mr. D. O'Brien, Mr. F. A. Jones, Mrs. N. F. Fawdry, Mr. A. D. Maltby, Mr. J. Brasier, Mr. A. Attrill, Mr. K. P. O'Hagan, Mrs. M. J. Smith, Mr. E. F. Bell, Miss P. R. Wess. English - Mr. T. J. McCabe, Mr. G. L. Colson, Mr. W. P. Lomas, Miss M. C. Gates, Mr. R. M. Counahan, Mrs. R. M. Griffiths, Mrs. E. L. Angus. Library and Aids - Mr. B. D. Gill, Mr. J. R. Goodrich, Mrs. E. I. Perry, Mr. R. D. Robinson, Mrs J. A. Maltby, Mrs. G. L. Barnes. Mathematics - Mr. K. C. Coles, Mr. A. J. Jones, Mrs. H. Knox, Mr. C. T. Dillon. Music - Mr. B. R. Reed, Mrs. B. P. Hyett, Miss E. A. McConnell, Mrs. M. P. Hibberd. Physical Education - Mr. R. Colliss, Miss J. de Ferranti, Mr. A. J. McIntosh, Mrs. S. M. Wheeler, Mr. D. Pinniger, Mrs. S. L. Anderson. Procedures and Practice of Teaching - Mr. B. T. Geary, Mr. C. J. Barnes, Mrs. D. E. Plim. Science - Mr. R. F. Colbourne, Mr. R. E. Martin, Mr. L. E. Leeson, Mr. N. J. West, Mr. P. L. Killeen. Social Science - Mr. L. A. Hall, Mr. J. A. White, Mr. R. B. Silverback, Mr. G. F. McIntosh, Mr. G. N. Dunn, Mrs. S. Sarto. International Teacher Fellow - Mr. D. J. Jones. Associated Medical Staff - Dr. L. M. Cleeve. Registrar - Mr. W. D. Kolle. On the following page is an outline of the program which includes an introduction by the Chairman of the Council Mr. J. P. Pearce. The signing of the Graduation Book is - student representatives are presented to Mr. J. Revell Inspector of Schools, by Miss Downward. The Principal's speech is presented by Mr. K. G. Scarrott. Miss Downward presents all the graduating students to Mr. Moyle. Congratulations are offered by Cr. A. Craig, Cr. M. O'Halloran for the Shire of Strathfieldsaye and the Principal of Golden Square State School, Mr. J. Hendry. The Occasional Address is presented by Mr. C. R. Moyle. The Master of Ceremonies is Mr. B. A. Clemson. The pianist is Barbara Hyett and the organist Michael Bottomley. On the back of the program is a list of the graduating students - Diploma of Teaching (Primary) - Rita J. Aniolkowski, Debra A. Ball, Valda J. Batey, Judith Batten, Mrs. Julie Bennett, Lidija A. Bertlands, Verence A. Bonsor, Barry R. Borneman, Michael K. Bottomley, Gregory Bowen, Ian G. Butcher, Christine V. Callaghan, Elizabeth A. Cannard, Janette J. Chaffey, Mrs. Sandra K. Chamberlain, Lorraine J. Chambers, Suzanne E. Chislett Mrs. Elaine Clark, Kathleen A. Cleave, Jennifer R. Cody, Janice E. Cole, Mimie E. Crook, Lidia Czerkaskyj, Kathryn F. Davis, Ivan J. Dedini, Bryan W. Derrick, Kaye E. Dillon, Bernadette M. Dixon, Marie L. Dowd, Dianne M. Dwyer, Helen D. Eames, Norma C. Eddy, Mrs. Rozlyn Effenberg, Barbara I. Fairmaid, Anne C. Ferry, Noela M. Flanagan, Lorraine J. Ford, Helen T. Fraser, Pauline H. Fraser, Julian F. Fuhrmann, Mrs. Susan L. Gemmell, Lynette M. Gilmore, Timothy A. Godber, Stephen J. Gough, Rosemary Joy Graves, Robyn M. Hanna, Geoffrey J. Harrison, Aileen M. Harrop, Margaret E. Harry, Kathryn Hermecz, Jennifer A. Hewetson, Mary Hickey, Mrs. Susan Higgins, Mandy S. Hilson, Anthony V. Holland, Galye A. Holyman, Julie M. Hyde, Susan B. James, Lorraine I. Joiner, Annie N. Jones, Ian D. Jones, Mrs. Margot E. Jones, Heather M. Jordan, Helen R. Keane, Joy Keating, Clare R. Keogh, Margaret T. La Fontaine, Kerry M. Larcombe, Julie T. Lewis, Michael R. May, Catherine A. Mays, Colin S. McKeown, Elaine A. McNabb, Bruce J. Meager, Noel C. Meredith, Margaret C. Metcalf, Jennifer J. Millard, Kerry M. Muldowney, Mrs. Kathleen E. Muller, Diane Nankivell, Roslyn B. Nankivell, Lennard Roy Neilsen, Mrs. Nanette B. Newstead, Anne M. O'Sullivan, Mrs. K. S. Parker, Heather J. Perrin, Kaye P. Ramsdale, Elaine J. Reddington, Cheryl Reid, John E. Reid, Mary L. Reilly, Mrs. Andra F. Robertson, Edwin D. Rogers, Mrs. Lorraine J. Rogers, James J. Rolfe, Laurice J. Ryall, Bernadette Ryan, Colleen F. Ryan, Alan J. Sands, Mrs. Judith A. Scarrott, Peter B. Scarrott, Suzanne M. Scott, Lynette J. Scown, Kathleen A. Sexton, Wendy A. Scheumack, Bryan W. Simm, Irene Simonaitis, Christine M. Smith, Heather N. Smith, Mary A. Smith, David G. Steel, Kate F. Stewart, Robyn F. Sutton, Barbara L. Turner, Robyn J. Turner, Dawn E. Veal, Ann Vickers, Johanna M. Vringer, Lisa D. Watkins, Barbara A. Watts, Sherrie M. West, Annette L. Whiting, Teresa L. Williamson, Jennifer L. Wirth, Margaret E. Wishart. Trained Infant Teachers' Certificate - Mrs. Annette Reid. Trained Primary Teachers' Certificate - Mrs. Gail Bennett, Prudence E. Chapman, Christine Colbert, Patricia L. Harris, Mrs. Gwenda Haveckin, Mrs. Jill Hobbs, Wayne Jackson. Mrs. Barbara Liston. In the centre of this program is a ticket for Miss J. C. Burnett to attend it.bendigo, education, state college of victoria bendigo, la trobe university bendigo collection, collection, bendigo teachers' college, bendigo, education, teaching, teachers, students, tertiary education, graduands, graduates, staff, graduation, bendigo teachers' college staff, bendigo teachers' college students