Showing 39 items matching "imperial figures"
-
 Bendigo Historical Society Inc.
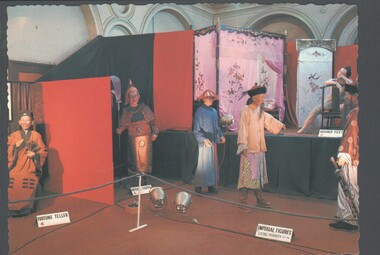
Postcard - WES HARRY COLLECTION: DAI GUM SAN WAX MUSEUM, 1970's ?
... ...Imperial Figures...POSTCARD Photograph wax museum Imperial Figures Ching Dynasty Dai Gum San wax museum Coloured postcard depicting the Ching Dynasty display at the Dai Gum San wax museum in View Street. ...Coloured postcard depicting the Ching Dynasty display at the Dai Gum San wax museum in View Street.postcard, photograph, wax museum, imperial figures, ching dynasty, dai gum san wax museum -
 Bendigo Military Museum
Badge - RSL MEMBERSHIP
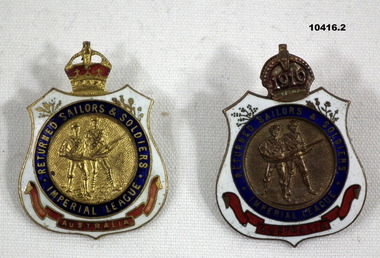
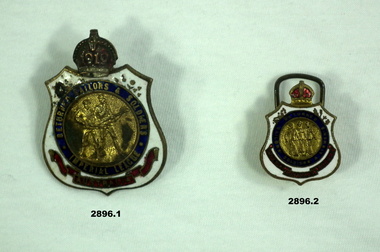
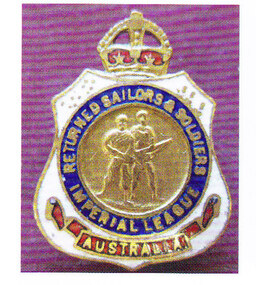
... Sayers 1419, refer Cat No 10411 for his service details. badges Membership Rsl on both, “Returned Saliors && Soldiers Imperial League of Australia” .1) Rear stamped “B5420 - Copyright W Bishop” .2) Rear stamped “P1397 - Copyright Prouds LTD” Badges, RSL Membership, metal. .1) One has Kings crown on top, central are two figures, colours are red, white and blue with the centre a gold colour, rear has two lugs and and stamped with a number. .2) This has a membership date attached to the Crown with “1919” on meaning a financial member for that year. ...Collection re J.E. Sayers 1419, refer Cat No 10411 for his service details.Badges, RSL Membership, metal. .1) One has Kings crown on top, central are two figures, colours are red, white and blue with the centre a gold colour, rear has two lugs and and stamped with a number. .2) This has a membership date attached to the Crown with “1919” on meaning a financial member for that year. Same colours and text.on both, “Returned Saliors && Soldiers Imperial League of Australia” .1) Rear stamped “B5420 - Copyright W Bishop” .2) Rear stamped “P1397 - Copyright Prouds LTD”badges, membership, rsl -
 Bendigo Military Museum
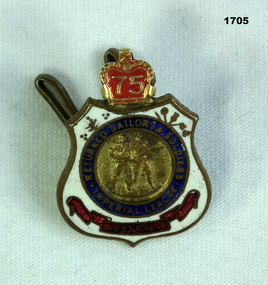
Badge - DISPLAYOF THE RSL BADGES, C. 1919 to post 1990
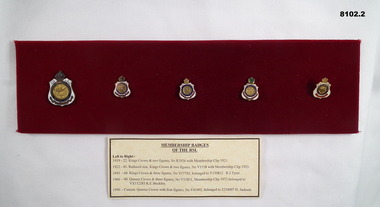
... figures Army, Navy, Airforce, Female figure. The first 3 badges have a Kings Crown on, last 2 Queens Crown. The names listed as per on card .2) left to right. 3rd badge, R.J. Tyrer, refer Cat No 1813.5. 4th badge, K.C. Buckley, refer Cat No 1438. 5th badge, H Jackson, refer Cat No ............ brsl smirsl badges rsl Badges from left to right re text on/years in use. First two large & small. "Returned Sailors & Soldiers Imperial ...The main centre piece of each badge has figures in, 1 & 2 have two figures Army & Navy, 3 & 4 have three figures Army, Navy, Airforce, 5 has four figures Army, Navy, Airforce, Female figure. The first 3 badges have a Kings Crown on, last 2 Queens Crown. The names listed as per on card .2) left to right. 3rd badge, R.J. Tyrer, refer Cat No 1813.5. 4th badge, K.C. Buckley, refer Cat No 1438. 5th badge, H Jackson, refer Cat No .............1) Cardboard covered with red felt with 5 RSL Badges attached in a row. One large and 4 small, 3 badges have a membership year clip on, all badges have difference's being text on or years used. .2) Card with details re each badge.Badges from left to right re text on/years in use. First two large & small. "Returned Sailors & Soldiers Imperial League - Australia". 1st 1919 - 1922 2nd 1922 - 1941 3rd and 4th. "Returned Sailors, Soldiers & Airmen's League - Australia". 3rd 1941 - 1966 4th 1966 - 1990 5th. "Returned & Services League Australia". 5th 1990 - current.brsl, smirsl, badges, rsl -
 Bendigo Military Museum
Badge - BADGES, RSL MEMBERSHIP, c.1919 - 1926
... Bendigo Military Museum 37 - 39 Pall Mall Bendigo goldfields Badges RSL membership Returned Sailors, Soldiers Imperial League Australia On rear. “71019, 72569, 51703, 213852” Four metal Badges with red, white & blue enamel work. Etched figures ...Four metal Badges with red, white & blue enamel work. Etched figures of servicemen in bronze in the centre. Badges are numbered on rear so recipient can be traced.Returned Sailors, Soldiers Imperial League Australia On rear. “71019, 72569, 51703, 213852”badges, rsl, membership -
 Romsey and Lancefield RSL Sub Branch
badge, c 1919
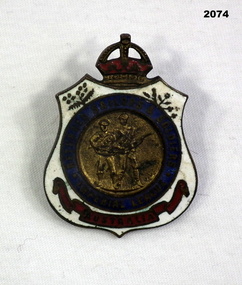
... Centre two figures in bronze surrounded by blue circle with words Returned Sailors and Soldiers Imperial League .Further surrounded by white enamel with red ribbon at base with words Australia in centre of ribbon. ...Centre two figures in bronze surrounded by blue circle with words Returned Sailors and Soldiers Imperial League .Further surrounded by white enamel with red ribbon at base with words Australia in centre of ribbon. ...The Australian Returned Services League was designed in 1919 and has remained predominately the same since then. The white background stands for purity of motives, The blue indicates willingness to render service to a comrade anywhere beneath the blue sky. The red stands for the blood ties of war. The wattle is symbolic of Australia. The Leek, Rose, Thistle and Shamrock are symbolic of and represent the link with Wales, England, Scotland and Ireland. .A Crown is positioned on the top of the badge symbolizing loyalty to the Monarchy.Bronze Metal. Centre two figures in bronze surrounded by blue circle with words Returned Sailors and Soldiers Imperial League .Further surrounded by white enamel with red ribbon at base with words Australia in centre of ribbon. Edward VII Crown at top. 1919-1926.Rear stamped number "96641"rsl, badge, medallion, crest, rssaila -
 Bendigo Military Museum
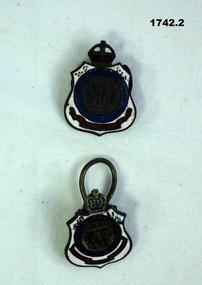
Badge - ASSOCIATION MEMBERSHIP BADGES, Post 1960
... Imperial League of Australia”. On the rear,”36363”. .2) “TPI Association”. .1) Badge RSL with three central figures and crown on top. ...The items belonged to Peter James Dodd. “TPI” means “Totally & Permanently Incapacitated”. Refer Cat Log No 2436.2P for his service details..1) Badge RSL with three central figures and crown on top. On the crown is “06” denoting member of the RSL in 2006. Rear has an pin attachment for a jacket. .2) Badge, TPI Association, round central piece with a scroll at the bottom, top has a crown, on the rear is a long pin for Jacket attachment..1) The front has “Returned Sailors, soldiers and Airman’s Imperial League of Australia”. On the rear,”36363”. .2) “TPI Association”.badges, membership, associations -
 Bendigo Military Museum
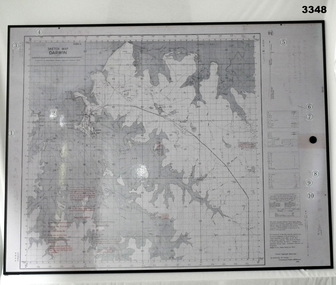
Map - MAP, MOUNTED, WW2, Possible pre WW2
... Imperial General Staff. Mounted on board backing with laminated surface added, black border around edge, hanging strap on back. A detailed map of Darwin area giving convergence & time correction figures for artillery purposes....Imperial General Staff. Mounted on board backing with laminated surface added, black border around edge, hanging strap on back. A detailed map of Darwin area giving convergence & time correction figures for artillery purposes. ...This sketch map is a copy of the original found in Tokyo after the 1939 - 1945 War. Note that Japanese writing that has been added.Copy of Sketch Map of Darwin prepared by Australian Section Imperial General Staff. Mounted on board backing with laminated surface added, black border around edge, hanging strap on back. A detailed map of Darwin area giving convergence & time correction figures for artillery purposes.Top left words: “Sketch Map Darwin”map, darwin -
 Bendigo Military Museum
Badge - BADGES RSL, 1) pre WW2
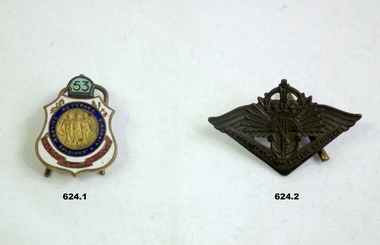
... .1) Returned sailors & soldiers Imperial League metal badge with crown at top, white background, 2 gold figures in centre. 2 Attachment rings on back. .2) Returned sailors & soldiers Imperial League metal badge, a crown bearing 53 ( member year 1953) inside it at top, white background, 2 gold figures in centre. ...RSL membership Badges .1) Printed on red marking at bottom on front: “AUSTRALIA”, “Stamped: 80413” .2) Printed on red marking at bottom on front: “AUSTRALIA”, Stamped on back attachment clip: “A2920 2” .1) Returned sailors & soldiers Imperial League metal badge with crown at top, white background, 2 gold figures in centre. 2 Attachment rings on back. .2) Returned sailors & soldiers Imperial League metal badge, a crown bearing 53 ( member year 1953) inside it at top, white background, 2 gold figures in centre. ...Items in collection re Sgt James Clarence WATT. Refer Cat No 3554.2 for his service records..1) Returned sailors & soldiers Imperial League metal badge with crown at top, white background, 2 gold figures in centre. 2 Attachment rings on back. .2) Returned sailors & soldiers Imperial League metal badge, a crown bearing 53 ( member year 1953) inside it at top, white background, 2 gold figures in centre. Attachment clip on back..1) Printed on red marking at bottom on front: “AUSTRALIA”, “Stamped: 80413” .2) Printed on red marking at bottom on front: “AUSTRALIA”, Stamped on back attachment clip: “A2920 2”rsl, membership, badges -
 Bendigo Military Museum
Badge - BADGES, RSL MEMBERSHIP, post WWI
... Refer Cat No 2759.2. numismatics-badges societies-returned service league Rsl membership .1) “Returned Sailor's Soldier's Imperial League Australia No 67888” .2) “Returned Sailor's Soldier's Airmen's Imperial League Australia No V99409” .1) Badge, metal, RSSILA. Crown at top with RSL Membership Clip 1919. Centre has 2 figures ...The badges relate to the HEWSTON family collection WW1 & WW11. The large badge with clip 1919 was possibly H.E.Hewstons No 40 AIF. Refer Cat No 2759.2..1) Badge, metal, RSSILA. Crown at top with RSL Membership Clip 1919. Centre has 2 figures. .2) Badge, metal, RSSAILA. Crown at top with 3 central figures. .1) “Returned Sailor's Soldier's Imperial League Australia No 67888” .2) “Returned Sailor's Soldier's Airmen's Imperial League Australia No V99409”numismatics-badges, societies-returned service league, rsl, membership -
 Bendigo Military Museum
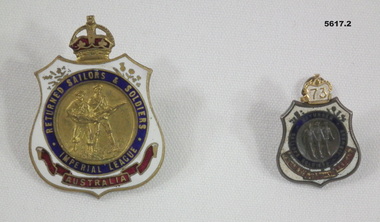
Badge - BADGES, RSL MEMBERSHIP, Stokes and Son Melbourne, 1) Post WW1, .2) Post WW2
... Item in collection relating to the Jackson Family. badges RSL league .1) "Returned Sailors & Soldiers Imperial League", on rear, "11693" .2) "Returned Sailors, Soldiers & Airmans Imperial League" .1) Badge, large, brass, crown at top, two central figures, rear has two lugs and is stamped. .2) Badge, small, brass, crown at top, three central figures, rear has one lug and stamped. ....1) This is the original old style. .2) Clip on top with "73" means financial member that year. Item in collection relating to the Jackson Family..1) Badge, large, brass, crown at top, two central figures, rear has two lugs and is stamped. .2) Badge, small, brass, crown at top, three central figures, rear has one lug and stamped. The crown has a clip on with the number "73" on..1) "Returned Sailors & Soldiers Imperial League", on rear, "11693" .2) "Returned Sailors, Soldiers & Airmans Imperial League"badges, rsl, league -
 Bendigo Military Museum
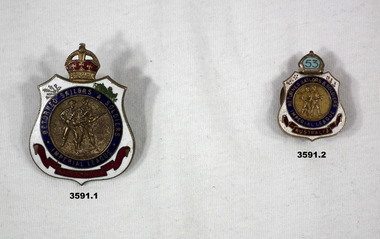
Uniform - VARIOUS AWARDS, CHEVRONS, EMPIRE WOUNDED & BADGE, 1.2) 1916-18. .3) 1914-18. .4.5) post WW1
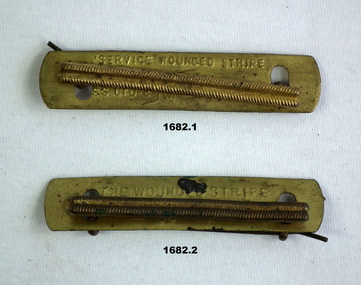
... Refer1661.3, 1663P, 1680.3. numismatics - badges - military metalcraft - brassware WIA RSL Association .1) "Service Wounded Stripe" .2) "The Wounded Stripe" .3) "Australian commonwealth military forces" .4) "Returned Sailors, Soldiers Imperial League of Australia" .1) .2) "Empire Wounded Stripes" metal, base plate with Stripe resembling gold braid fixed by two pins through the plate. .3) Rising Sun collar badge, blackened pressed brass with 2 lugs on rear. .4) RSL Membership badge, metal, enamelled, crown at top with two central figures. .5) Association Badge, 3rd Field Arty Brigade, copper wishbone shape and Field Artillery motif blue & red enamel. ...Empire Wounded Stripes were introduced in 1916. Each time a soldier was wounded and taken out of the field he was entitled to a stripe. Worn on the left sleeve below the elbow on your uniform These items belonged to Frederick Campbell Moller No 2233 AIF. Refer1661.3, 1663P, 1680.3..1) .2) "Empire Wounded Stripes" metal, base plate with Stripe resembling gold braid fixed by two pins through the plate. .3) Rising Sun collar badge, blackened pressed brass with 2 lugs on rear. .4) RSL Membership badge, metal, enamelled, crown at top with two central figures. .5) Association Badge, 3rd Field Arty Brigade, copper wishbone shape and Field Artillery motif blue & red enamel..1) "Service Wounded Stripe" .2) "The Wounded Stripe" .3) "Australian commonwealth military forces" .4) "Returned Sailors, Soldiers Imperial League of Australia"numismatics - badges - military, metalcraft - brassware, wia, rsl, association -
 Bendigo Military Museum
Badge - ACTIVE SERVICE AND MEMBERSHIP BADGES, Post WW11
... Refer 622.3, 775. rsl military history military service Active service .1) "Returned Sailors Soldiers Airmen Imperial League of Australia" On rear "V1314" .2) On rear "211849" .1) RSL Membership Badge with clip "53" denoting financial member 1953. Badge has 3 figures ...Belonged to Capt Warick Rosenthal No TX6321 AAMC. Refer 622.3, 775. .1) RSL Membership Badge with clip "53" denoting financial member 1953. Badge has 3 figures with a blue circle around, under is a scroll in red, rear has a clip with pin & numbered. .2) Returned from Active Service Badge, blackened brass, crown over rising sun, wings / anchor / Boomerang under with words "Returned From Active Service" Two lugs and pins on rear..1) "Returned Sailors Soldiers Airmen Imperial League of Australia" On rear "V1314" .2) On rear "211849"rsl, military history, military service, active service -
 Bendigo Military Museum
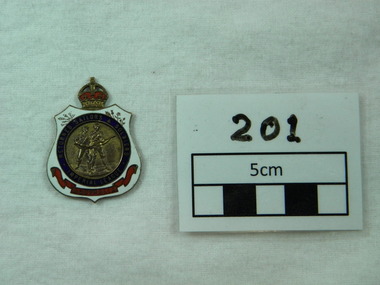
Badge - BADGE, RSL, C. CROESZIER & SON, 1922 onwards
... "Returned Sailors & Soldiers Imperial League of Australia". Large version of the Badge. Two central figures...."Returned Sailors & Soldiers Imperial League of Australia". Large version of the Badge. Two central figures. ...Badge, RSL member, metal, period 1922 - 1952. "Returned Sailors & Soldiers Imperial League of Australia". Large version of the Badge. Two central figures.On rear “4073”numismatics-badges, societies-service clubs, rsl -
 Bendigo Military Museum
Badge - BADGES, RSL MEMBERSHIP, 1920 - 1940
... Top has crown, 2 figures centre, blue circle around figures with "Returned Sailors and Soldiers Imperial League" under red scroll is "Australia". ...Top has crown, 2 figures centre, blue circle around figures with "Returned Sailors and Soldiers Imperial League" under red scroll is "Australia". ...The badge with two central figures is pre WW2 when there was no RAAF..1) Badge, RSL membership, metal. Top has crown, 2 figures centre, blue circle around figures with "Returned Sailors and Soldiers Imperial League" under red scroll is "Australia". Rear has 2 lugs and pin. Badge is number stamped on rear. .2) Badge, RSL membership metal top has crown 3 figures centre blue circle around figures with "Returned Sailors, Soldiers and Airmens". Under is scroll in red with "Imperial League Australia. Rear has 2 lugs, Badge is number stamped on rear..1) "V4715" .2) “Badge remains the property of the League 2566”badges, membership, rsl -
 Bendigo Military Museum
Badge - ACTIVE SERVICE, MEMBERSHIP BADGES, All post 1945
... Rear is stamped with a number. .2) Membership badge, metal, centre has 3 figures, crown at top with pin date 1954 membership. Front of badge "Returned Sailors, Soldiers and Airmans Imperial league of Australia. ...Rear is stamped with a number. .2) Membership badge, metal, centre has 3 figures, crown at top with pin date 1954 membership. Front of badge "Returned Sailors, Soldiers and Airmans Imperial league of Australia. ....1) badge, brass, "Returned From Active Service". Crown at top over wings. Rising Sun and Anchor. Boomerang at base with "Returned From Active Service, rear has 2 lugs and pin. Rear is stamped with a number. .2) Membership badge, metal, centre has 3 figures, crown at top with pin date 1954 membership. Front of badge "Returned Sailors, Soldiers and Airmans Imperial league of Australia. Numbered stamped badge on rear with 2 lugs and pin. .3) Membership badge, metal centre has 3 figures crown at top with pine date 1994 membership. Front of badge "Returned Services League Australia". Numbered stamped badge on rear with 2 lugs and pin. .4) Membership badge, metal, 5 star shape with wreath around. Centre in light blue circle "Ex POW R.A". Small pin at bottom in red with "50" denoting membership 1950. rear has 2 lugs and is stamped with number. .5) Membership badge, metal, crown at top, centre has depiction of barbwire through blue background. At bottom is a "v" then scroll with "Ex Prisoner of War Assn" in red. rear lhas 2 lugs and pin. .6) Membership badge, metal cone shape with small hole at top. Pin with "73" under denoting membership 1970. At bottom in blue "Rising Sun, Wings and Anchor surrounded by "Chelsea Returned Servicemens Club". Rear is numbered stamp..1) Issued by Commonwealth Government of Australia” .2) “Property of League V41531” .3) “Property of League V80354” .4) "593" .6) "470"”numismatics - medals /military, membership -
 Bendigo Military Museum
Badge - BADGES, MEMBERSHIP, 1939 - 1945, post 1945
... In blue circle around figures is "Returned, Sailors, Soldiers and Airmen". under in red scroll is "Imperial League of Australia". ...In blue circle around figures is "Returned, Sailors, Soldiers and Airmen". under in red scroll is "Imperial League of Australia". ....1) Hat badge, Rising Sun, pressed blackened brass, rising sun depiction with crown centre, under in scrolls "Australian Commonwealth Military Forces". On rear two lugs, sewn onto the lugs is a piece 1914 - 1918. Star Ribbon. .2) Lapel badge, Rising Sun, pressed blackened brass, 2 lugs and pin. Same as 2234.2 .3) Same as .2) .4) Badge, Life membership 39th Battalion. Top is oval shape of badge, grey surround with brown over red with "39" centre. Under in a scroll is "Life Membership". On rear is pin and clip. .5) Badge, R S L membership metal centre is a 3 figures. In blue circle around figures is "Returned, Sailors, Soldiers and Airmen". under in red scroll is "Imperial League of Australia". Top is crown with "93" denoting membership 1993. Rear has a pin attachment. Badge number stamped on. ,5 "Badge remains property of the league V 75371”badges, memmbership, uniform, rsl, rising sun -
 Bendigo Military Museum
Badge - BADGE RSL, Stokes & Sons, Possibly post 1945
... Centre circle has 2 figures of soldiers with text "Returned Sailors & Soldiers Imperial League Australia" in blue enamelled section. ...Centre circle has 2 figures of soldiers with text "Returned Sailors & Soldiers Imperial League Australia" in blue enamelled section. ...RSL membership badge, made of enamelled brass. Centre circle has 2 figures of soldiers with text "Returned Sailors & Soldiers Imperial League Australia" in blue enamelled section. Top of badge has a red crown with "75", indicating paid membership for that year. Rear has pins for attaching to clothes."V6878" on rear.numismatics-badges, societies-service clubs, military history, rsl -
 Bendigo Military Museum
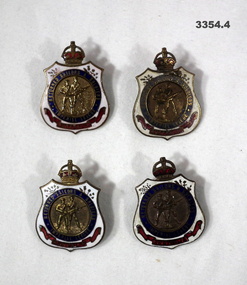
Badge - BADGES RSL, 1) 1919-26 .2) 1941-66
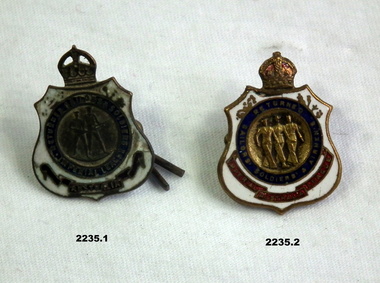
... Centre has two figures of soldiers, blue circle has text "Returned Sailors, Soldiers Imperial League", red banner has text "Australia." .2) RSL membership badge from 1941-66. ...Centre has two figures of soldiers, blue circle has text "Returned Sailors, Soldiers Imperial League", red banner has text "Australia." .2) RSL membership badge from 1941-66. ...Badges belonged to Victor Henry Evans No 418655 RAAF. Refer Cat No 1760.4.1) RSL membership badge from 1919-26. Enamelled white shield shape with blue circle and red banner, topped with crown. Centre has two figures of soldiers, blue circle has text "Returned Sailors, Soldiers Imperial League", red banner has text "Australia." .2) RSL membership badge from 1941-66. Same design as .1) but crown has blue enamel clip over with the figure "89" denoting financial membership 1989. .1) "A11526" .2) "V87093"badges, membership rsl -
 Bendigo Military Museum
Badge - ACTIVE SERVICE, AUSTRALIA, RSL BADGES, 1) 1939-45, .2) & .3) post WW11
... .1) Shoulder Badge "Australia" blackened metal with 2 lugs on rear. .2) Badge, "Returned from Active Service", Crown over wings, Rising sun, Anchor, Boomerang, 2 lugs on rear for uniform. .3) Badge, RSL Membership, 3 central figures, "Returned Sailors, Soldiers, Airmans Imperial League of Australia. ...Badges military membership .2) "288601 - Issued by the C'Wealth Govt" .3) "V90347 Property of the League" .1) Shoulder Badge "Australia" blackened metal with 2 lugs on rear. .2) Badge, "Returned from Active Service", Crown over wings, Rising sun, Anchor, Boomerang, 2 lugs on rear for uniform. .3) Badge, RSL Membership, 3 central figures, "Returned Sailors, Soldiers, Airmans Imperial League of Australia. ...Items relate to Alfred Charles Jury VX66822. Refer 2080 medals for service details also 2083P..1) Shoulder Badge "Australia" blackened metal with 2 lugs on rear. .2) Badge, "Returned from Active Service", Crown over wings, Rising sun, Anchor, Boomerang, 2 lugs on rear for uniform. .3) Badge, RSL Membership, 3 central figures, "Returned Sailors, Soldiers, Airmans Imperial League of Australia. Clip on top with figure "92" meaning financial member 1992..2) "288601 - Issued by the C'Wealth Govt" .3) "V90347 Property of the League"badges, military, membership -
 Bendigo Military Museum
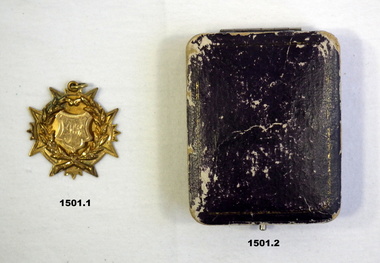
Memorabilia - MEDALLION EUSTON, BADGES, COLOUR PATCH, BOX, 1 2/5/19 .3 1916 others post WWI
... Imperial League Australia 63256" .5 "Returned from Active Service 262541" .1 Medallion, brass, star shaped with circular floral arrangement. Centre is shield with what appears to be "HP" with floral arrangement. Rear is engraved, top has small ring for a chain. .2 Small box, hinged, rectangular shape. Felt lined and held .1. .3 Colour patch, oval shaped, purple over red, 38th Btn AIF. .4 RSL membership badge, large version with 2 central figures ...Hughy Pippin. Refer 1502 medals, 1513.4 documents..1 Medallion, brass, star shaped with circular floral arrangement. Centre is shield with what appears to be "HP" with floral arrangement. Rear is engraved, top has small ring for a chain. .2 Small box, hinged, rectangular shape. Felt lined and held .1. .3 Colour patch, oval shaped, purple over red, 38th Btn AIF. .4 RSL membership badge, large version with 2 central figures. Stamped number on rear, 2 lugs on rear tor attaching to clothing. .5 badge, bronze, circular with crown atop and rising sun in centre. Underneath rising sun is a scroll with "Australian Military Forces" and underneath "AIF".1 "Presented to No 1895 Lance Corporal Hugh Pippin 38th Battalion AIF by the Euston Reception committee for returned soldiers 2.5.19" .4 "Returned Sailors & Soldiers Imperial League Australia 63256" .5 "Returned from Active Service 262541"numismatics-medallions, badges, uniforms-army, badges, containers-commercial, metalcraft-brassware, bronzeware, service clubs -
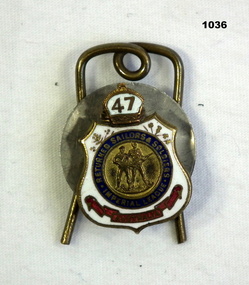 Bendigo Military Museum
Badge - RSL BADGE, Post WW1
... Imperial League of Australia. Badge belonged to Thomas William Tuckerman No 7318 AIF. Refer 935P, 1265.3. rsl military history rsl badges Numbered "V 90195" on the rear. Badge R.S.S.I.L.A (RSL) membership. Two central figures ...RSSILA. Returned Sailors, Soldiers Imperial League of Australia. Badge belonged to Thomas William Tuckerman No 7318 AIF. Refer 935P, 1265.3.Badge R.S.S.I.L.A (RSL) membership. Two central figures with a small crown at the top. Over the crown is a clip with "47" denoting membership paid 1947. On the rear is a metal washer and pin.Numbered "V 90195" on the rear.rsl, military history, rsl badges -
 Bendigo Military Museum
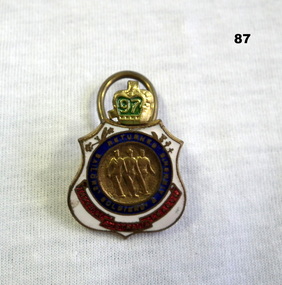
Accessory - RSL BADGE
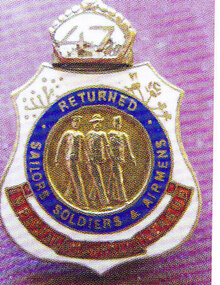
... Badges RSL Membership On front: Returned Soldier's, Sailors and Airmen, Imperial Australia League On rear: Badge No 56258 V Property of the League Badge RSL, metal, centre depicts 3 figures, crown at top with a clip over with the number 97. ...Membership badge for Howard Maxwell DAY VX31282 2nd AIF. Refer Reg No 92.2 for service details, other 88, 89, 90, 91.2. Badge RSL, metal, centre depicts 3 figures, crown at top with a clip over with the number 97. This denotes a financial member of the RSL in 1997. Rear has metal attachments for fixing.On front: Returned Soldier's, Sailors and Airmen, Imperial Australia League On rear: Badge No 56258 V Property of the Leaguebadges, rsl membership -
 Bendigo Military Museum
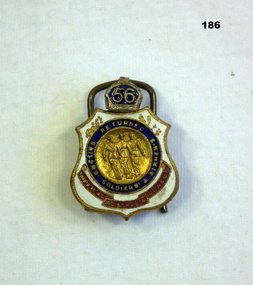
Badge - RSL BADGE, Stokes
... Refer 187.3, 190P, 192.2. numismatics badges military RSL "Returned Sailors Soldiers & Airmans Imperial League of Australia" On the back is marked "V 67359" Badge, RSL membership, centre has 3 figures in uniform. ...The badge belonged Frederick Victor Clive Lowery VX28403, 2nd AIF. Refer 187.3, 190P, 192.2.Badge, RSL membership, centre has 3 figures in uniform. At the top is a crown with a small clip with the No "56" denoting membership 1956. On the rear is a removable clip. "Returned Sailors Soldiers & Airmans Imperial League of Australia" On the back is marked "V 67359"numismatics, badges, military, rsl -
 Warrnambool RSL Sub Branch
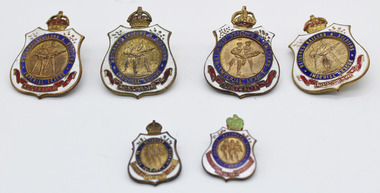
RSL BADGE COLLECTION _ Returned Sailors & Soldiers Imperial League Australia Badge and Returned Sailors' Soldiers' & Airmen's Imperial League Australia, RSL Membership Badges, Manufacturer - Stokes & Sons Melbourne for four badges, (Stokes closed in 1962). Small badges No 48030 (wiith 67 year clasp) has the makers inscription of - Property of League, Swann & Hudson VIC
... Imperial League. Below the circle a red enamel ribbon is depicted with the word - Australia enclosed. The brass centre of the badge has the figures of a Sailor & Soldier each carrying a rifle. ...Imperial League. Below the circle a red enamel ribbon is depicted with the word - Australia enclosed. The brass centre of the badge has the figures of a Sailor & Soldier each carrying a rifle. ...donation source and providence unknown - common item issued to individual RSL Members across VictoriaAs an historic RSL Badge from WW1 & WW2 membership periods It is also in very good condition. The 'First Field Dressing' has a khaki cotton cover with a single stitched opening flap on the right hand end of the cover. The 'Contents' and 'Directions for Use' are written on the front exterior as follows: FIRST FIELD DRESSING TO OPEN: Outer. Cotton Break thread holding flap Inner. Waterproof Covers Tear apart at the uncemented corner (indicated by arrow). CONTENTS: Two dressings in Waterproof Covers,each consisting of gauze stitched to a bandage and a safety pin. Directions for Use - Take the folded ends of the bandage in each hand, and, keeping the bandage taut, apply the gauze pad to the wound and fix the bandage. one dressing to be used for each wound. In each case of head wounds when respirators have to be worn, care should be taken to adjust the pad so that it does not interfere with the fit of the facepiece. DO NOT HANDLE THE GAUZE OR WOUND Three x Large Badges (30mm (W) x 40mm (H) - With membership numbered on the rear of 45147, 70848, 74487 & 74642 stamped on the rear These badges a brass with white blue and red enamel inlay. The badge is in the shape of shield with a regal crown on top. The shield is white enamel, with a blue enamel circle (containing the words - Returned Sailors & Soldiers Imperial League. Below the circle a red enamel ribbon is depicted with the word - Australia enclosed. The brass centre of the badge has the figures of a Sailor & Soldier each carrying a rifle. Two x Small Badges (18mm (W) x 24mm (H) - The smaller badge has the same material and colours but includes the third figure of an Airmen holding a rifle in the centre. The location of the organisation name has changed to Returned Sailors' soldiers' & Airmen's in the blue circle and red ribbon contains - Imperial League Australia. One of the small badges has a green 67 year clasp fastened with three clasps around the crown. In this period Financial members received a new clasp for each year of financial membership. -
 Port Melbourne Historical & Preservation Society
Badge (Item) - Imperial League of Australia Badge, c.1950
... Robert Cornelius WATTERS Armed Services - Navy Royal Australian Naval Reserve Imperial League of Australia Returned Soldiers Sailors Airmen, Imperial League Australia. 66 White, blue & gold enamelled badge topped by a crow with 3 figures in the centre. ...The Imperial League of Australia badge returned service badge belonged to Robert Cornelius WATTERS, a member of the Royal Australian Naval Reserve. He served as a Leading Sick Berth Attendant from 11 September 1940 - 21 March 1944.Returned Soldiers Sailors Airmen, Imperial League Australia. 66robert cornelius watters, armed services - navy, royal australian naval reserve, imperial league of australia -
 Bendigo Historical Society Inc.
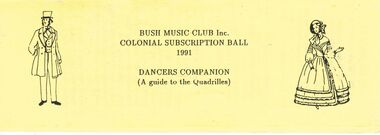
Document - PETER ELLIS COLLECTION: BUSH MUSIC CLUB COLONIAL BALL, 1991
... figures walked. Set & Turn is a 'balance' set and open two hand turn. The Prince Imperial's Quadrille Figure 1. (4x24) 4 Top couples visit right, honour sides. 4 Top men retire with partner & side lady to opposite place, (ladies facing each other). 8 Ladies grand chain to places 8 All set and turn partners 24 Top couples repeat back to place. 48 Repeat with side couples. ...figures walked. Set & Turn is a 'balance' set and open two hand turn. The Prince Imperial's Quadrille Figure 1. (4x24) 4 Top couples visit right, honour sides. 4 Top men retire with partner & side lady to opposite place, (ladies facing each other). 8 Ladies grand chain to places 8 All set and turn partners 24 Top couples repeat back to place. 48 Repeat with side couples. ...Small yellow booklet outline of a man on left of title and woman on right. Bush Music Club Inc. Colonial Subscription Ball 1991 Dancers Companion (A guide to the Quadrilles) The Quadrille Figure 1 (Le Pantelon) (2x32) 8 Top couples R and L through. (without giving hands). 8 Set & turn Partners 8 Top ladies chain. 4 Top couples promenade across set. 4 Half R and L to place. 32 Side couples repeat Figure 2 (Le 'Ete) (4x24) 4 Top couples advance & retire. 4 Cross over (without changing places with partner). 8 Repeat back to place. 8 Set & turn partners. 24 Sides repeat. 48 Top and Sides repeat. Figure 3 (La Poule) (4x32) 4 Lady 1, Man 2 adv, tough RH, retire to opposite place. 4 Lady 1, Man 2 adv, join LH give RH to partner 4 Line of 4 balance fwd & back twice. 4 Men lead partners to opp. Place. 4 Lady 1, Man 2 adv. & ret. 4 Lady 1, Man 2 adv, honour & ret. 4 Top couples, advance & retire. 4 Half R & L to place. 32 Repeat with Lady 2, Man !. 32 Repeat with Lady 3, Man 4. 32 Repeat with Lady 4, Man 3. The Quadrille Figure 4. (La Pastourelle) (4x32) 4 1st couple advance & retire. 4 1st couple adv, lady join 2nd couple. 4 Line of 3 adv. & ret, 1st man retire. 4 Line of 3 adv. Ladies cross to 1st man. 4 Line of 3 adv. & ret, 2nd man retire. 4 Re-advance, form circle with 2nd man. 4 Circle L half way round. 4 Half R & L to place. 32 Repeat with 2nd couple leading. 32 Repeat with 3rd couple leading. 32 Repeat with 4th couple leading. Figure 5 (La Finale) (4 x 32 + 8) 4 All advance & retire. 4 Turn partners. 4 Ladies adv, curtsey & retire. 4 Men advance, bow & retire. 8 All set & turn corners. 8 Promenade with corner. (men to original place with corner) 96 Repeat 3 times to return to partner. 4 All advance & retire. Turn Partners. Notes: 1 Couples numbered 1 4 2 3 2 Set & turn is a 'balance' set and open hand turn. The Lancers Quadrille Figure 1 (4x24) 4 1st lady, 2nd man advance & retire, 4 Adv, turn two hands, return to place. 4 1st couple lead through across set 4 2nd couple lead through back 8 all set & turn corners. 24 Repeat, 2nd lady, 1st man leading 24 Repeat 3rd lady, 4th man leading 24 Repeat, 4th lady, 3rd man leading Figure 2 (4x24) 4 1st couple advance & retire. 2 1st lady adv to centre, turn to face partner 2 1st couple honour each other. 8 1st couple set and turn then sides form top & bottom lines 4 Lines advance & retire, 4 Advance and turn partners to place. 24 Repeat with 2nd couple leading 24 Repeat with 3rd couple leading 24 Repeat with 4th couple leading Figure 3. (2x32) 4 Ladies advance, curtsey & retire. 4 Men adv, bow, turn by left, bow to partners, then join RH in centre, (ladies RH on partners left elbow). 8 Promenade round set to place. 4 Ladies adv, curtsey & retire again. 4 Men adv, bow, turn by right, bow to partners, join LH in centre, right arm behind partner. 8 Promenade round to set in place. 32 Repeat. The Lancers Quadrille. Figure 4. (4x24) 8 Top couples visit R then L 4 Right Hands around with LH couple 4 then left hands around. 8 Circle left with that couple. 24 Repeat with side couples leading. 24 repeat, top couples visit L then R. 24 Repeat, side couples visit L then R. Figure 5. (4x48 +24) 8 All grand chain 1/2 way round and honour partners. 8 Continue grand chain to place and honour partners. 8 1st couple visit, return to place, facing out with sides in behind. 2 Change places with partner, 2 All rock fwd and back 2 change places again 2 All rock fwd and back 8 Cast out reform in lines 4 Lines advance & retire 4 Advance & turn partners to place 48 Repeat with 2nd couple leading 48 Repeat with 3rd couple leading 48 Repeat with 4th couple leading. 8 Grand chain 1/2 way round and honour partners. 8 continue grand chain to place and honour partners 8 swing partners (R arm round partner, LH in air) Note: All figures walked. Set & Turn is a 'balance' set and open two hand turn. The Prince Imperial's Quadrille Figure 1. (4x24) 4 Top couples visit right, honour sides. 4 Top men retire with partner & side lady to opposite place, (ladies facing each other). 8 Ladies grand chain to places 8 All set and turn partners 24 Top couples repeat back to place. 48 Repeat with side couples. Figure 2 (4 x 24) 4 1st Lady, 2nd man adv & turn in centre finish facing 2nd lady. 2 2nd lady pass through to 1st man. 2 Both couples turn out to place. 4 top couples advance & retire. 4 Ladies chain back to place. (Nariel) 8 Chasse-croise. (4 steps past partner RH turn corner 4 steps back, LH turn with partner.) 24 Repeat with 2nd lady, 1st man leading 24 Repeat with 3rd lady, 4th man leading 24 Repeat wth 4th lady, 3rd man leading. Figure 3 (4x32) 4 1st lady to centre, curtsey to partner. (RH in RH, ACW turn in to centre) 4 2nd lady to centre, curtsey to partner. 4 3rd lady to centre, curtsey to partner.4 4th lady to centre, curtsey to partner. 8 ladies join hands, circle R, small steps after circle R, Men join circle, (giving RH to partner). 4 Balance for 4 (step lift x 4) 4 Turn partners to place, bow & curtsey. 32 Repeat, Lady 2, 1, 4 & 3 to centre 32 Repeat Lady 3, 4, 2 & 1 to centre 32 Repeat, Lady 4, 3, 1 & 2 to centre The Prince Imperial's Quadrille Figure 4 (4x32) 4 Top couples advance & retire. 4 Top couples adv, ladies move to R, as men retire to place. 8 Line of 3 adv & ret twice. 4 Single men adv, bow and retire. 4 Re-advance and turn to face partner. 4 Circle L half way round (with partner & side couple). 4 Half R & L to place. 32 Repeat with side couples leading. 32 Repeat with top couples leading (men moving to left as ladies retire) 32 Repeat with Side couple leading. (Men moving to left as ladies retire) Figure 5 (4x32 +32) 16 Ladies to the right, (RH turn with corner man then continue round to the right turning each man) 4 1st Lady, 2nd man advance & retire 4 re-advance & turn RH (finish facing partners) 8 set & turn partners (finishing in place) 32 Repeat with 2nd Lady, 1st man leading 32 repeat with 3rd lady, 4th man leading 32 Repeat with 4th Lady, 3rd man leading 16 Ladies to the right again. 4 Men turn partners to centre. 4 All bow and curtsey. 8 Promenade set ( hall) Note: Set & turn is a 'balance' set and open hand turn. The Parisienne Quadrille Figure 1 (1x32) 8 Couples R and L through. (without giving hands) 8 set & turn partners 8 Ladies chain. 4 Couples promenade across set. 4 Half R and L to place. Figure 2 (2x24) 4 Couples advance & retire. 4 Cross over (without changing places with partners) 8 Repeat back to place. 8 Set & turn partners. 24 Repeat. Figure 3 (2x32) 4 Lady 1, Man 2 adv, touch RH, retire to opposite place. 4 Lady 1, Man 2 adv, join LH, give RH to partner. 4 Line of 4 balance fwd & back twice 4 Men lead partners to opp. Place 4 Lady 1, Man 2 adv & retire 4 Lady 1, Man 2 adv, honour & ret. 4 Couples, advance & retire. 4 Half R & L to place. 32 Repeat with Lady 2, Man 1. The Parisienne Quadrille Figure 4. (2x32) 4 1st couple advance & retire. 4 1st couple adv, lady join 2nd couple. 4 Line of 3 adv. & ret, 1st man retire. 4 Line of 3 adv. Ladies cross to 1st man. 4 Line of 3 adv. & ret, 2nd man retire. 4 Re-advance, form circle with 2nd man. 4 Circle L half way round. 4 Half R & L to place. 32 Repeat with 2nd couple leading. Figure 5 (2x32) 4 Couples advance & retire 4 Cross over 8 Repeat back to place. 8 Ladies chain across & back.8 Set & turn partners. 32 Repeat Notes: 1 This 'quadrille' is similar to the first set (1st 4 figures) and is danced as two couple sets. 2 Set & turn is a 'balance' set and open hand turn. Wellington Waltz 8 Honour Partner, honour corner 8 Circle L 7 steps, then tap, tap 8 Circle R 7 steps, then tap, tap 4 Top couples, 2 side-steps to centre and back with lady turning under man's left arm. 4 Waltz across to opposite side 8 Side couples repeat. 8 Top ladies chain across. (pause in centre, turn twice with opp. Man) 8 Side ladies chain across. 8 Grand Chain half way round set. 8 Waltz to man's place. 64 Repeat with side couples leading. Waltz Cotillon 8 Honour Partner, honour corner 16 1st couple waltz the set. 8 Top ladies cross over.8 Side ladies cross over. 8 Top men cross over. 8 Side men cross over. 16 All waltz back to place. Form top & bottom lines, 8 Adv. & ret, cross over. 8 Adv. & ret, cross back. 16 Waltz chain to meet partner. 16 All waltz back to place. Form top & bottom lines, 8 Adv. & ret, cross over. 8 Adv. & ret, cross back. 16 Waltz chain to meet partner. 16 All waltz back to place. 112 Repeat with 2nd couple leading. 112 Repeat with 3rd couple leading. Side lines adv. & ret. 112 Repeat with 4th couple leading. Side lines adv. & ret. Galopade Quadrille 8 Honour Partner, honour corner 8 All galop round set. (Galop half way round set, on opp. Side change places with partner, continue galop to place.) 8 Top couples R & L through. 8 Side couples R & L through. 8 All set & swing partners. 8 All galop round set. 8 Top ladies chain. 8 Side ladies chain. 8 All set & swing partners. 8 All galop round set. 8 1st couple lead through, 2nd on return 8 3rd couple lead through, 4th on return 8 All set & swing partners. 8 All galop round set. 4 1st lady & 2nd man adv. & ret. 4 2nd lady & 1st man adv. & ret. 4 3rd lady & 4th man adv. & ret. 4 4th lady & 3rd man adv. & ret. 8 All set & swing partners. 8 All galop round set. 4 Ladies advance & retire. 4 Men advance & retire. 8 Double ladies chain. 8 All set & swing partners. 8 All galop round set. 8 Top couples waltz the set 8 Side couples waltz the set 8 All set & swing partners. 32 Waltz the hall. The Caledonians Quadrille Figure 1. (2x32) 4 Top couples R.H. across, move CW (Ladies hands joined over Mens). 4 then L.H. across, move ACW. 8 Set & swing Partners 8 Top ladies chain. 4 Top couples promenade across set. 4 Half R and L to place. 32 Side couples repeat. Figure 2. (4x24) 8 1st Man advance & retire twice. 8 Set & swing corners. 8 Promenade with corners (to men's position.) 24 2nd man repeat. 48 3rd and 4th man repeat. Figure 3. (4x32) 4 Lady 1, Man 2 advance & retire. 4 Re-advance, 2 hand turn to place. 8 1st & 2nd couples lead through and back. (1st lead through across, 2nd back) 8 Set & swing corners. 4 All advance & retire. 4 Swing partners. 32 Repeat wth Lady 2, Man 1. 32 Repeat with Lady 3, Man 4. 32 Repeat with Lady 4, Man 3. The Caledonians Quadrille Figure 4. (4x24) 2 Lady 1, Man 2 advance and stop. 2 Lady 2, Man 1 advance and stop. 4 Turn partners back to place. 2 All ladies to the right 4 steps. 2 All men to the left 4 steps. 2 All ladies to the right 4 steps. 2 All men to the left 4 steps. 4 Promenade to place. 4 Swing partners. 24 Repeat wth Lady 2, Man 1 leading. 24 Repeat wth Lady 3, Man 4 leading. 24 Repeat wth Lady 4, Man 3 leading. Figure 5. (4x48 + 16) 8 1st couple visit. 4 Ladies advance, curtsey & retire. 4 Men advance, bow & retire. 8 All set & swing partners. 8 Grand chain 1/2 way round and honour partners. 4 Promenade to place 4 and swing partners. 8 Chasse-croise, (4 steps past partner, RH to corner balance fwd & back, then 4 steps back, LH to partner balance fwd & back). 48 Repeat with 2nd couple leading. 48 Repeat wth 3rd couple leading. 48 Repeat wth 4th couple leading. 8 All promenade set. 8 Swing partners. Note: Set & swing is 'normal' set and cross hand swing. The Lancers Quadrille (BMC version) Figure 1. (4x32) 8 1st Lady, 2nd man advance & swing in centre (with ballroom hold). 4 Partners move 1/2 way across, Centres keep swinging. 4 Promenade partner to opp. Place. 8 1st couple lead through to place. 8 All swing corners. 32 Repeat with 2nd lady, 1st man. 32 Repeat with 3rd lady, 4th man. 32 Repeat with 4th lady, 3rd man. Figure 2. (4x32) 8 1st couple lead up (to 2nd) & retire. 8 1st couple swing in place Form top & bottom lines. 8 Lines adv & retire twice. 8 Swing partners. 32 Repeat with 2nd couple leading. 32 Repeat with 3rd couple leading. (Forming side lines instead) 32 Repeat with 4th couple leading. (Forming side lines instead) Figure 3. (2x32) 4 Introduction - Ladies to the centre and men form a circle around them. 8 Men circle left. 8 Men circle right. Men form a grand cross (LH) Right arm behind partners. 16 Promenade round set. Ladies return to the centre. 32 Repeat - Circle L & R, & Grand Cross. The Lancers Quadrille (BMC version) Figure 4. (2x48) 8 Top couples visit. 4 Tops RH star. 4 then LH star. 8 Tops basket Left. 8 Tops basket Right. 8 Tops circle Left. Tops circle Right. 48 Repeat with side couples leading. Figure 5. ((4x 16+32) + 24) 8 All grand chain 1/2 way round and honour partners. 8 Promenade with partners to place. 8 1st couple lead up, turn and lead out with side falling in behind. 8 Cast out, reform top & bottom lines. 4 Lines advance & retire. 4 Advance & swing partners to place. 8 Swing partners in place. 48 Repeat with 2nd couple leading. 48 Repeat with 3rd couple leading (forming side lines) 48 Repeat with 4th couple leading. (forming side lines) 8 All grand chain 1/2 way round and honour partners. 8 Promenade with partners to place. 8 Swing partners in place. Note: Normal swing here is with hands crossed. 1. The Quadrille 2.The Lancers Quadrille 3. The Prince Imperials 4. The Parisienne Quadrille 5. The Wellington Waltz 6. The Waltz Cotillon 7. The Galopade Quadrille 8. The Caledonians Quadrille 9. The Lancers Quadrille (BMC)person, individual, peter ellis oam -
 Geelong RSL Sub Branch
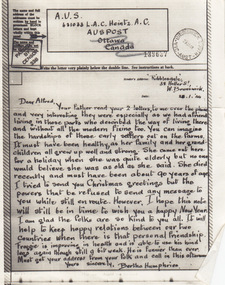
'Letters' 431003 Alfred C Heintz, There are no makers mark, Mid 20th Century
... The front of the folder has the RSL Badge embossed on the front (on two figures on the badge) and inscribed 'With Best Wishes from the Returned Sailors, Soldiers and Airmen's Imperial League of Australia'....WW2 Folder 431033 LAC A C Heintz Air Force The front of the folder has the RSL Badge embossed on the front (on two figures on the badge) and inscribed 'With Best Wishes from the Returned Sailors, Soldiers and Airmen's Imperial League of Australia'. ...431033 LAC Alfred C Heintz with the Air Force during WW2 and these letters have been sent to him from his Family.This Folder is the original that belonged to 431033 LAC Alfted C Heintz, there are photocopies of the letters inside the Folder.A series of 'Letters' to 431033 LAC Alfred C Heintz. The letters have been photocopied and are contained in a dark blue leather folder that was a gift from the RSL.The front of the folder has the RSL Badge embossed on the front (on two figures on the badge) and inscribed 'With Best Wishes from the Returned Sailors, Soldiers and Airmen's Imperial League of Australia'.ww2, folder, 431033 lac a c heintz, air force -
 Geelong RSL Sub Branch
Badge - RSSILA, Early 20th Century
... figures in the centre of the badge - Sailors and Soldiers. These badges are originals that were issued to Returned Service Personnel in the period 1922-1940 RSSILA Badge 1922 -1940 period Front - Returned Sailors and Soldiers Imperial League, Australia Back - Stokes Melb, 85803, Badge remains property of League Brass badge, crown on top, red,white and blue on the front, two figures in the centre of the badge - small version of the badge. ...These Badges were made between 1922-1940 , there are two figures in the centre of the badge - Sailors and Soldiers.These badges are originals that were issued to Returned Service Personnel in the period 1922-1940Brass badge, crown on top, red,white and blue on the front, two figures in the centre of the badge - small version of the badge. Front - Returned Sailors and Soldiers Imperial League, Australia Back - Stokes Melb, 85803, Badge remains property of Leaguerssila badge, 1922 -1940 period -
 Geelong RSL Sub Branch
Badge - RSS&AILA, Circa 1940
... figures in the round centre of the badge, these badges were made from 1940 . RSS&AILA Badge Made From 1940 Swann & Hudson Vic K G Luke Melb Front - Returned Sailors' Soldiers' & Airmen's Imperial League Australia Back - Badge Remains Property of League, 58242 V, Swann & Hudson, Vic Brass badge, enamel front, three people in the round centre on a gold background, the round centre is blue, white background, red ribbon area for 'Imperial League Australia Badge - RSS&AILA ...These badges have been issued to returned service personnel, there are three figures in the round centre of the badge, these badges were made from 1940 .Brass badge, enamel front, three people in the round centre on a gold background, the round centre is blue, white background, red ribbon area for 'Imperial League AustraliaFront - Returned Sailors' Soldiers' & Airmen's Imperial League Australia Back - Badge Remains Property of League, 58242 V, Swann & Hudson, Vicrss&aila badge, made from 1940, swann & hudson vic, k g luke melb -
 Flagstaff Hill Maritime Museum and Village
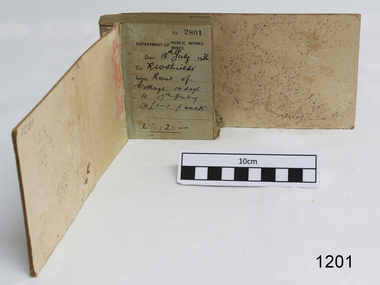
Financial record - Receipt Book, Department of Works and Mines Victoria, July 1936 (first record)
... imperial currency living costs 1936 Department of Works Department of Mines J F Condou 1933 13-3-33 Printed on spine "GENERAL RECEIPTS / 15 / 2801 / TO 3000" Printed on each receipt 'DEPARTMENT OF / PUBLIC WORKS. / MINES." Fill in using ink pen "(DATE) 18th July 1936 / (TO) - - - shields' / BEING) Rent of / Cottage: 14 days / (TO) 17th July / @ (symbol for pound) 1-1. p. week / . (symbol for pound) 2:2:-"Inside cover there is some red pencil writing, words and figures ...Establishment and Functions Prior to 1860, the Chief Secretary's Department had been responsible for the administration of the gold fields and associated mining activities. In November 1860 a Commissioner of Mines was appointed and a Department was established under his administration. For the period November 1861 to June 1863, the Postmaster General was responsible for the Mining Department. A Minister of Mines was again appointed in 1863. Responsibilities of the Department of Mines were: 1. Regulation of mining and related public works activities through the issue of miners rights, business and residence licences, mining leases, mineral and other prospecting licences 2. Superintendence of the activities of mining surveyors, registrars, wardens and Mining Boards. 3. Investigation of the state's geological structure, mineral wealth and underground water resources 4. Development of the mining industry 5. Supervision of the safe working of mines, machinery and quarries including checking the credential of mine managers, inspectors and operators 6. Regulation of the disposal of sludge and other waste products 7. Administration of the Victorian Mining Accident Relief Fund. Arising from its initial responsibility for the supply of water on the gold fields, the Department became responsible for rural water supply from the mid 1860s. Statutory responsibility for rural water works during this period rested with the Board of Land and Works. In 1865 the Waterworks Act gave the Board power to construct waterworks, purchase land, levy charges and lease or sell works, while the Public Loans Act 1865 empowered it to provide loans to local water trusts for waterworks. The actual administration of these statutory provisions was undertaken by the Victorian Water Supply Department which operated from 1865 to 1889 as a sub-department of the Department of Mines, from 1889 as a department in its own right, and from 1895 to 1909 as a sub-department of the Department of Mines and Water Supply. For a brief period from 1891 to 1893 the Department of Mines was also responsible for forests and, until 1880, for the Schools of Mines subsequently transferred to the Education Department. In 1895 the Department of Mines and the Victorian Water Supply Department were amalgamated to form the Department of Mines and Water Supply. A snapshot into social history around the 1930s when the Department of works and the Mines Departments were still linkedReceipt Book for the Department of Works; Mines. Receipt No 2801 - 3000. 1st receipt Number 2801, "18th July 1936, for Rent of Cottage: 14 days for 2 pounds, 2 shillings. The inscription on the back is signed by J F Condau in 13-3-33Printed on spine "GENERAL RECEIPTS / 15 / 2801 / TO 3000" Printed on each receipt 'DEPARTMENT OF / PUBLIC WORKS. / MINES." Fill in using ink pen "(DATE) 18th July 1936 / (TO) - - - shields' / BEING) Rent of / Cottage: 14 days / (TO) 17th July / @ (symbol for pound) 1-1. p. week / . (symbol for pound) 2:2:-"Inside cover there is some red pencil writing, words and figures unreadable. Handwritten on back cover "Numbers checked / and found corredt / J S Coudou (?) / 13-3-33" One some receipts "Wharfage / S.S. Koonara"flagstaff hill, warrnambool, shipwrecked coast, flagstaff hill maritime museum, maritime museum, shipwreck coast, flagstaff hill maritime village, great ocean road, department of works: mines, receipt book, rent 1936, imperial currency, living costs 1936, department of works, department of mines, j f condou, 1933, 13-3-33