Showing 398 items matching "king s"
-
 Phillip Island and District Historical Society Inc.
Book, GILL, William Wyatt, Myths and songs from the South Pacific / by Rev. William Wyatt Gill ; With a preface by F. Max Mu?ller, 1876
... ...Henry S. King & Co....Book GILL, William Wyatt Henry S. King & Co. ...Labelled 'Cowes Municipal Public Library', 'Phillip Island Historical Society, Cleeland Bequest'.mythology, polynesian, mangaia, cook islands, religion, songs, polynesia -
 Federation University Historical Collection
Book, W. Stanley Jevons, Money and the Mechanism of Exchange, 1876
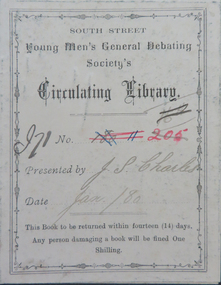
... ...Henry S. King & Co....Stanley Jevons Henry S. King & Co. ...Crimson and black cloth bound book of 350 pages. Formerly part of the South Street Young Men's General Debating Society's Circulating Library.non-fictionmoney, south street, south street debating society, south street young men's general debating society circulating library, bookplate, j.s. charles, john p. charles, library, barter, currency, metals as money, coining, coins, standards, exchange, promissory notes, paper currency, credit documents, foreign bills of exchange, bank of england, corn rents, legal tender -
 Linton Mechanics Institute and Free Library Collection
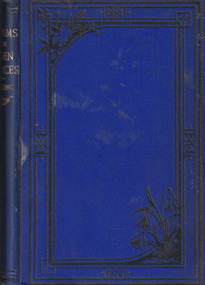
Book - Novel, Ranking, B. Montgomerie, Streams From Hidden Sources by B. Montgomerie Ranking, 1872
... ...Henry S. King & Co....Montgomerie Henry S. King & Co. Spottiswoode & Co. ...Seven stages of time.Hardcover book, 227 pages. Cover of book is royal blue with decorative black bordering. Gold embossed text on spine.fictionSeven stages of time.b. montgomerie ranking, fiction -
 Anglesea and District Historical Society
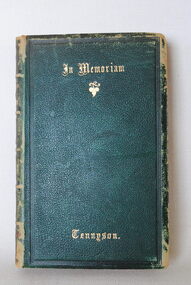
Book, Tennyson in Memorium, 1876
... Henry S. King and Co. London...Tennyson in Memorium Book Henry S. King and Co. London ..."In Memorium" consists of 131 smaller poems of varying length. The stanzas are isometric with the rhyme scheme ABBA, a form that has become known as the "In Memorium Stanza". Tennyson wrote this book after he learned that his beloved friend Arthur Henry Hallum had died suddenly and unexpectedly of fever at 22. It was written over the course of 17 years (1833-1849).Front: In Memorium (gold with gold leaf) / Tennyson Also on spine.tennyson, poetry -
 8th/13th Victorian Mounted Rifles Regimental Collection
Letter - From 14/20 Kings Hussars 1961
... Letter on 14/20 King 's Hussars letterhead paper dated 5 July 1961...8th/13th Victorian Mounted Rifles Regimental Collection 4/19 Prince of Wales's Light Horse Simpson Barracks McLeod melbourne Hussar guidon Letter on 14/20 King 's Hussars letterhead paper dated 5 July 1961 Letter From 14/20 Kings Hussars 1961 ...Letter on 14/20 King 's Hussars letterhead paper dated 5 July 1961hussar, guidon -
 4th/19th Prince of Wales's Light Horse Regiment Unit History Room
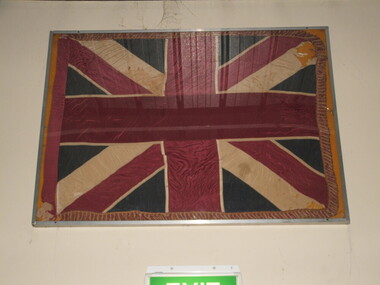
Flag - King's Colour, 5th Battalion AIF, 1919 (estimated)
... ...king s colours...4th/19th Prince of Wales's Light Horse Regiment Unit History Room 4/19 PWLH Regiment, Building 78 Simpson Barracks Macleod melbourne ww1 military world war 1 silk colours heraldry 5 battalion 5bn king s colours sir ronald munro fergusson 2 5 battalion board 3 military district laid up union flag st george st andrew st patrick college of arms King's Colour - 5th Battalion AIF. ...King's Colour - 5th Battalion AIF. Silk material. Design is of 'Great Union' flag as commissioned by the UK military (from the College of Arms) specifically for use on colours. The saltires of St Andrew and St Patrick are of the same width (4.5 inches) with a fimbriation added as in the original of the 1801 pattern Union Flag. The St George cross is 9 inches wide. All fimbriations are 1/2 inch. ww1, military, world war 1, silk, colours, heraldry, 5 battalion, 5bn, king s colours, sir ronald munro fergusson, 2 5 battalion, board, 3 military district, laid up, union flag, st george, st andrew, st patrick, college of arms -
 4th/19th Prince of Wales's Light Horse Regiment Unit History Room
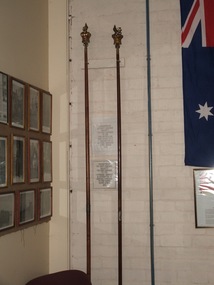
Pike, J Williams, 1905 (estimated)
... ...king s colours...4th/19th Prince of Wales's Light Horse Regiment Unit History Room 4/19 PWLH Regiment, Building 78 Simpson Barracks Macleod melbourne pike boer war colours heraldry king s colours victorian rangers lord northcote Plate inscribed: Commonwealth of Australia Victorian Rangers King's Colour presented to the Regiment on Monday 17 Nov 1905 by His Excellency The Governor-General Lord Northcote CCMG CCIE CBK Wooden Pike, originally carrying King's Colours of Victorian Rangers, brass ferrules each end, topped with brass Queen's crown surmounted by a lion wearing a crown. ...Wooden Pike, originally carrying King's Colours of Victorian Rangers, brass ferrules each end, topped with brass Queen's crown surmounted by a lion wearing a crown.Plate inscribed: Commonwealth of Australia Victorian Rangers King's Colour presented to the Regiment on Monday 17 Nov 1905 by His Excellency The Governor-General Lord Northcote CCMG CCIE CBKpike, boer war, colours, heraldry, king s colours, victorian rangers, lord northcote -
Frankston RSL Sub Branch
Plaque, Memorial, 1914-1918 Memorial Plaque, 1920 (estimated); Issued from 1920
... ...king s...Although Richard Harness was living at 52 Victoria Street, Abbotsford when enlisted, together with a scroll from the King, it was donated by a Frankston Family. commemorative memorial plaque dead man s penny king s richard evans harkness Around the edge are the words 'HE DIED FOR FREEDOM AND HONOUR' On the righthand side of the plaque is the name of the soldier, in this case Richard Evans Harkness. ...This round, bronze memorial plaque was presented to the family of Private Richard Evans Harkness, service number 3426, of the 37th Battalion, (8th Reinforcements) who was killed in action at Villers-Bretonneux on 12th August, 1918. Colloquially known as 'Dead Man's Penny' or 'King's Penny', this plaque was given to the next of kin of service personnel who died on active service in WW1. 1914-1918 Memorial Plaque In early 1920 it was announced that the next-of-kin of all Australian servicemen and women whose deaths were attributable to the First World War would receive a memorial plaque and scroll "as a solace for bereavement and as a memento". The memorial plaques were not uniquely Australian. In fact they were designed and produced in Britain and issued to commemorate all those who died as a result of war service from within the British Commonwealth. The idea for the plaques was originally conceived mid-way through the war. In 1917 a competition was announced to obtain a suitable design and 800 entries were eventually received. The winner, Mr. E. Carter Preston of Liverpool, England, was chosen in 1918. He was awarded a prize of 250 pounds. Mr Manning Pike directed the manufacture of the memorial plaques at the Memorial Plaque Factory set up at Acton, London. Some later plaques were also made at the Woolwich Arsenal. The cost of manufacturing so many plaques must have been considerable. Each plaque had the name of the soldier commemorated individually embossed (some were engraved) as part of the design. The full name was given without any indication of rank or honours to show the equality of sacrifice of all those who had lost their lives. The scroll designed to accompany the plaques was of thick paper, headed by the royal coat-of-arms, and bore the following message: "He whom this scroll commemorates was numbered among those who, at the call of King and Country, left all that was dear to them, endured hardness, faced danger, and finally passed out of the sight of men by the path of duty and self-sacrifice, giving up their own lives that others might live in freedom. Let those that come after see that his name is not forgotten". Underneath the message the serviceman or woman’s name, rank, honours and unit were written by hand in red ink. Because of the late arrival in Australia of the plaques many scrolls were sent out separately. A message from the King, "I join with my grateful people in sending you this memorial of a brave life given for others in the Great War", was included with the scroll. The first plaques were distributed in Australia in 1922. Each plaque was sent out from Base Records Office at Victoria Barracks in Melbourne by second-class mail. Approximately 60,000 plaques were issued in Australia. Families of deceased members of the Royal Australian Navy and the Australian Army Nursing Service also received plaques and scrolls This plaque is significant because it commemorates the death of an Australian soldier on active service in World War 1. It is representative of some 60,000 issued to next of kin of soldiers killed in World War 1. Although Richard Harness was living at 52 Victoria Street, Abbotsford when enlisted, together with a scroll from the King, it was donated by a Frankston Family.This round, bronze memorial plaque was presented to the family of Australian Army private Richard Evans Harkness, service number 03426, of the 37th battalion, 8th re-inforcement. Harkness was killed in action on 12th August, 1918, near the French village of Proyart, during the 3rd Division's advance along the Somme Valley. further details can be found here: https://www.awm.gov.au/collection/U51477 Colloquially known as 'Dead Man's Penny' or 'King's Penny', these plaques were awarded to the next of kin of service personnel who died on active service during WW1. refer to link for further information : http://www.awm.gov.au/encyclopedia/memorial_scroll/plaque.aspAround the edge are the words 'HE DIED FOR FREEDOM AND HONOUR' On the righthand side of the plaque is the name of the soldier, in this case Richard Evans Harkness.commemorative, memorial, plaque, dead, man s, penny, king s, richard, evans, harkness -
Federation University Historical Collection
Reports, Thylacenes and Large Predators Sightings, 2000-2010, 2000-2010
... ...lake king...s...The folder was collected for research being conducted by David Waldron. australian mythical animals collection david waldron depatment of primary industries marsupial lion thylacoled thylacine apollo bay dingo east gippsland metung lake king s. temby footprint feral cat puma australian rare fauna research association inc geelong ceres hill gippsland tasmanian tiger tasmanian tiger wilsons promomontory fauna scats lochsport philip g. gittins wilson's promontory national park peter hall lang lang alberton yanakie fish creek waratah bay walkerville cap liptrap lower tarwin middle tarwin grantville toora koonwarra foster welshpool cotters lake wild dogs stuart atkins bob cameron big cat sheep kills jaw bones livestock loss peter walsh woodside binginwarri yarram mountain lion cougars Folder of correspondence and newsclips relating to "Big Cats" and other large predators. ...The folder or correspondence is the result of a Freedom of Information request made to the Department of Sustainability and Environment in 2011. The folder was collected for research being conducted by David Waldron.Folder of correspondence and newsclips relating to "Big Cats" and other large predators. Sections of this file includes redacted areas relating to the privacy of correspondents.australian mythical animals collection, david waldron, depatment of primary industries, marsupial lion, thylacoled, thylacine, apollo bay, dingo, east gippsland, metung, lake king, s. temby, footprint, feral cat, puma, australian rare fauna research association inc, geelong, ceres hill, gippsland tasmanian tiger, tasmanian tiger, wilsons promomontory, fauna, scats, lochsport, philip g. gittins, wilson's promontory national park, peter hall, lang lang, alberton, yanakie, fish creek, waratah bay, walkerville, cap liptrap, lower tarwin, middle tarwin, grantville, toora, koonwarra, foster, welshpool, cotters lake, wild dogs, stuart atkins, bob cameron, big cat, sheep kills, jaw bones, livestock loss, peter walsh, woodside, binginwarri, yarram, mountain lion, cougars -
Kadimah Jewish Cultural Centre and National Library
Programme, The Kingdom of Beggars; 1939
... ...Mr. S. King...Mendelsohn Mr. M. Levy Mr. S. King Mr. S. Factor Mr. I. Gurfinkel Mr. M. ...Drama in 4 acts, produced by B. Newman-Jubal. Piano - J. Hacker. Kadimah Jewish Art Theatredovid herman theatre, mr. r. hirsh, mr. c. borall, mr. m. shechter, mr i. rothman, mr. j. white, mr a. light, mrs. r. wald, mrs. r. lifshits, mr. u. white, mr. a. aloni, mrs. r. levita, mrs. d. rothman, mr. a. rosner, mrs. e. korn, mr. s. mendelsohn, mr. m. levy, mr. s. king, mr. s. factor, mr. i. gurfinkel, mr. m. wald, mr. n. foegel, miss m. honik, miss s. honig, mr. a. murk -
 Federation University Historical Collection
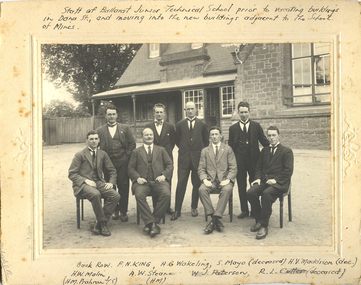
Photograph - Black and White, Staff of the Ballarat Junior Technical School at the Dana Street Primary School site, 1919, 1919
... ballarat junior technical school, dana street primary school, f.n. king, harold wakeling, s. mayo, v. maddison, h.w. malin, albert w. steane, william john paterson, r. cutter, paterson, steane...Standing left to right: F.N. King, Harold Wakeling, S. Mayo, V. Maddison Sitting left to right: H.W. ...Standing left to right: F.N. King, Harold Wakeling, S. Mayo, V. Maddison Sitting left to right: H.W. ...The Ballarat Junior Technical School is a division of the Ballarat School of Mines. See Courier 23 March 1957.Photograph of eight men, teachers of the Ballarat Junior Technical School, outside the Dana Street Primary School. Standing left to right: F.N. King, Harold Wakeling, S. Mayo, V. Maddison Sitting left to right: H.W. Malin, Albert W. Steane, William John Paterson, R. Cutterballarat junior technical school, dana street primary school, f.n. king, harold wakeling, s. mayo, v. maddison, h.w. malin, albert w. steane, william john paterson, r. cutter, paterson, steane -
Port Melbourne Historical & Preservation Society
Photograph - Port Melbourne Third Eighteen football team, Lagoon Reserve, Port Melbourne, 1939
... ...H S KING...BACK ROW L - R Mr. H S King (President), George Fisher, J Foden, A Brown, B Rosewarne, R Banks, D Gleeson, H Eason, Mrs. ...BACK ROW L - R Mr. H S King (President), George Fisher, J Foden, A Brown, B Rosewarne, R Banks, D Gleeson, H Eason, Mrs. ...Colour lasercopy of black and white, colourised photo of Port Melbourne Third Eighteen football team 1939 (team colours have been added on jumpers and socks). Taken outside rooms at Lagoon Reserve. BACK ROW L - R Mr. H S King (President), George Fisher, J Foden, A Brown, B Rosewarne, R Banks, D Gleeson, H Eason, Mrs. O King (Secretary) MIDDLE ROW L - R C Edland (Assistant Secretary), J Erridge, Albert "Digger" Cosham, H Barnes (Captain & Coach), G Upton (Vice Captain), A Ambler, Jack "Splinter" Lowrie (Boundary Umpire) FRONT ROW L - R P Howard, C Nuttall, R Marshall, A "Bertie" Maskell. E Johnstonsport - australian rules football, lagoon reserve, port melbourne football club, pmfc, h s king, george fisher, j foden, a brown, b rosewarne, r banks, d gleeson, h eason, mrs o king -
Federation University Historical Collection
Booklet, G.S. Hart, Ballarat School of Mines Student's Magazine, First Term, 1904, 1904
... ...s. r. white...r. king...Barker Library (top floor) Mount Helen goldfields Table of contents: Editorial, The analysis of water for technical purposes, Standard and other solutions, Bucket dredging in Ballarat and its vicinity, A visit to Dapto, Life in British Guiana, Deep alluvial mining, The S.M.B. camp, In the magazines, Practical experience for mining engineers, Balance sheet students' magazine for the year ending 1903, Past students', Our illustrations, Diplomas and Certificates, Sports, Meeting of student association, New students', News and notes, Editorial notices. ballarat school of mines students' magazine j. t. d'oliveyra j. r. mckenzie j. dickenson h. kingsbury f. bicknell, a. bendallack l. westcott a. gibson g. s. hart j. brangan v. barton w. a. gabriel a. turner a. woods f. futter v. vicol h. w. blyth f. m. lush s. b. vial l. nash p. f. d. elliott a. s. burdekin w. playford s. j. lindsay lloyd petersham j. wallis johnstone j. mcfeeters d. w. b. arthur f. fryer h. giles a. s. coyte f. malin j. m. currie d. thomas k. moore w. edwards h. alston w. white n. fraser s. adamson, w. brokenshire w. f. brinsden h. edgar j. hil h. leggo p. e. marmion j. don f. cooper f. dalton c. eeles r. elliott e. trend h. dowling, d. elder r. ford a. paramour a. gillespie a. walters w. bolte h. burrows p. v. barnard l. lambert w. j. lakeland a. mcburney j. ramsay b. reid f. a. marriott s. radcliff america o. e. jager p. a. millar m. gray r. j. allan f. f. bradbury w. a. gosman a. g. s. morton m. marks t. vincent j. vincent r. nevett d. urquhart south africa r. suter h. l. krause c. bailey a. c. atkins g. s. hart e. j. a. mcconnon o. e. jager j. t. philbin w. j. lakeland l. w. nott o. w. williams f. r. williams c. h. magennis w. e. dempster w, featherstone j. smart g. h. davenport alan cropper w. e. eyres j. w. pearce a. j. robin a. c. leathes w. o. avery g. sides c. milligan, g. elliott l. w. seward e. r. gaunt w. macartney n. buley s. r. white r. king c. s. stephenson Alfred Mica smith g. j. dawbarn r. w. hawken kerr gran professor ferdinand krause w. atherton j. w. hawthorne p. a. millar f. a. marriott f. c. futter. g. w. cornell j. adam h. w. nevett v. g. anderson c. mctaggart d. don w. tucker h. eklund kildhal Pale gray booklet of 19 pages Ballarat School of Mines Student's Magazine, First Term, 1904 Booklet Berry Anderson & Co. ...Table of contents: Editorial, The analysis of water for technical purposes, Standard and other solutions, Bucket dredging in Ballarat and its vicinity, A visit to Dapto, Life in British Guiana, Deep alluvial mining, The S.M.B. camp, In the magazines, Practical experience for mining engineers, Balance sheet students' magazine for the year ending 1903, Past students', Our illustrations, Diplomas and Certificates, Sports, Meeting of student association, New students', News and notes, Editorial notices.Pale gray booklet of 19 pagesballarat school of mines, students' magazine, j. t. d'oliveyra, j. r. mckenzie, j. dickenson, h. kingsbury, f. bicknell,, a. bendallack, l. westcott, a. gibson, g. s. hart, j. brangan, v. barton, w. a. gabriel, a. turner, a. woods, f. futter, v. vicol, h. w. blyth, f. m. lush, s. b. vial, l. nash, p. f. d. elliott, a. s. burdekin, w. playford, s. j. lindsay, lloyd petersham, j. wallis, johnstone, j. mcfeeters, d. w. b. arthur, f. fryer, h. giles, a. s. coyte, f. malin, j. m. currie, d. thomas, k. moore, w. edwards, h. alston, w. white, n. fraser, s. adamson,, w. brokenshire, w. f. brinsden, h. edgar, j. hil, h. leggo, p. e. marmion, j. don, f. cooper, f. dalton, c. eeles, r. elliott, e. trend, h. dowling,, d. elder, r. ford, a. paramour, a. gillespie, a. walters, w. bolte, h. burrows, p. v. barnard, l. lambert, w. j. lakeland, a. mcburney, j. ramsay, b. reid, f. a. marriott, s. radcliff, america, o. e. jager, p. a. millar, m. gray, r. j. allan, f. f. bradbury, w. a. gosman, a. g. s. morton, m. marks, t. vincent, j. vincent, r. nevett, d. urquhart, south africa, r. suter, h. l. krause, c. bailey, a. c. atkins, g. s. hart, e. j. a. mcconnon, o. e. jager, j. t. philbin, w. j. lakeland, l. w. nott, o. w. williams, f. r. williams, c. h. magennis, w. e. dempster, w, featherstone, j. smart, g. h. davenport, alan cropper, w. e. eyres, j. w. pearce, a. j. robin, a. c. leathes, w. o. avery, g. sides, c. milligan,, g. elliott, l. w. seward, e. r. gaunt, w. macartney, n. buley, s. r. white, r. king, c. s. stephenson, alfred mica smith, g. j. dawbarn, r. w. hawken, kerr gran, professor ferdinand krause, w. atherton, j. w. hawthorne, p. a. millar, f. a. marriott, f. c. futter., g. w. cornell, j. adam, h. w. nevett, v. g. anderson, c. mctaggart, d. don, w. tucker, h. eklund, kildhal -
Federation University Historical Collection
Magazine, Ballarat School of Mines Students' Magazine, 1963, 1963
... ...king island...s...ballarat school of mines t. bruer bob coutts paul pasari tony brauer jeni milbourne kerry penna brian mclennan bob grubb john davis netta walta kevin brady oscar rogers kuo yiew see king island s. white joseph heller j. humphreys bobby ong Orange covered exhibition Ballarat School of Mines Students' Magazine, 1963 Magazine ...Orange covered exhibitionballarat school of mines, t. bruer, bob coutts, paul pasari, tony brauer, jeni milbourne, kerry penna, brian mclennan, bob grubb, john davis, netta walta, kevin brady, oscar rogers, kuo yiew see, king island, s. white, joseph heller, j. humphreys, bobby ong -
 Bendigo Historical Society Inc.
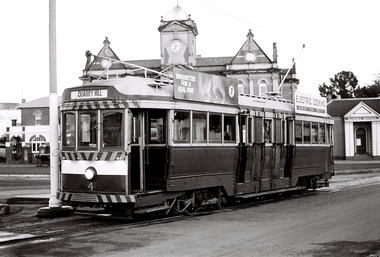
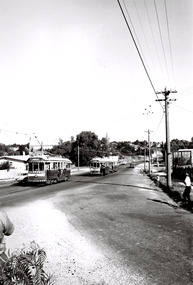
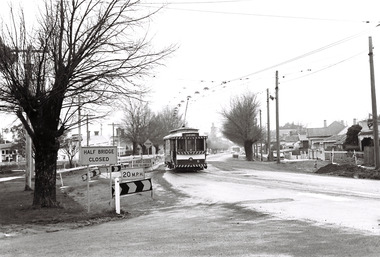
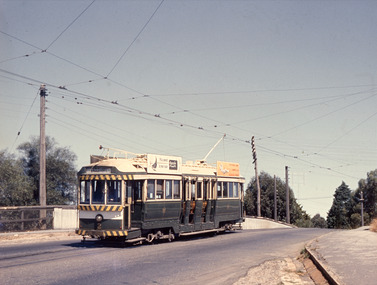
Photograph - Robert Green Collection - Photos of Bendigo Tramways - Sheet 1 of 8, 1960s
... keith s king...Sheet B also contains one slide taken by Robert's friend Keigh S King (1928-2019) who was the author of the book 'The Bendigo Tramways an illustrated history, published by the Australian Railway Historical Society Victorian Division Melbourne in February 1972; BHS Item no. 5052. ...Sixteen black and white prints from the images are also included. keith s king bendigo trams robert green Robert Green Collection, this item contains thirty three Black and White Negatives of trams at various locations around Bendigo. ...This collection contains eight archive sheets (Sheet 1 to Sheet 8) of strips of original 35mm black and white negatives of photographs taken during the 1960s and early 1970s by Robert Green, of the Bendigo State Electricty Commission of Victoria Tramways prior to their abandonment The collection also includes two archive quality sheets (Sheet A and Sheet B) of original 35mm colour slides taken by Robert Green during the same period. Sheet B also contains one slide taken by Robert's friend Keigh S King (1928-2019) who was the author of the book 'The Bendigo Tramways an illustrated history, published by the Australian Railway Historical Society Victorian Division Melbourne in February 1972; BHS Item no. 5052. The collection also includes one USB stick which contains images of all photographs described above, except for one colour slide taken by Keith S Kings. Sixteen black and white prints from the images are also included.Robert Green Collection, this item contains thirty three Black and White Negatives of trams at various locations around Bendigo. Photos: 11147.1a and 11147.1b Tram on its way out of Long Gully along Mt Korong (Eaglehawk) Road towards Eaglehawk. Houses in the foreground, on the left is 245 Eaglehawk Road and on the right 241 Eaglehawk Road. 11147.1c Birney Car Tram on its way out of Long Gully along Mt Korong (Eaglehawk) Road towards Eaglehawk, looking back ove the Long Gully township. 11147.1d Birney Car Tram on its way out of Long Gully along Mt Korong (Eaglehawk) Road towards Eaglehawk. Houses in the foreground, on the left is 245 Eaglehawk Road and on the right 241 Eaglehawk Road. 11147.1e No 28 Birney Car Special 11147.1f No 28 Birney Car Special and No 2 possibly in Eaglehawk 11147.1g No 18 roars up Eaglehawk Road into Iron Bark 11147.1h Tram crossing the railway at Jobs Gully, on its way to Bendigo 11147.1i Tram crossing the railway at Jobs Gully, on its way to Eaglehawk 11147.1j Central Deborah Gold Mine 11147.1k The intersection of Reginald and Houston St, with the Cemetery on the left. 11147.1l Tram Stop on Pall Mall opposite Ezywalkins Conrner of Mitchell St 11147.1m Electrical Cable junction box 11147.1n Electrical Cable junction box 11147.1o No 18 at Canterbury Park Terminus Eaglehawk 11147.1p No 26 at the top of Mitchell St on its way to Quarry Hill 11147.1q Nos 26 and 18 at the Railway Station stop in Mitchell St 11147.1r No 18 coming down Mitchell St 11147.1s No 5 possibly in Carpenter St 11147.1t No 5 at the Cemetery Gates ready to depart the terminus 11147.1u No 5 at the Cemetery Gates ready to depart the terminus 11147.1v No 5 at the Cemetery Gates ready to depart the terminus 11147.1w Nos 18 and 5 crossover at the Fountain 11147.1x Nos 18 and 5 crossover at the Fountain 11147.1y Nos 18 and 5 crossover at the Fountain 11147.1z Heading into Long Gully past the Manchester Arms Hotel 11147.1aa No 5 loading passengers at the Eaglehawk Terminus next to Canterbury Park 11147.1ab Traffic conjestion at the loop on the way back to Bendigo 11147.1ac The Eaglehawk Terminus next to Canterbury Park 11147.1ad The Eaglehawk Terminus next to Canterbury Park 11147.1ae The Eaglehawk Terminus next to Canterbury Park 11147.1af The Eaglehawk Terminus next to Canterbury Parkkeith s king, bendigo, trams, robert green -
 Bendigo Historical Society Inc.
Photograph - Robert Green Collection - Photos of Bendigo Tramways - Sheet 3 of 8, 1960s
... keith s king...Sheet B also contains one slide taken by Robert's friend Keigh S King (1928-2019) who was the author of the book 'The Bendigo Tramways an illustrated history, published by the Australian Railway Historical Society Victorian Division Melbourne in February 1972; BHS Item no. 5052. ...Sixteen black and white prints from the images are also included. keith s king bendigo trams robert green Robert Green Collection, this item contains 35 Black and White Negatives of the trams at various locations around Bendigo. ...This collection contains eight archive sheets (Sheet 1 to Sheet 8) of strips of original 35mm black and white negatives of photographs taken during the 1960s and early 1970s by Robert Green, of the Bendigo State Electricty Commission of Victoria Tramways prior to their abandonment The collection also includes two archive quality sheets (Sheet A and Sheet B) of original 35mm colour slides taken by Robert Green during the same period. Sheet B also contains one slide taken by Robert's friend Keigh S King (1928-2019) who was the author of the book 'The Bendigo Tramways an illustrated history, published by the Australian Railway Historical Society Victorian Division Melbourne in February 1972; BHS Item no. 5052. The collection also includes one USB stick which contains images of all photographs described above, except for one colour slide taken by Keith S Kings. Sixteen black and white prints from the images are also included.Robert Green Collection, this item contains 35 Black and White Negatives of the trams at various locations around Bendigo. Photos: 11147.3a No 21 turns out of McRae St into Nolan Street, on its way to North Bendigo 11147.3b No 5 on the way to Eaglehawk 11147.3c No 21 leaves Charing Cross towards North Bendigo, City Family Hotel in the background 11147.3d No 18 completes its run from Eaglehawk at the fountain, and is returning to the depot 11147.3e No 18 turns from McRae St into Tramway Avenue and the depot 11147.3f No 18 turns from McRae St into Tramway Avenue and the depot 11147.3g No 28 at the depot 11147.3h No 6 on its way to Golden Square 11147.3i No 6 at the Golden square Terminus, High and Maple Streets 11147.3j No 25 from Quarry Hill at the intersection of Wills and Mitchell Street 11147.3k No 2 leaves the Mitchell St railway bridge into Carpenter Street on its way to Quarry Hill 11147.3l No 21 comes into the Golden square Terminus, steeple of the Methodist church in the background 11147.3m Tram heading along McRae St in front of the School of Mines 11147.3n Tram heading along McRae St towards Pall Mall in front of the School of Mines 11147.o No 24 heading to Eaglehawk at the corner of Barnard and Forest Streets 11147.3p Three trams lined up in the depot, possible early morning or evening 11147.3q Tram No 21 at the North Bendigo Terminus, possible early morning or evening 11147.3s Tram leaving the Eaglehawk Town Hall in the dark 11147.3t View up Pall Mall towards the fountain from Mundy Street intersection 11147.3u Birney Car No 28 Special leaving the depot, crossing the Back Creek 11147.3w Birney Car No 28 Special at Eaglehawk Canterbury Park 11147.3x No 28 Birney Car Special hading to Eaglehawk at Iron Bark, just past the Marong Road turn-off at Iron Bark 11147.3y No 28 Birney Car Special heading to Eaglehawk at Long Gully, opposite the Manchester Arms Hotel 11147.3z No 28 Birney Car Special 11147aa No 28 Birney Car Special comes into the Eaglehawk Terminus 11147ab No 28 Birney Car Special heads down view St past the Rifle Brigade Hotel 11147ac No 28 Birney Car Special heads down Pall Mall past the Court House Hotel 11147.3ad No 5 to Eaglehawk runs up McCrae St in front of the School of Mines 11147.3ae No 28 Birney Car passes the Mundy St intersection with McRae St heading to the fountain 11147.3af No 3 passes the Mundy St intersection with McRae St heading to Eaglehawk 11147.3ah Tram passes the School of Mines in McRae St heading to the fountain 11147.3ai Birney Car Tram passes the School of Mines in McRae St heading to the fountain 11147.3aj Tramways High Electrical termination boxkeith s king, bendigo, trams, robert green -
 Bendigo Historical Society Inc.
Photograph - Robert Green Collection - Photos of Bendigo Tramways - Sheet 2 of 8, 1960s
... keith s king...Sheet B also contains one slide taken by Robert's friend Keigh S King (1928-2019) who was the author of the book 'The Bendigo Tramways an illustrated history, published by the Australian Railway Historical Society Victorian Division Melbourne in February 1972; BHS Item no. 5052. ...Sixteen black and white prints from the images are also included. keith s king bendigo trams robert green Robert Green Collection, this item contains 34 Black and White Negatives of the trams at various locations around Bendigo. ...This collection contains eight archive sheets (Sheet 1 to Sheet 8) of strips of original 35mm black and white negatives of photographs taken during the 1960s and early 1970s by Robert Green, of the Bendigo State Electricty Commission of Victoria Tramways prior to their abandonment The collection also includes two archive quality sheets (Sheet A and Sheet B) of original 35mm colour slides taken by Robert Green during the same period. Sheet B also contains one slide taken by Robert's friend Keigh S King (1928-2019) who was the author of the book 'The Bendigo Tramways an illustrated history, published by the Australian Railway Historical Society Victorian Division Melbourne in February 1972; BHS Item no. 5052. The collection also includes one USB stick which contains images of all photographs described above, except for one colour slide taken by Keith S Kings. Sixteen black and white prints from the images are also included.Robert Green Collection, this item contains 34 Black and White Negatives of the trams at various locations around Bendigo. Photos: 11147.2a No 30, 29, 28 and 11 Birney Cars lined up at the Depot 11147.2b No 30, 29, 28 and 11 Birney Cars lined up at the Depot 11147.2c No 30, 29, 28 and 11 Birney Cars lined up at the Depot 11147.2d No 30, 29, 28 and 11 Birney Cars lined up at the Depot 11147.2e No 30, 29, 28 and 11 Birney Cars lined up at the Depot 11147.2f No 30, 29, 28 Birney Cars lined up at the Depot 11147.2g No 30, 29, 28 and 11 Birney Cars lined up at the Depot 11147.2h No 30, 29, 28 and 11 Birney Cars lined up at the Depot 11147.2i No 30, 29, 28 and 11 Birney Cars and No 25 lined up at the Depot 11147.2j No 30, 29, 28 and 11 Birney Cars and No 25 lined up at the Depot 11147.2k No 28 and 11 Birney Cars lined up at the Depot 11147.2l No 30 Special leaves the depot watched by the photographer 11147.2m No 29 Special leaves the depot 11147.2n Driver and passenger inside a Birney Car 11147.2o Driver and passenger inside a Birney Car heading up Pall Mall 11147.2p The four Birney Cars in Carpenter Street, Quarry Hill Terminus at the Cemetery Gates 11147.2q The four Birney Cars in Carpenter Street, Quarry Hill Terminus at the Cemetery Gates 11147.2r The four Birney Cars in Carpenter Street, Quarry Hill Terminus at the Cemetery Gates 11147.2s The four Birney Cars in Carpenter Street, Quarry Hill Terminus at the Cemetery Gates 11147.2t The four Birney Cars at the Carpenter Street, Quarry Hill Loop 11147.2u No 28 Special Birney Car 11147.2v No 30 Special Birney Car 11147.2w The four Birney Cars at the fountain side by side getting reading to depart to Eaglehawk 11147.2x The four Birney Cars at Eaglehawk beside Canterbury Park 11147.2y The four Birney Cars at Eaglehawk beside Canterbury Park with the Drivers and the Inspector 11147.2z The four Birney Cars at Eaglehawk beside Canterbury Park 11147.2aa The four Birney Cars at Eaglehawk beside Canterbury Park 11147.2ab The four Birney Cars at Eaglehawk beside the town hall 11147.2ac Birney Car 28 passes 17 at the Long gully Manchester Arms Hotel Loop 11147.2ad No 21 and two others at the North Bendigo terminus 11147.2af Four trams heading to Golden Square in High Street 11147.2ag Four trams heading to Golden Square in High Street 11147.2ah Four trams heading at the Golden Square Terminus at Maple High Streetskeith s king, bendigo, trams, robert green -
Bendigo Historical Society Inc.
Mixed media - Robert Green Collection - Photos of Bendigo Tramways - USB of Images, 1960s
... keith s king...Sheet B also contains one slide taken by Robert's friend Keigh S King (1928-2019) who was the author of the book 'The Bendigo Tramways an illustrated history, published by the Australian Railway Historical Society Victorian Division Melbourne in February 1972; BHS Item no. 5052. ...Sheet B also contains one slide taken by Robert's friend Keigh S King (1928-2019) who was the author of the book 'The Bendigo Tramways an illustrated history, published by the Australian Railway Historical Society Victorian Division Melbourne in February 1972; BHS Item no. 5052. ...This collection contains eight archive sheets (Sheet 1 to Sheet 8) of strips of original 35mm black and white negatives of photographs taken during the 1960s and early 1970s by Robert Green, of the Bendigo State Electricty Commission of Victoria Tramways prior to their abandonment The collection also includes two archive quality sheets (Sheet A and Sheet B) of original 35mm colour slides taken by Robert Green during the same period. Sheet B also contains one slide taken by Robert's friend Keigh S King (1928-2019) who was the author of the book 'The Bendigo Tramways an illustrated history, published by the Australian Railway Historical Society Victorian Division Melbourne in February 1972; BHS Item no. 5052. The collection also includes one USB stick which contains images of all photographs described above, except for one colour slide taken by Keith S Kings. Sixteen black and white prints from the images are also included.Robert Green Collection: This item is a USB Stick 11147.11a which contains images scanned from eight plastic archival sheets of black and white negatives and colour slides. It contains all the images in 11147.1 to 11147.11keith s king, bendigo, trams, robert green -
Bendigo Historical Society Inc.
Mixed media - Robert Green Collection - Photos of Bendigo Tramways - Black and White Prints, 1968
... keith s king...Sheet B also contains one slide taken by Robert's friend Keigh S King (1928-2019) who was the author of the book 'The Bendigo Tramways an illustrated history, published by the Australian Railway Historical Society Victorian Division Melbourne in February 1972; BHS Item no. 5052. ...Sheet B also contains one slide taken by Robert's friend Keigh S King (1928-2019) who was the author of the book 'The Bendigo Tramways an illustrated history, published by the Australian Railway Historical Society Victorian Division Melbourne in February 1972; BHS Item no. 5052. ...This collection contains eight archive sheets (Sheet 1 to Sheet 8) of strips of original 35mm black and white negatives of photographs taken during the 1960s and early 1970s by Robert Green, of the Bendigo State Electricty Commission of Victoria Tramways prior to their abandonment The collection also includes two archive quality sheets (Sheet A and Sheet B) of original 35mm colour slides taken by Robert Green during the same period. Sheet B also contains one slide taken by Robert's friend Keigh S King (1928-2019) who was the author of the book 'The Bendigo Tramways an illustrated history, published by the Australian Railway Historical Society Victorian Division Melbourne in February 1972; BHS Item no. 5052. The collection also includes one USB stick which contains images of all photographs described above, except for one colour slide taken by Keith S Kings. Sixteen black and white prints from the images are also included.Robert Green Collection, this item 11147.12 contains 20 printed photos scanned from eight plastic archival sheets of black and white negatives, also one PDF Document entitled "Bendigo's Last Tram Mail" 11147.12v PDF The day before permanent closure of the Bendigo tramways on Sunday 16 April 1972, the Tramway Museum Society of Victoria Inc (TMSV) arranged for “Last Tram Mail” to be carried along the Eaglehawk line to simulate the once regular transport of mail around the city by tram. 5.5 x 3.5 Inch Photo Prints 11147.12a Print from Sheet 3 (11147.3ac) No 28 Birney Car Special heads down Pall Mall past the Court House Hotel 11147.12b Print from Sheet 8 (11147.8c) No 18 passing the View Street and Rowan Street intersection 11147.12c Print from Sheet 8 (11147.8u) No 25 at the Bendigo Cemetery Terminus 11147.12d Print from Sheet 5 (11147.5e) No 18 and old shop front 11147.12e Print from Sheet 7 (11147.7s) Passing Trams 11147.12f Print from Sheet 3 (11147.3s) Tram leaving the Eaglehawk Town Hall in the dark 11147.12g Print from Sheet 5 (11147.5m) No 21 returning to the Tramways Avenue Depot with the scrubber tram on the left 11147.12l Print from Sheet 6 (11147.6ag) Four trams and one driver at the depot TMS Bendigo Tour 24 March 1968. 11147.12m Print from Sheet 2 (11147.2ac) Birney Car 28 passes 17 at the Long gully Manchester Arms Hotel Loop TMS Bendigo Tour 24 March 1968 11147.12n Print from Sheet 2 (11147.2u) No 28 Special Birney Car on the Quarry Hill Line TMS Bendigo Tour 24 March 1968 11147.12o Print from Sheet 2 (11147.2v) No 30 Special Birney Car on the Quarry Hill Line TMS Bendigo Tour 24 March 1968 11147.12q Print from Sheet 2 (11147.2ab) The four Birney Cars at Eaglehawk beside the town hall TMS Bendigo Tour 24 March 1968 11147.12r Print from Sheet 6 (11147.6z) Birney Car 11 and two others arriving at the depot TMS Bendigo Tour 24 March 1968 11147.12s Print from Sheet 2 (11147.2t) The four Birney Cars at the Carpenter Street, Quarry Hill Loop TMS Bendigo Tour 24 March 1968 11147.12t Print from Sheet 2 (11147.2h) No 30, 29, 28 and 11 Birney Cars lined up at the Depot TMS Bendigo Tour 24 March 1968 11147.12u Print from Sheet 2 (11147.2ad) No 21 and two others at the North Bendigo terminus TMS Bendigo Tour 24 March 1968 8 x 10 Inch Photo Prints 11147.12h Print from Sheet 3 (11147.3ai) Birney Car Tram passes the School of Mines in McRae St heading to the fountain 11147.12i Print from Sheet 2 (11147.2a) No 30, 29, 28 and 11 Birney Cars lined up at the Depot 11147.12j Print from Sheet 2 (11147.2a) No 30, 29, 28 and 11 Birney Cars lined up at the Depot 11147.12k Print from Sheet 2 (11147.2a) No 30, 29, 28 and 11 Birney Cars lined up at the Depotkeith s king, bendigo, trams, robert green -
 Bendigo Historical Society Inc.
Photograph - Robert Green Collection - Photos of Bendigo Tramways - Sheet B of 10, 1960s
... keith s king...Sheet B also contains one slide taken by Robert's friend Keigh S King (1928-2019) who was the author of the book 'The Bendigo Tramways an illustrated history, published by the Australian Railway Historical Society Victorian Division Melbourne in February 1972; BHS Item no. 5052. ...Sixteen black and white prints from the images are also included. keith s king bendigo trams robert green Robert Green Collection, this item contains 20 Colour Slides of the trams at various locations around Bendigo. ...This collection contains eight archive sheets (Sheet 1 to Sheet 8) of strips of original 35mm black and white negatives of photographs taken during the 1960s and early 1970s by Robert Green, of the Bendigo State Electricty Commission of Victoria Tramways prior to their abandonment The collection also includes two archive quality sheets (Sheet A and Sheet B) of original 35mm colour slides taken by Robert Green during the same period. Sheet B also contains one slide taken by Robert's friend Keigh S King (1928-2019) who was the author of the book 'The Bendigo Tramways an illustrated history, published by the Australian Railway Historical Society Victorian Division Melbourne in February 1972; BHS Item no. 5052. The collection also includes one USB stick which contains images of all photographs described above, except for one colour slide taken by Keith S Kings. Sixteen black and white prints from the images are also included.Robert Green Collection, this item contains 20 Colour Slides of the trams at various locations around Bendigo. Photos: 11147.10a Tram in the darkness, sunset or morning 11147.10b Coming off the railway Line bridge towards Eaglehawk 11147.10c Coming on to the railway Line bridge from Eaglehawk 11147.10d The Quarry Hill and Eaglehawk trams waiting to leave the fountain 11147.10e No 18 from Quarry Hill arrives at the fountain 11147.10f Getting ready to leave the fountain for Eaglehawk 11147.10g Policeman on point duty and tram at the fountain, Charing Cross 11147.10h Eaglehawk and Quarry Hill trams at the fountain 11147.10i Policeman on point duty and tram at the fountain, Charing Cross, looking down Pall Mall 11147.10j No 3 roars up View Street at the corner of McKenzie Street 11147.10k From the Rifle Brigade Hotel the Eaglehawk tram comes past the Queen Elizabeth Oval down View Street 11147.10l From the Rifle Brigade Hotel the Eaglehawk tram comes past the Queen Elizabeth Oval down View Street 11147.10m From the Rifle Brigade Hotel the Eaglehawk tram up View Street opposite the Masonic Hall 11147.10n From the Rifle Brigade Hotel the Eaglehawk tram goes past the Queen Elizabeth Oval up View Street 11147.10o From the Rifle Brigade Hotel the Eaglehawk tram comes up View Street opposite the Masonic Hall 11147.10p From the Victoria Hotel Balcony, the Eaglehawk No 18 arrives 11147.10q From the Victoria Hotel Balcony, the Eaglehawk No 18 departs towards Bendigo 11147.10r Tram No 2 arrives into Eaglehawk 11147.10s Tram No 2 heads to Quarry Hill from California Gully (Probable) 11147.1t Tram on its way out of Long Gully along Mt Korong (Eaglehawk) Road towards Eaglehawk. Houses in the foreground, on the left is 245 Eaglehawk Road and on the right 241 Eaglehawk Road.keith s king, bendigo, trams, robert green -
 Bendigo Historical Society Inc.
Photograph - Robert Green Collection - Photos of Bendigo Tramways - Sheet 5 of 8, 1960s
... keith s king...Sheet B also contains one slide taken by Robert's friend Keigh S King (1928-2019) who was the author of the book 'The Bendigo Tramways an illustrated history, published by the Australian Railway Historical Society Victorian Division Melbourne in February 1972; BHS Item no. 5052. ...Sixteen black and white prints from the images are also included. keith s king bendigo trams robert green Robert Green Collection, this item contains 23 Black and White Negatives of the trams at various locations around Bendigo. ...This collection contains eight archive sheets (Sheet 1 to Sheet 8) of strips of original 35mm black and white negatives of photographs taken during the 1960s and early 1970s by Robert Green, of the Bendigo State Electricty Commission of Victoria Tramways prior to their abandonment The collection also includes two archive quality sheets (Sheet A and Sheet B) of original 35mm colour slides taken by Robert Green during the same period. Sheet B also contains one slide taken by Robert's friend Keigh S King (1928-2019) who was the author of the book 'The Bendigo Tramways an illustrated history, published by the Australian Railway Historical Society Victorian Division Melbourne in February 1972; BHS Item no. 5052. The collection also includes one USB stick which contains images of all photographs described above, except for one colour slide taken by Keith S Kings. Sixteen black and white prints from the images are also included.Robert Green Collection, this item contains 23 Black and White Negatives of the trams at various locations around Bendigo. Photos: 11147.5a Birney car decked out in advertising for the Bendigo Easter Fair 11147.5b Birney car decked out in advertising for the Bendigo Easter Fair heading to North Bendigo in Mcrae St 11147.5c Birney car decked out in advertising for the Bendigo Easter Fair heading to North Bendigo in Mcrae St passing No 17 and another tram approaching from the depot 11147.5d Birney car decked out in advertising for the Bendigo Easter Fair heading into the depot in Tramway Avenue 11147.5e No 18 and old shop front 11147.5f Tram Turning into Tramways Avenue from Mcrae St 11147.5g Three trams at the Golden Square Terminus in High Street 11147.5h No 18 tram in Mcrae Street passing by Tramways Avenue to North Bendigo 11147.5i No 21 returning to the Tramways Avenue Depot off Mcrae Street 11147.5j No 21 returning to the Tramways Avenue Depot off Mcrae Street 11147.5k No 21 returning to the Tramways Avenue Depot crossing the Back Creek 11147.5l No 21 returning to the Tramways Avenue Depot 11147.5m No 21 returning to the Tramways Avenue Depot with the scrubber tram on the left 11147.5n No 21 in the Tramways Avenue Depot 11147.5o Nos 18 and 17 pass at the Golden Square Terminus in High St 11147.5p No 17 on its way to the North Bendigo Terminus 11147.5q No 17 turns from the North Bendigo Terminus into Finn Street 11147.5r No 17 heading to the North Bendigo Terminus along Thunder Street 11147.5s No 17 at the North Bendigo Terminus off Finn Street 11147.5t Train heading from the Swan Hill direction to Bendigo off the Finn Street crossing 11147.5u No 25 heading to Golden Square 11147.5v No 25 turns from Weeroona Avenue into Caledonia Street 11147.5w The Easter Fair, intersection of Pall Mall and Williamson St with Myer Stores in the backgroundkeith s king, bendigo, trams, robert green -
 Bendigo Historical Society Inc.
Photograph - Robert Green Collection - Photos of Bendigo Tramways - Sheet 8 of 10, 1960s
... keith s king...Sheet B also contains one slide taken by Robert's friend Keigh S King (1928-2019) who was the author of the book 'The Bendigo Tramways an illustrated history, published by the Australian Railway Historical Society Victorian Division Melbourne in February 1972; BHS Item no. 5052. ...Sixteen black and white prints from the images are also included. keith s king bendigo trams robert green Robert Green Collection, this item contains 22 Black and White Negatives of the trams at various locations around Bendigo. ...This collection contains eight archive sheets (Sheet 1 to Sheet 8) of strips of original 35mm black and white negatives of photographs taken during the 1960s and early 1970s by Robert Green, of the Bendigo State Electricty Commission of Victoria Tramways prior to their abandonment The collection also includes two archive quality sheets (Sheet A and Sheet B) of original 35mm colour slides taken by Robert Green during the same period. Sheet B also contains one slide taken by Robert's friend Keigh S King (1928-2019) who was the author of the book 'The Bendigo Tramways an illustrated history, published by the Australian Railway Historical Society Victorian Division Melbourne in February 1972; BHS Item no. 5052. The collection also includes one USB stick which contains images of all photographs described above, except for one colour slide taken by Keith S Kings. Sixteen black and white prints from the images are also included.Robert Green Collection, this item contains 22 Black and White Negatives of the trams at various locations around Bendigo. Photos: 11147.8a No 4 outside the Eaglehawk Town Hall 11147.8b No 7 at the North Bendigo Terminus 11147.8c No 18 passing the View Street and Rowan Street intersection 11147.8d No 24 and driver at the fountain 11147.8e No 7 at the fountain 11147.8f No 24 and at the fountain 11147.8g No 24 and driver at Eaglehawk 11147.8h Picking up passengers at North Bendigo Terminus 11147.8i Birney Car 30 in Finn Street North Bendigo 11147.8j No 30 has just crossed the Bendigo Creek in high St Golden Square 11147.8k No 30 has just crossed the Bendigo Creek in High St Golden Square and is passing No 2 11147.8l Nos 29 and 19 at the depot with two drivers 11147.8m No 29 comes up Pall Mall past the Williamson St intersection 11147.8n No 29 comes up Pall Mall 11147.8o No 29 at the Golden Square Terminus loop 11147.8p No 29 and another at the Golden Square Terminus 11147.8q The Pahran and Malvern Tramways Trust Logo 11147.8r Passing No 6 on the High St Loop 11147.8s Passing No 6 on the High St Loop, Sacred Heart Cathedral Spire being buit in the background 11147.8t At the Cemetery Gate Quarry Hill 11147.8u No 25 at the Bendigo Cemetery Terminus 11147.8v At the Quarry Hill Gates in Carpenter Streetkeith s king, bendigo, trams, robert green -
 Bendigo Historical Society Inc.
Photograph - Robert Green Collection - Photos of Bendigo Tramways - Sheet 6 of 8, 1960s
... keith s king...Sheet B also contains one slide taken by Robert's friend Keigh S King (1928-2019) who was the author of the book 'The Bendigo Tramways an illustrated history, published by the Australian Railway Historical Society Victorian Division Melbourne in February 1972; BHS Item no. 5052. ...Sixteen black and white prints from the images are also included. keith s king bendigo trams robert green Robert Green Collection, this item contains 33 Black and White Negatives of the trams at various locations around Bendigo. ...This collection contains eight archive sheets (Sheet 1 to Sheet 8) of strips of original 35mm black and white negatives of photographs taken during the 1960s and early 1970s by Robert Green, of the Bendigo State Electricty Commission of Victoria Tramways prior to their abandonment The collection also includes two archive quality sheets (Sheet A and Sheet B) of original 35mm colour slides taken by Robert Green during the same period. Sheet B also contains one slide taken by Robert's friend Keigh S King (1928-2019) who was the author of the book 'The Bendigo Tramways an illustrated history, published by the Australian Railway Historical Society Victorian Division Melbourne in February 1972; BHS Item no. 5052. The collection also includes one USB stick which contains images of all photographs described above, except for one colour slide taken by Keith S Kings. Sixteen black and white prints from the images are also included.Robert Green Collection, this item contains 33 Black and White Negatives of the trams at various locations around Bendigo. Photos: 11147.6a Two trams passing at the loop in Eaglehawk Road at the Philpot Street intersection 11147.6b Two trams passing at the loop in Eaglehawk Road at the Philpot Street intersection 11147.6c Two trams passing at the loop in Eaglehawk Road at the Philpot Street intersection 11147.6d Two trams leave the loop in Eaglehawk Road at the Philpot Street intersection 11147.6e No 18 heading out of Iron Bark to Long Gully along Eaglehawk Road 11147.6f No 25 Special head down View Street at the McKenzie Street intersection 11147.6g The No 25 Special from Eaglehawk arrives at the fountain 11147.h No 2 to Eaglehawk comes up View Street past the Infant Welfare Centre 11147.6i The Quarry Hill tram passes the Carpenter and Houston St intersection at the corner of the cemetery 11147.6j The Quarry Hill tram passes the Carpenter and Houston St intersection at the corner of the cemetery 11147.6k The Quarry Hill tram approached the terminus at the Cemetery gates 11147.6l The Quarry Hill tram at the terminus at the Cemetery gates picking up passengers 11147.6m The Quarry Hill tram at the terminus at the Cemetery gates picking up passengers 11147.6n The Quarry Hill tram at the terminus at the Cemetery gates picking up passengers 11147.6o Tram and large crown in front of the Eaglehawk Town Hall 11147.6p Tram and large crown in front of the Eaglehawk Town Hall 11147.6q Tram and large crown in front of the Eaglehawk Town Hall 11147.6q Two Trams and large crown in front of the Eaglehawk Town Hall 11147.6r Two Trams and large crown in front of the Eaglehawk Town Hall 11147.6s Passengers on the "Last Tram" 11147.6t Passengers on the "Last Tram" 11147.6u Passengers on the "Last Tram" 11147.6v Two trams leaving the depot crossing the Back Creek 11147.6w The Scrubber tram in the depot 11147.6x Birney Car 30 tram in the depot 11147.6y Birney Car 29 and two others arriving at the depot 11147.6z Birney Car 11 and two others arriving at the depot 11147.6aa No 11 Birney Car at the depot 11147.6ab No 28 Birney Car at the depot 11147.6ac Nos 29, 11 and 25 at the depot 11147.6ad Birney Car 28 arrives at the depot 11147.6ae Birney Cars Nos 30 and 29 in the depot 11147.6af The Scrubber Car at the depot 11147.6ag Four trams and one driver at the depot TMS Bendigo Tour 24 March 1968keith s king, bendigo, trams, robert green -
 Bendigo Historical Society Inc.
Photograph - Robert Green Collection - Photos of Bendigo Tramways - Sheet 7 of 8, 1960s
... keith s king...Sheet B also contains one slide taken by Robert's friend Keigh S King (1928-2019) who was the author of the book 'The Bendigo Tramways an illustrated history, published by the Australian Railway Historical Society Victorian Division Melbourne in February 1972; BHS Item no. 5052. ...Sixteen black and white prints from the images are also included. keith s king bendigo trams robert green Robert Green Collection, this item contains 28 Black and White Negatives of the trams at various locations around Bendigo. ...This collection contains eight archive sheets (Sheet 1 to Sheet 8) of strips of original 35mm black and white negatives of photographs taken during the 1960s and early 1970s by Robert Green, of the Bendigo State Electricty Commission of Victoria Tramways prior to their abandonment The collection also includes two archive quality sheets (Sheet A and Sheet B) of original 35mm colour slides taken by Robert Green during the same period. Sheet B also contains one slide taken by Robert's friend Keigh S King (1928-2019) who was the author of the book 'The Bendigo Tramways an illustrated history, published by the Australian Railway Historical Society Victorian Division Melbourne in February 1972; BHS Item no. 5052. The collection also includes one USB stick which contains images of all photographs described above, except for one colour slide taken by Keith S Kings. Sixteen black and white prints from the images are also included.Robert Green Collection, this item contains 28 Black and White Negatives of the trams at various locations around Bendigo. Photos: 11147.7a No 6 to Golden Square in Mcrae Street 11147.7b No 21 to North Bendigo in Mcrae Street 11147.7c No 7 to North Bendigo in Mcrae Street 11147.7d No 7 to North Bendigo in Mcrae Street passes No 21 to Golden Square on the loop 11147.7e The Depot and Back Creek bridge 11147.7f The Depot and Back Creek bridge 11147.7g Nos 25, 23 and 30 in the depot 11147.7h The photographer in Thunder Street North Bendigo, railway line in the background 11147.7i No 21 coming up to the North Bendigo terminus in Thunder or Finn street 11147.7j No 21 leaving the North Bendigo terminus in Thunder or Finn street 11147.7k The Photographer in Thunder Street, North Bendigo 11147.7l No 21 in Thunder or Finn street 11147.7m No 21 in Thunder or Finn street 11147.7n No 17 in Eaglehawk 11147.7o No 17 in Eaglehawk 11147.7p No 26 at the top of Mitchell Street 11147.7q No 26 heading to Eaglehawk in the rain 11147.7r No 2 to Quarry Hill in the rain at the Manchester Arms Loop 11147.7s Passing Trams 11147.7t No 30 Birney Car to Quarry Hill in the rain at the Manchester Arms Loop 11147.7u No 7 to North Bendigo, the rowing Club in the background, Thunder Street 11147.7v No 7 turns into Finn Street from the North Bendigo Terminus 11147.7w The Birney Car turns into the North Bendigo Terminus from Finn Street 11147.7x The Birney Car turns into the North Bendigo Terminus from Finn Street 11147.7y Two trams at the North Bendigo Terminus 11147.7z No 24 approaches the Cemetery gates and horse hitching posts in Quarry Hill 11147.7aa The Cemetery and horse hitching posts in Quarry Hill 11147.7ab No 24 and horse hitching post in Quarry Hillkeith s king, bendigo, trams, robert green -
 Bendigo Historical Society Inc.
Photograph - Robert Green Collection - Photos of Bendigo Tramways - Sheet A of 10, 1972
... keith s king...Sheet B also contains one slide taken by Robert's friend Keigh S King (1928-2019) who was the author of the book 'The Bendigo Tramways an illustrated history, published by the Australian Railway Historical Society Victorian Division Melbourne in February 1972; BHS Item no. 5052. ...Sixteen black and white prints from the images are also included. keith s king bendigo trams robert green Robert Green Collection, this item contains Colour Slides of the trams at various locations around Bendigo. ...This collection contains eight archive sheets (Sheet 1 to Sheet 8) of strips of original 35mm black and white negatives of photographs taken during the 1960s and early 1970s by Robert Green, of the Bendigo State Electricty Commission of Victoria Tramways prior to their abandonment The collection also includes two archive quality sheets (Sheet A and Sheet B) of original 35mm colour slides taken by Robert Green during the same period. Sheet B also contains one slide taken by Robert's friend Keigh S King (1928-2019) who was the author of the book 'The Bendigo Tramways an illustrated history, published by the Australian Railway Historical Society Victorian Division Melbourne in February 1972; BHS Item no. 5052. The collection also includes one USB stick which contains images of all photographs described above, except for one colour slide taken by Keith S Kings. Sixteen black and white prints from the images are also included.Robert Green Collection, this item contains Colour Slides of the trams at various locations around Bendigo. Photos: 11147.9a No 2 to Eaglehawk leaves Carpenter Street, crosses the railway line and enters Mitchell Street 11147.9b Two Birney Cars ready to depart in Pall Mall 11147.9c Nos 30 and 28 Birney Cars ready to depart in Pall Mall 11147.9d No 30 to North Bendigo turns off Weeroona Avenue into Caledonia St at the Gas Works 11147.9e No 5 comes up View Street past Dudley House and the Masonic Hall 11147.9f No 28 Birney Car 11147.9g No 3 comes into Eaglehawk 11147.9h Nos 2 and 3 cross over at the Eaglehawk Road and Cuneen Streets Loop in Long Gully 11147.9j No 30 Birney Car crosses the Munday St and Pall Mall intersection heading for the fountain 11147.9k No 28 Birney Car comes down Nolan Street past the Lake Weeroona 11147.9l No 30 Birney Car in the darkness 11147.9m The Scrubber Car comes up Mitchell Street 11147.9n The Scrubber Car 11147.9o No 18 at Eaglehawk, Bendigo T.M.S of Vic. Ltd Photo, Sat 15 April 1972. Robert Green and John Fitzsimons holding "Last Tram Mail" 1/125 f8. Taken at 9am on the second last day of the trams.keith s king, bendigo, trams, robert green -
 Bendigo Historical Society Inc.
Photograph - Robert Green Collection - Photos of Bendigo Tramways - Sheet 4 of 8, 1960s
... keith s king...Sheet B also contains one slide taken by Robert's friend Keigh S King (1928-2019) who was the author of the book 'The Bendigo Tramways an illustrated history, published by the Australian Railway Historical Society Victorian Division Melbourne in February 1972; BHS Item no. 5052. ...Sixteen black and white prints from the images are also included. keith s king bendigo trams robert green Robert Green Collection, this item contains 22 Black and White Negatives of the trams at various locations around Bendigo. ...This collection contains eight archive sheets (Sheet 1 to Sheet 8) of strips of original 35mm black and white negatives of photographs taken during the 1960s and early 1970s by Robert Green, of the Bendigo State Electricty Commission of Victoria Tramways prior to their abandonment The collection also includes two archive quality sheets (Sheet A and Sheet B) of original 35mm colour slides taken by Robert Green during the same period. Sheet B also contains one slide taken by Robert's friend Keigh S King (1928-2019) who was the author of the book 'The Bendigo Tramways an illustrated history, published by the Australian Railway Historical Society Victorian Division Melbourne in February 1972; BHS Item no. 5052. The collection also includes one USB stick which contains images of all photographs described above, except for one colour slide taken by Keith S Kings. Sixteen black and white prints from the images are also included.Robert Green Collection, this item contains 22 Black and White Negatives of the trams at various locations around Bendigo. Photos: 11147.4a Tram at Carpenter St Quarry Hill, Cemetery Gates Terminus 11147.4b Tram and Conductor at Carpenter St Quarry Hill, Cemetery Gates Terminus 11147.4c Overhead Pole, wires and tram stop sign; and end of section sign 11147.4d Overhead Pole, wires and tram stop sign; and end of section sign, in View Street 11147.4e Quarry Hill, Eaglehawk and Golden Square Trams meeting at the Fountain, Charing Cross 11147.4f Quarry Hill, Eaglehawk trams and overhead sign at the fountain roundabout 11147.4g Tram line Point at the Fountain 11147.4h All lines cross at the fountain 11147.4i Turning Caution sign at Tramways Avenue (to the depot) and McRae Street 11147.4j Trams stop by request sign 11147.4k No 4 at the intersection of Eaglehawk and Havilah Roads, Long Gully 11147.4l No 4 to Quarry Hill picking up passengers in Eaglehawk Road 11147.4m No 30 Birney Car heading to Golden Square 11147.4n Birney Car crossing the creek 11147.4o Birney Car No 30 leaving Golden Square in High Street 11147.4p No 3 heading to Eaglehawk 11147.4q No 25 heading to Quarry Hill in Carpenter St possibly 11147.4r Three trams at the loop in Carpenter St Quarry Hill 11147.4s Two trams at the Quarry Hill Terminus Carpenter St 11147.4t Two trams at Canterbury Park Eaglehawk 11147.4u Birney Car 29 Special at Eaglehawk Terminus 11147.4v Passing No 26 at Eaglehawkkeith s king, bendigo, trams, robert green -
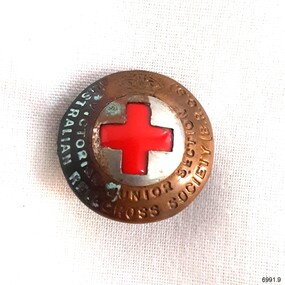 Flagstaff Hill Maritime Museum and Village
badge - Australia Red Cross Society (B.R.C.S.) badge, J R Gaunt and Son Limited, Victoria Junior Section, 1930
... FRONT; Symbol [King;s Crown], Embossed “AUSTRALIAN RED CROSS SOCIETY (B.R.C.S.)“. ...British Red Cross Society London manufacturer FRONT; Symbol [King;s Crown], Embossed “AUSTRALIAN RED CROSS SOCIETY (B.R.C.S.)“. ...The badge represents the Victorian Junior Section of the Australian Red Cross Society, which was formed in 1914 at the outbreak of World War I as a branch of the British Red Cross Society (B.R.C.S.), hence the crown on top of the red cross. It wasn't until 1941 that he Australian Branch was Incorporated by Royal Charter. The badge was made in London by J.R. Gaunt & Son Ltd. James Richard Gaunt and his son Charles Frederick Gaunt established the Birmingham firm of J R Gaunt & Son in 1884. The business operated for over a hundred years and specialised in making buttons for uniforms. This badge is one of a set of badges collected by Dr W R Angus from the organisations in which he was involved. The set of badges is now part of Flagstaff Hill’s comprehensive W.R. Angus Collection, donated by the family of Dr W R Angus, surgeon and oculist. The W.R. Angus Collection: - The W.R. Angus Collection includes historical medical equipment, surgical instruments and material belonging to Dr Edward Ryan and Dr Thomas Francis Ryan, (both of Nhill, Victoria) and Dr Angus’ own belongings. The Collection’s history spans the medical practices of the two Doctors Ryan, from 1885-1926 plus that of Dr Angus, up until 1969. It includes historical medical and surgical equipment and instruments from the doctors Edward and Thomas Ryan of Nhill, Victoria. Dr Angus married Gladys in 1927 at Ballarat, the nearest big city to Nhill where he began as a Medical Assistant. He was also Acting House surgeon at the Nhill hospital where their two daughters were born. During World War II He served as a Military Doctor in the Australian Defence Forces. Dr Angus and his family moved to Warrnambool in 1939, where Dr Angus operated his own medical practice. He later added the part-time Port Medical Officer responsibility and was the last person appointed to that position. Both Dr Angus and his wife were very involved in the local community, including the planning stages of the new Flagstaff Hill and the layout of the gardens there. Dr Angus passed away in March 1970.This badge is significant for connecting Doctor Angus with organisations that he supported. The W.R. Angus Collection is significant for still being located at the site it is connected with, Doctor Angus being the last Port Medical Officer in Warrnambool. The Collection includes historical medical objects that date back to the late 1800s.Badge; a brass dome'shaped badge with two rows of text around the outer edge and a white enamel centre behind a red enamel cross. A crown symbol is embossed above the cross. Text is embossed around the edges with remnants of white within the some of the letters. The reverse has text around the emblem of a wreath and the remnants of a catch. Inscriptions include text and emblems on front and reverse. The badge is for the Australian Red Cross Society, Victorian Junior Section. It was made by J. R. Gaunt & son, London. This badge is part of a set of badges collected by Dr W R Angus. the set represents organisations that he was involved in, and is part of the W.R. Angus Collection.FRONT; Symbol [King;s Crown], Embossed “AUSTRALIAN RED CROSS SOCIETY (B.R.C.S.)“. Inner text “VICTORIA JUNIOR SECTION” REVERSE: Symbol p[wreath] “J R GAUNT LTD, LONDON"flagstaff hill, warrnambool, maritime village, maritime museum, shipwreck coast, great ocean road, w.r. angus, badge, organisation badge, flagstaff hill maritime museum and village, australian red cross, charity, volunteer organisation, red cross, j r gaunt & son, birmingham, badges, buttons, military buttons, uniform buttons, lapel badge, junior section, b.r.c.s., british red cross society, london manufacturer -
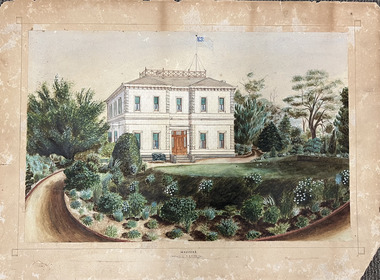 Kew Historical Society Inc
Work on paper, Madford: the property of A.S. King Esq
... "MADFORD / The Property of A. S. KING Esq"...Thomas Mitchell William Siddeley Arthur Septimus King "MADFORD / The Property of A. S. KING Esq" This fine perspective drawing of the architectural elements of Madford [formerly Elm Lodge, later St Anthony's Home for Babies] is contrasted with the freer addition in watercolour of the layout and plants of the garden facing Wellington Street. ...The Victorian-era mansion Madford in Wellington Street had several incarnations before it was finally demolished. While the precise details of its original construction have not been discovered, we know that it was originally named Elm Lodge, and that the property was offered for sale in 1863 by Thomas Mitchell, of the firm Mitchell & Bonneau, wholesale ironmongers and merchants. The house was sold in about 1873 to William Siddeley (1827-1905), who was described on the occasion of his death as ‘the father of Australian shipping’. The next owner was Arthur Septimus King (1827- 99), who renamed the house Madford after his purchase of the property in 1875. It was A.S. King for whom this artwork was completed. Following King’s death in 1899, portions of the property were sold, including to the Borough of Kew in 1905, to form the Alexandra Gardens. Then, in 1920, the house and its remaining lands were sold to the Catholic Church who opened St Anthony’s Home for Children on the site in 1922. That building was promptly demolished, and the site redeveloped circa 1976.Gift of James Pearson, 2022This fine perspective drawing of the architectural elements of Madford [formerly Elm Lodge, later St Anthony's Home for Babies] is contrasted with the freer addition in watercolour of the layout and plants of the garden facing Wellington Street. The view selected is the south-facing main facade and the west facing side. After A.S. King purchased the house in 1875, it was extended with new wings at the rear to accommodate his large family. There is no indication of these extensions in the painting so its creation must predate the renovations, and probably depicts the original building on the site."MADFORD / The Property of A. S. KING Esq"elm lodge, madford, st anthony's home for babies, houses -- wellington street -- kew (vic.), thomas mitchell, william siddeley, arthur septimus king -
 Glen Eira Historical Society
Album - Album page, Bureel (Kooyong Road), Circa 1972
... king...mansion...1860's...Classified:11/08/1990 trevor hart caulfield caulfield north kooyong road thomas king mansion 1860's bureel burreel francis john sidney stephen city of melbourne shire president 1850's verandah nursing home john allee ornamented corner stones new orleans manner plaster rendered mrs luxton vincent willis alexander family victorian architectural style ornate cast iron work lawyers brick houses richard buxton richard buckhurst buxton george allen george leavis allan allans music daniel luxton john taverner mary neate buxtons estate land subdivision mary neat gardens Handwritten: Bureel [top left] / 113 [bottom left] Page 113 of photograph album with 1 photograph of Burreel in its garden. ...This photograph is part of the Caulfield Historical Album 1972. This album was created in approximately 1972 as part of a project by the Caulfield Historical Society to assist in identifying buildings worthy of preservation. The album is related to a Survey the Caulfield Historical Society developed in collaboration with the National Trust of Australia (Victoria) and Caulfield City Council to identify historic buildings within the City of Caulfield that warranted the protection of a National Trust Classification. Principal photographer thought to be Trevor Hart, member of Caulfield Historical Society. Most photographs were taken between 1966-1972 with a small number of photographs being older and from unknown sources. All photographs are black and white except where stated, with 386 photographs over 198 pages. From: Glen Eira Heritage Management Plan 1996 by Andrew Ward In 1856, John Allee, a builder from Brighton, purchased C.A. 37 on the south-west corner of Glenhuntly and Kooyong Roads. The land comprised just over 45 acres. By 1863, Francis John Sidney Stephen, a lawyer and cousin of J. Wilberforce Stephen, owned most of lot 37. By 1866, Stephen had a built a "small mansion" named ''Burreel". It was a brick house and Stephen lived there until 1882. By 1884, Mrs Buxton of Hillside Terrace, East Melbourne, had purchased the property. Richard Buxton, a gentleman was listed as occupant and the house described as "brick, eight rooms". NAV was £300. Richard Buxton continued residency in 1887 however in 1888, George Allen, music seller, became occupant. At that time the house had thirteen rooms on twenty-three acres of land. Twelve people lived there and NAV was £920. In 1900, Daniel Luxton, stock and sharebroker and the Honourable John Taverner, M.H.A. leased the property. Fourteen people lived there. Mrs Buxton continued as owner. By 1910, ownership had passed to Mrs Mary Neate, who converted the house to a nursing home. The land had been subdivided by 1913 and sold by ''Buxtons Estate". Burreel Avenue, Baxter, Buxton and Hoddle Streets were created. "Burreel" was rated to Burreel Avenue and stood on lot 13 with frontages to Burreel Avenue and Kooyong Road of 198' and 214'. The house had ten rooms. NAV was £60. Mary Neate, a nurse, continued as owner/ operator of ''Burreel" nursing home in 1927. At that time there were sixteen rooms and fourteen residents. NAV was £100. Mrs Neat remained there until 1947. In 1948, the house was turned into apartments. In the 1980's, the Alexander family purchased it and restored it to a private residence.Burreel 331 Kooyong Road, ELSTERNWICK VIC 3185 - Property No B4950 National Trust https://vhd.heritagecouncil.vic.gov.au/places/65648 This is a large and substantially intact example of the grand villas of nineteenth century Melbourne. The bulk of the house most probably was built in 1866-1868 for Francis John Sidney Stephen, a prominent and highly regarded Melbourne solicitor and a member of an illustrious legal family. Stephen conducted a lucrative private practice and in 1845 was appointed first solicitor to the City of Melbourne; a position he held until his death in 1895. He took an active part in the development of Caulfield and was Shire President in 1874 and 1877. He was a resident at Burreel from 1868 to 1882. The house has evolved in stages, the rear wings possibly remaining from a house built during the 1850s. The existing ornate cast iron verandah was probably built between 1882 and 1888 during the residence of Richard Buckhurst Buxted, a notable boom period auctioneer and real estate agent. George Allan, the founder of Allan's music store, was another important occupier from 1888 to 1991. Bureel's essentially residential quality has been retained and the interior has been well preserved. The significance of this building does not rest in any single unusual outstanding architectural feature, or in its association with a particularly prominent member of society in the past, but rather in the consistent integrity of both the interior and exterior, which results in the survival of an outstanding example of this type of residential building and its associations with two notable citizens. Classified:11/08/1990Page 113 of photograph album with 1 photograph of Burreel in its garden.Handwritten: Bureel [top left] / 113 [bottom left]trevor hart, caulfield, caulfield north, kooyong road, thomas king, mansion, 1860's, bureel, burreel, francis john sidney stephen, city of melbourne, shire president, 1850's, verandah, nursing home, john allee, ornamented corner stones, new orleans manner, plaster rendered, mrs luxton, vincent willis, alexander family, victorian architectural style, ornate cast iron work, lawyers, brick houses, richard buxton, richard buckhurst buxton, george allen, george leavis allan, allans music, daniel luxton, john taverner, mary neate, buxtons estate, land subdivision, mary neat, gardens -
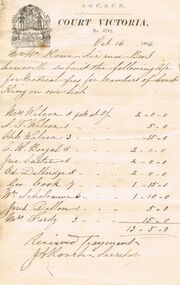 Bendigo Historical Society Inc.
Document - ANCIENT ORDER OF FORESTERS NO 3770 COLLECTION: ACCOUNT/RECEIPT
... King... W Wilcox... S...Account for Medical Fees for Members of Court King on our list. Names on account are: W. Wilcox, S. T. Wilcox, Chls. ...History House 11 Mackenzie Street Bendigo goldfields SOCIETIES Aof correspondence Ancient Order of Foresters No 3770 Collection - Account/Receipt Court Victoria No 3782 Wm Rowe Court King W Wilcox S T Wilcox Chls Wilcox C W Boegal Jno Carter Ed Delbridge Geo Cook Wm Schelemme Jer? ...Account/Receipt written on paper with Court Victoria No. 3782 letterhead and crest. Dated Oct 16 1886. Account for Medical Fees for Members of Court King on our list. Names on account are: W. Wilcox, S. T. Wilcox, Chls. Wilcox, C. W. Boegal, Jno. Carter, Ed. Debbridge, Geo. Cook, Wm. Schelemme, Jer? Dillon, Mrs Fardy, J. A. Roach. Court Victoria A.O.F.3782 Sandhurst impression stamp on the paper.J. A. Roachsocieties, aof, correspondence, ancient order of foresters no 3770 collection - account/receipt, court victoria no 3782, wm rowe, court king, w wilcox, s t wilcox, chls wilcox, c w boegal, jno carter, ed delbridge, geo cook, wm schelemme, jer? dillon, mrs fardy, j a roach