Showing 64 items matching "outside loop "
-
 Moorabbin Air Museum
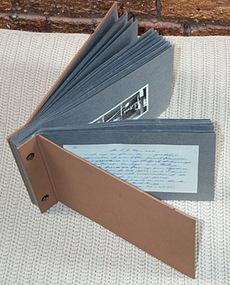
Book - Aerobatics, Conquest of Lines and Symmetry
... ...Outside loop & half loop...Aerobatics Cockpit checks Chandelies & lazy eights Spin The loop Immelman turn Hammerhead Cuban eight Knife edge Slow roll types Reverse Cuban eight Snap & barrel rolls Outside loop & half loop Square loop English bunt Inverted spin Tail slide Compound maneuvers Overview of aerobatic techniques, circa 1970 Conquest of Lines and Symmetry Book Aerobatics ...Overview of aerobatic techniques, circa 1970non-fictionOverview of aerobatic techniques, circa 1970cockpit checks, chandelies & lazy eights, spin, the loop, immelman turn, hammerhead, cuban eight, knife edge, slow roll types, reverse cuban eight, snap & barrel rolls, outside loop & half loop, square loop, english bunt, inverted spin, tail slide, compound maneuvers -
 Bendigo Historical Society Inc.
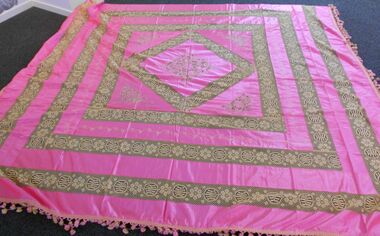
Textile - Satin and machine lace bedspread
... The third satin rectangle from the outside has a looped and wave pattern in couched cornelli work, missing on one corner....The third satin rectangle from the outside has a looped and wave pattern in couched cornelli work, missing on one corner. ...A pink satin and cream machine lace bedspread made from alternative 13 to 14cm wide strips in a rectangular pattern with central rectangle set at 45 degrees. Three sides are edged with silk chenille bobbles in pink and cream. The central rectangle and the four corners surrounding the central rectangle have a floral cut work pattern in the silk overlaying the lace which has couched cornelli work.. The third satin rectangle from the outside has a looped and wave pattern in couched cornelli work, missing on one corner.favaloro, bedspread, satin, chenile bobble trim -
 Bendigo Military Museum
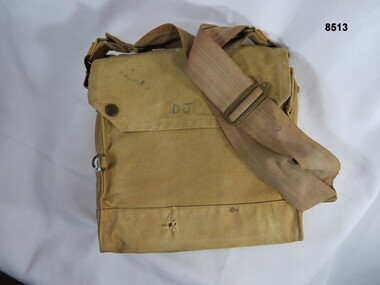
Equipment - MEDICAL FIELD BAG, 1939-1945
... outside of the front closure flap. “D.J” On the inside of the front flap, “VX 91862 VI, CLEPEHAM Brian, Capt. AAMC” Over the shoulder medical field carry bag, made with pockets both front and rear. The top flap closure is secured by press stud closures, the over the shoulder strap or webbing is clipped onto side loops. ...Over the shoulder medical field carry bag, made with pockets both front and rear. The top flap closure is secured by press stud closures, the over the shoulder strap or webbing is clipped onto side loops. The bottom of the bag has two brass ventilators.On outside of the front closure flap. “D.J” On the inside of the front flap, “VX 91862 VI, CLEPEHAM Brian, Capt. AAMC”passchendaele barracks trust -
 Bendigo Military Museum
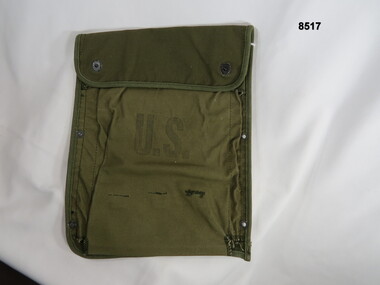
Equipment - BAG, OPERATIONAL MANUAL, Unknown
... loops. The bag has reinforced stitching around the outside edges. There are a series of eyelets around the outside of the bag. ...loops. The bag has reinforced stitching around the outside edges. There are a series of eyelets around the outside of the bag. ...US Army green case maintenance and Operational manual bag with double compartments and sewn on the inside attachment loops. The bag has reinforced stitching around the outside edges. There are a series of eyelets around the outside of the bag. The closure flap is fitted with press clips. This is a personal carry bag as there are no webbing attachments on the bag.Front of the bag, “U.S” (In large lettering). On inside flap; “CASE MAINTENANCE AND OPERATIONS MANUAL. ML-C-11743C, 7520-00-359-9613 GS-005-93185”passchendaele barracks trust, u.s., operational manual bag -
 Bendigo Military Museum
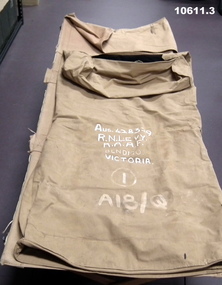
Equipment - STRETCHER WITH SLEEPING BAG, c.1939-45
... outside of sleeping bag: "AUS 42839 R.N. LEVY, RAAF BENDIGO, VICTORIA. (1) A18/Q". Stamped inside bag is "R/ W^D./ 85". 1. "X" shape frame for use as a stretcher. (4 x 'X' frames). Made from steel and timber. 2. Canvas section (top) to complete the assembly. The canvas has timber dowel edges with matching steel tube joiners. Along those dowels there are 4 steel loops ...Used by Richard Levy during occupation of Germany Post WW2. Flying Officer Levy joined the RAAF on 10/10/1942. RAAF No. 428329. Discharged on 3/1/1946. Last posting was 180 Sqn RAAF.1. "X" shape frame for use as a stretcher. (4 x 'X' frames). Made from steel and timber. 2. Canvas section (top) to complete the assembly. The canvas has timber dowel edges with matching steel tube joiners. Along those dowels there are 4 steel loops on each side. These lug over metal tips on the x frame legs. On the canvas section there is a canvas pocket section which can be held shut with cords or lugs (pillow). 3. Sleeping bag made from canvas. The floor section has a woollen layer. All the canvas is a brown colour. The sleeping bag has a lot written on it.Painted on the outside of sleeping bag: "AUS 42839 R.N. LEVY, RAAF BENDIGO, VICTORIA. (1) A18/Q". Stamped inside bag is "R/ W^D./ 85".equipment, stretcher, ww2, richard levy. -
 Bendigo Military Museum
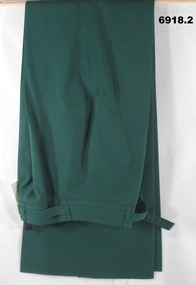
Uniform - SLACKS, SERVICE DRESS, ARMY, Australian Government Clothing Factory, 1980
... Outside back "THE TAG IS FOR IDENTIFICATION ONLY/ PLEASE REMOVE BEFORE WEARING" with printed and handwritten information. 1. Slacks - dark green colour wool and polyester, full length slacks with belt loops. ...Slacks - garment is part of a Women's Service Dress uniform. Possibly issued to "BALAAM", Service No. "F380519" Refer also Cat No. 9616.1. Slacks - dark green colour wool and polyester, full length slacks with belt loops. Front nylon zipper fly, brown colour plastic button at waist - no pockets. Manufacturers labels - two, inside back of waistband, exterior back of waistband - (to be removed when worn). White colour polyester fabric. 2. Belt - fabric as above with keeper and metal press stud closer.Manufacturers label - black ink print. Inside back "A.G.C.F. VICTORIA 1980 ^/ 8410-66-096-5182 size 10, AVE HGT/ FULL HIP/ WAIST 60 CM HIP 90 CM" Garment care instructions under headings "HAND WASH, MACHINE WASH IRONING", Followed by "NAME/ Service No.". Outside back "THE TAG IS FOR IDENTIFICATION ONLY/ PLEASE REMOVE BEFORE WEARING" with printed and handwritten information.uniform, womens trousers, army, balaam, passchendaele barracks trust -
 Bendigo Military Museum
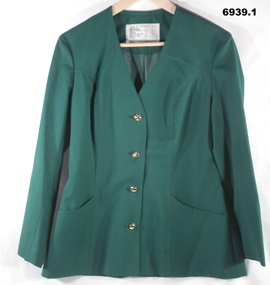
Uniform - SERVICE DRESS, ARMY, Australian Government Clothing Factory, 1981 - 1984
... Slacks - Winter Service dress slacks - full length with five belt loops, front nylon and metal zipper fly, dark green colour plastic button at waist, Manufacturer's labels two outside back. 5. ...Slacks - Winter Service dress slacks - full length with five belt loops, front nylon and metal zipper fly, dark green colour plastic button at waist, Manufacturer's labels two outside back. 5. ...Uniform items issued to "BROWNE" Service No. F3207137.Garments - dark green colour wool and polyester fabric. 1. Jacket - Winter service dress jacket - collarless, with two curved inset pockets at hip. Four gold colour plastic buttons with shank and metal safety pin. Buttons have raised emblem "Australian Army Psychology Corps". Dark green colour polyester fabric lining. Manufacturer's label at back below neckline. White cotton label. 2. Skirt - Winter Service Dress skirt. A-line skirt, narrow waistband, five belt loops. front of skirt pair of box pleats. Rear at waist, nylon and metal zipper and dark green plastic button. Dark green colour polyester fabric lining. Manufacturers label sewn to waistband lining. 3. Belt - self fabric belt with gold colour plastic buckle. 4. Slacks - Winter Service dress slacks - full length with five belt loops, front nylon and metal zipper fly, dark green colour plastic button at waist, Manufacturer's labels two outside back. 5. Belt - self fabric belt with keeper and metal press stud. 6. Hat - Service dress hat - dark green colour fabric split brim, turned down at front and up at rear with light green colour fabric three panel crown. Light green half hat band with a rising pointed peak at front attached with black elastic. Interior - black velveteen sweatband lining, crown lining dark green polyester fabric. Manufacturer's label sewn rear lining. Manufacturer's labels - black ink print. 1.& 2. "A.G.C.F. ^/VICTORIA 1981/ 8410-66-096-5154/ SIZE 14 AVE HEIGHT/FULL HIP/ 90cm BUST/ 70 cm WAIST 100 cm HIPS/ Wool & polyester/ Garment/ NAME / SERVICE NO" With garment care instructions. Handwritten - blue ink pen "BROWNE/ F3207137" 4. " A.G.C.F. VICTORIA 1984 ^ 1984/ 8410-66-096-5173 SIZE 14 AVE HGT/ AVE HIP Waist 70 cm/ Hip 96 cm/Name/ Service No". With garment care instructions. Outside back - 'THIS TAG IS FOR IDENTIFICATION PURPOSES ONLY/ PLEASE REMOVE BEFORE WEARING" with printed and handwritten information. 6. "EMERCO VIC./ ^/ 8410-66-097-4922/ SIZE 56/ NAME/ SERVICE NO".passchendaele barracks trust, uniform, winter service dress, army, browne -
Frankston RSL Sub Branch
Mortar Cover
... Two handle loops have been sewn on to the outside of the cover, the obverse loop being 24 mm long, reverse loop 12 mm long....Two handle loops have been sewn on to the outside of the cover, the obverse loop being 24 mm long, reverse loop 12 mm long. ...Dark green vynil over cloth material cover. Base is 90 mm in diameter, height 190 mm flap cover down, height 265 mm with flap cover extended. Flap cover uses press stud fastner to close cover. The cover has been cotton stitched. Two handle loops have been sewn on to the outside of the cover, the obverse loop being 24 mm long, reverse loop 12 mm long. -
 Bendigo Historical Society Inc.
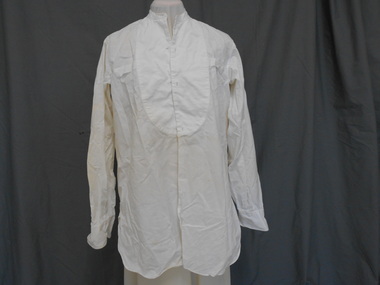
Clothing - AILEEN AND JOHN ELLISON COLLECTION: DRESS SHIRT BY WELMAR, 1950's
... Loop at centre back below neckline 7 cm X 8 cm Loops on either side of front 17 cms below shoulder extending from outside edge of waffle pattern panels (7 cm X 2.5 cm )....Loop at centre back below neckline 7 cm X 8 cm Loops on either side of front 17 cms below shoulder extending from outside edge of waffle pattern panels (7 cm X 2.5 cm ). ...Welmar white dress shirt. Collarless. Long sleeves with 7.5 cm cuffs of marcella waffle weave fabric. Cuffs have one button hole on either side of opening. 2cm band around neckline with buttonholes at centre back and either side of front opening. Panels of waffle patterned fabric on either side of front opening extending to above waistline (33cms X 11 cms). Each side of front opening has three button holes. Loop at centre back below neckline 7 cm X 8 cm Loops on either side of front 17 cms below shoulder extending from outside edge of waffle pattern panels (7 cm X 2.5 cm ).Label inside back, Welmar. All Cotton / Adhesive label 50 54costume, male, dress shirt -
 Montmorency–Eltham RSL Sub Branch
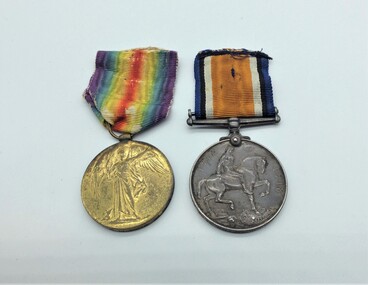
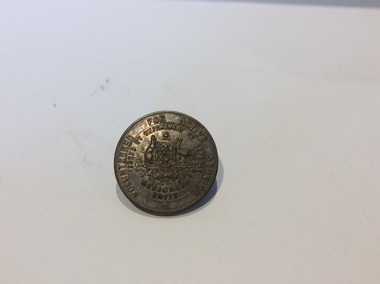
Medal - Medal Group, British War & Victory (Pte. Dempster)
... Victory Medal Bronze disc with circular loop which is threaded with ribbon Ribbon - a ‘two rainbow’ design, with the violet from each rainbow on the outside edges moving through to a central red stripe where both rainbows meet Obverse ... image of "winged Victory" Reverse ... inscription surrounded by laurel reath...Victory Medal Bronze disc with circular loop which is threaded with ribbon Ribbon - a ‘two rainbow’ design, with the violet from each rainbow on the outside edges moving through to a central red stripe where both rainbows meet Obverse ... image of "winged Victory" Reverse ... inscription surrounded by laurel reath Medal Medal Group, British War & Victory (Pte. ...Ancestor of Sub Branch memberPte. Dempster was an ancestor of a Montmorency/Eltham sub-branch member.British War Medal Silver disc with a straight clasp suspender without a swivel Ribbon (in clasp) - wide central watered stripe of orange, flanked by two narrow white stripes, which are in turn flanked by two black pin-stripes, further flanked by two outer stripes of blue Obverse ... bare headed effigy of King George V (by Sir Bertram Mackennal) facing left with the legend around circumference Reverse ... St. George on horseback trampling shield of eagle (symbol of "Central Powers"); above is rising sun of victory. Victory Medal Bronze disc with circular loop which is threaded with ribbon Ribbon - a ‘two rainbow’ design, with the violet from each rainbow on the outside edges moving through to a central red stripe where both rainbows meet Obverse ... image of "winged Victory" Reverse ... inscription surrounded by laurel reathBritish War Medal Obverse ... GEORGIVS V BRITT OMN : REX ET IND. IMP. (George V, King of all the British Isles and Emperor of India) Reverse ... 1914 1918 Rim ... Pte J. H. Dempster, 24 BN AIF Victory Medal Obverse ... no inscription Reverse ... THE GREAT WAR FOR CIVILIZATION 1914 - 1919 Rim ... Pte J. H. Dempster, 24 BN AIFwar service medals, ww1 -
 Kyneton RSL Sub Branch
Badge, Medically Unfit, c1915
... Kyneton RSL Sub Branch 37 - 39 Mollison Street Kyneton daylesford-and-the-macedon-ranges History / Summary This badge was issued to people of military age who had volunteered for active service outside Australia since 1 July 1915, but had been certified by an authorised Medical Officer as medically unfit to do so. ww1 badge Around circumference of badge, Volunteer for active service , below coat of Arms, Medically Unfit. Next line , Issued by Department of Defence. Back, 58682 Circular badge with two loops ...History / Summary This badge was issued to people of military age who had volunteered for active service outside Australia since 1 July 1915, but had been certified by an authorised Medical Officer as medically unfit to do so.Circular badge with two loops on back. Pin missing.Around circumference of badge, Volunteer for active service , below coat of Arms, Medically Unfit. Next line , Issued by Department of Defence. Back, 58682ww1, badge -
 Flagstaff Hill Maritime Museum and Village
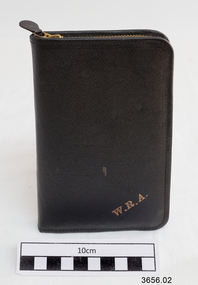
Container - Surgical Instrument Case, mid 20th century
... outside of case "W.R.A.". Maker's stamp on internal clot (Illegible). Surgical instrument case, black leather pouch with metal zipper closure, part of the W.R. Angus Collection. Inside is a removable white fabric insert with loops ...This surgical instrument case belonged to Dr. W.R. Angus, who had many portable medical and surgical sets in his possession. The case was donated to Flagstaff Hill Maritime Village by the family of Doctor William Roy Angus, Surgeon and Oculist. It is part of the “W.R. Angus Collection” that includes historical medical equipment, surgical instruments and material once belonging to Dr Edward Ryan and Dr Thomas Francis Ryan, (both of Nhill, Victoria) as well as Dr Angus’ own belongings. The Collection’s history spans the medical practices of the two Doctors Ryan, from 1885-1926 plus that of Dr Angus, up until 1969. ABOUT THE “W.R.ANGUS COLLECTION” Doctor William Roy Angus M.B., B.S., Adel., 1923, F.R.C.S. Edin.,1928 (also known as Dr Roy Angus) was born in Murrumbeena, Victoria in 1901 and lived until 1970. He qualified as a doctor in 1923 at University of Adelaide, was Resident Medical Officer at the Royal Adelaide Hospital in 1924 and for a period was house surgeon to Sir (then Mr.) Henry Simpson Newland. Dr Angus was briefly an Assistant to Dr Riddell of Kapunda, then commenced private practice at Curramulka, Yorke Peninsula, SA, where he was physician, surgeon and chemist. In 1926, he was appointed as new Medical Assistant to Dr Thomas Francis Ryan (T.F. Ryan, or Tom), in Nhill, Victoria, where his experiences included radiology and pharmacy. In 1927 he was Acting House Surgeon in Dr Tom Ryan’s absence. Dr Angus had become engaged to Gladys Forsyth and they decided he would take time to further his studies overseas in the UK in 1927. He studied at London University College Hospital and at Edinburgh Royal Infirmary and in 1928, was awarded FRCS (Fellow from the Royal College of Surgeons), Edinburgh. He worked his passage back to Australia as a Ship’s Surgeon on the on the Australian Commonwealth Line’s T.S.S. Largs Bay. Dr Angus married Gladys in 1929, in Ballarat. (They went on to have one son (Graham 1932, born in SA) and two daughters (Helen (died 12/07/1996) and Berenice (Berry), both born at Mira, Nhill ) Dr Angus was a ‘flying doctor’ for the A.I.M. (Australian Inland Ministry) Aerial Medical Service in 1928 . The organisation began in South Australia through the Presbyterian Church in that year, with its first station being in the remote town of Oodnadatta, where Dr Angus was stationed. He was locum tenens there on North-South Railway at 21 Mile Camp. He took up this ‘flying doctor’ position in response to a call from Dr John Flynn; the organisation was later known as the Flying Doctor Service, then the Royal Flying Doctor Service. A lot of his work during this time involved dental surgery also. Between 1928-1932 he was surgeon at the Curramulka Hospital, Yorke Peninsula, South Australia. In 1933 Dr Angus returned to Nhill where he’d previously worked as Medical Assistant and purchased a share of the Nelson Street practice and Mira hospital from Dr Les Middleton one of the Middleton Brothers, the current owners of what was once Dr Tom Ryan’s practice. Dr L Middleton was House Surgeon to the Nhill Hospital 1926-1933, when he resigned. [Dr Tom Ryan’s practice had originally belonged to his older brother Dr Edward Ryan, who came to Nhill in 1885. Dr Edward saw patients at his rooms, firstly in Victoria Street and in 1886 in Nelson Street, until 1901. The Nelson Street practice also had a 2 bed ward, called Mira Private Hospital ). Dr Edward Ryan was House Surgeon at the Nhill Hospital 1884-1902 . He also had occasions where he successfully performed veterinary surgery for the local farmers too. Dr Tom Ryan then purchased the practice from his brother in 1901. Both Dr Edward and Dr Tom Ryan work as surgeons included eye surgery. Dr Tom Ryan performed many of his operations in the Mira private hospital on his premises. He too was House Surgeon at the Nhill Hospital 1902-1926. Dr Tom Ryan had one of the only two pieces of radiology equipment in Victoria during his practicing years – The Royal Melbourne Hospital had the other one. Over the years Dr Tom Ryan gradually set up what was effectively a training school for country general-practitioner-surgeons. Each patient was carefully examined, including using the X-ray machine, and any surgery was discussed and planned with Dr Ryan’s assistants several days in advance. Dr Angus gained experience in using the X-ray machine there during his time as assistant to Dr Ryan. Dr Tom Ryan moved from Nhill in 1926. He became a Fellow of the Royal Australasian College of Surgeons in 1927, soon after its formation, a rare accolade for a doctor outside any of the major cities. He remained a bachelor and died suddenly on 7th Dec 1955, aged 91, at his home in Ararat. Scholarships and prizes are still awarded to medical students in the honour of Dr T.F. Ryan and his father, Dr Michael Ryan, and brother, John Patrick Ryan. ] When Dr Angus bought into the Nelson Street premises in Nhill he was also appointed as the Nhill Hospital’s Honorary House Surgeon 1933-1938. His practitioner’s plate from his Nhill surgery states “HOURS Daily, except Tuesdays, Fridays and Saturday afternoons, 9-10am, 2-4pm, 7-8pm. Sundays by appointment”. This plate is now mounted on the doorway to the Port Medical Office at Flagstaff Hill Maritime Village, Warrnambool. Dr Edward Ryan and Dr Tom Ryan had an extensive collection of historical medical equipment and materials spanning 1884-1926 and when Dr Angus took up practice in their old premises he obtained this collection, a large part of which is now on display at the Port Medical Office at Flagstaff Hill Maritime Village in Warrnambool. During his time in Nhill Dr Angus was involved in the merging of the Mira Hospital and Nhill Public Hospital into one public hospital and the property titles passed on to Nhill Hospital in 1939. In 1939 Dr Angus and his family moved to Warrnambool where he purchased “Birchwood,” the 1852 home and medical practice of Dr John Hunter Henderson, at 214 Koroit Street. (This property was sold in1965 to the State Government and is now the site of the Warrnambool Police Station. ). The Angus family was able to afford gardeners, cooks and maids; their home was a popular place for visiting dignitaries to stay whilst visiting Warrnambool. Dr Angus had his own silk worm farm at home in a Mulberry tree. His young daughter used his centrifuge for spinning the silk. Dr Angus was appointed on a part-time basis as Port Medical Officer (Health Officer) in Warrnambool and held this position until the 1940’s when the government no longer required the service of a Port Medical Officer in Warrnambool; he was thus Warrnambool’s last serving Port Medical Officer. (The duties of a Port Medical Officer were outlined by the Colonial Secretary on 21st June, 1839 under the terms of the Quarantine Act. Masters of immigrant ships arriving in port reported incidents of diseases, illness and death and the Port Medical Officer made a decision on whether the ship required Quarantine and for how long, in this way preventing contagious illness from spreading from new immigrants to the residents already in the colony.) Dr Angus was a member of the Australian Medical Association, for 35 years and surgeon at the Warrnambool Base Hospital 1939-1942, He served as a Surgeon Captain during WWII 1941-45, in Ballarat, Victoria, and in Bonegilla, N.S.W., completing his service just before the end of the war due to suffering from a heart attack. During his convalescence he carved an intricate and ‘most artistic’ chess set from the material that dentures were made from. He then studied ophthalmology at the Royal Melbourne Eye and Ear Hospital and created cosmetically superior artificial eyes by pioneering using the intrascleral cartilage. Angus received accolades from the Ophthalmological Society of Australasia for this work. He returned to Warrnambool to commence practice as an ophthalmologist, pioneering in artificial eye improvements. He was Honorary Consultant Ophthalmologist to Warrnambool Base Hospital for 31 years. He made monthly visits to Portland as a visiting surgeon, to perform eye surgery. He represented the Victorian South-West subdivision of the Australian Medical Association as its secretary between 1949 and 1956 and as chairman from 1956 to 1958. In 1968 Dr Angus was elected member of Spain’s Barraquer Institute of Barcelona after his research work in Intrasclearal cartilage grafting, becoming one of the few Australian ophthalmologists to receive this honour, and in the following year presented his final paper on Living Intrasclearal Cartilage Implants at the Inaugural Meeting of the Australian College of Ophthalmologists in Melbourne In his personal life Dr Angus was a Presbyterian and treated Sunday as a Sabbath, a day of rest. He would visit 3 or 4 country patients on a Sunday, taking his children along ‘for the ride’ and to visit with him. Sunday evenings he would play the pianola and sing Scottish songs to his family. One of Dr Angus’ patients was Margaret MacKenzie, author of a book on local shipwrecks that she’d seen as an eye witness from the late 1880’s in Peterborough, Victoria. In the early 1950’s Dr Angus, painted a picture of a shipwreck for the cover jacket of Margaret’s book, Shipwrecks and More Shipwrecks. She was blind in later life and her daughter wrote the actual book for her. Dr Angus and his wife Gladys were very involved in Warrnambool’s society with a strong interest in civic affairs. Their interests included organisations such as Red Cross, Rostrum, Warrnambool and District Historical Society (founding members), Wine and Food Society, Steering Committee for Tertiary Education in Warrnambool, Local National Trust, Good Neighbour Council, Housing Commission Advisory Board, United Services Institute, Legion of Ex-Servicemen, Olympic Pool Committee, Food for Britain Organisation, Warrnambool Hospital, Anti-Cancer Council, Boys’ Club, Charitable Council, National Fitness Council and Air Raid Precautions Group. He was also a member of the Steam Preservation Society and derived much pleasure from a steam traction engine on his farm. He had an interest in people and the community He and his wife Gladys were both involved in the creation of Flagstaff Hill, including the layout of the gardens. After his death (28th March 1970) his family requested his practitioner’s plate, medical instruments and some personal belongings be displayed in the Port Medical Office surgery at Flagstaff Hill Maritime Village, and be called the “W. R. Angus Collection”. The W.R. Angus Collection is significant for still being located at the site it is connected with, Doctor Angus being the last Port Medical Officer in Warrnambool. The collection of medical instruments and other equipment is culturally significant, being an historical example of medicine from late 19th to mid-20th century. Dr Angus assisted Dr Tom Ryan, a pioneer in the use of X-rays and in ocular surgery. Surgical instrument case, black leather pouch with metal zipper closure, part of the W.R. Angus Collection. Inside is a removable white fabric insert with loops for storing surgical instruments, attached with press studs. Initials are embossed on the case in gold “W.R.A.”. The cloth insert has a maker’s stamp on it (illegible).Gold print initials across corner on outside of case "W.R.A.". Maker's stamp on internal clot (Illegible).flagstaff hill, warrnambool, shipwrecked coast, flagstaff hill maritime museum, maritime museum, shipwreck coast, flagstaff hill maritime village, great ocean road, dr w r angus, dr ryan, surgical instrument, t.s.s. largs bay, warrnambool base hospital, nhill base hospital, mira hospital, flying doctor, medical treatment, surgical instrument case, surgical kit, portable surgical instruments, medical carry case, medical instruments and accessories -
 Flagstaff Hill Maritime Museum and Village
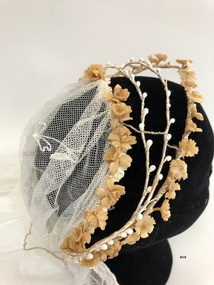
Headwear - Wedding Veil and Headpiece, 1920s-1940s
... A looped lace edging and lace trailing flower design is around the outside of the veil. ...A looped lace edging and lace trailing flower design is around the outside of the veil. ...An example of a wedding veil and headpiece dated around the 1920s to 1940s.This item is significant historically and socially as an example of a wedding veil and headpiece from the early 1900s.Full-length veil with a short train. A looped lace edging and lace trailing flower design is around the outside of the veil. The bridal wreath headband is composed of wax orange blossom flowers and pearl droplets attached to a wire base wrapped in cream ribbon.flagstaff hill, warrnambool, maritime village, maritime museum, flagstaff hill maritime museum & village, shipwreck coast, great ocean road, wedding veil, wax orange blossom headpiece, wax flower wreath, wax flower bridal wreath, orange blossom bridal wreath, lace wedding veil, wedding headpiece -
 Flagstaff Hill Maritime Museum and Village
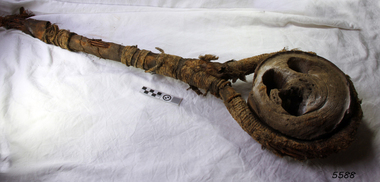
Deadeye, circa 1873
... The hitching of the two deadeyes with a looped lanyard provided the means of tightening, or loosening, the tension on the mast rigging ― essentially by pulling against the chain-plates bolted to the outside of the hull. ...The hitching of the two deadeyes with a looped lanyard provided the means of tightening, or loosening, the tension on the mast rigging ― essentially by pulling against the chain-plates bolted to the outside of the hull. ...This example of a sailing ship’s ‘dead-eye’ is from the wreck of the LOCH ARD, which sank near Port Campbell in 1878. The vessel was an iron hulled clipper ship constructed for the Loch Line in 1873. It was part of a fleet of similar merchant ships owned by that company, which specialised in bringing passengers and goods from London via the Great Circle route to Melbourne, and returning to Britain via Cape Horn with the colony’s wool clip. Deadeyes were a common feature of sailing ship technology in the nineteenth century. They were a simple, cheap, and hard-wearing device that, in conjunction with another deadeye, provided an effective means of levering, or tightening, attached ropes and stays. Lower deadeyes were fixed to the sides of the ship by an encircling metal collar (inset in a flattish groove chiselled around the outer circumference of the disc), which was bolted to iron bars attached to the hull (called chain-plates). Upper deadeyes were looped by a strong hemp or wire rope (inset in a rounded groove carved around the outer circumference of the disc), which was joined to the bottom ends of the rigging which reached up to secure the masts into position (called shrouds or stays). Connecting a Lower deadeye to its corresponding Upper deadeye was a rope (called a lanyard) which looped up and down through the three “eyes” of each disc, to form a pulley system. The hitching of the two deadeyes with a looped lanyard provided the means of tightening, or loosening, the tension on the mast rigging ― essentially by pulling against the chain-plates bolted to the outside of the hull. It was a procedure that could be performed by sailors at sea and in emergencies. For example, after a gale the stays may have stretched and the masts worked loose, requiring retightening. Or, in the extreme circumstance of shipwreck, the lanyards might need to be released on the weather side, so that the masts fall away from the stricken vessel. HISTORY OF THE LOCH ARD The LOCH ARD belonged to the famous Loch Line which sailed many ships from England to Australia. Built in Glasgow by Barclay, Curdle and Co. in 1873, the LOCH ARD was a three-masted square rigged iron sailing ship. The ship measured 262ft 7" (79.87m) in length, 38ft (11.58m) in width, 23ft (7m) in depth and had a gross tonnage of 1693 tons. The LOCH ARD's main mast measured a massive 150ft (45.7m) in height. LOCH ARD made three trips to Australia and one trip to Calcutta before its final voyage. LOCH ARD left England on March 2, 1878, under the command of Captain Gibbs, a newly married, 29 year old. She was bound for Melbourne with a crew of 37, plus 17 passengers and a load of cargo. The general cargo reflected the affluence of Melbourne at the time. On board were straw hats, umbrella, perfumes, clay pipes, pianos, clocks, confectionary, linen and candles, as well as a heavier load of railway irons, cement, lead and copper. There were items included that intended for display in the Melbourne International Exhibition in 1880. The voyage to Port Phillip was long but uneventful. At 3am on June 1, 1878, Captain Gibbs was expecting to see land and the passengers were becoming excited as they prepared to view their new homeland in the early morning. But LOCH ARD was running into a fog which greatly reduced visibility. Captain Gibbs was becoming anxious as there was no sign of land or the Cape Otway lighthouse. At 4am the fog lifted. A man aloft announced that he could see breakers. The sheer cliffs of Victoria's west coast came into view, and Captain Gibbs realised that the ship was much closer to them than expected. He ordered as much sail to be set as time would permit and then attempted to steer the vessel out to sea. On coming head on into the wind, the ship lost momentum, the sails fell limp and LOCH ARD's bow swung back. Gibbs then ordered the anchors to be released in an attempt to hold its position. The anchors sank some 50 fathoms - but did not hold. By this time LOCH ARD was among the breakers and the tall cliffs of Mutton Bird Island rose behind the ship. Just half a mile from the coast, the ship's bow was suddenly pulled around by the anchor. The captain tried to tack out to sea, but the ship struck a reef at the base of Mutton Bird Island, near Port Campbell. Waves broke over the ship and the top deck was loosened from the hull. The masts and rigging came crashing down knocking passengers and crew overboard. When a lifeboat was finally launched, it crashed into the side of LOCH ARD and capsized. Tom Pearce, who had launched the boat, managed to cling to its overturned hull and shelter beneath it. He drifted out to sea and then on the flood tide came into what is now known as LOCH ARD Gorge. He swam to shore, bruised and dazed, and found a cave in which to shelter. Some of the crew stayed below deck to shelter from the falling rigging but drowned when the ship slipped off the reef into deeper water. Eva Carmichael had raced onto deck to find out what was happening only to be confronted by towering cliffs looming above the stricken ship. In all the chaos, Captain Gibbs grabbed Eva and said, "If you are saved Eva, let my dear wife know that I died like a sailor". That was the last Eva Carmichael saw of the captain. She was swept off the ship by a huge wave. Eva saw Tom Pearce on a small rocky beach and yelled to attract his attention. He dived in and swam to the exhausted woman and dragged her to shore. He took her to the cave and broke open case of brandy which had washed up on the beach. He opened a bottle to revive the unconscious woman. A few hours later Tom scaled a cliff in search of help. He followed hoof prints and came by chance upon two men from nearby Glenample Station three and a half miles away. In a state of exhaustion, he told the men of the tragedy. Tom returned to the gorge while the two men rode back to the station to get help. By the time they reached LOCH ARD Gorge, it was cold and dark. The two shipwreck survivors were taken to Glenample Station to recover. Eva stayed at the station for six weeks before returning to Ireland, this time by steamship. In Melbourne, Tom Pearce received a hero's welcome. He was presented with the first gold medal of the Royal Humane Society of Victoria and a £1000 cheque from the Victorian Government. Concerts were performed to honour the young man's bravery and to raise money for those who lost family in the LOCH ARD disaster. Of the 54 crew members and passengers on board, only two survived: the apprentice, Tom Pearce and the young woman passenger, Eva Carmichael, who lost all of her family in the tragedy. Ten days after the LOCH ARD tragedy, salvage rights to the wreck were sold at auction for £2,120. Cargo valued at £3,000 was salvaged and placed on the beach, but most washed back into the sea when another storm developed. The wreck of LOCH ARD still lies at the base of Mutton Bird Island. Much of the cargo has now been salvaged and some was washed up into what is now known as LOCH ARD Gorge. Cargo and artefacts have also been illegally salvaged over many years before protective legislation was introduced. One of the most unlikely pieces of cargo to have survived the shipwreck was a Minton porcelain peacock - one of only nine in the world. The peacock was destined for the Melbourne International Exhibition in 1880. It had been well packed, which gave it adequate protection during the violent storm. Today, the Minton peacock can be seen at the Flagstaff Hill Maritime Museum in Warrnambool. From Australia's most dramatic shipwreck it has now become Australia's most valuable shipwreck artefact and is one of very few 'objects' on the Victorian State Heritage Register. The shipwreck of the LOCH ARD is of State significance. Victorian Heritage Register S417. Flagstaff Hill’s collection of artefacts from LOCH ARD is significant for being one of the largest collections of artefacts from this shipwreck in Victoria. It is significant for its association with the shipwreck, which is on the Victorian Heritage Register (VHR S417). The collection is significant because of the relationship between the objects, as together they have a high potential to interpret the story of the LOCH ARD. The LOCH ARD collection is archaeologically significant as the remains of a large international passenger and cargo ship. The LOCH ARD collection is historically significant for representing aspects of Victoria’s shipping history and its potential to interpret sub-theme 1.5 of Victoria’s Framework of Historical Themes (living with natural processes). The collection is also historically significant for its association with the LOCH ARD, which was one of the worst and best known shipwrecks in Victoria’s history. A reasonably well-preserved ship’s deadeye with rust-stained wire loop-rope still attached. It retains portions of its original hemp cord and hessian wrapping. The flat sides of this thick wooden disc have three holes drilled through in a triangular configuration. The artefact is from the shipwreck of the LOCH ARD (1878). The survival of the loop-rope (wire cable) indicates it was an Upper Deadeye, connected to the shrouds (mast rigging).flagstaff hill, warrnambool, shipwrecked coast, flagstaff hill maritime museum, maritime museum, shipwreck coast, flagstaff hill maritime village, great ocean road, loch line, loch ard, captain gibbs, eva carmichael, tom pearce, glenample station, mutton bird island, loch ard gorge, deadeye, rigging -
 Flagstaff Hill Maritime Museum and Village
Mast Collar, c. 1886
... Two metal loops are attached to the outside of the oval shape, next to the crossing band. ...Two metal loops are attached to the outside of the oval shape, next to the crossing band. ...The husband of the donor of this mast collar chanced to be staying a night at a motel in Peterborough, along the Great Ocean Road in Victoria. He had a keen interest in maritime items and recognise the mast collar at the motel’s back fence line. The motel owner told his guest the story of a customer, a doctor, who had organised and paid for divers to raise the mast collar from a local shipwreck, the Falls of Halladale. Shortly afterwards the doctor passed away, so the mast collar had remained at the motel site. The owner was leaving the motel the following week and wasn’t at all interested in the artefact. He was very happy for his guest to remove it. It took five men to load the mast collar up for the trip to the new owner’s two storey shed in Ballarat. It stayed there undercover, in the company of his collection of 5 buggies, for the next 40 or so years until the property was for sale. A friend, who realised the significance of the mast collar, suggested that it be donated to Flagstaff Hill Maritime Village where other artefacts from the Falls of Halladale, such as the slate tiles, were on display. This mast collar, or masthead, from the Falls of Halladale would have been used to join two sections of one of the tall masts. As sailing ships became larger there was a need for taller masts or spars, which became difficult or impossible to find. To overcome this problem mast was divided into sections; lower and top or upper mast (on some of the ‘tall ships’ a mast could be divided into three or even four sections). The Falls of Halladale was a four-masted British barque built-in 1886. On what turned out to be her fatal journey, she had left New York for Melbourne in late 1908. She ran aground on a reef close to the shore west of Peterborough, South West Victoria, on November 14th. All 29 crew eventually landed safely onshore. The wrecked ship stayed on the reef for several months as locals watched the sails slowly deteriorate. The salvaged cargo included slate tiles, as mentioned above, and many of these have been used on the roof of buildings at the Flagstaff Hill Maritime Village. The iron-hulled, four-masted barque, the Falls of Halladale, was a bulk carrier of general cargo. She left New York in August 1908 on her way to Melbourne and Sydney. In her hold, along with 56,763 tiles of unusual beautiful green American slates (roofing tiles), 5,673 coils of barbed wire, 600 stoves, 500 sewing machines, 6500 gallons of oil, 14400 gallons of benzene, and many other manufactured items, were 117 cases of crockery and glassware. Three months later and close to her destination, a navigational error caused the Falls of Halladale to be wrecked on a reef off the Peterborough headland at 3 am on the morning of the 15th of November, 1908. The captain and 29 crew members all survived, but her valuable cargo was largely lost, despite two salvage attempts in 1908-09 and 1910. ABOUT THE ‘FALLS OF HALLADALE’ (1886 - 1908) Built: in1886 by Russell & Co., Greenock shipyards, River Clyde, Scotland, UK. The company was founded in 1870 (or 1873) as a partnership between Joseph Russell (1834-1917), Anderson Rodger and William Todd Lithgow. During the period 1882-92 Russell & Co., standardised designs, which sped up their building process so much that they were able to build 271 ships over that time. In 1886 they introduced a 3000 ton class of sailing vessel with auxiliary engines and brace halyard winches. In 1890 they broke the world output record. Owner: Falls Line, Wright, Breakenridge & Co, 111 Union Street, Glasgow, Scotland. Configuration: Four masted sailing ship; iron-hulled barque; iron masts, wire rigging, fore & aft lifting bridges. Size: Length 83.87m x Breadth 12.6m x Depth 7.23m, Gross tonnage 2085 ton Wrecked: the night of 14th November 1908, Curdies Inlet, Peterborough south west Victoria Crew: 29 The Falls of Halladale was a four-masted sailing ship built-in 1886 in Glasgow, Scotland, for the long-distance cargo trade and was mostly used for Pacific grain trade. She was owned by Wright, Breakenridge & Co of Glasgow and was one of several Falls Line ships, all of which were named after waterfalls in Scotland. The lines flag was of red, blue and white vertical stripes. The Falls of Halladale had a sturdy construction built to carry maximum cargo and able to maintain full sail in heavy gales, one of the last of the ‘windjammers’ that sailed the Trade Route. She and her sister ship, the Falls of Garry, were the first ships in the world to include fore and aft lifting bridges. Previous to this, heavily loaded vessels could have heavy seas break along the full length of the deck, causing serious injury or even death to those on deck. The new, raised catwalk-type decking allowed the crew to move above the deck stormy conditions. This idea is still used today on the most modern tankers and cargo vessels and has proved to be an important step forward in the safety of men at sea. On 4th August 1908, with new sails, 29 crew, and 2800 tons of cargo, the Falls of Halladale left New York, bound for Melbourne and Sydney via the Cape of Good Hope. The cargo on board was valued at £35,000 and included 56,763 tiles of American slate roofing tiles (roof slates), 5,673 coils of barbed wire, 600 stoves, 500 sewing machines, 6,500 gallons of oil, 14,400 gallons of benzene, plumbing iron, 117 cases of crockery and glassware and many other manufactured items. The Falls of Halladale had been at sail for 102 days when, at 3 am on the night of 14th November 1908, under full sail in calm seas with a six knots breeze behind and misleading fog along the coast, the great vessel rose upon an ocean swell and settled on top of a submerged reef near Peterborough on the south-west Victoria’s coast. The ship was jammed on the rocks and began filling with water. The crew launched the two lifeboats and all 29 crew landed safely on the beach over 4 miles away at the Bay of Islands. The postmistress at Peterborough, who kept a watch for vessels in distress, saw the stranding and sent out an alert to the local people. A rescue party went to the aid of the sailors and the Port Campbell rocket crew was dispatched, but the crew had all managed to reach shore safely by the time help arrived. The ship stayed in full sail on the rocky shelf for nearly two months, attracting hundreds of sightseers who watched her slowly disintegrate until the pounding seas and dynamiting by salvagers finally broke her back, and her remains disappeared back into deeper water. The valuable cargo was largely lost, despite two salvage attempts in 1908-09 and 1910. Further salvage operations were made from 1974-1986, during which time 22,000 slate tiles were recovered with the help of 14 oil drums to float them, plus personal artefacts, ship fittings, reams of paper and other items. The Court of Marine Inquiry in Melbourne ruled that the foundering of the ship was entirely due to Captain David Wood Thomson’s navigational error, not too technical failure of the Clyde-built ship. The shipwreck is a popular site for divers, about 300m offshore and in 3 – 15m of water. Some of the original cargo can be seen at the site, including pieces of roof slate and coils of barbed wire. This mast collar is significant due to its association with the ship FALLS OF HALLADALE, which is listed on the Victorian Heritage Register, VHR S255 The Falls of Halladale shipwreck is listed on the Victorian Heritage Register (No. S255). She was one of the last ships to sail the Trade Routes. She is one of the first vessels to have fore and aft lifting bridges. She is an example of the remains of an International Cargo Ship and also represents aspects of Victoria’s shipping industry. The wreck is protected as a Historic Shipwreck under the Commonwealth Historic Shipwrecks Act (1976). Mast collar, steel, salvaged from the shipwreck FALLS OF HALLADALE, wrecked off the coast of Peterborough, South West Victoria. Oval shaped a band of metal with a straight band of same heights attached between the long sides. Two metal loops are attached to the outside of the oval shape, next to the crossing band. flagstaff hill, warrnambool, shipwrecked coast, flagstaff hill maritime museum, maritime museum, shipwreck coast, flagstaff hill maritime village, great ocean road, falls of halladale, shipwreck peterborough vic, sailing ship mast collar, masthead of sailing ship, falls of halladale mast collar, masthead, mast collar, ship rigging 1908, russell & co. -
 Flagstaff Hill Maritime Museum and Village
Deadeye, circa 1873
... The hitching of the two deadeyes with a looped lanyard provided the means of tightening, or loosening, the tension on the mast rigging ― essentially by pulling against the chain-plates bolted to the outside of the hull. ...The hitching of the two deadeyes with a looped lanyard provided the means of tightening, or loosening, the tension on the mast rigging ― essentially by pulling against the chain-plates bolted to the outside of the hull. ...This example of a sailing ship’s ‘dead-eye’ is from the wreck of the LOCH ARD, which sank near Port Campbell in 1878. The vessel was an iron hulled clipper ship constructed for the Loch Line in 1873. It was part of a fleet of similar merchant ships owned by that company, which specialised in bringing passengers and goods from London via the Great Circle route to Melbourne, and returning to Britain via Cape Horn with the colony’s wool clip. Deadeyes were a common feature of sailing ship technology in the nineteenth century. They were a simple, cheap, and hard-wearing device that, in conjunction with another deadeye, provided an effective means of levering, or tightening, attached ropes and stays. Lower deadeyes were fixed to the sides of the ship by an encircling metal collar (inset in a flattish groove chiselled around the outer circumference of the disc), which was bolted to iron bars attached to the hull (called chain-plates). Upper deadeyes were looped by a strong hemp or wire rope (inset in a rounded groove carved around the outer circumference of the disc), which was joined to the bottom ends of the rigging which reached up to secure the masts into position (called shrouds or stays). Connecting a Lower deadeye to its corresponding Upper deadeye was a rope (called a lanyard) which looped up and down through the three “eyes” of each disc, to form a pulley system. The hitching of the two deadeyes with a looped lanyard provided the means of tightening, or loosening, the tension on the mast rigging ― essentially by pulling against the chain-plates bolted to the outside of the hull. It was a procedure that could be performed by sailors at sea and in emergencies. For example, after a gale the stays may have stretched and the masts worked loose, requiring retightening. Or, in the extreme circumstance of shipwreck, the lanyards might need to be released on the weather side, so that the masts fall away from the stricken vessel. The shipwreck of the LOCH ARD is of State significance. Victorian Heritage Register S417.A well-preserved ship’s deadeye with wire loop rope still attached. The original tar coating for water-proofing still remains, colouring the entire artefact black. It is wrapped in hessian cloth and hemp cord and is currently in storage under secure and stable conditions. This deadeye was recovered from the wreck of the LOCH ARD. The artefact is a typical deadeye, comprising a thick round wooden disc, pierced by 3 similarly sized and shaped holes from one flat side through to the other, in a triangle formation. The survival of the wire cable loop-rope suggests it was an Upper Deadeye, connected to the shrouds (mast rigging). Previous number PWO 2388.flagstaff hill, warrnambool, shipwrecked-coast, flagstaff-hill, flagstaff-hill-maritime-museum, maritime-museum, shipwreck-coast, flagstaff-hill-maritime-village, deadeye, loch ard, rigging -
 City of Moorabbin Historical Society (Operating the Box Cottage Museum)
Uniform - Armed Services, Cape/groundsheet, 20th century
... They were used again during WWII 1939-45 Today the Army uses the hootchie - a sheet of 70D nylon or PU-coated cotton with various press snaps and webbing tape loops attached around the outside which allow it to be used in a variety of configuration. ...They were used again during WWII 1939-45 Today the Army uses the hootchie - a sheet of 70D nylon or PU-coated cotton with various press snaps and webbing tape loops attached around the outside which allow it to be used in a variety of configuration. ...Rain cape, also used as a groundsheet, issued Australian servicemen. Purchased for the donor from an "Army Surplus" store and re-purposed for camps as a Scout in the late 1960s. The MK VII Groundsheet (Rain Cape / Poncho) was introduced in October 1917 during WW1. They were made from dyed cotton, proofed with a rubber compound, "well vulcanized" on one side. Weight 3lb. 8oz;. 78 inches long by 36 inches wide and made by the Victoria Rubber Co. Edinburgh. They were used again during WWII 1939-45 Today the Army uses the hootchie - a sheet of 70D nylon or PU-coated cotton with various press snaps and webbing tape loops attached around the outside which allow it to be used in a variety of configuration. During WWII Australian forces fighting the Japanese in the Islands had an urgent requirement for a decent individual shelter. The rubberized canvas groundsheets and rain capes continued to be used, but these were less than effective in the tropics. Towards the end of the war in the Pacific Australia began issuing its troops a lighter weight version of the groundsheet manufactured from polyurethane-coated cotton – During the Malayan Emergency of the 1950s, Australian troops were issued with hooded ponchos. Unlike the WWII US pattern ponchos which always had a hole in the dead centre of the poncho sheet, the Australian-issue hooded ponchos made an effective shelter – especially when two where clipped together. The problem of course is that the rubberized canvas ponchos were far too heavy for jungle use. 1960s Australian units in Borneo were issued with the first pattern lightweight hootchies. 1 Kg. 1970 the Vietnam War, a second pattern lightweight hootchie was issued made from nylon, but retaining the hardware and loops. This lightweight hootchie weighed a mere 680 grams, still heavy, but suitable for tropical use. Currently the hootchie is made from AUSCAM nylon material . Historic significance; representative of the type believed to have been issued to Australian servicemen in World War II, possibly in World War I.Waterproofed Canvas rain cape, also used as a groundsheet in the Australian Army, press studs to close as a cape, collar to cover neck.NILuniforms, australian army, world war ii, army surplus, scouts australia, bentleigh, moorabbin, world war 1, hooded ponchos, borneo, auscam nylon material, hootchies, malayan emergency, vietnam war, groundsheets -
Glenelg Shire Council Cultural Collection
Functional object - Life Buoy, n.d
... Life buoy, circular ring, canvas covered cork, rope loop fixed to 4 points on the outside edge. Painted white "SS CASINO" and "PORT FAIRY" lettered in black. 2 images of flags painted opposite sides of the 'front' of buoy. ...Front: 'SS Casino' 'Port Fairy' Back: - Life buoy, circular ring, canvas covered cork, rope loop fixed to 4 points on the outside edge. Painted white "SS CASINO" and "PORT FAIRY" lettered in black. 2 images of flags painted opposite sides of the 'front' of buoy. ...Purchased by Glenelg Shire from Kurtze's Museum. The Casino commenced West Coast Trade in 1882 after being purchased by the Belfast and Koroit Steam Navigation Co. The Casino came to an end in 10.7.1932 when it rolled over and sank at Apollo Bay. Casino built at Dundee Scotland 425 reg. tons.Life buoy, circular ring, canvas covered cork, rope loop fixed to 4 points on the outside edge. Painted white "SS CASINO" and "PORT FAIRY" lettered in black. 2 images of flags painted opposite sides of the 'front' of buoy. Ex SS CASINO wrecked 10.7.1932.Front: 'SS Casino' 'Port Fairy' Back: - -
Glenelg Shire Council Cultural Collection
Functional object - Lifebuoy, n.d
... Canvas covered ring of bouyant material (possibly cork), with rope loop fixed to 4 ponts on the outside edge. Inscription "S.S. ...CASINO"|Centre bottom "PORT FAIRY"|flag on centre left and centre right Canvas covered ring of bouyant material (possibly cork), with rope loop fixed to 4 ponts on the outside edge. Inscription "S.S. ...City of Portland Collection|Kurtze Museum|19/4/2000. The lifebuoy came from the S S Casino. A popular cargo ship, the Casino was a regular sight on the Moyne river and along the coast. The ship was an integral part of coastal life until she was shipwrecked in the 1930's, and objects from the Casino can now be found in collections from across the region.S S CasinoCanvas covered ring of bouyant material (possibly cork), with rope loop fixed to 4 ponts on the outside edge. Inscription "S.S. CASINO" centre top, "PORT FAIRY" at centre bottom, a flag painted centre left and centre right.Front: Centre top "S. S. CASINO"|Centre bottom "PORT FAIRY"|flag on centre left and centre rightss casino, port fairy, cargo ship, lifebuoy -
 Flagstaff Hill Maritime Museum and Village
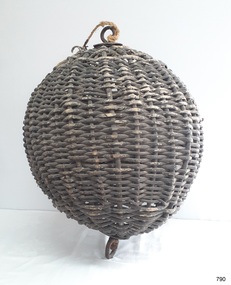
Equipment - Distant Signal, 1897-1931
... The rod has a loop at each end, then a concave, octagonal metal plate that rests on the outside surface of the ball, serving as a washer. ...The rod has a loop at each end, then a concave, octagonal metal plate that rests on the outside surface of the ball, serving as a washer. ...This three-dimensional Distant Signal is part of a Flagstaff Signal set of ball, cone and drum shapes. It has been woven and then fabricated with strong metal swivel fittings and loops for suspending from a high point on a flagstaff at a signal station or on a ship’s masthead. The cane signal was constructed to withstand all weather and to be visible from a long distance. The gaps between the woven cane allow air to pass through, minimising possible swaying. Similar sets were made from rope or fabric. Warrnambool's Flagstaff was erected in 1854. Its primary use was to display visual signals that could convey messages between land and sea. It was also used to notify the local population of the approach of ships. One of the popular signalling codes in use in the early-to-mid 1800s was the Marryat’s Code but there were others in use as well; there was no one standard code. In 1857 the International Marine Conference adopted an International Code of Signals as a standard communications system for all vessels that could be understood in many different languages. The Normanby Advertiser reported on June 5th 1857 a query from the Post Master General as to whether the request of the Chief Harbour Master would be carried out, in that Warrnambool would receive a new flagstaff and a set of Marryatt’s signal flags. The Table of Codes was published, showing how to use combinations of these flags to send messages. The Code was revised in 1887 to cover situations where distance, light, wind and weather conditions affected the visibility of the flags and prevented clear communication. The first report of the International Code of Signals Committee of 1897 warned signalmen not to rely on ordinary semaphore flags and introduced a Distant Signal Code using either particular semaphore flags or the three-dimensional shapes of a ball, cone and drum that aligned with the semaphore flag shapes of a circle, pennant and square. International Code of Signals In 1931, after World War I’s experiences in using signal codes, the International Code of Signals conference in Washington revised and published the rules for the conduct of signalling. One of the changes was that “the use of the Distant Signals and of fixed semaphore was abandoned”. It is of interest to know that modern marine law in many countries insists that a set of Day Shapes must be carried onboard vessels of a certain size. These highly visible geometric shapes are used at sea in daylight to communicate messages between vessels. They are used in a similar way to the Distant Signals, in that different combinations of shapes represent different messages. The set of shapes includes a ball, cylinder, cone and diamond. The shapes are hung between the top of the vessel’s foremast and the front of the vessel. They are only coloured black and are about 1.5 metres high. The vertical line of shapes can mean messages such as Boat not under command, Fishing, and Under sail and power.Distant Signals were an important means of marine communication from the late 1880s to the early 1930s, including during World War I. They were an advancement to the International Shipping Codes and safety. The cane signals’ shapes appear to be the same from whatever direction they are viewed, removing confusion about the message they convey. The same shapes continue to be used today for the sets of Day Shapes used as marine navigational signals that are mandatory on certain-sized vessels.Distant Signal Ball, part of a Flagstaff signal set. A round woven cane ball, painted black, with a metal rod passing through the centre. The rod has a loop at each end, then a concave, octagonal metal plate that rests on the outside surface of the ball, serving as a washer. The rod has swivels at each end.distant signal, flagstaff signal, signal station, masthead signal, communications, marine technology, signals, marine signals, flaghoists, international marine conference, international code of signals, signal codes, marine safety, signal flags, day shape, daymark, day symbol, navigation, warrnambool flagstaff, 1854, 1857 1931, 1887, 1897 -
 Flagstaff Hill Maritime Museum and Village
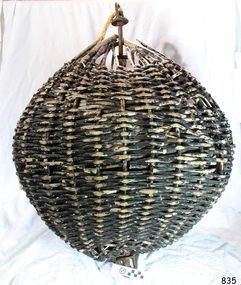
Equipment - Distant Signal, 1897-1931
... The rod has a loop at each end, then a concave, octagonal metal plate that rests on the outside surface of the ball, serving as a washer. ...The rod has a loop at each end, then a concave, octagonal metal plate that rests on the outside surface of the ball, serving as a washer. ...This three-dimensional Distant Signal is part of a Flagstaff Signal set of ball, cone and drum shapes. It has been woven and then fabricated with strong metal swivel fittings and loops for suspending from a high point on a flagstaff at a signal station or on a ship’s masthead. The cane signal was constructed to withstand all weather and to be visible from a long distance. The gaps between the woven cane allow air to pass through, minimising possible swaying. Similar sets were made from rope or fabric. Warrnambool's Flagstaff was erected in 1854. Its primary use was to display visual signals that could convey messages between land and sea. It was also used to notify the local population of the approach of ships. One of the popular signalling codes in use in the early-to-mid 1800s was the Marryat’s Code but there were others in use as well; there was no one standard code. In 1857 the International Marine Conference adopted an International Code of Signals as a standard communications system for all vessels that could be understood in many different languages. The Normanby Advertiser reported on June 5th 1857 a query from the Post Master General as to whether the request of the Chief Harbour Master would be carried out, in that Warrnambool would receive a new flagstaff and a set of Marryatt’s signal flags. The Table of Codes was published, showing how to use combinations of these flags to send messages. The Code was revised in 1887 to cover situations where distance, light, wind and weather conditions affected the visibility of the flags and prevented clear communication. The first report of the International Code of Signals Committee of 1897 warned signalmen not to rely on ordinary semaphore flags and introduced a Distant Signal Code using either particular semaphore flags or the three-dimensional shapes of a ball, cone and drum that aligned with the semaphore flag shapes of a circle, pennant and square. International Code of Signals In 1931, after World War I’s experiences in using signal codes, the International Code of Signals conference in Washington revised and published the rules for the conduct of signalling. One of the changes was that “the use of the Distant Signals and of fixed semaphore was abandoned”. It is of interest to know that modern marine law in many countries insists that a set of Day Shapes must be carried onboard vessels of a certain size. These highly visible geometric shapes are used at sea in daylight to communicate messages between vessels. They are used in a similar way to the Distant Signals, in that different combinations of shapes represent different messages. The set of shapes includes a ball, cylinder, cone and diamond. The shapes are hung between the top of the vessel’s foremast and the front of the vessel. They are only coloured black and are about 1.5 metres high. The vertical line of shapes can mean messages such as Boat not under command, Fishing, and Under sail and power.Distant Signals were an important means of marine communication from the late 1880s to the early 1930s, including during World War I. They were an advancement to the International Shipping Codes and safety. The cane signals’ shapes appear to be the same from whatever direction they are viewed, removing confusion about the message they convey. The same shapes continue to be used today for the sets of Day Shapes used as marine navigational signals that are mandatory on certain-sized vessels.Distant Signal Ball, part of a Flagstaff signal set. A round woven cane ball, painted black, with a metal rod passing through the centre. The rod has a loop at each end, then a concave, octagonal metal plate that rests on the outside surface of the ball, serving as a washer. The rod has swivels at each end.flagstaff hill, flagstaff hill maritime museum and village, warrnambool, maritime museum, maritime village, great ocean road, shipwreck coast, distant signal, signal, maritime signal, ball signal, signal shape, flagstaff signal, signal station, masthead signal, communications, marine technology, signals, marine signals, flaghoists, international marine conference, international code of signals, signal codes, marine safety, signal flags, day shape, daymark, day symbol, navigation, warrnambool flagstaff, 1854, 1857 1931, 1887, 1897 -
 Flagstaff Hill Maritime Museum and Village
Equipment - Distant Signal, 1897-1931
... The rod has a loop at each end, then a concave, octagonal metal plate that rests on the outside surface of the ball, serving as a washer. ...The rod has a loop at each end, then a concave, octagonal metal plate that rests on the outside surface of the ball, serving as a washer. ...This three-dimensional Distant Signal is part of a Flagstaff Signal set of ball, cone and drum shapes. It has been woven and then fabricated with strong metal swivel fittings and loops for suspending from a high point on a flagstaff at a signal station or on a ship’s masthead. The cane signal was constructed to withstand all weather and to be visible from a long distance. The gaps between the woven cane allow air to pass through, minimising possible swaying. Similar sets were made from rope or fabric. Warrnambool's Flagstaff was erected in 1854. Its primary use was to display visual signals that could convey messages between land and sea. It was also used to notify the local population of the approach of ships. One of the popular signalling codes in use in the early-to-mid 1800s was the Marryat’s Code but there were others in use as well; there was no one standard code. In 1857 the International Marine Conference adopted an International Code of Signals as a standard communications system for all vessels that could be understood in many different languages. The Normanby Advertiser reported on June 5th 1857 a query from the Post Master General as to whether the request of the Chief Harbour Master would be carried out, in that Warrnambool would receive a new flagstaff and a set of Marryatt’s signal flags. The Table of Codes was published, showing how to use combinations of these flags to send messages. The Code was revised in 1887 to cover situations where distance, light, wind and weather conditions affected the visibility of the flags and prevented clear communication. The first report of the International Code of Signals Committee of 1897 warned signalmen not to rely on ordinary semaphore flags and introduced a Distant Signal Code using either particular semaphore flags or the three-dimensional shapes of a ball, cone and drum that aligned with the semaphore flag shapes of a circle, pennant and square. International Code of Signals In 1931, after World War I’s experiences in using signal codes, the International Code of Signals conference in Washington revised and published the rules for the conduct of signalling. One of the changes was that “the use of the Distant Signals and of fixed semaphore was abandoned”. It is of interest to know that modern marine law in many countries insists that a set of Day Shapes must be carried onboard vessels of a certain size. These highly visible geometric shapes are used at sea in daylight to communicate messages between vessels. They are used in a similar way to the Distant Signals, in that different combinations of shapes represent different messages. The set of shapes includes a ball, cylinder, cone and diamond. The shapes are hung between the top of the vessel’s foremast and the front of the vessel. They are only coloured black and are about 1.5 metres high. The vertical line of shapes can mean messages such as Boat not under command, Fishing, and Under sail and power.Distant Signals were an important means of marine communication from the late 1880s to the early 1930s, including during World War I. They were an advancement to the International Shipping Codes and safety. The cane signals’ shapes appear to be the same from whatever direction they are viewed, removing confusion about the message they convey. The same shapes continue to be used today for the sets of Day Shapes used as marine navigational signals that are mandatory on certain-sized vessels.Distant Signal Ball, part of a Flagstaff signal set. A round woven cane ball, painted black, with a metal rod passing through the centre. The rod has a loop at each end, then a concave, octagonal metal plate that rests on the outside surface of the ball, serving as a washer. The rod has swivels at each end.flagstaff hill, warrnambool, flagstaff hill maritime museum and village, shipwreck coast, marine navigation, marine communications, communication signal, lifesaving, ship at sea, day shape, masthead signal, day signal, day mark signals, marine technology, safety equipment, navigation equipment, marine day shape, day marker, cane day shape, signal ball, day signal ball, ball signal, ball day shape, distant signal, flagstaff signal, signal station, communications, signals, marine signals, flaghoists, international marine conference, international code of signals, signal codes, marine safety, signal flags, daymark, day symbol, navigation, warrnambool flagstaff, 1854, 1857 1931, 1887, 1897 -
 Federation University Historical Collection
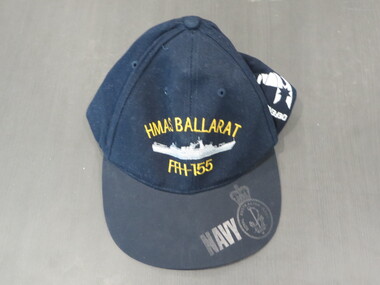
Clothing, HMAS Ballarat cap, 2006
... (https://en.wikipedia.org/wiki/HMAS_Ballarat_(FFH_155) hmas ballarat ffh-155 royal australian navy lisa gervasoni navy cap On the outside of the cap - HMAS Ballarat FFH-155, Navy, Defend the Flag Inside label - Oakwood (03) 97986278 Navy blue cap of heavy brushed cotton with the Navy Ceremonial badge on the left side which refers to the events of the Eureka Stockade (Ballarat, 1854) and is embroidered in white.. Hook-and-loop ...Collected by Lisa Gervasoni when she visited the ship as part of the City of Ballarat's delegation to the ship on the 9th December 2006. HMAS Ballarat (FFH 155) is an Anzac-class frigate of the Royal Australian Navy (RAN). The frigate was laid down in 2000 and commissioned into the RAN in mid-2004. Since entering service, Ballarat has been involved in border protection as part of Operation Relex II, was deployed to the Gulf for Operation Catalyst, and was one of the two ships involved in the Operation Northern Trident 2009 round-the-world voyage. Ballarat has undergone the Anti-Ship Missile Defence (ASMD) upgrade, completing in 2015. (https://en.wikipedia.org/wiki/HMAS_Ballarat_(FFH_155)Navy blue cap of heavy brushed cotton with the Navy Ceremonial badge on the left side which refers to the events of the Eureka Stockade (Ballarat, 1854) and is embroidered in white.. Hook-and-loop adjustment at the back. On the front of the cap the words HMAS Ballarat & FFH-155 are embroidered in gold and an embroidered representation of the ship is in white. Stamped into the brim is the word Navy and the Royal Australian Navy Emblem. On the outside of the cap - HMAS Ballarat FFH-155, Navy, Defend the Flag Inside label - Oakwood (03) 97986278hmas ballarat, ffh-155, royal australian navy, lisa gervasoni, navy cap -
 Ballarat Tramway Museum
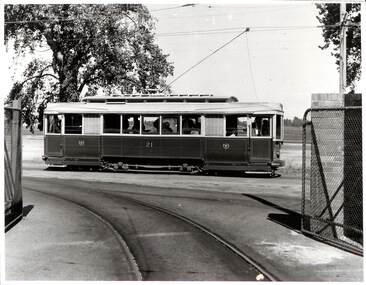
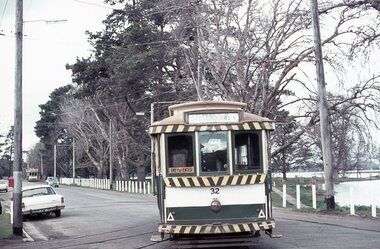
Photograph - Tram 21 outside Depot, Circa 1960s
... outside tram depot. Depot gates and tracks entering depot can be seen. R Lilburn Collection ields information about the Ballarat Tramway operations and views in the 1960s. Tramways trams Sturt St City Loop ...Black and white photograph of tram 21 in Wendouree Pre outside tram depot. Depot gates and tracks entering depot can be seen. R Lilburn Collectionields information about the Ballarat Tramway operations and views in the 1960s.Photograph - black and white print.tramways, trams, sturt st, city loop, tram 21 -
 Ballarat Tramway Museum
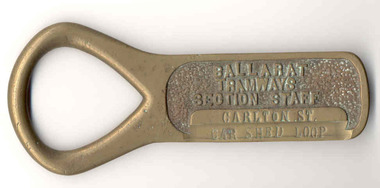
Functional object - Section Staff, Electric Supply Co. of Vic (ESCo), "Pleasant St Gardens - Loop Nth"
... Cast brass item with a flat part recessed section with the words "BALLARAT TRAMWAYS SECTION STAFF" cast into the surface and a flat section underneath, flush with the outside edges in which the words "PLEASANT ST - GARDENS LOOP NTH. " stamped in. ...Yields Information about the operation of Ballarat's trams and safeworking procedures. tramcars tramways staff safeworking tramway staffs sec esco Cast brass item with a flat part recessed section with the words "BALLARAT TRAMWAYS SECTION STAFF" cast into the surface and a flat section underneath, flush with the outside edges in which the words "PLEASANT ST - GARDENS LOOP NTH. " stamped in. ...Used as a means of authorising a tramcar to have sole use of the track between the named points to avoid head-on collisions. Safeworking object - known as a section staff. Not known when made, but in use, until the introduction of the electric signalling in the mid 1930's by the SEC. See also Reg Items 934 and 988 for details of use and other examples are at 1851, 52 and 53, 2473 and 4444 to 4448 , 4996 and 4497 and Reg item 934 and 988 for articles on the safeworking systems.Demonstrates aspects of Safeworking on the Ballarat Tramway system used to c1936 when replaced by electric signals. Yields Information about the operation of Ballarat's trams and safeworking procedures.Cast brass item with a flat part recessed section with the words "BALLARAT TRAMWAYS SECTION STAFF" cast into the surface and a flat section underneath, flush with the outside edges in which the words "PLEASANT ST - GARDENS LOOP NTH. " stamped in. Has an open rounded end which forms a handle or a point where it could be hung on a peg.tramcars, tramways, staff, safeworking, tramway staffs, sec, esco -
 Ballarat Tramway Museum
Photograph - Digital image Set of 10, Stuart Lodington, 1971
... Loop, Sturt St West after crossing a tram. No. 12 has destination of Victoria St. .7 - No. 12 inward bound in Lydiard St North with Fine Art Gallery in the background, 3BA. No. 12 has destination of Sebastopol and has a Twin Lakes sign. .8 - No. 12 inward bound, Sturt St West, No. 12 has destination of Victoria St and has a Twin Lakes sign. .9 - No. 26 at Sebastopol terminus, outside the Royal Mail Hotel, has a bus stop sign on a pole. ...Loop, Sturt St West after crossing a tram. No. 12 has destination of Victoria St. .7 - No. 12 inward bound in Lydiard St North with Fine Art Gallery in the background, 3BA. No. 12 has destination of Sebastopol and has a Twin Lakes sign. .8 - No. 12 inward bound, Sturt St West, No. 12 has destination of Victoria St and has a Twin Lakes sign. .9 - No. 26 at Sebastopol terminus, outside the Royal Mail Hotel, has a bus stop sign on a pole. ...Set of 10 digital images of Ballarat trams prior to closure, scanned from original slides by Stuart Lodington, 1971 prior to closure of the system. .1 - No. 32 entering the depot from Wendouree Parade, with the Lake in the background. Shows the depot fire alarm on an adjacent pole. .2 - No. 26 at Sebastopol, before turning the pole. Has a bus stop sign on a pole already. .3 - No. 27 and 26? crossing at the Bell St loop in Skipton St. No. 27 has a Twin Lakes sign. .4 - No. 32 outbound to the Gardens in Hamilton Ave about to enter Wendouree Parade with Loreto convent and Olympic monument the background. .5 - No. 26, Albert St Sebastopol, approaching the Sebastopol terminus, with Sebastopol Food Stores building on the left of the photo. .6 - No. 12 leaving the Parker St. Loop, Sturt St West after crossing a tram. No. 12 has destination of Victoria St. .7 - No. 12 inward bound in Lydiard St North with Fine Art Gallery in the background, 3BA. No. 12 has destination of Sebastopol and has a Twin Lakes sign. .8 - No. 12 inward bound, Sturt St West, No. 12 has destination of Victoria St and has a Twin Lakes sign. .9 - No. 26 at Sebastopol terminus, outside the Royal Mail Hotel, has a bus stop sign on a pole. Tram pole yet to be turned, but destination adjusted to Lydiard St. North. .10 - No. 12 at Sebastopol terminus, outside the Royal Mail Hotel. No. 12 has destination of Lydiard St Nth and has a Twin Lakes sign.trams, tramways, ballarat, sturt st west, sebastopol, skipton st, wendouree parade, hamilton ave, depot, depot junction, parker st loop, bell st, lydiard st nth, tram 32, tram 26, tram 27, tram 12 -
 Ballarat Tramway Museum
Photograph - Bromide of a b/w photograph - set of 2, John Phillips, 19/09/1992 12:00:00 AM
... Trams tramways BTPS 21st Anniversary Wendouree Parade Gardens Loop Dinner tram 38 tram 18 Bromide of a black and white photograph of the trams 38 and 18 outside the Lake Lodge Restaurant, on the night of the dinner for the 21st celebrations of the closure of the Ballarat tramways on 19/9/1992. ...Yields information about the BTPS 21st Anniversary celebrations which involved running a "all day" service and a cavalcade of trams.Bromide of a black and white photograph of the trams 38 and 18 outside the Lake Lodge Restaurant, on the night of the dinner for the 21st celebrations of the closure of the Ballarat tramways on 19/9/1992. Photo appeared in the Sept. 1992 issue of Fares Please! Caption was "Trams Nos. 38 and 18 are spot lit outside Lake Lodge Restaurant." Photo John Phillips. 1740.1 - Colour print, trimmed for the bromide - added 11/6/2008. See September 1992 Fares Please!trams, tramways, btps, 21st anniversary, wendouree parade, gardens loop, dinner, tram 38, tram 18 -
 Ballarat Tramway Museum
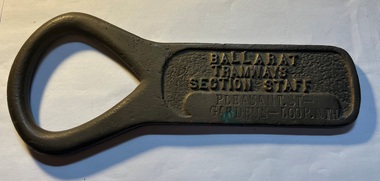
Functional Object - Section Staff, Electric Supply Co. of Vic (ESCo), "Carlton St - Car Shed Loop"
... Cast brass item with a flat part recessed section with the words "BALLARAT TRAMWAYS SECTION STAFF" cast into the surface and a flat section underneath, flush with the outside edges in which the words "CARLTON ST. CAR SHED LOOP." stamped in. ...Trams tramways Staff Safeworking Tramway Staffs SEC Signals Cast brass item with a flat part recessed section with the words "BALLARAT TRAMWAYS SECTION STAFF" cast into the surface and a flat section underneath, flush with the outside edges in which the words "CARLTON ST. CAR SHED LOOP." stamped in. ...Demonstrates aspects of Safeworking on the Ballarat Tramway system from 1960 to c1936 when replaced by electric signs. Yields Information about the operation of Ballarat's trams and safeworking procedures.Cast brass item with a flat part recessed section with the words "BALLARAT TRAMWAYS SECTION STAFF" cast into the surface and a flat section underneath, flush with the outside edges in which the words "CARLTON ST. CAR SHED LOOP." stamped in. Has an open rounded end which forms a handle or a point where it could be hung on a peg. The part with the words "CAR SHED LOOP" appears to have been ground down and a previous location name taken out and replaced. Used a means of authorising a tramcar to have sole use of the track between the named points to avoid head on collisions. Safeworking object - known as a section staff. Not known when made, but in use until the introduction of the electric signalling in the mid 1930's by the SEC. See also Reg Items 934 and 988 for details of use and other examples are at 1851, to 53, 2473 and 4444 to 4448, , 4996 and 4497 and Reg item 934 and 988 for articles on the safeworking systems.trams, tramways, staff, safeworking, tramway staffs, sec, signals -
 Ballarat Tramway Museum
Album - Photo Album, Keith Kings, Jul. 1970
... Loop, 1958. 25. Title sheet – “GEELONG” 26 1925 Photo of Geelong 19 in front of the depot. 27 1926 Photo of Geelong depot 28 1927 Photo of Geelong No. 3 at East terminus 29 1928 Photo of Geelong No. 23 outside depot. 30 1929 Photo of Geelong No. 16 at Eastern Park terminus. 31 1930 Photo of Geelong No. 28 at depot 32 1931 Photo of Geelong Birney No. 14 at Eastern Park terminus. 33 1932 Photo of Geelong No. 32 at Moorabool St. 34 1933 Photo of Geelong No. 37 outside depot 35 1934 Photo of Geelong No. 39 at West terminus 36. ...Loop, 1958. 25. Title sheet – “GEELONG” 26 1925 Photo of Geelong 19 in front of the depot. 27 1926 Photo of Geelong depot 28 1927 Photo of Geelong No. 3 at East terminus 29 1928 Photo of Geelong No. 23 outside depot. 30 1929 Photo of Geelong No. 16 at Eastern Park terminus. 31 1930 Photo of Geelong No. 28 at depot 32 1931 Photo of Geelong Birney No. 14 at Eastern Park terminus. 33 1932 Photo of Geelong No. 32 at Moorabool St. 34 1933 Photo of Geelong No. 37 outside depot 35 1934 Photo of Geelong No. 39 at West terminus 36. ...Album comprises heavy cardboard covers with brown Rexene covers, with inside papers of heavy dark grey photo album paper, 36 leaves of dark grey photo paper and two brass interscrews within black grommets. See Condition Details re damage to back cover. Album contains 32 photos - personal prints of Keith Kings. Title page has been hand written to Les Denmead, dated 6/7/1970, thanking Mr. Denmead for his assistance over the years. Photos divided into the three SEC Provincial Tramway cities, each with a typed name proceeding the set of photos. Two further photos of Geelong were at the rear of the album, but were not in position when catalogued. One of these photos may be Reg. Item 1874 - photo of Geelong scrubber tram. Each of the photographs have been separately registered, as shown in the table below. Scanned images made of front and back of the photos. Back has Keith Kings ID number, description, notes and date of photo. Conservation Notes prepared - within the cataloguing sheet - see related documents. Folio Reg. Notes Item No. 1 Handwritten note to Mr. L. J. Denmead from Keith Kings. 2 Title sheet – “BALLARAT” 3 1903 Small photo of SEC Monogram from Geelong No. 1 1904 Photo of SEC plaques etc at Wendouree office 4 1905 Photo of front of Wendouree Parade depot – 1957 - with trams 40 and 25 in photo. 5 1906 Photo of Ballarat 23 at depot 6 1907 Photo of Ballarat 29 in depot. 7 1908 Photo of Ballarat 17 in Wendouree Parade 8 1909 Photo of Ballarat 21 at depot. 9 1910 Photo of Ballarat 15 and 31 in Sturt St. 10 1911 Photo of Ballarat No. 40 Sturt St. 11 1912 Photo of Ballarat No. 38 – Wendouree Parade 12 1913 Photo of Scrubber car in depot. 13 Title sheet – “BENDIGO” 14 1914 Photo of Bendigo depot 15 1915 Photo of Bendigo No. 17, 1949. 16 1916 Photo of Bendigo 22 and 4 at Eaglehawk. 17 1917 Photo of Bendigo 12 at Golden Square. 18 1918 Photo of Bendigo 13 and 26 at Eaglehawk terminus. 19 1919 Photo of Bendigo 17 (bogie) at Quarry Hill terminus. 20 1920 Photo of Bendigo 18 at Charing Cross 21 1921 Photo of Bendigo Birneys 28 and 29 at Charing Cross 22 1922 Photo of original sprinkler and track cleaning car in Bendigo depot 23 1923 Photo of Bendigo 2nd track cleaning car 24. 1924 Photo of trams at Manchester Loop, 1958. 25. Title sheet – “GEELONG” 26 1925 Photo of Geelong 19 in front of the depot. 27 1926 Photo of Geelong depot 28 1927 Photo of Geelong No. 3 at East terminus 29 1928 Photo of Geelong No. 23 outside depot. 30 1929 Photo of Geelong No. 16 at Eastern Park terminus. 31 1930 Photo of Geelong No. 28 at depot 32 1931 Photo of Geelong Birney No. 14 at Eastern Park terminus. 33 1932 Photo of Geelong No. 32 at Moorabool St. 34 1933 Photo of Geelong No. 37 outside depot 35 1934 Photo of Geelong No. 39 at West terminus 36. No photo – marks of four corners remained. 37 – back cover No photo – marks of four corners remained. Photos not to be taken out of the album unless for photographic copying. Use image files. Photo Album - The Commercial Photo Album - No. 1 - 36 leaves. See hand written note from Keith Kings to Mr. L. J. Denmead. Dated 6/7/70.trams, tramways, ballarat, bendigo, geelong, photo album -
 Ballarat Tramway Museum
Slide - 35mm slide/s - set of 14, Noel Simons, 23/11/1962 12:00:00 AM
... Loop on Albert St. reserved track, Sebastopol route" 1162.8 - "No. 40 turning into Sturt St. from Drummond St." 1162.9 - "No. 18 in Wendouree Pde. Ballarat near tramway depot" 1162.10 - "No. 41 and 39 outside...Loop on Albert St. reserved track, Sebastopol route" 1162.8 - "No. 40 turning into Sturt St. from Drummond St." 1162.9 - "No. 18 in Wendouree Pde. Ballarat near tramway depot" 1162.10 - "No. 41 and 39 outside ...Set of 14 Kodachrome transparencies taken on 23/11/1962. 1162.1 - tram 38 turning into Lydiard St. North from Sturt St. with tram 20 in background. Many motor vehicles in photo. 1162.2 - as above, but a minute of so later. Has Mutual Life building in background as well as Town Hall. 1162.3 - No. 40 entering Albert St. from Skipton St. outbound to Sebastopol. 1162.4 - No. 40 near start of side of the road running in Albert St. heading to Sebastopol. 1162.5 - No. 40 at the City terminus, on the South side of Sturt St. Has Town Hall and other buildings along the south side of Sturt St. in the background. 1162.6 - No. 40 at Sebastopol terminus - shows arrangement of the signs at the terminus. 1162.7 - No. 40 and No. 38 crossing at loop between Sayle and Grey St. No. 40 inbound. 1162.8 - No. 40 turning from Drummond St. South to Sturt St. at Hospital Corner with Southern Cross Hotel in background. 1162.9 - No. 18 in Wendouree Parade near Forest St. heading east with destination of "Victoria St." 1162.10 - Nos 41 and 39 at Depot Junction. Both trams have SEC ads. 1162.11 - No. 39 turning into the depot from Wendouree Parade - showing destination of "Gardens via Drummond Nth" 1162.12- No. 17 at Lydiard St. North terminus, showing destination of "Grey St. Sebas". Has a Twin Lakes sign 1162.13 - ditto, but with trolley pole turned around. Has SEC Briquettes roof ad and Whitehorse whiskey ad on rear dash panel. 1162.14 - No. 40 outbound to Sebastopol crossing Albert St. 1162.1 -"Nos. 38 and 20 in Sturt St. Ballarat at corner of Lydiard St." 1162.2 - "No. 38 turns into Lydiard St. as No. 20 waits at stop in Sturt St. Ballarat" 1162.3 - "No. 40 entering Albert St. from Skipton St. Redan on Sebastopol route." 1162.4 - "No 40 at beginning of reserved track on Sebastopol route, Albert St. Redan." 1162.5 - "No. 40 in Sturt St. Ballarat near cnr. of Armstrong St." 1162.6 - "No. 40 at Sebastopol terminus" 1162.7 - "No. 38 and 40 crossing at Sayle St. Loop on Albert St. reserved track, Sebastopol route" 1162.8 - "No. 40 turning into Sturt St. from Drummond St." 1162.9 - "No. 18 in Wendouree Pde. Ballarat near tramway depot" 1162.10 - "No. 41 and 39 outside Ballarat tramway depot, Lake Wendouree in background" 1162.11 - "No. 39 entering tramway depot from Wendouree Parade, Ballarat" 1162.12 - "No 17 at Lydiard St. North terminus, Ballarat North" 1162.13 - "No 17 at Lydiard St. North terminus, Ballarat North" 1162.14 - "No. 40 crossing Albert St. Sebastopol as reserved track switches from left to right of road" All have date stamp of "23 Nov. 1962" in purple ink. All black ink unless otherwise noted.tramways, trams, ballarat, albert st., sturt st., sebastopol, grey st., hospital corner, wendouree parade, depot junction, lydiard st. north, tram 17, tram 18, tram 20, tram 38, tram 39, tram 40, tram 41