Showing 181 items matching "position light"
-
 Flagstaff Hill Maritime Museum and Village
Equipment - Navigation Lamp, Port, George Bocock & Co. Ltd, Trading As Seahorse Lamps, 1930s
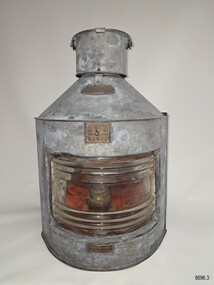
... ...position light...It allows the light to be visible horizontally from up to a 112.5-degree angle, and to be invisible past that angle. The light's colour and position are part of the code of signals that inform viewers of the vessel’s position, direction of travel and status. ...Flagstaff Hill Maritime Museum and Village Great Ocean Road Shipwreck Coast ship lamp navigation lamp masthead light masthead lamp port lamp port light bow side lamp lighting device navigation marine light marine lamp marine equipment marine technology marine safety running light position light code of lights International Regulations for Preventing Collisions at Sea Antique galvanised Seahorse Great Britain GB Patent 546575 Seahorse logo Trade Mark P55933 oil burner Bocock & Wilkinson Bocock & Sons George Bocock & Co. ...The donor recovered this navigation lamp before the 1980s from an old storage area in a South Melbourne factory where he worked. He asked about the lamp, but nobody there knew anything about its origin, and he was told that he could have it. This is a complete ship navigation lamp with its original oil burner. The internal red colour and shape indicate that the lamp was used for the port side of a vessel. The burner assembly is fixed to a removable tray, and the burner disconnects from the tank to allow fuel to be added. Light showing from the lamp is magnified by the polished brass reflector behind it, and the painted internal surfaces give the light its red colour. The lid on the chimney unclips for inspection purposes. The wedge shape of the lamp is intentional. It allows the light to be visible horizontally from up to a 112.5-degree angle, and to be invisible past that angle. The light's colour and position are part of the code of signals that inform viewers of the vessel’s position, direction of travel and status. The red lights indicate the port side of a vessel, green lights indicate the starboard side, and white lights are used on the masthead. From 1972, lights and signals on marine vessels are required to be fitted according to the International Regulations for Preventing Collisions at Sea. SEAHORSE lamp, made in Britain: The firm Bocock & Wilkinson was established in Birmingham in 1890 as an electroplate manufacturer. In 1900, Kelly’s Directory lists the firm as a ship lamp manufacturer. In 1910, the firm was listed Trading As “Seahorse” at 17 & 18 Mott Street, Birmingham. The firm later became Bocock & Son, and in 1932 was listed as George Bocock & Co. Ltd, and in 1973, it was still at that address. Ship’s navigation lamp: an original, galvanised metal, Port bow-side lamp. The wedge-shaped case has an arc front and two flat side panels that meet at the back, with a metal chimney and a swinging ‘C’ shaped handle on top. The curved, clear glass Fresnel has moulded ribs, top and bottom. The chimney has a hinged cap with a clip closure. One flat panel has a firmly attached, hollow rectangular channel for mounting onto a post or bracket. The other flat panel has a ‘D’ shaped, swinging handle, and slides upwards to access the burner assembly with its original brass burner. Concentric rings of ventilation holes are in the base. A removable tray, with ventilation holes on two edges, holds the round fuel tank and burner and the short post with the curved brass reflector. All internal metal surfaces, apart from the brass burner and reflector, were painted red sometime after the lamp’s manufacture. Inscriptions are embossed on the three brass plaques on the front; one has a rope design border and a seahorse emblem. Branded Seahorse, made in Great Britain, Ca. 1930s. Plaque on top, crescent shape: “PORT” Plaque in centre, square logo: “[rope design border] [Seahorse logo] “SEAHORSE / G B / TRADE / MARK / P55933” Plaque on base, rectangular: “PATENT NO. 546575 / AND OTHERS PENDING” flagstaff hill maritime museum and village, great ocean road, shipwreck coast, ship lamp, navigation lamp, masthead light, masthead lamp, port lamp, port light, bow side lamp, lighting device, navigation, marine light, marine lamp, marine equipment, marine technology, marine safety, running light, position light, code of lights, international regulations for preventing collisions at sea, antique, galvanised, seahorse, great britain, gb, patent 546575, seahorse logo, trade mark p55933, oil burner, bocock & wilkinson, bocock & sons, george bocock & co. ltd -
 Moorabbin Air Museum
Document (Item) - (SP) Technical Orders - multitude - list in "Context"
... Technical Order TO-8D3-8-6-3 Position Light Flasher Overhaul...Moorabbin Air Museum Moorabbin Airport 12 First Street Moorabbin melbourne Possibly related to navigation Technical Order AN 03-10ABB-163 Cyl Plug Selector Valve Assy Overhaul with Parts Breakdown Technical Order AN 03-5-308 Switch Pressure Actuated Overhaul with Parts Breakdown Technical Order AN 05-55A-13 D-C Selsyn Position Indicators and Transmitters Technical Order AN-03-10ABB-237 Swing Check Valve Overhaul with Parts Breakdown Technical Order TO-00-20A-2 Airplane Maintenance Forms Technical Order TO-01-1-390 Food and Galley Equipment Responsibility Technical Order TO-01-1-515 Rework Solenoid Control Head Part 966129 Technical Order TO-01-1-619 Oxygen Regulators Inspection and Replacement Technical Order TO-02-10AB-1 R985 Aircraft Engines Operations Technical Order TO-03-1-6 Solenoid Meshing Devices Ops Service Overhaul Technical Order TO-06-1-8 Fuels and Lubricants Technical Order TO-06-10-1 Lubrication oils Grades and Use Technical Order TO-08-5-10 Radio SCR-578-A Defective Reels RL-48 Technical Order TO-1-1-383 Removal of Ammunition from Aircraft Technical Order TO-10-25-3 Film Developer Assy Operations Servicing Parts Catalog Technical Order TO-14S3-1-503 Inspection of Life Raft CO2 Cylinders Technical Order TO-15A1-2-12-3 Air Pressure Regulator Overhaul Technical Order TO-15H4-2-2-3 Ignition Units Overhaul Technical Order TO-15H6-2-2-123 Cockpit Temperature Control Box Technical Order TO-15H6-2-2-13 Cockpit Temperature Control Box Technical Order TO-15H6-2-2-163 Cockpit Temperature Control Box Overhaul Technical Order TO-1F-1-525 Safety Wirting Pilot Oxygen Shutoff Valve Technical Order TO-1F-86-210 Sabre Electrical Connector for Test Equipment Technical Order TO-2R-0470-12 AN 02A-40EB-2 Aircraft Engines Service Technical Order TO-2R-0470-13 AN 02A-40EB-3 Aircraft Engines Overhaul Technical Order TO-2R-0470-14 AN 02A-40EB-4 Aircraft Engines Parts Breakdown Technical Order TO-4S-1-2 High Pressure Air Valve Cores Technical Order TO-4S5-2-3 Tail Skid Shock Struts Overhaul Technical Order TO-5F4-3-3 True Airspeed Signal Control Amplifier Overhaul Technical Order TO-6J13-2-1-501 Dual Float Switch Assy Installation Technical Order TO-6J14-1-5 Torque Values Self Sealing Bladder Cell Multi Bolt Fittings Technical Order TO-6J3-4-15-4A VS-2 Fuel Regulator Parts Breakdown Technical Order TO-6J5-15-3 Fuel Filetr Assy Overhaul Technical Order TO-6J5-15-4 Fuel Filter Assy Parts Breakdown Technical Order TO-6J5-18-3 Micronic Filters Overhaul Technical Order TO-6J5-18-4 Micronic Filters Parts Breakdown Technical Order TO-6J5-24-3 Av Fuel Filter Replaceable Micronic Element Technical Order TO-6J5-5-3 Fuel Filter 03S12166D Overhaul with Parts Breakdown Technical Order TO-6R-1-2 Engine Carburetor Installation Technical Order TO-6R1-3-1-35 Bendix Injector Carburetor Overhaul Technical Order TO-6R9-2-11-3 Valve Check Overhaul with Parts Breakdown Technical Order TO-6R9-2-12-3 Swing Check Valve Overhaul with Parts Breakdown Technical Order TO-6R9-2-14-3 Check Valve Flow Indicator Overhaul wth Parts Breakdown Technical Order TO-8A6-3-3-3 AC Generator Overhaul Technical Order TO-8A6-8-4-4 Engine Driven Aircraft Generator Parts Breakdown Technical Order TO-8A6-9-3-3 Aircraft AC Generator Overhaul Technical Order TO-8D1-21-3-33 Fractional Horsepower Motor 5BA25AJ28B Overhaul with Parts Breakdown Technical Order TO-8D1-21-3-33 Fractional Horsepower Motor 5BA25MJ426B Overhaul with Parts Breakdown Technical Order TO-8D1-29-2-3 Direct Current Motor Parts Breakdown Technical Order TO-8D1-9-13-23 Oil Cooler Flap Control Overhaul Parts Breakdown Technical Order TO-8D1-9-19-3 Direct Current Motor Overhaul with Parts Breakdown Technical Order TO-8D1-9-21-3 Electromechanical Linear Actuator Overhaul Technical Order TO-8D1-9-21-4 Electromechanical Linear Actuator Parts Breakdown Technical Order TO-8D1-9-22-3 Electromechanical Power Unit Overhaul Technical Order TO-8D1-9-22-4 Electromechanical Power Unit Parts Breakdown Technical Order TO-8D3-8-6-3 Position Light Flasher Overhaul Technical Order TO-8D6-5-4-504 Mod Westinghouse Generator A45J247 Technical Order TO-8E2-5-2-13 Aircraft Magnetos Overhaul Technical Order TO-8E2-5-2-14 Aircraft Magnetos Parts Breakdown Technical Order TO-8RI-3-5-3 Generator Field Control Relay M-2 Overhaul Technical Order TO-9H4-2-24-4A Stratopower Hydraulic Pump Parts Breakdown Document (SP) Technical Orders - multitude - list in "Context" ...Possibly related to navigationtechnical order an 03-10abb-163 cyl plug selector valve assy overhaul with parts breakdown, technical order an 03-5-308 switch pressure actuated overhaul with parts breakdown, technical order an 05-55a-13 d-c selsyn position indicators and transmitters, technical order an-03-10abb-237 swing check valve overhaul with parts breakdown, technical order to-00-20a-2 airplane maintenance forms, technical order to-01-1-390 food and galley equipment responsibility, technical order to-01-1-515 rework solenoid control head part 966129, technical order to-01-1-619 oxygen regulators inspection and replacement, technical order to-02-10ab-1 r985 aircraft engines operations, technical order to-03-1-6 solenoid meshing devices ops service overhaul, technical order to-06-1-8 fuels and lubricants, technical order to-06-10-1 lubrication oils grades and use, technical order to-08-5-10 radio scr-578-a defective reels rl-48, technical order to-1-1-383 removal of ammunition from aircraft, technical order to-10-25-3 film developer assy operations servicing parts catalog, technical order to-14s3-1-503 inspection of life raft co2 cylinders, technical order to-15a1-2-12-3 air pressure regulator overhaul, technical order to-15h4-2-2-3 ignition units overhaul, technical order to-15h6-2-2-123 cockpit temperature control box, technical order to-15h6-2-2-13 cockpit temperature control box, technical order to-15h6-2-2-163 cockpit temperature control box overhaul, technical order to-1f-1-525 safety wirting pilot oxygen shutoff valve, technical order to-1f-86-210 sabre electrical connector for test equipment, technical order to-2r-0470-12 an 02a-40eb-2 aircraft engines service, technical order to-2r-0470-13 an 02a-40eb-3 aircraft engines overhaul, technical order to-2r-0470-14 an 02a-40eb-4 aircraft engines parts breakdown, technical order to-4s-1-2 high pressure air valve cores, technical order to-4s5-2-3 tail skid shock struts overhaul, technical order to-5f4-3-3 true airspeed signal control amplifier overhaul, technical order to-6j13-2-1-501 dual float switch assy installation, technical order to-6j14-1-5 torque values self sealing bladder cell multi bolt fittings, technical order to-6j3-4-15-4a vs-2 fuel regulator parts breakdown, technical order to-6j5-15-3 fuel filetr assy overhaul, technical order to-6j5-15-4 fuel filter assy parts breakdown, technical order to-6j5-18-3 micronic filters overhaul, technical order to-6j5-18-4 micronic filters parts breakdown, technical order to-6j5-24-3 av fuel filter replaceable micronic element, technical order to-6j5-5-3 fuel filter 03s12166d overhaul with parts breakdown, technical order to-6r-1-2 engine carburetor installation, technical order to-6r1-3-1-35 bendix injector carburetor overhaul, technical order to-6r9-2-11-3 valve check overhaul with parts breakdown, technical order to-6r9-2-12-3 swing check valve overhaul with parts breakdown, technical order to-6r9-2-14-3 check valve flow indicator overhaul wth parts breakdown, technical order to-8a6-3-3-3 ac generator overhaul, technical order to-8a6-8-4-4 engine driven aircraft generator parts breakdown, technical order to-8a6-9-3-3 aircraft ac generator overhaul, technical order to-8d1-21-3-33 fractional horsepower motor 5ba25aj28b overhaul with parts breakdown, technical order to-8d1-21-3-33 fractional horsepower motor 5ba25mj426b overhaul with parts breakdown, technical order to-8d1-29-2-3 direct current motor parts breakdown, technical order to-8d1-9-13-23 oil cooler flap control overhaul parts breakdown, technical order to-8d1-9-19-3 direct current motor overhaul with parts breakdown, technical order to-8d1-9-21-3 electromechanical linear actuator overhaul, technical order to-8d1-9-21-4 electromechanical linear actuator parts breakdown, technical order to-8d1-9-22-3 electromechanical power unit overhaul, technical order to-8d1-9-22-4 electromechanical power unit parts breakdown, technical order to-8d3-8-6-3 position light flasher overhaul, technical order to-8d6-5-4-504 mod westinghouse generator a45j247, technical order to-8e2-5-2-13 aircraft magnetos overhaul, technical order to-8e2-5-2-14 aircraft magnetos parts breakdown, technical order to-8ri-3-5-3 generator field control relay m-2 overhaul, technical order to-9h4-2-24-4a stratopower hydraulic pump parts breakdown -
 8th/13th Victorian Mounted Rifles Regimental Collection
Photograph
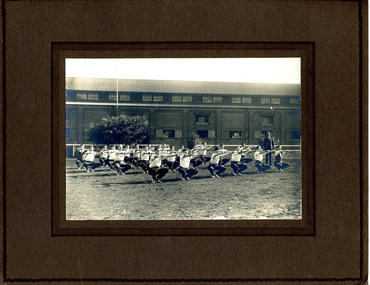
... They appear to be practicing advancing then dropping to a prone firing position. @0th Light Horse Regiment circa 1939....Light Horse regiment drawn from rural and regional Victoria in the period immediately prior to mobilisation for World War 2 (1939-1945). Black and white photograph, mounted on card, of line of men wearing slouch hats with plumes and holding rifles. They appear to be practicing advancing then dropping to a prone firing position ...The 20th Light Horse (Victorian Mounted Rifles) was raised in 1920 as part of the 3rd Cavalry Brigade, 2nd Cavalry Division, Citizen Military Forces, with Headquarters at Seymour and depots along the Goulburn Valley from Mansfield to Tocumwal in southern NSW. In December 1941, 20th Light Horse (Victorian Mounted Rifles) converted from horse to mechanised, initially as 20th Motor Regiment. In 1943 the Regiment was deployed to Merauke, Dutch New Guinea. Upon its return in April 1945, the Regiment was redesignated 20th Pioneer Battalion. It was disbanded following the end of the war. 20th Light Horse was the only light horse regiment to serve overseas in WWII.This is one of a collection of photographs featuring a Light Horse regiment drawn from rural and regional Victoria in the period immediately prior to mobilisation for World War 2 (1939-1945).Black and white photograph, mounted on card, of line of men wearing slouch hats with plumes and holding rifles. They appear to be practicing advancing then dropping to a prone firing position. @0th Light Horse Regiment circa 1939. -
 Bendigo Military Museum
Photograph - PROPELLOR WORKS, FRAMED, Ordnance Factory Bendigo, C.1986
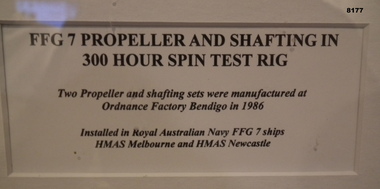
... Due to the position and light a good photo was not possible....Due to the position and light a good photo was not possible. ...This item is on display in the Bistro area of the Bendigo District RSL Havilah Road. Refer Cat No 8173.2 for an actual propellor in the same venue. Due to the position and light a good photo was not possible.Framed colour photo, brown timber frame with photo in a white inset, the photo shows a ships shaft and propellors under going a 300 hour spin test inthe Ordnance Factory Bendigo, under the photo is a description detail of the test procedure, where built and for which RAN ships.brsl, smirsl, bdrslinc -
 Geoffrey Kaye Museum of Anaesthetic History
Tool - Laryngoscope, Magill, 1926
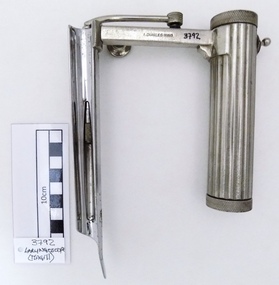
... light bulb. Cylindrical handle for battery deposit and with a wavy hand grip for easy handling. Serrated and screwed lids on top and base of the handle grip for insertion of batteries and checking of electrical contact stud. The handle also has a metallic switch without any instruction of use. The arm of the handle has a detachable screw to adjust extendable blade position...light bulb. Cylindrical handle for battery deposit and with a wavy hand grip for easy handling. Serrated and screwed lids on top and base of the handle grip for insertion of batteries and checking of electrical contact stud. The handle also has a metallic switch without any instruction of use. The arm of the handle has a detachable screw to adjust extendable blade position ...Ivan Magill (1888-1986) designer, this piece was designed in 1926 along with other anaesthetic equipment.Chrome plated straight complete Magill laryngoscope in medium size format, with attached light bulb. Cylindrical handle for battery deposit and with a wavy hand grip for easy handling. Serrated and screwed lids on top and base of the handle grip for insertion of batteries and checking of electrical contact stud. The handle also has a metallic switch without any instruction of use. The arm of the handle has a detachable screw to adjust extendable blade position and firmness. The light bulb is attached to a metallic tube connector to the handle arm which is just pressed to the contact point base. The blade has a oxidation spot under the blade. The piece in full has several scratches marks mostly founded in handle, arm and top blade areas. Two stamped inscriptions are present on the arm area, the manufacturer name and register number.Stamped on the arm of the handle lateral side, A.CHARLES KING Stamped on the arm of the handle opposite lateral side, REG. NO. 74901[9]magill, a. charles king ltd, regi. no. 749019, switch, laryngoscope -
 Bendigo Military Museum
Manual - RE - ESTABLISHMENT BENEFITS, Commonwealth of Australia, Ministry of Post War Reconstruction. Imperial Print, 1948
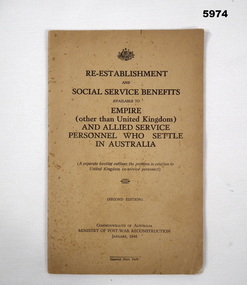
... position in relation to/ United Kingdom ex-service personnel). (SECOND EDITION). COMMONWEALTH OF AUSTRALIA/ MINISTRY OF POST WAR RECONSTRUCTION/ JANUARY 1948" Booklets Manuals Social Service Benefits Booklet. Cover - lightweight cardboard. light ...From front cover. "RE-ESTABLISHMNET/AND/SOCIAL SERVICE BENEFITS/AVAILABLE TO/EMPIRE/ (other than United Kingdom)/AND ALLIED SERVICE/ PERSONNEL WHO SETTLE/ IN AUSTRALIA. (A Separate booklet outlines the position in relation to/ United Kingdom ex-service personnel). (SECOND EDITION). COMMONWEALTH OF AUSTRALIA/ MINISTRY OF POST WAR RECONSTRUCTION/ JANUARY 1948"Booklet. Cover - lightweight cardboard. light brown colour. Black print on front cover. 16 pages - cut, plain, off white colour paper. No illustrations. Instruction manual - Social Service Benefits.booklets, manuals, social service benefits -
 Bendigo Military Museum
Booklet - Royal Australian Survey Corps - Annual Report 1 Jul 87 - 30 Jun 88, Director of Military Survey -Army, 01.09.1988
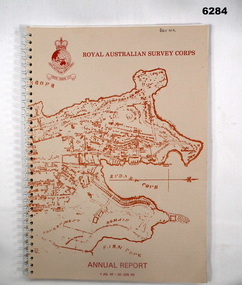
... light cardboard covers. Old map of Sydney Cove area printed in red/brown on front cover and Survey Corps Badge in red top left corner. "Map of the town of Sydney 1836" printed on back cover. A4 sized paper pages, 17 numbered pages plus, Annex A: 45 x pages, Annex B: 1 x page Aust Doppler Satellite Stations, Annex C: 1 x page, Aust Airborne Profile Recording, Annex D: 1 x page Aust Aerial photography, Annex E: 1 x page Aust Analytical Aerotriangulation, Annex F: 1 x page Inertial Positioning System Network Traverses Fils Svy, Annex G: 1 x page Global Positioning System Station/Networks TI4100 Svy, Annex H: 1 x page, Defence Cooperation Programme, Annex I 3 x pages RASvy Officer Manning, Annex J: 1 x page RASvy ARES Manning Levels....Annex A: 45 pages, Annex B: 1 page Aust Doppler Satelite Stations, Annex C: 1 page, Aust airborne Profile Recording, Annex D: 1 page Aust Aerial photography, Annex E: 1 page Aust Analytical Aerotriangulation, Annex F: 1 page Inertial Positioning System Network Traverses Fils Svy, Annex G: 1 page Global Positioning System Station/networks TI4100 Svy, Annex H: 1 page, Defence Cooperation Programme, Annex I 3 Pages RASvy Officer Manning, Annex J: 1 page RASvy ARES Manning Levels. Royal Australian Survey Corps RASvy Fortuna Army Survey Regiment Army Svy Regt ASR Buff coloured light cardboard covers. ...Royal Australian Survey Corps Annual Report detailing Surveying and mapping activities 1 July 87 - 30 Jun 88. The first part of the report details the highlights during the period followed by Annexes A to J detailing Australian Map and Chart production. Annex A: 45 pages, Annex B: 1 page Aust Doppler Satelite Stations, Annex C: 1 page, Aust airborne Profile Recording, Annex D: 1 page Aust Aerial photography, Annex E: 1 page Aust Analytical Aerotriangulation, Annex F: 1 page Inertial Positioning System Network Traverses Fils Svy, Annex G: 1 page Global Positioning System Station/networks TI4100 Svy, Annex H: 1 page, Defence Cooperation Programme, Annex I 3 Pages RASvy Officer Manning, Annex J: 1 page RASvy ARES Manning Levels.Buff coloured light cardboard covers. Old map of Sydney Cove area printed in red/brown on front cover and Survey Corps Badge in red top left corner. "Map of the town of Sydney 1836" printed on back cover. A4 sized paper pages, 17 numbered pages plus, Annex A: 45 x pages, Annex B: 1 x page Aust Doppler Satellite Stations, Annex C: 1 x page, Aust Airborne Profile Recording, Annex D: 1 x page Aust Aerial photography, Annex E: 1 x page Aust Analytical Aerotriangulation, Annex F: 1 x page Inertial Positioning System Network Traverses Fils Svy, Annex G: 1 x page Global Positioning System Station/Networks TI4100 Svy, Annex H: 1 x page, Defence Cooperation Programme, Annex I 3 x pages RASvy Officer Manning, Annex J: 1 x page RASvy ARES Manning Levels.royal australian survey corps, rasvy, fortuna, army survey regiment, army svy regt, asr -
 Bendigo Military Museum
Photograph - Royal Australian Survey Corps Aerial Surveys, c1980
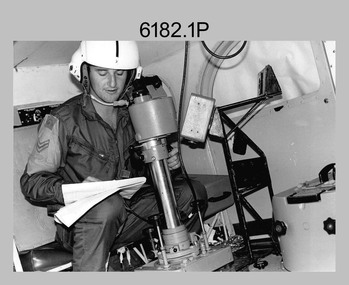
... Light Observation Helicopter (LOH) is supporting a field survey party undertaking Magnavox AN/PRR-14 portable Doppler satellite observations. The satellite receiver’s antenna is plumbed over the survey ground mark surrounded by white plastic panels. The panels were used to identify the survey station on aerial photography. Introduced in 1974–1975, the Magnavox AN/PRR-14 portable Doppler satellite (US Navy Navigation Satellite System – TRANSIT) receivers and computing system provided independent three-dimensional point positions...Light Observation Helicopter (LOH) is supporting a field survey party undertaking Magnavox AN/PRR-14 portable Doppler satellite observations. The satellite receiver’s antenna is plumbed over the survey ground mark surrounded by white plastic panels. The panels were used to identify the survey station on aerial photography. Introduced in 1974–1975, the Magnavox AN/PRR-14 portable Doppler satellite (US Navy Navigation Satellite System – TRANSIT) receivers and computing system provided independent three-dimensional point positions ...This is a set of nine photographs of technicians from the Royal Australian Survey Corps operating aerial surveys equipment c1980s. In photo .1P, CPL Steve Gloster was operating a RC10 air survey camera mounted in an Australian Army Pilatus Porter aircraft. The Wild RC10 super wide-angle air survey cameras were first introduced in 1971, were equipped with virtual distortion free lenses for supplementary, spot and special photography. In photo .2P, Roger Rees was operating Air Profile Recorder (APR) equipment. it was possibly taken during OP NERVOSE 84, sometime between June – August 1984 when based in Ngukurr, Northern Territory. The APR was operated at this time in unison with an RC10 camera. In 1963 the Royal Australian Survey Corps introduced the radar airborne profile recorder (Canadian Applied Research Ltd, Mark V, Airborne Profiler Recorder) was introduced for 1:100,000 mapping to replace terrain heighting by aneroid barometry. Later in 1974-1975, the Australian developed WREMAPS II airborne laser terrain profile recorder was introduced. In photo .3P, Neil Jones appears at the door of Airsearch Beechcraft Queen Air aircraft, Registration / Serial VH-MWX. This aircraft was typically used by RA Svy on air survey operations flying mission with Aerodist, APR and RC10 camera equipment. The Australian Army’s Pilatus Porter (short take-off and landing turbo propeller) was also equipped with a Wild RC10 aerial mapping camera for identification photography. The Pilatus Porter was also used on RA Svy’s map field checking operations. Photo .9P was taken at a survey station at an unknown location. In this photo an Australian Army Kiowa Light Observation Helicopter (LOH) is supporting a field survey party undertaking Magnavox AN/PRR-14 portable Doppler satellite observations. The satellite receiver’s antenna is plumbed over the survey ground mark surrounded by white plastic panels. The panels were used to identify the survey station on aerial photography. Introduced in 1974–1975, the Magnavox AN/PRR-14 portable Doppler satellite (US Navy Navigation Satellite System – TRANSIT) receivers and computing system provided independent three-dimensional point positions anywhere in the world, anytime, in any weather accurate to about 1.5metres with precise satellite ephemerides. The Bell OH-58 Kiowa LOH was a family of military helicopters used for observation, utility, and direct fire support. It was identified by RA Svy in the mid-1970s that considerable time was lost in replacing unserviceable remote equipment by road. Therefore Aerodist operations (pre-dating satellite receiver operations) were fully supported by Army’s Kiowa LOH aircraft. This is a set of nine photographs of technicians from the Royal Australian Survey Corps operating aerial surveys equipment c1980s. .1P to .3P, .5P to .9P - Colour and black and white photos on photographic paper and scanned at 300 dpi. .4P - Colour photo on 35mm slide film and scanned at 96 dpi. .1) & .2) - Photo, black & white, c1980s, CPL Steve Gloster operating an RC10 air camera. .3) - Photo, colour, 1984, Roger Rees operating Air Profile Recorder (APR) equipment. .4) - Photo, colour, c1980s, Neil Jones at the door of an Airsearch Beechcraft Queen Air aircraft, typically used by RA Svy on air survey operations. .5) - Photo, colour, c1980s. A Beechcraft King Air aircraft, also used by RA Svy on air survey operations. .6) - Photo, colour, c1980s. An Australian Army Pilatus Porter, used by RA Svy on air survey and map field checking operations. SGT Peter Mustart is possibly in the foreground. .7) to .8) - Photo, colour, c1980s. An Australian Army Pilatus Porter and unidentified personnel, used by RA Svy on air survey and map field checking operations. .9) - Photo, colour, c1980s. An Australian Army Kiowa helicopter supporting a field survey party undertaking Magnavox AN/PRR-14 portable Doppler satellite observations. There are biro marks on photos .4P to .9Proyal australian survey corps, rasvy, army survey regiment, asr, fortuna, aerial surveys -
 Bendigo Military Museum
Uniform - DRESS, WOMENS, RED CROSS, Super Overalls Product FA 8167, Unknown
... light khaki, short sleeved dress. It has a collar with round corners. the buttons of 2 cm diameter, are red. There are 8 buttons. The 4th position...light khaki, short sleeved dress. It has a collar with round corners. the buttons of 2 cm diameter, are red. There are 8 buttons. The 4th position ...Red Cross Dress,This is a light khaki, short sleeved dress. It has a collar with round corners. the buttons of 2 cm diameter, are red. There are 8 buttons. The 4th position down from the neck has a press stud. It has a small pocket on left breasat with a Red Cross badge. There are two waist level pockets. The left and right sides have a pleat. the left shoulder has a woven badge "The Australian Red Cross Society". The dress has belt loops at the waist.Nilred cross, uniform -
 Bendigo Military Museum
Equipment - HELIOGRAPH TRIPOD, Heliograph Tripod Legs, c. 1940 - 1945
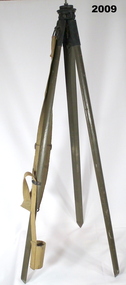
... A brass plate sits at the apex with a threaded rod positioned to allow the attachment of a heliograph or signal light. A khaki webbing shoulder strap for carrying the item is secured to one of the legs. ...A brass plate sits at the apex with a threaded rod positioned to allow the attachment of a heliograph or signal light. A khaki webbing shoulder strap for carrying the item is secured to one of the legs. ...Tripods similar to this were used in both WW1 and WW2. Note: Item 6482 is a Heliograph that was mounted onto a tripod such as this when it was used for surveying.Tripod with wooden legs painted in jungle green. The legs are attached to the apex with tarnished brass fittings, each secured with brass screws. Metal reinforcing plates protect the pointed end of each leg. A brass plate sits at the apex with a threaded rod positioned to allow the attachment of a heliograph or signal light. A khaki webbing shoulder strap for carrying the item is secured to one of the legs. At the bottom end of the strap is a webbing loop used to secure the tripod legs when closed. Stamped on one wooden leg: '15629' Stamped on the top plate: 'D(upwards arrow)D, 0 with an upwards arrow through it, 3(upwards arrow)0' Stamped on one brass leg fitting: 'STAND LAMP OR HELIO A MKlll'military equipment - army, heliograph, signals -
 Bendigo Military Museum
Equipment - GAS MASK AND CONTAINER
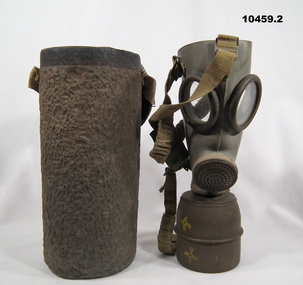
... At the chin position is a steel circular input filter. The colour of the rubber is a light grey. ...At the chin position is a steel circular input filter. The colour of the rubber is a light grey. ...1. Rubber face mask for gas. It has two round glass apertures. It has an exhaust valve nozzle at mouth level. At the chin position is a steel circular input filter. The colour of the rubber is a light grey. There is a metal wire and lead seal affixed on LHS of mask. The filter cartridge ca be unscrewed. 2. A cheap paper cylindric container with a cap. The cap is held in place with a 30mm webbing strap. The colour is a dark drab olive.Side of Mask = "AJAX II". Base of filter "C.P. 1935M". Stamped circle "(IN)". Top section of the filter is stamped = "OG.44.18".gas mask, equipment -
 Bendigo Military Museum
Certificate - VOLUNTEER AIR OBSERVERS CORPS, FRAMED, McLaren & Co. Pty Ltd, c.1944
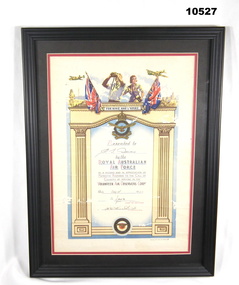
... light to be seen from any window". Framed accessories Certificate Volunteer Air Observers Corps WW2 Handwritten details on certificate, dark blue and black ink pen. "S.T. Ievers/ 1944/ G.Jones/ W.D. Heath S/R". Certificate - coloured print on cream paper. From the top the design includes two aircraft with a man and women positioned ...Details provided by donor. "Presented to Sidney Thomas Ievers in June 1944/ My father in addition to being an observer was in charge of rostering the volunteers/ who manned the Poppet Legs in Bendigo during WW2./ Their job was not to watch for enemy planes but also to ensure that Bendigo/ was in complete black out, no chinks of light to be seen from any window".Certificate - coloured print on cream paper. From the top the design includes two aircraft with a man and women positioned between two flags - Union Jack and Australian flags, the words ' “FOR KING AND COUNTRY” above Royal Australian Air Force insignia. Dark Cream columns with pale blue surround frame the details. Black, blue and red coloured lettering with handwritten details completed. Frame - timber with dark brown paint and decorative moulding. Glass front, brown paper and cardboard backing. Mount - black colour cardboard with inner red colour mount Handwritten details on certificate, dark blue and black ink pen. "S.T. Ievers/ 1944/ G.Jones/ W.D. Heath S/R".framed accessories, certificate, volunteer air observers corps, ww2 -
 4th/19th Prince of Wales's Light Horse Regiment Unit History Room
Instrument - Trumpet, Cavalry, Couesnon Cie, 1901 (exact)
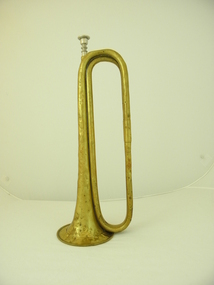
... Gaza finally fell on 7 November, after a wide outflanking move via Beersheba, in which the 1st Light Horse Brigade played a part. With the capture of Gaza, the Turkish position in southern Palestine collapsed. ...Gaza finally fell on 7 November, after a wide outflanking move via Beersheba, in which the 1st Light Horse Brigade played a part. With the capture of Gaza, the Turkish position in southern Palestine collapsed. ...The 2nd Light Horse Regiment was raised at Enoggera in Queensland on 18 August 1914. Its recruits came mainly from Queensland but some hailed from the northern rivers district of New South Wales. The 2nd was one of three regiments of the 1st Light Horse Brigade – the first Australian mounted formation raised by Australia during the First World War. The regiment sailed from Brisbane on 25 September and disembarked in Egypt on 9 December. The 2nd Light Horse Regiment deployed to Gallipoli without its horses and landed there on 12 May 1915, joining the New Zealand and Australian Division. It played a defensive role for most of the campaign but did attack the Turkish trenches opposite Quinn’s Post, one of the most contested positions along the ANZAC Line. The first assault wave was mown down and fortunately the officer commanding the attack had the wisdom and courage to call it off. The 2nd was withdrawn from the front line in September and left the peninsula on 18 December. Back in Egypt, the 2nd Light Horse joined the ANZAC Mounted Division. Between January and May 1916, the regiment was deployed to protect the Nile valley from bands of pro-Turkish Senussi Arabs. On 18 May, as part of its parent brigade, it joined the forces defending the Suez Canal. The 1st Light Horse Brigade played a significant role in turning back the Turkish advance on the canal at the battle of Romani on 4 August. In ensuing days the regiments of the brigade participated in the immediate follow-up of the defeated Turks, but were soon withdrawn to rest. The 2nd Light Horse Regiment rejoined the Allied advance across the Sinai in November and was subsequently involved in the fighting to secure the Turkish outposts on the Palestine frontier – Maghdaba on 23 December 1916 and Rafa on 9 January 1917. A stint of protective duty along the line of communications through the Sinai followed. The 2nd’s next major engagement was the abortive second battle of Gaza on 19 April. Gaza finally fell on 7 November, after a wide outflanking move via Beersheba, in which the 1st Light Horse Brigade played a part. With the capture of Gaza, the Turkish position in southern Palestine collapsed. The 2nd Light Horse Regiment participated in the advance to Jaffa that followed, and was then committed to operations to clear and occupy the west bank of the Jordan River. It was involved in the Amman (24–27 February) and Es Salt (30 April–4 May) raids and the repulse of a major German and Turkish attack on 14 July 1918. The final British offensive of the campaign was launched along the Mediterranean coast on 19 September 1918, with the ANZAC Mounted Division taking part in a subsidiary effort east of the Jordan aimed at Amman. Turkey surrendered on 30 October 1918. The 2nd Light Horse Regiment sailed for Australia on 13 March 1919 without their horses, which were either shot or transferred to Indian cavalry units. Events in the daily routine of the soldier were signalled by bugle and trumpet calls. This trumpet is signicant because historically, it was issued to the 2nd Australian Light Horse Regiment in 1912. This Regiment served with distinction in Gallipoli and Palestine in World War 1. It is probable, but not confirmed, that tthe trumpet was used by the Regiment during these operations. Each light horse regiment was divided into four squadrons. Each squadron had a trumpeter sergeant, equipped with a cavalry trumpet, who was employed at the Squadron Headquarters Technically called a cavalry trumpet, this brass instrument can be described as a "simple trumpet" ie. the direct forerunner of the modern valve trumpet. It is in E flat not B flat as is the bugle. Both were carried slung over the player's body by means of green tasselled cords.Crest with inscription: "Exposition Universelle De Paris" with circular logo with inscribed "1900". "Hors Concours Membre De Jury". Logo formed of initials (not deciphered). "Couesnon Cie 94 Rue Dangouleme Paris". Bomb burst type logo with "01" in centre. "W H Paling & Co Ltd Sydney NSW Brisbane" On bell: "Mounted Rifles (2nd ALH)" trumpet, cavalry, musical instrument, 2nd light horse, mounted rifles -
4th/19th Prince of Wales's Light Horse Regiment Unit History Room
Card - Christmas Card, 1915 (exact)
... Light Horse Regiment divided with one component deployed to Palestine and the other to the Western Front. Frank went on to serve in Palestine. He was promoted to Sergeant while at Gallipoli and, in Palestine, was promoted to Captain, serving as Adjutant of the Regiment. He was granted furlough to return to Australia from 14 October 1916 to 12 March 1917. On 16 January 1918 he was Mentioned in Despatches Citation: At Hill 750 near Bir El Esani on 30-4-17 he led an attack on Hill 750 under heavy rifle fire capturing the position...Light Horse Regiment divided with one component deployed to Palestine and the other to the Western Front. Frank went on to serve in Palestine. He was promoted to Sergeant while at Gallipoli and, in Palestine, was promoted to Captain, serving as Adjutant of the Regiment. He was granted furlough to return to Australia from 14 October 1916 to 12 March 1917. On 16 January 1918 he was Mentioned in Despatches Citation: At Hill 750 near Bir El Esani on 30-4-17 he led an attack on Hill 750 under heavy rifle fire capturing the position ...Service of Frank Phillips Prior to the commencement of World War I, Frank Phillips served in the Minyip Troop of the Light Horse militia. His civilian occupation was that of clerk. On 22 August 1914 he enlisted in C Squadron 4th Light Horse Regiment. The 4th Light Horse Regiment embarked on the troop ship “Wiltshire “ for training at Mena Camp, in Egypt. During May 1915 the Regiment was deployed to the Gallipoli campaign in a dismounted role. After seven months, the Gallipoli campaigned was abandoned and the troops withdrawn. On return to Egypt the 4th Light Horse Regiment divided with one component deployed to Palestine and the other to the Western Front. Frank went on to serve in Palestine. He was promoted to Sergeant while at Gallipoli and, in Palestine, was promoted to Captain, serving as Adjutant of the Regiment. He was granted furlough to return to Australia from 14 October 1916 to 12 March 1917. On 16 January 1918 he was Mentioned in Despatches Citation: At Hill 750 near Bir El Esani on 30-4-17 he led an attack on Hill 750 under heavy rifle fire capturing the position and 7 armed Bedouins. On 23-5-17 during reconnaissance, he led and attack on 790 under very heavy rifle and machine gun fire and captured the position, inflicting losses on the Turks. He has, at all times, set a fine example of courage to his men. 22 October: 1918 he was awarded the Military Cross Recommendation of Commanding Officer – For exceptional gallantry and devotion to duty on the 28th September 1918, during the crossing of the JORDAN near EL MIN, this officer (adjutant of the Regiment) personally reconnoitred for crossings under heavy M.G. fire and led the Regiment to the only available crossing, rendering invaluable assistance during the crossing. On 3oth September when the Regiment was advanced guard on to KAUKAB, this officer’s personal reconnaissance to confirm patrol reports was of the highest order and utmost value to his C.O. culminating in the capture of KAUKAB with a mounted attack and the The 4th/19th Prince of Wales’s Light Horse Regiment has a long and distinguished history that pre-dates Federation to colonial Victoria’s mounted troops. Our history parallels that of the nation, including its active participation in some of the most inspiring events in Australian Military History including the Defence of ANZAC and the charge at Beersheba. The Regiment is based on a linkage of the two post-World War II Victorian Army Reserve RAAC units - 4th/19th Prince of Wales’ Light Horse and 8th/13th Victorian Mounted Rifles. From these units we derive our links with the six Light Horse Regiments of Victoria and Southern New South Wales (4th, 8th, 13th, 17th, 19th and 20th Light Horse Regiments.) The Regiment proudly bears the guidon of the 4th Light Horse, with the guidons of the remaining regiments being laid up in the crypt of the Melbourne Shrine of Remembrance. During World War I, the 4th Light Horse Regiment served with distinction on three fronts – Gallipoli, Palestine and the Western Front. Corporal, later Captain, Phillips was a member of the 4th Australian Light Horse Regiment. He created the post card while serving with the Regiment as a Corporal at Gallipoli. Post Card hand made and sent to familyFrom Cpl Frank Phillips, 4th Australian Light Horse Regiment. Entries in pencil Front: Addressed to Andrew Phillips (father) at Minyip, Victoria, Message: “A Merry Christmas and Happy New Year to all, Made while on my day out. Love Frank” Reverse Top Centre – 4 LH Badge Centre – cloth map of Australia stapled to card Bottom – Print of flag stapled to card, Irish green ensign, Union flag in canton, gold coloured Irish harp on fly. Notations: Broadmeadows, Wiltshire (Troop Ship), Shrapnel Gully, Suicide Gully, Courtney’s Post Mena, Mex, Heliopolis, Imbros, Gallipoli, Turkish soil underneath (flag), Australia on Turkey, Lone Pine, Leans Trench, Constantinople, All honour to our Irish comrades, To greet you 1915-16. From the shells, yells, and little Hells, of the Darda Dardenelles 0 – 0 May you enjoy your Xmas dinner as I hope to enjoy my Xmas billy in the trenches.ww1, gallipoli, 4th light horse, post card, frank phillips -
4th/19th Prince of Wales's Light Horse Regiment Unit History Room
Tripod, Bren Light Machine Gun
... 4th/19th Prince of Wales's Light Horse Regiment Unit History Room 4/19 PWLH Regiment, Building 78 Simpson Barracks Macleod melbourne Used for setting up in defensive position for firing on fixed lines The 4/19 PWLH Regiment was previously equipped with Bren guns. ...Used for setting up in defensive position for firing on fixed linesThe 4/19 PWLH Regiment was previously equipped with Bren guns. However being a mounted unit, Bren LMG were either carried as personal weapons of the unit's assault troopers or mounted on Mk1 Ferret Scout Cars or Saracen Armoured Personnel Carriers. As far as is known, this tripod was not on issue.weapons, mounts, bren gun, tripod -
4th/19th Prince of Wales's Light Horse Regiment Unit History Room
Document, W Clowes & Sons, Drills & Rifle Instruction for the Corps of Rifle Volunteers 1859, Original document 1859
... 4th/19th Prince of Wales's Light Horse Regiment Unit History Room 4/19 PWLH Regiment, Building 78 Simpson Barracks Macleod melbourne Enfield muzzle loader drill A photo-copy of the titled publication, covering the exercises by number for loading, present and firing from both the standing and kneeling position in ranks and the reload for the Enfield muzzleloading rifle Drills & Rifle Instruction for the Corps of Rifle Volunteers 1859 Document George E Eyre & William Spottiswoode W Clowes & Sons ...A photo-copy of the titled publication, covering the exercises by number for loading, present and firing from both the standing and kneeling position in ranks and the reload for the Enfield muzzleloading rifleenfield muzzle loader drill -
4th/19th Prince of Wales's Light Horse Regiment Unit History Room
Book, Signal Communications in the Army Vol II Regimental Signalling Handbook Part 3 Antennas for Regimental Signalling, abt 1960
... 4th/19th Prince of Wales's Light Horse Regiment Unit History Room 4/19 PWLH Regiment, Building 78 Simpson Barracks Macleod melbourne Handbook for equipments used by the Regiment handbook antennas army Army Code 70449 (Part 3) Soft covered book detailing the electricd field, length, position, dimensions and types of antennas Signal Communications in the Army Vol II Regimental Signalling Handbook Part 3 Antennas for Regimental Signalling Book Department of Supply ...Handbook for equipments used by the RegimentSoft covered book detailing the electricd field, length, position, dimensions and types of antennasArmy Code 70449 (Part 3)handbook, antennas, army -
4th/19th Prince of Wales's Light Horse Regiment Unit History Room
Junction Distribution Box No 8
... 4th/19th Prince of Wales's Light Horse Regiment Unit History Room 4/19 PWLH Regiment, Building 78 Simpson Barracks Macleod melbourne Part of the radio control harness for tanks using the larkspur radio system As used by the Regiment in a previous life as a Tank Regiment control box radio harness jd 8 Junction Distribution Box No8 Aluminium box with three coupling positions with a volume control and call switch Junction Distribution Box No 8 ...Part of the radio control harness for tanks using the larkspur radio systemAs used by the Regiment in a previous life as a Tank RegimentAluminium box with three coupling positions with a volume control and call switchJunction Distribution Box No8control box, radio harness, jd 8 -
 Victoria Police Museum
Photograph (Victoria Police Group Exercise Photo), Police Officers group exercising on depot
... light brown frame. Approximately 25 young police officers on physical training with Police Officer in uniform standing and watching. They are all in low squat position...light brown frame. Approximately 25 young police officers on physical training with Police Officer in uniform standing and watching. They are all in low squat position ...Black and white photograph mounted on light brown frame. Approximately 25 young police officers on physical training with Police Officer in uniform standing and watching. They are all in low squat position, holding sticks straight in front of them - wearing white shirt and dark trousers. Set on earth ground with a tree and big open brick building on the backHandwritten: C 1925 Stamp: PHOTOGRAPH TAKEN // AT YOUR OWN HOME // P. J. DWYER // Onr. Harding & Salisbury Sts. // COBURG // PHOTOGRAPHS COPIED // AND ENLARGEDpoulter, william, william arthur poulter, victoria police museum, dwyer, p. j., police officers, squats, police academy, police training -
 Bendigo Military Museum
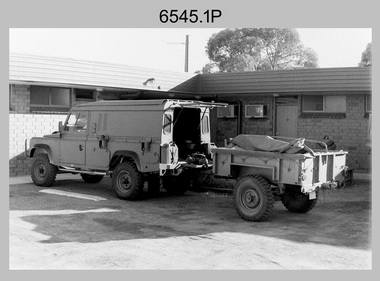
Photograph - 4th Field Survey Squadron - Land Rover Perentie Light Vehicles, Keswick Barracks, Adelaide SA, 1987
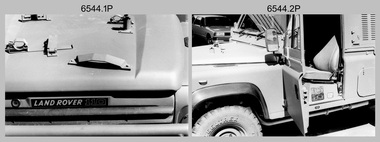
... light vehicles to replace the ageing fleet of Series 2A and 3 Land Rovers. The major differences between the Land Rover Perentie and British Land Rovers were the relocation of the spare wheel to a position under the rear of the load area, a galvanised chassis and the Isuzu engine. ...light vehicles to replace the ageing fleet of Series 2A and 3 Land Rovers. The major differences between the Land Rover Perentie and British Land Rovers were the relocation of the spare wheel to a position under the rear of the load area, a galvanised chassis and the Isuzu engine. ...This is a set of 35 photographs featuring 4th Field Survey Squadron’s newly introduced Survey variant of the Land Rover Perentie light vehicle, at Keswick Barracks, Adelaide SA in 1987. The Land Rover Perentie is a nickname for the Land Rover 110 produced by JRA Limited for the Australian Army, and part manufactured and assembled in Moorebank, New South Wales, during the 1980s and 1990s The name Perentie originates from Land Rover's successful tender to Project Perentie, which was the official Australian Army trial to select new 1 and 2-tonne light vehicles to replace the ageing fleet of Series 2A and 3 Land Rovers. The major differences between the Land Rover Perentie and British Land Rovers were the relocation of the spare wheel to a position under the rear of the load area, a galvanised chassis and the Isuzu engine. The Land Rover Perenties were produced in 4x4 and 6x6 variants and powered by an Isuzu 3.9-litre four-cylinder 4BD1 diesel engine. The Truck, Panel, Lightweight, Survey, FFR, Winch, MC2 model was one of eight 4x4 variants built for the Australian Army. There were 35 vehicles built to satisfy the operational requirements of RA Svy’s units. Source – Wikipedia. See item 6545.9P for related photos of these vehicles.This is a set of 35 photographs featuring 4th Field Survey Squadron’s newly introduced Survey variant of the Land Rover Perentie light truck vehicle, at Keswick Barracks, Adelaide SA in 1987. The black & white photographs are on 35mm negative film and are part of the Army Survey Regiment’s Collection. The photographs were scanned at 96 dpi. .1) to .8) - Photo, black & white, 1987. Land Rover Perentie light truck vehicle features. .9) - Photo, colour, 1986. L to R: unidentified, RQMS - WO2 Peter Symmans, unidentified. .10) to .15) - Photo, black & white, 1987. Land Rover Perentie light truck vehicle features. .16) - Photo, black & white, 1987. Land Rover Perentie light truck vehicle. L to R: WO2 Russ Larsen, SSGT Barry Lutwyche, 2IC Terry Lord, SGT Mick Hogan, unidentified. .17) - Photo, black & white, 1987. Land Rover Perentie light truck vehicle features. .18) & .19) - Photo, black & white, 1987. Loading field trip stores into Land Rover Perentie light truck vehicle. .20) & .21) - Photo, black & white, 1987. L to R: SPR Steve Perks, SGT Mick Hogan loading field trip stores into Land Rover Perentie light truck vehicle. .22) to .25) - Photo, black & white, 1987. L to R: SPR Steve Perks loading field trip stores into Land Rover Perentie light truck vehicle. .26) - Photo, black & white, 1987. CAPT Danny Galbraith loading field trip stores into Land Rover Perentie light truck vehicle. .27) to .31) - Photo, black & white, 1987. Loading field trip stores into Land Rover Perentie light truck vehicle. .32) to .34) - Photo, black & white, 1987. Land Rover Perentie light truck vehicle – broken transfer case lever. .35) - Photo, black & white, 1987. Land Rover Perentie light truck vehicle’s Isuzu 3.9-litre four-cylinder 4BD1 diesel engine..1P to .35P – There are no personnel identified. ‘PERENTI MOTOR VEHICLES JUL 87’ annotated on negatives sleeve.royal australian survey corps, rasvy, 4 fd svy sqn -
 Bendigo Military Museum
Photograph - 4th Field Survey Squadron - Land Rover Perentie Light Vehicles in the Field, 1987
... light vehicles to replace the ageing fleet of Series 2A and 3 Land Rovers. The major differences between the Land Rover Perentie and British Land Rovers were the relocation of the spare wheel to a position under the rear of the load area, a galvanised chassis and the Isuzu engine. ...light vehicles to replace the ageing fleet of Series 2A and 3 Land Rovers. The major differences between the Land Rover Perentie and British Land Rovers were the relocation of the spare wheel to a position under the rear of the load area, a galvanised chassis and the Isuzu engine. ...This is a set of nine photographs featuring 4th Field Survey Squadron’s newly introduced Survey variant of the Land Rover Perentie light truck vehicle on a field trip in SA, in 1987. The Land Rover Perentie is a nickname for the Land Rover 110 produced by JRA Limited for the Australian Army, and part manufactured and assembled in Moorebank, New South Wales, during the 1980s and 1990s The name Perentie originates from Land Rover's successful tender to Project Perentie, which was the official Australian Army trial to select new 1 and 2-tonne light vehicles to replace the ageing fleet of Series 2A and 3 Land Rovers. The major differences between the Land Rover Perentie and British Land Rovers were the relocation of the spare wheel to a position under the rear of the load area, a galvanised chassis and the Isuzu engine. The Land Rover Perenties were produced in 4x4 and 6x6 variants and powered by an Isuzu 3.9-litre four-cylinder 4BD1 diesel engine. The Truck, Panel, Lightweight, Survey, FFR, Winch, MC2 model was one of eight 4x4 variants built for the Australian Army. There were 35 Vehicles built to satisfy the operational requirements of RA Svy’s units. Source – Wikipedia. See item 6544.35P for related photos of these vehicles.This is a set of 35 photographs featuring 4th Field Survey Squadron’s newly introduced Survey variant of the Land Rover Perentie light truck vehicle, at Keswick Barracks, Adelaide SA in 1987. The black & white photograThis is a set of nine photographs featuring 4th Field Survey Squadron’s newly introduced Survey variant of the Land Rover Perentie light truck vehicle on a field trip in SA, in 1987. The black & white photographs are on 35mm negative film and are part of the Army Survey Regiment’s Collection. The photographs were scanned at 96 dpi. .1) - Photo, black & white, 1987. Perentie Land Rover with trailer parked outside unknown motel in SA. .2) & .3) - Photo, black & white, 1987. Field trip featuring Perentie Land Rover. .4) - Photo, black & white, 1987. Field trip featuring Perentie Land Rover. Series 3 Land Rover parked behind. Unidentified personnel. .5) & .6) - Photo, black & white, 1987. Field trip featuring Perentie Land Rover. Unidentified personnel. .7) & .8) - Photo, black & white, 1987. Field trip featuring Perentie Land Rover. Typical sandy 4WD track on fence line. .9) - Photo, black & white, 1987. Field trip featuring Perentie Land Rover. Probable gas extraction facility..1P to .9P – There are no personnel identified. ‘PERENTI MOTOR VEHICLES JUL 87’ annotated on negatives sleeve.tified. royal australian survey corps, rasvy, 4 fd svy sqn -
4th/19th Prince of Wales's Light Horse Regiment Unit History Room
Framed photograph, 2LT Bert Burnie, 1914
... Framed b&w photo of 2LT Bert Burnie, 4th Light Horse, at Broadmeadows. He is in the slope arms position...Ready to go to War - Broadmeadows 1914 Framed b&w photo of 2LT Bert Burnie, 4th Light Horse, at Broadmeadows. He is in the slope arms position 2LT Bert Burnie Framed photograph ...Framed b&w photo of 2LT Bert Burnie, 4th Light Horse, at Broadmeadows. He is in the slope arms positionCaption: 4th Australian Light Horse 2LT Bert Burnie. Ready to go to War - Broadmeadows 1914 -
4th/19th Prince of Wales's Light Horse Regiment Unit History Room
Framed photograph, WW1 Funeral for a German officer, c. 1917
... Framed b&w photo of 8 member armed funeral escort in position along each side of a light truck presumably carrying the coffin of a German officer. ...4th/19th Prince of Wales's Light Horse Regiment Unit History Room 4/19 PWLH Regiment, Building 78 Simpson Barracks Macleod melbourne Caption: WW1 Funeral for a German officer. Photo from the Museum's Whyte collection Framed b&w photo of 8 member armed funeral escort in position along each side of a light truck presumably carrying the coffin of a German officer. ...Framed b&w photo of 8 member armed funeral escort in position along each side of a light truck presumably carrying the coffin of a German officer. The vehicle has some camouflage foliage on it and a wreath mounted in front on the radiatorCaption: WW1 Funeral for a German officer. Photo from the Museum's Whyte collection -
4th/19th Prince of Wales's Light Horse Regiment Unit History Room
Framed Photograph, WW1 Turks in action against Light Horse at Sheria, c 1917
... Light Horse at Sheria. The fighting lasted several days. The Turkish cavalry in foreground, waiting, ready to go into action. This was a struggle for water and was known as the Junction Fight. Photo from Museums Whyte collection Framed b&w photo. In foreground, Turkish cavalry waiting to go into action, a mounted officer in front of them. In middle distance a line of infantry in lying position ...Framed b&w photo. In foreground, Turkish cavalry waiting to go into action, a mounted officer in front of them. In middle distance a line of infantry in lying position on a ridge. On the left is a group of observers, probably HQ group.Caption: WW1 Turks in action against Light Horse at Sheria. The fighting lasted several days. The Turkish cavalry in foreground, waiting, ready to go into action. This was a struggle for water and was known as the Junction Fight. Photo from Museums Whyte collection -
 4th/19th Prince of Wales's Light Horse Regiment Unit History Room
Photograph, Sydney Whillams, Silver Trophies, Est mid 20th Century
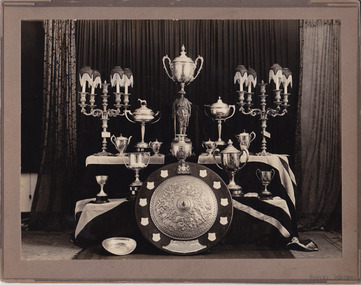
... position. There was a time limit of twelve minutes, and the rifle, of any Government pattern, had to be carried on the back or slung to the saddle. 13TH GIPPSLAND LIGHT HORSE HANDSOME TROPHIES ON VIEW Thery are on view in the window of Mr. ...position. There was a time limit of twelve minutes, and the rifle, of any Government pattern, had to be carried on the back or slung to the saddle. 13TH GIPPSLAND LIGHT HORSE HANDSOME TROPHIES ON VIEW Thery are on view in the window of Mr. ...Lloyd Lindsay Competition In 1873 Colonel Loyd Lindsay introduced a prize for mounted riflemen. The initial experimental competition was a great success and it was for many years a feature of the various shooting programs. The conditions in 1873 required that sections of four mounted men were to ride about three quarters of a mile, taking two flights of hurdles in the course, and were, while dismounted and their horses either linked or held by alternate files, each to fire five shots at 200 yards standing, and the same number at 400 yards in any position. There was a time limit of twelve minutes, and the rifle, of any Government pattern, had to be carried on the back or slung to the saddle. 13TH GIPPSLAND LIGHT HORSE HANDSOME TROPHIES ON VIEW Thery are on view in the window of Mr. A. W. Bennett, Jeweller, some handsome trophies which were pre sented to the 13th (Gippsland) Light Horse, and which are worthy of the admiration they have elicited. A handsome pair of solid silver candal abra, presented to the officers mess of the Regiment by Mrs. Norman Mc Lean in memory of her husband, the late Lieut. Norman McLean, who for many years was a member of the re giment, are a fine piece of workman ship and valued at £200. The silver cup donated by the same lady for competition amongst the Regimental troops, is also very handsome. The late* Hon. .William - Pearson, M.L.C., who was Honorary Colonel of the 13th (Gippsland) Light Horse Re giment, presented a handsome silver cup. for competition amongst the' troops of the 'regiment, Iand teams will compete 'for it annually at the camp of continuous training. The ar ray of trophies is a most interesting one. Gippsland Times 19 Jan 1925 HUTTON SHIELD Stratford Troop Beaten After winning the Hutton Shield for four years in succession, the Stratford Troop of the 13th. (Gipps land) Light Horse was defeated in this year's competition last week, Scottsdale Troop (Tasmania) beating Stratford by 17 points. Gippsland Times 22 May 1933 Black & white photo of 17 silver Light Horse trophies on a British flag draped display stand. Trophies include: Lloyd Lindsay Competition for best section & lance and sword events, Foster Cup for best troop in Australia, Machine Gun Troop, Pearson Cup, Digger Trophy for best Regiment in Australia, McClean Cup and donated candelabra, Hutton Shield for best Light Horse Troop in Australia, Brigade Cup for sports in annual camp.Sydney Whillams. Sketch on back identifying objectslight horse, trophies, photo -
4th/19th Prince of Wales's Light Horse Regiment Unit History Room
Audit Report (extract), J Williams, Auditor-General Thirteenth Annual Report June 1914, 1914
... 4th/19th Prince of Wales's Light Horse Regiment Unit History Room 4/19 PWLH Regiment, Building 78 Simpson Barracks Macleod melbourne A photocopy reproduction of the Receipts and Expenditure during the year ending 30 June 1914 concerning the Ordnance Stores showing the unsatisfactory position of the stocktaking accounts at these establishments and steps taken to overcome the irregularities in connection with the keeping of Equipment Ledgers. ...A photocopy reproduction of the Receipts and Expenditure during the year ending 30 June 1914 concerning the Ordnance Stores showing the unsatisfactory position of the stocktaking accounts at these establishments and steps taken to overcome the irregularities in connection with the keeping of Equipment Ledgers. -
4th/19th Prince of Wales's Light Horse Regiment Unit History Room
Field Sketch, The Battle of Beersheba, c. 31 Oct 1917
... 4th/19th Prince of Wales's Light Horse Regiment Unit History Room 4/19 PWLH Regiment, Building 78 Simpson Barracks Macleod melbourne O Hewett was a NZ Sergeant attached to the ANZAC Mounted Division HQ beersheba A field sketch, by Sgt Otho Hewett, looking toward Beersheba from the south-east from Khaslim Zana (a wadi). The sketch shows the position ...O Hewett was a NZ Sergeant attached to the ANZAC Mounted Division HQA field sketch, by Sgt Otho Hewett, looking toward Beersheba from the south-east from Khaslim Zana (a wadi). The sketch shows the position of 20th Corps Infantry, the rail bridge, various buildings within the town, the Gaza-Beersheba & Hebron roads, the aerodrome, the position of 4 Turkish guns and Tel el Saba trenchesbeersheba -
4th/19th Prince of Wales's Light Horse Regiment Unit History Room
Field Sketch, The Field of Battle for Richon Le Zion Morning 15th Nov, Morning of 15 Nov 1917
... 4th/19th Prince of Wales's Light Horse Regiment Unit History Room 4/19 PWLH Regiment, Building 78 Simpson Barracks Macleod melbourne sketch richon le zion A field sketch by Sgt Otho Hewett of ANZAC HQ showing the features, Turkish positions and positions of the NZ Mounted Regt as well as the placement of the machine guns of NZ MR and Auckland MR. ...A field sketch by Sgt Otho Hewett of ANZAC HQ showing the features, Turkish positions and positions of the NZ Mounted Regt as well as the placement of the machine guns of NZ MR and Auckland MR.sketch, richon le zion -
 Federation University Historical Collection
Equipment - Camera, The Junior Kromskop, c1899
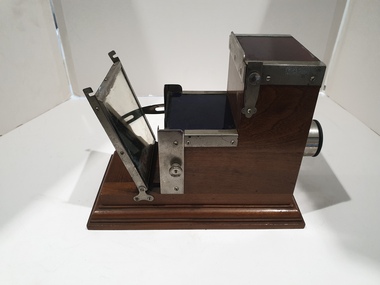
... An artificial light was also available. The mirrors and image positions can be adjusted in the event that they become misaligned. ...An artificial light was also available. The mirrors and image positions can be adjusted in the event that they become misaligned. ...The Kromskop (pronounced Chromescope) is one of the earliest commercial applications of colour photography, and was invented by Frederic Eugene Ives and announced around 1896, it is described in his English patent of 1895 and in a US patent of 1894. It was shown at a Camera Club in Britain in January 1896 and at the February Royal Photographic Society meeting, and was available for sale from early 1897. The Photochromoscope Syndicate was formed in 1896 or 97 to promote the viewer in Britain, and wound up in 1899. It was manufactured in south London.A monocular instrument used to reproduce colours, in a mahogany box The viewer combines stereo images from three-colour separation transparencies called Kromograms, these are viewed through red, green and blue filters. A Kromogram comprises three monochrome transparencies printed from three-colour separation negatives which are taped together. The order being red image, blue image, green image with a label and caption between the red and blue images. The red image lies horizontally on the top step of the viewer above a red filter, the blue image lies on the lower step above a blue filter, the green image stands vertically at the back of the viewer. The red and blue images are reflected into the eyepieces by transparent mirrors, these are coloured to absorb the light that they reflect to prevent a double image from the rear surface of the mirror, the mirror for the red image is coloured cyan/blue, that used for the blue filter is coloured green (the patent indicates a yellow filter). The green image is illuminated by a yellow reflector. As the mirror below the blue image is green there is no need for a green filter immediately in front of the green image. The viewer can be used in daylight, for some conditions a diffuser is used, this is hinged to the yellow reflector and laid across the steps. An artificial light was also available. The mirrors and image positions can be adjusted in the event that they become misaligned. (http://www.earlyphotography.co.uk/site/entry_V80.html, accessed 08 April 2022) The Junior Kromskop was a mono viewer Kromskop. henry sutton, photochromoscope syndicate, f.e. ives, camera club, photography, colour photography, kromskop, frederic eugene ives, junior kromskop, photographic equipment, camera -
 Orbost & District Historical Society
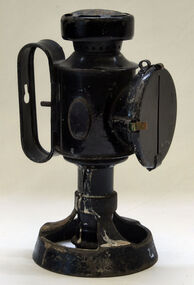
lantern, 1939?
... light being magnified by a lens. A shutter closes over the lens to give an illuminated vertical line. They were used originally in fortified siege artillery positions as a general purpose lamp. ...light being magnified by a lens. A shutter closes over the lens to give an illuminated vertical line. They were used originally in fortified siege artillery positions as a general purpose lamp. ...Blackout lantern used in WW11. This type of lantern was used during both World War. It is an artillery siege lamp and was originally used by artillery units. The lamps were powered by a single candle, the light being magnified by a lens. A shutter closes over the lens to give an illuminated vertical line. They were used originally in fortified siege artillery positions as a general purpose lamp. They were also used as aiming lamps when they were placed in front of artillery positions and used as a guide in aiming at night. These lamps were often used on the front of bicycles to guide at night. Donated by Clem Heather. Forestry Commision, carved faces on trees with axe., builder of tall. spliced single pole fire towers. This item is considered rare and important. It is historically and technically siginficant at a national level.Small black metal blackout lantern with handle. Front of lantern has round shield with small slit - small door at side for easy lighting of candle. It is hand held or placed on flat area, open base so candle can be inserted and 'screwed' in. Front is a magnifying glass and it has metal lens cover with vertical slit. lantern blackout ww11 military candle-power lamp