Showing 181 items matching "signalling light"
-
 Lakes Entrance Historical Society
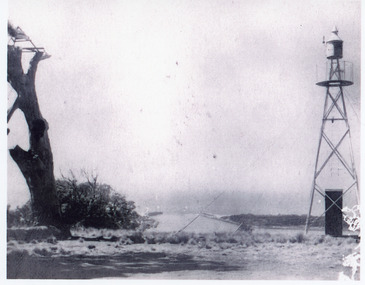
Photograph - Jemmys Point Lookout Tower, 1925
... Plus 1 x black and white small format photograph 6.5 x 6.5 taken from lookout, has signal light only|Plus 3 x small format postcards 6.5 x 8.5 taken from lookout, signal light quite distinct, with inscription Lookout Lakes Entrance...Black and white photograph of the entrance, taken from Jemmys Point between the old lookout tree and the signal light. Lakes Entrance Victoria...Lakes Entrance Historical Society 4 Marine Parade Lakes Entrance gippsland Plus 1 x black and white small format photograph 6.5 x 6.5 taken from lookout, has signal light only|Plus 3 x small format postcards 6.5 x 8.5 taken from lookout, signal light quite distinct, with inscription Lookout Lakes Entrance Coast Navigation Waterways Black and white photograph of the entrance, taken from Jemmys Point between the old lookout tree and the signal light. ...Plus 1 x black and white small format photograph 6.5 x 6.5 taken from lookout, has signal light only|Plus 3 x small format postcards 6.5 x 8.5 taken from lookout, signal light quite distinct, with inscription Lookout Lakes EntranceBlack and white photograph of the entrance, taken from Jemmys Point between the old lookout tree and the signal light. Lakes Entrance Victoria coast, navigation, waterways -
 Flagstaff Hill Maritime Museum and Village
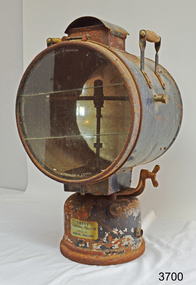
Functional object - Kerosene Searchlight, Circa 1935
... ...signalling light...Lamps that were used commercially, domestically and by the armed forces of many countries during the first and second world wars. flagstaff hill warrnambool flagstaff hill maritime museum maritime museum shipwreck coast flagstaff hill maritime village great ocean road Tilley Kerosene Pressure Searchlight Lighting John Tilley pressure lamps signalling light “TILLEY / SEARCHLIGHT PROJECTOR / MADE AT / HENDON, ENGLAND”, “256” handwritten in red on one wooden handle, “9” or “6” hand painted in white on top on light Tilley Searchlight Projector, or search lamp, made in Hendon, England 1935. ...The Tilley lamp derives from John Tilley’s invention of the hydro-pneumatic blowpipe in 1813 in England. W. H. Tilley was manufacturing pressure lamps at their works in Stoke Newington in 1818 and in Shoreditch in the 1830s. The company relocated to Brent Street in Hendon in 1915, during World War I, and began using paraffin (kerosene) as a fuel for its lamps. During World War I, Tilley lamps were used by the British armed forces and became so popular that "Tilley" became a generic name for a kerosene lamp in many parts of the world, much like "Hoover" is used for vacuum cleaners. During the 1920s, the company diversified into domestic lamps and expanded rapidly after orders from railway companies. After World War II, fears about the poisonous effects of paraffin fumes and widely available electricity reduced demand for domestic use. The company moved from Hendon to Ireland in the early 1960s, finally settling in Belfast. The company moved back to England in 2000.A significant item demonstrating the early use of kerosene under pressure as a lighting medium. These types of lamps were made by a company whose products became synonymous with oil lamps generally. Lamps that were used commercially, domestically and by the armed forces of many countries during the first and second world wars.Tilley Searchlight Projector, or search lamp, made in Hendon, England 1935. Metal kerosene pressure search lamp, glass front, fixed mirror at back, wooden carry handles. Mounted on fuel tank with pressure pump. Lamp has 8 airflow holes in the bottom and a covered outlet on the top. Glass is in 3 pieces, fitting together to make flat circle there is a maker’s plate on the pressure tank. “TILLEY / SEARCHLIGHT PROJECTOR / MADE AT / HENDON, ENGLAND”, “256” handwritten in red on one wooden handle, “9” or “6” hand painted in white on top on lightflagstaff hill, warrnambool, flagstaff hill maritime museum, maritime museum, shipwreck coast, flagstaff hill maritime village, great ocean road, tilley kerosene pressure searchlight, lighting, john tilley, pressure lamps, signalling light -
 Lakes Entrance Historical Society
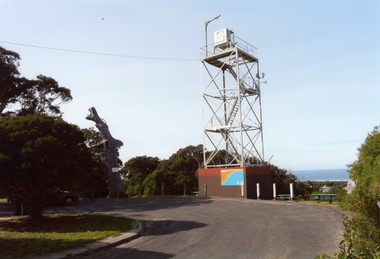
Photograph - Lookout tower Jemmy's Point, Price Wendy, 2008
... Colour photograph lookout tree and steel signal light tow on Jemmys Point. Lakes Entrance Victoria....Historic Sites Navigation Colour photograph lookout tree and steel signal light tow on Jemmys Point. Lakes Entrance Victoria. ...This is the 'after' paired photograph used in the 150 year Lakes Entrance 1858-2008 display. The 'before' paired photograph is number 02269. Also one 12 x 16 framed photograph used in room display.Colour photograph lookout tree and steel signal light tow on Jemmys Point. Lakes Entrance Victoria.historic sites, navigation -
 Parks Victoria - Point Hicks Lightstation
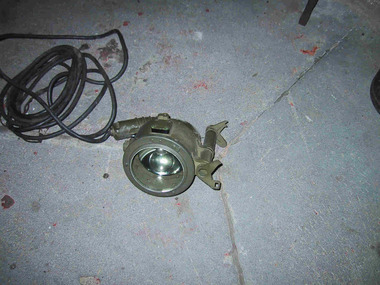
Lamp, Aldis
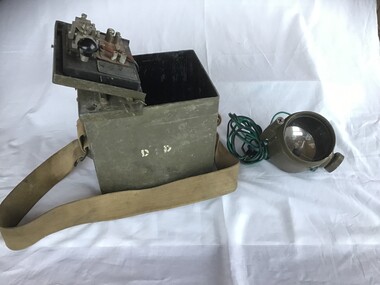
... signals. Smaller hand held versions like the Point Hicks example have a concave mirror that is tilted to focus the light into pulse signals via a trigger. ...PHLS0007.1 Hand held signal light. Painted metal trigger with attached black electrical leads with battery terminals at end. ...PHLS0007.2 Hinged lid, wooden box painted army green to house signal light. Metal plate with inscription on front of box. ...This portable, hand held visual signalling lamp was used for optical communication via Morse code. It comprises the metal encased Aldis lamp with electrical cord and its associated green-painted, hinged wooden carrying case, which has a metal clasp and leather hand grip. Larger versions of these lamps are fixed on ships or pedestals and have shutters on the front that are opened and closed to transmit signals. Smaller hand held versions like the Point Hicks example have a concave mirror that is tilted to focus the light into pulse signals via a trigger. The lamps were pioneered by the British navy in the late nineteenth century and continue to be used to the present day.317 Details on the Point Hicks lamp include a serial number and other information. Another Aldis lamp and case remaining at Cape Nelson Lightstation dates to 1960 and has the initials of the Department of Transport, which at that time incorporated the Commonwealth Lighthouse Service. Wilsons Promontory also has an Aldis lamp and case that dates from around the same year. A lamp formerly at Cape Schanck has disappeared. The Aldis lamp and associated case at Point Hicks has first level contributory significance for its historic values and provenance to the lightstation. PHLS0007.1 Hand held signal light. Painted metal trigger with attached black electrical leads with battery terminals at end. Inscriptions on metal of lantern. PHLS0007.2 Hinged lid, wooden box painted army green to house signal light. Metal plate with inscription on front of box.PHLS0007.1 "D^D / LANTERN PORTABLE SIGNALLING / ADMIRALITY No 5110D / SERIAL No 5482 YEAR 943 / AMALGAMATED WIRELESS / A ASA LTD / 9792-100" •PHLS0007.2 "20 K4 transporting lantern / admirality pattern no 91108" -
 Moorabbin Air Museum
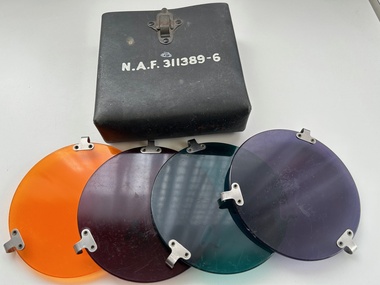
Accessory (Item) - Signal Light Lens Box Marked With N.A.F. 311389-6 , Without Lid, Complete with Four Coloured Lenses
... Signal Light Lens Box Marked With N.A.F. 311389-6 , Without Lid, Complete with Four Coloured Lenses....Signal Light Lens Box Marked With N.A.F. 311389-6 , Without Lid, Complete with Four Coloured Lenses....Signal Light Lens Box Marked With N.A.F. 311389-6 , Without Lid, Complete with Four Coloured Lenses 115mm Dia....Signal Light Lens Box Marked With N.A.F. 311389-6 , Without Lid, Complete with Four Coloured Lenses. ...N.A.F. 311389-6 -
 Queenscliffe Maritime Museum
Equipment - Morse and day light set in timber box with accessories
... 1942 portable morse code set with a day signaling light and spare globes. All fitted in timber carry case with webbing strap....Operating instructions on spare globes box lid 1942 portable morse code set with a day signaling light and spare globes. All fitted in timber carry case with webbing strap. ...Military communications and signaling equipment used from 19421942 portable morse code set with a day signaling light and spare globes. All fitted in timber carry case with webbing strap.Plate "Lamp Signaling Daylight. Short Range Case MK IIPMG MELM1942" S/N 10356. Operating instructions on spare globes box lidmorse code, wwii, signaling -
 Lakes Entrance Historical Society
Postcard - Western Wharf, 1930c
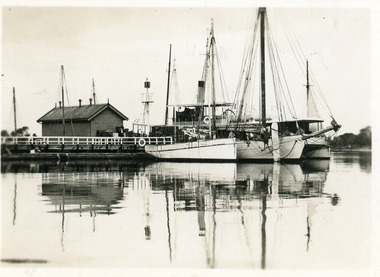
... Shown on the wharf a shed and signal light. Four boats moored including either Omeo or Dargo. ...Shown on the wharf a shed and signal light. Four boats moored including either Omeo or Dargo. ...Also black and white enlargement 18x25cmBlack and white small format postcard of the Western wharf. Shown on the wharf a shed and signal light. Four boats moored including either Omeo or Dargo. Reflections on calm waters of lake. Lakes Entrance VictoriaOn back 'Western Wharf Lakes Entrance'jetties, waterfront, ships and shipping -
 Bendigo Military Museum
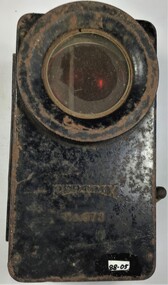
Equipment - LIGHT, C.WW2
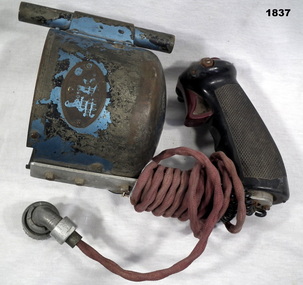
... Signal light from a Wellington Bomber consists of the light section circular blue colour. ...Bendigo Military Museum 37 - 39 Pall Mall Bendigo goldfields lighting-electric military equipment Wellington “Lamp electrical Signalling Daylight Mark M1918 65686 CAV” Signal light from a Wellington Bomber consists of the light section circular blue colour. ...Signal light from a Wellington Bomber consists of the light section circular blue colour. Attached to is a plate holds a plastic handgrip black with trigger and button from the base of the handgrip is an electric lead brown in colour with a section of black protectiv cord. “Lamp electrical Signalling Daylight Mark M1918 65686 CAV”lighting-electric, military equipment, wellington -
 Queenscliffe Maritime Museum
Equipment - Signal Light Box / flashlight
... Signal Light Box / flashlight...signaling with coloured lenses and many other uses. The blackout during the war also meant for a extended popularity of flashlights. Many carried them onto the streets to see as the streetlights where very rare and to top that of mostly blacked out. Most flashlights where fitted with blinds or coloured lenses to hide the bright light...A small metal light signal box or flashlight....Equipment Signal Light Box / flashlight ...Flashlights where a vital tool for night time map reading, signaling with coloured lenses and many other uses. The blackout during the war also meant for a extended popularity of flashlights. Many carried them onto the streets to see as the streetlights where very rare and to top that of mostly blacked out. Most flashlights where fitted with blinds or coloured lenses to hide the bright light they produced. These coloured lenses where also used to signal between individual soldiers. Mostly used in the 1940s by the military and civilians alike. A small metal light signal box or flashlight.Petrix No. 678signal box, flashlight, petrix 678 -
 Lakes Entrance Historical Society
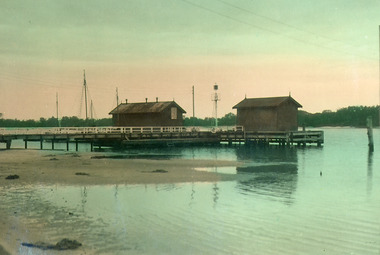
Photograph - Post Office Jetty Lakes Entrance Victoria c1931
... Tinted photograph of the Western Wharf, showing the jetty also known as the Post Office Jetty, two sheds signal light and masts of boats moored behind sand in foreground indicating low tide. ...Also Postcard of boats at Post Office jetty Jetties Waterfront Boats and Boating Tinted photograph of the Western Wharf, showing the jetty also known as the Post Office Jetty, two sheds signal light and masts of boats moored behind sand in foreground indicating low tide. ...Also Postcard of boats at Post Office jettyTinted photograph of the Western Wharf, showing the jetty also known as the Post Office Jetty, two sheds signal light and masts of boats moored behind sand in foreground indicating low tide. Scrub covered hummocks in background. Lakes Entrance Victoriajetties, waterfront, boats and boating -
 Melbourne Tram Museum
Photograph - Tram 415 - Riversdale Road, Travis Jeffrey, mid 1950s
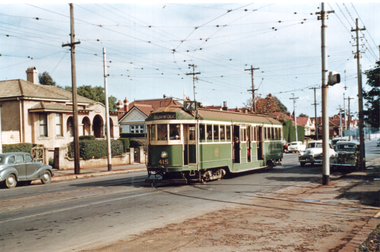
... Colour print showing W2 class tram No. 414 (Burwood Route 74), at the junction in Riversdale Road for Camberwell Depot. Note the signal light on the pole on the right hand side of the photograph....Melbourne Tram Museum 8 Wallen Road Hawthorn melbourne Colour print showing W2 class tram No. 414 (Burwood Route 74), at the junction in Riversdale Road for Camberwell Depot. Note the signal light on the pole on the right hand side of the photograph. ...Colour print showing W2 class tram No. 414 (Burwood Route 74), at the junction in Riversdale Road for Camberwell Depot. Note the signal light on the pole on the right hand side of the photograph.Yields information about tram 415 and the junction with the Camberwell Depot tracks.Colour print on Fujichrome paper.trams, tramways, tram 415, riversdale road, cambewell depot -
 Ballarat Tramway Museum
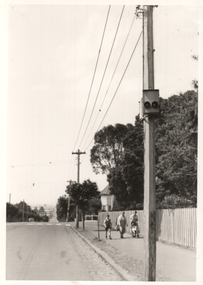
Photograph - Geelong Forest City signal lights, Keith Kings, Oct. 1955
... Photo shows a Forest City style signal light on a pole at the corner of Pakington St and Retreat Road Geelong, Newtown 17/10/1955. ...Ballarat Tramway Museum South Gardens Reserve Wendouree Parade Ballarat Ballarat goldfields Photo shows a Forest City style signal light on a pole at the corner of Pakington St and Retreat Road Geelong, Newtown 17/10/1955. ...Photo shows a Forest City style signal light on a pole at the corner of Pakington St and Retreat Road Geelong, Newtown 17/10/1955. Photo by Keith Kings, Number Q(m)(3). In the background are two ladies, a young boy and pram with a young child.Yields information about the Forest City signals in Geelong on the Newtown Route.Black and white photograph with notes on rear.See Contexttrams, tramways, secv, forest city signals, signals, pakington st, retreat road -
 Ballarat Tramway Museum
Photograph - Black & White Photograph/s, Dave Macartney, 4/08/1968 12:00:00 AM
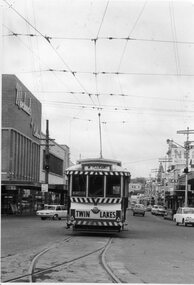
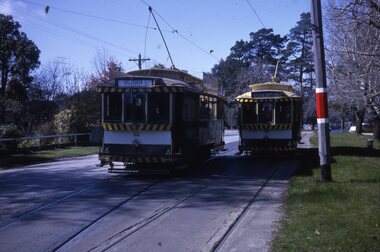
... Pleasant, has "TWIN LAKES" ad sign on rear end of tram. Signal light on pole shows track clear for tram to follow in same direction. ...Pleasant, has "TWIN LAKES" ad sign on rear end of tram. Signal light on pole shows track clear for tram to follow in same direction. ...Black and white photograph of SEC No. 11 entering Bridge St, c 1970. Photo taken after tram has passed photographer. Tram has destination of Mt. Pleasant, has "TWIN LAKES" ad sign on rear end of tram. Signal light on pole shows track clear for tram to follow in same direction. Taken 4/8/1968."DJM" on rear in penciltrams, tramways, ballarat, bridge st., mt pleasant , tram 11 -
 Melbourne Tram Museum
Photograph - 1926 Hudson Super 6 - Riversdale and Warragul Roads, Ray Pearson, 1930s
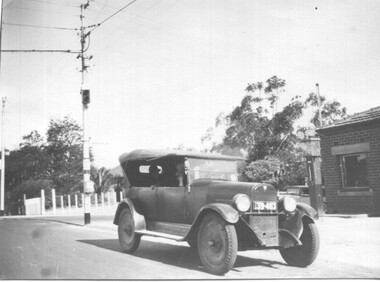
... Behind the car on the tramway pole is a colour light tramway signal for the single-line section between Warragul Road and the terminus. ...On rear in pencil "Colour light signal Wattle Park Route, down end loop line, corner of Riversdale and East Boundary Roads"....Behind the car on the tramway pole is a colour light tramway signal for the single-line section between Warragul Road and the terminus. ...Photograph of a 1926 Hudson Super 6 parked at the tea room/kiosk on the intersection of Riversdale Road and Warragul Road. Distinguishing features of the car include the triangular badge on the radiator and the unusual disc wheels. The 1926 Hudson also had horizontal radiator shutters. On this vehicle, a finer mesh has been attached in front of the shutters. This is normal practice when insects such as locusts are in plague. At the time, Warragul Road was known as East Boundary Road. Behind the car on the tramway pole is a colour light tramway signal for the single-line section between Warragul Road and the terminus. On 1 July 1928, the Wattle Park line was extended from Boundary Road via Riversdale Road to Elgar Road. It was built as a single track with a passing loop about halfway along, plus a passing loop at the former Boundary Road terminus. The tramway pole has a stop sign and a telephone box as well. In a box of negatives received is an envelope noting the car was owned by Ray Pearson and photo taken during the 1930s. Inside the motor car are two people, the driver, and a lady. In the background is part of the tea rooms located at this corner with a Shell gravity-fed petrol bowser. At the time, petrol was not sold at Service Stations on a Sunday - Sunday trading laws, but they allowed Tea Rooms or kiosks to be open.Yields information the intersection of Warragul and Riversdale Road and MMTB single line signals.Black and white photograph on Velox paper.On rear in pencil "Colour light signal Wattle Park Route, down end loop line, corner of Riversdale and East Boundary Roads".trams, tramways, riversdale road, wattle park, warragul road, motor cars, hudson super 6, shell fuel, signalling, single line, ray pearson -
 Ballarat Tramway Museum
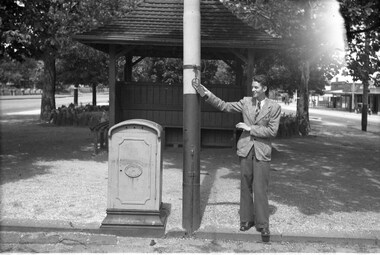
Photograph - Grenville St signal switch, Keith Kings, 12/4/1958
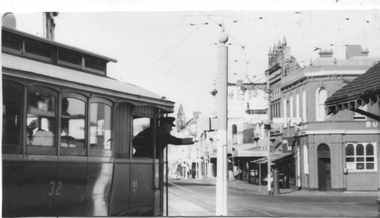
... Photograph shows the motorman of tram 32 selecting the correct signal light for his passage into Bridge St to either the Victoria St or Mt Pleasant Routes. ...Ballarat Tramway Museum South Gardens Reserve Wendouree Parade Ballarat Ballarat goldfields Photograph shows the motorman of tram 32 selecting the correct signal light for his passage into Bridge St to either the Victoria St or Mt Pleasant Routes. ...Photograph shows the motorman of tram 32 selecting the correct signal light for his passage into Bridge St to either the Victoria St or Mt Pleasant Routes. Also allowed the tram to shunt at the intersection and return along Sturt St. See page 44 of the photographer's book, The Ballarat Tramways published in Sept. 1971 - item 114. Has the Buckshead Hotel in the background. Dated 12/4/1958. Yields information about the operation of the Bridge St / Grenville St signal.Black and white photograph with photographers details and information on rear - Keith Kings No. A(l)(13)See image 2ballarat, trams, tramways, sturt st, bridge st, tram 32, signals, forest city signals, grenville st -
 Bendigo Military Museum
Equipment - HELIOGRAPH TRIPOD, Heliograph Tripod Legs, c. 1940 - 1945
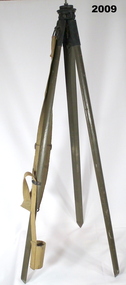
... A brass plate sits at the apex with a threaded rod positioned to allow the attachment of a heliograph or signal light. A khaki webbing shoulder strap for carrying the item is secured to one of the legs. ...A brass plate sits at the apex with a threaded rod positioned to allow the attachment of a heliograph or signal light. A khaki webbing shoulder strap for carrying the item is secured to one of the legs. ...Tripods similar to this were used in both WW1 and WW2. Note: Item 6482 is a Heliograph that was mounted onto a tripod such as this when it was used for surveying.Tripod with wooden legs painted in jungle green. The legs are attached to the apex with tarnished brass fittings, each secured with brass screws. Metal reinforcing plates protect the pointed end of each leg. A brass plate sits at the apex with a threaded rod positioned to allow the attachment of a heliograph or signal light. A khaki webbing shoulder strap for carrying the item is secured to one of the legs. At the bottom end of the strap is a webbing loop used to secure the tripod legs when closed. Stamped on one wooden leg: '15629' Stamped on the top plate: 'D(upwards arrow)D, 0 with an upwards arrow through it, 3(upwards arrow)0' Stamped on one brass leg fitting: 'STAND LAMP OR HELIO A MKlll'military equipment - army, heliograph, signals -
 Ballarat Tramway Museum
Slide - 35mm slide/s - set of 3, Les Fordham, Aug. 1967
... Set of 3 Kodachrome white cardboard mount 35mm slides - dated August 1967 taken by Les Fordham. .1 - trams 32 (Victoria St) and 30 ( (Gardens Via Drummond North) crossing at the depot loop or Barrett Ave loop in Wendouree Parade. .2 - tram in the loop, about to leave - blurry can't read the number. .3 - tram 30 entering the loop, the red signal light is illuminated. The tram stop pole appears to be recently painted....Tramways trams Depot Loop Barrett Ave Tram Stops Signals tram 30 tram 32 Set of 3 Kodachrome white cardboard mount 35mm slides - dated August 1967 taken by Les Fordham. .1 - trams 32 (Victoria St) and 30 ( (Gardens Via Drummond North) crossing at the depot loop or Barrett Ave loop in Wendouree Parade. .2 - tram in the loop, about to leave - blurry can't read the number. .3 - tram 30 entering the loop, the red signal light is illuminated. The tram stop pole appears to be recently painted. ...Yields information about tram operations in Wendouree Parade during August 1967.Set of 3 Kodachrome white cardboard mount 35mm slides - dated August 1967 taken by Les Fordham. .1 - trams 32 (Victoria St) and 30 ( (Gardens Via Drummond North) crossing at the depot loop or Barrett Ave loop in Wendouree Parade. .2 - tram in the loop, about to leave - blurry can't read the number. .3 - tram 30 entering the loop, the red signal light is illuminated. The tram stop pole appears to be recently painted.tramways, trams, depot loop, barrett ave, tram stops, signals, tram 30, tram 32 -
 Bendigo Historical Society Inc.
Document - BASIL MILLER COLLECTION: EASTER MONDAY, 11 APRIL 1966, c1966
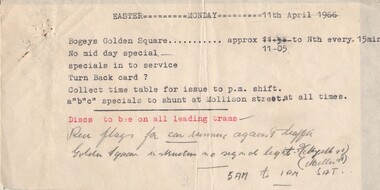
... (in pencil) Red flags for car summer against traffic Golden Square intersection no signal light? (Myrtle St) (Miller St) . 5am to 1 pm Sat....(in pencil) Red flags for car summer against traffic Golden Square intersection no signal light? (Myrtle St) (Miller St) . 5am to 1 pm Sat. ...Typed document. Heading: Easter Monday 11 April 1966. Body: Bogeys Golden Square, approx 11-05 to Nth every 15 mins. No midday special. Specials in to service. Turn Back card? Collect time table for issue to pm. Shift. a'b'c'' specials to shunt at Mollison street at all times. (in red) Discs to be on all leading trams. (in pencil) Red flags for car summer against traffic Golden Square intersection no signal light? (Myrtle St) (Miller St) . 5am to 1 pm Sat.organization, business, bendigo trams -
 Frankston RSL Sub Branch
Photograph
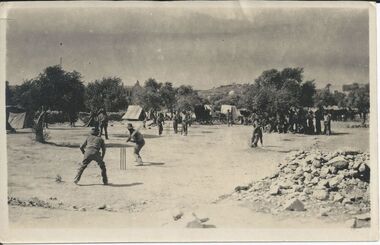
... Photograph of personnel of an Australian Light Horse Signal Squadron playing cricket at a camp in Bethlehem during World War 1....Frankston RSL Sub Branch 183 Cranbourne Road Frankston mornington-peninsula ww1 army alh australian light horse cricket sport Photograph of personnel of an Australian Light Horse Signal Squadron playing cricket at a camp in Bethlehem during World War 1. ...Photograph of personnel of an Australian Light Horse Signal Squadron playing cricket at a camp in Bethlehem during World War 1.ww1, army, alh, australian light horse, cricket, sport -
 Ballarat Tramway Museum
Photograph - SECV Ballarat - Forest City light signal, Chris Wurr, Jan 1971
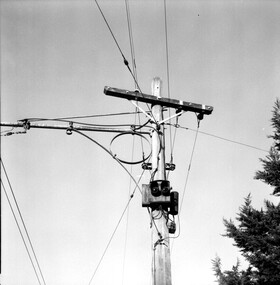
... SECV Ballarat - Forest City light signal....Digital image of the Forest City light signal mounted on a pole with a bracket arm. ...Ballarat Tramway Museum South Gardens Reserve Wendouree Parade Ballarat Ballarat goldfields Digital image of the Forest City light signal mounted on a pole with a bracket arm. ...Digital image of the Forest City light signal mounted on a pole with a bracket arm. Shows the signal box, associated resistor cylinder and the fuse box. Photo by Chris Wurr on Jan 1971.Yields information about one of the Forest City signals located on a pole and the associated equipment.Digital - Black and white imagetramways, trams, forest city signals, signals -
 City of Kingston
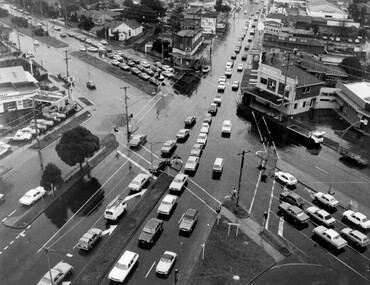
Photograph - Black and white, c. 1950
... The image shows a line of traffic travelling along South Road in response to traffic light signlas while an increasing number of cars are banking up along Nepean Highway, also in response to traffic light signals....City of Kingston Parkdale Library 96 Parkers Road, Parkdale Parkdale The image shows a line of traffic travelling along South Road in response to traffic light signlas while an increasing number of cars are banking up along Nepean Highway, also in response to traffic light signals. This image provides a strong contrast to images from earlier eras of the same intersection. ...The image shows a line of traffic travelling along South Road in response to traffic light signlas while an increasing number of cars are banking up along Nepean Highway, also in response to traffic light signals.This image provides a strong contrast to images from earlier eras of the same intersection. The amount of traffic has increased enormously as well as commercial development.Black and white photograph with an aerial view of the intersection of Nepean Highway and South Road, taken from above the Moorabbin Council Chambers.Handwritten in black ink Pic [indecipherable] / 1000 Handwritten in red ink: 150%moorabbin, traffic lights, cars, nepean highway -
 Wodonga & District Historical Society Inc
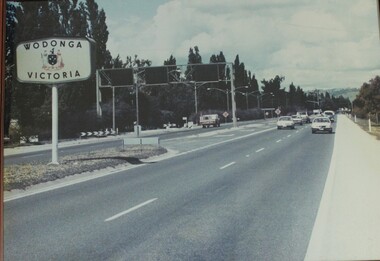
Photograph - Wodonga, Victoria sign and the Fruit Fly check point c1970s
... The southbound lanes on the right hand side feature overhead signals and traffic light signs to control traffic leading into the Fruit fly inspection checkpoint ahead. ...The southbound lanes on the right hand side feature overhead signals and traffic light signs to control traffic leading into the Fruit fly inspection checkpoint ahead. ...The permanent fruit fly road blocks in Victoria began in 1958. The first was set up on the Lincoln Causeway between Albury and Wodonga. The aim was to protect the Victorian fruit export industry, the largest in the country. Cars would be stopped and inspected when entering Victoria. At peaks periods, such as Easter and school holidays, there were up to 10 inspectors at the 24 hour checkpoint near the former butter factory on the Lincoln Causeway. Local residents could apply for a pass which would be displayed on their window, but were still subject to random checks. Hundreds of tonnes of fruit each week was confiscated and pulverised by Department of Agriculture staff. The road block was closed in 1980, partly due to the increased traffic flows and the cost of maintaining inspection points.This image reflects government measures taken to protect the fruit industry in Victoria.A large image of the LIncoln Causeway at the Victorian/NSW border at Wodonga. The southbound lanes on the right hand side feature overhead signals and traffic light signs to control traffic leading into the Fruit fly inspection checkpoint ahead. The photo is in a wooden frame.On right hand side: Border sign: Wodonga/Victoria and the Victorian State Coat of Arms.fruit fly control, victoria border, lincoln causeway wodonga -
 Puffing Billy Railway
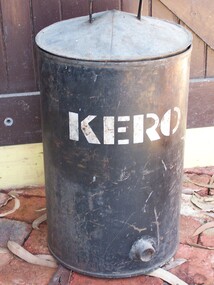
Equipment - Container
... Kerosene was used to light the signal lamps at night time on a railway, to ensure that a locomotive driver could see that the line was clear there was no danger of another train ahead. ...Puffing Billy Railway 1 old monbulk road Belgrave yarra-valley-and-the-dandenong-ranges Kerosene was used to light the signal lamps at night time on a railway, to ensure that a locomotive driver could see that the line was clear there was no danger of another train ahead. ...Kerosene was used to light the signal lamps at night time on a railway, to ensure that a locomotive driver could see that the line was clear there was no danger of another train ahead. This container was used to store the in kerosene to fuel such lamps and was kept inside a lamp room until required for use.Victorian Railways - Keroseane Container Used in the storage of kerosene prior to use in lamps at stations.Large, cylindrical tin container with conical lid and wire handle. A small zinc spout is embedded in the lower quadrant. The word 'KERO' is stencilled in white across the front. Keropuffing billy, kerosene, fuel, combustible material, tin container, lamps -
 National Vietnam Veterans Museum (NVVM)
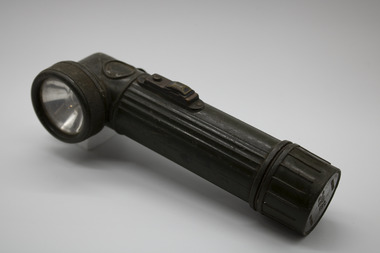
Functional Object - Torch, anglehead
... Standard issue item, the torch could be clipped onto uniform or webbing leaving the soldier's hands free and used for constant light or signaling position. The bottom section has a compartment containing four different coloured filters /lenses that make the use of the torch at night less visible to enemy....National Vietnam Veterans Museum (NVVM) 25 Veterans Drive Newhaven phillip-island-and-the-bass-coast Standard issue item, the torch could be clipped onto uniform or webbing leaving the soldier's hands free and used for constant light or signaling position. The bottom section has a compartment containing four different coloured filters /lenses that make the use of the torch at night less visible to enemy. torch flashlight angle head torch Vietnam war tunnel rat field torch 62'30.89-910 5033 Dark green coloured ribbed tube/handle with globe in right-angled section at top. ...Standard issue item, the torch could be clipped onto uniform or webbing leaving the soldier's hands free and used for constant light or signaling position. The bottom section has a compartment containing four different coloured filters /lenses that make the use of the torch at night less visible to enemy.Dark green coloured ribbed tube/handle with globe in right-angled section at top. Can be unscrewed at both ends and has metal clip to attach to webbing or uniform.62'30.89-910 5033torch, flashlight, angle head torch, vietnam war, tunnel rat, field torch -
 Ballarat Tramway Museum
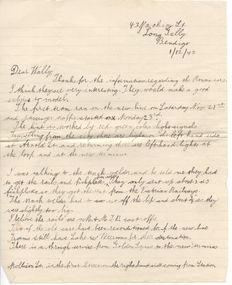
Document - Letter/s, Jim Goodman, 1/12/1942 12:00:00 AM
... Gives details of the new line to North Bendigo, issues with construction, sources of rails, timetable services on the line, colour light signals. Also has notes regarding NSW and VR steam locomotives. ...Gives details of the new line to North Bendigo, issues with construction, sources of rails, timetable services on the line, colour light signals. Also has notes regarding NSW and VR steam locomotives. ...Handwritten letter from Jim Goodman of 43 Jackson St Long Gully, dated 1/12/1942, to Wal Jack. Gives details of the new line to North Bendigo, issues with construction, sources of rails, timetable services on the line, colour light signals. Also has notes regarding NSW and VR steam locomotives. Letter consists of three pages on light grey ruled or line paper. Contained originally within Reg Item 5623 at the front of this note book. For items see btm5623 loose items list.pdf.trams, tramways, bendigo, north bendigo, timetables -
 Ballarat Tramway Museum
Negative - Set of 3, Wal Jack, c1948
... Note: The Ripon St - Lake View Loop - View Point section of track was not fitted with coloured light signals. Tram 22 (Reg Item 5533) entered service - 1945; post 1947, as side numbers (which can just be seen in image i2) were painted Oct. 1947 and was renumbered to 37, in Sept. 1952....Note: The Ripon St - Lake View Loop - View Point section of track was not fitted with coloured light signals. Tram 22 (Reg Item 5533) entered service - 1945; post 1947, as side numbers (which can just be seen in image i2) were painted Oct. 1947 and was renumbered to 37, in Sept. 1952. ...Yields information about staff or safeworking system in use at Ballarat up to the time of the introduction of the signal system. No information known at the time of cataloguing of the person in the photographs.Set of three Negative and Digital images of an unknown person: .1 - showing the hook and the section staff at the Ripon St - Sturt St corner. Alongside is an ESCo Electrical connection box or pillar. In the background is the shelter at this location. .2 - the same person handing the staff to a well loaded No. 22 (c1946) at Ripon St. Tram has a Regatta Auxiliary board. Has the Western Hotel in the background. .3 - the same person holding the Sturt St to Lake View Loop. .4 - close up of the staff. Note: The Ripon St - Lake View Loop - View Point section of track was not fitted with coloured light signals. Tram 22 (Reg Item 5533) entered service - 1945; post 1947, as side numbers (which can just be seen in image i2) were painted Oct. 1947 and was renumbered to 37, in Sept. 1952.trams, tramways, signals, staff, ripon st, view point, lake view, tram 22 -
 Federation University Historical Collection
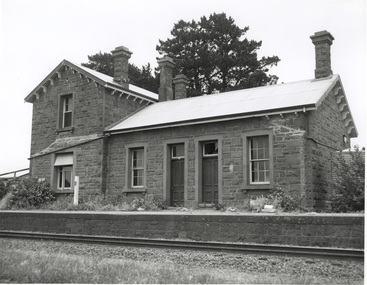
Photograph, Noel L. Harvey, Yendon Railway Station, 1968, 03/12/1968
... The Railways Department advised the meeting that an inspection had been made at the Yendon level crossing, but no recommendation could be made at present for installation of flashing light signals.'...The Railways Department advised the meeting that an inspection had been made at the Yendon level crossing, but no recommendation could be made at present for installation of flashing light signals.' university of ballarat ballarat institute of advanced education yendon railway bluestone john vernon Verso in blue ballpoint pen 'No 47 Yendon Railway Stn' Stamped in purple ink 'N.L. ...Buninyong had no railway station so residents would travel to Yendon to catch the train. The Yendon Railway Station building was demolished soon after this photograph was taken. The bluestone was purchased by John Vernon, and was used to construct retaining walls in a garden enclosure between the first two buildings at the new Ballarat Institute of Advanced Education campus at Mt Helen. This is now known as the courtyard between building 'F' and building 'G' at the University of Ballarat mt Helen Campus. The following article was published in the Ballarat Courier on 06 December 1968. 'Yendon Station to be demolished - The old bluestone railway station at Yendon is to be demolished. C.A.D. Fisken told Buninyong Shire Council of the proposal at its meeting yesterday. Fortunately, he said, the beautiful stonework would not be lost. It would be used and incorporated in the new School of Mines building at Mt Helen. the retention of the century-old building was the subject of representations by Council to the Railways following the closure of the station for goods traffic 'some time ago'. The building had also been noted by the National Trust as one of special interest. The Railways Department advised the meeting that an inspection had been made at the Yendon level crossing, but no recommendation could be made at present for installation of flashing light signals.'Bluestone building with dressed bluestone door and window jambs and chimney. The roof is corrugated iron. The platform edge is also of bluestone construction. The building is the former Yendon Railway Station (now demolished) on the Ballarat -Geelong main line (the original Melbourne to Ballarat mainline). When the line was opened, this station may have been originally called Buninyong as it was built a number of years before the Ballarat to Buninyong branch line was built. This this has subsequently caused some confusion. The station was later renamed Yendon. Verso in blue ballpoint pen 'No 47 Yendon Railway Stn' Stamped in purple ink 'N.L. Harvey & Son, Photographers, 131 Sturt Streeet Ballarat, Phone 25766, After hours 23397, Will photograph anywhere anytime any place. (in pen 3/12/68),university of ballarat, ballarat institute of advanced education, yendon, railway, bluestone, john vernon -
 Ballarat Tramway Museum
Slide - 35mm slide/s - set of 20, Noel Simons, 21/05/1971 12:00:00 AM
... (White Hills Road). Note signal light for Bridge St. loop on pole corner of street. ...(White Hills Road). Note signal light for Bridge St. loop on pole corner of street. ...Set of 20 transparencies taken on 21/5/1971 on Kodak mounts. 1197.1 - Bendigo No. 5 en route to Eaglehawk at Creeth St Long Gully. Tram has a SEC roof ad and Cinzano roof ad. 1197.2 - No 5 approaching Needle Loop between Long Gully and California Gully. On left hand side is the City of Bendigo sign, indicating city boundary. 1197.3 - As for 1197.2 but actually entering loop. Photo taken after tram has passed photographer. 1197.4 - No. 26 bound for Eaglehawk descending the railway bridge near Eaglehawk, at Jobs Gully. 1197.5 - as for 1197.4, but after crossing bridge, now ascending a hill. Photo taken after tram has passed photographer. 1197.6 - No. 26 climbing High St. hill Eaglehawk, nearing end of Double track, bound for Quarry Hill. Shows centre of the road poles. 1197.7 - As for 1197.6, with tram entering single track section. Photo taken after tram has passed photographer. Has a BP service station in the background. 1197.8 - No. 26 (bound for Quarry Hill) crossing No. 17 (Eaglehawk) at Job's Gully Loop. 1197.9 - No. 17 climbing railway bridge at Job's Gully, en route to Eaglehawk. Photo taken after tram has passed photographer. 1197.10 - No.26 bound for Quarry Hill, leaving Long Gully Loop? Has the Creeth St. church in l197.l in the far background. Photo taken after tram has passed photographer. 1197.11 - Tramway Point work at the northern end of Long Gully Loop. 1197.12 - No. 17 en route for Quarry Hill turning into View St. from Bamard St. Tram has SEC roof ads "Everything fine in my all electric Kitchen' and 'Electric Cooking is Matchless'. 1197.13 - as for 1197.12, but tram has turned into View St and about to enter the double line track. Photo taken after tram has passed photographer. 1197.14 - No. 21 enters Nolan St after turning from MacRae St. en route to Bendigo. Note sign on its own post noting tram turns "Beware Tram Turns" and stop sign on adjacent pole "Trams stop on Request". No. 21 has two SEC roof ads. 1197.15 - No. 21 in Nolan St. after turning from Bridge St. (White Hills Road). Note signal light for Bridge St. loop on pole corner of street. Photo taken after tram has passed photographer. 1197.16 - No. 2 bound for Eaglehawk at unknown location. 1197.17 - Tram stop sign on a pole "CARS STOP BY REQUEST" 1197.18 - No. 5 in Carpenter St.? en route to Quarry Hill. 1197.19 - No. 28 has just arrive at Golden Square terminus, passengers are disembarking and the trolley pole is being turned. Golden Square Hotel in the background. 1197.20 - No. 28 at Golden Square terminus. Has a "Nothing beats Briquettes for hear roof ad. Information written on in black ink and date stamped on purple ink. 1197.1 - "No. 5 at Creeth St. Long Gully" 1197.2 - "No. 5 approaching Needle Loop between Long Gully and California Gully" 1197.3 - "No. 5 at Needle Loop between Long Gully and California Gully" 1197.4 - "No. 26 crossing railway bridge at Job's Gully near Eaglehawk" 1197.5 - "No. 26 just after crossing railway bridge at Job's Gully near Eaglehawk/ 1197.6 - "No. 26 in High St. Eaglehawk" 1197.7 - "No. 26 at end of double track in High St. Eaglehawk" 1197.8 - "Nos. 26 and 17 crossing at Job's Gully Loop" 1197.9 - "No. 17 crossing railway bridge at Job's Gully near Eaglehawk". 1197.10 - "No. 26 at Long Gully" 1197.11 - 'Northern end of points at Long Gully Loop". 1197.12 - "No. 17 turning into View St. from Bamard St. Bendigo". 1197.13 -'No. 17 at beginning of double track in View St. after leaving Bamard St. Bendigo. 1197.14 - "No. 21 enters Nolan St. from MacRae St. Bendigo." 1197.15 - "No. 21 in Nolan St. Bendigo just after leaving White Hills Road." 1197.16 - "No. 2" 1197.18 - "No. 5" 1197.19 - "Birney car No. 28 at Golden Square Terminus" 1197.20 "Birney car No. 28 at Golden Square Terminus" tramways, trams, bendigo, long gully, railway bridge, jobs gully, trackwork, nolan st, quarry hill, tram stops, golden square, tram 2, tram 5, tram 17, tram 21, tram 26, tram 28 -
 Ballarat Tramway Museum
Film - Movie Film & Box, Kodak, 1960 to 1971
... Between 1960 and 1968 0:00 Trams Ahead sign before the Victoria St terminus with 20 at terminus 0.14 - No. 20 leaving Victoria St terminus and being followed along Victoria St by car and then passengers jointing the tram at a tram stop. 00.40 - No. 12 (c1960) in bound along Lydiard St North and arriving in the Gregory St loop. 00.56 - No. 12 and 14 crossing at Gregory St. 01.20 - No. 33 and a bogie car crossing at depot loop. 01.31 - No. 18 travelling along Wendouree Parade with the Lake in the background. 01.42 - No 41 at depot junction and running into the depot No. 2 road with a short sequence of a tramway signal. 02.17 - SEC Sign at the depot gate, shot of 41 in No. 2 road, with the lights other way around, Caution beware of trams sign and a red signal. 02.31- Timetable sign at Gardens Loop 02.36 - No. 30 arriving at Loop and view of a signal with no lights showing. 02.48 - Destination roll being changed through a number of destinations. 03.26 - No. 20 arriving at Carlton St loop with the Olympic monument in the background and the red signal light going out. 03.31 - a lady standing at the front of No. 20, with an ice cream in hand, and No. 17 arriving at the Carlton St loop with a short sped up sequence and No. 20 departing from the loop, followed by No. 17 leaving the loop, heading into the city. 03.41 - No. 13 inbound from Sebastopol crossing Albert St and heading into the city. 04.12 - view of signal and contactor, the light going green and the tram passing underneath. 04.24 - No. 12 at the Sebastopol terminus and departing. 04.51 - No. 12 crossing Albert St Sebastopol. 05.16 - Following No. 12 along Albert St, with Borough Offices in background initially. 05.28 - No. 12 arriving at the Grey St loop with No. 14 arriving at the loop from the city and both trams departing. ...Between 1960 and 1968 0:00 Trams Ahead sign before the Victoria St terminus with 20 at terminus 0.14 - No. 20 leaving Victoria St terminus and being followed along Victoria St by car and then passengers jointing the tram at a tram stop. 00.40 - No. 12 (c1960) in bound along Lydiard St North and arriving in the Gregory St loop. 00.56 - No. 12 and 14 crossing at Gregory St. 01.20 - No. 33 and a bogie car crossing at depot loop. 01.31 - No. 18 travelling along Wendouree Parade with the Lake in the background. 01.42 - No 41 at depot junction and running into the depot No. 2 road with a short sequence of a tramway signal. 02.17 - SEC Sign at the depot gate, shot of 41 in No. 2 road, with the lights other way around, Caution beware of trams sign and a red signal. 02.31- Timetable sign at Gardens Loop 02.36 - No. 30 arriving at Loop and view of a signal with no lights showing. 02.48 - Destination roll being changed through a number of destinations. 03.26 - No. 20 arriving at Carlton St loop with the Olympic monument in the background and the red signal light going out. 03.31 - a lady standing at the front of No. 20, with an ice cream in hand, and No. 17 arriving at the Carlton St loop with a short sped up sequence and No. 20 departing from the loop, followed by No. 17 leaving the loop, heading into the city. 03.41 - No. 13 inbound from Sebastopol crossing Albert St and heading into the city. 04.12 - view of signal and contactor, the light going green and the tram passing underneath. 04.24 - No. 12 at the Sebastopol terminus and departing. 04.51 - No. 12 crossing Albert St Sebastopol. 05.16 - Following No. 12 along Albert St, with Borough Offices in background initially. 05.28 - No. 12 arriving at the Grey St loop with No. 14 arriving at the loop from the city and both trams departing. ...Yields information in movie film format of Ballarat trams in 1960 through to 1971, how the system operated and was used by people, including special trams., Yields information in movie film format of Ballarat trams in 1960 through to 1971, how the system operated and was used by people, including special trams.Movie film - 8mm, approx. 15 mins, without leader strip on a plastic reel, within a clear plastic case - Standard 8, titled "Ballarat Trams". See Reg Item 4957 for DVD and Mini DVD. Has been transferred to DVD - see Reg item 4957 Made by Arthur Hill. Also transferred to DVD by Rod Cook Oct. 2015, via Roger Greenwood for use in his DVD, "The City of Ballarat Trams, Gardens & Gold" of 2016. See Reg Item 6883. In Arthur's letter - on file - Made between 1960 and August 1971. Synopsis: based on time. Between 1960 and 1968 0:00 Trams Ahead sign before the Victoria St terminus with 20 at terminus 0.14 - No. 20 leaving Victoria St terminus and being followed along Victoria St by car and then passengers jointing the tram at a tram stop. 00.40 - No. 12 (c1960) in bound along Lydiard St North and arriving in the Gregory St loop. 00.56 - No. 12 and 14 crossing at Gregory St. 01.20 - No. 33 and a bogie car crossing at depot loop. 01.31 - No. 18 travelling along Wendouree Parade with the Lake in the background. 01.42 - No 41 at depot junction and running into the depot No. 2 road with a short sequence of a tramway signal. 02.17 - SEC Sign at the depot gate, shot of 41 in No. 2 road, with the lights other way around, Caution beware of trams sign and a red signal. 02.31- Timetable sign at Gardens Loop 02.36 - No. 30 arriving at Loop and view of a signal with no lights showing. 02.48 - Destination roll being changed through a number of destinations. 03.26 - No. 20 arriving at Carlton St loop with the Olympic monument in the background and the red signal light going out. 03.31 - a lady standing at the front of No. 20, with an ice cream in hand, and No. 17 arriving at the Carlton St loop with a short sped up sequence and No. 20 departing from the loop, followed by No. 17 leaving the loop, heading into the city. 03.41 - No. 13 inbound from Sebastopol crossing Albert St and heading into the city. 04.12 - view of signal and contactor, the light going green and the tram passing underneath. 04.24 - No. 12 at the Sebastopol terminus and departing. 04.51 - No. 12 crossing Albert St Sebastopol. 05.16 - Following No. 12 along Albert St, with Borough Offices in background initially. 05.28 - No. 12 arriving at the Grey St loop with No. 14 arriving at the loop from the city and both trams departing. March 1971 05.58 - No. 30 being followed along Barkly St, Mt Pleasant and the pole being turned at the terminus 06.32 - No. 30 picking up a lady passenger. 06.38 - view from the front of a tram, with the drivers hand and a cigarette, view from the back of the tram, along the Mt Pleasant route and running through the loop and then turning into Main St - has the Ballarat (East) fire station in one sequence, and finally running along Main St. 07.35 - view from tram, with car turning into Bridge St. and then running into Sturt St passed the Parking Loop, and along Sturt St. 08.32 - Points at Drummond St North being changed, doors changed over and the tram running along Drummond St. North, through the Mill St loop and into Macarthur St and in Wendouree Parade, with the Lake Wendouree in view and crossing No. 12 at the Depot Loop, with crews chatting, past the depot, a lady passenger getting off the tram near Forest St., and arriving at Gardens Loop with the same lady passenger who got on in Barkly St, getting off the tram. 11.09 - view of No. 30 at Gardens Loop, departing the loop. August 1971 11.30 - R761 crossing Melton (Exford Wier) on the special train to Ballarat and then the bridge between Ballan and Gordon Stations. 12.16 - View from the front of a tram, following No. 26 along Lydiard St North, crossing at Gregory St and returning to the City. 12.39 - No. 14 and one other tram running along Albert St to Sebastopol, crossing No. 21 at Grey St and then to Sebastopol terminus, crossing Albert St and return and running along Albert St. 13.36 - No. 26, 39 crossing 13 at Gardens Loop. 14.00 - view looking across Lake Wendouree. 14.07 - 26 arriving at Victoria St, running part of Destination roll, passengers getting off with hotel in the background, trolley pole being turned and then with 39 following tram along Victoria St, crossing at the King St Loop. 15.07 - view of a trolley pole tracking through the overhead at curve 15.10 - end. Written labels giving title information on reel.trams, tramways, ballarat, sebastopol, lydiard st north, victoria st, mt pleasant, lake wendouree, depot, tram 12, tram 13, tram 14, tram 17, tram 18, tram 21, tram 26, tram 33, tram 39, tram 41 -
 4th/19th Prince of Wales's Light Horse Regiment Unit History Room
Colour Patch Display, Frontier Military History Services, Australian Light Horse Colour Patches of the 1st AIF 1915-1920 & AMF/CMF 1921-1940's, 24/07/2010
... Colour patches displayed are those of : 1st Cavalry Division HQ (CMF) Desert Mounted Corps HQ 2nd Cavalry Division HQ (CMF) HQ 1st Light Horse Brigade (AIF & CMF) HQ 2nd Light Horse Brigade (AIF & CMF) HQ 3rd Light Horse Brigade (AIF & CMF) HQ 4th Light Horse Brigade (AIF) HQ 5th Light Horse Brigade (AIF & CMF) HQ 4th Light Horse Brigade (CMF) HQ 6th Light Horse Brigade (CMF) 1st Light Horse Regiment / 1st Royal NSW Lancers 5th Light Horse Regiment / 5th Wide Bay & Burnett Light Horse 8th Light Horse Regiment / 8th Indi Light Horse Regiment 4th Light Horse Regiment / 4th Corangamite Light Horse Regiment 14th Light Horse Regiment / 14th West Moreton Light Horse Regiment 18th Adelaide Lancers 4th Light Horse Regiment / 1st Aust Div Mounted Regiment / 2nd ANZAC Mounted Regiment / 22nd Corps Mounted Regiment. 2nd Light Horse Regiment / 2nd Moreton Light Horse Regiment 6th Light Horse Regiment / 6th NSW Mounted Rifles 9th Light Horse Regiment / 9th Flinders Light Horse Regiment 11th Light Horse Regiment / 11th Darling Downs Light Horse Regiment 15th Light Horse Regiment / 15th Northern River Lancers 21st Riverina Light Horse 13th Light Horse Regiment / 2nd Aust Div Mounted Regiment / 1st ANZAC Mounted Regiment / Aust Corps Mounted Regiment / 13th Gippsland Light Horse Regiment 3rd Light Horse Regiment / 3rd South Australian Mounted Rifles 7th Light Horse Regiment / 7th Australian Horse 10th Light Horse Regiment / 10th Western Australian Mounted Infantry 12th Light Horse Regiment / 12th New England Light Horse Regiment 17th Prince of Wales Light Horse Regiment 22nd Tasmanian Mounted Infantry 11th Light Horse Regiment / 4th Aust Div Mounted Regiment / 24th Gwydir Light Horse Regiment 1st Machine Gun Squadron / 25th Light Horse (MG) 2nd Machine Gun Squadron / 16th Hunter River Lancers 3rd Machine Gun Squadron / 20th Victorian Mounted Rifles 4th Machine Gun Squadron / 26th Light Horse (MG) 5th Machine Gun Squadron / 19th Yarrowee Light Horse 23rd Barossa Light Horse Regiment 12th Light Horse Regiment / 5th Aust Div Mounted Regiment 1st Light Horse Field Ambulance 2nd Light Horse Field Ambulance 3rd Light Horse Field Ambulance 4th Light Horse Field Ambulance 5th Light Horse Field Ambulance 4th Signal Troop / 4th Light Horse brigade 6th Mobile Veterinary Section /1st Light Horse Brigade 7th Mobile Veterinary Section / 2nd Light Horse Brigade 8th Mobile Veterinary Section / 3rd Light Horse Brigade 9th Mobile Veterinary Section / 4th Light Horse brigade 10th Mobile Veterinary Section / 5th Light Horse Brigade 5th Signal Troop / 5th Light Horse Brigade 1st Signal Squadron / NZ & Aust Mounted Div Signal Squadron...Colour patches displayed are those of : 1st Cavalry Division HQ (CMF) Desert Mounted Corps HQ 2nd Cavalry Division HQ (CMF) HQ 1st Light Horse Brigade (AIF & CMF) HQ 2nd Light Horse Brigade (AIF & CMF) HQ 3rd Light Horse Brigade (AIF & CMF) HQ 4th Light Horse Brigade (AIF) HQ 5th Light Horse Brigade (AIF & CMF) HQ 4th Light Horse Brigade (CMF) HQ 6th Light Horse Brigade (CMF) 1st Light Horse Regiment / 1st Royal NSW Lancers 5th Light Horse Regiment / 5th Wide Bay & Burnett Light Horse 8th Light Horse Regiment / 8th Indi Light Horse Regiment 4th Light Horse Regiment / 4th Corangamite Light Horse Regiment 14th Light Horse Regiment / 14th West Moreton Light Horse Regiment 18th Adelaide Lancers 4th Light Horse Regiment / 1st Aust Div Mounted Regiment / 2nd ANZAC Mounted Regiment / 22nd Corps Mounted Regiment. 2nd Light Horse Regiment / 2nd Moreton Light Horse Regiment 6th Light Horse Regiment / 6th NSW Mounted Rifles 9th Light Horse Regiment / 9th Flinders Light Horse Regiment 11th Light Horse Regiment / 11th Darling Downs Light Horse Regiment 15th Light Horse Regiment / 15th Northern River Lancers 21st Riverina Light Horse 13th Light Horse Regiment / 2nd Aust Div Mounted Regiment / 1st ANZAC Mounted Regiment / Aust Corps Mounted Regiment / 13th Gippsland Light Horse Regiment 3rd Light Horse Regiment / 3rd South Australian Mounted Rifles 7th Light Horse Regiment / 7th Australian Horse 10th Light Horse Regiment / 10th Western Australian Mounted Infantry 12th Light Horse Regiment / 12th New England Light Horse Regiment 17th Prince of Wales Light Horse Regiment 22nd Tasmanian Mounted Infantry 11th Light Horse Regiment / 4th Aust Div Mounted Regiment / 24th Gwydir Light Horse Regiment 1st Machine Gun Squadron / 25th Light Horse (MG) 2nd Machine Gun Squadron / 16th Hunter River Lancers 3rd Machine Gun Squadron / 20th Victorian Mounted Rifles 4th Machine Gun Squadron / 26th Light Horse (MG) 5th Machine Gun Squadron / 19th Yarrowee Light Horse 23rd Barossa Light Horse Regiment 12th Light Horse Regiment / 5th Aust Div Mounted Regiment 1st Light Horse Field Ambulance 2nd Light Horse Field Ambulance 3rd Light Horse Field Ambulance 4th Light Horse Field Ambulance 5th Light Horse Field Ambulance 4th Signal Troop / 4th Light Horse brigade 6th Mobile Veterinary Section /1st Light Horse Brigade 7th Mobile Veterinary Section / 2nd Light Horse Brigade 8th Mobile Veterinary Section / 3rd Light Horse Brigade 9th Mobile Veterinary Section / 4th Light Horse brigade 10th Mobile Veterinary Section / 5th Light Horse Brigade 5th Signal Troop / 5th Light Horse Brigade 1st Signal Squadron / NZ & Aust Mounted Div Signal Squadron Australian Light Horse Colour Patches of the 1st AIF 1915-1920 & AMF/CMF 1921-1940's Colour Patch Display Frontier Military History Services Keith Dudley ...Display board of replica cloth colour patches, mounted in glass fronted wooden frame. Colour patches displayed are those of : 1st Cavalry Division HQ (CMF) Desert Mounted Corps HQ 2nd Cavalry Division HQ (CMF) HQ 1st Light Horse Brigade (AIF & CMF) HQ 2nd Light Horse Brigade (AIF & CMF) HQ 3rd Light Horse Brigade (AIF & CMF) HQ 4th Light Horse Brigade (AIF) HQ 5th Light Horse Brigade (AIF & CMF) HQ 4th Light Horse Brigade (CMF) HQ 6th Light Horse Brigade (CMF) 1st Light Horse Regiment / 1st Royal NSW Lancers 5th Light Horse Regiment / 5th Wide Bay & Burnett Light Horse 8th Light Horse Regiment / 8th Indi Light Horse Regiment 4th Light Horse Regiment / 4th Corangamite Light Horse Regiment 14th Light Horse Regiment / 14th West Moreton Light Horse Regiment 18th Adelaide Lancers 4th Light Horse Regiment / 1st Aust Div Mounted Regiment / 2nd ANZAC Mounted Regiment / 22nd Corps Mounted Regiment. 2nd Light Horse Regiment / 2nd Moreton Light Horse Regiment 6th Light Horse Regiment / 6th NSW Mounted Rifles 9th Light Horse Regiment / 9th Flinders Light Horse Regiment 11th Light Horse Regiment / 11th Darling Downs Light Horse Regiment 15th Light Horse Regiment / 15th Northern River Lancers 21st Riverina Light Horse 13th Light Horse Regiment / 2nd Aust Div Mounted Regiment / 1st ANZAC Mounted Regiment / Aust Corps Mounted Regiment / 13th Gippsland Light Horse Regiment 3rd Light Horse Regiment / 3rd South Australian Mounted Rifles 7th Light Horse Regiment / 7th Australian Horse 10th Light Horse Regiment / 10th Western Australian Mounted Infantry 12th Light Horse Regiment / 12th New England Light Horse Regiment 17th Prince of Wales Light Horse Regiment 22nd Tasmanian Mounted Infantry 11th Light Horse Regiment / 4th Aust Div Mounted Regiment / 24th Gwydir Light Horse Regiment 1st Machine Gun Squadron / 25th Light Horse (MG) 2nd Machine Gun Squadron / 16th Hunter River Lancers 3rd Machine Gun Squadron / 20th Victorian Mounted Rifles 4th Machine Gun Squadron / 26th Light Horse (MG) 5th Machine Gun Squadron / 19th Yarrowee Light Horse 23rd Barossa Light Horse Regiment 12th Light Horse Regiment / 5th Aust Div Mounted Regiment 1st Light Horse Field Ambulance 2nd Light Horse Field Ambulance 3rd Light Horse Field Ambulance 4th Light Horse Field Ambulance 5th Light Horse Field Ambulance 4th Signal Troop / 4th Light Horse brigade 6th Mobile Veterinary Section /1st Light Horse Brigade 7th Mobile Veterinary Section / 2nd Light Horse Brigade 8th Mobile Veterinary Section / 3rd Light Horse Brigade 9th Mobile Veterinary Section / 4th Light Horse brigade 10th Mobile Veterinary Section / 5th Light Horse Brigade 5th Signal Troop / 5th Light Horse Brigade 1st Signal Squadron / NZ & Aust Mounted Div Signal SquadronColour Patch Display No 39. Includes detailed notes about history, usage and design of colour patchesworld war one, ww1, army, aif, insignia, heraldry, light horse, militia, badges, colour patches, cmf