Showing 93 items matching "square loop"
-
 Moorabbin Air Museum
Book - Aerobatics, Conquest of Lines and Symmetry
... ...Square loop...Aerobatics Cockpit checks Chandelies & lazy eights Spin The loop Immelman turn Hammerhead Cuban eight Knife edge Slow roll types Reverse Cuban eight Snap & barrel rolls Outside loop & half loop Square loop English bunt Inverted spin Tail slide Compound maneuvers Overview of aerobatic techniques, circa 1970 Conquest of Lines and Symmetry Book Aerobatics ...Overview of aerobatic techniques, circa 1970non-fictionOverview of aerobatic techniques, circa 1970cockpit checks, chandelies & lazy eights, spin, the loop, immelman turn, hammerhead, cuban eight, knife edge, slow roll types, reverse cuban eight, snap & barrel rolls, outside loop & half loop, square loop, english bunt, inverted spin, tail slide, compound maneuvers -
 Flagstaff Hill Maritime Museum and Village
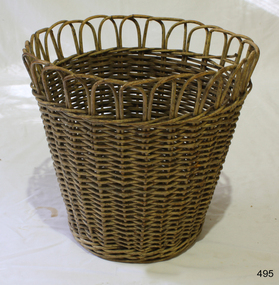
Basket
... Weaving stops some 6cm from top, leaving square loops...Weaving stops some 6cm from top, leaving square loops Basket ...Basket cane waste paper basket. Weaving stops some 6cm from top, leaving square loopsflagstaff hill, warrnambool, shipwrecked-coast, flagstaff-hill, flagstaff-hill-maritime-museum, maritime-museum, shipwreck-coast, flagstaff-hill-maritime-village, cane basket, waste paper basket, home office equipment -
 Flagstaff Hill Maritime Museum and Village
Functional object - Service Bell, 1855
... Bell; small service bell, brass, with heavy encrustation. Bell has a square loop at the top. The bell was recovered from the wreck of the Schomberg....The shipwreck is of additional historically significance for representing aspects of Victoria’s shipping history and for its association with the first passenger ship, which was designed not only to be the fastest and most luxurious of its day but foundered on its maiden voyage to Australia. warrnambool flagstaff-hill flagstaff-hill-maritime-museum shipwreck-coast flagstaff-hill-maritime-village schomberg shipwrecked-artefact clipper ship black ball line 1855 shipwreck aberdeen clipper ship captain forbes peterborough shipwreck ss queen bell Service Bell None Bell; small service bell, brass, with heavy encrustation. Bell has a square loop at the top. The bell was recovered from the wreck of the Schomberg. ...This service bell was recovered from the wreck of the ship Schomberg. The Schomberg was a large three-masted full-ship rigged wooden ship built in 1855 by Alexander Hall and Co in Aberdeen, Scotland for James Baines' famous Black Ball Line at £43,103. The vessel was 288 feet (88 meters) in length, with a beam of 45 feet (14 meters), a depth of 29.5 feet (8.99 meters) of 2,284 tons. The mainmast was 210 feet (64 meters) high and she carried 3.3 acres of sail. The vessel was constructed with three skins. One planked fore and aft, and two diagonally planked, fastened together with screw-threaded trunnels (wooden rails). The Schomberg is one of only three clipper wrecks in Victorian waters that operated the England to Australia run. While the other two, Empress of the Sea and Lightning, were built by the famous American shipbuilder, Donald Mac Kay. Schomberg was an attempt to build a faster ship than Mac Kay and a vessel fast enough to break the sailing record to Australia. The Schomberg sailed on her maiden voyage from Liverpool on 6 October 1855, under the command of Captain James Forbes, on its maiden voyage to Australia with a general cargo, jewellery, spirits, machinery, and 2,000 tons of iron rails and equipment intended to build the Melbourne to Geelong Railway and a bridge over the Yarra from Melbourne to Hawthorn. She also carried a cow for fresh milk, pens for fowls and pigs, plus 90,000 gallons of water for washing and drinking. She also carried 17,000 letters and 31,800 newspapers. There were approximately 473 passengers and a crew of 105. It was hoped that Schomberg would make Melbourne in sixty days, setting a record for the voyage, but light winds at the equator dashed those expectations. The ship sighted Moonlight Head in south west Victoria on Christmas Day but through a deadly combination of wind, currents and unmarked sand spits, the vessel gently ran aground on 26 December 1855 on a spit that juts into Newfield Bay, just east of Curdies Inlet, and the present town of Peterborough. Fortunately, the SS Queen was nearby and managed to save all passengers and crew. The steamers Keera and Maitland were dispatched to salvage the passenger's baggage and the more valuable cargo. Other salvage attempts were made, but deteriorating weather made the work impossible, and within two weeks the Schomberg's hull was broken up and the vessel abandoned. The wrecking of the Schomberg caused quite the public stir particularly in light of the fact the vessel was supposed to be, the most perfect clipper ship ever built. Captain Forbes was charged in the Supreme Court under suspicion that he was playing cards with two female passengers below decks when his ship ran aground. Despite a protest meeting, two inquiries and the court proceedings, he was found not guilty and cleared of all charges. In 1975, divers from Flagstaff Hill, including Peter Ronald, found an ornate communion set at the wreck. The set comprised a jug, two chalices, a plate and a lid. The lid did not fit any of the other objects and in 1978 a piece of the lid broke off, revealing a glint of gold. As museum staff carefully examined the lid and removed marine growth, they found a diamond ring, which is currently on display in the Great Circle Gallery at the Flagstaff Hill Maritime museum that also displays ship fittings and equipment, personal effects. Most of the artefacts were salvaged from the wreck by Peter Ronald, former director of Flagstaff Hill.The Schomberg has historical significance as one of the first luxurious ships built to bring emigrants to Australia to cash in on the gold rush era. And is included on the Victorian Heritage Register (VHR S612). The collection of Schomberg artefacts held at Flagstaff Hill Museum is primarily significant because of the relationship between these recovered items having a high potential to interpret the story of the Schomberg and its foundering during a storm. The shipwreck is of additional historically significance for representing aspects of Victoria’s shipping history and for its association with the first passenger ship, which was designed not only to be the fastest and most luxurious of its day but foundered on its maiden voyage to Australia.Bell; small service bell, brass, with heavy encrustation. Bell has a square loop at the top. The bell was recovered from the wreck of the Schomberg.Nonewarrnambool, flagstaff-hill, flagstaff-hill-maritime-museum, shipwreck-coast, flagstaff-hill-maritime-village, schomberg, shipwrecked-artefact, clipper ship, black ball line, 1855 shipwreck, aberdeen clipper ship, captain forbes, peterborough shipwreck, ss queen, bell, service bell -
Shepparton RSL Sub Branch
Gas Mask Cannister, c. 1910s
... Metal cylindrical canister with removable lid attached via a metal square loop. Lid has small lip for user to grip to open and on interior has two soldered metal wires crossed in an X shape. ...This canister housed a mask, filter, and spare goggle lenses. german germany world war i world war 1 first world war the great war chemical warfare gas mask gas warfare mustard gas Engraving on interior of lid reads "H.S.D. geprurt" Metal cylindrical canister with removable lid attached via a metal square loop. Lid has small lip for user to grip to open and on interior has two soldered metal wires crossed in an X shape. ...This canister is part of a complete set of a German gas mask dating to the First World War. This canister housed a mask, filter, and spare goggle lenses. Metal cylindrical canister with removable lid attached via a metal square loop. Lid has small lip for user to grip to open and on interior has two soldered metal wires crossed in an X shape. Exterior of canister has two loops through which khaki-coloured canvas straps are threaded, adjustable via a metal buckle; a further loop at the base is unused/attached. At base of canister is a circular piece of paper with German script.Engraving on interior of lid reads "H.S.D. geprurt"german, germany, world war i, world war 1, first world war, the great war, chemical warfare, gas mask, gas warfare, mustard gas -
 Ballarat Tramway Museum
Negative, Travis Jeffrey, 5/08/1962 12:00:00 AM
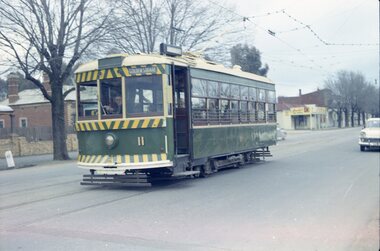
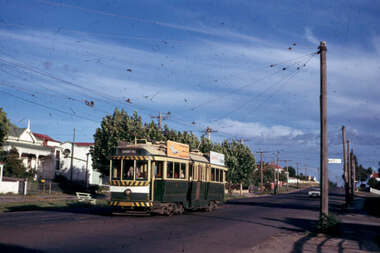
... N403, of Bendigo Birney No. 11, outbound to Golden Square at Honeysuckle St. Loop?, has a mile post oppose the front of the tram. ...N403, of Bendigo Birney No. 11, outbound to Golden Square at Honeysuckle St. Loop?, has a mile post oppose the front of the tram. ...Colour Negative No. N403, of Bendigo Birney No. 11, outbound to Golden Square at Honeysuckle St. Loop?, has a mile post oppose the front of the tram. Tram has the destination of Golden Square. Photo possibly 17/6/1962. Colour laser printed copy of image stored in box 73. Original negative hires scan and image updated 28/5/2020.In red pen on folder that contained negative, "NR91B" and "5 Aug 62". trams, tramways, bendigo, golden square, honeysuckle st., tram 11 -
 Bendigo Historical Society Inc.
Photograph - Robert Green Collection - Photos of Bendigo Tramways - Sheet 8 of 10, 1960s
... Photos: 11147.8a No 4 outside the Eaglehawk Town Hall 11147.8b No 7 at the North Bendigo Terminus 11147.8c No 18 passing the View Street and Rowan Street intersection 11147.8d No 24 and driver at the fountain 11147.8e No 7 at the fountain 11147.8f No 24 and at the fountain 11147.8g No 24 and driver at Eaglehawk 11147.8h Picking up passengers at North Bendigo Terminus 11147.8i Birney Car 30 in Finn Street North Bendigo 11147.8j No 30 has just crossed the Bendigo Creek in high St Golden Square 11147.8k No 30 has just crossed the Bendigo Creek in High St Golden Square and is passing No 2 11147.8l Nos 29 and 19 at the depot with two drivers 11147.8m No 29 comes up Pall Mall past the Williamson St intersection 11147.8n No 29 comes up Pall Mall 11147.8o No 29 at the Golden Square Terminus loop 11147.8p No 29 and another at the Golden Square Terminus 11147.8q The Pahran and Malvern Tramways Trust Logo 11147.8r Passing No 6 on the High St Loop 11147.8s Passing No 6 on the High St Loop, Sacred Heart Cathedral Spire being buit in the background 11147.8t At the Cemetery Gate Quarry Hill 11147.8u No 25 at the Bendigo Cemetery Terminus 11147.8v At the Quarry Hill Gates in Carpenter Street...Photos: 11147.8a No 4 outside the Eaglehawk Town Hall 11147.8b No 7 at the North Bendigo Terminus 11147.8c No 18 passing the View Street and Rowan Street intersection 11147.8d No 24 and driver at the fountain 11147.8e No 7 at the fountain 11147.8f No 24 and at the fountain 11147.8g No 24 and driver at Eaglehawk 11147.8h Picking up passengers at North Bendigo Terminus 11147.8i Birney Car 30 in Finn Street North Bendigo 11147.8j No 30 has just crossed the Bendigo Creek in high St Golden Square 11147.8k No 30 has just crossed the Bendigo Creek in High St Golden Square and is passing No 2 11147.8l Nos 29 and 19 at the depot with two drivers 11147.8m No 29 comes up Pall Mall past the Williamson St intersection 11147.8n No 29 comes up Pall Mall 11147.8o No 29 at the Golden Square Terminus loop 11147.8p No 29 and another at the Golden Square Terminus 11147.8q The Pahran and Malvern Tramways Trust Logo 11147.8r Passing No 6 on the High St Loop 11147.8s Passing No 6 on the High St Loop, Sacred Heart Cathedral Spire being buit in the background 11147.8t At the Cemetery Gate Quarry Hill 11147.8u No 25 at the Bendigo Cemetery Terminus 11147.8v At the Quarry Hill Gates in Carpenter Street Photograph Robert Green Collection - Photos of Bendigo Tramways - Sheet 8 of 10 ...This collection contains eight archive sheets (Sheet 1 to Sheet 8) of strips of original 35mm black and white negatives of photographs taken by Robert green during the 1960s and early 1970s of the Bendigo State Electricty Commission of Victoria Tramways prior to their abandonment. The collection also includes two archive quality sheets (Sheet A and Sheet B) of original 35mm colour slides taken by Robert Green during the same period. Sheet B also contains one slide taken by Robert's friend Keigh S King (1928-2019) who was the author of the book 'The Bendigo Tramways an illustrated history, published by the Australian Railway Historical Society Victorian Division Melbourne in February 1972; BHS Item no. 5052. The collection also includes one USB stick which contains images of all photographs described above, except for one colour slide taken by Keith S Kings. Sixteen black and white prints from the images are also included.Robert Green Collection, this item contains 22 Black and White Negatives of the trams at various locations around Bendigo. Photos: 11147.8a No 4 outside the Eaglehawk Town Hall 11147.8b No 7 at the North Bendigo Terminus 11147.8c No 18 passing the View Street and Rowan Street intersection 11147.8d No 24 and driver at the fountain 11147.8e No 7 at the fountain 11147.8f No 24 and at the fountain 11147.8g No 24 and driver at Eaglehawk 11147.8h Picking up passengers at North Bendigo Terminus 11147.8i Birney Car 30 in Finn Street North Bendigo 11147.8j No 30 has just crossed the Bendigo Creek in high St Golden Square 11147.8k No 30 has just crossed the Bendigo Creek in High St Golden Square and is passing No 2 11147.8l Nos 29 and 19 at the depot with two drivers 11147.8m No 29 comes up Pall Mall past the Williamson St intersection 11147.8n No 29 comes up Pall Mall 11147.8o No 29 at the Golden Square Terminus loop 11147.8p No 29 and another at the Golden Square Terminus 11147.8q The Pahran and Malvern Tramways Trust Logo 11147.8r Passing No 6 on the High St Loop 11147.8s Passing No 6 on the High St Loop, Sacred Heart Cathedral Spire being buit in the background 11147.8t At the Cemetery Gate Quarry Hill 11147.8u No 25 at the Bendigo Cemetery Terminus 11147.8v At the Quarry Hill Gates in Carpenter Streetkeith s king, bendigo, trams, robert green -
 Ballarat Tramway Museum
Slide - 35mm slide/s - set of 6, Noel Simons, 28 Feb. 1972
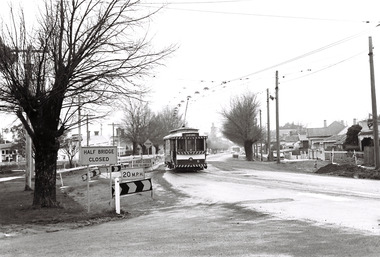
... Loop... View St.... Golden Square...Loop, Mt. Korong road, Ironbark. en route to Quarry Hill. Note the water column in the background. 1206.3 - No. 5 in View St. Bendigo, with the Commodore Motel in the background. 1206.4 - No. 6 en route for Golden Square in Fire Station loop, with the fire station building in the background. ...Korong road, Ironbark." 1206.3 - "No. 5 in View St. just after start of double track near Barnard St." 1206.4 - "No. 6 in High St. at Fire Station loop." 1206.5 - "No. 6 in High St. running through Golden Square shopping centre." 1206.6 - "No. 6 arriving at Charing Cross from Golden Square."...Loop, Mt. Korong road, Ironbark. en route to Quarry Hill. Note the water column in the background. 1206.3 - No. 5 in View St. Bendigo, with the Commodore Motel in the background. 1206.4 - No. 6 en route for Golden Square in Fire Station loop, with the fire station building in the background. ...Set of 6 transparencies taken on 28/2/1972 on Kodak mounts. 1206.1 - Bendigo No. 5 at Hayes St. Loop, en route for Quarry Hill. 1206.2 - No. 5 at Garden Gully Loop, Mt. Korong road, Ironbark. en route to Quarry Hill. Note the water column in the background. 1206.3 - No. 5 in View St. Bendigo, with the Commodore Motel in the background. 1206.4 - No. 6 en route for Golden Square in Fire Station loop, with the fire station building in the background. Photo taken after tram has passed photographer. 1206.5 - No. 6 in High St., running through Golden Square Shopping Centre, en route for Golden Square. Photo taken after tram has passed photographer. 1206.6 - No. 6 arriving at Charing Cross, bound for North Bendigo, with the City Family Hotel, ANZ bank and the Cenotaph (war memorial) in the background.Information written on in blue ink and date stamped on purple ink. 1206.1 - "No. 5 at Hayes Loop, Ironbark." 1206.2 - "No. 5 at Garden Gully Loop, Mt. Korong road, Ironbark." 1206.3 - "No. 5 in View St. just after start of double track near Barnard St." 1206.4 - "No. 6 in High St. at Fire Station loop." 1206.5 - "No. 6 in High St. running through Golden Square shopping centre." 1206.6 - "No. 6 arriving at Charing Cross from Golden Square."tramways, trams, bendigo, hayes st. loop, garden gully loop, view st., golden square, charing cross, tram 5, tram 6 -
 Ballarat Tramway Museum
Slide - 35mm slide/s - set of 11, Eldon Hogan, mid 1960's to early 1970's
... Set of 11 Agfa Plastic mounted slides - from the Eldon Hogan collection - possibly on an ARE Bendigo tours late 1960's or early 1970's with No. 18 Scanned on the Canon scanner at the depot 15/12/1971 at the time of the installation of the scanner. .1 - No 18 at Golden Square terminus with Billy Rodda's Golden Square Hotel in the background. .2 - ditto and the Victoria Bitter fence alongside the hotel. .3 - ditto and another single trucker. .4 - No. 18 at the Fire Station Loop, Golden Square line, with destination of Railway Station. .5 - No. 18 passing the Central Deborah mine, Violet St. ...Tramways trams Bendigo Golden Square Central Deborah North Bendigo McCrae St tram 18 tram 6 Set of 11 Agfa Plastic mounted slides - from the Eldon Hogan collection - possibly on an ARE Bendigo tours late 1960's or early 1970's with No. 18 Scanned on the Canon scanner at the depot 15/12/1971 at the time of the installation of the scanner. .1 - No 18 at Golden Square terminus with Billy Rodda's Golden Square Hotel in the background. .2 - ditto and the Victoria Bitter fence alongside the hotel. .3 - ditto and another single trucker. .4 - No. 18 at the Fire Station Loop, Golden Square line, with destination of Railway Station. .5 - No. 18 passing the Central Deborah mine, Violet St. ...Set of 11 Agfa Plastic mounted slides - from the Eldon Hogan collection - possibly on an ARE Bendigo tours late 1960's or early 1970's with No. 18 Scanned on the Canon scanner at the depot 15/12/1971 at the time of the installation of the scanner. .1 - No 18 at Golden Square terminus with Billy Rodda's Golden Square Hotel in the background. .2 - ditto and the Victoria Bitter fence alongside the hotel. .3 - ditto and another single trucker. .4 - No. 18 at the Fire Station Loop, Golden Square line, with destination of Railway Station. .5 - No. 18 passing the Central Deborah mine, Violet St. Tram has a Briquette advertisement on the roof - the flaming briquettes. .6 - Another bogie tram at ditto. .7 - No. 18 and No. 6 crossing McCrae St loop near the depot junction? .8 - ditto .9 - No. 18 and a single trucker at the North Bendigo terminus. .10 - ditto .11 - with the single trucker leaving.tramways, trams, bendigo, golden square, central deborah, north bendigo, mccrae st, tram 18, tram 6 -
 Bendigo Historical Society Inc.
Photograph - Robert Green Collection - Photos of Bendigo Tramways - Sheet 7 of 8, 1960s
... Photos: 11147.7a No 6 to Golden Square in Mcrae Street 11147.7b No 21 to North Bendigo in Mcrae Street 11147.7c No 7 to North Bendigo in Mcrae Street 11147.7d No 7 to North Bendigo in Mcrae Street passes No 21 to Golden Square on the loop 11147.7e The Depot and Back Creek bridge 11147.7f The Depot and Back Creek bridge 11147.7g Nos 25, 23 and 30 in the depot 11147.7h The photographer in Thunder Street North Bendigo, railway line in the background 11147.7i No 21 coming up to the North Bendigo terminus in Thunder or Finn street 11147.7j No 21 leaving the North Bendigo terminus in Thunder or Finn street 11147.7k The Photographer in Thunder Street, North Bendigo 11147.7l No 21 in Thunder or Finn street 11147.7m No 21 in Thunder or Finn street 11147.7n No 17 in Eaglehawk 11147.7o No 17 in Eaglehawk 11147.7p No 26 at the top of Mitchell Street 11147.7q No 26 heading to Eaglehawk in the rain 11147.7r No 2 to Quarry Hill in the rain at the Manchester Arms Loop 11147.7s Passing Trams 11147.7t No 30 Birney Car to Quarry Hill in the rain at the Manchester Arms Loop 11147.7u No 7 to North Bendigo, the rowing Club in the background, Thunder Street 11147.7v No 7 turns into Finn Street from the North Bendigo Terminus 11147.7w The Birney Car turns into the North Bendigo Terminus from Finn Street 11147.7x The Birney Car turns into the North Bendigo Terminus from Finn Street 11147.7y Two trams at the North Bendigo Terminus 11147.7z No 24 approaches the Cemetery gates and horse hitching posts in Quarry Hill 11147.7aa The Cemetery and horse hitching posts in Quarry Hill 11147.7ab No 24 and horse hitching post in Quarry Hill...Photos: 11147.7a No 6 to Golden Square in Mcrae Street 11147.7b No 21 to North Bendigo in Mcrae Street 11147.7c No 7 to North Bendigo in Mcrae Street 11147.7d No 7 to North Bendigo in Mcrae Street passes No 21 to Golden Square on the loop 11147.7e The Depot and Back Creek bridge 11147.7f The Depot and Back Creek bridge 11147.7g Nos 25, 23 and 30 in the depot 11147.7h The photographer in Thunder Street North Bendigo, railway line in the background 11147.7i No 21 coming up to the North Bendigo terminus in Thunder or Finn street 11147.7j No 21 leaving the North Bendigo terminus in Thunder or Finn street 11147.7k The Photographer in Thunder Street, North Bendigo 11147.7l No 21 in Thunder or Finn street 11147.7m No 21 in Thunder or Finn street 11147.7n No 17 in Eaglehawk 11147.7o No 17 in Eaglehawk 11147.7p No 26 at the top of Mitchell Street 11147.7q No 26 heading to Eaglehawk in the rain 11147.7r No 2 to Quarry Hill in the rain at the Manchester Arms Loop 11147.7s Passing Trams 11147.7t No 30 Birney Car to Quarry Hill in the rain at the Manchester Arms Loop 11147.7u No 7 to North Bendigo, the rowing Club in the background, Thunder Street 11147.7v No 7 turns into Finn Street from the North Bendigo Terminus 11147.7w The Birney Car turns into the North Bendigo Terminus from Finn Street 11147.7x The Birney Car turns into the North Bendigo Terminus from Finn Street 11147.7y Two trams at the North Bendigo Terminus 11147.7z No 24 approaches the Cemetery gates and horse hitching posts in Quarry Hill 11147.7aa The Cemetery and horse hitching posts in Quarry Hill 11147.7ab No 24 and horse hitching post in Quarry Hill Photograph Robert Green Collection - Photos of Bendigo Tramways - Sheet 7 of 8 ...This collection contains eight archive sheets (Sheet 1 to Sheet 8) of strips of original 35mm black and white negatives of photographs taken by Robert green during the 1960s and early 1970s of the Bendigo State Electricty Commission of Victoria Tramways prior to their abandonment. The collection also includes two archive quality sheets (Sheet A and Sheet B) of original 35mm colour slides taken by Robert Green during the same period. Sheet B also contains one slide taken by Robert's friend Keigh S King (1928-2019) who was the author of the book 'The Bendigo Tramways an illustrated history, published by the Australian Railway Historical Society Victorian Division Melbourne in February 1972; BHS Item no. 5052. The collection also includes one USB stick which contains images of all photographs described above, except for one colour slide taken by Keith S Kings. Sixteen black and white prints from the images are also included.Robert Green Collection, this item contains 28 Black and White Negatives of the trams at various locations around Bendigo. Photos: 11147.7a No 6 to Golden Square in Mcrae Street 11147.7b No 21 to North Bendigo in Mcrae Street 11147.7c No 7 to North Bendigo in Mcrae Street 11147.7d No 7 to North Bendigo in Mcrae Street passes No 21 to Golden Square on the loop 11147.7e The Depot and Back Creek bridge 11147.7f The Depot and Back Creek bridge 11147.7g Nos 25, 23 and 30 in the depot 11147.7h The photographer in Thunder Street North Bendigo, railway line in the background 11147.7i No 21 coming up to the North Bendigo terminus in Thunder or Finn street 11147.7j No 21 leaving the North Bendigo terminus in Thunder or Finn street 11147.7k The Photographer in Thunder Street, North Bendigo 11147.7l No 21 in Thunder or Finn street 11147.7m No 21 in Thunder or Finn street 11147.7n No 17 in Eaglehawk 11147.7o No 17 in Eaglehawk 11147.7p No 26 at the top of Mitchell Street 11147.7q No 26 heading to Eaglehawk in the rain 11147.7r No 2 to Quarry Hill in the rain at the Manchester Arms Loop 11147.7s Passing Trams 11147.7t No 30 Birney Car to Quarry Hill in the rain at the Manchester Arms Loop 11147.7u No 7 to North Bendigo, the rowing Club in the background, Thunder Street 11147.7v No 7 turns into Finn Street from the North Bendigo Terminus 11147.7w The Birney Car turns into the North Bendigo Terminus from Finn Street 11147.7x The Birney Car turns into the North Bendigo Terminus from Finn Street 11147.7y Two trams at the North Bendigo Terminus 11147.7z No 24 approaches the Cemetery gates and horse hitching posts in Quarry Hill 11147.7aa The Cemetery and horse hitching posts in Quarry Hill 11147.7ab No 24 and horse hitching post in Quarry Hillkeith s king, bendigo, trams, robert green -
 Bendigo Military Museum
Uniform - SHOULDER BOARDS
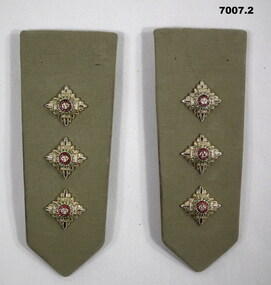
... square end of each board. Pips signify the rank of Captain. On the back of each board are two loops for fitting to an epaulette....square end of each board. Pips signify the rank of Captain. On the back of each board are two loops for fitting to an epaulette. ...Part of the Kevin John Herdman Collection. See Catalogue No. 5951 for details of his service record.PAir of klhaki coloured shoulder boards. Each board has three gold coloured metal pips. Pin holes for missing corps badge on the square end of each board. Pips signify the rank of Captain. On the back of each board are two loops for fitting to an epaulette.uniform, shoulder board, captain, kevin john herdman -
 Bendigo Military Museum
Equipment - BAG, CANVAS, c.1939-45
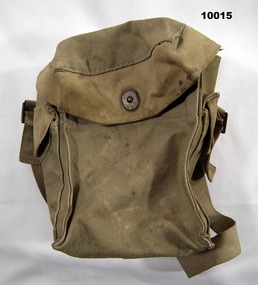
... Square" bag with shoulder strap bypass buckle. Colour green/brown. Both sides have little pockets, kept shut with press studs. The top lid is kept shut with an American Pattern clip and post system. Inside the bag are two little pockets. The bottom 'Pocket' covers the drain hole. On the back are two belt mounting steel loops...Square" bag with shoulder strap bypass buckle. Colour green/brown. Both sides have little pockets, kept shut with press studs. The top lid is kept shut with an American Pattern clip and post system. Inside the bag are two little pockets. The bottom 'Pocket' covers the drain hole. On the back are two belt mounting steel loops ...Part of the Alfred Boland collection, refer Cat No 2473.Canvas "Square" bag with shoulder strap bypass buckle. Colour green/brown. Both sides have little pockets, kept shut with press studs. The top lid is kept shut with an American Pattern clip and post system. Inside the bag are two little pockets. The bottom 'Pocket' covers the drain hole. On the back are two belt mounting steel loops.Inside the lid is a broad arrow.equipment, canvas bag, ww2 -
 Bendigo Military Museum
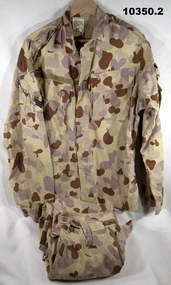
Uniform - CAMOUFLAGE UNIFORM, ADA, 2003
... square patch of Sergeant. There are two breast pockets held shut with buttons. Above the right breast pocket is a Velcro strip. The jacket is held shut with 5 buttons. The arm 'wrists' can be closed using a button up tag. 2. Camouflage trousers. Zip fly and belt loops...square patch of Sergeant. There are two breast pockets held shut with buttons. Above the right breast pocket is a Velcro strip. The jacket is held shut with 5 buttons. The arm 'wrists' can be closed using a button up tag. 2. Camouflage trousers. Zip fly and belt loops ...Uniform worn by "Lee Palfrey" on Operation Catalyst. Aug 5 to Feb 2006 Iraq, Combined Explosive Exploitation Cell (CEXC) Operation Slipper May 7 to Oct 7 Afghanistan, SOTG - IV. Refer Cat No 10263.1. Jacket - long sleeved in desert camouflage. Each arm has a pocket which is held shut with buttons. Above the right arm pocket is a Velcro patch. Above the left pocket is an oval shaped crest of Australia. On both arms pockets is a square patch of Sergeant. There are two breast pockets held shut with buttons. Above the right breast pocket is a Velcro strip. The jacket is held shut with 5 buttons. The arm 'wrists' can be closed using a button up tag. 2. Camouflage trousers. Zip fly and belt loops. Eah leg has a cargo pocket held shut with 2 buttons. There are two hip pockets. There is one right rear pocket.uniform, iraq, lee palfrey -
 Bendigo Military Museum
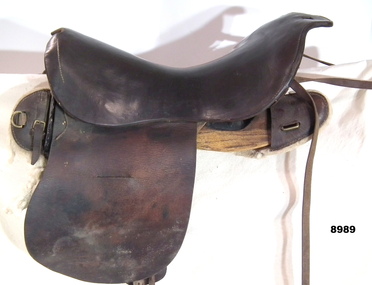
Equipment - SADDLE, LEATHER, Unknown
... square hole with brass tube across it. The front end has a chunk removed. The saddle sits on two timber panels. Those panels have felt padding. Each wooden panel has a small leather 1/2 shoe at each end. The front left “shoe” has a curved brass loop...square hole with brass tube across it. The front end has a chunk removed. The saddle sits on two timber panels. Those panels have felt padding. Each wooden panel has a small leather 1/2 shoe at each end. The front left “shoe” has a curved brass loop ...Brown leather saddle with a high rear end. it has a square hole with brass tube across it. The front end has a chunk removed. The saddle sits on two timber panels. Those panels have felt padding. Each wooden panel has a small leather 1/2 shoe at each end. The front left “shoe” has a curved brass loop. Both the rear “shoes” have a brass rectangular loop. there is a 12mm leather strap on the rear of the saddle. Under the saddle is leather tongs attached to webbing straps. These cross over fore and aft, between the wooden panels.passchendaele barracks trust, saddle, equipment -
 Bendigo Military Museum
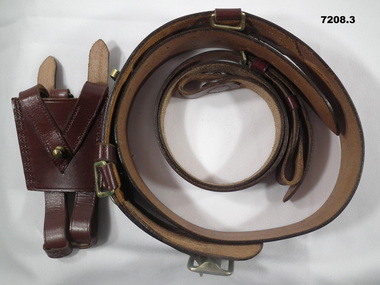
Uniform - BELT, SAM BROWNE, ARMY
... loop secure the free end of the belt tongue. A pair of brass rings are attached to the top edge of the belt for the attachment of the shoulder strap. A pair of squared...loop secure the free end of the belt tongue. A pair of brass rings are attached to the top edge of the belt for the attachment of the shoulder strap. A pair of squared ...Part of the Kevin John Herdman, No. 397661, Collection. See Catalogue No. 5942P for details of his service record..1) Brown leather Sam Browne belt fitted with a double clawed brass buckle. A brass stud and leather loop secure the free end of the belt tongue. A pair of brass rings are attached to the top edge of the belt for the attachment of the shoulder strap. A pair of squared “D”rings and a brass flat hook are located on the lower edge of the belt on the left side for the attachment of a sword frog. .2) Brown leather shoulder strap is attached at the front and rear of the belt by a brass stud and eyelet. Adjustment via a brass buckle. .3) Brown leather sword frog stitched on both sides with a brass “D” ring attached to the top. A brass post is placed at the centre where the supporting straps meet in a V. Two straps for attaching to the belt have two brass buckles for adjustment.sam browne, uniform, sword frog, kevin john herdman -
 Federation University Historical Collection
Card - Invitation, Invitation to 2010 graduating year Book Launch, 2010
... Two sided square invitation to Book Launch on Thursday 25 November 2010, at the Loop Bar & Venue, 23 Meyers Place, Melbourne VIC at 6.00pm. ...Barker Library (top floor) Mount Helen goldfields Two sided square invitation to Book Launch on Thursday 25 November 2010, at the Loop Bar & Venue, 23 Meyers Place, Melbourne VIC at 6.00pm. ...Two sided square invitation to Book Launch on Thursday 25 November 2010, at the Loop Bar & Venue, 23 Meyers Place, Melbourne VIC at 6.00pm. Door prize of an Apple iPad.Square format invitation (un-addressed) to University of Ballarat, Bachelor of Visual Arts (Graphic Design / Multimedia) third year, graduating students Book Launch.university of ballarat, federation university, graphic design, multimedia, camp street campus, bachelor, degree, arts academy -
 Shepparton RSL Sub Branch
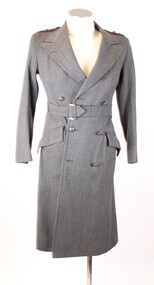
Uniform, Great Coat
... loops on either side of the waist. "AUSTRALIA" shoulder flashes on both left and right shoulders; on left arm a blue and brown rectangular colour patch and on the right arm, a blue square patch with embroidered crown and the words "BRITISH COMMONWEALTH FORCES." ...loops on either side of the waist. "AUSTRALIA" shoulder flashes on both left and right shoulders; on left arm a blue and brown rectangular colour patch and on the right arm, a blue square patch with embroidered crown and the words "BRITISH COMMONWEALTH FORCES." ...Coat worn by Sister Danson (VFX151507) during the British presence in Japan following the end of the Second World War. About 16,000 Australians served in the British Commonwealth Occupation Forces, including 130 from the Australian General Hospital with whom Sister Danson presumably served. Sister Danson was born in Numurkah and served as Leiutentant with the Heidelberg Military Hospital before embarking for Japan in 1947.This coat is part of a complete uniform set held by the Shepparton RSL. The uniform has representative and historic significance as an example of the style of uniform worn by nursing staff of the Australian General Hospital during the 1940s and into the 1950s. The uniform set has social significance to the Shepparton area, being owned and worn by a serving community member who was born in Numurkah, enlisted in Shepparton and returned to the community in later life.Shin length grey woollen double breasted coat fastened with three buttons on front centre. Interior bakelite or plastic button fastens panels on interior. Two hip-height pockets with folded flap on exterior. Grey fabric belt fastened with a metal buckle; belt is held in place with two fabric loops on either side of the waist. "AUSTRALIA" shoulder flashes on both left and right shoulders; on left arm a blue and brown rectangular colour patch and on the right arm, a blue square patch with embroidered crown and the words "BRITISH COMMONWEALTH FORCES." Epaulettes on either shoulder carry two metal badges signifying a senior Sister and fastened with a metal button. A pin is missing from the base of the epaulette. Interior lined with purple-grey lining; pocket on interior left chest and manufacturer's label at base of neck underneath loop.Shoulder flashes read "AUSTRALIA" and "BRITISH COMMONWEALTH FORCES". Label reads "TAILORS & HABIT/MAKERS/J. RAVENSDALE/& SON/NICHOLAS BLDG./SWANSTON ST MELBOURNE/SISTER DANSON". Buttons read "AUSTRALIAN MILITARY FORCES"second world war, world war ii, medical, wwii, nurse, women -
 Shepparton RSL Sub Branch
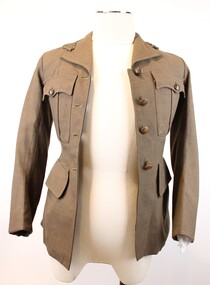
Uniform, Dress Jacket, 1943
... loop. Collar carries two metal rising sun badges on the left and right side. Two epaulettes on either shoulder are held in place by a button and carries a badge reading "AWAS". Colour patch on both left and right side is square...loop. Collar carries two metal rising sun badges on the left and right side. Two epaulettes on either shoulder are held in place by a button and carries a badge reading "AWAS". Colour patch on both left and right side is square ...This jacket belonged to Dorothy May Mortlock (VF518245) who was part of the Australian Womens Army Service (AWAS). Dorothy Mortlock was born in Swan Hill and enlisted with the 3rd AUST AWS REC DEPOT.Khaki-coloured woollen jacket which fastens along the centre via four metal buttons. Two hip-height pockets with external flap; two chest pockets with pleat in centre fastened via a metal button. Fabric belt around waist held in place by two fabric loops on back and fastened through metal buckle and loop. Collar carries two metal rising sun badges on the left and right side. Two epaulettes on either shoulder are held in place by a button and carries a badge reading "AWAS". Colour patch on both left and right side is square, half green and half black. Interior label on base of neck.Label reads "V 579/1943/SIZE/MADE IN/AUSTRALIA/D. MORTLOCK/VF518245". Rising sun badge reads "AUSTRALIAN COMMONWEALTH/MILITARY FORCES." Buttons read "AUSTRALIAN MILITARY FORCES."world war ii, second world war, wwii, women, australian women's army service -
 Shepparton RSL Sub Branch
Uniform, Dress, C. 1940s
... One square topstitched pocket on the left chest and two angled hip pockets on front. Fabric belt with metal buckle held in place by fabric loops on both left and right side. ...loop difficult to read, “VF518245” and 5-6 indiscernible characters. Button reads “AUSTRALIAN MILITARY FORCES” below an embossed image of Australia with the King George V crown on top. Stamped motif reads “[broad arrow]/S.D.” Light brown coloured woven cotton dress with button-up front secured by 6 metal buttons. Dress constructed of a skirt element attached to a short sleeve shirt-style torso section, a hook and eye sits on interior of two sections to fasten left and right sides together. One square ...This dress belonged to Dorothy May Mortlock (VF518245), who served as a Sapper with the Australian Women’s Army Service from 27 July 1945 to 1 August 1946.Light brown coloured woven cotton dress with button-up front secured by 6 metal buttons. Dress constructed of a skirt element attached to a short sleeve shirt-style torso section, a hook and eye sits on interior of two sections to fasten left and right sides together. One square topstitched pocket on the left chest and two angled hip pockets on front. Fabric belt with metal buckle held in place by fabric loops on both left and right side. Fabric epaulette passes through loop on both left and right side and secured with metal button. Two loops on interior left and right shoulders, left loop with inscription; woven label stitched to interior left side underneath which is a stamped motif.Ink inscription on interior loop difficult to read, “VF518245” and 5-6 indiscernible characters. Button reads “AUSTRALIAN MILITARY FORCES” below an embossed image of Australia with the King George V crown on top. Stamped motif reads “[broad arrow]/S.D.”women, wwii, world war two, second world war, australian womens army service, awas -
 Shepparton RSL Sub Branch
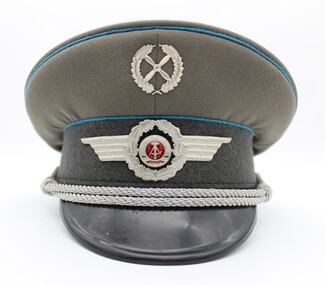
Uniform, Hat
... looped around a silver metallic stud on either side if the cap. Attached to the front/centre of the cap is a metallic ornament depicting the east German logo in red and silver, surrounded by a silver wreath and wings. Above this is a silver metallic ornament depicting a propeller surrounded by two curved pieces of foliage. There is a faux leather strap on the interior and a square...It is also in excellent condition. military airforce german cap hat east german Inscriptions on the grey square of fabric on cap interior: NVA 55 1856 T Inscriptions on yellow sticker on cap interior: HA.05 A grey fabric peaked cap with fine blue trims and a black plastic head cover. There is a silver fabric rope looped ...This is an East German cap which presumably would have been worn by a German airman. It is a fairly recently made piece, dating to the 1980’s or 90’s.This cap has historic significance as a piece of East German airforce uniform. Itnis a fairly recently made piece, dating to approximately the 1980’s-90’s. It is also in excellent condition.A grey fabric peaked cap with fine blue trims and a black plastic head cover. There is a silver fabric rope looped around a silver metallic stud on either side if the cap. Attached to the front/centre of the cap is a metallic ornament depicting the east German logo in red and silver, surrounded by a silver wreath and wings. Above this is a silver metallic ornament depicting a propeller surrounded by two curved pieces of foliage. There is a faux leather strap on the interior and a square of lighter grey fabric stitched into the underside of the cap. This contains inscriptions. There is also a round yellow sticker on the interior side of the plastic head cover. This also contains an inscription.Inscriptions on the grey square of fabric on cap interior: NVA 55 1856 T Inscriptions on yellow sticker on cap interior: HA.05military, airforce, german, cap, hat, east german -
Frankston RSL Sub Branch
Pack, Equipment
... square in shape and has additional straps for attaching to webbing. The front of the pack has 'NX 83432 G Siddaway' written in black. The top flap of the pack is secured by two straps which attach to brass buckles secured by canvas loops to the front of the pack....square in shape and has additional straps for attaching to webbing. The front of the pack has 'NX 83432 G Siddaway' written in black. The top flap of the pack is secured by two straps which attach to brass buckles secured by canvas loops to the front of the pack. ...Standard WW2 era Australian Army issue, pattern 1937 equipment pack made of heavy weight cotton webbing material in the standard khaki colour. This pack was carried on the wearer's back, supported by two straps worn over the shoulder. These packs were used by military personnel to carry personal equipment items whilst in the field. This pack type is square in shape and has additional straps for attaching to webbing. The front of the pack has 'NX 83432 G Siddaway' written in black. The top flap of the pack is secured by two straps which attach to brass buckles secured by canvas loops to the front of the pack.This pack is stamped with the standard Australian Dept of Defence mark and has the serviceman's name "NX 83432 G. Sidaway" -
 Bendigo Historical Society Inc.
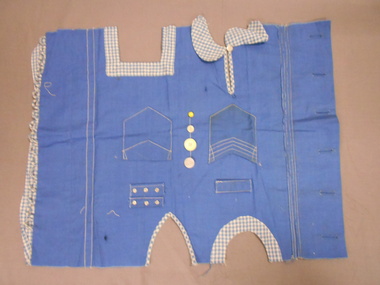
Textile - EMILY NANKIVELL COLLECTION: SCHOOL NEEDLEWORK SAMPLER, 1930's
... Collar: (1) Rounded ''Peter Pan"" collar, with bound placket opening, one pearl button, and hand stitched loop. Facings (3). One square, one round, one Vshaped. ...Collar: (1) Rounded ''Peter Pan"" collar, with bound placket opening, one pearl button, and hand stitched loop. Facings (3). One square, one round, one Vshaped. ...A school sampler from the 1930's, demonstrating a mastery of numerable sewing skills: Buttonholes- both bound;6 bound buttonholes. Button loop fastening 17 rouleau loops. Seams: Plain flat seam, machine stitched-part neatened by hand, and part neatened by machine. An overlapped flat seam-machine stitched. Fasteners: Press-studs (3) Buttons (4) shanked and f;flat. Metal hook-and-eyes (3), one eye hand stitched, all attached in buttonhole stitch. Pockets: (2) Machine stitched. Collar: (1) Rounded ''Peter Pan"" collar, with bound placket opening, one pearl button, and hand stitched loop. Facings (3). One square, one round, one Vshaped. Pintucks: 4 machine stitched pintucks.textiles, domestic, school needlework sampler 1930's -
 Bendigo Historical Society Inc.
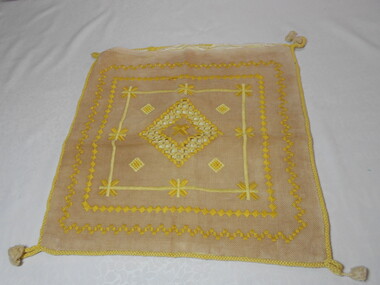
Textile - CUSHION COVER
... Edged with 5 mm cotton cord with loops and pom poms at corners. Tapestry fabric side has a pattern of concentric squares of yellow embroidered lines, squares and leaf patterns....Edged with 5 mm cotton cord with loops and pom poms at corners. Tapestry fabric side has a pattern of concentric squares of yellow embroidered lines, squares and leaf patterns. ...Textiles, brown coloured cushion cover of tapestry fabric on one side and yellow cotton fabric on reverse side. Edged with 5 mm cotton cord with loops and pom poms at corners. Tapestry fabric side has a pattern of concentric squares of yellow embroidered lines, squares and leaf patterns.textiles, domestic, cushion cover -
 Bendigo Historical Society Inc.
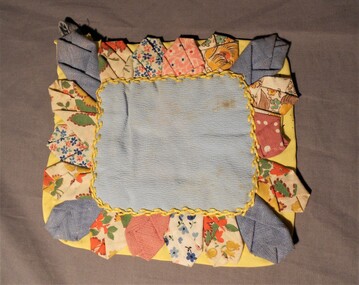
Domestic Object - MERLE HOULDEN COLLECTION: FABRIC POT HOLDER, 1940's-50's
... Square shaped pot holder. Centre panel, and back lining are made from pale blue "silky - type" (probably synthetic) fabric. This 9 X 11cm panel is surrounded by a band of yellow fabric, which also forms a binding around the edges. A blue and white check flannelette fabric forms the padding in the pot holder. Folded strips of floral cotton form a decorative band between the small and larger rectangles. This border is decorated by yellow stitchery. A fabric loop...Square shaped pot holder. Centre panel, and back lining are made from pale blue "silky - type" (probably synthetic) fabric. This 9 X 11cm panel is surrounded by a band of yellow fabric, which also forms a binding around the edges. A blue and white check flannelette fabric forms the padding in the pot holder. Folded strips of floral cotton form a decorative band between the small and larger rectangles. This border is decorated by yellow stitchery. A fabric loop ...Square shaped pot holder. Centre panel, and back lining are made from pale blue "silky - type" (probably synthetic) fabric. This 9 X 11cm panel is surrounded by a band of yellow fabric, which also forms a binding around the edges. A blue and white check flannelette fabric forms the padding in the pot holder. Folded strips of floral cotton form a decorative band between the small and larger rectangles. This border is decorated by yellow stitchery. A fabric loop at one corner is for hanging purposes.Made by Merle's Grandmother Williamson.domestic equipment, food storage & preservation, fabric pot holder -
 Bendigo Historical Society Inc.
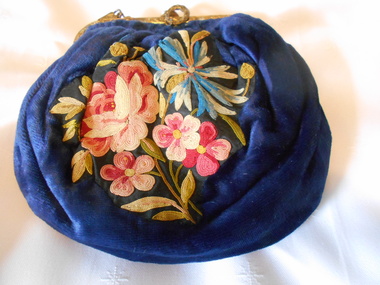
Clothing - MAGGIE BARBER COLLECTION: NAVY BLUE VELVET EMBROIDERED BAG WITH BRASS FRAME, Late 1800-early 1900's
... loop is attached to the centre of the frame. The velvet fabric is tightly gathered onto the frame. One side panel of the bag is exquisitely embroidered in a ''corded'' floral design, in pink, blue and greens. The bag is lined with a smokey blue watermark silk, with a flat pocket on one side. The bag contains a smokey blue pouch 7.5 cm square...loop is attached to the centre of the frame. The velvet fabric is tightly gathered onto the frame. One side panel of the bag is exquisitely embroidered in a ''corded'' floral design, in pink, blue and greens. The bag is lined with a smokey blue watermark silk, with a flat pocket on one side. The bag contains a smokey blue pouch 7.5 cm square ...Clothing. Navy blue velvet, on a brass frame, with a 34 cm long brass chain. A ''push-button'' 1.2 cm diameter, fastens the bag. A decorative, oval brass loop is attached to the centre of the frame. The velvet fabric is tightly gathered onto the frame. One side panel of the bag is exquisitely embroidered in a ''corded'' floral design, in pink, blue and greens. The bag is lined with a smokey blue watermark silk, with a flat pocket on one side. The bag contains a smokey blue pouch 7.5 cm square, holding a bevelled edge mirror on one side, and a pouch on the other, a blue nylon comb, two metal hair pins and a 5.5 cm long hat pin. with a pearl bead at one end.costume accessories, female, navy blue velvet embroidered bag -
 Bendigo Historical Society Inc.
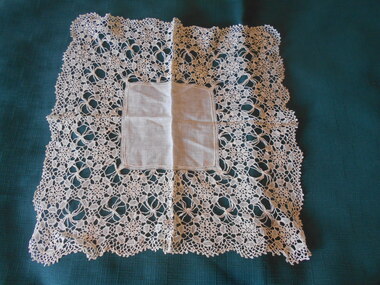
Clothing - MAGGIE BARBER COLLECTION: LINEN HANDKERCHIEF WITH CROCHET EDGE, 1800's
... A square of very fine linen, 12 cms diameter, surrounded by a one cm edging of drawn threadwork, and 9.5 cm of fine crochet. Crochet has circular shaped motifs, some very lacy and open, with a band of more closely worked pattern on either side of the open motifs. A looped...A square of very fine linen, 12 cms diameter, surrounded by a one cm edging of drawn threadwork, and 9.5 cm of fine crochet. Crochet has circular shaped motifs, some very lacy and open, with a band of more closely worked pattern on either side of the open motifs. A looped ...Clothing. A square of very fine linen, 12 cms diameter, surrounded by a one cm edging of drawn threadwork, and 9.5 cm of fine crochet. Crochet has circular shaped motifs, some very lacy and open, with a band of more closely worked pattern on either side of the open motifs. A looped pattern with picot finish edges the handkerchief.costume accessories, female, linen handkerchief with crochet edge. -
 Bendigo Historical Society Inc.
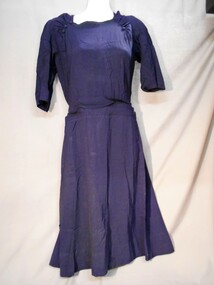
Clothing - NAVY BLUE SYNTHETIC CREPE DRESS
... Square neckline. Narrow shoulder sections gathered into bodice at each corner of neckline at front. Decorative buttons on seam- three each side (two missing on LHS).Padded shoulders. Three horizontal pleats at waist line that taper and narrow at centre back. Centre back opening fastened with thirty one fabric covered buttons and cotton cord loops...Square neckline. Narrow shoulder sections gathered into bodice at each corner of neckline at front. Decorative buttons on seam- three each side (two missing on LHS).Padded shoulders. Three horizontal pleats at waist line that taper and narrow at centre back. Centre back opening fastened with thirty one fabric covered buttons and cotton cord loops ...BHS CollectionNavy blue dress of synthetic crepe fabric. Length to just below the knee. Elbow length set in fitted sleeves. Square neckline. Narrow shoulder sections gathered into bodice at each corner of neckline at front. Decorative buttons on seam- three each side (two missing on LHS).Padded shoulders. Three horizontal pleats at waist line that taper and narrow at centre back. Centre back opening fastened with thirty one fabric covered buttons and cotton cord loops Skirt made from two sections. Front section ungathered. Back section has four inverted pleats falling from 15 cms below the waist to create fullness. Hemline faced with 7 cms cotton fabric.costume, female, navy blue synthetic crepe dress -
 Bendigo Historical Society Inc.
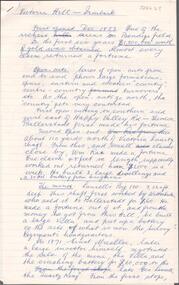
Document - ALBERT RICHARDSON COLLECTION: VICTORIA HILL IRONBARK
... Square, and a very good view of another tourist attraction, Lansells 'Fortuna' now Survey Regiment's headquarters. This hill is the centre of another rich area. The Lazarus mine 3,360 feet deep with 24 saddle reefs in 2,200 feet. The New Chum United, Lansell's 222with its 120 ft high poppet legs. BCV 8, John Brown Knitwear factory, Esposito's Gold Mines Hotel, Central Nell Gwynne and Manchester tram loops...Square, and a very good view of another tourist attraction, Lansells 'Fortuna' now Survey Regiment's headquarters. This hill is the centre of another rich area. The Lazarus mine 3,360 feet deep with 24 saddle reefs in 2,200 feet. The New Chum United, Lansell's 222with its 120 ft high poppet legs. BCV 8, John Brown Knitwear factory, Esposito's Gold Mines Hotel, Central Nell Gwynne and Manchester tram loops ...Three page document hand written by Albert Richardson, on the history of Victoria Hill, Ironbark. 'one of the richest areas on Bendigo field. In the first six years, £1,200,000 worth of gold was obtained. Almost every claim returned a fortune.' Page three title: Other features on Victoria Hill. 'Adjacent to Central Nell Gwynne area as the mining museum. Adjacent to the New Chum Hill on direct south side of the Calder Highway. This hill reached by a short and excellent access road gives a magnificent view of Bendigo and Golden Square, and a very good view of another tourist attraction, Lansells 'Fortuna' now Survey Regiment's headquarters. This hill is the centre of another rich area. The Lazarus mine 3,360 feet deep with 24 saddle reefs in 2,200 feet. The New Chum United, Lansell's 222with its 120 ft high poppet legs. BCV 8, John Brown Knitwear factory, Esposito's Gold Mines Hotel, Central Nell Gwynne and Manchester tram loops are mentioned.Albert Richardsonbendigo, mining, victoria hill -
 Bendigo Historical Society Inc.
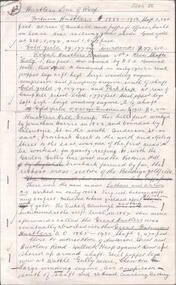
Document - Hustlers, Sheepshead and Deborah lines of reef
... Paddy's Gully Line, south to north, some shafts - Lansell's 'Sandhurst" ('Needle") Eaglehawk Road shaft 2,425 feet, about 50 yards east of Needle Loops, a brick square sided chimney with Cleopatra Needle top. ...Paddy's Gully Line, south to north, some shafts - Lansell's 'Sandhurst" ('Needle") Eaglehawk Road shaft 2,425 feet, about 50 yards east of Needle Loops, a brick square sided chimney with Cleopatra Needle top. ...Albert Richardson was a mining historian who wrote widely on the mines of the Bendigo Goldfield. The park opposite the Goldmines Hotel in Marong Road, is named in his honour. Five page document, hand written by Albert Richardson on lined foolscap and edited with cross-outs and insertions, . The mines along the Hustlers line of reef and the Sheepshead line of reef are described. Mines listed on Hustlers line of reef: Fortuna Hustlers (1888 - 1913), shaft 2,240 feet at rear of Buckell and Jeffrey's offices; Royal Hustlers Reserve No. 2 - two shafts 'City" 860 feet, now covered by R.S.L. building Pall Mall, steel poppet legs 60 ft high and 'Park Shaft" at rear of Camp Hill School, 1,775 feet, steel poppet legs 60 feet high; Hustlers Hill Group first worked by Jonathan Harris in 1853 and bounded by Valentine, Anderson and Ironbark Creek to the north and Milroy Street to the east, one of first areas worked for quartz reefing. It with Garden Gully line west and Victoria Hill Ironbark, formed by far the richest cross section of the Bendigo Goldfield. Great Extended Hustlers (1865-1921) close to intersection of Anderson Street and Hustlers Road, mullock heap against road and shored up around shaft, steel poppet legs now at Wattle Gully mine, Chewton, large winding machine, air compressor south of shaft and 36 head crushing battery. Hustlers Reef (Old Hustlers) and Hustlers Reef No. 1, two shafts, main 2,210 feet, about 220 yards east of Moran Street and against Fenton Street. , No. 1 shaft 1,140 feet and about 155 yards east of Moran Street. Lansell's Comet, Lightining Hill line, 2.100 feet, on Comet Hill approx 70 yards west of Holmes Road, near Comet Creek, steel poppet legs. United Hustlers and Redan (1876-1918), main Redan, 1,830 feet about 155 yards west of Sandhurst Roead, in line with Comet Hill State School, this hill known as Redan Hill. North, or New Hustlers, once known as Agnew Hustlers, wooden poppet legs, south side, Kneebone Street, Eaglehawk. Derby line, Johnson's No. 3, South Johnson's (east shaft of Collman and Tacchi) 439 feet on west wide of Woods Street, south of Wetherall Street. Paddy's Gully Line, south to north, some shafts - Lansell's 'Sandhurst" ('Needle") Eaglehawk Road shaft 2,425 feet, about 50 yards east of Needle Loops, a brick square sided chimney with Cleopatra Needle top. British American, 789 feet, just south of Holdsworth Road. Collman and Tacchi, main shaft 2,588 feet, 60 yards west of Eaglehawk Road, California Gully. Deborah Line of Reef, The Deborah (1932-1954) shaft 2.017 feet, west of Adams Road and south of Abel Street, Quarry Hill. North Deborah (1937 - 1954) shaft 1,151 feet, Breen Street, Quarry Hill, steel poppet legs. Central Deborah (1939-1954) shaft 1,347 feet Sheepshead line of reef, Lansell's South Red, White and Blue, shaft 2,124 feet, north east of Bellevue Road and 220 yards east of Adams Road. The New Red, White and Blue Consolidated (Big Blue) main shaft 2,416 feet. Lansell's Bendigo Battery 105 head, north of 'Big Blue" on his freehold lease, commenced crushing on 24th February 1895. After closing was erected as the Showground's Industrial Hall, July 1926. North Red, White and Blue, burnt down February 1926, new company 1934, closed 1938. Document is part of the Albert Richardson Collection of Bendigo mining history. bendigo, gold mining, deborah line of reef, sheepshead line of reef, hustlers line of reef, royal hustlers reserve mine, hustlers hill group of mines, great extended hustlers, hustlers reef no. 1, lightning hill line, old comet, collman and tacchi, lansell's comet, north deborah, central deborah, dhrrpdhrsf linr og trrg, new red, white and blue consolidated mine, big blue, lansell's bendigo battery, north red, white and blue mine, albert richardson collection -
 Bendigo Historical Society Inc.
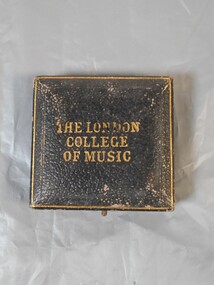
Medal - Music Award
... square box. Medal is circular with personalised inscription and musical instruments on front. The words "London College Music" and an image of a female kneeling are on the back of the medal. The inside cover of the box has printed "J.A.Restall Jeweller Silversmith and Medallist 82 Cambridge St. Birmingham". Medal is attached to blue velvet within the box by a metal loop...square box. Medal is circular with personalised inscription and musical instruments on front. The words "London College Music" and an image of a female kneeling are on the back of the medal. The inside cover of the box has printed "J.A.Restall Jeweller Silversmith and Medallist 82 Cambridge St. Birmingham". Medal is attached to blue velvet within the box by a metal loop ...From attached paperwork: 2 medals awarded to Doreen Hooley by the London college Music for Pianoforte Playing 1924 and 1927. Housed in black boxes with blue velvet lining. Marked JA Restall Jeweller Silversmith and Medallist 82 Cambridge St. Birmingham. Doreen St Clair Hooley b Eaglehawk 1912 Father Chas Wood Hooley Mother Margt Helena McMahon Reg No 29117. Married Anthony Taylor Mutton 1940 Reg No 3223. See The Argus (Melbourne, Vic. : 1848-1954) http://nla.gov.au/nlanews-page440306 Doreen Hooley Music Award: Medal awarded by the London College of Music for piano playing 1924 Medal encased in blue velvet in square box. Medal is circular with personalised inscription and musical instruments on front. The words "London College Music" and an image of a female kneeling are on the back of the medal. The inside cover of the box has printed "J.A.Restall Jeweller Silversmith and Medallist 82 Cambridge St. Birmingham". Medal is attached to blue velvet within the box by a metal loop. The box has a metal rod and hook fastener to open and close.medals, music, piano, london college of music, restall jeweller -
 Flagstaff Hill Maritime Museum and Village
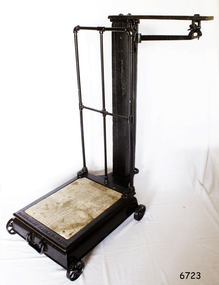
Functional object - Platform Scales
... At back, square hollow wooden post supports a hooded rod which bears the weight of the platform and which hooks onto a brass balancing arm, marked in pounds up to 50. There is a cylindrical sliding weight and on the end a loop...At back, square hollow wooden post supports a hooded rod which bears the weight of the platform and which hooks onto a brass balancing arm, marked in pounds up to 50. There is a cylindrical sliding weight and on the end a loop ...Thaddeus Fairbanks (1796 –1886) was an American inventor. of heating and cook stoves, cast iron ploughs, and other items. His greatest success was the invention and manufacture of the platform scale, which allowed the weighing of large objects accurately. Fairbanks was born in Brimfield, Massachusetts, on January 17, 1796, the son of Joseph Fairbanks (1763–1846) and Phebe (Paddock) Fairbanks (1760–1853). His uncle was Ephraim Paddock, the brother of Phebe Paddock. In 1815 he moved to St. Johnsbury, Vermont, and set up a wheelwright's shop above his father's gristmill. In 1820 he married Lucy Peck Barker and In 1824 he built an iron foundry. his brother Erastus joined him to establish E. and T. Fairbanks, a partnership to manufacture heating stoves, cast iron ploughs a design for which he patented in 1826. In 1830 Fairbanks and Erastus became interested in the raising and processing of hemp. Fairbanks went on to patent a hemp and flax dressing machine and became the manager of the St. Johnsbury Hemp Company. He also built a set of scales that would measure large loads of hemp accurately, as there were no reliable scales at the time. Upon the success of building these scales, his brothers recommended that he make and sell these for general use. Fairbanks' most famous invention then became the platform scale for weighing heavy objects. These are commonly known as the Fairbanks Scales, for which he patented his original design in 1830. Before this time, accurate weighing of objects required hanging them from a balancing beam as a result, particularly heavy or ungainly objects could not be weighed accurately. A platform scale, if large enough, could weigh an entire wagon. By placing a full wagon on the scale, unloading it, and then placing it on the scale when empty, it became possible to easily and accurately calculate the weight and value of farm produce and other loads. In 1834 Fairbanks and his brother formed "E. and T. Fairbanks and Company" to manufacture and sell these platform scales. These scales were well known in the United States and around the world resulting in the company doubling in volume every three years from 1842 to 1857. There was a temporary slow down during the American Civil War, however, the business took off again after the war. Their partnership was incorporated in 1874 into a firm known as "Fairbanks Scale Company". These platform scales revolutionized weighing methods of large loads and have been in use ever since. Portable platform scales are found in almost every hardware store, physician's office, and manufacturing factory throughout the United States and the world. The first railway track platform scale patent was granted to Fairbanks on January 13, 1857, as Patent No. 16,381. In 1916 the company was purchased by ”Fairbanks, Morse and Company”. Ownership of the company has since changed several times, but Fairbanks Scales continue to be made in St. Johnsbury Vermont to this day. Fairbanks had received 43 patents in his lifetime with the last one at the age of 91. He died on April 12, 1886, and is buried at St. Johnsbury, Vermont, at the Mount Pleasant Cemetery. An early example of the first type of platform scale that revolutionised the weighing of goods throughout the world made in the USA around the turn of the 19th century. Commercially built platform scale on wheels. Cast iron base supports iron weighing platform with wooden floor. At back, square hollow wooden post supports a hooded rod which bears the weight of the platform and which hooks onto a brass balancing arm, marked in pounds up to 50. There is a cylindrical sliding weight and on the end a loop for a metal weight holder. The holder is designed for three circular pieces of metal with a slit to the centre. The weights used are 50, 100 and 200 lbs.Embossed to base Fairbanks Patent No 11 1/2, flagstaff hill, warrnambool, shipwrecked-coast, flagstaff-hill, flagstaff-hill-maritime-museum, maritime-museum, shipwreck-coast, flagstaff-hill-maritime-village, platform scales