Showing 94 items matching "tramways - wellington"
-
 Ballarat Tramway Museum
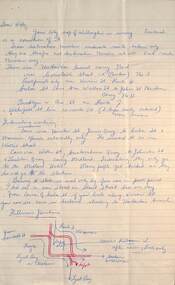
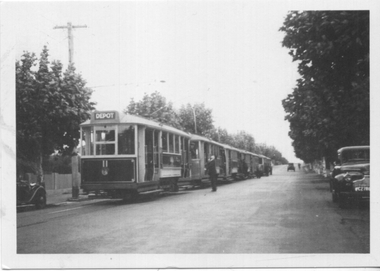
Letter - from Alwyn Marshall Toolamba to Wal Jack re Wellington NZ tramways, Alwyn Marshall, late 1950s
... from Alwyn Marshall Toolamba to Wal Jack re Wellington NZ tramways...tramways...Alwyn Marshall...Wellington...Wal Jack had an extensive range of correspondents throughout Australia and the world who often provided him with detail drawings and notes on various tramway system. This set looks at the Wellington system, though undated, most likely late 1950s, based on advice from the Wellington Tramway Museum and Alwyn's travels. ...Handwritten letter and drawing on foolscap ruled paper - four sheets, detailing the Wellington NZ tramway system. ...Letters Wal Jack railways tramways Alwyn Marshall Wellington NZ Handwritten letter and drawing on foolscap ruled paper - four sheets, detailing the Wellington NZ tramway system. ...Wal Jack had an extensive range of correspondents throughout Australia and the world who often provided him with detail drawings and notes on various tramway system. This set looks at the Wellington system, though undated, most likely late 1950s, based on advice from the Wellington Tramway Museum and Alwyn's travels. Demonstrates some of the correspondence that Wal Jack received from around the world.Handwritten letter and drawing on foolscap ruled paper - four sheets, detailing the Wellington NZ tramway system. letters, wal jack, railways, tramways, alwyn marshall, wellington nz -
 Ballarat Tramway Museum
Document - Annual report extracts, Extract from PWD Annual reports - Wellington, c1950
... Tramways... trams... Wellington...Three page type carbon copy on pink paper , blue carbon, listing of events for the Wellington NZ tramways for period 1906 to 1940, from Public Works Department Annual reports. ...Ballarat Tramway Museum South Gardens Reserve Wendouree Parade Ballarat Ballarat goldfields Tramways trams Wellington Tramway Construction Track Construction Three page type carbon copy on pink paper , blue carbon, listing of events for the Wellington NZ tramways for period 1906 to 1940, from Public Works Department Annual reports. ...Three page type carbon copy on pink paper , blue carbon, listing of events for the Wellington NZ tramways for period 1906 to 1940, from Public Works Department Annual reports. Rear of page 3 has page 3 in reverse, carbon paper for the next copy, wrong way around, possibly indicating numerous copies.tramways, trams, wellington, tramway construction, track construction -
Ballarat Tramway Museum
Document - Report, Les Stewart, "Proceedings of the joint Conference of the COTMA", 1993
... tramways... COTMA... Wellington...110 page A4 sized bound document - Proceedings of the joint Conference of the Council of Tramway Museums of Australasia and the National Federation of Rail Societies Inc. 1st - 8th June 1990. Has laminated plastic white covers front and back. Front cover has the title details. Edited by Les Stewart of the Wellington...Edited by Les Stewart of the Wellington Tramway Museum. (10th Conference) Contents: 1. ...110 page A4 sized bound document - Proceedings of the joint Conference of the Council of Tramway Museums of Australasia and the National Federation of Rail Societies Inc. 1st - 8th June 1990. Has laminated plastic white covers front and back. Front cover has the title details. Edited by Les Stewart of the Wellington Tramway Museum. (10th Conference) Contents: 1. Participants and programme 2. Workshops Development of the Volunteer Worker NZ Railway and Tramway Safety Regime Code of Electrical Practice for COTMA Groups Archives Photography as an aid in the Museum Tram and Railway Carriage roof coverings Handy hints and new ideas for Restoration and Maintenance Trolley Buses Is Your Museum Dying? Brill 21E and other tram truck bogie/requirements Overhead Construction and maintenance MMTB instructions in Overhead Construction Facts and Data on Overhead Trolley Wire Construction Trolley Wire Renewal Wellington Tramway Museum 1990 Projects 3. Field and Social Activities 4. AGM of COTMA 5. AGM of the NZFRS. See item 1255 for a group photo of delegates.trams, tramways, cotma, wellington, proceedings, conferences -
 Ballarat Tramway Museum
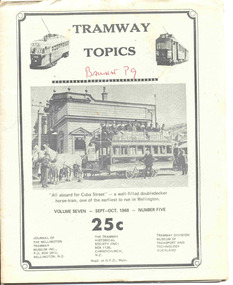
Magazine, Wellington Tramway Museum, "Tramway Topics", Oct. 1968
... tramways... Ballarat... Wellington...Magazine - Tramway Topics - Vol. 7, No. 5 Sep - Oct 1968 - 28 wax cut stencil duplicated pages with printed centre page of photos and printed covers, which are slightly larger in size than the internal sheets. Published by Wellington...Wellington Tramway Museum..."Tramway Topics" Magazine Wellington Tramway Museum ...Yields information primarily about New Zealand tram and bus city systems and what the various NZ Museums were doing at the time. Has an article on Ballarat Horse trams and the conversion to electric.Magazine - Tramway Topics - Vol. 7, No. 5 Sep - Oct 1968 - 28 wax cut stencil duplicated pages with printed centre page of photos and printed covers, which are slightly larger in size than the internal sheets. Published by Wellington Tramway Museum, Tramway Historical Society and Tramway Division of MOTAT jointly - editor J. Wilkinson. Contains articles on Brisbane trams for Queen Elizabeth Park, Peak Tram, Auckland, Horse trams in Ballarat, Napier, Wellington and News of Museums etc.On inside of front cover in black ink "Ballarat Tramway Preservation society Catalogue No. 111". In red ink on front cover "Ballarat p9"trams, tramways, ballarat, wellington, auckland, napier -
 Victorian Railway History Library
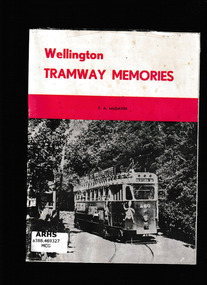
Book, TA McGavin, Wellington tramway memories, 1978
... Wellington tramway memories......Tramways - Wellington...Ill, maps, p.23. Wellington tramway memories Book TA McGavin New Zealand Railway and Locomotive Society ...A history of Wellington trams - a pictorial and descriptive representation.Ill, maps, p.23.non-fictionA history of Wellington trams - a pictorial and descriptive representation.urban transport - new zealand, tramways - wellington -
 Melbourne Tram Museum
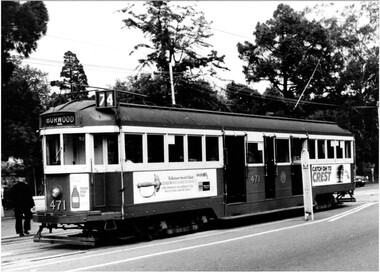
Photograph - Set of two Black & White Photograph/s, Tram 471 and 534 in Wellington Parade, 1950's? to 1960's
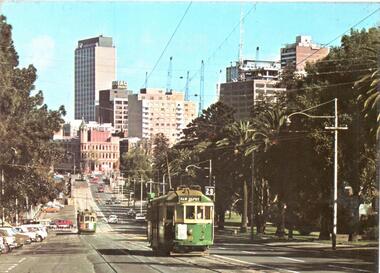
... tramways... Wellington Parade...Melbourne Tram Museum 8 Wallen Road Hawthorn melbourne Trams tramways Wellington Parade Burwood tram 472 tram 534 Stamped in black ink on back "TMSV Sales" Black and white photograph of W2's in Wellington Parade, late 1950's or early 1960's on route 74, Burwood in Wellington Parade between Clarendon and Lansdowne St, Melbourne. ...Black and white photograph of W2's in Wellington Parade, late 1950's or early 1960's on route 74, Burwood in Wellington Parade between Clarendon and Lansdowne St, Melbourne. Has the Clifton Hill rail line in the background. .1 - W2 472, outbound - with a Wilkinson Sword razor blade and "Catch onto Crest" body adverts. .2 - W2 534, in bound?, with Tolley's Brandy, Johnson ceramic wall tiles and another advertisement. Printed on Fujichrome paper. Not known who took the photograph or when it was printed.Stamped in black ink on back "TMSV Sales"trams, tramways, wellington parade, burwood, tram 472, tram 534 -
 Melbourne Tram Museum
Postcard, Murfett Publishers, W2 509 outbound in Wellington Parade Melbourne, early 1980's
... tramways... Wellington Parade...Melbourne Tram Museum 8 Wallen Road Hawthorn melbourne Trams tramways Wellington Parade Kew Depot Route 29 Spring St Flinders St tram 509 Postcard - full colour, Divided back type of W2 509 outbound in Wellington Parade Melbourne. ...Postcard - full colour, Divided back type of W2 509 outbound in Wellington Parade Melbourne. Two other trams are in the view. Tram has the destination of Kew Depot and route 29. In the background is a hoarding for the construction of the Melbourne Underground loop - indicates the photo taken late 1970's or early 1980's. Note the building on the corner of Spring and Flinders St, prior to the construction of Shell House mid 1980's. Note at this time Wellington Parade was only available for through motor traffic out of the city. published by National View by Murfett Publishers Australia. Has the details on the rear with place for stamp, address etc and logo.trams, tramways, wellington parade, kew depot, route 29, spring st, flinders st, tram 509 -
 Melbourne Tram Museum
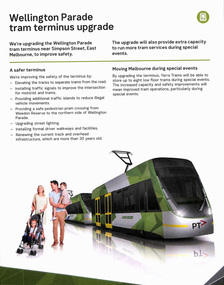
Pamphlet, Transport for Victoria, "Wellington Parade tram terminus upgrade", Nov. 2019
... tramways... Wellington Parade...Melbourne Tram Museum 8 Wallen Road Hawthorn melbourne Trams tramways Wellington Parade Simpson St Trackwork Construction Terminus Crossover .1 - Pamphlet - folded A3 to A4, titled "Wellington Parade tram terminus upgrade" to provide a set of scissors cross overs a the Simpson St siding, improved safety for crews, pedestrians and for use during particularly special events. ....1 - Pamphlet - folded A3 to A4, titled "Wellington Parade tram terminus upgrade" to provide a set of scissors cross overs a the Simpson St siding, improved safety for crews, pedestrians and for use during particularly special events. Has a map showing the extent of works, pedestrian crossings and car parks changes. Also shows two toilet blocks for crews in grey. On the rear has the dates for the drop in session. Has the PTV, Transport for Victoria and Yarra Trams logos. .2 - Pamphlet - 3 fold DL - printed on off white paper, titled "Buses replace Trams" - 25/10 to 1/11 Set of five digital images of pamphlets collected from Yarra Trams website 14-10-2020trams, tramways, wellington parade, simpson st, trackwork, construction, terminus, crossover -
 Melbourne Tram Museum
Album - Photo Album, Postcard, Colin Jones, Tramway postcards - cable trams, 1990's
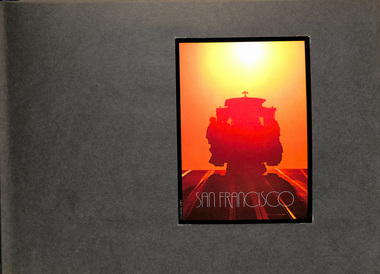
... Tramways... Wellington...Melbourne Tram Museum 8 Wallen Road Hawthorn melbourne Trams tramways Cable Trams San Francisco Melbourne Dunedin Tramways Wellington tram 1 Photo Album, heavy blue printed card covers, cord bound, containing some 40 grey sheets. ...Photo Album, heavy blue printed card covers, cord bound, containing some 40 grey sheets. Includes many commercial, Museum and some bus postcards of the San Francisco cable trams, generally on both sides of the sheets, with some Melbourne, Dunedin and Wellington cable cars. Each photo or postcard secured by a clear photo corner. Sample pages only scanned.trams, tramways, cable trams, san francisco, melbourne, dunedin tramways, wellington, tram 1 -
 Melbourne Tram Museum
Photograph - SW5 class trams - set of 2, Norm Cross, 1970s
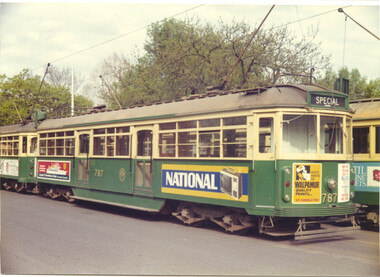
... tramways...Wellington Parade...Yields information about two different SW5s after the fitting of head and tail lights. trams tramways Wellington Parade tram 787 tram 842 St Georges Road Route 10 SW5 class Colour print with a plain back. ...Set of two colour prints of SW5 class trams: 1 - SW5 No.787 in the Wellington Parade siding East Melbourne - showing "Special", with a National TV and Walpamur paints adverts. 2 - SW5 No. 842, in St Georges Road at Miller Street, Preston. Route 10. with Peck's food paste, Coffey Ford and Amoco / Robo car wash adverts.Yields information about two different SW5s after the fitting of head and tail lights.Colour print with a plain back.trams, tramways, wellington parade, tram 787, tram 842, st georges road, route 10, sw5 class -
 Ballarat Tramway Museum
Postcard, Murfett Pty Ltd, Wellington Parade, East Melbourne
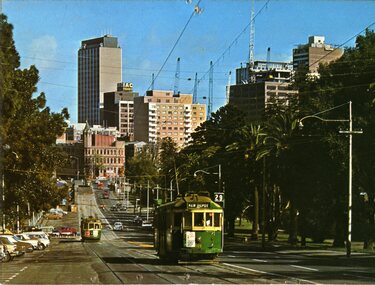
... tramways... Melbourne... Wellington...Ballarat Tramway Museum South Gardens Reserve Wendouree Parade Ballarat Ballarat goldfields Trams tramways Melbourne Wellington Parade Postcards tram 484 tram 229 tram 364 Colour postcard of Wellington Parade, East Melbourne with Melbourne skyline in background and Fitzroy Gardens in background. ...Colour postcard of Wellington Parade, East Melbourne with Melbourne skyline in background and Fitzroy Gardens in background. Would appear works for the underground are in progress. Has W2 509, outbound on route 29 to 'Kew Depot' and a tram (wide body car) in bound on route 74. Has on rear caption, "National View" by Murfett Pty Ltd. Australia, place for address and stamp. Taken early 70's.trams, tramways, melbourne, wellington parade, postcards, tram 484, tram 229, tram 364 -
 Melbourne Tram Museum
Negative, Wal Jack, c1955
... tramways... W2 class... Wellington...Melbourne Tram Museum 8 Wallen Road Hawthorn melbourne Trams tramways W2 class Wellington Parade Accidents Route 27 tram 257 Black and white negative, by Wal Jack, of W2 257 after a collision with a large vehicle. ...Black and white negative, by Wal Jack, of W2 257 after a collision with a large vehicle. Has part of the front saloon stowed in, footboard and grab handles torn away. Tram has the destination of Spencer St, route 27?. Appears to be in Bridge Road with the river in the background - see also Reg Item 5171 for another photo in Wellington Parade, near Simpson St Photo Wal Jack on a very wet day. Dated 20/4/1951 in the Ray Pearson Album, photographed in Wellington Parade.trams, tramways, w2 class, wellington parade, accidents, route 27, tram 257 -
 Melbourne Tram Museum
Negative, Wal Jack, c1950
... tramways... W2 class... Wellington...Melbourne Tram Museum 8 Wallen Road Hawthorn melbourne Trams tramways W2 class Wellington Parade Accidents Route 27 tram 257 Black and white negative, by Wal Jack, of W2 257 after a collision with a large vehicle. ...Black and white negative, by Wal Jack, of W2 257 after a collision with a large vehicle. Has part of the front saloon stowed in, footboard and grab handles torn away. Tram has the destination of Spencer St, route 27?. Appears to be in Wellington Parade at the Simpson St sidings junction. - see also Reg Item 5093 for another photo. Photo Wal Jack on a very wet day. Ray Pearson album dates the photo as 20/4/1957.trams, tramways, w2 class, wellington parade, accidents, route 27, tram 257 -
 Melbourne Tram Museum
Photograph - Former St Kilda Engine house, Wellington St - Set of 2, Clive M Gibson, 1960s
... tramways...cable trams...Wellington...Yields information about the former engine house in Wellington St that powered the Windsor (Chapel St) to St Kilda (Acland St) cable trams. tramways cable trams Wellington St engine houses winding houses Windsor St Kilda On rear of one print "Wellington St Windsor, cable tram engine house. ...The photos show the former St Kilda or Windsor engine or winding house at 105 Wellington St. This building is now known as the "Engine house".Yields information about the former engine house in Wellington St that powered the Windsor (Chapel St) to St Kilda (Acland St) cable trams.Set of two Black and white images, one with a plain back.On rear of one print "Wellington St Windsor, cable tram engine house. C M Gibson Photo"tramways, cable trams, wellington st, engine houses, winding houses, windsor, st kilda -
 Ballarat Tramway Museum
Album, Gus Weir, "Tramway Museums Australia"
... Compiled by Gus Weir of the Wellington Tramway Museum, former Wellington tram driver. ...Ballarat Tramway Museum South Gardens Reserve Wendouree Parade Ballarat Ballarat goldfields Compiled by Gus Weir of the Wellington Tramway Museum, former Wellington tram driver. ...Compiled by Gus Weir of the Wellington Tramway Museum, former Wellington tram driver. See Gus Weir Obituary - Wellington Tramway Museum 2019 file. Comprises photos taken during COTMA conferences and tours in Australia. Ballarat photos have details on the rear as do many others. Museums include Sydney, Victor Harbor, Bylands, Haddon, Bendigo, Ballarat, Rockhampton, Portland, Launceston, Perth, Portland and Hawthorn Melbourne. Ballarat photos are dated 11/2000.Yields photographic records of most Australian tramway museums. Album, black leather covered heavy card cover, with 46 double side paper sheets bound into album with two plastic sleeves per side to hold photographs. Some sheets at the front have been removed. Also has a paper envelope to hold negatives at the rear. Titled "Tramway Museums Australia" on the front spine.cotma, tram museums, btm, ballarat, gus weir, stm, tmsv, bendigo, portland, launceston, perth, mtpa, mtm, victor harbor -
 Melbourne Tram Museum
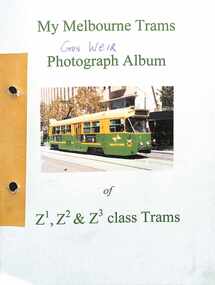
Album, Gus Weir, My Melbourne Trams - Z1, Z2 & Z3 class trams, 1980 to 2011
... Compiled by Gus Weir of the Wellington Tramway Museum, former Wellington tram driver. ...See last image file - Gus Weir Obituary - Wellington Tramway Museum 2019....Melbourne Tram Museum 8 Wallen Road Hawthorn melbourne Compiled by Gus Weir of the Wellington Tramway Museum, former Wellington tram driver. ...Compiled by Gus Weir of the Wellington Tramway Museum, former Wellington tram driver. Comprises some 70 double-sided album sheets for photographs of Melbourne Z1, Z2 and Z3 class trams. Scanned into 6 parts as pdf files. Many photos taken at Domain Interchange, Swanston Walk, Bourke St, St Kilda Road, Elizbeth St and La Trobe St. Photos by Gus himself during Melbourne visits with some by B R Symons, D W Jones, and Michael P Hawkins Part 1 - Introduction - Z1, 1, 2, 3, 4, 5, 7, 9, 10, 14, 19 & 22. Part 2 - Z1, 28, 31, 34, 37, 39, 49, 43, 45, 47, 49, 50, 52, 54, 56, 58, 59, 61, 63, 65, 71, 70, 73, 80, 81, 84, 85, 86, 87, 89, 93 & 95. Part 3 - Z1 & Z2 & Z3 - 96, 100, 101, 108, 112, 113, 114, 115, 116, 117, 120, 122, 123, 125, 126, 128, 199, 136, 137 & 138 Part 4 - Z3 138, 139, 148, 150, 151, 154, 157, 155, 158 (Royal Tram), 160, 163, 164, 166, 167, 168, 169, 170 & 173 Part 5 - Z3 175, 176. 178, 179, 181, 182, 185, 186, 187, 193, 194, 196, 197, 199, 201, 203, & 204 Part 6 - Z3 204, 205, 208, 209, 211, 217, 219, 220, 222, 223, 224, 225, 226, 228, 229 & 230, Yields detailed information about Melbourne trams from 1980 to 2011Set of 70 album sheets most with four photos - some blanks to allow for further photos. Each photo has a label on the rear, with details of the photograph location, photographer and date. An insert label on each page gives tram number, location and date. See last image file - Gus Weir Obituary - Wellington Tramway Museum 2019.tramways, tramcars, albums, z1 class, z2 class, z3 class, melbourne, mmtb, the met, ptc, yarra trams, swanston trams, m>tram, domain junction, swanston st, bourke st -
Melbourne Tram Museum
Album, Gus Weir, My Melbourne Trams - Miscellaneous images, 1982 to 2011
... Compiled by Gus Weir of the Wellington Tramway Museum, former Wellington tram driver. ...Melbourne Tram Museum 8 Wallen Road Hawthorn melbourne Compiled by Gus Weir of the Wellington Tramway Museum, former Wellington tram driver. ...Compiled by Gus Weir of the Wellington Tramway Museum, former Wellington tram driver. Comprises some 10 double-sided album sheets of miscellaneous photos. Includes photos of 1041, W2 512 in Seatlle, tram 969 at Arts Centre, Colonial stadium, Z2 108 drivers panel, Docklands, Domain Interchange, internal photos of C class, A2 and Z3 class, Collins St, St Vincents Plaza, Port Melbourne, Melbourne Tennis centre track under construction, signs, tram recovery vehicle, tram 1040 monument at Flinders St, A2 driver's control panel and Harbour Park extension.Yields detailed information about Melbourne trams from 1982 to 2011Set of 10 album sheets generally with four photos within a bound album, with many blanks to allow for further photos. Each photo has a label on the rear, with details of the photograph's location, photographer, and date. An insert label on each page gives the tram number, location, and date.tramways, tramcars, albums, melbourne, tram 1041, tram 512, seattle, tram 969, driver's panels, internal photos, port melbourne, docklands, st vincents plaza -
 Melbourne Tram Museum
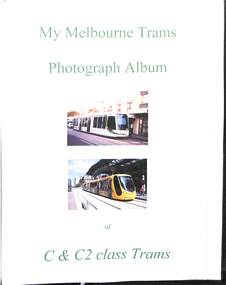
Album, Gus Weir, My Melbourne Trams - C, C1. C2 and E class, 1967 to 2014
... Compiled by Gus Weir of the Wellington Tramway Museum, former Wellington tram driver. ...Melbourne Tram Museum 8 Wallen Road Hawthorn melbourne Compiled by Gus Weir of the Wellington Tramway Museum, former Wellington tram driver. ...Compiled by Gus Weir of the Wellington Tramway Museum, former Wellington tram driver. Comprises some 42 double-sided album sheets for photographs of Melbourne - C, C1, C2 and E class trams. - Scanned into 4 parts as pdf files. Many photos taken in the City area, Some photos by M Hawkins. Part 1 - title sheet, 3001, 3002, 3036, 3003, 3005, 3006, 3008, 3009, 3010, 3013, 3004, 3015, 3015, 3016, 3017, 3020, 3021, 3022, 3023, 3024, 3025, 3026, 3029, 3030, 3032, 3034, 3036. Part 2 - E 6001, 6005, 6002, 6003, 6004, C2 class - 5123, 5113, 5111, 5103, 5106, Yields detailed information about Melbourne , C1, C2 and E class trams.Set of 42 album sheets generally with four photos within a bound album, with many blanks to allow for further photos. Each photo has a label on the rear, with details of the photograph's location, photographer, and date. An insert label on each page gives the tram number, location, and date.tramways, tramcars, albums, melbourne, yarra trams, c class, c1 class, c2 class, e class -
 Melbourne Tram Museum
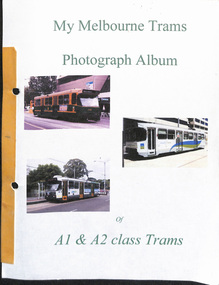
Album, Gus Weir, My Melbourne Trams - A1 & A2 class trams, 1991 to 2012
... Compiled by Gus Weir of the Wellington Tramway Museum, former Wellington tram driver. ...Melbourne Tram Museum 8 Wallen Road Hawthorn melbourne Compiled by Gus Weir of the Wellington Tramway Museum, former Wellington tram driver. ...Compiled by Gus Weir of the Wellington Tramway Museum, former Wellington tram driver. Comprises some 33 double-sided album sheets for photographs of Melbourne A1 & A2 class trams. Scanned into 3 parts as pdf files. Many photos taken in the City area, Kew Junction, Port Junction, Port Melbourne, Hawthorn Bridge, Mont Albert, Docklands Photos by Gus himself during Melbourne visits. Part 1 - cover - A1 231, 232, 233, 236, 237, 238, 239, 240, 243, 246 Part 2 - A1 246, 248, 255, 256, 257, 258, A2 259. 260, 261, 262, 263, 264, 268, 269, 275, 278, 280, 282, 283, 284, 286 and 287 Part 3 - A2 288, 291, 292, 293, 294, 295, 296, 298, & 300 Yields detailed information about Melbourne trams from 1991 to 2012Set of 33 album sheets generally with four photos within a bound album, with many blanks to allow for further photos. Each photo has a label on the rear, with details of the photograph's location, photographer, and date. An insert label on each page gives the tram number, location, and date.tramways, tramcars, albums, melbourne, yarra trams, m>tram, kew, docklands, cbd, kew junction, port melbourne, port junction, a1 class, a2 class -
 Ballarat Tramway Museum
Magazine, Wellington Tramway Museum, "Tramway Topics", Oct. 1966
... Magazine - Tramway Topics - Vol. 5, No. 5, Oct 1966 - 40 wax cut stencil duplicated pages with printed page of photos and printed covers. Published by Wellington...Wellington Tramway Museum...Contains articles on Christchurch, Orange Empire, Auckland, Dunedin, Invercargill and Museum News. "Tramway Topics" Magazine Wellington Tramway Museum ...Yields information primarily about New Zealand tram and bus city systems and what the various NZ Museums were doing at the time.Magazine - Tramway Topics - Vol. 5, No. 5, Oct 1966 - 40 wax cut stencil duplicated pages with printed page of photos and printed covers. Published by Wellington Tramway Museum, Tramway Historical Society - editor J. Wilkinson. Contains articles on Christchurch, Orange Empire, Auckland, Dunedin, Invercargill and Museum News.On inside of front cover in black ink "Ballarat Tramway Preservation society Catalogue No. 110".trams, tramways, christchurch, auckland, dunedin tramways, invercargill -
 Melbourne Tram Museum
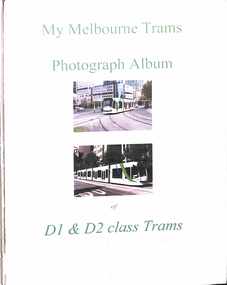
Album, Gus Weir, My Melbourne Trams - D1 & D2 class trams, 2002 to 2012
... Compiled by Gus Weir of the Wellington Tramway Museum, former Wellington tram driver. ...Melbourne Tram Museum 8 Wallen Road Hawthorn melbourne Compiled by Gus Weir of the Wellington Tramway Museum, former Wellington tram driver. ...Compiled by Gus Weir of the Wellington Tramway Museum, former Wellington tram driver. Comprises some 43 double-sided album sheets for photographs of Melbourne D1 & D2 class trams. Scanned into 4 parts as pdf files. Many photos taken at Domain Interchange, Swanston Walk, Bourke St, St Kilda Road, Port Junction, Elizbeth St, docklands, Swanston Walk, St Vincents Plaza, Toorak, and La Trobe St. Photos by Gus himself during Melbourne visits. Part 1 - Introduction - D1 3501, 3502, 3503, 3504, 3505, 3506, 3508, 3510, 3511, 3512, 3513 Part 2 - D1 3513, 3514, 3515, 3516, 3517, 3519, 3521, 3522, 3523, 3524, 3525, 2526, 3529, 3530 Part 3 - D1 3531, 3534, 3536, 3537, 3538, D2 5001, 5002, 5003, 5103, 5004, 5005, 5006, 5007, 5008, 5016, 5010 Part 4 - D2 5010, 5011, 5013, 5014, 5015, 5016, 5017, 5018, 5019, 5020, 5021Yields detailed information about Melbourne trams from 2002 to 2012Set of 43 album sheets generally with four photos within a bound album, heavy brown card covers, plastic cover with a Negative pocket, and some blanks to allow for further photos. Each photo has a label on the rear, with details of the photograph's location, photographer, and date. An insert label on each page gives the tram number, location, and date.tramways, tramcars, albums, melbourne, yarra trams, m>tram, domain junction, swanston st, bourke st, elizabeth st, d1 class, d2 class -
 Melbourne Tram Museum
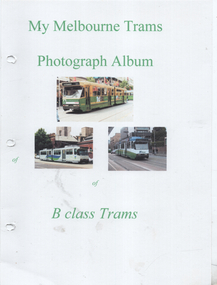
Album, Gus Weir, My Melbourne Trams - B class trams, 1990 to 2011
... Compiled by Gus Weir of the Wellington Tramway Museum, former Wellington tram driver. ...Melbourne Tram Museum 8 Wallen Road Hawthorn melbourne Compiled by Gus Weir of the Wellington Tramway Museum, former Wellington tram driver. ...Compiled by Gus Weir of the Wellington Tramway Museum, former Wellington tram driver. Comprises some 44 double-sided album sheets for photographs of Melbourne B class trams. Scanned into 4 parts as pdf files. Many photos taken at Domain Interchange, Swanston Walk, Bourke St, St Kilda Road, Elizbeth St, docklands, St Vincents Plaza, and La Trobe St. Photos by Gus himself during Melbourne visits. Part 1 - Introduction - B1 - 2001, 2002, B2 2003, 2005, 2009, 2010, 2027, 2010, 2012, 2014, 2106, 2026, 2027, 2032 & 2034. Part 2 - B2 2036, 2037, 2040, 2041, 2042, 2045, 2047, 2048, 2049, 2051, 2052, 2055, 2060, 2063, 2067, 2119, 2068, 2069, 2077 & 2078 Part 3 - B2 2078, 2085, 2087, 2093, 2094, 2047, 2049, 2100, 2101, 2103, 2089, 2114, 2104, 2105, 2106, 2108, 2109 & 2111. Part 4 - B2 2112, 2115, 2117, 2120, 2123, 2125. 2126, 2131 & 2132.Yields detailed information about Melbourne trams from 1990 to 2011Set of 44 album sheets most with four photos within a PerforMore spring clip album, heavy card covers, plastic cover with a Negative pocket, and some blanks to allow for further photos. Each photo has a label on the rear, with details of the photograph's location, photographer, and date. An insert label on each page gives the tram number, location, and date.tramways, tramcars, albums, melbourne, mmtb, the met, ptc, yarra trams, swanston trams, m>tram, domain junction, swanston st, bourke st, elizabeth st, b class, b1 class -
 Ballarat Tramway Museum
Photograph - Illustration/s, Hadfields, "Special Curves for the Ballarat Tramways", Jan. 2007
... Tramways". T Grenville St end of Sturt St. From page 9A of a catalogue publication of Hadfields held by the Wellington Tramway Museum, New Zealand. ...Tramways". T Grenville St end of Sturt St. From page 9A of a catalogue publication of Hadfields held by the Wellington Tramway Museum, New Zealand. ...Yields information about the supplier of the original track in Ballarat for electric trams and the extent of the work Hadfields undertook in providing curves, not just pointwork.Illustration from Hadfields Ltd of Sheffield, of the "Special Curves for the Ballarat Tramways". T Grenville St end of Sturt St. From page 9A of a catalogue publication of Hadfields held by the Wellington Tramway Museum, New Zealand. Shows the curves laid out in Hadfields yard. btm3679i - image of the printed version. Full size pdf copy held - filed as "Hadfields pic Ballarat Trackwork - btm3679i" on the high resolution image file.trams, tramways, trackwork, sturt st, hadfields, pointwork, grenville st -
 Melbourne Tram Museum
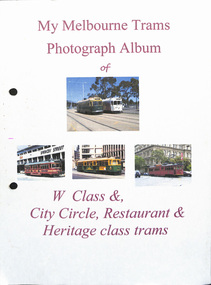
Album, Gus Weir, My Melbourne Trams - W class, City Circle, Restaurant & Heritage trams, 1967 to 2012
... Compiled by Gus Weir of the Wellington Tramway Museum, former Wellington tram driver. ...Melbourne Tram Museum 8 Wallen Road Hawthorn melbourne Compiled by Gus Weir of the Wellington Tramway Museum, former Wellington tram driver. ...Compiled by Gus Weir of the Wellington Tramway Museum, former Wellington tram driver. Comprises some 42 double-sided album sheets for photographs of Melbourne - W class, City Circle, Restaurant & Heritage trams. - Scanned into 4 parts as pdf files. Many photos taken in the City area, Some photos by M Hawkins. Part 1 - cover - logos - MMTB, The Met, PTC, Swanston Trams, M>Tram, Yarra Trams, PTC, 11W, cable dummy, V214, W2 262. 380., 384, 431, 442, 504, 510 and X2 676. Part 2 -W2 512, W5 729, 721, 727, 728, 731, 753, 758, 760, 777, 780, 808, 823, 824, 842, SW5 856, 842, 853, 854 SW6 866, 862, SW5 728, SW6 871, 888, 890, 891, 899. 900, 896,905, 907, 909, 910, 919, 909 and VR 53, Part 3 - W6 884, W7 1002, 1000, 1020,W6 991, 998, 982, 982, 975, 983, 974, 975, 962, 972, SW6 957, 961, 957, SW5 728, SW6 954, 951, 951, Restaurant trams 935, 939. 938, 939, and 937 Psrt 4 - W7 1020, 1000, 1002, 1015, 1021, 1024, 1026, 1034, 1031, 1036, 1039, Yields detailed information about Melbourne trams from 1967 to 2012Set of 42 album sheets generally with four photos within a bound album, with many blanks to allow for further photos. Each photo has a label on the rear, with details of the photograph's location, photographer, and date. An insert label on each page gives the tram number, location, and date.tramways, tramcars, albums, melbourne, yarra trams, logos, w2 class, w5 class, sw5 class, sw6 class, w6 class, w7 class, restaurant tram, city circle, mmtb, the met, ptc, m>trams, swanston trams, x2 class. -
 Ballarat Tramway Museum
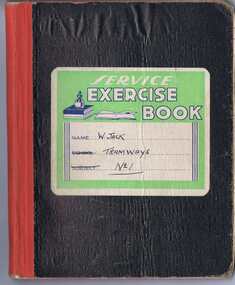
Document - Exercise Book, Wal Jack, "W. Jack Tramways No. 1", 1950s
... Steel (half page only) Perth Tramways Adelaide Municipal Tramways Trust notes South Africa Trams Wellington Corporation Tramways (NZ) Tramways in Soviet Russia World's Largest Tram Systems - July 1938...Steel (half page only) Perth Tramways Adelaide Municipal Tramways Trust notes South Africa Trams Wellington Corporation Tramways (NZ) Tramways in Soviet Russia World's Largest Tram Systems - July 1938 Demonstrates the work of Wal Jack in recording tramway information. ...Contains notes on the following tram systems. Brisbane - includes notes on photographs Rockhampton steam Sydney Tram Depots NSW Tramways tramcars - notes on each class and work vehicles Birmingham including two cuttings about the closure of Birmingham dated 31-3-1939 London Passenger Transport Board - one page Bristol - closure and damage. Sheffield History of the Tramcar Victorian Railways - St Kilda Brighton Electric Street Railway Sandringham to Black Rock MMTB Cable trams and opening dates Opening dates for the tramway routes in Melbourne to 1921 News Paper cuttings on Doncaster Newspaper cutting - cable trams "Cable Trams.....clang into history" by Hugh Murphy History and Development to 1943 - Brisbane Trams by G. R. Steel (half page only) Perth Tramways Adelaide Municipal Tramways Trust notes South Africa Trams Wellington Corporation Tramways (NZ) Tramways in Soviet Russia World's Largest Tram Systems - July 1938Demonstrates the work of Wal Jack in recording tramway information.Service Exercise Book, black covers, with label, red binding titled "W. Jack Tramways No. 1" lined pages, four sections each of 10 sheets, (80 pages), stitched bound. trams, tramways, tramways, sydney, brisbane, vr, melbourne, cable trams -
 Ballarat Tramway Museum
Photograph - Miscellaneous Images, Set of 15 (Only three photos in archive, .5, .6 and .7. Location of remaining 12 photos under investigation), 1960s
... tramways... Sydney... Brisbane... Adelaide... Wellington...Has 'Brisbane' written on back. 1901.3 - Photograph of Brisbane FM 473, showing Grange, as for 1901.2. 1901.4 - Photograph of Brisbane FM 422, showing Chermside, Brisbane CBD area, has "Brisbane May 1955' written on front of photo. 1901.5 - Illustration of Christchurch Horse Tram, Tramway Historical Society / Shell Oil company produced card, full details on rear. 1901.6 - Illustration of Wellington 'Fiducia' tram No. 238, operating on Wellington Tramway Museum track. ...Trams tramways Sydney Brisbane Adelaide Wellington Christchurch Toronto PCC Victoria Sq. tram 21 Set of 15 items personally collected or given to Les Denmead by visiting Tramway enthusiasts or other interested people to Ballarat. ...Set of 15 items personally collected or given to Les Denmead by visiting Tramway enthusiasts or other interested people to Ballarat. Retained as a sample of images or other mementoes given by people though not directly of Ballarat. The following items are a summary only: 1901.1 - Postcard from South Pacific Electric Railway of L/P class tram No. 154 on SPER track , SPER-1 - Nucolorvue. 1901.2 - Photograph of Brisbane FM 440? and drop centre behind - CBD area Brisbane. Has 'Brisbane' written on back. 1901.3 - Photograph of Brisbane FM 473, showing Grange, as for 1901.2. 1901.4 - Photograph of Brisbane FM 422, showing Chermside, Brisbane CBD area, has "Brisbane May 1955' written on front of photo. 1901.5 - Illustration of Christchurch Horse Tram, Tramway Historical Society / Shell Oil company produced card, full details on rear. 1901.6 - Illustration of Wellington 'Fiducia' tram No. 238, operating on Wellington Tramway Museum track. Produced by Museum, with full details on rear. 1901.7 - Colour illustration of Wellington tram No. 257, central or downtown Wellington, outside the Parliament grounds. Full details on rear of card - produced by Shell Oil Company? 1901.8 - Photo of four H class trams at Victoria Sq. Adelaide, 25/3/1967. Taken by Douglas A. Colquhoun. On left hand side is a single car 378 and on the other track a three car set 366, 367 and 368. 1901.9 - Photo of Adelaide E1 111, crossing the Holland St. Bridge, 24.10.1953. Photo by Douglas A. Colquhoun. 1901.10 - Photo of Adelaide A 82, Wayville Junction, Feb. 1952. Photo by Douglas A. Colquhoun. 1901.11 - Photo of Adelaide A 10, later SEC Ballarat 21, in Adelaide CBD, with Ferors Gresham Hotel alongside. Has written note on background re tram. 1901.12 - Two prints of the front vestibule of a Toronto PCC tram, with operator (driver) seated. 1901.13 - Two prints of Toronto PCC 4400 and 4404, coupled together, 9/8/1949 with a depot? or carbarn building in the background. Has caption on the base of the photograph - copy photograph. 1901.14 - Two prints of a close up photograph of the coupling between the two cars in 1901.13. 1901.15 - Photograph of a Fare Box on a Toronto Streetcar. (1901.13 to .14) have "Canada" written on the back. 1trams, tramways, sydney, brisbane, adelaide, wellington, christchurch, toronto, pcc, victoria sq., tram 21 -
Ballarat Tramway Museum
Photograph - Miscellaneous Images, Set of 15 Images. . There are 12 photos listed as 1901 in AS Box 72 (6" x 4" photos). Three photos in archive, 1901A, in AS Box 75(.5, .6 and .7 - 5" x 8" photos.)), 1960s
... tramways... Sydney... Brisbane... Adelaide... Wellington...Has 'Brisbane' written on back. 1901.3 - Photograph of Brisbane FM 473, showing Grange, as for 1901.2. 1901.4 - Photograph of Brisbane FM 422, showing Chermside, Brisbane CBD area, has "Brisbane May 1955' written on front of photo. 1901.5 - Illustration of Christchurch Horse Tram, Tramway Historical Society / Shell Oil company produced card, full details on rear. 1901.6 - Illustration of Wellington 'Fiducia' tram No. 238, operating on Wellington Tramway Museum track. ...Trams tramways Sydney Brisbane Adelaide Wellington Christchurch Toronto PCC Victoria Sq. tram 21 Set of 15 items personally collected or given to Les Denmead by visiting Tramway enthusiasts or other interested people to Ballarat. ...Set of 15 items personally collected or given to Les Denmead by visiting Tramway enthusiasts or other interested people to Ballarat. Retained as a sample of images or other mementoes given by people though not directly of Ballarat. The following items are a summary only: 1901.1 - Postcard from South Pacific Electric Railway of L/P class tram No. 154 on SPER track , SPER-1 - Nucolorvue. 1901.2 - Photograph of Brisbane FM 440? and drop centre behind - CBD area Brisbane. Has 'Brisbane' written on back. 1901.3 - Photograph of Brisbane FM 473, showing Grange, as for 1901.2. 1901.4 - Photograph of Brisbane FM 422, showing Chermside, Brisbane CBD area, has "Brisbane May 1955' written on front of photo. 1901.5 - Illustration of Christchurch Horse Tram, Tramway Historical Society / Shell Oil company produced card, full details on rear. 1901.6 - Illustration of Wellington 'Fiducia' tram No. 238, operating on Wellington Tramway Museum track. Produced by Museum, with full details on rear. 1901.7 - Colour illustration of Wellington tram No. 257, central or downtown Wellington, outside the Parliament grounds. Full details on rear of card - produced by Shell Oil Company? 1901.8 - Photo of four H class trams at Victoria Sq. Adelaide, 25/3/1967. Taken by Douglas A. Colquhoun. On left hand side is a single car 378 and on the other track a three car set 366, 367 and 368. 1901.9 - Photo of Adelaide E1 111, crossing the Holland St. Bridge, 24.10.1953. Photo by Douglas A. Colquhoun. 1901.10 - Photo of Adelaide A 82, Wayville Junction, Feb. 1952. Photo by Douglas A. Colquhoun. 1901.11 - Photo of Adelaide A 10, later SEC Ballarat 21, in Adelaide CBD, with Ferors Gresham Hotel alongside. Has written note on background re tram. 1901.12 - Two prints of the front vestibule of a Toronto PCC tram, with operator (driver) seated. 1901.13 - Two prints of Toronto PCC 4400 and 4404, coupled together, 9/8/1949 with a depot? or carbarn building in the background. Has caption on the base of the photograph - copy photograph. 1901.14 - Two prints of a close up photograph of the coupling between the two cars in 1901.13. 1901.15 - Photograph of a Fare Box on a Toronto Streetcar. (1901.13 to .14) have "Canada" written on the back. 1trams, tramways, sydney, brisbane, adelaide, wellington, christchurch, toronto, pcc, victoria sq., tram 21 -
 Ballarat Tramway Museum
Slide - BTPS Transport Cavalcade photos - set of 5, David Frost, c1980
... Ballarat Tramway Museum South Gardens Reserve Wendouree Parade Ballarat Ballarat goldfields Set of four colour slides of BTPS trams in Melbourne for the Transport Cavalcades 1 - BTPS tram 14 at the intersection of Elizabeth and La Trobe Streets - 31/1/1979 - Kodak cardboard slide 2 - Tram 27 Wellington Parade - Fujifilm - 1/2/1982 3 - Tram 40 Wellington Parade - Kodak - 28/1/1980 4 - Tram 27 Simpson St - Fujifilm - 1/2/1982 5 - Tram 14, La Trobe St with the site for Melbourne Central in the background - 31/1/1979 Yields information about the BTPS Operations for the Transport Cavalcades. ...Set of four colour slides of BTPS trams in Melbourne for the Transport Cavalcades 1 - BTPS tram 14 at the intersection of Elizabeth and La Trobe Streets - 31/1/1979 - Kodak cardboard slide 2 - Tram 27 Wellington Parade - Fujifilm - 1/2/1982 3 - Tram 40 Wellington Parade - Kodak - 28/1/1980 4 - Tram 27 Simpson St - Fujifilm - 1/2/1982 5 - Tram 14, La Trobe St with the site for Melbourne Central in the background - 31/1/1979Yields information about the BTPS Operations for the Transport Cavalcades.Set of five colour Slides - cardboard or plastic mounts.australia day, btps, wellington parade, la trobe st, transport cavalcade, tram 27, tram 14, tram 40 -
 Ballarat Tramway Museum
Postcard - Set of 6 and background card, Ken Flood, "Launceston Municipal Tramways"
... Ballarat Tramway Museum South Gardens Reserve Wendouree Parade Ballarat Ballarat goldfields The Postcards show trams of Launceston which operated from 1911 to 1952, published by International Railway Postcards of Launceston. The background card gives a short history of Launceston trams and the reproduction of two tickets. 1 - Postcard 1 - No. 11 leads a line up of cars in Elphin Road - Ken Flood 6-3-1948 2 - No 27, Mumford St loop - Ken Flood - 9-10-1948 3 - No. 24 Wellington St, photo Ken Flood, 26-2-1949 4 - No. 9 turns from George St into Cameron St - 25-9-1948 - Photo Ken Flood 5 - No. 26 - Talbot Road terminus - 1-11-1948 - Ken Flood 6 - No. 9 Elphin Road, 13-10-1948 - Ken Flood Yields information about Launceston trams, the Museum having No 14 on display, No. 14 from 2022. ...The Postcards show trams of Launceston which operated from 1911 to 1952, published by International Railway Postcards of Launceston. The background card gives a short history of Launceston trams and the reproduction of two tickets. 1 - Postcard 1 - No. 11 leads a line up of cars in Elphin Road - Ken Flood 6-3-1948 2 - No 27, Mumford St loop - Ken Flood - 9-10-1948 3 - No. 24 Wellington St, photo Ken Flood, 26-2-1949 4 - No. 9 turns from George St into Cameron St - 25-9-1948 - Photo Ken Flood 5 - No. 26 - Talbot Road terminus - 1-11-1948 - Ken Flood 6 - No. 9 Elphin Road, 13-10-1948 - Ken Flood Yields information about Launceston trams, the Museum having No 14 on display, No. 14 from 2022.Set of 6 black and white postcards and a story card. Each have a caption on the rear and a place for a stamp and address.launceston, tramways, tramcars -
 Ballarat Tramway Museum
Album - Postcards & Photographs - Vic Solomons and others - Australian Tramways, Vic Solomons, 2023
... Hobart Tas No 31 Unknown Hobart 24 Post Card Double Decker Tram 19 Hobart Tas A B Series No 24 Unknown Hobart 25 Photo Hobart Municipal Tramways Tas No 95 Unknown Hobart 26 Post Card Elizabeth St Hobart Unknown Hobart 27 Post Card Elizabeth St Hobart Unknown Hobart 28 Post Card Elizabeth St Hobart Unknown Hobart 29 Post Card Elizabeth St Hobart Tas Unknown Hobart 30 Post Card HMT 21 with crew at Beach Road Terminus Unknown Hobart 31 Post Card HMT 9 & another with crew at Beach Road Terminus. Front cover photo of Destination GPO 1921.01.00 Hobart 32 Post Card Cascade Road and Mount Wellington...Hobart Tas No 31 Unknown Hobart 24 Post Card Double Decker Tram 19 Hobart Tas A B Series No 24 Unknown Hobart 25 Photo Hobart Municipal Tramways Tas No 95 Unknown Hobart 26 Post Card Elizabeth St Hobart Unknown Hobart 27 Post Card Elizabeth St Hobart Unknown Hobart 28 Post Card Elizabeth St Hobart Unknown Hobart 29 Post Card Elizabeth St Hobart Tas Unknown Hobart 30 Post Card HMT 21 with crew at Beach Road Terminus Unknown Hobart 31 Post Card HMT 9 & another with crew at Beach Road Terminus. Front cover photo of Destination GPO 1921.01.00 Hobart 32 Post Card Cascade Road and Mount Wellington ...Contains 184 images of postcards and photographs collected primarily by Vic Solomons of Sydney, with others from the collection of Wal Jack and Warren Doubleday. Covers almost all of Australia's tramway systems. 1 Post Card Hay St Perth Looking East No 3 Unknown Perth 2 Post Card Cars 30 & 90 both on Route 19 pass in Barrack St looking South Perth WA 1935.02.18 Perth 3 Post Card Hay St Looking East Perth WA Unknown Perth 4 Post Card William St Perth WA Unknown Perth 5 Post Card Perth from Shaftsbury Hotel Unknown Perth 6 Post Card Hay St Perth WA Looking East Unknown Perth 7 Post Card Barrack St Perth Unknown Perth 8 Post Card Murray Views No 3 High St Showing Town Hall Fremantle WA Unknown Fremantle 9 Post Card High St Fremantle WA Unknown Fremantle 10 Post Card View of Bolder City Golden Mile in the Background (Section No 1) 1908.08.20 Kalgoolie 11 Post Card Hannan St Kalgoolie 1900.08.19 Kalgoolie 12 Post Card Hannan St Kalgoolie WA (No 2) Unknown Kalgoolie 13 Post Card Intersection Hannan & Maritana Sts Kalgoolie WA Unknown Kalgoolie 14 Post Card Hannan St Kalgoolie Unknown Kalgoolie 15 Post Card Lane Street Bolder City Unknown Kalgoolie 16 Post Card Hobart Double Deck Tram Unknown Hobart 17 Post Card Macquarie St Hobart Unknown Hobart 18 Photo Liverpool Street Hobart Unknown Hobart 19 Photo Hobart 21 Unknown Hobart 20 Photo Hobart 14 in Elizabeth St Hobart Unknown Hobart 21 Post Card Macquarie St Hobart Unknown Hobart 22 Post Card Macquarie St Hobart Tas Unknown Hobart 23 Photo Double Decker Tram 3 at G.P.O. Hobart Tas No 31 Unknown Hobart 24 Post Card Double Decker Tram 19 Hobart Tas A B Series No 24 Unknown Hobart 25 Photo Hobart Municipal Tramways Tas No 95 Unknown Hobart 26 Post Card Elizabeth St Hobart Unknown Hobart 27 Post Card Elizabeth St Hobart Unknown Hobart 28 Post Card Elizabeth St Hobart Unknown Hobart 29 Post Card Elizabeth St Hobart Tas Unknown Hobart 30 Post Card HMT 21 with crew at Beach Road Terminus Unknown Hobart 31 Post Card HMT 9 & another with crew at Beach Road Terminus. Front cover photo of Destination GPO 1921.01.00 Hobart 32 Post Card Cascade Road and Mount Wellington Hobart Unknown Hobart 33 Post Card Elizabeth St Hobart Unknown Hobart 34 Post Card Elizabeth St Hobart Unknown Hobart 35 Post Card Elizabeth St Hobart 1915.04.07 Hobart 36 Post Card Macquarie St Hobart Tas Unknown Hobart 37 Post Card Macquarie St showing Post Office Hobart 1908.03.12 Hobart 38 Post Card Hobart Municipal Tramways 21 Unknown Hobart 39 Post Card Elizabeth St Hobart Tas Unknown Hobart 40 Post Card Liverpool Street Hobart Unknown Hobart 41 Post Card Electric Tram Launceston Tas 446 W J Little Photo 1919.02.08 Launbceston 42 Post Card Launceston Tram no 3 1911.08.30 Launbceston 43 Post Card Launceston Tram no 3 passes tram No 1 Unknown Launbceston 44 Post Card Tram 6 at Trevallyn a popular suburb Launceston Tasmania Unknown Launbceston 45 Post Card Tram 7 at Trevallyn Road Terminus Launceston Tasmania Unknown Launbceston 46 Post Card Tram 4 in Brisbane St Launceston Unknown Launbceston 47 Post Card Tram 9 in Brisbane St Launceston Tasmania Unknown Launbceston 48 Post Card Camerom Street Launceston Tasmania Unknown Launbceston 49 Post Card Murray Views No 15 Jetty Road Glenelg Terminus 1962-02-08 Adelaide 50 Post Card Bay Tram at Jetty Road Terminus Glenelg SA Unknown Adelaide 51 Post Card Tram 3 in King William Street Adelaide S Aust Unknown Adelaide 52 Post Card Valentine Series No 3065 The Old Horse Tram Victor Harbour Unknown Victor Harbour 53 Post Card Bourke Street Melbourne with Cable Car Looking East 1904.04.25 Melbourne 54 Post Card Opening of New Electric Tramway Elsternwick 1913-11-13 Melbourne 55 Post Card Cable trams in Clarendon St Sth Melb Unknown Melbourne 56 Post Card Pall Mall from Charing Cross Bendigo Unknown Bendigo 57 Post Card Tram 4 & 7 pass at The Fountain and Mitchell Street Bendigo Vic Rose Series P 3198 Unknown Bendigo 58 Post Card M&MTB 133 at Charing Cross bound for Eaglehawk Bendigo Vic Murray Views No 45 Unknown Bendigo 59 Post Card Pall Mall Bendigo Vic Unknown Bendigo 60 Post Card Charing Cross & Mitchell St Bendigo Trams passing 1919.00.00 Bendigo 61 Post Card Pall Mall Looking East Unknown Bendigo 62 Post Card Electric Trams and City Hotel Bendigo Vic Unknown Bendigo 63 Post Card Moorabool Street Geelong V 23 Unknown Geelong 64 Post Card Murray Views No 3 Moorabool Street Geelong Vic Unknown Geelong 65 Post Card The Rose Series P 2487 Ryrie Street Geelong Vic Unknown Geelong 66 Post Card Southern Cross Series 2696 Ryrie Stret Geelong Vic Unknown Geelong 67 Post Card The Rose Series P 1490 Ryrie Street Geelong Vic 1920-03-04 Geelong 68 Post Card Valentine Series No 1568 Lower Sturt Street Ballarat Unknown Ballarat 69 Post Card Rose Series P 1710 Sturt Street Ballarat Victoria Unknown Ballarat 70 Post Card Sturt Street Ballarat Victoria Unknown Ballarat 71 Post Card Horse Tram In Sturt Street Ballarat 1905.11.10 Ballarat 72 Post Card Sturt Street Ballarat Looking North-West Unknown Ballarat 73 Post Card Shoppes Square Sturt Street Ballarat Looking North Unknown Ballarat 74 Post Card Junction Sturt and Lydiard Streets Ballarat 1909-09-01 Ballarat 75 Post Card The Electric Supply Co Souvenir Tram Ticket No 3085of the opening of Electric System August 18 1905 1905.08.18 Ballarat 76 Post Card Sturt Street Ballarat Victoria 1907.11.25 Ballarat 77 Post Card Off to the Gardens Electric Tram Ballarat Unknown Ballarat 78 Post Card Sturt Street Ballarat 1907.04.16 Ballarat 79 Post Card Sturt Street Ballarat Looking East Electric tram with Double Deck Trailer 1911.04.17 Ballarat 80 Post Card Sturt Street Ballarat Looking East Unknown Ballarat 81 Post Card Sturt Street Ballarat Looking West 1911.03.01 Ballarat 82 Post Card Town Hall and Sturt Street Ballarat Unknown Ballarat 83 Post Card Lydiard Street Ballarat 1906.11.23 Ballarat 84 Post Card Looking North along Adelaide Street from George Street Brisbane Sidues Series No 764 Unknown Brisbane 85 Post Card Looking South along Queen Street from the Creek Street Intersection Brisbane Qld Sirues Series No 1379 Unknown Brisbane 86 Post Card George Street from near Supreme Court Brisbane Unknown Brisbane 87 Post Card Queen and Eagle Streets Brisbane 1907.07.04 Brisbane 88 Post Card Queen Street showing His Majesty’s Theatre Brisbane Unknown Brisbane 89 Post Card Queen Street Treasury Building 1908.01.20 Brisbane 90 Post Card G P O and Queen Street Brisbane Unknown Brisbane 91 Post Card Queen Street Brisbane Looking from Wharf Street Unknown Brisbane 92 Post Card Customs House Brisbane 1905.02.16 Brisbane 93 Post Card Queen St Brisbane 1905.09.16 Brisbane 94 Post Card Queen St Brisbane 1907.11.19 Brisbane 95 Post Card Treasury Buildings Brisbane Unknown Brisbane 96 Post Card Queen and Eagle Streets Brisbane Unknown Brisbane 97 Post Card The Valley Corner Brisbane Unknown Brisbane 98 Post Card Brisbane Queen Street opposite General Post Office Unknown Brisbane 99 Post Card North Quay and Milton Beach Brisbane Q Unknown Brisbane 100 Post Card Victoria Bridge Brisbane South Side 1907.08.14 Brisbane 101 Post Card Victoria Bridge Brisbane Unknown Brisbane 102 Post Card Breakfast Creek Bridge Brisbane Q Unknown Brisbane 103 Post Card Melbourne Street Station South Brisbane Queensland Unknown Brisbane 104 Post Card General Post Office Queen Street Brisbane 1955.09.23 Brisbane 105 Post Card Customs House Brisbane 1904.11.04 Brisbane 106 Post Card Queen St Brisbane 1919.11.00 Brisbane 107 Post Card Queen St Brisbane Sidues Series No 627 Unknown Brisbane 108 Post Card Creek Street Brisbane Queensland Unknown Brisbane 109 Post Card Customs House and Garden Reach Brisbane Queensland 1910.00.08 Brisbane 110 Post Card Queen and Creek Streets Brisbane 1909.06.07 Brisbane 111 Post Card Queensland National Bank andd Queen Street Brisbane Queensland Unknown Brisbane 112 Post Card Queen Street and Treasury Buildings Brisbane 0000.09.07 Brisbane 113 Post Card Queen Street showing “Courier” Buildings Brisbane Unknown Brisbane 114 Post Card Intersection George & Roma Streets Brisbane Q 1916.05.11 Brisbane 115 Post Card Adelaide Street Brisbane Q Unknown Brisbane 116 Post Card G P O Queen Street Brisbane Q Unknown Brisbane 117 Post Card Treasury Building Brisbane 1906.03-20 Brisbane 118 Post Card Queen and Eagle Streets Brisbane 1907.02.01 Brisbane 119 Post Card Queen St Brisbane Unknown Brisbane 120 Post Card Queen St Brisbane Q Unknown Brisbane 121 Post Card Victoria Bridge Brisbane 1906.07.30 Brisbane 122 Post Card An Unusual View showing Head of Queen Street Victoria Bridge & South SideSuburbs Brisbane Q Unknown Brisbane 123 Post Card Petries Bight Brisbane Q Unknown Brisbane 124 Post Card South End Victoria Bridge Brisbane Q Unknown Brisbane 125 Post Card Customs House Brisbane Unknown Brisbane 126 Post Card Photo of toastrack car circa 1910 Unknown Brisbane 127 Post Card Treasury Buildings Brisbane Unknown Brisbane 128 Post Card East Street Rockhampton with Steam Tram & trailer Unknown Rockhampton 129 Post Card Post Office Rockhampton with steam tram Unknown Rockhampton 130 Post Card East Street Rockhampton with Steam Trams Rose Series P 7154 Unknown Rockhampton 131 Post Card William Street Rockhampton Rose Series P 7156 Unknown Rockhampton 132 Post Card Central East Street Rockhampton Q with Steam Trams Unknown Rockhampton 133 Photo Sturt St Ballarat Unknown Ballarat 134 Photo Bridge Street Ballarat Unknown Ballarat 135 Post Card George St Sydney Unknown Sydney 136 Post Card Elizabeth St Sydney Unknown Sydney 137 Post Card Railway Square Unknown Sydney 138 Post Card Sydney Harbor Bridge - pending receipt 139 Post Card Kings Cross - Mowbray Series with description on rear from C Roy G Field Unknown Sydney 140 Post Card Kings Cross - Mowbray Series with description on rear from C Roy G Field Unknown Sydney 141 Post Card Central Railway Station Sydney - Rose Series P6033 1954-01-26 Sydney 142 Post card William Street Darlinghurst looking towards City - Rose Series P6602 unknown Sydney 143 Post Card Circular Quay Sydney - Rose Series P6680 Unknown Sydney 144 Post Card View at Manly NSW - Rose Series B1003 Unknown Sydney 145 Post Card Hunter St Newcastle NSW - Rose Series P7843 Unknown Newcastle 146 Post Card Bank Corner Newcastle NSW - Mowbray Series No. 155 Unknown Newcastle 147 Post Card Hunter St Newcastle NSW Unknown Newcastle 148 Post Card Criterion Hotel Hunter St Newcastle NSW Unknown Newcastle 149 Photo Horse tram at Newtown Station 1894 to 1898 - PTC photo c1894 Newtown 150 Photo Steam tram motor No 3 at Railway Square 1879 1879 Sydney 151 Photo Railway steam tram c1900 with a horse drawn double deck bus c1900 Sydney 152 Photo Steam motor 5A and doubled deck bus Unknown Sydney 153 Photo Steam motor 53A with detail notes on rear 1922 Sydney 154 Photo Cable tram set at Milsons Point ferry terminal c1900 Sydney 155 Photo Early Sydney electric car - Ocean St - Rose Bay Unknown Sydney 156 Photo George St looking souoth c1905 c1905 Sydney 157 Photo Tram 165 at Circular Quay Unknown Sydney 158 Photo Tramcar ferry or transporter at The Spit Unknown Sydney 159 Photo tram 882 George St at Marti Place, 1937 1937 Sydney 160 Photo Tram 826 Railway Sq area Unknown Sydney 161 Photo Railway Sq in background, Broadway with double decker bus and toastrack car late 1930s Sydney 162 Photo Coupled St Pitt St? - photo Ben Parle Feb. 1950 Sydney 163 Photo Electric tram No. 2 - North Sydney with side trolley pole running Unknown Sydney 164 Photo George St - Horden's Corner Unknown Sydney 165 Photo George St at Martin Place c1920 Sydney 166 Photo Castlereagh St Sydney c1928 c1928 Sydney 167 Photo Railway Sqare c1920 c1920 Sydney 168 Photo Darling St Countereweight Unknown Sydney 169 Photo Trolley bus depot Unknown Sydney 170 Photo Trolley bus No. 14 Unknown Sydney 171 Photo Newcastle Railway Station with steam tram - Wharf Road?? Unknown Newcastle 172 Photo High St West Maitland - steam tram Unknown Maitland 173 Photo High St West Maitland - steam tram Unknown Maitland 174 Post Card Argent St near tram terminal Broken Hill NSW c1900 Broken Hill 175 postcard Argent St looking south Broken Hill - with Ken Magor's notes on rear Unknown Broken Hill 176 Photo Toronto - steam tram 61A Unknown Toronto 177 Photo 124A trial run 1911? Sutherland - Cronulla line 1911 Sutherland 178 Photo 103A at a tram stop Unknown Sydney 179 Photo Cable tram set at Crows Nest terminus grip car 12, trailer 22 Unknown Sydney 180 Photo Cable tram Queens Square Sydney 1903 Sydney 181 Photo cars 2078 and 2077 Chatswood late 1950s Sydney 182 Photo car 1877 Balmain area late 1950s Sydney 183 Photo Trolley bus - Rockdale destination Late 1950s Sydney 184 Photo Broken Hill steam tram - motor 18A North Tram Unknown Broken Hill 185 Photo Millars Point Sydney NSW - ferry/tram interchange, unknown Sydney All items imaged including the rear or back where there was writing of information. All files stored on the Museum's Photo Collections directory. Demonstrates through the medium of many images, Australian tramway systems and Ballarat's place in them.Album - heavy card covers, plastic lined with postcard or 6x4 photo sleeves.australia, tramways, postcards, photographs, steam trams, horse trams, cable trams, trolley buses