Showing 66 items matching "trolley line"
-
 Greensborough Historical Society
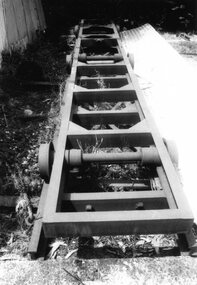
Photograph - Photograph Collection, Alison Lendoudis et al, Transfer trolley line at Briar Hill Timber 1996, 1996
... Transfer trolley line at Briar Hill Timber 1996...The Briar Hill Timber and Trading Company was active during the 1930s - 1950s during the development of the local area with many houses being built by owner-builders who used the company for their needs. briar hill timber and trading company briar hill timber alison lendoudis bob manuell sherbourne road briar hill squire family Group of 9 black and white photographs Transfer trolley line at Briar Hill Timber 1996 Photograph Photograph Collection Alison Lendoudis Bob Manuell ...Hardwood from Flowerdale and the Otways was 1. Milled. 2. Air dried. 3. Kiln dried for up to a week and 4. Reconditioned. Each kiln could hold 6,000 super feet of timber. The hydraulic lift on the transfer trolley enabled wood stacks to be picked up and put down readily.The Briar Hill Timber and Trading Company was active during the 1930s - 1950s during the development of the local area with many houses being built by owner-builders who used the company for their needs. Group of 9 black and white photographsbriar hill timber and trading company, briar hill timber, alison lendoudis, bob manuell, sherbourne road briar hill, squire family -
 Phillip Island and District Historical Society Inc.
Photograph
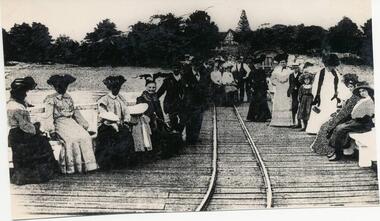
... ...trolley line...Photograph of ladies and gentlemen on the Cowes Jetty taken looking along the trolley line towards the township....Phillip Island and District Historical Society Inc. phillip-island-and-the-bass-coast One of a collection of over 400 photographs in an album commenced in 1960 and presented to the Phillip Island & Westernport Historical Society by the Shire of Phillip Island local history photography cowes jetty black & white photograph trolley line Cowes Pier Phillip Island John Jenner Bryant West Photograph of ladies and gentlemen on the Cowes Jetty taken looking along the trolley line towards the township. ...One of a collection of over 400 photographs in an album commenced in 1960 and presented to the Phillip Island & Westernport Historical Society by the Shire of Phillip IslandPhotograph of ladies and gentlemen on the Cowes Jetty taken looking along the trolley line towards the township.local history, photography, cowes jetty, black & white photograph, trolley line, cowes pier phillip island, john jenner, bryant west -
 Tatura Irrigation & Wartime Camps Museum
Book, Australia - Image of A Nation 1850-1950, 1989
... Photo of 5 workmen and line trolley on front. 1 adult and 3 girls - 1 with a cat on back. 385 pages....Photo of 5 workmen and line trolley on front. 1 adult and 3 girls - 1 with a cat on back. 385 pages. ...Pale green hard backcover. Dust jacket. Black writing, same photo on both covers. Photo of 5 workmen and line trolley on front. 1 adult and 3 girls - 1 with a cat on back. 385 pages.australia 1850-1950, glover i, tatura -
 Ballarat Tramway Museum
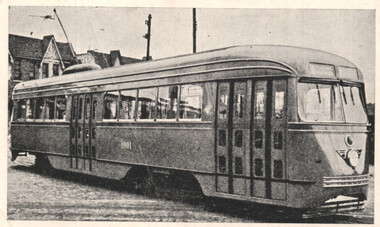
Photograph - PCC tram 1001, c1936
... The tram itself is now part of the collection of The Shore Line Trolley Museum, East Have CT. Melbourne Tram 980 was built using the PCC technology....The tram itself is now part of the collection of The Shore Line Trolley Museum, East Have CT. Melbourne Tram 980 was built using the PCC technology. ...Wal Jack collected tramway and railway items for his collection. This illustration of the first production President's Conference Committee (USA Transit operators) of 1936, built for the Brooklyn & Queens Transit Corporation. See reference for the background. The tram itself is now part of the collection of The Shore Line Trolley Museum, East Have CT. Melbourne Tram 980 was built using the PCC technology.Demonstrates a Tram that would have interested Wal Jack.Printed illustration of Brooklyn & Queens No. 1001 - the first production PCC Carletter, wal jack, pcc trams, usa, brooklyn -
 Puffing Billy Railway
NKS Trolly Motor Transporting Box
... NKS Trolley Motor Transporting Box A wooden box used for transporting the engines of the Gangers trolleys between the line in use and the Workshops at Spotswood. ...Puffing Billy Railway 1 old monbulk road Belgrave yarra-valley-and-the-dandenong-ranges NKS Trolley Motor Transporting Box A wooden box used for transporting the engines of the Gangers trolleys between the line in use and the Workshops at Spotswood. ...NKS Trolley Motor Transporting Box A wooden box used for transporting the engines of the Gangers trolleys between the line in use and the Workshops at Spotswood. Engines were often changed over due to mechanical failure or being required for a service. Rather than send the complete trolley in for work, the engine was removed and transported. These boxes may have arrived at a location with an engine in it, to replace the one returning to the Workshops, cutting down the time that the trolley may have been out of use. Historic - Victorian Railways - Permanent Way and Works - track equipment - NKS Trolly Motor Transporting BoxNKS Trolly Motor Transporting Box - two boxes made of timber with wrought iron fittings puffing billy, nks trolley motor transporting box, trolly, trolley -
 Lakes Entrance Historical Society
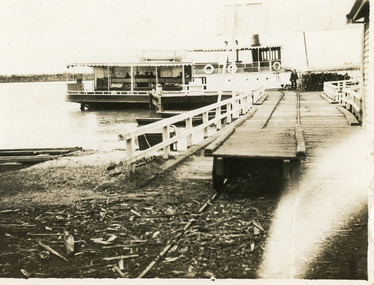
Photograph - SS Dargo, 1919 c
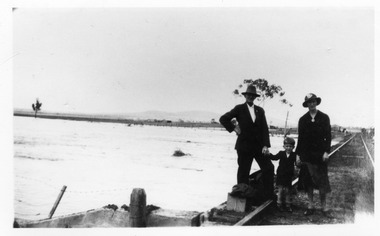
... The jetty has a trolley on a tram line for carrying goods and a pile of wood on the far end for the steamer's boilers. ...The jetty has a trolley on a tram line for carrying goods and a pile of wood on the far end for the steamer's boilers. ...Black and white photograph showing steamer Dargo tied up at Kalimna Jetty. The jetty has a trolley on a tram line for carrying goods and a pile of wood on the far end for the steamer's boilers. A few travellers are on board and a man in uniform, possibly the skipper, next to the wood pile. Back of a sign visible across the jetty from the end of the shed on right. Lakes Entrance Victoria'Dargo' Kalimna Jetty 1919? (on back)jetties, ships and shipping -
 Melbourne Tram Museum
Ephemera - Ticket/s, The Met, Set of 15 Metcard tickets, 2000
... All of the tickets appear to have been used. .1 - Millennium Metcards cartoon by Ron Tandberg (3 copies) .2 - Melbourne Comedy Festival - Matt Golding cartoon - estimated travel time (3 copies) .3 - standard Metcard (3 copies) .4 - Millennium Metcards cartoon by Peter Nicholson (3 copies) .5 - Metcard featuring a stylised image of the Sidney Myer Music Bowl (3 copies) .6 - ditto of Luna Park (4 copies) .7 - ditto Melbourne Exhibition Centre (3 copies) .8 - as for 2 - but with a fish line - trolley wire - theme. ( 3 copies) .9 - featuring Melbourne food. ( see also Reg Item 1466 for the same theme) .10 - Metcard featuring a stylised image of the Flinders St Station (3 copies) .11 - Melbourne Comedy Festival - Matt Golding cartoon - Metcard Machine tapping his foot (3 copies) .12 - ditto - Metcard Machine following a passenger onto a train (3 copies) .13 - ditto - Metcard Machine and an ATM ( 3 copies) .14 - Millennium Metcard - cartoon by John Spooner (3 copies) .15 - ditto - cartoon by Mark Knight. ( 3 copies) See also Reg item 1465 for other cartoons cards. ...All of the tickets appear to have been used. .1 - Millennium Metcards cartoon by Ron Tandberg (3 copies) .2 - Melbourne Comedy Festival - Matt Golding cartoon - estimated travel time (3 copies) .3 - standard Metcard (3 copies) .4 - Millennium Metcards cartoon by Peter Nicholson (3 copies) .5 - Metcard featuring a stylised image of the Sidney Myer Music Bowl (3 copies) .6 - ditto of Luna Park (4 copies) .7 - ditto Melbourne Exhibition Centre (3 copies) .8 - as for 2 - but with a fish line - trolley wire - theme. ( 3 copies) .9 - featuring Melbourne food. ( see also Reg Item 1466 for the same theme) .10 - Metcard featuring a stylised image of the Flinders St Station (3 copies) .11 - Melbourne Comedy Festival - Matt Golding cartoon - Metcard Machine tapping his foot (3 copies) .12 - ditto - Metcard Machine following a passenger onto a train (3 copies) .13 - ditto - Metcard Machine and an ATM ( 3 copies) .14 - Millennium Metcard - cartoon by John Spooner (3 copies) .15 - ditto - cartoon by Mark Knight. ( 3 copies) See also Reg item 1465 for other cartoons cards. ...Set of 15 Metcard tickets, used during the Metcard era. Has the Metcard logo on it, along with other Metcard, information. All of the tickets appear to have been used. .1 - Millennium Metcards cartoon by Ron Tandberg (3 copies) .2 - Melbourne Comedy Festival - Matt Golding cartoon - estimated travel time (3 copies) .3 - standard Metcard (3 copies) .4 - Millennium Metcards cartoon by Peter Nicholson (3 copies) .5 - Metcard featuring a stylised image of the Sidney Myer Music Bowl (3 copies) .6 - ditto of Luna Park (4 copies) .7 - ditto Melbourne Exhibition Centre (3 copies) .8 - as for 2 - but with a fish line - trolley wire - theme. ( 3 copies) .9 - featuring Melbourne food. ( see also Reg Item 1466 for the same theme) .10 - Metcard featuring a stylised image of the Flinders St Station (3 copies) .11 - Melbourne Comedy Festival - Matt Golding cartoon - Metcard Machine tapping his foot (3 copies) .12 - ditto - Metcard Machine following a passenger onto a train (3 copies) .13 - ditto - Metcard Machine and an ATM ( 3 copies) .14 - Millennium Metcard - cartoon by John Spooner (3 copies) .15 - ditto - cartoon by Mark Knight. ( 3 copies) See also Reg item 1465 for other cartoons cards. Additional copies added 3/5/16 from donation of G. Warburton - see Reg Item 1463.1 for other examples and details of donation.trams, tramways, tickets, metlink, metcard, luna park, cartoons, flinders st station -
 Charlton Golden Grains Museum Inc
Photograph - 1939 Marmal Creek flooded
... The Marmal Creek was a rageing stream a mile wide and caused damage to the railway line. Passengers travelled by motor trolley from Barrakee to Charlton. ...The Marmal Creek was a rageing stream a mile wide and caused damage to the railway line. Passengers travelled by motor trolley from Barrakee to Charlton. ...Easter 1939. The photo has the Barrakee station in the background. Photo is of the flooded Marmal Creek at Barrakee railway station. George Howell and visitors walked home from the station as it was the only course available. The Marmal Creek was a rageing stream a mile wide and caused damage to the railway line. Passengers travelled by motor trolley from Barrakee to Charlton. The photo was taken by the Howell family. Black and white original photo. -
 Otway Districts Historical Society
Photograph, R. Preston, Trolleying to work site, 1955, 14 December 1955
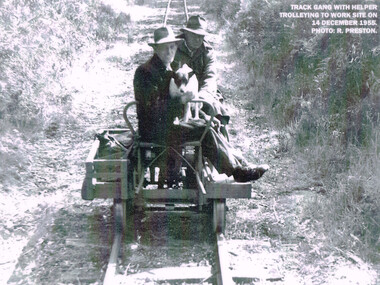
... line closed. Beech Forest; railways; track gang; A railway track gang, with helper, trolleying to a work site, on 14 December, 1955. ...At its peak the Beech Forest railway employed more than 21 staff between Colac and Crowes. Gangers (men in charge of the track gangs) tended to be promoted into the Otways but many of their subordinate repairers were local recruits. A few of the men who worked in the original construction gangs of 1900-1902 remained and obtained positions in the track gangs along the line. The track was maintained by seven three-man gangs based at Colac, Barongarook, Gellibrand, Banool, Beech Forest (2), and Lavers Hill. However, track gangs lessened as the line shortened. After 1954, the sole surviving track gang, in charge of Paddy Balcombe, stayed until the line closed.A railway track gang, with helper, trolleying to a work site, on 14 December, 1955.beech forest; railways; track gang; -
 Otway Districts Historical Society
Photograph, Albert Denning, Colac track gang near Kawarren, c.1950
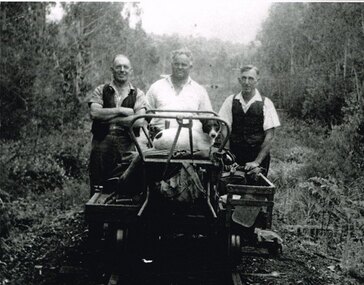
... line. colac; kawarren; railways; track gangs; B/W. 201mm x 254mm. In c.1950, the Colac track gang near Kawarren, featuring, from left to right, Bill Jamieson, Albert Denning, and Don Loury on an NKS motor trolley.. ...In 1955 staff numbers were reduced to an absolute minimum with one track gang at Beech Forest and one at Colac, one of whose members resided at Gellibrand. No new sleepers were issued to the track gangs after 1955/56, cut down ones being used instead. Albert Denning, the son of a Gellibrand selector, worked at Driver's planing mill and Hitt's Lardner mill before joining Victorian Railways in 1928 as an engine cleaner at Beech Forest and Crowes, the last one in both places. He later became a track repairer at Gellibrand and worked with this and the Colac track gang until 1962. Bill Jamieson was a track repairer on the Colac-Gellibrand gang from the 1950s until 1962, and witnessed the official policy of minimum maintenance in the last years of the line.B/W. 201mm x 254mm. In c.1950, the Colac track gang near Kawarren, featuring, from left to right, Bill Jamieson, Albert Denning, and Don Loury on an NKS motor trolley..colac; kawarren; railways; track gangs; -
 Otway Districts Historical Society
Photograph, Lavers Hill: Train and repair gang, 1913, 1913
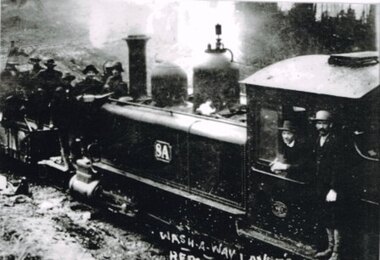
... For two years after the opening of the Colac-Beech Forest railway line trains were preceded by a ganger on a trolley to ensure no landslips or wash-a-ways created a danger to the trains. ...Otway Districts Historical Society Cliff Young Drive Beech Forest great-ocean-road For two years after the opening of the Colac-Beech Forest railway line trains were preceded by a ganger on a trolley to ensure no landslips or wash-a-ways created a danger to the trains. ...For two years after the opening of the Colac-Beech Forest railway line trains were preceded by a ganger on a trolley to ensure no landslips or wash-a-ways created a danger to the trains. Afterwards the trains continued on their own. The line was built as cheaply as possible, "a mere skeleton of a railway" as one Victorian Railways spokesperson commented. With earthworks specified to the bare minimum landslips in the cuttings and wash-a-ways in sloping areas were always a problem, particularly in the early years before the works had time to settle. The line to Crowes was built to open in 1911 and a wash-a-way between Lavers Hill and Crowes was only to be expected. B/W. 8A locomotive, with driver and fireman, and a mounted repair gang attending a wash-a-way just past Lavers Hill in 1913.183mm x 260mm print. -
 Otway Districts Historical Society
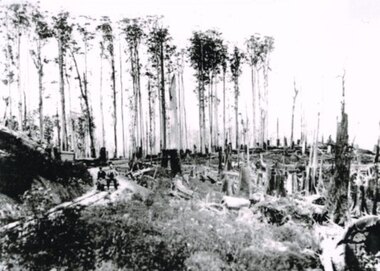
Photograph, Near Weeaproinah (Dinmont) railway station, 1907, 1907
... Note the trolley with two men aboard following the line on the left-hand side....Note the trolley with two men aboard following the line on the left-hand side. ...Photograph, B/W, A4. Near the Weeaproinah railway station (later known as Dinmont railway station) in 1907. Note the trolley with two men aboard following the line on the left-hand side.weeaproinah; dinmont; railways; -
 Bendigo Historical Society Inc.
Slide - DIGGERS & MINING. DIGGERS AND MINERS, c1850s
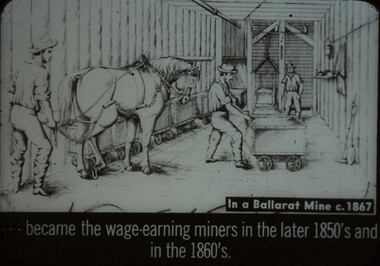
... Slide shows what appears to be the room that the rock is raised up into, and and then carted off in the mine trolleys by the horse (in this case). Walls and ceiling are lined with timber. ...Slide shows what appears to be the room that the rock is raised up into, and and then carted off in the mine trolleys by the horse (in this case). Walls and ceiling are lined with timber. ...Diggers & Mining. Diggers and miners. In a Ballarat Mine c. 1867. - - - Became the wage-earning miners in the later 1850's and in the 1860's. Slide shows what appears to be the room that the rock is raised up into, and and then carted off in the mine trolleys by the horse (in this case). Walls and ceiling are lined with timber. Floor has either timber or rock laid on it. Markings: 31 994:LIF I. Used as a teaching aid.hanimounteducation, tertiary, goldfields -
The Ed Muirhead Physics Museum
Photograph, Cyclotron accelerator
... Sticky typed labels on back from top and left to right: “GENERAL VIEW SHIELDING CAN & DEE LINE ASSEMBLY, FINAL AMP RAILS, TROLLEY RAILS” Handwritten on back bottom left corner in pen: “Dee line + Dee”...Sticky typed labels on back from top and left to right: “GENERAL VIEW SHIELDING CAN & DEE LINE ASSEMBLY, FINAL AMP RAILS, TROLLEY RAILS” Handwritten on back bottom left corner in pen: “Dee line + Dee” Black and white photo of cyclotron (nuclear physics accelerator): dee line & dee Photograph, Cyclotron accelerator, ...Builit in 1950s and used till the mid 1970s within the Physics Department used in Melbourne. John Rouse and David Caro was involved in the construction.Black and white photo of cyclotron (nuclear physics accelerator): dee line & deeSticky typed labels on back from top and left to right: “GENERAL VIEW SHIELDING CAN & DEE LINE ASSEMBLY, FINAL AMP RAILS, TROLLEY RAILS” Handwritten on back bottom left corner in pen: “Dee line + Dee” -
 Ballarat Tramway Museum
Document - Training, "Safety First - Section 1", c1974
... Document retyped from possibly an SECV training document titled "Safety First" outlining tram driving safety practices, awareness for motormen, electrical aspects, tram circuits, line breakers, insulated trams, trolley poles, light bulbs, broken trolley wires and fallen wires around trams. ...Ballarat Tramway Museum South Gardens Reserve Wendouree Parade Ballarat Ballarat goldfields Document retyped from possibly an SECV training document titled "Safety First" outlining tram driving safety practices, awareness for motormen, electrical aspects, tram circuits, line breakers, insulated trams, trolley poles, light bulbs, broken trolley wires and fallen wires around trams. ...Document retyped from possibly an SECV training document titled "Safety First" outlining tram driving safety practices, awareness for motormen, electrical aspects, tram circuits, line breakers, insulated trams, trolley poles, light bulbs, broken trolley wires and fallen wires around trams. Section 2 - "instructions to be Observed by members and workers working on track maintenance". Possibly prepared for use by the BTPS, c1974.Demonstrates a Safety document for use by tramway crews and workers.Document - typed 6 Quarto pages - original.tramways, tramcars, operations, passenger services, ballarat, training -
 Ballarat Tramway Museum
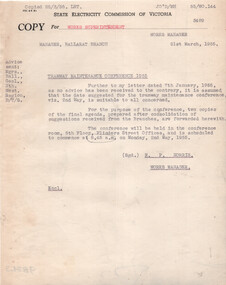
Administrative record, State Electricity Commission of Victoria (SECV), "Notes for 5th Annual Conference", 1955
... The typed foolscap sheet dated 5/5/1955 from the Works Supt to the Depot Foreman referring matters that require early attention - such as sponges, traction lamps, 22E brake gear, trolley wheel pressure, and survey of the Sebastopol line....The typed foolscap sheet dated 5/5/1955 from the Works Supt to the Depot Foreman referring matters that require early attention - such as sponges, traction lamps, 22E brake gear, trolley wheel pressure, and survey of the Sebastopol line. Yields information and demonstrates SEC Meeting minutes about discussions between the three Provincial operators about tramcars and operations. ...Set of notes for the Provincial Tramways Maintenance meeting to be held in Melbourne - 2/5/1955. Has a summary of actions from the 1953 (item 8057) and 1954 (item 9029) conferences. Second item is a memo regarding the date of the conference, dated 21/3/1955 and signed by P P Norris Works Manager. The typed foolscap sheet dated 5/5/1955 from the Works Supt to the Depot Foreman referring matters that require early attention - such as sponges, traction lamps, 22E brake gear, trolley wheel pressure, and survey of the Sebastopol line.Yields information and demonstrates SEC Meeting minutes about discussions between the three Provincial operators about tramcars and operations.Twenty foolscap typed sheets stapled in a landscape format to a folded manila card, a typed quarto sheet and a typed loose foolscap sheet.secv, ballarat, trams, tramways, minutes, sec, geelong, bendigo, tramcar equipment, maintenance, trackwork, trolley wheels, motors, maximum traction, employees, lamps, cleaning -
 Ballarat Tramway Museum
Album - Postcards & Photographs - Vic Solomons and others - Australian Tramways, Vic Solomons, 2023
... Trolley bus No. 14 Unknown Sydney 171 Photo Newcastle Railway Station with steam tram - Wharf Road?? Unknown Newcastle 172 Photo High St West Maitland - steam tram Unknown Maitland 173 Photo High St West Maitland - steam tram Unknown Maitland 174 Post Card Argent St near tram terminal Broken Hill NSW c1900 Broken Hill 175 postcard Argent St looking south Broken Hill - with Ken Magor's notes on rear Unknown Broken Hill 176 Photo Toronto - steam tram 61A Unknown Toronto 177 Photo 124A trial run 1911? Sutherland - Cronulla line...Australia tramways postcards photographs steam trams horse trams cable trams trolley buses Album - heavy card covers, plastic lined with postcard or 6x4 photo sleeves. ...Contains 184 images of postcards and photographs collected primarily by Vic Solomons of Sydney, with others from the collection of Wal Jack and Warren Doubleday. Covers almost all of Australia's tramway systems. 1 Post Card Hay St Perth Looking East No 3 Unknown Perth 2 Post Card Cars 30 & 90 both on Route 19 pass in Barrack St looking South Perth WA 1935.02.18 Perth 3 Post Card Hay St Looking East Perth WA Unknown Perth 4 Post Card William St Perth WA Unknown Perth 5 Post Card Perth from Shaftsbury Hotel Unknown Perth 6 Post Card Hay St Perth WA Looking East Unknown Perth 7 Post Card Barrack St Perth Unknown Perth 8 Post Card Murray Views No 3 High St Showing Town Hall Fremantle WA Unknown Fremantle 9 Post Card High St Fremantle WA Unknown Fremantle 10 Post Card View of Bolder City Golden Mile in the Background (Section No 1) 1908.08.20 Kalgoolie 11 Post Card Hannan St Kalgoolie 1900.08.19 Kalgoolie 12 Post Card Hannan St Kalgoolie WA (No 2) Unknown Kalgoolie 13 Post Card Intersection Hannan & Maritana Sts Kalgoolie WA Unknown Kalgoolie 14 Post Card Hannan St Kalgoolie Unknown Kalgoolie 15 Post Card Lane Street Bolder City Unknown Kalgoolie 16 Post Card Hobart Double Deck Tram Unknown Hobart 17 Post Card Macquarie St Hobart Unknown Hobart 18 Photo Liverpool Street Hobart Unknown Hobart 19 Photo Hobart 21 Unknown Hobart 20 Photo Hobart 14 in Elizabeth St Hobart Unknown Hobart 21 Post Card Macquarie St Hobart Unknown Hobart 22 Post Card Macquarie St Hobart Tas Unknown Hobart 23 Photo Double Decker Tram 3 at G.P.O. Hobart Tas No 31 Unknown Hobart 24 Post Card Double Decker Tram 19 Hobart Tas A B Series No 24 Unknown Hobart 25 Photo Hobart Municipal Tramways Tas No 95 Unknown Hobart 26 Post Card Elizabeth St Hobart Unknown Hobart 27 Post Card Elizabeth St Hobart Unknown Hobart 28 Post Card Elizabeth St Hobart Unknown Hobart 29 Post Card Elizabeth St Hobart Tas Unknown Hobart 30 Post Card HMT 21 with crew at Beach Road Terminus Unknown Hobart 31 Post Card HMT 9 & another with crew at Beach Road Terminus. Front cover photo of Destination GPO 1921.01.00 Hobart 32 Post Card Cascade Road and Mount Wellington Hobart Unknown Hobart 33 Post Card Elizabeth St Hobart Unknown Hobart 34 Post Card Elizabeth St Hobart Unknown Hobart 35 Post Card Elizabeth St Hobart 1915.04.07 Hobart 36 Post Card Macquarie St Hobart Tas Unknown Hobart 37 Post Card Macquarie St showing Post Office Hobart 1908.03.12 Hobart 38 Post Card Hobart Municipal Tramways 21 Unknown Hobart 39 Post Card Elizabeth St Hobart Tas Unknown Hobart 40 Post Card Liverpool Street Hobart Unknown Hobart 41 Post Card Electric Tram Launceston Tas 446 W J Little Photo 1919.02.08 Launbceston 42 Post Card Launceston Tram no 3 1911.08.30 Launbceston 43 Post Card Launceston Tram no 3 passes tram No 1 Unknown Launbceston 44 Post Card Tram 6 at Trevallyn a popular suburb Launceston Tasmania Unknown Launbceston 45 Post Card Tram 7 at Trevallyn Road Terminus Launceston Tasmania Unknown Launbceston 46 Post Card Tram 4 in Brisbane St Launceston Unknown Launbceston 47 Post Card Tram 9 in Brisbane St Launceston Tasmania Unknown Launbceston 48 Post Card Camerom Street Launceston Tasmania Unknown Launbceston 49 Post Card Murray Views No 15 Jetty Road Glenelg Terminus 1962-02-08 Adelaide 50 Post Card Bay Tram at Jetty Road Terminus Glenelg SA Unknown Adelaide 51 Post Card Tram 3 in King William Street Adelaide S Aust Unknown Adelaide 52 Post Card Valentine Series No 3065 The Old Horse Tram Victor Harbour Unknown Victor Harbour 53 Post Card Bourke Street Melbourne with Cable Car Looking East 1904.04.25 Melbourne 54 Post Card Opening of New Electric Tramway Elsternwick 1913-11-13 Melbourne 55 Post Card Cable trams in Clarendon St Sth Melb Unknown Melbourne 56 Post Card Pall Mall from Charing Cross Bendigo Unknown Bendigo 57 Post Card Tram 4 & 7 pass at The Fountain and Mitchell Street Bendigo Vic Rose Series P 3198 Unknown Bendigo 58 Post Card M&MTB 133 at Charing Cross bound for Eaglehawk Bendigo Vic Murray Views No 45 Unknown Bendigo 59 Post Card Pall Mall Bendigo Vic Unknown Bendigo 60 Post Card Charing Cross & Mitchell St Bendigo Trams passing 1919.00.00 Bendigo 61 Post Card Pall Mall Looking East Unknown Bendigo 62 Post Card Electric Trams and City Hotel Bendigo Vic Unknown Bendigo 63 Post Card Moorabool Street Geelong V 23 Unknown Geelong 64 Post Card Murray Views No 3 Moorabool Street Geelong Vic Unknown Geelong 65 Post Card The Rose Series P 2487 Ryrie Street Geelong Vic Unknown Geelong 66 Post Card Southern Cross Series 2696 Ryrie Stret Geelong Vic Unknown Geelong 67 Post Card The Rose Series P 1490 Ryrie Street Geelong Vic 1920-03-04 Geelong 68 Post Card Valentine Series No 1568 Lower Sturt Street Ballarat Unknown Ballarat 69 Post Card Rose Series P 1710 Sturt Street Ballarat Victoria Unknown Ballarat 70 Post Card Sturt Street Ballarat Victoria Unknown Ballarat 71 Post Card Horse Tram In Sturt Street Ballarat 1905.11.10 Ballarat 72 Post Card Sturt Street Ballarat Looking North-West Unknown Ballarat 73 Post Card Shoppes Square Sturt Street Ballarat Looking North Unknown Ballarat 74 Post Card Junction Sturt and Lydiard Streets Ballarat 1909-09-01 Ballarat 75 Post Card The Electric Supply Co Souvenir Tram Ticket No 3085of the opening of Electric System August 18 1905 1905.08.18 Ballarat 76 Post Card Sturt Street Ballarat Victoria 1907.11.25 Ballarat 77 Post Card Off to the Gardens Electric Tram Ballarat Unknown Ballarat 78 Post Card Sturt Street Ballarat 1907.04.16 Ballarat 79 Post Card Sturt Street Ballarat Looking East Electric tram with Double Deck Trailer 1911.04.17 Ballarat 80 Post Card Sturt Street Ballarat Looking East Unknown Ballarat 81 Post Card Sturt Street Ballarat Looking West 1911.03.01 Ballarat 82 Post Card Town Hall and Sturt Street Ballarat Unknown Ballarat 83 Post Card Lydiard Street Ballarat 1906.11.23 Ballarat 84 Post Card Looking North along Adelaide Street from George Street Brisbane Sidues Series No 764 Unknown Brisbane 85 Post Card Looking South along Queen Street from the Creek Street Intersection Brisbane Qld Sirues Series No 1379 Unknown Brisbane 86 Post Card George Street from near Supreme Court Brisbane Unknown Brisbane 87 Post Card Queen and Eagle Streets Brisbane 1907.07.04 Brisbane 88 Post Card Queen Street showing His Majesty’s Theatre Brisbane Unknown Brisbane 89 Post Card Queen Street Treasury Building 1908.01.20 Brisbane 90 Post Card G P O and Queen Street Brisbane Unknown Brisbane 91 Post Card Queen Street Brisbane Looking from Wharf Street Unknown Brisbane 92 Post Card Customs House Brisbane 1905.02.16 Brisbane 93 Post Card Queen St Brisbane 1905.09.16 Brisbane 94 Post Card Queen St Brisbane 1907.11.19 Brisbane 95 Post Card Treasury Buildings Brisbane Unknown Brisbane 96 Post Card Queen and Eagle Streets Brisbane Unknown Brisbane 97 Post Card The Valley Corner Brisbane Unknown Brisbane 98 Post Card Brisbane Queen Street opposite General Post Office Unknown Brisbane 99 Post Card North Quay and Milton Beach Brisbane Q Unknown Brisbane 100 Post Card Victoria Bridge Brisbane South Side 1907.08.14 Brisbane 101 Post Card Victoria Bridge Brisbane Unknown Brisbane 102 Post Card Breakfast Creek Bridge Brisbane Q Unknown Brisbane 103 Post Card Melbourne Street Station South Brisbane Queensland Unknown Brisbane 104 Post Card General Post Office Queen Street Brisbane 1955.09.23 Brisbane 105 Post Card Customs House Brisbane 1904.11.04 Brisbane 106 Post Card Queen St Brisbane 1919.11.00 Brisbane 107 Post Card Queen St Brisbane Sidues Series No 627 Unknown Brisbane 108 Post Card Creek Street Brisbane Queensland Unknown Brisbane 109 Post Card Customs House and Garden Reach Brisbane Queensland 1910.00.08 Brisbane 110 Post Card Queen and Creek Streets Brisbane 1909.06.07 Brisbane 111 Post Card Queensland National Bank andd Queen Street Brisbane Queensland Unknown Brisbane 112 Post Card Queen Street and Treasury Buildings Brisbane 0000.09.07 Brisbane 113 Post Card Queen Street showing “Courier” Buildings Brisbane Unknown Brisbane 114 Post Card Intersection George & Roma Streets Brisbane Q 1916.05.11 Brisbane 115 Post Card Adelaide Street Brisbane Q Unknown Brisbane 116 Post Card G P O Queen Street Brisbane Q Unknown Brisbane 117 Post Card Treasury Building Brisbane 1906.03-20 Brisbane 118 Post Card Queen and Eagle Streets Brisbane 1907.02.01 Brisbane 119 Post Card Queen St Brisbane Unknown Brisbane 120 Post Card Queen St Brisbane Q Unknown Brisbane 121 Post Card Victoria Bridge Brisbane 1906.07.30 Brisbane 122 Post Card An Unusual View showing Head of Queen Street Victoria Bridge & South SideSuburbs Brisbane Q Unknown Brisbane 123 Post Card Petries Bight Brisbane Q Unknown Brisbane 124 Post Card South End Victoria Bridge Brisbane Q Unknown Brisbane 125 Post Card Customs House Brisbane Unknown Brisbane 126 Post Card Photo of toastrack car circa 1910 Unknown Brisbane 127 Post Card Treasury Buildings Brisbane Unknown Brisbane 128 Post Card East Street Rockhampton with Steam Tram & trailer Unknown Rockhampton 129 Post Card Post Office Rockhampton with steam tram Unknown Rockhampton 130 Post Card East Street Rockhampton with Steam Trams Rose Series P 7154 Unknown Rockhampton 131 Post Card William Street Rockhampton Rose Series P 7156 Unknown Rockhampton 132 Post Card Central East Street Rockhampton Q with Steam Trams Unknown Rockhampton 133 Photo Sturt St Ballarat Unknown Ballarat 134 Photo Bridge Street Ballarat Unknown Ballarat 135 Post Card George St Sydney Unknown Sydney 136 Post Card Elizabeth St Sydney Unknown Sydney 137 Post Card Railway Square Unknown Sydney 138 Post Card Sydney Harbor Bridge - pending receipt 139 Post Card Kings Cross - Mowbray Series with description on rear from C Roy G Field Unknown Sydney 140 Post Card Kings Cross - Mowbray Series with description on rear from C Roy G Field Unknown Sydney 141 Post Card Central Railway Station Sydney - Rose Series P6033 1954-01-26 Sydney 142 Post card William Street Darlinghurst looking towards City - Rose Series P6602 unknown Sydney 143 Post Card Circular Quay Sydney - Rose Series P6680 Unknown Sydney 144 Post Card View at Manly NSW - Rose Series B1003 Unknown Sydney 145 Post Card Hunter St Newcastle NSW - Rose Series P7843 Unknown Newcastle 146 Post Card Bank Corner Newcastle NSW - Mowbray Series No. 155 Unknown Newcastle 147 Post Card Hunter St Newcastle NSW Unknown Newcastle 148 Post Card Criterion Hotel Hunter St Newcastle NSW Unknown Newcastle 149 Photo Horse tram at Newtown Station 1894 to 1898 - PTC photo c1894 Newtown 150 Photo Steam tram motor No 3 at Railway Square 1879 1879 Sydney 151 Photo Railway steam tram c1900 with a horse drawn double deck bus c1900 Sydney 152 Photo Steam motor 5A and doubled deck bus Unknown Sydney 153 Photo Steam motor 53A with detail notes on rear 1922 Sydney 154 Photo Cable tram set at Milsons Point ferry terminal c1900 Sydney 155 Photo Early Sydney electric car - Ocean St - Rose Bay Unknown Sydney 156 Photo George St looking souoth c1905 c1905 Sydney 157 Photo Tram 165 at Circular Quay Unknown Sydney 158 Photo Tramcar ferry or transporter at The Spit Unknown Sydney 159 Photo tram 882 George St at Marti Place, 1937 1937 Sydney 160 Photo Tram 826 Railway Sq area Unknown Sydney 161 Photo Railway Sq in background, Broadway with double decker bus and toastrack car late 1930s Sydney 162 Photo Coupled St Pitt St? - photo Ben Parle Feb. 1950 Sydney 163 Photo Electric tram No. 2 - North Sydney with side trolley pole running Unknown Sydney 164 Photo George St - Horden's Corner Unknown Sydney 165 Photo George St at Martin Place c1920 Sydney 166 Photo Castlereagh St Sydney c1928 c1928 Sydney 167 Photo Railway Sqare c1920 c1920 Sydney 168 Photo Darling St Countereweight Unknown Sydney 169 Photo Trolley bus depot Unknown Sydney 170 Photo Trolley bus No. 14 Unknown Sydney 171 Photo Newcastle Railway Station with steam tram - Wharf Road?? Unknown Newcastle 172 Photo High St West Maitland - steam tram Unknown Maitland 173 Photo High St West Maitland - steam tram Unknown Maitland 174 Post Card Argent St near tram terminal Broken Hill NSW c1900 Broken Hill 175 postcard Argent St looking south Broken Hill - with Ken Magor's notes on rear Unknown Broken Hill 176 Photo Toronto - steam tram 61A Unknown Toronto 177 Photo 124A trial run 1911? Sutherland - Cronulla line 1911 Sutherland 178 Photo 103A at a tram stop Unknown Sydney 179 Photo Cable tram set at Crows Nest terminus grip car 12, trailer 22 Unknown Sydney 180 Photo Cable tram Queens Square Sydney 1903 Sydney 181 Photo cars 2078 and 2077 Chatswood late 1950s Sydney 182 Photo car 1877 Balmain area late 1950s Sydney 183 Photo Trolley bus - Rockdale destination Late 1950s Sydney 184 Photo Broken Hill steam tram - motor 18A North Tram Unknown Broken Hill 185 Photo Millars Point Sydney NSW - ferry/tram interchange, unknown Sydney All items imaged including the rear or back where there was writing of information. All files stored on the Museum's Photo Collections directory. Demonstrates through the medium of many images, Australian tramway systems and Ballarat's place in them.Album - heavy card covers, plastic lined with postcard or 6x4 photo sleeves.australia, tramways, postcards, photographs, steam trams, horse trams, cable trams, trolley buses -
 Ballarat Tramway Museum
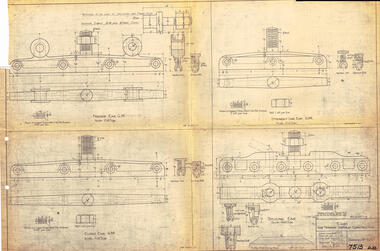
Drawing, Victorian Railways (VR), Ears for Tramway Overhead Construction, 1924
... trolley wire in position. Notes that the drawing was traced in 1924 from a MMTB drawing. Has details for a splicing ear, straight line ear. feeder ear and curve ear along with details for nuts and screws....trolley wire in position. Notes that the drawing was traced in 1924 from a MMTB drawing. Has details for a splicing ear, straight line ear. feeder ear and curve ear along with details for nuts and screws. ...Gives the design details of the device or fitting known as a trolley wire ears that holds a tramway copper trolley wire in position. Notes that the drawing was traced in 1924 from a MMTB drawing. Has details for a splicing ear, straight line ear. feeder ear and curve ear along with details for nuts and screws.Yields information about the design of four different types of trolley wire fittings and how they were fabricated for use on the two tram lines, or electric street railways operated by the Victorian Railways.Dyeline print of Victorian Railways drawing number 4057 - Ears for Tramway Overhead ConstructionHas number "7513 D.33" in black pen in bottom right hand corner.tramways, trams, overhead, victorian railways, trolley wire, engineering, electrical engineering -
 Ballarat Tramway Museum
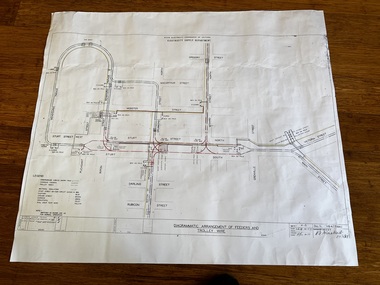
Drawing - VB4/7184C, State Electricity Commission of Victoria - Ballarat office, "Diagrammatic Arrangement of Feeders and Trolley Wire", 2-9-1958
... Print of drawing number VB4/7184C "Diagrammatic Arrangement of Feeders and Trolley Wire", marked up in colour showing the various feeder and trolley wire arrangements for the central part of Ballarat and the Gardens line. ...Ballarat Tramway Museum South Gardens Reserve Wendouree Parade Ballarat Ballarat goldfields Print of drawing number VB4/7184C "Diagrammatic Arrangement of Feeders and Trolley Wire", marked up in colour showing the various feeder and trolley wire arrangements for the central part of Ballarat and the Gardens line. ...Print of drawing number VB4/7184C "Diagrammatic Arrangement of Feeders and Trolley Wire", marked up in colour showing the various feeder and trolley wire arrangements for the central part of Ballarat and the Gardens line. Shows the detailed switch locations that enable the overhead to be isolated or changed when electrical work was being undertaken on the overhead that required it to be isolated. Shows how the various sections were fed from the power station. Revision C issued 2-9-1958.Yields information about the arrangement of the power supply to the trams from the power station and changes made to the system about 13 years prior to closure. Dyeline print on white paper of Drawing - "Diagrammatic Arrangement of Feeders and Trolley Wire" - VB4/7184Ctramways, ballarat, secv, trolley wire, feeder cables, overhead, power station, electrical engineering, electrical switching -
 Ballarat Tramway Museum
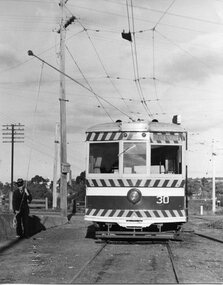
Photograph - Black & White Photograph/s, Chris Wurr, early 1970's
... Ballarat Tramway Museum South Gardens Reserve Wendouree Parade Ballarat Ballarat goldfields Yields information about the appearance of Bendigo Birney trams early 1970's en route to North Bendigo and its tree lined streets. trams tramways Bendigo North Bendigo Overhead Birney tram 30 "Photo by Chris Wurr" stamped on the rear. Black and White Photograph of SEC Bendigo 30, Birney at North Bendigo terminus with the driver turning the trolley pole. ...Yields information about the appearance of Bendigo Birney trams early 1970's en route to North Bendigo and its tree lined streets.Black and White Photograph of SEC Bendigo 30, Birney at North Bendigo terminus with the driver turning the trolley pole. Tram has the destination of Golden Square. Photo shows the fitting in the overhead to help locate the trolley pole on the inbound wire. Photo Chris Wurr, early 1970's. "Photo by Chris Wurr" stamped on the rear.trams, tramways, bendigo, north bendigo, overhead, birney, tram 30 -
 Ballarat Tramway Museum
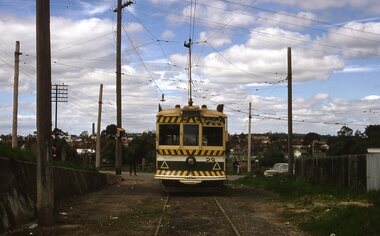
Photograph - Digital image Set of 11, Stuart Loddington, 10 images of Ballarat trams prior to closure, 1971
... (see also btm4976i4) .4 - No. 17 Wendouree Parade, near Gardens Loop .5 - Single truck tram at Victoria St terminus, taken from the west side of the Buninyong Rail line bridge, with CRB Roadwork sign, Eureka Caravan Park and Meagher Hotel in the background, possibly No. 11, see entry for .10 .6 - No. 12 and 30 crossing at the Urquhart St Loop, Drummond St South. .7 - No. 12 westbound in Sturt St, with Grenville St in the background. .8 - No. 17 at Gardens Loop with the Trolley pole being reversed. .9 - No. 30, Lydiard St North with Reid's Palace building in the background. .10 - No. 11 passing over the Buninyong rail line bridge, with Gardens via Sturt St West and a Twin Lakes sign. ...(see also btm4976i4) .4 - No. 17 Wendouree Parade, near Gardens Loop .5 - Single truck tram at Victoria St terminus, taken from the west side of the Buninyong Rail line bridge, with CRB Roadwork sign, Eureka Caravan Park and Meagher Hotel in the background, possibly No. 11, see entry for .10 .6 - No. 12 and 30 crossing at the Urquhart St Loop, Drummond St South. .7 - No. 12 westbound in Sturt St, with Grenville St in the background. .8 - No. 17 at Gardens Loop with the Trolley pole being reversed. .9 - No. 30, Lydiard St North with Reid's Palace building in the background. .10 - No. 11 passing over the Buninyong rail line bridge, with Gardens via Sturt St West and a Twin Lakes sign. ...Yields information about Ballarat Tramways and trams prior to the closure of the tramway system.Set of 11 digital images, comprising 1 donation text image and 10 images of Ballarat trams prior to closure, scanned from original slides by Stuart Lodington, 1971 prior to closure of the system. .1 - Donation text slide. .2 - No. 26 southbound in Lydiard St North, with the Ballarat Railway Station level crossing gates in the background. .3 - No. 27 and 30 crossing at Bell St Loop, Skipton St. (see also btm4976i4) .4 - No. 17 Wendouree Parade, near Gardens Loop .5 - Single truck tram at Victoria St terminus, taken from the west side of the Buninyong Rail line bridge, with CRB Roadwork sign, Eureka Caravan Park and Meagher Hotel in the background, possibly No. 11, see entry for .10 .6 - No. 12 and 30 crossing at the Urquhart St Loop, Drummond St South. .7 - No. 12 westbound in Sturt St, with Grenville St in the background. .8 - No. 17 at Gardens Loop with the Trolley pole being reversed. .9 - No. 30, Lydiard St North with Reid's Palace building in the background. .10 - No. 11 passing over the Buninyong rail line bridge, with Gardens via Sturt St West and a Twin Lakes sign. Has a number of children alongside the driver. .11 - No. 21 heading northbound in Wendouree Parade, Gardens, just to the north of the now BTM depot junction.trams, tramways, ballarat, level crossings, buninyong railway, lydiard st north, bell st, victoria st, wendouree parade, gardens, drummond st, sturt st, tram 26, tram 27, tram 30, tram 17, tram 12, tram 21, tram 11 -
 Ballarat Tramway Museum
Photograph - Digital image Set of 20, 1971-72
... The Tram has "Johnnie Walker whiskey" roof adverts. .6 - No. 29 outbound in Thunder St with a train passing over the bridge in the background. .7 - view from the front window of a tram on the Eaglehawk line with a large "display event float" in the foreground and tram approaching a crossing loop. .8 - No. 29 at North Bendigo .9 - view of High St Eaglehawk looking east from the terminus, showing the track and centre poles. .10 - No. 29 outbound on the North Bendigo line turning from either Nolan St or Caledonia St, running a special. .11 - No. 7 departing North Bendigo for Golden Square. .12 - No. 3 and 18 at Charing Cross. No. 3 has two SEC roof Advertisements .13 - No. 7 at North Bendigo with the trolley...The Tram has "Johnnie Walker whiskey" roof adverts. .6 - No. 29 outbound in Thunder St with a train passing over the bridge in the background. .7 - view from the front window of a tram on the Eaglehawk line with a large "display event float" in the foreground and tram approaching a crossing loop. .8 - No. 29 at North Bendigo .9 - view of High St Eaglehawk looking east from the terminus, showing the track and centre poles. .10 - No. 29 outbound on the North Bendigo line turning from either Nolan St or Caledonia St, running a special. .11 - No. 7 departing North Bendigo for Golden Square. .12 - No. 3 and 18 at Charing Cross. No. 3 has two SEC roof Advertisements .13 - No. 7 at North Bendigo with the trolley pole being reversed. .14 - No. 24 at Quarry Hill with Northern Terrazzo in the background with the driver alongside .15 - No. 7 and No.6 at Charing Cross with the Beehive buildings in the background. .16 - No. 7 at North Bendigo terminus .17 - ditto .18 - No. 24 at Quarry Hill with Northern Terrazzo in the background with the conductor alongside. .19 - ditto .20 - No. 26 and other bogie tram in View St near Charing Cross with the Armstrong Tyre Service building and signs for Cohn's Drinks and T&G in the view. ...Set of 20 digital images of Bendigo Tramways, 1972 at or before closure while on a tram tour by Stuart Lodington. .1 - No. 29 at the North Bendigo terminus .2 - No. 29 just past the Bendigo end of the double track in High St Eaglehawk, with a BP dealer in the background. .3 - Night photo of No. 18 at a terminus, showing "Eaglehawk" .4 - ditto .5 - Night photo of No. 24 at Eaglehawk with Leo A Hughes Photographer in the background. The Tram has "Johnnie Walker whiskey" roof adverts. .6 - No. 29 outbound in Thunder St with a train passing over the bridge in the background. .7 - view from the front window of a tram on the Eaglehawk line with a large "display event float" in the foreground and tram approaching a crossing loop. .8 - No. 29 at North Bendigo .9 - view of High St Eaglehawk looking east from the terminus, showing the track and centre poles. .10 - No. 29 outbound on the North Bendigo line turning from either Nolan St or Caledonia St, running a special. .11 - No. 7 departing North Bendigo for Golden Square. .12 - No. 3 and 18 at Charing Cross. No. 3 has two SEC roof Advertisements .13 - No. 7 at North Bendigo with the trolley pole being reversed. .14 - No. 24 at Quarry Hill with Northern Terrazzo in the background with the driver alongside .15 - No. 7 and No.6 at Charing Cross with the Beehive buildings in the background. .16 - No. 7 at North Bendigo terminus .17 - ditto .18 - No. 24 at Quarry Hill with Northern Terrazzo in the background with the conductor alongside. .19 - ditto .20 - No. 26 and other bogie tram in View St near Charing Cross with the Armstrong Tyre Service building and signs for Cohn's Drinks and T&G in the view.trams, tramways, bendigo, eaglehawk, quarry hill, golden square, depot, north bendigo, charing cross, tram 29, tram 18, tram 24, tram 3, tram 7, tram 6, tram 26 -
 Ballarat Tramway Museum
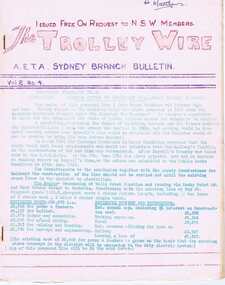
Magazine, Australian Electric Traction Association (AETA), "The Trolley Wire", Vol 2, No. 4, "The Trolley Wire", Vol 2, No. 5, "The Trolley Wire", Vol 2, No. 6, "The Trolley Wire", Vol 2, No. 7, "The Trolley Wire", Vol 2, No. 8, "The Trolley Wire", Vol 2, No. 9, 1953
... Has an editorial on Sydney transport, tramways and ferry connecting services in Sydney, Sydney news, introduction of electric trams into Sydney, Light St depot, Brisbane track layout, Sydney news, association news. 5686.4 - Spirit duplicated magazine, 9 quarto pages, single sided - " The Trolley Wire", Vol 1, No. 7, July 1953, stapled down along the left hand side. Has notes on replacement with buses on the Ryde line, tramways and ferry connecting services in Sydney, Sydney news, Honeysuckle Depot 1887, Iron Cove or Drummoyne Bridge, Sydney news, Association and Museum news. 5286.5 - Spirit duplicated magazine, 6 quarto pages, single sided - " The Trolley Wire", Vol 2, No. 8, August 1953, stapled down along the left hand side. ...Has an editorial on Sydney transport, tramways and ferry connecting services in Sydney, Sydney news, introduction of electric trams into Sydney, Light St depot, Brisbane track layout, Sydney news, association news. 5686.4 - Spirit duplicated magazine, 9 quarto pages, single sided - " The Trolley Wire", Vol 1, No. 7, July 1953, stapled down along the left hand side. Has notes on replacement with buses on the Ryde line, tramways and ferry connecting services in Sydney, Sydney news, Honeysuckle Depot 1887, Iron Cove or Drummoyne Bridge, Sydney news, Association and Museum news. 5286.5 - Spirit duplicated magazine, 6 quarto pages, single sided - " The Trolley Wire", Vol 2, No. 8, August 1953, stapled down along the left hand side. ...5686.1 - Spirit duplicated magazine, 8 quarto pages, single sided - " The Trolley Wire", Vol 2, No. 4, April 1953, stapled down along the left hand side. Has items on proposed tramway to Rockdale, map of the VR tramway to Brighton Beach, tramways and ferry connecting services in Sydney, Eastern Suburbs tramways, Sydney news, tram destination roll for Ashfield (1910), list of destination boards on Sydney steam trams. 5686.2 - Spirit duplicated magazine, 7 quarto pages, single sided - " The Trolley Wire", Vol 2, No. 5, May 1953, stapled down along the left hand side. Has notes on Tempe to Rockdale (map), tramways and ferry connecting services in Sydney, Rushcutters Bay depot track layout, opening dates of Sydney tramway extensions, Sydney news, association news and signs used on Sydney trams. 5686.3 - Spirit duplicated magazine, 7 quarto pages, single sided - " The Trolley Wire", Vol 2, No. 6, June 1953, stapled down along the left hand side. Has an editorial on Sydney transport, tramways and ferry connecting services in Sydney, Sydney news, introduction of electric trams into Sydney, Light St depot, Brisbane track layout, Sydney news, association news. 5686.4 - Spirit duplicated magazine, 9 quarto pages, single sided - " The Trolley Wire", Vol 1, No. 7, July 1953, stapled down along the left hand side. Has notes on replacement with buses on the Ryde line, tramways and ferry connecting services in Sydney, Sydney news, Honeysuckle Depot 1887, Iron Cove or Drummoyne Bridge, Sydney news, Association and Museum news. 5286.5 - Spirit duplicated magazine, 6 quarto pages, single sided - " The Trolley Wire", Vol 2, No. 8, August 1953, stapled down along the left hand side. Has notes on the commencement of electric trams in Sydney, Iron Cove or Drummoyne Bridge, Association and Museum news, map of Sydney electric lines in 1899 and opening dates of Sydney tramway extensions. 5286.6 - Spirit duplicated magazine, 6 quarto pages, single sided - " The Trolley Wire", Vol 2, No. 9, September 1953, stapled down along the left hand side. Has notes on an electric train tour, tramways and ferry connecting services in Sydney, Sydney news, Iron Cove or Drummoyne Bridge, Association news and Newcastle news. See Reg Item 5685 for other Vol 1 issues and Reg Item 105 for Vol 1, No. 6 and Vol. 3 No. 5All copies have pencil or typed inscription of "H. H. Matthews "along top edge.trams, tramways, tramway news, history, sydney, newcastle, map -
 Ballarat Tramway Museum
Document - Folder with papers, State Electricity Commission of Victoria (SECV), 1960's
... Type ‘B’ Main Cylinder 4870 6/1 7A BA-T3-6734 Brass Nut for Switch Mechanism 4829 6/2 7B BA-T3-6735 Tongue Clip Link for Switch Mechanism 4871 6/3 7C BA-T3-6736 Fulcrum for Switch Mechanism 4872 6/4 7D BA-T3-6737 Plunger for Switch Mechanism 4832 7/6 8 BA-T3-6754 Pivot for Switch Mechanism No numbers 9 or 10 4873 17/5 11 BA-T7-7639 Detail of Motor Pinion for Brill Cars 4831.2 21/4 B 12 BA-T7-7661A Half Ball Hanger Links – single bogie trucks 4874 21/6 13A BA-T7-7663 Axle Box Inner Spring Driving Wheels Maximum Traction Truck 22E 4875 22/1 13B BA-T7-7664 Axle Box Outer Spring Driving Wheels Maximum Traction Truck 22E 4876 22/2 14 BA-T7-7665 Body Spring Brill Maximum Traction Truck 22E 4830.2 22/3B 15 BA-T7-7666A Half Ball Brake Hanger Link Driving Wheel Brill Maximum Traction Truck 22E 4877 22/4 16 BA-T7-7667 Body Spring, Brush Maximum Traction Truck 22E 4820.2 22/6 A 17 BA-T7-7669 Wear cups for Half Ball Brake Hanger Links, Single & Double Bogie Trucks 4878 50/5 18 BA-T8-8149 Connections of Line Breaker and Ratchet Switch for use with Drum Controller 4879 74/6 19 BA-T13-8757/9 Signal boxes, Back of Panel Wiring and External Connections 4880 45/1 20 BA-T8-8116 Trolley Harp 4806 15/3 21 BA-T7-7625 Equalizing Lever, Fulcrum, Brill 21 E truck 4881 15/5 22 BA-T7-7626A Brake Beam Fulcrum Brill 21E truck 4808 16/1 23 BA-T7-7628 Pinion Remover, GE 201G and GE 202 motors 4882 16/3 24 BA-T7-7630 Spring Posts, Brill 21E Truck 4883 21/3 25 BA-T7-7660 Brake Shoe Holder, Driving Wheel, Maximum Traction Truck Brill 22E 4884 21/5 26 BA-T7-7662 Brake Rod Guide, Single Bogie Trucks 4885 22/5 27 BA-T7-7668 Brake Shoe Holder, Pony Wheel, Maximum Traction Truck Brill 22E 4809 42/2 B 28 BA-T8-8101 Trolley Wheel and Axle 4815 42/1 B 29 BA-T8-8102A Motor Suspension Bearing, GE 202 Motor 4796.2 42/5 30 BA-T8-8104 Connection Diagram WH 225N Motor 4886 42/6 B 31 BA-T8-8105B Motor Suspension Bearing, GE 201 Motor 4797.2 48/6 32 BA-T8-8137 WH T1F Controllers 4816 49/2 33 BA-T8-8138 Connection Diagram GE 202 Motor 4887 49/3 34 BA-T8-8139 Connection Diagram K-36-J Controller 4888 50/3 35 BA-T8-8146 GE K-36-JR Controllers, with line breaker (Connection diagram) 4889 50/6 36 BA-T8-8150 Commutator for Westinghouse 225N Motor 4846 51/1 37 BA-T8-8151A Armature Bearing Lining, Commutator End, Type GE 201G Motor 4813 51/2 38 BA-T8-8152 Armature Winding Diagram Westinghouse 225 Motor 4840.2 51/40 39 BA-T8-8154A Armature Bearing Lining, Pinion End, Type GE201G Motor 4890 51/6 40 BA-T8-8156 Armature Bearing Lining, Pinion End, Type GE202A Motor 4891 52/1 41 BA-T8-8157A Armature Bearing Lining, Commutator End, Type GE202A Motor 4892 64/5 42A BA-T9-8392A Step Hangers, Single and Double Bogie Trucks, Hinged Type 4785.2 64/6B 42B BA-T9-8392/1A Step Hangers, Single and Maximum Traction Trucks, Fixed Type 4812.2 43/1 43 BA-T8-8106B GE K36J Controller, Main Cylinder Segments 4893 50/2 44 BA-T8-8145A GE B23E Controller, Main Cylinder Segments 4816 65/2 45 BA-T9-8394B Door Lock for Motorman’ Cabin Maximum Traction Trucks. 4810 73/3 46 BA-T13-8757 Ballarat Electric Tramways Signalling System, Arrangements & Details of Box....Type ‘B’ Main Cylinder 4870 6/1 7A BA-T3-6734 Brass Nut for Switch Mechanism 4829 6/2 7B BA-T3-6735 Tongue Clip Link for Switch Mechanism 4871 6/3 7C BA-T3-6736 Fulcrum for Switch Mechanism 4872 6/4 7D BA-T3-6737 Plunger for Switch Mechanism 4832 7/6 8 BA-T3-6754 Pivot for Switch Mechanism No numbers 9 or 10 4873 17/5 11 BA-T7-7639 Detail of Motor Pinion for Brill Cars 4831.2 21/4 B 12 BA-T7-7661A Half Ball Hanger Links – single bogie trucks 4874 21/6 13A BA-T7-7663 Axle Box Inner Spring Driving Wheels Maximum Traction Truck 22E 4875 22/1 13B BA-T7-7664 Axle Box Outer Spring Driving Wheels Maximum Traction Truck 22E 4876 22/2 14 BA-T7-7665 Body Spring Brill Maximum Traction Truck 22E 4830.2 22/3B 15 BA-T7-7666A Half Ball Brake Hanger Link Driving Wheel Brill Maximum Traction Truck 22E 4877 22/4 16 BA-T7-7667 Body Spring, Brush Maximum Traction Truck 22E 4820.2 22/6 A 17 BA-T7-7669 Wear cups for Half Ball Brake Hanger Links, Single & Double Bogie Trucks 4878 50/5 18 BA-T8-8149 Connections of Line Breaker and Ratchet Switch for use with Drum Controller 4879 74/6 19 BA-T13-8757/9 Signal boxes, Back of Panel Wiring and External Connections 4880 45/1 20 BA-T8-8116 Trolley Harp 4806 15/3 21 BA-T7-7625 Equalizing Lever, Fulcrum, Brill 21 E truck 4881 15/5 22 BA-T7-7626A Brake Beam Fulcrum Brill 21E truck 4808 16/1 23 BA-T7-7628 Pinion Remover, GE 201G and GE 202 motors 4882 16/3 24 BA-T7-7630 Spring Posts, Brill 21E Truck 4883 21/3 25 BA-T7-7660 Brake Shoe Holder, Driving Wheel, Maximum Traction Truck Brill 22E 4884 21/5 26 BA-T7-7662 Brake Rod Guide, Single Bogie Trucks 4885 22/5 27 BA-T7-7668 Brake Shoe Holder, Pony Wheel, Maximum Traction Truck Brill 22E 4809 42/2 B 28 BA-T8-8101 Trolley Wheel and Axle 4815 42/1 B 29 BA-T8-8102A Motor Suspension Bearing, GE 202 Motor 4796.2 42/5 30 BA-T8-8104 Connection Diagram WH 225N Motor 4886 42/6 B 31 BA-T8-8105B Motor Suspension Bearing, GE 201 Motor 4797.2 48/6 32 BA-T8-8137 WH T1F Controllers 4816 49/2 33 BA-T8-8138 Connection Diagram GE 202 Motor 4887 49/3 34 BA-T8-8139 Connection Diagram K-36-J Controller 4888 50/3 35 BA-T8-8146 GE K-36-JR Controllers, with line breaker (Connection diagram) 4889 50/6 36 BA-T8-8150 Commutator for Westinghouse 225N Motor 4846 51/1 37 BA-T8-8151A Armature Bearing Lining, Commutator End, Type GE 201G Motor 4813 51/2 38 BA-T8-8152 Armature Winding Diagram Westinghouse 225 Motor 4840.2 51/40 39 BA-T8-8154A Armature Bearing Lining, Pinion End, Type GE201G Motor 4890 51/6 40 BA-T8-8156 Armature Bearing Lining, Pinion End, Type GE202A Motor 4891 52/1 41 BA-T8-8157A Armature Bearing Lining, Commutator End, Type GE202A Motor 4892 64/5 42A BA-T9-8392A Step Hangers, Single and Double Bogie Trucks, Hinged Type 4785.2 64/6B 42B BA-T9-8392/1A Step Hangers, Single and Maximum Traction Trucks, Fixed Type 4812.2 43/1 43 BA-T8-8106B GE K36J Controller, Main Cylinder Segments 4893 50/2 44 BA-T8-8145A GE B23E Controller, Main Cylinder Segments 4816 65/2 45 BA-T9-8394B Door Lock for Motorman’ Cabin Maximum Traction Trucks. 4810 73/3 46 BA-T13-8757 Ballarat Electric Tramways Signalling System, Arrangements & Details of Box. ...Yields information about the drawings that were used by the depot or workshop staff as reference drawings. Has a strong association with the depot workshop staff. Yields information about equipment on Ballarat tramcars and Signalling.Folder containing 46 blueprints or Dyeline prints of SEC tram equipment drawings. Front of folder made from a cloth back sheet of paper extended to secure to a thick cardboard runner. Rear of folder made from an old tram advertising panel or cardboard sheet, cut to size and secured to a thick cardboard runner with a cloth backing on both sides. Sheets secured with three brass screwed clips. Front cover damaged in bottom right hand corner. Rear cover breaking apart on outside around cloth binding. Heavy dirt marks from “grease” on bottom half of rear cover. Contains 46 drawings which have been individually catalogued and numbered on the rear of each drawing within the folder. Some of the drawings have been folded. Reg Item Micro Film No. Old BTPS No. SEC Drawing No Title 4807 42/4 1 VB4/8103C Westinghouse T1F Controller Main Cylinder Segments. 4867 47/2 2 BA-T8-8128 Westinghouse 225N Motor Case Bolt 4830 22/3 B 3 BA-T7-7666 Half Ball Brake Hanger Link, Driving Wheel, Brill Maximum Traction Truck 22E 4868 44/3A 4 BA-T8-8113 Split Suspension Bearing for Type W225 Motor (Westinghouse) 4869 52/2 5 BA-T8-8158 Contact Tips for G.E. Compressor Controller 4818 52/3 6 BA-T8-8159 GE B-23 Contact Finger Tips for G.E. Type ‘B’ Main Cylinder 4870 6/1 7A BA-T3-6734 Brass Nut for Switch Mechanism 4829 6/2 7B BA-T3-6735 Tongue Clip Link for Switch Mechanism 4871 6/3 7C BA-T3-6736 Fulcrum for Switch Mechanism 4872 6/4 7D BA-T3-6737 Plunger for Switch Mechanism 4832 7/6 8 BA-T3-6754 Pivot for Switch Mechanism No numbers 9 or 10 4873 17/5 11 BA-T7-7639 Detail of Motor Pinion for Brill Cars 4831.2 21/4 B 12 BA-T7-7661A Half Ball Hanger Links – single bogie trucks 4874 21/6 13A BA-T7-7663 Axle Box Inner Spring Driving Wheels Maximum Traction Truck 22E 4875 22/1 13B BA-T7-7664 Axle Box Outer Spring Driving Wheels Maximum Traction Truck 22E 4876 22/2 14 BA-T7-7665 Body Spring Brill Maximum Traction Truck 22E 4830.2 22/3B 15 BA-T7-7666A Half Ball Brake Hanger Link Driving Wheel Brill Maximum Traction Truck 22E 4877 22/4 16 BA-T7-7667 Body Spring, Brush Maximum Traction Truck 22E 4820.2 22/6 A 17 BA-T7-7669 Wear cups for Half Ball Brake Hanger Links, Single & Double Bogie Trucks 4878 50/5 18 BA-T8-8149 Connections of Line Breaker and Ratchet Switch for use with Drum Controller 4879 74/6 19 BA-T13-8757/9 Signal boxes, Back of Panel Wiring and External Connections 4880 45/1 20 BA-T8-8116 Trolley Harp 4806 15/3 21 BA-T7-7625 Equalizing Lever, Fulcrum, Brill 21 E truck 4881 15/5 22 BA-T7-7626A Brake Beam Fulcrum Brill 21E truck 4808 16/1 23 BA-T7-7628 Pinion Remover, GE 201G and GE 202 motors 4882 16/3 24 BA-T7-7630 Spring Posts, Brill 21E Truck 4883 21/3 25 BA-T7-7660 Brake Shoe Holder, Driving Wheel, Maximum Traction Truck Brill 22E 4884 21/5 26 BA-T7-7662 Brake Rod Guide, Single Bogie Trucks 4885 22/5 27 BA-T7-7668 Brake Shoe Holder, Pony Wheel, Maximum Traction Truck Brill 22E 4809 42/2 B 28 BA-T8-8101 Trolley Wheel and Axle 4815 42/1 B 29 BA-T8-8102A Motor Suspension Bearing, GE 202 Motor 4796.2 42/5 30 BA-T8-8104 Connection Diagram WH 225N Motor 4886 42/6 B 31 BA-T8-8105B Motor Suspension Bearing, GE 201 Motor 4797.2 48/6 32 BA-T8-8137 WH T1F Controllers 4816 49/2 33 BA-T8-8138 Connection Diagram GE 202 Motor 4887 49/3 34 BA-T8-8139 Connection Diagram K-36-J Controller 4888 50/3 35 BA-T8-8146 GE K-36-JR Controllers, with line breaker (Connection diagram) 4889 50/6 36 BA-T8-8150 Commutator for Westinghouse 225N Motor 4846 51/1 37 BA-T8-8151A Armature Bearing Lining, Commutator End, Type GE 201G Motor 4813 51/2 38 BA-T8-8152 Armature Winding Diagram Westinghouse 225 Motor 4840.2 51/40 39 BA-T8-8154A Armature Bearing Lining, Pinion End, Type GE201G Motor 4890 51/6 40 BA-T8-8156 Armature Bearing Lining, Pinion End, Type GE202A Motor 4891 52/1 41 BA-T8-8157A Armature Bearing Lining, Commutator End, Type GE202A Motor 4892 64/5 42A BA-T9-8392A Step Hangers, Single and Double Bogie Trucks, Hinged Type 4785.2 64/6B 42B BA-T9-8392/1A Step Hangers, Single and Maximum Traction Trucks, Fixed Type 4812.2 43/1 43 BA-T8-8106B GE K36J Controller, Main Cylinder Segments 4893 50/2 44 BA-T8-8145A GE B23E Controller, Main Cylinder Segments 4816 65/2 45 BA-T9-8394B Door Lock for Motorman’ Cabin Maximum Traction Trucks. 4810 73/3 46 BA-T13-8757 Ballarat Electric Tramways Signalling System, Arrangements & Details of Box.On front cover of folder, "1 - 46"trams, tramways, drawings, ballarat, sec, depot, workshops -
 Ballarat Tramway Museum
Pamphlet, State Electricity Commission of Victoria (SECV), "Overhead Line Material", Jun. 1937
... Trolley Wire 4914.1 - Letter from The Forest City Electric Co. Limited of Manchester 23/6/1937, to the Agent General for Victoria and the SEC, notifying that they have included within the shipment free of charge, three sample insulators and booklet 15.2. 4914.2 - Booklet or Sheet 15.2, titled "Overhead Line Material" comprising 12 pages showing details of porcelain insulators available from The Forest City Electric Co., and other associated equipment, including cap and cone suspensions, wood strain insulators, Giant Strain Insulators, overhead frogs, crossings, bonding compressors and contactors. ...Yields information about equipment made for Overhead tramway range and materials used and how correspondence was exchanged with the SEC via the Agent General.4914.1 - Letter from The Forest City Electric Co. Limited of Manchester 23/6/1937, to the Agent General for Victoria and the SEC, notifying that they have included within the shipment free of charge, three sample insulators and booklet 15.2. 4914.2 - Booklet or Sheet 15.2, titled "Overhead Line Material" comprising 12 pages showing details of porcelain insulators available from The Forest City Electric Co., and other associated equipment, including cap and cone suspensions, wood strain insulators, Giant Strain Insulators, overhead frogs, crossings, bonding compressors and contactors. Each sheet had three staples on left hand side and two punch holes. There were removed for scanning and have not been replaced.trams, tramways, overhead, forest city signals, insulation, trackwork, trolley wire -
 Ballarat Tramway Museum
Document - Report, Municipal Tramways Association, "Report of the Sub-Committee on Standardization of Overhead Line Material", Jun. 2020
... Sixteen page booklet, titled "Report of the Sub-Committee on Standardization of Overhead Line Material", published by Municipal Tramways Association, 2nd Edition, issued in May 1921, Submitted to the Annual Meeting of the Manager's Section of the Association at Birmingham, 16/6/1920 under the signature of J. Beckett, General Secretary. Gives an Appendix - List of Drawings, Suggested specification for Standard Copper Trolley...Trams tramways Overhead Trolley Wire Sixteen page booklet, titled "Report of the Sub-Committee on Standardization of Overhead Line Material", published by Municipal Tramways Association, 2nd Edition, issued in May 1921, Submitted to the Annual Meeting of the Manager's Section of the Association at Birmingham, 16/6/1920 under the signature of J. ...Yields information about the materials used in tramway overhead and could have been used as a specification by ESCo Engineers and standardization of materials in order to reduce costs.Sixteen page booklet, titled "Report of the Sub-Committee on Standardization of Overhead Line Material", published by Municipal Tramways Association, 2nd Edition, issued in May 1921, Submitted to the Annual Meeting of the Manager's Section of the Association at Birmingham, 16/6/1920 under the signature of J. Beckett, General Secretary. Gives an Appendix - List of Drawings, Suggested specification for Standard Copper Trolley Wire, steel span and guard wires, and Overhead wire fittings trams, tramways, overhead, trolley wire -
 Ballarat Tramway Museum
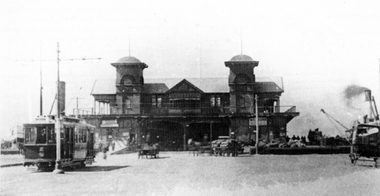
Photograph - SECV Geelong tram No. 2 at the Wharf terminus, c1920
... line was opened in 1912 and closed in 1940 when the track in Corio St was extended to the Beach terminus. There are several horse-drawn vehicles in the view with goods being loaded or unloaded on the ship moored on the right. The tramway was operated by the Melbourne Electric Supply Co. (MESCo). The photograph from the collection of Ken Magor was published in the Sydney Tramway Museum's magazine Trolley...line was opened in 1912 and closed in 1940 when the track in Corio St was extended to the Beach terminus. There are several horse-drawn vehicles in the view with goods being loaded or unloaded on the ship moored on the right. The tramway was operated by the Melbourne Electric Supply Co. (MESCo). The photograph from the collection of Ken Magor was published in the Sydney Tramway Museum's magazine Trolley ...The photograph shows Geelong No. 2, built by Duncan and Fraser of Adelaide in 1911 in its as-built configuration, c1920 at the Wharf terminus, known as the Moorabool Street Pier. The tram line was opened in 1912 and closed in 1940 when the track in Corio St was extended to the Beach terminus. There are several horse-drawn vehicles in the view with goods being loaded or unloaded on the ship moored on the right. The tramway was operated by the Melbourne Electric Supply Co. (MESCo). The photograph from the collection of Ken Magor was published in the Sydney Tramway Museum's magazine Trolley Wire in April 1981. The photo caption advises - "The steamship to the right is the Edina, a veteran Port Phillip steamer which was launched in 1854 and was not broken up until 1957." This tram is part of the collection at the Ballarat Tramway Museum.Yields information about Geelong No.2 and the Wharf terminus.Black and white photograph of Geelong tram No. 2 at the Wharf terminus c1920. Two copies held.geelong, wharf, mesco, moorabool st pier, edina, tram 2 -
 Ballarat Tramway Museum
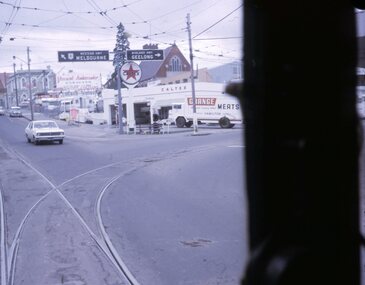
Slide - 27 mm sq slide/s - set of 7, Lilian Butler, Mt Pleasant line, Sep. 1971
... Ballarat Tramways trams Stones Corner Main Road Mt Pleasant Crews Drivers Conductors Trolley Poles tram 41 Set of seven Colour 27 x 27 mm slide in a Kodachrome cardboard mount. .1 - Tram turning onto the Mt Pleasant line at Stones Corner - Bridge St, Main Road .2 - Main Road looking south with Inland Body Works building on the left and Ampol Service Station .3 - Mt Pleasant terminus with the butcher shop on the left and the diary on the right - shows the terminating tram track .4 - Conductor changing pole. .5 - Putting pole on the overhead .6 - Conductor (D O'Leary - No. 38) standing in front of tram and Motorman or driver (N. ...Yields information about the streetscapes of Stones Corner to Mt Pleasant route and in particular buildings and people that crewed the trams.Set of seven Colour 27 x 27 mm slide in a Kodachrome cardboard mount. .1 - Tram turning onto the Mt Pleasant line at Stones Corner - Bridge St, Main Road .2 - Main Road looking south with Inland Body Works building on the left and Ampol Service Station .3 - Mt Pleasant terminus with the butcher shop on the left and the diary on the right - shows the terminating tram track .4 - Conductor changing pole. .5 - Putting pole on the overhead .6 - Conductor (D O'Leary - No. 38) standing in front of tram and Motorman or driver (N. Hall - No. 43) .7 - ditto with number visible. See Reg item 3425 for crew lists. Slide mount date September 1971. Photo from the collection of Lilian Butler.ballarat, tramways, trams, stones corner, main road, mt pleasant, crews, drivers, conductors, trolley poles, tram 41 -
 Marysville & District Historical Society
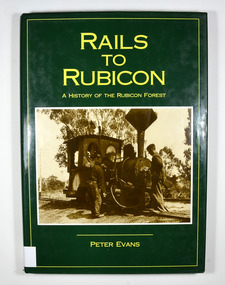
Book - Hardcover book, Peter Evans, Rails to Rubicon-A History of the Rubicon Forest, 1994
... trolley holding onto the brake lever. There is a group of men, some sitting and some standing, on piles of cut timber under a large, open shed in the background. There are also some small, timber, tent like structures standing next to the railway tracks. There is a forest in the far background. Written in white is the line...trolley holding onto the brake lever. There is a group of men, some sitting and some standing, on piles of cut timber under a large, open shed in the background. There are also some small, timber, tent like structures standing next to the railway tracks. There is a forest in the far background. Written in white is the line ...Hardcover. Green dust cover. Front cover photograph is Krauss 0-4-OWT, builder's No. 2459 of 1891, takes water at the western end of Rubicon Lane in 1934. Driver Bob Rees attends to his engine while brakeman Hayden looks on. End papers show a photograph of a man standing besides a timber railway trolley holding onto the brake lever. There is a group of men, some sitting and some standing, on piles of cut timber under a large, open shed in the background. There are also some small, timber, tent like structures standing next to the railway tracks. There is a forest in the far background. Written in white is the line "Mr Clarke & Kidd's Sawmill". non-fictionrubicon, timber, sawmill, railway, tramway, clarke and pearce, evans, peter, marysville, krause, forest, mountain -
 Marysville & District Historical Society
Book - Hardcover book, Rails to Rubicon-A History of the Rubicon Forest, 1994
... trolley holding onto the brake lever. There is a group of men, some sitting and some standing, on piles of cut timber under a large, open shed in the background. There are also some small, timber, tent like structures standing next to the railway tracks. There is a forest in the far background. Written in white is the line...trolley holding onto the brake lever. There is a group of men, some sitting and some standing, on piles of cut timber under a large, open shed in the background. There are also some small, timber, tent like structures standing next to the railway tracks. There is a forest in the far background. Written in white is the line ...A history of the Rubicon forestHardcover. Green dust cover. Front cover photograph is Krauss 0-4-OWT, builder's No. 2459 of 1891, takes water at the western end of Rubicon Lane in 1934. Driver Bob Rees attends to his engine while brakeman Hayden looks on. End papers show a photograph of a man standing besides a timber railway trolley holding onto the brake lever. There is a group of men, some sitting and some standing, on piles of cut timber under a large, open shed in the background. There are also some small, timber, tent like structures standing next to the railway tracks. There is a forest in the far background. Written in white is the line "Mr Clarke & Kidd's Sawmill".Stamp of the Marysville & District Historical Society Inc / PO Box 22 / Marysville 3779 Signed by the author, Peter Evansrubicon, timber, sawmill, railway, tramway, clarke and pearce, evans, peter