Showing 469 items matching "bendigo depot"
-
 Ballarat Tramway Museum
Photograph - Colour Photograph/s, 23/11/1962 12:00:00 AM
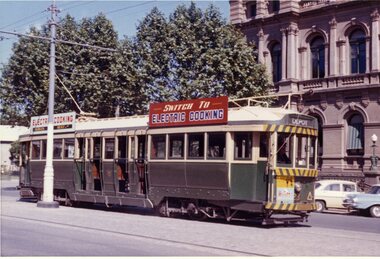
Colour print of Bendigo SECV Bendigo tram 23 outside the Bendigo Post Office in Pall Mall. On Kodacolor paper with a Kodak red ink stamp on rear. Tram has dash canopy lights, but no large white strip under the drivers windows. Photo dated 23.11.62. Tram showing destination of "Depot". Tram has "Hutton's" ham or bacon ad on front dash panel, with to SEC roof ads "Electric Cooking" and "Switch to Electric Cooking".On rear top left hand corner "17 / 22.11.62" in very wavy handwriting, typical of an aged person.bendigo post office, bendigo, pall mall., tram 26 -
 Ballarat Tramway Museum
Photograph - Black & White Photograph/s set of 19, Mar. 1972
Set of 19 black and white prints, all 89mm square of Bendigo trams, date machine printed on print is "Mar 1972". 981.1 - Tram 21 at North Bendigo terminus, with level crossing in background. Has destination "Golden Square" and two SEC roof ads. 981.2 - tram 2? at Eaglehawk, with destination "Depot", two SEC roof ads and "Leo A. Hughes Photographer" on side of building in background. 981.3 - tram 2? at Eaglehawk, side on view. 981.4 - tram 26 at Quarry Hill terminus looking back into city. 981.5 - tram 7 en route to North Bendigo at the site of the Bridge St. loop. Has a Peters Ice Cream truck and Sandhurst Fruit Juices truck on right side of photograph. 981.6 - tram 2 at Quarry Hill terminus. 981.7 - tram 2? at one of the loops on the Eaglehawk line, inbound? 981.8 - bogie tram at Charing Cross with fountain in background. Side on view looking south. 981.9 -trams 7 and 21 on Golden Square/North Bendigo line with bogie tram in background, at Charing Cross. Same as item 972. 981.10 - bogie tram at Charing Cross - has buildings in south west corner in background, including Colonial Mutual Life and an advertisement for the Herald newspaper. 981.11 - trams 25, 7 and two other trams at Charing Cross. 981.12 - trams 2 and 26 and three others at Charing Cross. 981.13 - tram 25 at Golden Square terminus, with Rodda's Golden Square Hotel in the background. Tram showing destination of "Nth Bendigo" 981.14 - tram 24, showing "Special" on depot access track. Has two Johnnie Walker roof ads on side. 981.15 - as above, but tram on bridge outside depot. 981.16 - trams 25 and 28 at depot 981.17 - tram 24 showing "Special" on depot access track with a single truck car in background. 981.18 - trams 2 and 26 at Charing Cross. Has advertisements for "Armstrong Tyre Service" and "Cohn's drinks" on buildings in background. 981.19 - Bendigo 2 at location?, about to enter a loop or double track section. Has hotel in background. On rear of each photo in the top left hand corner is a print number 1 to 19 in ink and location notes, generally "Bendigo"trams, tramways, charing cross, bendigo, golden square, quarry hill, tram 2, tram 21, tram 7, tram 24, tram 26 -
 Ballarat Tramway Museum
Document - Calendar, Topmill Pty Ltd, "Australian Trams 1999 Calendar", 1998
24 Page full colour calendar featuring Australian Trams, published by Top mill Pty Ltd. Cover (1299i5) features Sydney trams outside Central station in Eddy Ave. Other cities represented - Brisbane, Sydney, Adelaide, Perth, Fremantle, Bendigo, Ballarat, Sydney light rail, Hobart and Melbourne. Photos by Hugh Ballment, Dale Budd, Robert Merchant, Arthur Perry and the Sydney Tramway Museum. Priced at $9.95, and has "Parkholme Newsagency and Toys" sticker over bar code section, giving the same price. Distributed by Gordon and Gotch. Ballarat trams - 1299i1 - 33 at depot during hail storm on 20/8/1971 and 1299i2 - BTM trams 14 and 26 at Carlton St. during BTM operations 1970's or early 1980's. Used for month of June. Bendigo trams - 1299i3 - No. 4 at Eaglehawk terminus - 1/2/1971 and 1299i4 - trams 28, 2, 23 and two single truckers at Charing Cross 1970. Used for month of May.tramways, trams, australian trams, ballarat, bendigo, museums -
 Ballarat Tramway Museum
Magazine, Australian Electric Traction Association (AETA), "Electric Traction", 1951, 1953
Ten issues of "Electric Traction" of the Australian Electric Traction Association. 1303.1 - Vol VI, No. 4, April 1951 - printed covers with four pages of duplicated notes - in poor condition, torn along centre and some edge damage. Page 3 includes notes on the Provincial systems about bogie cars going to Ballarat, Bendigo and Geelong. 1303.2 - Vol VI, No. 5, May 1951- printed covers with four pages of duplicated notes - in fair condition - covers have yellowed. 1303.3 - Vol VI, No. 6, June 1951 - as for 1303.2 - in good condition - some foxing on covers. 1303.4 - Vol VI, No. 7, July 1951 - as for 1303.2 - in good condition, though the insert pages have suffered some edge damage as slightly larger in size than the printed covers. 1303.5 - Vol VI, No. 8 - August 1951 - as for 1303.2 - in good condition - includes an article on page 3 about Ballarat news - including relaying of Sturt and Drummond Sts junction, service cuts, fare increase, No. 23, and extension of the depot to accommodate bogie cars. 1303.6 - Vol VI, No. 9 - September 1951 - 8 pages all printed - includes on page 3 - item re Ballarat No. 23 withdrawn for scrapping, and bogie cars at Geelong. In good condition. 1303.7 - Vol VI, No. 12 - December 1951 - 6 printed pages - includes items re bogie cars at Ballarat, Bendigo and Geelong. In good condition. 1303.8 - Vol VIII, No. 8 - August 1953 - 6 printed pages with green title details - has an item that Wal Jack was recently given a front page write up in the Courier. Shown as being printed by "Traction Press" of the same address as the publisher - Traction Publications. In good condition. 1303.9 - Vol VIII, No. 9 - September 1953 - 8 printed pages with black title details, page 3 has map of Sydney printed in red and page 6, Sydney rail system. Page 4 has item re the Geelong system and a forthcoming Transport Regulation Board inquiry. In good condition though has been folded in the middle. Printer as for 1303.8 1303.10 - Vol VIII No. 2 - February 1953 - 6 printed pages - includes Tramways of Collie WA, Sydney News, Melbourne cable car conversion dates, electric railway news and branch news and notes Basil Miller has been appointed as an Inspector in Bendigo. 1303.10 - added 28/3/2010 - sourced from donations to the Museum by R. Elliston 28-3-16.Items 1303.2 to 1303.7 - have the stamp of the "The New Zealand Railway & Locomotive Society" on the front cover.trams, tramways, electric traction, aeta, ballarat, australian tramways, bendigo, cable trams -
 Ballarat Tramway Museum
Photograph - Newspaper Clipping and Black & White Photograph/s, 16/04/1972 12:00:00 AM
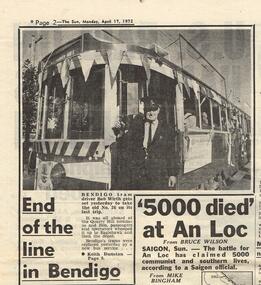
Newspaper clipping from The Melbourne Sun, dated Monday 17/4/1972, titled "End of the line in Bendigo" showing a photograph of Bendigo tram driver Bob Wirth standing by Bendigo No. 26 prior to its last trip to Eaglehawk and then the depot. One of a large group of newspaper cuttings from John Bainbridge, 7/4/02. .1 - black and white print of the photograph in fair order. Added 11-8-2016tramways, trams, bendigo, tramway closure, last tram -
 Ballarat Tramway Museum
Slide - 35mm slide/s, 11/12/1954 12:00:00 AM
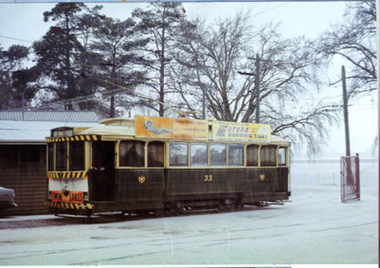
Bendigo scrubber car, photographed at tram depot, 11-12-1954. Has a person in the driving position. Under exposed. Photo by Keith Kings?.'11-12-54, XEY, K/WJU-55, 1/25, f3.5, Bendigo Vic' in blue ink.tramways, trams, bendigo, scrubber tram, scrubber -
 Ballarat Tramway Museum
Photograph - Black & White Photograph/s, State Electricity Commission of Victoria (SECV), late 1950's?
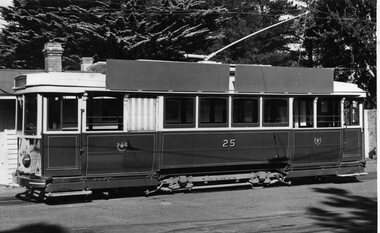
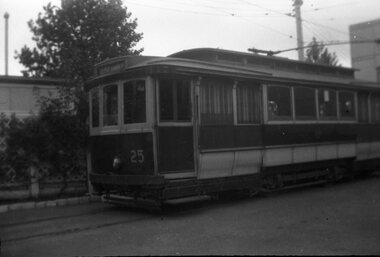
Yields information about No. 25 (one of the best side on photographs of this tram) and the fitting or trial of roof advertisements that was a prominent feature of SEC trams from the late 1950's onwards. Noted in an actual photograph, only one roof advertisement fitted.Black and white print of a photograph of No. 25 in the SEC Ballarat depot yard fitted with two blank advertising boards on the roof. Understood prepared to give details to prospective advertisers or to show management how arrangements could be made. Advised by Ron Scholten on 2/12/2013, that "Alan Davis (Vic) Advertising" was the SEC's advertising agent and it has long been defunct. Photo taken late 1950's. One of a few good photographs of No. 25 prior to going to Bendigo in October 1960. See Reg Item 2312 for a photograph of this tram with one roof advertisement c1960. Second copy added 30/11/2013 - high res scan added. See Reg Item 6408 for a 1959 memo regarding the fitting of roof advertising signs.tramways, trams, depot, roof ads, advertisements, tram 25 -
 Ballarat Tramway Museum
Document - Photocopy, M. Sayers, "Lighting Effects in the Victoria Gardens, Bendigo", 2000?
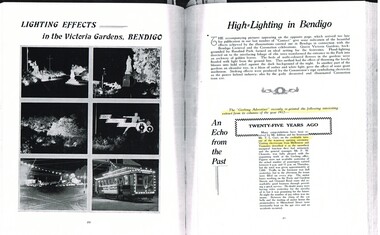
Article titled "Lighting Effects in the Victoria Gardens, Bendigo", "High = Lighting in Bendigo", "An Echo from the Past". The article has photos of celebratory flood lighting in Bendigo, Victoria Gardens during 1937, for the Bendigo Carnival and Coronation Celebrations. Festivities were held in Victoria Gardens. Notes the Coronation tram car, illuminated and decorated. Has a photo of No. 21 outside the depot. Reprint of an extract from the Geelong Advertiser in 1912, 25 years ago of the opening of the Geelong tramways, passenger numbers and celebrations of the event. Record revised 3/4/2019 to add digital images with those from Andrew Cook CD. See item 9099 for the image of tram 21. Page 35 - records the relocation of Mr. A N Mercer who was involved in the reconstruction of Ballarat and Bendigo Tramways has transferred to the Flinders St Drawing Office. Each item had a thin strip of paper attached by staple to the top left hand corner, giving the Vol. No. details.Yields information about tram 21 as the Bendigo Coronation tram in Photocopy of an article in the State Electricity Commission of Victoria Magazine, Contact, Vol 2, No. 2, Aug. 1937. One A3 sheet.trams, tramways, sec, geelong, decorated trams, bendigo, opening, coronation -
 Ballarat Tramway Museum
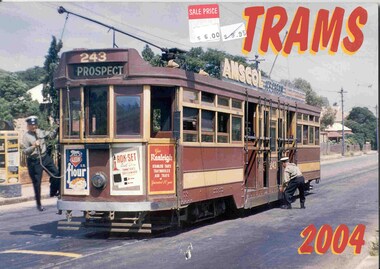
Document - Calendar, Topmill Pty Ltd, "Trams 2004 Calendar", 2003
26 Page full colour calendar with heavy card covers featuring Australian Trams, published by Topmill Pty Ltd. Cover (2983i1) features Adelaide No. 243 at Mitcham. Other cities represented - Brisbane, Sydney, Adelaide, Perth, Fremantle, Bendigo, Ballarat, Rockhampton, Sydney, and Melbourne. Photos by Arthur Perry, Ken Smith, Lawrie Hort, Leonard Stewart and Les Horsburgh. Originally priced at $9.95, and has Sale Price with $6.00 sticker. Distributed by Gordon and Gotch. Ballarat trams- 2983i2 - 26 southbound in Albert St to Sebastopol in 1970 used for month of May. Has been used at the depot to marked charters for each month and visitors and reminder dates. tramways, trams, australian trams, ballarat, bendigo, museums -
 Ballarat Tramway Museum
Ephemera, Travis Jeffrey, Ballarat tram timetables, 1960's
Notebook, with three sections of 16 pages each, two pink, one blue, stapled individually onto a yellow coloured card cover and then covered with a printed black and gold patterned sheet to cover the staples. Shown in a tabular form are the timetables for each of the Ballarat and Bendigo routes in the 1960's, for Mondays to Fridays, Saturdays and Sundays. Gives the run number, times at various points, special workings, terminals, short workings. The tables for Sundays in Bendigo has been prepared but not filled in. In the blue section has various notes on Ballarat weekday runs, timetables. Image 1 - cover, 2 - inside front cover and timetable for Lydiard St - Sebastopol, 3 - Stones Corner - View Point, Sebastopol - Depot and Eaglehawk to Quarry Hill, 4 - blue pages run details. On inside back cover in ink, addresses, calculations and street names.trams, tramways, ballarat, bendigo, rosters, employees, shifts, timetables -
 Ballarat Tramway Museum
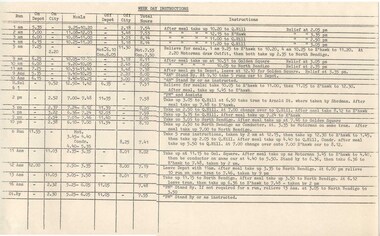
Document - Instruction, State Electricity Commission of Victoria (SECV), "Weekday Instructions", 1970
3053.1 - Duplicated foolscap sheet titled "Weekday Instructions", for Bendigo tramways giving details of tramcar roster runs, time on, where on, meal break times, time off - depot or city, total hours and specific instructions re tram runs after meal breaks, relief and changeovers. Five copies of this item received, three to Bendigo, two to Ballarat. The top copy (to Bendigo) had pencil date "2/9/70" in the top left hand corner. Image made. 3053.2 - Photocopy of a similar form titled "Weekday Instructions - Monday to Friday". Date unknown. Original copy to Bendigo Tramways. Style similar. Image not made. trams, tramways, bendigo, rosters, timetables -
 Ballarat Tramway Museum
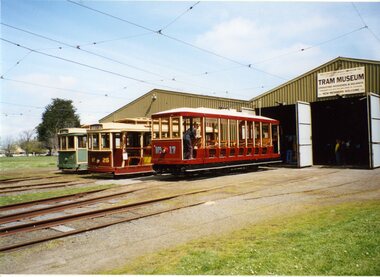
Photograph - Colour Photograph/s - set o f8, Carolyn Dean, 25.09.2005
Set of eight colour photographs of the operation of 100th anniversary of electric trams in Ballarat, 25/09/05 in Wendouree Parade. .1 - Trams 27, 26 and Bendigo 17 in front of the depot. .2 - 17 at St. Aidans Drive .3 - ditto with Graeme Cleak and Len Miller standing in front .4 - 17 and horse tram at loop. .5 - Horse tram 1 at St Aidans .6 - Horse tram 1 arriving gardens Loop .7 - 17 at St Aidans Drive with Graeme Cleak and Darren Hutchesson .8 - Horse tram arriving Gardens Loop with Sam Boon learning the brakes.On rear of all photos "25.9.05" and " Photo Carolyn Dean"horse tram, bendigo 17, 100 years of electric trams, wendouree parade, tram 1, tram 17, tram 27, tram 26 -
 Ballarat Tramway Museum
Slide - 35mm slide/s - set of 13, Carolyn Dean, 24/09/1970 12:00:00 AM
Set of photographs of operations, including special tram, track work by SEC prior to the Bendigo system closing closing.Set of 13 Agfa slides, blue and white plastic base of Bendigo trams. Taken 24.9.1970 by Carolyn Dean. .1 - "5" - No. 7 at Golden Square terminus, with Golden Square Hotel in background. .2 - "6" - No. 7 passing SEC workmen replacing a broken joint, in McCrae St. Piece of rail alongside tram. .3 - "7" - No. 7 crossing No. 29 at start of double track with Hotel in background .4 - "8" - No. 29 running special at depot junction. .5 - "9" - No. 29 turning from Nolan into Bridge St. .6 - "10" - ditto, passing old loop .7 - "12" - ditto, turning from Caledonia into Thunder St .8 - "13" - ditto, southbound in Pall Mall near Bull St. .9 - "16" - ditto, crossing bridge into tram depot, with tram depot in background. .10 - "17" - ditto, entering depot. .11 - "18" - No. 26 entering the Eaglehawk terminus, High St. with Leo A Hughes photographer shop in background. .12 - "19" - No. 26 at terminus, showing "Quarry Hill", with High St in the background. .13 - "21" - No. 26 after leaving terminus, travelling in High St with shops n the background.Each slide has in corner a number in pencil and the first one the date of "24-9-70".tramways, trams, bendigo, tram 7, tram 29, tram 26 -
 Ballarat Tramway Museum
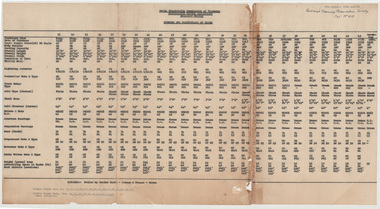
Document - List, State Electricity Commission of Victoria (SECV), "Numbers and Particulars of Trams" - Ballarat, 5/08/1964
Yields information about the dimensions and equiipment on Ballarat Tramcars operated by the SEC.Typed List of tramcars and their details for Ballarat dated 5-August-1964, titled "Numbers and Particulars of Trams". Prepared by Les Denmead, typed by PB. Ballarat - typed carbon copy - two sheets, are taped together. Gives details of where purchased from , date of purchase, type, body builder, seating capacity, overall length, overall height, overall width, condition of tram, trolley base, Lightning arrester, controller make and type, Truck Maker and type, type of truck, axle type, wheel base, axle diameter, motors type and maker, Motor horsepower, Armature bearings, suspension bearings, gear teeth, Air compressor make and type, Brake Valves make and type, Governor make and type, Weight in tons and details of advertising space in racks. At base has typed (original) list of trams of the two types, single truckers and bogie trams. List of trams includes the scrubber and No. 20 which was scrapped prior to system closure. See also 8721 and 8722 for other versions - different dates and 8690 for a Bendigo list. Note: Framed copies of both Ballarat and Bendigo are held in the depot. Some changes have been made to the tramcars since the preparation of this sheet and there are some errors and differences. See also Reg Item 6879 for an annotated version.In black ink, top right hand corner - "Ballarat Tramway Preservation Society Cat No. 613"tramcars, ballarat, equipment, lists, data -
 Ballarat Tramway Museum
Photograph - Black & White Photograph/s - set of 7, 16/04/1972 12:00:00 AM
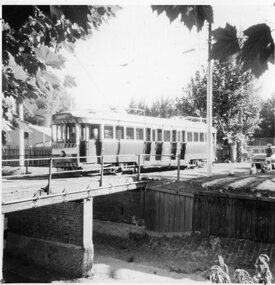
Yields information about the final day of the Bendigo tramways and some of the tramcars used.Set of seven black and white photographs of the day Bendigo Tramways closed 16-4-1972. Taken on Agfa paper. Has printing date of 18.8.72 stamped on rear. All have been used for display purposes. .1 - 25 leaving the depot .2 - 2 at Charing Cross, bound for Eaglehawk - has Ezywalkin Store in background. .3 - 18 crossing another tram at a loop on the Eaglehawk line. .4 - 28 at Charing Cross showing Special .5 - 26 inside depot, with Borough of Eaglehawk sign on the front bumper and bunting around the tram. .6 - 29 leaving the depot .7 - 26 in the final parade, with "Destination Eaglehawk" on a roof mounted advertisement board, with the Beehive building in the background and Coca Cola advertisement on top of the building. Photographer not known.3549.8 - has "photo No. 8" on rear and been marked out for publication. tramways, trams, bendigo, closure, eaglehawk, tram 25, tram 2, tram 18, tram 28, tram 26, tram 29 -
 Ballarat Tramway Museum
Photograph - Black & White Photograph/s, Wal Jack, 11/01/1945 12:00:00 AM
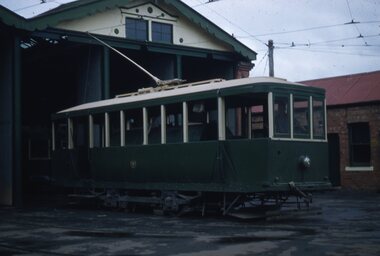
Yields information about the appearance of SEC single truck trams during 1945 and a photograph of a tramcar that later ran in Bendigo. Has a strong association with Wal Jack.Black and white photograph of No. 25, at the depot, taken on 11/1/1945. Photo by Wal Jack - details on rear in his hand writing. Has part of depot building in background. Original negative scanned at hi res and image updated 1/6/2020.On rear in blue ink "No 25, Depot Ballarat / Jan 11th, 1945" and in brackets "ex MMTB".tramways, trams, depot, secv, tram 25 -
 Ballarat Tramway Museum
Photograph - Black & White Photograph/s, 1956
... at Malvern Depot. tramways trams Bendigo MMTB AETA TMSV Yellow ...Yields information about the return of Bendigo 3, ex HTT 8, ex MMTB 114 being returned to Melbourne after donation to the AETA in 1956. Being offloaded at Malvern Depot.Black and white photograph of Bendigo 3, ex HTT 8, ex MMTB 114 being returned to Melbourne after donation to the AETA in 1956. Being offloaded at Malvern Depot. Coldblo Road, during 1956. Yellow Express prime mover. Unknown photographer. tramways, trams, bendigo, mmtb, aeta, tmsv, yellow express, tram 3 -
 Ballarat Tramway Museum
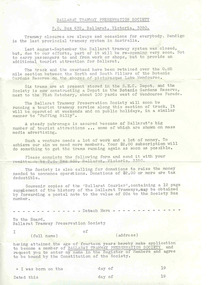
Document - Form/s, Ballarat Tramway Preservation Society (BTPS), BTPS seeking donations, 1972
Demonstrates early BTPS work - Membership application form the early days of the BTPS - following closure of the Ballarat SEC system, around the time of the closure of the Bendigo system.Single foolscap light green (teal) paper page, printed using the Gestetner wax stencil process; Membership Application form for membership of the Ballarat Tramway Preservation Society (BTPS), c1972. Gives details of the organisation, its proposals, notes that Bendigo is to close soon, trams are stored at the SEC depot.trams, tramways, btps, membership forms -
 Ballarat Tramway Museum
Document - Photocopy, Alan Bradley, "Let us envisage future demands", Apr. 2005
Yields information about the establishment phase of the BTPS, views of the Courier newspaper and the non-reaction of the residents of Ballarat.Photocopy of an editorial article in The Courier, 22-11-1971, titled "Let us envisage future demands", regarding the BTPS's application that night seeking approval for a depot in the Gardens and tramway service in the Botanical Gardens. The Courier notes Ballarat's apathy towards the trams, the use of the Gardens that parts of the former system were being removed.trams, tramways, btps, gardens, closure, bendigo -
 Ballarat Tramway Museum
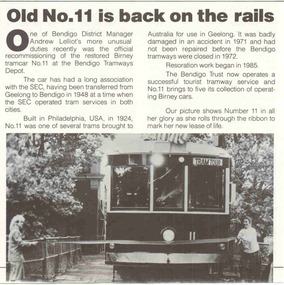
Newspaper, State Electricity Commission of Victoria (SECV), "Old No. 11 is back on the rails", Feb. 1987
Clipping from SEC News Feb 1987, page 8, titled "Old No. 11 is back on the rails", reporting on the recommissioning of Birney No. 11 in Bendigo. Has a photo of No. 11 breaking the ribbon after leaving the depot.birney, bendigo, commissioning -
 Ballarat Tramway Museum
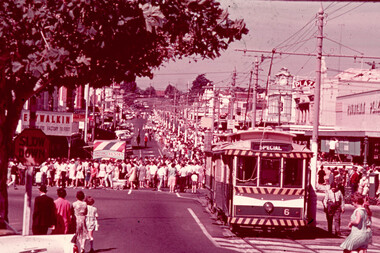
Slide - 35mm slide/s, Max Mitchell, Apr. 1969
White cardboard mount, 35mm slide, from the Association of Railway Enthusiast's film strip titled "Provincial Tramway Film Strip" of Bendigo No. 6 and another single trucker at Charing Cross, during the Bendigo Easter Fair Parade. The film strip notes (Reg. Item 2560), provided the following caption details: "Easter Monday afternoon in Bendigo was the traditional time for the float parade. Single truckers ran as second sections to the regular bogie cars on the "EAGLEHAWK" line until the commencement of the parade - which had to finish before they could proceed to the depot. - Apr. '69 (Max Mitchell)" See image btm2582p.tif for high level scan of image. Stamped on base of slide "11791" and written in ink on top edge "No. 6 Charing Cross"tramways, trams, are, film strip, charing cross, bendigo, easter fair, tram 6 -
 Ballarat Tramway Museum
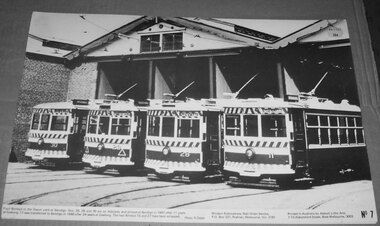
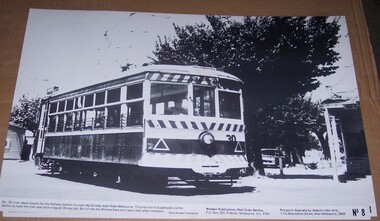
Photograph - Illustration/s, Windsor Publications, Bendigo Birneys
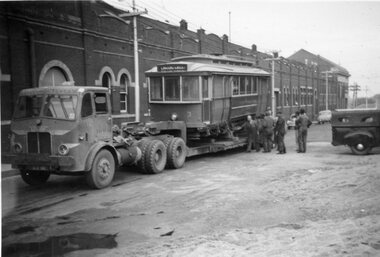
Large print illustration of SEC Bendigo Birneys in front of the SEC Depot. Print published by Windsor Publications as their No. 7 of a series. P Features tramcars 11, 28, 29 and 30. Photo by R. Green, either late 1969's or early 1970's. Two copies held. Printed on heavy cardboard with a gloss sheet.On rear of copy 1, letters "TBT"trams, tramways, birney, bendigo, windsor publications -
 Ballarat Tramway Museum
Photograph - Illustration/s, Windsor Publications, Bendigo Birney 30
Large print illustration of SEC Bendigo Birney No. 30 ex depot running out to the Railway station on a Sunday prior to running to Eaglehawk. No. 8 of a series of illustrations. Caption notes that Birney's no longer do this job - photo possible mid to late 1960's. Photo Windsor Publications. Two copies held. Printed on heavy cardboard with a gloss sheet.On rear of copy 1, letters "TBT"trams, tramways, birney, bendigo, windsor publications -
 Ballarat Tramway Museum
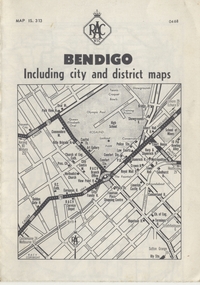
Map, Royal Automobile Club of Victoria, "Bendigo Including city and district maps - RACV", c1968
Printed street map titled "Bendigo Including city and district maps", published by the RACV, showing the central part of Bendigo on the front cover, Bendigo Outlets and notes on the city itself. Has the tram lines shown dotted, only shows the full extent of the Golden Square line. Inside has a district road map. The front cover has the number "0468" in the bottom left hand corner, indicating the publication date.in ink on the Bendigo Outlet map, has various notes showing the location of crossing loops on and off the map and the location of the tram depot itself.trams, tramways, map, bendigo, racv, railways -
 Ballarat Tramway Museum
Photograph - Digital image Set of 20, Dec. 1970
... Parade Ballarat Ballarat goldfields Trams tramways Bendigo ...Set of 20 digital images of Bendigo Tramways December 1970 by Stuart Lodington. .1 - Bendigo track gang renewing a joint, McCrae St, with welding truck alongside and Birney No. 29. .2 - No. 5 at Quarry Hill terminus? .3 - No. 24 at the depot .4 - No. 2 on the Quarry Hill line .5 - No. 5 approaching the Eaglehawk terminus .6 - No. 29? at the Golden Square Terminus with Bill Rodda's Golden Square hotel in the background. .7 - No. 3 inbound on the Quarry Hill line. .8 - trams crossing on the Eaglehawk line, through the window of one tram. .9 - side on view of a B23D controller in a bogie tram .10 - No. 5 at the Eaglehawk terminus .11 - No. 21 at No. 21 crossing on the Golden Square line. No. 29 showing special, No.21 - North Bendigo, Fire Station Loop? .12 - No. 29 and another tram - near work site? .13 - interior view from Birney looking at the front of another tram parked behind. .14 - No. 29, No. 6 crossing at .15 - No. 6, showing special at Charing Cross. .16 - No. 5 and another tram at North Bendigo on a Special .17 - No. 28 at Charing Cross .18 - No. 5 on Special at a Loop on the Eaglehawk line .19 - No. 28, and two other trams at the Myrtle St Loop .20 - No. 18 showing Quarry Hill and two other trams on View St.trams, tramways, bendigo, trackwork, mccrae st, depot, quarry hill, eaglehawk, golden square, controllers, north bendigo, view st, tram 29, tram 5, tram 24, tram 2, tram 3, tram 6, tram 28, tram 18 -
 Ballarat Tramway Museum
Photograph - Digital image Set of 20
Set of 20 digital images of Bendigo Tramways, 1972 at or before closure while on a tram tour by Stuart Lodington. .1 - No. 28 and 5 at Eaglehawk terminus .2 - No. 28 leaving Charing Cross and travelling into View St with Armstrong Type Service building in background and Firestone Advertisements. .3 - No. 29 with Eaglehawk Town Hall and Post Office in background. .4 - No. 26 and 29 at start of double track, High St Eaglehawk .5 - No. 29 leaving Eaglehawk with shops in the background, Foodland, J. Bests .6 - No. 29 and 23 crossing Manchester Loop with Manchester Arms Hotel in the background and an old poppet head. .7 - No. 29 at ditto with poppet head in the background. .8 - No. 28 and two other trams at the Quarry Hill terminus. .9 - No. 29 in High St Bendigo with the Cathedral and Golden Gate Hotel in the background. .10 - No. 3 with destination Eaglehawk, in bound Carpenter St? .11 - No. 29 following a single trucker through a loop or the end of the double track near the depot. .12 - No. 23?, at Eaglehawk terminus, with Eaglehawk Town Hall in the background. .13 - Birney tram crossing the bridge at the Depot entrance - No. 29 .14 - No. 29 on the Eaglehawk line? .15 - as for .13 .16 - No. 29 entering the depot. .17 - No. 23, inbound from Eaglehawk, at Jobs Gully Loop with the railway overbridge in the background. .18 - No. 28 and two other trams (see also Reg Item 4982) for the same tram tour at Myrtle St. Loop. .19 - No. 21 with North Bendigo on the destination approaching the Golden Square terminus. .20 - No. 7 at Golden Square terminustrams, tramways, bendigo, eaglehawk, quarry hill, golden square, depot, tram 5, tram 29, tram 28, tram 26, tram 23, tram 7, tram 21 -
 Ballarat Tramway Museum
Photograph - Digital image Set of 20, 1971-72
Set of 20 digital images of Bendigo Tramways, 1972 at or before closure while on a tram tour by Stuart Lodington. .1 - No. 7 at Golden Square terminus .2 - ditto .3 - No. 26 in bound on the Eaglehawk line with a crossing loop behind. .4 - Birney crossing the bridge by the tram depot. .5 - No. 29 running a special on the Eaglehawk line with a HBA billboard in the background. .6 - No. 29 with a driver walking in front of the tram at the above location. .7 - No. 29 on the Eaglehawk line .8 - ditto waiting for a tram at Manchester Loop with poppet head in the background. .9 - No. 29 on the Eaglehawk line .10 - Eaglehawk Town Hall at night. .11 - No. 7 at the depot junction in McCrae St, with Golden Square destination. .12 - No. 29 with the Camp Hotel Eaglehawk in the background. Also a Newsagent with The Sun, The Bendigo Advertiser and The Age signs on the building, High St .13 - No. 29 Mt Korong Rd, with the railway overbridge in the background. .14 - interior photo of Birney tram roof .15 - interior view of controls of Birney at Eaglehawk .16 - No. 29 outbound at the Depot Junction McCrae St. .17 - No. 18 at the Eaglehawk terminus .18 - close up view of No. 29 front. .19 - No. 29 in Nolan St, crossing the bridge, outbound. .20 - No. 18 at the Eaglehawk terminus with the Eaglehawk Town Hall, Post Office in the background. Has a circus banner on the side.trams, tramways, bendigo, eaglehawk, quarry hill, golden square, depot, mccrae st, nolan st, tram 7, tram 26, tram 29, tram 18 -
 Ballarat Tramway Museum
Photograph - Digital image Set of 20, 1971-72
... Eaglehawk Quarry Hill Golden Square Depot North Bendigo Charing ...Set of 20 digital images of Bendigo Tramways, 1972 at or before closure while on a tram tour by Stuart Lodington. .1 - No. 29 at the North Bendigo terminus .2 - No. 29 just past the Bendigo end of the double track in High St Eaglehawk, with a BP dealer in the background. .3 - Night photo of No. 18 at a terminus, showing "Eaglehawk" .4 - ditto .5 - Night photo of No. 24 at Eaglehawk with Leo A Hughes Photographer in the background. The Tram has "Johnnie Walker whiskey" roof adverts. .6 - No. 29 outbound in Thunder St with a train passing over the bridge in the background. .7 - view from the front window of a tram on the Eaglehawk line with a large "display event float" in the foreground and tram approaching a crossing loop. .8 - No. 29 at North Bendigo .9 - view of High St Eaglehawk looking east from the terminus, showing the track and centre poles. .10 - No. 29 outbound on the North Bendigo line turning from either Nolan St or Caledonia St, running a special. .11 - No. 7 departing North Bendigo for Golden Square. .12 - No. 3 and 18 at Charing Cross. No. 3 has two SEC roof Advertisements .13 - No. 7 at North Bendigo with the trolley pole being reversed. .14 - No. 24 at Quarry Hill with Northern Terrazzo in the background with the driver alongside .15 - No. 7 and No.6 at Charing Cross with the Beehive buildings in the background. .16 - No. 7 at North Bendigo terminus .17 - ditto .18 - No. 24 at Quarry Hill with Northern Terrazzo in the background with the conductor alongside. .19 - ditto .20 - No. 26 and other bogie tram in View St near Charing Cross with the Armstrong Tyre Service building and signs for Cohn's Drinks and T&G in the view.trams, tramways, bendigo, eaglehawk, quarry hill, golden square, depot, north bendigo, charing cross, tram 29, tram 18, tram 24, tram 3, tram 7, tram 6, tram 26 -
 Ballarat Tramway Museum
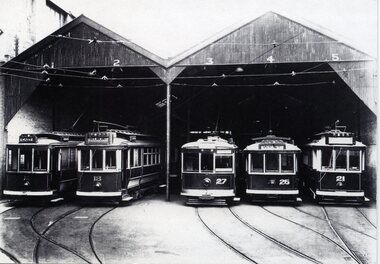
Photograph - Black & White Photograph/s, c1942
Yields information about the appearance of Bendigo Birney trams mid 1950's.Black and white photograph, printed onto card (inkjet printer?) of the Geelong depot with five trams parked - Nos. 2, 13, 27, 26 and 21 in the front. Roads marked 1 to 5. c1942"28 / Geelong publicity view taken about 1929 (crossed out), 1936 (crossed out) 1942? with WFS Collection in bottom left hand corner and "William Scott" address label in bottom right hand corner.trams, tramways, geelong, depot, tram 2, tram 13, tram 27, tram 26, tram 21 -
 Ballarat Tramway Museum
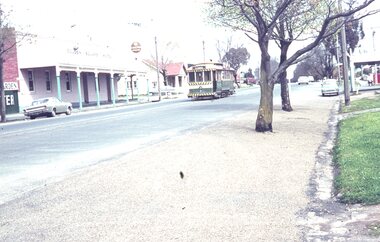
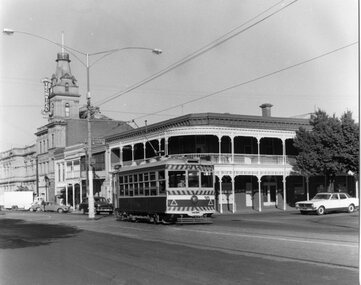
Photograph - Black & White Photograph/s, Chris Wurr, early 1970's
Yields information about the appearance of Bendigo Birney tram No. 11, stored at the depot, following an accident. Was not returned to service until after the SEC closed the tram system.Black and White Photograph of Bendigo No. 30, Birney, inbound to Charing Cross, McRae St, Bendigo, at Baxter St intersection? with the Bendigo Technical College in the background. Note the direction sign for "Heathcote". Tram has the destination of Golden Square. Photo Chris Wurr, early 1970's. "Photo by Chris Wurr" stamped on the rear.trams, tramways, bendigo, mccrae st, tram 30