Showing 4110 items
matching bendigo building
-
 Ballarat Tramway Museum
Photograph - Digital image Set of 20
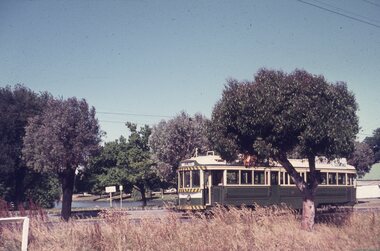
Set of 20 digital images of Bendigo Tramways, 1972 at or before closure while on a tram tour by Stuart Lodington. .1 - No. 28 and 5 at Eaglehawk terminus .2 - No. 28 leaving Charing Cross and travelling into View St with Armstrong Type Service building in background and Firestone Advertisements. .3 - No. 29 with Eaglehawk Town Hall and Post Office in background. .4 - No. 26 and 29 at start of double track, High St Eaglehawk .5 - No. 29 leaving Eaglehawk with shops in the background, Foodland, J. Bests .6 - No. 29 and 23 crossing Manchester Loop with Manchester Arms Hotel in the background and an old poppet head. .7 - No. 29 at ditto with poppet head in the background. .8 - No. 28 and two other trams at the Quarry Hill terminus. .9 - No. 29 in High St Bendigo with the Cathedral and Golden Gate Hotel in the background. .10 - No. 3 with destination Eaglehawk, in bound Carpenter St? .11 - No. 29 following a single trucker through a loop or the end of the double track near the depot. .12 - No. 23?, at Eaglehawk terminus, with Eaglehawk Town Hall in the background. .13 - Birney tram crossing the bridge at the Depot entrance - No. 29 .14 - No. 29 on the Eaglehawk line? .15 - as for .13 .16 - No. 29 entering the depot. .17 - No. 23, inbound from Eaglehawk, at Jobs Gully Loop with the railway overbridge in the background. .18 - No. 28 and two other trams (see also Reg Item 4982) for the same tram tour at Myrtle St. Loop. .19 - No. 21 with North Bendigo on the destination approaching the Golden Square terminus. .20 - No. 7 at Golden Square terminustrams, tramways, bendigo, eaglehawk, quarry hill, golden square, depot, tram 5, tram 29, tram 28, tram 26, tram 23, tram 7, tram 21 -
 Ballarat Tramway Museum
Photograph - Digital image Set of 20, 1971-72
Set of 20 digital images of Bendigo Tramways, 1972 at or before closure while on a tram tour by Stuart Lodington. .1 - No. 7 at Golden Square terminus .2 - ditto .3 - No. 26 in bound on the Eaglehawk line with a crossing loop behind. .4 - Birney crossing the bridge by the tram depot. .5 - No. 29 running a special on the Eaglehawk line with a HBA billboard in the background. .6 - No. 29 with a driver walking in front of the tram at the above location. .7 - No. 29 on the Eaglehawk line .8 - ditto waiting for a tram at Manchester Loop with poppet head in the background. .9 - No. 29 on the Eaglehawk line .10 - Eaglehawk Town Hall at night. .11 - No. 7 at the depot junction in McCrae St, with Golden Square destination. .12 - No. 29 with the Camp Hotel Eaglehawk in the background. Also a Newsagent with The Sun, The Bendigo Advertiser and The Age signs on the building, High St .13 - No. 29 Mt Korong Rd, with the railway overbridge in the background. .14 - interior photo of Birney tram roof .15 - interior view of controls of Birney at Eaglehawk .16 - No. 29 outbound at the Depot Junction McCrae St. .17 - No. 18 at the Eaglehawk terminus .18 - close up view of No. 29 front. .19 - No. 29 in Nolan St, crossing the bridge, outbound. .20 - No. 18 at the Eaglehawk terminus with the Eaglehawk Town Hall, Post Office in the background. Has a circus banner on the side.trams, tramways, bendigo, eaglehawk, quarry hill, golden square, depot, mccrae st, nolan st, tram 7, tram 26, tram 29, tram 18 -
 Ballarat Tramway Museum
Photograph - Digital image Set of 20, 1971-72
Set of 20 digital images of Bendigo Tramways, 1972 at or before closure while on a tram tour by Stuart Lodington. .1 - No. 29 at the North Bendigo terminus .2 - No. 29 just past the Bendigo end of the double track in High St Eaglehawk, with a BP dealer in the background. .3 - Night photo of No. 18 at a terminus, showing "Eaglehawk" .4 - ditto .5 - Night photo of No. 24 at Eaglehawk with Leo A Hughes Photographer in the background. The Tram has "Johnnie Walker whiskey" roof adverts. .6 - No. 29 outbound in Thunder St with a train passing over the bridge in the background. .7 - view from the front window of a tram on the Eaglehawk line with a large "display event float" in the foreground and tram approaching a crossing loop. .8 - No. 29 at North Bendigo .9 - view of High St Eaglehawk looking east from the terminus, showing the track and centre poles. .10 - No. 29 outbound on the North Bendigo line turning from either Nolan St or Caledonia St, running a special. .11 - No. 7 departing North Bendigo for Golden Square. .12 - No. 3 and 18 at Charing Cross. No. 3 has two SEC roof Advertisements .13 - No. 7 at North Bendigo with the trolley pole being reversed. .14 - No. 24 at Quarry Hill with Northern Terrazzo in the background with the driver alongside .15 - No. 7 and No.6 at Charing Cross with the Beehive buildings in the background. .16 - No. 7 at North Bendigo terminus .17 - ditto .18 - No. 24 at Quarry Hill with Northern Terrazzo in the background with the conductor alongside. .19 - ditto .20 - No. 26 and other bogie tram in View St near Charing Cross with the Armstrong Tyre Service building and signs for Cohn's Drinks and T&G in the view.trams, tramways, bendigo, eaglehawk, quarry hill, golden square, depot, north bendigo, charing cross, tram 29, tram 18, tram 24, tram 3, tram 7, tram 6, tram 26 -
 Ballarat Tramway Museum
Photograph - Digital image Set of 20, 1971-72
Set of 22 digital images of Bendigo Tramways, 1972 at or before closure while on a tram tour by Stuart Lodington. .1 - No. 7 arriving at North Bendigo .2 - No. 5 departing Charing Cross along View St, with a Firestone tyres in the background. .3 - front view of a tram in View St with a blurred background image. .4 - No. 24 showing Eaglehawk destination .5 - No 26 and 3 in View St, with the Armstrong Tyre Service building in the background and signs for T&G and Cohn's Drinks. .6 - ditto .7 - No. 3 arriving at Charing Cross from Eaglehawk in View St, with a Quarry Hill destination. .8 - No. 3 and 18 at Charing Cross. .9 - No. 24 on the Quarry Hill line. .10 - No 26 in View St, with the Armstrong Tyre Service building in the background and signs for T&G and Cohn's Drinks. .11 - ditto, with fountain in view, Colonial Mutual building and a newsagent with a Herald sign on the building. .12 - No. 7 at North Bendigo terminus .13 - ditto with pole being reversed. .14 - No. 18 at Quarry Hill terminus with Northern Terrazzo sign in the background. .15 - No. 24 at Quarry Hill terminus .16 - No. 18 arriving at Charring Cross, with Fountain Plaza and Bendigo Pharmacy in the background. .17 - No. 3 and 18 at Charing Cross. .18 - No. 7 at North Bendigo terminus with pole being placed on the overhead. .19 - No. 26 in View St inbound, with Sandhurst Trustees sign in the background. .20 - No. 6 leaving Charing Cross in Pall Mall with Myer and other buildings in the background. .21 - No. 7 at North Bendigo .22 - Single trucker with two roof Advertisements crossing View St with fountain in view, Colonial Mutual building and a newsagent with a Herald sign on the building.trams, tramways, bendigo, eaglehawk, quarry hill, north bendigo, charing cross, view st, tram 7, tram 5, tram 24, tram 26, tram 5, tram 3, tram 18, tram 6 -
 Ballarat Tramway Museum
Photograph - Digital image Set of 20, 9/12/1972 12:00:00 AM
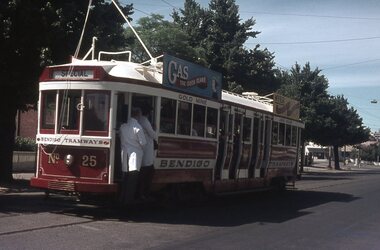
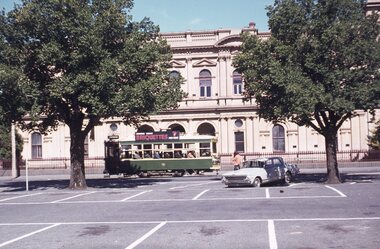
Set of 21 digital images of Bendigo Tramways, at the re-opening of the Bendigo tramways by the Bendigo Trust on 9/12/1972by Stuart Lodington. All trams in the first Bendigo Trust colours. .1 - No. 25 with Gas and Myer roof advertisements .2 - No. 30 with 3BO roof advert and a BP service station in the background. .3 - SEC single trucker at the Mine with a large "Tram Tours" sign on the front of the tram .4 - ditto .5 - No. 19 with a large group of passengers, Bendigo Motor Co and Sandhurst roof advertisements .6 - No. 30 in McCrae St .7 - view of opening march with band .8 - No. 19 in opening parade .9 - Opening Parade in High St with cathedral in the background .10 - No. 30 in Nolan St crossing bridge .11 - ditto .12 - No. 25 at the mine .13 - No. 30 leaving the mine .14 - No. 30 ditto with BCTV roof advert. .15 - Charing Cross with cenotaph, The Beehive building and Ezywalkin shoes and Coca Cola adverts .16 - No. 19 southbound in High St with City Centre Motel building in the background. .17 - No. 30 returning from North Bendigo .18 - No 25 in High St after leaving Gold Mine .19 - No. 30 at the Mine .20 - No. 30 in Nolan St .21 - No. 30 with 3BO roof advert and a BP service station in the background.trams, tramways, bendigo, north bendigo, charing cross, bendigo trust, central deborah, tram 25, tram 30, tram 19 -
 Ballarat Tramway Museum
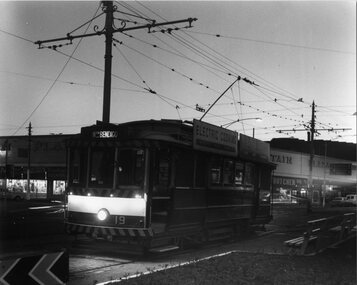
Photograph - Black & White Photograph/s, Chris Wurr, early 1970's
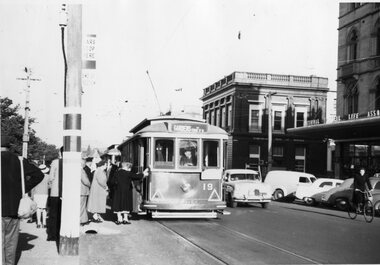
Yields information about the appearance of Bendigo Birney trams early 1970's and the North Bendigo area.Black and White Photograph of SEC Bendigo 19, late evening photograph, at Charing Cross with the Fountain Plaza building in the background. Tram has the destination of Nth Bendigo and SEC Electric Cooking roof advertisements. Photo Chris Wurr, early 1970's. "Photo by Chris Wurr" stamped on the rear.trams, tramways, bendigo, charing cross, night photo, tram 19 -
 Ballarat Tramway Museum
Photograph - Black & White Photograph/s, Chris Wurr, early 1970's
Yields information about the appearance of Bendigo Birney trams early 1970's and the McCrae St area.Black and White Photograph of Bendigo No. 7, in Pall Mall, at Charing Cross, with the destination of Golden Square. An inspector is leaning against the front door of the tram. Has in the background, The Beehive building, Coca Cola advertisement, Myers store and Stoneman's Shamrock Hotel. Photo Chris Wurr, early 1970's. "Photo by Chris Wurr" stamped on the rear.trams, tramways, bendigo, charing cross, pall mall, tram 7 -
 Ballarat Tramway Museum
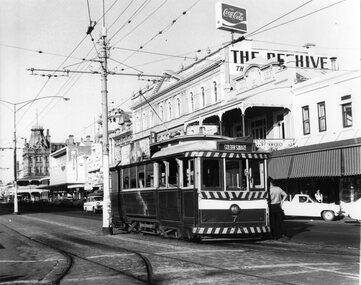
Photograph - Black & White Photograph/s, Andrew Ward, 15/01/1972 12:00:00 AM
Yields information about the appearance of Bendigo electric trams at the time of opening, how passengers could be seated, staff, paint schemes, decorations, and truck arrangements.Black and White photograph of four trams at Charing Cross, taken from the south east corner, looking towards the Beehive building and Ezywalkin stores. Trams 7, 5 and 26 in the photograph. Photo by Andrew Ward 15.1.1972.On rear in ink "Sat 15.1.72" / "single truck car 7 and bogie cars 5 & 26" in the top left hand corner and in a mix of ink and pencil "Bendigo Trust / Andrew C. Ward, Bendigo Vic 3550".trams, tramways, bendigo, charing cross, pall mall, tram 7, tram 5, tram 26 -
 Ballarat Tramway Museum
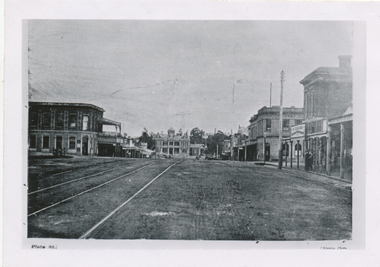
Postcard, Rose Stereograph Co, Charing Cross, Bendigo, mid 1900's
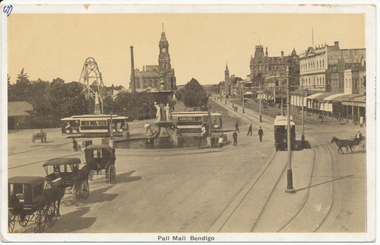
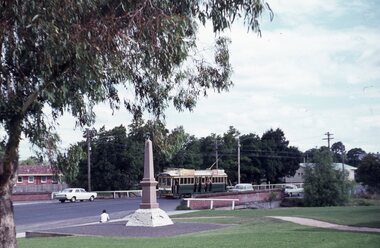
Demonstrates aspects of the development of the Bendigo tramways by ESCo prior to undertaking the Ballarat system. Yields information about Charing Cross soon after the electric tramway was opened.Black and White postcard, early 1900's view of Charing Cross, Bendigo looking towards the north, Pall Mall. Has three tram cars in the view, the fountain, centre poles, horse drawn cabs and vehicles, a poppet head and building on the east side of the Pall Mall. Divided back postcard with areas for message, address, and the stamp. Has "67)" in the top left hand corner of the back of the card, a circled "13" crossed out, "early 1900's" in ink. In the top right hand corner "$8" in pencil. On the front of the card has "67)" in the top left hand corner in ink.trams, tramways, bendigo, pall mall, charing cross, tram 4 -
 Ballarat Tramway Museum
Photograph - Two Bendigo Tramways Co. Ltd steam trams and trailers at Charing Cross, William Ninnis, 1898
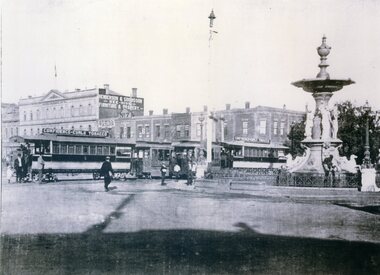
Black and White reproduction (copy by scanning and reprinting) of a image of two Bendigo Tramways Co. Ltd steam trams and trailers at Charing Cross. Appears to be trailers 3 and 4. Understood to be 1898. Shown as a William Ninnis photographer, held by the Bendigo Historical Society (crossed out) and Creative Image Photographic Collection, Both trailers have roof advertisements "Confidence-Curls Tobacco" and in the background is Henderson & Goodisson? Beehive building, advertising Furniture and Drapery. Also J. T. Mill Tailor. .1 - Black and White copy print contained within the Wal Jack Bendigo and Geelong Album, see Reg Item 5003 for more details. Added 1/7/2013In pencil "The Fountain 1898 / Bendigo Historic Society Inc Collection (crossed out) / Photographer William Ninnis" and in ink "Creative Image Photographic Collection". .1 - in ink on rear "Steam Trams at the Fountain" and in the bottom right hand corner "P.W. Duckett"trams, tramways, bendigo, steam trams, trailers, charing cross, tram 3, tram 4 -
 Ballarat Tramway Museum
Photograph - Black & White Photograph/s, The Bendigonian, Dec. 1896
Black and White copy print contained within the Wal Jack Bendigo and Geelong Album, see Reg Item 5003 for more details. Photograph of looking west along High St Eaglehawk, Dec 1896, shows steam tram track, buildings and vehicles. A steam tram and trailer is parked at the terminus. Copied by Keith Kings from The Bendigonian 24/12/1896. See Reg Item 5735 for a similar photograph.On rear in ink " S-A962, Bendigo, Steam Motor and 4 wheel (?) trailer at Eaglehawk terminus. Copied ex "The Bendigonian 24/12/1896."trams, tramways, bendigo, steam trams, eaglehawk -
 Ballarat Tramway Museum
Photograph - Black & White Photograph/s, Wal Jack, 8/08/1943 12:00:00 AM
... . Old Steam tram depot building, Mollison St Bendigo, 8 August... of the photograph, the building was used by the Bendigo Timber Co. i1 ...Black and White copy print contained within the Wal Jack Bendigo and Geelong Album, see Reg Item 5003 for more details. Old Steam tram depot building, Mollison St Bendigo, 8 August 1943, Photo Wal Jack. At the time of the photograph, the building was used by the Bendigo Timber Co. i1 - scan of print in the album i2 - rear of image i3 - scan of negative at 3200dpi added 6/6/2020..1 - On rear in ink "The old depot of the Bendigo Tramways Co. Ltd. Mollison St Bendigo 4-8-43". Has Wal Jack copyright stamp on print. trams, tramways, bendigo, steam trams, depot -
 Ballarat Tramway Museum
Photograph - Black & White Photograph/s, c1895
Black and White copy print contained within the Wal Jack Bendigo and Geelong Album, see Reg Item 5003 for more details. Copy photograph of a photograph from a book (Plate 1) showing a view along High St Eaglehawk, looking west, c1895. Shows buildings on both sides of the street. Has name J. Nimmon? or Ninnis (see btm 4372) in the bottom right hand corner. See also Reg item 5729 for a similar photograph. .1 - On rear in ink "Steam track tracks, Eaglehawk. (So much for the AETA boys who believe steam service did not cross the railway on the level!). In bottom right hand corner is "P. W. Duckett" trams, tramways, bendigo, high st, eaglehawk, steam trams -
 Ballarat Tramway Museum
Photograph - Black & White Photograph/s - first or opening tram to Eaglehawk, April 1903, Apr. 1903
Copy photograph of first or opening tram to Eaglehawk, April 1903 at Charing Cross. Tram is towing a small single deck trailer. In the background are buildings for C. Plumbe (tailor), Havelock tobacco, Williams spot cash and Louis Germann. See Keith Kings, Bendigo Tramways, ARHS 1972 page 29 for date. Two copies held.Yields information about the opening of the Bendigo Eaglehawk tram line,.Black and White copy print contained within the Wal Jack Bendigo and Geelong Album, see Reg Item 5003 for more details."13" in ink on rear.trams, tramways, bendigo, opening, esco, charing cross -
 Ballarat Tramway Museum
Photograph - Bendigo No. 1 - Easter Fair, Wal Jack, Easter Saturday 1941
Photograph of ESCo tram No. 1 entering Pall Mall from the Eaglehawk line, side view probably running into the depot. The tram has been modified with bracing and open saloon seats changed from cross bench to longitudinal and has been painted in SEC 1930s colours with an SEC monogram. The conductor is standing in the front saloon. Photo taken Easter Saturday 1941. See item 9100 for a similar photo. In the background are signs or buildings for J. B. Edwards Opticians and Pelaco collars, shirts and Pyjamas. i1 - scan of print in the album i2 - rear of image i3 - scan of negative at 3200dpi added 6/6/2020. Yields information about Bendigo 1 Easter 1941.Black and White print contained within the Wal Jack Bendigo and Geelong Album, see Reg Item 5003 for more details.On rear in ink "T195, Bendigo / No. 1 (Original type), Pall Mall, Easter Saturday 1941. Photo W. Jack.trams, tramways, bendigo, esco, secv, pall mall, tram 1 -
 Ballarat Tramway Museum
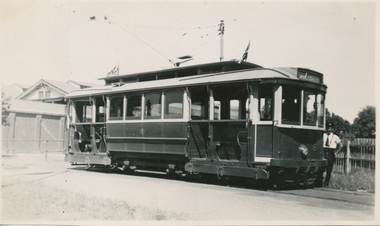
Photograph - Bendigo tram No. 6 at depot, Wal Jack, 7/07/1954
Photo of No. 6 outside the depot with the bridge and depot building in the background. Has a driver standing by the front of the tram. Tram has the destination of Eaglehawk. Taken by Wal Jack on 7-3-1954. See image i2 for rear of photograph. Two copies held. See image i3 for hi-res scan of negativeYields information about Bendigo tram No. 6Black and White print contained within the Wal Jack Bendigo and Geelong Album, see Reg Item 5003 for more details.On the rear in ink "SEC Bendigo, No. 6 outside depot 7-3-54". Has the Wal Jack copyright stamp in the top right hand corner with number "T69PC" written in.trams, tramways, bendigo, depot, tram 6 -
 Ballarat Tramway Museum
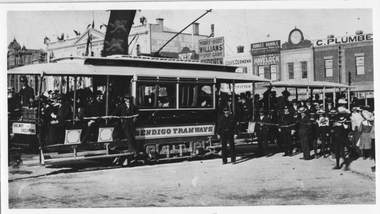
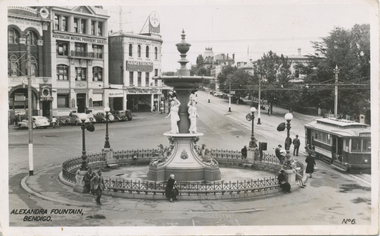
Postcard, Valentine & Sons Publishing Co, Valentines Series Postcard, No 6 of the Alexandra Fountain, Bendigo
Black and White postcard contained within the Wal Jack Bendigo and Geelong Album, see Reg Item 5003 for more details. Valentines Series Postcard, No 6 of the Alexandra Fountain, Bendigo. Charing Cross. Has a single trucker in the photo with the destination of Eaglehawk. In the back ground is the Australian Mutual Provident Society Building, Colonial Mutual Life building and Armstrong tyre service building. On rear of card is Valentine's name with space for written notes and stamps. Has a handwritten message to Wal Jack from Roy Field of Sydney, dated 21-6-1949 and 1d and 1/2 stamps. trams, tramways, bendigo, charing cross, alexandra fountain, tram 22 -
 Ballarat Tramway Museum
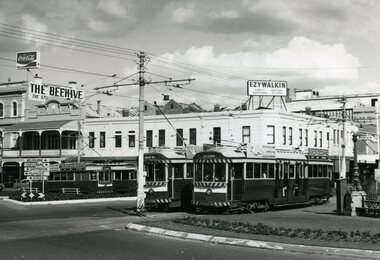
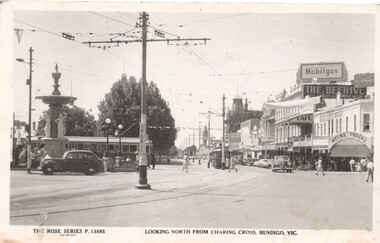
Postcard, Rose Stereograph Co, "Looking north from Charing Cross Bendigo Vic", c1950
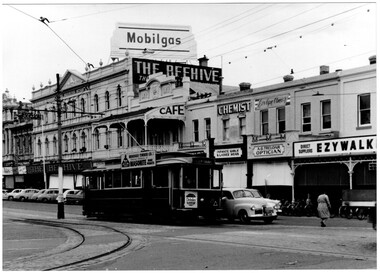
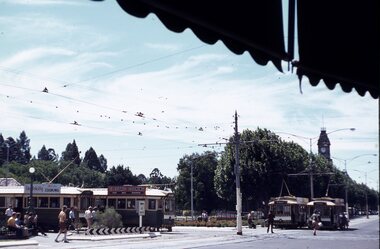
Black and white postcard of Charing Cross Bendigo, early 1950's or late 1940's. Rose Series postcard P13585, of a bogie tram heading to Eaglehawk behind the fountain and a single trucker heading for Golden Square hidden behind a pole. A number of motor cars in the scene along with people in summer clothing. In the background is the Beehive building, Mobilgas advertisement on top of the Beehive building and "Melba Frocks" shop on the corner, later Ezywalkin shoes. The postcard has the title underneath of "Looking north from Charing Cross Bendigo Vic". Divided back type with Rose Postcard Rose logo and that it was published by the Rose Stereograph Co. Armadale Victoria. Has not been used.trams, tramways, bendigo, charing cross, rose postcards -
 Ballarat Tramway Museum
Photograph - Black & White Photograph/s, mid to late 1950's
Demonstrates the use of the trams in the city area of Ballarat, late 1950's and their use.Black and white photograph of Ballarat 27, loading passengers at the intersection of Sturt and Lydiard St, City, late in a summer evening. Tram has the destination of Gardens via Sturt St West and an auxiliary board, but it cant be read. A number of passengers are boarding. Has the Commonwealth Bank building in the background, and the tram stop signs on the pole in front of the photo. Photographer unknown - see history of object. See Keith Kings, The Bendigo Tramways, re the fitting of reflective tape in 1956, page 59.In the rear in pencil - "Ballarat"trams, tramways, city, sturt st, lydiard st, tram 27 -
 Ballarat Tramway Museum
Photograph - Black & White Photograph/s, mid to late 1950's
Demonstrates the use of the trams in the city area of Ballarat, late 1950's and their use.Black and white photograph of Ballarat 19, loading passengers at the intersection of Sturt and Lydiard St, City, late in a summer evening. Tram has the destination of Gardens via Sturt St West and an auxiliary board, but it cant be read. Many passengers are boarding. Has the Commonwealth Bank building in the background, and the tram stop signs on the pole in front of the photo. Photographer unknown - see history of object. See Keith Kings, The Bendigo Tramways, re the fitting of reflective tape in 1956, page 59.In the rear in pencil - "Ballarat"trams, tramways, city, sturt st, lydiard st, tram 19 -
 Ballarat Tramway Museum
Photograph - Black & White Photograph/s, mid to late 1950's
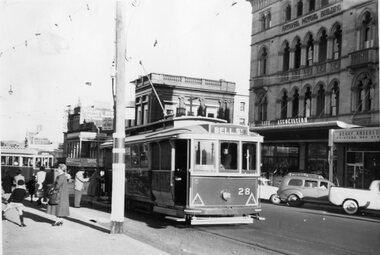
Demonstrates the use of the trams in the city area of Ballarat, late 1950's and their use.Black and white photograph of Ballarat 28 and a bogie tram at the Sturt St City stop, south side. No. 28 has the destination of Bell St. In the background are the Commonwealth Bank, Berry Anderson printers and the National Mutual building. A number of passengers are boarding the tram. Photographer unknown - see history of object. Keith Kings, The Bendigo Tramways, re the fitting of reflective tape in 1956, page 59.In the rear in pencil - "Ballarat"trams, tramways, city, sturt st, lydiard st, tram 28 -
 Ballarat Tramway Museum
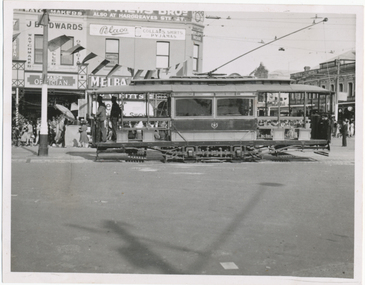
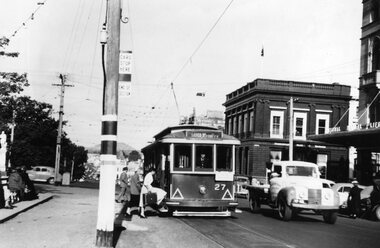
Photograph - Black & White Photograph/s, Bendigo tram 21 in Pell Mall, late 1950's
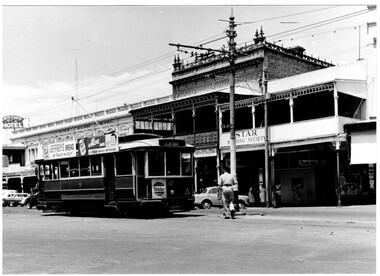
Black and White photograph, of Bendigo 21 with the destination of Golden Square, in the Pall Mall, approaching Charing Cross, during the mid to late 1950's. Tram has a roof advert for Bendigo Timber Co. Masonite and a Cohn's Drink ad on the front of the tram. In the background are roof advert for Mobilgas on the Beehive Building, Ezywalkin building, A. G. Treloar Optician and Evlyn Amer? shop for Infants Girls and Ladies Wear. There is a large number of Holden motor cars in the photos along with bicycles parked by the Ezywalkin shop. Printed on Fujichrome paper. Two copies held."TMSV Sales" stamp on rear. On rear of in ink "MMTB 188, Bendigo 21"trams, tramways, bendigo, charing cross, pall mall, tram 21 -
 Ballarat Tramway Museum
Photograph - Black & White, Bendigo 12 leaving Charing Cross, late 1950's
Black and White photograph, of Bendigo12 with destination of Golden Square, leaving Charing Cross in High St, during the mid to late 1950's. Tram has roof adverts for Jeffreys Bread, Alva Jams and a Cohn's Drink ad on the front drivers panel. In the background are the City Club Hotel and Start Building Society buildings. Printed on Fujichrome paper. Two copies held."TMSV Sales" stamp on rear. On rear of in ink 'HTT1 = MM107 = BED 19, Renumbered 12"trams, tramways, bendigo, charing cross, high st, tram 12 -
 Ballarat Tramway Museum
Slide - 35mm slide/s - set of 5, Eldon Hogan, 1/78 or late 1977
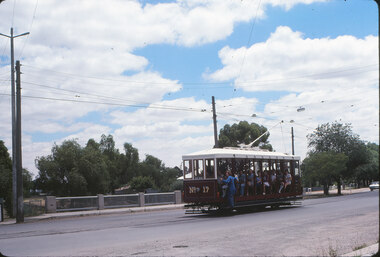
Set of five Kodak cardboard mounted slides - featuring photos taken during a visit to Bendigo Tour by Eldon Hogan. Slides have slide number (10 to 14) and date "Jan 78" stamped onto them. Scanned on the Canon scanner at the depot 15/12/1971 at the time of the installation of the scanner. .1 - No. 17 Nolan St .2 - No. 25 with Myer Roof Advertisement and No. 28 at Depot. .3 - No. 25 at Central Deborah Mine terminus .4 - No. 17 at North Bendigo terminus .5 - No. 17, Pall Mall at City terminus with the Beehive Building in the background.tramways, trams, bendigo, bendigo trust, nolan st, depot, central deborah, north bendigo, pall mall, tram 17, tram 25, tram 28 -
 Ballarat Tramway Museum
Slide - 35mm slide/s - set of 11, Eldon Hogan, mid 1960's to early 1970's
Set of 11 Agfa Plastic mounted slides - from the Eldon Hogan collection - possibly on an ARE Bendigo tours - mid 1960's (black destination rolls) and late 1960's or early 1970's. Scanned on the Canon scanner at the depot 15/12/1971 at the time of the installation of the scanner. .1 - No 18 with Lake Weeroona in the background - possibly at the same time as the tour with No. 18, though showing destination of Charing Cross. .2 - ditto .3 - No. 25 and two following trams on a special tour, note the white disc - Quarry Hill line? .4 - No. 29 on the Eaglehawk line at the Mt. Korong Road and the Calder Highway, with the Ampol Service station in the background. .5 - No. 29 passing Lake Weeroona with Destination of Nth Bendigo - has a Briquettes Roof Advertisement., .6 - No. 26 ditto - with two SEC Roof Advertisements. .7 - No. 24 leaving Charing Cross for Golden Square with The Beehive building, Ezywalkin, Coca Cola and the Fountain Shopping Centre in the background. .8 - No. 29 and a bogie tram at the Golden Square terminus with Golden Square Hotel and Victoria Bitter fence in the background. No. 29 has a SEC Briquettes roof advertisement. .9 - No. 29, with the Cathedral in background. Tram has a SEC Briquettes roof advertisement and destination of Golden Square. .10 - side view of a bogie tram on the Eaglehawk line? Tram has a Electric cooking roof advertisement. Photo has been over exposed. .11 - Single trucker, Violet St with the Central Deborah mine head in the background. Tram has two SEC Electric Cooking roof advertisements. tramways, trams, bendigo, lake weeroona, eaglehawk, golden square, charing cross, central deborah, tram 18, tram 25, tram 29, tram 24 -
 Ballarat Tramway Museum
Slide - 35mm slide/s - set of 10, Eldon Hogan, mid 1960's to early 1970's
Set of 10 Agfa Plastic mounted slides - from the Eldon Hogan collection - possibly on an ARE Bendigo tours - mid 1960's (black destination rolls) and late 1960's or early 1970's. Scanned on the Canon scanner at the depot 15/12/1971 at the time of the installation of the scanner. .1 - No. 24 in bound along High St Bendigo with the discovery of gold monument in the foreground, Golden Sq route. .2 - ditto .3 - No. 26 outbound at the above location. .4 - No. 24 at the corner of Short St and High St, with the Technical college building? in the background. .5 - No. 26 at ditto, outbound for Golden Square. .6 - No. 24, High St Bendigo, with the Cathedral in the background. Tram has two Johnnie Walker Whiskey roof advertisements. .7 - Three trams, Pall Mall, Charing Cross, with the Beehive building in the background. Trams have SEC roof advertisement. .8 - ditto with Coca Cola ad on the Beehive building, turning around. .9 - No. 29 and a bogie tram at the Golden Square terminus with Billy Rodda's Golden Square Hotel in the background. Just past the tram is a large truck carrying boxes. .10 - Nos, 18, a bogie tram, 21 and 29 at the Quarry Hill terminus. tramways, trams, bendigo, tram 18, tram 24, tram 26, tram 21, tram 29 -
 Ballarat Tramway Museum
Slide - 35mm slide/s - set of 11, Eldon Hogan, mid 1960's to early 1970's
Set of 11 Agfa Plastic mounted slides - from the Eldon Hogan collection - featuring an ARE tour with Nos. 21, 29 and 25 to Bendigo, mid 1960's. Scanned on the Canon scanner at the depot 15/12/1971 at the time of the installation of the scanner. .1 - No. 29 passing the Institute of Technology building, McCrae St. .2 - ditto .3 - Nos. 21 and 29 Lake Weeroona .4 - Nos. 29, 21 and 25 at the Golden Square Terminus with the Golden Square Hotel, Victoria Bitter fence in the background. .5 - ditto with a service car? .6 - ditto .7 - No. 21 with the Central Deborah mine poppet head in the background, Violet St. .8 - ditto with 21 and 29 .9 - ditto with 29 .10 - ditto with 21 and 29 .11 - 21, 29 and 25? at depot junction. Trams have SEC roof advertisements. tramways, trams, bendigo, lake weeroona, golden square, central deborah, tram 21, tram 29, tram 25 -
 Ballarat Tramway Museum
Slide - 35mm slide/s - set of 11, Eldon Hogan, mid 1960's to early 1970's
Set of 11 Agfa Plastic mounted slides - from the Eldon Hogan collection - featuring an ARE tour with Nos. 21, 29 and 25 to Bendigo, mid 1960's. Scanned on the Canon scanner at the depot 15/12/1971 at the time of the installation of the scanner. .1 - four trams at Charing Cross - includes 19 and 25. .2 - 21 and 25 at the depot junction. .3 - 21 and 29 Quarry Hill route? .4 - 29 ditto .5 - 24 at Golden Square terminus - photo taken from the city side - note all the little shops and buildings on the left hand side of the photograph. .6 - 29, 21 and 25 at Eaglehawk .7 - 29 - side on view - Eaglehawk line? .8 - ditto with 21 .9 - 29 - North Bendigo line? - side on view .10 - 29 and 21 - vacant paddocks - Eaglehawk line .11 - 29 crossing the railway overbridge, Eaglehawk line, in bound. Trams have SEC roof advertisements. tramways, trams, bendigo, eaglehawk, charing cross, golden square, tram 21, tram 29, tram 25, tram 19 -
 Ballarat Tramway Museum
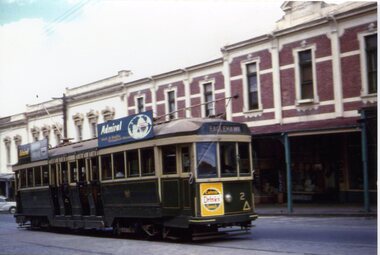
Photograph - Black & White Photograph/s - set of 3, Ron Hann, 26/12/1959 12:00:00 AM
Yields information about the principal intersection following the opening of electric trams, with an electric tram in photo and prior to a parade.Colour prints on laser print paper - of Bendigo 2 climbing the hill in View St Bendigo, 26/12/1959 enroute to Eaglehawk. Show streetscape, centre poles and buildings. The tram has a Cohn's drink ad on the front panel and two roof advertisements for Admiral Televisions and the destination of Eaglehawk. Printed on Fujifilm, Fujicolor Crystal Archive for Frontier"Has labels "References T3116, T3117 and T3118 Photo by Ron Hann" and another label "Bendigo 26.12.59" on rear.trams, tramways, view st, bendigo, tram 2 -
 Ballarat Tramway Museum
Photograph - Black & White Photograph/s, Wal Jack, 10/04/1950 12:00:00 AM
Black and White print contained within the Wal Jack Bendigo and Geelong Album, see Reg Item 5003 for more details. Photo of No. 24 leaving Charing Cross in View St with the destination of Eaglehawk, photo by Wal Jack 10-4-1950. Has the Beehive in the background, a single trucker at Charing Cross, and other buildings. i1 - scan of print in the album i2 - rear of image i3 - scan of negative at 3200dpi added 6/6/2020. On the rear in blue ink "SEC Bendigo No 24 bogie in View St Bendigo 10-4-50" with Wal Jack copyright stamp in the top right hand corner and the number "T216" written in.trams, tramways, bendigo, charing cross, view st, tram 24