Showing 916 items
matching family days
-
 Flagstaff Hill Maritime Museum and Village
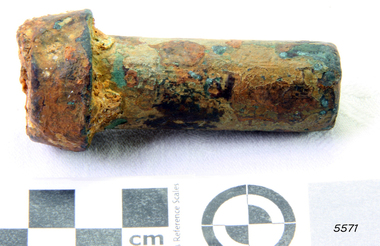
Rivet
HISTORY OF THE LOCH ARD The LOCH ARD belonged to the famous Loch Line which sailed many ships from England to Australia. Built in Glasgow by Barclay, Curdle and Co. in 1873, the LOCH ARD was a three-masted square rigged iron sailing ship. The ship measured 262ft 7" (79.87m) in length, 38ft (11.58m) in width, 23ft (7m) in depth and had a gross tonnage of 1693 tons. The LOCH ARD's main mast measured a massive 150ft (45.7m) in height. LOCH ARD made three trips to Australia and one trip to Calcutta before its final voyage. LOCH ARD left England on March 2, 1878, under the command of Captain Gibbs, a newly married, 29 year old. She was bound for Melbourne with a crew of 37, plus 17 passengers and a load of cargo. The general cargo reflected the affluence of Melbourne at the time. On board were straw hats, umbrella, perfumes, clay pipes, pianos, clocks, confectionary, linen and candles, as well as a heavier load of railway irons, cement, lead and copper. There were items included that intended for display in the Melbourne International Exhibition in 1880. The voyage to Port Phillip was long but uneventful. At 3am on June 1, 1878, Captain Gibbs was expecting to see land and the passengers were becoming excited as they prepared to view their new homeland in the early morning. But LOCH ARD was running into a fog which greatly reduced visibility. Captain Gibbs was becoming anxious as there was no sign of land or the Cape Otway lighthouse. At 4am the fog lifted. A man aloft announced that he could see breakers. The sheer cliffs of Victoria's west coast came into view, and Captain Gibbs realised that the ship was much closer to them than expected. He ordered as much sail to be set as time would permit and then attempted to steer the vessel out to sea. On coming head on into the wind, the ship lost momentum, the sails fell limp and LOCH ARD's bow swung back. Gibbs then ordered the anchors to be released in an attempt to hold its position. The anchors sank some 50 fathoms - but did not hold. By this time LOCH ARD was among the breakers and the tall cliffs of Mutton Bird Island rose behind the ship. Just half a mile from the coast, the ship's bow was suddenly pulled around by the anchor. The captain tried to tack out to sea, but the ship struck a reef at the base of Mutton Bird Island, near Port Campbell. Waves broke over the ship and the top deck was loosened from the hull. The masts and rigging came crashing down knocking passengers and crew overboard. When a lifeboat was finally launched, it crashed into the side of LOCH ARD and capsized. Tom Pearce, who had launched the boat, managed to cling to its overturned hull and shelter beneath it. He drifted out to sea and then on the flood tide came into what is now known as LOCH ARD Gorge. He swam to shore, bruised and dazed, and found a cave in which to shelter. Some of the crew stayed below deck to shelter from the falling rigging but drowned when the ship slipped off the reef into deeper water. Eva Carmichael had raced onto deck to find out what was happening only to be confronted by towering cliffs looming above the stricken ship. In all the chaos, Captain Gibbs grabbed Eva and said, "If you are saved Eva, let my dear wife know that I died like a sailor". That was the last Eva Carmichael saw of the captain. She was swept off the ship by a huge wave. Eva saw Tom Pearce on a small rocky beach and yelled to attract his attention. He dived in and swam to the exhausted woman and dragged her to shore. He took her to the cave and broke open case of brandy which had washed up on the beach. He opened a bottle to revive the unconscious woman. A few hours later Tom scaled a cliff in search of help. He followed hoof prints and came by chance upon two men from nearby Glenample Station three and a half miles away. In a state of exhaustion, he told the men of the tragedy. Tom returned to the gorge while the two men rode back to the station to get help. By the time they reached LOCH ARD Gorge, it was cold and dark. The two shipwreck survivors were taken to Glenample Station to recover. Eva stayed at the station for six weeks before returning to Ireland, this time by steamship. In Melbourne, Tom Pearce received a hero's welcome. He was presented with the first gold medal of the Royal Humane Society of Victoria and a £1000 cheque from the Victorian Government. Concerts were performed to honour the young man's bravery and to raise money for those who lost family in the LOCH ARD disaster. Of the 54 crew members and passengers on board, only two survived: the apprentice, Tom Pearce and the young woman passenger, Eva Carmichael, who lost all of her family in the tragedy. Ten days after the LOCH ARD tragedy, salvage rights to the wreck were sold at auction for £2,120. Cargo valued at £3,000 was salvaged and placed on the beach, but most washed back into the sea when another storm developed. The wreck of LOCH ARD still lies at the base of Mutton Bird Island. Much of the cargo has now been salvaged and some was washed up into what is now known as LOCH ARD Gorge. Cargo and artefacts have also been illegally salvaged over many years before protective legislation was introduced. One of the most unlikely pieces of cargo to have survived the shipwreck was a Minton porcelain peacock - one of only nine in the world. The peacock was destined for the Melbourne International Exhibition in 1880. It had been well packed, which gave it adequate protection during the violent storm. Today, the Minton peacock can be seen at the Flagstaff Hill Maritime Museum in Warrnambool. From Australia's most dramatic shipwreck it has now become Australia's most valuable shipwreck artefact and is one of very few 'objects' on the Victorian State Heritage Register. Flagstaff Hill’s collection of artefacts from LOCH ARD is significant for being one of the largest collections of artefacts from this shipwreck in Victoria. It is significant for its association with the shipwreck, which is on the Victorian Heritage Register (VHR S417). The collection is significant because of the relationship between the objects, as together they have a high potential to interpret the story of the LOCH ARD. The LOCH ARD collection is archaeologically significant as the remains of a large international passenger and cargo ship. The LOCH ARD collection is historically significant for representing aspects of Victoria’s shipping history and its potential to interpret sub-theme 1.5 of Victoria’s Framework of Historical Themes (living with natural processes). The collection is also historically significant for its association with the LOCH ARD, which was one of the worst and best known shipwrecks in Victoria’s history. Copper cargo rivet, still with encrustations. Recovered from the wreck of the Loch Ard. Artefact Reg No LA/73.flagstaff hill, warrnambool, shipwrecked coast, flagstaff hill maritime museum, maritime museum, shipwreck coast, flagstaff hill maritime village, great ocean road, loch line, loch ard, captain gibbs, eva carmichael, tom pearce, glenample station, mutton bird island, loch ard gorge, copper cargo rivet, cargo rivet -
 Flagstaff Hill Maritime Museum and Village
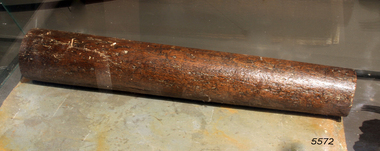
Equipment - Ships Yard End, 1876-1877
The Loch Ard got its name from ”Loch Ard” a loch which lies to the west of Aberfoyle, and the east of Loch Lomond. It means "high lake" in Scottish Gaelic. The vessel belonged to the famous Loch Line which sailed many vessels from England to Australia. The Loch Ard was built in Glasgow by Barclay, Curdle and Co. in 1873, the vessel was a three-masted square-rigged iron sailing ship that measured 79.87 meters in length, 11.58 m in width, and 7 m in depth with a gross tonnage of 1693 tons with a mainmast that measured a massive 45.7 m in height. Loch Ard made three trips to Australia and one trip to Calcutta before its fateful voyage. Loch Ard left England on March 2, 1878, under the command of 29-year-old Captain Gibbs, who was newly married. The ship was bound for Melbourne with a crew of 37, plus 17 passengers. The general cargo reflected the affluence of Melbourne at the time. Onboard were straw hats, umbrella, perfumes, clay pipes, pianos, clocks, confectionery, linen and candles, as well as a heavier load of railway irons, cement, lead and copper. There were other items included that were intended for display in the Melbourne International Exhibition of 1880. The voyage to Port Phillip was long but uneventful. Then at 3 am on June 1, 1878, Captain Gibbs was expecting to see land. But the Loch Ard was running into a fog which greatly reduced visibility. Captain Gibbs was becoming anxious as there was no sign of land or the Cape Otway lighthouse. At 4 am the fog lifted and a lookout aloft announced that he could see breakers. The sheer cliffs of Victoria's west coast came into view, and Captain Gibbs realised that the ship was much closer to them than expected. He ordered as much sail to be set as time would permit and then attempted to steer the vessel out to sea. On coming head-on into the wind, the ship lost momentum, the sails fell limp and Loch Ard's bow swung back towards land. Gibbs then ordered the anchors to be released in an attempt to hold its position. The anchors sank some 50 fathoms - but did not hold. By this time the ship was among the breakers and the tall cliffs of Mutton Bird Island rose behind. Just half a mile from the coast, the ship's bow was suddenly pulled around by the anchor. The captain tried to tack out to sea, but the ship struck a reef at the base of Mutton Bird Island, near Port Campbell. Waves subsequently broke over the ship and the top deck became loosened from the hull. The masts and rigging came crashing down knocking passengers and crew overboard. When a lifeboat was finally launched, it crashed into the side of Loch Ard and capsized. Tom Pearce, who had launched the boat, managed to cling to its overturned hull and shelter beneath it. He drifted out to sea and then on the flood tide came into what is now known as Loch Ard Gorge. He swam to shore, bruised and dazed, and found a cave in which to shelter. Some of the crew stayed below deck to shelter from the falling rigging but drowned when the ship slipped off the reef into deeper water. Eva Carmichael a passenger had raced onto the deck to find out what was happening only to be confronted by towering cliffs looming above the stricken ship. In all the chaos, Captain Gibbs grabbed Eva and said, "If you are saved Eva, let my dear wife know that I died like a sailor". That was the last Eva Carmichael saw of the captain. She was swept off the ship by a huge wave. Eva saw Tom Pearce on a small rocky beach and yelled to attract his attention. He dived in and swam to the exhausted woman and dragged her to shore. He took her to the cave and broke the open case of brandy which had washed up on the beach. He opened a bottle to revive the unconscious woman. A few hours later Tom scaled a cliff in search of help. He followed hoof prints and came by chance upon two men from nearby Glenample Station three and a half miles away. In a complete state of exhaustion, he told the men of the tragedy. Tom then returned to the gorge while the two men rode back to the station to get help. By the time they reached Loch Ard Gorge, it was cold and dark. The two shipwreck survivors were taken to Glenample Station to recover. Eva stayed at the station for six weeks before returning to Ireland by steamship. In Melbourne, Tom Pearce received a hero's welcome. He was presented with the first gold medal of the Royal Humane Society of Victoria and a £1000 cheque from the Victorian Government. Concerts were performed to honour the young man's bravery and to raise money for those who lost family in the disaster. Of the 54 crew members and passengers on board, only two survived: the apprentice, Tom Pearce and the young woman passenger, Eva Carmichael, who lost her family in the tragedy. Ten days after the Loch Ard tragedy, salvage rights to the wreck were sold at auction for £2,120. Cargo valued at £3,000 was salvaged and placed on the beach, but most washed back into the sea when another storm developed. The wreck of Loch Ard still lies at the base of Mutton Bird Island. Much of the cargo has now been salvaged and some items were washed up into Loch Ard Gorge. Cargo and artefacts have also been illegally salvaged over many years before protective legislation was introduced in March 1982. One of the most unlikely pieces of cargo to have survived the shipwreck was a Minton majolica peacock- one of only nine in the world. The peacock was destined for the Melbourne 1880 International Exhibition in. It had been well packed, which gave it adequate protection during the violent storm. Today the Minton peacock can be seen at the Flagstaff Hill Maritime Museum in Warrnambool. From Australia's most dramatic shipwreck it has now become Australia's most valuable shipwreck artifact and is one of very few 'objects' on the Victorian State Heritage Register.The shipwreck of the Loch Ard is of significance for Victoria and is registered on the Victorian Heritage Register ( S 417). Flagstaff Hill has a varied collection of artefacts from Loch Ard and its collection is significant for being one of the largest accumulation of artefacts from this notable Victorian shipwreck. The collections object is to also give us a snapshot into history so we can interpret the story of this tragic event. The collection is also archaeologically significant as it represents aspects of Victoria's shipping history that allows us to interpret Victoria's social and historical themes of the time. The collections historically significance is that it is associated unfortunately with the worst and best-known shipwreck in Victoria's history. Broken off end section of the Yard-arm from the Loch Ard. Artefact Reg No LA/33.Inscription Loch Ard flagstaff hill, warrnambool, shipwrecked coast, flagstaff hill maritime museum, maritime museum, shipwreck coast, flagstaff hill maritime village, great ocean road, loch line, loch ard, captain gibbs, eva carmichael, tom pearce, glenample station, mutton bird island, loch ard gorge, yard-arm -
 Flagstaff Hill Maritime Museum and Village
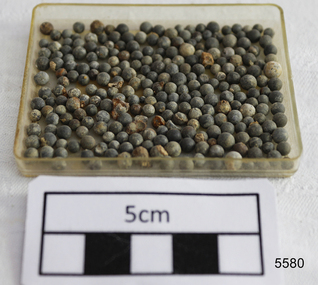
Lead shot, Before 1878
The objects comprise a quantity of small calibre lead shot raised from the LOCH ARD shipwreck site by Flagstaff Hill divers in 1976. The Maritime Village’s collection has companion pieces. The three masted, iron hulled, LOCH ARD was wrecked against the tall limestone cliffs of Mutton Bird Island in the early hours of the first of June 1878. Included in her diverse and valuable cargo were 22 tons of lead shot, packed in cloth bags and wooden casks. Bulk quantities of lead shot, uniformly round balls of dull grey metal ranging from 2mm “birdshot” to 8mm “buckshot”, were routinely exported to the Australian colonies. Shot was used mostly as projectiles fired from smooth bored guns to bring down moving targets such as wild ducks and small game. It was also useful as ballast, when a dense, “pourable” weight was required to fill cavities or establish volume within a measuring container. The production of consistently round spheres of lead shot required the pouring of molten metal through a sieve and then a long drop through the atmosphere to a water filled basin for final cooling and collection. This “shot tower” process was first patented by William Watts of Bristol in 1782. His calculation of a 150 feet fall was not only to form evenly spherical droplets through surface tension, but also to provide partial cooling and solidification to each shot before they hit the water below. The value of his innovation was the minimising of indentation and shape distortion, avoiding the expense of re-smelting and re-moulding the lead. Lead shot was already being produced in Australia at the time the LOCH ARD loaded her cargo and left Gravesend on the second of March 1878. James Moir constructed a 157 feet circular stone shot tower near Hobart in 1870, with a peak annual production of 100 tons of lead shot sold in 28 pound linen bags. However colonial demand exceeded this source of local supply. The continued strength of the market for lead shot in the Colony of Victoria prompted substantial investment in additional productive capacity in Melbourne in the next decade. In 1882 Richard Hodgson erected the 160 feet round chimney-shaped Clifton Hill shot tower on Alexandra Parade (VHR H0709) and in 1889 Walter Coop built the 160 feet square tower-shaped Melbourne Central shot tower on La Trobe Street (VHR H0067). At its peak, the Coop Tower produced 6 tons of lead shot per week, or 312 tons per annum. HISTORY OF THE LOCH ARD The LOCH ARD belonged to the famous Loch Line which sailed many ships from England to Australia. Built in Glasgow by Barclay, Curdle and Co. in 1873, the LOCH ARD was a three-masted square rigged iron sailing ship. The ship measured 262ft 7" (79.87m) in length, 38ft (11.58m) in width, 23ft (7m) in depth and had a gross tonnage of 1693 tons. The LOCH ARD's main mast measured a massive 150ft (45.7m) in height. LOCH ARD made three trips to Australia and one trip to Calcutta before its final voyage. LOCH ARD left England on March 2, 1878, under the command of Captain Gibbs, a newly married, 29 year old. She was bound for Melbourne with a crew of 37, plus 17 passengers and a load of cargo. The general cargo reflected the affluence of Melbourne at the time. On board were straw hats, umbrella, perfumes, clay pipes, pianos, clocks, confectionary, linen and candles, as well as a heavier load of railway irons, cement, lead and copper. There were items included that intended for display in the Melbourne International Exhibition in 1880. The voyage to Port Phillip was long but uneventful. At 3am on June 1, 1878, Captain Gibbs was expecting to see land and the passengers were becoming excited as they prepared to view their new homeland in the early morning. But LOCH ARD was running into a fog which greatly reduced visibility. Captain Gibbs was becoming anxious as there was no sign of land or the Cape Otway lighthouse. At 4am the fog lifted. A man aloft announced that he could see breakers. The sheer cliffs of Victoria's west coast came into view, and Captain Gibbs realised that the ship was much closer to them than expected. He ordered as much sail to be set as time would permit and then attempted to steer the vessel out to sea. On coming head on into the wind, the ship lost momentum, the sails fell limp and LOCH ARD's bow swung back. Gibbs then ordered the anchors to be released in an attempt to hold its position. The anchors sank some 50 fathoms - but did not hold. By this time LOCH ARD was among the breakers and the tall cliffs of Mutton Bird Island rose behind the ship. Just half a mile from the coast, the ship's bow was suddenly pulled around by the anchor. The captain tried to tack out to sea, but the ship struck a reef at the base of Mutton Bird Island, near Port Campbell. Waves broke over the ship and the top deck was loosened from the hull. The masts and rigging came crashing down knocking passengers and crew overboard. When a lifeboat was finally launched, it crashed into the side of LOCH ARD and capsized. Tom Pearce, who had launched the boat, managed to cling to its overturned hull and shelter beneath it. He drifted out to sea and then on the flood tide came into what is now known as LOCH ARD Gorge. He swam to shore, bruised and dazed, and found a cave in which to shelter. Some of the crew stayed below deck to shelter from the falling rigging but drowned when the ship slipped off the reef into deeper water. Eva Carmichael had raced onto deck to find out what was happening only to be confronted by towering cliffs looming above the stricken ship. In all the chaos, Captain Gibbs grabbed Eva and said, "If you are saved Eva, let my dear wife know that I died like a sailor". That was the last Eva Carmichael saw of the captain. She was swept off the ship by a huge wave. Eva saw Tom Pearce on a small rocky beach and yelled to attract his attention. He dived in and swam to the exhausted woman and dragged her to shore. He took her to the cave and broke open case of brandy which had washed up on the beach. He opened a bottle to revive the unconscious woman. A few hours later Tom scaled a cliff in search of help. He followed hoof prints and came by chance upon two men from nearby Glenample Station three and a half miles away. In a state of exhaustion, he told the men of the tragedy. Tom returned to the gorge while the two men rode back to the station to get help. By the time they reached LOCH ARD Gorge, it was cold and dark. The two shipwreck survivors were taken to Glenample Station to recover. Eva stayed at the station for six weeks before returning to Ireland, this time by steamship. In Melbourne, Tom Pearce received a hero's welcome. He was presented with the first gold medal of the Royal Humane Society of Victoria and a £1000 cheque from the Victorian Government. Concerts were performed to honour the young man's bravery and to raise money for those who lost family in the LOCH ARD disaster. Of the 54 crew members and passengers on board, only two survived: the apprentice, Tom Pearce and the young woman passenger, Eva Carmichael, who lost all of her family in the tragedy. Ten days after the LOCH ARD tragedy, salvage rights to the wreck were sold at auction for £2,120. Cargo valued at £3,000 was salvaged and placed on the beach, but most washed back into the sea when another storm developed. The wreck of LOCH ARD still lies at the base of Mutton Bird Island. Much of the cargo has now been salvaged and some was washed up into what is now known as LOCH ARD Gorge. Cargo and artefacts have also been illegally salvaged over many years before protective legislation was introduced. One of the most unlikely pieces of cargo to have survived the shipwreck was a Minton porcelain peacock - one of only nine in the world. The peacock was destined for the Melbourne International Exhibition in 1880. It had been well packed, which gave it adequate protection during the violent storm. Today, the Minton peacock can be seen at the Flagstaff Hill Maritime Museum in Warrnambool. From Australia's most dramatic shipwreck it has now become Australia's most valuable shipwreck artefact and is one of very few 'objects' on the Victorian State Heritage Register. The shipwreck of the LOCH ARD is of State significance – Victorian Heritage Register S417 Flagstaff Hill’s collection of artefacts from LOCH ARD is significant for being one of the largest collections of artefacts from this shipwreck in Victoria. It is significant for its association with the shipwreck, which is on the Victorian Heritage Register (VHR S417). The collection is significant because of the relationship between the objects, as together they have a high potential to interpret the story of the LOCH ARD. The LOCH ARD collection is archaeologically significant as the remains of a large international passenger and cargo ship. The LOCH ARD collection is historically significant for representing aspects of Victoria’s shipping history and its potential to interpret sub-theme 1.5 of Victoria’s Framework of Historical Themes (living with natural processes). The collection is also historically significant for its association with the LOCH ARD, which was one of the worst and best known shipwrecks in Victoria’s history. A quantity of lead shot pellets retrieved from the wreck of the LOCH ARD. There are 242 loose 2mm pieces and 17 loose 4mm pieces. They are in good condition, with some shape distortion and sedimentary concretion, and shot tower made.flagstaff hill, warrnambool, shipwrecked coast, flagstaff hill maritime museum, maritime museum, shipwreck coast, flagstaff hill maritime village, great ocean road, loch line, loch ard, captain gibbs, eva carmichael, tom pearce, glenample station, mutton bird island, loch ard gorge, lead shot, colonial industry, melbourne shot towers, victorian metallurgy, colonial imports -
 Flagstaff Hill Maritime Museum and Village
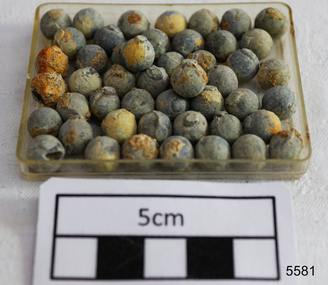
Weapon - Lead shot, Before 1878
The objects are a sample of medium caliber lead shot raised by Flagstaff Hill divers from the Loch Ard shipwreck site in 1976. Included in the vessel’s cargo manifest were 22 tonnes of lead shot, packed into her holds in cloth bags and wooden casks. These 49 pieces of 7 mm diameter lead shot are identical in size and smoothness. Each one also bears the same slightly raised square of residual metal left behind by the process of pouring molten lead into individual but identical moulds through a small (square) opening. These pieces of shot can be compared with contrast pieces in the Maritime Village collection, which are examples of shot tower pellet production; an industrial technique more suited to the creation of uniformly spherical balls that do not need subsequent trimming. In conventional shot tower production, lead is heated in a cauldron at the top of a 150-160 feet tower, and poured through a copper lattice that divides the metal into falling droplets. As these droplets fall, they spin into small spheres and gradually cool, before finishing in a pool of water at the bottom of the tower. However the maximum size of lead shot, and the economic efficiency of shot tower production, is limited by the practical height of the drop. Larger diameter lead shot must fall further in order to cool evenly and sufficiently to avoid shape distortion on hitting the water at the base. This sample of larger 7 mm lead shot, although mass produced, appears to have been manufactured under the traditional and more labour intensive mould system. They are therefore distinct from the other samples of smaller gauged and shot tower produced lead shot that were being imported on the Loch Ard . In terms of metallurgical technology these 7 mm shot are more closely related to an artifact in our Collection (No. 5241) — a forged set of pincers or pliers with two facing cups at the end. When the pincers are closed, the cups join to form a single mould. Molten lead is poured through a small (circular) opening left at the top of the mould. When cooled the pincers are opened, breaking the mould and releasing the lead shot. The excess metal left over from the pouring operation at the top of the ball is then trimmed off using the scissor like cutting edges on the inner side of the pliers handles. In this manner, individual shooters were able to make their own ammunition for their shotguns. History of the Loch Ard: The Loch Ard got it’s name from ”Loch Ard” a loch which lies to the west of Aberfoyle, and to the east of Loch Lomond. It means "high lake" in Scottish Gaelic.The vessel belonged to the famous Loch Line which sailed many vessels from England to Australia. The Loch Ard was built in Glasgow by Barclay, Curdle and Co. in 1873, the vessel was a three-masted square-rigged iron sailing ship that measured 79.87 meters in length, 11.58 m in width, and 7 m in depth with a gross tonnage of 1693 tons with a mainmast that measured a massive 45.7 m in height. Loch Ard made three trips to Australia and one trip to Calcutta before its fateful voyage. Loch Ard left England on March 2, 1878, under the command of 29-year-old Captain Gibbs, who was newly married. The ship was bound for Melbourne with a crew of 37, plus 17 passengers. The general cargo reflected the affluence of Melbourne at the time. Onboard were straw hats, umbrella, perfumes, clay pipes, pianos, clocks, confectionery, linen and candles, as well as a heavier load of railway irons, cement, lead and copper. There were other items included that were intended for display in the Melbourne International Exhibition of 1880. The voyage to Port Phillip was long but uneventful. Then at 3 am on June 1, 1878, Captain Gibbs was expecting to see land. But the Loch Ard was running into a fog which greatly reduced visibility. Captain Gibbs was becoming anxious as there was no sign of land or the Cape Otway lighthouse. At 4 am the fog lifted and a lookout aloft announced that he could see breakers. The sheer cliffs of Victoria's west coast came into view, and Captain Gibbs realised that the ship was much closer to them than expected. He ordered as much sail to be set as time would permit and then attempted to steer the vessel out to sea. On coming head-on into the wind, the ship lost momentum, the sails fell limp and Loch Ard's bow swung back towards land. Gibbs then ordered the anchors to be released in an attempt to hold its position. The anchors sank some 50 fathoms - but did not hold. By this time the ship was among the breakers and the tall cliffs of Mutton Bird Island rose behind. Just half a mile from the coast, the ship's bow was suddenly pulled around by the anchor. The captain tried to tack out to sea, but the ship struck a reef at the base of Mutton Bird Island, near Port Campbell. Waves subsequently broke over the ship and the top deck became loosened from the hull. The masts and rigging came crashing down knocking passengers and crew overboard. When a lifeboat was finally launched, it crashed into the side of Loch Ard and capsized. Tom Pearce, who had launched the boat, managed to cling to its overturned hull and shelter beneath it. He drifted out to sea and then on the flood tide came into what is now known as Loch Ard Gorge. He swam to shore, bruised and dazed, and found a cave in which to shelter. Some of the crew stayed below deck to shelter from the falling rigging but drowned when the ship slipped off the reef into deeper water. Eva Carmichael a passenger had raced onto the deck to find out what was happening only to be confronted by towering cliffs looming above the stricken ship. In all the chaos, Captain Gibbs grabbed Eva and said, "If you are saved Eva, let my dear wife know that I died like a sailor". That was the last Eva Carmichael saw of the captain. She was swept off the ship by a huge wave. Eva saw Tom Pearce on a small rocky beach and yelled to attract his attention. He dived in and swam to the exhausted woman and dragged her to shore. He took her to the cave and broke the open case of brandy which had washed up on the beach. He opened a bottle to revive the unconscious woman. A few hours later Tom scaled a cliff in search of help. He followed hoof prints and came by chance upon two men from nearby Glenample Station three and a half miles away. In a complete state of exhaustion, he told the men of the tragedy. Tom then returned to the gorge while the two men rode back to the station to get help. By the time they reached Loch Ard Gorge, it was cold and dark. The two shipwreck survivors were taken to Glenample Station to recover. Eva stayed at the station for six weeks before returning to Ireland by steamship. In Melbourne, Tom Pearce received a hero's welcome. He was presented with the first gold medal of the Royal Humane Society of Victoria and a £1000 cheque from the Victorian Government. Concerts were performed to honour the young man's bravery and to raise money for those who lost family in the disaster. Of the 54 crew members and passengers on board, only two survived: the apprentice, Tom Pearce and the young woman passenger, Eva Carmichael, who lost her family in the tragedy. Ten days after the Loch Ard tragedy, salvage rights to the wreck were sold at auction for £2,120. Cargo valued at £3,000 was salvaged and placed on the beach, but most washed back into the sea when another storm developed. The wreck of Loch Ard still lies at the base of Mutton Bird Island. Much of the cargo has now been salvaged and some items were washed up into Loch Ard Gorge. Cargo and artefacts have also been illegally salvaged over many years before protective legislation was introduced in March 1982. One of the most unlikely pieces of cargo to have survived the shipwreck was a Minton majolica peacock- one of only nine in the world. The peacock was destined for the Melbourne 1880 International Exhibition in. It had been well packed, which gave it adequate protection during the violent storm. Today the Minton peacock can be seen at the Flagstaff Hill Maritime Museum in Warrnambool. From Australia's most dramatic shipwreck it has now become Australia's most valuable shipwreck artifact and is one of very few 'objects' on the Victorian State Heritage Register. The shipwreck of the Loch Ard is of significance for Victoria and is registered on the Victorian Heritage Register Ref S 417. Flagstaff Hill has a varied collection of artefacts from Loch Ard and its collection is significant for being one of the largest accumulation of artefacts from this notable Victorian shipwreck. The collections object is to also give us a snapshot into history so we are able to interpret the story of this tragic event. The collection is also archaeologically significant as it represents aspects of Victoria's shipping history that allows us to interpret Victoria's social and historical themes of the time. The collections historically significance is that it is associated unfortunately with the worst and best-known shipwreck in Victoria's history. A quantity of forty-nine (49) loose round lead shot of 7 mm diameter retrieved from the wreck of the Loch Ard. All are smooth round spheres with the same small raised square of excess lead on one face.flagstaff hill, warrnambool, shipwrecked coast, flagstaff hill maritime museum, maritime museum, shipwreck coast, flagstaff hill maritime village, great ocean road, loch line, loch ard, captain gibbs, eva carmichael, tom pearce, glenample station, mutton bird island, loch ard gorge, shipwreck artefact, shot, lead shot, shot towers, shot mould, colonial imports, practical metallurgy -
 Flagstaff Hill Maritime Museum and Village
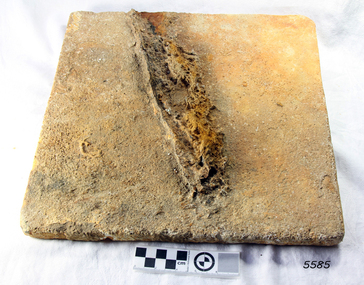
Geological specimen - Marble, 1873-1878
The Loch Ard got its name from ”Loch Ard” a loch that lies west of Aberfoyle, and east of Loch Lomond. It means "high lake" in Scottish Gaelic. The vessel belonged to the famous Loch Line which sailed many vessels from England to Australia. The Loch Ard was built in Glasgow by Barclay, Curdle and Co. in 1873, the vessel was a three-masted square-rigged iron sailing ship that measured 79.87 meters in length, 11.58 m in width, and 7 m in depth with a gross tonnage of 1693 tons with a mainmast that measured a massive 45.7 m in height. Loch Ard made three trips to Australia and one trip to Calcutta before its fateful voyage. Loch Ard left England on March 2, 1878, under the command of 29-year-old Captain Gibbs, who was newly married. The ship was bound for Melbourne with a crew of 37, plus 17 passengers. The general cargo reflected the affluence of Melbourne at the time. Onboard were straw hats, umbrella, perfumes, clay pipes, pianos, clocks, confectionery, linen and candles, as well as a heavier load of railway irons, cement, lead and copper. There were other items included that were intended for display in the Melbourne International Exhibition of 1880. The voyage to Port Phillip was long but uneventful. Then at 3 am on June 1, 1878, Captain Gibbs was expecting to see land. But the Loch Ard was running into a fog which greatly reduced visibility. Captain Gibbs was becoming anxious as there was no sign of land or the Cape Otway lighthouse. At 4 am the fog lifted and a lookout aloft announced that he could see breakers. The sheer cliffs of Victoria's west coast came into view, and Captain Gibbs realised that the ship was much closer to them than expected. He ordered as much sail to be set as time would permit and then attempted to steer the vessel out to sea. On coming head-on into the wind, the ship lost momentum, the sails fell limp and Loch Ard's bow swung back towards land. Gibbs then ordered the anchors to be released in an attempt to hold its position. The anchors sank some 50 fathoms - but did not hold. By this time the ship was among the breakers and the tall cliffs of Mutton Bird Island rose behind. Just half a mile from the coast, the ship's bow was suddenly pulled around by the anchor. The captain tried to tack out to sea, but the ship struck a reef at the base of Mutton Bird Island, near Port Campbell. Waves subsequently broke over the ship and the top deck became loosened from the hull. The masts and rigging came crashing down knocking passengers and crew overboard. When a lifeboat was finally launched, it crashed into the side of Loch Ard and capsized. Tom Pearce, who had launched the boat, managed to cling to its overturned hull and shelter beneath it. He drifted out to sea and then on the flood tide came into what is now known as Loch Ard Gorge. He swam to shore, bruised and dazed, and found a cave in which to shelter. Some of the crew stayed below deck to shelter from the falling rigging but drowned when the ship slipped off the reef into deeper water. Eva Carmichael a passenger had raced onto the deck to find out what was happening only to be confronted by towering cliffs looming above the stricken ship. In all the chaos, Captain Gibbs grabbed Eva and said, "If you are saved Eva, let my dear wife know that I died like a sailor". That was the last Eva Carmichael saw of the captain. She was swept off the ship by a huge wave. Eva saw Tom Pearce on a small rocky beach and yelled to attract his attention. He dived in and swam to the exhausted woman and dragged her to shore. He took her to the cave and broke the open case of brandy which had washed up on the beach. He opened a bottle to revive the unconscious woman. A few hours later Tom scaled a cliff in search of help. He followed hoof prints and came by chance upon two men from nearby Glenample Station three and a half miles away. In a complete state of exhaustion, he told the men of the tragedy. Tom then returned to the gorge while the two men rode back to the station to get help. By the time they reached Loch Ard Gorge, it was cold and dark. The two shipwreck survivors were taken to Glenample Station to recover. Eva stayed at the station for six weeks before returning to Ireland by steamship. In Melbourne, Tom Pearce received a hero's welcome. He was presented with the first gold medal of the Royal Humane Society of Victoria and a £1000 cheque from the Victorian Government. Concerts were performed to honour the young man's bravery and to raise money for those who lost family in the disaster. Of the 54 crew members and passengers on board, only two survived: the apprentice, Tom Pearce and the young woman passenger, Eva Carmichael, who lost her family in the tragedy. Ten days after the Loch Ard tragedy, salvage rights to the wreck were sold at auction for £2,120. Cargo valued at £3,000 was salvaged and placed on the beach, but most washed back into the sea when another storm developed. The wreck of Loch Ard still lies at the base of Mutton Bird Island. Much of the cargo has now been salvaged and some items were washed up into Loch Ard Gorge. Cargo and artefacts have also been illegally salvaged over many years before protective legislation was introduced in March 1982. One of the most unlikely pieces of cargo to have survived the shipwreck was a Minton majolica peacock- one of only nine in the world. The peacock was destined for the Melbourne 1880 International Exhibition. It had been well packed, which gave it adequate protection during the violent storm. Today the Minton peacock can be seen at the Flagstaff Hill Maritime Museum in Warrnambool. From Australia's most dramatic shipwreck, it has now become Australia's most valuable shipwreck artifact and is one of very few 'objects' on the Victorian State Heritage Register. The shipwreck of the Loch Ard is of significance for Victoria and is registered on the Victorian Heritage Register ( S 417). Flagstaff Hill has a varied collection of artefacts from Loch Ard and its collection is significant for being one of the largest accumulation of artefacts from this notable Victorian shipwreck. The collections object is to also give us a snapshot into history so we can interpret the story of this tragic event. The collection is also archaeologically significant as it represents aspects of Victoria's shipping history that allows us to interpret Victoria's social and historical themes of the time. The collections historically significance is that it is associated unfortunately with the worst and best-known shipwreck in Victoria's history. Rectangular piece of cream coloured marble fireplace surround, with an embedded section of wrought iron in one end. Recovered from the wreck of the Loch Ard. Noneflagstaff hill, warrnambool, shipwrecked coast, flagstaff hill maritime museum, maritime museum, shipwreck coast, flagstaff hill maritime village, great ocean road, loch line, loch ard, captain gibbs, eva carmichael, tom pearce, glenample station, mutton bird island, loch ard gorge, marble fireplace, wrought iron, fireplace surround -
 Flagstaff Hill Maritime Museum and Village
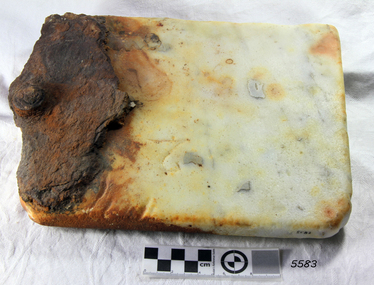
Marble Tile, circa 1878
The artefact is a white marble tile raised from the wreck of the LOCH ARD (1878). The cargo manifest of the sunken vessel has the entry “Marble £400”. This is placed directly following the entry “Glass (604 cases)”. This conjunction suggests the marble tile was originally part of a consignment intended for use in a ‘high end’ residential or public building project in the gold and wool rich Colony of Victoria. Traditionally, white or cream marble was imported into Britain from the Mediterranean region of Europe, where beds of sedimentary limestone (calcium and magnesium carbonate) had been buried over a long geological period of time. Deep in the earth’s crust, it had been subjected to immense pressures and high temperatures, sufficient to completely re-crystallise the original deposits. Marble beds began as layers of sediment at the bottom of ancient tropical seas, forming from the skeletal remains of calcareous fossils, shell, and coral fragments. The metamorphic process of prolonged compression and heating recrystallised this skeletal material, destroying all signs of the original sedimentary fabric. The resulting ‘true’ marbles of, for example, White Carrara (Tuscany, Italy), Verdi (green) Antico (Thessaly, Greece), and Rouge (red) Languadoc (Carcassone, France), were highly prized in classical decoration (sculpture and friezes) and architecture (temples and arches). Marble was found in nineteenth century Australia, but in small, uneconomic deposits, not suitable for commercial quarrying. The comparative expense of imported marble restricted its use in colonial buildings to carved fireplaces and mantel pieces, or outdoor ornaments such as fountains, statuary and grave stones. If Carrara marble floor tiles were used, they were used sparingly, as an arresting feature in entrance halls for instance. However, most prominent private and public construction used timber flooring, waxed or ‘japanned’, with carpet runners and rugs (for example the Austin’s Barwon Park Mansion, 1871), or laid tessellated and ceramic tiles of baked clay infused with colour (for example the Chirnside’s Werribee Park Mansion, 1878). HISTORY OF THE LOCH ARD The LOCH ARD belonged to the famous Loch Line which sailed many ships from England to Australia. Built in Glasgow by Barclay, Curdle and Co. in 1873, the LOCH ARD was a three-masted square rigged iron sailing ship. The ship measured 262ft 7" (79.87m) in length, 38ft (11.58m) in width, 23ft (7m) in depth and had a gross tonnage of 1693 tons. The LOCH ARD's main mast measured a massive 150ft (45.7m) in height. LOCH ARD made three trips to Australia and one trip to Calcutta before its final voyage. LOCH ARD left England on March 2, 1878, under the command of Captain Gibbs, a newly married, 29 year old. She was bound for Melbourne with a crew of 37, plus 17 passengers and a load of cargo. The general cargo reflected the affluence of Melbourne at the time. On board were straw hats, umbrella, perfumes, clay pipes, pianos, clocks, confectionary, linen and candles, as well as a heavier load of railway irons, cement, lead and copper. There were items included that intended for display in the Melbourne International Exhibition in 1880. The voyage to Port Phillip was long but uneventful. At 3am on June 1, 1878, Captain Gibbs was expecting to see land and the passengers were becoming excited as they prepared to view their new homeland in the early morning. But LOCH ARD was running into a fog which greatly reduced visibility. Captain Gibbs was becoming anxious as there was no sign of land or the Cape Otway lighthouse. At 4am the fog lifted. A man aloft announced that he could see breakers. The sheer cliffs of Victoria's west coast came into view, and Captain Gibbs realised that the ship was much closer to them than expected. He ordered as much sail to be set as time would permit and then attempted to steer the vessel out to sea. On coming head on into the wind, the ship lost momentum, the sails fell limp and LOCH ARD's bow swung back. Gibbs then ordered the anchors to be released in an attempt to hold its position. The anchors sank some 50 fathoms - but did not hold. By this time LOCH ARD was among the breakers and the tall cliffs of Mutton Bird Island rose behind the ship. Just half a mile from the coast, the ship's bow was suddenly pulled around by the anchor. The captain tried to tack out to sea, but the ship struck a reef at the base of Mutton Bird Island, near Port Campbell. Waves broke over the ship and the top deck was loosened from the hull. The masts and rigging came crashing down knocking passengers and crew overboard. When a lifeboat was finally launched, it crashed into the side of LOCH ARD and capsized. Tom Pearce, who had launched the boat, managed to cling to its overturned hull and shelter beneath it. He drifted out to sea and then on the flood tide came into what is now known as LOCH ARD Gorge. He swam to shore, bruised and dazed, and found a cave in which to shelter. Some of the crew stayed below deck to shelter from the falling rigging but drowned when the ship slipped off the reef into deeper water. Eva Carmichael had raced onto deck to find out what was happening only to be confronted by towering cliffs looming above the stricken ship. In all the chaos, Captain Gibbs grabbed Eva and said, "If you are saved Eva, let my dear wife know that I died like a sailor". That was the last Eva Carmichael saw of the captain. She was swept off the ship by a huge wave. Eva saw Tom Pearce on a small rocky beach and yelled to attract his attention. He dived in and swam to the exhausted woman and dragged her to shore. He took her to the cave and broke open case of brandy which had washed up on the beach. He opened a bottle to revive the unconscious woman. A few hours later Tom scaled a cliff in search of help. He followed hoof prints and came by chance upon two men from nearby Glenample Station three and a half miles away. In a state of exhaustion, he told the men of the tragedy. Tom returned to the gorge while the two men rode back to the station to get help. By the time they reached LOCH ARD Gorge, it was cold and dark. The two shipwreck survivors were taken to Glenample Station to recover. Eva stayed at the station for six weeks before returning to Ireland, this time by steamship. In Melbourne, Tom Pearce received a hero's welcome. He was presented with the first gold medal of the Royal Humane Society of Victoria and a £1000 cheque from the Victorian Government. Concerts were performed to honour the young man's bravery and to raise money for those who lost family in the LOCH ARD disaster. Of the 54 crew members and passengers on board, only two survived: the apprentice, Tom Pearce and the young woman passenger, Eva Carmichael, who lost all of her family in the tragedy. Ten days after the LOCH ARD tragedy, salvage rights to the wreck were sold at auction for £2,120. Cargo valued at £3,000 was salvaged and placed on the beach, but most washed back into the sea when another storm developed. The wreck of LOCH ARD still lies at the base of Mutton Bird Island. Much of the cargo has now been salvaged and some was washed up into what is now known as LOCH ARD Gorge. Cargo and artefacts have also been illegally salvaged over many years before protective legislation was introduced. One of the most unlikely pieces of cargo to have survived the shipwreck was a Minton porcelain peacock - one of only nine in the world. The peacock was destined for the Melbourne International Exhibition in 1880. It had been well packed, which gave it adequate protection during the violent storm. Today, the Minton peacock can be seen at the Flagstaff Hill Maritime Museum in Warrnambool. From Australia's most dramatic shipwreck it has now become Australia's most valuable shipwreck artefact and is one of very few 'objects' on the Victorian State Heritage Register. The wreck of the LOCH ARD is of State significance — Victorian Heritage Register S417 Flagstaff Hill’s collection of artefacts from LOCH ARD is significant for being one of the largest collections of artefacts from this shipwreck in Victoria. It is significant for its association with the shipwreck, which is on the Victorian Heritage Register (VHR S417). The collection is significant because of the relationship between the objects, as together they have a high potential to interpret the story of the LOCH ARD. The LOCH ARD collection is archaeologically significant as the remains of a large international passenger and cargo ship. The LOCH ARD collection is historically significant for representing aspects of Victoria’s shipping history and its potential to interpret sub-theme 1.5 of Victoria’s Framework of Historical Themes (living with natural processes). The collection is also historically significant for its association with the LOCH ARD, which was one of the worst and best known shipwrecks in Victoria’s history. A square marble tile retrieved from the wreck of the LOCH ARD. Most of its surface is covered by a thin layer of limestone and marine growth encrustation that is stained rust-red. The tile is ‘rough-worked’, cut to shape and size, but not smoothed or polished. There is a companion tile in similar condition in the Flagstaff Hill collection. From visual observation of the original surface (at low magnification) the tile appears to be of white Carrara-type marble.flagstaff hill, warrnambool, shipwrecked coast, flagstaff hill maritime museum, maritime museum, shipwreck coast, flagstaff hill maritime village, great ocean road, loch line, loch ard, captain gibbs, eva carmichael, tom pearce, glenample station, mutton bird island, loch ard gorge, white marble, marble tile, carrara marble, imported marble, colonial architecture, victorian building materials -
 Flagstaff Hill Maritime Museum and Village
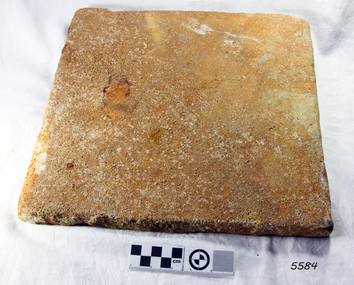
Marble Tile, circa 1878
The artefact is a white marble tile raised from the wreck of the LOCH ARD (1878). The cargo manifest of the sunken vessel has the entry “Marble £400”. This is placed directly following the entry “Glass (604 cases)”. This conjunction suggests the marble tile was originally part of a consignment intended for use in a ‘high end’ residential or public building project in the gold and wool rich Colony of Victoria. Traditionally, white or cream marble was imported into Britain from the Mediterranean region of Europe, where beds of sedimentary limestone (calcium and magnesium carbonate) had been buried over a long geological period of time. Deep in the earth’s crust, it had been subjected to immense pressures and high temperatures, sufficient to completely re-crystallise the original deposits. Marble beds began as layers of sediment at the bottom of ancient tropical seas, forming from the skeletal remains of calcareous fossils, shell, and coral fragments. The metamorphic process of prolonged compression and heating recrystallised this skeletal material, destroying all signs of the original sedimentary fabric. The resulting ‘true’ marbles of, for example, White Carrara (Tuscany, Italy), Verdi (green) Antico (Thessaly, Greece), and Rouge (red) Languadoc (Carcassone, France), were highly prized in classical decoration (sculpture and friezes) and architecture (temples and arches). Marble was found in nineteenth century Australia, but in small, uneconomic deposits, not suitable for commercial quarrying. The comparative expense of imported marble restricted its use in colonial buildings to carved fireplaces and mantel pieces, or outdoor ornaments such as fountains, statuary and grave stones. If Carrara marble floor tiles were used, they were used sparingly, as an arresting feature in entrance halls for instance. However, most prominent private and public construction used timber flooring, waxed or ‘jappaned’, with carpet runners and rugs (for example the Austin’s Barwon Park Mansion, 1871), or laid tessellated and ceramic tiles of baked clay infused with colour (for example the Chirnside’s Werribee Park Mansion, 1878). HISTORY OF THE LOCH ARD The LOCH ARD belonged to the famous Loch Line which sailed many ships from England to Australia. Built in Glasgow by Barclay, Curdle and Co. in 1873, the LOCH ARD was a three-masted square rigged iron sailing ship. The ship measured 262ft 7" (79.87m) in length, 38ft (11.58m) in width, 23ft (7m) in depth and had a gross tonnage of 1693 tons. The LOCH ARD's main mast measured a massive 150ft (45.7m) in height. LOCH ARD made three trips to Australia and one trip to Calcutta before its final voyage. LOCH ARD left England on March 2, 1878, under the command of Captain Gibbs, a newly married, 29 year old. She was bound for Melbourne with a crew of 37, plus 17 passengers and a load of cargo. The general cargo reflected the affluence of Melbourne at the time. On board were straw hats, umbrella, perfumes, clay pipes, pianos, clocks, confectionary, linen and candles, as well as a heavier load of railway irons, cement, lead and copper. There were items included that intended for display in the Melbourne International Exhibition in 1880. The voyage to Port Phillip was long but uneventful. At 3am on June 1, 1878, Captain Gibbs was expecting to see land and the passengers were becoming excited as they prepared to view their new homeland in the early morning. But LOCH ARD was running into a fog which greatly reduced visibility. Captain Gibbs was becoming anxious as there was no sign of land or the Cape Otway lighthouse. At 4am the fog lifted. A man aloft announced that he could see breakers. The sheer cliffs of Victoria's west coast came into view, and Captain Gibbs realised that the ship was much closer to them than expected. He ordered as much sail to be set as time would permit and then attempted to steer the vessel out to sea. On coming head on into the wind, the ship lost momentum, the sails fell limp and LOCH ARD's bow swung back. Gibbs then ordered the anchors to be released in an attempt to hold its position. The anchors sank some 50 fathoms - but did not hold. By this time LOCH ARD was among the breakers and the tall cliffs of Mutton Bird Island rose behind the ship. Just half a mile from the coast, the ship's bow was suddenly pulled around by the anchor. The captain tried to tack out to sea, but the ship struck a reef at the base of Mutton Bird Island, near Port Campbell. Waves broke over the ship and the top deck was loosened from the hull. The masts and rigging came crashing down knocking passengers and crew overboard. When a lifeboat was finally launched, it crashed into the side of LOCH ARD and capsized. Tom Pearce, who had launched the boat, managed to cling to its overturned hull and shelter beneath it. He drifted out to sea and then on the flood tide came into what is now known as LOCH ARD Gorge. He swam to shore, bruised and dazed, and found a cave in which to shelter. Some of the crew stayed below deck to shelter from the falling rigging but drowned when the ship slipped off the reef into deeper water. Eva Carmichael had raced onto deck to find out what was happening only to be confronted by towering cliffs looming above the stricken ship. In all the chaos, Captain Gibbs grabbed Eva and said, "If you are saved Eva, let my dear wife know that I died like a sailor". That was the last Eva Carmichael saw of the captain. She was swept off the ship by a huge wave. Eva saw Tom Pearce on a small rocky beach and yelled to attract his attention. He dived in and swam to the exhausted woman and dragged her to shore. He took her to the cave and broke open case of brandy which had washed up on the beach. He opened a bottle to revive the unconscious woman. A few hours later Tom scaled a cliff in search of help. He followed hoof prints and came by chance upon two men from nearby Glenample Station three and a half miles away. In a state of exhaustion, he told the men of the tragedy. Tom returned to the gorge while the two men rode back to the station to get help. By the time they reached LOCH ARD Gorge, it was cold and dark. The two shipwreck survivors were taken to Glenample Station to recover. Eva stayed at the station for six weeks before returning to Ireland, this time by steamship. In Melbourne, Tom Pearce received a hero's welcome. He was presented with the first gold medal of the Royal Humane Society of Victoria and a £1000 cheque from the Victorian Government. Concerts were performed to honour the young man's bravery and to raise money for those who lost family in the LOCH ARD disaster. Of the 54 crew members and passengers on board, only two survived: the apprentice, Tom Pearce and the young woman passenger, Eva Carmichael, who lost all of her family in the tragedy. Ten days after the LOCH ARD tragedy, salvage rights to the wreck were sold at auction for £2,120. Cargo valued at £3,000 was salvaged and placed on the beach, but most washed back into the sea when another storm developed. The wreck of LOCH ARD still lies at the base of Mutton Bird Island. Much of the cargo has now been salvaged and some was washed up into what is now known as LOCH ARD Gorge. Cargo and artefacts have also been illegally salvaged over many years before protective legislation was introduced. One of the most unlikely pieces of cargo to have survived the shipwreck was a Minton porcelain peacock - one of only nine in the world. The peacock was destined for the Melbourne International Exhibition in 1880. It had been well packed, which gave it adequate protection during the violent storm. Today, the Minton peacock can be seen at the Flagstaff Hill Maritime Museum in Warrnambool. From Australia's most dramatic shipwreck it has now become Australia's most valuable shipwreck artefact and is one of very few 'objects' on the Victorian State Heritage Register. HISTORY OF THE LOCH ARD The LOCH ARD belonged to the famous Loch Line which sailed many ships from England to Australia. Built in Glasgow by Barclay, Curdle and Co. in 1873, the LOCH ARD was a three-masted square rigged iron sailing ship. The ship measured 262ft 7" (79.87m) in length, 38ft (11.58m) in width, 23ft (7m) in depth and had a gross tonnage of 1693 tons. The LOCH ARD's main mast measured a massive 150ft (45.7m) in height. LOCH ARD made three trips to Australia and one trip to Calcutta before its final voyage. LOCH ARD left England on March 2, 1878, under the command of Captain Gibbs, a newly married, 29 year old. She was bound for Melbourne with a crew of 37, plus 17 passengers and a load of cargo. The general cargo reflected the affluence of Melbourne at the time. On board were straw hats, umbrella, perfumes, clay pipes, pianos, clocks, confectionary, linen and candles, as well as a heavier load of railway irons, cement, lead and copper. There were items included that intended for display in the Melbourne International Exhibition in 1880. The voyage to Port Phillip was long but uneventful. At 3am on June 1, 1878, Captain Gibbs was expecting to see land and the passengers were becoming excited as they prepared to view their new homeland in the early morning. But LOCH ARD was running into a fog which greatly reduced visibility. Captain Gibbs was becoming anxious as there was no sign of land or the Cape Otway lighthouse. At 4am the fog lifted. A man aloft announced that he could see breakers. The sheer cliffs of Victoria's west coast came into view, and Captain Gibbs realised that the ship was much closer to them than expected. He ordered as much sail to be set as time would permit and then attempted to steer the vessel out to sea. On coming head on into the wind, the ship lost momentum, the sails fell limp and LOCH ARD's bow swung back. Gibbs then ordered the anchors to be released in an attempt to hold its position. The anchors sank some 50 fathoms - but did not hold. By this time LOCH ARD was among the breakers and the tall cliffs of Mutton Bird Island rose behind the ship. Just half a mile from the coast, the ship's bow was suddenly pulled around by the anchor. The captain tried to tack out to sea, but the ship struck a reef at the base of Mutton Bird Island, near Port Campbell. Waves broke over the ship and the top deck was loosened from the hull. The masts and rigging came crashing down knocking passengers and crew overboard. When a lifeboat was finally launched, it crashed into the side of LOCH ARD and capsized. Tom Pearce, who had launched the boat, managed to cling to its overturned hull and shelter beneath it. He drifted out to sea and then on the flood tide came into what is now known as LOCH ARD Gorge. He swam to shore, bruised and dazed, and found a cave in which to shelter. Some of the crew stayed below deck to shelter from the falling rigging but drowned when the ship slipped off the reef into deeper water. Eva Carmichael had raced onto deck to find out what was happening only to be confronted by towering cliffs looming above the stricken ship. In all the chaos, Captain Gibbs grabbed Eva and said, "If you are saved Eva, let my dear wife know that I died like a sailor". That was the last Eva Carmichael saw of the captain. She was swept off the ship by a huge wave. Eva saw Tom Pearce on a small rocky beach and yelled to attract his attention. He dived in and swam to the exhausted woman and dragged her to shore. He took her to the cave and broke open case of brandy which had washed up on the beach. He opened a bottle to revive the unconscious woman. A few hours later Tom scaled a cliff in search of help. He followed hoof prints and came by chance upon two men from nearby Glenample Station three and a half miles away. In a state of exhaustion, he told the men of the tragedy. Tom returned to the gorge while the two men rode back to the station to get help. By the time they reached LOCH ARD Gorge, it was cold and dark. The two shipwreck survivors were taken to Glenample Station to recover. Eva stayed at the station for six weeks before returning to Ireland, this time by steamship. In Melbourne, Tom Pearce received a hero's welcome. He was presented with the first gold medal of the Royal Humane Society of Victoria and a £1000 cheque from the Victorian Government. Concerts were performed to honour the young man's bravery and to raise money for those who lost family in the LOCH ARD disaster. Of the 54 crew members and passengers on board, only two survived: the apprentice, Tom Pearce and the young woman passenger, Eva Carmichael, who lost all of her family in the tragedy. Ten days after the LOCH ARD tragedy, salvage rights to the wreck were sold at auction for £2,120. Cargo valued at £3,000 was salvaged and placed on the beach, but most washed back into the sea when another storm developed. The wreck of LOCH ARD still lies at the base of Mutton Bird Island. Much of the cargo has now been salvaged and some was washed up into what is now known as LOCH ARD Gorge. Cargo and artefacts have also been illegally salvaged over many years before protective legislation was introduced. One of the most unlikely pieces of cargo to have survived the shipwreck was a Minton porcelain peacock - one of only nine in the world. The peacock was destined for the Melbourne International Exhibition in 1880. It had been well packed, which gave it adequate protection during the violent storm. Today, the Minton peacock can be seen at the Flagstaff Hill Maritime Museum in Warrnambool. From Australia's most dramatic shipwreck it has now become Australia's most valuable shipwreck artefact and is one of very few 'objects' on the Victorian State Heritage Register. The wreck of the LOCH ARD is of State significance — Victorian Heritage Register S417 Flagstaff Hill’s collection of artefacts from LOCH ARD is significant for being one of the largest collections of artefacts from this shipwreck in Victoria. It is significant for its association with the shipwreck, which is on the Victorian Heritage Register (VHR S417). The collection is significant because of the relationship between the objects, as together they have a high potential to interpret the story of the LOCH ARD. The LOCH ARD collection is archaeologically significant as the remains of a large international passenger and cargo ship. The LOCH ARD collection is historically significant for representing aspects of Victoria’s shipping history and its potential to interpret sub-theme 1.5 of Victoria’s Framework of Historical Themes (living with natural processes). The collection is also historically significant for its association with the LOCH ARD, which was one of the worst and best known shipwrecks in Victoria’s history. A square marble tile retrieved from the wreck of the LOCH ARD. Most of its surface is covered by a thin layer of limestone and marine growth encrustation that is stained rust-red. There is a piece of corroded iron encrusted at an oblique angle on the tile’s rear face. The tile is ‘rough-worked’, cut to shape and size, but not smoothed or polished. There is a companion tile in similar condition in the Flagstaff Hill collection. From visual observation of the original surface (at low magnification) the tile appears to be of white Carrara-type marble.flagstaff hill, warrnambool, shipwrecked coast, flagstaff hill maritime museum, maritime museum, shipwreck coast, flagstaff hill maritime village, great ocean road, loch line, loch ard, captain gibbs, eva carmichael, tom pearce, glenample station, mutton bird island, loch ard gorge, white marble, marble tile, carrara marble, colonial architecture, victorian building materials -
 Flagstaff Hill Maritime Museum and Village
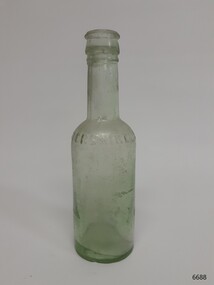
Container - Sauce Bottle, 1878
This Worcestershire Sauce bottle was made by Lee & Perkins. It was hand blown into a two-piece mould, snapped off the blowing rod and then had a separate mouth applied to the neck, as evidenced by the side seams, ripples in the body, join below the mouth, bubbles in the glass and a push-up base that is uneven in thickness. The Loch Ard got its name from ”Loch Ard” a loch that lies to the west of Aberfoyle, and the east of Loch Lomond. It means "high lake" in Scottish Gaelic. The vessel belonged to the famous Loch Line which sailed many vessels from England to Australia. The Loch Ard was built in Glasgow by Barclay, Curdle and Co. in 1873, the vessel was a three-masted square-rigged iron sailing ship that measured 79.87 meters in length, 11.58 m in width, and 7 m in depth with a gross tonnage of 1693 tons with a mainmast that measured a massive 45.7 m in height. Loch Ard made three trips to Australia and one trip to Calcutta before its fateful voyage. Loch Ard left England on March 2, 1878, under the command of 29-year-old Captain Gibbs, who was newly married. The ship was bound for Melbourne with a crew of 37, plus 17 passengers. The general cargo reflected the affluence of Melbourne at the time. Onboard were straw hats, umbrellas, perfumes, clay pipes, pianos, clocks, confectionery, linen and candles, as well as a heavier load of railway irons, cement, lead and copper. There were other items included that were intended for display in the Melbourne International Exhibition of 1880. The voyage to Port Phillip was long but uneventful. Then at 3 am on June 1, 1878, Captain Gibbs was expecting to see land. But the Loch Ard was running into a fog which greatly reduced visibility. Captain Gibbs was becoming anxious as there was no sign of land or the Cape Otway lighthouse. At 4 am the fog lifted and a lookout aloft announced that he could see breakers. The sheer cliffs of Victoria's west coast came into view, and Captain Gibbs realised that the ship was much closer to them than expected. He ordered as much sail to be set as time would permit and then attempted to steer the vessel out to sea. On coming head-on into the wind, the ship lost momentum, the sails fell limp and Loch Ard's bow swung back towards land. Gibbs then ordered the anchors to be released in an attempt to hold their position. The anchors sank some 50 fathoms - but did not hold. By this time the ship was among the breakers and the tall cliffs of Mutton Bird Island rose behind. Just half a mile from the coast, the ship's bow was suddenly pulled around by the anchor. The captain tried to tack out to sea, but the ship struck a reef at the base of Mutton Bird Island, near Port Campbell. Waves subsequently broke over the ship and the top deck became loosened from the hull. The masts and rigging came crashing down knocking passengers and crew overboard. When a lifeboat was finally launched, it crashed into the side of Loch Ard and capsized. Tom Pearce, who had launched the boat, managed to cling to its overturned hull and shelter beneath it. He drifted out to sea and then on the flood tide came into what is now known as Loch Ard Gorge. He swam to shore, bruised and dazed, and found a cave in which to shelter. Some of the crew stayed below deck to shelter from the falling rigging but drowned when the ship slipped off the reef into deeper water. Eva Carmichael a passenger had raced onto the deck to find out what was happening only to be confronted by towering cliffs looming above the stricken ship. In all the chaos, Captain Gibbs grabbed Eva and said, "If you are saved Eva, let my dear wife know that I died like a sailor". That was the last Eva Carmichael saw of the captain. She was swept off the ship by a huge wave. Eva saw Tom Pearce on a small rocky beach and yelled to attract his attention. He dived in and swam to the exhausted woman and dragged her to shore. He took her to the cave and broke the open case of brandy which had washed up on the beach. He opened a bottle to revive the unconscious woman. A few hours later Tom scaled a cliff in search of help. He followed hoof prints and came by chance upon two men from nearby Glenample Station three and a half miles away. In a complete state of exhaustion, he told the men of the tragedy. Tom then returned to the gorge while the two men rode back to the station to get help. By the time they reached Loch Ard Gorge, it was cold and dark. The two shipwreck survivors were taken to Glenample Station to recover. Eva stayed at the station for six weeks before returning to Ireland by steamship. In Melbourne, Tom Pearce received a hero's welcome. He was presented with the first gold medal of the Royal Humane Society of Victoria and a £1000 cheque from the Victorian Government. Concerts were performed to honour the young man's bravery and to raise money for those who lost family in the disaster. Of the 54 crew members and passengers on board, only two survived: the apprentice, Tom Pearce and the young woman passenger, Eva Carmichael, who lost her family in the tragedy. Ten days after the Loch Ard tragedy, salvage rights to the wreck were sold at auction for £2,120. Cargo valued at £3,000 was salvaged and placed on the beach, but most washed back into the sea when another storm developed. The wreck of Loch Ard still lies at the base of Mutton Bird Island. Much of the cargo has now been salvaged and some items were washed up into Loch Ard Gorge. Cargo and artefacts have also been illegally salvaged over many years before protective legislation was introduced in March 1982. One of the most unlikely pieces of cargo to have survived the shipwreck was a Minton majolica peacock- one of only nine in the world. The peacock was destined for the Melbourne 1880 International Exhibition. It had been well packed, which gave it adequate protection during the violent storm. Today the Minton peacock can be seen at the Flagstaff Hill Maritime Museum in Warrnambool. From Australia's most dramatic shipwreck, it has now become Australia's most valuable shipwreck artifact and is one of very few 'objects' on the Victorian State Heritage Register. The shipwreck of the Loch Ard is of significance for Victoria and is registered on the Victorian Heritage Register ( S 417). Flagstaff Hill has a varied collection of artefacts from Loch Ard and its collection is significant for being one of the largest accumulation of artefacts from this notable Victorian shipwreck. The collections object is to also give us a snapshot into history so we can interpret the story of this tragic event. The collection is also archaeologically significant as it represents aspects of Victoria's shipping history that allows us to interpret Victoria's social and historical themes of the time. The collections historically significance is that it is associated unfortunately with the worst and best-known shipwreck in Victoria's history.Clear glass bottle with a green tinge. The bottle has an applied mouth, seams from base to mouth, bubbles and impurities in the glass, and uneven glass thickness. Vertical and horizontal inscriptions are raised. The bottle once contained Worcestershire Sauce and was made by Lea and Perkins. Vertical; "LEA & PERKINS" and around shoulder "WORCESTERSHIRE SAUCE" flagstaff hill, flagstaff hill maritime museum and village, warrnambool, maritime museum, maritime village, great ocean road, shipwreck coast, sauce bottle, worcestershire sauce, shipwreck artefact, condiment bottle, loch ard artifacts, lea and perkins -
 Flagstaff Hill Maritime Museum and Village
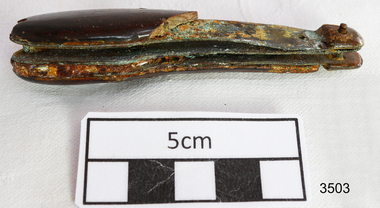
Pocket Knife, before 1878
Found on board the "Loch Ard" . 'Loch Ard" left Gravesend, England on 2nd March 1878, under the command of Captain Gibb, bound for Melbourne loaded with passengers and cargo. On June 1st 1878, almost at the end of her journey, she ran into a rocky reef at the base of Mutton Bird Island, near Port Campbell. Of the 54 crew members and passengers on board, only two survived: an apprentice, Tom Pearce and a young woman passenger, Eva Carmichael, who lost all of her family in the tragedy. The wreck of Loch Ard still lies at the base of Mutton Bird Island and much of the cargo has been salvaged. Some was washed up into what is now known as Loch Ard Gorge following the shipwreck. Amongst artefacts salvaged from the Loch Ard is the now famous Minton Peacock Statue which was destined for the Melbourne International Exhibition to be held in 1880 HISTORY OF THE LOCH ARD The LOCH ARD belonged to the famous Loch Line which sailed many ships from England to Australia. Built in Glasgow by Barclay, Curdle and Co. in 1873, the LOCH ARD was a three-masted square rigged iron sailing ship. The ship measured 262ft 7" (79.87m) in length, 38ft (11.58m) in width, 23ft (7m) in depth and had a gross tonnage of 1693 tons. The LOCH ARD's main mast measured a massive 150ft (45.7m) in height. LOCH ARD made three trips to Australia and one trip to Calcutta before its final voyage. LOCH ARD left England on March 2, 1878, under the command of Captain Gibbs, a newly married, 29 year old. She was bound for Melbourne with a crew of 37, plus 17 passengers and a load of cargo. The general cargo reflected the affluence of Melbourne at the time. On board were straw hats, umbrella, perfumes, clay pipes, pianos, clocks, confectionary, linen and candles, as well as a heavier load of railway irons, cement, lead and copper. There were items included that intended for display in the Melbourne International Exhibition in 1880. The voyage to Port Phillip was long but uneventful. At 3am on June 1, 1878, Captain Gibbs was expecting to see land and the passengers were becoming excited as they prepared to view their new homeland in the early morning. But LOCH ARD was running into a fog which greatly reduced visibility. Captain Gibbs was becoming anxious as there was no sign of land or the Cape Otway lighthouse. At 4am the fog lifted. A man aloft announced that he could see breakers. The sheer cliffs of Victoria's west coast came into view, and Captain Gibbs realised that the ship was much closer to them than expected. He ordered as much sail to be set as time would permit and then attempted to steer the vessel out to sea. On coming head on into the wind, the ship lost momentum, the sails fell limp and LOCH ARD's bow swung back. Gibbs then ordered the anchors to be released in an attempt to hold its position. The anchors sank some 50 fathoms - but did not hold. By this time LOCH ARD was among the breakers and the tall cliffs of Mutton Bird Island rose behind the ship. Just half a mile from the coast, the ship's bow was suddenly pulled around by the anchor. The captain tried to tack out to sea, but the ship struck a reef at the base of Mutton Bird Island, near Port Campbell. Waves broke over the ship and the top deck was loosened from the hull. The masts and rigging came crashing down knocking passengers and crew overboard. When a lifeboat was finally launched, it crashed into the side of LOCH ARD and capsized. Tom Pearce, who had launched the boat, managed to cling to its overturned hull and shelter beneath it. He drifted out to sea and then on the flood tide came into what is now known as LOCH ARD Gorge. He swam to shore, bruised and dazed, and found a cave in which to shelter. Some of the crew stayed below deck to shelter from the falling rigging but drowned when the ship slipped off the reef into deeper water. Eva Carmichael had raced onto deck to find out what was happening only to be confronted by towering cliffs looming above the stricken ship. In all the chaos, Captain Gibbs grabbed Eva and said, "If you are saved Eva, let my dear wife know that I died like a sailor". That was the last Eva Carmichael saw of the captain. She was swept off the ship by a huge wave. Eva saw Tom Pearce on a small rocky beach and yelled to attract his attention. He dived in and swam to the exhausted woman and dragged her to shore. He took her to the cave and broke open case of brandy which had washed up on the beach. He opened a bottle to revive the unconscious woman. A few hours later Tom scaled a cliff in search of help. He followed hoof prints and came by chance upon two men from nearby Glenample Station three and a half miles away. In a state of exhaustion, he told the men of the tragedy. Tom returned to the gorge while the two men rode back to the station to get help. By the time they reached LOCH ARD Gorge, it was cold and dark. The two shipwreck survivors were taken to Glenample Station to recover. Eva stayed at the station for six weeks before returning to Ireland, this time by steamship. In Melbourne, Tom Pearce received a hero's welcome. He was presented with the first gold medal of the Royal Humane Society of Victoria and a £1000 cheque from the Victorian Government. Concerts were performed to honour the young man's bravery and to raise money for those who lost family in the LOCH ARD disaster. Of the 54 crew members and passengers on board, only two survived: the apprentice, Tom Pearce and the young woman passenger, Eva Carmichael, who lost all of her family in the tragedy. Ten days after the LOCH ARD tragedy, salvage rights to the wreck were sold at auction for £2,120. Cargo valued at £3,000 was salvaged and placed on the beach, but most washed back into the sea when another storm developed. The wreck of LOCH ARD still lies at the base of Mutton Bird Island. Much of the cargo has now been salvaged and some was washed up into what is now known as LOCH ARD Gorge. Cargo and artefacts have also been illegally salvaged over many years before protective legislation was introduced. One of the most unlikely pieces of cargo to have survived the shipwreck was a Minton porcelain peacock - one of only nine in the world. The peacock was destined for the Melbourne International Exhibition in 1880. It had been well packed, which gave it adequate protection during the violent storm. Today, the Minton peacock can be seen at the Flagstaff Hill Maritime Museum in Warrnambool. From Australia's most dramatic shipwreck it has now become Australia's most valuable shipwreck artefact and is one of very few 'objects' on the Victorian State Heritage Register. The "Loch Ard" is registered on the National Shipwreck database and is protected as an Historic "Shipwreck. It is one of Australia's and Victoria's most tragic and most famous shipwrecks. The quantity of luxury and commercial items carried as cargo show the type and quality of goods passengers migrating to Australia at that time were bringing with them Flagstaff Hill’s collection of artefacts from LOCH ARD is significant for being one of the largest collections of artefacts from this shipwreck in Victoria. It is significant for its association with the shipwreck, which is on the Victorian Heritage Register (VHR S417). The collection is significant because of the relationship between the objects, as together they have a high potential to interpret the story of the LOCH ARD. The LOCH ARD collection is archaeologically significant as the remains of a large international passenger and cargo ship. The LOCH ARD collection is historically significant for representing aspects of Victoria’s shipping history and its potential to interpret sub-theme 1.5 of Victoria’s Framework of Historical Themes (living with natural processes). The collection is also historically significant for its association with the LOCH ARD, which was one of the worst and best known shipwrecks in Victoria’s history. Small pocket knife salvaged from the wreck of the Loch Ard. It has a dark brown cover on one side. Reverse side is only partly there. Both blades are missingflagstaff hill, warrnambool, shipwrecked coast, flagstaff hill maritime museum, maritime museum, shipwreck coast, flagstaff hill maritime village, great ocean road, loch line, loch ard, captain gibbs, eva carmichael, tom pearce, glenample station, mutton bird island, loch ard gorge, pocket knife, knife, tool -
 Kiewa Valley Historical Society
Book - Reference Melbourne Directory, Melbourne and Suburban Directory for 1889, Circa 1889
This Directory of 1889 covers the location of Melbourne based trade and professional offices by street and in Alphabetical order. It covers all of Melbourne and its suburbs. It also covers government and official, ecclesiastic, legal, municipal and miscellaneous information. The directory details a cross section of a developing city with a splattering of advertisements opening up an in depth look of all aspects of living in the late 1800s. It is interesting to see that all the advertisements do not have any telecommunication numbers listed (personal shoppers or mail orders only). This was a period of high moral standing within the community and hotels advertised rooms " suites of rooms for families and single rooms for Ladies and Gentlemen" also "electric bells throughout the house. Telephone, night porter and hot and cold baths."This directory would be used by the majority of families and businesses working and living within the Kiewa Valley and the surrounding area. Melbourne was the only place where every aspect of living requirement was catered for. Although the delivery of services and goods were not at a high rate, certain items or transactions would require a visit to "the big smoke". Business information are listed both by suburb and alphabetically. There is also a section for British and Foreign Trade. This directory covered nearly everything to do with commerce, an example pay days for principle firms. Greater evolution of trade locations started to balloon out after the mid 1950's. Increased populations and greater levels of communication and safe fast transport facilities permitted greater devolution of commercial enterprises into rural communities, such as the Kiewa Valley.This directory has no front or back cover and is held together by its cloth spine. It contains over 1300 pages, however there may be some pages missing front and back of the directory which would have contained advertisements of some unknown shops. All the sides of this directory (except the spine) have advertisements and content information stamped on. The spine cover has been placed in the directory until further conservation work is carried out. It has gold coloured printing and in the central section, a gold coloured background with the words "Sands & McDougall's Melbourne Directory 1889." The spine has three adverts on the spine.On the spine in gold colour "South * British insurance Company Fire and Marine. Risks Lowest Current Rates No. 11 Queen Street, Arthur J Masters, Manager" and half way down " *Phoenix* Fire Office of London established over 100 years Annual Income exceeds (pound sign) 1,000,000" underneath "Losses Paid Over (pound sign) 16,000,000" underneath "Reserve Fund Exceeds (pound sign) 1,000,000" underneath "9 Market Buildings William Street, Melbourne " underneath " R. Manfield Taylor, Agent" and at the bottom section" Henry Scott Auctioneer and Estate Agent 49 Bridport St., Albert Park" stamped on the bottom side across the page endings "The Wonderful Wertheim Sewing Machines Swanston Street opposite Town Hall", stamped on the top side across the page endings " The Sweet Hapsburg Pianos & Organs Swanston Street Opposite Town Hall"state government listings, names and location of early melbourne population business names, 1889 members of the victorian executive council -
 Kiewa Valley Historical Society
Stocks for Riding Boots, Late 1800's to early 1900's
These wooden trees for riding stocks are a concept that was brought to early colonial days from "mother" England. Gentle folk of wealth and status used these trees from early 1800's to keep and maintain their riding boots in their correct form. This form of maintaining the tall riding boot structure was maintained in Australia by the rural "elite" both on cattle properties and smaller cattle stations in the early 1900's. Good riding boots were a status symbol in rural and outback Australia. The riding stocks "wooden trees" are very significant in the Kiewa Valley because they were used by members of some of the original grazing cattle families to settle there. Both cattle and sheep properties occupied large areas of the Kiewa Valley and they also herded their flock and herd on the Bogong High Plains region. These stocks and boots were worn by Fred Roper whose great grand daughter donated them to KVHS. Therefore these boots and stocks would date from 1880's to 1920's and are a good representation of the style of boots worn during this period. This pair of wooden stocks for riding boots trees has been manufactured to a very high standard. Each of the four boot tree parts fit snugly together and maintain their form, and that of the boot that they occupy. The groove channels and foot forms (tongue and groove) are exact and once snapped together become very solid. There is a brass ring, attached by a small brass "peg" on each of the thin "sliding" middle uprights. See KVHS 0177 - Riding boots.On top "L" (for left boot), "R" (for right boot)horse. country. leather. gaiters. high plains. grazing. cattlemen. laces. studs. stocks. roper family. bogong high plains. -
 Wycheproof & District Historical Society Inc.
Wool Picture, Wycheproof Craft Group Emblem, 1984 (exact)
The Wycheproof Craft Group emblem made by Mrs Elaine Storey depicts a large ram and showcases beautifully, wool colours and versatility of creator and medium used. The wool industry, since Wycheproof's settlement days, has greatly supported the town, families and farming in general.The wool picture is the emblem of a local group that met between 1977 and 2010.This item is aesthetically significant as a visually pleasing craft piece that demonstrates the adaptability of skills to raw materials.It is representative of the lifeblood of the town of Wycheproof for 145 years.A framed wool picture constructed entirely from natural fleece, showing a merino ram in a paddock with natural looking vegetation growth. The subject aptly lends itself to a subtle display of various shades of wool colours. It is framed in oak wood.The word WYCHEPROOF is worked in fleece in an arc formation.Wycheproof Craft Group 1977-2010storey, wycheproof craft, wycheproof wool, spinners weavers, elaine -
 Wycheproof & District Historical Society Inc.
Railway Booklet, Steaming Up Broadway, 31/10/2010
Celebrating 125 years of Railway in WycheproofThe 28-09-1883 was a memorable date for Wycheproof for on that day the long-awaited official opening of the railway took place. It has been serving the district since then. In this booklet individual rail workers are acknowledged in a listing.Booklet of 14 pages - size A5. Sepia front cover photo depicts steam train hauling rail trucks up Broadway, Wycheproof, with early buildings and horse- drawn carriages showing. Back cover: Wycheproof Railway Station in its early beginnings - undated. Booklet celebrates the renovation of the historic Wycheproof Railway Station and 125 Years of Rail in Wycheproof. Chapters include: The Early Days, The Arrival of Rail, The New Century, Bulk Wheat and Million Bushell Silos, Railway Families and Workers, The Last Chapter , A new Era Begins. rail-wycheproof, bulk-wheat, railway-workers, station-renovation, steam-train -
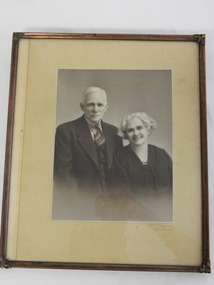 Kiewa Valley Historical Society
Photo Framed - Portrait of Walter and Ada Ryder, c 1930's
Portraits were taken professionally often on important occasions. As graziers from a prominent family in Redbank, Walter and Ada Ryder were well known and respected.Walter and Ada Ryder were pioneer high country graziers and cattlemen. Ada (nee Sullivan)'s family lived at Redbank. Their children were Walter, Victor, Beatrice, Vera, Lorna and Dorothy. Walter 1872 - 1954; Ada 1887 - 1983 Walter was a son of John and Annie Ryder - Walter's parents being one of the first settlers in the valley. According to Ada Ryder's notes and John Cooper's notes, Ryders were followed by Higginsons followed by Coopers in about 1867/8. Ropers held Mullindolingong Station/Mt Yorke Station, but had managers on the station before actually taking up residence about 1867/8. Whilst the Sullivans lived at Redbank (now known as Coral bank), the Ryders lived at Tawanga (correct spelling in those days) on Ryders Lane, Tawonga where John and Annie first built and lived; Walter and Ada then occupied the family home, followed by Vera Hore (nee Ryder) and the current owners Kevin and Rhonda Ryder.Black and white photo of an elderly man and woman both well dressed. Framed by cream cardboard 3.5 cm at sides and 5 cm top and bottom with a plain metal frame surrounding all sides with decorated corners. McPherson, Albury on front below righthand side of the photo.walter ryder; ada sullivan; cattle graziers; tawonga -
 Kiewa Valley Historical Society
Printed Ticket - for Tawonga Public Hall opening night, Prior to March 11, 1925
The first Tawonga Public Hall was opened in grand style with a Grand Ball and Opening Night with musical items, a first class orchestra and supper included. All costing 2/6 The old hall was demolished after the 'new' one was built and being used demonstrating that a hall was considered a necessary community facility for the townThis was the first public hall in Tawonga. On the ticket, W.J. Cooper was Vice President and J.F Cooper was Hon Secretary. Coopers were a prominent name in the early days of Tawonga. Frank Cooper donated the land which the present Tawonga Primary School is built on.Printed ticket on green card for Grand Ball and Opening Night of the Tawonga Public Hall. Wednesday March 11, 1925. Ticket is punched presumably as proof of admittancetawonga public hall; grand ball opening; ticket; cooper family -
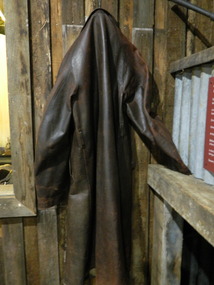 Kiewa Valley Historical Society
Coat - Cattleman's
Cattlemen wore coats when working with their cattle especially during the winter in the Kiewa Valley and when travelling on horses with cattle to, on and from the High Plains where they stayed for days during summer attending and mustering their cattle. The coats protected the cattlemen from harsh weather conditions including snow which sometimes fell in summer. This coat was owned and worn by Richard Marum who owned a farm in Tawonga south. He was the descendant of Kyran Marum, the stockman, who worked for Georgina Huggins. Brown leather full length coat with collar, lapel, long sleeves and buttoning up the front. Instead of pockets the coat has an opening about 12 cm on each side that look like pockets.cattlemen, leather coat, bogong high plains, marum family, tawonga south -
 Kiewa Valley Historical Society
Papers - Settlement Study - Mount Beauty 1971 x5, October 1971
Similar to a census for Mount Beauty in October 1971. Topics include Income, family, the town, society and travel outside the town.The results of the survey give an insight into the community of Mt Beauty after the SEC days, the infrastructure available and the activities of the population living in the town. This would also enable a comparison to be made before or after 1971.Typed papers on the Settlement Study results in Mt Beauty Oct. 1971. Each page gives the question asked and the number of people responding in each given area. The papers are dated October 1971.mt beauty, census 1971, statistics -
 Kiewa Valley Historical Society
Photograph - Folder of Photographs (KVHS 1150 A - F) – Photocopied set of black and white photographs from the display folder (pages 1 - 8) put together by KVHS to document life on the Kiewa Valley Hydro-electric Scheme
Although the Kiewa Hydro-Electric Scheme was first proposed in 1911, construction did not commence until 1938. As part of the push to cut electricity costs and diversify supply, the Victorian Government (circa 1930) initiated the conversion from primarily brown coal supply to hydro – electricity. Field investigations during the 1940’s resulted in a new proposal for a scheme that had more than double the capacity of the 1938 scheme. The Kiewa Hydroelectric Scheme became the largest scheme of its kind in the State Of Victoria and the second largest scheme in Australia. The number of personnel involved in the planning and construction of the scheme increased dramatically. During the late 1940’s, most activity centred around the construction of the West Kiewa Power Station, Rocky Valley Reservoir, McKay Creek Power Station and the Bogong Creek Aqueduct.A common thread across all the larger hydro scheme constructions was the need for workers, both qualified and unqualified who came from around the world seeking a new life for themselves and their families. New accommodation and facilities were required for the army of workers engaged in construction in often remote and wild areas. The SEC had a high demand for timber, and set up the first of a number of sawmills at Bogong Creek in 1939 and set up the first hardwood logging in the headwaters of the Kiewa River. These new ‘towns’ such as Mt Beauty and Bogong, survived, serving the needs of operational personnel and their families, and expanding with growth of new industries. Mount Beauty, and to a lesser extent Bogong, are among these places. Large A3 size spiral bound display folder containing 21 of 58 pages of photocopied black and white photographs of various aspects of the early days of the Kiewa Valley Hydro-electric scheme including equipment, various work sites and photographs of workers and their families. 1-Front page; 2-Security gate at Mt Beauty Camp; 3-Channel 1 on East Kiewa River; 4-Junction Dam – Diversion Tunnel Inlet; 5-Sawmill; 6- Homan’s Gap Sawmill; 7 Junction Dam: 8-Homan Dam Site-Diamond Drilling on River Buttress; 9- Homan Dam Site View Upstream 10-Homan Dam Investigation Camp 1-Windsor & Newton Visual Diary 60 sheet (120 pages) 11’ x 14’ 280 x 356mm 110 GSM Acid Free Drawing Paper 2-1940-Security Gate on Mt Beauty side of Kiewa River bridge. Part of old Mt Beauty camp and mess in background 3- STATE ELECTRICITY COMMISSION OF VICTORIA Date; 11.3.40 Time: 10.30am No K35 Kiewa Hydro Electric Works. Diverting East Kiewa River into Channel Page number 1 4-STATE ELECTRICITY COMMISSION OF VICTORIA Date: 5.4.40 Time: Noon No K58 Kiewa Hydro Electric Works. Junction Dam – Diversion Tunnel Inlet – Normal Flow Page number 2 5- STATE ELECTRICITY COMMISSION OF VICTORIA Date: 19.8.42 Time: 2.30pm No K883 Kiewa Hydro Electric Works. Sawmill – General View Page number 3 6- STATE ELECTRICITY COMMISSION OF VICTORIA Date: 12.1.42 Time: 2.00pm No K540 Kiewa Hydro Electric Works. Homan’s Gap Sawmill – General View Page number 4 7- STATE ELECTRICITY COMMISSION OF VICTORIA Date: 12.1.42 Time: 2.00pm No K540 Kiewa Hydro Electric Works. Junction Dam – General View looking upstream Page number 5 8- STATE ELECTRICITY COMMISSION OF VICTORIA Date: 16.11.45 Time: 10.32amm No K52153 Kiewa Hydro Electric Works Homan Dam Site – Diamond Drilling on River Buttress Page number 6 9-STATE ELECTRICITY COMMISSION OF VICTORIA Date: 15.1.45 Time: 4.10pm No K1781 Kiewa Hydro Electric Works Homan Dam Site – View Upstream Page number 7 10- STATE ELECTRICITY COMMISSION OF VICTORIA Date: 15.1.45 Time: 4.10pm No K1781 Kiewa Hydro Electric Works Homan Dam Investigation Camp 1944 – 1945 Page number 8 secv; kiewa hydro electric scheme; mt beauty; bogong; construction work; -
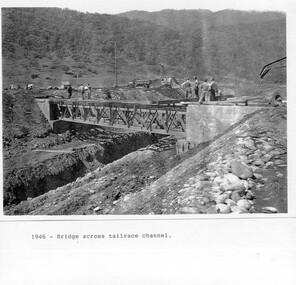 Kiewa Valley Historical Society
Photograph - Folder of Photographs – Photocopied set of black and white photographs (pages 9 - 18) from the display folder put together by KVHS to document life on the Kiewa Valley Hydro-electric Scheme
Although the Kiewa Hydro-Electric Scheme was first proposed in 1911, construction did not commence until 1938. As part of the push to cut electricity costs and diversify supply, the Victorian Government (circa 1930) initiated the conversion from primarily brown coal supply to hydro – electricity. Field investigations during the 1940’s resulted in a new proposal for a scheme that had more than double the capacity of the 1938 scheme. The Kiewa Hydroelectric Scheme became the largest scheme of its kind in the State Of Victoria and the second largest scheme in Australia. The number of personnel involved in the planning and construction of the scheme increased dramatically. During the late 1940’s, most activity centred around the construction of the West Kiewa Power Station, Rocky Valley Reservoir, McKay Creek Power Station and the Bogong Creek Aqueduct.A common thread across all the larger hydro scheme constructions was the need for workers, both qualified and unqualified who came from around the world seeking a new life for themselves and their families. New accommodation and facilities were required for the army of workers engaged in construction in often remote and wild areas. The SEC had a high demand for timber, and set up the first of a number of sawmills at Bogong Creek in 1939 and set up the first hardwood logging in the headwaters of the Kiewa River. These new ‘towns’ such as Mt Beauty and Bogong, survived, serving the needs of operational personnel and their families, and expanding with growth of new industries. Mount Beauty, and to a lesser extent Bogong, are among these places. PHYSICAL: Large A3 size spiral bound display folder containing 21 pages of photocopied black and white photographs of various aspects of the early days of the Kiewa Valley Hydro-electric scheme including equipment, various work sites and photographs of workers and their families. 1-Bridge across Tailrace Channel 1946 2-New Mess building, Mt Beauty 3-Homan’s Gap Saw Mill 4- Diamond Drilling Plant – Big Hill 5-Rocky Valley Camp-Mess Building 6-Parlimentary Party at Rocky Valley 7-No.4 Headrace Tunnel 8- Allis-Chalmers Tractor School 9- SECV Heavy Machinery lined up by road 10- No. 5 Raceline – Balasting Track with improvised truck 1-1946 – Bridge across tailrace channel Page number 9 2-New mess building, Mt Beauty 6.4.46 Page number 10 3- STATE ELECTRICITY COMMISSION OF VICTORIA Date: 10.1.47 Time: 11.40am No K2271 Kiewa Hydro Electric Works Homan’s Gap Saw Mill – Rip Saw Page number 11 4- STATE ELECTRICITY COMMISSION OF VICTORIA Date: 5.10.47 Time: 11am No K4111 Kiewa Hydro Electric Works Diamond Drilling Plant – Big Hill Page number 12 5- STATE ELECTRICITY COMMISSION OF VICTORIA Date: 11.2.48 Time: 3pm No K4277 Kiewa Hydro Electric Works Rocky Valley Camp-Mess Building Page number 13 6- STATE ELECTRICITY COMMISSION OF VICTORIA Date: 15.4.48 Time: 4.30pm No K4397 Kiewa Hydro Electric Works Parlimentary Party at Rocky Valley Page number 14 7- STATE ELECTRICITY COMMISSION OF VICTORIA Date: 22.8.48 Time: 9am No K4668 Kiewa Hydro Electric Works General view of No.4 Headrace Tunnel Page number 15 8-STATE ELECTRICITY COMMISSION OF VICTORIA Date: 5.9.49 Time: 10am No K5180 Kiewa Hydro Electric Works Allis-Chalmers Tractor School – HD 19, Mr I Crossthwaite at Controls Page number 16 9- No markings Page number 17 10- STATE ELECTRICITY COMMISSION OF VICTORIA Date: 7,12.49 Time: 4pm No K5423 Kiewa Hydro Electric Works No. 5 Raceline – Balasting Track with improvised truck. Page number 18 secv; kiewa hydro electric scheme; mt beauty; bogong; construction area -
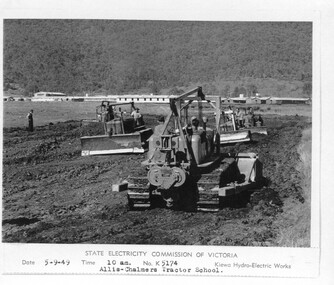 Kiewa Valley Historical Society
Photograph - Folder of Photographs – Photocopied set of 10 black and white photographs (pages 19 - 28) from the display folder put together by KVHS to document life on the Kiewa Valley Hydro-electric Scheme
Although the Kiewa Hydro-Electric Scheme was first proposed in 1911, construction did not commence until 1938. As part of the push to cut electricity costs and diversify supply, the Victorian Government (circa 1930) initiated the conversion from primarily brown coal supply to hydro – electricity. Field investigations during the 1940’s resulted in a new proposal for a scheme that had more than double the capacity of the 1938 scheme. The Kiewa Hydroelectric Scheme became the largest scheme of its kind in the State Of Victoria and the second largest scheme in Australia. The number of personnel involved in the planning and construction of the scheme increased dramatically. During the late 1940’s, most activity centred around the construction of the West Kiewa Power Station, Rocky Valley Reservoir, McKay Creek Power Station and the Bogong Creek Aqueduct.A common thread across all the larger hydro scheme constructions was the need for workers, both qualified and unqualified who came from around the world seeking a new life for themselves and their families. New accommodation and facilities were required for the army of workers engaged in construction in often remote and wild areas. The SEC had a high demand for timber, and set up the first of a number of sawmills at Bogong Creek in 1939 and set up the first hardwood logging in the headwaters of the Kiewa River. These new ‘towns’ such as Mt Beauty and Bogong, survived, serving the needs of operational personnel and their families, and expanding with growth of new industries. Mount Beauty, and to a lesser extent Bogong, are among these places. Large A3 size spiral bound display folder containing 21 pages of photocopied black and white photographs of various aspects of the early days of the Kiewa Valley Hydro-electric scheme including equipment, various work sites and photographs of workers and their families. 1-Allis Chalmers Tractor School 2- Gardens outside Administrative Office – Mt Beauty 3- Mt Beauty house – 1950 4-Bridge over Pretty Valley River, Bogong 5-Rocky Valley Spillway Tunnel break through 6-Ni 1 Headrace Tunnel drilling face 7-No 4 Power Station Drilling 8-Clover Dam Flood Waters 9-No1 Head Race Tunnel Portal Building 10-Clover Dam 1-STATE ELECTRICITY COMMISSION OF VICTORIA Date: 5.9.49 Time: 10amm No K5174 Kiewa Hydro Electric Works Allis Chalmers Tractor School Page number 19 2-STATE ELECTRICITY COMMISSION OF VICTORIA Date: 22.2.50 Time: 3.30pm No K5601 Kiewa Hydro Electric Works Gardens outside Administrative Office – Mt Beauty Page number 20 3-Mt Beauty house – 1950 Page number 21 4-STATE ELECTRICITY COMMISSION OF VICTORIA Date: 23.10.50 Time: 11.15am No K6331 Kiewa Hydro Electric Works Bogong-Bridge over Pretty Valley River Page number 22 5-STATE ELECTRICITY COMMISSION OF VICTORIA Date: 23.6.50 Time: 2.30pm No K5844 Kiewa Hydro Electric Works ROCKY VALLEY SPILLWAY TUNNEL BREAK THROUGH Page number 23 6-20/3/52 – No. 1 Headrace Tunnel Drilling face (E.E.E. contract) Page number 24 7-6/6/52 – No 4 Power Station – Drilling Page number 25 8-STATE ELECTRICITY COMMISSION OF VICTORIA Date: 6/6/52 Time: No K7113 Kiewa Hydro Electric Works Clover Dam Flood Waters Page number 26 9-STATE ELECTRICITY COMMISSION OF VICTORIA Date: Oct 1952 Time: No K7239 Kiewa Hydro Electric Works No. 1 HEAD RACE TUNNEL PORTAL BUILDING. Handwritten underneath – This information from Ron White-the later Principal Hydro Engineer of the SEC. Oct 1952 Location incorrect? All work on No 1 had ceased after financial crash of 1951. This photo would refer to No 4 Headrace Tunnel? Page number 27 10-STATE ELECTRICITY COMMISSION OF VICTORIA Date: Jan 1953 Time: No K7307 Kiewa Hydro Electric Works CLOVER DAM Page number 28 secv; kiewa hydro electric scheme; bogong; mt beauty; construction area -
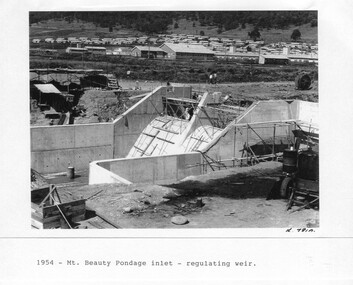 Kiewa Valley Historical Society
Photograph - Folder of Photographs – Photocopied set of 10 black and white photographs (pages 29 - 38) from the display folder put together by KVHS to document life on the Kiewa Valley Hydro-electric Scheme
Although the Kiewa Hydro-Electric Scheme was first proposed in 1911, construction did not commence until 1938. As part of the push to cut electricity costs and diversify supply, the Victorian Government (circa 1930) initiated the conversion from primarily brown coal supply to hydro – electricity. Field investigations during the 1940’s resulted in a new proposal for a scheme that had more than double the capacity of the 1938 scheme. The Kiewa Hydroelectric Scheme became the largest scheme of its kind in the State Of Victoria and the second largest scheme in Australia. The number of personnel involved in the planning and construction of the scheme increased dramatically. During the late 1940’s, most activity centred around the construction of the West Kiewa Power Station, Rocky Valley Reservoir, McKay Creek Power Station and the Bogong Creek Aqueduct.A common thread across all the larger hydro scheme constructions was the need for workers, both qualified and unqualified who came from around the world seeking a new life for themselves and their families. New accommodation and facilities were required for the army of workers engaged in construction in often remote and wild areas. The SEC had a high demand for timber, and set up the first of a number of sawmills at Bogong Creek in 1939 and set up the first hardwood logging in the headwaters of the Kiewa River. These new ‘towns’ such as Mt Beauty and Bogong, survived, serving the needs of operational personnel and their families, and expanding with growth of new industries. Mount Beauty, and to a lesser extent Bogong, are among these places. Large A3 size spiral bound display folder containing 21 pages of photocopied black and white photographs of various aspects of the early days of the Kiewa Valley Hydro-electric scheme including equipment, various work sites and photographs of workers and their families. 1-Mt Beauty Pondage inlet-Regulating weir 2-Langfords Gap Basalt Hill-Tunnel in quarry face.3-Rocky Valley Camp-from Engineering Office 4-Basalt Hill tunnel portal 5-No 1 Pressure Shaft Works Bench 6-No 1 Power Station 7-Overturned haulage wagons on the side of an embankment 8- Group of workers dressed in wet weather gear inside a tunnel 9-Workmen and vehicle in tunnel 10-Howman’s Gap campsite at 4,150 feet 1-1954 – Mt Beauty Pondage inlet – Regulating weir Page number 29 2-28/10/54 – Langfords Gap Basalt Hill – Tunnel in quarry face K7860 Page number 30 3-STATE ELECTRICITY COMMISSION OF VICTORIA Date: 17.8.55 Time: No K8132 Kiewa Hydro Electric Works ROCKY VALLEY CAMP – FROM ENGINEERING OFFICE Page number 31 4-28/10/54 – Basalt Hill tunnel portal K7859 Page number 32 5-No.1 Pressure Shaft Works Bench 5.7.56 Page number 33 6- No. 1 Power Station 26.4.59 Page number 34 7- No markings Page number 35 8-No markings (Wooden board on ground printed with - POLAR A.N.GELATINE DYNAMITE “75” DE 28.8.40) Page number 36 9-No markings Page number 37 10-Howman’s Gap campsite at 4,150 feet Page number 38 secv; kiewa hydro electric scheme; mt beauty; bogong; construction area -
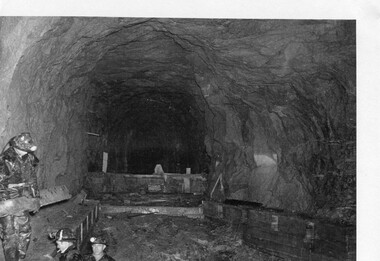 Kiewa Valley Historical Society
Photograph - Folder of Photographs – Photocopied set of black and white photographs (pages 49 -58) from the display folder put together by KVHS to document life on the Kiewa Valley Hydro-electric Scheme
Although the Kiewa Hydro-Electric Scheme was first proposed in 1911, construction did not commence until 1938. As part of the push to cut electricity costs and diversify supply, the Victorian Government (circa 1930) initiated the conversion from primarily brown coal supply to hydro – electricity. Field investigations during the 1940’s resulted in a new proposal for a scheme that had more than double the capacity of the 1938 scheme. The Kiewa Hydroelectric Scheme became the largest scheme of its kind in the State Of Victoria and the second largest scheme in Australia. The number of personnel involved in the planning and construction of the scheme increased dramatically. During the late 1940’s, most activity centred around the construction of the West Kiewa Power Station, Rocky Valley Reservoir, McKay Creek Power Station and the Bogong Creek Aqueduct.A common thread across all the larger hydro scheme constructions was the need for workers, both qualified and unqualified who came from around the world seeking a new life for themselves and their families. New accommodation and facilities were required for the army of workers engaged in construction in often remote and wild areas. The SEC had a high demand for timber, and set up the first of a number of sawmills at Bogong Creek in 1939 and set up the first hardwood logging in the headwaters of the Kiewa River. These new ‘towns’ such as Mt Beauty and Bogong, survived, serving the needs of operational personnel and their families, and expanding with growth of new industries. Mount Beauty, and to a lesser extent Bogong, are among these places. Large A3 size spiral bound display folder containing photocopied black and white photographs of various aspects of the early days of the Kiewa Valley Hydro-electric scheme including equipment, various work sites and photographs of workers and their families. 1-Workmen working inside one of the tunnels. 2-Workman drilling in West Kiewa Tunnel 3-Junction Dam wall construction 4&5-2B&W photographs Kiewa House residents ready to go to a ball in Mt Beauty 6-Workmen warming up in front of a fire at No 1 bench 7-Workmen being hauled in at No 4 P.S Shaft 8-No 4 Power Station – Drilling 9-Workmen eating a hot meal in the tunnel. 10-2 photographs (a)Pretty Valley camp showing workman’s huts and construction materials & (b)Worker in Langford Gap Basalt Hill Tunnel face 11-Tunnel entrance (unlabelled) with rail tracks in foreground 12- Workmen drilling at No 1 Head race tunnel-Drilling face 13- No 1 Power Station 14-Workmen at the entrance to one of the SECV tunnels under construction 1-SECV number at bottom of picture Half obscured possibly K8461 Page number 53 2-In West Kiewa Tunnel Page number 54 3- Construction of Junction Dam wall – approximately 1941 Page number 55 4&5- Residents of Kiewa House at Bogong ready to go to the ball at Mt Beauty-1946. Handwritten on a copy of the photo on opposite page Mrs Lorna Crosset filled out the names *Dad was Des Crossett – his daughter is Gael Petcopoulis Greta engaged to John broke it off. Charlie, Rosalind, Bill, Priscilla, Max Lawrence-Dad’s Boss, Mary & Max married, Mary, Kay, Gwen McPherson Mum’s boss, John McCluskey (c) At No. 5 Bench Page number 56 6- STATE ELECTRICITY COMMISSION OF VICTORIA Date: 27.2.51 Time:2.15pm No K6373 Kiewa Hydro Electric Works No. 4 P.S. Shaft – Haulage of men in buckets (b) As above Handwritten at top of photo Appendix 4 page number 57 7- STATE ELECTRICITY COMMISSION OF VICTORIA Date: 6.6.52 Time:… No K7122 Kiewa Hydro Electric Works No. 4 POWER STATION – DRILLING page number 58 8-No markings page number 59 9-(a)Handwritten under photograph Approx. 1948/49 (b) STATE ELECTRICITY COMMISSION OF VICTORIA Date: 28.10.54 Time:.. No K7860 Kiewa Hydro Electric Works LANGFORD GAP BASALT HILL TUNNEL FACE Page number 49 10-(a) No markings 11- STATE ELECTRICITY COMMISSION OF VICTORIA Date: 20.3.52 Time: No K6979 Kiewa Hydro Electric Works No. 1 HEAD RACE TUNNEL – DRILLING FACE (E.E.E. CONTRACT) ‘The Frenchies’ (E.E.E) as they were affectionately known Page number 50 12-31.5.56 No. 1 Power Station Aggregate Stock Piles. Page number 51 13&14-No markings Page number 52 secv; kiewa hydro electric scheme; bogong; mt beauty; construction area -
 Kiewa Valley Historical Society
Photograph - Folder of Photographs – Photocopied set of black and white photographs (pages 39 - 48) from the display folder put together by KVHS to document life on the Kiewa Valley Hydro-electric Scheme
Although the Kiewa Hydro-Electric Scheme was first proposed in 1911, construction did not commence until 1938. As part of the push to cut electricity costs and diversify supply, the Victorian Government (circa 1930) initiated the conversion from primarily brown coal supply to hydro – electricity. Field investigations during the 1940’s resulted in a new proposal for a scheme that had more than double the capacity of the 1938 scheme. The Kiewa Hydroelectric Scheme became the largest scheme of its kind in the State Of Victoria and the second largest scheme in Australia. The number of personnel involved in the planning and construction of the scheme increased dramatically. During the late 1940’s, most activity centered around the construction of the West Kiewa Power Station, Rocky Valley Reservoir, McKay Creek Power Station and the Bogong Creek Aqueduct.A common thread across all the larger hydro scheme constructions was the need for workers, both qualified and unqualified who came from around the world seeking a new life for themselves and their families. New accommodation and facilities were required for the army of workers engaged in construction in often remote and wild areas. The SEC had a high demand for timber, and set up the first of a number of sawmills at Bogong Creek in 1939 and set up the first hardwood logging in the headwaters of the Kiewa River. These new ‘towns’ such as Mt Beauty and Bogong, survived, serving the needs of operational personnel and their families, and expanding with growth of new industries. Mount Beauty, and to a lesser extent Bogong, are among these places. Large A3 size spiral bound display folder containing photocopied black and white photographs of various aspects of the early days of the Kiewa Valley Hydro-electric scheme including equipment, various work sites and photographs of workers and their families. 1-Breakdown in Circuit Breaker (Isolating Contacts) 2-Big Hill Bench- Site of No 5 Devlopment 3-No 1 Power Station 4-No 1 Pipeline, Anchor No 8 5-Push Dozing-RD8 Tractor 6- Tractor and driver at work 7- Workmen in unnamed tunnel 8- Front page of Journal of SECV Vol 15. Photograph of No 1 pipeline viewed from McKay Portal 9-Rocky Valley Dam Core Wall 10-Workmen working inside tunnel loading rocks into a rail truck. 1-Breakdown in (generator) Circuit Breaker (Isolating Contacts) Handwritten underneath (This is not a picture of any part of a generator. It is a circuit breaker Signed Ron White Ron was the Principal Hydro Engineer of the SEC Kiewa Scheme Page number 39 2-Big Hill Bench – Site of No. 5 Development (abandoned) Page number 40 3-No 1 Power Station Page number 41 4-No. 1 Pipeline, Anchor No. 8 Page number 42 5-Push Dozing – RD8 Tractor, 12 cubic yard Carryall and FD Cletrac Tractor Page number 43 6-No marking Page number 44 7-No marking Page number 45 8-Journal of State Electricity Commission of Victoria SEC Vol 15 No… April-May, 19… No 1 Pipeline-A view from McKay Portal G Hempenstall and D Sutton stiffening pipe section for transport during construction (….indicates missing text) Page Number 46 9-Rocky Valley Dam Core Wall Page number 47 10-No markings Page number 48 secv; kiewa hydro electric scheme; construction area; power stations; reservoirs; aqueduct; mt beauty; bogong -
 Kiewa Valley Historical Society
Papers - Memoir
Mary was born on 6th May 1939 and describe dairy farming in the Kiewa Valley throughout the years to c2020A handwritten family history of dairying in the Kiewa Valley consisting of 8 pages written with blue biro. A memoir by Mary Cardwell nee Creamer 'My early days of dairying in Kiewa Valley.'All pages are torn at the top.mary cardwell, dairy farming, kiewa valley, women -
 Kiewa Valley Historical Society
Egg Box
Pre egg cartons.Home-made with reused 'crate' wooden panels. Higginson and Hollond families - farmers in the Kiewa Valley. Bogong was a property owned by Kiewa Valley farmers. Dave Gibson worked with the SEC in the early days and married Lois Hollond (Robert and Reg's sister). Lois lives in WodongaOld brown wooden handmade box with two panels joined together on each face (sides, bottom, top). The lid fits inside at the top and has 3 smaller panels nailed on, 2 of which have leather straps nailed on one side of the box and fastened (nailed) to 1 side as a hinge. Inside: the box has 2 wooden vertical panels dividing the box into 3 sectionsTop of the lid in yellow paint "Mr D. Gibson/Bogong" on 1 wooden panel and "Eggs with Care" on smaller panel between the side panelseggs, farming. chooks, kiewa valley, higginson family, hollond family -
 Kiewa Valley Historical Society
Milking Cups - Dairy
This milking equipment was used in the early days of milking using machines. The dairy industry is and has been one of the major industries of the Kiewa Valley. This equipment was used on local farmers, P & R. Creamer's dairy farm.Set of early mechanical milking cups. 4 cups - 2 each side of 2 hollow metal (steel) rods which are attached to hollow rubber tubes that lead towards the main milking machine. The metal cups have black ends at the opening where they are attached to the cow. The outlet from the cups is via 2 metal tubes that lead into the rods that in turn lead to the tubes.At opening at end of cups: "Utility" possibly more but too difficult to read. milking machinery; dairy; kiewa valley; creamer family; -
 Kiewa Valley Historical Society
Map - Topographical, Ski Club of Victoria Bogong High Plains and Adjacent Peaks, Early 1930's
This map has been in the Ryder family for approx. 70 years. Probably used when bush walking and skiing in the early days on the Bogong High Plains. The Ryder family are farmers in the Kiewa Valley and were involved in taking their cattle up to the Bogong High Plains where they had a lease. The State Electricity Commission of Victoria constructed the Kiewa Hydro Electric Scheme opening up the area during the 1940's and 1950's. This type of map is an early one, used by people in the Kiewa Valley and possibly by surveyors prior to construction.The map is an early topographic map used by farmers living in the Kiewa Valley. It is historically significant as these people were involved in taking cattle up to the High Plains during summer and may have been used for bush walking and skiing.This is a sepia coloured paper map which was originally printed copyright registered. It was revised in 20/6.33/4.4.37/8.4.40/24.8.43/19/6/54. It shows roads / tracks / snow poles / snow pole numbers (27) / Snow pole spacing (3 chains. 66 yards) approximately 27 poles to the mile / height above sea level in feet - 5280. Water courses not definitely located etc.Rocky Valley Dam (Kiewa Hydro Electric Scheme) has been drawn on the map by hand with a biro. There is a wooden rod at the top of the map.topographic map; kiewa valley; ryder family; high plains of victoria -
 Kiewa Valley Historical Society
Books and Certificates - Baker Family
History and Beliefs of Jehovah's Witness Religious OrganisationThe Baker family lived in the Kiewa Valley. Their herd of 15 cows yielded an average of 5614 lbs. Milk 5.2% average test and 301.71 lbs. Butterfat in 273 days with allowances for junior cows in the year 1930-31 1. Book - 'Bible Readings for Home Circle' 1906 2. Book - 'Christ's Object Lessons' 3. 8 small folded papers each with a religious message 4. Certificate to Mr J. Baker presented by the Royal Agricultural Society of Victoria re Dairy Herd in Oct. 1931 5. Certificate to L.A.C.I. G. Baker 49th Optl. Based Unit R.A.A.F. Shire of Yackandandah Feb. 1946baker family, kiewa valley, jehovah's witness, dairy farming -
 Orbost & District Historical Society
black and white photograph, C1906
This is a photograph of John Draffin and his family. John Draffin was for a time the Orbost Shire Secretary. John Draffin came to Australia as a child with his parents from the north of Ireland . He came to Orbost in 1894 and was Shire Secretary from then until 1910 He had four children: Andrina, Eva, George, Maggie, Sally and Nellie. "Mr Draffin was 67 years of age when he died. He had for many years been engaged in farming pursuits, and at one time held the position of champion plough- man of Victoria. In his younger days he used to make it his boast- that although he was a small man he could do as much work as a big one Some thirty odd years ago be took up land in South Gippsland, but in 1895 gave up farming, and was appointed secretary to the Orbost shire, a position which he held until he was compelled by failing health to resign." - from Snowy River Mail 1 August 1912.John Draffin was a prominent Orbost citizen involved in many community activities.A black / white studio photograph of a family - mother father and six children. The parents are seated with the youngest child, other children are standing.draffin-john orbost-shire-secretary -
 Cheese World Museum
Book, Under Bayard's Banner, 1894
The Percy Uebergang family lived at Tooram Park, Allansford from 1912 until 1992. Percy and Myrtle Uebergang's children were twins, Ray and Joyce born in 1926 who lived at Tooram Park until their deaths, Ray in 1986 and Joyce in 1992. Neither Ray nor Joyce married and following the death of her brother Joyce set up the Ray and Joyce Uebergang Foundation which supports the local community. This bookis part of the collection of items given into the care of the Cheese World Museum. Uebergang catalogue No.K51 This book was school prize donated to Percy Uebergang in 1899 whilst a pupil at Cudgee State School.Green cloth hardbound book with gold print title 'Under Bayards Banner: a Story of the Days of Chivalry' and a in black print picture of two knights. On the spine the title is in gold print, the author's name Henry Frith, in black and a picture of a couple. On the back cover there is a black spray of leaves. The book includes eight illustrations by E Blair Leighton. There is an ornate book plate on the fly leaf which has a border of pink flowers on three sides.Presented to Percy Uebergang/ Class IV/ SS No.105 Cudgee/ 23-6-99allansford, uebergang, frith, henry, cassell & co ltd, children's books