Showing 532 items matching "charing cross bendigo"
-
 Ballarat Tramway Museum
Slide - 35mm slide/s - set of 5, 1970's
Series of five 35mm slides in a yellow colour "Peter Fox Collins St. Melbourne" cardboard mounts, of view of Bendigo trams. Each slide along the top edge has the details while the bottom edge, has a number in the details area. 2599.1 - No. 9420, No. 24 at Quarry Hill - photo at dusk, poor quality, has surface damage all over slide. 2599.2 - No. 9421, ditto 2599.3 - No. 10132, No. 19 in Bendigo Trust operation colours at intersection of McCrae St & Nolan St, some surface damage around the top and bottom edges. Has Gillies Pies roof advertisement. Tram has destination of North Bendigo. 2599.4 - No. 10133, No. 25, High St, south of Charing Cross - some surface damage around the top and bottom edges. Tram has roof advertisements for "Gas" and "Myers". Has destination of Joss House 2599.5 - No. 10134, No. 19, Pall Mall, some slight surface damage. Tram has destination of Golden Square and has a roof advertisement for Sandhurst Milk and one other company. In blue ink on each slide; number as above in bottom edge. 2599.1 and .2 - "No. 24 Quarry Hill" 2599.3 & .5 - "No. 19 Nth Bendigo" 2599.4 - "No. 25 Nth Bendigo"tramways, trams, bendigo, pall mall, bendigo trust, nolan st, tram 24, tram 19, tram 25 -
 Ballarat Tramway Museum
Slide - 35mm slide/s, Travis Jeffrey, c1962
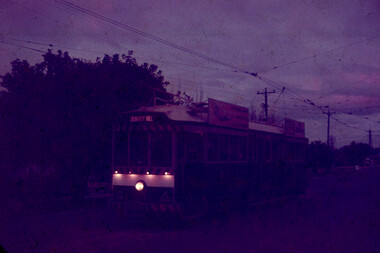
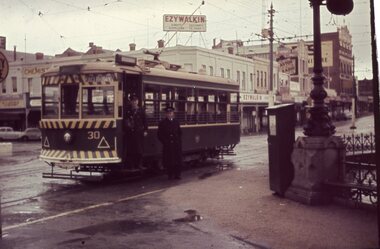
... of Bendigo No. 30 at Charing Cross, in View St., c1962. Photo... Charing Cross Eaglehawk tram 30 "BES 2" in pencil Agfa plastic ...Agfa plastic mount (blue base, white cover) with a photo of Bendigo No. 30 at Charing Cross, in View St., c1962. Photo follows on from Reg Item No. 2612. Photo taken during a rainy day. Tram has destination of Eaglehawk. Note SEC crewman and Inspector standing by door. Has the Ezywalkin building in the background and a billboard advertisement for Astor Radio."BES 2" in penciltramways, trams, bendigo, charing cross, eaglehawk, tram 30 -
 Ballarat Tramway Museum
Slide - 35mm slide/s, Travis Jeffrey, c1962
Agfa plastic mount (blue base, white cover) with a photo of Bendigo No. 30 at Eaglehawk terminus, High St. Eaglehawk, c1962 with the Eaglehawk Town Hall in the background. Photo follows on from Reg Item No. 2611 to 2613. Photo taken during a rainy day. Tram has destination of Eaglehawk. Tram has the destination of Charing Cross."BES 4" in penciltramways, trams, bendigo, high st, eaglehawk, tram 30 -
 Ballarat Tramway Museum
Slide - 35mm slide/s, Travis Jeffrey, c1962
... Charing Cross Pall Mall tram 7 tram 29 "BES 8" in pencil Agfa ...Agfa plastic mount (blue base, white cover) with a photo of Bendigo 7 and possibly No. 29 in Pall Mall Bendigo, with passengers boarding the Birney tram car and the conductor observing them. The Bendigo has the destination of Quarry Hill and No. 7, North Bendigo. Photo taken c1962."BES 8" in penciltramways, trams, bendigo, charing cross, pall mall, tram 7, tram 29 -
 Ballarat Tramway Museum
Slide - 35mm slide/s, Travis Jeffrey, c1962
... of Bendigo 29 at Charing Cross, with another single truck car behind... Bendigo Charing Cross City Club Hotel tram 29 "BES 12" in pencil ...Agfa plastic mount (blue base, white cover) with a photo of Bendigo 29 at Charing Cross, with another single truck car behind it (possibly No. 7). Has two SEC crewman (Driver and Conductor) standing at the front of the tram. In the background is the Ezywalkin Shoe Store and the City Club Hotel in the background. Tram has the destination of North Bendigo and has a SEC Briquettes roof advertisement."BES 12" in penciltramways, trams, bendigo, north bendigo, charing cross, city club hotel, tram 29 -
 Ballarat Tramway Museum
Slide - 35mm slide/s, Travis Jeffrey, c1962
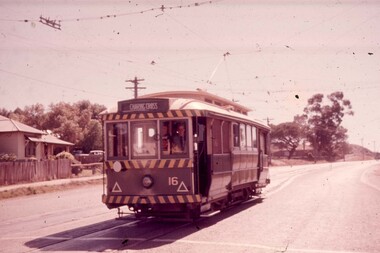
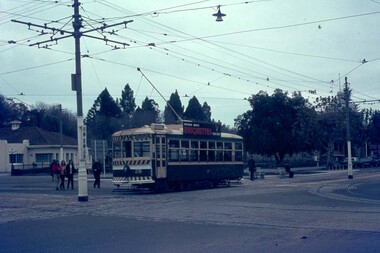
Agfa plastic mount (blue base, white cover) with a photo of Bendigo No. 16 Manchester Loop, near Jackson St. Taken c1962, spring or early summer. No. 16 has a tram following indicator on the front dash panel and destination of Charing Cross. Note wall behind tram remains in situ 8/2004."BES 20" in penciltramways, trams, bendigo, eaglehawk, tram 16 -
 Ballarat Tramway Museum
Slide - 35mm slide/s, Travis Jeffrey, c1962
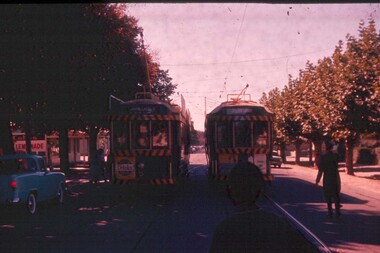
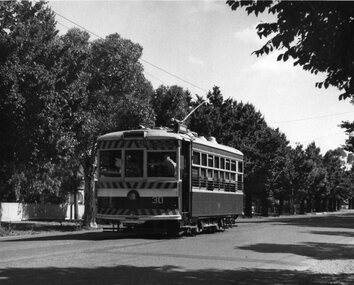
Agfa plastic mount (blue base, white cover) with a photo of Bendigo No. 5 and No. 24 crossing at Myrtle St. loop. No. 5 has destination of Charing Cross and a Cohns Drinks Advertisement on front panel. No. 24 has destination of Golden Square. On the front dash panel is advertisement for Huttons Hams and a Streets Ice-cream advertisement. Note the empty roof advertisement panel on No. 24 - refer to Reg. Item 2632, which shows the tram at Golden Square."BES 21" in penciltramways, trams, bendigo, golden square, myrtle st, tram 5, tram 24 -
 Ballarat Tramway Museum
Slide - 35mm slide/s, Travis Jeffrey, c1962
Agfa plastic mount (blue base, white cover) with a photo of Bendigo No. 5 in the crossing loop at Myrtle St. loop, with No. 24 leaving the crossing loop for Charing Cross. No. 24 has a Cohns Drink advertisement on the front dash panel and two roof advertisements. Tram has destination of Golden Square. In the background is the Sacred Heart Cathedral . Photo taken c1962."BES 24" in penciltramways, trams, bendigo, golden square, myrtle st, tram 5, tram 24 -
 Ballarat Tramway Museum
Slide - 35mm slide/s, Travis Jeffrey, c1962
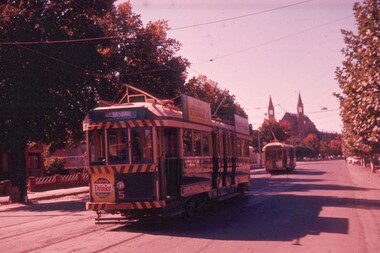
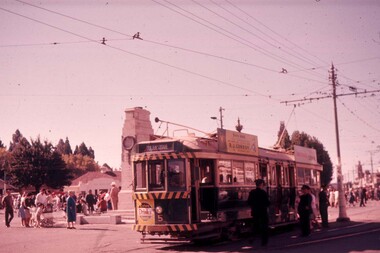
... of Bendigo No. 5 at Charing Cross near the end of the double line... Charing Cross Celebrations tram 5 "BES 26" in pencil Agfa plastic ...Agfa plastic mount (blue base, white cover) with a photo of Bendigo No. 5 at Charing Cross near the end of the double line with the Cenotaph in the background. Tram has the destination of Golden Square, a Cohns Drinks advertisement on the front panel and a R.J. Conroy roof advertisement. Three SEC Tramway personnel standing by the side of the tram. Many people standing in the background - Easter Fair or similar event. Photo taken c1962."BES 26" in penciltramways, trams, bendigo, charing cross, celebrations, tram 5 -
 Ballarat Tramway Museum
Slide - 35mm slide/s, Travis Jeffrey, late 1960's or early 1970's
... of Bendigo 7 and the scrubber tram at Charing Cross. No. 7 has roof ...Agfa plastic mount (blue base, white cover) with a photo of Bendigo 7 and the scrubber tram at Charing Cross. No. 7 has roof advertisements for SEC "Everything's under control in my all electric kitchen" and one for Electric Cooking. Photo taken late 1960's early 1970's."BES 33" in penciltramways, trams, bendigo, charing cross, scrubber tram, tram 7, scrubber -
 Ballarat Tramway Museum
Slide - 35mm slide/s, Travis Jeffrey, late 1960's or early 1970's
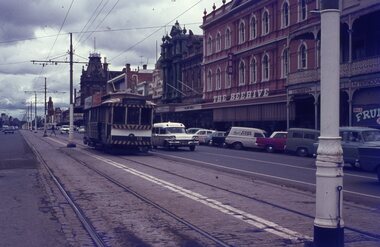
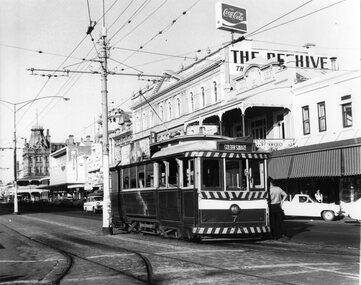
Agfa plastic mount (blue base, white cover) with a photo of Bendigo No. 19 in Pall Mall, nearing Charing Cross. Tram has the destination of Golden Square Photo taken late 1960's early 1970's. Photo has the Beehive, the Shamrock Hotel in the background. Radio station 3BO can be seen on the Beehive building. No. 19 has two SEC roof advertisements. Note the point bar on the pole on the right hand side of the photograph."BES 35" in penciltramways, trams, bendigo, pall mall, beehive building, tram 19 -
 Ballarat Tramway Museum
Slide - 35mm slide/s, Travis Jeffrey, late 1960's or early 1970's
... Charing Cross tram 28 "BES 47" in pencil. Agfa plastic mount (blue ...Agfa plastic mount (blue base, white cover) with a photo of Bendigo No 28 arriving at the Charing Cross stop, from Golden Square. Two SEC crewmen waiting at stop. Tram has a SEC Briquettes roof advertisement on the side of the tram. Photo taken late 1960's early 1970's from the window of another tram."BES 47" in pencil.tramways, trams, bendigo, charing cross, tram 28 -
 Ballarat Tramway Museum
Slide - 35mm slide/s, Travis Jeffrey, late 1960's or early 1970's
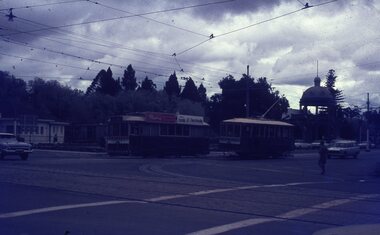
... Charing Cross tram 3 tram 26 "BES 48" in pencil. Agfa plastic ...Agfa plastic mount (blue base, white cover) with a photo of Bendigo Nos. 3 and 26 at Charing Cross. The trams are bound for Eaglehawk, Quarry Hill respectively. Photo shows the traffic arrangements at Charing Cross prior to closure. Photo taken late 1960's early 1970's from the window of another tram. No. 3 has two roof advertisement racks which are empty, while No. 26 has a SEC briquettes roof advertisement."BES 48" in pencil.tramways, trams, bendigo, charing cross, tram 3, tram 26 -
 Ballarat Tramway Museum
Slide - 35mm slide/s - set of 3, Travis Jeffrey, late 1960's or early 1970's
Series of three Agfa plastic mount (blue base, white cover) of photos of Bendigo No. 29 on the Golden Square - North Bendigo route. Photo taken late 1960's early 1970's from the window of another tram. The tram has a SEC Briquettes roof advertisement fitted. 2655.1 - No. 29 leaving Charing Cross for Golden Square with 26 in the background. 2655.2 - No. 29 north bound in Pall Mall with Stonemasons Supermarket and the Stoneman's Shamrock Hotel in the background. 2655.3 - No. 29 leaving a Myrtle St loop, in High St?, with Hardies Fibrolite Pipes yard in the background."BES 49", "50", "51" in pencil.tramways, trams, bendigo, golden square, pall mall, charing cross, high st, tram 29 -
 Ballarat Tramway Museum
Postcard, Nu-color-vue or Nucolorvue Productions, Bendigo No. 3 at Charing Cross, late 1960's
... Bendigo No. 3 at Charing Cross... at Charing Cross with Mitchell St in the background. Shows part... of Bendigo No. 3 at Charing Cross with Mitchell St in the background ...Nu-colour-Vue series postcard No. BE 24 of Bendigo No. 3 at Charing Cross with Mitchell St in the background. Shows part of the tram, fountain and the buildings on either side of Mitchell St. Photo taken mid to late 1960's. Has advertisements on buildings for Astor Radio, Fountain Plaza and a Peters Ice cream van in the photograph. On rear of postcard are the details of the photo, manufacturer, copy right statement and location to place the stamp.trams, tramways, bendigo, charing cross, mitchell st -
 Ballarat Tramway Museum
Document - Letter/s, State Electricity Commission of Victoria (SECV), "Tramways - Tracks over bridges, culverts etc.", Aug. 1957
... to the Bendigo Creek Bridge at Charing Cross and responsibility of costs... the correspondence that was involving damage to the Charing cross bridge ...Yields information about the correspondence that was involving damage to the Charing cross bridge in Bendigo and responsibilities for repair.Memo with attached letter dated 1/5/191, titled "Tramways - Tracks over bridges, culverts etc." regarding repairs to the Bendigo Creek Bridge at Charing Cross and responsibility of costs for repairs - SEC or City of Bendigo. Letter from Dooley and Breen Solicitors, dated 26/4/1951 regarding responsibilities, refer to original agreements. Was pinned the top left hand corner.Has initials in ink.trams, tramways, letters, sec, tram track, pmg -
 Ballarat Tramway Museum
Photograph - Digital image Set of 20, Dec. 1970
Set of 20 digital images of Bendigo Tramways December 1970 by Stuart Lodington. .1 - Bendigo track gang renewing a joint, McCrae St, with welding truck alongside and Birney No. 29. .2 - No. 5 at Quarry Hill terminus? .3 - No. 24 at the depot .4 - No. 2 on the Quarry Hill line .5 - No. 5 approaching the Eaglehawk terminus .6 - No. 29? at the Golden Square Terminus with Bill Rodda's Golden Square hotel in the background. .7 - No. 3 inbound on the Quarry Hill line. .8 - trams crossing on the Eaglehawk line, through the window of one tram. .9 - side on view of a B23D controller in a bogie tram .10 - No. 5 at the Eaglehawk terminus .11 - No. 21 at No. 21 crossing on the Golden Square line. No. 29 showing special, No.21 - North Bendigo, Fire Station Loop? .12 - No. 29 and another tram - near work site? .13 - interior view from Birney looking at the front of another tram parked behind. .14 - No. 29, No. 6 crossing at .15 - No. 6, showing special at Charing Cross. .16 - No. 5 and another tram at North Bendigo on a Special .17 - No. 28 at Charing Cross .18 - No. 5 on Special at a Loop on the Eaglehawk line .19 - No. 28, and two other trams at the Myrtle St Loop .20 - No. 18 showing Quarry Hill and two other trams on View St.trams, tramways, bendigo, trackwork, mccrae st, depot, quarry hill, eaglehawk, golden square, controllers, north bendigo, view st, tram 29, tram 5, tram 24, tram 2, tram 3, tram 6, tram 28, tram 18 -
 Ballarat Tramway Museum
Photograph - Digital image Set of 20
Set of 20 digital images of Bendigo Tramways, 1972 at or before closure while on a tram tour by Stuart Lodington. .1 - No. 28 and 5 at Eaglehawk terminus .2 - No. 28 leaving Charing Cross and travelling into View St with Armstrong Type Service building in background and Firestone Advertisements. .3 - No. 29 with Eaglehawk Town Hall and Post Office in background. .4 - No. 26 and 29 at start of double track, High St Eaglehawk .5 - No. 29 leaving Eaglehawk with shops in the background, Foodland, J. Bests .6 - No. 29 and 23 crossing Manchester Loop with Manchester Arms Hotel in the background and an old poppet head. .7 - No. 29 at ditto with poppet head in the background. .8 - No. 28 and two other trams at the Quarry Hill terminus. .9 - No. 29 in High St Bendigo with the Cathedral and Golden Gate Hotel in the background. .10 - No. 3 with destination Eaglehawk, in bound Carpenter St? .11 - No. 29 following a single trucker through a loop or the end of the double track near the depot. .12 - No. 23?, at Eaglehawk terminus, with Eaglehawk Town Hall in the background. .13 - Birney tram crossing the bridge at the Depot entrance - No. 29 .14 - No. 29 on the Eaglehawk line? .15 - as for .13 .16 - No. 29 entering the depot. .17 - No. 23, inbound from Eaglehawk, at Jobs Gully Loop with the railway overbridge in the background. .18 - No. 28 and two other trams (see also Reg Item 4982) for the same tram tour at Myrtle St. Loop. .19 - No. 21 with North Bendigo on the destination approaching the Golden Square terminus. .20 - No. 7 at Golden Square terminustrams, tramways, bendigo, eaglehawk, quarry hill, golden square, depot, tram 5, tram 29, tram 28, tram 26, tram 23, tram 7, tram 21 -
 Ballarat Tramway Museum
Photograph - Digital image Set of 20, 1971-72
... Eaglehawk Quarry Hill Golden Square Depot North Bendigo Charing ...Set of 20 digital images of Bendigo Tramways, 1972 at or before closure while on a tram tour by Stuart Lodington. .1 - No. 29 at the North Bendigo terminus .2 - No. 29 just past the Bendigo end of the double track in High St Eaglehawk, with a BP dealer in the background. .3 - Night photo of No. 18 at a terminus, showing "Eaglehawk" .4 - ditto .5 - Night photo of No. 24 at Eaglehawk with Leo A Hughes Photographer in the background. The Tram has "Johnnie Walker whiskey" roof adverts. .6 - No. 29 outbound in Thunder St with a train passing over the bridge in the background. .7 - view from the front window of a tram on the Eaglehawk line with a large "display event float" in the foreground and tram approaching a crossing loop. .8 - No. 29 at North Bendigo .9 - view of High St Eaglehawk looking east from the terminus, showing the track and centre poles. .10 - No. 29 outbound on the North Bendigo line turning from either Nolan St or Caledonia St, running a special. .11 - No. 7 departing North Bendigo for Golden Square. .12 - No. 3 and 18 at Charing Cross. No. 3 has two SEC roof Advertisements .13 - No. 7 at North Bendigo with the trolley pole being reversed. .14 - No. 24 at Quarry Hill with Northern Terrazzo in the background with the driver alongside .15 - No. 7 and No.6 at Charing Cross with the Beehive buildings in the background. .16 - No. 7 at North Bendigo terminus .17 - ditto .18 - No. 24 at Quarry Hill with Northern Terrazzo in the background with the conductor alongside. .19 - ditto .20 - No. 26 and other bogie tram in View St near Charing Cross with the Armstrong Tyre Service building and signs for Cohn's Drinks and T&G in the view.trams, tramways, bendigo, eaglehawk, quarry hill, golden square, depot, north bendigo, charing cross, tram 29, tram 18, tram 24, tram 3, tram 7, tram 6, tram 26 -
 Ballarat Tramway Museum
Photograph - Digital image Set of 20, 1971-72
... Eaglehawk Quarry Hill North Bendigo Charing Cross View St tram 7 ...Set of 22 digital images of Bendigo Tramways, 1972 at or before closure while on a tram tour by Stuart Lodington. .1 - No. 7 arriving at North Bendigo .2 - No. 5 departing Charing Cross along View St, with a Firestone tyres in the background. .3 - front view of a tram in View St with a blurred background image. .4 - No. 24 showing Eaglehawk destination .5 - No 26 and 3 in View St, with the Armstrong Tyre Service building in the background and signs for T&G and Cohn's Drinks. .6 - ditto .7 - No. 3 arriving at Charing Cross from Eaglehawk in View St, with a Quarry Hill destination. .8 - No. 3 and 18 at Charing Cross. .9 - No. 24 on the Quarry Hill line. .10 - No 26 in View St, with the Armstrong Tyre Service building in the background and signs for T&G and Cohn's Drinks. .11 - ditto, with fountain in view, Colonial Mutual building and a newsagent with a Herald sign on the building. .12 - No. 7 at North Bendigo terminus .13 - ditto with pole being reversed. .14 - No. 18 at Quarry Hill terminus with Northern Terrazzo sign in the background. .15 - No. 24 at Quarry Hill terminus .16 - No. 18 arriving at Charring Cross, with Fountain Plaza and Bendigo Pharmacy in the background. .17 - No. 3 and 18 at Charing Cross. .18 - No. 7 at North Bendigo terminus with pole being placed on the overhead. .19 - No. 26 in View St inbound, with Sandhurst Trustees sign in the background. .20 - No. 6 leaving Charing Cross in Pall Mall with Myer and other buildings in the background. .21 - No. 7 at North Bendigo .22 - Single trucker with two roof Advertisements crossing View St with fountain in view, Colonial Mutual building and a newsagent with a Herald sign on the building.trams, tramways, bendigo, eaglehawk, quarry hill, north bendigo, charing cross, view st, tram 7, tram 5, tram 24, tram 26, tram 5, tram 3, tram 18, tram 6 -
 Ballarat Tramway Museum
Photograph - Black & White Photograph/s, mid 1900's
... the appearance of Bendigo trams early 1970's and the Charing Cross area ...Yields information about the appearance of Bendigo trams early 1970's and the Charing Cross area.Black and white photograph of an ESCo combination tramcar at the Eaglehawk terminus, with the Eaglehawk Town Hall in the background. Driver at the controls, with a number of men standing alongside and the conductor (2 No.) in the front portion of the tramcar. Note the curtains in the tramcar, taken during a summers day. Photo taken early mid 1900's. Creative Images Photographic Collection. High Resolution image added 31/8/2012In pencil, top left hand corner, "Eaglehawk early 1900's and in the bottom right hand corner / Bendigo / Creative Image Photographic Collection".trams, tramways, bendigo, eaglehawk, esco -
 Ballarat Tramway Museum
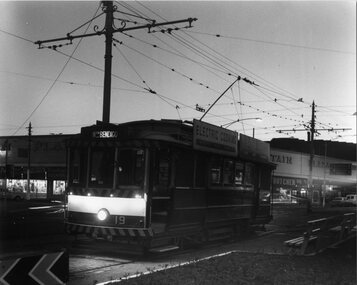
Photograph - Black & White Photograph/s, Chris Wurr, early 1970's
... area. trams tramways Bendigo Charing Cross Night Photo tram 19 ...Yields information about the appearance of Bendigo Birney trams early 1970's and the North Bendigo area.Black and White Photograph of SEC Bendigo 19, late evening photograph, at Charing Cross with the Fountain Plaza building in the background. Tram has the destination of Nth Bendigo and SEC Electric Cooking roof advertisements. Photo Chris Wurr, early 1970's. "Photo by Chris Wurr" stamped on the rear.trams, tramways, bendigo, charing cross, night photo, tram 19 -
 Ballarat Tramway Museum
Photograph - Black & White Photograph/s, Chris Wurr, early 1970's
... the appearance of Bendigo trams early 1970's and the Charing Cross area ...Yields information about the appearance of Bendigo trams early 1970's and the Charing Cross area.Black and White Photograph of SEC Bendigo 30, Birney en route to North Bendigo , possibly in McCrae St. Tram has the destination of North Bendigo. Note conductor at the front of the tram, talking to the driver. Photo Chris Wurr, early 1970's. "Photo by Chris Wurr" stamped on the rear.trams, tramways, bendigo, north bendigo, mccrae st, birney, tram 30 -
 Ballarat Tramway Museum
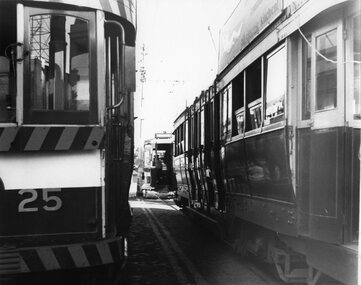
Photograph - Black & White Photograph/s, Chris Wurr, early 1970's
... the appearance of Bendigo trams early 1970's and the Charing Cross area ...Yields information about the appearance of Bendigo trams early 1970's and the Charing Cross area.Black and White Photograph of three trams at Charing Cross. Photo taken between two bogie cars (25 and one other) on the Eaglehawk line while a Birney crosses in front of them. Possibly No. 29. Photo Chris Wurr, early 1970's. "Photo by Chris Wurr" stamped on the rear.trams, tramways, bendigo, charing cross, tram 25, tram 29 -
 Ballarat Tramway Museum
Photograph - Black & White Photograph/s, Chris Wurr, early 1970's
... area. trams tramways Bendigo Charing Cross Pall Mall tram 7 ...Yields information about the appearance of Bendigo Birney trams early 1970's and the McCrae St area.Black and White Photograph of Bendigo No. 7, in Pall Mall, at Charing Cross, with the destination of Golden Square. An inspector is leaning against the front door of the tram. Has in the background, The Beehive building, Coca Cola advertisement, Myers store and Stoneman's Shamrock Hotel. Photo Chris Wurr, early 1970's. "Photo by Chris Wurr" stamped on the rear.trams, tramways, bendigo, charing cross, pall mall, tram 7 -
 Ballarat Tramway Museum
Photograph - Black & White Photograph/s, Chris Wurr, early 1970's
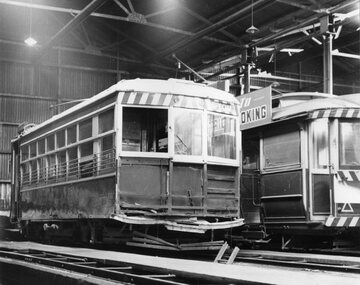
... the appearance of Bendigo Birney trams early 1970's and the Charing Cross ...Yields information about the appearance of Bendigo Birney trams early 1970's and the Charing Cross area.Black and White Photograph of Bendigo No. 11, Birney, stored in the Bendigo tram depot, early 1970's following an accident. See Bendigo Tramways excerpt re this tram, ex their web site 9/6/2009. Has another, possibly stored tram along side. Photo shows the damaged end panel removed, distorted bumper bar and broken life guard tray. Photo Chris Wurr, early 1970's. "In 1968, the SECV assessed damage to the tram after an accident with an automobile. Upon inspection, it was found that the side bearers of the tram body had spread, and the centre bearers had been severely distorted because of the impact. Repairs of this nature required costly engineering work and with the closure of the tramway being imminent, it was decided to place Car 11 in storage on 6 road until the cessation of SECV services in 1972. Work commenced on the restoration of this tram in 1975 and it returned to service in 1986, being painted in the SECV livery of the 1950s." See Bendigo Tramway web site, accessed 9/6/2009 for notes re accident damage."Photo by Chris Wurr" stamped on the rear. On rear in pencil "B'go 11"trams, tramways, bendigo, depot, tram 11 -
 Ballarat Tramway Museum
Photograph - Black & White Photograph/s, Andrew Ward, 15/01/1972 12:00:00 AM
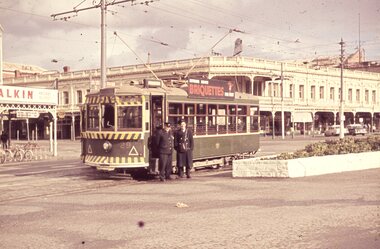
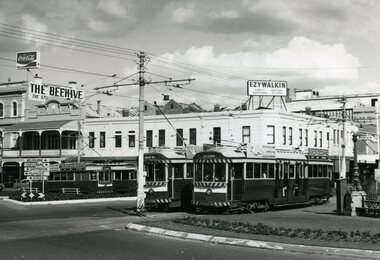
... , and truck arrangements. trams tramways Bendigo Charing Cross Pall ...Yields information about the appearance of Bendigo electric trams at the time of opening, how passengers could be seated, staff, paint schemes, decorations, and truck arrangements.Black and White photograph of four trams at Charing Cross, taken from the south east corner, looking towards the Beehive building and Ezywalkin stores. Trams 7, 5 and 26 in the photograph. Photo by Andrew Ward 15.1.1972.On rear in ink "Sat 15.1.72" / "single truck car 7 and bogie cars 5 & 26" in the top left hand corner and in a mix of ink and pencil "Bendigo Trust / Andrew C. Ward, Bendigo Vic 3550".trams, tramways, bendigo, charing cross, pall mall, tram 7, tram 5, tram 26 -
 Ballarat Tramway Museum
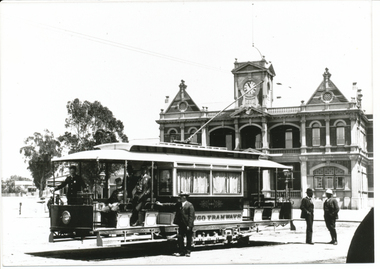
Photograph - Two Bendigo Tramways Co. Ltd steam trams and trailers at Charing Cross, William Ninnis, 1898
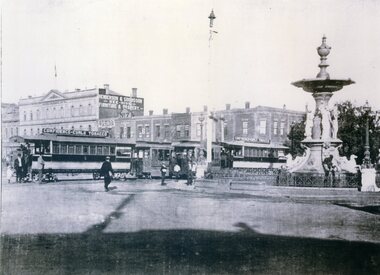
... Trams Trailers Charing Cross tram 3 tram 4 In pencil ...Black and White reproduction (copy by scanning and reprinting) of a image of two Bendigo Tramways Co. Ltd steam trams and trailers at Charing Cross. Appears to be trailers 3 and 4. Understood to be 1898. Shown as a William Ninnis photographer, held by the Bendigo Historical Society (crossed out) and Creative Image Photographic Collection, Both trailers have roof advertisements "Confidence-Curls Tobacco" and in the background is Henderson & Goodisson? Beehive building, advertising Furniture and Drapery. Also J. T. Mill Tailor. .1 - Black and White copy print contained within the Wal Jack Bendigo and Geelong Album, see Reg Item 5003 for more details. Added 1/7/2013In pencil "The Fountain 1898 / Bendigo Historic Society Inc Collection (crossed out) / Photographer William Ninnis" and in ink "Creative Image Photographic Collection". .1 - in ink on rear "Steam Trams at the Fountain" and in the bottom right hand corner "P.W. Duckett"trams, tramways, bendigo, steam trams, trailers, charing cross, tram 3, tram 4 -
 Ballarat Tramway Museum
Newspaper, The Courier Ballarat, "Cabinet stops tram move", 9/06/1953 12:00:00 AM
Yields information about the considerations of State Cabinet of a proposal by the SEC to close a Bendigo tram line and thoughts to move the tramways from the SEC to MMTB Management.Newspaper clipping from the Ballarat Courier - 9/6/1953, titled "Cabinet stops tram move" reporting that state cabinet had vetoed the SEC's proposal to cease tram operations between Charing Cross and Golden Square from July 6. Quotes the Acting Premier Mr. Garvin. Follows a mass meeting of tramway employees the previous Sunday. Item notes that the Govt was planning to re-organise the SEC and the trams are likely to come under the control of the MMTB, or the Transport Board. See Reg Item 5651 for a follow up Courier Editorial on this matter. On rear of cutting is an item about trains services in Melbourne being restored following the Jolimont dispute and that the MMTB were to run more peak period trams. Contained originally within Reg Item 5623 at the front of this note book. For items see btm5623 loose items list.pdf.has date "9-6-53" in ink on right hand side at top.mmtb, sec, bendigo, golden square -
 Ballarat Tramway Museum
Photograph - Black & White Photograph/s, The Bendigonian, Feb. 2001
... Trams Charing Cross On rear in ink " S-A773, Bendigo, Steam Tram ...Black and White copy print contained within the Wal Jack Bendigo and Geelong Album, see Reg Item 5003 for more details. Photograph of steam trams at Charing Cross, Fountain, during a procession for the death of Queen Victoria. Dated Feb. 1901. Copied by Keith Kings from The Bendigonian 5/2/1901. Photo caption notes different types of six wheel trailers.On rear in ink " S-A773, Bendigo, Steam Tram Motor and two different types of 6 window trailers at Charing Cross (Procession re death of Queen Victoria). Copied by Keith Kings ex "The Bendigonian" 5/2/1901. "trams, tramways, bendigo, steam trams, charing cross