Showing 824 items
matching route 1
-
 University of Melbourne, Burnley Campus Archives
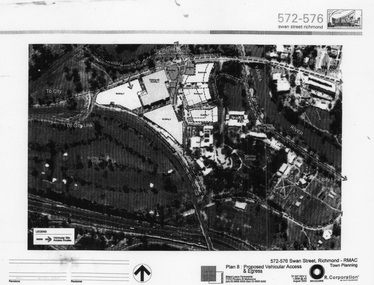
Photograph - Black and white print, Billard Leece R. Corporation, Proposed changes to Burnley Campus site, 2003
Laminated photograph of Burnley site and surroundings. Buildings 1-9 (on area sold off) outlined. Vehicular Site Access Routes marked. By Billard Leece Partnership. R. Corporation No TP 007 REV C August 2003. Typed paper attachment describes proposed development of site.areas sold off, burnley campus, adjustments to site -
 Bacchus Marsh & District Historical Society
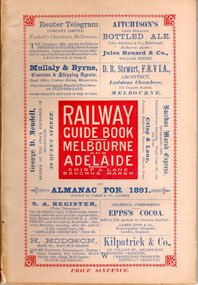
Book, Railway guide book and time table for Melbourne, Ballarat, Adelaide and all intermediate stations, also gazette for Bacchus Marsh, Ballan, Melton, &c., and almanac for 1891
Publication details: 'Railway guide book and time table for Melbourne, Ballarat, Adelaide and all intermediate stations, also gazette for Bacchus Marsh, Ballan, Melton, &c., and almanac for 1891', compiled by Christopher Crisp. Printed and published by Crisp and Lane, Bacchus Marsh, Vic., 1891. SUMMARY OF CONTENT: Includes detailed timetables and schedule of fares, descriptions of stations and refreshment facilities pp.6-26; overviews of Shires of Bacchus Marsh, Ballan and Melton, pp.27-30; historical, geographic, and economic background notes about places on the Melbourne to Adelaide route, pages 31-64, including descriptions of Bacchus Marsh, pp.34-42 and briefer notes on Ballan, pp.42-43 and Melton, pp.32-33. Almanac section is pp.65-95 (not numbered), containing common information in nineteenth century almanacs such as a calendar of the days, weeks, and months of the year; a record of various astronomical phenomena, climate information and seasonal suggestions for farmers, the rising and setting times of the Sun and Moon, dates of eclipses, hours of high and low tides, and religious festivals. A brief history of Irrigation in Mildura is on pages 1 and 112 (first and last pages). Advertisements, mostly for Bacchus Marsh businesses are on pp.96-111. The Almanac section is illustrated with drawings of scenic views of various places in Australia, but none of the Bacchus Marsh region. Online access is available on Trove at: http://nla.gov.au/nla.obj-392504046Printed book. 112 pages in total. Pages 13 -64 numbered.non-fictionPublication details: 'Railway guide book and time table for Melbourne, Ballarat, Adelaide and all intermediate stations, also gazette for Bacchus Marsh, Ballan, Melton, &c., and almanac for 1891', compiled by Christopher Crisp. Printed and published by Crisp and Lane, Bacchus Marsh, Vic., 1891. SUMMARY OF CONTENT: Includes detailed timetables and schedule of fares, descriptions of stations and refreshment facilities pp.6-26; overviews of Shires of Bacchus Marsh, Ballan and Melton, pp.27-30; historical, geographic, and economic background notes about places on the Melbourne to Adelaide route, pages 31-64, including descriptions of Bacchus Marsh, pp.34-42 and briefer notes on Ballan, pp.42-43 and Melton, pp.32-33. Almanac section is pp.65-95 (not numbered), containing common information in nineteenth century almanacs such as a calendar of the days, weeks, and months of the year; a record of various astronomical phenomena, climate information and seasonal suggestions for farmers, the rising and setting times of the Sun and Moon, dates of eclipses, hours of high and low tides, and religious festivals. A brief history of Irrigation in Mildura is on pages 1 and 112 (first and last pages). Advertisements, mostly for Bacchus Marsh businesses are on pp.96-111. The Almanac section is illustrated with drawings of scenic views of various places in Australia, but none of the Bacchus Marsh region. Online access is available on Trove at: http://nla.gov.au/nla.obj-392504046railways, railway lines, almanacs, railway lines timetables -
 Mordialloc College Alumni Association Inc (MCAA)
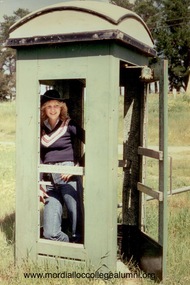
Photograph, 1978 - Telephone box on roadside en route to Wyperfeld National Park - Mordialloc-Chelsea High School annual biosciences camp, 1978
Image digitised from 35mm slide -
 Phillip Island Conservation Society Inc.
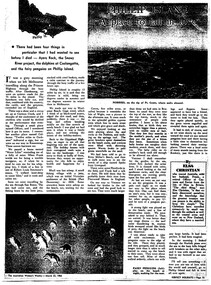
Work on paper - Photocopy of newspaper cutting, "PHILLIP ISLAND/A place to fall in love"
This article was written by an English visitor named Elsa Christian who was touring Australia and New Zealand with her husband Frank in their own small van. The article was published in the Australian Women’s Weekly, magazine, March 1966. Elsa writes she wanted to visit four Australian locations before she died: Ayers Rock (actually Uluru), the Snowy River project, dolphins at Coolangatta and the Penguin Parade at Phillip Island. These destinations were all very popular in the 1960s for both Australian residents and overseas visitors. Because the roads were becoming better too many locations, self guided tours in small vans for cars towing bond would caravans were becoming more popular means of seeing AustraliaThe article is significant in many ways. 1. Indicates the places English visitors commonly wish to see in Australia. 2. Describes the growing trend to self- drive van/camping holidays. 3. Gives the route taken from Melbourne to Phillip Island during the 1960s. 4. Describes the appearance of the roadsides and locations visited. 5. It is written in a descriptive and lyrical style designed to appeal to Women’s Weekly magazine readers, who were probably wondering how they could visit Phillip Island with their husbands or families themselves, and what there was to see there. 6. Gives the visitors’ view of how the Penguin Parade operated at the time. 7. Includes a description of potter and artist Eric Juckert’s renowned garden at Grossard Point, Ventnor. 8. Indicates how introduced plants such as Hawthorn pushes and Kate weed were common in the area. 9. Describes Phillip Island as “a place to fall in love” because of its natural beauty, fauna and coastal seascapes. 10. As a visitor Elsa describes the housing estates as a blot on the landscape, but also sees the value as a way of their owners escaping from the hustle and bustle of Melbourne. 11. Gives the visitors’ interpretation of the behaviour of wildlife the RC in the wild, as well as Elsa’s knowledge about some of the species she encounters.Photocopy of full page article with 5 columns of text, a map and 2 photographs. Black ink on white paper. Photographs blackened in photocopying processphillip island, cape woolamai, penguin parade, seal rocks, nobbies, township of rhyll phillip island, princes highway, dandenong, pakenham, kooweerup, carinya creek, officer, san remo, gippsland highway, holiday homes, fort dumaresq, kitty miller's beach, wreck of the speke, hereford cattle, fleetwood manor, koalas, ventnor, eric juckert, little penguin behaviour -
 Wodonga & District Historical Society Inc
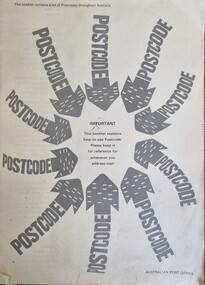
Booklet - Postcode Instruction Book, Australia Post, 1967
The use of postcodes was introduced in Australia on Saturday, 1 July 1967 by the Postmaster General's department. They are used to more efficiently sort and route mail within AUstralia. In July 1967, the first edition of the Postcode Booklet was distributed free by mail to every Australian household and business address. A total of 4.5 million booklets were distributed, as well as a postcard identifying the recipient’s own postcode. Originally the four digit postcodes were developed for electronic mail handling equipment at the former Redfern Mail Exchange in Sydney. This was extended to cover all locations in Australia and continues to grow as new residential areas are developed.A small booklet issued by the Australian Post Office to explain the use of post codes 1967. It outlines how to use a postcode, advice for businesses to ensure their correct use and a list of all the postcodes allocated throughout Australia at that time. Two other booklets are updated lists of postcodes.non-fictionThe use of postcodes was introduced in Australia on Saturday, 1 July 1967 by the Postmaster General's department. They are used to more efficiently sort and route mail within AUstralia. In July 1967, the first edition of the Postcode Booklet was distributed free by mail to every Australian household and business address. A total of 4.5 million booklets were distributed, as well as a postcard identifying the recipient’s own postcode. Originally the four digit postcodes were developed for electronic mail handling equipment at the former Redfern Mail Exchange in Sydney. This was extended to cover all locations in Australia and continues to grow as new residential areas are developed.australian mail services, australia post, postcodes -
 Melbourne Legacy
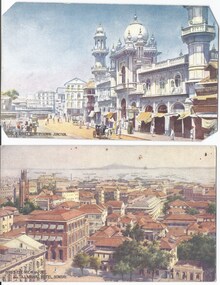
Postcard, Postcards of India
Postcards were a common form of souvenirs for soldiers who were travelling either during World War 1, or just after, or while returning to Australia. These postcard scenes are from Bombay which is a stop on the route from Australia to Europe. India was often the first time young soldiers saw a different culture on their way to the first World War. These were with other World War 1 memorabilia that has come from Private John Basil McLean, 2nd Reinforcements, 37th Battalion, A.I.F. There was a large collection of postcards so he may have been collecting them as souvenirs (none of these have been written on or posted). J.B. McLean (Service No. 13824) was from near Maffra, Victoria and enlisted on 22 January 1916. He embarked on 16 December 1916 for Europe. His full war record is available from AWM. He spent time with the Australian Field Artillery (Pack Section). At the end of the war he worked for a year at the A.I.F. Headquarters in London before returning to Australia on the 'Ceramic', (which stopped in Bombay), arriving Portsea in 1920.Postcards were a very common form of communication in the first World War. Postcards as souvenirs or as correspondence would have been familiar to the first Legatees as they had served in World War 1. These places in Bombay, India could have been visited by the first Legatees when they were soldiers in World War 1.Postcards x 7 with images from Bombay in India.01139.1 Bombay - A street scene, Pydowni Junction 01139.2 Bird's eye view of Fort from Taj Mahal Hotel, Bombay 01139.3 Cuffe Parade - Bombay 01139.4 General Post Office - Bombay 01139.5 Bombay - Queen's Road showing palms 01139.6 A woman tapping rubber tree (possibly from Sri Lanka as it was printed in Colombo). 01139.7 Bombay from Harbour Each one has the word POST CARD on the reverse with room for an address and an area for Correspondence. Different makers.souvenir, world war one -
 Ballarat Tramway Museum
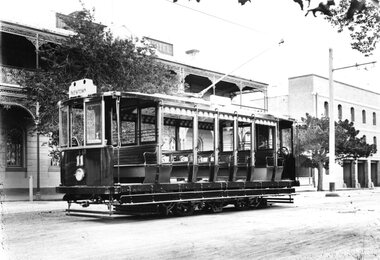
Photograph - Geelong Tramway "Summer Car"
"Summer Car" 11 outside Mac's Hotel in Corio Tce. To the right is Strachan, Murray and Shannon's wool store whose facade still stands. The tramcar, shown in pristine condition was one of the two trailers motorised in 1913 with equipment identical to that of the Duncan & Fraser cars. They were built for use mainly on the new South route to the Barwon River. The coloured destination lights were from left: Red for GEELONG WEST, blank (later blue for the East route), white for SOUTH GEELONG and green for NEWTOWN. Side destination boxes have been added. Late 1913.Black and white print on paperNo. 1 inside a circle, and 13-7 written in ink on reverse. GSR7109/13/1/7 written on reverse in pencil.geelong tramway summer car 11, geelong streetscape, geelong tramway motorised trailer, geelong tram destination lights -
 Ballarat Tramway Museum
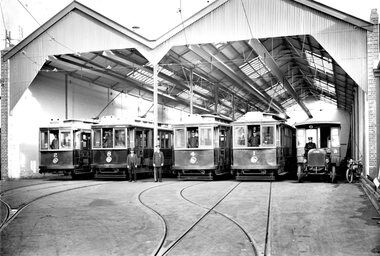
Photograph - Geelong Tram Depot
The extended tram shed now has four roads and a space for the three buses that served the East Geelong route. Tram 8 appears new which would date the photograph as 1915.Black and white print on paper13-5 and the No. 1 inside a circle written i ink on the reverse. GSR710/13/1/5 written in pencil on the reverse.geelong tramways, geelong tram depot, geelong tram depot extension, geelong tram 8 -
 Ballarat Tramway Museum
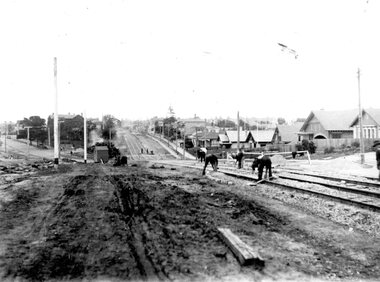
Photograph - Geelong Tramway North line
Men laying sleeper tram tracks for the North tram route along The Esplanade. In the midddle distance, the double track towards the city is in Mercer St. (now The Esplanade South). The street off to the left is Victoria Tce., (now Western Beach Road). 1928Black and white print on paper.GRS710/25/1/10 and 25-10, written on the reverse in paper. The No., 2 inside a circle, written on the reverse in ink.geelong tramway, geelong tramway laying sleeper tracks -
 Ballarat Tramway Museum
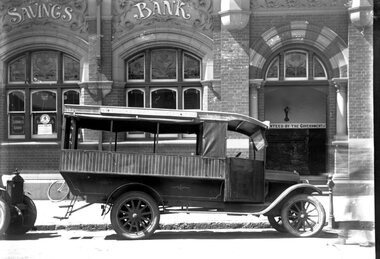
Photograph - Geelong vintage bus
Private bus parked outside the former lavishly signed State Savings Bank in Moorabool St on the SE corner with Corio St. The bus provided a direct route to West Geelong (Church St and possibly to the stockyards west of Pakington St, via Clarence and Elizabeth Sts. The tram route via Aberdeen St would have taken considerably longer. 1920s.Black and white print on paper.GSR710/20/1/14 and 20-14 written on the reverse in pencil. The No. 2 inside a circle written on the reverse in ink.geelong private bus, geelong state savings bank -
 Melbourne Tram Museum
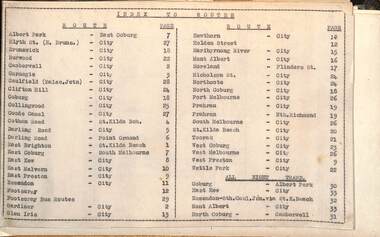
Administrative record - Tram fare route diagrams or maps, Melbourne & Metropolitan Tramways Board (MMTB), 1930s
The route maps give for each tram, including cable trams, and bus routes, a map of the fare structure, sections, all-night routes, details of transfers and tickets such as combined tickets. Not dated as such but sheet 1 has a note regarding the East Brighton - St Kilda route that it was out of date from 16/10/1938.Yields information about the MMTB fare structure for tram, and bus routes during the 1930s.Album brown card heavy card coves, secured with two interscrews containing a type index, 33 cartridge paper sheets with ink drawings and six loose sheets. Hand drawn in black, red and green ink.mmtb, tramways, fares, maps, routes, buses, cable trams -
 Ballarat Tramway Museum
Slide - Set of 6, Warren Doubleday, Operation of Ballarat 36 in Melbourne, Sept. 1971
Photos taken during the operation of Ballarat No. 36 promoting Tourism Week, South St Competitions, Begonia Festival and Sovereign Hill during the week following the closure of the SEC operated Ballarat tram system. 1 - Outside Flinders St station with W2 513 behind - 20-9-1971 2 - tram 1024 promotion Channel O in St Kilda Road - 20-9-1971 3 - tram 36 in St Kilda Road - 21-9-1971 4 - On the King St overoass with W2 390 (Spencer St. route 48) behind - 21-9-1971 5 - Park St South Melbourne, cross over - 21-9-1971 6 - running into South Melbourne Depot. - 23-9-1971 Yields information about the operation of Ballarat 36 in Melbourne for tourism promotion.Set of 6 Kodachrome colour slides - cardboard mounts or green card mount.Have the photographer's slide numbers written on them.trams, tramways, closure, tram 36, ballarat tourism, st kilda road, king st overpass, tram 1024, tram 390 -
 Bendigo Military Museum
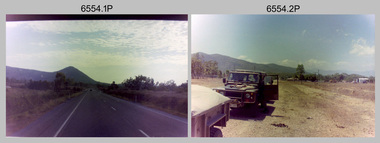
Photograph - 4th Field Survey Squadron deployed on Operation NERIGHT, Queensland & Northern Territory, 1989
This is a set of 19 photographs taken in 1989 during 4th Field Survey Squadron’s deployment on Operation NERIGHT 89 in Queensland and the Northern Territory. It was a two-part operation in 1989 with work conducted in the areas of Camooweal and Weipa. Part 1 was the field completion of topographic maps conducted near Camooweal QLD, along the Barkley Highway on the border between NT and QLD, from the 12th of September to the 20th of October 1989. A Bell Kiowa LOH helicopter from 162 Recce Sqn supported topographic field completion. Operation NERIGHT 89 Part 2 was the acquisition of mapping control by GPS field parties utilising Texas Instruments TI4100 Global Positioning System receivers around Weipa on Cape York Peninsula from the 22nd of September to the 22nd of October 1989. Part 2 Two Bell UH-1H Iroquois helicopters from RAAF’s 35 Squadron were principally used to deploy GPS field parties. Identification photography of control points was taken by air camera operators in AAAvn Pilatus Porter aircraft from 173 Gen Spt Sqn fitted with an RC10 aerial camera. The two parts of the operation were conducted concurrently. This is a set of 19 photographs taken in 1989 during 4th Field Survey Squadron’s deployment on Operation Neright in Queensland & the Northern Territory. The colour photographs are on 35mm negative film and are part of the Army Survey Regiment’s Collection. The photographs were scanned at 96 dpi. .1) to .3) - Photo, colour, 1989. En-route to areas of survey operations. .4) to .5) - Photo, colour, 1989. Unidentified personnel relax next to river/waterhole. .6) - Photo, colour, 1989. Two Bell UH-1H Iroquois helicopters from RAAF’s 35 SQN utilised in the movement of GPS parties. .7) to .9) - Photo, colour, 1989. Unidentified soldier practices repelling from a UH1H Iroquois helicopter. .10) - Photo, colour, 1989. Inside the cockpit of a UH1H Iroquois helicopter. .11) - Photo, colour, 1989. Field Party camp with GPS equipment in foreground. Unidentified soldier prepares a meal. .12) - Photo, colour, 1989. GPS antenna plumbed over a survey ground mark. Witness post on left. .13) & .14) - Photo, colour, 1989. Unknown Cape York Peninsula beaches. .15) & .16) - Photo, colour, 1989. Dramatic fire next to base camp. .17) - Photo, colour, 1989. Aboriginal rock art at unknown location. .18) - Photo, colour, 1989. Aboriginal rock art at unknown location. L to R: unidentified, SPR Andrew Quin. .19) - Photo, colour, 1989. Aboriginal rock art at unknown location. LT Chris Topovsek..1P to .19P – There are no personnel identified. ‘1989 OP NERIGHT’ annotated on negative sleeve.royal australian survey corps, rasvy, 4 fd svy sqn, op neright 89 -
 Melbourne Tram Museum
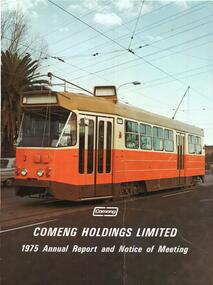
Document - Illustration/s, Letter/s, Commonwealth Engineering - Comeng, "Comeng Holdings Limited 1975 Annual Report and Notice of Meeting", Nov. 1975
.1 - Illustration of Z3 3 on the front cover of "Comeng Holdings Limited 1975 Annual Report and Notice of Meeting" with the Comeng Logo. Tram appears not to have been fitted with its route number and destination equipment. .2 - Letter on stippled paper, Comeng letterhead, with raised printing and watermarked "Z Mattpost" addressed to the donor supplying copies of the cover to him. Dated 19/11/1975. Signed by G. McArley Secretary.trams, tramways, z class, comeng, letterhead, annual reports, tram 3 -
 Melbourne Tram Museum
Postcard, Rose Stereograph Co, "Collins Street Melbourne", late 1940s
Rose Series postcard No. P 202, titled "Collins Street Melbourne" with a view from Russell St looking west. W2 class 574 (East Preston, route 9) is climbing the hill with another four W2's in the view as well. There is a horse-drawn delivery cart (milk? - Marche ?) parked on the north side of the street. 2 - Coloured postcard - does not have the company name on the rear. Only coloured Rose series seen as at 1/2025 by the Museum.Yields information about Collins St, late 1940sPostcard - printed real photograph with Rose Stereograph Co. name on the rear. Second copy has been coloured printed.tramways, collins st, tram 574, w2 class, trams -
 Bacchus Marsh & District Historical Society
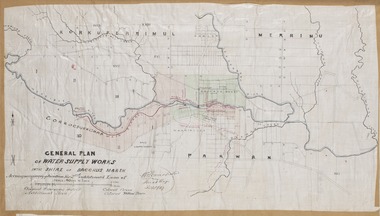
Map, General Plan for Water Supply Works, Shire of Bacchus Marsh 1887
Debate about water supply and its planning and development took place in the Bacchus Marsh region from the 1850s through into the twentieth century. This plan was part of documentation to support an application for an additional loan of money from the Ministry of Water Supply to the Bacchus Marsh Shire Water Supply Trust. The plan includes the route of a proposed water channel in the Parwan area, and other features of water supply infrastructure such as the location of standpipes and gates are also shown on the plan.A single page paper map showing a general plan for the supply of water in the Bacchus Marsh area.The plan shows the route of the 'Main Channel' near the Werribee River and a proposed route for a Parwan Channel. The location of 'Dryden's House' near the Werribee River is also shown and the locations of land held by T. (Tom) Oliver and the Racecourse Reserve in Maddingley. Scale 40 chains to 1 inch. The plan is signed by Bacchus Marsh Shire Engineer, W.E. Standfield. The map is pasted into a bound volume containing 76 maps or plans in total. High resolution digital image stored on BMDHS computer network. General Plan of Water Supply Works in the Shire of Bacchus Marsh. Accompanying application for 2nd additional Loan. Original Waterworks district. Additional area. W.E. Standfield, 30/8/87.water supply, water supply maps, water supply bacchus marsh, irrigation, bacchus marsh victoria maps -
 Melbourne Tram Museum
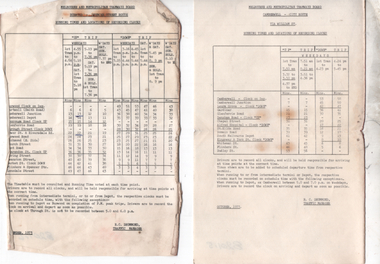
Document, Melbourne & Metropolitan Tramways Board (MMTB), "Running Timetable and Locations of Recording Clocks", 1973
Set of 7 timetable information sheets titled "Running Timetable and Locations of Recording Clocks" for various tram routes - signed R. C. Drummond Traffic Manager. Gives running times for sections during various parts of the day, early am, am peak, mid period, pm peak, weekdays, Saturdays and Sundays, and evening and the location of Bundy Clocks. See items 1442 and 5530 for other examples. 1 - Toorak - City - June 1973 2 - Prahran - North Richmond and St Kilda Road and North Richmond - August 1973 3 - Prahran - City - August 1973 4 - Camberwell - City via Swanston St - Oct. 1973 5 - Camberwell - City via William St - Oct. 1973 6 - Burwood - Spencer St - Nov. 1973 7 - Wattle Park - Princes Bridge - Dec. 1973Demonstrates a MMTB Employee timetable information.Set of 7 small printed sheets.tramways, timetables, schedules, bundy clock, mmtb -
 Ballarat Tramway Museum
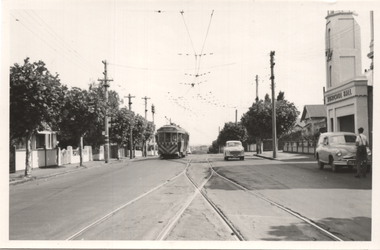
Photograph - Geelong 37 Pakington at Aphrasia Sts, Keith Kings, Jan. 1956
Photo shows the track layout and operation at the corner of Pakington St and Aphrasia St looking south from the passing loop. Shows Geelong tram 37, ex Chilwell swinging out before entering the loop. Photographer notes the Newtown turns right at this location shown in the trolley wire. The Municipal Hall and fire station tower are on the right. Photo by Keith Kings 8/1/1956, photo number Q(w)(7). Yields information about the junction of the Chillwell and Newtown tram routes in Geelong.Black and white photograph with notes on rear.See rear image and context.trams, tramways, pakington st, geelong, tram 37, newtown, aphrasia st -
 Melbourne Tram Museum
Document - Report, Swanston Trams, "Combino Problems", 2002
Set of 3 reports on A4 sheets about Combino trams. Only top sheet scanned. .1 - 4 pages with hand written notes titled "Combino Problems" - listing many issues on various route during the commissioning phase, includes an email dated 28/2/2002 from Russell Brooks re a meeting of 27/8/2002 and issues from the meeting. .2 - 3 A4 pages titled "Combino Meeting - Minutes" of a meeting of 26/9/2002, following from above meeting. .3 - 1 A4 page of a meeting of 23/11/2002 notes.trams, tramways, siemens, combino, unions, new trams, commissioning -
 Melbourne Tram Museum
Slide - Set of 5, Ron Scholten, May. 1973
Set of five colour slides, white/red cardboard, Duplicates by Pacific Film Laboratories of tram 912 in the City area testing clearances around safety zones, as part of the development of the Z class tram. Done on a Sunday morning. .1 - Bourke St showing the various equipment or protrusions attached to the tram in order to test clearances to safety zones at crossings. .2 - about to travel through a crossover. .3 - using the Queen or William St crossover. Tram has adverts for Tolleys Brandy and PGF Golf clubs. .4 - ditto - with tram 1021 running a route 97 to North Fitzroy Park St. .5 - ditto- with adverts for Williamson Real Estate and All Saints winery. See also Reg Item 3795 for Black and White and Reg Item 4611 for photos of the event and the use of car 1018.All have a running number "1204" to "1208" and "912" written on the slide.trams, tramways, sw6 class, testing, safety zone, bourke st, safety, z class, north fitzroy, route 97, tram 912 -
 Ballarat Tramway Museum
Album - Postcards & Photographs - Vic Solomons and others - Australian Tramways, Vic Solomons, 2023
Contains 184 images of postcards and photographs collected primarily by Vic Solomons of Sydney, with others from the collection of Wal Jack and Warren Doubleday. Covers almost all of Australia's tramway systems. 1 Post Card Hay St Perth Looking East No 3 Unknown Perth 2 Post Card Cars 30 & 90 both on Route 19 pass in Barrack St looking South Perth WA 1935.02.18 Perth 3 Post Card Hay St Looking East Perth WA Unknown Perth 4 Post Card William St Perth WA Unknown Perth 5 Post Card Perth from Shaftsbury Hotel Unknown Perth 6 Post Card Hay St Perth WA Looking East Unknown Perth 7 Post Card Barrack St Perth Unknown Perth 8 Post Card Murray Views No 3 High St Showing Town Hall Fremantle WA Unknown Fremantle 9 Post Card High St Fremantle WA Unknown Fremantle 10 Post Card View of Bolder City Golden Mile in the Background (Section No 1) 1908.08.20 Kalgoolie 11 Post Card Hannan St Kalgoolie 1900.08.19 Kalgoolie 12 Post Card Hannan St Kalgoolie WA (No 2) Unknown Kalgoolie 13 Post Card Intersection Hannan & Maritana Sts Kalgoolie WA Unknown Kalgoolie 14 Post Card Hannan St Kalgoolie Unknown Kalgoolie 15 Post Card Lane Street Bolder City Unknown Kalgoolie 16 Post Card Hobart Double Deck Tram Unknown Hobart 17 Post Card Macquarie St Hobart Unknown Hobart 18 Photo Liverpool Street Hobart Unknown Hobart 19 Photo Hobart 21 Unknown Hobart 20 Photo Hobart 14 in Elizabeth St Hobart Unknown Hobart 21 Post Card Macquarie St Hobart Unknown Hobart 22 Post Card Macquarie St Hobart Tas Unknown Hobart 23 Photo Double Decker Tram 3 at G.P.O. Hobart Tas No 31 Unknown Hobart 24 Post Card Double Decker Tram 19 Hobart Tas A B Series No 24 Unknown Hobart 25 Photo Hobart Municipal Tramways Tas No 95 Unknown Hobart 26 Post Card Elizabeth St Hobart Unknown Hobart 27 Post Card Elizabeth St Hobart Unknown Hobart 28 Post Card Elizabeth St Hobart Unknown Hobart 29 Post Card Elizabeth St Hobart Tas Unknown Hobart 30 Post Card HMT 21 with crew at Beach Road Terminus Unknown Hobart 31 Post Card HMT 9 & another with crew at Beach Road Terminus. Front cover photo of Destination GPO 1921.01.00 Hobart 32 Post Card Cascade Road and Mount Wellington Hobart Unknown Hobart 33 Post Card Elizabeth St Hobart Unknown Hobart 34 Post Card Elizabeth St Hobart Unknown Hobart 35 Post Card Elizabeth St Hobart 1915.04.07 Hobart 36 Post Card Macquarie St Hobart Tas Unknown Hobart 37 Post Card Macquarie St showing Post Office Hobart 1908.03.12 Hobart 38 Post Card Hobart Municipal Tramways 21 Unknown Hobart 39 Post Card Elizabeth St Hobart Tas Unknown Hobart 40 Post Card Liverpool Street Hobart Unknown Hobart 41 Post Card Electric Tram Launceston Tas 446 W J Little Photo 1919.02.08 Launbceston 42 Post Card Launceston Tram no 3 1911.08.30 Launbceston 43 Post Card Launceston Tram no 3 passes tram No 1 Unknown Launbceston 44 Post Card Tram 6 at Trevallyn a popular suburb Launceston Tasmania Unknown Launbceston 45 Post Card Tram 7 at Trevallyn Road Terminus Launceston Tasmania Unknown Launbceston 46 Post Card Tram 4 in Brisbane St Launceston Unknown Launbceston 47 Post Card Tram 9 in Brisbane St Launceston Tasmania Unknown Launbceston 48 Post Card Camerom Street Launceston Tasmania Unknown Launbceston 49 Post Card Murray Views No 15 Jetty Road Glenelg Terminus 1962-02-08 Adelaide 50 Post Card Bay Tram at Jetty Road Terminus Glenelg SA Unknown Adelaide 51 Post Card Tram 3 in King William Street Adelaide S Aust Unknown Adelaide 52 Post Card Valentine Series No 3065 The Old Horse Tram Victor Harbour Unknown Victor Harbour 53 Post Card Bourke Street Melbourne with Cable Car Looking East 1904.04.25 Melbourne 54 Post Card Opening of New Electric Tramway Elsternwick 1913-11-13 Melbourne 55 Post Card Cable trams in Clarendon St Sth Melb Unknown Melbourne 56 Post Card Pall Mall from Charing Cross Bendigo Unknown Bendigo 57 Post Card Tram 4 & 7 pass at The Fountain and Mitchell Street Bendigo Vic Rose Series P 3198 Unknown Bendigo 58 Post Card M&MTB 133 at Charing Cross bound for Eaglehawk Bendigo Vic Murray Views No 45 Unknown Bendigo 59 Post Card Pall Mall Bendigo Vic Unknown Bendigo 60 Post Card Charing Cross & Mitchell St Bendigo Trams passing 1919.00.00 Bendigo 61 Post Card Pall Mall Looking East Unknown Bendigo 62 Post Card Electric Trams and City Hotel Bendigo Vic Unknown Bendigo 63 Post Card Moorabool Street Geelong V 23 Unknown Geelong 64 Post Card Murray Views No 3 Moorabool Street Geelong Vic Unknown Geelong 65 Post Card The Rose Series P 2487 Ryrie Street Geelong Vic Unknown Geelong 66 Post Card Southern Cross Series 2696 Ryrie Stret Geelong Vic Unknown Geelong 67 Post Card The Rose Series P 1490 Ryrie Street Geelong Vic 1920-03-04 Geelong 68 Post Card Valentine Series No 1568 Lower Sturt Street Ballarat Unknown Ballarat 69 Post Card Rose Series P 1710 Sturt Street Ballarat Victoria Unknown Ballarat 70 Post Card Sturt Street Ballarat Victoria Unknown Ballarat 71 Post Card Horse Tram In Sturt Street Ballarat 1905.11.10 Ballarat 72 Post Card Sturt Street Ballarat Looking North-West Unknown Ballarat 73 Post Card Shoppes Square Sturt Street Ballarat Looking North Unknown Ballarat 74 Post Card Junction Sturt and Lydiard Streets Ballarat 1909-09-01 Ballarat 75 Post Card The Electric Supply Co Souvenir Tram Ticket No 3085of the opening of Electric System August 18 1905 1905.08.18 Ballarat 76 Post Card Sturt Street Ballarat Victoria 1907.11.25 Ballarat 77 Post Card Off to the Gardens Electric Tram Ballarat Unknown Ballarat 78 Post Card Sturt Street Ballarat 1907.04.16 Ballarat 79 Post Card Sturt Street Ballarat Looking East Electric tram with Double Deck Trailer 1911.04.17 Ballarat 80 Post Card Sturt Street Ballarat Looking East Unknown Ballarat 81 Post Card Sturt Street Ballarat Looking West 1911.03.01 Ballarat 82 Post Card Town Hall and Sturt Street Ballarat Unknown Ballarat 83 Post Card Lydiard Street Ballarat 1906.11.23 Ballarat 84 Post Card Looking North along Adelaide Street from George Street Brisbane Sidues Series No 764 Unknown Brisbane 85 Post Card Looking South along Queen Street from the Creek Street Intersection Brisbane Qld Sirues Series No 1379 Unknown Brisbane 86 Post Card George Street from near Supreme Court Brisbane Unknown Brisbane 87 Post Card Queen and Eagle Streets Brisbane 1907.07.04 Brisbane 88 Post Card Queen Street showing His Majesty’s Theatre Brisbane Unknown Brisbane 89 Post Card Queen Street Treasury Building 1908.01.20 Brisbane 90 Post Card G P O and Queen Street Brisbane Unknown Brisbane 91 Post Card Queen Street Brisbane Looking from Wharf Street Unknown Brisbane 92 Post Card Customs House Brisbane 1905.02.16 Brisbane 93 Post Card Queen St Brisbane 1905.09.16 Brisbane 94 Post Card Queen St Brisbane 1907.11.19 Brisbane 95 Post Card Treasury Buildings Brisbane Unknown Brisbane 96 Post Card Queen and Eagle Streets Brisbane Unknown Brisbane 97 Post Card The Valley Corner Brisbane Unknown Brisbane 98 Post Card Brisbane Queen Street opposite General Post Office Unknown Brisbane 99 Post Card North Quay and Milton Beach Brisbane Q Unknown Brisbane 100 Post Card Victoria Bridge Brisbane South Side 1907.08.14 Brisbane 101 Post Card Victoria Bridge Brisbane Unknown Brisbane 102 Post Card Breakfast Creek Bridge Brisbane Q Unknown Brisbane 103 Post Card Melbourne Street Station South Brisbane Queensland Unknown Brisbane 104 Post Card General Post Office Queen Street Brisbane 1955.09.23 Brisbane 105 Post Card Customs House Brisbane 1904.11.04 Brisbane 106 Post Card Queen St Brisbane 1919.11.00 Brisbane 107 Post Card Queen St Brisbane Sidues Series No 627 Unknown Brisbane 108 Post Card Creek Street Brisbane Queensland Unknown Brisbane 109 Post Card Customs House and Garden Reach Brisbane Queensland 1910.00.08 Brisbane 110 Post Card Queen and Creek Streets Brisbane 1909.06.07 Brisbane 111 Post Card Queensland National Bank andd Queen Street Brisbane Queensland Unknown Brisbane 112 Post Card Queen Street and Treasury Buildings Brisbane 0000.09.07 Brisbane 113 Post Card Queen Street showing “Courier” Buildings Brisbane Unknown Brisbane 114 Post Card Intersection George & Roma Streets Brisbane Q 1916.05.11 Brisbane 115 Post Card Adelaide Street Brisbane Q Unknown Brisbane 116 Post Card G P O Queen Street Brisbane Q Unknown Brisbane 117 Post Card Treasury Building Brisbane 1906.03-20 Brisbane 118 Post Card Queen and Eagle Streets Brisbane 1907.02.01 Brisbane 119 Post Card Queen St Brisbane Unknown Brisbane 120 Post Card Queen St Brisbane Q Unknown Brisbane 121 Post Card Victoria Bridge Brisbane 1906.07.30 Brisbane 122 Post Card An Unusual View showing Head of Queen Street Victoria Bridge & South SideSuburbs Brisbane Q Unknown Brisbane 123 Post Card Petries Bight Brisbane Q Unknown Brisbane 124 Post Card South End Victoria Bridge Brisbane Q Unknown Brisbane 125 Post Card Customs House Brisbane Unknown Brisbane 126 Post Card Photo of toastrack car circa 1910 Unknown Brisbane 127 Post Card Treasury Buildings Brisbane Unknown Brisbane 128 Post Card East Street Rockhampton with Steam Tram & trailer Unknown Rockhampton 129 Post Card Post Office Rockhampton with steam tram Unknown Rockhampton 130 Post Card East Street Rockhampton with Steam Trams Rose Series P 7154 Unknown Rockhampton 131 Post Card William Street Rockhampton Rose Series P 7156 Unknown Rockhampton 132 Post Card Central East Street Rockhampton Q with Steam Trams Unknown Rockhampton 133 Photo Sturt St Ballarat Unknown Ballarat 134 Photo Bridge Street Ballarat Unknown Ballarat 135 Post Card George St Sydney Unknown Sydney 136 Post Card Elizabeth St Sydney Unknown Sydney 137 Post Card Railway Square Unknown Sydney 138 Post Card Sydney Harbor Bridge - pending receipt 139 Post Card Kings Cross - Mowbray Series with description on rear from C Roy G Field Unknown Sydney 140 Post Card Kings Cross - Mowbray Series with description on rear from C Roy G Field Unknown Sydney 141 Post Card Central Railway Station Sydney - Rose Series P6033 1954-01-26 Sydney 142 Post card William Street Darlinghurst looking towards City - Rose Series P6602 unknown Sydney 143 Post Card Circular Quay Sydney - Rose Series P6680 Unknown Sydney 144 Post Card View at Manly NSW - Rose Series B1003 Unknown Sydney 145 Post Card Hunter St Newcastle NSW - Rose Series P7843 Unknown Newcastle 146 Post Card Bank Corner Newcastle NSW - Mowbray Series No. 155 Unknown Newcastle 147 Post Card Hunter St Newcastle NSW Unknown Newcastle 148 Post Card Criterion Hotel Hunter St Newcastle NSW Unknown Newcastle 149 Photo Horse tram at Newtown Station 1894 to 1898 - PTC photo c1894 Newtown 150 Photo Steam tram motor No 3 at Railway Square 1879 1879 Sydney 151 Photo Railway steam tram c1900 with a horse drawn double deck bus c1900 Sydney 152 Photo Steam motor 5A and doubled deck bus Unknown Sydney 153 Photo Steam motor 53A with detail notes on rear 1922 Sydney 154 Photo Cable tram set at Milsons Point ferry terminal c1900 Sydney 155 Photo Early Sydney electric car - Ocean St - Rose Bay Unknown Sydney 156 Photo George St looking souoth c1905 c1905 Sydney 157 Photo Tram 165 at Circular Quay Unknown Sydney 158 Photo Tramcar ferry or transporter at The Spit Unknown Sydney 159 Photo tram 882 George St at Marti Place, 1937 1937 Sydney 160 Photo Tram 826 Railway Sq area Unknown Sydney 161 Photo Railway Sq in background, Broadway with double decker bus and toastrack car late 1930s Sydney 162 Photo Coupled St Pitt St? - photo Ben Parle Feb. 1950 Sydney 163 Photo Electric tram No. 2 - North Sydney with side trolley pole running Unknown Sydney 164 Photo George St - Horden's Corner Unknown Sydney 165 Photo George St at Martin Place c1920 Sydney 166 Photo Castlereagh St Sydney c1928 c1928 Sydney 167 Photo Railway Sqare c1920 c1920 Sydney 168 Photo Darling St Countereweight Unknown Sydney 169 Photo Trolley bus depot Unknown Sydney 170 Photo Trolley bus No. 14 Unknown Sydney 171 Photo Newcastle Railway Station with steam tram - Wharf Road?? Unknown Newcastle 172 Photo High St West Maitland - steam tram Unknown Maitland 173 Photo High St West Maitland - steam tram Unknown Maitland 174 Post Card Argent St near tram terminal Broken Hill NSW c1900 Broken Hill 175 postcard Argent St looking south Broken Hill - with Ken Magor's notes on rear Unknown Broken Hill 176 Photo Toronto - steam tram 61A Unknown Toronto 177 Photo 124A trial run 1911? Sutherland - Cronulla line 1911 Sutherland 178 Photo 103A at a tram stop Unknown Sydney 179 Photo Cable tram set at Crows Nest terminus grip car 12, trailer 22 Unknown Sydney 180 Photo Cable tram Queens Square Sydney 1903 Sydney 181 Photo cars 2078 and 2077 Chatswood late 1950s Sydney 182 Photo car 1877 Balmain area late 1950s Sydney 183 Photo Trolley bus - Rockdale destination Late 1950s Sydney 184 Photo Broken Hill steam tram - motor 18A North Tram Unknown Broken Hill 185 Photo Millars Point Sydney NSW - ferry/tram interchange, unknown Sydney All items imaged including the rear or back where there was writing of information. All files stored on the Museum's Photo Collections directory. Demonstrates through the medium of many images, Australian tramway systems and Ballarat's place in them.Album - heavy card covers, plastic lined with postcard or 6x4 photo sleeves.australia, tramways, postcards, photographs, steam trams, horse trams, cable trams, trolley buses -
 Bendigo Military Museum
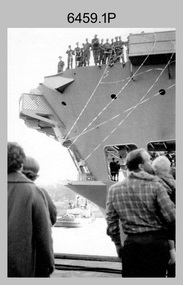
Photograph - A Section, 1st Topographic Survey Troop, Vung Tau, Vietnam, 1966
This is a set of 12 photographs of A Section, 1st Topographic Survey Troop taken from the 25th of May to the 12th of June 1966 during their deployment to Vung Tau, Vietnam. Led by OC CAPT Bob Skitch, the ten personnel from A Section 1st Topo Svy Tp and six personnel from supporting units were the first contingent from the Royal Australian Survey Corps deployed to provide topographic support to the Australian Task Force in Vietnam. They arrived in Saigon, Vietnam on the 10th of June 1966 enroute to the Australian Reinforcement Unit (ARU) “back beach” camp in Vung Tau. The ten RA Svy technical personnel from 1st Topo Svy Tp deployed were: WO2 David Christie, SGT Stan Campbell, SGT Dave King, CPL Jim Roberts, CPL Dennis Duquemin, CPL Des Ceruti, SPR Derek Chambers, SPR Brian Firns, SPR Joe O’Connor and SPR Ron Smith. External personnel deployed were: WO2 Snow Rollston from Northern Command Field Survey Unit, T/CPL Peter Clarke – orderly room corporal, T/CPL Alan Carew – Technical Storeman, SPR Stan Johns – Map Storeman, SPR Boots Campbell – batman/driver and PTE BNF Brunning – cook. The ship featured in photos .1P and .2P was the aircraft carrier HMAS Sydney on its 4th voyage to Vietnam. On board were SGT Stan Campbell and SPR Brian Firns, tasked to manage A Section’s stores and equipment. The rest of A Section deployed to Vietnam by air on the chartered Qantas 707B ‘City of Longreach'. A Section’s main tasks were to establish a Theatre Grid, map compilation and map revision; Engineer Survey Support in the camp and to the civil community; give assistance to the Cordon Search Missions by producing large scale plots from aerial photos with every house and fence etc plotted; and then reproduce these by silk screening usually, within a 24-hour period. RA Svy’s support concluded with the withdrawal of Australian troops from Vietnam in 1972. More information on the A Section, 1st Topographic Survey Troop and the Army Survey Regiment’s supporting role is provided in pages 89 to 94 of Valerie Lovejoy’s book 'Mapmakers of Fortuna – A history of the Army Survey Regiment’ ISBN: 0-646-42120-4.This is a set of 12 photographs of A Section, 1st Topographic Survey Troop (1st Topo Svy Tp), taken from the 25th of May to the 12th of June 1966 during their deployment to Vung Tau, Vietnam. The black and white photographs were printed on photographic paper and are part of the Army Survey Regiment’s Collection. The photographs were scanned at 300 dpi. .1) &.2) - Photo, black & white, 1966. HMAS Sydney departing Woolloomooloo wharf en-route to Vietnam. .3) - Photo, black & white, 1966. A Section 1 Topo Svy Tp relaxing in a bar before deployment. OC CAPT Bob Skitch in centre of photo. .4) - Photo, black & white, 1966. Unidentified A Section 1 Topo Svy Tp personnel and troops from other units relaxing in a bar before deployment. .5) - Photo, black & white, 1966. A Section 1 Topo Svy Tp personnel arrival by bus at Saigon (Tan Son Nhut) Airport. OC CAPT Bob Skitch 4th from right. .6) - Photo, black & white, 1966. A Section 1 Topo Svy Tp personnel boarding the USAF Hercules aircraft enroute from Saigon (Tan Son Nhut) Airport to Vung Tau Airfield. OC CAPT Bob Skitch on left. .7) - Photo, black & white, 1966. A Section 1 Topo Svy Tp personnel and troops from other units boarding the USAF Hercules aircraft enroute from Saigon (Tan Son Nhut) Airport to Vung Tau Airfield. .8) & .9) - Photo, black & white, 1966. A Section 1 Topo Svy Tp personnel arrive at the Australian Reinforcement Unit (ARU) “back beach” camp. .10) - Photo, black & white, 1966. A Section 1 Topo Svy Tp personnel in oppressive conditions work on map products. .11) - Photo, black & white, 1966. Group photo of A Section 1 Topo Svy Tp. OC CAPT Bob Skitch on far right. .12) - Photo, black & white, 1966. Group photo of A Section 1 Topo Svy Tp. OC CAPT Bob Skitch 3rd from right.Annotated with the photo set - ‘ DET 1 Topo Svy Tp Vung Tau 25 May to 12 of Jun 66’royal australian survey corps, rasvy, army survey regiment, army svy regt, fortuna, asr, 1st topographical survey troop -
 Eltham District Historical Society Inc
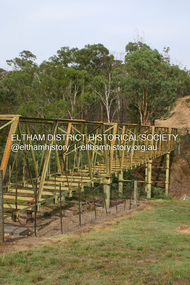
Photograph - Digital Photograph, Alan King, Maroondah Aqueduct Siphon Bridge over the Plenty River, 26 January 2008
Opened in 1891, the bridge formed part of the Maroondah Aqueduct carrying water from Watts River near Healesville to the reservoir at Preston where it joined Melbourne's metropolitan water system. Covered under Heritage Overlay, Nillumbik Planning Scheme. Published: Nillumbik Now and Then / Marguerite Marshall 2008; photographs Alan King with Marguerite Marshall.; p99 Built to supply thirsty Melbourne in the late 19th century, the siphon bridge spanning the Plenty River off Leischa Court, Greensborough, was part of an engineering masterpiece. Opened in 1891, the bridge formed part of the Maroondah Aqueduct carrying water from the Watts River near Healesville to the reservoir at Preston where it joined the metropolitan distribution system. A major link in Melbourne’s water supply, it also had a huge impact on communities, which mushroomed along its route. Named after the Aboriginal word for the area around the Maroondah Reservoir, the Maroondah Aqueduct was fully operational until the 1970s. Since the 1980s the land along parts of the aqueduct have been used for walking and bicycle riding, shaded in places by Monterey Pine trees planted to stabilise the surrounding ground. From 1857 the Yan Yean Reservoir supplied Melbourne’s water but the growing city needed additional catchments.1 In 1886 work began on a weir on the Watts River to enable the aqueduct to carry most of the river water 41 miles (66km) to Melbourne. The aqueduct, built by the Board of Works, is the oldest remaining aqueduct near Melbourne and was probably the first built with concrete.2 Although the aqueduct is now only used between the Maroondah and Sugarloaf Reservoirs, it can still be traced across the Shire. It extends from the Maroondah Reservoir through Christmas Hills, Kangaroo Ground, Research, Eltham, St Helena and then previously wound west through Greensborough to Reservoir.3 Built by horse and manpower the aqueduct gravity fed 25 million gallons (113.6ML) of water a day to Melbourne along a gradient of one foot to the mile. It included 25 miles (41km) of open concrete and brick channel, six miles (10km) of tunnels, and nine miles (15km) of 14 inverted siphons of riveted wrought-iron across creeks. Bricks for the aqueduct were made from clay found near the sites and remains of several kilns can still be found between Kangaroo Ground and Christmas Hills. Building the aqueduct transformed local communities. An abattoir was established at Christmas Hills. Grog shanties and labourers’ camps sprang up and local courts dealt with cases of ‘petty pilfering and boisterous behaviour’.4 The Kangaroo Ground school population jumped to 91, crammed into a room with one teacher. Miners who built the tunnels camped just north of Churinga in Greensborough – then called Tunnel Hill Camp – and adjacent to the Evelyn Arms Hotel. The miners’ high spirits were sometimes quenched in horse troughs or by a ‘welt under the ear and kick on the behind’ as the local constable calmed them down rather than lock them up.5 But the growing city of Melbourne needed more water, so the O’Shannassy catchment, east of Warburton, was added to the system in 1914. In 1920 work began on the present concrete Maroondah Dam one mile (1.6km) from the weir on the Watts River. The aqueduct capacity was thus doubled to 50 million gallons (227ML) a day.6 Intense land development threatened to pollute the open water supply, so channel sections were replaced with large pipes. In the late 1960s a large water main was built from the tunnel outlet at Research and extended through St Helena and Greensborough, so this section of the aqueduct was taken out of use. Long sections of the unused open channels in Greensborough and Bundoora were destroyed, but the old channel in Research and Eltham North remained largely intact. In the 1970s, the Sugarloaf Reservoir was constructed, inundating 445 hectares of land in Christmas Hills. Sugarloaf was officially opened in 1980 and serves as a water storage and treatment plant supplying Melbourne. In the early 1980s pipes replaced the section from Sugarloaf Reservoir to the tunnel entrance at Kangaroo Ground. The Research-Kangaroo Ground tunnel operates as part of the pipeline system.This collection of almost 130 photos about places and people within the Shire of Nillumbik, an urban and rural municipality in Melbourne's north, contributes to an understanding of the history of the Shire. Published in 2008 immediately prior to the Black Saturday bushfires of February 7, 2009, it documents sites that were impacted, and in some cases destroyed by the fires. It includes photographs taken especially for the publication, creating a unique time capsule representing the Shire in the early 21st century. It remains the most recent comprehenesive publication devoted to the Shire's history connecting local residents to the past. nillumbik now and then (marshall-king) collection, maroondah aqueduct, pipe bridge, siphon bridge -
 Eltham District Historical Society Inc
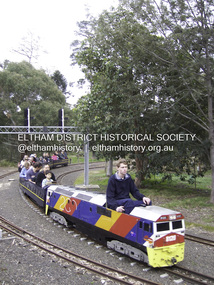
Photograph - Digital Photograph, Marguerite Marshall, Diamond Valley Railway, Eltham Lower Park, 7 September 2008
Kids of all ages enjoy the Miniature Railway. Published: Nillumbik Now and Then / Marguerite Marshall 2008; photographs Alan King with Marguerite Marshall.; p163 On Sundays in Eltham thousands of children, mums, dads and grandparents can be seen travelling around Lower Eltham Park in tiny trains. They are among the two and half million passengers who have travelled on the Diamond Valley Railway since it officially began in 1961. The miniature railway originally operated from the 1940s at Chelsworth Park, Ivanhoe, until flooding caused it to be moved to the Eltham Lower Park in 1959. The railway is modelled on the 1920s era – the heyday of passenger rail travel – and the trains are built on a scale of two inches to the foot (1/6). Although not exact replicas, trains include models of the Spirit of Progress, Puffing Billy, The Overland, Dog Boxes, Vic Rail S class, G class and a NSW 81 Class. The three and a half kilometres of track is set amongst native plants and picnic areas. A friendly hoot or the clang of a bell occasionally punctuates the tranquillity as a train emerges from a treed bend with passengers excitedly waving to onlookers. For $3 the train takes you on a 13-minute two-kilometre ride. Passengers sit in single file in the narrow train, which clatters along tracks built to the scale of the Australian narrow gauge of three feet six inches (1.1m). These are used in Queensland, South Australia, Tasmania and Western Australia. Safety standards are stringently kept. Even before you buy a ticket notices tell you that you must wear closed shoes. You can even borrow these, and you are given a pair of socks for the ride! Blue-overalled volunteers check tickets, see you aboard, and drive the train. They are mainly retired men who can at last devote their time to what little boys dream of – playing with trains. Passengers are instructed in safe behaviour, then the station master waves a white flag and off we go. The guard sits at the back with his whistle and green flag at the ready. The winding track, fringed by native trees and bushes planted by volunteers, stands on crown land managed by Nillumbik Council. The train clatters along the track and crosses a bridge over a drain elevated by name to The Blow Fly Creek. We pass by Meadmore Junction at a speed of three kilometres an hour. Then on through a tunnel, accompanied by squeals of delight, and after a few moments of blackness, light glimmers at the end. On we go, past the original platform, along another route past busy Main Road through Pine Creek Station, over a bridge and through another tunnel with more screams of delight.Then a signal stops us before the ‘all clear’ to return to our original point of departure. The railway services its passengers – the largest number of any miniature railway in Australia – with a fleet including: six diesel locomotives, three steam locomotives, eight sets of passenger cars and one battery electric Dog Box set. Members also privately own 20 locomotives and powered carriage sets as well as four carriage sets.1 All the trains are stored on-site in workshops, sheds and a tunnel. The railway is entirely run by volunteers, so that all ticket money is used for maintenance and extensions, and some goes to local charities. Since 1991, the entire railway has been rebuilt, including an upgraded signalling system. About half of the 120 volunteer members are active with about 35 working each Sunday, and a dozen or so working every Wednesday. Members are trained to positions of station assistant, booking officer, train guard, train driver or signalman. Members construct new carriages and locomotives as well as maintaining track, signalling and rolling stock.This collection of almost 130 photos about places and people within the Shire of Nillumbik, an urban and rural municipality in Melbourne's north, contributes to an understanding of the history of the Shire. Published in 2008 immediately prior to the Black Saturday bushfires of February 7, 2009, it documents sites that were impacted, and in some cases destroyed by the fires. It includes photographs taken especially for the publication, creating a unique time capsule representing the Shire in the early 21st century. It remains the most recent comprehenesive publication devoted to the Shire's history connecting local residents to the past. nillumbik now and then (marshall-king) collection, diamond valley railway, eltham lower park -
 Melbourne Tram Museum
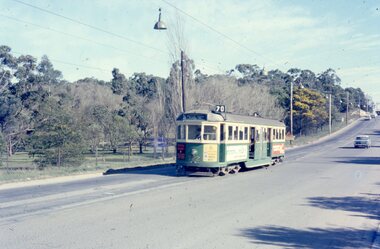
Photograph - Four colour slides - Wattle Park Single Line, Warren Doubleday, 1-8-1970
Set of four photographs taken at the time of the conversion of the Wattle Park route, in Riversdale Road from single line to double track between Warragul Road and the terminus, alongside Wattle Park itself. Yields information on the single line operation of the Wattle Park line prior the conversion to double track operation.Set of four colour Anscochrome slides, of single line operations on the Wattle Park line. .1 - W5 722 on Wattle Park single line, Sat. p.m. .2 - W2 388 meets W2 344 on Wattle park loop - shows the commencement of roadworks. .3 - SW5 853 from the park .4 - W5 738 at Warragul Road - shows the gates to Wattle park and the Caltex Service Station sign.Has photographers slide numbers on each slide.wattle park, route 70, riversdale rd, w2 class, w5 class, sw5 class, trackwork, tram 722, tram 388, tram 853, tram 738, trams, tramways -
 Melbourne Tram Museum
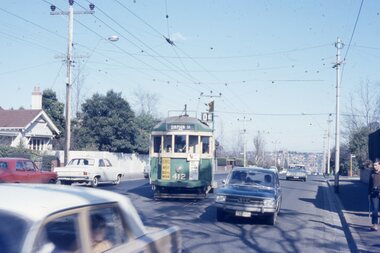
Photograph - Four color slides - tram W2 412 and tour ticket, 9-8-1970
Set of four colour slides taken during the Monash Railway club tour on 9-8-1970 using W2 412. The route number and destinations are for show only. Photography by Warren Doubleday. Ticket - No. 0004, printed on yellow card detailing the event. Date stamped on the rear using and Edmondson ticket dater.Yields information on Monash Railway club tour, the trams used, the ticket and the locations.Set of four Anscochrome colour slides, of Melbourne tram W2 412 on a Monash Railway Club tour - 9-8-1970 .1 - Shuntiing at Leura Grove Crossover in Burke Road .2 - Shunting at the crossover in Riversdale Road, near Glenferrie Road .3 - at the Burwood terminus .4 - Outside 412 Toorak Road. Since changed to 1412 Toorak Road .5 - Edmondson style ticket for the tourHas photographers slide numbers on each slide.monash railway club, w2 class, tram 412, toorak road, burwood, burke road, riversdale road, trams, tramways, tickets, edmondson tickets -
 Melbourne Tram Museum
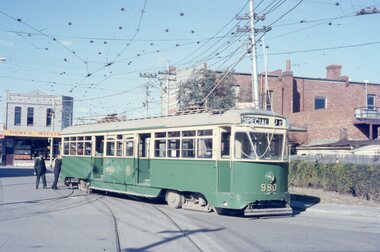
Photograph - Five color slides - tram PCC 980, 9-8-1970
Set of four colour slides taken during the Monash Railway club tour on 9-8-1970 using PCC 980 from Malvern Tram Depot. The route number and destinations are for show only. Photographs by Warren Doubleday.Yields information on Monash Railway club tour, the trams used and the locations.Set of five Anscochrome colour slides, of Melbourne tram PCC 980 on a Monash Railway Club tour - 9-8-1970 .1 - PCC 980 on the depot access tracks for Malvern Tram Depot in Coldblo Road .2 - With the Malvern Tram Depot in the view .3 - In Dandenong Road at Hawthorn Road .4 - Crossing Hawthorn Road - has a tram shelter in the view. .5 - About to use the then new Nolan St (now Southbank Blvd) crossover.Has photographers slide numbers on each slide.monash railway club, tram 980, malvern depot, hawthorn road, dandenong road, nolan st, tramways, trams, pcc class -
 Melbourne Tram Museum
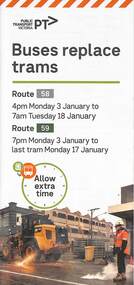
Pamphlet, Yarra Trams, Buses Replace Trams - Routes 58, 59, 86 and 96, 2022
.1 - pamphlet provided at tram stops giving details of the works and bus services for routes 58 and 59 .2 - Project document describing the work and dates - downloaded from the Yarra Trams website after buses were used to replace route 58 from the Royal Children's Hospital rather than from Royal Park Station as originally planned. .3 - as for .1 - for the upgrading of the Merri Creek Bridge - route 86 - see also Reg Item 6066 .4 - as for .1 - for the installation of superstops in Nicholson St between Elgin St and Holden St - route 96Shows the methods that Yarra Trams customers are advised of changes due to track replacement works..1 - Pamphlet - DL, four fold printed on off white paper titled - Buses Replace Trams - Route 58 and Route 59 - Jan 2022 .2 - Project sheet - 3 A4 sheets, titled "Renewal works: Essendon Depot and Mt Alexander Road - 3.1 to 18.1.2022. .3 - Pamphlet - DL 3 fold, Buses Replace Trams, route 86, November 2021 - Merrit Creek Bridge works .4 - Pamphlet - DL - 4 fold, Buses Replace Trams, route 96, January 2020 - Nicholson St works for tram super stops.mt alexander road, tram works, track work, route 58, route 59, yarra trams, ptv, essendon tram depot, route 86, route 96, nicholson st, merri creek, bridges, carlton, super stops, trams, tramways, northcote -
 Melbourne Tram Museum
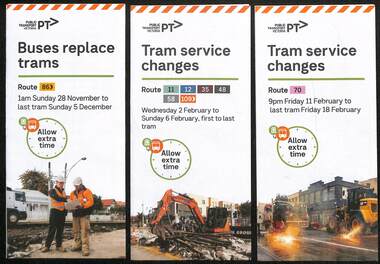
Pamphlet, Yarra Trams, Tram Service Changes, 2022
.1 - pamphlet provided at tram stops giving details of the works and bus services for 86 - Merri Creek Bridge works .2 - ditto - for provision of a super stop in William St at Collins St including replacement bus services on route 58 .3 - as for .1 - track reconstruction in Swan St between Stanley St and Stawell St Richmond or BurnleyShows the methods that Yarra Trams customers are advised of changes due to track replacement works..1 - Pamphlet - DL, three fold DL - Buses replace trams - route 86 - 28/11/2021 to 5 December 2021 - Route 86 .2 - Pamphlet - DL, four fold DL - Tram Service changes 2/2/2022 to 6/2/2022 - Routes 11, 12, 35, 48, 58 and 109 .3 - Pamphlet - DL, four fold DL - Tram Service changes - 11/2022 to 18/2/2022 - Route 70tram works, track work, route 58, yarra trams, ptv, route 86, merri creek, bridges, super stops, trams, tramways, richmond, burnley, route 70, collins st, william st -
 Melbourne Tram Museum
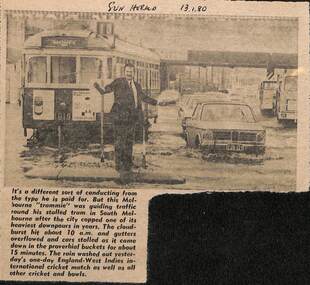
Newspaper, Herald Sun, Newspaper clipping re flooding in South Melbourne, 13-1-1980
Newspaper cutting about flooding in South Melbourne disabling a tram and a "trammie" conductor or driver, directing traffic. Tram W7 1019, route 10.Yields information about the type of delays that can occur on a big tram system.Newspaper cutting from the Herald Sun 13-1-1980 about flooding in South Melbourne and delaying tram W7 1019"Sun Herald 13.1.80"trams, tramways, tramcars, flooding, floods, south melbourne, w7 1019, route 10, crews