Showing 693 items
matching 19 set
-
 Ballarat Tramway Museum
Photograph - Digital image Set of 20, Dec. 1970
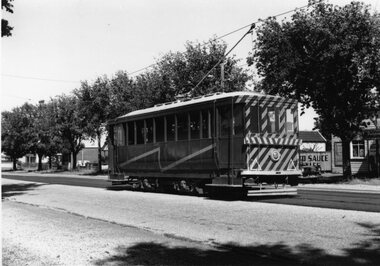
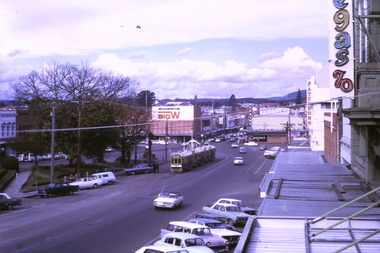
Set of 20 digital images of Bendigo Tramways December 1970 by Stuart Lodington. .1 - Bendigo track gang renewing a joint, McCrae St, with welding truck alongside and Birney No. 29. .2 - No. 5 at Quarry Hill terminus? .3 - No. 24 at the depot .4 - No. 2 on the Quarry Hill line .5 - No. 5 approaching the Eaglehawk terminus .6 - No. 29? at the Golden Square Terminus with Bill Rodda's Golden Square hotel in the background. .7 - No. 3 inbound on the Quarry Hill line. .8 - trams crossing on the Eaglehawk line, through the window of one tram. .9 - side on view of a B23D controller in a bogie tram .10 - No. 5 at the Eaglehawk terminus .11 - No. 21 at No. 21 crossing on the Golden Square line. No. 29 showing special, No.21 - North Bendigo, Fire Station Loop? .12 - No. 29 and another tram - near work site? .13 - interior view from Birney looking at the front of another tram parked behind. .14 - No. 29, No. 6 crossing at .15 - No. 6, showing special at Charing Cross. .16 - No. 5 and another tram at North Bendigo on a Special .17 - No. 28 at Charing Cross .18 - No. 5 on Special at a Loop on the Eaglehawk line .19 - No. 28, and two other trams at the Myrtle St Loop .20 - No. 18 showing Quarry Hill and two other trams on View St.trams, tramways, bendigo, trackwork, mccrae st, depot, quarry hill, eaglehawk, golden square, controllers, north bendigo, view st, tram 29, tram 5, tram 24, tram 2, tram 3, tram 6, tram 28, tram 18 -
 Ballarat Tramway Museum
Photograph - Digital image Set of 20
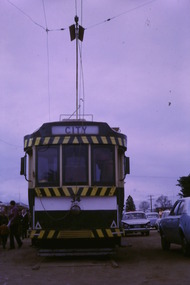
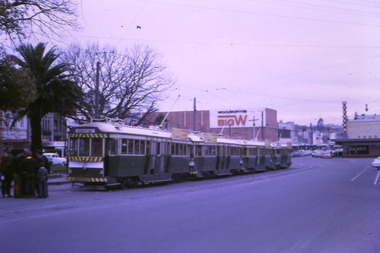
Set of 20 digital images of Bendigo Tramways, 1972 at or before closure while on a tram tour by Stuart Lodington. .1 - No. 28 and 5 at Eaglehawk terminus .2 - No. 28 leaving Charing Cross and travelling into View St with Armstrong Type Service building in background and Firestone Advertisements. .3 - No. 29 with Eaglehawk Town Hall and Post Office in background. .4 - No. 26 and 29 at start of double track, High St Eaglehawk .5 - No. 29 leaving Eaglehawk with shops in the background, Foodland, J. Bests .6 - No. 29 and 23 crossing Manchester Loop with Manchester Arms Hotel in the background and an old poppet head. .7 - No. 29 at ditto with poppet head in the background. .8 - No. 28 and two other trams at the Quarry Hill terminus. .9 - No. 29 in High St Bendigo with the Cathedral and Golden Gate Hotel in the background. .10 - No. 3 with destination Eaglehawk, in bound Carpenter St? .11 - No. 29 following a single trucker through a loop or the end of the double track near the depot. .12 - No. 23?, at Eaglehawk terminus, with Eaglehawk Town Hall in the background. .13 - Birney tram crossing the bridge at the Depot entrance - No. 29 .14 - No. 29 on the Eaglehawk line? .15 - as for .13 .16 - No. 29 entering the depot. .17 - No. 23, inbound from Eaglehawk, at Jobs Gully Loop with the railway overbridge in the background. .18 - No. 28 and two other trams (see also Reg Item 4982) for the same tram tour at Myrtle St. Loop. .19 - No. 21 with North Bendigo on the destination approaching the Golden Square terminus. .20 - No. 7 at Golden Square terminustrams, tramways, bendigo, eaglehawk, quarry hill, golden square, depot, tram 5, tram 29, tram 28, tram 26, tram 23, tram 7, tram 21 -
 Ballarat Tramway Museum
Photograph - Digital image Set of 20, 1971-72
Set of 20 digital images of Bendigo Tramways, 1972 at or before closure while on a tram tour by Stuart Lodington. .1 - No. 7 at Golden Square terminus .2 - ditto .3 - No. 26 in bound on the Eaglehawk line with a crossing loop behind. .4 - Birney crossing the bridge by the tram depot. .5 - No. 29 running a special on the Eaglehawk line with a HBA billboard in the background. .6 - No. 29 with a driver walking in front of the tram at the above location. .7 - No. 29 on the Eaglehawk line .8 - ditto waiting for a tram at Manchester Loop with poppet head in the background. .9 - No. 29 on the Eaglehawk line .10 - Eaglehawk Town Hall at night. .11 - No. 7 at the depot junction in McCrae St, with Golden Square destination. .12 - No. 29 with the Camp Hotel Eaglehawk in the background. Also a Newsagent with The Sun, The Bendigo Advertiser and The Age signs on the building, High St .13 - No. 29 Mt Korong Rd, with the railway overbridge in the background. .14 - interior photo of Birney tram roof .15 - interior view of controls of Birney at Eaglehawk .16 - No. 29 outbound at the Depot Junction McCrae St. .17 - No. 18 at the Eaglehawk terminus .18 - close up view of No. 29 front. .19 - No. 29 in Nolan St, crossing the bridge, outbound. .20 - No. 18 at the Eaglehawk terminus with the Eaglehawk Town Hall, Post Office in the background. Has a circus banner on the side.trams, tramways, bendigo, eaglehawk, quarry hill, golden square, depot, mccrae st, nolan st, tram 7, tram 26, tram 29, tram 18 -
 Ballarat Tramway Museum
Photograph - Digital image Set of 20, 1971-72
Set of 20 digital images of Bendigo Tramways, 1972 at or before closure while on a tram tour by Stuart Lodington. .1 - No. 29 at the North Bendigo terminus .2 - No. 29 just past the Bendigo end of the double track in High St Eaglehawk, with a BP dealer in the background. .3 - Night photo of No. 18 at a terminus, showing "Eaglehawk" .4 - ditto .5 - Night photo of No. 24 at Eaglehawk with Leo A Hughes Photographer in the background. The Tram has "Johnnie Walker whiskey" roof adverts. .6 - No. 29 outbound in Thunder St with a train passing over the bridge in the background. .7 - view from the front window of a tram on the Eaglehawk line with a large "display event float" in the foreground and tram approaching a crossing loop. .8 - No. 29 at North Bendigo .9 - view of High St Eaglehawk looking east from the terminus, showing the track and centre poles. .10 - No. 29 outbound on the North Bendigo line turning from either Nolan St or Caledonia St, running a special. .11 - No. 7 departing North Bendigo for Golden Square. .12 - No. 3 and 18 at Charing Cross. No. 3 has two SEC roof Advertisements .13 - No. 7 at North Bendigo with the trolley pole being reversed. .14 - No. 24 at Quarry Hill with Northern Terrazzo in the background with the driver alongside .15 - No. 7 and No.6 at Charing Cross with the Beehive buildings in the background. .16 - No. 7 at North Bendigo terminus .17 - ditto .18 - No. 24 at Quarry Hill with Northern Terrazzo in the background with the conductor alongside. .19 - ditto .20 - No. 26 and other bogie tram in View St near Charing Cross with the Armstrong Tyre Service building and signs for Cohn's Drinks and T&G in the view.trams, tramways, bendigo, eaglehawk, quarry hill, golden square, depot, north bendigo, charing cross, tram 29, tram 18, tram 24, tram 3, tram 7, tram 6, tram 26 -
 Ballarat Tramway Museum
Photograph - Digital image Set of 20, 1971-72
Set of 22 digital images of Bendigo Tramways, 1972 at or before closure while on a tram tour by Stuart Lodington. .1 - No. 7 arriving at North Bendigo .2 - No. 5 departing Charing Cross along View St, with a Firestone tyres in the background. .3 - front view of a tram in View St with a blurred background image. .4 - No. 24 showing Eaglehawk destination .5 - No 26 and 3 in View St, with the Armstrong Tyre Service building in the background and signs for T&G and Cohn's Drinks. .6 - ditto .7 - No. 3 arriving at Charing Cross from Eaglehawk in View St, with a Quarry Hill destination. .8 - No. 3 and 18 at Charing Cross. .9 - No. 24 on the Quarry Hill line. .10 - No 26 in View St, with the Armstrong Tyre Service building in the background and signs for T&G and Cohn's Drinks. .11 - ditto, with fountain in view, Colonial Mutual building and a newsagent with a Herald sign on the building. .12 - No. 7 at North Bendigo terminus .13 - ditto with pole being reversed. .14 - No. 18 at Quarry Hill terminus with Northern Terrazzo sign in the background. .15 - No. 24 at Quarry Hill terminus .16 - No. 18 arriving at Charring Cross, with Fountain Plaza and Bendigo Pharmacy in the background. .17 - No. 3 and 18 at Charing Cross. .18 - No. 7 at North Bendigo terminus with pole being placed on the overhead. .19 - No. 26 in View St inbound, with Sandhurst Trustees sign in the background. .20 - No. 6 leaving Charing Cross in Pall Mall with Myer and other buildings in the background. .21 - No. 7 at North Bendigo .22 - Single trucker with two roof Advertisements crossing View St with fountain in view, Colonial Mutual building and a newsagent with a Herald sign on the building.trams, tramways, bendigo, eaglehawk, quarry hill, north bendigo, charing cross, view st, tram 7, tram 5, tram 24, tram 26, tram 5, tram 3, tram 18, tram 6 -
 Ballarat Tramway Museum
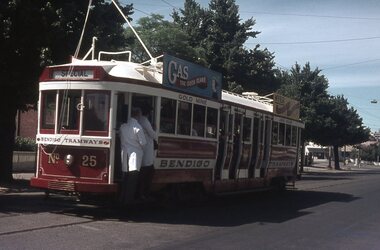
Photograph - Digital image Set of 20, 9/12/1972 12:00:00 AM
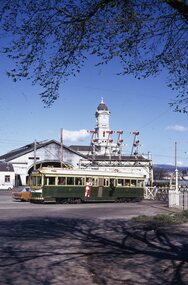
... 30 tram 19 Set of 21 digital images of Bendigo Tramways ...Set of 21 digital images of Bendigo Tramways, at the re-opening of the Bendigo tramways by the Bendigo Trust on 9/12/1972by Stuart Lodington. All trams in the first Bendigo Trust colours. .1 - No. 25 with Gas and Myer roof advertisements .2 - No. 30 with 3BO roof advert and a BP service station in the background. .3 - SEC single trucker at the Mine with a large "Tram Tours" sign on the front of the tram .4 - ditto .5 - No. 19 with a large group of passengers, Bendigo Motor Co and Sandhurst roof advertisements .6 - No. 30 in McCrae St .7 - view of opening march with band .8 - No. 19 in opening parade .9 - Opening Parade in High St with cathedral in the background .10 - No. 30 in Nolan St crossing bridge .11 - ditto .12 - No. 25 at the mine .13 - No. 30 leaving the mine .14 - No. 30 ditto with BCTV roof advert. .15 - Charing Cross with cenotaph, The Beehive building and Ezywalkin shoes and Coca Cola adverts .16 - No. 19 southbound in High St with City Centre Motel building in the background. .17 - No. 30 returning from North Bendigo .18 - No 25 in High St after leaving Gold Mine .19 - No. 30 at the Mine .20 - No. 30 in Nolan St .21 - No. 30 with 3BO roof advert and a BP service station in the background.trams, tramways, bendigo, north bendigo, charing cross, bendigo trust, central deborah, tram 25, tram 30, tram 19 -
 Ballarat Tramway Museum
Photograph - Digital image Set of 20, 16/04/1972 12:00:00 AM
Set of 20 digital images of Bendigo Tramways, of the last running day of the Eaglehawk to Quarry Hill line 16 April 1972, .1 - No. 24 outbound to Eaglehawk .2 - No. 3? at Manchester Loop .3 - No. 24 outbound to Eaglehawk .4 - bogie tram crossing the rail over bridge from Eaglehawk .5 - No. 18 in View St .6 - No. 24 outbound to Eaglehawk .7 - No 18 at Eaglehawk with destination roll being changed, and shopping centre in the background. .8 - No. 24 crossing the railway overbridge, going to Eaglehawk .9 - No. 3 outbound to Eaglehawk .10 - No. 24 crossing the railway overbridge, going to Eaglehawk .11 - No. 3 and 24 crossing at Long Gully .12 - No. 18 at Eaglehawk with Leo A Hughes photographer building in the background and a CFA truck passing the tram. Tram SEC roof advertisement and a banner for "German -?- Circus" at Eaglehawk and dates. .13 - No. 3 inbound on the Eaglehawk line. .14 - No. 18 outbound to Eaglehawk .15 - ditto .16 - No. 18 at Eaglehawk terminus with the Mechanics Institute in the background. .17 - No. 24 at the Eaglehawk terminus .18 - No 24 at the intersection with Taylor St .19 - No. 24 at the Eaglehawk terminus .20 - dittotrams, tramways, bendigo, eaglehawk, long gully, manchester loop, tram 24, tram 18, tram 3 -
 Ballarat Tramway Museum
Photograph - Digital image Set of 20, 16/04/1972 12:00:00 AM
Set of 22 digital images of Bendigo Tramways, of the last running day of the Eaglehawk to Quarry Hill line 16 April 1972, .1 - No. 3 and 24 crossing at Long Gully .2 - No. 3 turning at the Cricket ground, Barnard and View Sts, inbound to the City and Quarry Hill .3 - No. 3 in bound to the City and Quarry Hill, Long Gully area .4 - No. 18 inbound to the City and Quarry Hill crossing the railway bridge from Eaglehawk. .5 - Manchester Loop .6 - No. 18 inbound to the City and Quarry Hill crossing the railway bridge from Eaglehawk. .7 - No. 18 about to enter Jobs Gully Loop .8 - No. 3 about to turn at the Cricket ground, Barnard and View Sts inbound to the City and Quarry Hill .9 - No. 3 turning at the Cricket ground, Barnard and View Sts, inbound to the City and Quarry Hill .10 - No. 18 at Eaglehawk terminus with the Mechanics Institute in the background. .11 - No. 3 in bound, Ironbark area. .12 - No. 3 at Long Gully Loop .13 - No. 3 outbound to Eaglehawk. .14 - No. 18 at Eaglehawk with German circus banner on tram .15 - No. 18 on the Eaglehawk line at Jobs Gully Loop .16 - No. 24 outbound to Eaglehawk at Taylor St .17 - No. 18 inbound to the City and Quarry Hill crossing the railway bridge from Eaglehawk. .18 - No. 3 at Manchester Loop .19 - No. 18 at Eaglehawk terminus .20 - No. 18 at Eaglehawk with German circus banner on tram .21 - bogie tram at Long Gully Loop. .22 - No. 24 outbound to Eaglehawk at Taylor Sttrams, tramways, bendigo, eaglehawk, long gully, jobs gully, manchester loop, tram 24, tram 18, tram 3 -
 Ballarat Tramway Museum
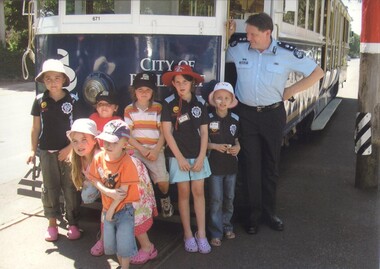
Photograph - Colour Photograph/s - set of 2, Austin Brehaut, 19/11/2007 12:00:00 AM
Has a strong association with the BTM and the Cop's n Kids charter of November 2007 and Austin Brehaut and Dave O'Neil.Print of digital Image of a group of kids during the 19/11/2007 charter for the Cops 'n Kids (with cancer) programme. Features Victorian Police Superintendent and Dave O'Neil. Photo taken by Austin Brehaut. also appeared in Fares Please! of the time. Photo was printed by the Gold Museum 2008 for a local exhibition and additional copies given to the Museum by Roger Trudgeon 2009.trams, tramways, btm, charters, cops n kids -
 Ballarat Tramway Museum
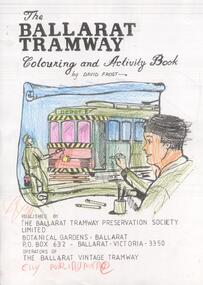
Domestic object - Colouring Book, Ballarat Tramway Museum (BTM), Sep. 2011
Set of 22 sheets featuring sheets from the David Frost colour book (See Reg item ) used on the BTM Family Fun Day on 19/9/2011 - have been coloured in or partly coloured in and some with drawings on rear. Photocopied onto A4 sheets by Richard Gilbert/Neil Lardner for the event. Collected on the day.Niltram, trams, btm, 40th anniversary, family fun day, events -
 Ballarat Tramway Museum
Photograph - Digital prints, The Courier Ballarat, "Family fun day celebrates Ballarat trams", 19/09/2011 12:00:00 AM
Yields information about the BTM Family Fun day and what was published by The Courier on their web site.Set of 11 colour digital prints on A4 sheets from The Courier website, 19/9/2011 with the web story and then 10 sheets each with a photo by Jeremy Bannister. Has two comments. BTM Members in the photographs include Roger Salen, Alan Bradley, Richard Gilbert, Neil Lardner and Christopher Mitchell. Each of the sheets has the caption and people involved at the bottom of the sheet. trams, tramways, btm, family fun day, events -
 Ballarat Tramway Museum
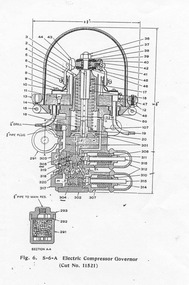
Document - Instruction, Ballarat Tramway Museum (BTM), "S-6-A Electric Compressor Governor", 2009
Yields information about a compressor governor that is fitted to some Ballarat Trams, Westinghouse.Two A4 photocopied sheets, giving a side elevation of the Westinghouse "S-6-A Electric Compressor Governor" and the setting or the regulation and adjustment, installation and maintenance of the Governor. Commonly known as a "Bettleback" Governor. Dates from 1916. See Reg Item 703 for a MMTB drawing. WAD’s thoughts on setting Beetle back compressor Governors – 19/12/2009. Refer to instructions as well. Set both valves to approximately the same tension or thread length If when pumping up, both valves start to chatter, screw down the back valve further. When working satisfactorily, but pressures not right, that is, the governor is cutting out without valves chattering or with excessive range or pressure too high. Adjust the front valve until the desired cut out pressure arrived at. The cap must be on this valve for it to work. Adjust the back valve to adjust the cutting in setting, screw down for high cut in pressure. Adjust both as necessary to obtain your desires! And best of luck, it can be done, but is frustrating!!!!!trams, tramways, governors, westinghouse, air compressors, instructions -
 Ballarat Tramway Museum
Document - Letter/s, City of Greater Bendigo, 19/12/2003 12:00:00 AM
Yields information about the City of Bendigo and Eaglehawks crests and format of letters 12/2003.Set of four documents - City of Bendigo and Borough of Eaglehawk civic crests/ coat of arms / emblems 4371.1 - Letter dated 19/12/2003, from the City of Greater Bendigo, signed by Daryl Griffiths Director Corporate Services to William F Scott, giving permission to use the City and Borough civic crests in his forthcoming book. .2 - folded piece of paper marked "88") and with a black and white version of the Borough of Eaglehawk Crest and plastic envelope containing three copies of the With Compliments card of the Borough. .3 - City of Bendigo Crest - full colour version on art paper. .4 - City of Bendigo Crest - black and white version.2 - "Bendigo and Eaglehawk coats of arms/emblemstrams, tramways, crests, coat of arms, borough of eaglehawk, city of bendigo, city of greater bendigo -
 Ballarat Tramway Museum
Document - Letter/s, City of Ballarat, 19/03/2007 12:00:00 AM
Yields information about the City of Ballaarat's Coat of Arms and colours.Set of four documents - City of Ballarat civic crests/ coat of arms / emblems 4371.1 - Letter dated 19/3/2007, from the City of Ballarat, signed by Shaun Foy, Archives Support Officer to William F Scott, giving permission to use the City civic crests in his forthcoming book. .2 - City of Ballaarat Crest - full colour version. .3 - City of Ballaarat Crest - black and white version .4 - Colour sheet - explaining the layout of the "Arms of Ballaarat" Letter also notes Mayor's report at the time of closure - see Reg Items 653 and 1829 for these items.trams, tramways, crests, coat of arms, city of ballaarat, city of ballarat -
 Ballarat Tramway Museum
Photograph - Black & White Photograph/s - set of 2, Wal Jack, 28/02/1962 12:00:00 AM
Yields information about Bendigo trams, the Golden Square route in the early 1960's prior to fitting dash canopy lighting.Black and white print of the Ballarat Scrubber tram, at the Bell Street loop, 28/2/1962, Photo by Wal Jack. Two copies. Photo print courtesy of Port Dock Railway Museum, now the National Railway Museum. See worksheet 4311 for letter and details of prints sent to Bill Scott, 19/10/2001. Any photo credit to mention NRM Collection. .1 - same photograph with Doug Colquhoun stamp on rear - see image i2..1 - On rear of copy 1"SEC Ballarat / Scrubber car /Bell St loop / 28/2/62 2125 / Wal Jack " In the top right hand corner "74)" .2 - On rear has Douglas Colquhoun stamp with photograph details - see image i2 trams, tramways, scrubber tram, bell st, tram scrubber -
 Ballarat Tramway Museum
Newspaper, The Courier Ballarat, "Town and Country Journal", 13/07/2009 12:00:00 AM
Yields information about Ballarat in 1899 and the way that information communication, style of writing and magazine printing was done at the turn of the century.Newspaper clipping, - set of three pages - from the Town and Country Journal August 19, 1899. 4443.1 - pages 31 and 32 - see images 4431i1, i6 and i7 Page 31 - Australian Insects Page 32 - Illustration of Sturt St, Entrance to fernery, Orphan Asylum, Eureka Stockade, the Hospital, West St (Bridge St). 4443.2 - pages 35 and 36 - see images 4443i2, i3, i8 to i12 Features photos of Hon. Peter Lalor, Ballarat, Batchelor's Newsagency Ballarat, Sumerscales Book and Stationery Depot, Ballarat Mining Exchange, Bradford (UK) steam tram and trailer, New Electric tram for Sydney and article titled "A contrast in Transit Facilities" 4443.3 - pages 33 and 34 - see images 443i5, i6 and i13 to i15 Features an article on the City of Ballarat, with photos by P. Black of Ballarat. Has photos of The Post Office, Sturt St from Town Hall, Sturt St from Grenville St with a horse tram in the photograph, and three photos of the Botanic Gardens.ballarat, sturt st, gardens, horse trams -
 Ballarat Tramway Museum
Slide - 35mm slide/s - set of 6, Campbell Duncan, 19/09/1971 12:00:00 AM
Yields information about the operations of the Ballarat Tramway system on the last day of SEC tramway operations in Ballarat.Set of 6 Kodak - Kodachrome slides - cardboard mounts - all taken on 19/9/1971, last day of operations prior to closure of the SEC operated tramway. .1 - Tram 40, waits at the level crossing gates - the gates are being opened. In the background is the station building and the signal gantry. Tram has the destination of Sebastopol. .2 - No. 42, with destination of Lydiard St north, northbound in Lydiard St, with railway station buildings and VRI in the background. .3 - No. 35 on inbound, Lydiard St North. .4 - No. 35, on inbound service, leaving Skipton St loop with another bogie in the background. .5 - No. 39 on inbound service, Albert St Sebastopol with the Sebastopol boundary sign and Binks Ford in the background. Tram has an everything under control in my all electric kitchen roof advert. .6 - No. 42, with destination of Sebastopol, Albert St Sebastopol.In ink on slide: .1 - Sun 19 Sept 71 - up Lydiard St Nth waits for gates to be opened after fast goods. .2 - Sun 19 Sept 1971, down Lydiard St Nth near VRI. .3 - Sun 19 Sept 1971, Up Lydiard St Nth .4 - Sun 19 Sept 1971, Up Sebastopol (supplementary service) has just crossed down in Skipton St near Drummond St. .5 - Sun 19 Sept 1971, Up Sebas at Ballarat / Sebastopol boundary. .6 - Sun 19 Sept 1971, c5.30pm down Sebas in Sebas shire.tramways, trams, lydiard st nth, railway station, level crossings, skipton st, albert st, sebastopol, closure, last day, tram 40, tram 42, tram 35, tram 39 -
 Ballarat Tramway Museum
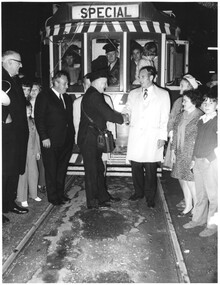
Photograph - Black & White Photograph/s set of 2, Harvey Studios, 19/09/1971 12:00:00 AM
Yields information about the closure of the SEC operated Ballarat tram system and the people involved.Set of two photographs of the last tram leaving the Borough of Sebastopol where the tram keys were handed over to to Cr. J. Chisholm , at the town boundary. Cr. N. Donald, Mr. L. J. Denmead (behind Lew Walker), L. Walker, Cr. Walker, Mrs. Chisholm and Mrs Donald. Photo taken 19/9/1971. For The Courier newspaper photographs of the event see Reg Item 3335.On rear is the Photography stamp - "N.L. Harvey & Son - Photographers - 131 Sturt St, Ballarat" with phone numbertrams, tramways, closure, sebastopol, last tram, city of ballaarat, borough of sebastopol, closure, tram 40 -
 Ballarat Tramway Museum
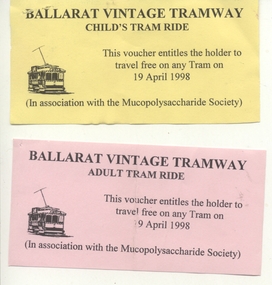
Ephemera - Ticket, Ballarat Tramway Museum (BTM), Mucopolysaccharide Society, Apr. 1998
Yields information about the type of ticket provided to visitors, in this case the Mucopolysaccharide Society and that nature of its use.Set of two preprinted tickets for use on the BTM tramway, 19 April 1998 by the Mucopolysaccharide Society. .1 - printed on yellow paper. .2 - ditto printed on green Mucopolysaccharide diseases (MPS) are rare inherited disorders of the metabolism. They are caused by a problem with the enzymes that break down complex carbohydrates. When carbohydrates build up in body tissues, this causes damage to the heart, bones, lungs, cornea, skin, connective tissue and the central nervous system (brain and spinal cord). http://raisingchildren.net.au/articles/mucopolysaccharide_diseases_d.html - accessed 3/11/2012.trams, tramways, visitors, btm, tickets, special trams -
 Ballarat Tramway Museum
Slide - 35mm slide/s - set of 2, Donor?, 19/09/1971 12:00:00 AM
Yields information about the operation of SEC trams on the final day of the Sebastopol line. Yields information about the operation of SEC trams on the final day of the Sebastopol line.Set of two colour slides, 35mm Kodachrome, of the last day of trams on the Sebastopol line - 19/9/1971. .1 - No. 42, southbound to Sebastopol, south of the Albert St crossover. .2 - No. 35, southbound to Sebastopol, crossing Albert St at Ophir St with another tram in the distance. See donor details for further details of the photograph,tramways, trams, closure, albert st, sebastopol, ophir st, tram 42, tram 35 -
 Ballarat Tramway Museum
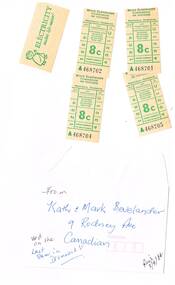
Ephemera - Ticket/s, State Electricity Commission of Victoria (SECV), SEC 8c tickets - last Drummond St trams, c1970
Has a strong association with the closure of the Ballarat SEC operated tram system - tickets used on the last services on 19/9/1971.Set of five green on off white SEC 8c tickets A468701 to A468705 used according to the donor on the last tram in Drummond St 19/9/1971. See also Reg Items 259, 1950, 3464, 6246, 6977 for other "last tickets". trams, tramways, tickets, closure, secv, ballarat, drummond st -
 Ballarat Tramway Museum
Photograph - Digital image Set of 10, Tony Smith, 19/09/1971 12:00:00 AM
Yields information about Ballarat Tramways and trams prior to the closure of the tramway system.Set of 10 digital images of Ballarat trams prior to closure, scanned from original slides by Tony Smith, 1971 prior to closure of the system. This set of slides appears to be the last day of operations - 19/9/1971 .1 - 40 in Drummond St Nth. near Macarthur St, showing Sebastopol. .2 - 35 turning from Drummond St north into Sturt St with the Southern Cross hotel in the background. Note the shoes in the overhead. .3 - 42 in Drummond St North, showing Special, nearing Sturt St. .4 - 42 turning into Sturt St, with the Shell Service station on the left. .5 - 42 reversing on the Lydiard St Nth crossover with the post office in the background. Tram showing Sebastopol. .6 - 39 reversing at Grenville St, tram showing Special. Has the Dickins and the Gasometer in the background. the conductor adjusting the trolley ropes. .7 - 39 running from Bridge St into Sturt St - as above. .8 - 34 and 39? parked in the City Loop. Has Patersons furniture, Gear Chemist and Edments stores in the background. .9 - 43 showing special at the Sturt and Lydiard St stop with 39? about to leave Lydiard St Nth. Has the post office in the background. .10 - 40 at the Lydiard St North terminus, with passengers boarding. Cemetery gates in the background.trams, tramways, drummond st nth, macarthur st, sturt st, closure, lydiard st nth, grenville st, city loop, closure, tram 40, tram 35, tram 42, tram 39, tram 34 -
 Ballarat Tramway Museum
Photograph - Digital image Set of 9, Tony Smith, 19/09/1971 12:00:00 AM
Yields information about Ballarat Tramways and trams prior to the closure of the tramway system.Set of 9 digital images of Ballarat trams prior to closure, scanned from original slides by Tony Smith, 1971 prior to closure of the system. This set of slides appears to be the last day of operations - 19/9/1971 .1 - 40 south bound in Lydiard St Nth, at the Gregory St Loop. .2 - 40 after passing through the loop .3 - 42, north bound in Lydiard St. North at Macarthur St. .4 - 42 southbound at the Railway station level crossing with the Kennedy Murray Pty Ltd General Carriers building at the station yard in the background. .5 - 42 southbound in Lydiard St North after crossing the railway - taken from the signal box (B) with Reids Palace in the background and the Provincial Hotel. .6 - 35 northbound after passing through the level crossing. .7 - bogie tram crossing the tracks with Ballarat Railway Station in the background. .8 - bogie tram entering the double track section in Lydiard St with Reids Palace in the background. Note the new bus stop bay. .9 - 35 and another bogie in Sturt St, with the Town Hall, Golden Star Chinese Cafe and Georges Fish & Chip shop in the background.trams, tramways, lydiard st nth, gregory st, level crossings, ballarat railway station, sturt st, closure, tram 40, tram 42, tram 35 -
 Ballarat Tramway Museum
Photograph - Digital image Set of 10, Tony Smith, 19/09/1971 12:00:00 AM
Yields information about Ballarat Tramways and trams prior to the closure of the tramway system.Set of 10 digital images of Ballarat trams prior to closure, scanned from original slides by Tony Smith, 1971 prior to closure of the system. This set of slides appears to be the last day of operations - 19/9/1971 .1 - Photo taken from Cooks Hotel balcony overlooking three bogie trams parked in the City Loop with Big W and Dickins store in the background. .2 - 42 in Albert St, showing destination of Sebastopol, though could be north bound near Ophir St. .3 - 42 crossing Ophir St to the north. .4 - 42 (Lydiard St Nth), 34 (Sebastopol) crossing at the Bell St loop .5 - 42, 35 and another bogie tram at ditto - note the neat line of photographers and one person (bounding) around. .6 - 34 and 35 leaving the Grey St loop southbound. .7 - 34 and 35 southbound in Albert St passing the Borough of Sebastopol Town Hall .8 - 34 nearing the Sebastopol terminus in Albert St .9 - 35 ditto .10 - 35 ditto after passing the camera looking towards the terminus.trams, tramways, sturt st, sebastopol, albert st, city loop, ophir st, bell st, grey st, borough of sebastopol, closure, tram 42, tram 34, tram 35 -
 Ballarat Tramway Museum
Photograph - Digital image Set of 7, Tony Smith, 19/09/1971 12:00:00 AM
Yields information about Ballarat Tramways and trams prior to the closure of the tramway system.Set of 7 digital images of Ballarat trams prior to closure, scanned from original slides by Tony Smith, 1971 prior to closure of the system. This set of slides appears to be the last day of operations - 19/9/1971 .1 - 34 at the Sebastopol terminus - shows the trolley pole guide in the overhead. .2 - 34 and another bogie tram at Sebastopol with the driver and conductor posing with a family. Also note the bus stop sign on the pole by the front tram. .3 - 35 at the Sebastopol terminus .4 - 39 southbound in Drummond St south at the Bell St loop .5 - 39 passing roadworks in Bell St. .6 - 37 parked in city Loop showing Special .7 - front end of an ex HTT bogie tram in Sturt St, with Gear Chemist and Edments Hartleys store in the background.trams, tramways, sebastopol, trolley wire, albert st, drummond st, bell st, closure, tram 34, tram 35, tram 39 -
 Ballarat Tramway Museum
Photograph - Digital image Set of 7, Tony Smith, 19/09/1971 12:00:00 AM
Yields information about Ballarat Tramways and trams prior to the closure of the tramway system.Set of 7 digital images of Ballarat trams prior to closure, scanned from original slides by Tony Smith, 1971 prior to closure of the system. This set of slides appears to be the last day of operations - 19/9/1971 .1 - Four bogie trams parked in city loop with Woolworth's Big W and Dickins in the background. Not well focused. first tram 37 - see Reg Item 6158.6. .2 - 42 at Sturt and Lydiard St, north side, night photo with crew standing by the tram stop sign. Has the post office in the background. .3 - bogie tram at the south side, night photo, has the Commonwealth Bank in the background. .4 - 39 (at the rear of the four bogie trams parked in the City loop), night photo, looking west. .5 - 42 at Sebastopol terminus with the Royal Mail Hotel in the background - night photo. .6 - bogie tram and 39 parked in the city loop - two have now departed. Has Dickins, Gear Chemist and Edments Hartleys stores in the background. .7 - 34 at Sturt and Lydiard St north side.trams, tramways, closure, night photo, city loop, post office, tram 37, tram 42, tram 39, tram 34 -
 Ballarat Tramway Museum
Photograph - Colour Photograph/s - set of 13, Lloyd Rogers, 30/04/1989 12:00:00 AM
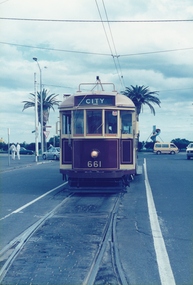
Yields information about the appearance of the operation of BTPS tram No. 661 in Melbourne on a tour.Set of 13 colour prints of BTPS / BTM tram No. 661 in Melbourne on a BTPS tour 30-4-1989. All photos by Lloyd Rogers, on AGFA paper. All have a photo number on rear and captions - see images 14 to 19. .1 - At Sth Melbourne Beach terminus. .2 - MMTB Paying fares dated Dec. 1968 in four languages inside tram. .3 - 661 and 878 at Brunswick Depot .4 - Y612 partly derailed at Brunswick .5 - 661, 8789 and 612 at Brunswick .6 - 661 at Batman Avenue .7 - Batman Avenue .8 - from the window looking forwards - reserved track. .9 - at South Melbourne Beach terminus with Bleak House in the background and an Advert for Swan Premium beer. .10 - ditto with Vopas Centre building in the background and an advert advertising Volvo motor cars - Swedish Lifesavers. .11 - ditto .12 - interior view of tram .13 - At Batman Ave with the shop on the railway side in the view.See images i14 to i19 for rear of photos.trams, tramways, melbourne, batman ave, brunswick depot, south melbourne beach, tram 661, tram 612, tram 878 -
 Ballarat Tramway Museum
Slide - 35mm slide/s - set of 20, Eldon Hogan, 22/05/1971 12:00:00 AM
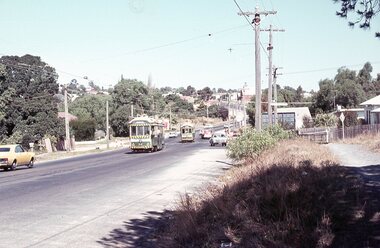
Set of 20 35mm Agfa colour blue and white plastic mount slide - featuring photos taken during an Association of Railway Enthusiasts Tour by Eldon Hogan. Folder had the date "22/5/1971" on it. Scanned on the Canon scanner at the depot 15/12/2005 at the time of the installation of the scanner. .1 - No. 25 in Nolan St with Lake Weeroona in the background. .2 - Three Birneys at the Depot junction, 30 and 29 with Conoles Hotel, McCrae St in the background. .3 - No. 5 in front of the Shamrock Hotel, Pall Mall .4 - No. 29 in front of the Shamrock Hotel with Stonemasons sign in the background. .5 - No. 18 ditto .6 - No. 30 and another Birney at the Quarry Hill terminus .7 - No. 24 southbound High St at the Violet St intersection with a "Mine Open" sign in the foreground and the Cathedral in the background. .8 - No. 19 at the Golden Square terminus, with the Golden Square Hotel in the background. .9 - No. 29 - side on view, North Bendigo line? Thunder St? .10 - No. 30 crossing the railway overbridge, inbound from Eaglehawk with a number of photographers in the foreground. .11 - No. 29? ditto .12 - No. 5 outbound - side on view, Thunder St, North Bendigo line? .13 - No. 29 and 30 at the intersection of High St and Brazier St with Church or School hall in the background. .14 - ditto .15 - ditto .16 - No. 25 and the two Birneys at the Eaglehawk terminus. .17 - No. 29 and two other trams at ditto .18 - No. 30 and 19 adjacent to the Lake View Hotel, McCrae St .19 - No. 5 and 25 crossing on the Eaglehawk Line, Ironbark? .20 - No. 29 at Quarry Hilltramways, trams, bendigo, lake weeroona, pall mall, golden square, eaglehawk, quarry hill, tram 25, tram 30, tram 29, tram 5, tram 18, tram 19, tram 24, tram 25 -
 Ballarat Tramway Museum
Slide - 35mm slide/s - set of 11, Eldon Hogan, mid 1960's to early 1970's
Set of 11 Agfa Plastic mounted slides - from the Eldon Hogan collection - possibly on an ARE Bendigo tours - mid 1960's (black destination rolls) and late 1960's or early 1970's. Scanned on the Canon scanner at the depot 15/12/1971 at the time of the installation of the scanner. .1 - front of depot -26, 19, 24, 29 and 28 amongst those present. .2 - ditto .3 - 24 departing depot .4 - 26 at Eaglehawk .5 - No. 5 turning from Pall Mall into Mitchell St with town hall in background. .6 - No. 5 using crossover in Mitchell St - with Maples, CBA Bank, Astor, Homecrafts, Roger David shops or signs in the background. .7 - ditto .8 - bogie car at Charing Cross with the Fountain Plaza shopping centre in the background. .9 - Charing Cross, with the fountain in the foreground, The Beehive and three trams in the view. .10 - No. 24 outbound, Golden Square line crossing the bridge over the creek, adjacent to the discovery of Gold Monument. .11 - ditto. tramways, trams, bendigo, eaglehawk, depot, charing cross, golden square, tram 26, tram 19, tram 24, tram 29, tram 28, tram 26, tram 5 -
 Ballarat Tramway Museum
Slide - 35mm slide/s - set of 11, Eldon Hogan, mid 1960's to early 1970's
... 19 Set of 11 Agfa Plastic mounted slides - from the Eldon ...Set of 11 Agfa Plastic mounted slides - from the Eldon Hogan collection - featuring an ARE tour with Nos. 21, 29 and 25 to Bendigo, mid 1960's. Scanned on the Canon scanner at the depot 15/12/1971 at the time of the installation of the scanner. .1 - four trams at Charing Cross - includes 19 and 25. .2 - 21 and 25 at the depot junction. .3 - 21 and 29 Quarry Hill route? .4 - 29 ditto .5 - 24 at Golden Square terminus - photo taken from the city side - note all the little shops and buildings on the left hand side of the photograph. .6 - 29, 21 and 25 at Eaglehawk .7 - 29 - side on view - Eaglehawk line? .8 - ditto with 21 .9 - 29 - North Bendigo line? - side on view .10 - 29 and 21 - vacant paddocks - Eaglehawk line .11 - 29 crossing the railway overbridge, Eaglehawk line, in bound. Trams have SEC roof advertisements. tramways, trams, bendigo, eaglehawk, charing cross, golden square, tram 21, tram 29, tram 25, tram 19