Showing 553 items matching " mirrors"
-
 Eltham District Historical Society Inc
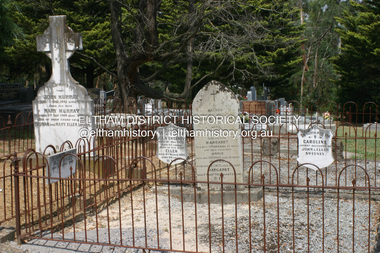
Photograph - Digital Photograph, Alan King, Graves of Thomas Sweeney and family, Eltham Cemetery, Victoria, 27 January 2008
The grave of Thomas Sweeney, former convict turned respectable citizen. The Murray and Sweeney families were both early settlers of the Eltham district and connected by marriage. Their family plots are located side by side in the Catholic section of the Eltham Cemetery. Irish-born Thomas Sweeney is regarded as the first settler in Eltham. He was transported to Sydney in 1823 after being convicted of arson. He was granted his freedom in 1838 and married Margaret Meehan in the same year. They moved to Melbourne and in 1842 Thomas purchased 110 acres beside the Yarra River in the vicinity of present-day Sweeneys Lane. He called the property ‘Culla Hill’ and built a small slab hut (reputedly with Wurundjeri help; Margaret is said to have run an informal hospital for them in return). This was followed in 1846 by more substantial buildings consisting of a three-roomed Irish-style ‘longhouse’ and a barn made of stone and handmade bricks, with doors large enough to accommodate a fully loaded wagon. When the gold rush came, Thomas prospered by selling meat and potatoes to the prospectors, enabling him to purchase a further 308 acres in 1856. He promoted the construction of a bridge over the Plenty River and the establishment of a school at Eltham. Roman Catholic Church services were held at Culla Hill in the early years. When he died in 1867, he was regarded as a respected member of the community. Thomas and Margaret are buried in Eltham Cemetery with many of their descendants. Their first son John continued to farm Culla Hill until his death in 1909. Culla Hill passed out of the Sweeneys' possession in 1939. The house and barn remain today, though lesser outbuildings have gone. The facade of the house is much the same as it was in the 1840s. Sacred To the memory of Thomas Sweeney Who died Sep 6th 1867 Aged 65 years May his soul res in peace Also his wife Margaret Died Oct 3rd 1884 aged 73 years And their daughters Annie Died Aug 22nd 1860 aged 21 years Johanna Died Aug 19th 1872 aged 22 years Margaret Died 7th Sep 1913 aged 72 years R.I.P. Also In Memory Of John Sweeney Died 24th May 1909 Aged 65 years Also of his wife Ellen Died 8th March 1910 Aged 64 years R.I.P Also In Memory Of Caroline Infant daughter of John & Ellen Sweeney Published: Nillumbik Now and Then / Marguerite Marshall 2008; photographs Alan King with Marguerite Marshall.; p55 From the piety and poverty of 19th century Eltham, 20th century artists and environmentalists, to today’s comfortable middle class, Eltham Cemetery records it all — and more. A visit to Eltham Cemetery reveals an important social record since its beginnings in 1858. The cemetery was situated on about six acres (2.4ha) (now around 4.8ha) at the corner of Mount Pleasant and Metery Roads.1* It is thought that Metery Road was originally called Cemetery Road, but in the early 1940s, a resident, possibly a councillor, objected to the name resulting in the change.2 Much can be gleaned about the developing Eltham community from burial styles and the names of former local residents. Originally the cemetery was divided into Christian denominations, like others of that time, following the United Kingdom burial system. In 1861 the cemetery included Church of England, Presbyterian, Roman Catholic and Wesleyans (later Methodist) sites. Graves also indicated social class. Some had grand tombstones, perhaps fenced with ornamental cast iron railing, but most in the 1860s and 1870s were constructed of modest stone slabs.3 This indicated the poverty of the district, which was largely inhabited by farmers on small landholdings. A poignant reminder of the high rates of infant mortality of those times, are the many infants and young children recorded on the headstones. Major changes occurred in the cemetery in the late 20th century as Christian adherence weakened and society became more egalitarian and informal. In the early 1970s a non-denominational lawn section for burials was established. Since then all new areas have been non-denominational to accommodate the more diverse local community. Now, instead of large ornamental headstones, some mourners have chosen boulders, reflecting the natural Eltham style, while others choose graves in the lawn areas or niches in walls. In the late 1970s, the University Donor Section was established north-west of Candlebark Lawn for those who donated their bodies for The University of Melbourne medical research. In the early 1980s the natural Australian garden style, popular in Eltham, was mirrored in a new section called Ashes Walk. Local landscape architect Gordon Ford, who had popularised this style, designed the Walk using boulders shaded by native plants beside curved pathways. Landscape architect Robert Boyle later redesigned Ashes Walk and developed other parts of the cemetery in keeping with this style.4 Appropriately Ford, who died in 1999, was interred in the Native Garden Section in a cluster of sites shaded by a large eucalyptus tree.5 By 2007, about 6400 interments were recorded in the Eltham Cemetery. Close inspection reveals notable names in the district’s history. The grave of Thomas Sweeney, a former convict who became a respected citizen, can be found in the Roman Catholic section near the path. Eltham Primary School’s first headmaster, David Clark, is buried in a modest grave in the Church of England section to the east of the path from the main entrance. Sir William Irvine, Victorian Premier from 1900 to 1902, whose grave is in the north-east Presbyterian section was at various times Victoria’s Chief Justice, Deputy Governor and Treasurer.6 Further south is the grave of social reformer Bertram Wainer, born in Scotland in 1928 and died in 1987. He campaigned to legalise abortion and exposed police corruption in allowing illegal ‘backyard’ abortions. Other prominent local residents interred in the cemetery include: Justus Jörgensen, who founded Montsalvat; Alistair Knox, the mud-brick housing pioneer and Eltham Shire Councillor from 1971 to 1975 and President in 1975; Clem and Nina Christensen, who had a major influence on the literary development of post World War Two Australia. Others were: composer Dorian Le Gallienne; artist Peter Glass; Stephen Dattner, a prominent Melbourne furrier; ALP parliamentarian for Greensborough, Pauline Toner and political scientist and commentator, Professor William Macmahon Ball.This collection of almost 130 photos about places and people within the Shire of Nillumbik, an urban and rural municipality in Melbourne's north, contributes to an understanding of the history of the Shire. Published in 2008 immediately prior to the Black Saturday bushfires of February 7, 2009, it documents sites that were impacted, and in some cases destroyed by the fires. It includes photographs taken especially for the publication, creating a unique time capsule representing the Shire in the early 21st century. It remains the most recent comprehenesive publication devoted to the Shire's history connecting local residents to the past. nillumbik now and then (marshall-king) collection, annie sweeney, caroline sweeney, ellen sweeney, eltham cemetery, graves, gravestones, johanna sweeney, john murray, john sweeney, margaret sweeney, mary ellen drain, mary murray, thomas murray, thomas sweeney -
 Flagstaff Hill Maritime Museum and Village
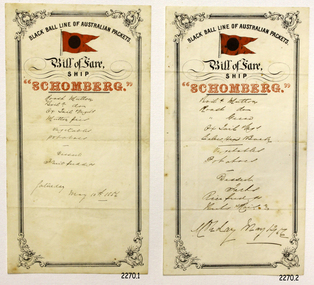
Document - Menu, Bill of Fare ship Schomberg, circa 1855 - May 12 1856
A “Bill of Fare” is a menu or list of food offered for a meal. This Bill of Fare from the sailing ship Schomberg is handwritten in pen in hard-to-read script on the printed pages specifically for the Schomberg ship, of the Black Ball Line of Australian Packets. (‘Packets’ were vessels that had a regular trade run of cargo, passengers and mail; the sailing ship Schomberg was designed for long voyages between England and Australia.) These menus posed a puzzle as they have the handwritten dates of, May 10 and 12, 1856, by which time the Schomberg had sunk (she sunk on December 26, 1855). The donor of these pages of Bill of Fare is a stamp collector from Melbourne. He came across the menus in a package that he bought in 1980 at a stamp auction in Tasmania. He decided to give the menus to Flagstaff Hill this year during his annual family holiday in Warrnambool. A 1981 newspaper article about this donation included an interview with Flagstaff Hill’s curator Mr Peter Ronald, who said that the stationery of these menus is genuine. He went on to say that there would have been much stationery printed for use on the Schomberg although she sank on her maiden voyage. These menus could have been written at a dated late because the surplus Schomberg stationery could have been used for menus on other ships. We will probably never be sure of the answer but none-the-less the pages are still connected to the Schomberg. Below is what we believe the menu consists of although some of the writing is indecipherable - - - - - - - - - - - - - - - - - - - - - - - - - - - - - - - - - - - - - (first menu) Roast Mutton Boiled Mutton? Ox Tail Mulligatawny? Or possibly Ox Tail Vegetables? Mutton Pies? ------------------------------- Vegetables Potatoes ---------------------------------- Dessert Fruit Puddings? Saturday May 10, 1856 - - - - - - - - - - - - - - - - - - - - - - - - - - - - - - - - - - - - AND - - - - - - - - - - - - - - - - - - - - - - - - - - - - - - - - - - - - (second menu) Boiled Mutton Roast Mutton? Roast Geese? Ox Tail?? Calves Head Broth? ------------------------------- Vegetables Potatoes ------------------------------- Dessert Tarts? Rice Pudding? ?...Maids?? Monday May 12, 1856 - - - - - - - - - - - - - - - - - - - - - - - - - - - - - - - - - - - - Background of “SCHOMBERG” When SCHOMBERG was launched in July, 1855, she was considered the “Noblest ship that ever floated on water.” SCHOMBERG’s owners, the Black Ball Line (one of three companies by that name), commissioned the ship for their fleet of passenger liners. She was built by Alexander Hall of Aberdeen, UK at a cost of £43,103. She was constructed with 3 skins: one planked fore and aft, and two diagonally planked, fastened together with screw threaded trunnels (wooden rails). Her first class accommodation was luxurious: velvet pile carpets; large mirrors; rosewood; birds-eye maple; mahogany; soft furnishings of gold satin damask; an oak-lined library; and a piano. Overall she had accommodation for 1000 passengers. SCHOMBERG’s 34 year old master, Captain James ‘Bully’ Forbes, had promised Melbourne in 60 days at the launch, "with or without the help of God." James Nicol Forbes was born in Aberdeen in 1821 and rose to fame with his record-breaking voyages on the famous Black Ball Line ships MARCO POLO and LIGHTNING. In 1852 in the MARCO POLO he made the record passage from London to Melbourne in 68 days. There were 53 deaths on the voyage but the great news was of the record passage by the master. In 1954 Captain Forbes took the clipper LIGHTNING to Melbourne in 76 days and back in 63 days, this was never beaten by a sailing ship. He often drove his crew and ship to breaking point to beat his own records. He cared little for the comfort of the passengers. On this, the SCHOMBERG’s maiden voyage, he was going to break records. SCHOMBERG departed Liverpool on her maiden voyage on 6 October 1855 flying the sign “Sixty Days to Melbourne”. She departed with 430 passengers and 3000 tons cargo including iron rails and equipment intended to build the Melbourne to Geelong Railway as well as a bridge over the Yarra from Melbourne to Hawthorn. She also carried a cow for fresh milk, pens for fowls and pigs, and 90,000 gallons of water for washing and drinking. SCHOMBERG also carried 17,000 letters and 31,800 newspapers. The ship and cargo was insured for $300,000, a fortune for the time. The winds were poor as she sailed across the equator, slowing SCHOMBERG’s journey considerably. Land was first sighted on Christmas Day, at Cape Bridgewater near Portland, and Captain Forbes followed the coastline towards Melbourne. Forbes was said to be playing cards when called by the Third Mate Henry Keen, who reported land about 3 miles off. Due in large part to Forbes regarding a card game as more important than his ship, SCHOMBERG eventually ran aground on a sand spit near Curdie's Inlet (about 56 km west of Cape Otway) on 26 December 1855, 78 days after leaving Liverpool. The sand spit and the currents were not marked on Forbes’s map. Overnight, the crew launched a lifeboat to find a safe place to land the ship’s passengers. The scouting party returned to SCHOMBERG and advised Forbes that it was best to wait until morning because the rough seas could easily overturn the small lifeboats. The ship’s Chief Officer spotted the steamer SS QUEEN at dawn and signalled it. The master of the SS QUEEN approached the stranded vessel and all of SCHOMBERG’s passengers and crew were able to disembark safely. The SCHOMBERG was lost and with her, Forbes’ reputation. The Black Ball Line’s Melbourne agent sent a steamer to retrieve the passengers’ baggage from the SCHOMBERG. Other steamers helped unload her cargo until the weather changed and prevented the salvage teams from accessing the ship. Later one plunderer found a case of Wellington boots, but alas, all were for the left foot! Local merchants Manifold & Bostock bought the wreck and cargo, but did not attempt to salvage the cargo still on board the ship. They eventually sold it on to a Melbourne businessman and two seafarers. In 1864 salvage efforts were abandoned after two men drowned when they tried to reach SCHOMBERG. Parts of the SCHOMBERG were washed ashore on the south island of New Zealand in 1870, nearly 15 years after the wreck. The wreck of the SCHOMBERG lies in almost 9 metres of water. Although the woodwork is mostly disintegrated, the shape of the ship can still be seen due to the remaining railway irons, girders and the ship’s frame. A variety of goods and materials can be seen surrounding the wreck, by divers. Flagstaff Hill holds many items salvaged from the SCHOMBERG including a ciborium (in which a diamond ring was concealed in concretion), communion set, ship fittings and equipment, personal effects, a lithograph, tickets and photograph from the SCHOMBERG. These Bills of Fare are significant due to their connection to Flagstaff Hill’s collection of artefacts from the Schomberg, which is significant for its association with the Victorian Heritage Registered shipwreck S612. The collection is primarily significant because of the relationship between the objects, as together they have a high potential to interpret the story of the Schomberg. The Schomberg collection is archaeologically significant as the remains of an international passenger ship. The shipwreck collection is historically significant for representing aspects of Victoria’s shipping history and its potential to interpret sub-theme 1.5 of Victoria’s Framework of Historical Themes (living with natural processes). The collection is also historically significant for its association with the shipwreck and the ship, which was designed to be fastest and most luxurious of its day. The Schomberg collection meets the following criteria for assessment: Criterion A: Importance to the course, or pattern, of Victoria’s cultural history. Criterion B: Possession of uncommon, rare or endangered aspects of Victoria’s cultural history. Criterion C: Potential to yield information that will contribute to an understanding of Victoria’s cultural history. Menu, or Bill of Fare, on cream coloured stationery from the sailing vessel “Schomberg”. Two rectangular pieces of paper, each bears the printed words “Black Ball Line of Australian Packets, Bill of Fare, Ship, Schomberg”, a printed symbol of the Black Ball line (a black ball on a red flag) and a decorative border. Both pages are handwritten, in similar but different sized writing, with a Bill of Fare and a date, Page (1) dated May 10th 1856 and (2) dated May 12th ’56, (Both dates are AFTER the Schomberg sank in December 26th 1855.) Both pages have three fold lines spaced across their width. To be used for the return voyage.Printed on the pages ““BLACK BALL LINE OF AUSTRALIAN PACKETS.” “Bill of Fare, / SHIP / “SCHOMBERG”.” Handwritten list of food, and on one page “Saturday May 10 1856” and on the other page “Monday May 12” warrnambool, peterborough, shipwrecked coast, shipwreck coast, flagstaff hill maritime museum, flagstaff hill maritime village, maritime museum, great ocean road, flagstaff hill, sailing ship schomberg, shipwreck schomberg, black ball line of australian packets, bill of fare schomberg, menu schomberg 1856, food mid-1800’s, food on ships mid-1800’s, menu, may 10, 1856, may 12, 1856 -
 Bendigo Historical Society Inc.
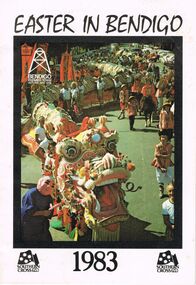
Document - EASTER IN BENDIGO, OFFICIAL PROGRAM, 28 March 1983
Easter in Bendigo, Official Program1983. Premier Town Victoria 1982-85. Easter In Bendigo '83 Welcome to the 1983 Easter Fair. This is a special time for Bendigo. . . The Fair has a long history bating back to 1871. . . Bendigo Base Hospital, Home and Hospital for the Aged or Benevolent Asylum. . . Back in the 1800s. Gone are the days of the ladies' Fancy Bazaar, Fat Baby Contest, Greasy Pig Chase. . . Many old traditions remain. . . Bendigo's links with the Chinese community go back to the dates when the first settlers arrived seeking gold. The Chinese took a very active part in the fist Fair. . . Monday Procession has always been the most famous as many old photographs show. Some of these photos date back before the turn of the century. In those days many people made the journey to Bendigo by train from Melbourne or by horse and buggy from outlying districts.. . ''Sun Loong'', or ''New Dragon''. . . Horse and Harness Parade a great success each tear attracted an immense variety of horses and horse drawn vehicles. . . Torchlight Procession on Sunday Sports Carnival Fireworks. . . Easter Monday requires precise planning and discipline if it is to run smoothly. A volunteer committee meets through the year to see that this happens. The Popular Girl Contest was introduced in 1930, the four main Streets of Bendigo, Pall Mall, Mitchell Street, Hargreaves Street and Williamson Street (formerly View Street), sponsored a popular girl by means of fund raising events. Winner was announced from the Shamrock Hotel balcony Easter Saturday night by the Mayor of Bendigo. The contest is still being held. . . The Shamrock Hotel now fully restored and reopened. . . Sunday night special ceremony, in time for the winning Popular Girl to take pride of place in the Procession. . . The accent is on the cycling. The Easter sports Carnival dates back to the beginning of the Fair in 1871, seven years before the start of the famous Stawell Gift. Sid. Paterson, Hubert Opperman. . . Golden Mile Wheelrace, the final on Monday night. AFT Amateur Madison, woodchopping, boomerang throwing and gala fireworks Sunday and Monday. This year for the first time the Golden Mile goes Pro/Am, an Open event for the first time. This could see the first clash between Danny Clark and Kenrick Tucker. Hopefully Michael Grenda, Tony Hughes, Michael Turtur will also be starters against leading professionals, Terry Hammond, Murray Hall and Ross Forster. The Golden Mile has been conducted every year since 1956 when it was won by John McDonough. Ron Grenda (Tas) won in 1959, Barry Waddell was the first scratchman to win in 1962 and Frank McCaig (Bendigo) has won the event three times in 1963/5/7. The event carries total prize money of $3000 making it (with Wangaratta Wheelrace) the richest Wheelrace in Provincial Victoria. . . Newly completed Hargreaves Mall being a focus for all this activity. . . Rotary Art Show and Easter Fair Society amalgamated their art shows resulting in a combined exhibition of outstanding quality, since then the Rotary Club has added the Antique Fair. The Handcraft Bazaars, a more sophisticated version of the bazaars of old, offers. . . The Bathtub Derby at Lake Weeroona, Music Festival at Queen Elizabeth Oval. . . Easter Fair of 1871 was almost washed out. . . Necessary top abandon the ''Golden Mile'' Wheelrace on two occasions 1960 & 1979. . . 1983 Official Programme, Good Friday April 1, Saturday April 2, Sunday April 3, Monday April 4, Tuesday April 5. . . Holy Week Ecumenical Services: . . The Chinese And The Bendigo Easter Fair, 3 pages on the history of the chinese involvment in the Bendigo Easter Fair. . . A Little Of Dragons: brief history on chinese and dragons. Sun Loong, Yar Loong. The Birth Of A Dragon: In China a story of the birth of a Dragon. . . Such Trial was set a group of Bendigo Businessmen led by Mr A Guy and comprising MR C Michelsen, Mr L Chon, Mr J Granter, Mr J Henderson, Mr B Andres. In 1969 they formed the ''Loong 100 Committee''. The purpose of the committee was to purchase a dragon to replace the ageing Loong, from donations raised. But who could build a worthy successor to the Great Loong? In Hong Kong a 47 year old dragon builder whose traditions and craft came from the famous dragon building city of Fat Shan on the Pearl River, near Canton where Loong was born. Mr Law On created the famous Sun Loong in his tiny 4x4 metre workshop in Hong Kong. . . 1970 Sun Loong was blessed and brought to life by 101 year old Mr James Lew, dotting his eyes with chicken blood. . . To Awaken A Dragon Dragons tend to sleep a lot and are quiet deaf. . . The Dragon is blessed and fed with pomolo leaves then the process of wakening begins with drums. . . 5000 crackers. The Easter Monday Chinese Procession have a long and varied history in China. The Bendigo Procession is no exception to this. In recent years much research has gone into . . The Procession may be divided into six sections. . . Dragon built in 1969 First Displayed in 1970, length-300ft plus, Extra 100ft added in 1980, number carrying: Head 1 plus 5 releifs, Neck 3, Body 52 plus 52 reliefs, head weight 63 lbs. tail weight 36 lbs.. Scales 4,500 approx. Mirrors 90,000 fins 50, beads 30,000 approx. . . Conclusion. . . Advertisements: Bendigo Pottery, Square Deal Cars, Bob Bell of Borough Bricklaying Pty Ltd, Pinups Wine Bar, Cumberland Hotel, Manchester Arms Hotel, British & American Hotel, Langley Hall BYO Restaurant, White Horse Hotel, Ascot Lodge Caravan Park, The Lemonade Factory, The Pepper Pot, M & M J Meade Mobil, Lakeview Motor Inn Restaurant, Truffles Restaurant, Marong Hotel, 4 Penny Dark BYO Restaurant, Chaplin's Coffee Shoppe, Copper Pot Restaurant, Skins of Australia, Central Deborah Gold Mine, Chris Wall Auto Sales, Brian Boru Hotel, The Green Carnation, Sandhurst Town, Dragon Court BYO Chinese Restaurant, Australian Fixed Trust Investors Services Ltd., The Mohair Farm, Bendigo Model Railroaders, Mexican Kitchen Restaurant, BP Super Shops, Coke, Southern Cross TV8.event, easter fair, bendigo easter fair society, easter in bendigo, official program1983. premier town victoria 1982-85. easter bendigo '83 welcome to the 1983 easter fair. this is a special time for bendigo. . . the fair has a long history bating back to 1871. . . bendigo base hospital, home and hospital for the aged or benevolent asylum. . . back in the 1800s ladies' fancy bazaar, fat baby contest, greasy pig chase. . . many old traditions. . . bendigo's links with chinese the first settlers arrived seeking gold. the chinese took a very active part in the fist fair. . . monday procession the most famous as many photographs show, the turn of the century. many people journey to bendigo from melbourne & from outlying districts.. . ''sun loong'', or ''new dragon''. . . horse and harness parade an immense variety of horses, horse drawn vehicles. . . torchlight procession on sunday sports carnival fireworks. . . easter monday precise planning and discipline to run smoothly. a volunteer committee meets through the year. the popular girl contest introduced in 1930, sponsored a popular girl by means of fund raising events. winner announced from shamrock hotel balcony easter saturday night by the mayor. . . the shamrock hotel now reopened. . . sunday night special ceremony, in time for the winning popular girl to take pride in the procession. . . accent is on the cycling. the easter sports carnival dates back to fair in 1871, seven years before stawell gift. sid. paterson, hubert opperman. . . golden mile wheelrace, final on monday night. aft amateur madison, woodchopping, boomerang throwing, gala fireworks sunday& monday. for the first time golden mile goes pro/am. danny clark and kenrick tucker. michael grenda, tony hughes, michael turtur will also be starters against leading professionals, terry hammond, murray hall and ross forster. the golden mile has been conducted every year since 1956, won john mcdonough. ron grenda (tas) won 1959, barry waddell the first scratchman to win 1962, frank mccaig (bendigo) has won 1963/5/7. prize money of $3000 making it (with wangaratta wheelrace) the richest wheelrace in provincial victoria. . . newly completed hargreaves mall. . . rotary art show and easter fair society amalgamated art shows, antique fair. handcraft bazaars, . . the bathtub derby lake weeroona, music festival queen elizabeth oval. . . easter fair of 1871 was almost washed out. . . necessary top abandon the ''golden mile'' wheelrace on two occasions 1960 & 1979. . . 1983 official programme, good friday april 1, saturday april 2, sunday april 3, monday april 4, tuesday april 5. . . holy week ecumenical services: . . chinese and the bendigo easter fair, . dragons: brief history. sun loong, yar loong. in china a story of the birth of a dragon. . . bendigo businessmen mr a guy, mr c michelsen, mr l chon, mr j granter, mr j henderson, mr b andres. 1969 formed ''loong 100 committee'' purchase a dragon to replace ageing loong, donations raised. build successor great loong? hong kong dragon builder traditions craft came from dragon building city fat shan on the pearl river, canton where loong was born. mr law on created the famous sun loong in his tiny 4x4 metre workshop in hong kong. . . 1970 sun loong was blessed and brought to life by 101 year old mr james lew, dotting his eyes with chicken blood. . . to awaken a dragon dragons tend to sleep a lot and are quiet deaf. . .dragon is blessed fed with pomolo leaves wakening begins with drums. . . 5000 crackers. the easter monday chinese procession have a long and varied history in china. the bendigo procession is no exception to this. in recent years much research has gone into… procession may be divided into six sections. dragon 1969 first displayed in 1970, length-300ft plus, extra 100ft added in 1980, number carrying: head 1 plus 5 releifs, neck 3, body 52 plus 52 reliefs, head weight 63 lbs. tail 36 lbs.. scales 4, 500 approx. mirrors 90, 000 fins 50, beads 30, 000 approx. advertisements: bendigo pottery, square deal cars, bob bell of borough bricklaying pty ltd, pinups wine bar, cumberland hotel, manchester arms hotel, british & american hotel, langley hall byo restaurant, white horse hotel, ascot lodge caravan park, the lemonade factory, the pepper pot, m & m j meade mobil, lakeview motor inn restaurant, truffles restaurant, marong hotel, 4 penny dark byo restaurant, chaplin's coffee shoppe, copper pot restaurant, skins of australia, central deborah gold mine, chris wall auto sales, brian boru hotel, the green carnation, sandhurst town, dragon court byo chinese restaurant, australian fixed trust investors services ltd., mohair farm, bendigo model railroaders, mexican kitchen restaurant, bp super shops, coke, southern cross tv8. -
 Flagstaff Hill Maritime Museum and Village
Domestic object - Bowl, Late 19th or early 20th Century
The Process of Making Pottery Decorating, Firing, Glazing, Making, Technical There is a rhythm and flow to clay. It can’t be done all at once! Even the making process! It can take weeks to get everything done, especially if you can only work on your pottery once a week! Even though we have three hour classes, it’s often just not enough time! Here is an overview of some of the processes so you have a bit more grasp on some of the technical stuff! Step One – Design There are SO many ideas out there for making stuff in clay! From delicate porcelain jewellery, through to heavy sculptural work and everything in between. Deciding your direction is sometimes not that easy – when you first start, try everything, you will naturally gravitate to the style that you enjoy! The options and variations are endless and can get a wee bit overwhelming too! Check in with me before you start to ensure your ideas will work, what order you might do things, how you could achieve the look you are seeking and any other technical data required! Step Two – Making Clay is thixotropic. This means that as you work with it, the clay first gets sloppier and wetter, before is begins to dry in the atmosphere. For most things, you simply can’t do all parts of the project at once. An example of work order might look like: Get last weeks work out from the shelves Prepare clay for today’s work – roll your clay, prepare balls for throwing, make the first stage of a pinch pot) Clean up last week’s work and put it on the shelf for bisque firing Check that you have any glazing to do – and do enough of it that you will have time to finish your main project Do the next step of your next project – there might be a further step that can’t be complete immediately, in that case, wrap your work well and put onto the shelves. Letting your work rest for a while can really help keep your work clean and professional looking. Many things require bagging under plastic to keep it ready for work the next week – put your name on the outside of the bag so you can find your work easily. We have stickers and markers. Consider how you want to decorate your work – coloured slip can be applied at a fairly wet stage (remembering that it will make your work even wetter!). Trying to apply slip to dry clay won’t work! If you want to do sgraffito – you will need to keep the work leather hard (a state of dryness where you can still work the clay with a little effort and a little water and care). Step Three – Drying Most of the time your work can go into the rack uncovered to let it dry out for the following week. If you want to continue forming or shaping you will need to double bag your work – put your work on a suitable sized bat and put the bat in a bag so the base of the bag is under the bat, then put another bag over the top of the work and tuck the top of the bag under the bat. If you want to trim (or turn) your thrown work the following week, it should also be double bagged. If your work is large, delicate, or of uneven thicknesses, you should lightly cover your work for drying. When considering the drying process, bare in mind the weather, humidity and wind! The hotter and dryer, the faster things dry and work can dry unevenly in the shelves – this can lead to cracking – another time to lightly cover your work for drying. Step Four – Trimming and Cleaning Up Your work is dry! It is called greenware now and it is at it’s most fragile! Handle everything with two hands. I often refer to soft hands – keep everything gentle and with your fingers spread as much as possible. Try to not pick up things like plates too much, and always with both hands! Before your work can be bisque fired it should be “cleaned up”. You work won’t go into the kiln if it has sharp edges – when glazed, sharp edges turn into razor blades! Use a piece of fly wire to rub the work all over – this will scratch a little so be light handed. Use a knife or metal kidney to scrape any areas that require a bit more dynamic treatment than the fly wire offers! Finally, a very light wipe over with a slightly damp sponge can help soften and soothe all of your edges and dags! Trimming thrown work: If you are planning to trim (or turn) your thrown work (and you should be), make sure you bag it well – your work should be leather hard to almost dry for easiest trimming. Use this step to finish the work completely – use a metal kidney to polish the surface, or a slightly damp sponge to give a freshly thrown look. Wipe the sponge around the rim after trimming, and check the inside of the pot for dags! Trimming slip cast work: Usually I will trim the rims of your work on the wheel the following day to make that stage easier, however you will still need to check your work for lumps and bumps. Last but not least – check that your name is still clearly on the bottom of your work. Step Five – Bisque Firing When the work is completely dry it can go into the bisque kiln. The bisque kiln is fired to 1000°C. This process burns off the water in the clay as well as some of the chemically bound water. The structure of the clay is not altered that much at this temperature. Inside the bisque kiln, the work is stacked a little, small bowl inside a larger bowl and onto a heavy plate. Smaller items like decorations or drink coasters might get stacked several high. Consideration is paid to the weight of the stack and shape of the work. A bisque kiln can fire about one and a half times the amount of work that the glaze kiln can fire. The firing takes about 10 hours to complete the cycle and about two days to cool down. Once it has been emptied the work is placed in the glaze room ready for you to decorate! Step Six – Glazing Decorating your work with colour can be a lot of fun – and time consuming! There are three main options for surface treatment at this stage: Oxide Washes Underglazes Glazes Washes and underglazes do not “glaze” the work – It will still need a layer of glaze to fully seal the clay (washes don’t need glaze on surfaces not designed for food or liquid as they can gloss up a little on their own). Underglazes are stable colourants that turn out pretty much how they look in the jar. They can be mixed with each other to form other colours and can be used like water colours to paint onto your work. Mostly they should have a clear glaze on top to seal them. Oxides are a different species – the pink oxide (cobalt) wash turns out bright blue for instance. They don’t always need a glaze on top, and some glazes can change the colour of the wash! The glazes need no other “glaze” on top! Be careful of unknown glaze interactions – you can put any combination of glaze in a bowl or on a plate, but only a single glaze on the outside of any vertical surface! Glazes are a chemical reaction under heat. We don’t know the exact chemicals in the Mayco glazes we use. I can guess by the way they interact with each other, however, on the whole, you need to test every idea you have, and not run the test on a vertical surface! Simply put, glaze is a layer of glass like substance that bonds with the clay underneath. Clay is made of silica, alumina and water. Glaze is made of mostly silica. Silica has a melting point of 1700°C and we fire to 1240°C. The silica requires a “flux” to help it melt at the lower temperature. Fluxes can be all sorts of chemicals – a common one is calcium – calcium has a melting point of 2500°C, however, together they both melt at a much lower temperature! Colourants are metal oxides like cobalt (blue), chrome (green through black), copper (green, blue, even red!), manganese (black, purple and pink) iron (red brown), etc. Different chemicals in the glaze can have dramatic effects. for example, barium carbonate (which we don’t use) turns manganese bright pink! Other elements can turn manganese dioxide brown, blue, purple and reddish brown. Manganese dioxide is a flux in and of itself as well. So, glazes that get their black and purple colours, often interact with other glazes and RUN! Our mirror black is a good example – it mixes really well with many glazes because it fluxes them – causes them to melt faster. It will also bring out many beautiful colours in the glazes because it’s black colouring most definitely comes from manganese dioxide! Glaze chemistry is a whole subject on it’s own! We use commercial Mayco glazes on purpose – for their huge range of colour possibilities, stability, cool interactions, artistic freedom with the ability to easily brush the glazes on and ease of use. We currently have almost 50 glazes on hand! A major project is to test the interactions of all glazes with each other. That is 2,500 test tiles!!!! I’m going to make the wall behind the wheels the feature wall of pretty colours! Step Seven – Glaze (Gloss or sometimes called “Glost”) Firing Most of the time this is the final stage of making your creation (but not always!) The glaze kiln goes to 1240°C. This is called cone 6, or midrange. It is the low end of stoneware temperatures. Stoneware clays and glazes are typically fired at cone 8 – 10, that is 1260 – 1290°C. The energy requirement to go from 1240°C to 1280°C is almost a 30% more! Our clay is formulated to vitrify (mature, turn “glass-like”) at 1240°, as are our glazes. A glaze kiln take around 12 hours to reach temperature and two to three days to cool down. Sometimes a third firing process is required – this is for decoration that is added to work after the glaze firing. For example – adding precious metals and lustres. this firing temperature is usually around 600 – 800°C depending upon the techniques being used. There are many students interested in gold and silver trims – we will be doing this third type of firing soon! After firing your work will be in the student finished work shelves. Remember to pay for it before you head out the door! There is a small extra charge for using porcelain clay (it’s more than twice the price of regular clay), and for any third firing process! Once your work has been fired it can not turn back into clay for millennia – so don’t fire it if you don’t like it! Put it in the bucket for recycling. https://firebirdstudios.com.au/the-process-of-making-pottery/ The bowl is an example of kitchenware used in the 19th century and still in use today.Bowl white ceramic. Crack on side. Badly stained.Backstamp very faint and unable to be read.flagstaff hill, warrnambool, shipwrecked-coast, flagstaff-hill, flagstaff-hill-maritime-museum, maritime-museum, shipwreck-coast, flagstaff-hill-maritime-village, mixing bowl, food preparation, kitchen equipment, ceramic -
 Flagstaff Hill Maritime Museum and Village
Domestic object - Bowl
The Process of Making Pottery Decorating, Firing, Glazing, Making, Technical There is a rhythm and flow to clay. It can’t be done all at once! Even the making process! It can take weeks to get everything done, especially if you can only work on your pottery once a week! Even though we have three hour classes, it’s often just not enough time! Here is an overview of some of the processes so you have a bit more grasp on some of the technical stuff! Step One – Design There are SO many ideas out there for making stuff in clay! From delicate porcelain jewellery, through to heavy sculptural work and everything in between. Deciding your direction is sometimes not that easy – when you first start, try everything, you will naturally gravitate to the style that you enjoy! The options and variations are endless and can get a wee bit overwhelming too! Check in with me before you start to ensure your ideas will work, what order you might do things, how you could achieve the look you are seeking and any other technical data required! Step Two – Making Clay is thixotropic. This means that as you work with it, the clay first gets sloppier and wetter, before is begins to dry in the atmosphere. For most things, you simply can’t do all parts of the project at once. An example of work order might look like: Get last weeks work out from the shelves Prepare clay for today’s work – roll your clay, prepare balls for throwing, make the first stage of a pinch pot) Clean up last week’s work and put it on the shelf for bisque firing Check that you have any glazing to do – and do enough of it that you will have time to finish your main project Do the next step of your next project – there might be a further step that can’t be complete immediately, in that case, wrap your work well and put onto the shelves. Letting your work rest for a while can really help keep your work clean and professional looking. Many things require bagging under plastic to keep it ready for work the next week – put your name on the outside of the bag so you can find your work easily. We have stickers and markers. Consider how you want to decorate your work – coloured slip can be applied at a fairly wet stage (remembering that it will make your work even wetter!). Trying to apply slip to dry clay won’t work! If you want to do sgraffito – you will need to keep the work leather hard (a state of dryness where you can still work the clay with a little effort and a little water and care). Step Three – Drying Most of the time your work can go into the rack uncovered to let it dry out for the following week. If you want to continue forming or shaping you will need to double bag your work – put your work on a suitable sized bat and put the bat in a bag so the base of the bag is under the bat, then put another bag over the top of the work and tuck the top of the bag under the bat. If you want to trim (or turn) your thrown work the following week, it should also be double bagged. If your work is large, delicate, or of uneven thicknesses, you should lightly cover your work for drying. When considering the drying process, bare in mind the weather, humidity and wind! The hotter and dryer, the faster things dry and work can dry unevenly in the shelves – this can lead to cracking – another time to lightly cover your work for drying. Step Four – Trimming and Cleaning Up Your work is dry! It is called greenware now and it is at it’s most fragile! Handle everything with two hands. I often refer to soft hands – keep everything gentle and with your fingers spread as much as possible. Try to not pick up things like plates too much, and always with both hands! Before your work can be bisque fired it should be “cleaned up”. You work won’t go into the kiln if it has sharp edges – when glazed, sharp edges turn into razor blades! Use a piece of fly wire to rub the work all over – this will scratch a little so be light handed. Use a knife or metal kidney to scrape any areas that require a bit more dynamic treatment than the fly wire offers! Finally, a very light wipe over with a slightly damp sponge can help soften and soothe all of your edges and dags! Trimming thrown work: If you are planning to trim (or turn) your thrown work (and you should be), make sure you bag it well – your work should be leather hard to almost dry for easiest trimming. Use this step to finish the work completely – use a metal kidney to polish the surface, or a slightly damp sponge to give a freshly thrown look. Wipe the sponge around the rim after trimming, and check the inside of the pot for dags! Trimming slip cast work: Usually I will trim the rims of your work on the wheel the following day to make that stage easier, however you will still need to check your work for lumps and bumps. Last but not least – check that your name is still clearly on the bottom of your work. Step Five – Bisque Firing When the work is completely dry it can go into the bisque kiln. The bisque kiln is fired to 1000°C. This process burns off the water in the clay as well as some of the chemically bound water. The structure of the clay is not altered that much at this temperature. Inside the bisque kiln, the work is stacked a little, small bowl inside a larger bowl and onto a heavy plate. Smaller items like decorations or drink coasters might get stacked several high. Consideration is paid to the weight of the stack and shape of the work. A bisque kiln can fire about one and a half times the amount of work that the glaze kiln can fire. The firing takes about 10 hours to complete the cycle and about two days to cool down. Once it has been emptied the work is placed in the glaze room ready for you to decorate! Step Six – Glazing Decorating your work with colour can be a lot of fun – and time consuming! There are three main options for surface treatment at this stage: Oxide Washes Underglazes Glazes Washes and underglazes do not “glaze” the work – It will still need a layer of glaze to fully seal the clay (washes don’t need glaze on surfaces not designed for food or liquid as they can gloss up a little on their own). Underglazes are stable colourants that turn out pretty much how they look in the jar. They can be mixed with each other to form other colours and can be used like water colours to paint onto your work. Mostly they should have a clear glaze on top to seal them. Oxides are a different species – the pink oxide (cobalt) wash turns out bright blue for instance. They don’t always need a glaze on top, and some glazes can change the colour of the wash! The glazes need no other “glaze” on top! Be careful of unknown glaze interactions – you can put any combination of glaze in a bowl or on a plate, but only a single glaze on the outside of any vertical surface! Glazes are a chemical reaction under heat. We don’t know the exact chemicals in the Mayco glazes we use. I can guess by the way they interact with each other, however, on the whole, you need to test every idea you have, and not run the test on a vertical surface! Simply put, glaze is a layer of glass like substance that bonds with the clay underneath. Clay is made of silica, alumina and water. Glaze is made of mostly silica. Silica has a melting point of 1700°C and we fire to 1240°C. The silica requires a “flux” to help it melt at the lower temperature. Fluxes can be all sorts of chemicals – a common one is calcium – calcium has a melting point of 2500°C, however, together they both melt at a much lower temperature! Colourants are metal oxides like cobalt (blue), chrome (green through black), copper (green, blue, even red!), manganese (black, purple and pink) iron (red brown), etc. Different chemicals in the glaze can have dramatic effects. for example, barium carbonate (which we don’t use) turns manganese bright pink! Other elements can turn manganese dioxide brown, blue, purple and reddish brown. Manganese dioxide is a flux in and of itself as well. So, glazes that get their black and purple colours, often interact with other glazes and RUN! Our mirror black is a good example – it mixes really well with many glazes because it fluxes them – causes them to melt faster. It will also bring out many beautiful colours in the glazes because it’s black colouring most definitely comes from manganese dioxide! Glaze chemistry is a whole subject on it’s own! We use commercial Mayco glazes on purpose – for their huge range of colour possibilities, stability, cool interactions, artistic freedom with the ability to easily brush the glazes on and ease of use. We currently have almost 50 glazes on hand! A major project is to test the interactions of all glazes with each other. That is 2,500 test tiles!!!! I’m going to make the wall behind the wheels the feature wall of pretty colours! Step Seven – Glaze (Gloss or sometimes called “Glost”) Firing Most of the time this is the final stage of making your creation (but not always!) The glaze kiln goes to 1240°C. This is called cone 6, or midrange. It is the low end of stoneware temperatures. Stoneware clays and glazes are typically fired at cone 8 – 10, that is 1260 – 1290°C. The energy requirement to go from 1240°C to 1280°C is almost a 30% more! Our clay is formulated to vitrify (mature, turn “glass-like”) at 1240°, as are our glazes. A glaze kiln take around 12 hours to reach temperature and two to three days to cool down. Sometimes a third firing process is required – this is for decoration that is added to work after the glaze firing. For example – adding precious metals and lustres. this firing temperature is usually around 600 – 800°C depending upon the techniques being used. There are many students interested in gold and silver trims – we will be doing this third type of firing soon! After firing your work will be in the student finished work shelves. Remember to pay for it before you head out the door! There is a small extra charge for using porcelain clay (it’s more than twice the price of regular clay), and for any third firing process! Once your work has been fired it can not turn back into clay for millennia – so don’t fire it if you don’t like it! Put it in the bucket for recycling. https://firebirdstudios.com.au/the-process-of-making-pottery/ This bowl is an example of kitchenware used in the 19th century and still in use today.Bowl white ceramic plain that has two sets of edging around lip. Inside bowl has plaster designed to look like cooking mixture.flagstaff hill, warrnambool, shipwrecked-coast, flagstaff-hill, flagstaff-hill-maritime-museum, maritime-museum, shipwreck-coast, flagstaff-hill-maritime-village, kitchen equipment, ceramic -
 Flagstaff Hill Maritime Museum and Village
Domestic object - Bowl, J & G Meakin, Late 19th or early 20th Century
The Process of Making Pottery Decorating, Firing, Glazing, Making, Technical There is a rhythm and flow to clay. It can’t be done all at once! Even the making process! It can take weeks to get everything done, especially if you can only work on your pottery once a week! Even though we have three hour classes, it’s often just not enough time! Here is an overview of some of the processes so you have a bit more grasp on some of the technical stuff! Step One – Design There are SO many ideas out there for making stuff in clay! From delicate porcelain jewellery, through to heavy sculptural work and everything in between. Deciding your direction is sometimes not that easy – when you first start, try everything, you will naturally gravitate to the style that you enjoy! The options and variations are endless and can get a wee bit overwhelming too! Check in with me before you start to ensure your ideas will work, what order you might do things, how you could achieve the look you are seeking and any other technical data required! Step Two – Making Clay is thixotropic. This means that as you work with it, the clay first gets sloppier and wetter, before is begins to dry in the atmosphere. For most things, you simply can’t do all parts of the project at once. An example of work order might look like: Get last weeks work out from the shelves Prepare clay for today’s work – roll your clay, prepare balls for throwing, make the first stage of a pinch pot) Clean up last week’s work and put it on the shelf for bisque firing Check that you have any glazing to do – and do enough of it that you will have time to finish your main project Do the next step of your next project – there might be a further step that can’t be complete immediately, in that case, wrap your work well and put onto the shelves. Letting your work rest for a while can really help keep your work clean and professional looking. Many things require bagging under plastic to keep it ready for work the next week – put your name on the outside of the bag so you can find your work easily. We have stickers and markers. Consider how you want to decorate your work – coloured slip can be applied at a fairly wet stage (remembering that it will make your work even wetter!). Trying to apply slip to dry clay won’t work! If you want to do sgraffito – you will need to keep the work leather hard (a state of dryness where you can still work the clay with a little effort and a little water and care). Step Three – Drying Most of the time your work can go into the rack uncovered to let it dry out for the following week. If you want to continue forming or shaping you will need to double bag your work – put your work on a suitable sized bat and put the bat in a bag so the base of the bag is under the bat, then put another bag over the top of the work and tuck the top of the bag under the bat. If you want to trim (or turn) your thrown work the following week, it should also be double bagged. If your work is large, delicate, or of uneven thicknesses, you should lightly cover your work for drying. When considering the drying process, bare in mind the weather, humidity and wind! The hotter and dryer, the faster things dry and work can dry unevenly in the shelves – this can lead to cracking – another time to lightly cover your work for drying. Step Four – Trimming and Cleaning Up Your work is dry! It is called greenware now and it is at it’s most fragile! Handle everything with two hands. I often refer to soft hands – keep everything gentle and with your fingers spread as much as possible. Try to not pick up things like plates too much, and always with both hands! Before your work can be bisque fired it should be “cleaned up”. You work won’t go into the kiln if it has sharp edges – when glazed, sharp edges turn into razor blades! Use a piece of fly wire to rub the work all over – this will scratch a little so be light handed. Use a knife or metal kidney to scrape any areas that require a bit more dynamic treatment than the fly wire offers! Finally, a very light wipe over with a slightly damp sponge can help soften and soothe all of your edges and dags! Trimming thrown work: If you are planning to trim (or turn) your thrown work (and you should be), make sure you bag it well – your work should be leather hard to almost dry for easiest trimming. Use this step to finish the work completely – use a metal kidney to polish the surface, or a slightly damp sponge to give a freshly thrown look. Wipe the sponge around the rim after trimming, and check the inside of the pot for dags! Trimming slip cast work: Usually I will trim the rims of your work on the wheel the following day to make that stage easier, however you will still need to check your work for lumps and bumps. Last but not least – check that your name is still clearly on the bottom of your work. Step Five – Bisque Firing When the work is completely dry it can go into the bisque kiln. The bisque kiln is fired to 1000°C. This process burns off the water in the clay as well as some of the chemically bound water. The structure of the clay is not altered that much at this temperature. Inside the bisque kiln, the work is stacked a little, small bowl inside a larger bowl and onto a heavy plate. Smaller items like decorations or drink coasters might get stacked several high. Consideration is paid to the weight of the stack and shape of the work. A bisque kiln can fire about one and a half times the amount of work that the glaze kiln can fire. The firing takes about 10 hours to complete the cycle and about two days to cool down. Once it has been emptied the work is placed in the glaze room ready for you to decorate! Step Six – Glazing Decorating your work with colour can be a lot of fun – and time consuming! There are three main options for surface treatment at this stage: Oxide Washes Underglazes Glazes Washes and underglazes do not “glaze” the work – It will still need a layer of glaze to fully seal the clay (washes don’t need glaze on surfaces not designed for food or liquid as they can gloss up a little on their own). Underglazes are stable colourants that turn out pretty much how they look in the jar. They can be mixed with each other to form other colours and can be used like water colours to paint onto your work. Mostly they should have a clear glaze on top to seal them. Oxides are a different species – the pink oxide (cobalt) wash turns out bright blue for instance. They don’t always need a glaze on top, and some glazes can change the colour of the wash! The glazes need no other “glaze” on top! Be careful of unknown glaze interactions – you can put any combination of glaze in a bowl or on a plate, but only a single glaze on the outside of any vertical surface! Glazes are a chemical reaction under heat. We don’t know the exact chemicals in the Mayco glazes we use. I can guess by the way they interact with each other, however, on the whole, you need to test every idea you have, and not run the test on a vertical surface! Simply put, glaze is a layer of glass like substance that bonds with the clay underneath. Clay is made of silica, alumina and water. Glaze is made of mostly silica. Silica has a melting point of 1700°C and we fire to 1240°C. The silica requires a “flux” to help it melt at the lower temperature. Fluxes can be all sorts of chemicals – a common one is calcium – calcium has a melting point of 2500°C, however, together they both melt at a much lower temperature! Colourants are metal oxides like cobalt (blue), chrome (green through black), copper (green, blue, even red!), manganese (black, purple and pink) iron (red brown), etc. Different chemicals in the glaze can have dramatic effects. for example, barium carbonate (which we don’t use) turns manganese bright pink! Other elements can turn manganese dioxide brown, blue, purple and reddish brown. Manganese dioxide is a flux in and of itself as well. So, glazes that get their black and purple colours, often interact with other glazes and RUN! Our mirror black is a good example – it mixes really well with many glazes because it fluxes them – causes them to melt faster. It will also bring out many beautiful colours in the glazes because it’s black colouring most definitely comes from manganese dioxide! Glaze chemistry is a whole subject on it’s own! We use commercial Mayco glazes on purpose – for their huge range of colour possibilities, stability, cool interactions, artistic freedom with the ability to easily brush the glazes on and ease of use. We currently have almost 50 glazes on hand! A major project is to test the interactions of all glazes with each other. That is 2,500 test tiles!!!! I’m going to make the wall behind the wheels the feature wall of pretty colours! Step Seven – Glaze (Gloss or sometimes called “Glost”) Firing Most of the time this is the final stage of making your creation (but not always!) The glaze kiln goes to 1240°C. This is called cone 6, or midrange. It is the low end of stoneware temperatures. Stoneware clays and glazes are typically fired at cone 8 – 10, that is 1260 – 1290°C. The energy requirement to go from 1240°C to 1280°C is almost a 30% more! Our clay is formulated to vitrify (mature, turn “glass-like”) at 1240°, as are our glazes. A glaze kiln take around 12 hours to reach temperature and two to three days to cool down. Sometimes a third firing process is required – this is for decoration that is added to work after the glaze firing. For example – adding precious metals and lustres. this firing temperature is usually around 600 – 800°C depending upon the techniques being used. There are many students interested in gold and silver trims – we will be doing this third type of firing soon! After firing your work will be in the student finished work shelves. Remember to pay for it before you head out the door! There is a small extra charge for using porcelain clay (it’s more than twice the price of regular clay), and for any third firing process! Once your work has been fired it can not turn back into clay for millennia – so don’t fire it if you don’t like it! Put it in the bucket for recycling. https://firebirdstudios.com.au/the-process-of-making-pottery/This bowl was made by renowned pottery company J & G Meakin of England. The firm was established in the mid-1800's. The bowl is an example of kitchenware used in the 19th century and still in use today.Bowl; white ceramic, round and tapering inwards towards base. Made by J and G Meakin England.On base, 'Ironstone China Reg SOL 391413' with symbolflagstaff hill, flagstaff hill maritime museum and village, warrnambool, maritime museum, maritime village, great ocean road, shipwreck coast, mixing bowl, food preparation, j & g meakin, pottery, stoke-on-trent, kitchen equipment, ceramic -
 Flagstaff Hill Maritime Museum and Village
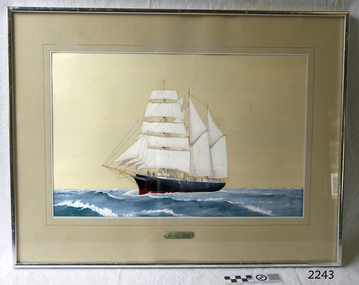
Painting - Maritime painting, The La Bella, 1980s
This painting of the “La Bella” is associated with Flagstaff Hill’s collection of artefacts from the wreck of the “La Bella”. It was painted around the 1980s by maritime artist Philip J. Gray. Some 15 – 17 ships are believed to have sunk in Lady Bay, but only two have been discovered on the seafloor; the “La Bella” and the “Edinburgh Castle”. Both wrecks are popular diving sites and are preserved as significant historical marine and marine archaeological sites. The Kosnar Picture Framing and Mirrors Shop identified the "GRAY 3135, Y04/111" as their job number for the framing and said that the label "ANOTHER KOSNAR FEATURE" was last used before about 1990. About artist Philip J. Gray “Philip is one of Australia’s leading maritime artists and his meticulous research and social commentary paintings of ships, such as, the Loch Ard and Schomberg form an important part of Warrnambool’s Flagstaff Hill Maritime Museum.” [Dr Marion Manifold, Artist and Art Historian, 2014] Philip James Gray was born in London but has lived most of his life in Australia. He graduated from a London school of art as an illustrator, specialising in technical and scientific illustration as well as other commercial and applied art. He was also a student for a time of Fyffe Christie - British figurative artist, mural painter and humanitarian – who had a great influence on his career. Philip has always worked as a professional artist and illustrator. Many publications on maritime history have featured his work. His paintings have been released and sold all over the world as limited edition prints. The State Library of Victoria’s ‘Latrobe Collection’ holds two of his paintings. His street painting of ‘The Ashes Contest’ decorates the brick wall of Old Bakery Laneway in Sunbury and a Sunbury café owner commissioned him to paint the ‘Sunbury Pop Festival’ as a remembrance of local history. Philip has been an active member of the Sunbury Art Society in Victoria for several years, serving on the committee for some of that time and being involved in exhibitions. He enjoys helping new artists and sharing his skills and experience. About the “La Bella” The wreck of the La Bella lies at the bottom of the Warrnambool Harbour in Lady Bay. Some 15 ships are believed to have been wrecked there but only two have been discovered on the sea floor; the La Bella and the Edinburgh Castle. Both wrecks are popular diving sites and are preserved as significant historical marine and marine archaeological sites. The story of the final voyage of the La Bella is summarised as follows … The ship from which the sailors were rescued was the three-masted, iron and steel barquentine the La Bella, built in Norway in 1893. She was one of two iron and steel ships by Johan Smith, the company being one of the leading shipping families in Tvedestrand, Norway. She was significant to Norwegian shipping, being one of only 27 iron and steel ships ever built in Norway. La Bella was registered in New Zealand and engaged from 1902 in inter-colonial trading of timber in the pacific, between New Zealand and Australia and was often in Port Phillip Bay, Victoria. On 5th October 1905 the twelve year old La Bella left Lyttleton, New Zealand carrying a cargo of timber bound for Warrnambool, Australia . She was manned by a crew of twelve: the Master, (Captain Mylius, previously 1st Mate of La Bella, appointed Captain to La Bella on 6th February 1903) 2 Mates, Cook, six able seamen, one ordinary seaman and a boy. Bad weather en-route caused her to shelter at Burnie on Tasmania's North West coast. On November 10th, the 37th day of her journey, La Bella approached Warrnambool. Captain Mylius steered her towards Lady Bay Channel in heavy south-west seas and evening mist. He ordered the helmsman to steer for the light. As the ship came round, a tremendous sea struck her on the port quarter, causing her to breach broadside in a north-westerly direction into breakers. The helm was brought round twice more, but each time heavy seas broke over her, the third time throwing the La Bella on to a submerged reef in Lady Bay now known as La Bella Reef (about 100 yards from the Warrnambool breakwater). The sea was so rough that it even wrenched a one-and-a-half ton anchor from its fastenings and into the sea. As Captain Mylius headed to the steel wheelhouse, intending to send up a rocket flare, a huge sea slammed the steel door into him (resulting in massive bruising front and back) Despite his injuries he still managed to set off a blue light, which he held up in his hands. La Bella’s lifeboats were filled with sea water and broke up on their chocks. The blue light was the first indication to people on shore that there was a ship in distress. The Harbour Master, Captain Roe (who lived in the Harbour Master’s House opposite Flagstaff Hill), organised a group of volunteers to crew the lifeboat because the trained crew was unavailable; the crewmen were working on a steamer in Port Fairy at the time. He then poured oil onto the water to try and smooth the sea. At around 11pm three of the crew took shelter in the steel forecastle but the sea crashed into it and broke it up. While the rest of the crew and onlookers watched helplessly in the moonlight the bodies were washed away into the sea, never to be seen again. Some of the crew lashed themselves to the weather rail to keep from being washed away. Watson, the ordinary seaman, became tangled in the rigging lines and was too weak to move, so the 2nd Mate, Robertson, put a line onto him so that he wouldn’t wash off. Around 11pm three of the crew were unconscious from exhaustion. The situation on La Bella was becoming dangerous. The 2nd Mate moved to the ‘house’ and soon afterwards the ship slipped in the heavy sea. The lashings of the 1st Mate and the ‘boy’ Denham had kept them safe until about 2am when they were washed overboard; no one was able to help. One by one, the exhausted crew were being washed overboard, too weak to hold on any longer. During the night the La Bella had broken into two and the deckhouse ran out towards the sea. Two more men drowned when trying to reach the lifeboat. By sunrise the only survivors of the twelve were the Master, 2nd Mate and three seamen. Early in the morning Captain Roe used the rocket apparatus on shore to try and shoot a line to the ship for a safer rescue but each attempt fell short of the target. Several attempts were made by the lifeboat to rescue the stricken sailors, but the rough conditions made this difficult for the boat to get close enough to the ship and the lifeboat had to return to shore. During a final attempt to reach the ship Captain Mylius ordered his men to jump into the sea. Leonard Robertson, 2nd mate, jumped and swam towards the lifeboat, taking hold of the boat hook offered to him. Oscar Rosenholme managed to reach the boat floating on a piece of timber from the ship’s load and a third survivor, Noake, also made the boat. Along with the lifeboat rescue crew, 25 year old William Ferrier rowed his small dingy through the heavy seas and managed to rescue the Captain, whom he landed on the breakwater. Ferrier then returned to the ship to attempt a final rescue, losing his oars and rowlocks into the high sea. Using just a spare paddle he skulled towards the La Bella, reaching her stern in time to cut loose the lone surviving sailor, Payne, from the lashing that held him to the ship; the terrified sailor dropped from the ship and into the dingy. Shortly after the last man was rescued, the La Bella was lifted by a huge wave and crashed back down on the reef; she broke up and sank. The ordeal had lasted ten hours. The survivors were taken to the nearby Bay View Hotel and gratefully received warm food and clothing, medical attention and a place to sleep. In the following days an unidentified body of a young person was washed ashore; it was either Watson or Denham. The body was buried in the Warrnambool cemetery with an appropriate gravestone and inscription. William Ferrier became a national hero as news of the daring rescue spread. In recognition of his bravery in the two daring rescues he was awarded the Silver Medal for Bravery by the Royal Humane Society and was honoured in the letter from the Prime Minister and the Parliament of the Commonwealth, telegrams and a cheque for £20 from the Governor General, over £150 subscribed by the public, including Warrnambool and district and readers of The Argus, and a gold medal from the Glenelg Dinghy Club of South Australia. Ferrier’s rescue efforts are one of the most heroic in Victoria’s shipwreck history. (William Ferrier’s son, Frank, received a similar award almost fifty years later, when he helped rescue four members of the crew on the yacht Merlan, after it ran on to a reef near the Point Lonsdale Lighthouse. ) The wreck of La Bella now lies on her port side in 13 metres of sheltered water inside the reef she struck. The bow section is relatively intact and part of the stern has drifted north-easterly towards the mouth of the Hopkins River. The reef the La Bella struck now bears its name. Those five rescued from the La Bella were Captain George Mylius, Leonard Robertson (2nd Mate, 21 years old), R. Payne, Oscar Rosenholme and Jack Noake. Those seven who lost their lives were Mr Coulson (1st mate), Charles Jackman (cook) Gustave Johnson, Pierre Johann and Robert Gent (all able seamen), Harry Watson (ordinary seaman) and Jack Denham (ship’s boy). Captain Mylius was found guilty of careless navigation; he had sailed into the bay without the services of a pilot. His Master Certificate was suspended for twelve months. Later he was also charged with manslaughter of one of the crew who had died when the La Bella was wrecked, but found not guilty. The event’s adverse publicity and damage to his career took a toll on his health and he died of a heart attack six months after the wreck; he was only thirty-seven. His body was buried in the Melbourne General Cemetery. The La Bella was “the best documented of all sailing ships owned in New Zealand”. Her record books, ship logs, correspondence and supporting papers are still available. At the time of the tragedy she was owned by Messers David C.Turnbull and Co. of Timaru, New Zealand timber merchants and shipping agents, who had purchased her on 13th December 1901. A detailed account of the last journey of La Bella can be read in “Leonard Robertson, the Whangaroa & La Bella” written by Jack Churchouse, published in 1982 by Millwood Press Ltd, Wellington, NZ.This painting of the La Bella by Philip J. Gray is part of the La Bella Collection and is significant at both a local and state level. Its connection to the La Bella shipwreck and the rescue of five survivors highlights the dangers of Victoria’s Shipwreck Coast. The painting connects with other objects and artefacts associated with the wreck of the La Bella. This painting is significant because of its association with the sailing ship “La Bella” . the “La Bella” is of local and state and national significance. It is one of the only two shipwrecks discovered in Lady Bay, Warrnambool, out of the 15-17 shipwrecks in the bay. Large framed painting of the three masted barquentine "La Bella" fully rigged. Painted by Phillip J Gray. A fine printed line squares off the painting. Beneath painting and line is a gold plate with black copper plate designating "La Bella" is encased in glass, surrounded by a silver-metal frame. Yellow and brown paper label is adhered to back of painting. Picture framed by Kosnar in Melbourne."The La Bella" on gold plaque Logo of "K" inside a brown square. "GRAY 3135, Y04/111", "ANOTHER KOSNAR FEATURE" flagstaff hill, warrnambool, shipwrecked-coast, flagstaff-hill, flagstaff-hill-maritime-museum, maritime-museum, shipwreck-coast, flagstaff-hill-maritime-village, painting, la bella, artist phillip j gray, maritime painting, lady bay warrnambool -
 Flagstaff Hill Maritime Museum and Village
Domestic object - Plate
The Process of Making Pottery Decorating, Firing, Glazing, Making, Technical There is a rhythm and flow to clay. It can’t be done all at once! Even the making process! It can take weeks to get everything done, especially if you can only work on your pottery once a week! Even though we have three hour classes, it’s often just not enough time! Here is an overview of some of the processes so you have a bit more grasp on some of the technical stuff! Step One – Design There are SO many ideas out there for making stuff in clay! From delicate porcelain jewellery, through to heavy sculptural work and everything in between. Deciding your direction is sometimes not that easy – when you first start, try everything, you will naturally gravitate to the style that you enjoy! The options and variations are endless and can get a wee bit overwhelming too! Check in with me before you start to ensure your ideas will work, what order you might do things, how you could achieve the look you are seeking and any other technical data required! Step Two – Making Clay is thixotropic. This means that as you work with it, the clay first gets sloppier and wetter, before is begins to dry in the atmosphere. For most things, you simply can’t do all parts of the project at once. An example of work order might look like: Get last weeks work out from the shelves Prepare clay for today’s work – roll your clay, prepare balls for throwing, make the first stage of a pinch pot) Clean up last week’s work and put it on the shelf for bisque firing Check that you have any glazing to do – and do enough of it that you will have time to finish your main project Do the next step of your next project – there might be a further step that can’t be complete immediately, in that case, wrap your work well and put onto the shelves. Letting your work rest for a while can really help keep your work clean and professional looking. Many things require bagging under plastic to keep it ready for work the next week – put your name on the outside of the bag so you can find your work easily. We have stickers and markers. Consider how you want to decorate your work – coloured slip can be applied at a fairly wet stage (remembering that it will make your work even wetter!). Trying to apply slip to dry clay won’t work! If you want to do sgraffito – you will need to keep the work leather hard (a state of dryness where you can still work the clay with a little effort and a little water and care). Step Three – Drying Most of the time your work can go into the rack uncovered to let it dry out for the following week. If you want to continue forming or shaping you will need to double bag your work – put your work on a suitable sized bat and put the bat in a bag so the base of the bag is under the bat, then put another bag over the top of the work and tuck the top of the bag under the bat. If you want to trim (or turn) your thrown work the following week, it should also be double bagged. If your work is large, delicate, or of uneven thicknesses, you should lightly cover your work for drying. When considering the drying process, bare in mind the weather, humidity and wind! The hotter and dryer, the faster things dry and work can dry unevenly in the shelves – this can lead to cracking – another time to lightly cover your work for drying. Step Four – Trimming and Cleaning Up Your work is dry! It is called greenware now and it is at it’s most fragile! Handle everything with two hands. I often refer to soft hands – keep everything gentle and with your fingers spread as much as possible. Try to not pick up things like plates too much, and always with both hands! Before your work can be bisque fired it should be “cleaned up”. You work won’t go into the kiln if it has sharp edges – when glazed, sharp edges turn into razor blades! Use a piece of fly wire to rub the work all over – this will scratch a little so be light handed. Use a knife or metal kidney to scrape any areas that require a bit more dynamic treatment than the fly wire offers! Finally, a very light wipe over with a slightly damp sponge can help soften and soothe all of your edges and dags! Trimming thrown work: If you are planning to trim (or turn) your thrown work (and you should be), make sure you bag it well – your work should be leather hard to almost dry for easiest trimming. Use this step to finish the work completely – use a metal kidney to polish the surface, or a slightly damp sponge to give a freshly thrown look. Wipe the sponge around the rim after trimming, and check the inside of the pot for dags! Trimming slip cast work: Usually I will trim the rims of your work on the wheel the following day to make that stage easier, however you will still need to check your work for lumps and bumps. Last but not least – check that your name is still clearly on the bottom of your work. Step Five – Bisque Firing When the work is completely dry it can go into the bisque kiln. The bisque kiln is fired to 1000°C. This process burns off the water in the clay as well as some of the chemically bound water. The structure of the clay is not altered that much at this temperature. Inside the bisque kiln, the work is stacked a little, small bowl inside a larger bowl and onto a heavy plate. Smaller items like decorations or drink coasters might get stacked several high. Consideration is paid to the weight of the stack and shape of the work. A bisque kiln can fire about one and a half times the amount of work that the glaze kiln can fire. The firing takes about 10 hours to complete the cycle and about two days to cool down. Once it has been emptied the work is placed in the glaze room ready for you to decorate! Step Six – Glazing Decorating your work with colour can be a lot of fun – and time consuming! There are three main options for surface treatment at this stage: Oxide Washes Underglazes Glazes Washes and underglazes do not “glaze” the work – It will still need a layer of glaze to fully seal the clay (washes don’t need glaze on surfaces not designed for food or liquid as they can gloss up a little on their own). Underglazes are stable colourants that turn out pretty much how they look in the jar. They can be mixed with each other to form other colours and can be used like water colours to paint onto your work. Mostly they should have a clear glaze on top to seal them. Oxides are a different species – the pink oxide (cobalt) wash turns out bright blue for instance. They don’t always need a glaze on top, and some glazes can change the colour of the wash! The glazes need no other “glaze” on top! Be careful of unknown glaze interactions – you can put any combination of glaze in a bowl or on a plate, but only a single glaze on the outside of any vertical surface! Glazes are a chemical reaction under heat. We don’t know the exact chemicals in the Mayco glazes we use. I can guess by the way they interact with each other, however, on the whole, you need to test every idea you have, and not run the test on a vertical surface! Simply put, glaze is a layer of glass like substance that bonds with the clay underneath. Clay is made of silica, alumina and water. Glaze is made of mostly silica. Silica has a melting point of 1700°C and we fire to 1240°C. The silica requires a “flux” to help it melt at the lower temperature. Fluxes can be all sorts of chemicals – a common one is calcium – calcium has a melting point of 2500°C, however, together they both melt at a much lower temperature! Colourants are metal oxides like cobalt (blue), chrome (green through black), copper (green, blue, even red!), manganese (black, purple and pink) iron (red brown), etc. Different chemicals in the glaze can have dramatic effects. for example, barium carbonate (which we don’t use) turns manganese bright pink! Other elements can turn manganese dioxide brown, blue, purple and reddish brown. Manganese dioxide is a flux in and of itself as well. So, glazes that get their black and purple colours, often interact with other glazes and RUN! Our mirror black is a good example – it mixes really well with many glazes because it fluxes them – causes them to melt faster. It will also bring out many beautiful colours in the glazes because it’s black colouring most definitely comes from manganese dioxide! Glaze chemistry is a whole subject on it’s own! We use commercial Mayco glazes on purpose – for their huge range of colour possibilities, stability, cool interactions, artistic freedom with the ability to easily brush the glazes on and ease of use. We currently have almost 50 glazes on hand! A major project is to test the interactions of all glazes with each other. That is 2,500 test tiles!!!! I’m going to make the wall behind the wheels the feature wall of pretty colours! Step Seven – Glaze (Gloss or sometimes called “Glost”) Firing Most of the time this is the final stage of making your creation (but not always!) The glaze kiln goes to 1240°C. This is called cone 6, or midrange. It is the low end of stoneware temperatures. Stoneware clays and glazes are typically fired at cone 8 – 10, that is 1260 – 1290°C. The energy requirement to go from 1240°C to 1280°C is almost a 30% more! Our clay is formulated to vitrify (mature, turn “glass-like”) at 1240°, as are our glazes. A glaze kiln take around 12 hours to reach temperature and two to three days to cool down. Sometimes a third firing process is required – this is for decoration that is added to work after the glaze firing. For example – adding precious metals and lustres. this firing temperature is usually around 600 – 800°C depending upon the techniques being used. There are many students interested in gold and silver trims – we will be doing this third type of firing soon! After firing your work will be in the student finished work shelves. Remember to pay for it before you head out the door! There is a small extra charge for using porcelain clay (it’s more than twice the price of regular clay), and for any third firing process! Once your work has been fired it can not turn back into clay for millennia – so don’t fire it if you don’t like it! Put it in the bucket for recycling. https://firebirdstudios.com.au/the-process-of-making-pottery/Ceramics have evolved over thousands of years.White earthenware dinner plate. Crazing evident all over.Backstamped ‘Made in England S LTD’flagstaff hill, warrnambool, shipwrecked-coast, flagstaff-hill, flagstaff-hill-maritime-museum, maritime-museum, shipwreck-coast, flagstaff-hill-maritime-village, ceramics, tableware -
 Flagstaff Hill Maritime Museum and Village
Domestic object - Plate, Johnson Bros
The Process of Making Pottery Decorating, Firing, Glazing, Making, Technical There is a rhythm and flow to clay. It can’t be done all at once! Even the making process! It can take weeks to get everything done, especially if you can only work on your pottery once a week! Even though we have three hour classes, it’s often just not enough time! Here is an overview of some of the processes so you have a bit more grasp on some of the technical stuff! Step One – Design There are SO many ideas out there for making stuff in clay! From delicate porcelain jewellery, through to heavy sculptural work and everything in between. Deciding your direction is sometimes not that easy – when you first start, try everything, you will naturally gravitate to the style that you enjoy! The options and variations are endless and can get a wee bit overwhelming too! Check in with me before you start to ensure your ideas will work, what order you might do things, how you could achieve the look you are seeking and any other technical data required! Step Two – Making Clay is thixotropic. This means that as you work with it, the clay first gets sloppier and wetter, before is begins to dry in the atmosphere. For most things, you simply can’t do all parts of the project at once. An example of work order might look like: Get last weeks work out from the shelves Prepare clay for today’s work – roll your clay, prepare balls for throwing, make the first stage of a pinch pot) Clean up last week’s work and put it on the shelf for bisque firing Check that you have any glazing to do – and do enough of it that you will have time to finish your main project Do the next step of your next project – there might be a further step that can’t be complete immediately, in that case, wrap your work well and put onto the shelves. Letting your work rest for a while can really help keep your work clean and professional looking. Many things require bagging under plastic to keep it ready for work the next week – put your name on the outside of the bag so you can find your work easily. We have stickers and markers. Consider how you want to decorate your work – coloured slip can be applied at a fairly wet stage (remembering that it will make your work even wetter!). Trying to apply slip to dry clay won’t work! If you want to do sgraffito – you will need to keep the work leather hard (a state of dryness where you can still work the clay with a little effort and a little water and care). Step Three – Drying Most of the time your work can go into the rack uncovered to let it dry out for the following week. If you want to continue forming or shaping you will need to double bag your work – put your work on a suitable sized bat and put the bat in a bag so the base of the bag is under the bat, then put another bag over the top of the work and tuck the top of the bag under the bat. If you want to trim (or turn) your thrown work the following week, it should also be double bagged. If your work is large, delicate, or of uneven thicknesses, you should lightly cover your work for drying. When considering the drying process, bare in mind the weather, humidity and wind! The hotter and dryer, the faster things dry and work can dry unevenly in the shelves – this can lead to cracking – another time to lightly cover your work for drying. Step Four – Trimming and Cleaning Up Your work is dry! It is called greenware now and it is at it’s most fragile! Handle everything with two hands. I often refer to soft hands – keep everything gentle and with your fingers spread as much as possible. Try to not pick up things like plates too much, and always with both hands! Before your work can be bisque fired it should be “cleaned up”. You work won’t go into the kiln if it has sharp edges – when glazed, sharp edges turn into razor blades! Use a piece of fly wire to rub the work all over – this will scratch a little so be light handed. Use a knife or metal kidney to scrape any areas that require a bit more dynamic treatment than the fly wire offers! Finally, a very light wipe over with a slightly damp sponge can help soften and soothe all of your edges and dags! Trimming thrown work: If you are planning to trim (or turn) your thrown work (and you should be), make sure you bag it well – your work should be leather hard to almost dry for easiest trimming. Use this step to finish the work completely – use a metal kidney to polish the surface, or a slightly damp sponge to give a freshly thrown look. Wipe the sponge around the rim after trimming, and check the inside of the pot for dags! Trimming slip cast work: Usually I will trim the rims of your work on the wheel the following day to make that stage easier, however you will still need to check your work for lumps and bumps. Last but not least – check that your name is still clearly on the bottom of your work. Step Five – Bisque Firing When the work is completely dry it can go into the bisque kiln. The bisque kiln is fired to 1000°C. This process burns off the water in the clay as well as some of the chemically bound water. The structure of the clay is not altered that much at this temperature. Inside the bisque kiln, the work is stacked a little, small bowl inside a larger bowl and onto a heavy plate. Smaller items like decorations or drink coasters might get stacked several high. Consideration is paid to the weight of the stack and shape of the work. A bisque kiln can fire about one and a half times the amount of work that the glaze kiln can fire. The firing takes about 10 hours to complete the cycle and about two days to cool down. Once it has been emptied the work is placed in the glaze room ready for you to decorate! Step Six – Glazing Decorating your work with colour can be a lot of fun – and time consuming! There are three main options for surface treatment at this stage: Oxide Washes Underglazes Glazes Washes and underglazes do not “glaze” the work – It will still need a layer of glaze to fully seal the clay (washes don’t need glaze on surfaces not designed for food or liquid as they can gloss up a little on their own). Underglazes are stable colourants that turn out pretty much how they look in the jar. They can be mixed with each other to form other colours and can be used like water colours to paint onto your work. Mostly they should have a clear glaze on top to seal them. Oxides are a different species – the pink oxide (cobalt) wash turns out bright blue for instance. They don’t always need a glaze on top, and some glazes can change the colour of the wash! The glazes need no other “glaze” on top! Be careful of unknown glaze interactions – you can put any combination of glaze in a bowl or on a plate, but only a single glaze on the outside of any vertical surface! Glazes are a chemical reaction under heat. We don’t know the exact chemicals in the Mayco glazes we use. I can guess by the way they interact with each other, however, on the whole, you need to test every idea you have, and not run the test on a vertical surface! Simply put, glaze is a layer of glass like substance that bonds with the clay underneath. Clay is made of silica, alumina and water. Glaze is made of mostly silica. Silica has a melting point of 1700°C and we fire to 1240°C. The silica requires a “flux” to help it melt at the lower temperature. Fluxes can be all sorts of chemicals – a common one is calcium – calcium has a melting point of 2500°C, however, together they both melt at a much lower temperature! Colourants are metal oxides like cobalt (blue), chrome (green through black), copper (green, blue, even red!), manganese (black, purple and pink) iron (red brown), etc. Different chemicals in the glaze can have dramatic effects. for example, barium carbonate (which we don’t use) turns manganese bright pink! Other elements can turn manganese dioxide brown, blue, purple and reddish brown. Manganese dioxide is a flux in and of itself as well. So, glazes that get their black and purple colours, often interact with other glazes and RUN! Our mirror black is a good example – it mixes really well with many glazes because it fluxes them – causes them to melt faster. It will also bring out many beautiful colours in the glazes because it’s black colouring most definitely comes from manganese dioxide! Glaze chemistry is a whole subject on it’s own! We use commercial Mayco glazes on purpose – for their huge range of colour possibilities, stability, cool interactions, artistic freedom with the ability to easily brush the glazes on and ease of use. We currently have almost 50 glazes on hand! A major project is to test the interactions of all glazes with each other. That is 2,500 test tiles!!!! I’m going to make the wall behind the wheels the feature wall of pretty colours! Step Seven – Glaze (Gloss or sometimes called “Glost”) Firing Most of the time this is the final stage of making your creation (but not always!) The glaze kiln goes to 1240°C. This is called cone 6, or midrange. It is the low end of stoneware temperatures. Stoneware clays and glazes are typically fired at cone 8 – 10, that is 1260 – 1290°C. The energy requirement to go from 1240°C to 1280°C is almost a 30% more! Our clay is formulated to vitrify (mature, turn “glass-like”) at 1240°, as are our glazes. A glaze kiln take around 12 hours to reach temperature and two to three days to cool down. Sometimes a third firing process is required – this is for decoration that is added to work after the glaze firing. For example – adding precious metals and lustres. this firing temperature is usually around 600 – 800°C depending upon the techniques being used. There are many students interested in gold and silver trims – we will be doing this third type of firing soon! After firing your work will be in the student finished work shelves. Remember to pay for it before you head out the door! There is a small extra charge for using porcelain clay (it’s more than twice the price of regular clay), and for any third firing process! Once your work has been fired it can not turn back into clay for millennia – so don’t fire it if you don’t like it! Put it in the bucket for recycling. https://firebirdstudios.com.au/the-process-of-making-pottery/Ceramics have evolved over thousands of years.A white earthenware side plate with a gadroon edge. Has water marks and chips on front.‘Johnson Bros England Reg No 15587’flagstaff hill, warrnambool, shipwrecked-coast, flagstaff-hill, flagstaff-hill-maritime-museum, maritime-museum, shipwreck-coast, flagstaff-hill-maritime-village, johnson bros, ceramics, tableware -
 Flagstaff Hill Maritime Museum and Village
Domestic object - Plate, Alfred Meakin
The Process of Making Pottery Decorating, Firing, Glazing, Making, Technical There is a rhythm and flow to clay. It can’t be done all at once! Even the making process! It can take weeks to get everything done, especially if you can only work on your pottery once a week! Even though we have three hour classes, it’s often just not enough time! Here is an overview of some of the processes so you have a bit more grasp on some of the technical stuff! Step One – Design There are SO many ideas out there for making stuff in clay! From delicate porcelain jewellery, through to heavy sculptural work and everything in between. Deciding your direction is sometimes not that easy – when you first start, try everything, you will naturally gravitate to the style that you enjoy! The options and variations are endless and can get a wee bit overwhelming too! Check in with me before you start to ensure your ideas will work, what order you might do things, how you could achieve the look you are seeking and any other technical data required! Step Two – Making Clay is thixotropic. This means that as you work with it, the clay first gets sloppier and wetter, before is begins to dry in the atmosphere. For most things, you simply can’t do all parts of the project at once. An example of work order might look like: Get last weeks work out from the shelves Prepare clay for today’s work – roll your clay, prepare balls for throwing, make the first stage of a pinch pot) Clean up last week’s work and put it on the shelf for bisque firing Check that you have any glazing to do – and do enough of it that you will have time to finish your main project Do the next step of your next project – there might be a further step that can’t be complete immediately, in that case, wrap your work well and put onto the shelves. Letting your work rest for a while can really help keep your work clean and professional looking. Many things require bagging under plastic to keep it ready for work the next week – put your name on the outside of the bag so you can find your work easily. We have stickers and markers. Consider how you want to decorate your work – coloured slip can be applied at a fairly wet stage (remembering that it will make your work even wetter!). Trying to apply slip to dry clay won’t work! If you want to do sgraffito – you will need to keep the work leather hard (a state of dryness where you can still work the clay with a little effort and a little water and care). Step Three – Drying Most of the time your work can go into the rack uncovered to let it dry out for the following week. If you want to continue forming or shaping you will need to double bag your work – put your work on a suitable sized bat and put the bat in a bag so the base of the bag is under the bat, then put another bag over the top of the work and tuck the top of the bag under the bat. If you want to trim (or turn) your thrown work the following week, it should also be double bagged. If your work is large, delicate, or of uneven thicknesses, you should lightly cover your work for drying. When considering the drying process, bare in mind the weather, humidity and wind! The hotter and dryer, the faster things dry and work can dry unevenly in the shelves – this can lead to cracking – another time to lightly cover your work for drying. Step Four – Trimming and Cleaning Up Your work is dry! It is called greenware now and it is at it’s most fragile! Handle everything with two hands. I often refer to soft hands – keep everything gentle and with your fingers spread as much as possible. Try to not pick up things like plates too much, and always with both hands! Before your work can be bisque fired it should be “cleaned up”. You work won’t go into the kiln if it has sharp edges – when glazed, sharp edges turn into razor blades! Use a piece of fly wire to rub the work all over – this will scratch a little so be light handed. Use a knife or metal kidney to scrape any areas that require a bit more dynamic treatment than the fly wire offers! Finally, a very light wipe over with a slightly damp sponge can help soften and soothe all of your edges and dags! Trimming thrown work: If you are planning to trim (or turn) your thrown work (and you should be), make sure you bag it well – your work should be leather hard to almost dry for easiest trimming. Use this step to finish the work completely – use a metal kidney to polish the surface, or a slightly damp sponge to give a freshly thrown look. Wipe the sponge around the rim after trimming, and check the inside of the pot for dags! Trimming slip cast work: Usually I will trim the rims of your work on the wheel the following day to make that stage easier, however you will still need to check your work for lumps and bumps. Last but not least – check that your name is still clearly on the bottom of your work. Step Five – Bisque Firing When the work is completely dry it can go into the bisque kiln. The bisque kiln is fired to 1000°C. This process burns off the water in the clay as well as some of the chemically bound water. The structure of the clay is not altered that much at this temperature. Inside the bisque kiln, the work is stacked a little, small bowl inside a larger bowl and onto a heavy plate. Smaller items like decorations or drink coasters might get stacked several high. Consideration is paid to the weight of the stack and shape of the work. A bisque kiln can fire about one and a half times the amount of work that the glaze kiln can fire. The firing takes about 10 hours to complete the cycle and about two days to cool down. Once it has been emptied the work is placed in the glaze room ready for you to decorate! Step Six – Glazing Decorating your work with colour can be a lot of fun – and time consuming! There are three main options for surface treatment at this stage: Oxide Washes Underglazes Glazes Washes and underglazes do not “glaze” the work – It will still need a layer of glaze to fully seal the clay (washes don’t need glaze on surfaces not designed for food or liquid as they can gloss up a little on their own). Underglazes are stable colourants that turn out pretty much how they look in the jar. They can be mixed with each other to form other colours and can be used like water colours to paint onto your work. Mostly they should have a clear glaze on top to seal them. Oxides are a different species – the pink oxide (cobalt) wash turns out bright blue for instance. They don’t always need a glaze on top, and some glazes can change the colour of the wash! The glazes need no other “glaze” on top! Be careful of unknown glaze interactions – you can put any combination of glaze in a bowl or on a plate, but only a single glaze on the outside of any vertical surface! Glazes are a chemical reaction under heat. We don’t know the exact chemicals in the Mayco glazes we use. I can guess by the way they interact with each other, however, on the whole, you need to test every idea you have, and not run the test on a vertical surface! Simply put, glaze is a layer of glass like substance that bonds with the clay underneath. Clay is made of silica, alumina and water. Glaze is made of mostly silica. Silica has a melting point of 1700°C and we fire to 1240°C. The silica requires a “flux” to help it melt at the lower temperature. Fluxes can be all sorts of chemicals – a common one is calcium – calcium has a melting point of 2500°C, however, together they both melt at a much lower temperature! Colourants are metal oxides like cobalt (blue), chrome (green through black), copper (green, blue, even red!), manganese (black, purple and pink) iron (red brown), etc. Different chemicals in the glaze can have dramatic effects. for example, barium carbonate (which we don’t use) turns manganese bright pink! Other elements can turn manganese dioxide brown, blue, purple and reddish brown. Manganese dioxide is a flux in and of itself as well. So, glazes that get their black and purple colours, often interact with other glazes and RUN! Our mirror black is a good example – it mixes really well with many glazes because it fluxes them – causes them to melt faster. It will also bring out many beautiful colours in the glazes because it’s black colouring most definitely comes from manganese dioxide! Glaze chemistry is a whole subject on it’s own! We use commercial Mayco glazes on purpose – for their huge range of colour possibilities, stability, cool interactions, artistic freedom with the ability to easily brush the glazes on and ease of use. We currently have almost 50 glazes on hand! A major project is to test the interactions of all glazes with each other. That is 2,500 test tiles!!!! I’m going to make the wall behind the wheels the feature wall of pretty colours! Step Seven – Glaze (Gloss or sometimes called “Glost”) Firing Most of the time this is the final stage of making your creation (but not always!) The glaze kiln goes to 1240°C. This is called cone 6, or midrange. It is the low end of stoneware temperatures. Stoneware clays and glazes are typically fired at cone 8 – 10, that is 1260 – 1290°C. The energy requirement to go from 1240°C to 1280°C is almost a 30% more! Our clay is formulated to vitrify (mature, turn “glass-like”) at 1240°, as are our glazes. A glaze kiln take around 12 hours to reach temperature and two to three days to cool down. Sometimes a third firing process is required – this is for decoration that is added to work after the glaze firing. For example – adding precious metals and lustres. this firing temperature is usually around 600 – 800°C depending upon the techniques being used. There are many students interested in gold and silver trims – we will be doing this third type of firing soon! After firing your work will be in the student finished work shelves. Remember to pay for it before you head out the door! There is a small extra charge for using porcelain clay (it’s more than twice the price of regular clay), and for any third firing process! Once your work has been fired it can not turn back into clay for millennia – so don’t fire it if you don’t like it! Put it in the bucket for recycling. https://firebirdstudios.com.au/the-process-of-making-pottery/Ceramics have evolved over thousands of years.Earthenware dessert plate, cream colour. Made by Alfred Meakin, England. Backstamped ‘Alfred Meakin England’. flagstaff hill, warrnambool, shipwrecked-coast, flagstaff-hill, flagstaff-hill-maritime-museum, maritime-museum, shipwreck-coast, flagstaff-hill-maritime-village, alfred meakin, ceramics, earthenware, kitchenware -
 Flagstaff Hill Maritime Museum and Village
Domestic object - Jug
The Process of Making Pottery Decorating, Firing, Glazing, Making, Technical There is a rhythm and flow to clay. It can’t be done all at once! Even the making process! It can take weeks to get everything done, especially if you can only work on your pottery once a week! Even though we have three hour classes, it’s often just not enough time! Here is an overview of some of the processes so you have a bit more grasp on some of the technical stuff! Step One – Design There are SO many ideas out there for making stuff in clay! From delicate porcelain jewellery, through to heavy sculptural work and everything in between. Deciding your direction is sometimes not that easy – when you first start, try everything, you will naturally gravitate to the style that you enjoy! The options and variations are endless and can get a wee bit overwhelming too! Check in with me before you start to ensure your ideas will work, what order you might do things, how you could achieve the look you are seeking and any other technical data required! Step Two – Making Clay is thixotropic. This means that as you work with it, the clay first gets sloppier and wetter, before is begins to dry in the atmosphere. For most things, you simply can’t do all parts of the project at once. An example of work order might look like: Get last weeks work out from the shelves Prepare clay for today’s work – roll your clay, prepare balls for throwing, make the first stage of a pinch pot) Clean up last week’s work and put it on the shelf for bisque firing Check that you have any glazing to do – and do enough of it that you will have time to finish your main project Do the next step of your next project – there might be a further step that can’t be complete immediately, in that case, wrap your work well and put onto the shelves. Letting your work rest for a while can really help keep your work clean and professional looking. Many things require bagging under plastic to keep it ready for work the next week – put your name on the outside of the bag so you can find your work easily. We have stickers and markers. Consider how you want to decorate your work – coloured slip can be applied at a fairly wet stage (remembering that it will make your work even wetter!). Trying to apply slip to dry clay won’t work! If you want to do sgraffito – you will need to keep the work leather hard (a state of dryness where you can still work the clay with a little effort and a little water and care). Step Three – Drying Most of the time your work can go into the rack uncovered to let it dry out for the following week. If you want to continue forming or shaping you will need to double bag your work – put your work on a suitable sized bat and put the bat in a bag so the base of the bag is under the bat, then put another bag over the top of the work and tuck the top of the bag under the bat. If you want to trim (or turn) your thrown work the following week, it should also be double bagged. If your work is large, delicate, or of uneven thicknesses, you should lightly cover your work for drying. When considering the drying process, bare in mind the weather, humidity and wind! The hotter and dryer, the faster things dry and work can dry unevenly in the shelves – this can lead to cracking – another time to lightly cover your work for drying. Step Four – Trimming and Cleaning Up Your work is dry! It is called greenware now and it is at it’s most fragile! Handle everything with two hands. I often refer to soft hands – keep everything gentle and with your fingers spread as much as possible. Try to not pick up things like plates too much, and always with both hands! Before your work can be bisque fired it should be “cleaned up”. You work won’t go into the kiln if it has sharp edges – when glazed, sharp edges turn into razor blades! Use a piece of fly wire to rub the work all over – this will scratch a little so be light handed. Use a knife or metal kidney to scrape any areas that require a bit more dynamic treatment than the fly wire offers! Finally, a very light wipe over with a slightly damp sponge can help soften and soothe all of your edges and dags! Trimming thrown work: If you are planning to trim (or turn) your thrown work (and you should be), make sure you bag it well – your work should be leather hard to almost dry for easiest trimming. Use this step to finish the work completely – use a metal kidney to polish the surface, or a slightly damp sponge to give a freshly thrown look. Wipe the sponge around the rim after trimming, and check the inside of the pot for dags! Trimming slip cast work: Usually I will trim the rims of your work on the wheel the following day to make that stage easier, however you will still need to check your work for lumps and bumps. Last but not least – check that your name is still clearly on the bottom of your work. Step Five – Bisque Firing When the work is completely dry it can go into the bisque kiln. The bisque kiln is fired to 1000°C. This process burns off the water in the clay as well as some of the chemically bound water. The structure of the clay is not altered that much at this temperature. Inside the bisque kiln, the work is stacked a little, small bowl inside a larger bowl and onto a heavy plate. Smaller items like decorations or drink coasters might get stacked several high. Consideration is paid to the weight of the stack and shape of the work. A bisque kiln can fire about one and a half times the amount of work that the glaze kiln can fire. The firing takes about 10 hours to complete the cycle and about two days to cool down. Once it has been emptied the work is placed in the glaze room ready for you to decorate! Step Six – Glazing Decorating your work with colour can be a lot of fun – and time consuming! There are three main options for surface treatment at this stage: Oxide Washes Underglazes Glazes Washes and underglazes do not “glaze” the work – It will still need a layer of glaze to fully seal the clay (washes don’t need glaze on surfaces not designed for food or liquid as they can gloss up a little on their own). Underglazes are stable colourants that turn out pretty much how they look in the jar. They can be mixed with each other to form other colours and can be used like water colours to paint onto your work. Mostly they should have a clear glaze on top to seal them. Oxides are a different species – the pink oxide (cobalt) wash turns out bright blue for instance. They don’t always need a glaze on top, and some glazes can change the colour of the wash! The glazes need no other “glaze” on top! Be careful of unknown glaze interactions – you can put any combination of glaze in a bowl or on a plate, but only a single glaze on the outside of any vertical surface! Glazes are a chemical reaction under heat. We don’t know the exact chemicals in the Mayco glazes we use. I can guess by the way they interact with each other, however, on the whole, you need to test every idea you have, and not run the test on a vertical surface! Simply put, glaze is a layer of glass like substance that bonds with the clay underneath. Clay is made of silica, alumina and water. Glaze is made of mostly silica. Silica has a melting point of 1700°C and we fire to 1240°C. The silica requires a “flux” to help it melt at the lower temperature. Fluxes can be all sorts of chemicals – a common one is calcium – calcium has a melting point of 2500°C, however, together they both melt at a much lower temperature! Colourants are metal oxides like cobalt (blue), chrome (green through black), copper (green, blue, even red!), manganese (black, purple and pink) iron (red brown), etc. Different chemicals in the glaze can have dramatic effects. for example, barium carbonate (which we don’t use) turns manganese bright pink! Other elements can turn manganese dioxide brown, blue, purple and reddish brown. Manganese dioxide is a flux in and of itself as well. So, glazes that get their black and purple colours, often interact with other glazes and RUN! Our mirror black is a good example – it mixes really well with many glazes because it fluxes them – causes them to melt faster. It will also bring out many beautiful colours in the glazes because it’s black colouring most definitely comes from manganese dioxide! Glaze chemistry is a whole subject on it’s own! We use commercial Mayco glazes on purpose – for their huge range of colour possibilities, stability, cool interactions, artistic freedom with the ability to easily brush the glazes on and ease of use. We currently have almost 50 glazes on hand! A major project is to test the interactions of all glazes with each other. That is 2,500 test tiles!!!! I’m going to make the wall behind the wheels the feature wall of pretty colours! Step Seven – Glaze (Gloss or sometimes called “Glost”) Firing Most of the time this is the final stage of making your creation (but not always!) The glaze kiln goes to 1240°C. This is called cone 6, or midrange. It is the low end of stoneware temperatures. Stoneware clays and glazes are typically fired at cone 8 – 10, that is 1260 – 1290°C. The energy requirement to go from 1240°C to 1280°C is almost a 30% more! Our clay is formulated to vitrify (mature, turn “glass-like”) at 1240°, as are our glazes. A glaze kiln take around 12 hours to reach temperature and two to three days to cool down. Sometimes a third firing process is required – this is for decoration that is added to work after the glaze firing. For example – adding precious metals and lustres. this firing temperature is usually around 600 – 800°C depending upon the techniques being used. There are many students interested in gold and silver trims – we will be doing this third type of firing soon! After firing your work will be in the student finished work shelves. Remember to pay for it before you head out the door! There is a small extra charge for using porcelain clay (it’s more than twice the price of regular clay), and for any third firing process! Once your work has been fired it can not turn back into clay for millennia – so don’t fire it if you don’t like it! Put it in the bucket for recycling. https://firebirdstudios.com.au/the-process-of-making-pottery/The form of the jug has been in use for many centuries.Stoneware jug. Two tone brown glaze with pierced lip behind spout. Spout chipped.None.flagstaff hill, warrnambool, shipwrecked-coast, flagstaff-hill, flagstaff-hill-maritime-museum, maritime-museum, shipwreck-coast, flagstaff-hill-maritime-village, jug, ceramic jug -
 Victorian Aboriginal Corporation for Languages
Periodical, Australian Institute of Aboriginal and Torres Strait Islander Studies, Australian Aboriginal studies : journal of the Australian Institute of Aboriginal and Torres Strait Islander Studies, 2007
1. Musical and linguistic perspectives on Aboriginal song Allan Marett and Linda Barwick Song brings language and music together. Great singers are at once musicians and wordsmiths, who toss rhythm, melody and word against one another in complex cross-play. In this paper we outline some initial findings that are emerging from our interdisciplinary study of the musical traditions of the Cobourg region of western Arnhem Land, a coastal area situated in the far north of the Australian continent 350 kilometres northeast of Darwin. We focus on a set of songs called Jurtbirrk, sung in Iwaidja, a highly endangered language, whose core speaker base is now located in the community of Minjilang on Croker Island. We bring to bear analytical methodologies from both musicology and linguistics to illuminate this hitherto undocumented genre of love songs. 2. Iwaidja Jurtbirrk songs: Bringing language and music together Linda Barwick (University of Sydney), Bruce Birch and Nicholas Evans (University of Melbourne) Song brings language and music together. Great singers are at once musicians and wordsmiths, who toss rhythm, melody and word against one another in complex cross-play. In this paper we outline some initial findings that are emerging from our interdisciplinary study of the musical traditions of the Cobourg region of western Arnhem Land, a coastal area situated in the far north of the Australian continent 350 kilometres northeast of Darwin. We focus on a set of songs called Jurtbirrk, sung in Iwaidja, a highly endangered language, whose core speaker base is now located in the community of Minjilang on Croker Island. We bring to bear analytical methodologies from both musicology and linguistics to illuminate this hitherto undocumented genre of love songs. 3. Morrdjdjanjno ngan-marnbom story nakka, ?songs that turn me into a story teller?: The morrdjdjanjno of western Arnhem Land Murray Garde (University of Melbourne) Morrdjdjanjno is the name of a song genre from the Arnhem Land plateau in the Top End of the Northern Territory and this paper is a first description of this previously undocumented song tradition. Morrdjdjanjno are songs owned neither by individuals or clans, but are handed down as ?open domain? songs with some singers having knowledge of certain songs unknown to others. Many morrdjdjanjno were once performed as part of animal increase rituals and each song is associated with a particular animal species, especially macropods. Sung only by men, they can be accompanied by clap sticks alone or both clap sticks and didjeridu. First investigations reveal that the song texts are not in everyday speech but include, among other things, totemic referential terms for animals which are exclusive to morrdjdjanjno. Translations from song language into ordinary register speech can often be ?worked up? when the song texts are discussed in their cultural and performance context. The transmission of these songs is severely endangered at present as there are only two known singers remaining both of whom are elderly. 4. Sung and spoken: An analysis of two different versions of a Kun-barlang love song Isabel O?Keeffe (nee Bickerdike) (University of Melbourne) In examining a sung version and a spoken version of a Kun-barlang love song text recorded by Alice Moyle in 1962, I outline the context and overall structure of the song, then provide a detailed comparative analysis of the two versions. I draw some preliminary conclusions about the nature of Kun-barlang song language, particularly in relation to the rhythmic setting of words in song texts and the use of vocables as structural markers. 5. Simplifying musical practice in order to enhance local identity: Rhythmic modes in the Walakandha wangga (Wadeye, Northern Territory) Allan Marett (University of Sydney) Around 1982, senior performers of the Walakandha wangga, a repertory of song and dance from the northern Australian community of Wadeye (Port Keats), made a conscious decision to simplify their complex musical and dance practice in order to strengthen the articulation of a group identity in ceremonial performance. Recordings from the period 1972?82 attest to a rich diversity of rhythmic modes, each of which was associated with a different style of dance. By the mid-1980s, however, this complexity had been significantly reduced. I trace the origin of the original complexity, explore the reasons why this was subsequently reduced, and trace the resultant changes in musical practice. 6. ?Too long, that wangga?: Analysing wangga texts over time Lysbeth Ford (University of Sydney) For the past forty or so years, Daly region song-men have joined with musicologists and linguists to document their wangga songs. This work has revealed a corpus of more than one hundred wangga songs composed in five language varieties Within this corpus are a few wangga texts recorded with their prose versions. I compare sung and spoken texts in an attempt to show not only what makes wangga texts consistently different from prose texts, but also how the most recent wangga texts differ from those composed some forty years ago. 7. Flesh with country: Juxtaposition and minimal contrast in the construction and melodic treatment of jadmi song texts Sally Treloyn (University of Sydney) For some time researchers of Centralian-style songs have found that compositional and performance practices that guide the construction and musical treatment of song texts have a broader social function. Most recently, Barwick has identified an ?aesthetics of parataxis or juxtaposition? in the design of Warumungu song texts and musical organisation (as well as visual arts and dances), that mirrors social values (such as the skin system) and forms 'inductive space' in which relationships between distinct classes of being, places, and groups of persons are established. Here I set out how juxtaposition and minimal contrast in the construction and melodic treatment of jadmi-type junba texts from the north and north-central Kimberley region similarly create 'inductive space' within which living performers, ancestral beings, and the country to which they are attached, are drawn into dynamic, contiguous relationships. 8. The poetics of central Australian Aboriginal song Myfany Turpin (University of Sydney) An often cited feature of traditional songs from Central Australia (CA songs) is the obfuscation of meaning. This arises partly from the difficulties of translation and partly from the difficulties in identifying words in song. The latter is the subject of this paper, where I argue it is a by-product of adhering to the requirements of a highly structured art form. Drawing upon a set of songs from the Arandic language group, I describe the CA song as having three independent obligatory components (text, rhythm and melody) and specify how text is set to rhythm within a rhythmic and a phonological constraint. I show how syllable counting, for the purposes of text setting, reflects a feature of the Arandic sound system. The resultant rhythmic text is then set to melody while adhering to a pattern of text alliteration. 9. Budutthun ratja wiyinymirri: Formal flexibility in the Yol?u manikay tradition and the challenge of recording a complete repertoire Aaron Corn (University of Sydney) with Neparr? a Gumbula (University of Sydney) Among the Yol?u (people) of north-eastern Arnhem Land, manikay (song) series serve as records of sacred relationships between humans, country and ancestors. Their formal structures constitute the overarching order of all ceremonial actions, and their lyrics comprise sacred esoteric lexicons held nowhere else in the Yol?u languages. A consummate knowledge of manikay and its interpenetrability with ancestors, country, and parallel canons of sacred y�ku (names), bu?gul (dances) and miny'tji (designs) is an essential prerequisite to traditional leadership in Yol?u society. Drawing on our recordings of the Baripuy manikay series from 2004 and 2005, we explore the aesthetics and functions of formal flexibility in the manikay tradition. We examine the individuation of lyrical realisations among singers, and the role of rhythmic modes in articulating between luku (root) and bu?gul'mirri (ceremonial) components of repertoire. Our findings will contribute significantly to intercultural understandings of manikay theory and aesthetics, and the centrality of manikay to Yol?u intellectual traditions. 10. Australian Aboriginal song language: So many questions, so little to work with Michael Walsh Review of the questions related to the analysis of Aboriginal song language; requirements for morpheme glossing, component package, interpretations, prose and song text comparison, separation of Indigenous and ethnographic explanations, candour about collection methods, limitations and interpretative origins.maps, colour photographs, tablesyolgnu, wadeye, music and culture -
 4th/19th Prince of Wales's Light Horse Regiment Unit History Room
Photo Albums - set of two, c. 1919
Memorabilia of 908 Dvr Thomas Edward Whyte, 3rd Light Horse Field Ambulance, World War 1 READ THIS. During the last war I sent these pictures home through devious channels. When I lobbed back I found them all pasted in these albums by my young brother Billy. He was only a kid then! Nowadays he is serving up North. Went away with the original 9th Battn. Was in the Blitz on England and served in Libya, Tobruk, Greece, Crete and Palestine and was twice knocked. It's not long since the last upheaval 1914-18 and I wonder if these boys think as we did. This will be the last war? I sincerely hope so. TWSet of two photo albums. Photos pasted into albums with captions in white ink. Photo captions - Vol 1. (? = not legible) 1. Prisoners from ES SALT 2. Dust scene at AUJA FORD. 4th LH BDE 3. ? ? CHEOPS PYRAMID 4. Houses and domain WASSA battle 5 .Pontoon at SERAPELAI 6. SPINX (sic) & PYRAMID 7. The Nile floods occur once yearly and all irrigation centres are alternatively flooded 8. Pontoon bridge over SUEZ Canal at SERAPEUM . Constructed by Aust Engineers 9. The arrival of newspapers and mail 10. Lake IIMSAH-ISMALIA 11. Camp outside Jerusalem. Walls of old city easily discernible 12. Roman walls on beach at MONTAZEH 13. ? ? These boats are used for conveying between steamer & shore 14. Interest shown in the new issue. Through the scarcity of horses Batmen/Grooms and drivers ? allotted donkeys ? ? 15. DAMASCUS GATE JERUSALEM 16. Trumpeter ? 17 Indians making ? for railroad 18. 'SPELLO' Sinai Country 19. Police searching Egyptian labourer 20. Cavalry ?? SHA? 21. Entering ? WADI ? 22. Bedouins at ? 23 No caption 24 No caption 25 Bolar trees EZBEKIEH Gardens CAIRO 26 .Flamingos at NOUZEH Gardens ALEXANDRIA 27 BARAGE 28 KASR-ELNILL Bridge 29 NOUZEH GARDENS 30 AMGS on beach at ? 31 NOUZEH GARDENS - ALEX 32 Mascot of 7th M.V.G. 3RD ALHR 33 Printing on walls inside St Mary's Church. Depicting the Flight from Herod. (Corner torn off photo) 34 Inside Virgin Mary's Church at MATARA 35 ? painting in Church ?? 36 SUEZ Canal. Finish of Arab pony race. ZAL-A-ZIA 37 Admiralty offices at PORT SAID 38 A corner of CHEOP"s PYRAMID 39 The Spinx (sic). Nose was blown off by a shell from one of Napoleon's guns. 40 Monastry on the MT of TEMPTATION 41 Mess orderlies. Foodstuffs in locker given to troops by the AIF 42 Mid day meal on treck 43 Ambulance sand carts for conveying wounded and sick over desert sand 44 3rd ALHB 45 Kaisers Church JERUSALEM. Inside is a large painting figuring the Kaiser & Kaiserine holding a model church. 46 Bedouin women drawing water from well at EL-ARISH 47 2nd ALH BGDE doing route march on JERUSALEM-JERICHO ROAD 48 GEN HODSON GOC Anzac Mounted Divn presenting decorations & investitures on the sands at SHEIKS-ZOWAID 49 Armoured Car 50 Snow at the CEEDERS (sic) on Mt LEBANON 51 Compulsory phenyle bath for all troops in front line area 52 Austrian guns taken at point of bayonet by NZ & 2nd BGDE at GAZA 53 CACHOLETS for carrying wounded 54 The boys found some timber and made a spring board on SUEZ Canal 55 Bedouin wedding. The Bride travels in state amongst rubbish on top of camel. Her father leads conveyance. 56 Australian graves at SHALLAL 57 Camel Transport Company bring rations along beach 58 Billy the mascot holds an offensive & checks advancement 59 Exercising horses at HELMIEH Egypt 60 PONT-DE-QUOBBA Egypt. A suburb of well-to-do Egyptian merchants 61 Demolition stunt at ASLU. Bridge destroyed by Australian Engineers 62 Swimming horses in Great Bitter Lakes Egypt 63 On the move along Wadi 64 On the shores of the Bitter Lakes EL-EGYTE 65 A leave party waiting for the pontoon to swing into position 66 Carting grain 67 Egyptian Brass Band 68 French warboat (sic) in Canal 69 Russian Troops from Mesopotamia passing through SUEZ Canal 70 Prisoners coming in under escort. Turkish & German officers in lead mounted on ponies 71 Turkish prisoners 72 T.B.D in Canal 73 Old trenches on SUEZ CANAL near BITTER LAKES on W Bank 74 Monitor in Canal 75 Block house, trenches & entanglements near Post 62 76 A halt in an Egyptian village EL-MARO' 77 Mobile wireless plant 78 On the road from Canal to Railhead 79 Old Turkish guns in ancient fort at ALEXANDRIA 80 Francenia steaming through Canal 81 After MAGHDABA stunt. Convoy taking wounded form EL-ARISH to railway at 139 82 Indian Camelry 83 Virgin Mary's Church 84 Sluice gate at BARAGE Egypt 85 Hospital at lower W bank of Canal 86 Virgin Mary's tree 87 Sweetwater Canal at ISMAILIA Egypt 88 Halt and Feed. The A.M.C. attached to flying column. 89 Bringing stores ashore at JAFFA 90 H Videon & J Britton astride donks. Horses became scarce through casualties etc and units had donkeys issued to them 91 RAMLEH. The traditional burial place of St John the patron saint of England (sic). 92 Jewish Synagogue at RISHON-COUR-LE-LION (Richard the Lion Hearted) 93 Water tower at HELIOPOLIS 94 Portion of camp on HELIOPOLIS Racecourse 95 Arrival of papers 96 Sand sleigh 97 Boring plant & prisoners taken on the JIFF-JAFFA stunt. Two Austrian officers and party of Turks taken whilst building a concrete gun emplacement 98 The obelisk at MATARIA 99 In an avenue of Australian gums at ZEITOUA 100 Mountain battery gun 101 The 3rd ALH BGDE camped at HELIOPOLIS Racecourse 102 Captured Turkish guns 103 Turkish and Austrian prisoners. JORDAN VALLEY 104 The MT of Temptation Monastery built over spot where Christ spent his 40 days 105 Refugees from ES-SALT at JERICHO 106 3rd LHFA and 8th LH REGT at HELIOPOLIS 107 Fig trees at Roman Wells JIFF JAFFA 108 Inside the Blue Mosque CAIRO 109 Lagoon that was destroyed on JIFF JAFFA stunt 110 Section race at Brigade sports 111 Another tombstone at ALEX 112 Innoculating female date palm 113 Bronze tombstone in a cemetary at ALEXANDRIA 114 Luna Park at HELIOPOLIS 115 Egyptian water buffalo. Used by natives for ploughing etc 116 Russian church. Some call it the "Church of St Mary Magdelene" 117 At pyramids GIZA. Billingsley lost leg & McMullin KIA 118 Pontoon bridge over Suez Canal 119 DURBAN 120 Rescue work 121 Paddy Hanly 122 Motor train for conveying rations between Canal and Railhead. 123 At MUCKSHUBE ? 124 British ??? 125 Bedouins bringing in their harvest from the fields of ABBASSAN-EL-KEBIR Palestine 126 German HD QTRS BEERSHEBA 127 Date ? SINAI 128 Military railroad running through ? at EL-ARISH 129 Street scene at KHAN-YUNIS Palestine. Samson often called at this place to visit his girl. Napoleon narrowly escaped capture here during his ? in 1799 130 Date palms bearing fruit. These do not ? they are ?? 131 Motor ambulance convoy 132 Turkish hospital BEERSHEBA 133 MT CALVARY 134 Town Hall BEERSHEBA 135 Railway station BEERSHEBA 136 ASLUJ 137 Turkish depot MAGDABA 138 DURAN 139 3rd ALAB Hospital 140 Main Street PORT SAID 141 Stock Exchange ALEXANDRIA 142 The "Bull Ring" 14th AGH 143 (Double exposure) 144 Jewish School at DURAN Palestine 145 Damascus Gate JERUSALEM 146 Roller used for grinding clay for making bricks 147 The Harbour at ALEXANDRIA 148 Part of Napoleons Road along sea shore opposite BEELAH 149 Hotel at ALEX. Barred to the troops of course. 150 HELIOPOLIS 151 -153 ALEXANDRIA 154 Ambulance treck 155 Cacholets at the casually clearing station 156 Refugees from ES-SALT entering the Jordan Valley. Mts of MOAB in background 157 Cameliers bring in prisoners 158 The "Niagara". Casualties were from the front line by all descriptions of transport and passed through several field hospitals until they eventually reached the railway. They were sent to KANTARA by train. Despatched from there to PORT SAID by this boat 159 JERICHO 160 Turkish prisoners in JORDAN VALLEY 161 Bedouin nippers of SINAI 162 Bridge destroyed by ALH at ASLUJ 163 Railway sheds at BEERSHEBA. Portion was set afire by retreating Turks 164 ASLUJ Station 165 German Hospice 166 at ASLUJ 167 Suez Canal offices PORT SAID 168 MENA Village from top of Cheops. White lines at left are roads made by Australian troop. First Aust Contingent camped here. 169 A felukeh passing through gate at BARAGE 170 Military railway terminal EL ARISH 171 (No caption) 172 Egyptian family waiting for a train 173 Turkish prisoners and captured material coming in 174 Turkish wounded at BEERSHEBA awaiting removal 175 Two hospital ships at ALEXANDRIA 176 Some of the Bd boys 177 Race meeting 3rd ALHB at TRIPOLI- SYRIA 178 The blacksmith and Rodney Thomas swimming horse in SUEZ CANAL 179 Natives grinding grain 180 Thoroughbred 181 MUKATTAM HILLS 182 Trenches at JIFF JAFFA 183 MacBoyd as a Padre 184 Egyptian Syce having shave by travelling barber 185 The creek outside ALMINA 186 Cameliers 187 Clearing Station on beach at EL-ARISH 188 Wadi at TALLAT-EL-DUMM 189 Motor transport park 190 Some of the boys 191 Pompeys Pillar 192 at MAGHDABA 193 Hospital at JERUSALEM 194 Cheop's Pyramid 195 Golden Gate JERUSALEM 196 Hustling Turks through BEERSHEBA 197 Holy City 198 Mosque of Omar Jerusalem 199 Railway bridge destroyed by ALH at ASLUJ 200 Enemy material captured at SHERIA BEERSHEBA 201-3 These Mosques built with alabaster taken from pyramids at GIZA 204 Pontoon bridge built by our Engineers over RIVER JORDAN 205 3rd Bgde in Koil at MASAID 206 Billy McGhie throwing the weight 207 Nirazeh ? Gardens 208 Motor Ambulance Park 209 Bedouin women in Palestine village 210 ALEXANDRIA 211 Junction Stn 212 Indian Lancers 213 Motor convoy at ESSANI 214 A & B Sections 215 JERUSALEM. Once known as the 'City of Palms' and presented to Cleopatra by Anthony 216 Monastery on the Mount of Temptation. Situated on the Hills of Solomon on E side of Jordan Valley just behind JERICHO 217 DURAN A Jewish village in Palestine 218 One of our planes meets with a mishap on landing 219 Bedouin flocks around NABLUS 220 ES-SALT Road just above Jordan River 221 Halt! Action Front! Getting guns into action from pack 222 Village well 223 Gun inspection 224 WADI GHUZZEE Bridge 225-6 At GIZA Zoo Egypt 227 Syrians gathering olives 228 Smashed plane 229 MacBoyd 230 Bridge across Jordan at GORRONHOER 231 Competitors for Gretna Green. 3rd Bgde sports at TRIPOLIA 232 EL ARISH 233 Main street JAFFA 234 The beach at MARI-KHEB 235 Scene of old Cairo 236 Bedouin market 237 Bridge built over Wadi EL-ARISH. The biblical "River of Egypt". 238 Old water reservoir in native village 239 A "spello" on the track 240 Plane going out on reconnaissance 241 Bomb attached to carrier on a plane 242 Ancient Turkish gun at forts in TRIPOLI - SYRIA 243 Gun inspection 3rd AMGS 244 Old Turkish trenches outside GAZA 245 Wadi KHUZEL Bridge at SHALLA 246 BEERSHEBA 247 Street scene ZAG-A-ZIG 248 Spinx (sic) & Pyramid - GIZA 249 Egyptian Coastguards at ALEXANDRIA 250 A Palestine camp E Troop 3rd MG Sqn 251 B class horses killed in Syria 252 Scene from summit of Pyramid 253 Bert Richmond & an old Turkish Howitzer on MONTAZEH 254 LION'S WELL 255 Australian trenches outside Ferry's Post near Hill 70 256 A street scene in HELIO{PLIS 257 Electric trams at ALEXANDRIA 258 Cleaning harness 259 Swinging pontoon bridge into position at SERAPEUM 260 British Monitor in Suez Canal 261-2 Scenes of Turkish buildings at MAGHDABA. Taken by the ALH The first time in history mounted troops have attacked and taken entrenched positions 263 Aussies at Egypt's ancient monuments 264 Scenes of old CAIRO from MOKATTAM Hils 265 Bridge across canal at BARAGE, 16 miles outside CAIRO 266 Curly and Vic Norton 267 Stumpy McIntyre & Long Pikington 268 In Wadi GHUZZEL near TELL-EL-JEMM 269 Digging post holes for stables 270 Cameliers bring in prisoner. Austrian Officer in black 271 White washing mess shed 272 F Troop 3rd AMGS Sqn 273 Jews at Recruiting Depot at JERUSALEM, forming Jewish Battalion 274 In Jordan Valley, 3rd Machine Gunners have 8 horses killed by an aerial torpedo 275 Turkish prisoners 276 Cocos Island 277 Snow on the Lebanon Ranges 278 Egyptian Hotel 279 Gordon Wake. Note intruders 280 Electric trams at HELIOPOLIS Egypt. Heliopolis built by Belgian firm in 7 years 281 Sweetwater Canal at SERAPEUM 282 The ? wells at JIFF-JAFFA 283 Virgin Mary's well at MATARIA. Boyd, Simpkin & Crowley 284 Cricket for convalescents at MONTAREH 285 Indians working at cutting for military railway 286 Australian Hospital BEERSHEBA 287 Removing wrecked ambulance car from rail road 288 Engineers depot in ? at EL-ARISH 289 Water preservation scheme at SHALLAL 290 German Princes Palace at HELIOPOLOLIS 291 Some of the boys 292 Aussie aerodrome BEELAH 293 EL-JALLAH outside BETHLEHEM 294 Some of the gunners 295 Trying camels in gun carriages. Note sand caterpillar 296 Street outside old city JERUSALEM 297 D.H QRS In EL-ARISH. Hod 298 Cairo Museum 299 Wadi bridge built by Army Engineers 300 A two storied building at GALM used as German HQrs until reached by our guns 301-2 No caption 303 Ambulance with Flying Column 304 Jack Pegg 3 AMGS 305 KHAN YUNIS 306 In the Jewish village of "Rischon le Lion" 307 Wet Canteen BEELAH 308 Motor Transport LATRON 309 Gen Chauvel OC Desert Mounted Column 310 10th LH - Inverness Battery "Railhead" 311 3rd LHFA "SERAPIUM" 312 ESBEKIEN Gardens "LE CAIRE" 313 Camel training and wireless station Hill 60 314 ZAG-A-ZIG Rly Stn 315 One of the Irrigation Canal locks "HELOUAN" 316 Indian Camel Corps 317 Base at Hill 60 318 Aussie transport arriving "ALEXANDRIA" 319 3 ALHB at AL MINA 320 Main entry to city of JAFFA 321 Mosque at DAMASCUS 322 A Turk brought to earth by one of our patrols 323 Brigade boxing contrst 324 Ostrich farm ZEITOUN 325 MATERIA 326 No caption 327 Mail day 328 3rd LHFA entering HELIOPOLIS from MENA 329 M Boyd, L Simpkins, S Crowley 330 Stretcher bearers 331 French Hosp JERUSALEM 332 SERAPIUM 333 Gippo crushing wheel 334 On the move - bully and biscuits 335 V Morton, F Stokes, L Simpkins & Hanley 336 Turkish prisoners - SHERIA 337 Getting used to the mask J Antonio MM 338 Sand carts 339 Model house - MONTAZA Hospital 340 "Abdul" 341 Wood Depot "ESDUD" 342 On troop ship - from Syria 343 Turkish prisoners "JULIUS" 344 TRIPOLI 345 3rd AMGS cook house "BEELAH" 346 Breaking camp "ZEITOUN" 347 Turkish prisoners "GAZA" 348 One of our tanks. About nine were blown out of action at GAZA 349 Camp in HOD-EL-ARISH 350 German HQRS BEERSHEBA 351 Race Course TRIPOLI 352 A Locke & P Leeming 353 Sea planing in Suez Canal 354 MOASCR detail camp 355 KANTARE Suez Canal 356 Four boys of MG Sqn at cards while convalescing . Marked X was a prisoner of war for three days. Got him back with us when we countered. 357 Signal station at CANA 358 H Videon in german rig 359 ROD-EL-FARAC 360 Sweetwater Canal ZAG-A-ZOG 361 Hospital train on beach EL-ARISH 362 Jerusalem Road 363 Bedouin camel and young'un 364 Admiralty Offices, PORT SAID 365 Suez Canal PORT SAID 366 Taking wounded to clearing station 367 Hills of 10-60 MALHA 368 Junction Station 369 EL ARISH 370 Wine Distillery LATRON 371 White figures how entrance to Pyramid 372 RAPC Wireless Station 373 Sports in Canal. ANZAC Day 1916. Prince of Wales is aboard white launch. 374-5 Captured Austrian boat. 40,000 cases of benzine aboard. She was brought into Canal at Port Said. Spies set her afire. She burnt for some considerable time and eventually blew up. 376 Pumping water from Wadi on Muckshabee stunt 377 On trenches 378 Bringing in disabled battle plane 379 Giving a motor transport a lift 380 Old Turkish howitzer. MONTAZZA 381 Jerusalem country 382 Palm Hod in SINAI. Trees do not bear dates until 14 years old. No bees here. Palms innoculated by Bedouin. 383 Camel cacolets for conveying wounded 384 ESKBEKIEL Gardens Cairo 385 LAKE TIMBAH 386 Xmas dinner 1916 387 Gift billies from ACF 388 Section competition 389 In big marquees HELIOPOLIS 390 HM Landships 391 Capt Aberdeen inspecting horses 392 Football. Black vs White 393 The game 394 Old Napoleon fort. 10 mile along coast from ALEX 395 Jewish Cemetery AKRON 396 Ration fatigue 397 Blowing bottom out of Turkish Reservoir to allow soakage 398 Tilley & Farley - 14th AGH 399 At GIZA Zoo. Note height of giraffe 400 On this stunt we destroyed Turkish reservoir of 2 1/2 million gallons 401 Demolition party at wells MUCK-SHUBE 402 3rd ALH Bde HELIOPOLIS Race course 403 HMLS "Lady Wingate" 404 Turks blew out our tanks at GAZA 405 One of our aviators captured by German. Note German wearing Iron Cross. Snapped behind Turkish lines. Original of this snap was dropped at Aust aerodrome to let them know Aussie airman was alright and not killed in capture. Chivalry 406 Sausage observation balloon 407 READY 408 Bomb on carrier 409 Testing 410 B Richmond, Wireless Operator RAFC 411 Loading Bomb 412 Crash in desert 413 Bomb in YMCA at MAZRAR 414 No caption 415 LW Simpkin - Late 3LHFA 416 LEMNOS 417 Shelling the MARSDEN 418 Pontoon across Jordan River 419 Shells on Walkers Ridge 420 Sweetwater Canal 421 LAKE ISMAILIA 422 Indian Lancers on Canal 423 CAIRO Railway Station 424 Destroying Turkish water supplies. Explosives used for breaking clay at bottom of lagoon, help to absorb water 425 Exercising horses at ZEITOUN Egypt 426 In Wadi on MUG-SHUBEE stunt 427 Tractor drawing 60 lb gun towards front line 428 Sultan's mother's place at HELIOPOLIS = City of the Sun 429 Camped on the sands outside RAILHEAD, Jump off for SINAI campaign 430 G Turner & A Lockwood out for a camel ride. 431 GAZA and Nile floods from top of Pyramid 432 Baby refuses to carry his harness and his pal wears an astonished look 433 No caption 434 Turkish Officers 435 Regt HQRS at IBEETA 436 No caption 437 3rd Machine Gun Squadron 3rd ALH Bgde (my unit) 438 Camel Corps at dinner 439 KHEFREN Pyramid snapped from top of Cheops 440 CHEOPS 441 Pyramids 442 MENA from top of Pyramids 443 Snap from Pyramid showing MENA-CAIRO road running through Nile floods 444 MENA village from Pyramid 445 Band of British West Indies Regt 446 Gippo Band 447 Swimming on Med Sea 102 KmA 448 H Maddocks 449 Bedouin and Egyptians utilise any animals for their fields 450 Captured Turkish train - BEERSHEBA 451 Gardens ISMAILIA 452 Gippos used for horse lines etc 453 Canteens at HELIOPOLIS 454 3 ALHB watering in Wadi on ESSANI stunt 454 JAFFA 455 ALEX, Napoleon relics 456 Egyptian water wheel 457 SUEZ 458 WADI GHUZZEE 459 On Reconnaissance at 10-60 460 Goats and sheep captured from hostile Bedouins 461 Pontoon SERAPIUM 462 Aust trenches - Suez Canal. Turks attacked FEB 1916 463 Camel transport 464 3 ALHB Wireless Station. Col Scott 9 LH got DSO on this stunt (MUCK SHUBE) 465 ALEXANDRIA 466 Canal Hospital Ships 467 Ambulance - Sand cart 468 At old Cairo 469 No 1 Casualty Clearing Station 470 3rd Brigade on move 471 3rd LHFB- Making camp SERAPIUM 472 Watering horses 473 Moving up wadi 474 The wells at Wadi GHUZZEE 475 Camel transport SINAI 476 Turkish reservoir destroyed by ALH 477 Wall in a Luxor tomb 478 Entrance to "Temple of Bulls" 479 Bob White 480 Bedouin crops 481 Harem of Montazza, Turkish prince 482 Jack Holmes, Billy McGhee 483 MUDERIA, B Troop post 484 JIFF JAFFA 485 Natives on railroad construction 486 Aust graves SHALLAL 487 The Stumpy Mirror 488 R Nile at MANSUREH 489 Aust graves - BEELAH 490 NOUZEH Gardens - ALEXANDRIA 491 On issue from QMS. Take what comes. Fit does not matter 492 MATARA 493 German Yacht Club - ALEX 494 Old Turkish Howitzer and cannon ball 495 Field hospital 496 Gardens at BARAGE 497 A dispute's ending 498 Snow. MT LEBANON 499 Bedouin sheep 500 Combat in the air 501 no caption 502 Old Napoleon gun 503 Gordon Wake HQ car 504-5 Burying the dead at GAZA 506 Water Polo 507 Brigade boxing comp 508 Field cooker 509 Bridge on Jerusalem road, Blown up by Turks 510 Teaching horses to lay quiet. For protective purposes 511 "Major" and "Bitsy" 512 Bedouin Scarabs 513 Convalescent 514 1. W Billings. Returned to Aust 2. W McMahon KIA 515 Hospital 516 Coming good 517 1st day up - 14th AGH PORT SAID 518 Back again in Regt 519 Billy and Taffy 520 Stew 521 KHAN YUNIS 522 MENA 523 Casualties PORT SAID 524 Washing 525 Mail 526 Gun from the "Emden" mounted in Syney 527 MARSURES 528 Desert bivouac 529 HASSED 530 3RD ALH Bde. Good camp (Extra) All conv's 531 New issue 532 On to another camp (8 LH Regt) 533 Shore - JAFFA on MED SEA Photo Captions Volume 2 (Illegible = ?) 1 The Cedars on Mt Lebanon, according to tradition originated from the staves of the 12 Apostles 2000 years ago. 2 TIBERIUS taken 27th Sept '18 3 NAZARETH taken 20th Sept. German officer and Arab pony 4 TIBERIUS fell on 27th Sep. Von Saunders was the GOC of Turkish Forces in Palestine 5 Jordan Valley & Plains of Jericho run between Mts of Moab & Hills of Solomon. Distance across valley from foot of each range of hills abt 13 miles, looks ? 6 Storm on Sea of Galilee 7 DAMASCUS fell on 1st October. German vehicle park. 8 German funeral near Jerusalem 9 JENIN. German Headquarters. Fell 20th Sept. German field bakery 10 Three pages back will be seen a storm on GALILEE. Note now calm here. This photo taken near spot from which the previous one was taken. German motor launch on Galilee. 11 Captured intact on 20th Sept. German workshops JENIN 12 Turkish aerodrome captured here. Hostile aircraft landed whilst it was in our hands. Aviators greatly surprised and even indignant. Motor smash near EL FULE. 13 German Orderly Room (Ammunition box full of gold), DAMASCUS. All this gold Turkish coin secured by our troops. 14 German artillery on the way to the front near KENETRA. The ALH swooped down on the artillery around this vicinity & captured many field guns. 15 German Despatch Rider on the road to ES SALT. Unsuccessful raids carried out on ES SALT on 30th April & 4th May. This country was hard on men and horses. Goat tracks were used at times but horse were led most of the time. Stunt lasted 14 days in wet weather & horses were only unsaddled for about 2 hours during stunt. 16 Strand, ? , Tiberius, Gallilee 17 German workshop. Captured by ALH 18 One of the dead lying outside GAZA. Killed 19th April 17. We could not bury them before November 19 Some of the boys that fell in the charge at BEERSHEBA. Tibby Cotter 20 Collecting our dead for burial. They were K in A on the 19th April at GAZA. Buried seven months later, 23,000 casualties in one day 21 German U-Boat 22 Page of postage stamps and money - Struck to commemorate Gallipoli victory - Turkish war postage stamps - War duty - Turkish war bank notes 23 Pamphlet. With paper badges affixed These badges were worn by young Egyptian students. Arabic translation means "Egypt for Egyptians Long Live Egypt" This pamphlet was printed under German influence & distributed around ZAG-A-ZIG, the chief centre of hostilities during the recent Egyptian riots. The Young Egyptian Students influenced the Natives to oppose British Administration, what they called Tyranny. They professed to have sufficient competent educated men to govern their own affairs, but our Heads would not hear of it. Consequently the riots. Many ? and soldiers killed. All railways and communications disorganised. It took several months to bring things to their normal ? Pictures of medals 1. In honour of General Falkenhaugh GOC Turkish Forces 2. The Victorious Emperors of Germany, Austria and Turkey 3. Egypt Awakening 24 Those large photographs I sent you were procured for me by a pal who knew the chap that owned the negatives. The owner of these snaps belongs to the 5th Regiment of the 2nd Brigade, and he took the camera from a Turkish Officer. It had only 6 snaps of a spool of 10, and the BIll Jim finished off the spool by taking 4 of the special entry into Jerusalem. The cross indicates those taken by the Australian, the remainder were taken by the Jackos in the vicinity of BEERSHEBA and SHERIA Turkish field bakery 25 Cavalry going up to support their own line. However never had much action against the Turkish horsemen 26 Turkish Electricians in the field. I have an idea that this photo was taken to get the centre figure. He looks dinkum Australian. Note Australian leggings on Turk on the right 27 Turkish machine gunners ready for action. This is very much like the Beersheba country. Turkish officers on the right, and along side him is the range taker with his Barand Stroud. We use these instruments in the Sqn and they cost about 83 (Pound) 28 Turkish General Head Quarters just beyond SHERIA. Note hard rocky country 29 Turkish Cavalry watching a fight and getting ready to go into action. This is at SHERIA, and the heavy fighting lasted several days. Plenty of water and the Jacko's tried their hardest to hold on to this pozzie. Often our chaps met the gamer Turks in the dead of night, because both sides were on the same game, crawling down for water. This stunt is known as the Junction Fight. 30 Official entry Dec 11th. The official entry into Jerusalem. Sir G Allenby in the lead with his staff officers of the French and Italian troops accompanying him. Guard represents New Zealand, Australia, England Wales Scotland Ireland and India entering theJaffa Gate 31 Sir Ronald Storrs made Governor of JERU. Captured 9th Dec 17. Reading the Proclamation, General Allenby wearing white breeches. Troops of other nations were present, and the notables of Jerusalem. It was read from the foot of the Tower of David, a place that has been standing since the time of Christ 32 The first of the British troops entering Jerusalem. A few Turkish officers may b seen walking at the head of the column. Populace in a bad plight, very poor and no tucker, and all were greatly overjoyed at the ?? of the British Hundreds and kiddies ill treated ?? (Part of caption missing) 33 10th LH Regt first to enter JERUSALEM. Mounted officer on the right supposed to be the CO of the first troops to enter Jerusalem. Note mud on the horses. Had very wet and muddy weather 34 Dead Jacko 35 Turkish machine gun and crew 36 Hanging Armenian doctors who refused to join Turkish Army 37 Outside Damascus Gate Jerusalem 38 Turkish patrol lying outside trench at EL BUAJ 39 Burying Aussies at DAMASCUS 40 1. Djemel Pasha 2. General Limon Von Saunders GOC Turkish Forces in Palestine 41 One execution in Egypt. Executing an Egyptian offender 42 Turkish atrocities DAMASCUS 43 Turks occupying trenches outside JERICHO 44 On ASLUJ demolition stunt. Feeding and spelling. Arrived at Rendezvous too early 45 Turkish saw bayonet 46 Captured guns taken at BEERSHEBA & SHERIA 47 Our gunners obtained a direct hit on ammunition train 48 The large and small of the game. At GAZA. 74th CCS in background 49 Around JULIOUS. These Turkish shell dumps were very numerous around this vicinity 50 Captured Turkish Cavalry 51 Cavalry leaders 52 Turkish machine gun & crew 53 Enemy officers. One on left is wearing Iron Cross ribbon 54 Captured Austrian boat afire, Suez Canal Port Said. 40,000 cases of benzine aboard. Fire a mysterious outbreak 55 ? Hotchkiss gunners and enemy aircraft over ? TELL-EL-FARA 56 Types of enemy officers. One of our bikes in their possession. Recaptured later. The five pointed medals worn by these officers is called the Gallipoli Star. Issued to commemorate the Turkish victory at Gallipoli 57 Our batteries put in some good shooting amongst Turkish transport 58 Showing compactness of Turkish trenches 59 Desert homes. The only time we had cover in SINAI was when we camped near a Hod. Then we could use date palm leaves 60 JIFF JAFFA 61 ZAITZOUN 62 10th Regt MGS amongst hills outside JERUSALEM 63 Jews wailing place JERUSALEM 64-5 German post card characters 66 Post Card PHYLAE The Kiosk 67 Post Card Vue du Canal de Suez 68 Post Card No 93 Queen Street, Fort, Colombo 69 Snipers at NALIN Sth Syria. Lousy country for richochets. Nast wounds. (Aust War Memorial Melbourne) 70 Myself on Ginger. This little neddie is boshter jumper 71 Magazine cutting - Lt C H Vautin & German airman G Felmy 72 9th Regt 3rd LHB Judean Hills outside JERUSALEM. (Aust War memorial Melbourne) 73 Sand hills SINAI ? Desert (Aust War Memorial Melbourne) 74 3rd LHB spelling at GALILEE (AWM Melbourne) 75 Jordan Valley outside JERICHO (AWM Melbourne) - lovely Jordan Valley, dust and heat, 1280 ft below sea level 76 Copy of no 69 77 Watering at MATARIA 78 A desert grave - Tpr H R Olver MM 6th LH MGS Beneath this simple cross there lies a comrade true and tried He fought as fights a soldier And like a soldier died 79 B Section. When they first took our Stetsons and issued cumbersome helmets 80 Palestine types of Turkish and German officers 81 Some of the gunners amongst the snows in MT LEBANON 82 The country around JERUSALEM 83 JERUSALEM 84 Fishing ? ? at GALLILEE 85 Jerusalem taken Dec 9th. Official entry on the 11th. Jerusalem (showing) Holy City and Mosque of Omar 86 Turkish shell hits old tomb at ZERNUKAH. Capt Hurley official photographer - AWM Melbourne 87 14th AGH at PORT SAID 88 Human bones at Dead City ABBASSIA 89 3rd ALH Bde at HELIOPOLIS 90 Men wearing gloves 91 Wireless station in course of erection at MATARIA - 28 masts 92 Old slave market at ABBRASSIA. Many excavations performed on projecting wooden frame at corners 93 3rd guns on the move. The beautiful scenery between LATRON & JERUSALEM 94 Bedouin agents 95 Collecting captured enemy material 96 Captured double-engined plane 97 On the march. Country at Eastern SINAI 98 Anzac mosaic found at SHALLAL whilst trench digging now covered with gun etc ready for removal. Was sent to Canberra. 99 A Troop watering. A rotten job at a small well when horses are thirsty 100 The new Jericho road. Running through Hills of Solomon Valley in distance 101 Gun inspection 102 Draining pools at WADI AUJA. Keeping down Malaria carrying mosquitos 103 8th Regt and 3rd AMGS at BEELAH 104 A rendezvous in the Jordan Valley 105 2nd ALHB camped outside JERUSALEM 106 WADI AUJA in the Jordan Valley 107 Hospital train on the beach at EL -ARISH 108 Jacko's 109 Jerries 110 Stables of Turkish Headquarters SHALLAL 111 Early training. Every man to throw and quieten his horse for purpose of taking cover 112 A Troop 3rd Guns at TAALAT-EL-DUMM 113 Watering at WADI GHUZZEE 114 J Rushden KIA at ES-SALT 115 J Carling F Troop 3rd AMGS. Taken prisoner at EL-BURJ. Repatriated after Armistace 116 Captured enemy plane 117 Jacko gun 118 Brig-Gen Galloping Jack Royston. OC 3rd ALH Bde 119 Cleaning ammunition belts in the Hod at MASAID 120 Bringing up the fodder at ABBASSAN-EL-KEBIA 121 Some of the boys amongst the snow on MT LEBANON 122 Turkish barley crops at SHALLAL in Southern Palestine 123 The crops a few weeks after our horses had been in this vicinity 124 Clearing up after a stunt 125 On the move. 5 minute spells for the horses 126 In Jordan Valley. An airial torpedo lobbed amongst 3rd MG Transport horses & killed 28 127 Camel ration convoy coming along beach 128 Field Hospital at ET MALER 129 Desert graves at ROMANI 130 A day on the beach. Wash self, horse and clothing 131 Watering on the beach at BEELAH. Note how close fresh water is to the seashore 132 A patrol caught by a shell 133 Spello 134 Crossing the Wadi 135 Halt! Weights off and feed 136 Gas instruction 137 F Troop at TELL-EL-FARI 138 Xmas Dinner at MASAID 1916-17. Arrived back at this camp Xmas Eve after 5 nights & 4 days in saddle & the capture of MAGHDABA 139 Exercising along the beach at MARA-KHEB 140 Watering at a Bedouin well 141 At Sheikh's ZOWAID 142 3rd Gun Squadron at ABBASSAN-EL-KEBIR 143 Captured plane on its way to Australian Aerodrome 144 One of our planes about to pass over Hod 145 E & F Troop horse lines and horses 146 Sun set on Med Sea 147 Beach scene at EL-ARISH 148 Turkish transport. Small animals but they can pull big loads and they possess large hearts 149 The dressing station JIFF JAFFA ? 150-8 Types of Egyptian women - Nubian - Fellaheen - Sudanese - Low class Gippo - Egyptian - Middle Class -Egyptian Aristocracy - Turkish 159 French girls on beach at PORT SAID 160 Bedouin girls drawing water 161 Egyptian flappers at ALEXANDRIA 162 Post Card- Dame Turque 163 Post Card - Jeunne Fille Arabe 164 Graves of New Zealanders at RISCHON 165 Graves of Australians at DEIR-EL-BELAH 166 Race day. The saddling paddock 167 Bivouacs 168 3rd ALH Brigade at TRIPOLI 169 Advance party putting down horse lines at KHAN YURIS 170 Breaking the desert monotony 171 WADI QUELT. Taken from one of its precipitous banks 172 Turkish stores on N shore of DEAD SEA 173 Watering at Solomon's Pools 174 Waiting for action at - ES DUN (AWM Melbourne) 175 Camel Corps in action SINAI (AWM Melbourne) 176 ALH Time to Camp (part missing) (AWM Melbourne) 177 3rd Machine Gun Squadron IBU-HARITH, Lieut Breed, McLeod, Guppy, Whyte 178 Cartoon sketch - "A Digger" 179 Turkish Cavalry 180 Gun crew of No 2 Sub F Troop, 3rd Gun Sqdn 181 Operating base of JIFF JAFFA stunt 182 One of the British war boats that cooperated with the Land Force 183 Military railway line passing through a Hod in SINAI 184 AL-MINAH The sea port of Tripoli, Syria 185 NAZARETH Taken on 20 Sep 18 186 The Monastery on the Mt of Temptation, Taken from a cave on opposite hill. 187 JAFFA From the beach 188 In Monastery on the Mt of Temptation Rock on which Christ spent his 40 days 189 Cross indicates Garden of Gethsemane. Arrow at Russian Church of St Magdalene. MT of Olives on left 190 The Roman Bath at MONTAZAH. Hewn out of solid rock 191 Mine sweeper ashore near SHEIK'S ZOWAIL 192 Throwing "Chester" for an operation 193 The swimming pozzie at LAKE TIMSAH, ISMAILIA. Half a mile from MOASCAR, the Aust Training Depot 194 The remains of Napoleon's road. Portions can be seen running between BEELAH & GAZA 195 Camels utilised for ambulance work 196 TULKERAM taken on 19th Sep. This stunt started the previous night and this position fell to us the first day. About 60 miles from starting point 197 German officer at mess, JERUSALEM 198 German Headquarters SEMAK 199 TIBERIAS 200 Water preservation scheme at SHALLAL 201 A dip in the Jordan River. Crossed river on night 21-22 April 18 202 Watering and a wash up 203 JERICHO Taken on 21 Feb 18 204 Turkish graves 205 KHAN YUNIS. Southern Palestine, Note how sand ridges from the beach meet vegetation area. Fertile land 20 miles in width. the beginning of PHILISTIA 206 TAUBE-OVER 207 Drawing drinking water in Wadi GHUZZEE 208 The swimming pozzie in JORON 209 Landing stores at EL-ARISH 210 A camp near the wadi 211 Railway line and bridge crossing wadi above SHALLAL 212 The mid-day halt 213 Turks and Aussies at Dressing Station on beach 214 Washing day 215 Bringing supplies ashore 216 Trying mules in a 60 pounder 217 The desert winds have blown away and left this piece standing 218 Pontoons used by the Turks in their attempt to cross Suez Canal Feb 15 219 "HASSEIN" 220 "GIPPO" Mascot of 3rd AMG Sqdn 221 "Biddy" 222 Railhead camp 223 Typical Bedouin 224 Motor Submarine chaser dvr whyte, photos, ww1, light horse field ambulance -
 Eltham District Historical Society Inc
Photograph - Postcard, Geisha Sakae looking into a mirror applying makeup, c.1905 to c.1920s
The text on reverse translates Kikaha toilet department. There is also the printed image of a swallow on the back, which suggests that it was taken by the S. N. Banshiudo Studio in Shiba Park, Tokyo. Geisha Sakae was an extremely popular postcard model shortly after the Russo-Japanese war 1904-05, people used to line up early in the morning whenever a new postcard was released at the postcard shop in Ginza. The beauty of her gait was so widely admired that her walk inspired many of the leading Onnagata (male Kabuki actors in female roles) of the day. She went on to marry Ichikawa Sadanji II, one of the most popular Kabuki actors in Japan, who worked hard to promote new plays and revive long-forgotten classical dramas. [Ref: https://www.flickr.com/photos/blue_ruin_1/8448420741] During the Russo-Japanese War (1904–05), the Japanese government sent postcards of beautiful Japanese women, bijin ehagaki (美人絵葉書), to soldiers to motivate them. Publishers continued to print them well into the 1920s. [Ref: Duits, Kjeld (February 21, 2022). 1910s: Geisha Postcards, OLD PHOTOS of JAPAN. Retrieved on March 31, 2024 (GMT) from https://www.oldphotosjapan.com/photos/883/vintage-geisha-postcards-early-20th-century] See also: Sakae さかえ - Meiji / Taishō Era Geisha https://www.flickr.com/groups/1988804@N22/pool/ The photochrom process Photochroms are not photographs but actual prints, produced using 6 to 15 colors and the lithography printing process. The technique was invented by the Swiss Hans Jakob Schmid during the 1880s. The fascinating aspect of these prints is that they are created from black and white photographs. It required quite some work and talent to create these images. The photographer would usually make notes about the colors in the image he shot. These enabled a painter to create a painting that served as a color guide for the litho stone maker. This artisan would then create multiple exposures of the original black-and-white negative, changing the exposure time, development settings, and using dodge and burn techniques to create the required set of 6 to 15 stones that would each be used to print one specific color. By combining all these colors you get the prints [Ref: https://www.prepressure.com/printing/history/photochrome-prints]This item, a souvenir from Japan from between the wars (circa 1923) was brought home to Research, Victoria by Bill Teagle who was serving in the Royal Australian Navy (1919-1945). Bill Teagle's sister Violet Amelda Teagle had married Theodore (Curly) Feldbauer in 1933. Bill's brother-in-law Curly was taken as a Prisoner of War by the Japanese and died at Sandakan in March 1945. The family did not learn of Curly’s death till months later and Bill's sister, Violet, herself could never forgive the Japanese for what happened to Curly. Curly is remembered on the Eltham Roll of Honour Board and his son, Albert Feldbauer (Bill’s nephew and youngest child of the children of the soldier fathers attending a school in the district), was given the honour of turning the first sod for the Eltham War Memorial Infant Welfare Centre Building. Despite this, the family maintained this cherished souvenir from a time of previous foreign friendship with Japan. The item was possibly given by Bill Teagle to his sister Margaret Rose (formerly Ingram) who later married Richard Edward (Eddie) Fielding in early 1948. (Eddie had been engaged to someone else before he went to war, but his fiancée broke it off before his return to Australia.) It was cared for by the Teagle/Fielding family for approximately one hundred years. It is of particular significance given the family's connection to the Eltham War Memorial and the significance of that memorial to the local community and represents that despite the horrors of war, former friends then foes can become friends again.tom fielding collection, geisha sakae, japanese postcard, postcard -
Glen Eira Historical Society
Article - Alma, Will
This file contains seven items about the life and international career of magician Will Alma: 1/A letter dated 15/06/1987, from Will Alma to Caulfield Historical Society which accompanied items he donated to CHS. 2/A letter dated 12/11/1987, from Will Alma to Caulfield Historical Society thanking them for sending him the Society’s October 1987 newsletter containing his brief biography. 3/Photocopy of article in CAULFIELD HISTORICAL SOCIETY NEWSLETTER No 30 of October 1987 about Will Alma. 4/Photocopy of cover and excerpt of article in Volume 67 of THE LINKING RING, dated March 1987, about magicians in Australia, including Will Alma. His photograph is on cover. 5/Transcript of article about Will Alma from THE LINKING RING, date and author unknown. 6/Transcript of article THE WILL ALMA LEGACY TO MAGIC by Margaret Yates, date and source unknown. Transcript of examination report by Leonard C. Mason to The Magic Circle, dated 17/06/1958, recommending promotion of Will Alma to membership of MIMC, London.alma will, sebastopol street, caulfield north, caulfield historical society, caulfield south, bishop oswald george, glen betty, alma william george, w.g. alma conjuring collection, caulfield historical society newsletter, zim, the magic circle mirror, will andrade’s magical review, mason leonard c, magicians, entertainers, entertainment equipment -
 Eltham District Historical Society Inc
Newspaper, Diamond Valley Mirror, Tuesday, August 31, 1965
Includes Newspaper article on page three "Living Memorial Is Trust's Gift To A Shire" a second clipping of which is also attached to cardboard for display purposes. Article includes text and photographs. Living Memorial is Trust's Gift To A Shire Bathed in bright sunshine and now at its best, the Memorial Garden of the Eltham War Memorial provided a perfect setting for the handing over of the Memorial to the people of Eltham last Saturday afternoon. Speaking for the War Memorial Trust, Mr E. P. Harmer, chairman paid tribute to the unselfishh service given by its members , some for more than 20 years. Special tribute was paid to the late Mrs Ada Lyon, a foundation member who, Mr Harmer said, made the Trust her life. A memorial plaque to Mrs Lyon was unveiled by foundation members Mr N. Kerr. Facilities. An infant welfare centre, a pre-school cente and a children's library are built within the memorial. Funds for the buildings were raised by the Trust and theh women's auxiliary. Accepting the Memorial on behalf of the people of the Shire, the Shire President, Cr. L. C. Docksey, assessed the value at beyond £50,000. To make the transaction legal, Cr. Docksey paid the sum of £1 to the Trust. Many foundation members of the Trust and councillors of the Shire were among the official guests. The Shire of Eltham Brass Band provided suitable background music for the ceremony and at. (remaining part of article is missing) Photo: Mrs C RAINS signs the agreement on behalf of the Eltham War Memorial Trust, transferring the Memorial to the Shire of Eltham, as Mr L. Virgo, secretary of the Trust, affixes the seal and Mr. E. P. Harmer, chairman, accepts payment of £1 from Cr. L. C. Docksey, Shire President. In the background are Mrs Harmer, Cr. T. Collins and Mr S. Addison. Accepting the Memorial on behalf of the people of the Shire was Cr. Docksey's last official duty as President. Separate article on the clipping includes the heading: President Rests in Comfort with a photograph and text: A Tribute to Cr. A. K.Lines, first President of the Shire of Diamond Valley, was paid by fellow councilors last Tuesday night. Acting on behalf of all members of the council, Cr. George Upton, in presenting Cr Lines with an armchair, expressed gratitude for his guidance and assistance to the new shire. Newspaper, 12 pages with four holes punched through near centre margin.eltham war memorial building,eltham war memorial trust,eltham pre-school,e. p. harmer,mrs ada lyon,mrs n. kerr,cr. l. c. docksey,shire of eltham brass band,cr. a. k. lines,diamond valley mirror,1965,cr t. collins,mr. s. addison -
 Eltham District Historical Society Inc
Newspaper clipping, Supermarket next on old site, Diamond Valley Mirror, Wed. Feb 17, 1965, p5, 1965
In February 1965, Staffs Railway Store, the oldest business premises in the Eltham shopping district was demolished. Formerly a self-service grocery, restaurant and electrical repair shop, the building for many years housed Eltham’s only ‘family’ grocer and feed store. Earlier it had appeared to have been the town’s bakery. The building had been purchased in late March 1939 by Mr Eric N. Staff. At the time of E.N. Staff’s purchase there were huge bakers’ ovens located at the rear and the building also had a well and four toilets for employees. When the ‘pictures’ came to Eltham with the opening of the Eltham Public Hall across the road in 1941, Mr E.N. Staff extended the business and opened a milk bar and sweet shop. Further extensions re-established the tea rooms of days gone by. Mr E.N. Staff conducted business for about 15 years before handing over the reins to his son, Ray Staff. When his son Ray took over, the milk bar and tea rooms were closed for several years but the milk bar and was later re-opened and subsequently became a greengrocers and later again, a restaurant. The tea rooms section was converted to an electrical repair shop about 1955. Electoral Roll records for 1967 record Raymond Charles Staff at 929 Main Road, Eltham, grocer, and in 1968 at Lot 4, Hillcrest Avenue, Eltham, taxi truck operator. So it would appear that Ray continued to run the business for approximately two years after the original store was demolished and a new supermarket was built. Today, 929 Main Road is the Nongkhai Thai Restaurant and is precisely where the original Staffs store stood. Even though the facade has been modified at eye level with new larger windows, the upper facade is identical to that of the new Eltham Big Star Food Centre of 1965/66. But how did the original building, the oldest premises in the 1965 era shopping centre come about? On August 12th, 1902 at the Eltham Courthouse, appearing before T. Smallman, Esq,. Police Magistrate, and Messrs. W. Duncan and W.J. Taylor, Justices of the Peace is Luther Haley, baker. Wilfred Henry Johnston, by his agent Stanley Ernest Elder had applied for a warrant of ejectment under the Landlord and Tenant Act 1890 against Luther Haley from the bakery premises at the corner of Main Road and York Street. From the evidence presented we learn that Mrs Burgoyne of Eltham had purchased the property some months earlier from Mr Johnston, which consisted of a store and bakery establishment at Eltham occupied by Mr. Luther Haley, and whose lease expired some little time back, and up to the present time, Mr. Haley was not prepared to leave. He informed the court that he is unable to secure at Eltham a suitable house in which to carry on his business, but was building a place near the railway station which he expected to be done in about three weeks time, and he is then prepared to give up possession of the premises he now occupies. Mr Smallman informed the defendant, Luther Haley, that he will have to quit the premises in three weeks from the present date, and that a warrant of ejectment would be issued. However he also informed Mr Haley that he would order the warrant to lie in the office for three weeks from that date. The premises under construction referred to by Luther Haley in court were situated on the western side of Main Road, near the railway station slightly opposite present-day Arthur Street. It was opened around September 1902 as a General Store, Bakery and Tea Rooms. This was the original building in the present-day shopping precinct. At the time the only thing nearby was the railway station. Luther Haley’s business appeared to prosper and he would have catered to not only the locals abut also day visitors by train on Sundays coming up from Melbourne, offering fresh baked produce, tea rooms and summer drinks. The fields across Main Road running between present day Arthur Street and Luck Street were known as Haley’s Paddock and at times were used for community festivities and picnics. A newspaper report on the annual State schools picnic held at Haley’s Paddock on March 11, 1904 described it as “quite close to the railway station, and is quite capable of holding comfortably 10,000 people. With its ample shade and hilly surroundings, it is an ideal place for any gathering.” Luther Haley successfully ran his general store, bakery and tea rooms until 1917 when he and his family departed the district and moved to Westgarth Street in Northcote where he changed careers and became a publisher. It was then taken over by Hannah Lloyd and became known as Lloyd’s Railway General Store from 1917 to 1920. From then it had a succession of owners, one as short as two months until March 31, 1939 when the Grocery Business formerly carried on by Mr. T.K. White of Eltham for the previous eight years was purchased by Mr Eric N. Staff of Research and became known as E.N. Staff’s Railway Store. The ownership timeline for the store is as follows: Luther Haley Sep 1902-1917 Hannah Lloyd 1917-c.Feb 1920 Messrs J.R. & N.E. Lee 1920-Sep 1922 A. & E. Copeland Sep 1922-Sep 1925 Mr Price Sep 1925-Nov 1925 Mr Warren Nov 1925?-Nov 1926 A.W.J. Edwards Nov 1926-1931 T.K. White 1931-Mar 1939 Eric Staff Apr 1939-c.1954 Ray Staff c.1954-Feb 1965 then demolished Ray Staff Eltham Big Star Food Centre c.1965-1967 Digital file only from scan of copy on loan to EDHSa. copeland, a.w.j. edwards, big star food centre, e. copeland, eltham, eric staff, general store, hannah lloyd, j.r. lee, lloyd's general store, luther haley, main road, n.e. lee, price, ray staff, staffs general store, supermarket, t.k. white -
 Shepparton RSL Sub Branch
Sighting Mirror, Stainless Steel, 1945
WW2Polished Stainless Steel. Centre hole has a copper eyelett. Top hole for storage. Rounded CornersWtl. Broad Arrow. 1945 -
 Greensborough Historical Society
Newspaper Clipping - Digital Image, John Miers of Greensborough, 14/09/1960
John Miers was the proprietor of Miers' Electrical at 64 Main Street Greensborough. This advertisement was chiefly for Kriesler productsScanned copy of newspaper advertisement, with captionelectrical shops, john miers, main street greensborough -
 Greensborough Historical Society
Newspaper Clipping - Digital Image, Diamond Valley News, Alfred Stephen Cattanach, Chemist, Watsonia, 1960o
A. S. Cattanach owned the pharmacy at 77 Old Greensborough Road (now Watsonia Road). These advertisements are from 1960 and 1973.Scanned images of two advertisements, with notes.pharmacies, alfred stephen cattanach, watsonia road watsonia -
 Greensborough Historical Society
Newspaper, Elliott Provincial newspapers Pty Ltd, Diamond Valley Mirror May 4, 1965, 04/05/1965
Contains article "Valley plan goes to Council", discussing the development of the Plenty Valley, north of Greensborough.Early plan submitted to Diamond Valley Council in 19658 p.greensborough -
Glenelg Shire Council Cultural Collection
Book, Edited By W.A. Waller, A Victorian Mirror, c. 1947
An anthology of nineteenth century prose. Orange cloth, limp cover, black print. -
Australian Commando Association - Victoria
Equipment - Mirror
-
Federation University Historical Collection
Photograph, Joseph At Her Majesty's Theatre Ballarat, c1990
A student production of Joseph and His Amazing Technicolour Dreamcoat. Possibly dating c. 199039 Colour Photographs of a Student Production of Joseph At Her Majesty's Theatre Ballarat c. 1990s .1) Len Bauska (Technician) on a red ladder .2) Len Bauska .3) Unknown Student .4) Unknown Student .5) Older woman .6) Rehearsals in Progress .7) Students in Dressing Room .8) Two students .9) Student .10)Rehearsing in Orchestra Pit .11) Rehearsing In Orchestra Pit .12)Rehearsing in Orchestra Pit .13) Set Design .14)Student .15) Two Students .16) Green Room at Her Majesty's Theatre Ballarat .17)Directors and students .18)Len Bauska with Disco Balls .19)On set with ladder .20)Rehearsals .21) Making the Technicolour Dreamcoat .22)Making the Technicolour Dreamcoat .23) Student making costume .24)Students making costumes .25)Student .26)Students making costumes .27)Making costumes .28) Students making costumes .29) students making costumes .30) Younger members of the cast .31) Hair and Makeup .32)Preparing for a performance .33)Male cast members .34) Three cast members .35) Male cast members in dressing room .36) Student on phone .37)Student on phone .38) Courier poster announcing 6 more nights .39) Promotional banner for Joseph and the Amazing Technicolour Dreamcoat - Students in dressing room - Children on stairs -Male actor's headshot joseph, joseph and his amazing technicolour dreamcoat, performing arts, alumni, her majesty's theatre ballarat, ballarat, rehearsals, costume design, stage, mirror ball, orchestra pit, band, 1990, balllarat university college, bapa, ballarat academy of performing arts -
Glen Eira Historical Society
Document - NEWSPAPER PUBLISHED OR CIRCULATED IN CAULFIELD
This file contains four items: 1/Two typed lists of the names and years of circulation of Elsternwick and Caulfield Newspapers held at the Caulfield Library, the first with amendments in ballpoint pen and the second a revised version of the first dated 12/07/1988. Also included in the item is a typed list of what appears to be issues of the Southern Cross newspaper held at the library and an original handwritten list with a black and white photocopy of newspapers held at the Caulfield Library, dated 11/09/1988. These were provided by Gladys Vallati (longtime member; Head Librarian of Caulfield Library for many years). 2/Two extracts from the Caulfield Historical Society Newsletters (issues April 1975 No 15 and June 1975 No 16) detailing newspapers published and or circulated in Caulfield that are held at the State Library of Victoria, both undated and author unknown. The first has some handwritten annotations and a minute from the first meeting of the Caulfield Road Board on 25/11/1857 on the reverse side, listing the surnames of those present. Also included in the item is a typed draft for one of the extracts. 3/A six page handwritten list of newspapers circulated in the area of Caulfield held in Australian libraries, taken from a Union List dated 1967 in the Canberra National Library, author unknown. Details given of the newspapers include the title and dates of issue, in some cases also listing the merging of newspapers and ceasing of publication. Attached is a handwritten note detailing the production history of the Caulfield and Elsternwick Advertiser dated October 1980, author unknown. 4/A file note dated 24/02/2021 noting that the acompanying typed list of the titles, eras of publications and storage location of newspapers held at Glen Eira Historical Society dated September 2008, is out of date and superceded.elsternwick, buzz, glenhuntly advertiser caulfield communication activities, the elsternwick advertiser, libraries, newspapers elsternwick times caulfield library, the caulfield star southern cross documents, the caulfield advertiser, the age, the caulfield mercury and glenhuntly guardian, the elsternwick and caulfield herald, the elsternwick and caulfield mercury, the caulfield and elsternwick star, the caulfield and elsternwick times caulfield elsternwick advertiser, caulfield and elsternwick leader the caulfield and elsternwick advertiser caulfield contact caulfield news australia israel review, regional progress jerusalem post international edition australian jewish news, the elsternwick leader, microforms, caulfield bibliography brighton , malvern , oakleigh, prahran, carnegie courier, the observer, south east suburban mail, elsternwick news caulfield road board meetings, board meetings caulfield historical society, caulfield historical society newsletter victorian government gazette, the argus, caulfield city council caulfield city council rate books , books, rate books, minute books, harris mr , brooks mr , semple mr, handasyde gilbert, nelson mr, dempsey mr, grants, financial economics, brighton independent, brighton leader, brighton news, brighton southern cross, southern weekly, sunshine times, malvern advertiser, malvern and armadale express, malvern and armadale recorder, malvern argus, malvern courier and caulfield mirror, malvern news, malvern press, malvern spectator, malvern standard, southern news, ormond news, prahran telegraph, oakleigh and caulfield times, chadstone progress, property review weekly, glen eira historical society newsletter, glen eira caulfield leader, glen eira news, south east suburban mail, brighton independent, bentleigh echo, bentleigh news, bentleigh standard, prahran and st kilda advertiser, prahran chronicle, prahran news, prahran post, the times, daily mail, esplanade post, st kilda advertiser, st kilda and balaclava news, st kilda and caulfield southern cross, st kilda district guide, st kilda chronicle, st kilda mercury, st kilda news, oakleigh local news, oakleigh advertiser, oakleigh and caulfield times, oakleigh and mulgrave guardian, oakleigh leader, oakleigh southern cross, standard times -
 Federation University Historical Collection
Photograph - Little Gem tintype, Portrait of a Woman
The tintype (or ferrotype or Melainotype) was produced on metallic sheet (not, actually, tin) instead of glass. The plate was coated with collodion and sensitized just before use. It was introduced by Adolphe Alexandre Martin in 1853. The most common size was about the same as the carte-de-visite, 5.5cm x 9.0cm, but both larger and smaller ferrotypes were made. The smallest were "Little Gem" tintypes, about the size of a postage-stamp, made simultaneously on a single plate in a camera with 12 or 16 lenses. They were often produced by travelling photographers, and were cheaper than Ambrotypes so made photography available to working classes, not just to the more well-to-do. The print would come out laterally reversed (as one sees oneself in a mirror). Being quite rugged, tintypes could be sent by post. Tintypes were eventually superseded by gelatin emulsion dry plates in the 1880s, though street photographers in various parts of the world continued with this process until the 1950s. (Above information abridged from http://www.rleggat.com/photohistory/history/tintype.htm) The firm of Gove and Allen opened in Sydney in 1880 and were responsible for the belated popularizing of the gem tintype in Australia. The firm traded as both The American Gem Studio and The American Studio. Others franchises were opened in Melbourne, Ballarat and Sandhurst (Bendigo). The Sandhurst branch closed in 1882 and Adelaide in 1884. All Gove and Allen studios had ceased trading by 1885. The studio addresses were: 23 King William St, Adelaide; 324 George St, Sydney; 95 Swanston St, Melbourne; Howard Place, Sandhurst; 7 Queen St, Brisbane; The card mounts used in Gove and Allen studios in Australia are identical to those used in America. They were initially made of plain white card with embossing around the oval image opening in the mount while some also had simple geometric and floral printed designs as well. Although Gove and Allen studios produced the majority of gem tintypes in Australia, other studios offered them including: - London, American & Sydney Photo Company, 328 George St, Sydney; - David Edelsten, 55 & 57 Bourke St, Melbourne; - Burman's Portrait Rooms, St. George's Hall, 209 Bourke St, Melbourne; - Bell's Gem Portrait Studio, 57 Bourke St East, Melbourne; - R. H. Kenny, Bridge St, Ballarat; - Marinus W. Bent, Sandhurst (Bendigo); - George Fisher, Victoria; - Anson Brothers, Hobart Town. (Abridged information from http://members.ozemail.com.au/~msafier/photos/tintypes.html) .3) A tintype portrait of a woman, attached to a card. little gem, tintype, woman, unidentified woman, women -
 Federation University Historical Collection
Photograph - Little Gem tintype, Portrait of a Man
The tintype (or ferrotype or Melainotype) was produced on metallic sheet (not, actually, tin) instead of glass. The plate was coated with collodion and sensitized just before use. It was introduced by Adolphe Alexandre Martin in 1853. The most common size was about the same as the carte-de-visite, 5.5cm x 9.0cm, but both larger and smaller ferrotypes were made. The smallest were "Little Gem" tintypes, about the size of a postage-stamp, made simultaneously on a single plate in a camera with 12 or 16 lenses. They were often produced by travelling photographers, and were cheaper than Ambrotypes so made photography available to working classes, not just to the more well-to-do. The print would come out laterally reversed (as one sees oneself in a mirror). Being quite rugged, tintypes could be sent by post. Tintypes were eventually superseded by gelatin emulsion dry plates in the 1880s, though street photographers in various parts of the world continued with this process until the 1950s. (Above information abridged from http://www.rleggat.com/photohistory/history/tintype.htm) The firm of Gove and Allen opened in Sydney in 1880 and were responsible for the belated popularizing of the gem tintype in Australia. The firm traded as both The American Gem Studio and The American Studio. Others franchises were opened in Melbourne, Ballarat and Sandhurst (Bendigo). The Sandhurst branch closed in 1882 and Adelaide in 1884. All Gove and Allen studios had ceased trading by 1885. The studio addresses were: 23 King William St, Adelaide; 324 George St, Sydney; 95 Swanston St, Melbourne; Howard Place, Sandhurst; 7 Queen St, Brisbane; The card mounts used in Gove and Allen studios in Australia are identical to those used in America. They were initially made of plain white card with embossing around the oval image opening in the mount while some also had simple geometric and floral printed designs as well. Although Gove and Allen studios produced the majority of gem tintypes in Australia, other studios offered them including: - London, American & Sydney Photo Company, 328 George St, Sydney; - David Edelsten, 55 & 57 Bourke St, Melbourne; - Burman's Portrait Rooms, St. George's Hall, 209 Bourke St, Melbourne; - Bell's Gem Portrait Studio, 57 Bourke St East, Melbourne; - R. H. Kenny, Bridge St, 6 Sturt St Ballarat; - Marinus W. Bent, Sandhurst (Bendigo); - George Fisher, Victoria; - Anson Brothers, Hobart Town. (Abridged information from http://members.ozemail.com.au/~msafier/photos/tintypes.html) .8)A tintype portrait of a man's head, attached to a card. The cheeks have been hand coloured.little gem -
 Federation University Historical Collection
Flyer - Document, W.S. McKee, Printers, Gem Pictures Advertisement, c1920
The advertised feature "Heritage' was released in the United States in August 1920. See an advertisement at http://news.google.com/newspapers?nid=1499&dat=19210703&id=26tRAAAAIBAJ&sjid=TCEEAAAAIBAJ&pg=3490,5244641Gem Pictures advertising pamphlets (three of the same on green paper), and Gem Pictures advertising tickets (six of the same: three are printed on green paper and three are printed on orange paper).gem pictures, matty robourt, willard mack, wonders of the sea, electric mirror arc projection -
 Flagstaff Hill Maritime Museum and Village
Functional object - Carbide Lamp, Powell & Hanmer, 1920s
Francis Powell (1861-) and Francis Hanmer (1858-1925) founded Powell and Hanmer Ltd in the Summer of 1885 for the manufacturer of bike and carriage lamps. Their first advertisements began to appear in November of 1885. In 1890 they lodged a Patent for “velocipede” lamps to be used by lightweight wheeled vehicles propelled by a rider, such as a bike, tricycle and railroad handcar. In April of 1913, they were selling headlamps for cars and in 1914 built their second factory manufacturing dynamo lighting sets in Rocky Lane Birmingham, also for the production of dynamos for motor cars. Then in 1929 Powell and Hanmer Ltd, was acquired by the Lucas company which was at that time the main competitor for the manufacture of non-electrical equipment for cycles and motorcycles. When a director of Powell and Hanmer joined the board of Austin motor cars, Lucas feared that Austins might encourage Powell and Hanmer to start to produce electrical equipment for supply to the company and as a result this association might affect Lucas's business with other large vehicle manufacturers. As a result, Lucas made an offer to Powell & Hanmer and purchased the business for £500,000. Carbide lighting was used in rural and urban areas of Australia which were not served by electrification. Its use began shortly after 1900 in many countries and continued past the 1950s. Calcium carbide pellets were placed in a container outside the home, with water piped to the container and allowed to drip on the pellets releasing acetylene. This gas was piped to lighting fixtures inside the house, where it was burned, creating a very bright flame. Carbide lighting was inexpensive but was prone to gas leaks and explosions. Early models of the automobile, motorbike and bicycles used carbide lamps as headlamps. Acetylene gas, derived from carbide, enabled early automobiles to drive safely at night. Thick concave mirrors combined with magnifying lenses projected the acetylene flame light. These type of lights were used until reliable batteries and dynamos became available, and manufacturers switched to electric lights. Acetylene lamps were also used on riverboats for night navigation. The National Museum of Australia has a lamp made in about 1910 that was used onboard the PS Enterprise, an 1878 Australian paddle steamer, currently owned by the National Museum of Australia in Canberra. It is still operational, and one of the oldest working paddle steamers in the world, listed on the Australian Register of Historic Vehicles.Acetylene Carbide lamp, Model “Panther” distinct patterned side red and green lenses. These lamps were also known as acetylene gas lamps. They work off a chemical reaction between calcium carbide and water.Model 75flagstaff hill, warrnambool, flagstaff-hill-maritime-museum, maritime-museum, shipwreck-coast, flagstaff-hill-maritime-village, carbide lamp, motor vehicle, bike lamp, lighting, vehicle lighting, powell, hanmer, acetylene gas lamp, early lighting -
 Flagstaff Hill Maritime Museum and Village
leisure object - Pram, Probably late 19th or early 20th century
The pram appears to have been developed during the 18th century. Queen Victoria is known to have bought three prams (she had 10 children). From then, it was a natural progression to create a smaller version as a leisure item, particularly for little girls.The introduction of dolls prams into the leisure item area, mirrors the development of toys generally.Pram cane, painted white with interwoven cane hood. Noneflagstaff hill, warrnambool, shipwrecked-coast, flagstaff-hill, flagstaff-hill-maritime-museum, maritime-museum, shipwreck-coast, flagstaff-hill-maritime-village, pram, cane pram