Showing 5989 items
matching s. white
-
 Tennis Australia
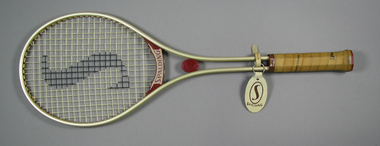
Racquet, Circa 1980
... butt cap has adhesive label featuring 'S' logo. Manufacturer's... featuring 'S' logo. Manufacturer's name embossed in white across ...A Spalding 'Targa' model metal tennis racquet, with double shaft, red plastic throat bridges; red plastic shaft casing; and handle wrapped in light tan Spalding-branded leather. Red plastic butt cap has adhesive label featuring 'S' logo. Manufacturer's name embossed in white across throat bridge on reverse; on obverse model name is embossed also in white on throat bridge. 'S' logo spraypainted onto net in black. An oval leather Spalding key-ring tag is attached to the shaft pillar. Materials: Metal, Adhesive tape, Plastic, Leather, Adhesive label, Nylon, Painttennis -
 Tennis Australia
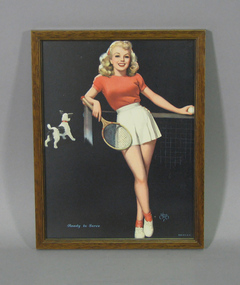
Calendar, Circa 1952, Circa 1980
A reproduction of 1950's calendar art entitled 'READY TO SERVE', depicting a blonde pin-up girl in white shorts posing with racquet and leaning on a tennis net. Materials: Paper, Ink, Cardboard, Glass, Woodtennis -
 Kew Historical Society Inc
Photograph - Villa, Redmond Street (Kew), 1977
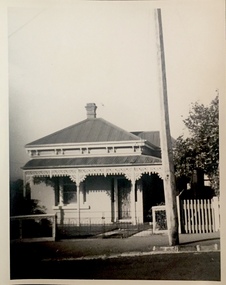
Original black and white print positive of a double fronted late Victorian Villa in Redmond Street, Kew. When the photograph was taken in 1977, it was the home of Mrs Darby.Reverse: "Elderly Kew resident['s home]. Taken by Trinity Grammar School Boys during a history study of People and Places in Kew 1978."victorian villas, victorian architecture, redmond street -- kew (vic.) -
 Kew Historical Society Inc
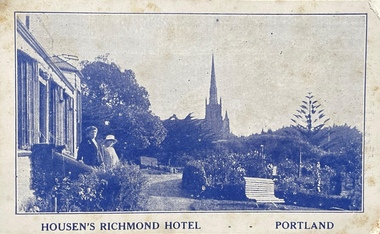
Postcard, Housen's Richmond Hotel | Portland
Many of the Henty's of the Western District of Victoria also owned houses in Kew, Victoria. Stephen Henty, referred to on the reverse of the postcard, lived while a member of the Vitoria Parliament at 'Findon' in Kew. Kew Historical Society also holds a nationally significant collection of costumes belonging to three generations of Henty women.Monochrome, blue tinted 'real photo' postcard of Housen's Richmond Hotel, Portland. Two women stand on the steps of the hotel at left, with the rose garden in front of them. Behind them is a church spire. The hotel and its significance is outlined in two columns of blue coloured text on the reverse.Printed reverse: "THE RICHMOND is the most historical building in the State. On the site of today's building Edward Henty, the founder of permanent settlement in Victoria, commenced his first house February 19, 1835, finishing the work in two months. He had landed in Portland on Nov. 19th, 1834, and turned the first plough furrows in Victoria where the Hotel now stands on the 26th of the following month. It was also here that Major Mitchell ended his explorations from Sydney, meeting the Hentys on August 29th, 1836. In December of the same year Mrs S. G. Henty joined her husband, their son Richmond, the first male white child in Portland, being born in the Henty cottage. The present Richmond Hotel was built in 1840, and became the home of Stephen Henty until his departure from Portland in 1869. Though Edward Henty's first house was demolished in 1840, to make room for the new surveyed town streets, part of his wool store remains in the Hotel grounds, and is used as a wood shed. This is about the oldest building in the State : in it was held the first christening service in Portland on September 26th, 1841. On the site of the Richmond Hotel all the early visiting celebrities were entertained - Mitchell, Wedge, La Trobe, Fyans, Sir John Franklin, Capt. Stokes, etc. No other hostelry in Victoria can give you the historical atmosphere of the RICHMOND. / THE ORIGINAL HOME OF THE HENTYS."henty family, richmond hotel -- portland (vic.), stephen henty, edward henty, richmond henty, henty houses -- victoria, portland, postcards -
![Cr. F.K. White, Mayor [of Kew] 1932-'33, 1945-'46](/media/collectors/550653872162f11fb04854aa/items/5922bd43d0cde3131ca1dc07/item-media/5c1b849e21ea7118c068468b/item-fit-380x285.jpg) Kew Historical Society Inc
Kew Historical Society IncPhotograph, C Stuart Tompkins, Cr. F.K. White, Mayor [of Kew] 1932-'33, 1945-'46, 1932
Kew achieved independence from the Boroondara Roads Board in 1860. As a new municipality, its first three leaders were designated as chairmen. On becoming a borough in 1863, its leaders were identified as mayors. The earliest photographs date from ca.1906, when the Town of Kew commissioned the noted local photographer Josiah E Barnes to produce standardised portraits of former mayors to be displayed in the Mayoral Chamber of the Town Hall. The collection also includes photographs by other well-known photographic studios such as Burlington Studios, Melba – Melbourne, Stuart Tompkins, Spencer Shier and Talma & Co. The majority of mounts identify the photographer. Eighty photographs are housed in their original frames.This portrait is one of a series of mounted and framed photographic portraits of mayors and town clerks of the former Borough, Town and City of Kew. The portraits were transferred by the City of Kew to the Kew Historical Society in March 1989. A Significance Assessment in 2018, funded by the National Library of Australia confirmed the historic, and often artistic significance of the series.Framed portrait of Cr. F.K. White, Mayor of Kew 1932-33, 1945-46. The mounting and framing of the photograph follows a typical layout or style in that each is framed in dark wood, glazed, and laid down on an inscribed board. The inscription identifies the name of the mayor and the year/s that he/she served.Cr. F.K. White / Mayor 1932-'33, 1945-'46 C. Stuart Tompkins / Junction / Camberwellmayors of kew (vic), australian photographers - c. stuart tompkins - junction - camberwell, cr. f.k. white, kew (vic.) — municipal collection -
 Kew Historical Society Inc
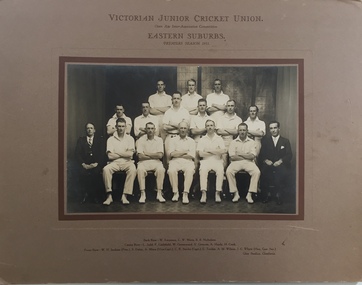
Photograph - Victorian Junior Cricket Union, Eastern Suburbs Premiers, Glen Studios, 1931
Arthur Henry Miers, pictured in the photograph played for cricket, football and baseball teams in Kew for a number of decades in the first half of the twentieth century. He was born on 22 November 1901, the son of Rodolph Theophilus Miers (1874-1951) and Margaret Frances (Margaretta) Fry (1875-1958). He had two brothers, Rodolph Cecil Miers (1904-80) and Charles Wilfred Miers (1906-88), and a sister Marjorie Elizabeth Miers (1911-84). Arthur Miers died in Kew on 25 January 1966, and after his body was cremated, his body was interred in the Mausoleum of Boroondara General (Kew) Cemetery.Rare early photograph of the Victorian Junior Cricket Union premiership team of 1931Team photograph, mounted on card, of the Victorian Junior Cricket Union, Eastern Suburbs Premiers Season 1931.VICTORIAN JUNIOR CRICKET UNION / OPEN AGE INTER-ASSOCIATION COMPETITION / EASTERN SUBURBS PREMIERS SEASON 1931 / BACK ROW - W EWENSON; C W MIERS, B B NICHOLSON / CENTRE ROW - L JUDD; L LITTLEFIELD; W GREENWOOD; V GREAVES; A HARDY; H COOK / FRONT ROW - W H JENKINS (PRES,); S DALEY; A MIERS (VICE-CAPT.); C R STOCKS (CAPT.); E TONKIN; A M WILSON; J C WHITE (HON.GEN.SEC.) / GLEN STUDIOS, CARNEGIE Reverse: MR A MIERS, AS VICE CAPTAIN OF THE SUCCESSFUL TEAM, I EXTEND TO YOU MY HEARTIEST CONGRATULATIONS ON YOUR SUCCESS. W H JENKINS 12/5/1931arthur miers, cricket, cricket teams, victorian junior cricket union -
 Kew Historical Society Inc
Photograph, Cottage, Derby Street, 1950s
This work forms part of the collection assembled by the historian Dorothy Rogers, that was donated to the Kew Historical Society by her son John Rogers in 2015. The manuscripts, photographs, maps, and documents were sourced by her from both family and local collections or produced as references for her print publications. Many were directly used by Rogers in writing ‘Lovely Old Homes of Kew’ (1961) and 'A History of Kew' (1973), or the numerous articles on local history that she produced for suburban newspapers. Most of the photographs in the collection include detailed annotations in her hand.The Rogers Collection provides a comprehensive insight into the working habits of a historian in the 1960s and 1970s. Together it forms the largest privately-donated collection within the archives of the Kew Historical Society.Small black and white snapshot of a single-fronted weatherboard cottage in Derby Street, Kew."Derby S. Lady lived at Fairyland as a child"houses -- kew (vic), houses -- derby street -- kew (vic.) -
 Kew Historical Society Inc
Photograph - Country road
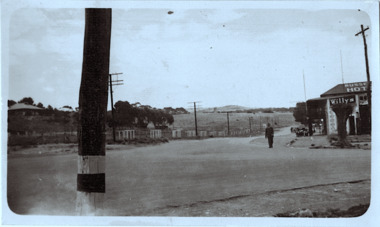
Original, black and white positive print which the inscription on the reverse incorrectly claims is of Kew during the 1934 floods. The date may be 1934, but there is no evidence of flood waters or of location. The photo is of an intersection with a hotel on the corner in front of which a man is standing. The hotel would appear to be named Russell['s] Hotel. There is also an advertisement for Willys on the hotel verandah. Inscribed verso: "Yarra Floods Kew 1934" unidentified locations -
 Friends of Westgarthtown
Lamp, Miller, Miller
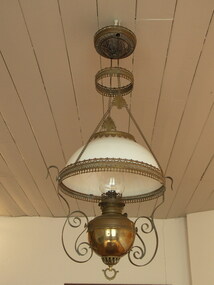
Purchased by Christian Ziebell on one of his two visits back to Germany.This object is of primary significance. Christian Ziebell brought it back from Germany on his return visit to Germany in 1856. It always hung where it is now and it is retractable to different heights. It hung on the lowest chain length over the table and was only raised when the family had festive events such as dances when Dorothea would accompany them on the piano. Great care had to be exercised when the lamp was raised because if it went up too high, and therefore became too close to the wooden ceiling, it could cause a fire. Francis Adams – son of Sylvia Adams (Ziebell) restored the lamp in the 1990’s.Original Miller hanging lamp, made of brass and opaque white glass. Lamp has chain-operated raising and lowering mechanism. Decorative brass trimming around widest edge of glass lampshade. Contains tubular wick.B & H Valpirfor written on lowering mechanism on top of the lamp. Rayo 24.98, PAT'D. NOV. 20.94, FEB 28.95, written on top of oil compartment.lighting, kerosene & oil, oil lamp, hanging lamp, original. -
 Friends of Westgarthtown
Salt shaker
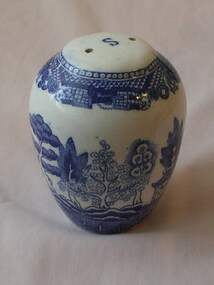
... condiments willow china blue and white pattern food S' in blue on top ...China salt shaker with willow pattern, a truncated ovoid shape. Scene extending from base, with geometric pattern around top. Slight raising at top with two holes and blue 'S'. Small cork on bottom for filling.S' in blue on top, small oval sticker on base 'made in Japan'domestic items, food storage and preservation, salt, condiments, willow, china, blue and white, pattern, food -
 Expression Australia
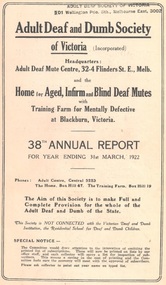
Annual Report, 38th Report of the Adult Deaf and Dumb Society of Victoria 1922
The Adult Deaf and Dumb Society of Victoria, now known as Vicdeaf, (the Victorian Deaf Society), was founded in 1884 as the Victorian Society for Promoting the Spiritual and Temporal Welfare of the Adult Deaf and Dumb. The provisional committee being Mr W Bates, Mr J M Bruce, Mr J D Gowan, Mr Edwin Newbiggin, Mr C M Officer, M. L, A., and the Rev. W. Moss. The Adult Deaf and Dumb Mission's objects were: 1. To provide the means for religious worship and instruction for the adult deaf and dumb of Victoria 2. To visit the deaf and dumb in their homes, especially when sick or in distress 3. To assist the deaf and dumb of good character in obtaining suitable employment 4. To provide technical and other education for the adult and dumb 5. To give pecuniary assistance to adult deaf and dumb who are in needThe Annual Reports of the Adult Deaf and Dumb Society are historically significant providing insight into the history of the evolving Deaf Community in Victoria. They are a annual 'snapshot' of the year with references not only to the progress of the Society but also to the significant people and events within the Deaf Community.Pink Cover, Size 21.5Hx13.5W,20 pagesdr j. f. mackeddie, e. r. peacock, r. j. oehr, j. dudley, m. l. miller, john higgins, harold w. bickford, f. e. frewin, j. m. johnston, r. h. luff,w. a. paterson, h. a. sinclair, george vial, ernest j. d. abraham, r. dow, e. empson, d, hickey, mrs w. a. paterson, margaret gibson, lydia sanders, mrs e. johnson, mrs a. wilson, mab dow, j. craig, john cronin, alex williamson, adam c. muir, w. taylor, s. moss, m. g. b mortimer, blackburn, deaf workers club, ramblers club, j. johnston, lacrosse, cricket, a suthersland, w. a. paterson, n. amos, mrs abraham, douglas abraham, a. mclellan, w. b. anderson, c. graham, d. white, j. m. jjohnston, h. mckenzie, v. tyzzer, n. webb, j. williams, o. tyzzer, d. m. kilpatrick, n. amos, a. williams, g. newnham, i. kennedy, a. tyzzer, a. stewart, j. mclean, r. durham, n. ormsby, mrs goddard, c. smith, h. taggart, mr brett, -
 Expression Australia
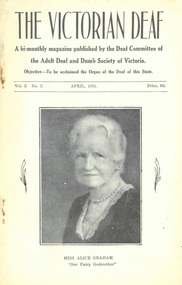
Newsletter, The Victorian Deaf - April 1931
A bi-monthly magazine published by the Deaf Committee of the Adult Deaf and Dumb Society of Victoria. E. Johnson, Editor, H. Puddy, Manager'The Victorian Deaf' Newsletter is a significant publication as an historical record giving and insight into the people, activities and events of the Deaf Community in Victoria.Vol. 2 No. 2, April 1931; Size 21.5cmHx14cmWalice graham, fred kendall, maurice marks, warrie ashby, hennessey, len ashley, rev f. w. g. gilbey, karl pearson, edgar schuster, dr. kerr love, mcaleod yearsley, dr haslam, charles heath, helen keller, ida m tarbell, anne sullivan, womens guild, mens guild, lacrosse, solomon moss, lucy moss, allsop, sutherland, james gibson, mrs lawson, mrs muir, ashby, maloney, e. rose, g. mortimer, c. hunt, j. mason, r. white, e. rainesw. h. crush, a. aird, v. wilson, h. s. nathan, halliday, nolan, j. lindsay, -
 Expression Australia
Newsletter, The Victorian Deaf News January 1936
Published by the Deaf Committee of the Adult Deaf and Dumb Society of Victoria'The Victorian Deaf News' Newsletter is a significant publication as an historical record giving and insight into the people, activities and events of the Deaf Community in Victoria.Vol. 1 (New Series) January 1936; Size 24.5cmHx18.5cmW; 24 pagesedgar h. peacock, warwick ashby, rev j. h. frewin, theo frewin, fred frewin, freda connolly, iris connolly, lord mayor's queen carnival campaign, mrs abraham, alice graham, victorian deaf and dumb institution, jim johnston, douglas abraham, w. h. crush, henry w. gladwin, j. boortz, dorothy johnston, charlie buck, colin johns, w. mcmillin, h. r. gillet, i. boast, s. nielson, f. sandon, willie hately, joe unsworth, rivers, a. sutherland, m. reiffel, w. durston, j. boal, deaf tennis club, adult deaf cricket club, lacrosse, deaf chess, w. donnelly, willie smith, les sutton, lydia sanders, melby allsop, ruth peters, mortimer, e. r. e. noble, c. graham, l. smiththelma whateley, thomas newton, roy white, mra and mrs white, h. blackmore, e. raines, elsie denman, g. mccaffrey, ethel dow, james frame, muriel smith, ray cornell, w. grant, john mcgonigal, thomas tonkin, john cardwell, william kent, richard hann, annie secombe, winnie henry, g.g. mercy, -
 Trentham and District Historical Society
Photograph - Photograph, Black and white, Staff at Melbourne Austico 1950's, 1950-1960
Austico staff in Melbourne.1950's turnbull bros., austico, tie factory, turnbull bros, factory, tie, staff, workers, gladys langdon -
 Queen Victoria Women's Centre
Postcard Series, c.2004
All photos used courtesy of Southern Health Monash Medical Centre Historical Collection. 10 postcards. Black and white photographs. standard A6 size. Woman Pathologist, 1890s to early 1900s Queen Victoria Hospital at the corner of Lonsdale and Swanston Streets 1950's Multicultural Nurses 'Give Generously' Infants in the Queen Vic Hospital maternity ward A Van donated by auxiliaries, used to transport nurses and deliver supplies to nursing homes. Around 1957. Queen Vic nurses in the 1900s Nurses in a recovery room, 1960s Matron with a blind patient and her guide dog in 1963 Queen Victoria Memorial Hospital (Mint Place) ward on a verandah 1920shosptial, postcards, historic site, charitable organisations -
 Glen Eira City Council History and Heritage Collection
Kuraburn bottle
This Kuraburn Bottle is part of a Sanax First Aid Case which was used at the the former Carnegie Senior Citizens' Centre. The centre was located at 314 Neerim Road, Carnegie. When the Neerim Road facility closed, its activities were moved to the Carnegie Library and Community Centre. For Occupational Health and Safety reasons, Council no longer maintains first aid kits at senior citizens' centres. Clear glass bottle with two paper labels on narrow side. One red, green, white and black label with Sanax branding, one red and white label at base of bottle with address and contact details. Black plastic screw-top lid with a section missing. Bottle has been decanted however some residue remains. Small cork stopper contained within bottle."Sanax" KURABURN / FOR THE TREATMENT / OF BURNS / SCALDS AND / SUNBURN / THE SANAX CO. / 849-51 NEPEAN HIGHWAY / MOORABIN / TEL XU 2651 / Left side of label: Directions: Dab on lightly, and repeat in two hours if necessary. Applied early, it prevents blistering. Right side of label: Allow to dry on the skin before putting on wearing apparel, to avoid staining the clothes. 223-5 BAY ROAD, / SANDRINGHAM, S.8 / VICTORIA / Phone: 98-1604 -
 8th/13th Victorian Mounted Rifles Regimental Collection
Photograph - Tpr Allison
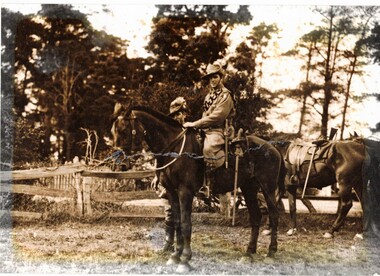
The 13th Light Horse Regiment (AIF) was raised at Broadmeadows Victoria in March 1915. Following service at Gallipoli the regiment was broken up with squadrons going to France as Divisional Cavalry Squadrons of 2nd, 4th and 5th Divisions. The regiment was reformed as firstly 1st Anzac Corps Mounted Troops and later Australian Corps Mounted Troops. The regiment was raised as 13th Light Horse (Gippsland), a Citizen Forces unit following WWI, and trained as a cavalry regiment till August 1940, when it converted from horse to mechanised initially as 13th Motor Regiment then 13th Armoured Regiment. It trained in Victoria and, as the Japanese threat to the mainland declined, was disbanded in October 1943 with men going to other units. Good study of pre-WWII light horseman in regional Victoria.Black and white photograph of mounted light horseman with second light horseman standing behind horse. Second horse to side.Pte Valentine Reginald Allison / 13th Gippsland Light Horse / Leongatha Showgrounds / c.1938 / (Grandfather of Cpl S Mather / Tng Sgt, 2001)military, militia, cmf, gippsland, leongatha, allison -
 8th/13th Victorian Mounted Rifles Regimental Collection
Photograph
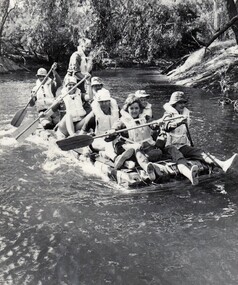
Units conducted Adventure Training to build team values.Black and white photograph of soldiers on a raft made of jerry cans engaged in Adventure Training on Ovens River, December 1976.Sodiers from Administrative Troop 8/13Victorian Mounted Rifles..Adventure Training, S/Sgt. M.Miles,Lt Shefford, Sgt S. Berg, Major I Docking, Pte H Delaney, Pte M Clarke" -
 8th/13th Victorian Mounted Rifles Regimental Collection
Photograph
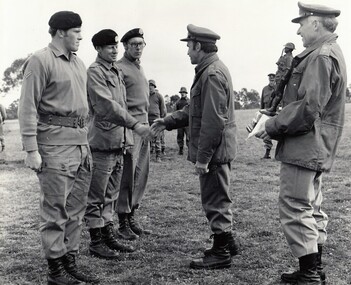
" A " Squadron 8/13 VMR won the 3rd Division Small Arms Competition in 1977.Black and white photograph of 3 soldiers of 8/13 Victorian Mounted Rifles with Commander of 3rd Division, Major General Jim Barrie at Divisional Shooting Competition Puckapunyal 1977." 3 Div Small Arms Competition 1977. Cpl. S. Loughton, Cpl. B. McDonald, Tpr. J. Ranftel being congrarulated by Major General Barry. " -
 8th/13th Victorian Mounted Rifles Regimental Collection
Photograph
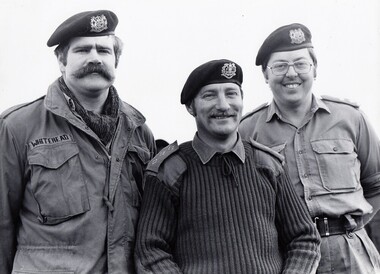
" A " Squadron VMR won the 3rd Division Small Arms Competition 1977Black and white photograph of 3 soldiers of 8/13 Victorian Mounted Rifles." 3 Div. Small Arms Competition 2977. L to R : Lt. s. Whitehead, Capt. J, McLean, Lt. G. Malloy . " -
 8th/13th Victorian Mounted Rifles Regimental Collection
Photograph
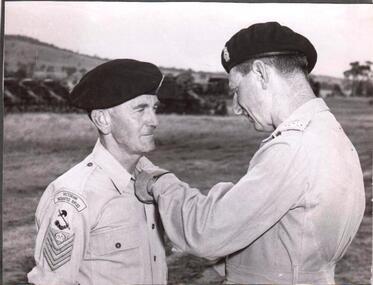
The 8th/13th Victorian Mounted Rifles was raised as a regiment of the Royal Australian Armoured Corps on 1 May 1948 with Headquarters in Melbourne and squadrons in Sale, Benalla/Wangaratta and Albury. In 1955 Regimental Headquarters moved to Wangaratta and a second squadron was located at Albury. The Sale squadron transferred to 4th/19th Prince of Wales’s Light Horse. In 1977 8/13 VMR Regiment was reduced to an independent squadron A Squadron 8th/13th Victorian Mounted Rifles and in 1991 was linked with 4th/19th Prince of Wales’s Light Horse forming the VMR Squadron of that regiment.Black and white photograph of Brigadier H.H. Hammer, Commander 2nd Armoured Brigade and Staff - Sargeant R.J. Roberts, Orderly Room Sergeant of 8/13 Victorian Mounted Rifles.Comd 2 Armd Bde, Brig H.H. Hammer, pinning British Empire medal on S/Sgt R. J. Roberts, Earlsfield Road, Hampton, O/Room Sgt of 8/13thVictorian Mounted Rifles at Puckapunyal Camp during 14 day camp of Regiment in January. S/Sgt Roberts saw service in M.E., England, and South Africa with Australia Mil Liaison Staff. S/Sgt Roberts was a member of champion Victorian debating team, and trained Regt team to highest standard yet attained in services.Gave up great deal of own time in this work, and also re-organizing orderly rooms of units in country areas. Is a member of ARA. -
 8th/13th Victorian Mounted Rifles Regimental Collection
Photograph - Mensford 13th ALH
... Black and white photograph of Trooper S Mensford 13th Light... ALH Trooper France 1917 " Black and white photograph ...1389 Trooper Samuel Mensford of Hay NSW. The 13th Light Horse Regiment (AIF) was raised at Broadmeadows Victoria in March 1915. Following service at Gallipoli the regiment was broken up with squadrons going to France as Divisional Cavalry Squadrons of 2nd, 4th and 5ht Divisions. The regiment was reformed as firstly 1st Anzac Corps Mounted Troops and lather Australian Corps Mounted Troops. Black and white photograph of Trooper S Mensford 13th Light Horse, mounted on his horse. He is holding his rifle and is wearng a steel helmet." 13 ALH Trooper France 1917 "world war one, wwi, mensford, 13th, light horse -
 Surrey Hills Historical Society Collection
Work on paper - Photograph, The 2/1 Australian Field Butchery Platoon, Petrie, Queensland, 1945, 9 March 1945
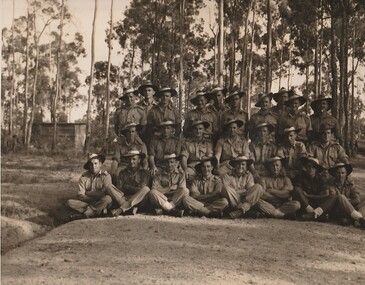
This is an official group portrait of the 2/1st Field Butchery Platoon who are identified as: Left to right, back row: VX33117 Corporal (Cpl) F M Hogan; NX85618 Private (Pte) A J Nicol; VX127710 Pte E C J Kemp; VX143647 Lance Corporal (LCpl) L G Lobb; QX44905 Pte C L Adams; SX25540 Lance Sergeant R J Gray; NX193508 Pte K A Burgess; VX5112 Pte J T Roberts; NX153073 Pte D J Evans; WX9743 Pte M F Lynch. Middle row: QX49356 Pte L V Symes; QZ31697 Pte N R Underhill; QX16156 Staff Sergeant H L Cairns; VX19172 Lieutenant W H Thomas; VX55658 Sgt D W Craig; QX47082 Sgt E S Wilbraham; SX19778 Pte D Weatherald. Front row: NX155215 Pte E Corrigan; QX56335 Pte E Corrigan; NX57204 LCpl W H Jackson; VX59081 Pte B Moszkowicz; SX31901 Pte J Lambre; NX94941 Cpl R A Hanson; QX40009 Pte T G O’Neill; VX84971 Pte S J Welsh. The photo was taken under the command of 1 Aust Base Sub Area and Lt R B Irving. According to the Australian War Memorial website, the photographer was David Tennant Gaery Eastman and the photo was taken on 9 March 1945. In the AWM collection there is also a photo of members of the platoon at the unit slaughter yards in Milne Bay, New Guinea (REF: AWM 0703790). An overview of the history of the unit can be found at https://birtwistlewiki.com.au/wiki/2/1st_Field_Butchery_Company Leslie George Lobb, the father of the donor, was the platoon sergeant. He had multiple copies of this photo, which may have been obtained with the aim of distributing them to other platoon members. Leslie George Lobb - born 15 July 1920 in Box Hill; married Elizabeth Annie Stephenson in 1954; died 14 Nov. 1997. Leslie became a service station / garage proprietor at 352 Mont Albert Road, Mont Albert a business he took over from his father. An associated mechanical business operated under the name of Leo Green Motors, at the same address. The family lived next door at 354 Mont Albert Road, Mont Albert. Leslie's father Harry Lobb had operated at an adjoining property (350 Mont Albert Road, Mont Albert) as a fuel and ice merchant, before installing a petrol bowser to service the expanding motor car industry. The house at 354 Mont Albert Road, Mont Albert was removed and relocated by the family in 2000 to Mirboo North, Gippsland, Victoria, where it still stands.The photo is a touchstone to local servicemen who served in World War 2.A B&W / sepia photo with a narrow white border of 25 men in uniform. They are standing / sitting in 3 distinct rows with the rear row standing and the other 2 sitting on a 'sandy' area with sapling eucalypts and a (?) corrugated iron shed in the background.REAR: Purple photographer's stamp approximately in the centre: "Photograph No. MH [in lead pencil 87544] / Supplied by Military History / Section (S.D.9) / General Staff L H Q. / For personal enjoyment ONLY / and on condition that it will / not be reproduced in any form." f m hogan, a j nicol, c j kemp, l g lobb, c l adams, r j gray, k a burgess, j t roberts, d j evans, m f lynch, l v symes, n r underhill, h l cairns, w h thomas, d w craig, e s wilbraham, d weatherald, e corrigan, w h jackson, b moszkowicz, j lambre, r a hanson, t g o’neill, s j welsh, 2/1st field butchery platoon, petrie, world war, 1939-1945, mont albert -
 Stawell Historical Society Inc
Archive, Red Cross Records, 1939 - 2004
2 Archive Boxes: Archive Box 18 contains: BAG 1 1 Red Cross First Aid Group. Black Folder 1954 - 1968 Exams 1 Grey Cover July 1944 to April 1945 (Minutes). Group to Disband & Join Red Cross and become Stawell Red Cross Emergency Company. 1 Red Cover - Red Cross Service Company Annual & General Meeting Minutes July 1970 to 1 September 1989. March & September 1978 Meetings abandoned due to insufficient persons attending. 21 September 1989 Meeting called to finalise all Accounts & distribute equipment. BAG 2 1 Plastic Sleeve: Contains 1 X Loose sheets of Miscellaneous Information. 1 Green cover Shell Exercise book - Miscellaneous Information. 1 The Great Blood Bank Evolution with Blood Donor Book Mark. 1 X3 Exercise Books: Monthly List of Donors. 1 Green Cover Shell Exercise Book Aug 1960 - Feb 1968 1 Green Cover Shell Excerise Book April 1968 - July 1979 1 Angle Striped Cover Student Excercise Book Spet - 1979 - March 1982. BAG 3 Blood Bank: Blood Donors & Voluntary Staff at "Blood Takes" 1962 - 1989 1. Blue and White Dimond COver Exercise book: Sept. 1964 - June 1968 1. Blue and White Check with Green Border Embassy Exercise Book: July 1968 - June 1973. 1. Blue Dimond Cover Exercise Book. Aug 1973 - Mar. 1983 1. Red Bound Bound Blue Book. Aug 1with Blood Bank Sticker: April 1983 - June 1989. BAG 4 1 X Bank Statements BAG 5 1. Plastic Bag: 2 Junior Red Cross First Aid Booklets. 1. Grey Cover, Red bound Disaster Times Register & Catering Register. 1. Gordon Exercise Book. Brown Cover Bool Disaster Times & Catering Registers 1984--1988 ( 2 Entries) BAG 6 1. Plastic Sleeve: Assorted Newspaper cuttings, Photos, cerftifcates 3 X Plastic Scapbooks 1961 Mid 1990's BAG 7 1 Plastic Sleeve: Red Cross Recollections Cassette Tape Made By Mrs Rene Hall, Mrs AliceBurton, Mrs Mill Walker, Mrs Jean Hughes; recorded by Elizabeth and2 hand written recollections my Mrs Jean Hughes and Mrs Ivy Newman. 1 Blue Cover Invicta Reservoir Esercise book: Distributing Book: List of Materials and wool supplied to members & What They Made for solders. 1939 - 9/06/1943. 1: Australian Red Cross Knitting Book. 1. Australian Red Cross Victorian Division Pyjamas etc. 1. Small Book Tennis Tournament 1939 with Photocopy of 2 Newspaper Cuttings. BAG 8 1 Plastic Sleeve: 6 News Sheets. 1. Branch Management Book 1940 1. Unit Information Handbook 1985 1 Treasurer's Handbook 1997 1 Office Bearer's Handbook.' 1999 *1 . Stawell Unit Award & Commendation in green folder 1985. 1. Roll of Article from Stawell Times 1,9,1999' 1 Cardboard around wrap for Pewter Wien Goblet sold as a Fundraiser 1. Pewter Bell donated for meeting by Annie N=Neil, and engraved as the Annie Neil Bell 1. Blue Covered book: Study of Red Cross Services ( Stawell Branch) 1939 - 1945 By Christina Joy. * Calico Cloth with Australian Red Cross These were attached to Garments owned by Red Cross. e.g. Short Gowns used at Blood Bank Had one on the Pocket. Archive Bos 19 BAG 1 1 Mottled Black over Red bound. Mon Oct 2 1939 Public Meeting called to form branch in Stawell. Committee meeting to Aug 1946 Page 281. Pages282 - 283 Minutes of Special Meeting: Feb 1942 June 1940 Aug. 1940 2. Public Meeting called to reform the Red Cross Emergency Service 29/07/1942 to 20/03/1970 BAG 2 1: The Original Subscription Book 1939-1940 2: Annual Roll Call Books 1941 1: Gordon Exercise book - Memberships 1941/42 1942/43 2: Membership Rolls: 1944/45 - 1950/51 Membership Rolls 1952/52 - 1959/1960. 1: Red bound Mottled Grey Cover Book - Memberships 1942 - 1968 Sundry Entries 1: Blue Cover Roll Call 1975 - 2002 1: Striped Cover Roll Call 1991 - 2005 1: Membership Subscriptions 2002 - 2004 1 Yellow Cover Office Bearers and Committee Members BAG 3 1 Treasurer's Cash Book 1939 - 1943 1 Receipts & Expenditure 1939 - 1943 1 Red Cover Receipts and Expenditure 1965/66 - 1983 1 Red Bound Receipts and Expenditure 1989 1993 1 Green Cover Receipts & Expenditure 1994 -2003 1 Red and Black Cover Receipts & Expenditire 1995 - 2004 1 White Cash Book 2004 BAG 4 1 Red & Grey Marble cover Red Cross Committe Meeting May 1947 - Oct 1955 2 Special Meeting Minutes: Feb 1951 Nov 1951 1 Brown Bound Minute Book Red Cross Committe Meeting Nov 1955 - Feb 1963 Special Meeting November 1960 1 Red Bound Account Book Used as Minutes March 1963 - Sept 1970. BAG 5 1 Red Bound Black book: Annual Meeting Book 1942- 1989 1 Red Mottled Cover Book Annual Meeting Book 1990 - 2004 BAG 6 1 Red Cover Book: Oct 1970 - June 1978 1 Red Mottled Cover Book: July 1978 - Nov 1987 1 Red Mottled Cover Book July 1996 - May 2004 Tray Cloth with Red Cross Identification Tag Stitched on. (Donated by Graeme McDonough Aug 2010) stawell -
 Stawell Historical Society Inc
Memorabilia - Realia, Semco Embroidery Text Book 3D !st Edition Free Sampler insede, 1930's
Published by Semco Art Needlework Pty.Ltd> Semco Park Cheltenham Road Black Rock S.9. Farrow Falcon Press Pty. Ltd. 226 Lonsdale Place, Melbourne. For Girls learning embroidery- home/schoolSemco Embroidery Text Book. White outline around Black cover. Large red circle with girl siting in front doing embroidery wearing Victorian style short puffed sleeved dress polka dot pattern and pantaloons red stockings and lace up ballerina style shoes1st Edition Semco Embroidery Text Book 3D Free sampler transfer inside. Booklet contains illustrations and instructions for each stich. Pages 2 and 3 have pencil squiggles across the top.: Stem stitch, Snail Trail, Back Stitch, Lazy Daisy Stitch, Thousand Flower Stitch, Buttonhole Stitch, Long and short buttonhole stitch, Chain Stitch Seed Stitch, Arrow stitch, Feather Stitch, Herringbone Stitch, Cross Stitch, French Knots, Lattice Stitch. Illustrations of designs with stiches referred to on previous pages. stawell -
 Stawell Historical Society Inc
Photograph, Upper Main Street Stawell looking East c1930's
... Black and white photo taken 1930's Upper Main Street... grampians Black and white photo taken 1930's Upper Main Street ...Black and white photo taken 1930's Upper Main Street looking East stawell businesses streetscape -
 Stawell Historical Society Inc
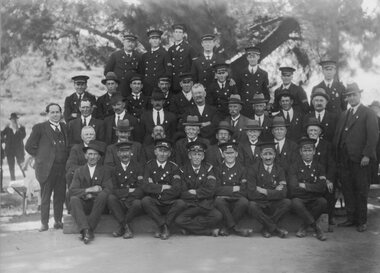
Photograph, Stawell Fire Brigade Members in Uniform Portrait 1920 - 1926
Group Portrait of Stawell Fire Brigade Members in Uniform 1920-1926 BACK ROW: L-R W. STEWART, N. FRASER, H. GRAY, J MADDOCKS (EX. CAPT), ????? SECOND ROW: L-R S.. ROSS,, R. HUGHES , T. DADSWELL, ?, ABRAHAMS , W. COLLINS, ?????? , A. OLIVER (EX. Capt.) THIRD ROW: L-R W. WILLIAMS, W. JONES , W. THOMLINSON , W. RICKARD, R. BROWN, J. BROWN (EX. Capt.) ,T. GOODSON, T. REA . E. GRAY (EX. Capt) , W. EARLE FOURTH ROW: L-R M. CHELLEW, J.H. CLARKE , I. COOK , ???????????? , ??????????????? G. BARNES , W. A. WHITEHEAD , T.S. MARSHALL (Chief Officer) FRONT ROW: L-R JOHN MARTIN , E. CLOUGH (EX. Capt), R. K. CHAPMAN (EX. Capt) , J. NEYLAN (Capt.) , H.H CHAPMAN, P. LEDGAR (EX. Capt), F. CROUCH *NEYLAN was in the brigade from 1922 to 1926Black & white photograph of a large group of men. Some are dressed in uniform.. Large tree, and other men in the backgroundR.K. Chapman !920's Stawell Fire Brigade with older members. J. Neylan Captain R.K. Chapman Lieutenantstawell -
 Williamstown Botanic Gardens- Hobsons Bay City Council
Photos - Cannons, 1970
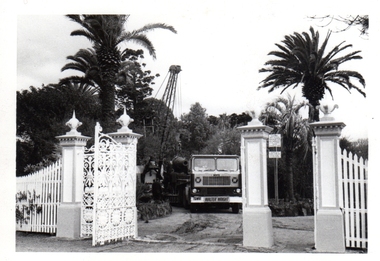
The Armstrong Cannons were originally placed at Fort Gellibrand, located at the southernmost tip of the Williamstown peninsula. The Fort was developed during the 1850s as part of a defensive system for the city and port of Melbourne. The importance of the Fort batteries declined from the 1890s, when they were effectively replaced by new facilities at Queenscliff and Point Nepean, but they were still used for gunnery practice. Local residents, through the Williamstown Town Council, complained to the Acting Minister for Defence that the concussion from the guns damaged windows, walls and foundations of buildings. The Armstrong Cannons were moved from Fort Gellibrand to the Gardens in 1906. A primary source of evidence of the cannons being in the Gardens. The cannons are remembered fondly as play equipment for the local children. Many tales have been told of climbing over them and pretending to be shot out of them A collection of seven black and white photographs documenting the removal of the cannons from the Gardens Photo 1 (a) Black and white landscape image. View is looking through the main gates looking at the front of the truck, which has the name Walter Wright across the front bumper, the crane and canon. The gates and fence are painted a light colour, probably white. Photo 2 (b) Black and white landscape image. Back of loader with cannon on it. Man standing on top of the cannon bending over either tying or untying ropes. Trunk of a palm tree is on the left side of the photo with a top of a palm tree in the background. Photo 3 (c) Black and portrait white image. A cannon being loaded by the crane on to trailer. Palm tree is in the background and fronds from a palm tree can be seen in the right top corner. Photo 4 (d) Black and white landscape image. Side on view of a cannon on the truck parked outside the grounds of the Gardens. The logo of the name of the trucking company is on the door of the truck above the words ‘WALTER H WRIGHT / TRANSPORT PTY LTD / S SCHULZ ST WEST MELB’. A second cannon can be seen in the background. A bus is in the background on the middle right side of the image. Photo 5 (e) Black and white landscape image. Truck with cannon on the back leaving the ground of the Gardens. Tree on the right side of the image and power pole is behind the truck. The logo of the name of the trucking company is on the door of the truck above the words ‘WALTER H WRIGHT / TRANSPORT PTY LTD / S SCHULZ ST WEST MELB’. ‘WALTER WRIGHT’ is on the front bumper Photo 6 (f) Black and white landscape image. Cannon tied down on the back of the truck as it is being driven across the street. Three houses in the background and two cars, one is a Volkswagen Photo 7 (g) Black and white landscape image. Cannon on the back of the truck which is parked over the street from the Gardens. Three houses are in the background. Two trees bare of leaves. The front of a car in in the foreground – it has a sun visor and the steering wheel is a light colour.armstrong cannons, williamstown botanic gardens, hobsons bay city council, 1970, walter h wright / transport pty ltd -
 Bendigo TAFE
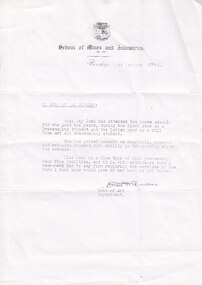
Reference, 14/10/1942
This is a reference written on 14th October, 1942, by the Head of the Art Department at the School of Mines and Industries Bendigo, Ernest H. Duncan, for a former pupil, Miss Ivy Jack. It is a complimentary reference assuring 'To Whom it May Concern' that Miss Jack 'is a fine type of girl possessing many fine qualities...' and that she has '...proved herself an energetic, careful and reliable student with ability in Dressmaking above the average.'This is significant in relation to the history of the Bendigo School of Mines and Industries. It gives an insight into the type of courses being offered by the school in 1942, as well as an insight into how references for individuals were written in the 1940's, as opposed to the way they are written in 2013. This significance has been assessed in-house.White paper photocopy of reference from Ernest H. Duncan, Head of Art Department of the School of Mines and Industries, Bendigo to Miss Ivy Jack, dated 14th October 1942. On School of Mines and Industries, Bendigo letterhead: "School of Mines and Industries, / No. 161 / Bendigo 14th October 1942. / TO WHOM IT MAY CONCERN: / Miss Ivy Jack has attended the above school / for the past two years,... /" Signed, "Ernest H. Duncan / Head of Art / Department."bendigo school of mines and industries, duncan, ernest h., jack, ivy, jack, shirley ivy, dressmaking, art department, 1942, reference -
 Bendigo TAFE
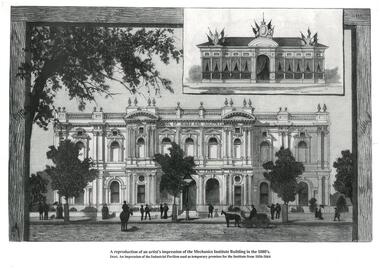
Print, A reproduction of an artist's impression of the Mechanics Institute Building in the 1880's, 20th Century
This is an artist's impression in reproduction of the Mechanics Institute building as it was in the 1880's. It has since changed quite significantly, especially what can be seen of the surrounds. The insert picture is an impression of the Industrial Pavilion which, as is stated, was used between 1856-1864 as temporary premises for the Institute. The print was first published in 'The Australian Sketcher' under the title "Sandhurst Mechanics Institute and free library: the new and old." [Go to the State Library of Victoria and the following link for more details.] http://www.slv.vic.gov.au/miscpics/gid/slv-pic-aab22020This is a significant print in an historical context, portraying the Bendigo School of Mines and Industries as it was in the 1880's, as well as the Industrial Pavilion. It indicates the significance of it to the community that an artist's impression was sought. Significance assessed in-house.A3 print on heavy paper. A reproduction of an artist's impression of the Mechanics Institute Building in the 1880's. The picture is of the building with an insert impression of the Industrial Pavilion used as temporary premises for the Institute from 1856-1864. It is a black and white print of the front of the building with rough depictions of people, horses, a carriage and trees in front of it."A reproduction of an artist's impression of the Mechanics Institute Building in the 1880's. / Insert. An impression of the Industrial Pavilion used as temporary premises for the Institute from 1856-1864"bendigo school of mines and industries, industrial pavilion, mechanics institute, bendigo, 1880, 1856-1864