Showing 608 items matching " overhead"
-
 Melbourne Tram Museum
Newsletter - Set of 12, Swanston Trams, "Tramfare" or Swanston News, 1998 to 2000
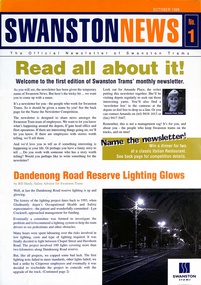
Set of 14 newsletters issued by Swanston Trams - 1998 to 2000. When privatised, Swanston Trams became part of the National Express group. Includes general news of the operator, depot news and operational news. Depots were Essendon, Malvern, Glenhuntly and Brunswick. Generally known as "Tramfare" No. 1 - Swanston News - Oct. 1998 - 4 A4 pages - Dandenong road lighting, overhead conversion. No. 3 - December 1998 - 4 A4 pages No. 4 - Feb. 1999 - folded A3 - Ron Scholten awarded driver of the month for Malvern depot, Salvo tram No. 5 - March 19999 - Cricket - Vic wins, passing stationary trams - 3 images No. 6 - April 1999 - 4 A4 pages - Senior drivers, Grand Prix No. 7 - May 1999 - 4 A4 pages + single A4 sheet - Privatisation newsletter - recovering a lost bag, Tramjack, and news from the depots. No. 8 - June 1999 - Norm Maddock at Malvern Museum, No. 9 - July 1999 - celebrating 80 years, includes a privatisation newsletter - issue 3, details the senior team. No. 10 - August 1999 - welcomes Peter Strachan - Chief Executive of National Express rail division. Includes retirement of Doug Prosser Dec 1999 - 12 A3 pages - W class, plans for 2000, Steven Altham's and his models, Feb March 2000 - 12 A3 pages, new trams, Grand Prix, Millennium messages on Melbourne tram, National Express in Australia, New Head Office, and Midland (Birmingham) Metro. June 2000 - 12 A3 pages centre stapled, extensive news and people. September 2000 - unnamed looking for a new name, general National Express news - 12 A3 page June/July 2000, National Express Quarterly Journal - patrollers, M>Tram maintenance article, Demonstrates the work of Swanston Trams and National Express.Newsletter A4 or A3 size, printed on gloss paper.tramways, swanston trams, depots, drivers, norm maddock, national express, m>tram, maintenance -
 Ballarat Tramway Museum
Slide - 35mm slide/s - set of 13, Peter Moses, 1974
Set of 13 colour slides, 7 on Kodak cardboard mounts and 6 on Agfa colour plastic mounts. .1 - Bendigo Trust, Birney trams 28 and 30 at Central Deborah Mine terminus. No. 30 has a 3BO Roof advertisement. .2 - ditto .3 - ditto with the Central Deborah mine and buildings in the background. .4 - No. 30 inbound in High St. with Sacred Heart Cathedral in the background (spire under construction) .5 - Nos. 30 and 28 crossing at Charing Cross with the Fountain Plaza building and the fountain in the background. .6 - No. 28 north bound in Pall Mall, after leaving Charing Cross with the Shamrock Hotel in the background. .7 - Photo showing track and centre poles in View St. looking west - no overhead. Has AMOCO service station near McKenzie St. .8 - No. 28 taken from cab of No. 30, in McCrae St, at end of double track. .9 - No. 28 turning from McCrae St. into Nolan St. .10 - No. 28 in Nolan St. with Lake Weeroona rowing sheds in the background. .11 - No. 19 in now Tramway Ave (then Arnold St.) running into depot .12 - No. 19 outside Bendigo depot .13 - ditto Slides taken by Peter Moses, during the winter of 1974 (no leaves on the trees).On the rear of all the slides "P. Moses" in black ink. .1 - "1974 Bendigo Central Deborah Mine" in blue ink and in red ink “16”. .2 - "1974 Bendigo two Birney cars / Central Deborah Mine" in blue ink and in red ink “18”. .3 - "1974 Bendigo trams at Central Deborah Mine" in blue ink and in red ink “17”. .4 - "1974 Bendigo High St / tram near Sacred Hearth Cathedral" in blue ink and in red ink “15”. .5 - "1974 Bendigo two Birney cars / Charing Cross" in blue ink and in red ink “20”. .6 - "1974 Bendigo No. 28 Pall Mall" in blue ink and in red ink “8”. .7 - "1974 Bendigo / Old Tramline View St." in black ink and in red ink “5”. .8 - "1974 Bendigo, McRae St. (Pall Mall)" and in red ink "9". .9 - "1974 Bendigo, Lake Weeroona, / tram " and in red ink "10". .10 - "1974 Bendigo, Lake Weeroona" and in red ink “11”. .11 - "1974 Bendigo / Outside depot" and in red ink “24”. .12 - "1974 Bendigo / Outside depot" and in red ink “25”. .13 - "1974 Bendigo / Depot" and in red ink “26”.tramways, trams, bendigo, central deborah, bendigo trust, sacred hearth cathedral, north bendigo, depot, tram 19, tram 28, tram 30 -
 Melbourne Tram Museum
Slide - Set of 9, Keith Caldwell, 17/03/1966 12:00:00 AM
Set of 8 Agfa colour blue white plastic mount slides, photo by Keith Caldwell of trams on the Royal Park line in the vicinity of the Royal Park railway line. .1 - W2 328 (West Coburg Bell St route 55) passing under the railway bridge, with another W2 (362 or 382?) behind. Tram 328 has adverts for Remy Martin and Kleenex tissues. .2 - W2 521, route 55, passing a tram stop. Note the overhead light. .3 -W2 456, route 55 West Coburg via William St, passing under the railway bridge. .4 - not used, .5 - W2 355 with railway bridge in background, Domain Road, Route 56. .6 - W2 506 climbing the hill, Domain Road, route 55. Tram has adverts for White Crow tomato sauce. .7 - W5 812, arriving at stop (Section sign), to Carnegie, route 4. The tram stop has the fares to the city (15d and 7d). In the background is a Perway box. .8 - W2 227 (Domain Road route 56) with the railway station and two other trams in the background. .9 - SW6 (Route 55) outbound with the zoo walls in the background. Tram has advert for Coffey Ford. 17/3/1966In ink "17 iii 66"trams, tramways, royal park, route 55, west coburg, w2 class, domain rd, route 56, w5 class, sw6 class, tram 328, tram 521, tram 456, tram 355, tram 506, tram 812, tram 227, tram 913 -
 Ballarat Tramway Museum
Film - Movie Film & Box, Kodak, 1960
Yields information in movie film format of Ballarat trams in 1960, how the system operated and was used by people., Yields information in movie film format of Ballarat trams in 1960, how the system operated and was used by people.Movie film - 8mm, approx. 17.5 mins, with leader strip on a plastic reel, within a black and white plastic box, titled "Ballarat No. 1. 1960" contained with a cardboard box, 'Tuscan Super 8 and Standard 8 Spool and Can' . Has been transferred to DVD - see Reg item 4100 as Segment No. 1. Filmed and made by Ben Parle. Also transferred to DVD by Rod Cook Oct. 2015, via Roger Greenwood for use in his DVD, "The City of Ballarat Trams, Gardens & Gold" of 2016. See Reg Item 6883. Synopsis: based on time. 0:00 Starts with bogies cars crossing railway level crossing (34?, 39?) 0:30 SEC Logo 0:45 Ballarat Station sign and intro “Some City Scenes” 0:49 35 turning from Lydiard St Nth to Sturt St towards Grenville St with Commonwealth Bank in view. and then 42 returning 1:19 42 showing Mt Pleasant, turns from Sturt St into Lydiard St Nth 1:53 Tramway road works in Lydiard St Nth, near intersection with Mair St with Jelbart Road roller in use, starts with an SEC roadworks sign. 2:12 39 passing the works out bound to Lydiard St Nth. 2:46 Good view of the roller working before 35 arrives. 3:01 35 passing the works in bound with 3:29 14 crossing Lydiard St in Sturt St, towards Grenville St 3:47 Trams in City Loop 3:55 21 coming up the hill 4:04 31 entering Bridge St from Sturt St with Bucks Head Hotel in the background. 4:27 Overhead work at corner of Sturt and Lydiard, with view of the sign at the City terminus “Trams leave here for Sebastopol, Gardens, View Point.” 4:34 Passengers getting off and then onto 38, ex Lydiard St Nth at city terminus including a young lady wearing gloves and a wheeling a pram hurriedly the photographer. A number of other prams in the view as well as. The Conductor helps to unload the pram. 5:07 41 proceeding up Sturt St, appears to have just rained. 5:26 11 using the Dawson St crossover, with a motor car doing a U turn as well. 6:00 14 descending Sturt St towards the City, filmed at Dawson St. 6:11 Title “The Gardens via Drummond St North Line” 6:16 19 showing Victoria St, turning from Drummond St Nth into Sturt St. 6:28 30 inbound in Drummond St Nth, approach and trailing shots. Trailing shot ahs the hospital in the background. 6:49 31 outbound, Drummond St Nth, approach and trailing shots, trees are in autumn colours. 7:04 12, inbound Drummond St Nth, with Macarthur St in the background, stopping to pick up a lady, approach and trailing shots and then entering the Mill St crossing loop. 7:53 14 outbound in Drummond St Nth, dropping a lady passenger off and then turning into Macarthur St and then tram going away. 8:37 View of overhead junction at View Point Jtn. 8:45 View of “Cars Stop Here” sign and pole sign “To City Only” 8:55 30 inbound in Wendouree Parade, stops to pick up passenger, and then a trailing shot of tram entering Macarthur St loop 9:37 View of “Cars Stop Here”, “End of Section” and timetable boards at Haddon St. 9:50 34, pausing at Haddon St and then proceeding towards depot – approach and trailing shots, with “Warning Oncoming Trams” sign in shot. 10:27 “Warning Oncoming Trams” sign 10:32 34 crossing 12 at the Martin Ave loop 10:48 39? Wendouree Parade, near Barrett Ave, stopping and letting off passengers. 11:24 30 passing depot junction and then trailing shot of it entering Tram Sheds or Depot Loop and then proceeding towards the City. 12:11 Shot of the “Caution Beware of Trams” sign at the depot. 12:14 25 stopping at depot junction and then trailing shot of it going toward Forrest St. 12:47 12 passing Depot Junction, trailing shot. 13:07 Shot of :Electricity Supply Department, Ballarat Branch” sign at depot. 13:13 View of a destination showing “Depot” on a bogie tram 13:15 Title “Some Depot Scenes” 13:19 View of a trolley pole and then 13 leaving the depot through the gates, destination showing “View Point”. 13:54 View of trolley pole and then 32 stopping at the depot gates. 14:08 12 (Sunny view) running out onto Wendouree Parade and then a bogie tram approaching Depot Loop. 14:43 View of 42 running in with a single trucker behind in Wendouree Parade, and another single trucker running out. 15:02 Title “Some Scenes in the Gardens” 15:05 25 running through the Gardens, approach and trailing shots, near our Depot Junction. 15:55 View of “No Parking East of Loop” sign 15:59 View of overhead and then trackwork (with points removed), but overhead still in position at the Old Gardens Loop or Gardens South Loop and then 12 entering the loop from the south and then a trailing shot looking along the Parade. 16:33 View of “Cars Stop Here” and “End of Section” and then timetable boards at Gardens Loop. 16:55 View of 34 leaving the loop 17:14 Title “The End”Written labels giving title information on outside of box.trams, tramways, ballarat, sebastopol, lydiard st north, victoria st, mt pleasant, sturt st west -
 Flagstaff Hill Maritime Museum and Village
Cash Ball
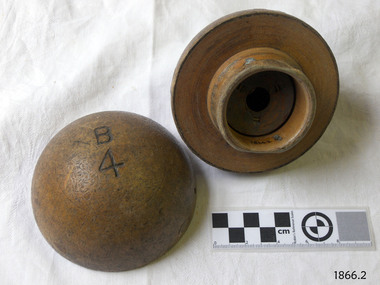
This cash ball was used by Cramond and Dickson, a large clothing store on the corner of Liebig and Timor Streets, Warrnambool. The Cash Ball system serviced the ground floor, which measured about 30 metres by 25 metres. An overhead pipe connected each service point in the store, with the pipes connected to the upstairs office. The ball would be filled with a note of details of the sale, and the cash payment; a vacuum system would be activated that would transport the ball upstairs to the office where details were recorded and change assembled. Change was placed in the ball, and the vacuum system activated to return the ball to the correct sales point. A frequent customer has reported that she never remembered the system not working efficiently, and the service was probably quicker than having a cash register at each sales location. John Glass Cramond and James Dickson migrated from Scotland to Melbourne where they opened a Cramond and Dickson store in St Kilda. They were inspired by the growth in Warrnambool after a visit and opened a second store there in 1855. The Cramond and Dickson store, grocers – drapery – ironmongery - chemist, was located on the corner of Liebig and Timor Streets, Warrnambool (now the site of a Mexican restaurant). Both Cramond and Dickson were involved in the business and social aspects of Warrnambool’s community. Cramond and Dickson closed in 1974. An advertisement placed by Cramond and Dickson in The Camperdown Chronicle, Saturday 6th April 1895, states them “showing the latest novelties for the coming winter season” … “import directly from English and Continental manufacturers” … “representatives in London … always in touch with the Newest Continental Fashions” ... “having been established for so many years we know the requirements of the Western District”… “allow 5 percent discount on goods paid for at the time of purchase”. [references: local historian John Lindsay, Warrnambool City Council’s CBD Heritage Trail leaflet, The Camperdown Chronicle, Facebook “Lost Warrnambool” site; WDHS Journal Volume 49 No2 2015] Cash ball, wooden, round, used by Cramond and Dickson clothing store. Two half spheres that fit into each other securely both are marked "B4" and one has "Fancy" marked on it.Carved into the surfaces of each half sphere are the characters "B4". Written on one is "Fancy"flagstaff hill, warrnambool, shipwrecked-coast, flagstaff-hill, flagstaff-hill-maritime-museum, maritime-museum, shipwreck-coast, flagstaff-hill-maritime-village, cash ball, cramond and dickson, office equipment -
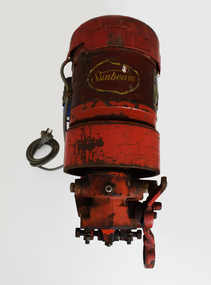
 National Wool Museum
Tool - Grinder, 1960-69
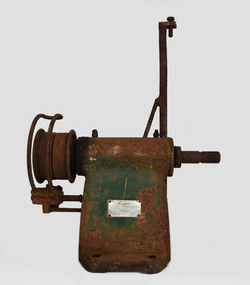
Cooper S.E. Ball Bearing Grinder made and guaranteed by Sunbeam Corporation Limited. Grinders like this example have been made the same since the early 1900s, with this grinder thought to have been produced in the 1960s. It is belt driven, with the other end of the belt being attached to an engine; the same engine that would have powered the overhead shearing equipment in shearing sheds. It was common for shearing teams to bring their own equipment, especially pre-1960 as most shearing sheds were not connected to power, and shearers preferred to work with their own equipment. The engines that powered the shears and grinder were typically fuelled with kerosene or petrol. The large circular disks are attached to the bolt that protrudes from the grinder and fastened tightly with a nut. An example of seeing a similar grinder in action can be found on the following link - https://www.youtube.com/watch?v=O7eimI_Gm9o. Inventor Frederick Wolseley made the world's first commercially successful power-shearing system in Australia in 1888. US company Cooper, which had been founded in 1843 as a maker of sheep dip, began selling Wolseley equipment in the USA in 1895. The Chicago Flexible Shaft Company successfully entered the power-shearing market a few years later and entered a joint venture with Cooper. It set up a branch in Sydney and sold shearing sets, and engines to power them, into the Australian market. In 1921 the US parent company, realising it needed to make products whose sales were not as seasonal as those of shearing equipment, made its first household appliances and branded them Sunbeam. In 1933, changes in exchange rates and taxes led the company to manufacture engines and shearing equipment in Australia via subsidiary Cooper Engineering, which changed its name to Sunbeam in 1946. Although most Australians know of this company as a major manufacturer of household appliances, its rural division flourished and retained the Sunbeam name for shearing equipment even after it was taken over by New Zealand company Tru-Test in 2001. The grinder is formed from a central arch shaped block of green painted metal. Much of this paint has been lost to age, leaving the grinder in a ‘farm used’ condition with much surface oxidation present. On the front of the arch is a specification plate, reading “Cooper S.E. ball bearing grinder. Made and guaranteed by Sunbeam”. At the foot of the arch, three bolt holes are found for securing the grinder to the base of a solid wooden surface. Two of the bolt holes are found on the front of the grinder, with another found on the rear. From the central arch, a bolt protrudes to the right of the grinder. This large bolt is for securing a grinding plate to the grinder. Above the central arch is a pendulum which holds the comb / cutter that is being sharpened. From the pendulum, a large arm extends down (not pictured) to meet and strike the plate spinning at a rapid speed. On the left-hand side of the central arch of the grinder, a wheel is found which a belt is attached to for power. This belt is then attached to a separate engine, spinning the wheel and hence powering the grinder. The wheel is partially covered with a section of protective bent tube, designed to provide protection from the rapidly spinning wheel. Below this wheel is the belt shifter. It is designed to move the protective bent tube from one side of the grinder to the other, to accommodate the grinder in the setup of different shearing sheds. The two separate grinding plates are identical. They have a slight slope for sharpening the comb and cutters in the correct method, with a slight bias towards the base, or “tooth”, of the equipment. The disks have a large central bolt for attaching to the grinder. They have tags on the horizontal axis of the grinding plates, for securing the plates in transportation, and to help with initial alignment when setting up the grinder. The reverse of these grinding plates has the same green painted metal finish found on the grinder. This paint is also in a ‘farm used’ condition, with surface oxidation present. The grinder would be provided from the factory with a comb holder, shifter for securing the grinding plates, emery cloth and emery glue. The emery cloth is what does the actual grinding and is applied to the grinding disks, replacing once well worn. These items can be seen in the final images in the multimedia section, showcasing advertising for this grinder. Plate. Inscribed. “Cooper / S.E. BALL BEARING GRINDER / MADE AND GUARANTEED BY / Sunbeam / CORPORATION LIMITED / SYDNEY MELBOURNE / ADELAIDE BRISBANE ”sheep shearing, shearing equipment, sunbeam, grinder -
 Ballarat Tramway Museum
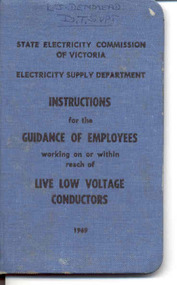
Book, State Electricity Commission of Victoria (SECV), "Instruction for the Guidance of Employees working on or within reach of Live Low Voltage Conductors", 1949
Booklet with blue Rexene cover and round corners on heavy card with sheet of paper glued on inside of covers and 32 printed pages stapled with in, titled "Instruction for the Guidance of Employees working on or within reach of Live Low Voltage Conductors". Also possibly known as the "L.V. Blue Book" - see top of definitions page. Dated 1949. Above title has name of the organisation - SECV - Electricity Supply Department. Inside front cover has space to record name and occupation of person issued to. In bottom left hand corner has form number "596-210 R2" Has been stamped "L. J. Denmead" by a hand stamped in blue ink and words "Departmental Tramway Supt." written in using blue ink. See image file 1854i2.jpg Book details procedure and rules for SEC employees working on or near low voltage conductors or Powerlines. Covers general matters, authorised employees, work on low voltage overhead lines, moving a conductor near live wires, public lighting, radio and carrier circuits, batteries, portable equipment, metering work on consumer premises, and definitions. Consists of 32 pages sheets of paper, printed and folded with one staple centrally and then stapled into the covers with paper inside pasted onto cover. Contents pages are not numbered. Covers blocked in blackSee issuing details above. On front cover in blue ink "L. J. Denmead / D. T. Supt"trams, tramways, sec, power lines, linesman, safety -
 Ballarat Tramway Museum
Photograph - Digital image Set of 10, Tony Smith, 19/09/1971 12:00:00 AM
Yields information about Ballarat Tramways and trams prior to the closure of the tramway system.Set of 10 digital images of Ballarat trams prior to closure, scanned from original slides by Tony Smith, 1971 prior to closure of the system. This set of slides appears to be the last day of operations - 19/9/1971 .1 - 40 in Drummond St Nth. near Macarthur St, showing Sebastopol. .2 - 35 turning from Drummond St north into Sturt St with the Southern Cross hotel in the background. Note the shoes in the overhead. .3 - 42 in Drummond St North, showing Special, nearing Sturt St. .4 - 42 turning into Sturt St, with the Shell Service station on the left. .5 - 42 reversing on the Lydiard St Nth crossover with the post office in the background. Tram showing Sebastopol. .6 - 39 reversing at Grenville St, tram showing Special. Has the Dickins and the Gasometer in the background. the conductor adjusting the trolley ropes. .7 - 39 running from Bridge St into Sturt St - as above. .8 - 34 and 39? parked in the City Loop. Has Patersons furniture, Gear Chemist and Edments stores in the background. .9 - 43 showing special at the Sturt and Lydiard St stop with 39? about to leave Lydiard St Nth. Has the post office in the background. .10 - 40 at the Lydiard St North terminus, with passengers boarding. Cemetery gates in the background.trams, tramways, drummond st nth, macarthur st, sturt st, closure, lydiard st nth, grenville st, city loop, closure, tram 40, tram 35, tram 42, tram 39, tram 34 -
 Melbourne Tram Museum
Document - Report, Hector Bell, Melbourne and Metropolitan Tramways Board, "Report of H.H. Bell Chairman on his overseas trip March - October 1938", 1939
Research Report or Overseas Tour report, Half bound in green and black Rexene with mottled end papers, 222 pages (Gestetner printed single sided), typed report - titled "Report of H.H. Bell Chairman of the Melbourne and Metropolitan Tramways Board on his overseas trip March - October 1938". Dated 31/1/1939. He was accompanied by Mr. R. A. Spencer the Board Secretary. Reg Item 3875 indicates that their wives travelled as well with them. Has an index, notes on his visits to five cities on his voyage to England, visits to 10 UK cities, Berlin, Paris and 12 USA and Canadian cities. Includes notes on buses, gas-producer engines, PCC trams, closure of tramways, technical notes, trolley buses, conversion of Bourke St cable tram routes, overhead, motors, engines and many other topics. Note pages scanned in particular have reference to Bourke St conversion and driving habits in the UK compared to Melbourne (road hogs). Inside front cover has a label from "Sands & McDougall Pty Ltd" about the job number and date of binding "6-3-1939" See Reg Item 3846 for a copy of the report re conversion of the cable tram routes and 3906 for an Oct. 1938 report on the PCC car to the Board.trams, tramways, mmtb, bourke st, conversion, double deck buses, tours, overseas tours, pcc, buses, trolley buses, uk, usa, canada -
 Melbourne Tram Museum
Photograph - Set of 25 Colour Photograph/s, Mike Ryan, late 1990's
Set of 25 colour photographs of Hawthorn depot, with some tramcars, mainly internal photos and some externals, late 1990's, prior to redevelopment. Photographed by Mike Ryan. Printed on Agfa paper. .1 - interior view of driver training room .2 - ditto .3 - ditto .4 - ditto .5 - ditto .6 - Depot view with W2 646 and W6 968 .7 - Depot view with W2 646, W6 968 and S 164 .8 - view of main room .9 - roof view with overhead troughing .10 - interior view looking at room .11 - PCC 1041 and other trams. .12 - exterior view showing trackwork .13 - exterior view showing front of the "new" depot or roads 5 - 7. .14 - interior view showing fence and walkway to rear of No.1 road. .15 - rear view of the "new" depot or roads 5 - 7. .16 - decaying brickwork. .17 - exterior view showing front of original depot or roads 1 - 4. .18 - interior view of sub-station .19 - interior view of band practice room in the main room. .20 - ditto .21 - ditto .22 - exterior view showing trackwork - also shows tramcar road or track allocation board. .23 - ditto .24 - ditto .25 - dittotrams, tramways, mmtb, museum, tramcars, driver training, tram 1041, tram 646, tram 968, tram 164, hawthorn depot, w6 class, s class, pcc class, melbourne tramways band, substation, w2 class -
 National Wool Museum
Machine - Shearing Motor, Sunbeam, 1960-69
With more and more woolsheds being connected to power lines, the need for electric shearing gear markedly increased from the 1960s onwards. The greater economy made electric gear an attractive proposition to many graziers. Requiring only an electric shearing motor, for small and medium scale operations, electric shearing motors were a more economical way of shearing a wool clip. The other option for graziers was Overhead shearing gear, which also required an Engine to provide shared power to a row of shearing stations. Still working, this Sunbeam Electric Shearing Motor – Heavy Duty Model, features a slow speed motor totally enclosed for protection against dust and insects. The full bearing down tube is easily removed and stored to be out of the way when not in use (not pictured). Providing 0.5 hp, which is twice the power ever needed for shearing sheep, this buffer allows for fluctuations in voltages that can occur in rural districts. Inventor Frederick Wolseley made the world's first commercially successful power-shearing system in Australia in 1888. US company Cooper, which had been founded in 1843 as a maker of sheep dip, began selling Wolseley equipment in the USA in 1895. The Chicago Flexible Shaft Company successfully entered the power-shearing market a few years later and entered into a joint venture with Cooper. It set up a branch in Sydney and sold shearing sets, and engines to power them, into the Australian market. In 1921 the US parent company, realising it needed to make products whose sales were not as seasonal as those of shearing equipment, made its first household appliances and branded them Sunbeam. In 1933, changes in exchange rates and taxes led the company to manufacture engines and shearing equipment in Australia via subsidiary Cooper Engineering, which changed its name to Sunbeam in 1946. Although most Australians know of this company as a major manufacturer of household appliances, its rural division flourished and retained the Sunbeam name for shearing equipment even after it was taken over by New Zealand company Tru-Test in 2001. This 0.5 horsepower vertical brushed motor air-cooled engine was designed to drive a single shearing plant. From the central cylinder which features a yellow “Sunbeam” sticker, a grey 240v power lead can be found on the left-hand side. A blue capacitor is located next to this power lead. Below, two legs extend and meet to form a foot which is fastened to a wall. On the right-hand side of the engine, a specification plate is located on the central cylinder. A yellow directional arrow sticker is located on the rotating section of the engine below the specification plate (location for photography, this section is designed to rotate and hence this sticker is not fixed in this location). At the rear of the cylinder, a plastic cap with small air cut outs protects the air-cooled engine from contaminants. At the front of the engine, the location for securing the bearing down tube is located. On the right-hand side of the lock for the bearing down tube is the handle, to which a string is often attached for switching the motor on and off by a shearer bent at the waist (not pictured). Sticker. Gold writing. Front of shearing motor “Sunbeam” Plate. Inscribed. Side of shearing motor. “Sunbeam / SHEARING MOTOR / MADE IN AUSTRALIA / 0.5 H.P. / 220/240 V / 1 PHASE A.C. / 4.0 AMPS / 50 C/S. / CONT. RTG. / 1425 R.P.M. / CLASS A INSUL / NO. J244560 / TYPE: NSB5C2/49." sheep sheering, shearing equipment, sunbeam, electric shearing motor -
 Ringwood and District Historical Society
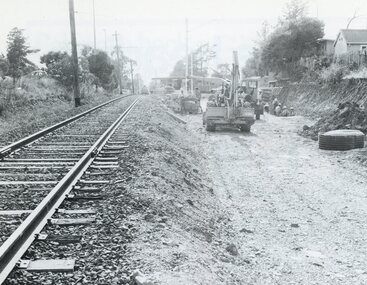
Photograph, Duplication of the five-kilometre section of railway line between Ringwood and Croydon in 1983
Digital scanFrom Vicrail News magazine, April 1983. “Duplication of the five-kilometre section of line between Ringwood and Croydon is on the way. Several major works will be undertaken over the next few months so the two tracks can be brought into service later this year. Intensive work on this section follows completion of duplication works between Ringwood and Bayswater on the Belgrave line last December. The completion of this 5.17 kilometre section between Ringwood and Bayswater means that this Belgrave line is now duplicated as far out as Ferntree Gully. Commuters using the Belgrave line now have an improved service with the intro duction in January of an additional evening peak train to Upper Ferntree Gully, two additional peak hour services in the morning from both Belgrave and Upper Ferntree Gully, and with the additional tracks delays on one line will not affect trains travelling in the opposite direction. Commenting on the completion of this stretch of track the Minister of Transport, Mr. Crabb, said a further improvement had been made with the commissioning of boom barriers at the Bedford Road level crossing in Ringwood. "The installation is part of the State Government's $9.4 million four-year plan to equip 70 dangerous level crossings throughout the State with boom barriers", he said. Works to be carried out on the Ringwood/ Croydon section include laying of new track, station works at Croydon and installation of boom barriers at East Ringwood. Already completed are bridge works to cater for double tracks at both Mt. Dandenong and Eastfield Roads between Croydon and East Ringwood and construction of an island platform at East Ringwood station. At several locations alignment of the existing track will be slightly relocated. The new line is being constructed with concrete sleepers and heavyweight rails. The existing line will also be reconstructed using these heavy 60kg per metre rails. Engineering works to be completed include installation of overhead wiring necessary to supply power to trains, construction of two new station buildings and a new platform at Croydon, provision of boom barriers, and pedestrian boom barriers at Dublin Road level crossing. East Ringwood, and replacement of existing timber overhead wire support structures with steel structures. Other works in this program included installation of boom barriers at Bedford Road, Ringwood and Scoresby Road, Bayswater and provision of a new platform for trains going to Melbourne and Heathmont. A new timetable on the Lilydale and Belgrave lines will commence when the Ringwood—Croydon duplication track work is completed.” -
 Ballarat Tramway Museum
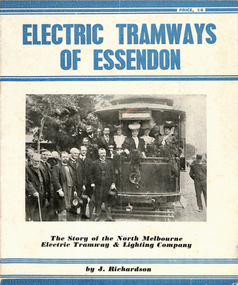
Book, Jack Richardson, "The Essendon Tramways", 1963, 1956
Twenty four page book including card covers on glossy paper titled "The Essendon Tramways" written by Jack Richardson, published by Traction Publications, Historical Series No. 153 in 1963. The story of the North Melbourne and Electric Tramway and Lighting Company. Note on page 3, advises that this book was the 2nd edition. Price at the time 3/- Details the historical background, a map of the tramway in 1906, relationship with the Victorian Railways, construction, rolling stock, carbarn, (depot) power station, overhead, takeover by the MMTB, connection to the City, 1963 map, expansion under the MMTB, services at the time of publication, Rolling Stock Roster, notes on some of the personnel of the tramway, junction details and dates of the various extensions etc. Includes a number of photographs, a list of railway and tramway books published by Traction Publications, a publishers note and on the rear cover a short biography on the author. 2459.1 - 1st edition of book - no cover page, rear cover remains. Gives caption of front cover photo. Has some different layout of text at rear and different map. 2459.2 - 2nd edition of the book - from the Wal Jack Collection 2011 - added 28/10/2011. 2459.3 - 1st edition of the book - from the Ian Stanley Collection 2015 - added 20-12-2015 - see images 4 to 7. - printed by 1956, by Zenith Press 290 High St Kew. pdf copy of book - 1st edition - 1956 version - see btm2459i9.pdf pdf copy of book - 2nd edition - 1963 version added 16-3-2017 - see btm2459i8.pdf 2459 - On the front cover in black ink "Ex ARHS Archives", 2459.1 - has Graeme Breydon's address stamp twice on front cover, possibly indicating he acquired it without the cover., 2459.2 - on page 3 in blue ink "Wally: with compliments and best wishes from Jack"trams, tramways, essendon, moonee ponds, north melbourne, nmetl -
 Melbourne Tram Museum
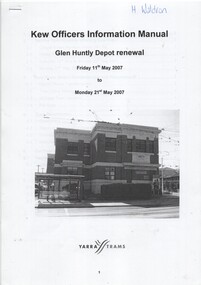
Manual, Yarra Trams, "Glen Huntly Depot Renewal", "Kew Depot - Pit Deepening Roads 1 to 4", "Camberwell Depot Yard Tracks Renewal", 2007 to 2011
Set of three Reports or Operations Plan or Manual for work at Kew and Glen Huntly Depots. .1 - 12 A4 pages - stapled - "Kew Officers Information Manual - Glen Huntly Depot renewal" - Friday 11 May 2007 to Monday 21st May 2007". Has a photo of the depot on the front sheet. Covers service changes, arrangements for changes to services running from Kew Depot, car parking, tram requirements. Has a table of contents. .2 - 7 A4 pages - stapled - "Operations Plan - "Kew Depot - Pit Deepening Roads 1 to 4" = Monday 23 June 2008 to Friday 18 July 2008" - has a table of contents, covers maintenance, tram requirements, out stabling, security, sanding and hours of operation. .3 - 19 A4 pages - stapled - "Camberwell Depot Yard Tracks Renewal" - Saturday 3 December 2011 to Monday 12 December 2011 - has a table of contents, service changes, car parking, stabling, maintenance, operations, sanding, cleaning, rosters and test trams and notice to employees. .4 - 3 A4 foolscap sheets - Co-ordinating plan for Kew Depot / Barkers Road entrance and High Street and Cotham Road - dated 25/11/2005 - list works, location, overhead, cabling, track and other works and isolation requirements. On the rear has a list of the trams for the depot, Collins St, Simpson St and Camberwell. .5 - Notes on the Kew Depot relay by Hugh Waldron received in an email dated 9/3/2018 - from Kew Depot History..1 - Has "H. Waldron" in top left hand corner in blue ink. .2 - ditto "Hugh" in red ink.trams, tramways, yarra trams, kew depot, glenhuntly tram depot, trackwork, depot fan, tram services -
 Melbourne Tram Museum
Book, Jack Richardson, "Electric Tramways of Essendon", "The Essendon Tramways", 1963
Book - 16 pages including card covers on semi gloss paper titled "The Essendon Tramways" written by Jack Richardson, published by Traction Publications, Historical Series No. 3 in 1956. The story of the North Melbourne and Electric Tramway and Lighting Company. Foreword on page 2 gives the background to the book and the persons who assisted with it. Details the historical background, a map of the tramway in 1906, relationship with the Victorian Railways, construction, rolling stock, carbarn, (depot) power station, overhead, takeover by the MMTB, connection to the City, 1956 map, expansion under the MMTB, services at the time of publication, Rolling Stock Roster, notes on some of the personnel of the tramway, junction details and dates of the various extensions etc. Includes a number of photographs, a list of railway and tramway books published by Traction Publications on the rear cover a short biography on the author. 2nd copy - from the H. S. McComb collection - stored in the original box - Items 2027 to 2030 and 1309 copy 2 contained within box 72.3 in a brown folder marked "Historical Data regarding Essendon Tramways and their services to the City" PDF copy of 1309.1 - the 1956 version added 25-2-2021 PDF copy of 1309.2 - the 1963 version added 16-3-2017. 1309.2 - 2nd edition, 1963, Historical Series No. 153, with a photo of J. Richardson on rear cover. Has notes on the edition and publisher notes. Revised to pick up errors and other photographs. Added 16-3--2017.1309.2 - has "L. W. Rogers" in ink on the top right hand corner of page 3.trams, tramways, essendon, nmetl, tramcars, depots, moonee ponds, north melbourne -
 Melbourne Tram Museum
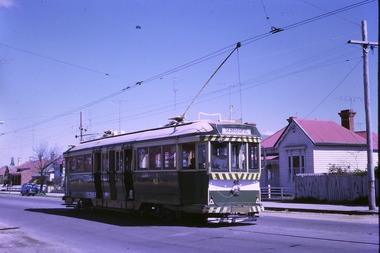
Photograph - Last day of original Essendon Airport tram terminus, Ron Scholten, 7-10-1976
The original line to the Essendon Aerodrome was constructed in 1943 to serve the airport and aircraft construction. It was funded by the Commonwealth Government. By 1976, patronage to the airport terminus in Vaughan St had dropped, the crossing of the highway to the Tullamarine Airport opened in 1970, was dangerous, and the highway needed to be widened. The new terminus was a short distance to the north between Mathews Ave and the Highway. This series of photographs show the last day of operations to the original terminus and the changeover, which was done in about 7 hours. No buses were required. It was done by workers of the Melbourne and Metropolitan Tramways Board. The line was later extended to Airport West. .1 - W5 789, (Essendon Airport Route 59) about to turn from Mathews Ave into Vaughan St. Has new track and footbridge in the foreground. .2 - W5 791 on the siding or spur at the airport terminus, the last tram to use this facility. .3 - W2 571, at the Airport terminus alongside Vaughan St on the last morning of the use of this terminus. The Bundy clock can be seen behind the pole on the lefthand side and the Brick passenger shelter. Shows buffer stops, and Forestair hanger behind. .4 - W2 595 turning from Vaughan St into Mathews Ave. Has the tram stop No. 55 in the view. .5 - W5 839 turning from Vaughan St into Mathews Ave. Shows the flashing yellow light that gave some protection to the trams. .6 - W2 247 about to turn into Vaughan St. Driver about to reboard the tram. Note the new copper trolley wire is up for the new track but has been pulled to the west side using rope. .7 - W5 805, turning from Mathews Ave into Vaughan St, to the old Essendon Airport terminus. Has a new track in the foreground, and the overhead for the curves is still in position. .8 - W6 991 turning from Vaughan St into Matthews Ave, at 855am, the last tram from the old terminus. The track gang has commenced work to remove the outbound curve. Would appear four passengers waiting at the tram stop, two with lunch bags. Note the cattle grid in the foreground between the rails. New rails on the ground on the left-hand side. See Reg Item 6163 for further photos of this event.Yields information about the last day of the operation of the original Essendon Airport tram line.Set of 8 Kodachrome cardboard mount colour slides of the relocation of the Essendon Airport tram terminus 7-10-1976, by Ron Scholten.All slides have detailed descriptions on the reartrams, tramways, essendon aerodrome, essendon airport, closure, new tramways, route 59, w5 789, w5 791, w2 571, w2 595, w5 839, w2 247, w5 805, w6 991, w2 class, w5 class, w6 class, mmtb, trackwork -
 Flagstaff Hill Maritime Museum and Village
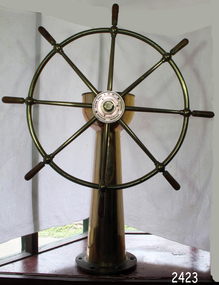
Equipment - Ship's Wheel, John Hastie et al, Early 20th Century
John Hastie Engineer and millwright John Hastie opened small manufacturing works in Greenock in 1845 and 1853 patented the first self-holding steering gear. The firm became known as John, Hastie and Co. Ltd. in 1898 after taking on limited liability status and their main works were at Kilblain Street, Greenock, where they specialised in ships' steering gear. The company also occupied works at Rue End Street, Greenock. Plans of this unit depict a stockyard to the east, with areas for welding; fitting and assembly; flame, cutting and fabrication; and a machine bay. The company was dissolved in 1991. Brown Brothers Brown Bros Rosebank Ironworks made the steering gears for many large ship's, including The Titanic. Andrew Betts Brown the founder was born in 1741 and closely associated with many improvements in marine engineering. He was educated in his native city and served his apprenticeship as an engineer in the locomotive works of the North British Railway Company at St. Margaret's. During his apprenticeship, he attended the evening classes at Watt College. subsequently going to Manchester to study chemistry. He went to London around 1863 and took over an old brewery, which he converted into an engineering works. During his time there he invented an overhead travelling crane, which was used on the construction of Blackfriars Bridge London. He went on to develop plant which used steam and hydraulic power for discharging ships as a result the company was contracted to install this equipment in Hamburg Docks. By around 1870 he continued to construct machinery in London but realised that conditions were more favourable in Edinburgh. He acquired land at Rosebank adjoining the North British Railway Company's line to Granton, and the necessary infrastructure was completed allowing him to finish the Hamburg contract. The works at Rosebank were eventually extended and added to until they became one of the largest engineering works in the East of Scotland. Mr Brown was a member of numerous engineering institutions, the best known at the time being the Institution of Naval Architects. He was also a Fellow of the Royal Society of Edinburgh, a member of the Institute of Mechanical Engineers and of the Institution of Marine Engineers he died in 1906 at the age of 67.An item made by two marine innovators of marine auxiliary machinery, equipment and itemsShip's wheel, brass, attached to brass pillar. The base has six holes in it for securing it in place. Top of the ship's wheel pillar has a brass, adjustable arrow pointer that is positioned over a dial etched into the flat brass surface. The dial reads " PORT STABD". Lines and degrees are marked, with '0' in centre and every 5 degrees, from 0-35, in both Port and Starboard sidesInscription to wheel hub "Brown Brothers & Co. Ltd, Rosebank Ironworks, Edinburgh"flagstaff hill, warrnambool, shipwrecked-coast, flagstaff-hill, flagstaff-hill-maritime-museum, maritime-museum, shipwreck-coast, flagstaff-hill-maritime-village, john hastie, john hastie, andrew betts brown, ships wheel, ship steering gear, marine equipment, instrument, navigation -
 Melbourne Tram Museum
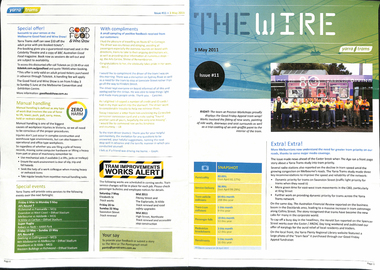
Magazine, Yarra Trams, "The Wire", 5/2011 to 1/2015
0 - No 9 - 1/4/2011 - Rhinos on skateboards, Did you know, Spencer St works, .1 - No. 11 of 3/5/2011 with the revised Yarra trams logo, traffic priority, work over Easter in Spencer St at Bourke and Collins St, Good Friday appeal, safety, passenger feedback and future works. .2 - No. 13 - 31/5/2011 - new uniform, cleaning, CEPR, trackwork - Fitzroy St, Northcote, Rhino, Carlton Control. .3 - No. 14 - 15/6/2011 - Haymarket Roundabout, accessibility, maintenance, CSE. 3a - No. 16 - 19/7/2011 - Managers on the move, Trevor Jones, Yarra's vision, Richard Ch'ng and Rhino update. .4 - No. 17 - 2/8/2011 - High St Westgarth trackwork, Swanston St, IMF CEO visit .5 - No. 18 - 16/8/2011 - Performance benchmarks met, Preston Workshops, repairs to 3018, tram signal priority. .6 - No . 19 - 30/8/2011 - New E class trams, routes "a" or "d", TramTracker in shelters, police, fare evasion .7 - No. 20 - 15/9/2011 - Football trams, Superstops, Bridge Road, Rhinos. .8 - No. 21 - 27/9/2011 - CEO's journey to work, accessibility, increased patronage, E class. .8a - No. 22 - 11/10/2011 - Minister Mulder visit, E class, Customer experience, Elizabeth Kerdelhue Corporate Affairs Director, flood indicator in Wellington Parade, Keolis - Orleans and PTV coming your way. .9 - No. 23 - 25/10/2011 - forthcoming royal visit, opening for Footscray Road extension, Rhinos, Stockholm .10 - No. 24 - 8/11/2011- Royal visit, photos, Z3 158, route 86 works in High St. (see htd5043i21 for a image from an unknown newspaper of the actual event - features Z3 158.) .11 - No. 25 - 22/11/2011 - new staff guide, Gold Coast tram line, Macarthur St, overhead, fund raising, route numbering update. .12 - No. 26 - 6/12/2011 - Swanston St Superstops, Newmarket bridge strikes, rhinos. .13 - No. 27 - 20/12/2011 - Christmas carnival, Lenny Bates, portable crossover, uniforms. .14 - No. 28 - 17/1/2012 - Passing of Len Bates, Myki, Gardiner railway station. 14a - No. 29 - 31/1/2012 - Southbank depot, patronage, myki, think like a passenger, fatigue management, .15 - No. 30 - 15/2/2012 - visit of Keolis, SNCF people, list of Executive leadership team with photos, Swanston St works, Myki introduction. .16 - No. 31 - 29/2/2012 - patronage up, tram postage stamps, Myki, rhinos. .17 - No. 32 - 14/3/2012 - St Kilda Rd trackwork, fund raising, Southbank Depot extensions, Myki, driving conditions, grand prix. .18 - No. 33 - 30/3/2012 - introduction of the PTV, end of MetLink and Transport Ticketing Authority, changes in management structure, trackwork, Gold Coast tramway and Keolis. .19 - No. 34 - Dr Jake - Royal children's Hospital super stop, route 96 - Premium line. .20 - No. 35, 2/5/2012 - Revision of Rules, trackwork in St Kilda Road and Elizabeth St, Myki, safety - Zero Harm. .21 - No. 69 - 25/9/2013 - Passengers paying their way, E class update, Mal Ashworth retires, progress report, feedback, new chime on trams. .22 - No. 70 - 9/10/2013 - Art comes alive, tram 925, driver simulator at Preston Workshops, E class project, 90th Glen Huntly. .23 - No. 83 - 23/4/2014 - Screen time for trams, new PIDs on B class, assistance animals, Operations Centre, Preston Workshops, Electrical log sheets to SLV. .24 - No. 89 - 23/7/2014 - punctuality, refresh of network map (fold-out map), women drivers. .25 - No. 97 - 19/11/2014 - Revitalising route 96, Keolis news, free tram zone, guide dogs. .26 - No. 99 - 17/12/2014 - Accessibility week, new uniform top for CSE's, free tram zone, world trade centre stop upgrade, heat stress, Art tram 158. .27 - No. 100 - 14/1/2015 - Route 96 complete, New Years eve free travel, fare compliance, patronage down, .28 - No. 12 - 16/5/2011 - Gold coast tramway, performance dashboard, tramworks and the rhino .29 - No. 16 - 19/7/2011 - Depot managers, tevor jones, record patronage, vision, rhino .30 - No. 17 - 2/8/2011 - High St Westgarth works, Duncan Smith, David Clarke Training, Swanston St works, and Preston Workshops . .32 - No. 39 - 28/6.2012 - maintenance, Emmanual Sorin, transformation, fare evasion, and Combino in Potsdam. .33 - No. 105 - 25/3/2015 - Grand Prix, Elgin and Lygon upgrade, Camberwell Junction, PTV hub, overhead.Demonstrates Yarra trams staff newsletters.Set of 33 Yarra Trams internal newsletter "The Wire", All A4, printed in full colour. All four pages unless noted otherwise, full colour, performance snapshot on front cover.trams, tramways, yarra trams, traffic control, trackwork, spencer st, fund raising, operations, rhinos, carlton control, high st, haymarket, preston workshops, e class, route numbers, bridge road, wellington parade, ptv, royal visit, footscray road, new tramway, gold coast, macarthur st, swanston st, superstops, newmarket, gardiner, burke road, level crossings, railway squares, myki, metlink, tickets, route 96, rules, st kilda road, elizabeth st, tram 158, tram 925, glen huntly depot, simulator, b class, opeations centre, art trams, patronage -
 Melbourne Tram Museum
Album - Geoff Grant Photos, Geoff Grant, mid 1950s
Photo - see pdf file for further information. Number Brief Description GAG1 51 Sandringham GAG2 50 Sandringham GAG3 50 side Sandringham GAG4 Depot Sandringham_ GAG5 426 Camberwell Depot GAG6 822 St Kilda Rd GAG7 496 St Kilda Rd GAG8 347 Caulfield GAG9 440 Princes Bridge GAG10 190 Camberwell GAG11 190 Camberwell GAG12 Ys Camberwell GAG13 Interior Camberwell Depot GAG14 921 Camberwell GAG15 613 Camberwell Depot GAG16 613 front Camberwell Depot GAG17 887 Bourke St opening_ GAG18 888 Victoria St North Richmond GAG19 888 Victoria Pde GAG20 888 887 Malvern Depot GAG21 888 887 Malvern Depot GAG22 888 Victoria Pde GAG23 1033 North Fitzroy Depot GAG24 957 1033 Bourke St GAG25 1033 Nicholson St East Brunswick GAG26 1001 East Preston Depot GAG27 980 East Preston Depot GAG28 980 Dandenong Rd GAG29 Tower wagons Bourke St at Swanston St GAG30 Tower wagons Nicholson St GAG31 988 tower wagons Nicholson St GAG32 988 tower wagons Bourke St at Russell St GAG33 Albion Tower wagon Clifton Hill GAG34 988 tower wagon Bourke St at Russell St GAG35 988 East Preston Depot GAG36 Cleaner 7 Bourke St GAG37 988 turning from Nicholson St into Victoria Pde GAG38 991 Bourke St GAG39 View down Bourke St from 988 GAG40 988 Nicholson St GAG41 988 Smith St GAG42 988 High St GAG43 988 testing overhead Bourke St GAG44 1003 Nicholson St into Gertrude St GAG45 988 Clifton Hill GAG46 988 Nicholson St GAG47 988 1003 Nicholson St GAG48 988 Bourke St looking west from Elizabeth St GAG49 988 Bourke St looking east from Swanston St GAG50 988 1003 and tower wagons Nicholson St GAG51 988 Clifton Hill GAG52 988 East Preston Depot GAG53 190 Etched saloon door window Yields infomation about VR Tramways, Bourke Street trams and AETA tours. Geoff Grant was a Herald Sun photographer.Assembled album in a black presentation folder of 53 photographs from the Geoff Grant Collection - 27 sleeves All photographs have been scanned and placed on the Museum's G drive. A list of all photographs with details where possible has been compiled. tramways, trams, sandingham, camberwell depot, bourke st, new tramways, tower wagons, tours, victoria parade, east preston, aeta tours -
 Ballarat Tramway Museum
Slide - 35mm slide/s - set of 13, Noel Simons, 24/05/1971 12:00:00 AM
Set of 13 transparencies taken on 24/5/1971 on Kodak mounts. 1200.1 - No. 7 en route to Golden Square turning from Bridge St. into Nolan St. Photo taken after tram has passed photographer. Tram has a briquettes roof ad. 1200.2 - No. 21 in McCrae St. just before Nolan St. Photo taken after tram has passed photographer. 1200.3 - No. 7 in Nolan St at corner with McCrae St. Passenger boarding tram at a tram stop. 1200.4 - No 7 turning from Nolan into McCrae St. with Golden Fleece service station in background. 1200.5 - No. 7 in Thunder St en route to North Bendigo. Photo taken after tram has passed photographer. 1200.6 - No. 5 en route to Eaglehawk just after leaving Needle Loop between Long Gully and California Gully. 1200.7 - No. 5 at the start of the double track in High St. Eaglehawk. 1200.8 - No. 5 at Eaglehawk terminus showing "Depot" with Leo A Hughes Photographer advertisement on building in background. 1200.9 - No. 5 at Eaglehawk terminus. Has two SEC roof ads 'Everything's fine in my all electric kitchen' and 'Electricity best for cooking'. 1200.10 - No. 5 at Eaglehawk terminus, with canon, war memorial outside Town Hall and Leo A Hughes Photographer advertisement on building in background. 1200.11 - No. 5 in McCrae St. about to enter Arnold St. and depot. Tram showing depot, has driver changing points. 1200.12 - No. 5 in Arnold St. Photo taken looking up the centre of the access track - shows the overhead at depot junction. 1200.13 - Depot entrance with signage at depot entrance and depot building in background.Information written on in black ink and date stamped on purple ink. 1200.1 - "No. 7 entering Nolan St. from Bridge St." 1200.2 -"No. 21 in McRae St. about to turn into Nolan St." 1200.3 - "No. 7 in Nolan St. at corner of McRae St." 1200.4 - "No. 7 turning from Nolan St. into McRae St." 1200.5 - "No. 7 in Thunder St. just after turning from Caledonia St." 1200.6 - "No. 5 just after leaving Needle Loop between Long Gully and California Gully. 1200.7 - "No. 5 in High St. Eaglehawk at start of double track." 1200.8 - "No. 5 at Eaglehawk terminus" 1200.9 - "No. 5 at Eaglehawk terminus" 1200.10 - "No. 5 at Eaglehawk terminus."\ 1200.11 - "No. 5 in McCrae St. about to enter Arnold St." 1200.12 - "No. 5 in Arnold St." 1200.13 - "Entrance to Bendigo Tram Depot, No. 5 running into shed."tramways, trams, bendigo, mccrae st, north bendigo, california gully, eaglehawk, depot, tram 5, tram 7, tram 21 -
 Ballarat Tramway Museum
Photograph - Digital image Set of 20, 1971-72
Set of 22 digital images of Bendigo Tramways, 1972 at or before closure while on a tram tour by Stuart Lodington. .1 - No. 7 arriving at North Bendigo .2 - No. 5 departing Charing Cross along View St, with a Firestone tyres in the background. .3 - front view of a tram in View St with a blurred background image. .4 - No. 24 showing Eaglehawk destination .5 - No 26 and 3 in View St, with the Armstrong Tyre Service building in the background and signs for T&G and Cohn's Drinks. .6 - ditto .7 - No. 3 arriving at Charing Cross from Eaglehawk in View St, with a Quarry Hill destination. .8 - No. 3 and 18 at Charing Cross. .9 - No. 24 on the Quarry Hill line. .10 - No 26 in View St, with the Armstrong Tyre Service building in the background and signs for T&G and Cohn's Drinks. .11 - ditto, with fountain in view, Colonial Mutual building and a newsagent with a Herald sign on the building. .12 - No. 7 at North Bendigo terminus .13 - ditto with pole being reversed. .14 - No. 18 at Quarry Hill terminus with Northern Terrazzo sign in the background. .15 - No. 24 at Quarry Hill terminus .16 - No. 18 arriving at Charring Cross, with Fountain Plaza and Bendigo Pharmacy in the background. .17 - No. 3 and 18 at Charing Cross. .18 - No. 7 at North Bendigo terminus with pole being placed on the overhead. .19 - No. 26 in View St inbound, with Sandhurst Trustees sign in the background. .20 - No. 6 leaving Charing Cross in Pall Mall with Myer and other buildings in the background. .21 - No. 7 at North Bendigo .22 - Single trucker with two roof Advertisements crossing View St with fountain in view, Colonial Mutual building and a newsagent with a Herald sign on the building.trams, tramways, bendigo, eaglehawk, quarry hill, north bendigo, charing cross, view st, tram 7, tram 5, tram 24, tram 26, tram 5, tram 3, tram 18, tram 6 -
 Ballarat Tramway Museum
Document - Photocopies, Ballarat Tramway Museum (BTM), newspaper items - Ballarat closure, Mar. 1996
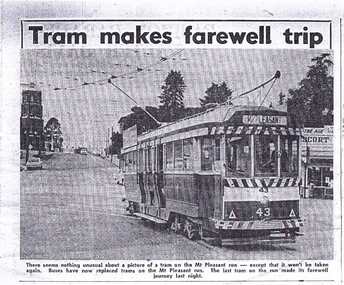
Photocopies of original newspaper clippings from the Ballarat Courier. Originals of cuttings held - see notes below. 278.1 - "Tram makes farewell trip" - photo of No. 43, near dusk on Mt. Pleasant route, fire station in background. - Sunday Sept. 5, 1971. - Courier Monday 6/9/1971 - A4 sheet. - (See Reg. Item 2907 for actual copy of cutting) 278.2. - "Last Journey for 39" - report on tram 39 last trip to Mt. Pleasant by Judy Graham - page 1 of Courier, 6/9/1971 - A4 sheet. - See Reg. Item 2908.1 for actual copy of cutting and 2908.2 for 2nd part on page 2. 278.3 - "Tram Change Uneventful" - report in the Courier of 24/8/1971, day after buses started on Victoria Street and photo of overhead dismantling (A4 sheet). - See Reg Item 1065 for actual copy of the cutting. 278.4. - "Many will miss tram" - report in Courier, Monday 23/8/1971 - following closure of Victoria St. route on 232/8/1971. Photo of No. 31 at Victoria St. (A3 sheet). (See Reg Item 1068 for actual copy of cutting). 278.5 - "Pieces of Tram History" - item in Courier of Wed. 22/9/1971 of tramway Supt. Mr. Denmead, handing over tokens and sample tickets to City of Ballarat - 2 photos - A3 sheet. - (See Reg Item 1846 for actual copy of cutting). Record updated 11/9/2013 for actual cuttings held. See Page 57 of KS Kings, "Ballarat Tramways"trams, tramways, ballarat, secv, closure -
 Melbourne Tram Museum
Negative - W2 343 (Essendon Aerodrome Route 59) and SW6 860 (City Route 19) southbound in Elizabeth St, Wal Jack, 10/03/1954
Black and white negative, by Wal Jack, of W2 343 (Essendon Aerodrome Route 59) and SW6 860 (City Route 19) southbound in Elizabeth St, c1955 near to Franklin St Note the Moomba decorations in the overhead. In the background is Disney's (at 416 Elizabeth St a Holden dealer) with flags under the verandah) Rod Atkins advised 7/9/2020: "He was born in Ballarat to Arthur Disney and Isabella Christina Hill. During World War I he served with the Australian Flying Corps and was at Gallipoli. He then became a motor dealer, running his own company. In June 1924 he married Ruby Chapman. From 1935 to 1952 he served on Melbourne City Council. He was elected to the Victorian Legislative Council in 1940 as a United Australia Party member, representing Higginbotham Province; at this time his father still represented Melbourne West for the Labor Party. Disney was a supporter of Ian MacFarlane, and served in his brief ministry in October–November 1945 as Minister of Transport and Mines. He consequently lost Liberal endorsement in 1946 and was defeated. In 1948 he was elected Lord Mayor of Melbourne, serving until 1951; during this period he was closely involved with securing the 1956 Olympic Games for Melbourne. Knighted in 1951, Disney died in 1952 at Auburn.[1] The ones at Swanston street are taken on different days. Yes there is one of those under powered Jaguars parked across the road .... Did you notice the tram signal on the pole? An interesting thing I did not know looking at all three photos is that the flag pole holder on the route number box is on the inside. So when did it move to the outside of the box? On the photo of the RAAF tram, there is one employee wearing a cap but appears to be wearing overalls? I wonder what that is all about? "trams, tramways, sw6 class, w2 class, route 59, route 19, elizabeth st, moomba, tram 343, tram 860 -
 Federation University Historical Collection
Photograph - Black and white photograph, Ballarat School of Mines Model Steam Engine
The Davey Paxman Experimental Steam Engine was purchased as the result of a bequest from Thomas Bath. The 'substantial sum' was used to build an Engineering Laboratory. The Ballarat School of Mines Council minutes of 08 November 1901 record: - Plans for [the] proposed building were submitted ... and ... it was resolved that a temporary building for an Engineering Laboratory be put up.' This laboratory, as an existing building, is first mentioned in the Ballarat School of Mines President's Annual Report of 1901, presented on 28 February 1902, reporting 'the erection of a building 67ft long by 33 ft wide' This report also lists all the equipment that would be accommodated in the Engineering Laboratory, including the experimental steam engine and boiler. The experimental Davey-Paxman steam engine arrived in Ballarat towards the end of 1902. The Engineering Laboratory was opened on 14 August 1903 by His Excellency Sir Sydenham Clarke. This engineering laboratory remained in use till about 1945. By 1944 preparations were under way at the Ballarat School of Mines to expand existing facilities, to be ready for the influx of returned soldiers. A new Heat Engines laboratory was built, this time of brick construction, replacing the previous corrugated-iron shed. In the early stages the steam engine was used to drive an overhead transmission shaft for machinery in the adjacent workshop. Later the steam engine was moved to a space that became the Heat Thermodynamics Laboratory. At the end of 1969 the engine was relocated to the Thermodynamics Laboratory at the then Ballarat Institute of Advanced Education (BIAE) Mt Helen Campus. It was donated to Sovereign Hill in 2006. According to the research of Rohan Lamb in 2001 around five experimental steam engines were made by Davey Paxman, and three of these had similar configuration to the Ballarat School of Mines Steam Engine, however, each of these was also unique with different valve arrangements. The list, which was on a scrap of paper in a folio held in the Essex Archives, confirmed that one was sent to India. The Ballarat steam engine can be dated to late 1901 to early 1902. Zig Plavina was responsible for moving the steam engine to Mount Helen, and worked on it as a technician for many years. He observed the following: * The condenser is driven by the low pressure engine. * The following arrangements are possible: i) the high pressure engine alone, exhausting to atmosphere. Condenser not used, crankshaft flanges not coupled. ii) crankshafts coupled, mains pressure (120 psi) steam supplied to high pressure engine, partially expanded steam delivered to low pressure engine (Tandem operation). Choice available re exhaust steam: either to the condenser or to atmosphere. iii) crankshafts not coupled, reduced pressure steam supplied to low pressure engine. Exhaust steam - either to the condenser or to atmosphere. * Valve arrangement - a choice of Pickering cut-off or throttle governor. On low pressure engine - throttle governor only.Black and white photograph of the Davey Paxman Experimental Steam Engine. On the brake is returned serviceman Norman WIlliam Ludbrook (Diploma Electrical Engineering, 1952). Far right is Roy E. Mawby (Diploma Electrical Engineering, 1950)steam engine, model steam engine, davey paxman, electrical engineering, laboratory, scientific instrument, norman ludbrook, norman william ludbrook, roay mawby, roy e. mawby -
 Federation University Historical Collection
Photograph - Photograph - Black and white, Ballarat School of Mines Model Steam Engine
The Davey Paxman Experimental Steam Engine was purchased as the result of a bequest from Thomas Bath. The 'substantial sum' was used to build an Engineering Laboratory. The Ballarat School of Mines Council minutes of 08 November 1901 record: - Plans for [the] proposed building were submitted ... and ... it was resolved that a temporary building for an Engineering Laboratory be put up.' This laboratory, as an existing building, is first mentioned in the Ballarat School of Mines President's Annual Report of 1901, presented on 28 February 1902, reporting 'the erection of a building 67ft long by 33 ft wide' This report also lists all the equipment that would be accommodated in the Engineering Laboratory, including the experimental steam engine and boiler. The experimental Davey-Paxman steam engine arrived in Ballarat towards the end of 1902. The Engineering Laboratory was opened on 14 August 1903 by His Excellency Sir Sydenham Clarke. This engineering laboratory remained in use till about 1945. By 1944 preparations were under way at the Ballarat School of Mines to expand existing facilities, to be ready for the influx of returned soldiers. A new Heat Engines laboratory was built, this time of brick construction, replacing the previous corrugated-iron shed. In the early stages the steam engine was used to drive an overhead transmission shaft for machinery in the adjacent workshop. Later the steam engine was moved to a space that became the Heat Thermodynamics Laboratory. At the end of 1969 the engine was relocated to the Thermodynamics Laboratory at the then Ballarat Institute of Advanced Education (BIAE) Mt Helen Campus. It was donated to Sovereign Hill in 2006. According to the research of Rohan Lamb in 2001 around five experimental steam engines were made by Davey Paxman, and three of these had similar configuration to the Ballarat School of Mines Steam Engine, however, each of these was also unique with different valve arrangements. The list, which was on a scrap of paper in a folio held in the Essex Archives, confirmed that one was sent to India. The Ballarat steam engine can be dated to late 1901 to early 1902. Zig Plavina was responsible for moving the steam engine to Mount Helen, and worked on it as a technician for many years. He observed the following: * The condenser is driven by the low pressure engine. * The following arrangements are possible: i) the high pressure engine alone, exhausting to atmosphere. Condenser not used, crankshaft flanges not coupled. ii) crankshafts coupled, mains pressure (120 psi) steam supplied to high pressure engine, partially expanded steam delivered to low pressure engine (Tandem operation). Choice available re exhaust steam: either to the condenser or to atmosphere. iii) crankshafts not coupled, reduced pressure steam supplied to low pressure engine. Exhaust steam - either to the condenser or to atmosphere. * Valve arrangement - a choice of Pickering cut-off or throttle governor. On low pressure engine - throttle governor only.Black and white photograph of the Davey Paxman Experimental Steam Engine installed at the Ballarat School of MInes. steam engine, model steam engine, davey paxman, thomas bath, experimental steam engine -
 Federation University Historical Collection
Photograph, Ballarat School of Mines Davey Paxman Experimental Steam Engine, c1902
The Davey Paxman Experimental Steam Engine was purchased as the result of a bequest from Thomas Bath. The 'substantial sum' was used to build an Engineering Laboratory. The Ballarat School of Mines Council minutes of 08 November 1901 record: - Plans for [the] proposed building were submitted ... and ... it was resolved that a temporary building for an Engineering Laboratory be put up.' This laboratory, as an existing building, is first mentioned in the Ballarat School of Mines President's Annual Report of 1901, presented on 28 February 1902, reporting 'the erection of a building 67ft long by 33 ft wide' This report also lists all the equipment that would be accommodated in the Engineering Laboratory, including the experimental steam engine and boiler. The experimental Davey-Paxman steam engine arrived in Ballarat towards the end of 1902. The Engineering Laboratory was opened on 14 August 1903 by His Excellency Sir Sydenham Clarke. This engineering laboratory remained in use till about 1945. By 1944 preparations were under way at the Ballarat School of Mines to expand existing facilities, to be ready for the influx of returned soldiers. A new Heat Engines laboratory was built, this time of brick construction, replacing the previous corrugated-iron shed. In the early stages the steam engine was used to drive an overhead transmission shaft for machinery in the adjacent workshop. Later the steam engine was moved to a space that became the Heat Thermodynamics Laboratory. At the end of 1969 the engine was relocated to the Thermodynamics Laboratory at the then Ballarat Institute of Advanced Education (BIAE) Mt Helen Campus. It was donated to Sovereign Hill in 2006. According to the research of Rohan Lamb in 2001 around five experimental steam engines were made by Davey Paxman, and three of these had similar configuration to the Ballarat School of Mines Steam Engine, however, each of these was also unique with different valve arrangements. The list, which was on a scrap of paper in a folio held in the Essex Archives, confirmed that one was sent to India. The Ballarat steam engine can be dated to late 1901 to early 1902. Zig Plavina was responsible for moving the steam engine to Mount Helen, and worked on it as a technician for many years. He observed the following: * The condenser is driven by the low pressure engine. * The following arrangements are possible: i) the high pressure engine alone, exhausting to atmosphere. Condenser not used, crankshaft flanges not coupled. ii) crankshafts coupled, mains pressure (120 psi) steam supplied to high pressure engine, partially expanded steam delivered to low pressure engine (Tandem operation). Choice available re exhaust steam: either to the condenser or to atmosphere. iii) crankshafts not coupled, reduced pressure steam supplied to low pressure engine. Exhaust steam - either to the condenser or to atmosphere. * Valve arrangement - a choice of Pickering cut-off or throttle governor. On low pressure engine - throttle governor only. Black and white photograph of an experimental steam engine which was produced for the Ballarat School of Mines. It was designed for experimental purposes, such as testing of efficiency, etc. The laboratory which housed the steam engine was lit with gas lighting. davey paxman experimental steam engine, model steam engine, davey paxman, steam, thomas bath, thermodynamics -
 Ballarat Tramway Museum
Slide - 27 mm sq slide/s - set of 22 - moving 18 to Sebastopol, Lilian Butler, 30/09/1971
Yields information about the transfer of tram 18 to Victory Park Sebastopol.Set of 22 Agfa blue and white plastic mount slides of tram 18 being moved to Victory Park for the Borough of Sebastopol - 30/9/1971. See Reg Item 2909 for the actual Newspaper cutting and 3778 for a photograph of the move. See Reg Item 3929 for list of dates of tram disposal, though this item gives the date as 2/10/71 .1 - No. 18 parked on the depot fan, with E. Davis alongside. .2 - group of 6 men standing alongside 18 - left to right - N. Lorensini, ? W. Trusler, S. Lakey, B.Peart and E. Davis .3 - tram being driven into Wendouree Parade. .4 - ditto .5 - turning from Macarthur St into Drummond St south with a SEC bucket truck following. .6 - ditto - with the Lisette Beauty Salon on the corner. .7 - Drummond St North .8 - Coupling a SEC tractor to the tram with the Ballarat Base Hospital in the background. .9 - Ditto with S. Lakey cleaning out the points. .10 - being towed across Sturt St .11 - being towed along Drummond St South .12 - workmen at Victory Park preparing the section of track. .13 - ditto .14 - being derailed near Vickers St with an Alsco Linen Service van in the background - note the overhead appears to have been removed. .15 - towing the tram across Albert St. .16 - towing the tram along Victory St, .17 - ditto .18 - moving steel channel along the street, with a tram sitting on one already. .19 - moving the tram .20 - ditto .21 - turning the track to align up with the storage track. .22 - Group of 7 men (see slide 2 for some of the names) and three children with the tram in position. Photo from the collection of Lilian Butler. See also Reg Item 6857 for a digital image. ballarat, tramways, trams, sec, depot, tram disposal, sebastopol, victory park, albert st, moving trams, drummond st, macarthur st, tram 18 -
 University of Melbourne, Burnley Campus Archives
Photograph - Black and white and colour prints and negatives, Dept pf Agriculture, Victoria, Miscellaneous Burnley, 1942-1943
orchard, margaret bowron, betty williams, dept of agriculture, opium poppy, j l provan, t h kneen, geelong excursion, horses pulling lawnmower, ponds, greenhouses, trees, principal's residence, flying fox, j p mclennan, plants, draught horse, calf, students working outside, luffmann ponds, lily ponds, sequoia sempervirans, californian redwood, gardewn views, prunus glandulosa, magnolia stellata, petunia x hybrida -
 Ballarat Tramway Museum
Slide - 35mm slide/s - set of 32, Noel Simons, 25/02/1971 12:00:00 AM
Set of 31 transparencies taken on 25/2/1972 on Kodak mounts. 1201.1 - Bendigo No. 26 in Bond St. just after leaving Long Gully en route for Quarry Hill. Has Norris Supermarket in background. Has two SEC roof ads. 1201.2 - No. 26 climbing View St. from Charing Cross en route to Eaglehawk. Has ANZ bank and AMOCO service station in background. 1201.3 - as for 1201.3, but after tram has passed photographer. Has buildings west of Mackenzie St. in photograph. 1201.4 - Tram stop and centre of the road pole with two "CARS STOP BY REQUEST" signs mounted on pole at the corner of Mackenzie St. 1201.5 - same position as for 1201.3, but with No. 5 descending the street. 1201.6 - same position as for 1201.2, but with No. 5 descending the street. Photo taken after tram has passed photographer. 1201.7 - No. 7 in Nolan St. from across the park at Lake Weeroona. 1201.8 - No. 7 entering McCrae St from Nolan St. - distant view. Note "TRAM "sign on left hand side under tree and overhead in McCrae St. from former track that once was in this street. 1201.9 - No. 7 in High St. with Cathedral in background. Tram en route to North Bendigo. Note scaffolding around Cathedral main spire area. 1201.10 - No. 7 crossing Bendigo Creek bridge in High St. near Golden Square. Has a Caltex Service station in the background. 1201.11 - No. 7 at Golden Square terminus with Sunburst Fruit Juices and a Peters Ice cream delivery vans alongside. 1201.12 - as for 1201.11 but photo taken from behind tram, with the end of the rails in the photograph. 1201.13 - No. 7 and 21 in Pall Mall at Charing Cross with No. 5 in the background. Taken some distance away from the location. 1201.14 - No. 7 at Golden Square terminus, taken a short distance from the tram terminus. Shows Milk Bar on right hand side and the hotel on the left hand side. Taken from the south side of the roadway. 1201.15 - as from 1201.14 but taken from the north side of the roadway. 1201.16 - No 5 waiting at California Gully loop. Distant photo showing surrounds 1201.17 - No. 5 en route for Quarry Hill crossing No. 26 at California Gully. 1201.18 - No. 26 at Eaglehawk terminus with Eaglehawk Town Hall and Post Office in background. 1201.19 - No. 21 arriving at Charing Cross en route to North Bendigo. Has Alexandra Fountain in the background, ANZ bank RACV building, and other buildings on the north side of Pall Mall or Nolan St. 1201.20 - No. 26 en route for Quarry Hill at Charing Cross, with crew standing by front door. Has Colonial Mutual life building, Armstrong Tyre Service (Firestone) and a sign for Cohns Drinks in the background. 1201.21 - as for 1201.20 but with No. 5 en route to Eaglehawk now in photograph. 1201.22 - No. 26 at Quarry Hill terminus. 1201.23 - No. 26 at Quarry Hill terminus, view of front portion of tram only from a gate at the Bendigo cemetery. 1201.24 - Track at the end of the Quarry Hill line showing the point blades of the former "Y" terminus and the overhead for this. 1201.25 - No. 2 at the Quarry Hill terminus, looking along the former Trackwork. 1201.26 - as for 1201.25 1201.27 - number not used. 1201.28 - Golden Square terminus from some distance from the actual terminus, showing the Warning sign "TRAM" for motorists from the south. No. 7 at the terminus. 1201.29 - No. 7 passing through the Golden Square shopping centre. Numerous cars and pedestrians. Tram en route for North Bendigo. 1201.30 - No. 7 in High St. Golden Square, en route for North Bendigo. Photo taken after tram has passed photographer. 1201.31 - No. 7 in High St. just past Wattle St. with the Cathedral in the background. Tram has two SEC roof ads good side on photo, 'Everything's fine in my all electric kitchen' and 'Electrical cooking - clean, quick, economical'. 1201.32 - No. 7 in High St. nearing Wattle St. Has Cathedral in the background. Photo taken after tram has passed photographer.Information written on in black ink and date stamped on purple ink. 1201.1 - "No. 26 in Bond St just after leaving Long Gully" 1201.2 - "No. 26 climbing View St. from Charing Cross" 1201.3 - "No. 26 ascending View St. from Charing Cross (At Mackenzie St.)" 1201.4 - "View St. & Mackenzie St." 1201.5 - "No. 5 in View St. near Mackenzie St." 1201.6 - "No. 5 in View St. nearing Charing Cross." 1201.7 - "No. 7 in Nolan St. seen from Lake Weeroona Park." 1201.8 - "No. 7 entering McRae St. from Nolan St. Note "TRAM" warning sign on left. 1201.9 - "No. 7 in High St. passing Short St." 1201.10 - "No. 7 crossing Bendigo Creek bridge in High St. near Golden Square." 1201.11 - "No. 7 at Golden Square terminus" 1201.12 - "No. 7 at Golden Square terminus" 1201.13 - "No 7, 21 and 5 at Charing Cross" 1201.14 - "No. 7 at Golden Square terminus" 1201.15 - "No. 7 at Golden Square terminus" 1201.16 - "No 5 waiting at California Gully loop." 1201.17 - "Nos. 5 and 26 crossing at California Gully loop" 1201.18 - "No. 26 at Eaglehawk terminus" 1201.19 - "No. 21 arriving at Charing Cross from Golden Square" 1201.20 - "No. 26 at Charing Cross" 1201.21 - "Nos. 5 and 26 at Charing Cross." 1201.22 - "No. 26 at Quarry Hill terminus" 1201.23 - "No. 26 at Quarry Hill terminus seen through the gates of the Bendigo Cemetery." 1201.24 - "Quarry Hill terminus showing remains for former double track layout abandoned before 1964." 1201.25 - "No. 2 at Quarry Hill terminus" 1201.26 - "No. 2 at Quarry Hill terminus" 1201.28 - "The Southern approach to Golden Square with No. 7 standing at the terminus, "TRAM" warning sign on the left. 1201.29 - "No. 7 passing through Golden Square Shopping Centre" 1201.30 - "No. 7 in High St. Golden Square" 1201.31 - "No. 7 in High St. passing Wattle St." 1201.32 - "No. 7 in High St. nearing Wattle St."tramways, trams, bendigo, bond st., view st., nolan st., high st., eaglehawk, california gully, charing cross, quarry hill, trackwork, tram 2, tram 5, tram 7, tram 21, tram 26 -
 Bendigo Historical Society Inc.
Photograph - HILDA HILL COLLECTION: BLACK AND WHITE PHOTOS, 1921-1922
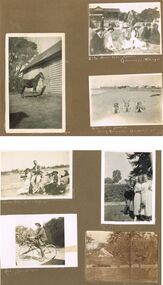
Series of Black & White Images of Hill Family in the years 1921-1922. Total 7 Photos. Darkie the horse tethered to stable. Zita, Nora, Rita & Doreen one Zita is dressed in black with white scarf around her neck and wearing a dark coloured hat, other three are all dressed in white Nora has a dark hat and other two have broad brimmed hats, Rita and Doreen have black ribbons hanging from their necks, to the right are a man and lady seated on the ground and in dark clothing, a man with a pipe in his mouth and wearing a grey suit and hat in background, lady in black and lady in white looking in other directions, background has grandstand with gab le roof and fronted by a white picket fence and people sitting at tables and chairs, trees in right background, Queenscliff February 1921. Rita Nora Doreen lying face down on the beach, girl on left has dark hat on, background shows large shed and other housing with fences, 'Merry Mermaids' Queenscliff 1921.Four girls and one male, three girls dressed in white, one in dark colour, two have light coloured hats and two have dark colour hats, one girl dressed in dark colour, male is wearing white trousers and college coat with stripes, background shows skyline of the nearby city and beach buildings, two men occupy a seat right back ground and dressed in dark clothing, Queenscliff 1921. Cyril Fred Mollie Doreen in a conga line the boys in grey suits and the girls in white, one has circular bands on her skirt, hedge in near back ground, gable roofed building and trees further back,'Durvol' January 1922. Hal wearing dark coat and jodhpurs long boots sitting astride a bicycle, something balanced between the handlebars and on the top bar, paling fence with vine hanging overhead other plants in the corner of the yard, December 24 1921. Doreen riding in a billy cart and pulled by a large dog along a pathway, Doreen is wearing all white, background is bushes and hedge with large tree, Dog is dark colour, 'I'm coming' January 1921.Hilda Hill Personal Collectionaustralia, history, post war life