Showing 780 items matching " passenger signs"
-
 Puffing Billy Railway
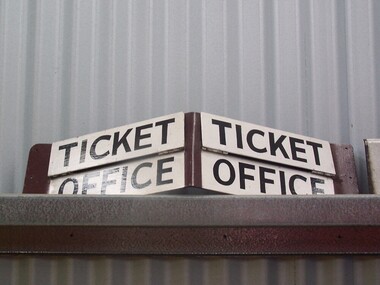
Guards Van Ticket Office Sign
Guards Van Sign - Ticket Office In the Preservation Society days of Puffing Billy, not all stations were manned for the sale of tickets, and tickets were sold from the Guards Van. To advise the public where they could obtain tickets this sign was placed above one of the windows on the guards van. Tickets could be issued from here for passengers to travel on the line.Historic - Puffing Billy Railways Guards Van Sign - Ticket Office sign Guards Van Sign - Ticket Office White enamel sign with black letteringTicket Office puffing billy, station sign, ticket box -
 Puffing Billy Railway
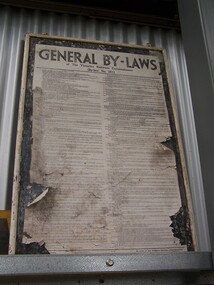
Station Sign - Railway General By-Laws Poster, 1968
Station Sign - Railway General By-Laws Poster Since the very early days, Railways have had to have rules for those who travel and those who work on the trains. Some of the rules may refer to social practices of the time, the comfort of passengers or to the safety required in the Railway environment. The Victorian Railways referred to these rules as By-Laws. Not only were there rules, but there may be a fixed penalty (fines) for those who may break them. Being a government body the Victorian Railways had the rules and appropriate action authorised. This poster was issued in 1968 and was one of many that were displayed at most Victorian railway stations. Historic - Victorian Railways - notice board with General By-Laws PosterStation Sign - Railway By-Laws Poster wooden rectangle Station notice board with Railway By-Laws PosterGeneral By-Laws station sign, puffing billy, railway by-laws poster, victorian railways -
 Puffing Billy Railway
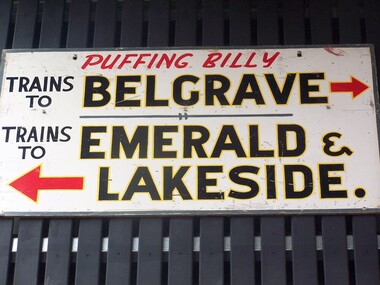
Station Sign - Puffing Billy Direction Trains to Belgrave - Emerald & Lakeside
Station Sign - Puffing Billy Direction Trains At Menzies Creek, a Puffing Billy train has had to pass another train since 1966, due to a single line in operation from Belgrave or Emerald / Lakeside / Cockatoo / Gembrook to enable more trains to operate. When two trains passed at Menzies Creek, to assist passengers to travel on the correct train, this sign was erected. The arrows pointed towards the direction of travel as well as the locomotive that was hauling the train. This sign dates from 1975 when the line was re-opened to Lakeside. Historic - Puffing Billy Railway - Station Sign used at Menzies Creek to show next station directionStation Sign - Puffing Billy Direction Trains to Belgrave - Emerald & Lakeside Large rectangle wooden sign Puffing Billy Trains to BELGRAVE Trains to EMERALD & LAKESIDEpuffing billy, menzies creek, station sign -
 Puffing Billy Railway
Clothing - Shoes
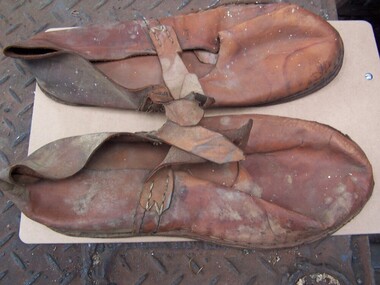
These leather soled shoes were used by railway workers undertaking work on overhead electrical cables and HV boxes. Known as "slippers" they were provided just inside explosives vans and worn to stop metal protectors on shoes scraping across metal floor and possibly causing a spark and a explosion. info from Syd Coles : on Explosives Slippers Beaufort station used to get a explosive wagon with drums of gelignite regularly slipper type shoes were in a little box built into the inside wall of the wagon....A Special powdervan key was sent from H/OFFICE as a VALUE which each person handling it had to sign for it.....It would arrive on the early down Passenger Train ex Melbourne...then the "P" wagon was unloaded....Prior to the wagon leaving a Railway Internal telegram was sent to the SM @Beaufort giving the wagon number...consignee (owners of dynamite) contents and the KEY number which would be sent....When all unloaded the KEY sent back as a VALUE...a Internal telegram sent as to KEY number and train it was despatched on....fair bit of security.but couldn't afford to lose a KEY as they fitted all the LOCKS used on the EXPLOSIVE "P" wagons whatever Stations they went to.Historic - Victorian Railways - leather soled shoesLeather soled slip-on shoes, with single strap across bridge of foot and featuring stitchwork along edges.VR & arrow symbolpuffing billy, victorian railways, leather soled shoes, railway slippers, explosives, worker safety, linesmen -
 Uniting Church Archives - Synod of Victoria
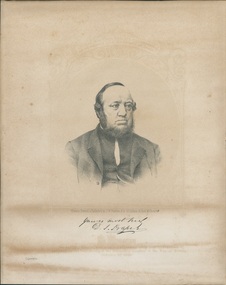
Print, J W Pearson & Co
Rev. Daniel J. Draper (1810 - 1866). Arrived in Australia in 1820 where he worked for ten years in NSW and Vic before going to SA where he worked for the next 20 years. He built the Pirie Street Methodist Church. He left SA in 1855 returning to Victoria where, in 1859, he was elected President of the Australian Conference. Rev Draper returned to England in 1865 where he was appointed representative to the British Conference from Australia. He set out to return to Australia with his wife on the SS London in 1866 which almost immediately ran into a storm and all but 19 passengers died. Black and white etched head and shoulders portrait of Rev. Daniel Draper who is looking to his left. It is printed on buff paper and has a signed inscription."Victoria Printed & Published by J. W. Pearsen & Co. 67 Collins St. East Melbourne" "Yours most truly D. J. Draper."rev daniel james draper methodist minister, methodist minister, draper memorial methodist church gilbert st adelaide, representartive to the british conference from australia 1865, president of the australian methodist conference -
 Hume City Civic Collection
Photograph, c 1989-1990
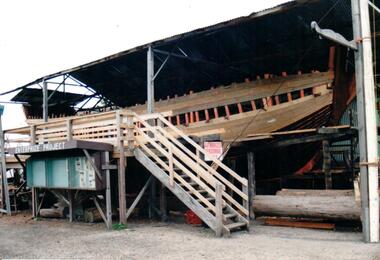
A set of 12 photographs of the 'Enterprize Project' showing the different stages of the rebuilding of the historic schooner 'Enterprize' which brought early setters to Victoria from Tasmania in 1834. George Evans who settled in Sunbury was one of the schooner passengers.A coloured photograph of the early stages in the reconstruction of the schooner 'Enterprize'. The ribs of the hull are exposed and some of the boards around the sides of the hull have been fitted. The structure is on a raised scaffold under an open shed. A painted sign 'Enterprize Project' shows details of the project is under a wooden stairway.schnooner 'enterprize', evans, irene, south wharf - melbourne, enterprize project, shire of bulla, george evans collection -
 Geelong Naval and Maritime Museum
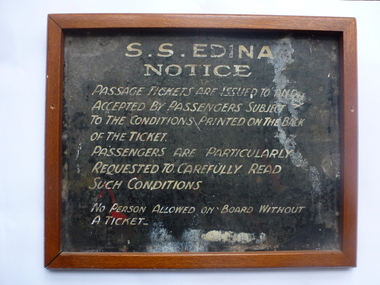
Sign, SS Edina Notice, c.1880-1938
The SS. Edina was built on the River Clyde by Barclay Curle & Co. for Leith, Hull & Hamburg Steam Packet Co. She was launched on 4 May 1854 as a 3 masted steamer. She initially carried passengers and cargo across the North Sea. She then went onto serve in the Crimean War (HMS Edina), the American Civil War (c.1862), took fortune hunters to New Zealand during the Gold Rush and ferried passengers and cargo up the Queensland coast and across Victoria's Western District. In 1880 she began to trade between Geelong and Melbourne, traveling in her later years between Portarlington and Williamstown, via Geelong and Point Henry. She averaged 312 trips a year with 100 passengers a day. She made her last trip in 1938.The notice from the S.S.Edina likely relates to her use as a passenger boat, operating between Geelong and Melbourne from 1880-1938. The object is significant for its historic connections to Victoria's early travel networks by sea and to the S.S. Edina as a long serving vessel. A black board with white stenciled lettering set in a wooden frame. On the front is a Notice pertaining to the SS Edina. On the back of the board are 4 paintings of the SS Edina, showing her in 1875, 1884, 1917 and 1938."S.S EDINA NOTICE passage tickets are issued to & accepted by passengers subject to the conditions printed on the back of the ticket. Passengers are particularly requested to carefully read such conditions. No person allowed on board without a ticket."s.s edina, geelong harbour trust, corio bay, geelong -
 National Wool Museum
Sign
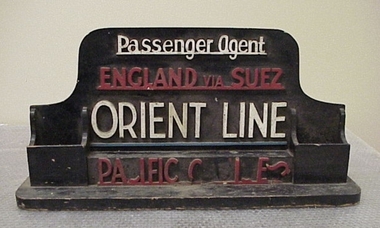
Advertising sign board with two pockets to hold brochures used to advertise Dennys Lascelles as a passenger agent to England via Suez on Orient Line Pacific Cruises.dennys, lascelles limited -
 Southern Sherbrooke Historical Society Inc.
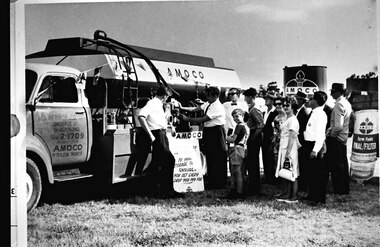
Photograph - The Hermons at the Pakenham Show, c.1965, with their fuel tanker
B&W photo showing a group of people watching John and Bill Hermon displaying their fuel tanker at Pakenham Show, c.1965. Photo shows a fuel tanker parked on grass. On the passenger side door is written “W.J. HERMON/71 LONSDALE ST./DANDENONG/Phone 2-1709/AGENT FOR/AMOCO/PETROLEUM PRODUCTS”. John Hermon, in shirtsleeves and trousers, is leaning against the truck, watching his father, Bill, similarly dressed and with a tie, demonstrating what appears to be a gauge on the truck. “AMOCO” is painted twice on the truck. Between the two men is a sign on the ground and leaning against the truck. It reads “[illegible] deliveries to your/storage tank/ensures/you get every/drop you pay for”. A group of approximately seven men, two women and a boy about 10yo are watching. The women and two of the men are wearing sunglasses. A tank with “AMOCO” is behind the truck and on the right of the photo, behind the crowd, is a sign which says “AMOCO/Farm Fuels/FINAL/FILTER” -
 Southern Sherbrooke Historical Society Inc.
Photograph - 1906 railway accident, Belgrave
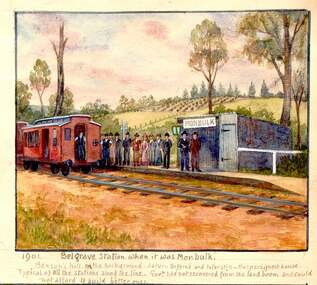
Watercolour painting by Charlie Hammond showing two train carriages at Belgrave Station. A group of people stand on the small platform beside the small station building which bears the sign 'Monbulk'. In the background are hilly paddocks. The most distant paddock has rows of what appear to be fruit trees. Below the painting Hammond has written '1901 Belgrave Station when it was Monbulk. Benson's Hill in the background. Later – Biffin's and later still – Harper's Guest House. Typical of all the stations along the line. Govt. had not recovered from the land boom and could not afford to build better ones.' This painting is based on a photo taken by Hammond in 1906, which is labelled by him, 'Sunday 28th Jany 1906. bringing the injured passengers to Belgrave Ry Station after the accident at the trestle bridge.' -
 Ballarat Tramway Museum
Document - Letter/s, State Electricity Commission of Victoria (SECV), 1/02/1962 12:00:00 AM
Yields information about the method of advising the City of Ballarat and the Borough of the planned closure of the tram system and the actual advice provided.Letter - four foolscap sheets, each with rounded corners, addressed to the Town Clerk, City of Ballarat and the Borough of Sebastopol, dated 1/2/1962, signed by the Secretary of the SEC D H Munro, advising Councils that the SEC no longer would support the tramways and that the propose to abandon them. Gives a history of the SEC involvement, finances, poor fare returns, time for the TRB to arrange bus replacement, future of the employees, includes Bendigo and Eaglehawk. Fourth sheet lists 11 years of finances and losses. With numbers of passengers carried.Date stamped 2/2/62 and has file number in the top right hand corner in ink.trams, tramways, closure, staff, sec, ballarat, city of ballarat, borough of sebastopol -
 Ballarat Tramway Museum
Photograph - Digital image, Wal Jack, 1/01/1970 12:00:00 AM
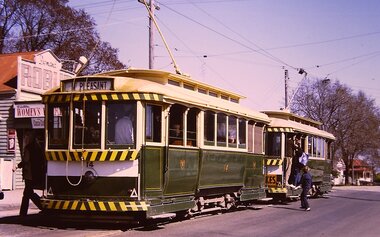
Yields information about the Mt Pleasant terminus and tram operations c1970.Digital images of two trams at the Mt Pleasant terminus. Tram 14 has just arrived with passengers leaving. In front is another single trucker with passengers - possibly a charter - this tram has a Twin Lakes sign. Photo by Chris Phillips. Image dated 1/1/1970 - to be confirmed. In the background is the Milk bar with a Robur Tea, Women's Weekly, a cigarette advert and Coca Cola advert. trams, tramways, mt pleasant, barkly st, tram 14 -
 Ballarat Tramway Museum
Photograph - Digital image Set of 2, Chris Phillips, c1970
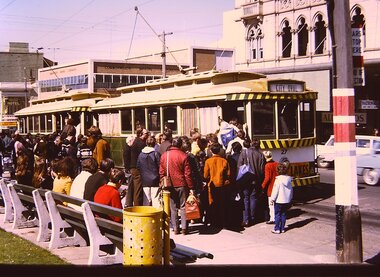
Yields information about the City terminus on the south side of Sturt St and the passenger traffic prior to closure of the system. Shows many people boarding the tram.Set of two digital images of trams at the City terminus on the south side of Sturt St, c1970. and corner with Lydiard St. .1 - No. 27 and another single trucker loading large crowds of passengers at the tram stop. No. 27 has the destination of City Oval. In the background is the Commonwealth Bank building. The tram has a Twin Lakes sign. .2 - Four trams at the same stop, from rear - 12, 43, 26 and ?. No. 12 has the destination of Sebastopol and has a Twin Lakes sign. Has the Town Hall in the background and the ESCo pillar cabinet on the corner.trams, tramways, sturt st, city oval, city, lydiard st, electrical switching, electrical equipment, esco, tram 27, tram 12, tram 43, tram 26 -
 Ballarat Tramway Museum
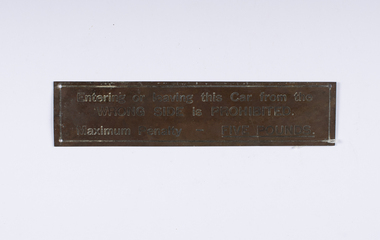
Sign - Warning Sign - Entering or leaving this car, Melbourne and Metropolitan Tramways Board (MMTB), "Entering or leaving this car from the Wrong side is prohibited. Maximum Penalty - Five Pounds", Preston Workshops
... Passengers BTM Ballarat Tramways Brass sign, engraved with the words ...Brass sign, engraved with the words "Entering or leaving this car from the Wrong side is prohibited. Maximum Penalty - Five Pounds" with four screw holes in each corner and a border. Has some scratching on the rear with possibly "711" scratched into the rear. Would appear to be a later version of Reg Item 6874. May have been taken off a bogie tram as more like a MMTB sign. trams, tramways, tramcars, signs, passengers, btm, ballarat tramways -
 Ballarat Tramway Museum
Photograph - Black and White - tram 36 Bridge St, A T Miles, 27/11/1969
Black and White - tram 36 (Victoria St), at Stones Corner, picking up 6 passengers. The man is carrying a Gladstone bag. The photo is looking west and has a Top 4 dry cleaners shop sign in the background. Taken by A T Miles 27/11/1969. The photo likely to have been taken before a 48-hour strike by SEC workers that commenced on that day. See item 8774. Yields information about services to Victoria St.Photograph - black and white print with notes on rear. A T Miles stamp and location and date notes.tramways, trams, stones corner, victoria st, bridge st, passengers -
 Ballarat Tramway Museum
Slide - 35mm slide/s - set of 3, Dave Simpson, trams at the intersection of Sturt and Lydiard St - City terminus, late 1960's early 1970's
... monument. Tramways trams Sturt St City Lydiard St Passengers Signs ...Yields information about the intersection of Sturt and Lydiard Sts tramway centre and Boer War monument.Set of three 35mm slides - AGFA dark blue / white plastic mounts of trams at the intersection of Sturt and Lydiard St - City terminus. 1 - view from the central median on the west side of Lydiard St, looking East with the Commonwealth Bank, Post Office, with many passengers at the location. The Boer War monument /statue is in the centre part of the photograph. 2 - No. 14 about to turn into Lydiard St North/ The short tram stop and End of Section sign are adjacent to the tram. 3 - Tram waiting at the north side tram stop - has a Twin Lakes and Cinzano sign. Has the ANZ bank and the SEC offices in the background.tramways, trams, sturt st, city, lydiard st, passengers, signs, tram 14 -
 Ballarat Tramway Museum
Slide - 27 mm sq slide/s - set of 9 - tram tracks - Gardens to the City, Lilian Butler, Aug. 1971
Yields information about the streetscapes of Ballarat on the Gardens to Victoria St route and in particular buildings and people that crewed the trams.Set of nine Colour 27 x 27 mm slide in a Kodachrome cardboard mount of a series of photographs taken from Wendouree Parade in the Gardens to the City tramway - taken from the front or rear window of the tram. .1 - Carlton St loop looking north .2 - Wendouree Parade, north of the Windmill Drive north intersection - has a tram stop pole. .3 - Sturt St - in bound just past Pleasant St - has passengers waiting at the tram stop. .4 - at Ascot St. .5 - at Drummond St with Shell garage in the view and a track worker. .6 - at Talbot St? with track workers repairing the road surface. .7 - at Dawson St showing the tram stop and End of Section signs. .8 - nearing the intersection with Armstrong St. .9 - nearing Lydiard St. Slide mount date cannot be read - possibly August 1971. Photo from the collection of Lilian Butler.ballarat, tramways, trams, wendouree parade, sturt st, drummond st, trackwork, tram stops, carlton st loop -
 Ballarat Tramway Museum
Photograph - Digital image Set of 5, George Coop, 1968 - 1970
Yields information about the tram operations on the Sebastopol line at Grey St and the terminus.Five (5) Digital images taken by George Coop during the period 1968 - 1970, of SEC trams on the Sebastopol line .1 - Trams 40 (Sebastopol) and 41 (Lydiard St North, with Johnny Walker Whiskey roof adverts) cross at Grey St. .2 - Trams 40 (Lydiard St North) and 35 (Sebastopol) cross at Grey St. Photos has the street signs - Gray St and Bala St in the photo. .3 - ditto, with a male passenger with walking stick boarding 40 - photo shows the loop arrangements. .4 - Tram 40 at the Sebastopol terminus - has destination of Lydiard St North, the Royal Mail Hotel in the background. .5 - ditto with poles being reversed. Tram has roof adverts for Eureka Tiles and a SEC roof advert. trams, tramways, sebastopol, grey st loop, gray st, passengers, crews, tram 40, tram 41, tram 35 -
 Ballarat Tramway Museum
Photograph - Digital image Set of 10, George Coop, 1968 - 1970
Yields information about the tram operations and the landscape views of the Sturt St median strip.Ten (10) Digital images taken by George Coop during the period 1968 - 1970, of SEC trams in Sturt St, between the City and Pleasant Streets. .1 - Tram 26 climbing the Sturt St hill to Lydiard St, with the Cook's Private Hotel, the Commonwealth Bank and the National Mutual Life building in the background. Photo taken from the Titanic Bandstand. .2 - Tram 40 Sturt St, enough to Lydiard St North just before Raglan St. Has a lady passenger by the tram stop. .3 - Tram 30 - Sturt St north side, near Armstrong St, - has a blue framing line around the photograph. .4 - Tram 39, Sturt St, near Doveton St, shows the rotunda in the median strip. .5 - Tram 18, with median step in view. .6 - Tram 31, with two Johnnie Walker whiskey roof adverts, outside the National Mutual Life building with the Alan Bros Jewellers and Golden Star Chinese Cafe in the view. .7 - Tram 31, Sturt St south side with Town Hall and the Golden City Hotel in the view. Tram has destination of Gardens via Drummond North. .8 - Tram 41 - ditto - going to Sebastopol. .9 - Tram 13, south side, Gardens via Sturt West, about , near Ripon St, with the Ampol service station in the background and about to pick up a lady passenger .10 - Tram 17, near Doveton St. Has a Twin Lakes sign and a Wilkinson Sword Razor Bladese roof advert. trams, tramways, sturt st, raglan st, passengers, doveton st, tram 26, tram 40, tram 30, tram 39, tram 18, tram 31, tram 41, tram 13, tram 17 -
 Ballarat Tramway Museum
Photograph - Digital image Set of 6, George Coop, 1968 - 1970
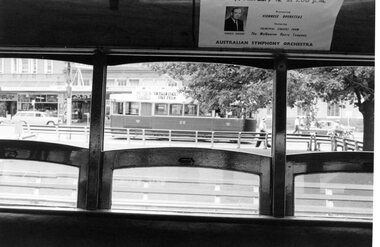
Yields information about the interior views of the Ballarat tramcars and the driver's compartment.Six (6) Digital images taken by George Coop during the period 1968 - 1970, of the interior of trams. .1 - looking out of the open windows of a the saloon of a single trucker to the tram 28, at the City terminus. There is an Australian Symphony Orchestra interior advert. .2 - Looking through the open passenger door, with No. 17 behind. .3 - Looking from the saloon towards to the open end, no car number apparent. .4 - Looking at the driver's bulkhead with the used ticket box and a hand on the controller. .5 - View of the driver's compartment - T1F Controller, PV brake valve and "Pay as you enter" reversed. .6 - Close up of the Westinghouse T1F controller. trams, tramways, interiors, controllers, brake valves, signs, westinghouse, tram 17, tram 28 -
 Ballarat Tramway Museum
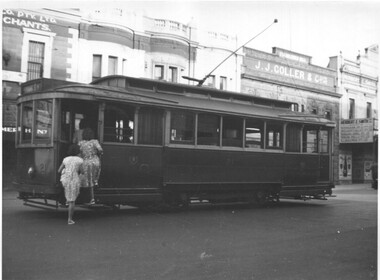
Photograph - Black & White Photograph/s, Charles Craig, early 1950's?
Yields information about the use of the trams and the appearance of Lydiard St North buildings during the early 1950's.Photograph of No. 21, in Lydiard St North, near the Railway Station, boarding two lady passengers. Has J. J. Coller & Co. building and the Hersert E Smith building and sign in the view. Early 1950's? photo by Charles Craig. trams, tramways, lydiard st north, tram 21 -
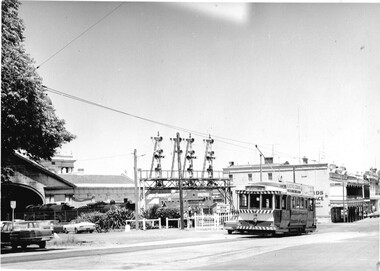 Ballarat Tramway Museum
Photograph - Black & White Photograph/s - set of 6, Charles Craig, 1950s
Yields information about the appearance and use of the Ballarat Railway Station level crossing by trams prior to closure.Set of six black and white photographs of trams at the railway level crossing, Ballarat, Lydiard St North featuring the railway station, gates and signals, Reeds Coffee Palace and the Provincial Hotel. .1 - 28 heading south, with an R class and a K class locomotive in the view. .2 - 11, heading north - taken during the 1950's. .3 - 17 parked right up to the gates while K184 shunts at the station. .4 - single trucker (number obscured) - most likely 17 giving the passengers in the previous photo. .5 - Photo with two single truckers in the view and the gates being closed after the tram has passed. .6 - 11, at the gates with a bogie tram behind. No. 11 has a Briquettes roof advert and a Twin Lakes sign. Photo by Charles Craig - during 1971, except for .2, taken during the 1950's. trams, tramways, lydiard st north, railway station, signals, level crossings, tram 28, tram 11, tram 17 -
 Ballarat Tramway Museum
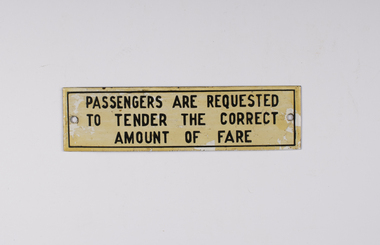
Sign, "Passengers are requested to tender the correct amount of fare", c1920
... enamel signs to convey instructions to passengers or to confirm ...Demonstrates how the SEC used enamel signs to convey instructions to passengers or to confirm the advice of the conductor and how enamel signs were made.Enamel sign, black capital letters and lines on an off-white background, titled "Passengers are requested to tender the correct amount of fare". Marks on rear from the enamelling process. The front of the sign has been covered with varnish. trams, tramways, tramcars, signs, conductors, passengers -
 Ballarat Tramway Museum
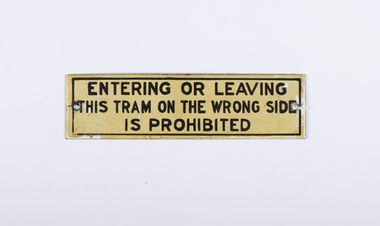
Sign - Warning Sign - Entering or leaving, Melbourne and Metropolitan Tramways Board (MMTB), "Entering or leaving this tram on the wrong side is prohibited", c1920
... enamel signs to convey instructions to passengers or to confirm ...Demonstrates how the SEC used enamel signs to convey instructions to passengers or to confirm the advice of the conductor and how enamel signs were made.Enamel sign, black capital letters and lines on an off-white background, titled "Entering or leaving this tram on the wrong side is prohibited". Marks on rear from the enamelling process. The front of the sign has been covered with varnish. See also Reg Item 7118 for a later sign. Of the type that could have been fitted by the MMTB to its trams. 2nd copy added 25/11/2019 trams, tramways, tramcars, signs, passengers, btm, ballarat tramways -
 Ballarat Tramway Museum
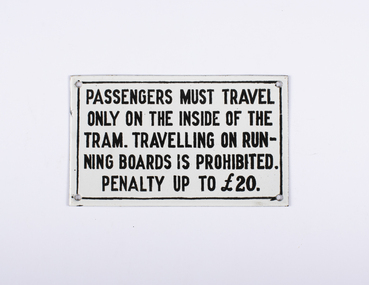
Sign - Warning Sign - Passengers must travel, State Electricity Commission of Victoria (SECV), "Passengers must travel only on the inside of the tram. Travelling on Running Boards is Prohibited Penalty up to L20", 1960's
... enamel signs to convey instructions to passengers or to confirm ...Demonstrates how the SEC used enamel signs to convey instructions to passengers or to confirm the advice of the conductor and how enamel signs were made.Enamel sign, black capital letters and lines on white background, titled "Passengers must travel only on the inside of the tram. Travelling on Running Boards is Prohibited Penalty up to L20". Sign has a black enamel backing, with marks from the enamelling process and screw holes in each corner. Has not been used. trams, tramways, signs, sec, passengers, btm, ballarat tramways -
 Ballarat Tramway Museum
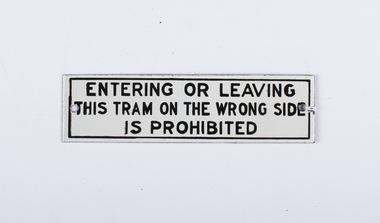
Sign - Warning Sign - Entering or leaving this tram, State Electricity Commission of Victoria (SECV), "Entering or leaving this tram on the wrong side is prohibited", 1960's
... enamel signs to convey instructions to passengers or to confirm ...Demonstrates how the SEC used enamel signs to convey instructions to passengers or to confirm the advice of the conductor and how enamel signs were made.Enamel sign, black capital letters and lines on white background, titled "Entering or leaving this tram on the wrong side is prohibited". Sign has a black enamel backing, with marks from the enamelling process and screw holes sides. Has not been used. trams, tramways, signs, sec, passengers, btm, ballarat tramways -
 Ballarat Tramway Museum
Photograph - Black & White Photograph/s, c1956
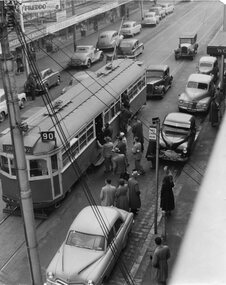
Black and white photograph of W6 994 in Smith St. Collingwood/Fitzroy, in bound on route 90 to City - Spencer St., picking up passengers at a tram stop. Pole obscuring front of tram. Tram has destination "City Spencer St" and run number "P44" Tram appears to be fairly crowded already. Photo taken c1956 with a number of motor cars in the street including some Holdens. In the background are a number of shop fronts, with signs for "Singer Sewing Machines", "Freddo frogs", "Peters Ice Cream", Davies Hardware, John Cornish. On the side of the photograph is the first part of a Woolworths store front. The address of the John Cornish, Mercer, was 205 Smith St. Fitzroy and Woolworths were at 182 -184 Smith St. Collingwood. See 1968 Sands and McDougal Director of Victoria for Smith St. details.trams, tramways, mmtb, smith st., w6 class, bourke st., tram w6 994 -
 Ballarat Tramway Museum
Slide - 35mm slide/s - set of 6, Noel Simons, 22/05/1971 12:00:00 AM
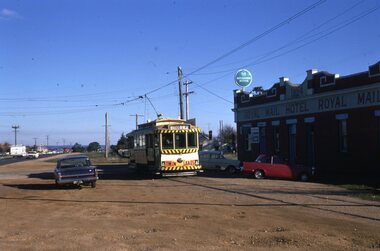
Set of 6 Kodachrome transparencies taken on 22/5/1971. 1171.1 - Tram 33 at Sebastopol terminus, showing destination of Lydiard St. Nth, with Royal Mail Hotel in the background and three parked cars. Tram has "Twin Lakes" sign on front dash. 1171.2 - as for 1171.1 but taken from other side of tram, has hotel in part of photo. Shows arrangement of tram terminus signs on a pole in the background. 1171.3 - Tram 26 just after arrival at the Lydiard St. terminus, with passengers getting off and driver about to swap ends. Destination has been changed to Sebastopol. Has Lydiard St. shelter in the right edge of the photo. 1171.4 - as for 1171.3 - but with pole turned and looking back along street towards city. Shows the undulating nature of the street. 1171.5 - Tram 26 outbound in Albert St. for Sebastopol, crossing the street near Ophir St. Has a motor cyclist stopped for tram and shows tram stop on the west side of the road. 1171.6 - Tram 26, close up of tram at the Sebastopol terminus with two cars parked along side. Tram has destination of Lydiard St. Nth.1171.1 - "No. 33 at Sebastopol Terminus" and initials "BC" in bottom left hand corner. 1171.2 - "No. 33 at Sebastopol Terminus" and initials "BC" in bottom left hand corner. 1171.3 - "No. 26 at Lydiard St. North terminus" and initials "BC" in bottom left hand corner. 1171.4 - "No. 26 at Lydiard St. North terminus" and initials "BC" in bottom left hand corner. 1171.5 - "No. 26 crossing from left side of Albert St. Sebastopol to right side near Ophir St." and initials "BC" in bottom left hand corner. 1171.6 - No. 26 at Sebastopol Terminus" and initials "BC" in bottom left hand corner. All slides have date stamp of "22 May 1971" in purple ink and Kodak developing date of "Jun 71M7" in red ink. tramways, trams, sebastopol, lydiard st nth, royal mail hotel, tram stops, tram 33, tram 26 -
 Ballarat Tramway Museum
Slide - 35mm slide/s - set of 9, Noel Simons, Sept. 1971
Set of 9 Kodak Ready-mount with slides made from the Association of Railway Enthusiast Provincial Tramways film strip. Reference Item 2560 details the ARE Film Strip, and provide references to other slides. See also Reg. item 1164. 1174.9 on plain white mount. 1174.1 - Tram 40 North bound for Lydiard St. North at the Railway Gates, with the gates closed. Tram carrying a heavy load of passengers. Railway station building and car park in background. Taken from the signal box. 1174.2 - Tram 12 bound for Gardens, photographed across the median strip plantation near Dawson St. Image i2a - adjusted 9/2021 to remove colour cast. 1174.3 - Tram 43 in bound along Wendouree Parade near Barrett Ave, passing a former tram stop and with "Warning Oncoming Trams" sign mounted on an adjacent pole. See also Reg. item 1172.1 for a photo taken in May 1971. This photo taken after the closure of the Victoria St. line, as the tram stop has been painted out. 1174.4 - Looking along the track to Sebastopol terminus on the west side of Albert St. - telephoto shot showing bogie tram in the far distance. Shows the nature of the track, poles, tram stop frequency and in the fare distance the terminus. Also show the trees that used to be along this section of the track. 1174.5 - No. 42 showing "Special" in Macarthur St. approaching Drummond St. north. Photo taken from under the verandah of a shop on the south side of the street that were many years later to become the Tramcar Restaurant. Note metal fence to cemetery. 1174.6 - Nos. 21 (Sebastopol) crossing 14 (Lydiard St. Nth) at the loop between Sayle and Grey St. Photo taken looking south. 1174.7 - No. 12 bound for Mt Pleasant, in Bridge St. about to stop at the junction for the two routes. Telephoto photo looking west along Bridge St. with many cars in the photo. Very few people on the street itself. 1174.8 - No. 30 and 17 at the City Terminus, on the north side of Sturt St. Taken from the Post Office corner with the Town Hall in the background. 1174.9 - No. 39 inbound along Sturt St. West. with many cars on the road. Bus stop on a pole on the other side of the road.1174.1 - "No. 40 on Lydiard St. North service waits at the level crossing at Ballarat Railway Station." 1174.2 - "No. 12 bound for 'Gardens' seen across the centre plantation in Sturt St." 1174.3 - "Barrett Ave." 1174.4 - "The Sebastopol route near the terminus" 1174.6 - "Nos. 21 and 14 crossing at Sayle St. Loop on Sebastopol route" 1174.7 - "No. 12 at Eastern end of Bridge St." 1174.8 - "Nos. 30 and 17 in Sturt St. at Cnr of Lydiard St." 1174.9 - "No. 39 City bound from 'Gardens" in Sturt St. West" All have date stamp of "Sep 1971" in black ink. Writing in blue ink.tramways, trams, lydiard st. nth, railway crossing, sturt st, wendouree parade, sebastopol, macarthur st., bridge st., sturt st. west, tram 12, tram 14, tram 17, tram 21, tram 30, tram 39, tram 40, tram 42, tram 43 -
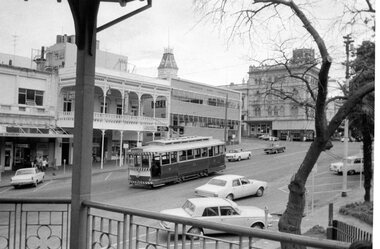
 Ballarat Tramway Museum
Slide - 35mm slide/s - set of 17, Noel Simons, 20/11/1962 12:00:00 AM
Set of 17 transparencies taken on 20/11/1962 on Kodak mounts. 1187.1 - Bendigo No. 2 at the Quarry Hill terminus, showing destination of Quarry Hill. Has Cohns Drinks and Streets Ice Cream ads on dash panel, a SEC 'electric cooking' roof ad and another roof ad. Shows the Y terminus at this location, but tram standing just before it. Overhead in position. 1187.2 - as above, but closer up. 1187.3 - as above, but from the north side, showing cemetery in the background. 1187.4 - Bendigo No.3 at Eaglehawk terminus. Tram showing destination of Quarry Hill. Has the various buildings at Eaglehawk in the background including the Foodland store. Has Streets Ice cream and White Horse Whiskey ads on the dash panel. 1187.5 - Bendigo No. 18 at Garden Gully crossing loop, in bound, with destination of Eaglehawk. Passengers waiting for an Eaglehawk tram at the stop. Has a white horse whiskey ad on dash panel and SEC roof ads. Conductor standing in doorway looking out. 1187.6 - Bendigo No. 7 inbound in Nolan St. at cnr of McCrae St. showing destination of Golden Square. Has Streets Ice cream ad on dash panel and a Castrol Roof ad. 1187.7 - Bendigo No. 19 at the North Bendigo terminus with railway level crossing in background. Tram has a Cohns Drinks ad and an SEC 'Electric Cooking' roof ad. 1187.8 - Bendigo No. 2 at the Quarry Hill terminus, looking back into Bendigo, showing destination of Eaglehawk. 1187.9 - Bendigo No. 21 in McCrae St, near Nolan St outbound for North Bendigo. Photo taken after tram has passed photographer. 1187.10 - Bendigo Nos. 4 and 26 at Charing Cross in View St. with fountain alongside and the Beehive, Ezywalkin Buildings in the background. No. 26 has a Sandhurst Milk and SEC 'Electric Cooking' roof ad. 1187.11 - close up of 22E maximum traction truck and folded footstep. 1187.12 - Bendigo No. 19 at Charing Cross terminus, after tram has passed photographer, showing destination of North Bendigo, with the Beehive building in the background and passengers boarding tram. 1187.13 - Bendigo No. 11, turning from View St. into Pall Mall, showing Special with the conductor holding point bar. Has the Beehive and Ezywalkin Buildings in the background. 1187.14 - No. 7 at Charing Cross terminus, in Pall Mall, bound for Golden Square. Has the Beehive and Ezywalkin buildings in the background and passengers waiting at the tram stop. 1187.15 - No. 18 at the Charing Cross terminus, bound for Eaglehawk. Has the Beehive and Ezywalkin buildings in the background and passengers waiting at the tram stop. Also has the 'Safety Zone' sign in the photograph. 1187.16 - No. 2 at Quarry Hill terminus, night or dusk photo. Tram showing destination of Depot. 1187.17 - No. 26 at Charing Cross, night photo. Tram has destination of Quarry Hill, but is on the line for Eaglehawk. Photo looks along Mitchell St. Also shows Safety Zone sign. Information written on in black ink and date stamped on purple ink. 1187.1 - "No. 2 at Quarry Hill terminus Bendigo" 1187.2 - "No. 2 at Quarry Hill terminus Bendigo" 1187.3 - "No. 2 at Quarry Hill terminus Bendigo" 1187.4 - "No. 3 at Eaglehawk terminus" 1187.5 - "No. 18 in Mt Korong Road, Long Gully at cnr of Havilah Road (Eaglehawk Route)" 1187.6 - "No. 7 in Nolan St. Bendigo, at Cnr of McCrae St., near lake Weeroona, (North Bendigo Route)' 1187.7 - "No. 19 at North Bendigo terminus" 1187.8 - "No. 2 at Quarry Hill terminus" 1187.9 - "No. 21 in McCrae St. Bendigo, near Nolan St. (North Bendigo Route) 1187.10 - "4 and 26 at Alexandra Fountain, Charing Cross Bendigo" 1187.11 - "Truck of Bogie Car, Bendigo Tramways" 1187.12 - "No. 19 in Pall Mall at Charing Cross, Bendigo" 1187.13 - "Birney car No. 11 entering Pall Mall from View St. at Charing Cross Bendigo" 1187.14 - "No. 7 in Pall Mall at Charing Cross, Bendigo" 1187.15 - "No. 18 at Alexandra Fountain, Charing Cross, Bendigo" 1187.16 - "No. 2 at Quarry Hill terminus, Bendigo" 1187.17 - "No. 26 at Alexandra Fountain, Charing Cross, Bendigo" tramways, trams, bendigo, quarry hill, eaglehawk, north bendigo, maximum traction, night photo, tram 2, tram 3, tram 4, tram 7, tram 11, tram 18, tram 19, tram 21, tram 26