Showing 1664 items
matching tram 10
-
 Ballarat Tramway Museum
Photograph - Digital image Set of 20
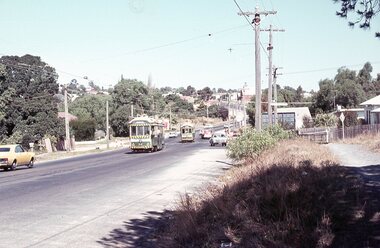
Set of 20 digital images of Bendigo Tramways, 1972 at or before closure while on a tram tour by Stuart Lodington. .1 - No. 28 and 5 at Eaglehawk terminus .2 - No. 28 leaving Charing Cross and travelling into View St with Armstrong Type Service building in background and Firestone Advertisements. .3 - No. 29 with Eaglehawk Town Hall and Post Office in background. .4 - No. 26 and 29 at start of double track, High St Eaglehawk .5 - No. 29 leaving Eaglehawk with shops in the background, Foodland, J. Bests .6 - No. 29 and 23 crossing Manchester Loop with Manchester Arms Hotel in the background and an old poppet head. .7 - No. 29 at ditto with poppet head in the background. .8 - No. 28 and two other trams at the Quarry Hill terminus. .9 - No. 29 in High St Bendigo with the Cathedral and Golden Gate Hotel in the background. .10 - No. 3 with destination Eaglehawk, in bound Carpenter St? .11 - No. 29 following a single trucker through a loop or the end of the double track near the depot. .12 - No. 23?, at Eaglehawk terminus, with Eaglehawk Town Hall in the background. .13 - Birney tram crossing the bridge at the Depot entrance - No. 29 .14 - No. 29 on the Eaglehawk line? .15 - as for .13 .16 - No. 29 entering the depot. .17 - No. 23, inbound from Eaglehawk, at Jobs Gully Loop with the railway overbridge in the background. .18 - No. 28 and two other trams (see also Reg Item 4982) for the same tram tour at Myrtle St. Loop. .19 - No. 21 with North Bendigo on the destination approaching the Golden Square terminus. .20 - No. 7 at Golden Square terminustrams, tramways, bendigo, eaglehawk, quarry hill, golden square, depot, tram 5, tram 29, tram 28, tram 26, tram 23, tram 7, tram 21 -
 Ballarat Tramway Museum
Photograph - Digital image Set of 20, 1971-72
Set of 20 digital images of Bendigo Tramways, 1972 at or before closure while on a tram tour by Stuart Lodington. .1 - No. 7 at Golden Square terminus .2 - ditto .3 - No. 26 in bound on the Eaglehawk line with a crossing loop behind. .4 - Birney crossing the bridge by the tram depot. .5 - No. 29 running a special on the Eaglehawk line with a HBA billboard in the background. .6 - No. 29 with a driver walking in front of the tram at the above location. .7 - No. 29 on the Eaglehawk line .8 - ditto waiting for a tram at Manchester Loop with poppet head in the background. .9 - No. 29 on the Eaglehawk line .10 - Eaglehawk Town Hall at night. .11 - No. 7 at the depot junction in McCrae St, with Golden Square destination. .12 - No. 29 with the Camp Hotel Eaglehawk in the background. Also a Newsagent with The Sun, The Bendigo Advertiser and The Age signs on the building, High St .13 - No. 29 Mt Korong Rd, with the railway overbridge in the background. .14 - interior photo of Birney tram roof .15 - interior view of controls of Birney at Eaglehawk .16 - No. 29 outbound at the Depot Junction McCrae St. .17 - No. 18 at the Eaglehawk terminus .18 - close up view of No. 29 front. .19 - No. 29 in Nolan St, crossing the bridge, outbound. .20 - No. 18 at the Eaglehawk terminus with the Eaglehawk Town Hall, Post Office in the background. Has a circus banner on the side.trams, tramways, bendigo, eaglehawk, quarry hill, golden square, depot, mccrae st, nolan st, tram 7, tram 26, tram 29, tram 18 -
 Ballarat Tramway Museum
Photograph - Digital image Set of 20, 1971-72
Set of 20 digital images of Bendigo Tramways, 1972 at or before closure while on a tram tour by Stuart Lodington. .1 - No. 29 at the North Bendigo terminus .2 - No. 29 just past the Bendigo end of the double track in High St Eaglehawk, with a BP dealer in the background. .3 - Night photo of No. 18 at a terminus, showing "Eaglehawk" .4 - ditto .5 - Night photo of No. 24 at Eaglehawk with Leo A Hughes Photographer in the background. The Tram has "Johnnie Walker whiskey" roof adverts. .6 - No. 29 outbound in Thunder St with a train passing over the bridge in the background. .7 - view from the front window of a tram on the Eaglehawk line with a large "display event float" in the foreground and tram approaching a crossing loop. .8 - No. 29 at North Bendigo .9 - view of High St Eaglehawk looking east from the terminus, showing the track and centre poles. .10 - No. 29 outbound on the North Bendigo line turning from either Nolan St or Caledonia St, running a special. .11 - No. 7 departing North Bendigo for Golden Square. .12 - No. 3 and 18 at Charing Cross. No. 3 has two SEC roof Advertisements .13 - No. 7 at North Bendigo with the trolley pole being reversed. .14 - No. 24 at Quarry Hill with Northern Terrazzo in the background with the driver alongside .15 - No. 7 and No.6 at Charing Cross with the Beehive buildings in the background. .16 - No. 7 at North Bendigo terminus .17 - ditto .18 - No. 24 at Quarry Hill with Northern Terrazzo in the background with the conductor alongside. .19 - ditto .20 - No. 26 and other bogie tram in View St near Charing Cross with the Armstrong Tyre Service building and signs for Cohn's Drinks and T&G in the view.trams, tramways, bendigo, eaglehawk, quarry hill, golden square, depot, north bendigo, charing cross, tram 29, tram 18, tram 24, tram 3, tram 7, tram 6, tram 26 -
 Ballarat Tramway Museum
Photograph - Digital image Set of 20, 1971-72
Set of 22 digital images of Bendigo Tramways, 1972 at or before closure while on a tram tour by Stuart Lodington. .1 - No. 7 arriving at North Bendigo .2 - No. 5 departing Charing Cross along View St, with a Firestone tyres in the background. .3 - front view of a tram in View St with a blurred background image. .4 - No. 24 showing Eaglehawk destination .5 - No 26 and 3 in View St, with the Armstrong Tyre Service building in the background and signs for T&G and Cohn's Drinks. .6 - ditto .7 - No. 3 arriving at Charing Cross from Eaglehawk in View St, with a Quarry Hill destination. .8 - No. 3 and 18 at Charing Cross. .9 - No. 24 on the Quarry Hill line. .10 - No 26 in View St, with the Armstrong Tyre Service building in the background and signs for T&G and Cohn's Drinks. .11 - ditto, with fountain in view, Colonial Mutual building and a newsagent with a Herald sign on the building. .12 - No. 7 at North Bendigo terminus .13 - ditto with pole being reversed. .14 - No. 18 at Quarry Hill terminus with Northern Terrazzo sign in the background. .15 - No. 24 at Quarry Hill terminus .16 - No. 18 arriving at Charring Cross, with Fountain Plaza and Bendigo Pharmacy in the background. .17 - No. 3 and 18 at Charing Cross. .18 - No. 7 at North Bendigo terminus with pole being placed on the overhead. .19 - No. 26 in View St inbound, with Sandhurst Trustees sign in the background. .20 - No. 6 leaving Charing Cross in Pall Mall with Myer and other buildings in the background. .21 - No. 7 at North Bendigo .22 - Single trucker with two roof Advertisements crossing View St with fountain in view, Colonial Mutual building and a newsagent with a Herald sign on the building.trams, tramways, bendigo, eaglehawk, quarry hill, north bendigo, charing cross, view st, tram 7, tram 5, tram 24, tram 26, tram 5, tram 3, tram 18, tram 6 -
 Ballarat Tramway Museum
Photograph - Digital image Set of 20, 9/12/1972 12:00:00 AM
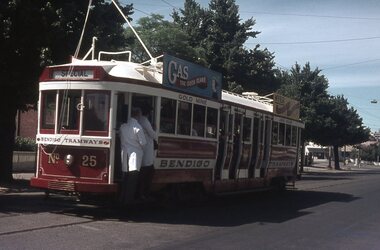
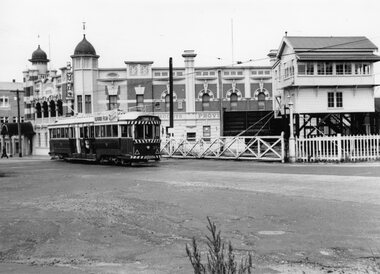
Set of 21 digital images of Bendigo Tramways, at the re-opening of the Bendigo tramways by the Bendigo Trust on 9/12/1972by Stuart Lodington. All trams in the first Bendigo Trust colours. .1 - No. 25 with Gas and Myer roof advertisements .2 - No. 30 with 3BO roof advert and a BP service station in the background. .3 - SEC single trucker at the Mine with a large "Tram Tours" sign on the front of the tram .4 - ditto .5 - No. 19 with a large group of passengers, Bendigo Motor Co and Sandhurst roof advertisements .6 - No. 30 in McCrae St .7 - view of opening march with band .8 - No. 19 in opening parade .9 - Opening Parade in High St with cathedral in the background .10 - No. 30 in Nolan St crossing bridge .11 - ditto .12 - No. 25 at the mine .13 - No. 30 leaving the mine .14 - No. 30 ditto with BCTV roof advert. .15 - Charing Cross with cenotaph, The Beehive building and Ezywalkin shoes and Coca Cola adverts .16 - No. 19 southbound in High St with City Centre Motel building in the background. .17 - No. 30 returning from North Bendigo .18 - No 25 in High St after leaving Gold Mine .19 - No. 30 at the Mine .20 - No. 30 in Nolan St .21 - No. 30 with 3BO roof advert and a BP service station in the background.trams, tramways, bendigo, north bendigo, charing cross, bendigo trust, central deborah, tram 25, tram 30, tram 19 -
 Ballarat Tramway Museum
Photograph - Digital image Set of 20, 16/04/1972 12:00:00 AM
Set of 20 digital images of Bendigo Tramways, of the last running day of the Eaglehawk to Quarry Hill line 16 April 1972, .1 - No. 24 outbound to Eaglehawk .2 - No. 3? at Manchester Loop .3 - No. 24 outbound to Eaglehawk .4 - bogie tram crossing the rail over bridge from Eaglehawk .5 - No. 18 in View St .6 - No. 24 outbound to Eaglehawk .7 - No 18 at Eaglehawk with destination roll being changed, and shopping centre in the background. .8 - No. 24 crossing the railway overbridge, going to Eaglehawk .9 - No. 3 outbound to Eaglehawk .10 - No. 24 crossing the railway overbridge, going to Eaglehawk .11 - No. 3 and 24 crossing at Long Gully .12 - No. 18 at Eaglehawk with Leo A Hughes photographer building in the background and a CFA truck passing the tram. Tram SEC roof advertisement and a banner for "German -?- Circus" at Eaglehawk and dates. .13 - No. 3 inbound on the Eaglehawk line. .14 - No. 18 outbound to Eaglehawk .15 - ditto .16 - No. 18 at Eaglehawk terminus with the Mechanics Institute in the background. .17 - No. 24 at the Eaglehawk terminus .18 - No 24 at the intersection with Taylor St .19 - No. 24 at the Eaglehawk terminus .20 - dittotrams, tramways, bendigo, eaglehawk, long gully, manchester loop, tram 24, tram 18, tram 3 -
 Ballarat Tramway Museum
Photograph - Digital image Set of 20, 16/04/1972 12:00:00 AM
Set of 22 digital images of Bendigo Tramways, of the last running day of the Eaglehawk to Quarry Hill line 16 April 1972, .1 - No. 3 and 24 crossing at Long Gully .2 - No. 3 turning at the Cricket ground, Barnard and View Sts, inbound to the City and Quarry Hill .3 - No. 3 in bound to the City and Quarry Hill, Long Gully area .4 - No. 18 inbound to the City and Quarry Hill crossing the railway bridge from Eaglehawk. .5 - Manchester Loop .6 - No. 18 inbound to the City and Quarry Hill crossing the railway bridge from Eaglehawk. .7 - No. 18 about to enter Jobs Gully Loop .8 - No. 3 about to turn at the Cricket ground, Barnard and View Sts inbound to the City and Quarry Hill .9 - No. 3 turning at the Cricket ground, Barnard and View Sts, inbound to the City and Quarry Hill .10 - No. 18 at Eaglehawk terminus with the Mechanics Institute in the background. .11 - No. 3 in bound, Ironbark area. .12 - No. 3 at Long Gully Loop .13 - No. 3 outbound to Eaglehawk. .14 - No. 18 at Eaglehawk with German circus banner on tram .15 - No. 18 on the Eaglehawk line at Jobs Gully Loop .16 - No. 24 outbound to Eaglehawk at Taylor St .17 - No. 18 inbound to the City and Quarry Hill crossing the railway bridge from Eaglehawk. .18 - No. 3 at Manchester Loop .19 - No. 18 at Eaglehawk terminus .20 - No. 18 at Eaglehawk with German circus banner on tram .21 - bogie tram at Long Gully Loop. .22 - No. 24 outbound to Eaglehawk at Taylor Sttrams, tramways, bendigo, eaglehawk, long gully, jobs gully, manchester loop, tram 24, tram 18, tram 3 -
 Ballarat Tramway Museum
Photograph - Digital prints, The Courier Ballarat, "Family fun day celebrates Ballarat trams", 19/09/2011 12:00:00 AM
Yields information about the BTM Family Fun day and what was published by The Courier on their web site.Set of 11 colour digital prints on A4 sheets from The Courier website, 19/9/2011 with the web story and then 10 sheets each with a photo by Jeremy Bannister. Has two comments. BTM Members in the photographs include Roger Salen, Alan Bradley, Richard Gilbert, Neil Lardner and Christopher Mitchell. Each of the sheets has the caption and people involved at the bottom of the sheet. trams, tramways, btm, family fun day, events -
 Ballarat Tramway Museum
Document - Photocopies, Royal South Street Society, Royal South Street Society Guide, 2008
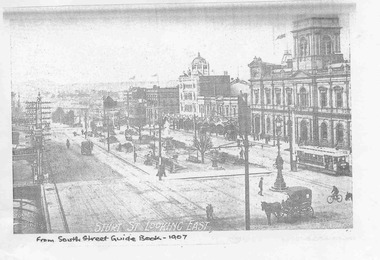
Has a strong association with the work of the Royal South Street Society, who published a handbook/guide or manual for their competitions. Used a photograph published at about the same time.Set of 15 photocopies of pages from the Royal South Street Society Guide showing trams in Sturt St Ballarat. .1 - Sturt St Looking East - with an ESCo tram outside the town hall and other horse drawn vehicles - 1907 .2 - Sturt St Looking West - same image as in Reg item 2688 - 1907 .3 - Sturt St Looking East - with many vehicles and people - 1910 and the "Chef" kitch range stove advertisement sold by Middleton and Morris of Sturt St. .4 - Sturt and Lydiard St, with a tram turning from Sturt into Lydiard St, 1910 with the post office in the background - 1910 and an advertisement for Woderine medicine sold by Jas. A. Gear, herbalist. .5 - Sturt St looking West - tram turning from Sturt into Lydiard St, taken from near post office corner - 1911 and a advertisement for Williams the Shoeman. .6 - Sturt St. West - with an ESC0o tram outbound - the only vehicle - 1913. .7 - same photo as .3, with a Monster Military Carnival Advertisement for Nov. 8th - 1913 .8 - Sturt and Lydiard St from next to post office, looking west with two trams, one horse trailer and many people - a busy scene - 1914 .9 - Sebastopol tram No. 21 at Grenville St - 1928 - with the Ballarat Gas Company Show rooms in the background, the Sturt St shelter. The tram has a Suttons Organs roof advertisement. .10 - View of Sturt Street, showing City Hall Buildings, with an ESCo Sebastopol type tramcar crossing the street, taken from the post office stops. - 1928 - Advertisements for G. Ludbrook Furnishing Undertaker (Motor Service and Horse drawn vehicles) and R. Young Grocer. .11 - Sturt St looking West, looking west, with a Sebastopol type tram at Grenville St and the big shelter removed. Has many buildings and many people in the background - 1928. .12 - same photo as for .10 and Clarendon Presbyterian Ladies Collection, Ballarat photograph - 1929. .13 - Advertisement for Ballarat Tramways - cars for Coliseum, fare box, route numbers and route colour scheme - 1929. .14 - as for above, no date, but opposite is the is an item for the Mouth Organ Band Contest, "A" Grade - c1933, notes the Coburg Tramway Athletic Club Harmonica Band and the Malvern Tramways Harmonica band amongst the contestants. .15 - same as .9, with a advertisement for the Melbourne Coffee Palace - Bourke St. Photocopies made by Neville Hasket for the BTM 10/2008. See also Reg item 675 for alternative source details.Handwritten note on photocopiestrams, tramways, ballarat, sturt st., royal south street society, lydiard st, town hall, post office, esco -
 Ballarat Tramway Museum
Film - Microfiche, Nova Micrographics, "ESCo Tramway Employee Register", Jun. 1994
Yields information about the ESCo employees register that was donated to the Museum, c1990. Microfiche of this register., Yields information about the ESCo employees register that was donated to the Museum, c1990. Microfiche of this register.Set of 3 microfiche, each in a plastic envelope of the ESCo Employee Register (Reg Item 100), made by Nova Micrographics, North Carlton, early 1994. 10 Copies made, one to Alan Bradley and one to Ballarat Genealogical society 10/1994. Each Microfiche has the heading "Ballarat Tramway Preservation Society, "ESCo Tramway Employee Register" and Fiche No on the right hand edge. Each set of fiche contained within a separate plastic envelope. One set of fiche transferred to Melbourne and held in the negative file - Ntrams, tramways, esco, employees, crews, personnel -
 Ballarat Tramway Museum
Photograph - Black & White Photograph/s, W.H. Watts, 10/01/1912 12:00:00 AM
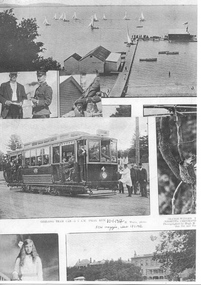
... the opening of the Geelong tram system and the events of the day ...Yields information about the opening of the Geelong tram system and the events of the day, including the respective mayoresses driving decorated trams.Black and white reproduction photograph of a page from the Now Magazine, 18.1.1912 issue featuring photographs of Geelong and in particular a photograph of Geelong No. 4 on a trail run, 10.1.1912, at 5am. Photo credited to W.H. Watts. Image 1 - Copy 1 - has the reproduction of part of the page. Image 2 - Copy 2 - part print of the page, featuring the tramcar - printed on Hewlett Packard paper.Copy 1 - "10)2" in the top left hand corner, a William Scott address label on the rear in ink "10) middle pic car 4". Copy 2 - a William Scott address label on the rear and "10)" trams, tramways, geelong, first tram, testing, commissioning, tram 4 -
 Ballarat Tramway Museum
Photograph - Black & White Photograph/s, Doug Colquhoun, 24/03/1959 12:00:00 AM
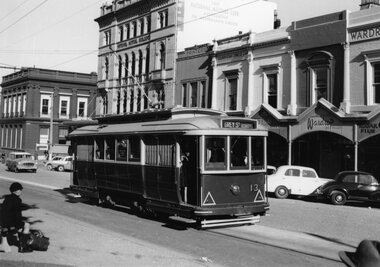
Yields information about Ballarat Trams and streetscapes late 1950's and the details of Sturt St shops.Black and white print of Ballarat 13, at the Sturt St stop, just west of Lydiard St. North, 24/3/1959. Photo by Doug Colquhoun. Has the Commonwealth Bank, National Mutual Building, Golden Star Chinese Cafe, V & L. Leslie Hairdresser and Wardrop Tailor shops in the background. Two copies. A school boy with cap is sitting on the bench opposite the tram. Tram has the destination of Grey St Sebastopol. Photo print courtesy of Port Dock Railway Museum, now the National Railway Museum. See worksheet 4311 for letter and details of prints sent to Bill Scott, 19/10/2001. Any photo credit to mention NRM Collection.On rear of copy 1"SEC Ballarat / 13 / Sturt St/ 24/3/59 / D. A. Colquhoun" Copy 2 "DAC" in ink, bottom right hand corner.trams, tramways, sturt st, schools, commonwealth bank, tram 13 -
 Ballarat Tramway Museum
Photograph - Black & White Photograph/s, Digital Image, Wal Jack, 27/06/1957 12:00:00 AM
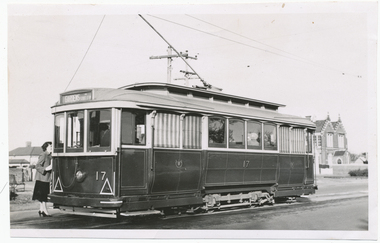
Yields information about Ballarat Trams and streetscapes early 1960's and the details of the Victoria St terminus, Yields information about Ballarat Trams and streetscapes early 1960's and the details of the Victoria St terminusBlack and white print of Ballarat 17, in Victoria Street, at Otway St photographed by Wal Jack, 27/6/1957. Two copies. A lady is standing at the back of the tram, possibly talking to the conductor. Tram has the destination of Gardens via Sturt St West. Has the Convent building in background. Photo print courtesy of Port Dock Railway Museum, now the National Railway Museum. See worksheet 4311 for letter and details of prints sent to Bill Scott, 19/10/2001. Any photo credit to mention NRM Collection. 4412.1 - Digital image from the Wal Jack Ballarat Album of the same photograph. See i3 for details of the rear of the photograph.On rear of copy 1 "SEC Ballarat / 17 / Victoria / 27/6/57 / Wal Jack" Copy 2 "DAC" in ink, bottom right hand corner. 4412.1 - on rear of photo in ink, "SEC Ballarat, No. 17 Victoria St at Otway St, Ballarat East 25 June '57" and "W. Jack photo Neg. to D. Colquhoun"trams, tramways, victoria st, tram 17 -
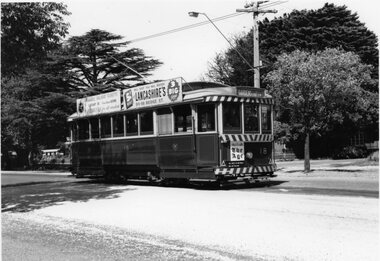 Ballarat Tramway Museum
Photograph - Black & White Photograph/s, Wal Jack, 28/02/1962 12:00:00 AM
Yields information about Ballarat Trams and streetscapes in the early 1960's and the details of the Lydiard St railway gates from the north end.Black and white print of Ballarat 18, in Victoria Street, photographed by Wal Jack, 28/2/1962. Two copies. Tram has advertisements for "The Age", Whites Florists, Lancashire's. Tram has the destination of Gardens via Sturt St. Note the pan at the end of the overhead and "X" in front of the tram. Photo print courtesy of Port Dock Railway Museum, now the National Railway Museum. See worksheet 4311 for letter and details of prints sent to Bill Scott, 19/10/2001. Any photo credit to mention NRM Collection.On rear of copy 1"SEC Ballarat / 18 / Victoria / 28/2/62 2090 / Wal Jack" Copy 2 "DAC" in ink, bottom right hand corner.trams, tramways, victoria st, terminus, tram 18 -
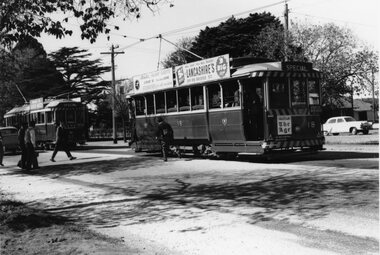
 Ballarat Tramway Museum
Photograph - Black & White Photograph/s, Wal Jack, 21/04/1962 12:00:00 AM
Yields information about Ballarat Trams and streetscapes early 1960's and the details of the Victoria St terminus while running specials for the AETA.Black and white print of Ballarat 18 and 37, at the Lydiard St gates, while B79 crosses the street. Photographed by Wal Jack, 21/4/1962. Two copies. Tram has advertisements for "The Age". Tram is showing Special and has a number of people photographing the scene - AETA tour. Photo print courtesy of Port Dock Railway Museum, now the National Railway Museum. See worksheet 4311 for letter and details of prints sent to Bill Scott, 19/10/2001. Any photo credit to mention NRM Collection.On rear of copy 1" "73)" and "SEC Ballarat / 18 & 37 / Lydiard St North / 21/4/62 2091 / Wal Jack" trams, tramways, lydiard st, railway crossing, aeta, tram 18, tram 37 -
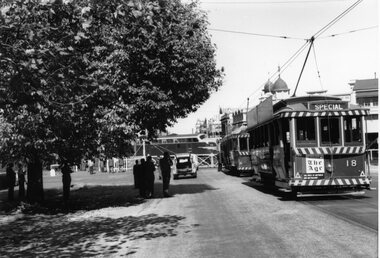
 Ballarat Tramway Museum
Photograph - Black & White Photograph/s, Wal Jack, 21/04/1962 12:00:00 AM
Yields information about Ballarat Trams and streetscapes late 1950's on the Mt Pleasant route and advertising of the period.Black and white print of Ballarat 18 and 37, at the Victoria Street terminus, photographed by Wal Jack, 21/4/1962. Two copies. Tram has advertisements for "The Age", Whites Florists, Lancashire's. Both trams are showing "Special" and have the AETA tour boards on the front of the tram. Photo print courtesy of Port Dock Railway Museum, now the National Railway Museum. See worksheet 4311 for letter and details of prints sent to Bill Scott, 19/10/2001. Any photo credit to mention NRM Collection.On rear of copy 1 "SEC Ballarat / 18 & 37 / Victoria / 21/4/62 2092 / Wal Jack" Copy 2 "DAC" in ink, bottom right hand corner.trams, tramways, victoria st, terminus, tram 18, tram 37 -
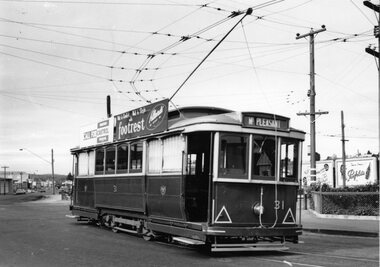 Ballarat Tramway Museum
Photograph - Black & White Photograph/s, Doug Colquhoun, 26/04/1960 12:00:00 AM
Yields information about Ballarat Trams and streetscapes and Wendouree Parade during the early 1960's.Black and white print of Ballarat of No. 31 enroute to Mount Pleasant, turning from Main St into Barkly St. Tram has the destination of Mt Pleasant. Two copies. Photo taken Doug Colquhoun 26/4/1960. Has roof advertisements for Castrol Oils and Footrest of Sturt St furnishings. In the background is a Penfolds sign. Photo print courtesy of Port Dock Railway Museum, now the National Railway Museum. See worksheet 4311 for letter and details of prints sent to Bill Scott, 19/10/2001. Any photo credit to mention NRM Collection.On rear of copy 1"SEC Ballarat / 31 / Bridge St / 26/4/60 2101 / D. A. Colquhoun" Copy 2 "DAC" in ink, bottom right hand corner.trams, tramways, mt pleasant, main st, barkly st, tram 31 -
 Ballarat Tramway Museum
Photograph - Black & White Photograph/s, Wal Jack, 28/02/1962 12:00:00 AM
Yields information about Ballarat Trams and streetscapes and the city terminal area, late 1950's.Black and white print of Ballarat of No. 36 in Wendouree Parade, northern side of the lake. Tram has the destination of Gardens Via Drummond St, a roof advertisement for "Edmonds" Two copies. Photographed by Wal Jack 28/2/1962. Photo print courtesy of Port Dock Railway Museum, now the National Railway Museum. See worksheet 4311 for letter and details of prints sent to Bill Scott, 19/10/2001. Any photo credit to mention NRM Collection.On rear of copy 1"SEC Ballarat / 35 / Wendouree Parade / 28/2/62 2116 / " Copy 2 "Ballarat car 35" in ink, bottom right hand corner.trams, tramways, wendouree parade, tram 35 -
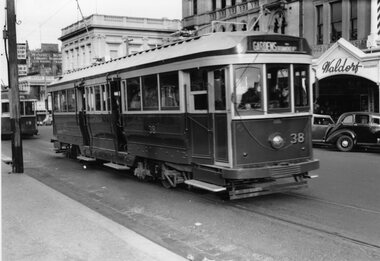 Ballarat Tramway Museum
Photograph - Black & White Photograph/s, Doug Colquhoun, 27/04/1954 12:00:00 AM
Yields information about Ballarat Trams and streetscapes, the scrubber tram and the Bell Street loop, early 1960's.Black and white print of Ballarat of No. 38 in Sturt St, just to the west of Lydiard St with No. 19 in the background. Tram has the destination of Gardens via Drummond North, No. 19, Sebastopol. IN the background is the Waldorf shop premises, tram stop signs. Photo by Doug Colquhoun 27/4/1954. Two copies. Photo print courtesy of Port Dock Railway Museum, now the National Railway Museum. See worksheet 4311 for letter and details of prints sent to Bill Scott, 19/10/2001. Any photo credit to mention NRM Collection.On rear of copy 1"SEC Ballarat / 38 / Sturt St / 27/4/54 2118 / D A Colquhoun " Copy 2 "DAC" in ink, bottom right hand corner.trams, tramways, sturt st, city, tram 38, tram 19 -
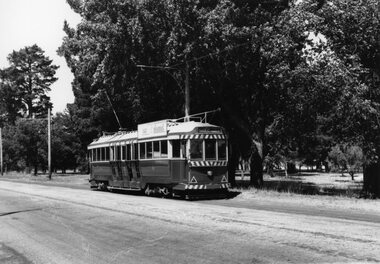
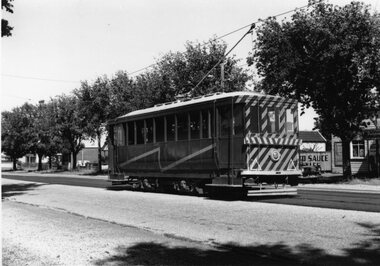 Ballarat Tramway Museum
Photograph - Black & White Photograph/s - set of 2, Wal Jack, 28/02/1962 12:00:00 AM
Yields information about Bendigo trams, the Golden Square route in the early 1960's prior to fitting dash canopy lighting.Black and white print of the Ballarat Scrubber tram, at the Bell Street loop, 28/2/1962, Photo by Wal Jack. Two copies. Photo print courtesy of Port Dock Railway Museum, now the National Railway Museum. See worksheet 4311 for letter and details of prints sent to Bill Scott, 19/10/2001. Any photo credit to mention NRM Collection. .1 - same photograph with Doug Colquhoun stamp on rear - see image i2..1 - On rear of copy 1"SEC Ballarat / Scrubber car /Bell St loop / 28/2/62 2125 / Wal Jack " In the top right hand corner "74)" .2 - On rear has Douglas Colquhoun stamp with photograph details - see image i2 trams, tramways, scrubber tram, bell st, tram scrubber -
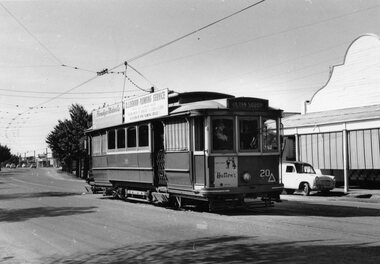 Ballarat Tramway Museum
Photograph - Black & White Photograph/s, Doug Colquhoun, 25/04/1960 12:00:00 AM
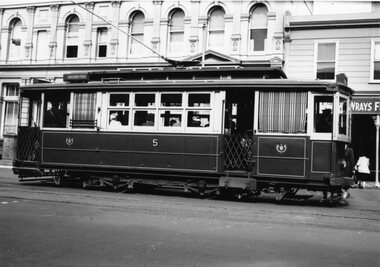
Yields information about one of Geelong's trams.Black and white print of Bendigo No. 20, enroute to Golden Square. Photo by Doug Colquhoun 25/4/1960. Two copies. Trams has a front dash advertisement for Hutton's hams and roof advertisements for D. J. Osborn Plumbing Service and Bendigo Motor Co. Photo print courtesy of Port Dock Railway Museum, now the National Railway Museum. See worksheet 4311 for letter and details of prints sent to Bill Scott, 19/10/2001. Any photo credit to mention NRM Collection.On rear of copy 1"SEC Bendigo / 20 / Golden Square / 25/5/60 2121 / D A Colquhoun " Copy 2 "DAC" in ink, bottom right hand corner.trams, tramways, bendigo, golden square, tram 20 -
 Ballarat Tramway Museum
Photograph - Black & White Photograph/s, Doug Colquhoun, 15/04/1955 12:00:00 AM
Yields information about Ballarat's trams in the early 1960's and the street scape at the Ballarat Railway station and level crossing.Black and white print of Geelong No. 5 - side view, Ryrie St, 15/4/1955, by Doug Colquhoun. Two copies. Photo print courtesy of Port Dock Railway Museum, now the National Railway Museum. See worksheet 4311 for letter and details of prints sent to Bill Scott, 19/10/2001. Any photo credit to mention NRM Collection.On rear of copy 1 "SEC Geelong / 5 / Ryrie St / 15/4/55 2141 / D A Colquhoun " Copy 2 "Ryrie St? going E / D. Colquhoun" in ink, bottom right hand corner.trams, tramways, geelong, ryrie st, tram 5 -
 Ballarat Tramway Museum
Photograph - Black & White Photograph/s, Wal Jack, 18/11/1961 12:00:00 AM
Yields information about Ballarat's trams in the late 1960'ss and the street scape in Victoria St?, Yields information about Ballarat's trams in the late 1960'ss and the street scape in Victoria St?Black and white print of Ballarat 35, northbound to Lydiard St North, crossing the Railway level crossing with Moodys Provincial Hotel and the Ballarat "B" signal box in the background. The tram has a roof advertisement for Ilford film. Note the entry canopy to the hotel. Two copies. Photo by Wal jack, 18/11/1961. Photo print courtesy of Port Dock Railway Museum, now the National Railway Museum. See worksheet 4311 for letter and details of prints sent to Bill Scott, 19/10/2001. Any photo credit to mention NRM Collection.On rear of copy 1 "SEC Ballarat / 35 / Lydiard St North / 18/11/61 2920 / Wal Jack " Copy 2 "DAC" in ink, bottom right hand corner.trams, tramways, lydiard st, ballarat railway station, level crossings, tram 35 -
 Ballarat Tramway Museum
Photograph - Black & White Photograph/s, Doug Colquhoun, May. 1969
Yields information about Ballarat's trams in the early 1970's and the street scape around Lake Wendouree.Black and white print of Ballarat 35, northbound in Drummond St North (check on this ). Tram has the destination of "Gardens via Drummond Nth" and SEC roof advertisement "Everything's under control in my all electric kitchen. Two copies. Photo by Doug Colquhoun, 5/1969. Note the conductor standing on the footstep on the wrong side (for traffic operation) of the tram - could have been a posed photograph. Photo print courtesy of Port Dock Railway Museum, now the National Railway Museum. See worksheet 4311 for letter and details of prints sent to Bill Scott, 19/10/2001. Any photo credit to mention NRM Collection.On rear of copy 1 "SEC Ballarat / 39 /Sturt St East / 5/1969 3743 / D.A. Colquhoun" and "75" in the top right hand corner. Copy 2 "DAC" in ink, bottom right hand corner.trams, tramways, conductors, drummond st nth, tram 39 -
 Ballarat Tramway Museum
Photograph - Black & White Photograph/s, Doug Colquhoun, 15/05/1971 12:00:00 AM
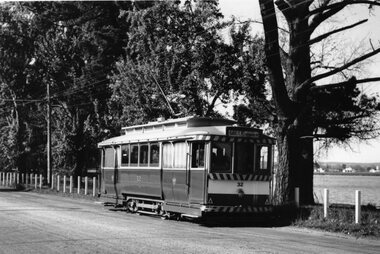
Yields information about Ballarat's trams in the early 1970's and the street scape from Lydiard St to Bridge St.Black and white print of Ballarat 32, in Wendouree Parade, north side of Lake Wendouree, near the depot. Two copies. Photo by Doug Colquhoun, 15/5/1971. Trams has the destination of Gardens via Drummond Nth. Photo print courtesy of Port Dock Railway Museum, now the National Railway Museum. See worksheet 4311 for letter and details of prints sent to Bill Scott, 19/10/2001. Any photo credit to mention NRM Collection.On rear of copy 1 "SEC Ballarat / 32 /Near Depot / 15/5/71 4162 / D.A. Colquhoun" . Copy 2 "DAC" in ink, bottom right hand corner.trams, tramways, wendouree parade, tram 32 -
 Ballarat Tramway Museum
Photograph - Black & White Photograph/s, Doug Colquhoun, 15/05/1971 12:00:00 AM
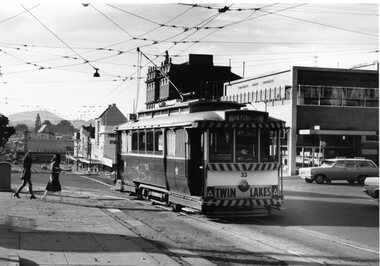
Yields information about Ballarat's trams in the early 1970's and the Drummond St streetscape near the Mill St loop, Yields information about Ballarat's trams in the early 1970's and the Drummond St streetscape near the Mill St loopBlack and white print of Ballarat 33, in turning from Lydiard St Nth into Sturt St, with the Commonwealth Bank and buildings on the south side of Sturt St.. Two copies. Photo by Doug Colquhoun, 15/5/1971. Trams has the destination of Sebastopol and has a "Twin Lakes" sign on the dash panel. In the photograph is signage for Dickins, Neptune, Commonwealth Bank and Patersons. Has two young ladies walking across the street and the ESCo electrical cabinet. Photo print courtesy of Port Dock Railway Museum, now the National Railway Museum. See worksheet 4311 for letter and details of prints sent to Bill Scott, 19/10/2001. Any photo credit to mention NRM Collection.On rear of copy 1 "SEC Ballarat / 33 / 15/5/71 4164 / Lydiard St @ Sturt St / D.A. Colquhoun" . Copy 2 "DAC" in ink, bottom right hand corner.trams, tramways, sturt st, fashions, lydiard st nth, tram 33 -
 Ballarat Tramway Museum
Photograph - Black & White Photograph/s, Doug Colquhoun, 15/05/1971 12:00:00 AM
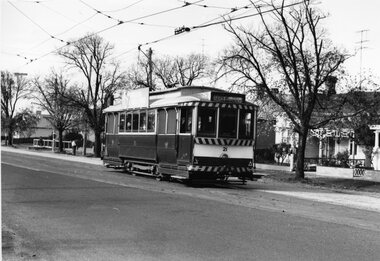
Yields information about Ballarat's trams in the early 1970's and the Drummond St South streetscape.Black and white print of Ballarat 21 in Macarthur St, leaving the High St loop. Tram has the destination of Gardens via Drummond Nth. Two copies. Photo by Doug Colquhoun, 15/5/1971. Photo print courtesy of Port Dock Railway Museum, now the National Railway Museum. See worksheet 4311 for letter and details of prints sent to Bill Scott, 19/10/2001. Any photo credit to mention NRM Collection.On rear of copy 1 "SEC Ballarat / 21 (Ex MTT A.10)/ Drummond St / 15/5/71 4170 / D.A. Colquhoun" . Copy 2 "DAC" in ink, bottom right hand corner.trams, tramways, macarthur st, high st, tram 21 -
 Ballarat Tramway Museum
Photograph - Black & White Photograph/s, Doug Colquhoun, 15/05/1971 12:00:00 AM
Yields information about Ballarat's trams in the early 1970's and the Sebastopol terminus.Black and white print of Ballarat 37, north bound in Drummond St South at near South St and a Holden motor car alongside. Two copies. Photo by Doug Colquhoun, 17/5/1971. Trams has the destination of Lydiard St Nth. Photo print courtesy of Port Dock Railway Museum, now the National Railway Museum. See worksheet 4311 for letter and details of prints sent to Bill Scott, 19/10/2001. Any photo credit to mention NRM Collection.On rear of copy 1 "SEC Ballarat / 37 / Sebastopol / 17/5/71 4176 / D.A. Colquhoun" . Copy 2 "DAC" in ink, bottom right hand corner.trams, tramways, drummond st sth, tram 37 -
 Ballarat Tramway Museum
Photograph - Black & White Photograph/s, Doug Colquhoun, Ballarat 40 at the Sebastopol terminus, 15/05/1971 12:00:00 AM
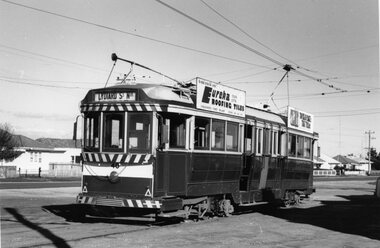
Yields information about Ballarat tram 40 and the Sebastopol terminus.Black and white print of Ballarat 40 at the Sebastopol terminus. Two copies. Photo by Doug Colquhoun, 17/5/1971. Trams has the destination of Lydiard St Nth and roof advertisements for Eureka Tiles and Bliss Bombs (To read pack: Tilt Tram"). Also has the houses in the background and shows the overhead arrangements. Photo print courtesy of Port Dock Railway Museum, now the National Railway Museum. See worksheet 4311 for letter and details of prints sent to Bill Scott, 19/10/2001. Any photo credit to mention NRM Collection.On rear of copy 1 "SEC Ballarat / 40 / Sebastopol terminus / 17/5/71 4179 / D.A. Colquhoun" . Copy 2 "Douglas Colquhoun / 5.1971 National Rly Museum" in ink, bottom right hand corner and in the top left hand corner in ink "Car 40 SEC Tramways Ballarat Vic 3350"trams, tramways, sebastopol, tram 37 -
 Ballarat Tramway Museum
Photograph - Black & White Photograph/s, Doug Colquhoun, 16/05/1971 12:00:00 AM
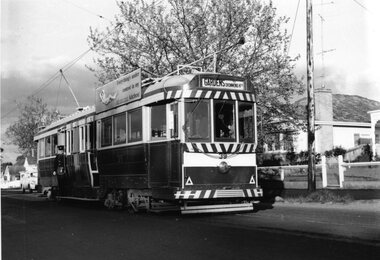
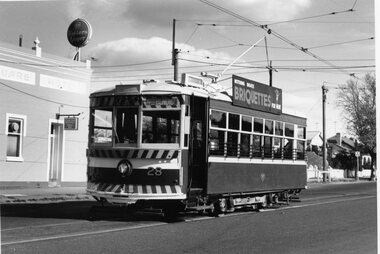
Yields information about Bendigo's trams in the early 1970's and the Eaglehawk terminus.Black and white print of Bendigo 28 at the Golden Square terminus. Two copies. Photo by Doug Colquhoun, 16/5/1971. Trams has the destination of Nth Bendigo and roof advertisements for Briquettes. Also has the Golden Square hotel in the background. Photo print courtesy of Port Dock Railway Museum, now the National Railway Museum. See worksheet 4311 for letter and details of prints sent to Bill Scott, 19/10/2001. Any photo credit to mention NRM Collection.On rear of copy 1 "SEC Bendigo / 28 /Golden Square / 16/5/71 4187 / D.A. Colquhoun" . Copy 2 "DAC" in ink, bottom right hand corner.trams, tramways, golden square, tram 28