Showing 2589 items
matching tram 4
-
 Ballarat Tramway Museum
Document - Folder with papers, State Electricity Commission of Victoria (SECV), 1930's
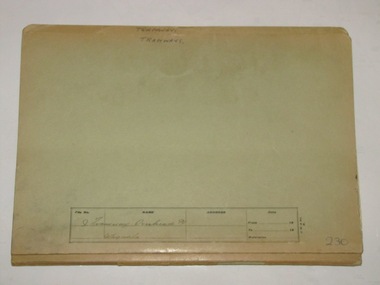
Yields information about how the SEC filed pamphlets or information papers about tramway overhead and associated equipment and letters.Green cardboard file folder with metal clip and binder - "The Acorn Individual File - Foolscap size with title blocks containing the following items: 4910 - Tangential Suspension - overhead 4911.1 - Letter from "The Forest City Electric Co. Limited" to ESCo re Point controllers, tramway signals and warning signs, dated 29/7/1936 - 2 pages 4911.2 - Collins Patent Automatic Point Turner - sheet 19 - 4 pages - sheet 19, two copies 4911.2a - ditto, sheet 18 QT - four pages 4911.3 - Electrically operated Point switches, overhead frogs and signals for tramcar depots. - four pages 4911.4 - Automatic Tramway Signals - five pages - sheet ATS1 4911.5 - Universal Insulator - Sheet 17 - 2 pages 4911.6 - Porcelain hangers - sheet 15/1 - 2 pages 4911.7 - Porcelain insulators for cap and cone supension - page 11, 1 page. 4911.8 - Motor Bus and Tramcar Stage and Fare Signs in Cast Aluminium - sheet MD2 - 1 page 4911.9 - Flashers and Spellers - Sheet F1 - 2 pages 4911.10 - Forest City Relays - 2 pages 4911.11 - Traffic light - 1 page, sheet 2A 4912 - Memo re Suitability of Mr A. Widdop as a linesman - 18/11/1936 4913.1 - Letter dated 22/6/1937 from Agent General in London to the SEC Melbourne regarding shipment of the Non-Car Counting Signals. 4913.2 - Letter from the Forest City Electric Co 18/6/1937, regarding forwarding a blue print for the signals. 4914 - Letter from the Forest City Electric Co 23/6/1937, regarding forwarding sample insulators and booklet 15.2 4915 - Letter from Sands Hill Manufacturing Co to ESCo re regarding overhead crossings - dated 13/4/1928. 4916 - Memo dated 14/3/1934 to Mr Pringle, regarding tension in trolley wire. 4917 - Letter from T. Strickland MMTB to Bendigo re standard height for ears above rail level - 16/3/1934. Some of these document Scanned in pdf form to COTMA Library 1/2011 On rear of file: Top of file - "Tramways", in title block "Tramway Overhead & Signals" and in bottom right hand corner - "230". On spine - in pencil - "Overhead Parts and Proceedings"trams, tramways, signals, overhead, pamphlets, manual -
 Ballarat Tramway Museum
Document - Letter/s, Sands Hill Manufacturing Co, 12/04/1928 12:00:00 AM
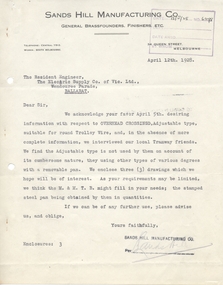
Yields information about the manufacture of brass overhead crossings and the complex ones ESCo were using compared to the MMTB.Letter dated 12/4/1928 from the Sands Hill Manufacturing Co, General Brass founders, Finishers Etc of 34 Queen St Melbourne to The Resident Engineer, ESCo, regarding the Overhead Crossing, Adjustable type for round Trolley Wire, forwarding three drawings of fixed type used by the MMTB in Melbourne and stamped steel pans. Typed on Mount Royal Bond Made in Canada paper.trams, tramways, overhead, points, trolley wire, esco -
 Ballarat Tramway Museum
Photograph - Digital image Set of 10, 19/02/2011 12:00:00 AM
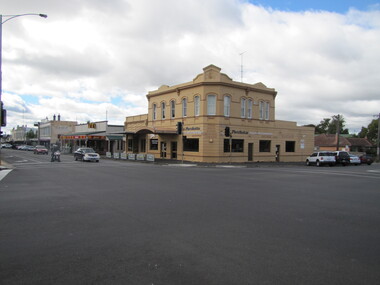
Yields information about the 2011 appearance of Hospital Corner.Set of 10 digital images of Hospital Corner, taken by Warren Doubleday on 19-2-2011 for use in BTM web presentation - Hospital Corner. .1 - SE Corner - La Porchetta's .2 - NE Corner - Shell service station .3 - Looking across to SE corner .4 - Looking across to SW corner - Celebrations store .5 - looking across to NW corner and Hospital .6 - ditto .7 - ditto .8 - Drummond St signage on western side .9 - Celebrations store on SW corner .10 - Davis bus turning from Drummond into Lydiard Sts.trams, tramways, hospital corner, drummond st, sturt st, davis buses -
 Ballarat Tramway Museum
Newspaper, The Courier Ballarat, "Our trams on the right track, 40 years on", 28/05/2011 12:00:00 AM
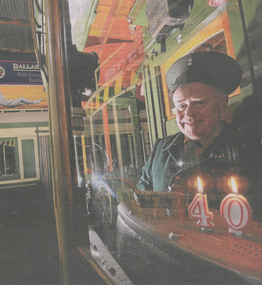
Has a strong association with Richard Gilbert and the BTM's 40th anniversary celebrations.Newspaper clipping from The Courier, Ballarat 28 May 2011, titled "Our trams on the right track, 40 years on", written by Emma Schenk, featuring a photo of Richard Gilbert in a single trucker with 39 in the background and two lit candles "4" and "0" on the controller. Details the weekend events. Photo by Jeremy Bannister.btm, 40th anniversary, celebrations, btps -
 Ballarat Tramway Museum
Photograph - Digital image Set of 10, 1971
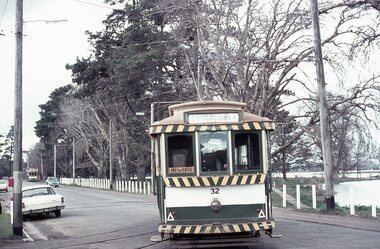
Yields information about Ballarat Tramways and trams prior to the closure of the tramway system.Set of 10 digital images of Ballarat trams prior to closure, scanned from original slides by Stuart Lodington, 1971 prior to closure of the system. .1 - No. 17 at the City Centre, Sturt St, south side, with Gardens via Sturt St on destination roll. Can see the ESCo switch box in the back and the stop and section sign on the adjacent pole. .2 - No. 26 at Sebastopol terminus alongside the Royal Mail Hotel. The tram has yet to turn the pole or the destination roll. Note the Bus Stop sign on the pole, just prior to closure. .3 - ditto .4 - No. 27 and 30 crossing in Skipton St at the Bell St loop (see also btm4975i3) .5 - No. 32, Gardens, about to enter the Carlton St loop, with Lake Wendouree in background, Wendouree Parade. .6 - No. 32 at Depot junction, good photo of depot trackwork entry area. .7 - No. 21, Wendouree Parade, Gardens area, north bound, showing Gardens via Sturt. .8 - No. 12, inbound on Sturt St west at a tram stop. Has destination of Mt. Pleasant. .9 - No. 27 at Lydiard St north terminus with the shelter in the background. .10 - No. 21 at Gardens Loop, tram has destination of Mt. Pleasant. Crews sitting in the saloon.trams, tramways, ballarat, sturt st, sebastopol, drummond st sth, wendouree parade, carlton st, depot, depot junction, trackwork, gardens, sturt st west, crews, tram 17, tram 26, tram 27, tram 32, tram 21, tram 12 -
 Ballarat Tramway Museum
Photograph - Digital image Set of 10, Stuart Lodington, 1971
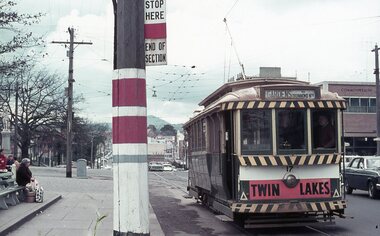
Set of 10 digital images of Ballarat trams prior to closure, scanned from original slides by Stuart Lodington, 1971 prior to closure of the system. .1 - No. 32 entering the depot from Wendouree Parade, with the Lake in the background. Shows the depot fire alarm on an adjacent pole. .2 - No. 26 at Sebastopol, before turning the pole. Has a bus stop sign on a pole already. .3 - No. 27 and 26? crossing at the Bell St loop in Skipton St. No. 27 has a Twin Lakes sign. .4 - No. 32 outbound to the Gardens in Hamilton Ave about to enter Wendouree Parade with Loreto convent and Olympic monument the background. .5 - No. 26, Albert St Sebastopol, approaching the Sebastopol terminus, with Sebastopol Food Stores building on the left of the photo. .6 - No. 12 leaving the Parker St. Loop, Sturt St West after crossing a tram. No. 12 has destination of Victoria St. .7 - No. 12 inward bound in Lydiard St North with Fine Art Gallery in the background, 3BA. No. 12 has destination of Sebastopol and has a Twin Lakes sign. .8 - No. 12 inward bound, Sturt St West, No. 12 has destination of Victoria St and has a Twin Lakes sign. .9 - No. 26 at Sebastopol terminus, outside the Royal Mail Hotel, has a bus stop sign on a pole. Tram pole yet to be turned, but destination adjusted to Lydiard St. North. .10 - No. 12 at Sebastopol terminus, outside the Royal Mail Hotel. No. 12 has destination of Lydiard St Nth and has a Twin Lakes sign.trams, tramways, ballarat, sturt st west, sebastopol, skipton st, wendouree parade, hamilton ave, depot, depot junction, parker st loop, bell st, lydiard st nth, tram 32, tram 26, tram 27, tram 12 -
 Ballarat Tramway Museum
Photograph - Digital image Set of 10, 1971
Yields information about Ballarat Tramways and trams prior to the closure of the tramway system.Set of 10 digital images of Ballarat trams prior to closure, scanned from original slides by Stuart Lodington, 1971 prior to closure of the system. .1 - No. 27 at Lydiard St North terminus with passengers alighting/boarding and an enthusiast about to turn the pole. .2 - No. 27 and No. 30 Skipton St at the Bell St Loop. .3 - No. 13 at the Mt Pleasant terminus, showing destination of Gardens via Drummond St North. .4 - Crews of No. 31 (Conductor and Driver) reversing pole of No. 31 at the depot. .5 - No. 11 inbound on Victoria St. .6 - Night view of a tram at a terminus. .7 - Scrubber on 0 road at the depot .8 - No. 14 at Gardens Loop with another tram behind and the driver standing in the front of the tram. .9 - No. 13 (Mt Pleasant) inbound in Sturt St with 14 behind. .10 - No. 26 northbound to Lydiard St north, about to cross Albert St Sebastopol with the SSW shop in the background. trams, tramways, sebastopol, lydiard st nth, skipton st, bell st, mt pleasant, victoria st, depot, albert st, tram 27, tram 30, tram 13, tram 11, scrubber, tram 14, tram 26 -
 Ballarat Tramway Museum
Photograph - Digital image Set of 10, 1971
Yields information about Ballarat Tramways and trams prior to the closure of the tramway system.Set of 10 digital images of Ballarat trams prior to closure, scanned from original slides by Stuart Lodington, 1971 prior to closure of the system. .1 - No. 43 westbound in Sturt St. .2 - No. 43 at Gardens Loop showing Mt Pleasant on the destination roll. .3 - Scrubber on 0 road at the depot. .4 - night photo of a bogie tramcar. .5 - No. 43 at the Gardens Loop, Wendouree Parade .6 - night photo of a bogie tramcar .7 - Sturt St West, with tram following? and Parker St Loop? .8 - Night photo of a single truck tramcar at the Sebastopol terminus .9 - Night photo of a bogie tram at Gardens Loop .10 - Night photo of No. 30 at Sebastopoltrams, tramways, sebastopol, sturt st, depot, wendouree parade, gardens loop, sturt st west, night lighting, tram 26, tram 27, tram 14, tram 39, tram 13, tram 43 -
 Ballarat Tramway Museum
Photograph - Digital image Set of 7, 1971
Yields information about Ballarat Tramways and trams prior to the closure of the tramway system.Set of 7 digital images of Ballarat trams prior to closure, scanned from original slides by Stuart Lodington, 1971 prior to closure of the system. .1 - No. 26 and 27 inbound Sturt St West at Parker St loop, both trams showing CITY. .2 - No. 43 and 14 crossing at Parker St Loop. .3 - No. 39 turning in bound from Hamilton Ave into Sturt St West. Tram showing destination of Mt Pleasant. .4 - No. 39 inbound in Hamilton Ave. .5 - No. 14 (Gardens via Sturt St W), and No. 13 (Special) at Gardens Loop .6 - No. 26, crossing Albert St Sebastopol, northbound, going to Lydiard St North .7 - Crew of No. 43 standing in front of the tram at Gardens Looptrams, tramways, sturt st west, parker st loop, hamilton ave, albert st, crews -
 Ballarat Tramway Museum
Photograph - Digital image Set of 20, Dec. 1970
Set of 20 digital images of Bendigo Tramways December 1970 by Stuart Lodington. .1 - Bendigo track gang renewing a joint, McCrae St, with welding truck alongside and Birney No. 29. .2 - No. 5 at Quarry Hill terminus? .3 - No. 24 at the depot .4 - No. 2 on the Quarry Hill line .5 - No. 5 approaching the Eaglehawk terminus .6 - No. 29? at the Golden Square Terminus with Bill Rodda's Golden Square hotel in the background. .7 - No. 3 inbound on the Quarry Hill line. .8 - trams crossing on the Eaglehawk line, through the window of one tram. .9 - side on view of a B23D controller in a bogie tram .10 - No. 5 at the Eaglehawk terminus .11 - No. 21 at No. 21 crossing on the Golden Square line. No. 29 showing special, No.21 - North Bendigo, Fire Station Loop? .12 - No. 29 and another tram - near work site? .13 - interior view from Birney looking at the front of another tram parked behind. .14 - No. 29, No. 6 crossing at .15 - No. 6, showing special at Charing Cross. .16 - No. 5 and another tram at North Bendigo on a Special .17 - No. 28 at Charing Cross .18 - No. 5 on Special at a Loop on the Eaglehawk line .19 - No. 28, and two other trams at the Myrtle St Loop .20 - No. 18 showing Quarry Hill and two other trams on View St.trams, tramways, bendigo, trackwork, mccrae st, depot, quarry hill, eaglehawk, golden square, controllers, north bendigo, view st, tram 29, tram 5, tram 24, tram 2, tram 3, tram 6, tram 28, tram 18 -
 Ballarat Tramway Museum
Photograph - Digital image Set of 20
Set of 20 digital images of Bendigo Tramways, 1972 at or before closure while on a tram tour by Stuart Lodington. .1 - No. 28 and 5 at Eaglehawk terminus .2 - No. 28 leaving Charing Cross and travelling into View St with Armstrong Type Service building in background and Firestone Advertisements. .3 - No. 29 with Eaglehawk Town Hall and Post Office in background. .4 - No. 26 and 29 at start of double track, High St Eaglehawk .5 - No. 29 leaving Eaglehawk with shops in the background, Foodland, J. Bests .6 - No. 29 and 23 crossing Manchester Loop with Manchester Arms Hotel in the background and an old poppet head. .7 - No. 29 at ditto with poppet head in the background. .8 - No. 28 and two other trams at the Quarry Hill terminus. .9 - No. 29 in High St Bendigo with the Cathedral and Golden Gate Hotel in the background. .10 - No. 3 with destination Eaglehawk, in bound Carpenter St? .11 - No. 29 following a single trucker through a loop or the end of the double track near the depot. .12 - No. 23?, at Eaglehawk terminus, with Eaglehawk Town Hall in the background. .13 - Birney tram crossing the bridge at the Depot entrance - No. 29 .14 - No. 29 on the Eaglehawk line? .15 - as for .13 .16 - No. 29 entering the depot. .17 - No. 23, inbound from Eaglehawk, at Jobs Gully Loop with the railway overbridge in the background. .18 - No. 28 and two other trams (see also Reg Item 4982) for the same tram tour at Myrtle St. Loop. .19 - No. 21 with North Bendigo on the destination approaching the Golden Square terminus. .20 - No. 7 at Golden Square terminustrams, tramways, bendigo, eaglehawk, quarry hill, golden square, depot, tram 5, tram 29, tram 28, tram 26, tram 23, tram 7, tram 21 -
 Ballarat Tramway Museum
Photograph - Digital image Set of 20, 1971-72
Set of 20 digital images of Bendigo Tramways, 1972 at or before closure while on a tram tour by Stuart Lodington. .1 - No. 7 at Golden Square terminus .2 - ditto .3 - No. 26 in bound on the Eaglehawk line with a crossing loop behind. .4 - Birney crossing the bridge by the tram depot. .5 - No. 29 running a special on the Eaglehawk line with a HBA billboard in the background. .6 - No. 29 with a driver walking in front of the tram at the above location. .7 - No. 29 on the Eaglehawk line .8 - ditto waiting for a tram at Manchester Loop with poppet head in the background. .9 - No. 29 on the Eaglehawk line .10 - Eaglehawk Town Hall at night. .11 - No. 7 at the depot junction in McCrae St, with Golden Square destination. .12 - No. 29 with the Camp Hotel Eaglehawk in the background. Also a Newsagent with The Sun, The Bendigo Advertiser and The Age signs on the building, High St .13 - No. 29 Mt Korong Rd, with the railway overbridge in the background. .14 - interior photo of Birney tram roof .15 - interior view of controls of Birney at Eaglehawk .16 - No. 29 outbound at the Depot Junction McCrae St. .17 - No. 18 at the Eaglehawk terminus .18 - close up view of No. 29 front. .19 - No. 29 in Nolan St, crossing the bridge, outbound. .20 - No. 18 at the Eaglehawk terminus with the Eaglehawk Town Hall, Post Office in the background. Has a circus banner on the side.trams, tramways, bendigo, eaglehawk, quarry hill, golden square, depot, mccrae st, nolan st, tram 7, tram 26, tram 29, tram 18 -
 Ballarat Tramway Museum
Photograph - Digital image Set of 20, 1971-72
Set of 20 digital images of Bendigo Tramways, 1972 at or before closure while on a tram tour by Stuart Lodington. .1 - No. 29 at the North Bendigo terminus .2 - No. 29 just past the Bendigo end of the double track in High St Eaglehawk, with a BP dealer in the background. .3 - Night photo of No. 18 at a terminus, showing "Eaglehawk" .4 - ditto .5 - Night photo of No. 24 at Eaglehawk with Leo A Hughes Photographer in the background. The Tram has "Johnnie Walker whiskey" roof adverts. .6 - No. 29 outbound in Thunder St with a train passing over the bridge in the background. .7 - view from the front window of a tram on the Eaglehawk line with a large "display event float" in the foreground and tram approaching a crossing loop. .8 - No. 29 at North Bendigo .9 - view of High St Eaglehawk looking east from the terminus, showing the track and centre poles. .10 - No. 29 outbound on the North Bendigo line turning from either Nolan St or Caledonia St, running a special. .11 - No. 7 departing North Bendigo for Golden Square. .12 - No. 3 and 18 at Charing Cross. No. 3 has two SEC roof Advertisements .13 - No. 7 at North Bendigo with the trolley pole being reversed. .14 - No. 24 at Quarry Hill with Northern Terrazzo in the background with the driver alongside .15 - No. 7 and No.6 at Charing Cross with the Beehive buildings in the background. .16 - No. 7 at North Bendigo terminus .17 - ditto .18 - No. 24 at Quarry Hill with Northern Terrazzo in the background with the conductor alongside. .19 - ditto .20 - No. 26 and other bogie tram in View St near Charing Cross with the Armstrong Tyre Service building and signs for Cohn's Drinks and T&G in the view.trams, tramways, bendigo, eaglehawk, quarry hill, golden square, depot, north bendigo, charing cross, tram 29, tram 18, tram 24, tram 3, tram 7, tram 6, tram 26 -
 Ballarat Tramway Museum
Photograph - Digital image Set of 20, 1971-72
Set of 22 digital images of Bendigo Tramways, 1972 at or before closure while on a tram tour by Stuart Lodington. .1 - No. 7 arriving at North Bendigo .2 - No. 5 departing Charing Cross along View St, with a Firestone tyres in the background. .3 - front view of a tram in View St with a blurred background image. .4 - No. 24 showing Eaglehawk destination .5 - No 26 and 3 in View St, with the Armstrong Tyre Service building in the background and signs for T&G and Cohn's Drinks. .6 - ditto .7 - No. 3 arriving at Charing Cross from Eaglehawk in View St, with a Quarry Hill destination. .8 - No. 3 and 18 at Charing Cross. .9 - No. 24 on the Quarry Hill line. .10 - No 26 in View St, with the Armstrong Tyre Service building in the background and signs for T&G and Cohn's Drinks. .11 - ditto, with fountain in view, Colonial Mutual building and a newsagent with a Herald sign on the building. .12 - No. 7 at North Bendigo terminus .13 - ditto with pole being reversed. .14 - No. 18 at Quarry Hill terminus with Northern Terrazzo sign in the background. .15 - No. 24 at Quarry Hill terminus .16 - No. 18 arriving at Charring Cross, with Fountain Plaza and Bendigo Pharmacy in the background. .17 - No. 3 and 18 at Charing Cross. .18 - No. 7 at North Bendigo terminus with pole being placed on the overhead. .19 - No. 26 in View St inbound, with Sandhurst Trustees sign in the background. .20 - No. 6 leaving Charing Cross in Pall Mall with Myer and other buildings in the background. .21 - No. 7 at North Bendigo .22 - Single trucker with two roof Advertisements crossing View St with fountain in view, Colonial Mutual building and a newsagent with a Herald sign on the building.trams, tramways, bendigo, eaglehawk, quarry hill, north bendigo, charing cross, view st, tram 7, tram 5, tram 24, tram 26, tram 5, tram 3, tram 18, tram 6 -
 Ballarat Tramway Museum
Photograph - Digital image Set of 4, 8/05/2011 12:00:00 AM
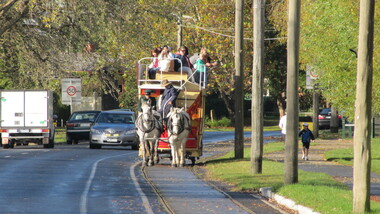
Yields information about the operation of the horse tram by the BTM during the Ballarat Heritage Weekend 2011Set of four digital images of the Horse tram No 1 operation in Wendouree Parade on Mother's Day, 8/5/2011, Photos by Warren Doubleday. .1 - Southbound .2 - in some light rain, with no one on the upper decks. .3 - through the parklands .4 - details of the horse owners caravan / float, Horse Drawn Cab Co.trams, tramways, horse tram, btm, wendouree parade, heritage, tram 1 -
 Whitehorse Historical Society Inc.
Article, Russell Report, 4/03/1992 12:00:00 AM
'A Vision derailed' regarding public transport options in the Doncaster and Nunawading areas recommended in the Russell Report.'A Vision derailed' regarding public transport options in the Doncaster and Nunawading areas recommended in the Russell Report. Nunawading Gazette, 4 March 1992.'A Vision derailed' regarding public transport options in the Doncaster and Nunawading areas recommended in the Russell Report. railway lines, roads and streets, russell report, russell, e.w., trams -
 Ballarat Tramway Museum
Photograph - Colour Photograph/s, Richard Gilbert, 20/04/1980 12:00:00 AM
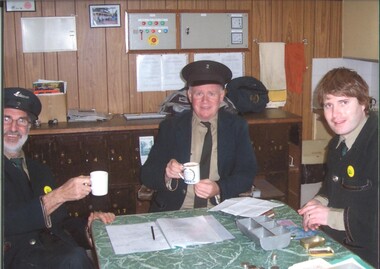
Yields information about three BTM workers enjoying a break in the depot.Mounted colour print, digital printed, onto a foam backing of Neville Hesketh, Richard Gilbert and Ryan Vanderzweep in the depot 20/4/2008. Print made 9/2009 for exhibition purposes and laminated.trams, tramways, btm, depot, tram crews -
 Ballarat Tramway Museum
Photograph - Colour Photograph/s, Richard Gilbert, c2004
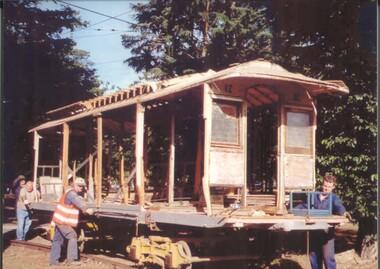
Yields information about the reconstruction of the body of ESCo 12.Mounted colour print, digital printed, onto a foam backing of Alastair Reither, Garry Wood, Richard Gilbert pushing No. 12 back into the depot on 4 road c2004. Print made 9/2009 for exhibition purposes and laminated.trams, tramways, btm, depot, tram 12 -
 Ballarat Tramway Museum
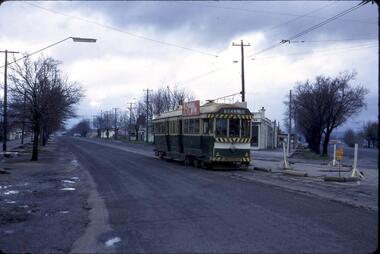
Photograph - Digital image set of 6, 27/06/1971 12:00:00 AM
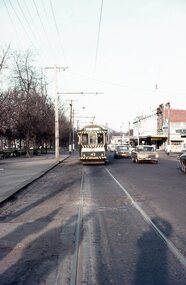
... , "Make Bliss, Not Love". .4 - slide FQ22 - Trams 26 and 41..., "Make Bliss, Not Love". .4 - slide FQ22 - Trams 26 and 41 ...Yields information about the SEC Ballarat trams in the months before the closure of the SEC Tramway system. Yields information about the streetscape.Set of six Digital images, scanned from slides by Graeme Cleak, scanning by Peter Winspur 9/2011. .1 - Slide FQ16 - No. 41, outbound at the south end of Drummond St south about to turn into Skipton St, with the destination of Bell St. .2 - slide FQ18 - No. 41, outbound to Sebastopol terminus, Albert St, just before the terminus itself. .3 - slide FQ21 - No. 41, inbound Albert St Sebastopol with the Sebastopol Town Hall in the background. Tram has a "Bliss Bombs" roof advertisement on the side, "Make Bliss, Not Love". .4 - slide FQ22 - Trams 26 and 41, crossing at Grey St Sebastopol Loop. No. 41 has destination of Grey St. .5 - slide FQ27 - Trams 27 and 37, crossing at the Hamilton Ave loop, No. 41 inbound - with destination of Victoria St at the Hamilton Ave loop with the "Stonehenge" fence house in the background. Sturt St West. .6 - slide FS29 - No. 37 at Grenville St, Sturt St intersection with Bridge St in the background. Tram has the destination of View Point and is entering the loop itself. The destination was no longer in use at the time of the photograph and would indicate that the destination has been arranged. In the background is the Woolworths Big W store and the Dickins Food Store. All photos taken on 27/6/1971. trams, tramways, drummond st sth, sebastopol, grey st, albert st, sturt st west, grenville st, tram 41, tram 26, tram 27, tram 37 -
 Ballarat Tramway Museum
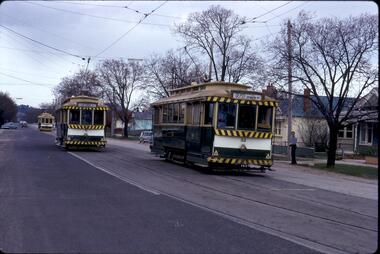
Photograph - Digital image Set of 8, 21/08/1971 12:00:00 AM
Yields information about the SEC Ballarat trams in the months before the closure of the SEC Tramway system. Yields information about the streetscape. Set of 8 Digital images, scanned from slides by Graeme Cleak, scanning by Peter Winspur 9/2011. .1 - Slide FS14 - No. 31 and 32 crossing at the High St Loop in Macarthur St. Tram 31 has the destination of Victoria St. Geoff Dean and his mini on the right hand side of the photograph. Another depot bound single trucker in the photograph, .2 - Slide FS3 - 31 outbound in Victoria St, with St Alipius church in the background. .3 - Slide FS5 - No. 31, and four other trams, some running special at Sturt and Lydiard Sts during the ARHS tour of that day. Has the ANZ Bank and SEC offices in the background. .4 - Slide FS9 - Nos. 39, 26 and two other trams in Lydiard St for the ARHS tour with Reid's Palace, Macleod & Co and J.J. Collier buildings in the background along with other buildings in Lydiard St North. Taken from the Provincial Hotel. .5 - Slide FS11 - No. 26 northbound showing Special running through the level crossing at Ballarat with the Kennedy Murray General Carrier in the background. Taken from the Provincial Hotel. .6 - Slide FS13 - No. 32 turning from Sturt St into Drummond Street North showing Depot via Drummond North, with the Southern Cross Hotel, Rimmington Bros and J.A, Malpass(?) buildings in the background. .7 - Slide FR35 - night shot of No. 17 (with Twin Lakes sign) and No. 32 in Nos 3 and 4 roads at the depot. .8 - Slide FR34 - night shot of the front of the depot - as above and No. 43 on "0" road. All photos 21-8-1971 trams, tramways, railway station, macarthur st, victoria st, sturt st, lydiard st north, level crossings, depot, tram 31, tram 32, tram 39, tram 26, tram 17, tram 43 -
 Ballarat Tramway Museum
Administrative Record - Meeting Minutes, Australian Railway Historical Society (ARHS), Minutes of the ARHS SA Division, 1962 and 1963
Duplicated meeting minutes on foolscap sheets of the ARHS SA Division meetings. .1 - 16.8.1963 .2 - 31.7.1963 .3 - 19.7.1963 .4 - 29.5.1963 .5 - 29.8.1962 Gives indication of those involved in setting up the railway museum and other activities. Many of the people attending would have been friends of Wal Jack.trams, tramways, arhs, adelaide -
 Ballarat Tramway Museum
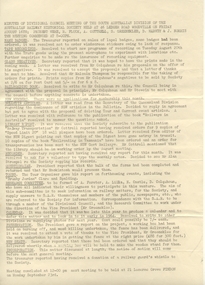
Photograph - Digital image, Wal Jack, 5/04/1958 12:00:00 AM
Yields information the appearance of the SEC tramcar No. 21, and the south east corner of Sturt and Lydiard Streets in 1958 and an AETA tour.Digital image from the Wal Jack Ballarat Album of trams No. 21 turning from Lydiard St into Sturt St while on an AETA tour special, 5 April 1958. Has the AETA sign on the rear of the tram. In the background are the Commonwealth Bank, the MLC building. Includes a number of cyclists in the photograph. See image i2 for rear of photograph. See image i3 for hi res scan of print. See image i4 for hi res scan of negativeon rear of photo in ink, "SEC Ballarat, No. 21 as AETA Special turning into Sturt St from Lydiard St Nth, 5-4-58." in the top right hand corner is the Wal Jack stamp with number "T246" written intrams, tramways, sturt st, lydiard st, aeta, tram 21 -
 Ballarat Tramway Museum
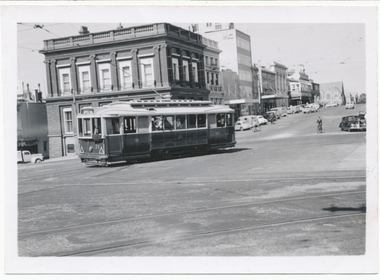
Photograph - Digital image, 9/04/1958 12:00:00 AM
Yields information about one of the tramcars in the Museum's collection and its operation. Also yields information about a Melbourne level crossing that has been replaced.Digital image of W3 661 as Elsternwick level crossing in Glen Huntly Road, 9/4/1958, taken by Ian Brady. Shows the overhead arrangements, level crossing gates posts, signal box and the disc signal for the catch points. Has an Advertisements for Best Biscuits in the photograph. Glenhuntly road. See emails in the worksheet files - see re use and acknowledgement conditions. See Reg item 4162 for a John Alfred photograph after level crossing replacement works commenced featuring 661.trams, tramways, level crossings, tram 661 -
 Ballarat Tramway Museum
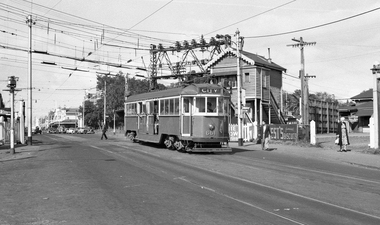
Photograph - Digital image, L.W. Torr Best Street Bowen Hill and Brisbane Q, 4/03/1939 12:00:00 AM
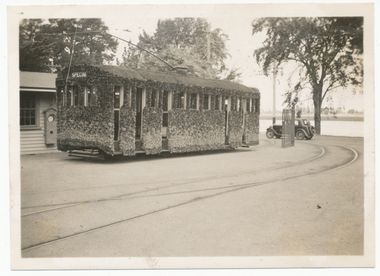
Yields information about Ballarat tram 29 when it was dressed for the Floral Festival and the launch of the tram and how it was used by a small photograph publisher for sales.Digital image from the Wal Jack Ballarat Album of a postcard featuring the 1939 Floral Tram, photograph at the depot, rendered in colour and positioned within an outline of a map of Australia. Wal's notes date it as 4-3-1939. Uses the same base photo similar to 1369, but without the motor bike in the rear. On the rear has a the stamp "L.W. Torr Best Street Bowen Hill, Brisbane Q" See image i2 for rear of photograph. See Reg Item 7000 for a hand coloured image.Stamped on the rear of the photograph "L.W. Torr Best Street Bowen Hills, Brisbane Q" and the date stamp "5 May 1939"trams, tramways, floral tram, decorated trams, depot, tram 29 -
 Ballarat Tramway Museum
Photograph - Digital image, 4/03/1939 12:00:00 AM
Yields information about Ballarat 's 29 decorated for the 1939 Ballarat Floral Festival and its appearance and its use and publicity.Digital image from the Wal Jack Ballarat Album of a photograph featuring the 1939 Floral Tram, Ballarat No. 29 decorated for the 1939 floral festival at the depot looking outwards towards Lake Wendouree with a motor car in the background. Wal's Album notes give the date as 4-3-1939. Very similar to Reg Item 1369, may have been another print of the same photograph that has been trimmed to suit. Printed on Kodak paper, but no other details. See image i2 for rear of photograph. See image i3 for hi res scan of print. See image i4 for hi res scan of negative See Reg Item 7537 for another photo, at the time of the launch with the girls.trams, tramways, floral tram, decorated trams, depot, tram 29 -
 Ballarat Tramway Museum
Photograph - Digital image, 4/03/1939 12:00:00 AM
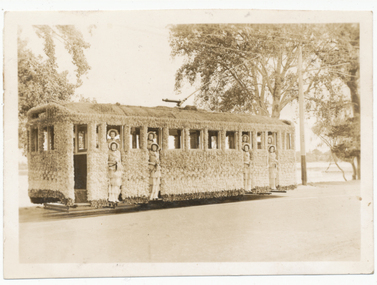
Yields information about Ballarat 's 29 decorated for the 1939 Ballarat Floral Festival and its appearance and its use and publicity.Digital image from the Wal Jack Ballarat Album of a postcard featuring the 1939 Floral Tram, Ballarat No. 29 decorated for the 1939 floral festival. Photographed with the eight SEC hostesses standing inside the tram. Wal's Album notes give the date as 4-3-1939. Photograph printed on Kodak Paper, but no other details. See image i2 for rear of photograph.trams, tramways, floral tram, decorated trams, tram 29 -
 Ballarat Tramway Museum
Photograph - Digital image, 11/04/1944 12:00:00 AM
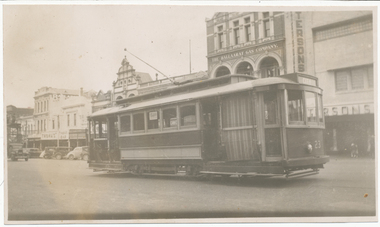
Yields information about Ballarat tram No. 23 in 1944 and the Sturt St east end south side streetscape.Digital image from the Wal Jack Ballarat Album of a photograph of No. 23 in Sturt St parking loop south side east end with the Paterson's store, Ballarat Gas Co and Thomas' Tarax bar in the background. On the left hand edge is the tower truck. Dated 11-4-1944. See image i2 for rear of photograph. On rear of photograph in ink "Ballarat Tramways No. 23 (ex Adelaide "A" 69) on parking loop, Sturt St Ballarat 11-4-44" and "R. Pearson Photo" in bottom right hand corner.trams, tramways, sturt st, city loop, tram 23 -
 Ballarat Tramway Museum
Photograph - Digital image, Keith Kings, 7/04/1962 12:00:00 AM
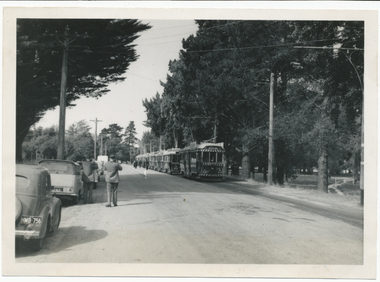
Yields information about the arrangements made to transport ARHS members on a tram tour of Ballarat in 1962.Digital image from the Wal Jack Ballarat Album of a photograph of the ARHS Specials outside the tram depot on tour on 7/4/1962. Keith Kings Photograph N(e)(11). Tram Nos. (from rear) 41, 28, 36, 14, 37, 33, 35, 31, 38. Printed on Ilford paper. See image i2 for rear of photographOn rear of photograph in ink "Ballarat, ARHS specials shunting into Depot for lunch layover. Nos. 41, 28, 36, 14, 37, 33, 35, 31, 38. No. 20 is behind camera with "photo party" for Warrenheip. Sat. 7/4/62" and has Keith Kings stamp and number N(e)(11) in bottom right hand corner.trams, tramways, arhs, special trams, wendouree parade, tram 38 -
 Ballarat Tramway Museum
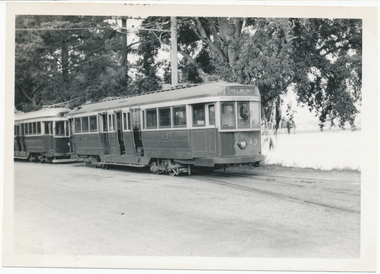
Photograph - Digital image, Wal Jack, 13/04/1956 12:00:00 AM
Yields information about bogie trams prior to entering service in Ballarat.Digital image from the Wal Jack Ballarat Album of a photograph of No.43 without trolley poles being moved by No. 35 at Wendouree Depot 13-4-1956. Photo by Wal Jack, Negative T234. Note the "Belmont" destination. See image i2 for rear of photograph. See image i3 for hi res scan of print. See image i4 for hi res scan of negativeOn rear of photograph in ink "SEC Ballarat No. 43 without poles. No. 35 on rear, outside Wendouree depot 13-4-56" with W. Jack stamp in the top right hand corner and number "T234". trams, tramways, bogie trams, depot, wendouree parade, new trams, tram 43, tram 35 -
 Ballarat Tramway Museum
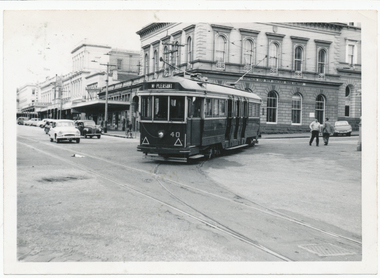
Photograph - Digital image, Wal Jack, 25/04/1959 12:00:00 AM
Yields information about No. 40, tramway centre and special arrangements for events.Digital image from the Wal Jack Ballarat Album of a photograph of No.40 turning from Lydiard St North into Sturt St to run to Mount Pleasant on 25-4-1959, rearranged working due to the Anzac day March. Has the ANZ bank in the background. Wal's album notes say the tram used the Lydiard St crossover. See image i2 for rear of photograph. See image i3 for hi res scan of print. See image i4 for hi res scan of negativeOn rear of photograph in ink "SEC Ballarat No. 40 turning out of Lydiard St Nth into Sturt St, during Anzac Day march 25-4-59" with W. Jack stamp in the top right hand corner and number "T249". trams, tramways, anzac day, lydiard st, sturt st, special workings, tram 40