Showing 1324 items matching "tram terminus"
-
 Ballarat Tramway Museum
Slide - 35mm slide/s, Eldon Hogan, mid 1970's
Colour slide of Birney tram No. 30 at the North Bendigo Terminus in Bendigo Trust colours, mid 1970's and a SEC Bogie tram behind. Possibly on an ARE tour. Photographer Eldon Hogan, AGFA Slide, blue plastic with white plastic on reverse.tramways, trams, sper, bendigo, birney, north bendigo, tram 30 -
 Ballarat Tramway Museum
Domestic Object - China dish, Shelley, mid 1920's
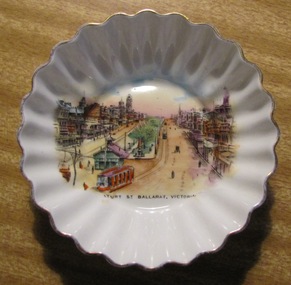
... with an ESCo tram arriving at the Grenville St terminus and two other... with an ESCo tram arriving at the Grenville St terminus and two other ...Yields information about the appearance through a drawing of Sturt St in the mid 1920's and yields information about the manufacture of china dishes with images in the bowl of the dish.White china dish, fluted sides, with a gold rim, flat base with a transferred image of Sturt St from Grenville St early 1920's with an ESCo tram arriving at the Grenville St terminus and two other trams in the view. Looks west along Sturt St. One of a series of dishes made for R. Tunbridge and Sons (see images of other dishes) by Shelley, England. i3 and i4 - of another dish held by the donor - Andrew Mitchell - shows the manufacturing details. - See Reg Item 7214 for another dish with the same image. See correspondence with Grania Poliness with Alan Bradley - printed copy with worksheet file. Stored in box 20A, within its own separate box wrapped with tissue paper. tramways, trams, crockery, sturt st, esco -
 Ballarat Tramway Museum
Map, Royal Automobile Club of Victoria, "Ballarat District Map - RACV", c1966
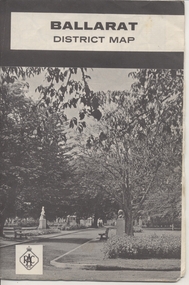
Yields information about the extent of Ballarat in the early to mid 1960's shows the tram lines and other rail lines in the district.Printed street map titled "Ballarat District Map", published by the RACV, showing the central part of Ballarat, Ballarat Outlets, streets, principal attractions, Ballarat and district maps and information, and a list of sporting and entertainment facilities. Has the tram lines shown dotted, does not run out to Sebastopol or the Lydiard St North terminus. Each map in the bottom left hand corner has the numbers "1166", possibly indicating the date.trams, tramways, map, ballarat, racv, railways -
 Ballarat Tramway Museum
Film - Movie Film & Box, Kodak, 1960 to 1971
Yields information in movie film format of Ballarat trams in 1960 through to 1971, how the system operated and was used by people, including special trams., Yields information in movie film format of Ballarat trams in 1960 through to 1971, how the system operated and was used by people, including special trams.Movie film - 8mm, approx. 15 mins, without leader strip on a plastic reel, within a clear plastic case - Standard 8, titled "Ballarat Trams". See Reg Item 4957 for DVD and Mini DVD. Has been transferred to DVD - see Reg item 4957 Made by Arthur Hill. Also transferred to DVD by Rod Cook Oct. 2015, via Roger Greenwood for use in his DVD, "The City of Ballarat Trams, Gardens & Gold" of 2016. See Reg Item 6883. In Arthur's letter - on file - Made between 1960 and August 1971. Synopsis: based on time. Between 1960 and 1968 0:00 Trams Ahead sign before the Victoria St terminus with 20 at terminus 0.14 - No. 20 leaving Victoria St terminus and being followed along Victoria St by car and then passengers jointing the tram at a tram stop. 00.40 - No. 12 (c1960) in bound along Lydiard St North and arriving in the Gregory St loop. 00.56 - No. 12 and 14 crossing at Gregory St. 01.20 - No. 33 and a bogie car crossing at depot loop. 01.31 - No. 18 travelling along Wendouree Parade with the Lake in the background. 01.42 - No 41 at depot junction and running into the depot No. 2 road with a short sequence of a tramway signal. 02.17 - SEC Sign at the depot gate, shot of 41 in No. 2 road, with the lights other way around, Caution beware of trams sign and a red signal. 02.31- Timetable sign at Gardens Loop 02.36 - No. 30 arriving at Loop and view of a signal with no lights showing. 02.48 - Destination roll being changed through a number of destinations. 03.26 - No. 20 arriving at Carlton St loop with the Olympic monument in the background and the red signal light going out. 03.31 - a lady standing at the front of No. 20, with an ice cream in hand, and No. 17 arriving at the Carlton St loop with a short sped up sequence and No. 20 departing from the loop, followed by No. 17 leaving the loop, heading into the city. 03.41 - No. 13 inbound from Sebastopol crossing Albert St and heading into the city. 04.12 - view of signal and contactor, the light going green and the tram passing underneath. 04.24 - No. 12 at the Sebastopol terminus and departing. 04.51 - No. 12 crossing Albert St Sebastopol. 05.16 - Following No. 12 along Albert St, with Borough Offices in background initially. 05.28 - No. 12 arriving at the Grey St loop with No. 14 arriving at the loop from the city and both trams departing. March 1971 05.58 - No. 30 being followed along Barkly St, Mt Pleasant and the pole being turned at the terminus 06.32 - No. 30 picking up a lady passenger. 06.38 - view from the front of a tram, with the drivers hand and a cigarette, view from the back of the tram, along the Mt Pleasant route and running through the loop and then turning into Main St - has the Ballarat (East) fire station in one sequence, and finally running along Main St. 07.35 - view from tram, with car turning into Bridge St. and then running into Sturt St passed the Parking Loop, and along Sturt St. 08.32 - Points at Drummond St North being changed, doors changed over and the tram running along Drummond St. North, through the Mill St loop and into Macarthur St and in Wendouree Parade, with the Lake Wendouree in view and crossing No. 12 at the Depot Loop, with crews chatting, past the depot, a lady passenger getting off the tram near Forest St., and arriving at Gardens Loop with the same lady passenger who got on in Barkly St, getting off the tram. 11.09 - view of No. 30 at Gardens Loop, departing the loop. August 1971 11.30 - R761 crossing Melton (Exford Wier) on the special train to Ballarat and then the bridge between Ballan and Gordon Stations. 12.16 - View from the front of a tram, following No. 26 along Lydiard St North, crossing at Gregory St and returning to the City. 12.39 - No. 14 and one other tram running along Albert St to Sebastopol, crossing No. 21 at Grey St and then to Sebastopol terminus, crossing Albert St and return and running along Albert St. 13.36 - No. 26, 39 crossing 13 at Gardens Loop. 14.00 - view looking across Lake Wendouree. 14.07 - 26 arriving at Victoria St, running part of Destination roll, passengers getting off with hotel in the background, trolley pole being turned and then with 39 following tram along Victoria St, crossing at the King St Loop. 15.07 - view of a trolley pole tracking through the overhead at curve 15.10 - end. Written labels giving title information on reel.trams, tramways, ballarat, sebastopol, lydiard st north, victoria st, mt pleasant, lake wendouree, depot, tram 12, tram 13, tram 14, tram 17, tram 18, tram 21, tram 26, tram 33, tram 39, tram 41 -
 Ballarat Tramway Museum
Photograph - Colour Print/s, c2006
Has a strong association with BTM staff, Richard Gilbert c2007.Colour print of Richard Gilbert holding the trolley rope on No. 27 prior to turning the pole at Carlton St terminus. Photo c2006, prior to repainting of the tram. Photographer and date unknown at time of cataloguing, trams, tramways, btm, carlton st, trolley poles, tram 27 -
 Ballarat Tramway Museum
Photograph - Digital image Set of 10, 1971
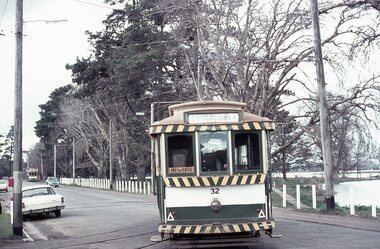
Yields information about Ballarat Tramways and trams prior to the closure of the tramway system.Set of 10 digital images of Ballarat trams prior to closure, scanned from original slides by Stuart Lodington, 1971 prior to closure of the system. .1 - No. 17 at the City Centre, Sturt St, south side, with Gardens via Sturt St on destination roll. Can see the ESCo switch box in the back and the stop and section sign on the adjacent pole. .2 - No. 26 at Sebastopol terminus alongside the Royal Mail Hotel. The tram has yet to turn the pole or the destination roll. Note the Bus Stop sign on the pole, just prior to closure. .3 - ditto .4 - No. 27 and 30 crossing in Skipton St at the Bell St loop (see also btm4975i3) .5 - No. 32, Gardens, about to enter the Carlton St loop, with Lake Wendouree in background, Wendouree Parade. .6 - No. 32 at Depot junction, good photo of depot trackwork entry area. .7 - No. 21, Wendouree Parade, Gardens area, north bound, showing Gardens via Sturt. .8 - No. 12, inbound on Sturt St west at a tram stop. Has destination of Mt. Pleasant. .9 - No. 27 at Lydiard St north terminus with the shelter in the background. .10 - No. 21 at Gardens Loop, tram has destination of Mt. Pleasant. Crews sitting in the saloon.trams, tramways, ballarat, sturt st, sebastopol, drummond st sth, wendouree parade, carlton st, depot, depot junction, trackwork, gardens, sturt st west, crews, tram 17, tram 26, tram 27, tram 32, tram 21, tram 12 -
 Ballarat Tramway Museum
Photograph - Digital image Set of 10, Stuart Lodington, 1971
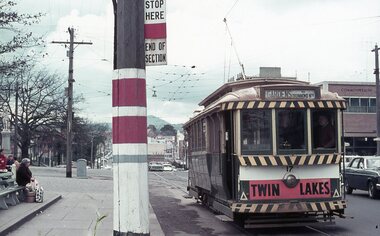
Set of 10 digital images of Ballarat trams prior to closure, scanned from original slides by Stuart Lodington, 1971 prior to closure of the system. .1 - No. 32 entering the depot from Wendouree Parade, with the Lake in the background. Shows the depot fire alarm on an adjacent pole. .2 - No. 26 at Sebastopol, before turning the pole. Has a bus stop sign on a pole already. .3 - No. 27 and 26? crossing at the Bell St loop in Skipton St. No. 27 has a Twin Lakes sign. .4 - No. 32 outbound to the Gardens in Hamilton Ave about to enter Wendouree Parade with Loreto convent and Olympic monument the background. .5 - No. 26, Albert St Sebastopol, approaching the Sebastopol terminus, with Sebastopol Food Stores building on the left of the photo. .6 - No. 12 leaving the Parker St. Loop, Sturt St West after crossing a tram. No. 12 has destination of Victoria St. .7 - No. 12 inward bound in Lydiard St North with Fine Art Gallery in the background, 3BA. No. 12 has destination of Sebastopol and has a Twin Lakes sign. .8 - No. 12 inward bound, Sturt St West, No. 12 has destination of Victoria St and has a Twin Lakes sign. .9 - No. 26 at Sebastopol terminus, outside the Royal Mail Hotel, has a bus stop sign on a pole. Tram pole yet to be turned, but destination adjusted to Lydiard St. North. .10 - No. 12 at Sebastopol terminus, outside the Royal Mail Hotel. No. 12 has destination of Lydiard St Nth and has a Twin Lakes sign.trams, tramways, ballarat, sturt st west, sebastopol, skipton st, wendouree parade, hamilton ave, depot, depot junction, parker st loop, bell st, lydiard st nth, tram 32, tram 26, tram 27, tram 12 -
 Ballarat Tramway Museum
Photograph - Digital image Set of 10, 1971
Yields information about Ballarat Tramways and trams prior to the closure of the tramway system.Set of 10 digital images of Ballarat trams prior to closure, scanned from original slides by Stuart Lodington, 1971 prior to closure of the system. .1 - No. 43 westbound in Sturt St. .2 - No. 43 at Gardens Loop showing Mt Pleasant on the destination roll. .3 - Scrubber on 0 road at the depot. .4 - night photo of a bogie tramcar. .5 - No. 43 at the Gardens Loop, Wendouree Parade .6 - night photo of a bogie tramcar .7 - Sturt St West, with tram following? and Parker St Loop? .8 - Night photo of a single truck tramcar at the Sebastopol terminus .9 - Night photo of a bogie tram at Gardens Loop .10 - Night photo of No. 30 at Sebastopoltrams, tramways, sebastopol, sturt st, depot, wendouree parade, gardens loop, sturt st west, night lighting, tram 26, tram 27, tram 14, tram 39, tram 13, tram 43 -
 Ballarat Tramway Museum
Photograph - Digital image Set of 20, Dec. 1970
Set of 20 digital images of Bendigo Tramways December 1970 by Stuart Lodington. .1 - Bendigo track gang renewing a joint, McCrae St, with welding truck alongside and Birney No. 29. .2 - No. 5 at Quarry Hill terminus? .3 - No. 24 at the depot .4 - No. 2 on the Quarry Hill line .5 - No. 5 approaching the Eaglehawk terminus .6 - No. 29? at the Golden Square Terminus with Bill Rodda's Golden Square hotel in the background. .7 - No. 3 inbound on the Quarry Hill line. .8 - trams crossing on the Eaglehawk line, through the window of one tram. .9 - side on view of a B23D controller in a bogie tram .10 - No. 5 at the Eaglehawk terminus .11 - No. 21 at No. 21 crossing on the Golden Square line. No. 29 showing special, No.21 - North Bendigo, Fire Station Loop? .12 - No. 29 and another tram - near work site? .13 - interior view from Birney looking at the front of another tram parked behind. .14 - No. 29, No. 6 crossing at .15 - No. 6, showing special at Charing Cross. .16 - No. 5 and another tram at North Bendigo on a Special .17 - No. 28 at Charing Cross .18 - No. 5 on Special at a Loop on the Eaglehawk line .19 - No. 28, and two other trams at the Myrtle St Loop .20 - No. 18 showing Quarry Hill and two other trams on View St.trams, tramways, bendigo, trackwork, mccrae st, depot, quarry hill, eaglehawk, golden square, controllers, north bendigo, view st, tram 29, tram 5, tram 24, tram 2, tram 3, tram 6, tram 28, tram 18 -
 Ballarat Tramway Museum
Photograph - Digital image Set of 20
Set of 20 digital images of Bendigo Tramways, 1972 at or before closure while on a tram tour by Stuart Lodington. .1 - No. 28 and 5 at Eaglehawk terminus .2 - No. 28 leaving Charing Cross and travelling into View St with Armstrong Type Service building in background and Firestone Advertisements. .3 - No. 29 with Eaglehawk Town Hall and Post Office in background. .4 - No. 26 and 29 at start of double track, High St Eaglehawk .5 - No. 29 leaving Eaglehawk with shops in the background, Foodland, J. Bests .6 - No. 29 and 23 crossing Manchester Loop with Manchester Arms Hotel in the background and an old poppet head. .7 - No. 29 at ditto with poppet head in the background. .8 - No. 28 and two other trams at the Quarry Hill terminus. .9 - No. 29 in High St Bendigo with the Cathedral and Golden Gate Hotel in the background. .10 - No. 3 with destination Eaglehawk, in bound Carpenter St? .11 - No. 29 following a single trucker through a loop or the end of the double track near the depot. .12 - No. 23?, at Eaglehawk terminus, with Eaglehawk Town Hall in the background. .13 - Birney tram crossing the bridge at the Depot entrance - No. 29 .14 - No. 29 on the Eaglehawk line? .15 - as for .13 .16 - No. 29 entering the depot. .17 - No. 23, inbound from Eaglehawk, at Jobs Gully Loop with the railway overbridge in the background. .18 - No. 28 and two other trams (see also Reg Item 4982) for the same tram tour at Myrtle St. Loop. .19 - No. 21 with North Bendigo on the destination approaching the Golden Square terminus. .20 - No. 7 at Golden Square terminustrams, tramways, bendigo, eaglehawk, quarry hill, golden square, depot, tram 5, tram 29, tram 28, tram 26, tram 23, tram 7, tram 21 -
 Ballarat Tramway Museum
Photograph - Digital image Set of 20, 1971-72
Set of 20 digital images of Bendigo Tramways, 1972 at or before closure while on a tram tour by Stuart Lodington. .1 - No. 7 at Golden Square terminus .2 - ditto .3 - No. 26 in bound on the Eaglehawk line with a crossing loop behind. .4 - Birney crossing the bridge by the tram depot. .5 - No. 29 running a special on the Eaglehawk line with a HBA billboard in the background. .6 - No. 29 with a driver walking in front of the tram at the above location. .7 - No. 29 on the Eaglehawk line .8 - ditto waiting for a tram at Manchester Loop with poppet head in the background. .9 - No. 29 on the Eaglehawk line .10 - Eaglehawk Town Hall at night. .11 - No. 7 at the depot junction in McCrae St, with Golden Square destination. .12 - No. 29 with the Camp Hotel Eaglehawk in the background. Also a Newsagent with The Sun, The Bendigo Advertiser and The Age signs on the building, High St .13 - No. 29 Mt Korong Rd, with the railway overbridge in the background. .14 - interior photo of Birney tram roof .15 - interior view of controls of Birney at Eaglehawk .16 - No. 29 outbound at the Depot Junction McCrae St. .17 - No. 18 at the Eaglehawk terminus .18 - close up view of No. 29 front. .19 - No. 29 in Nolan St, crossing the bridge, outbound. .20 - No. 18 at the Eaglehawk terminus with the Eaglehawk Town Hall, Post Office in the background. Has a circus banner on the side.trams, tramways, bendigo, eaglehawk, quarry hill, golden square, depot, mccrae st, nolan st, tram 7, tram 26, tram 29, tram 18 -
 Ballarat Tramway Museum
Photograph - Digital image Set of 20, 1971-72
Set of 20 digital images of Bendigo Tramways, 1972 at or before closure while on a tram tour by Stuart Lodington. .1 - No. 29 at the North Bendigo terminus .2 - No. 29 just past the Bendigo end of the double track in High St Eaglehawk, with a BP dealer in the background. .3 - Night photo of No. 18 at a terminus, showing "Eaglehawk" .4 - ditto .5 - Night photo of No. 24 at Eaglehawk with Leo A Hughes Photographer in the background. The Tram has "Johnnie Walker whiskey" roof adverts. .6 - No. 29 outbound in Thunder St with a train passing over the bridge in the background. .7 - view from the front window of a tram on the Eaglehawk line with a large "display event float" in the foreground and tram approaching a crossing loop. .8 - No. 29 at North Bendigo .9 - view of High St Eaglehawk looking east from the terminus, showing the track and centre poles. .10 - No. 29 outbound on the North Bendigo line turning from either Nolan St or Caledonia St, running a special. .11 - No. 7 departing North Bendigo for Golden Square. .12 - No. 3 and 18 at Charing Cross. No. 3 has two SEC roof Advertisements .13 - No. 7 at North Bendigo with the trolley pole being reversed. .14 - No. 24 at Quarry Hill with Northern Terrazzo in the background with the driver alongside .15 - No. 7 and No.6 at Charing Cross with the Beehive buildings in the background. .16 - No. 7 at North Bendigo terminus .17 - ditto .18 - No. 24 at Quarry Hill with Northern Terrazzo in the background with the conductor alongside. .19 - ditto .20 - No. 26 and other bogie tram in View St near Charing Cross with the Armstrong Tyre Service building and signs for Cohn's Drinks and T&G in the view.trams, tramways, bendigo, eaglehawk, quarry hill, golden square, depot, north bendigo, charing cross, tram 29, tram 18, tram 24, tram 3, tram 7, tram 6, tram 26 -
 Ballarat Tramway Museum
Photograph - Digital image Set of 20, 16/04/1972 12:00:00 AM
Set of 20 digital images of Bendigo Tramways, of the last running day of the Eaglehawk to Quarry Hill line 16 April 1972, .1 - No. 24 outbound to Eaglehawk .2 - No. 3? at Manchester Loop .3 - No. 24 outbound to Eaglehawk .4 - bogie tram crossing the rail over bridge from Eaglehawk .5 - No. 18 in View St .6 - No. 24 outbound to Eaglehawk .7 - No 18 at Eaglehawk with destination roll being changed, and shopping centre in the background. .8 - No. 24 crossing the railway overbridge, going to Eaglehawk .9 - No. 3 outbound to Eaglehawk .10 - No. 24 crossing the railway overbridge, going to Eaglehawk .11 - No. 3 and 24 crossing at Long Gully .12 - No. 18 at Eaglehawk with Leo A Hughes photographer building in the background and a CFA truck passing the tram. Tram SEC roof advertisement and a banner for "German -?- Circus" at Eaglehawk and dates. .13 - No. 3 inbound on the Eaglehawk line. .14 - No. 18 outbound to Eaglehawk .15 - ditto .16 - No. 18 at Eaglehawk terminus with the Mechanics Institute in the background. .17 - No. 24 at the Eaglehawk terminus .18 - No 24 at the intersection with Taylor St .19 - No. 24 at the Eaglehawk terminus .20 - dittotrams, tramways, bendigo, eaglehawk, long gully, manchester loop, tram 24, tram 18, tram 3 -
 Ballarat Tramway Museum
Photograph - Digital image Set of 20, 16/04/1972 12:00:00 AM
Set of 22 digital images of Bendigo Tramways, of the last running day of the Eaglehawk to Quarry Hill line 16 April 1972, .1 - No. 3 and 24 crossing at Long Gully .2 - No. 3 turning at the Cricket ground, Barnard and View Sts, inbound to the City and Quarry Hill .3 - No. 3 in bound to the City and Quarry Hill, Long Gully area .4 - No. 18 inbound to the City and Quarry Hill crossing the railway bridge from Eaglehawk. .5 - Manchester Loop .6 - No. 18 inbound to the City and Quarry Hill crossing the railway bridge from Eaglehawk. .7 - No. 18 about to enter Jobs Gully Loop .8 - No. 3 about to turn at the Cricket ground, Barnard and View Sts inbound to the City and Quarry Hill .9 - No. 3 turning at the Cricket ground, Barnard and View Sts, inbound to the City and Quarry Hill .10 - No. 18 at Eaglehawk terminus with the Mechanics Institute in the background. .11 - No. 3 in bound, Ironbark area. .12 - No. 3 at Long Gully Loop .13 - No. 3 outbound to Eaglehawk. .14 - No. 18 at Eaglehawk with German circus banner on tram .15 - No. 18 on the Eaglehawk line at Jobs Gully Loop .16 - No. 24 outbound to Eaglehawk at Taylor St .17 - No. 18 inbound to the City and Quarry Hill crossing the railway bridge from Eaglehawk. .18 - No. 3 at Manchester Loop .19 - No. 18 at Eaglehawk terminus .20 - No. 18 at Eaglehawk with German circus banner on tram .21 - bogie tram at Long Gully Loop. .22 - No. 24 outbound to Eaglehawk at Taylor Sttrams, tramways, bendigo, eaglehawk, long gully, jobs gully, manchester loop, tram 24, tram 18, tram 3 -
 Ballarat Tramway Museum
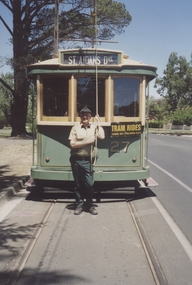
Photograph - Colour Print/s - set of 4, Earl Ewers, 28/05/2011 12:00:00 AM
Yields information about the BTM's 40th anniversary celebrations, and some of the people involved.Set of four colour prints of trams in Wendouree Parade during the 40th anniversary celebrations. Taken by Earl Ewers, printed on Fujichrome paper. Taken 28/5/2011 .1 - No. 27 as service tram, entering Gardens Loop. .2 - No. 33 at the Crossing Loop, with Sovereign Caravans and Eureka Roofing Tiles roof adverts. .3 - ditto at Carlton St. .4 - ditto at St Aidans DriveOn rear in blue pen .1 - No. 27 as service car, Wendouree Parade Ballarat 28 May 2011 .2 - No. 33 on a "special", Wendouree Parade Ballarat 28 May 2011 .3 - No. 33 at Carlton St terminus, Ballarat Gardens 28 May 2011 .4 - No. 33 Lake Wendouree, Mt Warrenheip, Black Swans, Ballarat Gardens 28 May 2011.trams, tramways, 40th anniversary, lake wendouree, wendouree parade, gardens loop, tram 27, tram 33 -
 Ballarat Tramway Museum
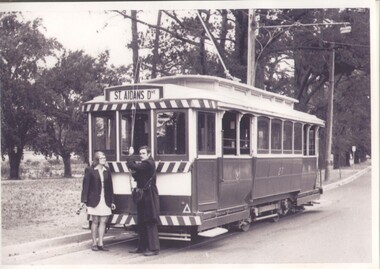
Photograph - Black and White photograph - laminated, Richard Gilbert, 1978
... and Barry McCandlish at Carlton St terminus, c198?. with tram 27... terminus, c198?. with tram 27. Carolyn was being trained ...Yields information about two BTM workers enjoying at St Adians Drive turning the tram.Laminated A4 black and white print of Carolyn Dean and Barry McCandlish at Carlton St terminus, c198?. with tram 27. Carolyn was being trained at the time by Richard Gilbert in Ballarat, 1978. Photo Richard Gilbert. Print made 9/2009 for exhibition purposes and laminated.trams, tramways, carlton st, wendouree parade -
 Ballarat Tramway Museum
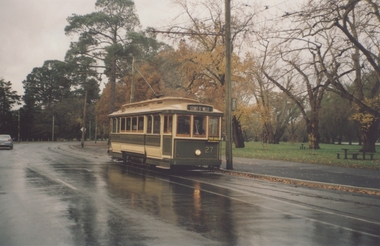
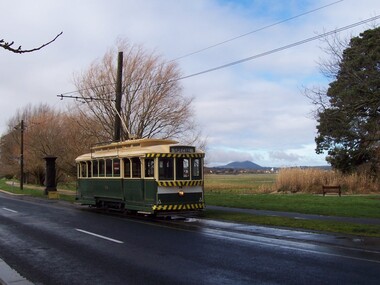
Photograph - Digital image, 1/08/2009 12:00:00 AM
Yields information about the condition of Lake Wendouree following a prolonged drought, photographed with some water in it during the winter of 2009.Digital Image of BTM Tram No. 14 at the St Aidans Drive terminus, 1/8/2009 with an almost dry Lake Wendouree in the background and green grass on the lake bed. There is some water in the lake after a long drought..trams, tramways, lake wendouree, drought, st aidans drive, tram 14 -
 Ballarat Tramway Museum
Photograph - Digital image, c1916
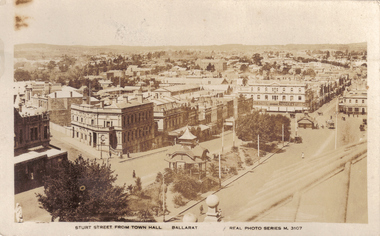
Shows the details of buildings in the east end of Sturt St, c1916.Digital image from a postcard from the collection of David Critchley, of Ballarat, Sturt St c1916. This 'birds eye' view of Sturt St reveals on of the early fleet standing at the city terminus probably during the Great War. Note the absence of motor cars and women's skirts are somewhat shorter - an economy concession with the shortage of cloth during the war years. A Valentines photo postcard. David scanned this pic at a higher resolution than normal, so you should be able to zoom in on the tram, which has been fitted with windshields and looks typically well used and unloved as did most of the original Ballarat fleet in their latter years. Image supplied by email 30/8/2011 - not to be published without David's authority.trams, tramways, sturt st, bridge st, esco -
 Ballarat Tramway Museum
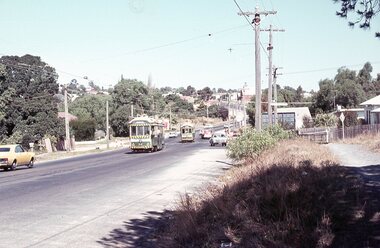
Photograph - Digital image set of 6, 27/06/1971 12:00:00 AM
Yields information about the SEC Ballarat trams in the months before the closure of the SEC Tramway system. Yields information about the streetscape.Set of six Digital images, scanned from slides by Graeme Cleak, scanning by Peter Winspur 9/2011. .1 - Slide FQ16 - No. 41, outbound at the south end of Drummond St south about to turn into Skipton St, with the destination of Bell St. .2 - slide FQ18 - No. 41, outbound to Sebastopol terminus, Albert St, just before the terminus itself. .3 - slide FQ21 - No. 41, inbound Albert St Sebastopol with the Sebastopol Town Hall in the background. Tram has a "Bliss Bombs" roof advertisement on the side, "Make Bliss, Not Love". .4 - slide FQ22 - Trams 26 and 41, crossing at Grey St Sebastopol Loop. No. 41 has destination of Grey St. .5 - slide FQ27 - Trams 27 and 37, crossing at the Hamilton Ave loop, No. 41 inbound - with destination of Victoria St at the Hamilton Ave loop with the "Stonehenge" fence house in the background. Sturt St West. .6 - slide FS29 - No. 37 at Grenville St, Sturt St intersection with Bridge St in the background. Tram has the destination of View Point and is entering the loop itself. The destination was no longer in use at the time of the photograph and would indicate that the destination has been arranged. In the background is the Woolworths Big W store and the Dickins Food Store. All photos taken on 27/6/1971. trams, tramways, drummond st sth, sebastopol, grey st, albert st, sturt st west, grenville st, tram 41, tram 26, tram 27, tram 37 -
 Ballarat Tramway Museum
Photograph - Digital image, 19/09/1971 12:00:00 AM
Yields information about the appearance of the Sebastopol terminus on the last day of SEC tramway operations.Digital image from a black and white print of 40 at the Sebastopol terminus, on the last day of SEC services, 19/9/1971. Photo by Bill Kingsley, looking north. Royal Mail Hotel, Sebastopol, alongside. trams, tramways, sebastopol, closure, tram 40 -
 Ballarat Tramway Museum
Postcard, E.W. Cole Arcade, Ballarat Horse tram arriving at the Grenville St. terminus, c1900
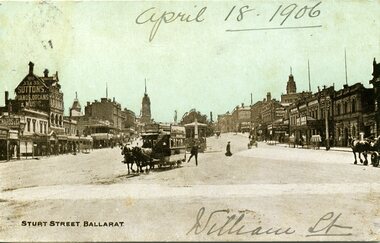
Demonstrates aspects of working of Ballarat tramways, with a passenger stepping off a moving horse tram at Grenville St. Has a strong association with the sender and receiver, giving family/friends movements. Hand painted card.Printed black and white postcard with hand painted light blue sky background of Ballarat Horse tram arriving at the Grenville St. terminus, at the bottom end of Sturt St terminus with a person stepping off the tramcar. Has buildings on both sides of Sturt St. in photograph, and one other horse drawn vehicle. Also Suttons and Richards & Co. buildings in photo. See Reg. Item 1539 for photographic image of the postcard and 2762, and 3298. Titled "Sturt Street, Ballarat" in bottom left hand corner". On rear of postcard, printed is the words "Post Card", areas for "This space may be used for correspondence" and "The Address to be written here" and in stamp area in a square "Penny Stamp here". On the left hand side of the card "Cole's Sunny Australia 96 Views", E.W. Cole Book Arcade Melbourne, Sydney and Adelaide. See also Reg Item 2762 for another postcard using the same photograph and Reg Item 3298 for another version with some writing on the card.On front of card in black ink "April 18 1906" and "William St" On rear stamped "Melbourne, 17.4.06", 1d stamp and addressed to Mrs. Keast, Cumberland, Waymouth St Adelaide. and a message about family members/friends travelling. On top edge stamp "E.G.Butland"trams, tramways, sturt st, postcards, horse tram, grenville st, tram 35 -
 Ballarat Tramway Museum
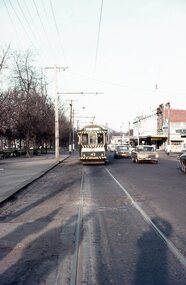
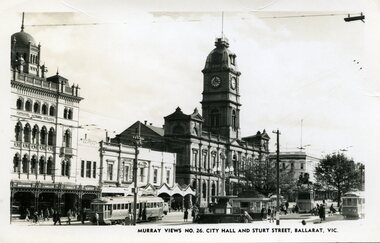
Photograph - Black & White Photograph/s, Murray Views, Murray Views No. 26 City Hall and Sturt St Ballarat Vic, c1950
Demonstrates a typical street view following the delivery of the bogie trams following the second world war and the street scape at the time. Able to determine the tramcar numbers. Yields information about the era of the photograph.B&W print, postcard print of Sturt St Ballarat, looking towards the Town Hall from the Post Office, City terminus. Photo taken by Murray Views to form "Murray Views No. 26, City Hall and Sturt St, Ballarat Vic." No. 22 on south side and No. 34 on north side - see Hi-Res scans. Has the National Mutual, Town Hall and Myers and other buildings in the view. Photo taken c1950, prior to renumbering of No. 22. 2nd copy added 28-12-2021 - most likely a reproduction of the original as it does not have a postcard back.On reverse side - black ink stamp "E.G.Butland" On reverse of 2nd copy - "Ballarat, Sturt St, west from Lydiard Sts" and Keith Kings stamp.tramways, trams, sturt st, bogie trams, tramway centre, town hall, tram 22, tram 34 -
 Ballarat Tramway Museum
Photograph - Black & White Photograph/s, mid 1900's
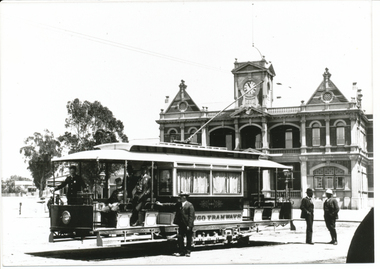
Yields information about the appearance of Bendigo trams early 1970's and the Charing Cross area.Black and white photograph of an ESCo combination tramcar at the Eaglehawk terminus, with the Eaglehawk Town Hall in the background. Driver at the controls, with a number of men standing alongside and the conductor (2 No.) in the front portion of the tramcar. Note the curtains in the tramcar, taken during a summers day. Photo taken early mid 1900's. Creative Images Photographic Collection. High Resolution image added 31/8/2012In pencil, top left hand corner, "Eaglehawk early 1900's and in the bottom right hand corner / Bendigo / Creative Image Photographic Collection".trams, tramways, bendigo, eaglehawk, esco -
 Ballarat Tramway Museum
Photograph - Black & White Photograph/s, Chris Wurr, early 1970's
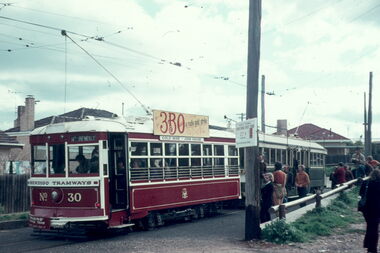
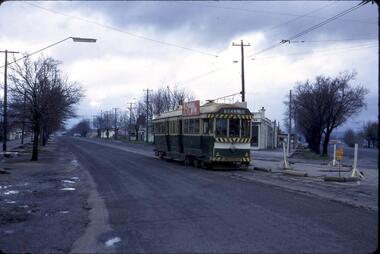
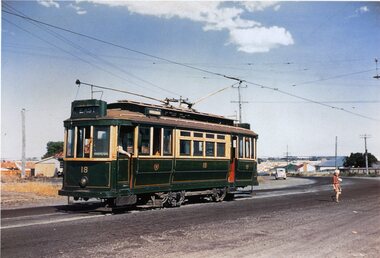
Yields information about the appearance of Bendigo Birney trams early 1970's en route to North Bendigo and its tree lined streets.Black and White Photograph of SEC Bendigo 30, Birney at North Bendigo terminus with the driver turning the trolley pole. Tram has the destination of Golden Square. Photo shows the fitting in the overhead to help locate the trolley pole on the inbound wire. Photo Chris Wurr, early 1970's. "Photo by Chris Wurr" stamped on the rear.trams, tramways, bendigo, north bendigo, overhead, birney, tram 30 -
 Ballarat Tramway Museum
Photograph - Black & White Photograph/s, Chris Wurr, Jan. 1971
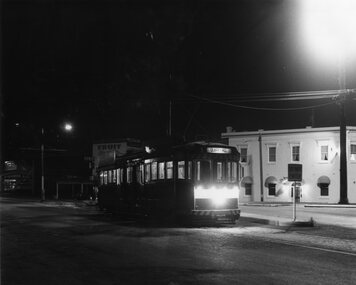
Black and White Photograph of Bendigo No. 2 at the Eagle Hawk terminus, Jan. 1971, night photograph. Tram has the destination of Quarry Hill. In the background is the Foodland Store, a Milk bar. The tram has arrived at the terminus, the trolley pole has been turned, but the headlights and dash canopy lights have yet to be turned. Tram has the destination of Quarry Hill. Photo Chris Wurr, early 1970's. "Photo by Chris Wurr" stamped on the rear. In top left hand corner, in ink "71)" and "Bendigo (SEC) Tramways / 1.1971 / Eaglehawk Terminus"trams, tramways, bendigo, eaglehawk, night photo, tram 2 -
 Ballarat Tramway Museum
Photograph - Colour Photograph/s, William. F. Scott, Jan. 1992
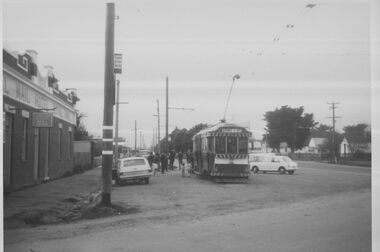
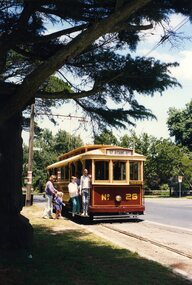
Yields information about the appearance and the use of trams by the BTM in Wendouree Parade, passengers boarding trams and the front cover photograph used in the "Ballarat Heritage Tramway" booklet.Colour photograph of BTM No. 26 picking up passengers at Carlton St , Wendouree Parade, photograph by William F Scott, 1.1992. Printed on AGFA paper. Photo used on the front cover of the Ballarat Tramway Museum book - "Ballarat's Heritage Tramway". Two copies held.On rear in ink "Ballarat Try Museum Carlton St terminus 1.1992 / William F Scott photo." In the bottom right hand corner, a "William F Scott" address label and the number "BAL 61" in ink.trams, tramways, wendouree parade, carlton st, tram 26 -
 Ballarat Tramway Museum
Photograph - Black & White Photograph/s, William. F. Scott, Mar. 1985
Black and white photograph of Ballarat 27, repainted by the BTM in the SEC 1930's colour scheme, at Carlton St terminus, Wendouree Parade March 1985. Photo by William F Scott. Printed on Agfa paper.On rear in ink "Car 27 soon after major restoration work and repainting in the original livery of the SEC" / "Ballarat Tramway Museum" / "William F Scott" and "3.1985"trams, tramways, btm, wendouree parade, carlton st, tram 27 -
 Ballarat Tramway Museum
Photograph - Colour Photograph/s, 8/01/1956 12:00:00 AM
Yields information - Photo printed from a slide of Geelong No. 4 decorated for the last tram in Geelong.Colour print from a Agfachrome Professional plastic mount reproduction slide of a colour slide of Geelong No. 18 at East terminus on the last day of the first closures, 8.1.1956 Shows a young boy walking away from the tram and the driver closing the door. Tram has the destination of East. See also Reg Item 2676 for a the original slide of this photograph. Two copies held.On rear in ink on both copies: "Geelong Trmys SEC 4a) (crossed out) East terminus on last day of first closures 8.1.1956 - Ballarat Try Museum"trams, tramways, geelong, east, last tram, closure, tram 18 -
 Ballarat Tramway Museum
Photograph - Black & White Photograph/s, Digital Image, Wal Jack, 27/06/1957 12:00:00 AM
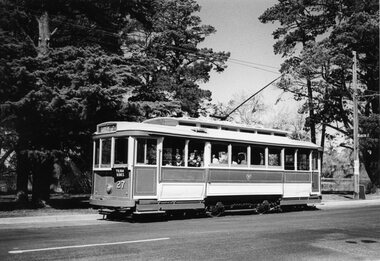
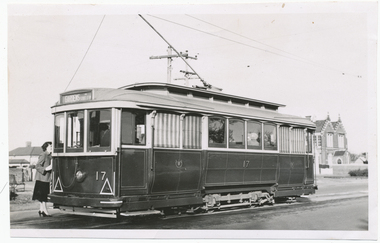
... of the Victoria St terminus, Yields information about Ballarat Trams ...Yields information about Ballarat Trams and streetscapes early 1960's and the details of the Victoria St terminus, Yields information about Ballarat Trams and streetscapes early 1960's and the details of the Victoria St terminusBlack and white print of Ballarat 17, in Victoria Street, at Otway St photographed by Wal Jack, 27/6/1957. Two copies. A lady is standing at the back of the tram, possibly talking to the conductor. Tram has the destination of Gardens via Sturt St West. Has the Convent building in background. Photo print courtesy of Port Dock Railway Museum, now the National Railway Museum. See worksheet 4311 for letter and details of prints sent to Bill Scott, 19/10/2001. Any photo credit to mention NRM Collection. 4412.1 - Digital image from the Wal Jack Ballarat Album of the same photograph. See i3 for details of the rear of the photograph.On rear of copy 1 "SEC Ballarat / 17 / Victoria / 27/6/57 / Wal Jack" Copy 2 "DAC" in ink, bottom right hand corner. 4412.1 - on rear of photo in ink, "SEC Ballarat, No. 17 Victoria St at Otway St, Ballarat East 25 June '57" and "W. Jack photo Neg. to D. Colquhoun"trams, tramways, victoria st, tram 17 -
 Ballarat Tramway Museum
Photograph - Black & White Photograph/s, Wal Jack, 21/04/1962 12:00:00 AM
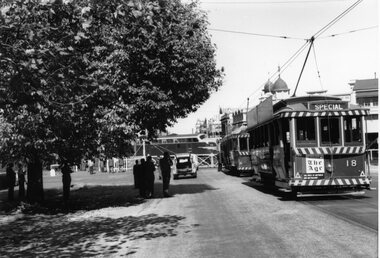
Yields information about Ballarat Trams and streetscapes early 1960's and the details of the Victoria St terminus while running specials for the AETA.Black and white print of Ballarat 18 and 37, at the Lydiard St gates, while B79 crosses the street. Photographed by Wal Jack, 21/4/1962. Two copies. Tram has advertisements for "The Age". Tram is showing Special and has a number of people photographing the scene - AETA tour. Photo print courtesy of Port Dock Railway Museum, now the National Railway Museum. See worksheet 4311 for letter and details of prints sent to Bill Scott, 19/10/2001. Any photo credit to mention NRM Collection.On rear of copy 1" "73)" and "SEC Ballarat / 18 & 37 / Lydiard St North / 21/4/62 2091 / Wal Jack" trams, tramways, lydiard st, railway crossing, aeta, tram 18, tram 37