Showing 1348 items
matching post office building
-
 Ballarat Tramway Museum
Slide - 35mm slide/s - set of 32, Noel Simons, 25/02/1971 12:00:00 AM
Set of 31 transparencies taken on 25/2/1972 on Kodak mounts. 1201.1 - Bendigo No. 26 in Bond St. just after leaving Long Gully en route for Quarry Hill. Has Norris Supermarket in background. Has two SEC roof ads. 1201.2 - No. 26 climbing View St. from Charing Cross en route to Eaglehawk. Has ANZ bank and AMOCO service station in background. 1201.3 - as for 1201.3, but after tram has passed photographer. Has buildings west of Mackenzie St. in photograph. 1201.4 - Tram stop and centre of the road pole with two "CARS STOP BY REQUEST" signs mounted on pole at the corner of Mackenzie St. 1201.5 - same position as for 1201.3, but with No. 5 descending the street. 1201.6 - same position as for 1201.2, but with No. 5 descending the street. Photo taken after tram has passed photographer. 1201.7 - No. 7 in Nolan St. from across the park at Lake Weeroona. 1201.8 - No. 7 entering McCrae St from Nolan St. - distant view. Note "TRAM "sign on left hand side under tree and overhead in McCrae St. from former track that once was in this street. 1201.9 - No. 7 in High St. with Cathedral in background. Tram en route to North Bendigo. Note scaffolding around Cathedral main spire area. 1201.10 - No. 7 crossing Bendigo Creek bridge in High St. near Golden Square. Has a Caltex Service station in the background. 1201.11 - No. 7 at Golden Square terminus with Sunburst Fruit Juices and a Peters Ice cream delivery vans alongside. 1201.12 - as for 1201.11 but photo taken from behind tram, with the end of the rails in the photograph. 1201.13 - No. 7 and 21 in Pall Mall at Charing Cross with No. 5 in the background. Taken some distance away from the location. 1201.14 - No. 7 at Golden Square terminus, taken a short distance from the tram terminus. Shows Milk Bar on right hand side and the hotel on the left hand side. Taken from the south side of the roadway. 1201.15 - as from 1201.14 but taken from the north side of the roadway. 1201.16 - No 5 waiting at California Gully loop. Distant photo showing surrounds 1201.17 - No. 5 en route for Quarry Hill crossing No. 26 at California Gully. 1201.18 - No. 26 at Eaglehawk terminus with Eaglehawk Town Hall and Post Office in background. 1201.19 - No. 21 arriving at Charing Cross en route to North Bendigo. Has Alexandra Fountain in the background, ANZ bank RACV building, and other buildings on the north side of Pall Mall or Nolan St. 1201.20 - No. 26 en route for Quarry Hill at Charing Cross, with crew standing by front door. Has Colonial Mutual life building, Armstrong Tyre Service (Firestone) and a sign for Cohns Drinks in the background. 1201.21 - as for 1201.20 but with No. 5 en route to Eaglehawk now in photograph. 1201.22 - No. 26 at Quarry Hill terminus. 1201.23 - No. 26 at Quarry Hill terminus, view of front portion of tram only from a gate at the Bendigo cemetery. 1201.24 - Track at the end of the Quarry Hill line showing the point blades of the former "Y" terminus and the overhead for this. 1201.25 - No. 2 at the Quarry Hill terminus, looking along the former Trackwork. 1201.26 - as for 1201.25 1201.27 - number not used. 1201.28 - Golden Square terminus from some distance from the actual terminus, showing the Warning sign "TRAM" for motorists from the south. No. 7 at the terminus. 1201.29 - No. 7 passing through the Golden Square shopping centre. Numerous cars and pedestrians. Tram en route for North Bendigo. 1201.30 - No. 7 in High St. Golden Square, en route for North Bendigo. Photo taken after tram has passed photographer. 1201.31 - No. 7 in High St. just past Wattle St. with the Cathedral in the background. Tram has two SEC roof ads good side on photo, 'Everything's fine in my all electric kitchen' and 'Electrical cooking - clean, quick, economical'. 1201.32 - No. 7 in High St. nearing Wattle St. Has Cathedral in the background. Photo taken after tram has passed photographer.Information written on in black ink and date stamped on purple ink. 1201.1 - "No. 26 in Bond St just after leaving Long Gully" 1201.2 - "No. 26 climbing View St. from Charing Cross" 1201.3 - "No. 26 ascending View St. from Charing Cross (At Mackenzie St.)" 1201.4 - "View St. & Mackenzie St." 1201.5 - "No. 5 in View St. near Mackenzie St." 1201.6 - "No. 5 in View St. nearing Charing Cross." 1201.7 - "No. 7 in Nolan St. seen from Lake Weeroona Park." 1201.8 - "No. 7 entering McRae St. from Nolan St. Note "TRAM" warning sign on left. 1201.9 - "No. 7 in High St. passing Short St." 1201.10 - "No. 7 crossing Bendigo Creek bridge in High St. near Golden Square." 1201.11 - "No. 7 at Golden Square terminus" 1201.12 - "No. 7 at Golden Square terminus" 1201.13 - "No 7, 21 and 5 at Charing Cross" 1201.14 - "No. 7 at Golden Square terminus" 1201.15 - "No. 7 at Golden Square terminus" 1201.16 - "No 5 waiting at California Gully loop." 1201.17 - "Nos. 5 and 26 crossing at California Gully loop" 1201.18 - "No. 26 at Eaglehawk terminus" 1201.19 - "No. 21 arriving at Charing Cross from Golden Square" 1201.20 - "No. 26 at Charing Cross" 1201.21 - "Nos. 5 and 26 at Charing Cross." 1201.22 - "No. 26 at Quarry Hill terminus" 1201.23 - "No. 26 at Quarry Hill terminus seen through the gates of the Bendigo Cemetery." 1201.24 - "Quarry Hill terminus showing remains for former double track layout abandoned before 1964." 1201.25 - "No. 2 at Quarry Hill terminus" 1201.26 - "No. 2 at Quarry Hill terminus" 1201.28 - "The Southern approach to Golden Square with No. 7 standing at the terminus, "TRAM" warning sign on the left. 1201.29 - "No. 7 passing through Golden Square Shopping Centre" 1201.30 - "No. 7 in High St. Golden Square" 1201.31 - "No. 7 in High St. passing Wattle St." 1201.32 - "No. 7 in High St. nearing Wattle St."tramways, trams, bendigo, bond st., view st., nolan st., high st., eaglehawk, california gully, charing cross, quarry hill, trackwork, tram 2, tram 5, tram 7, tram 21, tram 26 -
 Ballarat Tramway Museum
Slide - 35mm slide/s - set of 25, Noel Simons, 26/02/1972 12:00:00 AM
Set of 25 transparencies taken on 26/2/1972 on Kodak mounts. 1204.1 - Bendigo No. 5 - just arrived at Manchester Loop near Havilah Road, Long Gully. Photo taken after tram has passed photographer. 1204.2 - No. 26 in Backhaus St. Long Gully passing William St, en route to Quarry Hill. Photo taken after tram has passed photographer. 1204.3 - No. 5 climbing the High St. Hill Eaglehawk, heading for Quarry Hill with the buildings on the West side of High St. in the background, including the Eaglehawk Town Hall. 1204.4 - as for 1204.3, but tram close up. 1204.5 - as for 1204.3, but after tram has passed photographer. 1204.6 - No. 5 at intersection of Mt Korong Road Ironbark and Calder Highway, with the AMPOL service 'station in the background. Photo taken after tram has passed photographer. 1204.7 - No. 26 en route to Quarry Hill shortly after leaving Needle Loop, passing William St., Long Gully. 1204.8 - No. 5 at California Gully Loop, picking up a passenger, with the shops at Long Gully in the background. Photo taken after tram has passed photographer. 1204.9 - No. 5 in Long Gully, en route to Quarry Hill. Photo taken after tram has passed photographer. 1204.10 - No. 2 at Eaglehawk terminus with the Eaglehawk Town Hall and Post Office in the background. Tram has two SEC roof ads. 1204.11 - No. 2 at Eaglehawk terminus, close up. 1204.12 - as for 1204.11, but through the park gates. 1204.13 - as for 1204.11, but with tram stop shelters in the foreground and buildings on the West side of High St in the background. 1204.14 - No. 2 in Mt. Korong Rd, midway between California Gully Loop and Needle Loop. Photo taken after tram has passed photographer. 1204.15 - No. 5 in Long Gully, en route to Quarry Hill. 1204.16 - as for 1204.15, but with trams departed loop. Has an ESSO service station in the background. 1204.17 - No. 26 leaves Charing Cross up View St.. Photo taken after tram has passed photographer. Has Armstrong Tyre Service, Cohns Drinks ad on a building and the T&G building in the background. Also Firestone ads on the tyre service building. 1204.18 - No. 5 waits at Charing Cross with the Alexandra Fountain in the background. Tram has two SEC roof ads, 'Everything s fine in my all electric kitchen' and 'Electricity Best for Cooking'. Has RACV, Colonial Mutual Life buildings in the background and the planting areas around Charing Cross gardens in the foreground. 1204.19 - No. 21 en route to North Bendigo arrives at Charing Cross, with passengers waiting to board. No. 5 in the background. In the background is the Fountain Gate Plaza building and the City Family Hotel. 1204.20 - as for 1204.19, but with No. 7 en route to Golden Square. 1204.21 - as for 1204.19, but closer up. 1204.22 - as for 1204.18 1204.23 - No. 25 in Nolan St. near the crossing of Bendigo Creek, running a special tram tour. 1204.24 - No. 25 on a special charter, in Weeroona Ave. at Cnr of Caledonia St. passing the Gas works. 1204.25 - Nos. 25 (showing Golden Square), 7 and 26 at Charing Cross. Has fountain in the background.Information written on in blue ink and date stamped on purple ink. 1204.1 - "No. 5 at Manchester Loop, near Havilah Rd. Long Gully." 1204.2 - "No. 26 in Backhaus St. Long Gully passing William St." 1204.3 - "No. 5 in High St. Eaglehawk." 1204.4 - "No. 5 in High St. Eaglehawk." 1204.5 - "No. 5 in High St. Eaglehawk." 1204.6 - "No. 5 in Mt. Korong Rd., Ironbark, passing Calder Highway Junctn." 1204.7 - "No. 26 shortly after leaving Needle Loop, passing William St., Long Gully. No. 5 cresting hill in distance." 1204.8 - "No. 5 at California Gully Loop." 1204.9 - "No. 5 in Long Gully" 1204.10 - "No. 2 at Eaglehawk terminus." 1204.11 - "No. 2 at Eaglehawk terminus." 1204.12 - "No. 2 at Eaglehawk terminus." 1204.13 - "No. 2 at Eaglehawk terminus." 1204.14 - "No. 2 in Mt. Korong Rd, midway between California Gully Loop and Needle Loop. 1204.15 - "Nos. 2 and 26 crossing at Long Gully." 1204.16 - "No. 26 leaves Long Gully loop for Eaglehawk as No. 2 pulls out of the far end towards Bendigo" 1204.17 - "No. 26 beginning the climb up View St. from Charing Cross." 1204.18 - "No. 5 at Charing Cross." 1204.19 - "No 21 arrives at Charing Cross from Golden Square while No. 5 awaits departure time for Eaglehawk." 1204.20 - "Nos. 7, 21, and 2 (behind which is No. 5) at Charing Cross." 1204.21 - "Nos. 7, 21, and 2 at Charing Cross." 1204.22 - "No. 5 at Charing Cross." 1204.23 - "No. 25 in Nolan St. near Bendigo creek crossing" 1204.24 - "No. 25 in Weeroona Ave. at cnr of Caledonia St." 1204.25 - "Nos. 25, 7, 26 and 2 (behind 26) at Charing Cross."tramways, trams, bendigo, eaglehawk, long gully, california gully, charing cross, north bendigo, tram 2, tram 5, tram 7, tram 21, tram 25, tram 26 -
 Ballarat Tramway Museum
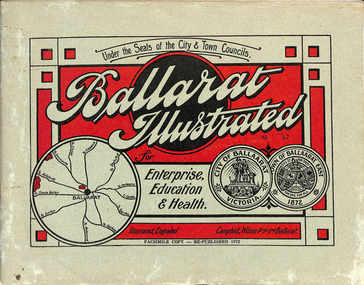
Book, "Ballarat Illustrated", 1972
Original c 1914 (see below), facsimile copy - re-published 1972. Original features photos of Ballarat City and Town, its buildings, parks and the various industries and organisations that were in Ballarat at the time of publication, including ESCo. Many photos features ESCo trams. Photos sepia toned. Has some red colour block printing on the front cover and rear, for Star Oil Engines. On inside back cover is a map with the places of interest and tram route map, marked in red. Pages are un-numbered. Original published by Ballarat East Town Council and Ballaarat City Council. On cover has number stamped in black in, "No. 87" (assume facsimile copy No.). Photos with publication show tram No. 21, built 1913 and ESCo photo page shows Mr. Pringle as Manager. Mr Pringle became manager in January 1911, As there is no photos of the "Avenue of Honour", or other mention of the first world war, assume original published about 1913 or 1914. Original shows Engravings and printing by "Campbell Wilson Prop Ltd, Ballarat". See Other Information as well for more listing details. High Resolution image added 31/8/2012 of i2 of ESCo page and i3 for Ballarat identies and sheet i4 extracted for Mr Pringle. PDF scan of full document added 21/5/2019 - see images btm633-1i.pdf and btm633-2i.pdf Notes on "Ballarat Illustrated" Reg. Item No. 733 From notes made by Neville Gower 12/1/1997 Cover: Inside front cover: Last paragraph, "Facilities for Travelling" - Electric trams serve all parts of Ballarat. Page 3: Street Scene, Municipal Town Hall, showing tram wiring Page 7: Street Scene, Lydiard St. North, intersection and tramway centre, with ESCo tram No. 21 in the bottom photo. Other photos features trams as well in Sturt St and Lydiard St. North. Page 9: Street Scene, Top photo of Sturt St. from Lydiard St. looking east, shows piles on right-hand side of road. Car parked by Post Office has a car registration number "9007". Bottom photo, an tram climbing hill, shows double trolley in the street, with early English type of pull offs. Page 13: Street Scenes and Historic Buildings: One of five photos, shows Victoria St. looking East, with tram track prominent in photo and how stone work was set up about the rails and overhead poles. Page 23: Street scene, Gardens North Entrance gates, shows details of gates near St. Aidans Drive. Note double trolley wire on poles, and style of insulators. No trams in photo, three ladies walking down the track. Page 37: Street Scene; Lydiard St views, top left hand photo, shows Railway station and railway gates with signal gantry and horse drawn vehicles. Tram tracks apparent. Bottom left hand photo shows Lydiard St. North, near Post Office, double track with centre poles - Single wire per track. Top right hand photo, showing Cemetery gates in background. Bottom right hand photo - from north end of Lydiard St. South, looking north, with an ESCo tram in background. Also has a parked car on left hand side. Page 45: Street Scenes - Bridge St; top photo at west end of Bridge St. with ESCo No. 11 with possibly double trolley wire in photo. Bottom photo at east end of Bridge St. with tram in background, shows junction. Double trolley heading out to Mt. Pleasant, single trolley for Victoria St. Page 45: Street Scenes - Bridge St; top photo at west end of Bridge St. with ESCo No. 11 with possibly double trolley wire in photo. Bottom photo at east end of Bridge St. with tram in background, shows junction. Double trolley heading out to Mt. Pleasant, single trolley for Victoria St. Page 61: Street Scenes and Historic Buildings - Public Institutions Ballarat - top left hand photo of the Hospital shows some tram track in foreground, with double trolley wire. Top right photo is of the Orphanage, the name of the tram terminus for many years. Page 68: Electric Supply Co. of Victoria's pages - top photo showing powerhouse in background, across the lake, can hardly see anything for the trees, except for the chimney. Bottom photos of the steam Turbo Generators and the switchboard. Gives Mr. P.J. Pringle as Chief Engineer and General Manager. He took over in Jan. 1911. Page 69: Ballarat East Views - features photo of Black Hill open cut, Ballarat East Railway Station, Ballarat Fire Station and "Victoria St. looking East", repeat of photo printed on page 12, but slightly darker. Image on system includes fire station and railway station, - Ballarat East. Page 78: Series of photos of various Ballarat VIP's of the era, fourth one in on top line features "P.J.Pringle, Electric Supply Co." Inside Back cover - map of Ballarat including tram lines and places of interest marked in red. Gives a detailed photographic presentation of Ballarat in 1914.80 page book with, in addition, light green card covers, titled "Ballarat Illustrated". Loose copy of page 9 and 10 held.trams, tramways, ballarat, local history, heritage buildings, esco -
 Ballarat Tramway Museum
Photograph - Black & White Photograph/s, Lindsay Bounds, c1971
Series of black and white photos of SEC Ballarat 30 by Lindsay Bounds, late 1970, early 1971 on 8" x 10" prints. 840.1 - tram 30, city bound, at Bell St. Loop (?) crossing another single trucker. Tram has destination of Lydiard St. North. 840.2 - trams 13, 30 and 18 and another single trucker at the depot gates, all showing Depot or Depot via Drummond North destinations - possibly on a Sunday morning. 840.3 - Trams 13 and 30 on the north side of Drummond St. north, with Sturt St. Mansions buildings behind. Winter photo. Tram 30 has Lydiard St. Nth destination, while 13 has Victoria St. 840.4 - Tram 30 crossing Sturt St., bound for Sebastopol with Post office in background. 840.5 - Tram 30 in Victoria St. bound for Gardens via Sturt St. West. 840.6 - Tram 30 crossing Sturt St. at Drummond St. bound for Lydiard St. North. Has lights on. 840.7 - Tram 30 west bound in Victoria St. at King St. loop with St. Alipius church in background. Many Holden motor cars in photo as well. Some imperfections in the printing of the photograph.trams, tramways, victoria st., sturt st, skipton st., tram 30, tram 13, tram 18 -
 Ballarat Tramway Museum
Negative - Set of 3, Geoff Grant, 19/06/1955 12:00:00 AM
Negatives Nos. N320 to N322 and black and white print made by a laser printer (stored in folder ) of W6 988 as the first tram in Bourke St. Melbourne, near the intersection of Elizabeth St.. Date of photograph 19/6/1955. Photos of tram approaching Elizabeth St., coming down the hill, with building on the north side of Bourke St visible in photo, just about to cross the intersection and one on the other side of the intersection, adjacent to the General Post Office with Myers in the background. Very few motor cars in the photo. Negative scanned hi res and imaged updated 21/5/2020. Page 6 of 1968 Sands and McDougall's directory of Melbourne.trams, tramways, melbourne, bourke st, elizabeth st., tram w6 988 -
 Ballarat Tramway Museum
Postcard, "Sturt St Ballarat", 1905
Printed colour postcard of an ESCo tram west bound at the intersection of Sturt and Lydiard St. Ballarat, c1905. Has a number of horse drawn vehicles and pedestrians in the picture. Taken from the Post Office tower looking south west, with buildings on the south side of Sturt St., west of Lydiard St in the view. Has the Robert Burns statue in the bottom left hand corner. Titled "Sturt Street, Ballarat" along the bottom edge. On rear of postcard are the words "Post Card", and guidance where the message may be written and space for the address. In the stamp section, details for Inland 1/2d stamp needed, and for Foreign 1d. On the bottom of the space for the stamp, has the words "Printed in Britain" See Reg Item 3151 for the same photo (slightly different position and different cloud effects), but different manufacturer. trams, tramways, esco, sturt st, postcards, lydiard st. -
 Ballarat Tramway Museum
Slide - 35mm slide/s, Travis Jeffrey, late 1960's
Agfa plastic mount (blue base, white cover) of a photograph of No. 30 turning from Lydiard St. North into Sturt St. Has the National Mutual building, Craigs Hotel and MLC building in the background. Note tram stop on the pole adjacent to the Post Office and the policemen standing on the corner near the City terminus. Slide rescanned at 3200 dpi 25-10-2020, jpg replaced, tiff file retained. This file was scanned in 2003 and may show colour changes."BAS 45" in penciltramways, trams, sturt st, lydiard st nth, tram 30 -
 Ballarat Tramway Museum
Postcard, ESCo tram at the east end of Sturt St
B&W postcard of an ESCo tram at the east end of Sturt St. Ballarat, with the Grenville St. shelter in the background. Shows buildings along both sides of Sturt St. Has a few pedestrians in the photo and some horse drawn vehicles in the background. Tram in style with destination box/lights at back of drivers canopy. Has title "Sturt Street - looking West, Ballarat" in top left hand corner. On rear "H.J. Summerscales, next Post Office, Ballarat - Printed in Germany" on left hand edge vertically. Post card dated 29/12/10 (1910), from E.H. Colson? at 49 Webster St. wishing the recipient a happy new year. Recipient - Mr. A. Steer, Glen Eira Rd. Elsternwick. Has a Ballarat Post office and stamp and Victorian 1d stamp (red). As well in pencil, a price "$15". See also scanned image file and prints from negative at Reg. Item 833. Image cropping is slightly different at the bottom to that of Reg. Item 833. Used in postcard display 2017-2018trams, tramways, esco, sturt st, postcards -
 Ballarat Tramway Museum
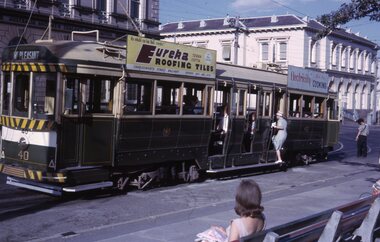
Slide - 35mm slide/s - set of 2, Peter Moses, Jan. 1966
Photo of SEC Ballarat Tram No. 40 at the City terminus in Sturt St. at Lydiard St. Tram has destination of "Mt Pleasant" and roof advertisements for Eureka roofing tiles and SEC "Electricity Best for Cooking". In the background are the Post Office and the ANZ bank buildings. The driver and conductor appear to be looking at the points. 2041.1 - with lady boarding the tram 2041.2 - with conductor returning to the tram. All of the tram in the photo. Note lady on the seat. Kodak cardboard mount slide, taken by Peter Moses January 1966.On back of both slides in blue ink "Jan. 1966 “Main St.” Ballarat No. 40 / 125 f11" and in bottom right hand corner "P. Moses".tramways, trams, city terminus, sturt st, tram 40 -
 Ballarat Tramway Museum
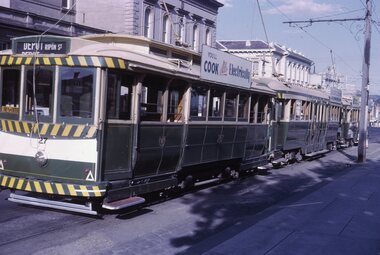
Slide - 35mm slide/s, Peter Moses, Jan. 1966
Photo of SEC Ballarat Tram No. 40, 35 and 27 at the City terminus in Sturt St. at Lydiard St. Tram 27 has destination of "Depot via Ripon St." and roof advertisements SEC "You'll cook better electrically". In the background are the Post Office and the ANZ bank buildings. Kodak cardboard mount slide, taken by Peter Moses January 1966.On back of both slides in blue ink "Jan. 1966, Sturt St. No. 35, 27" and in bottom right hand corner "P. Moses".tramways, trams, city terminus, sturt st, tram 40, tram 35, tram 27 -
 Ballarat Tramway Museum
Photograph - Black & White Photograph/s - set of 2, Dave Macartney, 4/08/1968 12:00:00 AM
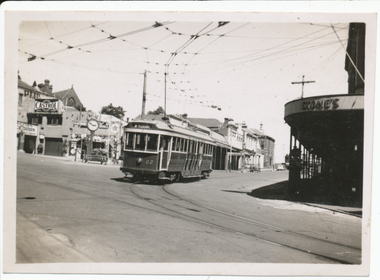
... office building. Trams Tramways Ballarat Lydiard St. Post Office ...Yields information about intersection of Lydiard and Sturt Streets, in particular the post office building.Black and white photograph of SEC Ballarat tram No. 18 turning from Sturt St. into Lydiard St. with Post Office in background. Photo taken after tram has passed photographer. Tram has destination of "LYDIARD ST NTH". Taken 4/8/1968. Print a bit over exposed for the sky. 585.1 - a horizontal view of the same image. See also Reg Item 1014 for a different crop (vertical) view of the same photograph. Small copy of .1 added 10/10/2019. Image updated.trams, tramways, ballarat, lydiard st., post office , tram 18 -
 Ballarat Tramway Museum
Postcard, JE, "Sturt St Ballarat", 1905
Yields information about the appearance of SEC single truck trams during 1938. Has a strong association with Wal Jack.Printed colour postcard of an ESCo tram west bound at the intersection of Sturt and Lydiard St. Ballarat, c1905. Has a number of horse drawn vehicles and pedestrians in the picture. Taken from the Post Office tower looking south west, with buildings on the south side of Sturt St., west of Lydiard St in the view. Has the Robert Burns statue in the bottom left hand corner. Titled "Sturt Street, Ballarat" along the top edge. On rear of postcard are the words "Post Card", on either side of a symbol "JE" within a diamond, a 1d Victorian stamp. Divided back type. Address to Mrs, C. Harkneww 21 Alma St North Sydney NSW, from a person a 46 Grosvenor's St., South Yarra." Message includes words "what do you think of this street, none in Sydney like it" See Reg Item 2231 for the same photo (slightly different position and different cloud effects), but different manufacturer.trams, tramways, esco, sturt st, postcards, lydiard st., tram 18 -
 Ballarat Tramway Museum
Postcard - Folder set, Valentine & Sons Publishing Co, "Geelong Photographic Souvenir", early 1920's
Shows views of the Geelong CBD and beach area in the 1930's including one tram photo and two other photos of trams in the street and the centre poles which were later removed. Demonstrates production of souvenirs of the era - folded postcards. The photos could also be used for individual postcards.Set of 15 black and white views of Geelong printed on a folded strip, glued within a manila colour cardboard folder, titled "Geelong Photographic Souvenir". Booklet printed with an address area with title and kookaburras and on the rear, an area where the sender could write their name. Produced by The Valentine Publishing Co. Pty Ltd Melbourne. The rear has a slit on the rear cover that allowed the folder to be secured. Pictures are: 1. Panorama of Eastern Beach Geelong 2. Eastern Beach Gardens 3. Eastern Beach 4. Ryrie St with centre poles and a tram in the distance. 5. Botanic Gardens 6. Johnstone Park 7. Gordon Technical College 8. Moorabool St. - with poles in street, single line track and tram in far distance. 9. Eastern Beach and Wharves 10 T and G Building 11 The Fountain, Eastern Beach 12 Town Hall and Post Office 13 Baron bridge - just prior to opening - roadway construction appears to be underway. 14 Malop St with tram (10?) in foreground 15 View of Johnstone Park. Made during 1930's given motor cars in the photo. trams, tramways, geelong, postcards, malop st, town hall, post office, gardens -
 Ballarat Tramway Museum
Photograph - Black & White Photograph/s, Chris Wurr, 1971
Yields information about the streetscape at the City terminus at night and just how lonely it could be.Black and White photograph of No. 17 at the city terminus at night - time exposure. Tram has the destination of 'Sebastopol'. No other vehicles in the scene, though a motor car has passed the scene behind the tramcar. In the view are the Post Office, tram stop signs and buildings near Grenville St.Stamped on rear in black ink "Donated to BTPS by and Photo By" / "Chris Wurr 12 Truscott Street, Ararat 3377 (053) 52 3403.tramways, trams, city, sturt st, lydiard st, night photo, tram 17 -
 Ballarat Tramway Museum
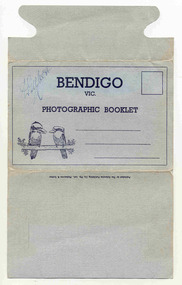
Postcard - Folder set, Valentine & Sons Publishing Co, "Bendigo Photographic Booklet", 1940's
Set of 9 black and white views of Bendigo printed on a folded strip, glued within a light grey colour light weight cardboard folder, titled "Bendigo Photographic Booklet". Booklet printed with an address area with title and kookaburras. Produced by The Valentine Publishing Co. Pty Ltd Melbourne & Sydney The rear has a slit on the rear cover that allowed the folder to be secured. Pictures are: 1. Mitchell St 2. The Lookout Tower 3. Conservatory Gardens 4. Shamrock Hotel 5. The Lake, Upper Reserve 6. The Pall Mall 7. Civic Buildings 8. Soldiers Memorial Hall and Post Office 9. Alexandria Fountain, Bendigo with a single trucker, M class type tram, prior to alterations, but in SEC colour scheme of the mid 1930's Made during 1940, with photographs of the 1930's as well given motor cars in the photo. Has "D. Gilbert" in ink on cover.trams, tramways, bendigo, pall mall, charing cross, mitchell st -
 Ballarat Tramway Museum
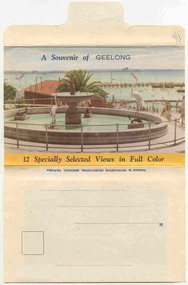
Postcard - Folder set, Nu-color-vue or Nucolorvue Productions, "A Souvenir of Geelong", 1950's
Set of 12 colour views of Geelong on a folded strip, glued within a colour printed cover, titled "A Souvenir of Geelong", printed on both sides of the strip. Booklet printed with an address area on rear. Produced by Nulcolorvue Productions, Mentone, Victoria. The rear has a slit on the rear cover that allowed the folder to be secured. On the inside of the front cover, has an introduction to Geelong, notes "modern tram and bus routes" Pictures are: 1. Gheringhap St showing Geelong City Hall and Post Office 2. The Barwon River, Geelong 3. T&G Building, Ryrie St - shows tramway overhead 4. Christ Church, Moorabool St 5. Malop St Geelong 6. Art Gallery and Park 7. St Marys Roman Catholic Cathedral 8. The Geelong Post Office with buses in background and a Safety Zone sign 9. Moorabool St Geelong - has overhead and a bar traffic light/ 10. Queens Park Geelong 11. The Waterfront at Geelong. 12. Eastern Beach Swimming Pool. Made during the early 1950's, given motor cars in the photo. trams, tramways, geelong, moorabool st, ryrie st -
 Ballarat Tramway Museum
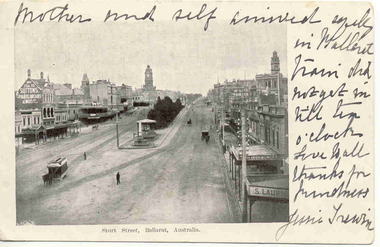
Postcard, J. Summerscales and Ballarat, Ballarat horse tram arriving at the Grenville St. terminus
Printed black and white postcard of a Ballarat horse tram arriving at the Grenville St. terminus, at the bottom end of Sturt St terminus. Has buildings on both sides of Sturt St. in photograph, with some other horse drawn vehicles and a few pedestrians. In the photo are Suttons building, and business near Grenville St. of an Ironmonger and S. Laurens? On the front of the card is written a short message: - "Mother and self arrived safely in Ballarat. Train did not get in till ten o'clock. Love to all, thank for kindness. Jessie Frewin. On rear is places for correspondences stamp, address. On left hand edge is "H. J. Summerscales, next Post Office, Ballarat." Has cancellation stamp, Ballarat 3.40pm, 19.11.04" or could be 1901. Also another cancellation stamp over the red Victorian stamp with a "5" in the centre. Addressed to Mrs. J. Coutts, Meghan Street, Maryborough Titled "Sturt Street, Ballarat Australia" along bottom edge. \trams, tramways, sturt st, postcards, esco, grenville st -
 Ballarat Tramway Museum
Photograph - Digital image Set of 20
Set of 20 digital images of Bendigo Tramways, 1972 at or before closure while on a tram tour by Stuart Lodington. .1 - No. 28 and 5 at Eaglehawk terminus .2 - No. 28 leaving Charing Cross and travelling into View St with Armstrong Type Service building in background and Firestone Advertisements. .3 - No. 29 with Eaglehawk Town Hall and Post Office in background. .4 - No. 26 and 29 at start of double track, High St Eaglehawk .5 - No. 29 leaving Eaglehawk with shops in the background, Foodland, J. Bests .6 - No. 29 and 23 crossing Manchester Loop with Manchester Arms Hotel in the background and an old poppet head. .7 - No. 29 at ditto with poppet head in the background. .8 - No. 28 and two other trams at the Quarry Hill terminus. .9 - No. 29 in High St Bendigo with the Cathedral and Golden Gate Hotel in the background. .10 - No. 3 with destination Eaglehawk, in bound Carpenter St? .11 - No. 29 following a single trucker through a loop or the end of the double track near the depot. .12 - No. 23?, at Eaglehawk terminus, with Eaglehawk Town Hall in the background. .13 - Birney tram crossing the bridge at the Depot entrance - No. 29 .14 - No. 29 on the Eaglehawk line? .15 - as for .13 .16 - No. 29 entering the depot. .17 - No. 23, inbound from Eaglehawk, at Jobs Gully Loop with the railway overbridge in the background. .18 - No. 28 and two other trams (see also Reg Item 4982) for the same tram tour at Myrtle St. Loop. .19 - No. 21 with North Bendigo on the destination approaching the Golden Square terminus. .20 - No. 7 at Golden Square terminustrams, tramways, bendigo, eaglehawk, quarry hill, golden square, depot, tram 5, tram 29, tram 28, tram 26, tram 23, tram 7, tram 21 -
 Ballarat Tramway Museum
Photograph - Digital image Set of 20, 1971-72
Set of 20 digital images of Bendigo Tramways, 1972 at or before closure while on a tram tour by Stuart Lodington. .1 - No. 7 at Golden Square terminus .2 - ditto .3 - No. 26 in bound on the Eaglehawk line with a crossing loop behind. .4 - Birney crossing the bridge by the tram depot. .5 - No. 29 running a special on the Eaglehawk line with a HBA billboard in the background. .6 - No. 29 with a driver walking in front of the tram at the above location. .7 - No. 29 on the Eaglehawk line .8 - ditto waiting for a tram at Manchester Loop with poppet head in the background. .9 - No. 29 on the Eaglehawk line .10 - Eaglehawk Town Hall at night. .11 - No. 7 at the depot junction in McCrae St, with Golden Square destination. .12 - No. 29 with the Camp Hotel Eaglehawk in the background. Also a Newsagent with The Sun, The Bendigo Advertiser and The Age signs on the building, High St .13 - No. 29 Mt Korong Rd, with the railway overbridge in the background. .14 - interior photo of Birney tram roof .15 - interior view of controls of Birney at Eaglehawk .16 - No. 29 outbound at the Depot Junction McCrae St. .17 - No. 18 at the Eaglehawk terminus .18 - close up view of No. 29 front. .19 - No. 29 in Nolan St, crossing the bridge, outbound. .20 - No. 18 at the Eaglehawk terminus with the Eaglehawk Town Hall, Post Office in the background. Has a circus banner on the side.trams, tramways, bendigo, eaglehawk, quarry hill, golden square, depot, mccrae st, nolan st, tram 7, tram 26, tram 29, tram 18 -
 Ballarat Tramway Museum
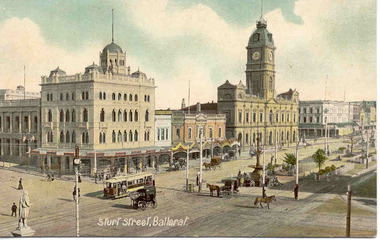
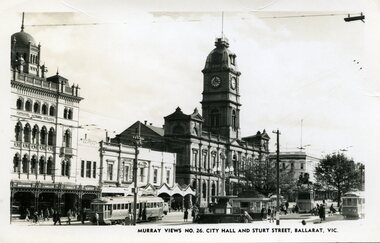
Photograph - Black & White Photograph/s, Murray Views, Murray Views No. 26 City Hall and Sturt St Ballarat Vic, c1950
Demonstrates a typical street view following the delivery of the bogie trams following the second world war and the street scape at the time. Able to determine the tramcar numbers. Yields information about the era of the photograph.B&W print, postcard print of Sturt St Ballarat, looking towards the Town Hall from the Post Office, City terminus. Photo taken by Murray Views to form "Murray Views No. 26, City Hall and Sturt St, Ballarat Vic." No. 22 on south side and No. 34 on north side - see Hi-Res scans. Has the National Mutual, Town Hall and Myers and other buildings in the view. Photo taken c1950, prior to renumbering of No. 22. 2nd copy added 28-12-2021 - most likely a reproduction of the original as it does not have a postcard back.On reverse side - black ink stamp "E.G.Butland" On reverse of 2nd copy - "Ballarat, Sturt St, west from Lydiard Sts" and Keith Kings stamp.tramways, trams, sturt st, bogie trams, tramway centre, town hall, tram 22, tram 34 -
 Ballarat Tramway Museum
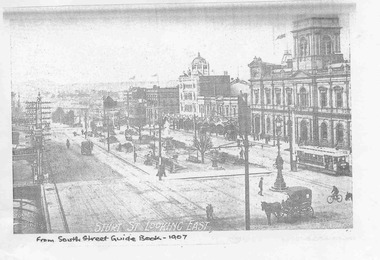
Document - Photocopies, Royal South Street Society, Royal South Street Society Guide, 2008
Has a strong association with the work of the Royal South Street Society, who published a handbook/guide or manual for their competitions. Used a photograph published at about the same time.Set of 15 photocopies of pages from the Royal South Street Society Guide showing trams in Sturt St Ballarat. .1 - Sturt St Looking East - with an ESCo tram outside the town hall and other horse drawn vehicles - 1907 .2 - Sturt St Looking West - same image as in Reg item 2688 - 1907 .3 - Sturt St Looking East - with many vehicles and people - 1910 and the "Chef" kitch range stove advertisement sold by Middleton and Morris of Sturt St. .4 - Sturt and Lydiard St, with a tram turning from Sturt into Lydiard St, 1910 with the post office in the background - 1910 and an advertisement for Woderine medicine sold by Jas. A. Gear, herbalist. .5 - Sturt St looking West - tram turning from Sturt into Lydiard St, taken from near post office corner - 1911 and a advertisement for Williams the Shoeman. .6 - Sturt St. West - with an ESC0o tram outbound - the only vehicle - 1913. .7 - same photo as .3, with a Monster Military Carnival Advertisement for Nov. 8th - 1913 .8 - Sturt and Lydiard St from next to post office, looking west with two trams, one horse trailer and many people - a busy scene - 1914 .9 - Sebastopol tram No. 21 at Grenville St - 1928 - with the Ballarat Gas Company Show rooms in the background, the Sturt St shelter. The tram has a Suttons Organs roof advertisement. .10 - View of Sturt Street, showing City Hall Buildings, with an ESCo Sebastopol type tramcar crossing the street, taken from the post office stops. - 1928 - Advertisements for G. Ludbrook Furnishing Undertaker (Motor Service and Horse drawn vehicles) and R. Young Grocer. .11 - Sturt St looking West, looking west, with a Sebastopol type tram at Grenville St and the big shelter removed. Has many buildings and many people in the background - 1928. .12 - same photo as for .10 and Clarendon Presbyterian Ladies Collection, Ballarat photograph - 1929. .13 - Advertisement for Ballarat Tramways - cars for Coliseum, fare box, route numbers and route colour scheme - 1929. .14 - as for above, no date, but opposite is the is an item for the Mouth Organ Band Contest, "A" Grade - c1933, notes the Coburg Tramway Athletic Club Harmonica Band and the Malvern Tramways Harmonica band amongst the contestants. .15 - same as .9, with a advertisement for the Melbourne Coffee Palace - Bourke St. Photocopies made by Neville Hasket for the BTM 10/2008. See also Reg item 675 for alternative source details.Handwritten note on photocopiestrams, tramways, ballarat, sturt st., royal south street society, lydiard st, town hall, post office, esco -
 Ballarat Tramway Museum
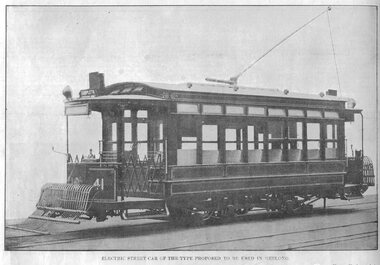
Photograph - Black & White Photograph/s, mid 1900's
... system and in particular the Post Office building in Ryrie St ...Yields information about the streetscape in Geelong prior to the opening of the Geelong Tramway system and in particular the Post Office building in Ryrie St Geelong.Black and white (sepia coloured) reproduction of a photograph from the NOW Magazine 11.7.1907 issue of NOW Magazine, of the type of Electric street car proposed to be used in Geelong. this is a typical USA tram, different to what was actual used. Two copies, one copy with more the original magazine and the other, masked. From the Geelong Historical Society. Printed on Hewlett Packard paper - copy 1Copy 1 - In ink on the front of the print "Now magazine issue 11.7.1907", number "8)1" and on the rear, a "William Scott" address label. Copy 2 - a yellow label with "8-2 140%", "8)2" on the front of the sheet, and on the rear, a "William Scott" address label. trams, tramways, geelong, tramcars, tram 41 -
 Ballarat Tramway Museum
Postcard, WTP, "Post Office - Ballarat", c1907
View of the intersection of Sturt St and Lydiard St Nth with the Ballarat Post Office being the primary feature. Has an ESCo tram turning from Sturt St into Lydiard St. Shows the trackwork at this location and has several horse-drawn vehicles in the photograph. Note the building in the road space on the left hand side of the photograph. Postmarked Coleraine, 12/9/1908. Has a red 1d stamp. For a similar image see items 8244 and 9008.Demonstrates postcard printing c1908 and has a strong association with the sender and receiver.Black and white postcard - divided back used. Has initials "WTP" in bottom right hand corner.On the rear is a short message from C Kelso to Miss Ruth Waters, of Hill View, Nareen.trams, tramways, post office, sturt st, lydiard st nth, esco -
 Ballarat Tramway Museum
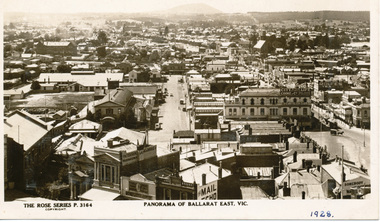
Photograph - Digital image, Rose Stereograph Co, c1929
Yields information the buildings, and the general scene from the Post Office looking over Ballarat East towards Mount Warrenheip.Digital image from the Wal Jack Ballarat Album of a postcard - titled "Panorama of Ballarat East Vic. The Rose Series Postcard No. P 3164. Two ESCo trams are in the west end of Bridge St at Grenville St. Photo looks east from the Post Office tower, has the Alfred Hall, the Drill Hal and many other major buildings in the view. Wal has dated the photo in ink in the bottom right hand corner 1928, and about 1930 on the rear and 1929 in his album notes. For rear of postcard - see image i2.trams, tramways, esco, ballarat east, alfred hall -
 Ballarat Tramway Museum
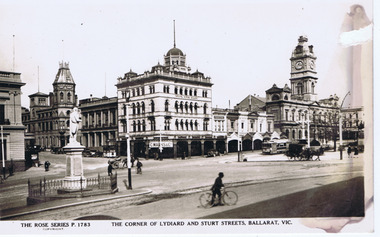
Photograph - Digital image, Rose Stereograph Co, "Corner of Lydiard and Sturt Streets, Ballarat", c1929
Digital image titled "The Corner of Lydiard and Sturt Streets Ballarat Vic", photo looks south west from the Post Office steps towards the south west corner - has Craigs Hotel, National Mutual Life, town hall shops including Anderson Printer and the Town Hall in the picture along with Robbie Burns statue. The Rose Series Postcard No. P 1783. An ESCo tram is parked at the tram stop - No. 5? A number of horse drawn and motor vehicles are in the photograph. Wal has dated the photo about 1930 on the rear of the postcard and about 1929 in his album notes. See item 9193 for a copy print.Yields information the buildings, buildings and scene at the intersection of Sturt and Lydiard St with a number of vehicles in the view.Digital image from the Wal Jack Ballarat Album of a postcard .trams, tramways, esco, lydiard st, sturt st, town hall, tram 5 ? -
 Ballarat Tramway Museum
Photograph - Digital image, Wal Jack, 29/12/1945 12:00:00 AM
Yields information about the early use of Ballarat's first bogie tram after it had been re-numbered and Stones Corner.Digital image from the Wal Jack Ballarat Album of No. 22 turning from Bridge St into Main St 29-12-1945. Has the Castrol / Caltex service station with clock in the background and Stones Corner building. Tram proceeding to Mt Pleasant. See image i2 for rear of photograph. See image i3 for hi res scan of print. See image i4 for hi res scan of negativeIn ink on rear " SEC Ballarat Tramways bogie. 22, turning out of Bridge St into Main St, Ballarat East Post Office in background in Main St. 29-12-45" with number "T547" within Wal Jack photo stamp.trams, tramways, bridge st, stones corner, main st, bogie trams, tram 22 -
 Ballarat Tramway Museum
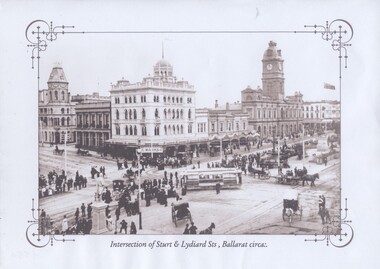
Photograph - Black & White Photograph/s, Intersection of Sturt & Lydiard Sts Ballarat, c1907
Titled "Intersection of Sturt and Lydiard Streets, Ballarat circa:." shows an ESCO tram, without windows turning from Sturt St into Lydiard St North with many people lining the streets prior to a parade. Has a number of horse drawn vehicles in photo taken from the Post Office or Summerscales Office. In photo are Craigs Hotel, National Mutual Life building and the Town Hall. See item 8247 for a colour postcard of this image. Yields information about Sturt and Lydiard St during an event.Black and white historic photograph downloaded from a picture resource website within a decorative frame and printed with an inkjet printer. trams, tramways, sturt st, lydiard st, town hall, esco -
 Ballarat Tramway Museum
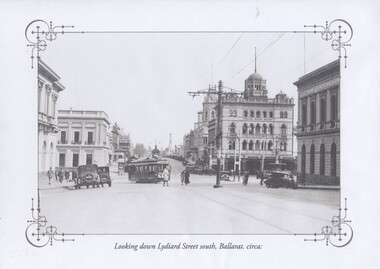
Photograph - Black & White Photograph/s, c1927
Yields information about Sturt and the streetscape with a horse tram outside St Andrews Kirk with two small boys playing.Black and white historic photograph downloaded from a picture resource website within a decorative frame. Printed with an inkjet printer. Titled "Looking down Lydiard Street south, Ballarat. circa:" shows an ESCo tram turning from Lydiard St north into Sturt St with many parked motor vehicles and pedestrians. Has the Post Office, Craigs Hotel, Commonwealth Bank, National Mutual Building and the Bank of Australasia in the photograph. One centre pole in the photograph. Photo c1927 Original photo from a postcard?trams, tramways, lydiard st north, poles, post office, esco, tram 20 -
 Bendigo Historical Society Inc.
Photograph - SOUVENIR PHOTOGRAPHS OF BENDIGO, 1800's
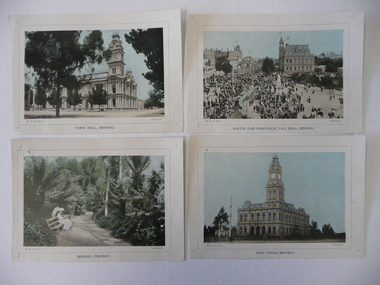
Loose copies of coloured photographs of, Bendigo Fernery, Town Hall, Easter Fair Procession, Post Office & Albert Bush's Store circa late 1800's.W.T.P.& Co.bendigo, buildings, civic buildings -
 Bendigo Historical Society Inc.
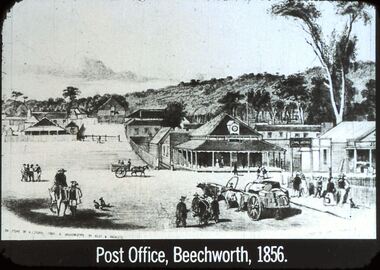
Slide - DIGGERS & MINING: THE DIGGINGS - THE DIGGERS, c1856
... ; Post Office, Beechworth, 1856. Depicts the buildings including...: The Digging - The Diggers. Slide reads; Post Office, Beechworth, 1856 ...Diggers & Mining: The Digging - The Diggers. Slide reads; Post Office, Beechworth, 1856. Depicts the buildings including other buildings around the post office with the hillside in the background and towns folk in the foreground. Bottom left corner of the picture reads; ON STONE BY A STOPPS FROM A DAGUEREOTYPE BY ACCLEY K ROCWLETZ. Black and white slide. Markings: 44 994.LIF:6. Used as a teaching aid.hanimounteducation, tertiary, goldfields